

Page 1

TM
User’s Manual
Page 2

Notes, Cautions, and Warnings
NOTE: A NOTE indicates important information that helps you make better use of your smartphone.
CAUTION: A CAUTION indicates either potential damage to hardware or loss of data and tells you how
to avoid the problem.
WARNING: A WARNING indicates a potential for property damage, personal injury, or death.
Information in this document is subject to change without notice.
© 2010 Dell Inc. All rights reserved.
Reproduction of these materials in any manner whatsoever without the written permission of Dell Inc. is strictly forbidden.
Trademarks used in this text: Dell and the DELL logo are trademarks of Dell Inc.; Bluetooth is a registered trademark owned by Bluetooth SIG, Inc.
and is used by Dell under license.
Other trademarks and trade names may be used in this document to refer to either the entities claiming the marks and names or their products. Dell
Inc. disclaims any proprietary interest in trademarks and trade names other than its own.
Designs, images and other depictions of products may change from when this publication was produced.
August 2010
Page 3

Contents
Before Using Your
Smartphone
Safety Warnings
General Statement on RF
Energy . . . . . . . . . . . . . . . 14
Proper Disposal
IEEE 1725 . . . . . . . . . . . . . . 14
FCC
. . . . . . . . . . . . . . 13
. . . . . . . . . . . . 13
. . . . . . . . . . 14
. . . . . . . . . . . . . . . . . 15
Setting Up Your Smartphone . . . 18
Smartphone Requirements
Activating Phone Service
. . . . . . 18
. . . . . . . 18
Setting Up the Phone for the
First Time
. . . . . . . . . . . . . . . . 18
Dell™ Aero Smartphone
Accessories
. . . . . . . . . . . . . 22
Dell Aero Smartphone
Features
Front View
Back View
Left View
Right view
. . . . . . . . . . . . . . . 24
. . . . . . . . . . . . . . . . 24
. . . . . . . . . . . . . . . . 24
. . . . . . . . . . . . . . . . . 25
. . . . . . . . . . . . . . . . 26
3
Page 4

Contents
Basic Smartphone Functions. . . 28
Using the Touch Screen
Connection Manager . . . . . . . . 30
Status Bar . . . . . . . . . . . . . 32
Main Panels
Customizing the Screen
Panels . . . . . . . . . . . . . . . 37
. . . . . . . . 28
. . . . . . . . . . . . 34
Phone Display Panels . . . . . . . . . 38
Sleep Mode
Phone Lock
Entering Text
Activating the Keyboard . . . . . . 45
Using the Keyboard
4
. . . . . . . . . . . . . . . 43
. . . . . . . . . . . . . . . 44
. . . . . . . . . . . . . . 45
. . . . . . . . . 46
Closing the Keyboard . . . . . . . . 47
Selecting an Input Method
Selecting Input Languages
. . . . . 47
. . . . . 48
Entering Text With QWERTY . . . . 49
Entering Numbers or Symbols
Using HandWriting
. . . . . . . . . 52
. . . 51
Using the Phone Keypad . . . . . . 53
Editing Text
. . . . . . . . . . . . . 54
Connecting to the Internet. . . . . . 56
Selecting Cellular Data
Networks . . . . . . . . . . . . . . 56
Basic Smartphone Settings . . . . . 56
Display Settings. . . . . . . . . . . 56
Date & Time Settings . . . . . . . . 59
Location Settings
Language Settings
. . . . . . . . . . 62
. . . . . . . . . 62
Page 5

Contents
Ringtones and Sounds
Settings. . . . . . . . . . . . . . . 63
Wizard Settings
. . . . . . . . . . 67
Online Help . . . . . . . . . . . . . 67
Using the Smartphone . . . . . . . 68
Making a Call
. . . . . . . . . . . . . . 68
Answering or Rejecting
an Incoming Call
Accessing the Call Log
Contacts
. . . . . . . . . . . . . . . . . 76
Call Settings
Fixed Dial Number (FDN) List . . . 79
Call Barring
. . . . . . . . . . . . 73
. . . . . . . . 74
. . . . . . . . . . . . . . 78
. . . . . . . . . . . . . 80
Call Forwarding
Other Basic Call Settings
My SIM number
. . . . . . . . . . . 81
. . . . . . 82
. . . . . . . . . . 83
Dialing Prefix Number . . . . . . . 83
Speed Dial
Voicemail
. . . . . . . . . . . . . 84
. . . . . . . . . . . . . . 85
Setting the In-Call Timer . . . . . . 85
TTY Settings
. . . . . . . . . . . . 86
Managing Bluetooth
Connections
Turning On Bluetooth . . . . . . . . 86
Changing Bluetooth Settings
Pairing With Bluetooth
Devices . . . . . . . . . . . . . . . 87
. . . . . . . . . . . . . . . 86
. . . . 87
Managing Wi-Fi Connections . . . . . 88
Turning On Wi-Fi . . . . . . . . . . 88
5
Page 6

Contents
Changing Wi-Fi Settings . . . . . . 89
Adding a Wi-Fi Network
. . . . . . 89
Connecting to a Wi-Fi
Network. . . . . . . . . . . . . . . 90
Mobile Networks . . . . . . . . . . . . 90
Configuring Mobile Networks . . . 91
Security Options . . . . . . . . . . . . 91
Resetting the Smartphone
Master Clear . . . . . . . . . . . . 93
Master Reset
. . . . . . . . . . . . 93
. . . . . . 93
Storage Information . . . . . . . . . . 93
Managing SD Card and Phone
Storage . . . . . . . . . . . . . . . 93
Using Voice Command. . . . . . . . . 94
6
Configuring Voice Command . . . . 95
Using Internet Features . . . . . 96
Internet Browser
Viewing Web Pages. . . . . . . . . 96
Navigating Web Pages
Browser Overview
Bookmarks . . . . . . . . . . . . 100
. . . . . . . . . . . 96
. . . . . . . 98
. . . . . . . . . 99
Browser Options . . . . . . . . . . . 102
Browser Settings . . . . . . . . . 103
Twitter . . . . . . . . . . . . . . . . . 104
Logging In to Twitter . . . . . . . 104
Using Twitter
. . . . . . . . . . . 104
Facebook. . . . . . . . . . . . . . . . 107
Page 7

Contents
Logging In to Facebook . . . . . 107
Using Facebook
Account Settings
. . . . . . . . . 107
. . . . . . . . . 111
Using Email Features. . . . . . . 114
Adding an Email Account
Adding an Internet Email
Account
Adding an Exchange Server
Account
Adding More Email
Accounts . . . . . . . . . . . . . 116
. . . . . . . . . . . . . 114
. . . . . . . . . . . . . 115
. . . . . . 114
Setting Up and Editing Email
Accounts
. . . . . . . . . . . . . . . 116
Editing Account Settings. . . . . 116
Removing an Account
. . . . . . 118
Managing Exchange Server
Account
. . . . . . . . . . . . . . . . 118
Synchronization Settings . . . . . 118
Managing Email Messages . . . . . 119
Sending Emails . . . . . . . . . . 119
Receiving Emails . . . . . . . . . 119
Deleting Messages
. . . . . . . . 120
Using Multimedia Features . . . 122
Browsing and Playing Music
Music Player
Music Player Controls . . . . . . 125
Setting a Song as Your
Ringtone . . . . . . . . . . . . . 125
. . . . . . . . . . . . . 124
. . . . 122
Managing Music Files . . . . . . . . 126
7
Page 8

Contents
Synchronizing Music . . . . . . . 126
Transferring Music
Creating a Playlist
. . . . . . . . 126
. . . . . . . . 127
Managing Playlists . . . . . . . . 127
Browsing and Playing Videos. . . . 128
Managing Videos
Sorting Videos . . . . . . . . . . 129
Deleting a File From a List
Viewing Video File
Properties. . . . . . . . . . . . . 130
Sharing Videos
Deleting a Video
Using the Video Player . . . . . . 132
. . . . . . . . . . . 129
. . . . 129
. . . . . . . . . . 130
. . . . . . . . . 130
Using the Picture Application. . . . 133
Browsing Pictures . . . . . . . . 133
8
Managing Picture Files . . . . . . 134
Changing Picture Settings
. . . . 136
Using the Video Editor . . . . . . . . 137
Using the Storyboard . . . . . . . 137
Using the Music Movie
. . . . . . 138
Using Auto Cut . . . . . . . . . . 139
Using the Camera. . . . . . . . . . . 140
Camera Mode . . . . . . . . . . . 140
Video Recording Mode
. . . . . . 142
Using the Recorder Application . . 143
Using Network Features
AT&T Navigator
AT&T Maps
. . . . . . . . . . . . 144
. . . . . . . . . . . . . . 144
. . . . . 144
Page 9

Contents
GPS . . . . . . . . . . . . . . . . . . 147
Using Where . . . . . . . . . . . 147
Using AllSport GPS. . . . . . . . 148
AT&T Music . . . . . . . . . . . . . . 148
Using AT&T Radio . . . . . . . . 148
Using MusicID
. . . . . . . . . . 149
AT&T Games . . . . . . . . . . . . . 150
AT&T Hot Spots
YPmobile
Using YPmobile. . . . . . . . . . 151
. . . . . . . . . . . . 151
. . . . . . . . . . . . . . . 151
AT&T Video . . . . . . . . . . . . . . 153
Mobile Video . . . . . . . . . . . 153
MobiTV
. . . . . . . . . . . . . . 153
Mobile Banking . . . . . . . . . . . . 153
Using Google Applications
Google Talk
Google Maps
. . . . . . . . . . . . . . 154
. . . . . . . . . . . . . 154
Searching Places. . . . . . . . . 154
Getting Directions . . . . . . . . 155
Changing Map Modes
Finding Your Location
Using Latitude . . . . . . . . . . 156
. . . 154
. . . . . . 156
. . . . . . . 156
Market . . . . . . . . . . . . . . . . . 158
Using Market . . . . . . . . . . . 158
YouTube . . . . . . . . . . . . . . . . 160
Using YouTube . . . . . . . . . . 160
9
Page 10

Contents
Accessing My YouTube
Account. . . . . . . . . . . . . . 161
Uploading Videos
. . . . . . . . . 162
Using Applications . . . . . . . . 164
Messaging
. . . . . . . . . . . . . . 164
Sending Messages to
Contacts
Replying to a Message
Reading Unread Messages
. . . . . . . . . . . . . 164
. . . . . . 165
. . . 166
Viewing Messages . . . . . . . . 166
Using the Message View
Messaging Settings
. . . . . 167
. . . . . . . 168
Quickoffice . . . . . . . . . . . . . . 169
Calendar
10
. . . . . . . . . . . . . . . . 170
Using the Calendar . . . . . . . . 170
Calendar Views
Calendar Settings
. . . . . . . . . . 171
. . . . . . . . . 174
Alarm Clock . . . . . . . . . . . . . . 176
Add More Alarms . . . . . . . . . 177
Changing the Clock Display. . . . 178
Hiding the Clock
Setting the Date & Time
. . . . . . . . . . 178
. . . . . . 179
Calculator . . . . . . . . . . . . . . . 179
File Manager
Viewing Stored Files . . . . . . . 180
Adding New Folders . . . . . . . 180
Sorting Files and Folders
Deleting Files and Folders
Cut, Copy, and Paste . . . . . . . 182
. . . . . . . . . . . . . 180
. . . . . 181
. . . . 181
Page 11

Contents
Searching for Contents. . . . . . 183
Renaming Files or Folders
. . . . 183
Compressing Files and
Folders . . . . . . . . . . . . . . 184
Decompressing Files and
Folders
. . . . . . . . . . . . . . 184
Notes . . . . . . . . . . . . . . . . . 184
Adding Notes. . . . . . . . . . . 184
Reading Notes . . . . . . . . . . 185
Editing Notes
Deleting Notes
. . . . . . . . . . . 186
. . . . . . . . . . 186
Tasks . . . . . . . . . . . . . . . . . . 187
Creating New Tasks . . . . . . . 187
Editing Tasks . . . . . . . . . . . 187
Deleting Tasks
. . . . . . . . . . 188
World Clock . . . . . . . . . . . . . . 188
Viewing Clocks . . . . . . . . . . 188
Adding Clocks . . . . . . . . . . 189
Deleting Clocks
World Clock Settings
. . . . . . . . . . 189
. . . . . . . 189
Search . . . . . . . . . . . . . . . . . 190
Using Search . . . . . . . . . . . 190
Selecting Search
Categories . . . . . . . . . . . . 191
Advanced Search
. . . . . . . . . 191
Index Statistic . . . . . . . . . . 192
DM Service . . . . . . . . . . . . . . 192
Backup
. . . . . . . . . . . . . . . . . 193
Backup Your Mobile Contacts,
Messages, and Settings . . . . . 193
11
Page 12

Contents
Restore Your Mobile Contacts,
Messages, and Settings From the
Backup File . . . . . . . . . . . . 193
Managing Applications . . . . . . . 194
Uninstalling an Application. . . . 194
Clearing an Application
Data. . . . . . . . . . . . . . . . 194
Clearing an Application
Cache . . . . . . . . . . . . . . . 194
Stopping an Application
. . . . . 194
PC Sync Tool . . . . . . . . . . . . . 195
Installing PC Sync
Application . . . . . . . . . . . . 195
Connecting the Smartphone . . . 196
Index. . . . . . . . . . . . . . . . . . . . . . 197
12
Page 13

Before Using Your Smartphone
Safety Warnings
Read the following safety warnings before using
your smartphone.
• This equipment is intended for use with
power supplied from the provided battery
charger(s) and/or power supply unit(s). Other
usage will invalidate any certification given
to this product and may be dangerous.
• Switch off your cell phone when in an
aircraft. Use of cell phone in an aircraft may
be dangerous to the operation of the aircraft,
could disrupt cellular networks, and may be
illegal. Failure to observe this warning may
lead to suspension or denial of cell phone
services to the offender, legal action, or both.
• Do not use the cell phone or cell phone
equipment when you are at a refueling point
or gas station.
• Observe restrictions on the use of radio
equipment in fuel depots, gas stations,
chemical plants, or where blasting
operations are in progress.
• When driving a vehicle, you MUST exercise
proper control of the vehicle at all times.
Observe the following safety precautions
while driving:
– Do not use a hand-held telephone or
microphone.
– While driving, find a safe place to stop
the vehicle before you use the phone.
– Do not speak into a hands-free
microphone if it will distract you from
driving.
13
Page 14
Before Using Your Smartphone
– You MUST NOT stop on the hard
shoulder of a motorway to answer or
make a call, except in an emergency.
NOTE: In some areas where electric current
is known to fluctuate, it is recommended that
you connect the charger to an AVR (AC
Voltage Regulator) instead of connecting it
directly to a power outlet. Fluctuations in the
electric current may damage the charger
and/or the cell phone.
General Statement on RF Energy
Your cell phone has a transmitter and a receiver.
When the cell phone is on, it receives and transmits
radio frequency (RF) energy. When you
communicate using your phone, the system
handling your call controls the power level at which
your phone transmits RF energy.
14
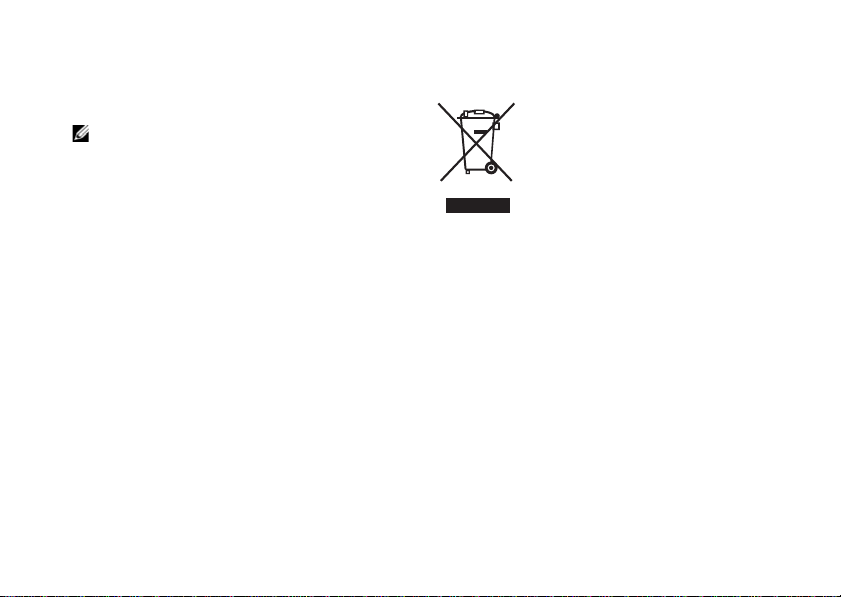
Proper Disposal
The symbol of the crossed out bin
indicates that the product
(electrical and electronic
equipment) should not be placed
in municipal waste. Please check
local regulations for disposal of
electronic products.
IEEE 1725
1 Do not disassemble/open, crush, bend/
deform, or puncture/shred the battery.
2 Do not attempt to modify/remanufacture, or
insert foreign objects into the battery.
3 Do not immerse or expose the battery to
water/other liquids, fire, explosion, or other
hazards.
4 Use the battery only with the device for
which it is specified.
Page 15

Before Using Your Smartphone
5 Use the battery only with charging systems
that have been qualified with IEEE-Std-17252006 standard. Use of unqualified chargers
may present risk of fire, explosion, leakage,
or other hazards.
6 Do not short circuit the battery or allow
metallic conductive objects to contact
battery terminals.
7 Replace the battery only with another battery
that has been qualified with the IEEE-Std1725-2006 standard. Use of unqualified
batteries may present risk of fire, explosion,
leakage, or other hazards.
8 Promptly dispose of used batteries in
accordance with local regulations
9 Use of the battery by children should be
supervised.
10 Avoid dropping the phone or battery,
especially on hard surfaces. If you suspect
any damage to the phone or battery, take it to
a service center for inspection.
11 Improper use of the battery may result in fire,
explosion, or other hazards.
12 To charge the battery by connecting to a
USB port, the phone should only be
connected to charging systems that have the
USB-IF logo or have completed the USB-IF
compliance program.
FCC
FCC Warning
You are cautioned that changes or modifications
not expressly approved by the party responsible for
compliance could void your authority to operate the
equipment.
Cautions
In August 1996 the Federal Communications
Commission (FCC) of the United States with its
action in Report and Order FCC 96-326 adopted an
updated safety standard for human exposure to
radio frequency electromagnetic energy emitted by
FCC regulated transmitters. Those guidelines are
consistent with the safety standard previously set
by both U.S. and international standards bodies.
The design of this phone complies with the FCC
15
Page 16

Before Using Your Smartphone
guidelines and these international standards. Use
only the supplied or an approved antenna.
Unauthorized antennas, modifications, or
attachments could impair call quality, damage the
phone, or result in violation of FCC regulations. Do
not use the phone with a damaged antenna. If a
damaged antenna comes into contact with the skin,
a minor burn may result. Contact your local dealer
for a replacement antenna.
Body-worn operation
This device was tested for typical body-worn
operations with the back of the phone kept 1.5 cm
away from the body. To maintain compliance with
FCC RF exposure requirements, use only belt-clips,
holsters or similar accessories that maintain a 2.0
cm separation distance between the user’s body
and the back of the phone, including the antenna.
The use of belt-clips, holsters and similar
accessories should not contain metallic
components in its assembly. The use of accessories
that do not satisfy these requirements may not
comply with FCC RF exposure requirements, and
should be avoided.
16
FCC ID: E2KV01B001
SAR: 1.09 W/kg over 1 g
This device complies with Part 15 of the FCC Rules.
Operation is subject to the following two conditions:
(1) this device may not cause harmful interference
and (2) this device must accept any interference
received, including interference that may cause
undesired operation.
This equipment has been tested and found to
comply with the limits for a Class B digital device,
pursuant to part 15 of the FCC rules. These limits are
designed to provide reasonable protection against
harmful interference in a residential installation.
This equipment generates, uses and can radiate
radio frequency energy and, if not installed and
used in accordance with the instructions, may
cause harmful interference to radio
communications. However, there is no guarantee
that interference will not occur in a particular
installation. If this equipment does cause harmful
interference to radio or television reception, which
can be determined by turning the equipment off and
Page 17

on, the user is encouraged to try to correct the
interference by one or more of the following
measures:
• Reorient or relocate the receiving antenna increase the separation between the
equipment and receiver.
• Connect the equipment into an outlet on a
circuit different from that to which the
receiver is connected.
• Consult the dealer or an experienced radio/
TV technician for help.
CAUTION: Do not use solvents, water, or
other liquids to clean your smartphone.
Before Using Your Smartphone
17
Page 18
Setting Up Your Smartphone
Congratulations on the purchase of your Dell™
Aero smartphone. This section provides information
about setting up your smartphone.
Smartphone Requirements
To use all of the smartphone features, you require:
• A wireless service plan with AT&T
• An Internet connection
• A computer with a USB 2.0 port
Activating Phone Service
You must activate phone service before using your
smartphone. To activate the phone service you
must:
• Sign up for a service plan with AT&T
• Register the smartphone with AT&T
If you purchased this smartphone from AT&T,
activation may have been done during the purchase.
18
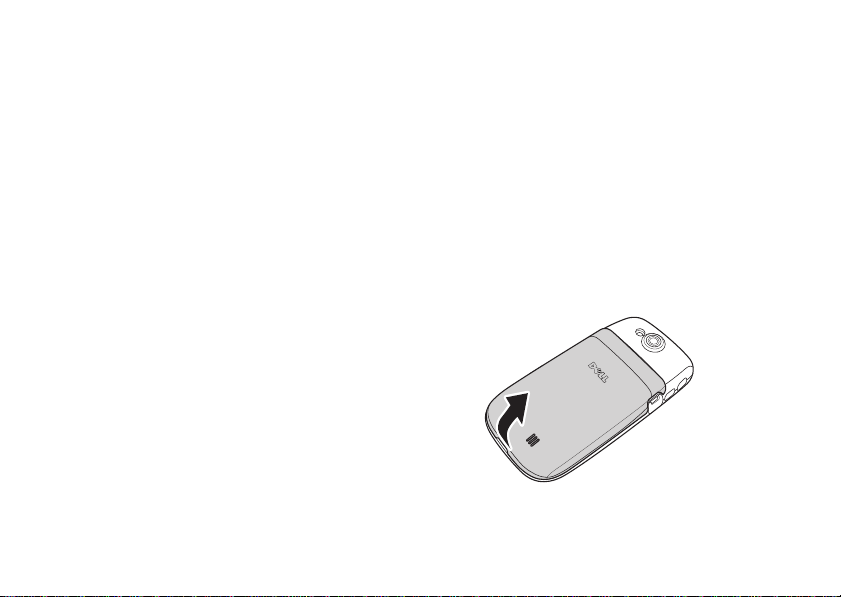
Setting Up the Phone for the First Time
You must install the battery, SIM card, and charge
the battery before using your smartphone.
To set up your phone for the first time:
1 Open the cover
Press down with your right thumb on the Dell
logo then lift the cover from the bottom.
Page 19
Setting Up Your Smartphone
PRESS
PRESS
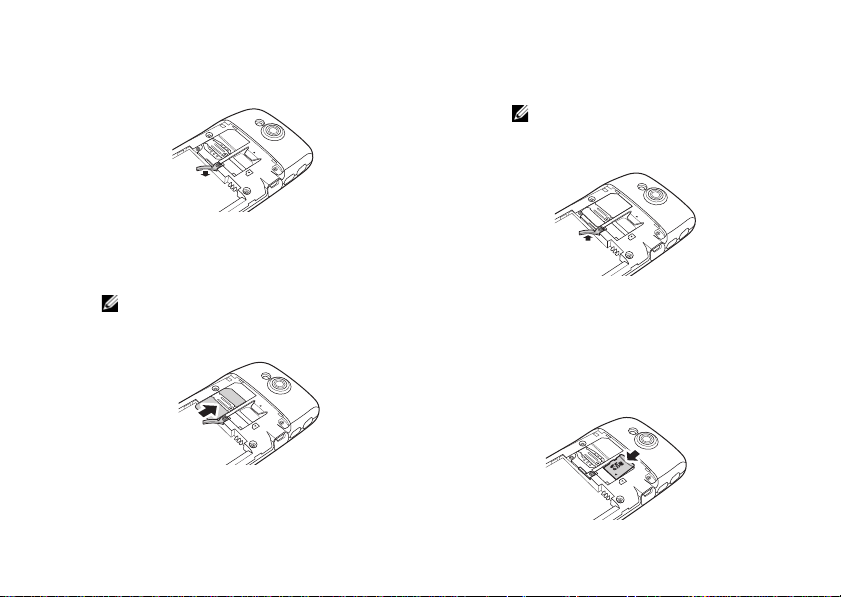
2 Install the SIM card
a Rotate the SIM card lock outwards.
b Hold the SIM card with the metal
contacts facing down and insert the
card into the SIM card holder.
NOTE: To ensure proper installation, align
the cut corners on the SIM card with that in
the SIM card slot.
c Rotate the SIM card lock back into
place to lock the SIM card.
NOTE: The SIM card lock ensures
that the SIM card is held in place in
case of accidental drop.
PRESS
3 Install the microSD card (if not installed)
a Hold the microSD card with the metal
contacts facing down.
b Slide the microSD card into the
microSD card holder.
PRESS
19
Page 20
Setting Up Your Smartphone
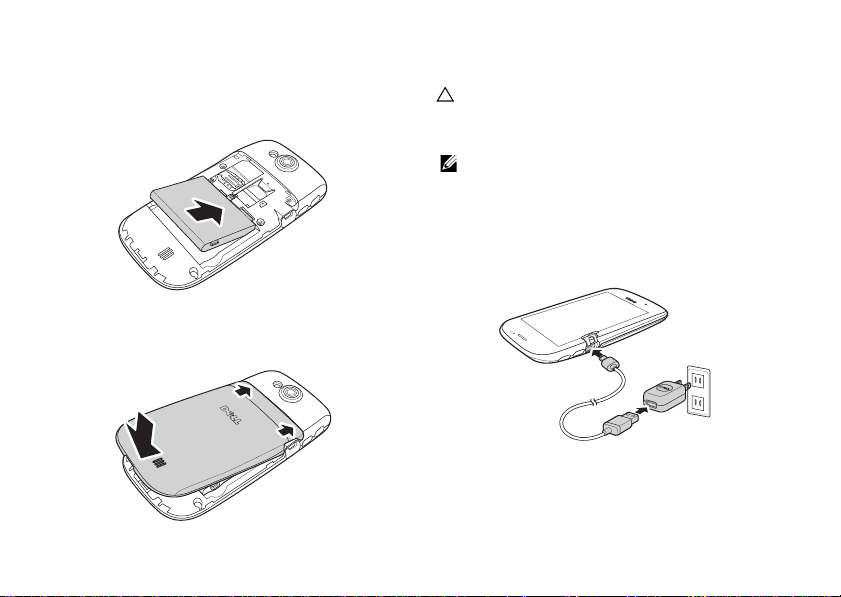
4 Install the battery
Align the metal contacts on the battery with
the contacts on the battery holder and insert
the battery.
PRESS
5 Close the cover
Insert the tabs on the cover into the slots on
the phone and snap the cover in place.
20
6 Charge the battery
CAUTION: Do not use unapproved battery
chargers as they may damage your
smartphone and invalidate any warranties.
NOTE: The battery requires at least one full
charging cycle to attain peak performance.
a Using the Mini-USB to USB cable,
connect your smartphone to the power
adapter, and then plug the power
adapter into a power outlet.
b Charge your smartphone for about 2
hours. Ensure that your smartphone is
fully charged by checking the charge
status indicator on the display.
Page 21

7 When charging is complete, press the power
key for 2 seconds to exit the charging mode.
Your smartphone is now ready to use.
Setting Up Your Smartphone
21
Page 22
Dell™ Aero Smartphone Accessories
Your smartphone may include the following
accessories:
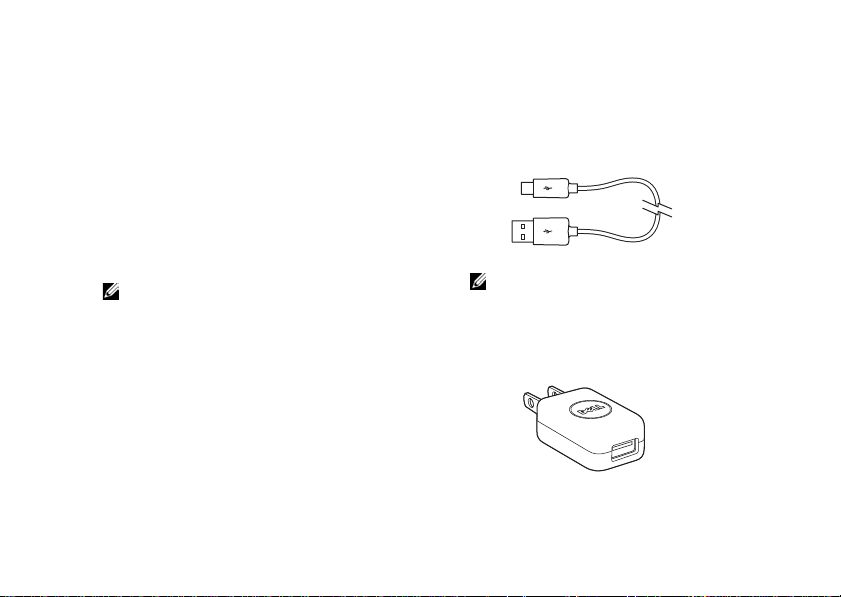
• Mini-USB headset
music or perform a phone conversation.
Callers hear you through the integrated
microphone. To use the headset, connect it
to the Mini-USB connector (see “Left View”
on page 25).
NOTE: If the headset is connected
during a call, there may be a slight
delay of 3 to 4 seconds before the
headset registers the ongoing call.
22
— Allows you to listen to
• Mini-USB to USB cable
connect your smartphone to a computer for
file transfers and data synchronization.
NOTE: The Mini-USB to USB cable is
also used to connect the power adapter
for charging the battery.
• Power adapter
(see “Charge the battery” on page 20).
— Allows you to
— Use to charge the battery
Page 23
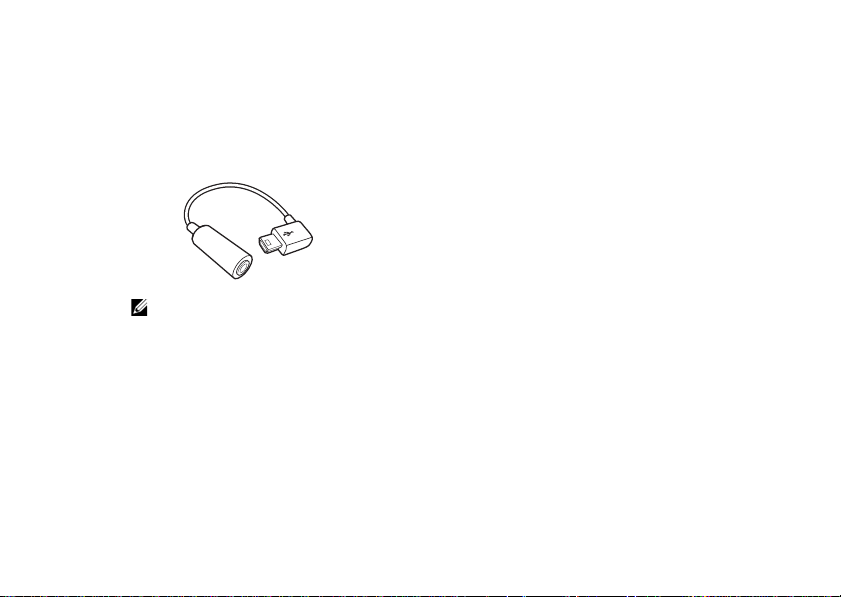
• Mini-USB to 3.5 mm headset adapter —
Allows you to connect a 3.5 mm headset to
your smartphone. To use the adapter,
connect one end of the adapter to the MiniUSB connector (see “Left View” on page 25)
and the other end to a 3.5 mm headset.
NOTE: If the headset/3.5 mm adapter is
connected during a call, there may be a
slight delay of 3 to 4 seconds before the
headset registers the ongoing call.
Dell™ Aero Smartphone Accessories
23
Page 24

Dell Aero Smartphone Features
2
3
4
1
1
2
3
Front View Back View
1 Speaker — Use to listen to phone conversations.
2 Proximity sensor — Deactivates the display and
touch screen when the phone is brought near the
face during a call to save battery power and
prevent unintended phone behavior.
2 Touch screen — Displays phone images.
3 Microphone — Use for voice calls.
24
1 Camera — Use to capture photos and videos.
2 Cover — Covers the battery, SIM card, and
microSD card holder.
3 Camera flash — Use to capture photos in dim
light.
Page 25

Left View
1
2
3
Dell Aero Smartphone Features
1 Power/Lock key — Press (when the display is
active): locks or unlocks the display.
Press (when the display is in sleep mode): wakes
up the display.
MINI USB
Press and hold: Power On/Power Off /Airplane
mode.
2 Home/Back key — Press: navigate back one
screen at a time.
Press and hold: return to the Home screen.
3 Mini-USB Connector — Use to charge the phone,
connect to a computer or a headset.
25
Page 26

Dell Aero Smartphone Features
1
3
2
Right view
26
1 Volume key — Press up to increase volume.
Press down to decrease volume.
In Camera mode, press to zoom in or out.
2 Options key — Press to open the Options menu.
Press and hold for 3 to 4 seconds to activate the
Voice Control function..
3 Camera key — Press and hold for 3 to 4 seconds
to launch the camera application.
In camera mode, half press to focus on the
image, full press to capture the image.
Page 27

Dell Aero Smartphone Features
Headset
Your smartphone accepts many commands while
using your headset.
• Answer a call — Press the Send/End key to
answer a call.
• Reject a call — Press and hold the Send/End
key to reject the call.
• Mute/Unmute a call — During a call, press
the Send/End key to mute or unmute the call.
• Answer another call — Press the Send/End
key to answer another incoming call and put
the current call on hold.
• End the second call — Press and Hold the
Send/End key to end the call and go the
original call.
NOTE: Two short beeps sound to
confirm that you ended the second call.
• Activate Voice Control — While the phone is
idle, press and hold the Send/End key to
activate the Voice Control feature.
• Start or stop music playback — While
listening to music, press the Send/End key to
start or stop the music.
27
Page 28

Basic Smartphone Functions
3
1
2
Using the Touch Screen
This section provides information about using the
touch screen features.
• Selection — To select an item or open an
application, touch the item or application
with your fingertip.
To go back to the previous screen, tap the
Home/Back button or press the Home/Back
key.
To go back to the Home screen, press and
hold the Home/Back key or drag the Home/
Back button to the right.
To perform additional actions in an
application, tap the Options menu button. You
may have to scroll up or down the menu to
see all the available actions.
28
1 Home/Back button
2 Options menu button
3 Title bar
Page 29

Basic Smartphone Functions
• Options menu
— The options menu appears
when you tap the Options menu button or
press the Options key. The options menu
displays the additional actions available in an
application.
• Pop-up menu
— The pop-up menu appears
when you tap and release the item on the
screen. It provides the options available for
the current selection. You may have to scroll
the pop-up menu to see all the available
options.
• Tit le B ar — In certain applications, the Title
bar is highlighted as a button to allow you to
quickly complete a function within the
application, such as Add city or Call. The Title
bar changes depending on the application
you are in.
• Search Bar — In applications with a Search
bar, tap the search bar to bring up the
QWERTY keyboard.
• Navigate Between Fields — Use either the
up / down arrows or tap the field you wish to
utilize.
• Touch screen gestures — The touch screen
converts your phone into an interactive
display.
Press and hold: Provides additional
functionality if available. For example, press
and hold a blank area on the display to
change wallpaper or add shortcuts, or press
and hold an Email account to edit the
account.
Zoom in: To zoom in the
current view, move two
fingers away from each
other at the section of the
screen where you want to
zoom in.
Zoom out: To zoom out in the
current view, move two
fingers closer together on
the screen where you want
to zoom out.
29
Page 30
Basic Smartphone Functions
1
Drag Items: To move an
item on the screen, place
your finger and drag the
item to the desired
position.
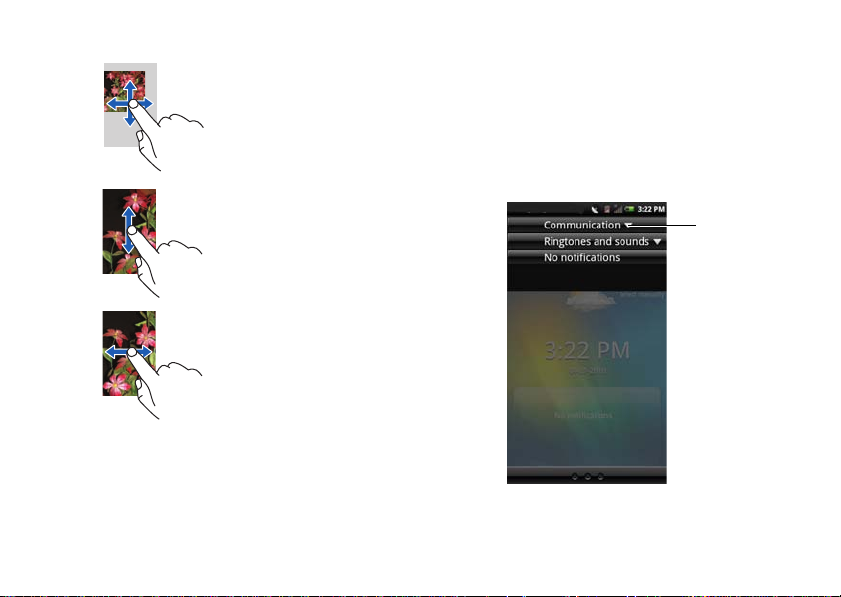
Connection Manager
Use the Connection Manager to change ringtones
and sounds, view notifications, and enable/disable
Mobile Network, Wi-Fi, and Bluetooth
®
.
1 Tap and slide the status bar downwards to
Scroll up/down: To scroll
open the Connection Manager.
up or down in a list or
page on the screen, slide
your finger up/down on
the screen.
Scroll right/left: To scroll
left or right in a menu or
back to the previous
menu, slide your finger
right/left on the screen.
1 Expand icon
30
Page 31

Basic Smartphone Functions
1
2
2 Tap the Expand icon to view the options
under Communication and Ringtones and
Sounds.
• Communication — Tap Mobile Network
to turn on/off the cellular network
service. Tap Wi-Fi to turn on/off Wi-Fi.
Tap Bluetooth to turn on/off Bluetooth.
• Ringtones and sounds — Tap an icon to
change the ringtone profile.
NOTE: To change the Ringtone
song, either tap the right arrow or
go to Settings > Ringtones and
sounds, and then select a new
song under the desired ringtone
profile.
• Notifications — Displays notification
messages, such as missed calls,
Emails, messages, and others.
3 Tap the right arrow for additional options.
4 To view a notification, tap the alert.
1 Right arrow — Tap to view and edit the
associated settings.
2 Tap to edit the corresponding ringtone profile
settings. See “Ringtones and Sounds Settings”
on page 63.
5 Press the Home/Back key to close the
Connection Manager.
31
Page 32

Basic Smartphone Functions
If you are in a call or listening to music, pull down
the Connection Manager to get back to the active
phone call or song.
Status Bar
Icon Information
New Email message
New SMS or MMS
The status bar is located on the top of your phone
screen. Icons appear on the status bar to notify you
of a new message, upcoming calendar event, alarm
or other information important to you.
The following are the status icons that may appear
on your smartphone:
32
New instant message
New voicemail
Alarm is set
GPS is enabled
GPS is connected
Sync
Sync error
Outgoing call
Page 33

Basic Smartphone Functions
Icon Information
Missed call
Call forwarding is active
Speakerphone is on
Phone is on mute
Silent mode
Vibrate mode
USB is connected
Bluetooth is
Bluetooth is enabled
Battery is fully charged
Battery charge level is 20%
connected
Icon Information
Battery is charging
Network signal strength is full
Network signal strength is half
No network signal
microSD card is installed
Flight mode
3G data connection is active
Wi-Fi connection in range
33
Page 34

Basic Smartphone Functions
2
Home Screen Panel
1
3
Main Panels
Your smartphone has four screen panels.
1 Favorites bar — Appears on all screen panels.
2 Current screen panel indicator
3 Weather widget (see “Using the Weather
Widget” on page 35).
34
NOTE: Additional panels may be present on
your smartphone.
• Slide your finger to the left to view the next
screen panel.
• Slide your finger to the right to view the
previous screen panel.
• Tap the screen panel indicator to open the
screen shown below, then tap a screen
panel to view.
Page 35

Basic Smartphone Functions
1
NOTE: The configuration and applications
available on you smartphone may vary.
Going Back to Home Screen
Your smartphone provides several ways to go back
to the home screen:
• If viewing a screen panel, tap the screen
panel indicator, and then tap the Home icon
(as shown on the previous page).
• Press and hold the Home/Back key for 3
seconds.
• Slide the Home/Back button to the far right.
1 Home/Back button
Using the Weather Widget
The Weather widget automatically displays the
weather based on your location.
NOTE: Location services must be enabled to
use this feature. See “Location Settings” on
page 62.
35
Page 36

Basic Smartphone Functions
1
2
2
1
To manually set the location, do the following:
1 Tap the current city to open the Weather
settings screen.
2 Enter the name of the new city on the Search
bar.
1 Search bar
2 Search icon
36
3 On the QWERTY keyboard, tap the Search
icon.
4 Tap to select the city on the pop-up menu.
5 Tap Save.
1 Tap to toggle Fahrenheit or Celsius display.
2 Tap to select interval of weather updates.
Page 37

Basic Smartphone Functions
Customizing the Screen Panels
Changing the Wallpaper
1 From any of the screen panels, press the
Options key to display MyPanel pop-up
menu.
2 Tap Wallpaper.
3 Tap either of the following:
• Pictures — To select the wallpaper
from pictures stored in the microSD
card.
• Wallpaper gallery — To select the
wallpaper from the wallpaper gallery.
• Wallpaper restore — To restore the
original wallpaper setting.
Adding More Screen Panels
1 From any of the screen panels, tap the
Options menu button to display MyPanel
pop-up menu.
2 Tap Screen panels.
3 Tap the desired number of screen panels.
NOTE: Maximum number of screens
available is 10.
37
Page 38

Basic Smartphone Functions
Phone Display Panels
The Phone Display panels provide access to all the applications available on your smartphone. The following
are the applications available on your smartphone:
NOTE: The applications available on your smartphone may vary based on the model and configuration.
Application Description
Phone Allows you to make calls using either the recent caller list, contacts list, or manually
using the numeric keypad.
Browser Allows you to browse the Internet.
Messaging Allows you to send and receive MMS and SMS text messages.
Email Allows you to send and receive e-mail messages through the Internet.
Contacts Allows you to view, search, add, change, or delete contacts.
Market Allows you to download games and applications from the Android Market.
YouTube Allows you to watch and upload videos to YouTube from your smartphone.
Calendar Allows you to set alerts to remind you of events, appointments, and deadlines.
AT&T Music Allows you identify songs from many sources, share tagged music with friends and
purchase songs from your smartphone.
AT&T Video Allows you to watch Mobile Video and MobiTV on your smartphone.
38
Page 39

Basic Smartphone Functions
Application Description
AT&T Navigator Provides voice and on-screen driving directions on your smartphone.
AT&T Maps Allows you to search for local businesses, point of interest, and addresses.
Camera Allows you to capture pictures and videos.
Pictures Allows you to view slideshow of pictures stored on the microSD card.
Videos Allows you to watch videos.
Music Provides a rich music experience with playlist management.
Facebook Allows you to access Facebook on your smartphone.
Twitter Allows you to access Twitter on your smartphone.
Google Talk Allows you to connect and chat with friends.
AT&T Games Allows you to play preset games on your smartphone.
Settings Allows you to set up connections, networks, basic functions, and applications.
Alarm Allows you to set up, add, or delete alarms.
World Clock Allows you to view the time in cities around the world by enabling you to add clocks
of your favorite cities.
Help Allows you to view the online help.
Voice Control Allows you to access VSuite for voice commands.
39
Page 40

Basic Smartphone Functions
Application Description
Video Editor Allows you to edit video clips.
File Mgr Allows you to use and manage the files on the microSD card.
Backup
Calculator Allows you to perform simple calculations.
Notes Allows you to record notes.
Recorder Allows you to record voice and store it in the microSD card.
Tasks
Mobile Banking Allows you to manage your bank account, transfer funds, pay bills, and perform other
Quickoffice Allows you to use Quickoffice to view Word documents, Excel spreadsheets, and
YPmobile Allows you to find local businesses and get maps and driving directions on your
GPS Allows you to use Where, AllSport GPS, and Google Maps.
40
Allows you to backup the data on your phone so you can restore the original data if
data is lost.
Time management program that allows you to add time, date, priority, and status to
your tasks.
banking transactions on your smartphone.
PowerPoint presentations on your smartphone.
smartphone.
Page 41

Basic Smartphone Functions
Application Description
AT&T Hot Spots Allows you to search for hot spot venues.
DM Service Allows you to check and install software updates for your smartphone.
41
Page 42

Basic Smartphone Functions
1
Moving Items on the Phone Display Panel
1 Tap and hold the item until the Delete icon
appears.
2 Tap and drag the item to its new location.
NOTE: If you want to cancel moving the
item, press the Back key.
Adding Items on the Phone Display Panel
1 Press the Options key to display the MyPanel
pop-up.
2 Tap Add.
3 Tap the type of item to add: Applications,
Shortcuts, Native tools, or Remote widgets.
4 Tap an option to add the item.
42
Removing Items on the Phone Display Panel
1 Tap and hold the item until the Delete icon
appears.
1 Delete icon
2 Tap the Delete icon to delete the item.
Page 43

Basic Smartphone Functions
1
Sleep Mode
Your smartphone may automatically enter sleep
mode after a period of inactivity. You can set the
period of inactivity after which the smartphone
enters into sleep mode using the phone settings
menu. When in sleep mode the display turns off,
and your smartphone consumes less battery power.
Activating Sleep Mode
Press the Power/Lock key once to activate sleep
mode.
Waking Up the Phone
1 Press the Power/Lock or the Home/Back key.
2 Tap and slide the lock panel to unlock.
1 Lock panel
43
Page 44

Basic Smartphone Functions
Phone Lock
When not on a call, you can lock your control
buttons and screen for security.
Locking the Phone
1 Tap the Settings icon, and then tap Security >
Phone Lock Settings > Phone lock.
2 Enter a 4-8 digit phone lock password.
The default password for phone lock is
“1234”. When setting the phone lock for the
first time, enter “1234”. To set a new
password, tap Security > Phone Lock
Settings > Change Password (see “Phone
Lock Setting” on page 92).
44
3 Tap OK to save and exit to the previous
screen.
4 Tap Phone lock timeout.
5 Tap an option to automatically lock the phone
once the time interval has passed.
Page 45

Basic Smartphone Functions
Unlocking the Phone
1 Tap the text field, and then enter a 4-8 digit
phone lock password.
2 Tap Unlock to unlock the phone.
Entering Text
When you start a program or select a field that
requires text or numbers, the input panel appears
automatically. You can start entering text using the
default input method. The phone’s predictive text
feature may automatically suggest words or
commonly used phrases as you enter text.
Activating the Keyboard
In applications that have a text field or a Search bar,
tap the text field or the Search field to bring up the
keyboard.
45
Page 46

Basic Smartphone Functions
2
3
4
1
5
1 Text field — Tap to activate the keyboard.
2 Capitalize icon
3 Numbers or symbols icon
4 Delete icon
5 Enter icon
46
Using the Keyboard
• To toggle between upper and lower case
letter entry, tap the Capitalize icon.
• To enter all text in upper case letters, tap and
hold the Capitalize icon.
• To enter numbers or symbols, tap the
Numbers or Symbols icon.
• To swap keyboard input methods or edit
keyboard settings, tap and hold the Numbers
or Symbols icon.
• To delete a character, tap the Delete icon.
• To go to the next field, tap the Enter icon.
NOTE: The Done icon appears in place
of the Enter icon if no succeeding text
field is available. Tap the Done icon to
close the keyboard.
Page 47

Basic Smartphone Functions
1
Closing the Keyboard
To close the keyboard, quickly swipe your finger
from the top to the bottom of the keyboard.
NOTE: Some keypads have a Done button.
Press the Done button to close the keypad.
Selecting an Input Method
Your phone supports input in multiple languages,
and provides the following input methods:
• QWERTY Keyboard
• Phone Keypad
• HandWriting
1 Tap a text field, such as in a note or new
contact, to open the input panel.
2 Tap and hold the Numbers or Symbols icon to
open the Input Method Settings screen.
1 Numbers or Symbols icon
47
Page 48

Basic Smartphone Functions
1
3 Tap the input method you prefer.
Selecting Input Languages
1 Tap a text field, such as in a note or new
contact, to activate the keypad.
2 Tap and hold the Numbers or Symbols icon to
open the Input Method Settings screen.
48
1 Numbers or Symbols icon
3 Tap Keyboard Settings.
Page 49

Basic Smartphone Functions
4 Tap Optional Input Language to select the
input language.
5 Tap the desired language.
6 Tap the Home/Back button to close the Input
Method Setting screen.
Entering Text With QWERTY
To type text using the standard keyboard, you
should use the QWERTY input mode. As you type,
each letter appears above your thumb or finger. The
letter is not entered until you release your finger
from the key.
Switching to QWERTY Keyboard Mode
1 Tap a text field, such as in a note or new
contact, to open the input panel.
2 Tap and hold the ABC or 123 icon to select
QWERTY Keyboard as your input method.
49
Page 50

Basic Smartphone Functions
1
2
3 Tap the keys on the keyboard to enter text. As
you tap the keys, word suggestions appear in
the suggestion area. Tap a word to select it.
1 Suggestion area
2 Numbers or Symbols icon — Tap to change the
input to numbers or symbols.
50
NOTE: If you begin a word and are interrupted
without finishing the word, when you return to
finish the word, predictive text picks up with
the new letters you begin typing rather than
the original word. For example, you begin to
type the word “Olympics” but only get “Oly”
typed. When you return to add “mpics”,
predictive text begins to predict words
beginning with “m”.
Entering Special Characters
Tapping and holding some letters, numbers or
symbols on the keyboard allows you to insert
special characters.
For example, tap and hold “n” to display other
options. To select, slide your finger to the desired
special character.
Page 51

Basic Smartphone Functions
1
2
Or, tap and hold “$” to display other monetary
symbols.
Entering Numbers or Symbols
Tap the Numbers or Symbols icon to change the
input to numbers or symbols.
1 Tap to view more symbols.
2 ABC icon — Tap to change to alphabet keyboard.
51
Page 52

Basic Smartphone Functions
Using HandWriting
Handwriting allows writing across the entire
screen.
1 Tap a text field, such as in a note or new
contact, to open the input panel.
2 Tap and hold the Switch Input Method icon
and select HandWriting as your input
method.
52
3 Use a stylus or your finger to write anywhere
on the screen.
The handwriting will be converted to text
shortly after you lift the stylus or your finger
from the screen.
4 The suggestion area displays predicted
words. Tap a word to select it.
Page 53

Basic Smartphone Functions
1
2
Using the Phone Keypad
In the Phone Keypad mode, you can text by typing
out letters similar to texting on a numeric keypad.
1 Tap a text field, such as in a note or new
contact, to open the input panel.
2 Tap and hold the Switch Input Method icon
and select Phone Keypad as your input
1 Screen
2 Suggestion area
method.
3 Use a stylus or your finger to touch a key on
the keypad. Characters, numbers, or symbols
appear on the box.
Continue touching the key to toggle different
characters, numbers, or symbols.
4 Tap the desired character, number or symbol
to insert it immediately.
5 If Auto completion is on (see page “Default
Input Method Setting” on page 63), as you
tap the keys, the smartphone matches the
characters you type with the words in the
53
Page 54

Basic Smartphone Functions
1
dictionary and displays predicted texts in the
suggestion area. Tap a word to complete the
entry.
6 Tap the Home/Back button to exit the input
panel.
.
1 Suggestion area
54
Editing Text
Inserting the Cursor
To insert the cursor and make corrections, do one of
the following:
• Tap to insert the cursor where you want to
make a correction.
• Tap and hold the word to bring up the pop-up
bubble, then move the cursor left and right to
show you where you are within the text and
allow you to insert the cursor easily.
Page 55

Basic Smartphone Functions
Selecting, Copying, or Cutting Text
You can select text by either of the following:
• Tap and hold in one place to display the Edit
text pop-up menu. Then select either Select
all, Select text (to select the current word),
Copy all, or Cut all.
• Lightly swipe your finger over the word to
highlight the text. Move the pins to the left or
right to accurately highlight the text you
want to copy or cut. Then tap and hold the
cursor to display the Edit text pop-up menu.
Select either Copy or Cut.
Pasting Text
Text that has been cut or copied can be pasted
elsewhere.
1 Open the application where you want to
paste the text.
2 In any text field, tap and hold the text field to
display the Edit text pop-up menu.
3 Tap Paste.
55
Page 56

Basic Smartphone Functions
Connecting to the Internet
Your phone connects to the Internet using a cellular
data network.
Selecting Cellular Data Networks
You can connect to the Internet through EDGE,
GPRS, 3G, HSDPA, or Wi-Fi networks. Check the
carrier’s network coverage in your area for
availability. Ensure that you get the appropriate
service plan for a desired network.
56
Basic Smartphone Settings
This section provides information about the basic
settings for your smartphone.
Tap the Settings icon to open the Settings screen.
Display Settings
Display settings allow you to adjust the screen
brightness, screen timeout, and screen lock
settings.
Page 57

Basic Smartphone Functions
1
Enabling Auto Brightness
1 Tap the Settings icon to open the Settings
screen.
2 In the Phone basics section, tap Display
settings to open the Display settings screen.
3 Enable Auto brightness to activate auto
brightness.
Setting Brightness Manually
1 Tap the Settings icon to open the Settings
screen.
2 In the Phone basics section, tap Display
settings to open the Display settings screen.
3 Ensure that Auto brightness is disabled.
4 Tap Brightness from the Display settings
screen to open the Brightness panel.
5 Use your finger or stylus to move the slider
left or right on the screen to adjust the
brightness.
1 Slider
6 Tap OK to save and exit the Brightness panel.
57
Page 58

Basic Smartphone Functions
Setting Compatibility Mode
Certain Google Market Place applications may not
display correctly. Set the compatibility mode on
your smartphone to improve application viewing.
1 Tap the Settings icon to open the Settings
screen.
2 In the Phone basics section, tap Display
settings to open the Display settings screen.
3 Tap to select the Compatibility mode settings
box to change settings.
4 Tap Compatibility.
5 Tap either Center or Scale.
Setting Font Size
1 Tap the Settings icon to open the Settings
screen.
2 In the Phone basics section, tap Display
settings to open the Display settings screen.
3 Tap Font settings to open the Font settings
panel.
4 Tap an option to set the font size.
58
Setting Screen Timeout
1 Tap the Settings icon to open the Settings
screen.
2 In the Phone basics section, tap Display
settings to open the Display settings screen.
3 Tap Screen timeout to open the Screen
timeout panel.
4 Tap any of the available options to select the
idle time after which the screen turns off.
5 To exit the screen, tap Cancel.
Page 59

Basic Smartphone Functions
Date & Time Settings
Date and time settings allow you to set the date,
time, time zone, and formats.
Setting the Date and Time Automatically By the
Network
1 Tap the Settings icon to open the Settings
screen.
2 In the Phone basics section, tap Date & time
settings to open the Date & time settings
screen.
3 Tap Automatic to set the date and time using
the network provided values.
Setting the Date and Time Automatically By Time
Zone
1 Tap the Settings icon to open the Settings
screen.
2 In the Phone basics section, tap Date & time
settings to open the Date & time settings
screen.
3 Tap the Automatic box to disable setting the
date and time by network.
4 Tap Set time zone to open the Set time zone
screen.
5 Slide your finger up or down on the screen to
view the entire list.
6 Tap the time zone you desire to select.
The date and time are automatically set based on
the selected time zone.
59
Page 60

Basic Smartphone Functions
Setting the Date Manually
1 Tap the Settings icon to open the Settings
screen.
2 In the Phone basics section, tap Date & time
settings to open the Date & time settings
screen.
3 Tap the Automatic box to disable setting the
date and time by network.
4 Tap Set date to open the Change date panel.
5 Slide your finger up or down on each field to
change the Month, Day, and Year.
6 Tap Save to save your changes and exit the
Change date panel.
60
Setting the Time Manually
1 Tap the Settings icon to open the Settings
screen.
2 In the Phone basics section, tap Date & time
settings to open the Date & time settings
screen.
3 Tap the Automatic box to disable setting the
date and time by network.
4 Tap Set time to open the Change time panel.
5 Slide your finger up or down on each field to
change the time.
6 Tap Save to save your changes and exit the
Change time panel.
Page 61

Basic Smartphone Functions
Setting the Time to 24-hour Time Format
1 Tap the Settings icon to open the Settings
screen.
2 In the Phone basics section, tap Date & time
settings to open the Date & time settings
screen.
3 In the Set format section, tap Use 24-hour
format to display the time in 24-hour format.
Setting Date Format
1 Tap the Settings icon to open the Settings
screen.
2 In the Phone Basics section, tap Date & time
settings to open the Date & time settings
screen.
3 Tap Select date format to open the Select
date format panel.
4 Tap the date format you prefer from the list.
5 Tap OK to save and exit the Select Date
Format panel.
61
Page 62

Basic Smartphone Functions
Location Settings
Location settings allow you to select the source the
smartphone will use to determine your location.
Enabling Location Settings
1 Tap the Settings icon to open the Settings
screen.
2 In the Phone basics section, tap My Location
to open the My Location screen.
3 In the My location sources, tap Enable GPS
satellites.
62
Language Settings
The language settings allow you to set the display
language and the input method.
Selecting the Display Language
1 Tap the Settings icon to open the Settings
screen.
2 In the Phone basics section, tap Language
and input > Select Language to open the
Language screen.
3 Tap to select the language you prefer from
the list. The screen exits automatically after
your selection.
Page 63

Basic Smartphone Functions
Default Input Method Setting
1 Tap the Settings icon to open the Settings
screen.
2 In the Phone basics section, tap Language
and input to open the Language screen.
3 Ta p Default input method to open the Input
methods settings screen.
4 Select any of the following settings:
• Vibrate on — Tap to turn on vibrate
when a key is pressed.
• Auto Completion on — Tap to enable
auto complete.
• AutoCaps on — Tap to enable auto
caps function.
• Optional Input language — Tap to
select the first input language.
• Pen color — Tap to select the pen color
for handwriting input method.
• Pen width — Tap to select the pen
width for handwriting input method.
• Recognize waiting — Slide the bar to
set the waiting time in seconds to
recognize handwriting.
• ABC Input mode interval — Tap to
select the interval time (milliseconds)
between tapping keys.
Ringtones and Sounds Settings
Ringtones and Sounds settings allow you to change
or create a ringtone profile, select a profile to use,
and edit an existing profile.
Selecting a Profile
1 Tap the Settings icon to open the Settings
screen.
2 Tap Ringtones and sounds to open the
Ringtones and sounds settings. The check
mark appears beside the selected ringtone
63
Page 64

Basic Smartphone Functions
1
2
profile. The available profiles include Ring,
Vibrate, Silent, Ring and vibrate, and
Airplane.
NOTE: You can also select the ringtone
profile using the Connection Manager.
.
3 Tap the ringtone profile you want to select.
The Ringtone profile screen is displayed.
64
4 Tap the Options menu button, and then tap
Select to activate the ringtone profile.
1 Options menu button
2 Options menu
Page 65

Basic Smartphone Functions
Changing Ringtones and Alerts
1 Tap the Settings icon to open the Settings
screen.
2 Tap Ringtones and sounds to open the
Ringtones and sounds settings.
3 Edit the individual settings by tapping the
options on the screen.
• Alert Style — Tap Ring, Vibrate, or Ring
and Vibrate on the panel to change the
alert style and tap OK to exit.
NOTE: You can only change the alert
style in Ring and vibrate mode or a
custom ringtone profile that you
created.
• Audible selection — Select this option
to play sound when tapping the screen.
65
Page 66

Basic Smartphone Functions
• Volume — Slide your finger right/left on
the screen to increase/decrease the
volume and tap OK to exit.
66
• Ringtone — Tap Ringtone or a specific
alert from the Ringtone Profile Settings
screen to open the Ringtones screen.
Tap to select the ringtone you prefer,
and then tap OK to exit.
• Message alert — Tap this option to set
the message alert tone.
• Email alert — Tap this option to set the
Email alert tone.
Page 67

Basic Smartphone Functions
• Calendar alert — Tap this option to set
the calendar alert tone.
• Alarm alert — Tap this option to set the
alarm alert tone.
• Reminder alert — Tap this option to set
the reminder alert tone.
4 Tap Save to save settings and close the
screen.
Wizard Settings
The wizard provides visual tutorial on setting up and
using your smartphone.
1 Tap the Settings icon.
2 In the Applications section, tap Wizard.
3 Follow the instructions on the screen.
Online Help
Tap the Help icon to view the online help manual for
additional information.
NOTE: You may also access online help and
additional information on Dell Aero at
support.Dell.com/Aero
.
67
Page 68

Using the Smartphone
You can make calls using your smartphone by either
tapping a number in your contacts list or recent
caller list. You can also dial a number manually
using the Phone icon that appears on the screen.
Making a Call
You can make calls using either the on-screen
dialer, Contacts, Call log, Favorites, or Voice Control.
68
Dialing a Number Using the On-Screen Dialer
1 Tap the Phone icon to open the Phone
screen.
Page 69

Using the Smartphone
1
5
6
4
3
2
2 Tap the on-screen dial pad to enter a number.
Use the Backspace icon to make
corrections.
As you dial the numbers, the phone will auto-match
the numbers already stored in your Contacts list.
Both the number you are dialing and the potential
matches are displayed. If you see a match, you can
tap it to make the call.
If no matching result is found, finish dialing the
number and then tap the Call tab to dial the number
you entered.
1 Home/Back button
2 Call tab
3 Options menu button
4 Backspace icon
5 Matching numbers from Contacts
6 On-screen dial pad
69
Page 70

Using the Smartphone
1
You can switch out of the In call screen by tapping
the Home/Back button to continue using other
features on the phone.
The Ongoing call icon will be displayed in the status
bar during your phone call.
1 Ongoing call icon
70
Ending a Call
Tap the End call tab to end the phone call.
NOTE: Making a new phone call before ending
the current call places the current call on hold.
Page 71

Using the Smartphone
1
Redialing the Last Called Number
1 Tap the Phone icon to open the Phone
screen.
2 Tap Redial to display the last called number.
3 Tap Call.
Dialing a Number Using the Call Log
1 Tap the Phone icon to open the Phone
screen.
2 Tap the Call log icon to open the Call log
screen.
1 Call log icon
3 Tap a contact from the log.
4 Tap Call.
71
Page 72

Using the Smartphone
1
1
Dialing a Number Using Your Contacts
1 Tap the Phone icon to open the Phone
screen.
2 Tap the Contacts icon to open the Contacts
list.
1 Contacts icon
72
3 Scroll through the list and tap the Call icon to
the right of the contact to place a call.
1 Call icon
NOTE: When scrolling through the
Contacts list, be sure to scroll through
the middle of the list and not the far right
to avoid accidentally calling someone
that you do not intend to call.
Page 73

Using the Smartphone
1
1
Dialing a Number Using Your Favorites
1 Tap the Phone icon to open the Phone
screen.
2 Tap the Favorites icon to open the Favorites
screen.
1 Favorites icon
3 Tap a contact from the list.
4 Tap Call.
Answering or Rejecting an Incoming Call
To answer a call, tap and drag the slider to Answer.
To reject a call, drag the slider to Decline.
1 Slider
73
Page 74

Using the Smartphone
1
1
2
Accessing the Call Log
1 Tap the Phone icon to open the Phone
screen.
2 Tap the Call log icon to open the call log
screen.
1 Call log icon
74
The call log lists all incoming, outgoing, and
missed calls.
1 Call log tab
All
Missed
Received
Dialed
Failed
2 Received/Dialed/Missed calls icon
Page 75

Using the Smartphone
1
To sort the call list, tap the Call log tab, then select
sorting view.
To delete a contact from the Call log list, change the
category, or view call time, tap the Options menu
button.
Using the Call Log
1 Tap and hold a contact to open the pop-up
menu.
1 Pop-up menu
2 Perform any of the options below as
required:
•Tap Call to call the contact.
•Tap View contact to view the contact
details.
•Tap Edit and call to edit contact details
then call the contact.
•Tap Send message to send a message
to the contact.
•Tap Send contact to send the selected
contact’s information to another
contact.
•Tap Remove from call log to remove the
contact from the call log list.
75
Page 76

Using the Smartphone
1
2
3
Contacts
Adding New Contacts
1 Tap the Contacts icon.
2 Tap Add Contact.
1 Add Contact tab
2 Please input name field — To search a contact,
enter the contact’s name here.
3 Call icon — Tap to call Contact
76
3 Enter the contact information. Continue
adding data to the remaining fields by
tapping on the next field you would like to
edit.
NOTE: To close the keypad, swipe your
finger from the top to the bottom of the
keypad. See “Closing the Keyboard” on
page 47.
Tap the Add icon to add an icon for the
contact.
Tap the Add Field tab on the bottom of the
screen to add more information.
Page 77

Using the Smartphone
1
2
3
Tap the Delete icon to delete a field.
1 Save tab
2 Delete icon
3 Add Field tab
4 Tap the Save tab to save your contact
information and exit. Tap the Home/Back
button to exit without saving.
Adding a Contact to Favorites
1 In the Contacts screen, tap a contact to open
the Edit Contact screen.
2 Press the Options key, and then tap Add to
Favorites.
Synchronizing with Facebook Contacts
You can manually sync your Facebook contacts to
your smartphone Contacts.
NOTE: You must enable the Synchronize
address book setting in Facebook before you
can sync to your Contacts (see “Account
Settings” on page 111).
1 Tap the Contacts icon to open the Contacts
screen.
2 Press the Options key, and then tap Sync
with Facebook.
77
Page 78

Using the Smartphone
12
Call Settings
The following options are available from the Call
settings screen:
• Fixed Dial Number list
• Call barring
• Call forwarding
• Other basic settings
• My SIM number
• Dialing prefix number
• Speed dial
•Voice mail
• In-call timer
• TTY settings
Editing Call Settings
1 Open the Settings > Call settings screen.
78
2 Tap any of the available options to enter the
sub menu.
1 Settings screen
2 Call settings screen
3 To exit the screen tap the Home/Back button.
See the following sections for more information on
each Call setting option.
Page 79

Using the Smartphone
Fixed Dial Number (FDN) List
The FDN list allows you to restrict outgoing calls
from your phone to a preset list of numbers. To
enable this feature, you must know the SIM PIN2
code for your phone. You can obtain this number
from your cellular operator, provided this feature is
supported.
Managing the FDN list
1 In the Call settings screen, tap Fixed dialing
number.
2 Type in your PIN2 number to enable this the
FDN feature.
3 Tap Manage FDN list. If you have numbers on
your SIM card you will be able to select
them. If not, you will be able to add contacts
or numbers to your list.
4 To add new numbers, tap Add. Type the name
and number of the contact and then tap
Save. Your FDN list now includes the newly
added contact.
79
Page 80

Using the Smartphone
5 Continue adding numbers until you have all
the contacts you wish to include on the FDN
list.
You may also edit or delete contacts at any
time.
6 To disable FDN functionality, tap the FDN
Enabled option again.
Call Barring
The call barring screen allows you to restrict
outgoing or incoming calls from a specific number
or contact.
To enable or disable the call barring functions, tap
the option on the Call barring screen that you want
like to set up.
80
To exit the Call barring screen, tap the Home/Back
button.
Page 81

Using the Smartphone
Call Forwarding
The Call forwarding option allows you to forward
your calls directly to voicemail or to other numbers.
The following are the available call forwarding
options:
• Always forward
— Select to enable this
feature and specify a forwarding number.
When this feature is enabled, the Forward
when busy, Forward when unanswered,
Forward when unreachable are disabled.
• Forward when busy
— Select to enable this
feature. When enabled, incoming calls are
forwarded to a voicemail when you are on a
call.
• Forward when unanswered
— Select to
enable this feature. When enabled, incoming
calls are forwarded to a voicemail when
unanswered.
• Forward when unreachable
— Select to
enable this feature. When enabled, calls are
forwarded to a voicemail if an incoming call
cannot connect.
To exit the Call forwarding screen, tap the Home/
Back button.
81
Page 82

Using the Smartphone
Other Basic Call Settings
82
The following are the available options:
• Caller number
number settings. Options are:
• Network default — Tap to use the
• Hide number — Tap to hide your
• Show number — Tap to show your
— Select to change the caller
default network setting.
number to your call recipients. Your call
recipients will see your number as an
unknown number.
number to your call recipients. Your
phone number and Caller number
picture will appear on your call
recipient’s phone provided the call
recipient’s phone supports this feature.
Page 83

Using the Smartphone
• Call waiting
incoming calls when you are on a call.
Disable to ignore incoming calls when you
are already on a call.
• Auto answer
calls automatically without performing any
action.
• Auto redial
failed the first time.
To exit this screen, tap the Home/Back button.
— Enable Call waiting to display
NOTE: When call waiting is set to ignore
incoming calls, routing of the ignored call
is determined by your Call forwarding
settings.
— Select to answer incoming
— Select to auto redial a call that
My SIM number
The My SIM number option allows you to view the
SIM name and number.
Dialing Prefix Number
The Dialing Prefix Number option allows you to set
up to two prefix numbers when making calls.
1 Tap to enable the Dialing prefix number box.
2 Enter a prefix number. Tap the next text field
to enter another prefix number.
3 To save settings, tap the Options menu
button, then tap Save.
83
Page 84

Using the Smartphone
1
Speed Dial
The speed dialing option allows you to set up your
most frequently used numbers for quick dialing.
1 Add icon
84
Setting Up Speed Dialing
Tap the Add icon to add a name from Contacts or
tap a number icon to enter the phone number
directly.
Using Speed Dialing
Tap the Phone icon, and then tap and hold the
Speed dial number. For example, tap and hold 1 to
call Speed dial #1.
To exit this screen, tap the Home/Back button.
Page 85

Using the Smartphone
Voicemail
Your Voicemail number is set by your cellular
operator and is stored on your SIM card. Use the
Voicemail option to view your voicemail number.
1 Tap Settings > Call Settings > Voice mail.
2 When you have completed using the
voicemail option, tap OK to save and exit the
screen.
Setting the In-Call Timer
The in-call timer allows you to monitor the duration
of your calls. You can set the timer to 30, 60, 90, or
120 seconds. You will hear a tone at the interval set.
You can also use this option to enable or disable the
in-call timer function.
1 Tap Settings > Call Settings > In-call timer.
2 Tap the appropriate in-call timer option from
the list.
85
Page 86

Using the Smartphone
TTY Settings
Use the TTY settings to set TTY.
1 Tap Settings > Call Settings > TTY Settings.
2 Tap the appropriate TTY option from the list.
Managing Bluetooth Connections
Bluetooth® is a short-range wireless
communication technology. Using Bluetooth
technology, devices within a 10 meter range can
exchange information without requiring a physical
connection.
86
Turning On Bluetooth
1 Tap and slide the status bar downwards to
open the Connection Manager.
2 If Bluetooth is not turned on, tap it to enable
Bluetooth connections.
Page 87

Using the Smartphone
Changing Bluetooth Settings
1 Tap and slide the status bar downwards to
open the Connection Manager.
2 Tap the Bluetooth right arrow to display the
Bluetooth settings screen.
• Discoverable — Enable Discoverable
to make your smartphone discoverable
to other Bluetooth devices in 120
seconds.
• Device name — Tap to change the
name of your smartphone. This is the
name that appears on other Bluetooth
devices.
• Scan for devices — Tap to scan for
Bluetooth devices.
Pairing With Bluetooth Devices
1 Tap and slide the status bar downwards to
open the Connection Manager.
Ensure that Bluetooth is enabled on your
smartphone before you begin to pair with
another device.
2 Tap the Bluetooth right arrow to display the
Bluetooth settings screen.
3 Select a Bluetooth device listed in Bluetooth
devices screen to initiate a connection.
4 You might be prompted to enter a passkey to
authenticate. Enter the same passkey on
both devices, or enter the specific passkey
provided by the device manufacturer.
87
Page 88

Using the Smartphone
Managing Wi-Fi Connections
Wi-Fi or wireless fidelity is a network that allows
Internet connection within 100 meters of a wireless
access point.
Turning On Wi-Fi
1 Tap and slide the status bar downwards to
open the Connection Manager.
88
2 If Wi-Fi disabled, tap it to enable Wi-Fi
connections.
Page 89

Using the Smartphone
Changing Wi-Fi Settings
1 Tap and slide the status bar downwards to
open the Connection Manager.
2 Tap the Wi-Fi right arrow to display the Wi-Fi
settings screen to set up and manage
wireless access points.
3 Tap Network notification to display or sound
an alert when a network is available.
Adding a Wi-Fi Network
1 Tap and slide the status bar downwards to
open the Connection Manager.
2 Tap the Wi-Fi right arrow to display the Wi-Fi
settings screen.
3 Tap Add a Wi-Fi network to search and add
an new network manually.
4 Enter the network SSID, Typ e, Security, and
other security settings.
NOTE: The above screen may vary based
on the selected Security setting.
5 Tap Save to add the Wi-Fi network.
89
Page 90

Using the Smartphone
Connecting to a Wi-Fi Network
1 Tap and slide the status bar downwards to
open the Connection Manager.
2 Tap the Wi-Fi right arrow to display the Wi-Fi
settings screen.
3 Tap an available network on the list.
4 When prompted, enter the security
password.
5 Tap Connect.
90
Mobile Networks
The Mobile Networks settings enable you to set
options for roaming and networks.
1 Tap and slide the status bar downwards to
open the Connection Manager.
2 Tap the Mobile Network right arrow to
display the Mobile Networks settings screen.
Page 91

Using the Smartphone
Configuring Mobile Networks
• Current Network — Select this setting to
view your current network.
• Operator selection
select a network operator.
• Preferred networks
set network preferences.
• Search mode
search mode to manual or auto.
• Network mode — Select this setting to set
the preferred network mode.
— Use this setting to
— Select this setting to
— Select this setting to set the
Security Options
SIM Lock Settings
In the Settings screen, tap Security > SIM lock
settings to enable the SIM card lock and change
your pin code.
• Lock SIM — Select to lock your SIM card.
• Change PIN — Select this setting to change
your SIM card’s PIN code.
91
Page 92

Using the Smartphone
Phone Lock Setting
In the Settings menu, tap Security > Phone lock
settings to open Phone Lock Setting and set the
Phone lock and change your password.
NOTE: The phone lock feature may not be
available on your smartphone.
92
• Phone lock — Select to set the phone lock.
• Change password — Select this setting to
change the password for your phone. The
default password is “1234”.
Change PIN2
In the Settings menu, tap Security > Change PIN2 to
change the PIN2 code.
Change Call Barring Password
In the Settings menu, tap Security > Change call
barring password to change the call barring
password.
Change Factory Password
In the Settings menu, tap Security > Change factory
password to change the factory password.
Restore Factory Password
In the Settings menu, tap Security > Restore factory
password to restore the factory password.
Page 93

Using the Smartphone
Resetting the Smartphone
You can reset your smartphone to the factory
default settings.
Master Clear
Select this option to reset all user settings to the
factory default settings and delete all data stored
on your smartphone, such as calendar events,
tasks, and contacts, including contents that you
have downloaded, such as applications,
wallpapers, and ringtones.
1 In the Settings menu, tap Master clear &
reset > Master clear.
2 Enter the master clear password. The default
password is “1234”.
3 Tap OK to reset the smartphone.
Master Reset
Select this option to reset all user settings to the
factory default settings. However, all data stored on
your smartphone, such as Contacts, are not
deleted.
1 In the Settings menu, tap Master clear &
reset > Master reset.
2 Enter the master reset password. The default
password is “1234”.
3 Tap OK to reset the smartphone.
Storage Information
Managing SD Card and Phone Storage
In the Settings menu, tap Storage Information to
view storage information such as Total space,
Available space on your smartphone and SD card.
To safely remove your SD card, tap Safely remove
storage card.
93
Page 94

Using the Smartphone
To delete applications and clear user data, tap
Manage storage.
94
Using Voice Command
1 Open Voice Control application by one of the
following methods:
• Tap the Voice Control icon.
• Press and hold the Options key.
2 When the application prompts you to speak
an available command from the menu, such
as Call (number or contact name) or Check
battery, say the command in normal
conversation tone and speed.
3 If the application recognizes the command
you said, it may prompt you for a
confirmation, select Yes or No.
NOTE: To view the tutorial, press the
Options key, and then tap Tuto r ial at the
bottom of the screen.
Page 95

Using the Smartphone
Configuring Voice Command
1 Open Voice Control application by one of the
following methods:
• Tap the Voice Control icon.
• Press and hold the Options key.
2 Press the Options key.
3 Tap Settings at the bottom of the screen.
4 Tap any of the following:
• Confirmation — Allows you to control
whether the system should ask you to
confirm a name or number.
• Adaptation — Allows you to improve
voice recognition of primary user. You
will be prompted to speak several
commands for the system to record
which will improve voice recognition of
user.
• Audio Modes — Allows you to set the
level of audio assistance.
• Shortcuts — Allows you to select what
shortcuts are activated with the Go To
command.
• Dialing Region — Allows you to select
the region that you are dialing from.
• About — Allows you to view the
software version.
95
Page 96

Using Internet Features
1
Internet Browser
On the Favorites bar, tap the Browser icon to open
the Browser screen.
96
Viewing Web Pages
1 Open the Browser screen and tap the Web
address tab to open the web address screen.
1 Web address tab
Page 97

2 Tap the current web address to bring you to
2
1
the search screen.
3 Select a web address from the list or tap the
Search on Internet field to enter the web
address manually.
4 Possible matches appear on a list of links as
you enter the web address. Select a match
or continue entering the web address.
5 Tap the Go icon to follow the link to the
selected address.
Using Internet Features
1 Search on Internet field
2Go icon
97
Page 98

Using Internet Features
5
3 4
2
1
Navigating Web Pages
To zoom in, pinch the section of the screen where
you want to zoom in (see “Touch screen gesture”
on page 29).
To zoom out, expand your fingers at the section of
the screen where you want to zoom out (see “Touch
screen gesture” on page 29).
Slide your finger across the screen to display the
Page Bar.
Tap the Previous Page icon to view the previous
web page.
Tap the Next Page icon to view the next web page.
Tap the Browser Overview icon to add a new
window and manage opened web pages.
Tap the Save Page icon to bookmark the page.
98
1 Previous Page icon
2
Next Page icon
3
Browser Overview icon
Save Page icon
4
5 Page Bar
Page 99

Using Internet Features
1
2
3
Browser Overview
Browser overview allows you to open and manage
multiple web pages.
1 Tap New window to open a new web page.
1 Opens a new window
2 Opened web page window
3 Close icon
2 Tap a window to view the opened web page.
3 Tap the Close icon to close opened pages.
4 For more options, tap the Options menu
button, and then tap any of the following:
• New window — To open a new
window.
• Bookmarks — To view saved
bookmarks.
• History — To view the history of visited
web pages.
99
Page 100

Using Internet Features
Bookmarks
You can store your favorite web pages as
bookmarks in your phone browser.
Viewing Bookmarks
1 Open the Browser screen and tap the
Options menu button.
2 Tap Bookmarks on the options menu to open
the available bookmarks.
100
Adding Bookmarks
1 Open the Browser screen and tap the
Options menu button to open the options
menu.
2 Tap Bookmarks on the options menu to open
the Bookmarks screen.
3 Tap Add new to open the Bookmark link
screen.
 Loading...