

Page 1

Dell™ Inspiron™
ADVANCED PORT REPLICATOR
USER’S GUIDE
BE DIRECT
www.dell.com
™
™
Page 2
Notes, Notices, and Cautions
Throughout this guide, blocks of text may be accompanied by an icon and printed in bold type or in italic type.
These blocks are notes, notices, and cautions, and they are used as follows:
NOTE: A NOTE indicates important information that helps you make better use of your computer system.
NOTICE: A NOTICE indicates either potential damage to hardware or loss of data and tells you
how to avoid the problem.
CAUTION: A CAUTION indicates a potentially hazardous situation which, if not avoided, may
result in minor or mode ra te injury.
____________________
Information in this document is subject to change without notice.
© 1999–2000 Dell Computer Corporation. All rights reserved.
Reproduction in any manner whatsoever without the written permission of Dell Computer Corporation is strictly forbidden.
Trademarks used in this text: Dell, the DELL logo, BE DIRECT, Inspiron, and DellWare are trademarks of Dell Computer Corporation;
Microsoft, Windows, and Windows NT are registered trademarks of Microsoft Corporation; 3Com is a registered trademark of 3Com
Corporation.
Other trademarks and trade names may be used in this document to refer to either the entities claiming the marks and names or their
products. Dell Computer Corporation disclaims any proprietary interest in trademarks and trade names other than its own.
February 2000 P/N 8498T Rev. A02
Page 3

Contents
APR I/O Connectors . . . . . . . . . . . . . . . . . . . . . . . . . . . . . . . . . . . . . . . . . . . . . . . . 1-1
APR Controls and Indicators . . . . . . . . . . . . . . . . . . . . . . . . . . . . . . . . . . . . . . . . . . 1-3
Connecting External Devices to the APR . . . . . . . . . . . . . . . . . . . . . . . . . . . . . . . . 1-4
Connecting the Computer to the APR. . . . . . . . . . . . . . . . . . . . . . . . . . . . . . . . . . . 1-4
Docking the Computer . . . . . . . . . . . . . . . . . . . . . . . . . . . . . . . . . . . . . . . . . . . 1-5
Undocking the Computer. . . . . . . . . . . . . . . . . . . . . . . . . . . . . . . . . . . . . . . . . 1-6
Monitor Stand . . . . . . . . . . . . . . . . . . . . . . . . . . . . . . . . . . . . . . . . . . . . . . . . . . . . . 1-7
Safety Instructions. . . . . . . . . . . . . . . . . . . . . . . . . . . . . . . . . . . . . . . . . . . . . . . . . . 1-8
Technical Specifications . . . . . . . . . . . . . . . . . . . . . . . . . . . . . . . . . . . . . . . . . . . . . 1-9
Regulatory Notices . . . . . . . . . . . . . . . . . . . . . . . . . . . . . . . . . . . . . . . . . . . . . . . . 1-11
FCC Notices (U.S. Only) . . . . . . . . . . . . . . . . . . . . . . . . . . . . . . . . . . . . . . . . . 1-12
Class A . . . . . . . . . . . . . . . . . . . . . . . . . . . . . . . . . . . . . . . . . . . . . . . . . . 1-12
Class B . . . . . . . . . . . . . . . . . . . . . . . . . . . . . . . . . . . . . . . . . . . . . . . . . . 1-13
IC Notice (Canada Only) . . . . . . . . . . . . . . . . . . . . . . . . . . . . . . . . . . . . . . . . . 1-13
CE Notice (European Union). . . . . . . . . . . . . . . . . . . . . . . . . . . . . . . . . . . . . . 1-14
EN 55022 Compliance (Czech Republic Only) . . . . . . . . . . . . . . . . . . . . . . . . 1-14
VCCI Notice (Japan Only). . . . . . . . . . . . . . . . . . . . . . . . . . . . . . . . . . . . . . . . 1-14
Class A ITE . . . . . . . . . . . . . . . . . . . . . . . . . . . . . . . . . . . . . . . . . . . . . . . 1-15
Class B ITE . . . . . . . . . . . . . . . . . . . . . . . . . . . . . . . . . . . . . . . . . . . . . . . 1-15
MOC Notice (South Korea Only) . . . . . . . . . . . . . . . . . . . . . . . . . . . . . . . . . . 1-16
Class A Device . . . . . . . . . . . . . . . . . . . . . . . . . . . . . . . . . . . . . . . . . . . . 1-16
Class B Device . . . . . . . . . . . . . . . . . . . . . . . . . . . . . . . . . . . . . . . . . . . . 1-17
Polish Center for Testing and Certification Notice . . . . . . . . . . . . . . . . . . . . . 1-17
!"#$%$&'$()*+,-'.%*(/.&012#(3$4$5('(/.10"6'-$78' . . . . . . . . . . . . . . . . . . . 1-17
)*9*,0$:.('&,012-78.(;.9<'.79.5,0=$. . . . . . . . . . . . . . . . . . . . . . . . . . . . . . . 1-18
NOM Information (Mexico Only) . . . . . . . . . . . . . . . . . . . . . . . . . . . . . . . . . . 1-18
Información para NOM (únicamente para México) . . . . . . . . . . . . . . . . . . . . 1-19
Warranty and Return Policy . . . . . . . . . . . . . . . . . . . . . . . . . . . . . . . . . . . . . . . . . . 1-20
Three-Year Limited Warranty (U.S. Only) . . . . . . . . . . . . . . . . . . . . . . . . . . . . 1-20
v
Page 4

Coverage During Year One . . . . . . . . . . . . . . . . . . . . . . . . . . . . . . . . . . . 1-20
Coverage During Years Two and Three . . . . . . . . . . . . . . . . . . . . . . . . . 1-21
General Provisions . . . . . . . . . . . . . . . . . . . . . . . . . . . . . . . . . . . . . . . . . 1-21
Three-Year Limited Warranty (Canada Only) . . . . . . . . . . . . . . . . . . . . . . . . . 1-22
Coverage During Year One . . . . . . . . . . . . . . . . . . . . . . . . . . . . . . . . . . . 1-22
Coverage During Years Two and Three . . . . . . . . . . . . . . . . . . . . . . . . . 1-23
General Provisions . . . . . . . . . . . . . . . . . . . . . . . . . . . . . . . . . . . . . . . . . 1-23
“Total Satisfaction” Return Policy (U.S. and Canada Only) . . . . . . . . . . . . . . 1-24
Figures Figure 1-1. I/O Connectors on the Back of the APR . . . . . . . . . . . . . . . . . . . . . . 1-2
Figure 1-2. Audio Line-Out Connector. . . . . . . . . . . . . . . . . . . . . . . . . . . . . . . . . 1-3
Figure 1-3. Controls and Indicators . . . . . . . . . . . . . . . . . . . . . . . . . . . . . . . . . . . 1-3
Figure 1-4. Docking the Computer . . . . . . . . . . . . . . . . . . . . . . . . . . . . . . . . . . . 1-5
Figure 1-5. Undocking the Computer . . . . . . . . . . . . . . . . . . . . . . . . . . . . . . . . . 1-6
Figure 1-6. APR With the Monitor Stand. . . . . . . . . . . . . . . . . . . . . . . . . . . . . . . 1-7
Figure 1-7. VCCI Class A ITE Regulatory Mark . . . . . . . . . . . . . . . . . . . . . . . . . 1-15
Figure 1-8. VCCI Class B ITE Regulatory Mark . . . . . . . . . . . . . . . . . . . . . . . . . 1-15
Figure 1-9. MOC Class A Regulatory Mark . . . . . . . . . . . . . . . . . . . . . . . . . . . . 1-16
Figure 1-10. MOC Class B Regulatory Mark . . . . . . . . . . . . . . . . . . . . . . . . . . . . 1-17
Tables Table 1-1. External I/O Connectors . . . . . . . . . . . . . . . . . . . . . . . . . . . . . . . . . . 1-2
Table 1-2. Technical Specifications . . . . . . . . . . . . . . . . . . . . . . . . . . . . . . . . . . 1-9
vi
Page 5

Dell™ Inspiron™Advanced Port Replicator User’s Guide
The advanced port replicator (APR) integrates your computer quickly and easily into a
desktop environment. Use the instructions in this document to attach external devices
to the APR and to connect your computer to the APR.
NOTE: If you received a basic input/output system (BIOS) upgrade diskette with your
APR, use the diskette to upgrade the BIOS on your computer before attaching it to the
APR. For instructions, see the documentation that came with the BIOS upgrade
diskette.
NOTICE: Do not attempt to lift the computer while it is docked in the APR.
Doing so will damage the docking connector. For instructions, refer to
“Undockin g th e Computer,” found later in this guide.
APR I/O Connectors
The input/output (I/O) connectors on the back and side of the APR (see Figures 1-1
and 1-2) duplicate the primary connectors on the back and side of your computer.
Dell Inspiron Advanced Port Replicator User’s Guide 1-1
Page 6
USB
connectors (2)
mouse
connector
parallel port
connector
video
connector
keyboard
connector
serial port
connector
NIC connector
AC adapter
connector
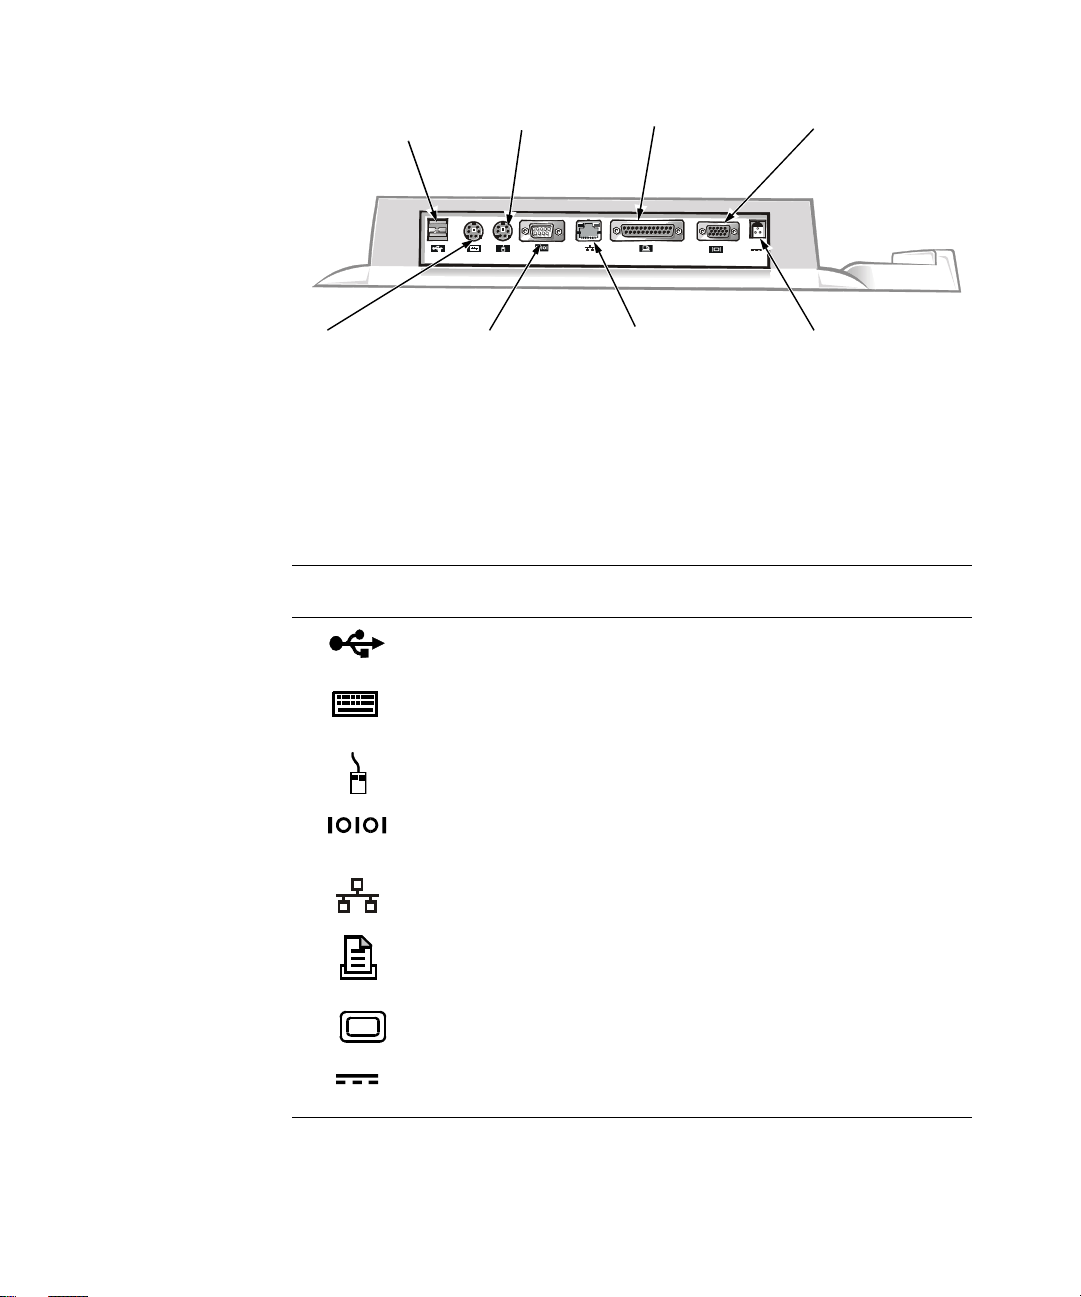
Figure 1-1. I/O Connectors on the Back of the APR
Table 1-1 shows the icons for each of the connectors on the back of the APR and indicates the type of external device(s) that you can attach to each connector.
Table 1-1. External I/O Connectors
Connector
Icon Connector Description
One or two USB devices, such as a USB mouse, can be connected
to the dual USB connectors.
An external PS/2-style keyboard or external numeric keypad can be
connected to the keyboard connector.
An external PS/2-compatible mouse can be connected to the PS/2
mouse connector.
A serial device, such as a serial mouse or external modem, can be
connected to the serial port connector.
A network interface cable can be connected to the NIC connector.
A parallel device, such as a printer, can be connected to the parallel
port connector.
An external monitor can connected to the video connector.
The AC adapter that came with the APR can be connected to the AC
adapter connector.
NOTE: For the full name of an abbreviation or acronym used in this table, see the Glossary in the
system Help.
1-2 Dell Inspiron Advanced Port Replicator User’s Guide
Page 7
The audio line-out connector is on the side of the APR (see Figure 1-2).
audio line-out connector
Figure 1-2. Audio Line-Out Connector
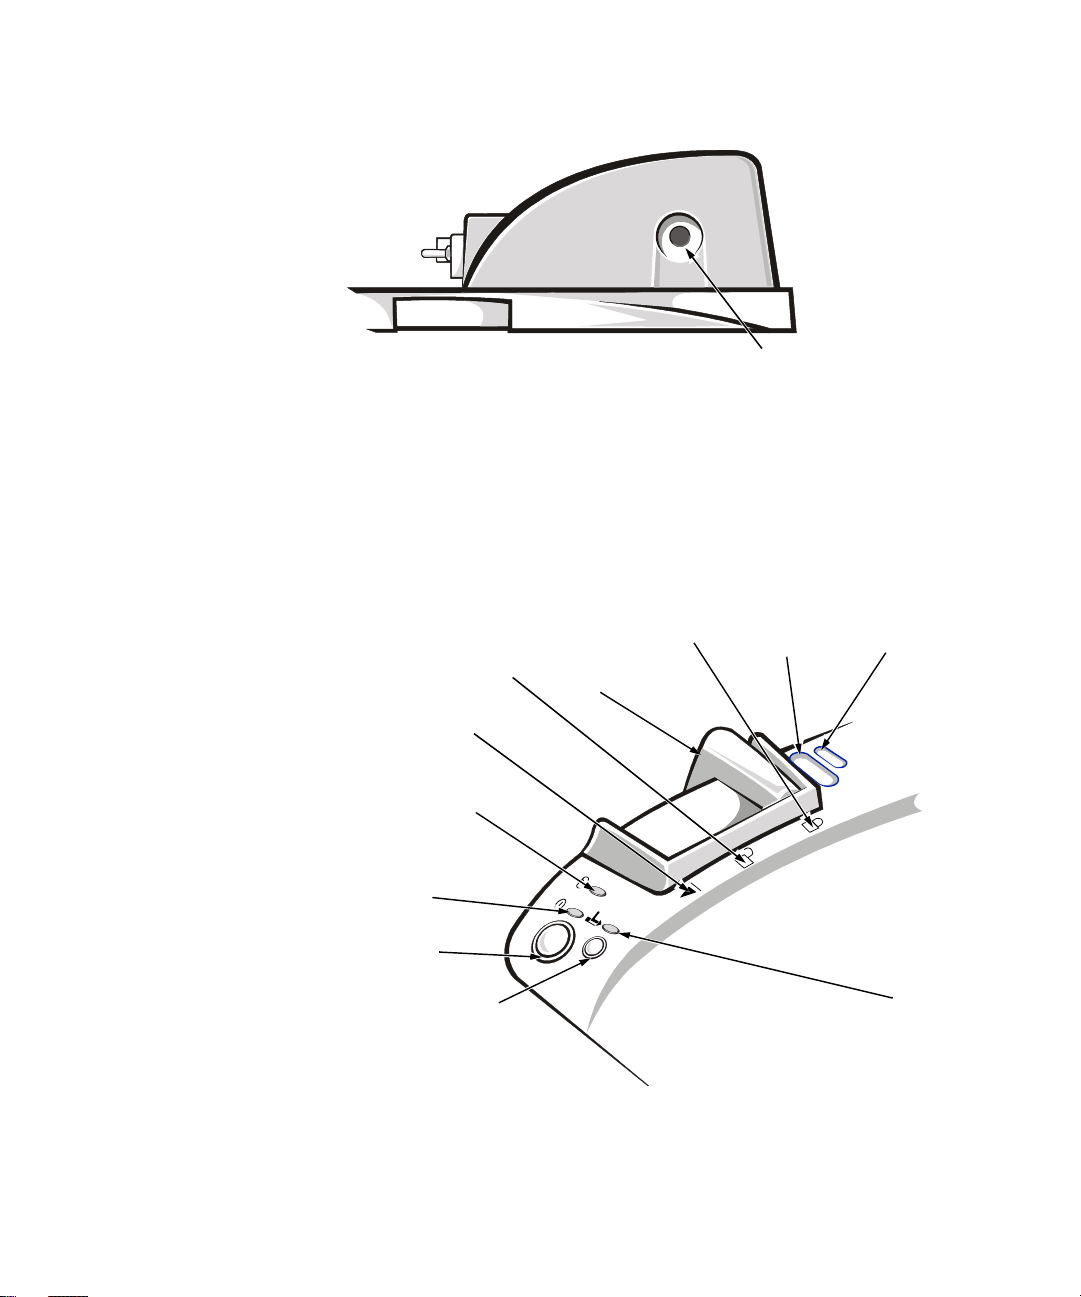
APR Controls and Indicators
The controls and indicators on the APR are shown in Figure 1-3.
locked
unlocked
position
eject
position
drive
access
indicator
power
indicator
power button
undock request button
eject/locking
lever
position
Figure 1-3. Controls and Indicators
padlock
slot
security
lock slot
docking
indicator
Dell Inspiron Advanced Port Replicator User’s Guide 1-3
Page 8

Connecting External Devices to the APR
To attach external devices to the APR, perform the following steps:
1. Refer to Figure 1-1 to attach external devices to the appropriate connectors on the
back of the APR.
NOTE: If the cable connector from the external device has thumbscrews, be sure
to tighten them to ensure a proper connection.
For detailed information on using external devices with your computer, see
“Connecting External Devices” in the system Help.
2. Connect the external devices to an electrical outlet, if applicable.
Connecting the Computer to the APR
You must attach an AC adapter to the APR before you dock and turn on the computer.
The AC adapter powers the APR and the computer at the same time. Any battery
installed in the computer charges while you use the APR.
NOTICE: Always use the Dell AC adapter that came with the APR. (Look for
model number PA-6 on the bottom of the AC adapter.) If you use any other
commercially available AC adapter—or the AC adapter from earlier models
of Dell computers—you may damage the APR or the computer.
Before you initially connect your computer to the APR, the operating system must
complete its setup process. To verify that the operating system has completed the
setup process, perform the following steps:
1. Be sure that the computer is not docked in the APR.
2. Turn on the computer.
3. Verify that your computer’s operating system completes the setup process. For
instructions, refer to the Setup Guide that accompanied your computer.
4. Turn off the computer.
You can now connect your computer to the APR as described in the following
subsection, “Docking the Computer.”
1-4 Dell Inspiron Advanced Port Replicator User’s Guide
Page 9
Docking the Computer
To connect (or dock) your computer to the APR, perform the following steps:
1. Verify that the operating system has completed the setup process. For instructions, refer to the Setup Guide that accompanied your computer.
2. Save and close all open files, exit all open application programs, and shut down
the computer.
3. If you have not already done so, connect the AC adapter to the connector on
the APR (see Figure 1-1), and plug the AC power cable into an electrical outlet.
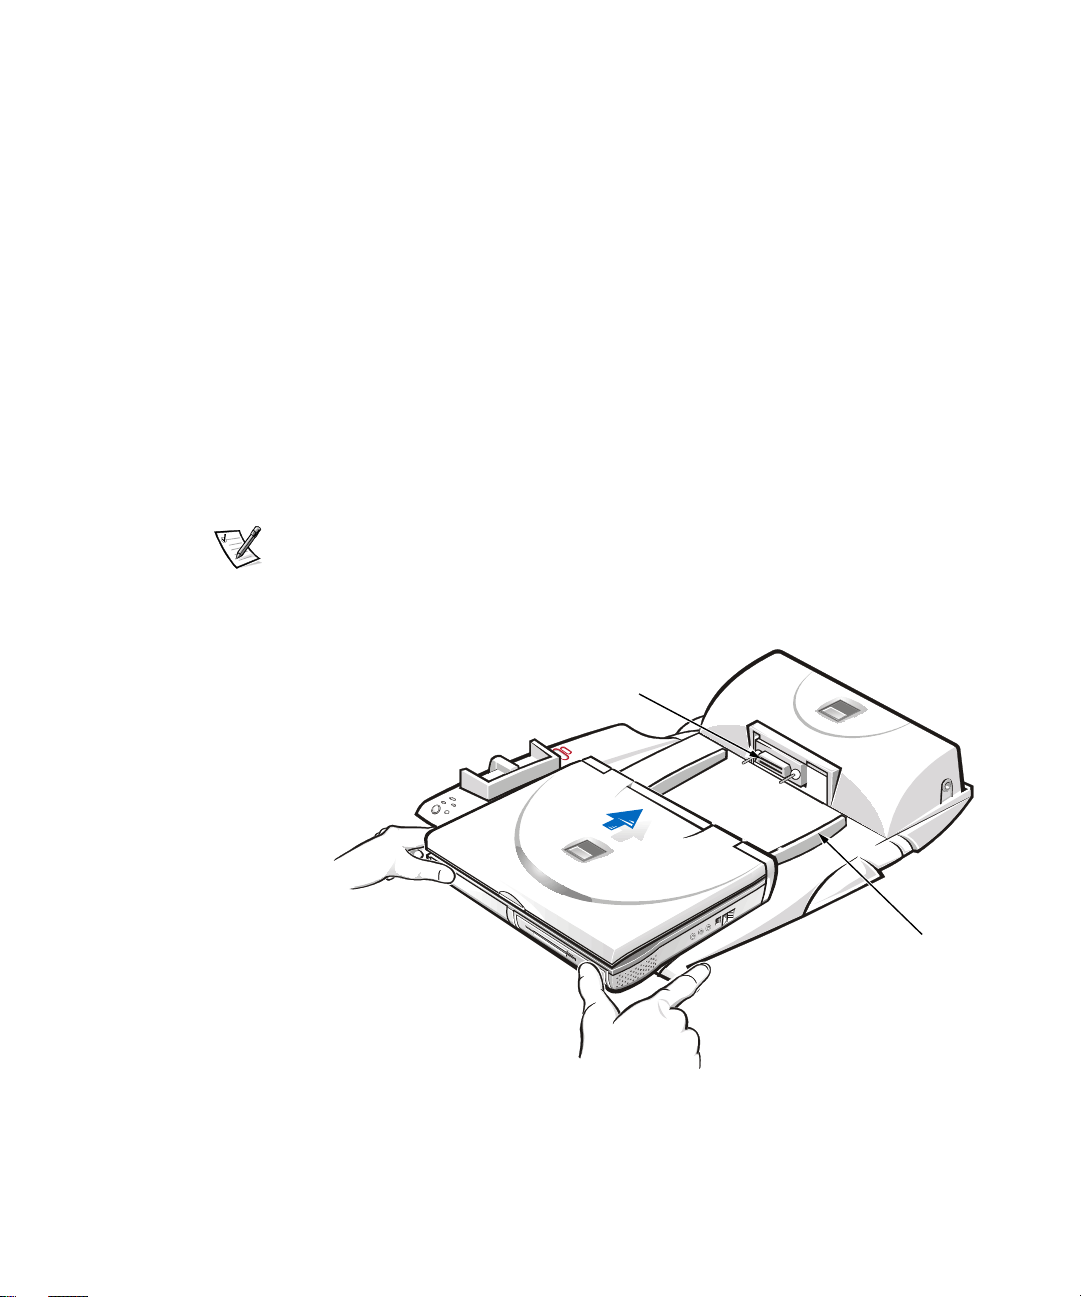
4. Horizontally center the computer on the APR platform, with the back of the
computer facing the APR’s docking connector, as shown in Figure 1-4.
5. Slide the computer toward the connector until you feel the grooves on the
bottom of the computer engage with the alignment rails.
NOTICE: If you attempt to push the computer all the way into the APR
without engaging the alignment rails, you may irreparably damage
the docking conne ctor on the computer.
NOTE: If you have a monitor stand installed, you will not be able to see the
alignment rails or the docking connector.
6. Gently push the computer forward until the docking connector is fully engaged.
docking connector
Figure 1-4. Docking the Computer
Dell Inspiron Advanced Port Replicator User’s Guide 1-5
alignment rails (2)
Page 10

Undocking the Co mputer
Perform the following steps to disconnect the computer from the APR:
1. Save and close all open files and exit all open application programs.
NOTICE: If the com puter does not have a char ged battery, the computer
turns off when you detach the computer from the APR, and all unsaved
data is lost.
NOTICE: Never undock the compu ter and the APR without first prepari n g
the computer. Any of the three following methods prepares the operat i ng
system, netw ork , and storage devices for undocking by co m pleting data
transfers. If you undo ck the computer before th ese transfers are completed, you will lose data and the computer may not recover normal
operation for several minutes, if at all.
2. To prepare the computer for undocking, perform one of the following procedures:
• Press <Fn><Esc> on the computer's keyboard (or press <Scroll
Lock><Esc> on an external keyboard).
After a few seconds, the power indicator on the computer turns off.
• If you are using the Microsoft
system, click the
Microsoft Windows NT® operating system, click the docking icon and then
click
Undock
After a few seconds, the power indicator on the computer turns off.
Start
to place the computer in standby mode.
®
Windows® 98 or Windows 2000 operating
button, and then click
Eject PC
. If you are using the
• Press the undock request button on the APR (see Figure 1-5).
The green docking indicator turns off.
3. Slide the eject/locking lever on the left side of the APR (see Figure 1-5) to the
eject position to undock the computer.
eject/locking lever
docking indicator
Figure 1-5. Undocking the Computer
1-6 Dell Inspiron Advanced Port Replicator User’s Guide
undock request button
Page 11

Monitor Stand
The monitor stand setup is shown in Figure 1-6.
NOTICE: The stand supports monitors that weigh up to 45.3 kilograms (kg)
(100 pounds [lb]). Heavier monitors may damage the stand, computer , and
APR.
NOTE: Be sure that the back legs on the monitor stand engage the slots on either side
of the docking control base.
monitor
stand
APR
computer
docking control base
Figure 1-6. APR With the Monitor Stand
Dell Inspiron Advanced Port Replicator User’s Guide 1-7
Page 12

Safety Instructions
Use the following safety guidelines to help protect your APR from potential damage
and to help ensure your own personal safety:
• Do not attempt to service the APR yourself. Always follow installation
instructions closely.
• Be sure that nothing rests on your AC adapter’s power cable.
• Be sure that the cable is not located where it can be tripped over or stepped on.
• Place the AC adapter in a ventilated area, such as a desktop or on the floor, when
powering the APR. Do not cover the AC adapter with papers or other items that
will reduce cooling. Do not use the AC adapter inside a carrying case.
• Do not use your APR in a wet environment, for example, near a bathtub, sink, or
swimming pool or in a wet basement.
• Do not push objects into air vents or openings of your APR. Doing so can cause
fire or electric shock by shorting out interior components.
• Use only the AC adapter that is approved for use with this APR as indicated in
this document. Use of another type of AC adapter may risk fire or explosion.
• Before you connect the APR to a power source, ensure that the voltage rating
of the AC adapter matches that of the available power source:
— 115 volts (V)/60 hertz (Hz) in most of North and South America and some Far
Eastern countries such as South Korea and Taiwan
— 100 V/50 Hz in eastern Japan and 100 V/60 Hz in western Japan
— 230 V/50 Hz in most of Europe, the Middle East and the Far East
• To help prevent electric shock, plug the AC adapter and peripheral power cables
into properly grounded electrical outlets. These cables are equipped with 3-prong
plugs to help ensure proper grounding. Do not use adapter plugs or remove the
grounding prong from a cable. If you must use an extension cable, use a 3-wire
cable with properly grounded plugs.
• If you use an extension cable with your AC adapter, ensure that the total ampere
rating of the products plugged into the extension cable does not exceed the
ampere rating of the extension cable.
• To remove power from the APR, turn off the computer and disconnect the AC
adapter from the electrical outlet.
• To help avoid the potential hazard of electric shock, do not connect or disconnect
any cables or perform maintenance or reconfiguration of this product during an
electrical storm.
• When setting up the APR for work, place it on a level surface.
• Protect your APR from environmental hazards such as dirt, dust, food, liquids,
temperature extremes, and overexposure to sunlight.
• When you move your APR between environments with very different
temperature or humidity ranges, condensation may form on or within the
1-8 Dell Inspiron Advanced Port Replicator User’s Guide
Page 13

computer. To avoid damaging the APR, allow sufficient time for the moisture to
evaporate before using the computer.
NOTICE: When taking the APR from low-temperature conditions int o a
warmer environment or from high-temperature conditions into a
cooler environ ment, allow the APR to acclimate to room tempera ture
before turning on power.
• When you disconnect a cable, pull on its connector or on its strain-relief loop, not
on the cable itself. As you pull out the connector, keep it evenly aligned to avoid
bending any connector pins. Also, before you connect a cable make sure both
connectors are correctly oriented and aligned.
• Before you clean your APR, turn it off and unplug it from the electrical outlet.
• Clean your APR with a soft cloth dampened with water rather than with liquid or
aerosol cleaners.
• If your APR gets wet or is damaged, follow the procedures described in
Chapter 3, “Troubleshooting,” of the Reference and Troubleshooting Guide. If,
after following these procedures, you confirm that your APR is not operating
properly, contact Dell Computer Corporation. (See Chapter 5, “Getting Help,” in
the Reference and Troubleshooting Guide for the appropriate telephone number.)
Technical Specifications
Table 1-2 lists the technical specifications for the APR.
Ta ble 1-2. Technical Specifications
Physical
Height:
With monitor stand . . . . . . . . . . . . .
Stand-alone . . . . . . . . . . . . . . . . . . .
Depth:
With monitor stand . . . . . . . . . . . . .
Stand-alone . . . . . . . . . . . . . . . . . . .
Width:
With monitor stand . . . . . . . . . . . . .
Stand-alone . . . . . . . . . . . . . . . . . . .
NOTE: For the full name of an abbreviation or acronym used in this table, see the Glossary in the
system Help.
Dell Inspiron Advanced Port Replicator User’s Guide 1-9
10.2 cm (4.0 inches)
5.8 cm (2.3 inches)
39.0 cm (15.4 inches)
35.8 cm (14.1 inches)
37.5 cm (14.8 inches)
40.9 cm (16.1 inches)
Page 14

Ta b le 1-2. Technical Specifications
(continued)
Physical
(continued)
Weight:
With monitor stand . . . . . . . . . . . . .
Stand-alone . . . . . . . . . . . . . . . . . . .
I/O Connectors
3.0 kg (6.5 lb)
1.6 kg (3.5 lb)
Serial (DTE) . . . . . . . . . . . . . . . . . . . . . . . 9-pin connector
Parallel . . . . . . . . . . . . . . . . . . . . . . . . . . . 25-hole connector
PS/2-style keyboard/keypad. . . . . . . . . . . 6-hole PS/2 keyboard connector
PS/2-compatible mouse. . . . . . . . . . . . . . 6-hole PS/2 mouse connector
Video . . . . . . . . . . . . . . . . . . . . . . . . . . . . 15-hole connector
Audio . . . . . . . . . . . . . . . . . . . . . . . . . . . . speaker-out (for optional headphones)
USB (dual) . . . . . . . . . . . . . . . . . . . . . . . . two 4-pin connectors
DC-IN . . . . . . . . . . . . . . . . . . . . . . . . . . . one connector
Docking connector. . . . . . . . . . . . . . . . . . 240-pin connector
NIC. . . . . . . . . . . . . . . . . . . . . . . . . . . . . . RJ-45 connector
Ethernet Network Controller
Chip set . . . . . . . . . . . . . . . . . . . . . . . . . . 3Com® 3C920; 10/100 BASE-TX
(PC98-compliant)
Data bus width. . . . . . . . . . . . . . . . . . . . . 32-bit PCI host bus interface
IRQ. . . . . . . . . . . . . . . . . . . . . . . . . . . . . . IRQ10
Voltage. . . . . . . . . . . . . . . . . . . . . . . . . . . requires 20 VDC from AC adapter
Amperage . . . . . . . . . . . . . . . . . . . . . . . . 3.5 A
NOTE: For the full name of an abbreviation or acronym used in this table, see the Glossary in the
system Help.
1-10 Dell Inspiron Advanced Port Replicator User’s Guide
Power
Page 15

Regulatory Notices
Electromagnetic Interference (EMI) is any signal or emission, radiated in free space or
conducted along power or signal leads, that endangers the functioning of a radio
navigation or other safety service or seriously degrades, obstructs, or repeatedly
interrupts a licensed radio communications service. Radio communications services
include but are not limited to AM/FM commercial broadcast, television, cellular
services, radar, air-traffic control, pager, and Personal Communication Services (PCS).
These licensed services, along with unintentional radiators such as digital devices,
including computer systems, contribute to the electromagnetic environment.
Electromagnetic Compatibility (EMC) is the ability of items of electronic equipment to
function properly together in the electronic environment. While this computer system
has been designed and determined to be compliant with regulatory agency limits for
EMI, there is no guarantee that interference will not occur in a particular installation. If
this equipment does cause interference with radio communications services, which
can be determined by turning the equipment off and on, you are encouraged to try to
correct the interference by one or more of the following measures:
• Reorient the receiving antenna.
• Relocate the computer with respect to the receiver.
• Move the computer away from the receiver.
• Plug the computer into a different outlet so that the computer and the receiver
are on different branch circuits.
If necessary, consult a Technical Support representative of Dell Computer Corporation
or an experienced radio/television technician for additional suggestions. You may find
the FCC Interference Handbook, 1986, to be helpful. It is available from the U.S.
Government Printing Office, Washington, DC 20402, Stock No. 004-000-00450-7 or
on the World Wide Web at
tvibook.html
.
http://www.fcc.gov/Bureaus/Compliance/WWW/
Dell computer systems are designed, tested, and classified for their intended
electromagnetic environment. These electromagnetic environment classifications
generally refer to the following harmonized definitions:
• Class A is typically for business or industrial environments.
• Class B is typically for residential environments.
Information Technology Equipment (ITE), including peripherals, expansion cards,
printers, input/output (I/O) devices, monitors, and so on, that are integrated into
or connected to the system should match the electromagnetic environment
classification of the computer system.
A Notice About Shielded Si gn al Cables: Use only shielded cables for
connecting peripherals to any Dell device to reduce the possibility of
interference wit h radio communications se rvices. Using shielded ca bles
ensures that you main tain the appropriate EMC classification for th e
intended enviro n m en t. For parallel printers, a cable is available from
Dell Computer Corporation. If you prefer, you can order a cable from
Dell Inspiron Advanced Port Replicator User’s Guide 1-11
Page 16

Dell Computer C orp or atio n on the World Wide Web at http ://w ww.dell.com/
products/dellware/index.htm.
A Notice About Networked Computer Systems: Some Dell computer systems
that are classified f or Class B environments may include an on- board
network interface controller (NIC). If your Class B system contains a NIC,
it may be considered to be a Class A system at the time that the NIC is
connected to a network. When the NIC is not connected to a network, your
system is considered to be a Class B digital device.
Most Dell computer systems are classified for Class B environments. To determine
the electromagnetic classification for your system or device, refer to the following
sections specific for each regulatory agency. Each section provides country-specific
EMC/EMI or product safety information.
FCC Notices (U.S. Only)
Most Dell computer systems are classified by the Federal Communications
Commission (FCC) as Class B digital devices. However, the inclusion of certain
options can change the rating of some configurations to Class A. To determine which
classification applies to your computer system, examine all FCC registration labels
located on the bottom or back panel of your computer, on card-mounting brackets, and
on the cards themselves. If any one of the labels carries a Class A rating, your entire
system is considered to be a Class A digital device. If all labels carry an FCC Class B
rating as distinguished by either an FCC ID number or the FCC logo, ( ), your system is considered to be a Class B digital device.
Once you have determined your system’s FCC classification, read the appropriate
FCC notice. Note that FCC regulations provide that changes or modifications not
expressly approved by Dell Computer Corporation could void your authority to operate
this equipment.
This device complies with Part 15 of the FCC Rules. Operation is subject to the
following two conditions:
• This device may not cause harmful interference.
• This device must accept any interference received, including interference that
may cause undesired operation.
Class A
This equipment has been tested and found to comply with the limits for a Class A
digital device pursuant to Part 15 of the FCC Rules. These limits are designed to
provide reasonable protection against harmful interference when the equipment is
operated in a commercial environment. This equipment generates, uses, and can
radiate radio frequency energy and, if not installed and used in accordance with the
manufacturer’s instruction manual, may cause harmful interference with radio
communications. Operation of this equipment in a residential area is likely to cause
harmful interference, in which case you will be required to correct the interference at
your own expense.
1-12 Dell Inspiron Advanced Port Replicator User’s Guide
Page 17

Class B
This equipment has been tested and found to comply with the limits for a Class B
digital device pursuant to Part 15 of the FCC Rules. These limits are designed to
provide reasonable protection against harmful interference in a residential installation.
This equipment generates, uses, and can radiate radio frequency energy and, if not
installed and used in accordance with the manufacturer’s instruction manual, may
cause interference with radio communications. However, there is no guarantee that
interference will not occur in a particular installation. If this equipment does cause
harmful interference to radio or television reception, which can be determined by
turning the equipment off and on, you are encouraged to try to correct the
interference by one or more of the following measures:
• Reorient or relocate the receiving antenna.
• Increase the separation between the equipment and the receiver.
• Connect the equipment into an outlet on a circuit different from that to which
the receiver is connected.
• Consult the dealer or an experienced radio/television technician for help.
The following information is provided on the device or devices covered in this
document in compliance with FCC regulations:
• Model number: PRX
• Company name: Dell Computer Corporation
EMC Engineering Department
One Dell Way
Round Rock, Texas 78682 USA
512-338-4400
IC Notice (Canada Only)
Most Dell computer systems (and other Dell digital apparatus) are classified by the
Industry Canada (IC) Interference-Causing Equipment Standard #3 (ICES-003) as
Class B digital devices. To determine which classification (Class A or B) applies to your
computer system (or other Dell digital apparatus), examine all registration labels
located on the bottom or the back panel of your computer (or other digital apparatus).
A statement in the form of “IC Class A ICES-003” or “IC Class B ICES-003” will be
located on one of these labels. Note that Industry Canada regulations provide that
changes or modifications not expressly approved by Dell Computer Corporation could
void your authority to operate this equipment.
This Class B (or Class A, if so indicated on the registration label) digital apparatus
meets the requirements of the Canadian Interference-Causing Equipment
Regulations.
Cet appareil numérique de la Classe B (ou Classe A, si ainsi indiqué sur l’étiquette
d’enregistration) respecte toutes les exigences du Reglement sur le Materiel
Brouilleur du Canada.
Dell Inspiron Advanced Port Replicator User’s Guide 1-13
Page 18

CE Notice (European Union)
Marking by the symbol indicates compliance of this Dell system to the EMC
Directive and the Low Voltage Directive of the European Union. Such marking is
indicative that this Dell system meets the following technical standards:
• EN 55022 — “Limits and Methods of Measurement of Radio Interference
Characteristics of Information Technology Equipment.”
• EN 50082-1: 1992 — “Electromagnetic compatibility—Generic immunity
standard Part 1: Residential, commercial, and light industr y.”
• EN 60950 — “Safety of Information Technology Equipment.”
NOTE: EN 55022 emissions requirements provide for two classifications:
• Class A is for typical commercial areas.
• Class B is for typical domestic areas.
This Dell device is classified for use in a typical Class B domestic environment.
A “Declaration of Conformity” in accordance with the preceding directives and
standards has been made and is on file at Dell Products Europe BV, Limerick, Ireland.
EN 55022 Compliance (Czech Republic Only)
This device belongs to Class B devices as described in EN 55022, unless it is specifically stated that it is a Class A device on the specification label. The following
applies to devices in Class A of EN 55022 (radius of protection up to 30 meters).
The user of the device is obliged to take all steps necessary to remove sources of
interference to telecommunication or other devices.
!"#$%&'(')& '*& +,-"./0&1+2+#$&-"3)+*3(& $.(%('"4&5(&6 -*%7& %"& +8)%,&9&-"%:(
;< ==>??4& 6-*%7& *$+"0*+2@#,& %"& +8)%,& A& -"%:(& ;<& ==>??B& & !C"& D*8)D(')
D*8*D('7&%"&+8)%,&9&E"@FC*''/&&-760"&G>0H&-"%:(&;<&==>??&-:*+)&'76:(%$I)@)B
J"I%(-:2&#&C$1(')&+(:(#"0$'2#*3')@F&'(K"&I2',@F&D*8)D(')4&I(&$52.*+(:&-".2'('
-C"./6+&+*#".7&"-*+8(')4&*K,&C$1(')&"%6+C*'2:B
VCCI Notice (Japan Only)
Most Dell computer systems are classified by the Voluntary Control Council for
Interference (VCCI) as Class B information technology equipment (ITE). However, the
inclusion of certain options can change the rating of some configurations to Class A.
ITE, including peripherals, expansion cards, printers, input/output (I/O) devices,
monitors, and so on, integrated into or connected to the system, should match the
electromagnetic environment classification (Class A or B) of the computer system.
To determine which classification applies to your computer system, examine the
regulatory labels/markings (see Figures 1-7 and 1-8) located on the bottom or back
panel of your computer. Once you have determined your system’s VCCI classification,
read the appropriate VCCI notice.
1-14 Dell Inspiron Advanced Port Replicator User’s Guide
Page 19

Class A ITE
This is a Class A product based on the standard of the Voluntary Control Council for
Interference (VCCI) for information technology equipment. If this equipment is used in
a domestic environment, radio disturbance may arise. When such trouble occurs, the
user may be required to take corrective actions.
VCCI-A
Figure 1-7. VCCI Class A ITE Regulatory Mark
Class B ITE
This is a Class B product based on the standard of the Voluntary Control Council for
Interference (VCCI) for information technology equipment. If this equipment is used
near a radio or television receiver in a domestic environment, it may cause radio
interference. Install and use the equipment according to the instruction manual.
Figure 1-8. VCCI Class B ITE Regulatory Mark
Dell Inspiron Advanced Port Replicator User’s Guide 1-15
Page 20

MOC Notice (South Korea Only)
To determine which classification (Class A or B) applies to your computer system
(or other Dell digital device), examine the South Korean Ministry of Communications
(MOC) registration labels located on your computer (or other Dell digital device). The
MOC label may be located separately from the other regulatory marking applied to
your product. The English text, “EMI (A),” for Class A products, or “EMI (B)” for
Class B products, appears in the center of the MOC label (see Figures 1-9 and 1-10).
NOTE: MOC emissions requirements provide for two classifications:
• Class A devices are for business purposes.
• Class B devices are for nonbusiness purposes.
Class A Device
Please note that this device has been approved for business purposes with regard to
electromagnetic interference. If you find that this device is not suitable for your use,
you may exchange it for a nonbusiness device.
Figure 1-9. MOC Class A Regulatory Mark
1-16 Dell Inspiron Advanced Port Replicator User’s Guide
EMI ( A )
Page 21

Class B Device
Please note that this device has been approved for nonbusiness purposes and may be
used in any environment, including residential areas.
EMI ( B )
Figure 1-10. MOC Class B Regulat ory Mark
Polish Center for Testing and Certification Notice
The equipment should draw power from a socket with an attached protection circuit
(a three-prong socket). All equipment that works together (computer, monitor, printer,
and so on) should have the same power supply source.
The phasing conductor of the room’s electrical installation should have a reserve
short-circuit protection device in the form of a fuse with a nominal value no larger than
16 amperes (A).
To completely switch off the equipment, the power supply cable must be removed
from the power supply socket, which should be located near the equipment and easily
accessible.
A protection mark “B” confirms that the equipment is in compliance with the
protection usage requirements of standards PN-93/T-42107 and PN-EN55022:1996.
L,0*M*'2*&!":6#2(M"&N('+C$0&A*%*O&2&N(C+,P2#*@I2
QCDR%D('2(&-"S2''"&K,T&D*62:*'(&D&M'2*D%*&D&-CD,UR@D"',0&"KS"%(0&"@FC"'
',0&EM'2*D%"&D&#"U#2(0HB&L6-VU-C*@$IR@(&D(&6"KR&$CDR%D('2*&E#"0-$+(C4&0"'2
+"C4&%C$#*C#*H&-"S2'',&K,T&D*62:*'(&D&+(M"&6*0(M"&WCV%U*B
X'6+*:*@I*&(:(#+C,@D'*&-"02(6D@D('2*&-"S2''*&D*S2(C*T&S&-CD(S"%D2(&P*D"S,0&
C(D(CS"SR&"@FC"'Y&-CD(%&DS*C@2*024&S&-"6+*@2&K(D-2(@D'2#*&"&S*C+"Z@2&D'*02
"'"S(I&'2(&S2Y#6D(I&'2[&\]9&E*0-(CVSHB&
L&@(:$&@*U#"S2+(M"&S,UR@D('2*&$CDR%D('2*&D&62(@2&D*62:*'2*4&'*:([,&S,IRT&
S+,@D#Y&#*K:*&D*62:*IR@(M"&D&M'2*D%#*4&#+VC(&-"S2''"&D'*I%"S*T&62Y&S&-"K:2[$&
$CDR%D('2*&2&K,T&U*+S"&%"6+Y-'(B&
^'*#&K(D-2(@D(O6+S*&_A_&-"+S2(C%D*&DM"%'"ZT&$CDR%D('2*&D&S,0*M*'2*02&
K(D-2(@D(O6+S*&$[,+#"S*'2*&D*S*C+,02&S&!<-`Gab-c?\>d&2&!<-;<==>??e\``]B
Dell Inspiron Advanced Port Replicator User’s Guide 1-17
Page 22

!"D"6+*U(&2'6+C$#@I(&K(D-2(@D(O6+S*
<2(&'*:([,&$[,S*T&S+,@D(#&*%*-+(C"S,@F&:$K&$6$S*T&#"U#*&"KS"%$&
•
"@FC"''(M"&D&S+,@D#2B&f([(:2&#"'2(@D'(&I(6+&$[,@2(&-CD(%U$[*@D*&+"&'*:([,&
$[,T&-CD(%U$[*@D*&G-[,U"S(M"&D&-C*S2%U"S"&-"UR@D"',0&-CD(S"%(0&
"@FC"'',0B
g,6+(0&#"0-$+(C"S,&'*:([,&D*K(D-2(@D,T&-CD(%&'*MU,024&@FS2:"S,02&
•
SDC"6+*02&:$K&6-*%#*02&'*-2Y@2*4&$[,S*IR@&(:202'*+"C*&-CD(-2YT4&$CDR%D(
'2*&
%"-*6"S$IR@(M"&:$K&K(DD*#UV@('2"S(M"&WCV%U*&D*62:*'2*B
<*:([,&$-(S'2T&62Y4&*K,&'2@&'2(&:([*U"&'*&#*K:*@F&6,6+(0$&#"0-$+(C"S(M"4&
•
"C*D&*K,&#*K:(&'2(&K,U,&$02(6D@D"'(&S&02(I6@$4&M%D2(&0"['*&K,U"K,&'*&'2(&
'*%(-+,S*T&:$K&-"+,#*T&62Y&"&'2(B
<2(&'*:([,&C"D:(S*T&'*-"IVS&*'2&2'',@F&-U,'VS&'*&6,6+(0&#"0-$+(C"S,B
•
<2(&'*:([,&S-,@F*T&[*%',@F&-CD(%02"+VS&%"&"+S"CVS&6,6+(0$&#"0-$+
•
(C"S(M"4&M%,[&0"[(&+"&6-"S"%"S*T&-"[*C&:$K&-"C*[('2(&-CR%(04&-"-CD(D&
DS*C@2(&
(:(0('+VS&S(S'Y+CD',@FB
g,6+(0&#"0-$+(C"S,&-"S2'2('&D'*I%"S*T&62Y&D&%*:*&"%&MCD(I'2#VS&2&WCV%(U&
•
@2(-U*B&!"'*%+"4&'2(&'*:([,&K:"#"S*T&"+S"CVS&S('+,:*@,I',@FB&<*:([,&$'2
#*T&#U*%D('2*&:$W',@F&-*-2(CVS&-"%&#"0-$+(C&"C*D&$02(6D@D*'2*&
#"0-$+(C*&S&
@2*6',0&02(I6@$&K(D&0"[:2S"Z@2&@,C#$:*@I2&-"S2(+CD*&S"#VU&'2(M"B
NOM Information (Mexico Only)
The following information is provided on the device(s) described in this document in
compliance with the requirements of the official Mexican standards (NOM):
Exporter: Dell Computer Corporation
Importer: Dell Computer de México,
Ship to: Dell Computer de México,
Supply voltage: 100–240 VAC
Frequency: 60–50 Hz
Input
current rating: 1.5 A
1-18 Dell Inspiron Advanced Port Replicator User’s Guide
One Dell Way
Round Rock, TX 78682
S.A. de C.V.
Rio Lerma No. 302 - 4° Piso
Col. Cuauhtemoc
16500 México, D.F.
S.A. de C.V. al Cuidado
de Kuehne & Nagel de
México S. de R.I.
Avenida Soles No. 55
Col. Peñon de los Baños
15520 México, D.F.
Page 23

Información para NOM (únicamente para México)
La información siguiente se proporciona en el dispositivo o en los dispositivos
descritos en este documento, en cumplimiento con los requisitos de la Norma Oficial
Mexicana (NOM):
Exportador: Dell Computer Corporation
One Dell Way
Round Rock, TX 78682
Importador: Dell Computer de México,
Embarcar a: Dell Computer de México,
Tensión
alimentación: 100–240 VAC
Frecuencia: 60–50 Hz
Consumo de
corriente: 1.5 A
S.A. de C.V.
Rio Lerma No. 302 - 4° Piso
Col. Cuauhtemoc
16500 México, D.F.
S.A. de C.V. al Cuidado
de Kuehne & Nagel de
México S. de R.I.
Avenida Soles No. 55
Col. Peñon de los Baños
15520 México, D.F.
Dell Inspiron Advanced Port Replicator User’s Guide 1-19
Page 24

Warranty and Return Policy
Three-Year Limited Warranty (U.S. Only)
Dell Computer Corporation (“Dell”) manufactures its hardware products from parts
and components that are new or equivalent to new in accordance with industrystandard practices. Dell warrants that the hardware products it manufactures will be
free from defects in materials and workmanship. The limited warranty term is three
years beginning on the date of invoice, as described in the following text.
Damage due to shipping the products to you is covered under this limited warranty.
Otherwise, this limited warranty does not cover damage due to external causes,
including accident, abuse, misuse, problems with electrical power, servicing not
authorized by Dell, usage not in accordance with product instructions, failure to perform required preventive maintenance, and problems caused by use of parts and
components not supplied by Dell.
This limited warranty does not cover any items that are in one or more of the following categories: software; external devices (except as specifically noted); accessories
or parts added to a Dell system after the system is shipped from Dell; accessories or
parts added to a Dell system through Dell’s system integration department; accessories or parts that are not installed in the Dell factory; or DellWare
keyboards, and mice that are Dell-branded or that are included on Dell’s standard price
list are covered under this limited warranty; all other monitors, keyboards, and mice
(including those sold through the DellWare program) are not covered. Batteries for
portable computers are covered only during the initial one-year period of this limited
warrant y.
™
products. Monitors,
Coverage During Year One
During the one-year period beginning on the invoice date, Dell will repair or replace
products covered under this limited warranty that are returned to Dell’s facility. To
request warranty service, you must call Dell’s Customer Technical Support within the
warranty period. Refer to the chapter titled “Getting Help” in your system’s trouble-
shooting documentation or, for some systems, the section titled “Contacting Dell” in
your system’s online guide to find the appropriate telephone number for obtaining
customer assistance. If warranty service is required, Dell will issue a Return Material
Authorization Number. You must ship the products back to Dell in their original or
equivalent packaging, prepay shipping charges, and insure the shipment or accept the
risk of loss or damage during shipment. Dell will ship the repaired or replacement
products to you freight prepaid if you use an address in the continental U.S., where
applicable. Shipments to other locations will be made freight collect.
NOTE: Before you ship the product(s) to Dell, back up the data on the hard-disk
drive(s) and any other storage device(s) in the product(s). Remove any removable
media, such as diskettes, CDs, or PC Cards. Dell does not accept liability for lost data
or software.
Dell owns all parts removed from repaired products. Dell uses new and reconditioned
parts made by various manufacturers in performing warranty repairs and building
1-20 Dell Inspiron Advanced Port Replicator User’s Guide
Page 25

replacement products. If Dell repairs or replaces a product, its warranty term is not
extended.
Coverage During Years Two and Three
During the second and third years of this limited warranty, Dell will provide, on an
exchange basis and subject to Dell’s Exchange Policy in effect on the date of the
exchange, replacement parts for the Dell hardware product(s) covered under this limited warranty when a part requires replacement. You must report each instance of
hardware failure to Dell’s Customer Technical Support in advance to obtain Dell’s concurrence that a part should be replaced and to have Dell ship the replacement part.
Dell will ship parts (freight prepaid) if you use an address in the continental U.S.,
where applicable. Shipments to other locations will be made freight collect. Dell will
include a prepaid shipping container with each replacement part for your use in returning the replaced part to Dell. Replacement parts are new or reconditioned. Dell may
provide replacement parts made by various manufacturers when supplying parts to
you. The warranty term for a replacement part is the remainder of the limited warranty term.
You will pay Dell for replacement parts if the replaced part is not returned to Dell. The
process for returning replaced parts, and your obligation to pay for replacement parts
if you do not return the replaced parts to Dell, will be in accordance with Dell’s
Exchange Policy in effect on the date of the exchange.
You accept full responsibility for your software and data. Dell is not required to advise
or remind you of appropriate backup and other procedures.
General Provisions
THIS LIMITED WARRANTY GIVES YOU SPECIFIC LEGAL RIGHTS WHICH VARY
FROM STATE TO STATE (OR JURISDICTION TO JURISDICTION). DELL'S RESPONSIBILITY FOR MALFUNCTIONS AND DEFECTS IN HARDWARE IS LIMITED TO REPAIR
AND REPLACEMENT AS SET FORTH IN THIS LIMITED WARRANTY STATEMENT.
ALL EXPRESS AND IMPLIED WARRANTIES FOR THE PRODUCT, INCLUDING BUT
NOT LIMITED TO ANY IMPLIED WARRANTIES OF AND CONDITIONS OF MERCHANTIBILITY AND FITNESS FOR A PARTICULAR PURPOSE, ARE LIMITED IN
DURATION TO THE WARRANTY PERIOD SET FORTH ABOVE AND NO WARRANTIES, WHETHER EXPRESS OR IMPLIED, WILL APPLY AFTER SUCH PERIOD.
SOME STATES (OR JURISDICTIONS) DO NOT ALLOW LIMITATIONS ON HOW
LONG AN IMPLIED WARRANTY LASTS, SO THE PRECEDING LIMITATION MAY NOT
APPLY TO YOU.
DELL DOES NOT ACCEPT LIABILITY BEYOND THE REMEDIES SET FORTH IN THIS
LIMITED WARRANTY STATEMENT OR LIABILITY FOR INCIDENTAL OR CONSEQUENTIAL DAMAGES, INCLUDING WITHOUT LIMITATION ANY LIABILITY FOR
PRODUCTS NOT BEING AVAILABLE FOR USE OR FOR LOST DATA OR SOFTWARE.
SOME STATES (OR JURISDICTIONS) DO NOT ALLOW THE EXCLUSION OR LIMITATION OF INCIDENTAL OR CONSEQUENTIAL DAMAGES, SO THE PRECEDING
EXCLUSION OR LIMITATION MAY NOT APPLY TO YOU.
Dell Inspiron Advanced Port Replicator User’s Guide 1-21
Page 26

These provisions apply to Dell’s three-year limited warranty only. For provisions of any
service contract covering your system, refer to your invoice or the separate service
contract that you will receive.
If Dell elects to exchange a system or component, the exchange will be made in
accordance with Dell’s Exchange Policy in effect on the date of the exchange. In any
instance in which Dell issues a Return Material Authorization Number, Dell must
receive the product(s) for repair prior to the expiration of the warranty period in order
for the repair(s) to be covered by the limited warranty.
NOTE: If you chose one of the available warranty and service options in place of the
standard three-year limited warranty described in the preceding text, the option you
chose will be listed on your invoice.
Three-Year Limited Warranty (Canada Only)
Dell Computer Corporation (“Dell”) manufactures its hardware products from parts
and components that are new or equivalent to new in accordance with industrystandard practices. Dell warrants that the hardware products it manufactures will be
free from defects in materials and workmanship. The warranty term is three years
beginning on the date of invoice, as described in the following text.
Damage due to shipping the products to you is covered under this limited warranty.
Otherwise, this limited warranty does not cover damage due to external causes,
including accident, abuse, misuse, problems with electrical power, servicing not
authorized by Dell, usage not in accordance with product instructions, failure to perform required preventive maintenance, and problems caused by use of parts and
components not supplied by Dell.
This limited warranty does not cover any items that are in one or more of the following categories: software; external devices (except as specifically noted); accessories
or parts added to a Dell system after the system is shipped from Dell; accessories or
parts added to a Dell system through Dell’s system integration department; accessories or parts that are not installed in the Dell factory; or DellWare products. Monitors,
keyboards, and mice that are Dell-branded or that are included on Dell’s standard price
list are covered under this limited warranty; all other monitors, keyboards, and mice
(including those sold through the DellWare program) are not covered. Batteries for
portable computers are covered only during the initial one-year period of this limited
warrant y.
Coverage During Year One
During the one-year period beginning on the invoice date, Dell will repair or replace
products covered under this limited warranty that are returned to Dell’s facility. To
request warranty service, you must call Dell’s Customer Technical Support within the
warranty period. Refer to the chapter titled “Getting Help” in your system’s trouble-
shooting documentation or, for some systems, the section titled “Contacting Dell” in
your system’s online guide to find the appropriate telephone number for obtaining
customer assistance. If warranty service is required, Dell will issue a Return Material
Authorization Number. You must ship the products back to Dell in their original or
equivalent packaging, prepay shipping charges, and insure the shipment or accept the
risk of loss or damage during shipment. Dell will ship the repaired or replacement
1-22 Dell Inspiron Advanced Port Replicator User’s Guide
Page 27

products to you freight prepaid if you use an address in Canada, where applicable.
Shipments to other locations will be made freight collect.
NOTE: Before you ship the product(s) to Dell, back up the data on the hard-disk
drive(s) and any other storage device(s) in the product(s). Remove any removable
media, such as diskettes, CDs, or PC Cards. Dell does not accept liability for lost data
or software.
Dell owns all parts removed from repaired products. Dell uses new and reconditioned
parts made by various manufacturers in performing warranty repairs and building
replacement products. If Dell repairs or replaces a product, its warranty term is not
extended.
Coverage During Years Two and Three
During the second and third years of this limited warranty, Dell will provide, on an
exchange basis and subject to Dell’s Exchange Policy in effect on the date of the
exchange, replacement parts for the Dell hardware product(s) covered under this limited warranty when a part requires replacement. You must report each instance of
hardware failure to Dell’s Customer Technical Support in advance to obtain Dell’s concurrence that a part should be replaced and to have Dell ship the replacement part.
Dell will ship parts (freight prepaid) if you use an address in Canada, where applicable.
Shipments to other locations will be made freight collect. Dell will include a prepaid
shipping container with each replacement part for your use in returning the replaced
part to Dell. Replacement parts are new or reconditioned. Dell may provide replacement parts made by various manufacturers when supplying parts to you. The warranty
term for a replacement part is the remainder of the limited warranty term.
You will pay Dell for replacement parts if the replaced part is not returned to Dell. The
process for returning replaced parts, and your obligation to pay for replacement parts
if you do not return the replaced parts to Dell, will be in accordance with Dell’s
Exchange Policy in effect on the date of the exchange.
You accept full responsibility for your software and data. Dell is not required to advise
or remind you of appropriate backup and other procedures.
General Provisions
DELL MAKES NO EXPRESS WARRANTIES OR CONDITIONS BEYOND THOSE
STATED IN THIS LIMITED WARRANTY STATEMENT. DELL DISCLAIMS ALL OTHER
WARRANTIES AND CONDITIONS, EXPRESS OR IMPLIED, INCLUDING WITHOUT
LIMITATION IMPLIED WARRANTIES AND CONDITIONS OF MERCHANTABILITY
AND FITNESS FOR A PARTICULAR PURPOSE. SOME STATES (OR JURISDICTIONS)
DO NOT ALLOW LIMITATIONS ON IMPLIED WARRANTIES OR CONDITIONS, SO
THIS LIMITATION MAY NOT APPLY TO YOU.
DELL’S RESPONSIBILITY FOR MALFUNCTIONS AND DEFECTS IN HARDWARE IS
LIMITED TO REPAIR AND REPLACEMENT AS SET FORTH IN THIS LIMITED WARRANTY STATEMENT. THESE WARRANTIES GIVE YOU SPECIFIC LEGAL RIGHTS,
AND YOU MAY ALSO HAVE OTHER RIGHTS, WHICH VARY FROM STATE TO STATE
(OR JURISDICTION TO JURISDICTION).
Dell Inspiron Advanced Port Replicator User’s Guide 1-23
Page 28

DELL DOES NOT ACCEPT LIABILITY BEYOND THE REMEDIES SET FORTH IN THIS
LIMITED WARRANTY STATEMENT OR LIABILITY FOR INCIDENTAL OR CONSEQUENTIAL DAMAGES, INCLUDING WITHOUT LIMITATION ANY LIABILITY FOR
PRODUCTS NOT BEING AVAILABLE FOR USE OR FOR LOST DATA OR SOFTWARE.
SOME STATES (OR JURISDICTIONS) DO NOT ALLOW THE EXCLUSION OR LIMITATION OF INCIDENTAL OR CONSEQUENTIAL DAMAGES, SO THE PRECEDING
EXCLUSION OR LIMITATION MAY NOT APPLY TO YOU.
These provisions apply to Dell’s three-year limited warranty only. For provisions of any
service contract covering your system, refer to your invoice or the separate service
contract that you will receive.
If Dell elects to exchange a system or component, the exchange will be made in
accordance with Dell’s Exchange Policy in effect on the date of the exchange. In any
instance in which Dell issues a Return Material Authorization Number, Dell must
receive the product(s) for repair prior to the expiration of the warranty period in order
for the repair(s) to be covered by the limited warranty.
NOTE: If you chose one of the available warranty and service options in place of the
standard three-year limited warranty described in the preceding text, the option you
chose will be listed on your invoice.
“Total Satisfaction” Return Policy (U.S. and Canada Only)
If you are an end-user customer who bought new products directly from a Dell
company, you may return them to Dell within 30 days of the date of invoice for a
refund or credit of the product purchase price. If you are an end-user customer who
bought reconditioned or refurbished products from a Dell company, you may return
them to Dell within 14 days of the date of invoice for a refund or credit of the product
purchase price. In either case, the refund or credit will not include any shipping and
handling charges shown on your invoice. If you are an organization that bought the
products under a written agreement with Dell, the agreement may contain different
terms for the return of products than specified by this policy.
To return products, you must call Dell Customer Service to receive a Credit Return
Authorization Number. Refer to Chapter 5, “Getting Help,” or the section titled
“Contacting Dell” in your system Help to find the appropriate telephone number for
obtaining customer assistance. To expedite the processing of your refund or credit,
Dell expects you to return the products to Dell in their original packaging within five
days of the date that Dell issues the Credit Return Authorization Number. You must
also prepay shipping charges and insure the shipment or accept the risk of loss or
damage during shipment. You may return software for refund or credit only if the
sealed package containing the diskette(s) or CD(s) is unopened. Returned products
must be in as-new condition, and all of the manuals, diskette(s), CD(s), power cables,
and other items included with a product must be returned with it. For customers who
want to return, for refund or credit only, either applications software or an operating
system that has been installed by Dell, the whole system must be returned, along
with any media and documentation that may have been included in the original
shipment.
1-24 Dell Inspiron Advanced Port Replicator User’s Guide
Page 29

This “Total Satisfaction” Return Policy does not apply to DellWare products,
which may be returned under DellWare's then-current return policy. In addition,
reconditioned parts purchased through Dell Spare Parts Sales in Canada are
nonreturnable.
Dell Inspiron Advanced Port Replicator User’s Guide 1-25
Page 30

1-26 Dell Inspiron Advanced Port Replicator User’s Guide
 Loading...