


Active System Manager Release 8.1.1
User’s Guide

Notes, cautions, and warnings
NOTE: A NOTE indicates important information that helps you make better use of your computer.
CAUTION: A CAUTION indicates either potential damage to hardware or loss of data and tells you
how to avoid the problem.
WARNING: A WARNING indicates a potential for property damage, personal injury, or death.
Copyright © 2015 Dell Inc. All rights reserved. This product is protected by U.S. and international copyright and
intellectual property laws. Dell™ and the Dell logo are trademarks of Dell Inc. in the United States and/or other
jurisdictions. All other marks and names mentioned herein may be trademarks of their respective companies.
2015 - 11
Rev. A01

Contents
1 Overview................................................................................................................. 7
About this document............................................................................................................................ 8
What’s New in this Release................................................................................................................... 8
Accessing Online Help.......................................................................................................................... 9
Other documents you may need......................................................................................................... 9
Contacting Dell Technical Support................................................................................................ 9
Licensing..............................................................................................................................................10
2 Getting started with ASM 8.1.1......................................................................... 12
3 Initial Setup.......................................................................................................... 14
Uploading License............................................................................................................................... 15
Configuring time zone and NTP settings........................................................................................... 15
Configuring proxy settings..................................................................................................................15
Configure DHCP settings....................................................................................................................16
Verifying initial setup............................................................................................................................17
4 Dashboard............................................................................................................18
Service states.......................................................................................................................................20
5 Services................................................................................................................. 21
Deploy Service.....................................................................................................................................22
Viewing Service Details....................................................................................................................... 23
Component deployment states....................................................................................................27
Editing service information................................................................................................................. 27
Deleting service...................................................................................................................................28
Exporting service details..................................................................................................................... 28
Retry Service........................................................................................................................................29
View All Settings.................................................................................................................................. 29
Migrating servers (service mobility)....................................................................................................29
Migration prerequisites................................................................................................................. 29
Migrating servers.................................................................................................................................30
Upgrade Components........................................................................................................................ 30
Adding components to existing service deployments...................................................................... 30
Adding applications to existing service.........................................................................................31
Adding clusters to existing service................................................................................................32
Adding Virtual Machines to existing service.................................................................................32
Adding servers to existing service.................................................................................................33
3

Adding storage to existing service................................................................................................34
Deleting resources from service........................................................................................................ 34
6 Templates.............................................................................................................35
Manage templates...............................................................................................................................36
Viewing template details............................................................................................................... 37
Creating template......................................................................................................................... 38
Editing template information........................................................................................................39
Building template overview.......................................................................................................... 39
Building and publishing template.................................................................................................40
Importing template........................................................................................................................41
Export Template............................................................................................................................ 41
Upload External Template............................................................................................................ 42
Editing template............................................................................................................................ 42
Viewing template details...............................................................................................................43
Deleting template..........................................................................................................................43
Cloning template...........................................................................................................................43
Deploying service..........................................................................................................................43
Deploy Multiple Instances of Service........................................................................................... 45
Add Attachments...........................................................................................................................45
Decommissioning services provisioned by ASM......................................................................... 46
Component types..........................................................................................................................47
Component combinations in templates...................................................................................... 65
Sample templates................................................................................................................................66
Template – deploy Citrix XenDesktop for 500 users ................................................................. 66
Template – deploy operating system to hard drive.................................................................... 68
Template – deploy physical server and virtual machine.............................................................68
Template – deploying with Compellent iSCSI ............................................................................69
Template – deploy virtual machines to cluster............................................................................71
Template – install ESXi to SD card with Fibre Channel storage..................................................72
Template – install ESXi to SD card with iSCSI storage.................................................................73
Template – deploy Hyper-V host with iSCSI storage..................................................................74
Template – deploy Hyper-V cluster with iSCSI storage.............................................................. 75
Template – deploy Hyper-V cluster with Fibre Channel storage to SCVMM............................. 77
Template – deploy VMware cluster with NetApp storage.......................................................... 78
Template – boot from Fibre Channel SAN.................................................................................. 79
Template – boot from iSCSI SAN.................................................................................................80
Template – deploy virtual machine template clone on Hyper-V cluster................................... 81
Template – deploy virtual machine template clone on VMware cluster................................... 82
Template – deploy SQL Server 2012 ...........................................................................................83
Additional template information........................................................................................................ 84
Deploying ESXi cluster for SAN applications................................................................................84
4

7 Resources............................................................................................................. 87
Understanding All Resources tab....................................................................................................... 87
Resource health status..................................................................................................................89
Resource operational state...........................................................................................................89
Resource firmware compliance status.........................................................................................90
Updating firmware........................................................................................................................ 90
Viewing firmware compliance report........................................................................................... 91
Discovery overview........................................................................................................................91
Configuring resources or chassis................................................................................................. 95
Removing resources................................................................................................................... 103
Updating resource inventory .....................................................................................................104
Viewing resource details.............................................................................................................104
Understanding server pools..............................................................................................................108
Creating server pool....................................................................................................................108
Editing server pool...................................................................................................................... 109
Deleting server pool....................................................................................................................109
8 Settings...............................................................................................................110
Backup and restore........................................................................................................................... 110
Backup details...............................................................................................................................111
Editing backup settings and details............................................................................................. 111
Editing automatically scheduled backups.................................................................................. 112
Backup now................................................................................................................................. 112
Restore now.................................................................................................................................113
Credentials management..................................................................................................................113
Creating credentials.....................................................................................................................114
Editing credentials........................................................................................................................115
Deleting credentials.....................................................................................................................115
Getting Started...................................................................................................................................115
Application logs................................................................................................................................. 115
Exporting all log entries...............................................................................................................116
Purging log entries.......................................................................................................................116
Networks............................................................................................................................................ 117
Networking...................................................................................................................................117
Repositories.......................................................................................................................................120
OS Image repositories.................................................................................................................120
Understanding Firmware tab.......................................................................................................121
Viewing firmware bundle details.................................................................................................122
Adding Custom Bundle............................................................................................................... 123
Jobs................................................................................................................................................... 124
Users.................................................................................................................................................. 124
5

Creating a user.............................................................................................................................125
Deleting a user.............................................................................................................................126
Editing a user............................................................................................................................... 126
Enabling or disabling users......................................................................................................... 126
Directory services........................................................................................................................126
Importing users........................................................................................................................... 130
About roles.................................................................................................................................. 130
Virtual appliance management.........................................................................................................137
Update the ASM virtual appliance............................................................................................... 137
Generating and uploading the ssl certificates............................................................................138
Editing DHCP settings................................................................................................................. 139
Editing proxy settings..................................................................................................................140
License management..................................................................................................................140
Editing default time zone and NTP settings............................................................................... 141
Update Repository Path...............................................................................................................141
Virtual identity pools......................................................................................................................... 142
Creating virtual identity pools.....................................................................................................143
Deleting virtual identity pools.....................................................................................................144
Exporting virtual identity pools................................................................................................... 145
9 Troubleshooting...............................................................................................146
Contacting Dell Technical Support..................................................................................................146
LC operation times out while deploying server profile to a server ................................................146
Hyper-V host deployments using network storage only support certain configurations.............146
iSCSI storage network only support static IP addressing................................................................146
Unable to deploy a service for Compellent component with same server object and volume
names.................................................................................................................................................147
Unable to deploy a service using the template with two EqualLogic CHAP components............147
Unable to log in to ASM using active directory using “”...................................................................147
Chain booting issue occurs while booting microkernel in a multi-hop DHCP environment....... 147
6

1
Overview
Active System Manager (ASM) is Dell’s unified management product that provides a comprehensive
infrastructure and workload automation solution for IT administrators and teams. ASM simplifies and
automates the management of heterogeneous environments enabling IT to respond more rapidly to
dynamic business needs.
IT organizations today are often burdened by complex data centers that contain a mix of technologies
from different vendors and cumbersome operational tasks for delivering services while managing the
underlying infrastructure. These tasks are typically performed through multiple management consoles for
different physical and virtual resources, which can dramatically slow down service deployment.
ASM features a user interface that provides an intuitive, end-to-end infrastructure and workload
automation experience through a unified console. This speeds up workload delivery and streamlines
infrastructure management, enabling IT organizations to accelerate service delivery and time to value for
customers.
What can you do with ASM?
ASM provides capabilities and benefits that allow organizations to:
• Accelerate IT service delivery by automating and centralizing key operational functions like workload
and infrastructure deployment.
• Free up IT staff to focus on higher priority projects by dramatically reducing manual steps and human
touch points.
• Use infrastructure more fully and efficiently by pooling available server, storage and network
resources that you can schedule for future use or allocate on demand.
• Standardize workload delivery processes to ensure accuracy and consistency for initial deployment,
while maintaining the flexibility to scale workloads according to business needs.
• Maximize investments in both Dell and Non-Dell IT resources with support for heterogeneous IT
environments.
How is ASM different?
ASM helps you realize these benefits through a unique set of features and capabilities designed for IT
administrators. These capabilities include:
• Template-based provisioning and orchestration — Simplify IT service delivery with a centralized
approach for capturing and applying workload-specific configuration and best practices; plus stepby-step definition and execution of tasks across the workload lifecycle.
• Infrastructure lifecycle management — Easily manage the entire infrastructure lifecycle with:
– Fast discovery, inventory, and initial configuration of assets.
7

– Full lifecycle management of physical and virtual infrastructure and workloads.
• Deep virtualization integration — Manage cluster-level and virtual machine (VM) lifecycle.
• Resource pooling and dynamic allocation — Optimize capital expenditures by creating and
managing physical and virtual IT resource pools.
• Radically simplified management — Powerful and intuitive user interface that makes it easy to set up,
deploy, and manage your IT environment and enables simplified integration with third party tools.
• Open and extensible — An architecture that integrates with the IT of today and tomorrow; this means
being able to plug a new solution into your existing architecture, as well as giving you flexibility in the
future to adopt new technical innovations.
ASM makes it easy to automate IT service delivery and to manage your IT environment end-to-end. You
can improve and accelerate service and infrastructure delivery, maximize efficiency across your IT service
lifecycle, and consistently achieve high-quality IT services.
About this document
This document version is updated for ASM release 8.1.1.
What’s New in this Release
Active System Manager release 8.1.1 consists primarily of additions to the compatibility matrix in support
of Dell Blueprints and Reference Architectures, and a new plugin for VMware vRealize Orchestrator that
uses the Applications Programming Interface (API) introduced earlier with ASM release 8.1.
The highlights of Active System Manager release 8.1.1 include the following:
• A new Active System Manager plugin to VMware vRealize Orchestrator (vRO), which enables ASM
template deployment, scaling, and deprovisioning to be called from vRO orchestration workflows, or
published to the vRealize Automation (vRA) service catalog.
• Performance improvements to most of the ASM web application pages.
• Compatibility matrix additions, including those detailed below, to support the Dell Blueprint Reference
Architectures, including select reference architectures for the Virtualization, Cloud, and Unified
Communications and Collaboration Blueprints.
ASM release 8.1.1 build 5079 is an update to ASM release 8.1.1. It contains fixes and enhancements that
include:
• Improvement to the Discovery wizard flow and Resource page on the ASM web interface.
• Added log file size management.
• Improvement for greater deployment consistency.
• Configuration of ESXi High Availability (HA) after firmware updates.
• Filtering of servers based on the server pool and resource state.
This release also includes compatibility support for the following:
• Dell PowerEdge T630, PowerEdge T620, and PowerEdge C6320 servers
8

• Dell Compellent iSCSI on non-converged fabrics
• Cisco Nexus B22 Blade Fabric Extender
Accessing Online Help
Active System Manger (ASM) online help system provides context-sensitive help available from every page
in the ASM user interface.
Log in to ASM user interface with the user name admin and then enter password admin, and press Enter.
After you log in to ASM user interface, you can access the online help in any of the following ways:
• To open context-sensitive online help for the active page, click ?, and then click Help.
• To open context-sensitive online help for a dialog box, click ? in the dialog box.
Additionally, in the online help, use the Enter search items option in the Table of Contents to search for a
specific topic or keyword.
Other documents you may need
In addition to this guide, the following documents available on the Dell Support website at dell.com/
support/manuals provide additional information about ASM.
Go to http://www.dell.com/asmdocs for additional supporting documents such as:
• Active System Manager Release 8.1.1 Release Notes
• Active System Manager Release 8.1.1 Quick Installation Guide
• Active System Manager Release 8.1.1 Compatibility Matrix Guide
• Active System Manager Release 8.1.1 API Reference Guide
For more information about ASM, including how-to videos, whitepapers, and blogs, see the Active System
Manager page on Dell TechCenter:
http://www.dell.com/asmtechcenter
Contacting Dell Technical Support
To contact Dell Technical Support, make sure that the Active System Manager Service Tag is available.
• Go to the tech direct portal https://techdirect.dell.com
• Login using your existing account or create an account if you do not have an account.
• Create a new case for your incident.
• Add your Active system Manager service tag
• Select Active System Manager as the Incident type.
• Type relevant information in the Problem Details, and add attachments or screenshots if necessary.
• Fill in contact information and submit the request.
9

Licensing
ASM licensing is based on the total number of managed resources, except for the VMware vCenter and
Windows SCVMM instances.
ASM 8.1.1 supports following license types:
• Trial License — A Trial license can be procured through the account team and it supports up to 25
resources for 90 days.
• Standard License — A Standard license grants full access.
You will receive an e-mail from customer service with the instructions for downloading ASM. The license
file is attached to that email.
If you are using ASM for the first time, you must upload the license file using the Initial Setup wizard. To
upload and activate subsequent licenses, click Settings → Virtual Appliance Management.
1. Under the License Management section on the Virtual Appliance Management page, click Add.
License Management window is displayed.
2. Click Browse button beside Upload License and select an evaluation license file, and then click
Open.
You will get information regarding license type, number of resources and expiration date of the
uploaded license on License Management window.
3. Click Save to apply the evaluation license.
4. After uploading the license file, the following information about the license is displayed:
• License Type
• Number of Resources
• Number of Used Resources
• Number of Available Resources
• Expiration Date
5. To replace the Evaluation license with standard license click the same Add button under License
Management section, click Browse button beside Upload License and select a regular standard
license file, and then click Open.
You will get information regarding license type, number of resources and expiration date of the
uploaded license on License Management window.
6. Click Save to apply the standard license.
It replace the evaluation license with standard license.
After uploading the license file, the following information about the license is displayed:
• License Type
• Number of Resources
• Number of Used Resources
• Number of Available Resources
You can add multiple standard licenses. After uploading multiple licenses, all the licenses are aggregated
together and displayed as one under License Management section
10

NOTE: If you try to upload the same standard license second time, you will get an error message
stating that License has already been used.
11

2
Getting started with ASM 8.1.1
When you log in to ASM for the first time, the Getting Started page is displayed. This page provides a
recommended guided workflow for getting started with ASM. A check mark on each step indicates that
you have completed the step.
NOTE: The Getting Started page is not displayed for standard users.
NOTE: login using admin as the username and password.
The steps include:
• Step 1: Initial Setup — Click Initial Setup to configure basic settings required before you start using
ASM, such as license, virtual appliance time zone, NTP server, DHCP, and proxy server settings. To
proceed to Step 2, you must complete the initial setup configuration.
After initial setup is complete, click Setting → Virtual Appliance Managementto edit the license
information, NTP, DHCP server, and proxy server settings..
• Step 2: Define Networks — Click Define Networks to define networks that are currently configured in
your environment for resources to access. You can also click Setting → Network to define, edit, or
delete the existing network. For more information on defining networks see, Define Networks
• Step 3: Discover Resources — Click Discover Resources to discover one or more resources (chassis,
blade server, switch, storage, and hypervisor management software instances) that you want ASM to
manage on your network. Additionally, following information is displayed on the Discover pane. For
more information on discovering resources see, Discovering Resources
– Discovered Resources — Indicates the number of resources that are discovered in ASM.
– Pending Resources — Indicates that discovery is in progress for the number of resources
displayed.
– Errors — Indicates that ASM is unable to discover the number of resources displayed due to some
issues.
• Step 4: Configure Resources — Click Configure Resources to perform a firmware compliance check
on the discovered resources and configure the chassis as needed.
• Step 5: Publish Templates — Click Publish Templates to open the Templates page. On the
Templates page, create a new template or edit a draft default template and publish it. The templates
ready to be deployed after they are published.
You can also use the options available on the left pane to discover resources, create, edit, or publish
templates.
If you do not want to view the Getting Started page when you log in next time, clear the Show welcome
screen on next launch check box at the bottom of the page. However, to revisit the Getting Started
page, click Settings in the left pane, and then click Getting Started.
Related Concepts
Discovery overview
12

Related Tasks
Initial Setup
Discovering resources
Templates
Defining or editing existing network
Configuring resources or chassis
13

3
Initial Setup
The Initial Setup wizard enables you to configure the basic settings required to start using ASM.
Before you begin, ensure that you have the following information available:
• The local network share that contains the ASM license.
• The time zone of the virtual appliance that hosts ASM.
• The IP address or host name of at least one Network Time Protocol (NTP) servers.
• The IP address or host name, port, and credentials of the proxy server. (Optional)
• The networks in your environment for ASM to access. (Optional)
To configure the basic settings:
1. On the Welcome page, read the instructions and click Next.
2. On the Licensing page, select a valid license and click Save and Continue.
3. On the Time Zone and NTP Settings page, configure the time zone of the virtual appliance, add the
NTP server information, and then click Save and Continue.
4. (Optional) On the Proxy Settings page, select the Use a proxy server check box, enter the
configuration details, and then click Save and Continue.
5. (Optional) If you want to configure ASM appliance as a DHCP or PXE server, on the DHCP Settings
page, select the Enable DHCP/PXE server check box, enter the DHCP details, and then click Save
and Continue.
6. On the Summary page, verify the license, time zone, proxy server, and DHCP settings.
7. Click Finish to complete the initial setup.
After the initial setup is complete, if you want to edit the NTP, proxy server, DHCP settings, and license
information, click Settings in the left pane, and then click Virtual Appliance Management.
Related Concepts
Uploading License
Related Tasks
Configuring time zone and NTP settings
Configuring proxy settings
Configure DHCP settings
14

Uploading License
If you are using ASM for the first time, you must upload the license file using the Initial Setup wizard. To
upload a subsequent license, click Settings in the left pane, and then click Virtual Appliance
Management. In the Virtual Appliance Management page, click Edit in the License Management section.
1. On the Licensing page of the Initial Setup wizard, click Browse, and select a valid license file.
The following information is displayed based on the license selected:
• Type — Displays the license type. There are two valid license types supported in ASM:
– Standard — Full-access license type.
– Trial — Evaluation license that expires after 90 days and supports up to 25 resources.
• Total Resources — Displays the maximum number of resources allowed by the license.
• Expiration Date — Displays the expiry date of the license.
2. Click Save and Continue to activate the license.
Related Tasks
License management
Configuring time zone and NTP settings
On the Time Zone and NTP Settings page of the Initial Setup wizard, you can set the time zone of the
virtual appliance that hosts ASM and configure the Network Time Protocol (NTP) servers used for time
synchronization.
NOTE: Configuring NTP adjusts your ASM system time. If the time is adjusted forward it will end
your current user session. The time will sync 5-10 minutes after this step. If this occurs, log in to
ASM again and continue with the setup process.
NOTE: When adding NTP server settings in the OS section of a server component, if more than one
NTP server is necessary, make sure to separate the IP addresses by a comma (,)
1. On the Time Zone and NTP Settings page of the Initial Setup wizard, from the Time Zone drop-
down list, select the time zone in which the virtual appliance operates.
2. To synchronize the time with the NTP server, enter the IP address or Fully Qualified Domain Name
(FQDN) of a Preferred NTP Server and Secondary NTP Server (optional).
3. Click Save and Continue.
After the initial setup is complete, to change NTP server information, click Setting → Virtual Appliance
Management. On the Virtual Appliance Management page, click Edit in the Time Zone and NTP Settings
section.
Related Tasks
Editing default time zone and NTP settings
Configuring proxy settings
If your environment uses a proxy server to communicate with external services, then you must configure
the proxy server settings in ASM.
15

To enable communication using a proxy server:
1. On the Proxy Settings page of the Initial Setup wizard, select the Use a proxy server check box.
2. In the Server IP Address box, enter the IP address or host name for the proxy server.
3. In the Port box, enter the port number for the proxy server.
4. If the proxy server requires credentials to log in, select the Use Proxy Credentials check box, enter
the User Name and Password, and then reenter the password to confirm.
5. Click Test Proxy Connection to test the connection to the proxy server.
6. Click Save and Continue.
After the initial setup is complete, to change the proxy settings, click Settings in the left pane, and then
click Virtual Appliance Management. On the Virtual Appliance Management page, click Edit in the Proxy
Settings section.
Related Tasks
Editing proxy settings
Configure DHCP settings
Configure the following settings to set the ASM appliance as a DHCP or PXE server.
NOTE: If you want to configure the DHCP server on a particular VLAN that has one or more DHCP
server already configured, then make sure to turn off the other DHCP servers on the VLAN.
1. On the DHCP Settings page, select the Enable DHCP/PXE Server check box.
NOTE: The Enable DHCP/PXE Server check box is not selected by default.
2. In the Subnet box, enter the IP address of the subnet on which DHCP server can be operated.
3. In the Netmask box, enter the subnet mask that will be used by DHCP clients.
4. In the DHCP Scope Starting IP Address box, enter the starting IP address in the range assigned to the
clients.
5. In the DHCP Scope Ending IP Address box, enter the ending IP address in the range assigned to the
clients.
6. In the Default Lease Time (DD:hh:mm:ss) box, enter the default time that an IP address is granted to
a client.
NOTE: It is recommended to set the default lease time for a short duration, ranging from one to
three hours.
7. In the Max Leave Time (DD:hh:mm:ss) box, enter the amount of time that an IP address is granted to
a client.
8. In the Default Gateway box, enter the gateway address. This address will be used by the DHCP
clients as the default gateway.
9. In the DNS Server box, enter the domain name system (DNS) domain name of this DHCP scope to
use with one or more DNS servers.
10. Click Save and Continue.
It may take 15 to 20 seconds to enable the DHCP server.
16

Verifying initial setup
1. On the Summary page, verify the settings you have configured in the previous pages.
2. If the information is correct, click Finish to complete the initial setup.
3. If you want to edit any of the information, click Back or click the corresponding page name in the left
navigation bar.
17

4
Dashboard
The Dashboard displays the following information:
NOTE: For standard users, only the details of the services they have created or for which they have
permission is displayed.
• The Service Overview section, displays a graphical representation of the services based on the state,
total number of services deployed, and state icons that represent the service state. The number next
to each icon indicates how many services are in a particular state. The services are categorized based
on the following states:
– Error (red band on the graphic): Indicates that the services for which the deployment process is
incomplete due to errors.
– Deployed (green band on the graphic): Indicates that the services that are deployed successfully.
– In Progress (blue band on the graphic): Indicates that the services for which deployment is in
progress.
– Warning (yellow band on the graphic): Indicates that the resources in a service are in a state that
require corrective action, but does not affect the overall system health. For example, the firmware
version installed on a resource in the service is not compliant.
To display a list of services in a particular state, click the corresponding color bands on the
graphic: red, blue, green, or yellow. The following information about the services is listed below
the graphical display:
* State icons.
* Service name — Click to view detailed information about the service
* Name of the user deployed the service.
* Date and time when the service was deployed.
* The number of resources used by the particular service based on the component type.
* Errors, if any.
From the Service History drop-down list, you can select one of the following options to filter and
view the service deployments.
* All Deployments
* Last 10 Deployments
* Last Week
18

* Last Month
* Last 6 Months
* Last Year
• Resource Overview — Indicates the numbers of chassis, servers, switches, and storage that have been
discovered.
The state of the servers is categorized based on the following:
– Healthy (green band on the graphic): Indicates that there is no issue with the servers and working
as expected.
– Critical (red band on the graphic): Indicates critical problems exist with one or more components
in the server. These issues must be fixed immediately.
– Warning (yellow band on the graphic): Indicates that the servers are in a state that requires
corrective action, but does not affect overall system health. For example, the firmware running on
a server is not at the required level or not compliant.
– Unknown (gray band on the graphic): Indicates that the state of the server is unknown.
• Under Server Utilization in Services, a pie chart displays:
– Servers In Use (blue band on the pie chart) — Indicates exact number of servers that are in use. To
view the total number of servers used, move the mouse pointer over the band.
– Servers Available (gray band on the graphic) — Indicates the exact number of servers that are
available for deployment. To view the number of servers that are available, move the mouse
pointer over the band.
• Under Utilization by Server Pool, each bar represents a server pool and displays the number of
servers used and available in that server pool.
• Under Total Storage Capacity, a pie chart displays the percentage of storage disk space currently
being used.
– Storage Used (blue band on the graphic) — Indicates the percentage of used storage disk space.
To view the percentage of used storage disk space, move the mouse pointer over the band.
– Storage Available (gray band on the graphic) — Indicates the percentage of available disk storage
space. To view the percentage of available storage space, move the mouse pointer over the band.
• Under Capacity by Storage Group, each bar represents one of the following storage groups and
displays the storage capacity used or available on the particular storage group.
– Dell EqualLogic Group
– Dell Compellent Arrays
– NetApp Arrays
The Dashboard also displays the following information in the right pane:
• Licensing Information — Displayed when any one of the of the following events occur:
– The number of resources managed by ASM exceeds the valid license count.
– The trial license expires.
• Quick Action — Enables you to create a new template and deploy a new service.
19

• Recent Activity — Lists the most recent user and system initiated activities. Click View All to view the
activities in the Logs page.
Additionally, following information is displayed on the Discover pane.
– Discovered Resources — Indicates the number of resources that are discovered in ASM.
– Pending Resources — Indicates that the discovery is in progress for the number of resources
displayed.
– Errors — Indicates that ASM is unable discover the number of resources displayed due to some
errors.
• Links to learn more about service deployments and templates.
Related Concepts
Viewing Service Details
Related References
Service states
Related Tasks
Deploying service
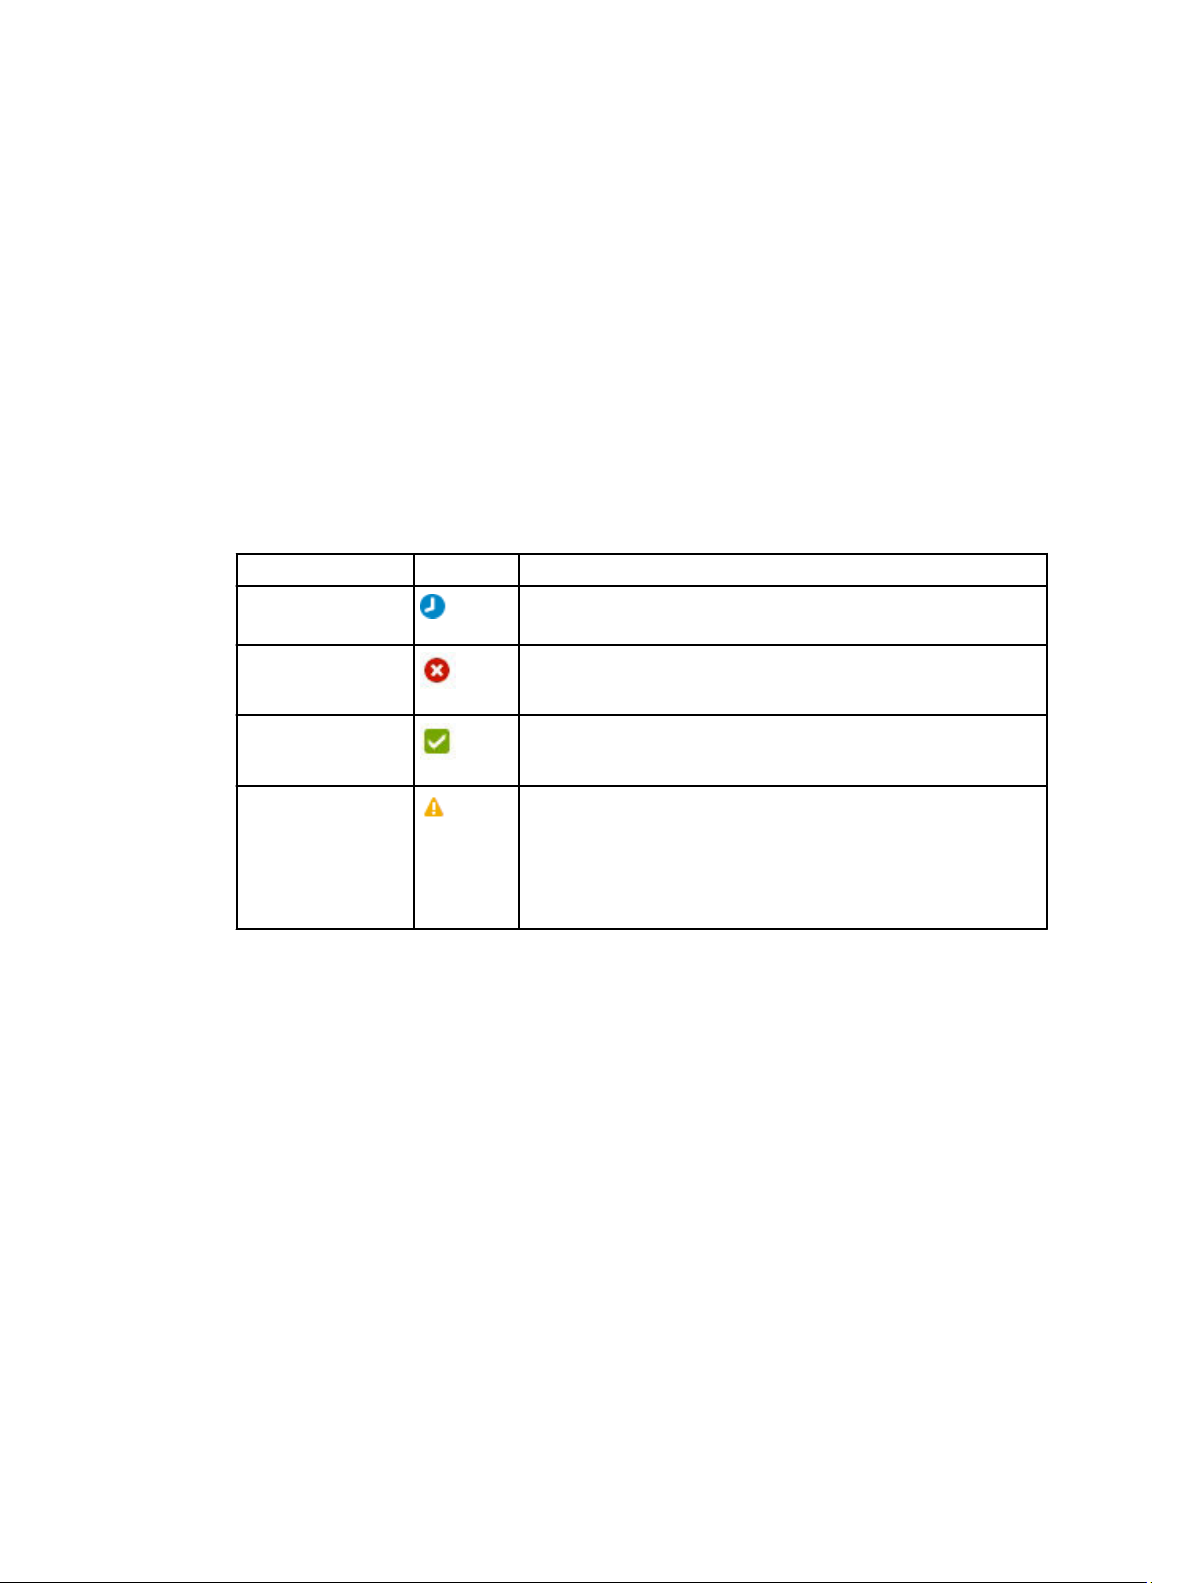
Service states
State Icon Description
Error Indicates service deployed is failed due to some issues.
Warning Indicates that one of resources that are part of a service is in
a state that requires corrective action, however this does not
affect the overall health of the system. For example, the
firmware running on the resource is not at the required level
or not compliant.
In Progress that the deployment of the service is in progress.
Deployed Indicates that the service is successfully deployed.
Related Concepts
Dashboard
20

5
Services
A service is a deployment of a published template.
NOTE: For standard users, only the details of the services they have created or for which they have
permission is displayed.
The Services page displays the services that are in following states in both Graphical and Tabular view.
• Error — Displays the number of services for which the deployment process is incomplete due to
errors.
• Deployed — Indicates that number of services successfully deployed.
• In Progress — Indicates that services for which deployment is in progress.
• Warning — Indicates that one or more resources in a service require corrective action.
To switch between Graphical and Tabular view, click the Graphic icon or Table icon next to the
View As option.
To view the services based on a particular service state, select one of the following options from the
Filter By drop-down list. Alternately, in the Graphical view, click the graphic in a particular state.
• All
• Error
• Deployed
• In progress
• Warning
In the Graphical view, each square title represents a service and has the name of the service at the
bottom of the graphic. The state icon on the graphic indicates the state of the service. The components
in blue indicate the component types that are included in the deployment. The components that are in
gray indicate the component types that are not included in the service.
In the Tabular view, the following information is displayed:
• Status — Indicates the status of the service.
• Name — Indicates the name of the service.
• Deployed By — Indicates the name of the user who deployed the service.
• Deployed On —Indicates the date and time when the service is deployed.
Click the service in the Tabular or Graphical view to view the following information about the service in
the right pane:
• Service name and description to identify the service.
21

• Name of the user who deployed the service.
• Date and time when the service is deployed.
• Displays the name of the reference template used in the service.
• Lists the number of resources included in the service for deployment, based on the following
component types:
– Application
– Virtual Machine
– Cluster
– Server
– Storage
From the Service page, you can:
• Click Deploy New Service to deploy new service.
NOTE: Standard users are allowed to deploy services that they have created or for which they
have permissions.
• Click View Details in the right pane to view more details about the service.
• Click Update Firmware to update the firmware of one or more servers in the service that are not
compliant.
• Click Export All to File to export the service details to .csv file.
NOTE: Standard users are allowed only to export the details of the services that they have
created or for which they have granted permission.
Related Concepts
Viewing Service Details
Related Tasks
Deploy Service
Deploy Service
NOTE: You cannot deploy a service using a template that is in draft state. Publish the template
before you use the template to deploy a service.
To deploy a service:
1. In the left pane, click Services.
The Services page is displayed.
2. On the Services page, click Deploy New Service.
The Deploy Service wizard is displayed.
3. In the Service Information page, perform the following steps, and click Next.
a. From the Select Template drop-down list, select the template to deploy a service.
22

b. Enter the Service Name (required) and Service Description (optional) that identifies the service.
c. If you want to update the firmware version running on the servers that are in the service, select
theManage Server Firmware check box, and from the Use Firmware Repository drop-down,
select a firmware repository.
NOTE: Changing the firmware repository could update the firmware level on servers for
this service. Firmware on shared devices will still be maintained by the global default
firmware repository.
d. If you want to grant permission for Standard users to use this service, under Manage Service
Permissions, select the In addition to all Admins, grant Standard Users access to this service
check box, and perform one of the following actions:
• To grant access to all Standard users, select All Standard Users option
• To grant access only to specific Standard users, select Specific Standard Users option, and
perform the following tasks:
a. Click Add User (s) to add one or more Standard users to the list.
To remove a Standard user from the list, select the Standard user and click Remove
User(s).
b. After adding the Standard users, select or clear the check box next to the Standard
users to grant or block access to the service.
4. In the Deployment Settings page, configure the require settings, and click Next. click View All
Details to view the details of the components that are part of the service
5. In the Schedule Deployment page, perform one of the following actions:
• Deploy Now — Select this option to deploy the service immediately.
• Schedule Later — Select this option and enter the date and time to deploy the service.
NOTE: For C-Series sever deployment, network and BIOS configuration can not be done using
appliance. You need to do it manually. You need to make sure that hard disk is available for server to
install OS. You need to set single NIC to PXE boot. This should be set as first boot device and hard
disk should be set as second boot device.
You need to configure network on top of rack switch which are connected to C-Series server. You
need to configure necessary VLAN on the service facing port of that top of rack switch. For that you
need to place PXE VLAN-untagged for any kind of OS deployment. If it’s Windows and Linux bare
metal OS installation, you need to set worklaod network and you need to set Hypervisor
management network for ESXi deployment.
NOTE: Prior to deployment of FX2 or Blade server, you need to disable Flexadress every server in
chassis. To disable Flexadress, follow the path:
CMC > Server Overview > Setup > FlexAddress.
You need to make sure that server is powered down to disable FlexAddress. Ideally these should be
done prior discovering the server.
Viewing Service Details
The Service Details page displays the state of the service at component level in Topology and Tabular
view.
23

• In the Topology view, under Service Resources, you can view the topology of the components and
connections as structured in a selected service template.
In the Topology view, the color of the component icons indicate the following:
– The red component icon indicates the service is not deployed on a particular component due to
some issues.
– The blue component icon indicates the service is successfully deployed on the components.
– The light blue component icon indicates the service deployment is in progress.
– The yellow icon indicates particular component requires firmware update.
To view the following information about the resources, click the corresponding component icons.
– IP Address. (Click the IP address of a Dell resource to open the Element Manager.)
– Hypervisor IP Address (for servers only)
– Deployment state
• In the Tabular view, under Service Resources, the following information is displayed based on the
resource types in the service.
– Under Applications, you can view the following information about the application deployed on
the virtual machines:
* Name
* IP Address
* Asset/Service Tag
– Under Virtual Machines, you can view the following information about the virtual machines
configured on the clusters:
* Hostname
* OS Type
* CPUs
* Disk Size
* Memory
– Under Clusters, you can view the following information about the clusters created on VMware
vCenter or Microsoft virtualization environments:
* IP Address
* Asset/Service Tag
* Manufacturer
* Model
– Under Physical Servers, you can view the following information about the servers that are part of a
service
:
* IP Address
24
* Hypervisor IP Address
* Asset/Service Tag
* Manufacturer
* Model
– Under Storage, you can view the following information and view the volumes created on a
particular storage and the size of the volumes.
* IP Address
* Asset/Service Tag
* Manufacturer
* Model
• Under Service Information, you can view the following information:
– Name of the service
– State — Displays one of the following state based on the deployment status of a service.
Service State Icon Description
In Progress Indicates service deployment is in progress.
Error Indicates service deployment is failed due to some issues.
Successful Indicates service deployment is completed successfully.
Warning Indicates that the one of more resource that are part of a
service is in a state that requires corrective action, but does
not affect overall system health. For example, the firmware
running on the resource is not at the required level or not
compliant.
View Logs—To view logs, select the component icon of a deployed service from the Component
States window on Service Information page , you will get View Logs link. Click the View Logs link,
you will get In progress, Error, Succesful , Warning, Informational log from View Logs. This is
varied with deployed service.
– Deployed By — Displays the name of the user who deployed the service.
– Deployed On — Displays the date and time when the service is deployed.
– Reference Template — Displays the name of the reference template used in the service.
– Reference Firmware Repository — Displays the reference firmware repository.
– User Permissions — Displays one of the following:
* Enabled — Indicates that the permission is granted for one or more Standard users to deploy
this service.
25

* Disabled — Indicates that the permission is not granted for Standard users to deploy this
service.
Under Service Actions:
• Click Delete to delete a service or resources in the service.
• Click Retry to redeploy a failed service.
• Click View All Settings to view the settings configured on the resources in a service for deployment.
• Click Export to File to export the service details to a .csv file.
• Click Generate troubleshooting bundle link, you can generate a compressed file of ASM logs files
which are used for trouble shooting.
Under Resource Actions:
• From the Add Resources drop-down list, select the type of the resources that you want to add to the
service.
From this drop-down menu, you can even select Network to update workload network.
For more information regarding Add Network , see Add Network
• If you need to input data for the template which is used to create the running service, then the
Upgrade Components button will be displayed. Click on the Upgrade Components buttons, Update
Service Component window will be displayed. Fields in the Update Service Component window
varies depending on templates. Fill all the displayed fields in it. Click Save.
• Click Migrate Server(s) to migrate a server’s settings to another server in a designated server pool.
Alternatively, to migrate a server’s settings, click the server component icon on the topology view, and
click Migrate Server(s).
NOTE: The migrate server is only available for Boot from SAN deployments.
• Click Delete Resources to delete resources from a service.
Under Firmware Actions:
To update the firmware on out of compliant servers within the service, click the Update Server Firmware
button.
Under Recent Activity:
you will get all the component’s deployment status and information of a current deployed service.
Component deployment states:
After you deploy a service, ASM assigns one or more states to the components based on the deployment
status.
The following are the different states a component can have within a service:
• Pending — Indicates the deployment is not yet started for the particular components
• In Progress — Indicates the service deployment is in progress for the particular components.
• Complete — Indicates the service deployment is completed for the particular components.
• Error — Indicates the service deployment is not successful .
26

• Cancel — Indicates the deployment is not yet started for the particular components and canceled due
to other component’s deployment failure.
Related Tasks
Deploying service
Exporting service details
Exporting service details
Updating firmware
Retry Service
Adding components to existing service deployments
Deleting service
Deleting resources from service
Migrating servers
Upgrade Components
Component deployment states
After you deploy a service, ASM assigns one or more states to the components based on the deployment
status.
The following are different types of states displayed at a component level:
• Pending — Indicates that, within a service, the deployment is not yet started for the particular
components.
• In Progress — Indicates that, within a service, service deployment is in progress for the particular
components.
• Complete — Indicates that, within a service, the service deployment is completed for the particular
components.
• Error — Indicates that, with in a service, service deployment is not successful for the particular
components.
• Cancel — Indicates that, within a failed service, deployment is not yet started for the particular
components and canceled due to other component (s) deployment failure.
Editing service information
To edit the information of a service:
1. In the left pane, click Services.
2. On the Services page, click the service, and in the right pane click View Details.
3. On the Serv ice Details page, in the right pane, next to Service Information section title, click Edit.
4. In the Edit Service Information dialog box, perform the following steps:
a. Modify the Service Name and Service Description that identifies the service.
b. If you want to update the firmware running on the servers that are part of the service, select
Manage Server Firmware check box, and from the Use Firmware Repository drop-down list,
select a firmware repository.
27

NOTE: Changing the firmware repository could update the firmware level on servers for
this service. Firmware on shared devices will still be maintained by the global default
firmware repository.
c. If you want to grant permission for Standard users to use this service, under Manage Service
Permissions, select the In addition to all Admins, grant Standard Users access to this service
check box, and perform one of the following actions:
• To grant access to all Standard users for this service, select All Standard Users option.
• To grant access only to specific Standard users for this service, select Specific Standard
Users option, and perform the following tasks:
a. Click Add User (s) to add one or more Standard users to the list.
To remove the Standard user from the list, select the Standard user and click Remove
User(s).
b. After adding the Standard users, select or clear the check box next to the Standard users
to grant or block access to the service.
Deleting service
To delete a service, perform the following steps:
NOTE: Standard users are allowed only to delete the service that they have deployed.
1. In the left pane, click Services.
2. On the Services page, click a service, and then in the right pane, click View Details.
3. On the Service Details page, under Service Actions in the right pane, click Delete.
4. In the Delete Service dialog box, perform the following steps:
NOTE: Deleting a shared resource could affect other running services.
a. The Return Servers to resource Pool check box is selected by default. This process returns the
IP/IQNs assigned to the servers that were a part of the service and returns the servers to the
server pool. After the service is deleted, the Dell servers that were part of the deleted service are
rebooted, and the servers are set to PXE boot ready for the next deployment. The servers that
are selected by default for tear down are turned off after the service is torn down.
b. The Delete VMs check box is selected by default to delete the VMs created on the cluster. The
servers and VMs are selected by default for tear down.
c. Select Delete Cluster(s) and Remove from Hyper-V and vCenter check box to remove the
clusters created on Hyper-V or vCenter and removes the Hyper-V and vCenter instances.
Servers and VMs are selected by default for tear down.
d. Select Delete Storage Volume(s) check box to remove the storage volumes created during the
service deployment.
Exporting service details
This feature enables you to export the service details to a .csv file.
1. In the Services page, click Export to File in the right pane.
2. Open and save the .csv file.
28

Retry Service
You can redeploy a service for which deployment is not successful due to some issues.
NOTE: Standard users can only redeploy a failed service that they have deployed.
1. In the left pane, click Services.
The Services page is displayed.
2. Select an error service and click View Details in the right pane.
The Service Details page is displayed.
3. In the right pane, under Service Actions, click Retry.
Click Yes when a confirmation message appears.
View All Settings
The View All Settings page displays all the component settings used to configure the resources in the
deployment of the service.
• For more details about the Application properties, see Application Settings
• For more details about the Virtual Machine properties, see Virtual Machine Settings
• For more details about the Cluster properties, see Cluster Settings
• For more details about the Server properties, see Server Settings
• For more details about the Storage properties, see Storage Settings
Migrating servers (service mobility)
In ASM, service mobility refers to the capability to migrate server’s BIOS, NICs, storage connectivity, and
assigned identity information to another server in a designated server pool, in order to perform planned
maintenance or service activities or to respond to a hardware fault or failure issue.
Currently, migration is supported only for boot form SAN server, and it is supported only for bare metal
OS installs of Linux or Windows. It is not supported for ESXi. Therefore, the migration will not affect the
virtual machines.
It is recommended only to migrate between identically configured hardware. Different operating systems
may not boot correctly on hardware that is different.
Migration prerequisites
• ASM does not install operating systems on the boot from SAN volume. Therefore, you must install
operating system on the servers prior to migration.
• Make sure that the free servers are available in the server pool for migration, and it is compatible.
• During the migration, the operating systems will not be booted. Therefore, it is recommended to shut
down the server before migrating the boot from SAN image.
• It is recommended configure a server pool that has servers with same model, RAID, and networking
devices, including the specific slot to which network resources are connected.
29

Related Tasks
Migrating servers
Migrating servers
NOTE: Standard users can migrate the servers that are part of the server pool for with they have
permission.
You can migrate only one server at a time. However, after a successful migration, additional servers can
be migrated. During migration, ASM tries to identify an exact match for the hardware. If it is not available
in the server pool, a different hardware can be selected.
You may encounter some issues during configuration of the new servers. In such scenarios, you can
address the issues preventing the proper configuration of the target server, and retry the deployment.
To migrate a server’s configuration to a different server pool:
1. In the Service Details page, perform one of the following actions:
• In the topology view, click a server component, and click Migrate in the box that is displayed
• In the topology view, click a server component, and click Migrate in the right page.
2. In the Migrate Server(s) dialog box, in the State column, select the server, and then in the New
Server Pool column, select the designated server pool to migrate.
NOTE: When you boot from SAN, you always get a migrate option on Service Details page.
Migrate is not available for any other type of deployment so in that case, you do not get
Migrate Server option Service Details page.
Upgrade Components
If an upgrade to ASM has added new required fields to components within the template from which the
service was deployed, the Upgrade Components button will be displayed. While this action is not
mandatory, certain service or resource functions are not available until this upgrade has been completed.
Click on the Upgrade Components button to launch the Update Service Component window. Fields in
this window vary depending on which components contain newly required settings. Complete all the
displayed fields. Click Save.
Adding components to existing service deployments
After a successful service deployment, you can add one or more application, storage, server, cluster, and
virtual machine components to an existing service.
NOTE: Standard users are allowed only to add components to a service for which they have
permission.
NOTE: You can add components even if they are currently not in the template. For example, if you
have a storage, server and cluster, you can still add VM.
NOTE: You can add components to a service for which deployment is successful or to a failed
service deployment.
30
 Loading...