

Dell 7285 User manual

Latitude 7285 2-in-1
Owner's Manual
Regulatory Model: T02J
Regulatory Type: T02J001

Notes, Cautions, and Warnings
NOTE: A NOTE indicates important information that helps you make better use of your tablet.
CAUTION: A CAUTION indicates either potential damage to hardware or loss of data and tells you how to avoid the problem.
WARNING: A WARNING indicates a potential for property damage, personal injury, or death.
© 2017 Dell Inc. or its subsidiaries. All rights reserved. Dell, EMC, and other trademarks are trademarks of Dell Inc. or its subsidiaries. Other trademarks
may be trademarks of their respective owners.
2018 - 10
Rev. A00

Contents
1 System specications.................................................................................................................................... 6
Processor specications....................................................................................................................................................6
System specications........................................................................................................................................................6
Memory specications.......................................................................................................................................................7
Video specications........................................................................................................................................................... 7
Audio specications........................................................................................................................................................... 7
Port and connector specications................................................................................................................................... 7
Communication specications..........................................................................................................................................8
Camera specications........................................................................................................................................................8
Display specications.........................................................................................................................................................9
AC adapter specications................................................................................................................................................. 9
Battery specications........................................................................................................................................................9
Physical specications..................................................................................................................................................... 10
Active pen specications.................................................................................................................................................10
Wireless charging mat specications.............................................................................................................................. 11
Environmental specications............................................................................................................................................11
2 Using your tablet.......................................................................................................................................... 13
Before Working Inside Your Tablet.................................................................................................................................. 13
After working inside your tablet......................................................................................................................................14
Turning o Your Tablet..................................................................................................................................................... 14
3 Removing and Installing components............................................................................................................16
microSIM card...................................................................................................................................................................16
microSD card.....................................................................................................................................................................17
Display Panel and display cable.......................................................................................................................................18
Removing the display panel.......................................................................................................................................18
Installing the display panel.........................................................................................................................................23
Battery...............................................................................................................................................................................24
Lithium-ion battery precautions............................................................................................................................... 24
Removing the battery................................................................................................................................................24
Installing the battery..................................................................................................................................................25
Power switch board.........................................................................................................................................................25
Removing the power button board..........................................................................................................................25
Installing the power button board............................................................................................................................26
WLAN card....................................................................................................................................................................... 26
Removing the WLAN card........................................................................................................................................26
Installing the WLAN card...........................................................................................................................................27
PCIe Solid State Drive (SSD)..........................................................................................................................................27
Removing the SSD module....................................................................................................................................... 27
Installing the SSD module......................................................................................................................................... 28
WWAN card......................................................................................................................................................................29
Removing the WWAN card.......................................................................................................................................29
Contents
3

Installing the WWAN card.........................................................................................................................................29
Audio board.......................................................................................................................................................................30
Removing the audio port.......................................................................................................................................... 30
Installing the audio port..............................................................................................................................................31
Front facing camera......................................................................................................................................................... 31
Removing the front camera ......................................................................................................................................31
Installing the front camera........................................................................................................................................ 32
Rear facing camera..........................................................................................................................................................32
Removing the rear camera........................................................................................................................................32
Installing the rear camera..........................................................................................................................................34
Coin-cell battery...............................................................................................................................................................34
Removing the coin cell battery.................................................................................................................................34
Installing the coin cell battery...................................................................................................................................35
Docking board.................................................................................................................................................................. 36
Removing the docking board....................................................................................................................................36
Installing the docking board......................................................................................................................................36
Thunderbolt over Type-C USB bracket.........................................................................................................................37
Removing the thunderbolt over Type-C bracket....................................................................................................37
Installing the thunderbolt over Type-C USB bracket.............................................................................................38
System Board...................................................................................................................................................................38
Removing the system board.....................................................................................................................................38
Installing the system board....................................................................................................................................... 40
Speaker............................................................................................................................................................................. 40
Removing the speaker...............................................................................................................................................40
Installing the speaker..................................................................................................................................................41
Back cover........................................................................................................................................................................42
Replacing the back cover..........................................................................................................................................42
4 Technology and components........................................................................................................................44
Power adapter..................................................................................................................................................................44
Processors........................................................................................................................................................................ 44
Kaby Lake — 7th Generation Intel Core processors............................................................................................. 44
Chipset.............................................................................................................................................................................. 45
Memory features..............................................................................................................................................................45
Display options................................................................................................................................................................. 45
Camera features...............................................................................................................................................................45
Starting the camera...................................................................................................................................................45
Hard drive options............................................................................................................................................................45
Drivers............................................................................................................................................................................... 46
System drivers............................................................................................................................................................46
Disk driver................................................................................................................................................................... 47
Sound, video and game controller drivers...............................................................................................................48
Storage controller drivers..........................................................................................................................................49
Network drivers......................................................................................................................................................... 50
Graphics driver...........................................................................................................................................................50
Thunderbolt over USB Type-C........................................................................................................................................51
Thunderbolt 3 over USB Type-C.............................................................................................................................. 51
Contents
4

Key Features of Thunderbolt 3 over USB Type-C .................................................................................................51
Thunderbolt Icons......................................................................................................................................................52
Dell Active Pen ................................................................................................................................................................ 52
Wireless charging mat..................................................................................................................................................... 53
5 System setup...............................................................................................................................................54
Entering BIOS without keyboard................................................................................................................................... 54
Accessing System Setup BIOS...................................................................................................................................... 54
Accessing ePSA .............................................................................................................................................................. 54
System setup options......................................................................................................................................................55
General screen options..............................................................................................................................................55
System Conguration screen options..................................................................................................................... 56
Video screen options.................................................................................................................................................58
Security screen options.............................................................................................................................................58
Secure Boot screen options..................................................................................................................................... 60
Intel software guard extensions screen options.....................................................................................................60
Performance screen options..................................................................................................................................... 61
Power management screen options.........................................................................................................................61
POST behavior screen options.................................................................................................................................63
Manageability............................................................................................................................................................. 64
Virtualization support screen options......................................................................................................................64
Wireless screen options.............................................................................................................................................64
Maintenance screen options.................................................................................................................................... 65
System logs screen options......................................................................................................................................65
Updating the BIOS ..........................................................................................................................................................65
System and setup password.......................................................................................................................................... 66
Assigning a system setup password........................................................................................................................66
Deleting or changing an existing system setup password.....................................................................................67
6 Troubleshooting........................................................................................................................................... 68
Enhanced Pre-boot System Assessment - ePSA........................................................................................................68
Features:..................................................................................................................................................................... 68
Running the ePSA Diagnostic Utility ...................................................................................................................... 68
Dell wireless charging mat.............................................................................................................................................. 68
Tablet LED.........................................................................................................................................................................69
Diagnostic LED...........................................................................................................................................................69
Real Time Clock reset......................................................................................................................................................69
Identifying the AC adapter shipped with your notebooktablet...................................................................................70
7 Contacting Dell.............................................................................................................................................71
Contents
5

System specications
NOTE: Oerings may vary by region. The following specications are only those required by law to ship with your computer. For
more information about the conguration of your computer, go to Help and Support in your Windows operating system and
select the option to view information about your computer.
Topics:
• Processor specications
• System specications
• Memory specications
• Video specications
• Audio specications
• Port and connector specications
• Communication specications
• Camera specications
• Display specications
• AC adapter specications
• Battery specications
• Physical specications
• Active pen specications
• Wireless charging mat specications
• Environmental specications
1
Processor specications
Table 1. Processor
Feature Specication
Types
System
Table 2. System
Feature Specication
Chipset Integrated in the processor
DRAM bus width 64-bit; 2 channels
specications
7th Generation Intel Core i5-7Y54 (4M Cache, up to 3.2 GHz)
supports Windows 10 only
7th Generation Intel Core i5-7Y57 (4M Cache, up to 3.30 GHz),
vPro supports Windows 10 only
7th Generation Intel Core i7-7Y75 (4M Cache, up to 3.60 GHz),
vPro supports Windows 10 only
specications
specications
6 System specications

Memory specications
Table 3. Lists the memory specications
Feature Specication
Memory connector Onboard memory
Memory capacity 8 GB and 16 GB (on board)
Memory type LPDDR3—1866 MHz
Video specications
Table 4. Lists the video specications
Feature Specication
Type Integrated on system board
UMA controller Intel Integrated HD Graphics 615
External display support Optional Dell Adapter - USB Type-C to HDMI/VGA/ Ethernet/USB
3.0/DisplayPort
NOTE: Supports VGA, DisplayPort, HDMI through the
docking station.
Audio specications
Table 5. Audio
Feature Specication
Types High-denition audio
Controller Realtek ALC3253
Stereo conversion 24-bit—analog-to-digital and digital-to-analog
Internal interface High-denition audio
External interface Microphone-in, stereo headphones, and speakers universal
Speakers Two
Internal speaker amplier 2 W (RMS) per channel
Volume controls Volume up and Volume down buttons
specications
connector
Port and connector specications
Table 6. Lists the port and connector
specications
Feature Specication
Audio
• Realtek ALC3253-CG Controller
System specications 7

Feature Specication
• Microphone-in and stereo headphones/speakers universal
connector
Video Two DisplayPorts over USB Type-C
Memory card reader micro SD 3.0
Micro Subscriber Identity Module (uSIM) card Optional
Micro SIM Optional micro-SIM card slot
Security Lock Noble Wedge Lock slot
Other
• Windows Home Button
• Power Button
• I2C for the Dock Pin Keyboard connection
Communication specications
Table 7. Lists the communication specications
Features Specication
Wireless LAN Intel Dual-Band Wireless-AC 8265 Wi-Fi + BT 4.2 Wireless Card
(2x2). Bluetooth Optional
Mobile Broadband (Optional)
• Dell Wireless Qualcomm Snapdragon X7 LTE-A (DW5811e) for
AT&T, Verizon, & Sprint (US)
• Dell Wireless Qualcomm Snapdragon X7 LTE-A (DW5811e)
(EMEA/ROW)
• Dell Wireless Qualcomm Snapdragon X7 HSPA+ (DW5811e)
(China/Indonesia/India)
• Dell Wireless Qualcomm Snapdragon X7 LTE-A (DW5816e for
Japan)
WiGig (Optional) Intel Tri-Band Wireless-AC 18265 WiGig + Wi-Fi + BT 4.2 Wireless
Card WiFi Display (Miracast)
Camera specications
Table 8. Lists the camera
Feature Specication
Type
Sensor type CMOS sensor technology (Front and Rear camera)
Imaging rate Up to 30 frames per second
Video Resolution
specications
• Front Camera- 720P xed focus
• Rear Camera- 8MP auto focus
• IR Camera- VGA IR camera
• Front Camera- 1280 x 720 pixels
• Rear Camera- 3264 x 2448 pixels
8 System specications

Display specications
Table 9. Lists the display specications
Feature Specication
Type 12.3" 3:2 Touch with Corning Gorilla Glass 4 Antireective, and
Antismudge
Luminance 400 nits
Height 10.37 inches ( 263.50 mm)
Width 7.28 inches ( 185.06 mm)
Diagonal 12.0 inches (312.42 mm)
Maximum resolution 2880 x 1920
Refresh rate 60 Hz
Maximum viewing angles—horizontal +/-88°
Maximum viewing angles—vertical +/-88°
Pixel pitch 0.09 mm
AC adapter specications
Table 10. Lists the AC adapter
Feature Specication
Type 45 W USB Type-C
Input voltage 100 V AC–240 V AC
Input current—maximum 1.5 A
Input frequency 50 Hz to 60 Hz
Output current 3.34 A (continuous)
Rated output voltage 20 VDC
Weight 0.64 lbs (0.29 kg)
Dimensions
Temperature range—Operating 0°C to 40°C (32°F to 104°F)
Temperature range—Non-Operating –40°C to 70°C (–40°F to 158°F)
specications
• 1.1 x 1.9 x 4.3 inches
• 28 x 47 x 108 mm
Battery specications
Table 11. Lists the Battery
specications
Feature Specication
Type
• 34 Whr Polymer battery with ExpressCharge
System specications 9

Feature Specication
• 34 Whr Long Life Cycle Battery (2-cell)
34 Whr Polymer battery with
ExpressCharge
Length 184.00 mm (7.24 inches)
Width 97.00 mm (3.82 inches)
Height 5.9 mm (0.232 inch)
Weight 185.0 g (0.40 lb)
Voltage 11.4 VDC
34 Whr Long Life Cycle Battery (2-cell)
Length 233.06 mm (9.170 inches)
Width 90.73 mm (3.572 inches)
Height 5.9 mm (0.232 inch)
Weight 250.00 g (0.55 lb)
Voltage 11.4 VDC
Temperature range
Operating
• Charge: 0°C to 50°C (32°F to 122°F)
• Discharge: 0°C to 70°C (32°F to 158°F)
Non-operating - 20°C to 85°C (- 4°F to 185°F)
Life span 300 discharge per charge cycles
Physical specications
Table 12. Lists the physical
Feature Specication
Weight - Tablet only 1.5 lb (0.7kg)
Weight - Tablet+Keyboard 3.01 lb (1.36 kg)
Width 10.8 inches (274.8 mm)
Height 0.3 inch (7.9 mm)
Depth 8.2 inches (209.2 mm)
specications
Active pen specications
Table 13. Lists the Active pen
Feature Specication
Model number PN557W
Length 6.33 inches (160.6 mm)
Diameter 0.37 inch (9.5 mm)
Pressure Resolution 2048 levels
specications
10 System specications

Feature Specication
Accuracy/Resolution
Weight (including battery) 20.4 g with batteries
Battery
• Pen contact accuracy is 0.2 mm at 0° tilt; < 0.4 mm at up to
60° tilt in either stationary or in motion state
• Pen hover accuracy is less than 2 mm within hovering height of
more or equal to 10 mm in either stationary or in motion state
• Stylus: Primary non- rechargeable AAAA alkaline (1x)
• End cap: 319 lithium coin cell (2x)
Battery life
Stylus Tip
• Primary AAAA: 12 months for 3 hours/day, 5 days/week
• 319 coin cell (2x): 12 months or more
• Tip — 0.11 inch (2.8 mm)
• Diameter —0.07 inch (1.8 mm)
Wireless charging mat specications
Table 14. Lists the wireless charging mat specications
Feature Specication
Model Number PM30W17
NOTE: The wireless charging mat works when paired with
one of the available keyboards for this model (optional).
PTU Rated Power
Weight 645 g (Charging Mat only)
Dimension:
Legnth 12.28 inch (312.00 mm)
Width 11.17 inch (283.82 mm)
Height 0.69 inch (17.73 mm)
DC Cable length 2.0 m
AC Cable length 1.0 m
• 20W (AirFuel mode)
• 30W (Dell on Dell mode)
Environmental specications
Table 15. Lists the environmental
Temperature Specication
Operating 0°C to 35°C (32°F to 95°F)
Storage –40°C to 65°C (–40°F to 149°F)
Relative humidity—maximum
Operating 10% to 90% (non-condensing)
Storage 0% to 95% (non-condensing)
specications
System specications 11

Temperature Specication
Altitude—maximum
Operating 0 m to 3048 m (0 to 10,000 ft)
Non-operating 0 m to 10,668 m (0 ft to 35,000 ft)
Airborne contaminant level G2 or lower as dened by ISA S71.04–1985
12 System specications

Using your tablet
This section covers how to power on and turn o your tablet including how to install the micro SD and micro SIM cards.
Topics:
• Before Working Inside Your Tablet
• After working inside your tablet
• Turning o Your Tablet
Before Working Inside Your Tablet
Use the following safety guidelines to help protect your tablet from potential damage and to help to ensure your personal safety. Unless
otherwise noted, each procedure included in this document assumes that the following condition exists:
• You have read the safety information that shipped with your tablet.
2
WARNING
best practices information, see the Regulatory Compliance Homepage at www.dell.com/regulatory_compliance
CAUTION: Many repairs may only be done by a certied service technician. You should only perform troubleshooting and simple
repairs as authorized in your product documentation, or as directed by the online or telephone service and support team.
Damage due to servicing that is not authorized by Dell is not covered by your warranty. Read and follow the safety instructions
that came with the product.
CAUTION: To avoid electrostatic discharge, ground yourself by using a wrist grounding strap or by periodically touching an
unpainted metal surface, such as a connector on the back of the tablet.
CAUTION: Handle components and cards with care. Do not touch the components or contacts on a card. Hold a card by its
edges or by its metal mounting bracket.
CAUTION: When you disconnect a cable, pull on its connector or on its pull-tab, not on the cable itself. Some cables have
connectors with locking tabs; if you are disconnecting this type of cable, press in on the locking tabs before you disconnect the
cable. As you pull connectors apart, keep them evenly aligned to avoid bending any connector pins. Also, before you connect a
cable, ensure that both connectors are correctly oriented and aligned.
NOTE: The color of your tablet and certain components may appear dierently than shown in this document.
To avoid damaging your tablet, perform the following steps before you begin working inside the tablet.
1 Ensure that your work surface is at and clean to prevent the tablet cover from being scratched.
2 Turn o your tablet (see Turning O Your Tablet).
3 If the tablet is connected to a docking device (docked) such as the optional docking station or keyboard dock, un-dock it.
4 Disconnect the power adapter from the tablet.
5 Press and hold the power button for a few seconds to remove the ea power from the system board.
: Before working inside your tablet, read the safety information that shipped with your tablet. For additional safety
CAUTION
CAUTION: Before touching anything inside your tablet, ground yourself by touching an unpainted metal surface, such as the
metal at the back of the tablet. While you work, periodically touch an unpainted metal surface to dissipate static electricity,
which could harm internal components.
6 Remove the storage SD card from the tablet.
: To guard against electrical shock, always unplug your tablet from the electrical outlet.
Using your tablet 13
After working inside your tablet
NOTE: Leaving stray loose screws inside your table may severely damage your tablet.
1 Replace all screws and ensure that no stray screws remain inside your tablet.
2 Connect any external devices, peripherals, and cables that you removed before working on your tablet.
3 Replace any media card, SIM card, and any other parts that you removed before working on your tablet.
4 Connect your tablet and all attached devices to their electrical outlets.
5 Turn on your tablet.
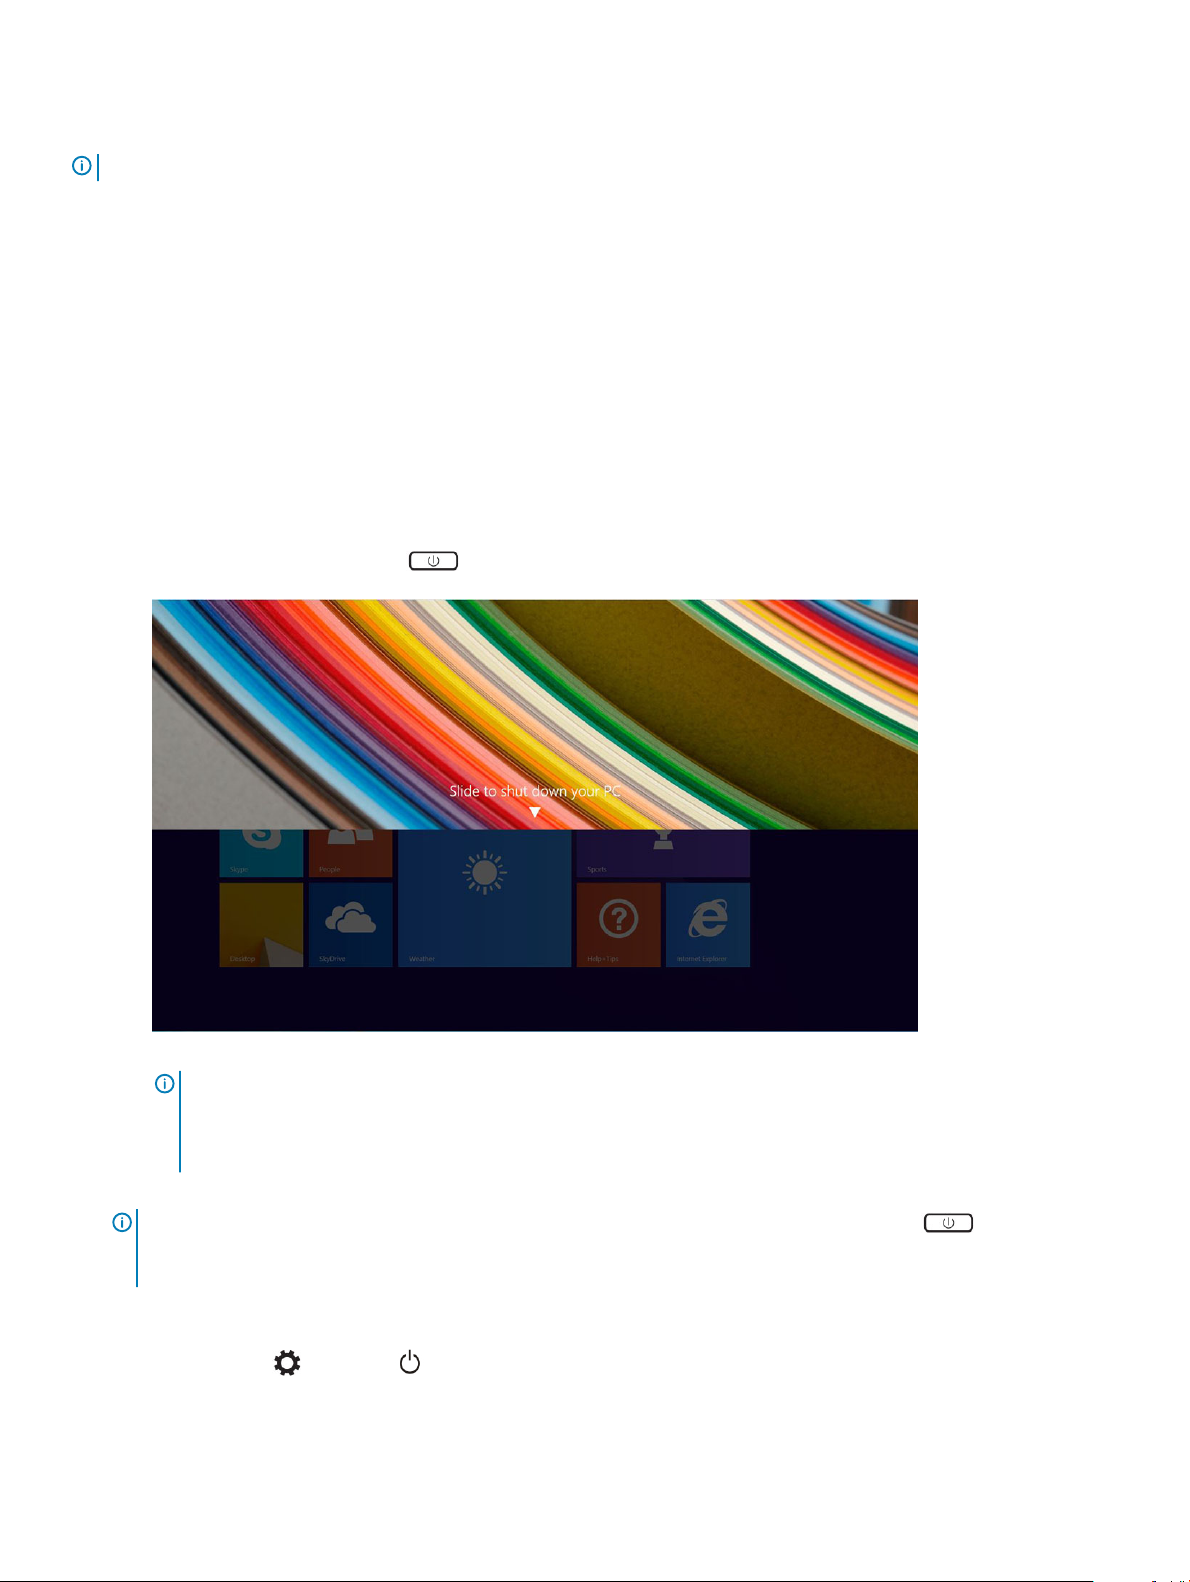
Turning o Your Tablet
Turning o your tablet completely shuts down your tablet. You can turn o your tablet by two ways:
• Using power button
• Using charms menu
1 To turn o your tablet using power button:
a Press and hold the Power button until you see “Slide to shut down your PC” on the screen.
NOTE
: After you press and hold the Power button, by default, the tablet enters sleep mode. However, if you change
the power button setting to shut down, the tablet shuts down. To change the power button setting, go to Control
Panel > Power Options > Change Plan Setting > Change Advanced Power Settings. To access Control Panel, swipe at
the right edge of the screen, tap Search, enter Control Panel in the search box, and then click Control Panel.
b Slide to shut down your tablet.
: You can also turn o your tablet without sliding down the screen. Press and hold the Power button for >10
NOTE
seconds to turn o your tablet. You can perform this force shutdown, if your tablet is not responding / behaving
unexpectedly or touch is not working.
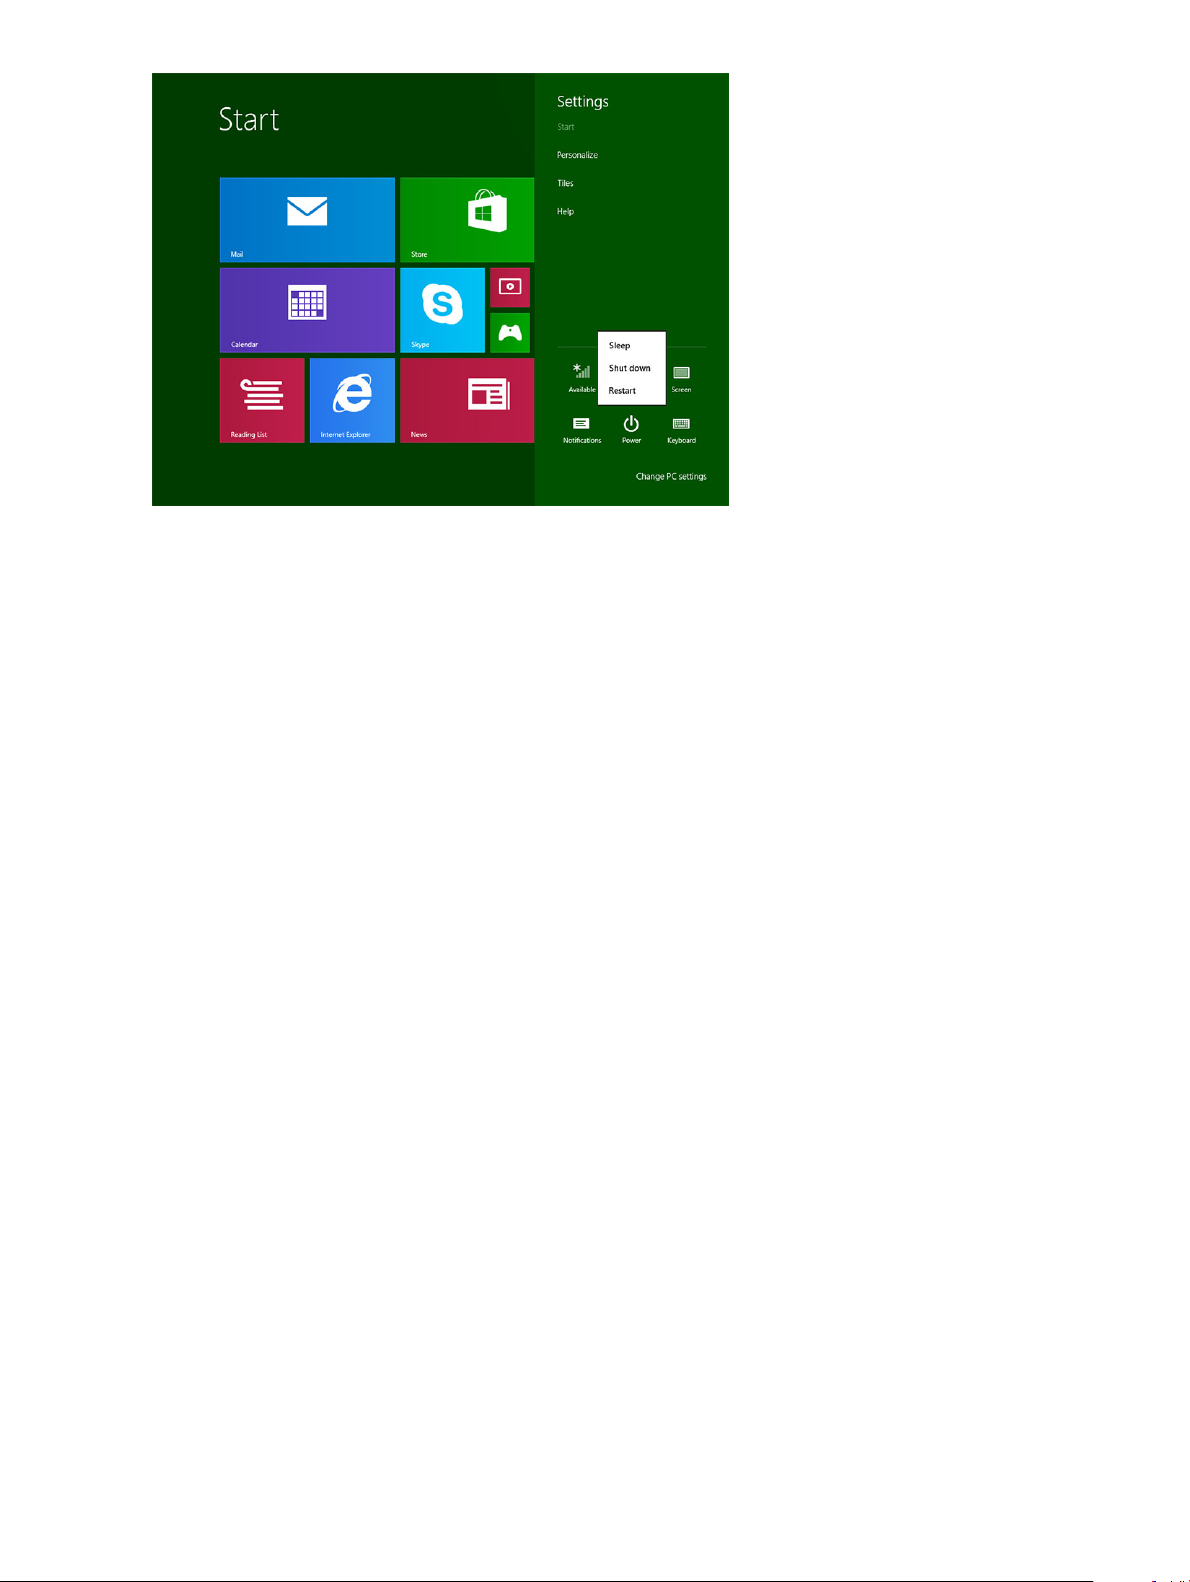
2 To turn o your tablet using the charms menu:
a Swipe from the right edge of the display to access the Charms menu.
b Touch Settings —> Power —> Shut down to turn o the tablet.
Using your tablet
14
Using your tablet 15

Removing and Installing components
This section provides detailed information on how to remove or install the components from your tablet.
Topics:
• microSIM card
• microSD card
• Display Panel and display cable
• Battery
• Power switch board
• WLAN card
• PCIe Solid State Drive (SSD)
• WWAN card
• Audio board
• Front facing camera
• Rear facing camera
• Coin-cell battery
• Docking board
• Thunderbolt over Type-C USB bracket
• System Board
• Speaker
• Back cover
3
microSIM card
1 Insert a paperclip or a microSIM card removal tool into the pinhole on the microSIM card tray [1].
2 Insert the microSIM card into the slots indicated on the slot [2].
3 Align the cover with the groove on the tablet and slide it inside to secure the microSIM [3].
16 Removing and Installing components
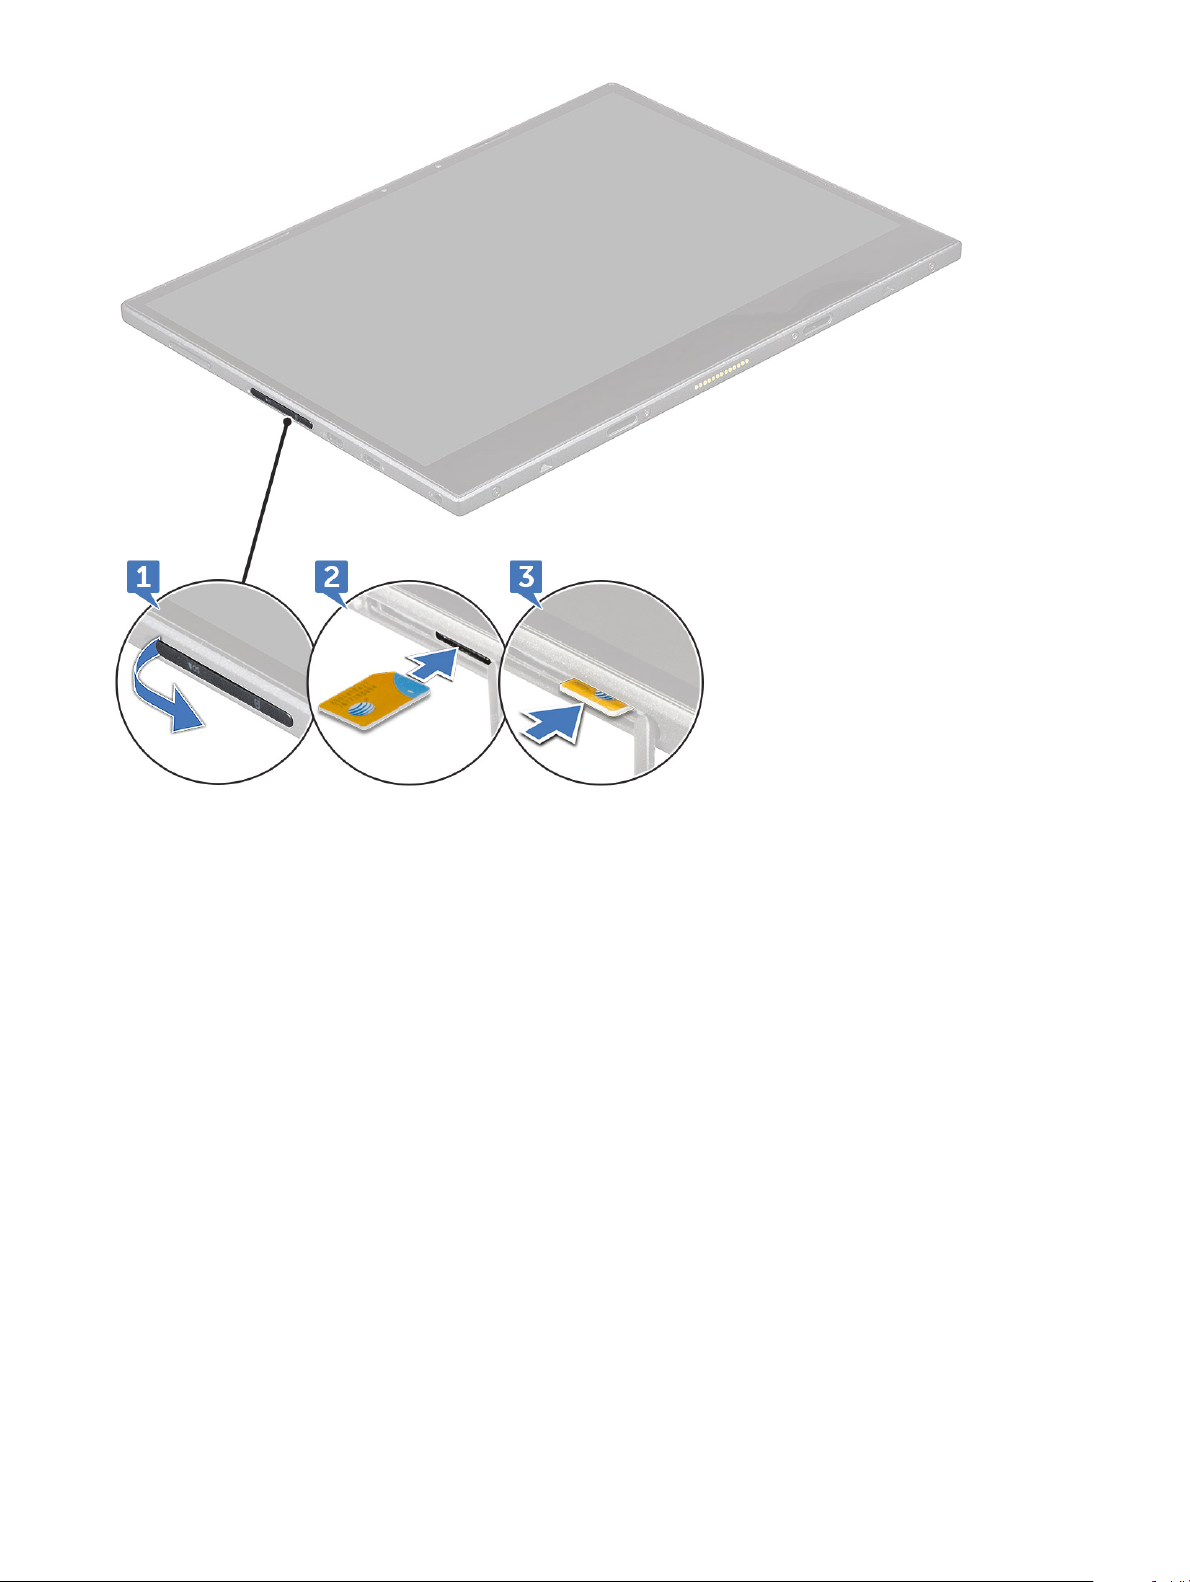
4 Perform the steps 1 to 3 to remove the microSIM card.
microSD card
1 Insert a paperclip or a microSD card removal tool into the pinhole on the microSD card tray [1].
2 Insert the microSD card into the slots indicated on the slot [2].
3 Align the cover with the groove on the tablet and slide it inside to secure the microSD [3].
Removing and Installing components
17
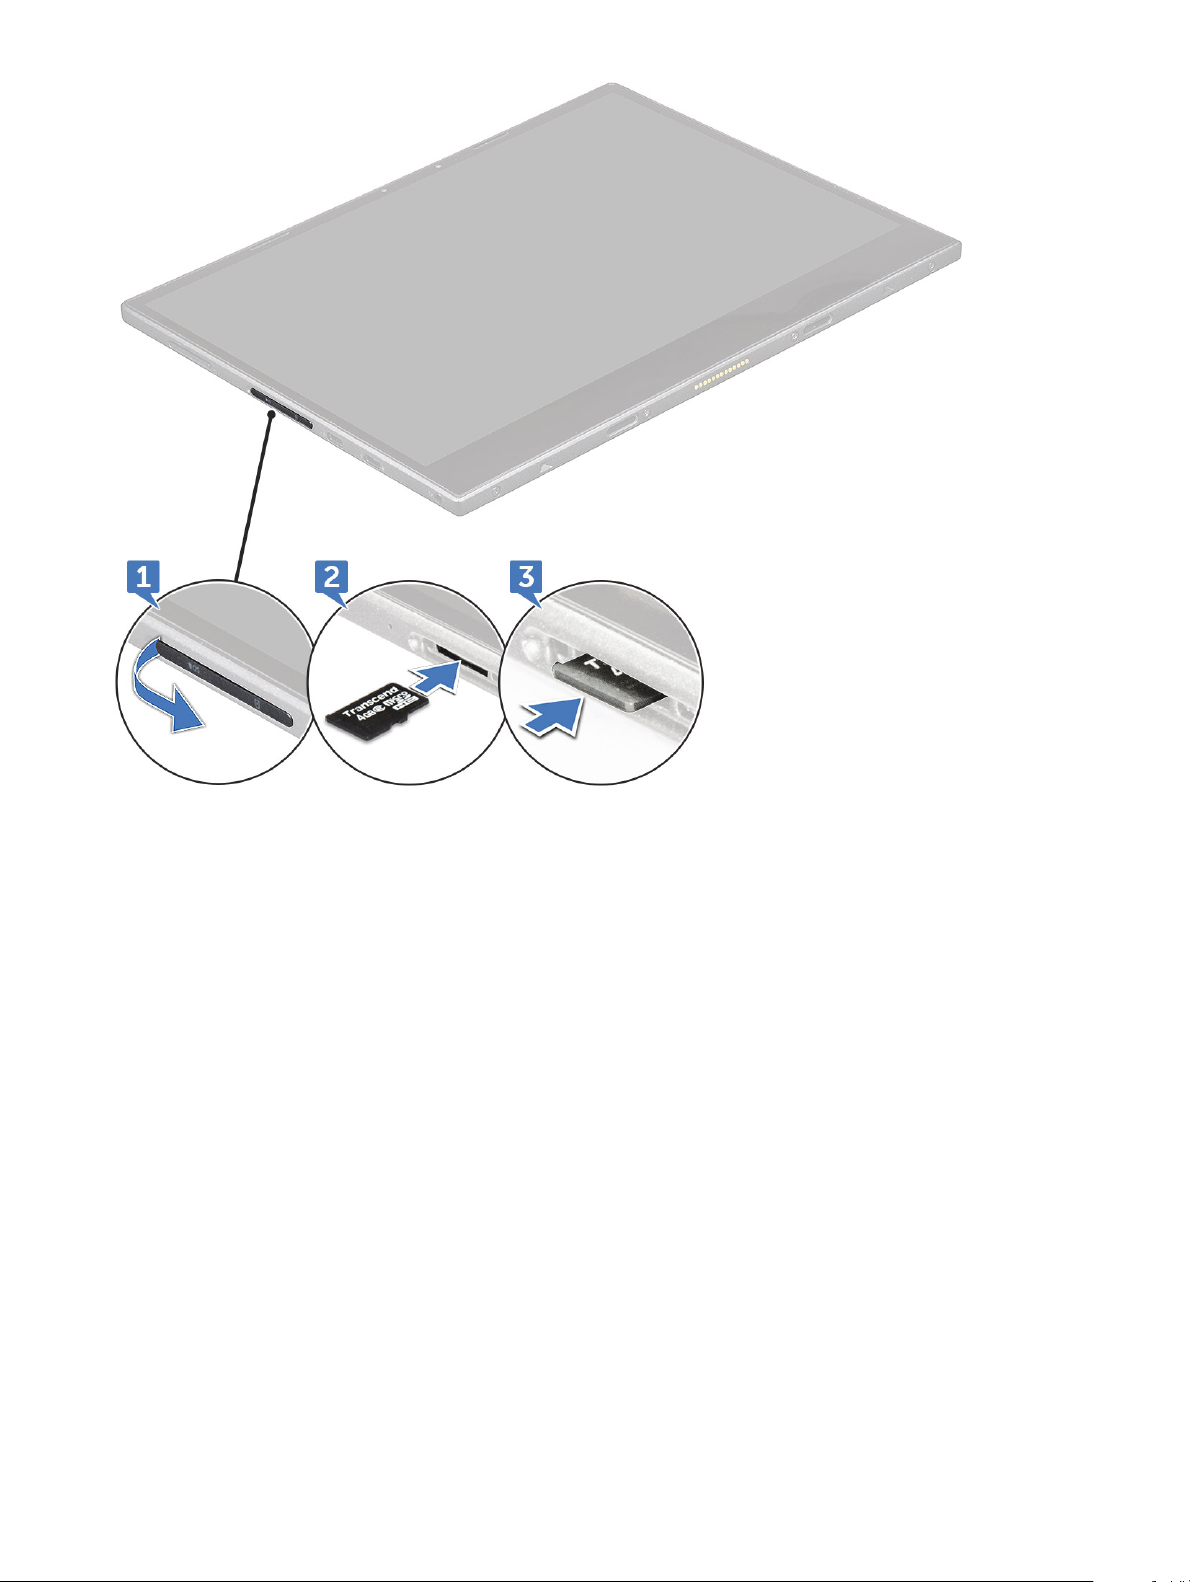
4 Perform the steps 1 to 3 to remove the microSD card.
Display Panel and display cable
Removing the display panel
1 Follow the procedure in Before working inside your tablet.
2 Remove the microSIM card and microSD card.
3 To release the display panel (with plastic scribe):
a Remove the M2x4 (4) screws that secure the display panel to the tablet [1].
b Use a plastic scribe to remove the microSIM/microSD cover [2].
Removing and Installing components
18
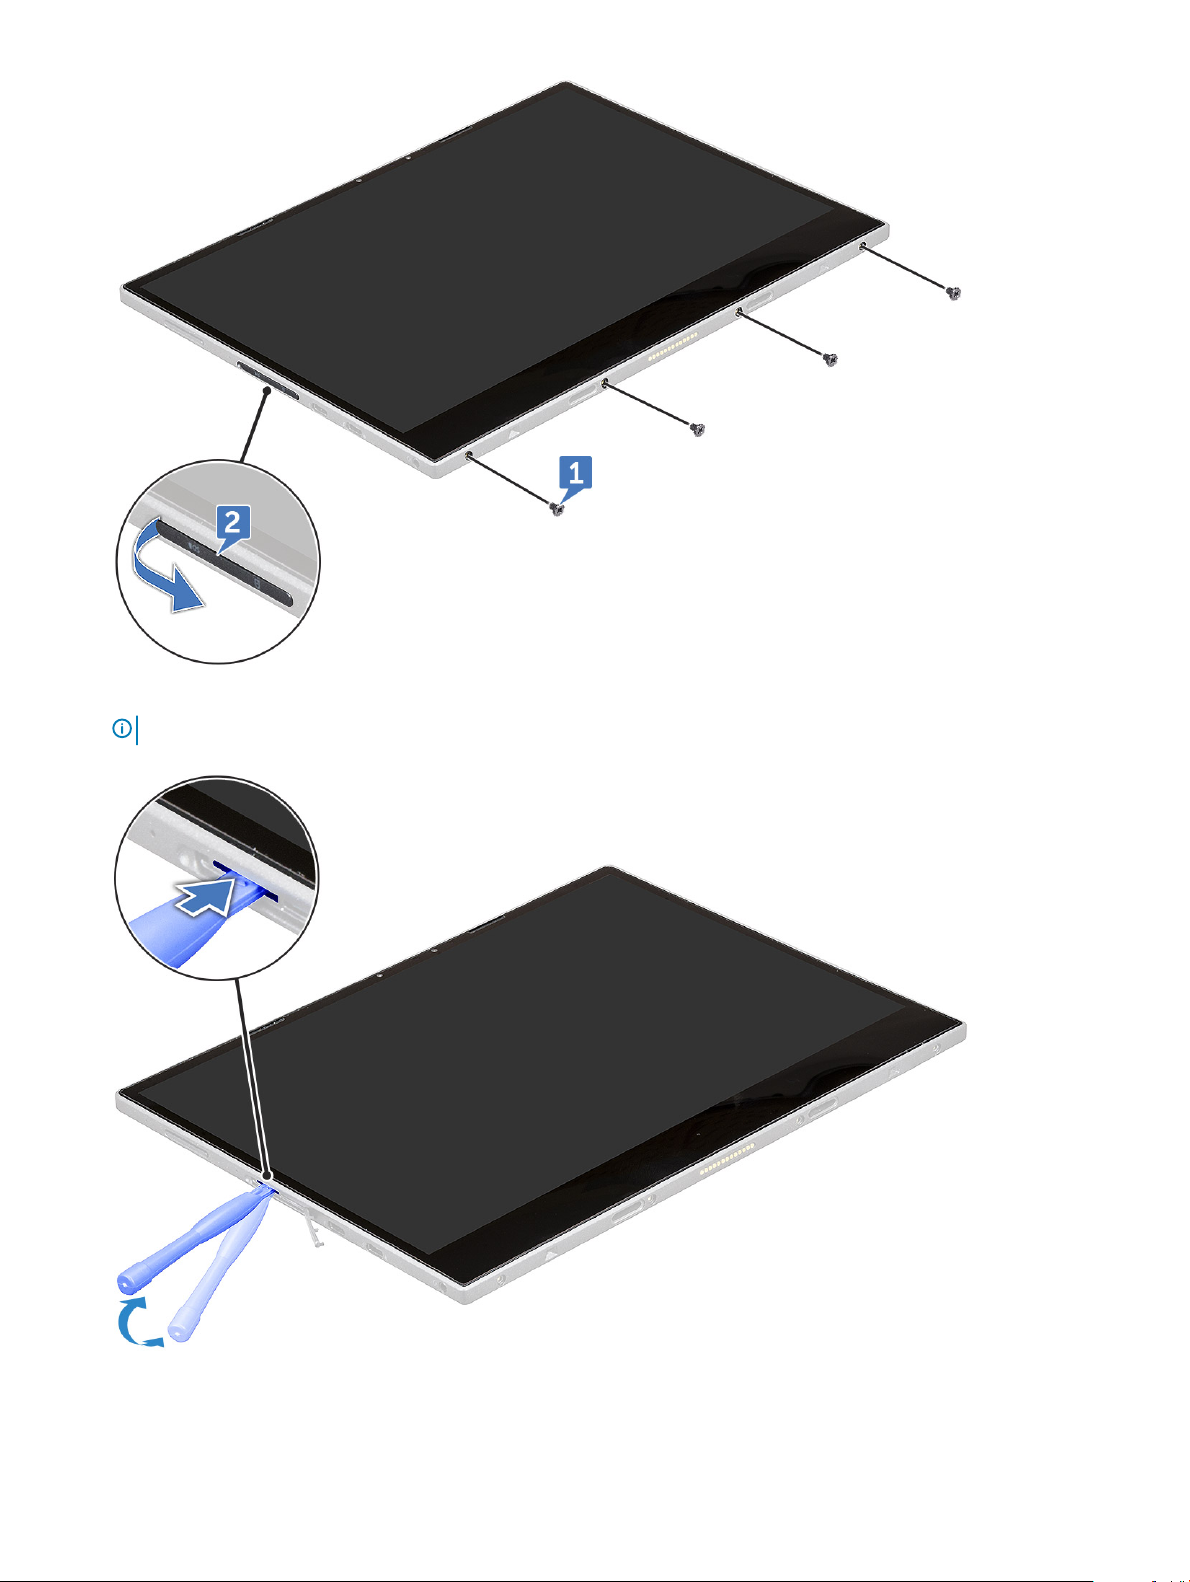
4 Insert a plastic scribe into the microSIM/microSD slot.
NOTE
: Ensure to pry cautiously to avoid damaging the SIM/micro SD connector on the system board.
5 Pry the edges starting from microSIM/microSD slot [1, 2].
Removing and Installing components
19
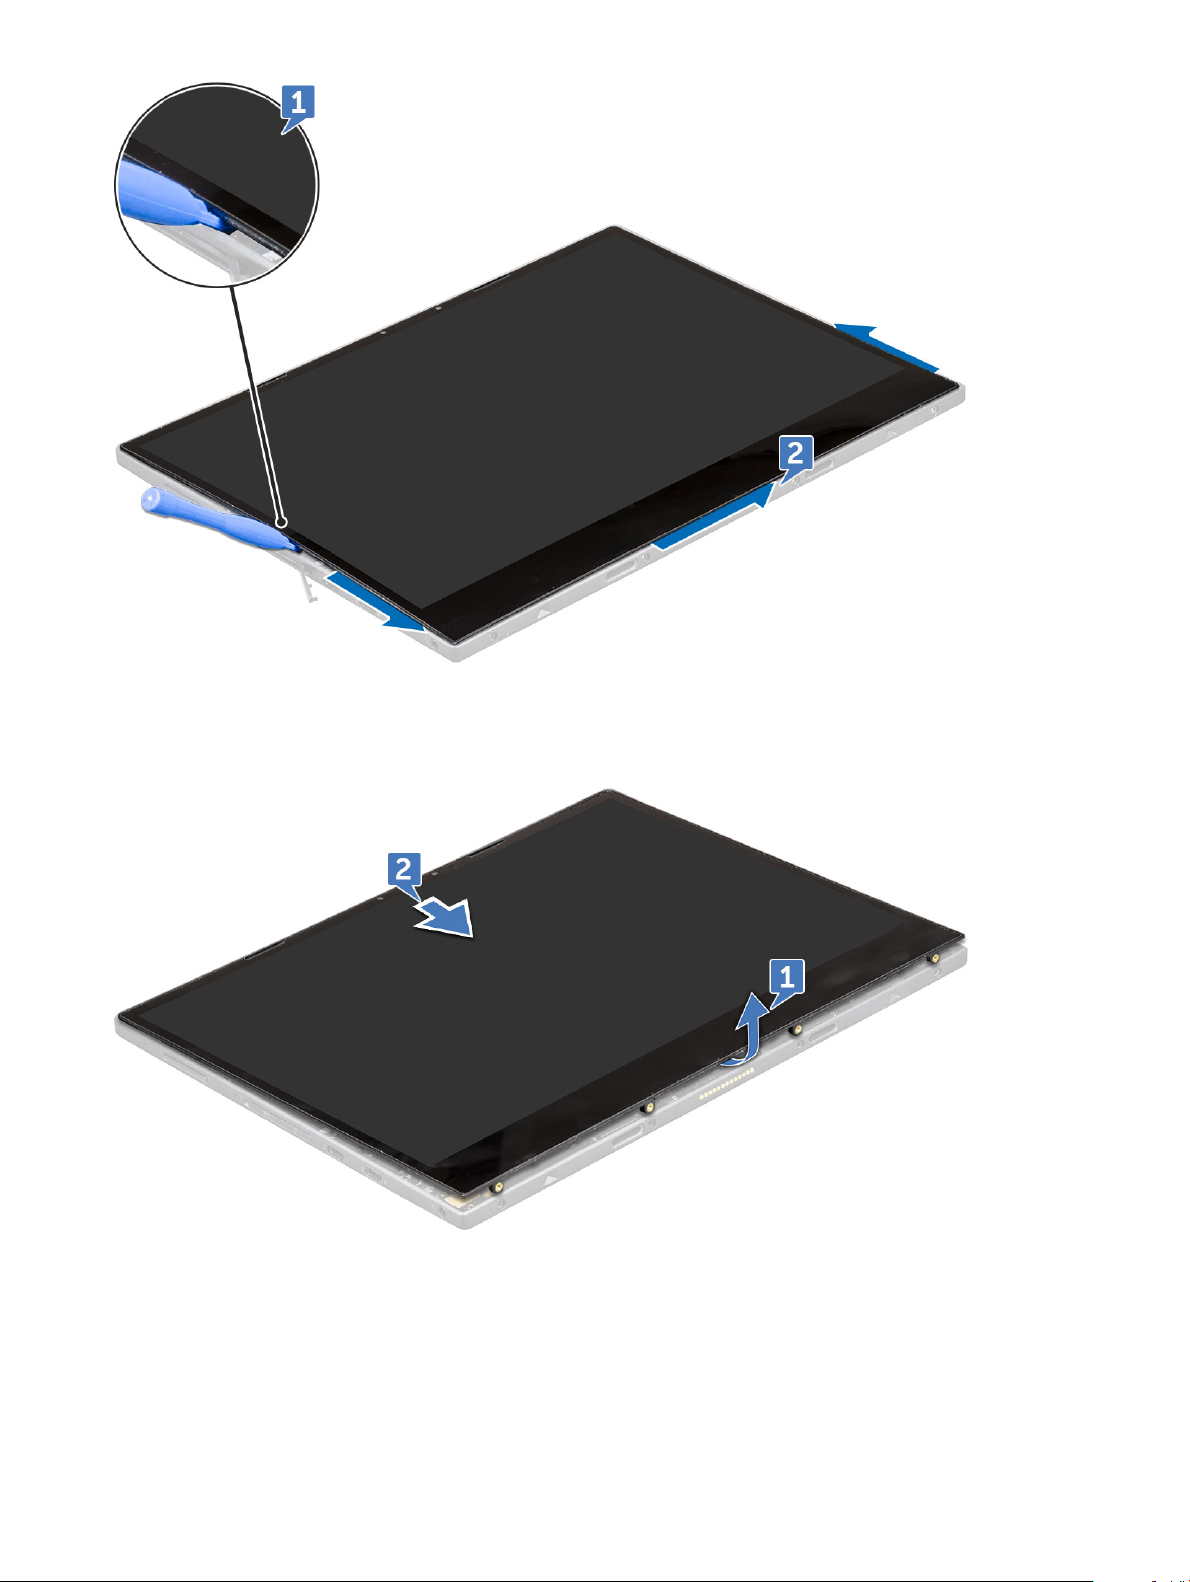
6 Lift the display panel and slide the display panel from the tablet [1,2].
7 Slide and ip the display panel.
Removing and Installing components
20
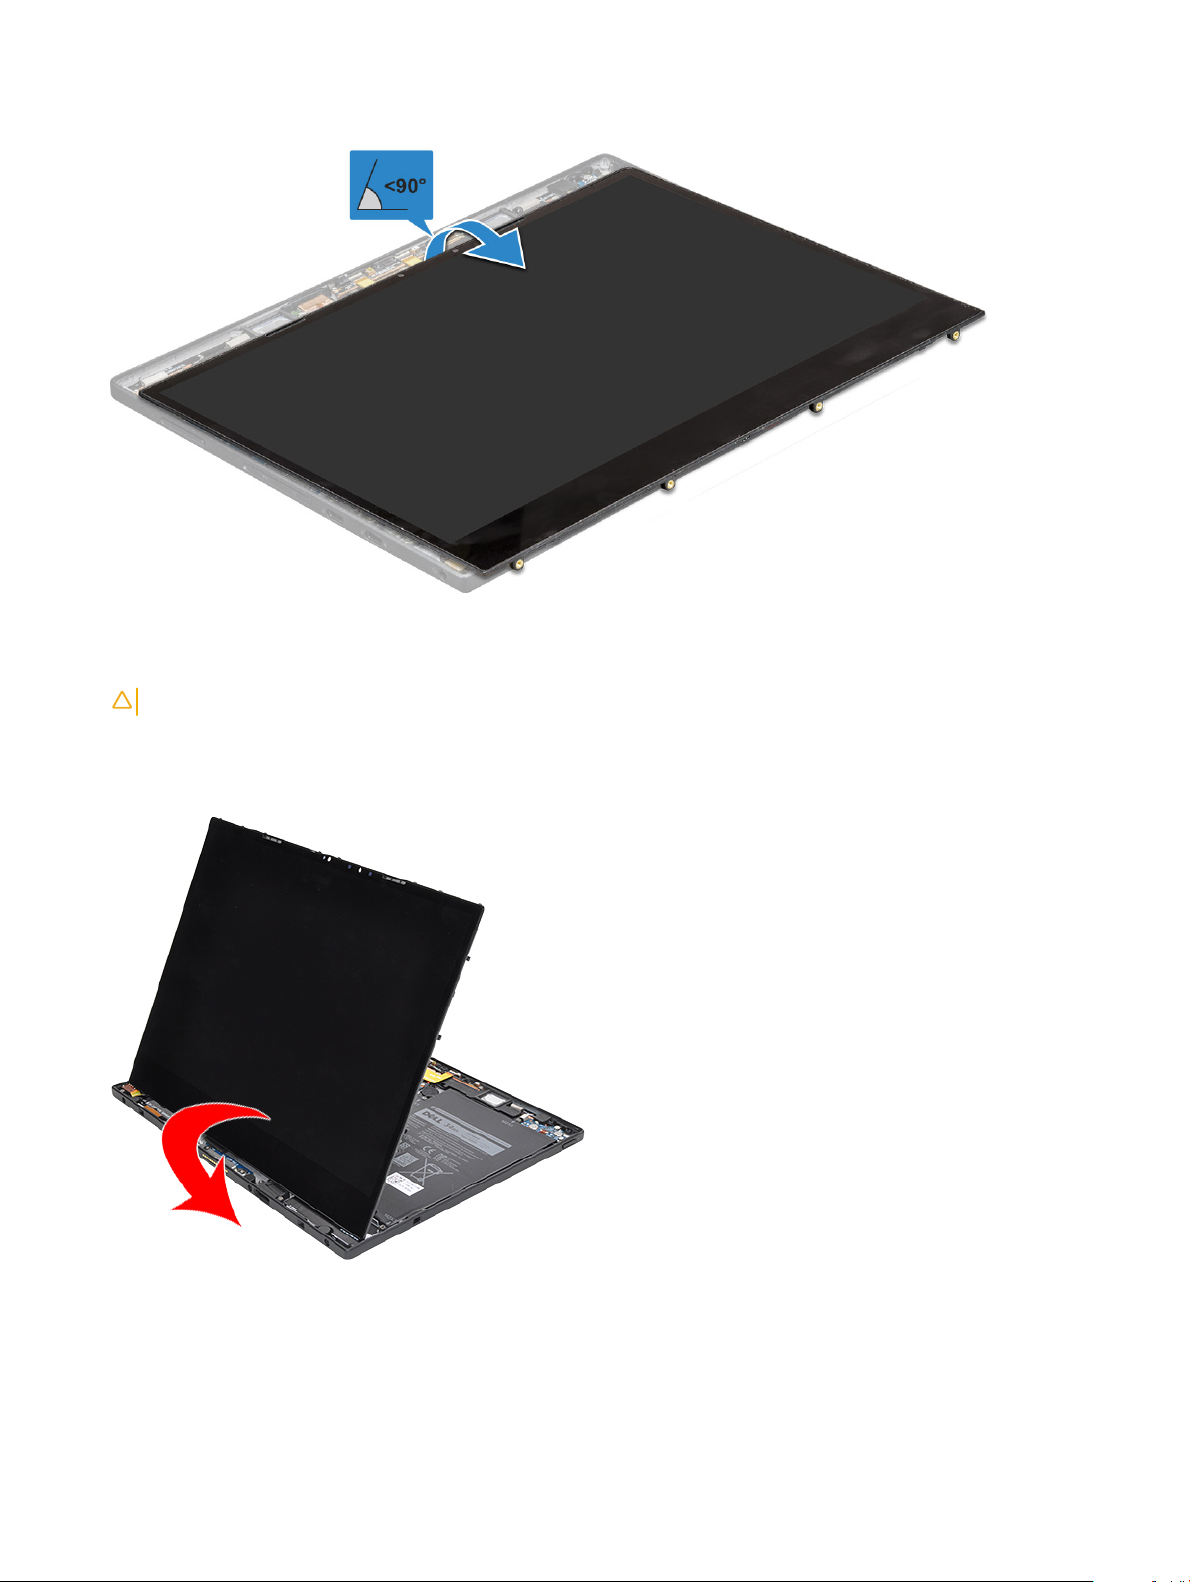
CAUTION: Do not open the display panel more than 90 degrees as this may damage the display cable.
8 Before removing display panel:
a Gently place the bottom edge of the display panel inside the bottom edge of the rear cover.
b Flip open the display panel to a 180 degree angle and lay it at on the surface.
9 To disconnect the display cable:
a Remove the M1.6x2.5 (1) screw that secures the metal bracket on the system board [1].
b Lift the metal tab and disconnect the battery cable [2].
c Remove the adhesive tape that secure the display cable on the system board [3].
d Remove the M1.6x2.5 (2) screws that secures display cable [4].
Removing and Installing components
21
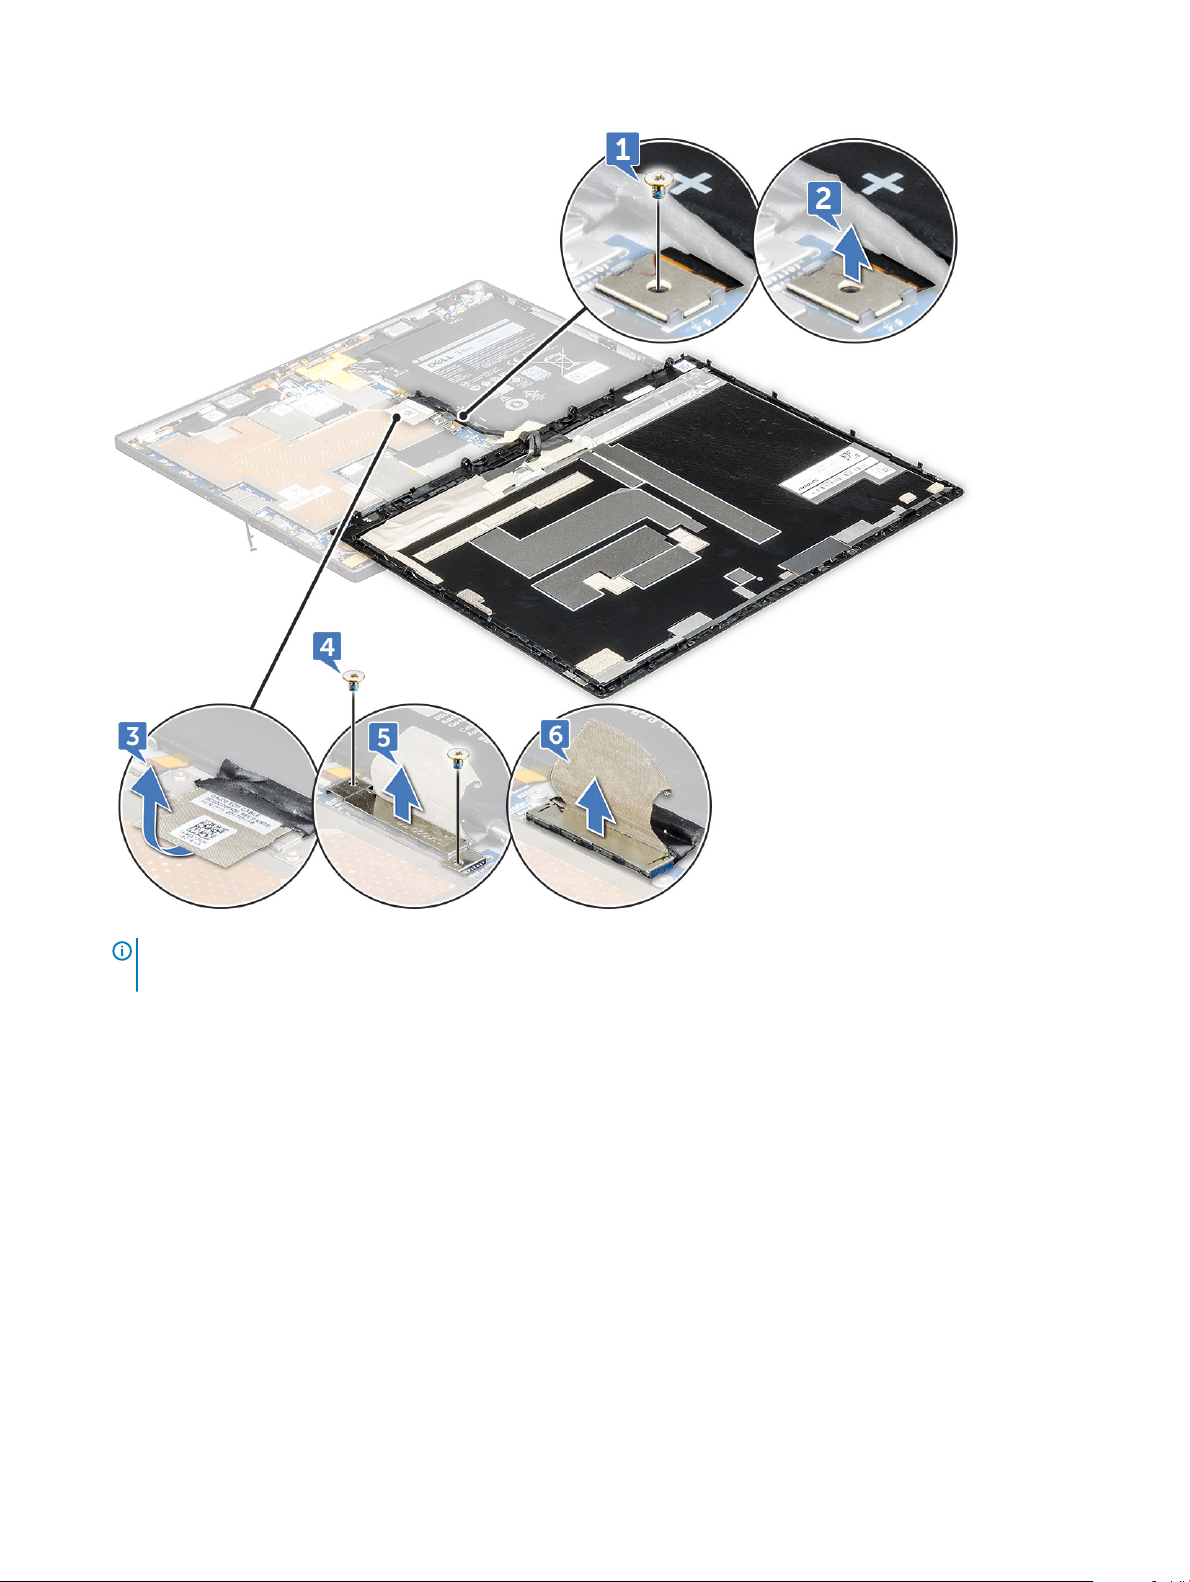
e Lift the metal tab from the system board [5].
f Lift the tab and disconnect the display cable [6].
NOTE: Only disconnect the display cable from the system board. DO NOT disconnect the display cable from the display
panel.
10 Remove the display panel from the tablet.
22
Removing and Installing components
 Loading...