

Page 1

7130cdn Professional Color Printer
User Guide
Guide d'utilisation
Guida dell'utente
Benutzerhandbuch
Guía del usuario
www.support.dell.com
Page 2

Copyright protection claimed includes all forms of matters of copyrightable materials and information now
allowed by statutory or judicial law or hereinafter granted, including without limitation, material generated from
the software programs which are displayed on the screen such as styles, templates, icons, screen displays,
looks, etc.
Trademarks used in the text: Adobe
Photoshop
®
, and PostScript® are trademarks of Adobe Systems Incorporated in the United States and/or other
Reader®, Adobe Type Manager®, ATM™, Flash®, Macromedia®,
countries.
®
Apple
, AppleTalk®, Bonjour®, EtherTalk®, Macintosh®, Mac OS®, and TrueType® are trademarks of
Apple Computer, Inc. in the United States and/or other countries.
®
HP-GL
, HP-UX®, and PCL® are trademarks of Hewlett-Packard Corporation in the United States and/or other
countries.
®
and AIX® are trademarks of International Business Machines Corporation in the United States and/or
IBM
other countries.
Microsoft
®
, Windows Vista®, Windows®, and Windows Server® are trademarks of Microsoft Corporation in the
United States and/or other countries.
®
, NetWare®, NDPS®, NDS®, Novell Directory Services®, IPX™, and Novell Distributed Print
Novell
Services
SGI
Sun
™
are trademarks of Novell, Incorporated in the United States and/or other countries.
®
IRIX® is a trademark of Silicon Graphics, Inc.
SM
, Sun Microsystems™, and Solaris™ are trademarks of Sun Microsystems, Incorporated in the United
States and/or other countries.
®
UNIX
is a trademark in the United States and other countries, licensed exclusively through X/
Open Company Limited.
This product meets the E
NERGY STAR
®
guidelines for energy efficiency. The ENERGY STAR name and logo are
registered U.S. marks.
Other trademarks and trade names may be used in this document to refer to either the entities claiming the
marks and names or their products. Dell Inc. disclaims any proprietary interest in trademarks and trade names
other than its own.
Page 3

Contents
1 Features
Parts of the Printer. . . . . . . . . . . . . . . . . . . . . . . . . . . . . . . . . . . . . . . . . . . . . . . . . . . . . . . . . . . . 8
Front View . . . . . . . . . . . . . . . . . . . . . . . . . . . . . . . . . . . . . . . . . . . . . . . . . . . . . . . . . . . . . . . 8
Rear View . . . . . . . . . . . . . . . . . . . . . . . . . . . . . . . . . . . . . . . . . . . . . . . . . . . . . . . . . . . . . . . 9
Internal Components . . . . . . . . . . . . . . . . . . . . . . . . . . . . . . . . . . . . . . . . . . . . . . . . . . . . . . . 9
Printer Configurations . . . . . . . . . . . . . . . . . . . . . . . . . . . . . . . . . . . . . . . . . . . . . . . . . . . . . . . . 10
Standard Features . . . . . . . . . . . . . . . . . . . . . . . . . . . . . . . . . . . . . . . . . . . . . . . . . . . . . . . . 10
Available Configurations . . . . . . . . . . . . . . . . . . . . . . . . . . . . . . . . . . . . . . . . . . . . . . . . . . . 10
Options. . . . . . . . . . . . . . . . . . . . . . . . . . . . . . . . . . . . . . . . . . . . . . . . . . . . . . . . . . . . . . . . . 11
Control Panel . . . . . . . . . . . . . . . . . . . . . . . . . . . . . . . . . . . . . . . . . . . . . . . . . . . . . . . . . . . . . . . 12
Control Panel Layout . . . . . . . . . . . . . . . . . . . . . . . . . . . . . . . . . . . . . . . . . . . . . . . . . . . . . . 12
Information Pages . . . . . . . . . . . . . . . . . . . . . . . . . . . . . . . . . . . . . . . . . . . . . . . . . . . . . . . . 13
More Information . . . . . . . . . . . . . . . . . . . . . . . . . . . . . . . . . . . . . . . . . . . . . . . . . . . . . . . . . . . . 14
2 Network Basics
Overview of Network Setup and Configuration . . . . . . . . . . . . . . . . . . . . . . . . . . . . . . . . . . . . . 16
Choosing a Connection Method. . . . . . . . . . . . . . . . . . . . . . . . . . . . . . . . . . . . . . . . . . . . . . . . . 17
Connecting via Ethernet (Recommended). . . . . . . . . . . . . . . . . . . . . . . . . . . . . . . . . . . . . . 17
Connecting via USB. . . . . . . . . . . . . . . . . . . . . . . . . . . . . . . . . . . . . . . . . . . . . . . . . . . . . . . 18
Configuring the Network Address . . . . . . . . . . . . . . . . . . . . . . . . . . . . . . . . . . . . . . . . . . . . . . . 19
TCP/IP and IP Addresses . . . . . . . . . . . . . . . . . . . . . . . . . . . . . . . . . . . . . . . . . . . . . . . . . . 19
Automatically Setting the Printer’s IP Address. . . . . . . . . . . . . . . . . . . . . . . . . . . . . . . . . . . 20
Dynamic Methods of Setting the Printer’s IP Address . . . . . . . . . . . . . . . . . . . . . . . . . . . . . 20
Manually Setting the Printer’s IP Address . . . . . . . . . . . . . . . . . . . . . . . . . . . . . . . . . . . . . . 21
Printer Management Software . . . . . . . . . . . . . . . . . . . . . . . . . . . . . . . . . . . . . . . . . . . . . . . . . . 23
Embedded Web Server . . . . . . . . . . . . . . . . . . . . . . . . . . . . . . . . . . . . . . . . . . . . . . . . . . . . 23
Available Printer Drivers . . . . . . . . . . . . . . . . . . . . . . . . . . . . . . . . . . . . . . . . . . . . . . . . . . . . . . 24
Windows 2000 or Later . . . . . . . . . . . . . . . . . . . . . . . . . . . . . . . . . . . . . . . . . . . . . . . . . . . . . . . 25
Preliminary Steps. . . . . . . . . . . . . . . . . . . . . . . . . . . . . . . . . . . . . . . . . . . . . . . . . . . . . . . . . 25
Quick CD Install Steps . . . . . . . . . . . . . . . . . . . . . . . . . . . . . . . . . . . . . . . . . . . . . . . . . . . . . 25
Other Methods of Installation . . . . . . . . . . . . . . . . . . . . . . . . . . . . . . . . . . . . . . . . . . . . . . . . 26
Windows 64-Bit Server to 32-Bit Client Installation . . . . . . . . . . . . . . . . . . . . . . . . . . . . . . . 28
Windows 2000 or Later Troubleshooting . . . . . . . . . . . . . . . . . . . . . . . . . . . . . . . . . . . . . . . 29
Macintosh OS X, Version 10.3 and Higher . . . . . . . . . . . . . . . . . . . . . . . . . . . . . . . . . . . . . . . . 31
Macintosh OS X, Version 10.3. . . . . . . . . . . . . . . . . . . . . . . . . . . . . . . . . . . . . . . . . . . . . . . 31
Macintosh OS X, Version 10.4 and Higher . . . . . . . . . . . . . . . . . . . . . . . . . . . . . . . . . . . . . 32
Macintosh Troubleshooting (Mac OS X, Version 10.3 and Higher) . . . . . . . . . . . . . . . . . . . 33
UNIX (Linux) . . . . . . . . . . . . . . . . . . . . . . . . . . . . . . . . . . . . . . . . . . . . . . . . . . . . . . . . . . . . . . . 34
Quick Install Steps . . . . . . . . . . . . . . . . . . . . . . . . . . . . . . . . . . . . . . . . . . . . . . . . . . . . . . . . 34
Dell 7130cdn Professional Color Printer
User Guide
3
Page 4

Contents
IPv6 . . . . . . . . . . . . . . . . . . . . . . . . . . . . . . . . . . . . . . . . . . . . . . . . . . . . . . . . . . . . . . . . . . . . . . 36
Enabling IPv6. . . . . . . . . . . . . . . . . . . . . . . . . . . . . . . . . . . . . . . . . . . . . . . . . . . . . . . . . . . . 36
Setting the Interface ID . . . . . . . . . . . . . . . . . . . . . . . . . . . . . . . . . . . . . . . . . . . . . . . . . . . . 37
Automatic Address Assignment . . . . . . . . . . . . . . . . . . . . . . . . . . . . . . . . . . . . . . . . . . . . . . 38
DHCPv6 . . . . . . . . . . . . . . . . . . . . . . . . . . . . . . . . . . . . . . . . . . . . . . . . . . . . . . . . . . . . . . . . 38
Manual Address Assignment . . . . . . . . . . . . . . . . . . . . . . . . . . . . . . . . . . . . . . . . . . . . . . . . 39
Address Precedence . . . . . . . . . . . . . . . . . . . . . . . . . . . . . . . . . . . . . . . . . . . . . . . . . . . . . . 40
3Printing
Printing Overview. . . . . . . . . . . . . . . . . . . . . . . . . . . . . . . . . . . . . . . . . . . . . . . . . . . . . . . . . . . . 42
Supported Media . . . . . . . . . . . . . . . . . . . . . . . . . . . . . . . . . . . . . . . . . . . . . . . . . . . . . . . . . . . . 43
General Media Loading Guidelines . . . . . . . . . . . . . . . . . . . . . . . . . . . . . . . . . . . . . . . . . . . 43
Media That Can Damage Your Printer. . . . . . . . . . . . . . . . . . . . . . . . . . . . . . . . . . . . . . . . . 44
Paper Storage Guidelines . . . . . . . . . . . . . . . . . . . . . . . . . . . . . . . . . . . . . . . . . . . . . . . . . . 44
Loading Media . . . . . . . . . . . . . . . . . . . . . . . . . . . . . . . . . . . . . . . . . . . . . . . . . . . . . . . . . . . . . . 45
Loading Paper in Tray 1 (MPT) . . . . . . . . . . . . . . . . . . . . . . . . . . . . . . . . . . . . . . . . . . . . . . 45
Using Manual Feed in Tray 1 (MPT) . . . . . . . . . . . . . . . . . . . . . . . . . . . . . . . . . . . . . . . . . . 50
Loading Paper in Trays 2–5. . . . . . . . . . . . . . . . . . . . . . . . . . . . . . . . . . . . . . . . . . . . . . . . . 50
Printing on Special Media . . . . . . . . . . . . . . . . . . . . . . . . . . . . . . . . . . . . . . . . . . . . . . . . . . . . . 58
Printing on Transparencies . . . . . . . . . . . . . . . . . . . . . . . . . . . . . . . . . . . . . . . . . . . . . . . . . 58
Printing on Envelopes . . . . . . . . . . . . . . . . . . . . . . . . . . . . . . . . . . . . . . . . . . . . . . . . . . . . . 59
Printing on Labels . . . . . . . . . . . . . . . . . . . . . . . . . . . . . . . . . . . . . . . . . . . . . . . . . . . . . . . . 59
Printing on Glossy Paper . . . . . . . . . . . . . . . . . . . . . . . . . . . . . . . . . . . . . . . . . . . . . . . . . . . 60
Using Custom Paper Types . . . . . . . . . . . . . . . . . . . . . . . . . . . . . . . . . . . . . . . . . . . . . . . . . 61
Using Custom Size Paper . . . . . . . . . . . . . . . . . . . . . . . . . . . . . . . . . . . . . . . . . . . . . . . . . . 62
Selecting Printing Options . . . . . . . . . . . . . . . . . . . . . . . . . . . . . . . . . . . . . . . . . . . . . . . . . . . . . 64
Printing Options for Windows. . . . . . . . . . . . . . . . . . . . . . . . . . . . . . . . . . . . . . . . . . . . . . . . 64
Setting Default Printing Options for Windows . . . . . . . . . . . . . . . . . . . . . . . . . . . . . . . . . . . 65
Selecting Printing Options for an Individual Job in Windows . . . . . . . . . . . . . . . . . . . . . . . . 65
Saving a Set of Commonly Used Printing Options in Windows . . . . . . . . . . . . . . . . . . . . . . 65
Printing Options for Macintosh. . . . . . . . . . . . . . . . . . . . . . . . . . . . . . . . . . . . . . . . . . . . . . . 66
Selecting Options for an Individual Job for Macintosh . . . . . . . . . . . . . . . . . . . . . . . . . . . . . 66
Saving a Set of Commonly Used Printing Options for Macintosh . . . . . . . . . . . . . . . . . . . . 66
Printing on Both Sides of the Paper. . . . . . . . . . . . . . . . . . . . . . . . . . . . . . . . . . . . . . . . . . . . . . 67
2-Sided Printing Guidelines . . . . . . . . . . . . . . . . . . . . . . . . . . . . . . . . . . . . . . . . . . . . . . . . . 67
Printing a 2-Sided Document . . . . . . . . . . . . . . . . . . . . . . . . . . . . . . . . . . . . . . . . . . . . . . . . 68
Page Layout Options . . . . . . . . . . . . . . . . . . . . . . . . . . . . . . . . . . . . . . . . . . . . . . . . . . . . . . 69
Selecting Paper Type to Use . . . . . . . . . . . . . . . . . . . . . . . . . . . . . . . . . . . . . . . . . . . . . . . . . . . 70
Selecting Paper Type to Use for a Supported Driver. . . . . . . . . . . . . . . . . . . . . . . . . . . . . . 70
Printing Multiple Pages to a Single Sheet (N-Up) . . . . . . . . . . . . . . . . . . . . . . . . . . . . . . . . . . . 71
Printing N-Up Using a supported Driver. . . . . . . . . . . . . . . . . . . . . . . . . . . . . . . . . . . . . . . . 71
Printing Booklets . . . . . . . . . . . . . . . . . . . . . . . . . . . . . . . . . . . . . . . . . . . . . . . . . . . . . . . . . . . . 72
Selecting Booklet Printing in a Supported Driver . . . . . . . . . . . . . . . . . . . . . . . . . . . . . . . . . 72
Dell 7130cdn Professional Color Printer
4
User Guide
Page 5

Contents
Using Color Corrections. . . . . . . . . . . . . . . . . . . . . . . . . . . . . . . . . . . . . . . . . . . . . . . . . . . . . . . 74
Selecting Color Correction in a Supported Driver . . . . . . . . . . . . . . . . . . . . . . . . . . . . . . . . 74
Making Color Adjustments in a Supported Driver . . . . . . . . . . . . . . . . . . . . . . . . . . . . . . . . 74
Making Custom Color Adjustments . . . . . . . . . . . . . . . . . . . . . . . . . . . . . . . . . . . . . . . . . . . 76
Adjusting the Automatic Color Correction in a Supported Driver . . . . . . . . . . . . . . . . . . . . . 76
Printing in Black and White . . . . . . . . . . . . . . . . . . . . . . . . . . . . . . . . . . . . . . . . . . . . . . . . . . . . 77
Printing Black and White Using a Supported Driver . . . . . . . . . . . . . . . . . . . . . . . . . . . . . . 77
Printing Separators . . . . . . . . . . . . . . . . . . . . . . . . . . . . . . . . . . . . . . . . . . . . . . . . . . . . . . . . . . 78
Printing Insert Pages in a Supported Driver. . . . . . . . . . . . . . . . . . . . . . . . . . . . . . . . . . . . . 78
Printing Cover Pages. . . . . . . . . . . . . . . . . . . . . . . . . . . . . . . . . . . . . . . . . . . . . . . . . . . . . . . . . 79
Printing Cover Pages in a Supported Driver . . . . . . . . . . . . . . . . . . . . . . . . . . . . . . . . . . . . 80
Printing Watermarks . . . . . . . . . . . . . . . . . . . . . . . . . . . . . . . . . . . . . . . . . . . . . . . . . . . . . . . . . 81
Selecting, Creating, and Editing Watermarks in a Supported Driver . . . . . . . . . . . . . . . . . . 81
Printing Mirror Images . . . . . . . . . . . . . . . . . . . . . . . . . . . . . . . . . . . . . . . . . . . . . . . . . . . . . . . . 82
Selecting Mirror Image in a Supported Driver . . . . . . . . . . . . . . . . . . . . . . . . . . . . . . . . . . . 82
Printing Special Job Types . . . . . . . . . . . . . . . . . . . . . . . . . . . . . . . . . . . . . . . . . . . . . . . . . . . . 83
Sending Personal, Personal Saved, Secure, Proof, or Saved Print Jobs . . . . . . . . . . . . . . 83
Sending Print With Jobs. . . . . . . . . . . . . . . . . . . . . . . . . . . . . . . . . . . . . . . . . . . . . . . . . . . . 84
Printing or Deleting Secure Print Jobs . . . . . . . . . . . . . . . . . . . . . . . . . . . . . . . . . . . . . . . . . 84
Printing or Deleting Personal Print Jobs . . . . . . . . . . . . . . . . . . . . . . . . . . . . . . . . . . . . . . . 85
Printing or Deleting Proof and Saved Print Jobs . . . . . . . . . . . . . . . . . . . . . . . . . . . . . . . . . 85
Printing or Deleting Personal Saved Jobs . . . . . . . . . . . . . . . . . . . . . . . . . . . . . . . . . . . . . . 85
4 Maintenance
Maintenance and Cleaning . . . . . . . . . . . . . . . . . . . . . . . . . . . . . . . . . . . . . . . . . . . . . . . . . . . . 88
General Precautions . . . . . . . . . . . . . . . . . . . . . . . . . . . . . . . . . . . . . . . . . . . . . . . . . . . . . . 88
Locating the Serial Number and the Service Tag . . . . . . . . . . . . . . . . . . . . . . . . . . . . . . . . 88
Printing Meters. . . . . . . . . . . . . . . . . . . . . . . . . . . . . . . . . . . . . . . . . . . . . . . . . . . . . . . . . . . 89
Cleaning the Printer . . . . . . . . . . . . . . . . . . . . . . . . . . . . . . . . . . . . . . . . . . . . . . . . . . . . . . . . . . 90
Cleaning the Exterior . . . . . . . . . . . . . . . . . . . . . . . . . . . . . . . . . . . . . . . . . . . . . . . . . . . . . . 90
Cleaning the LEDs . . . . . . . . . . . . . . . . . . . . . . . . . . . . . . . . . . . . . . . . . . . . . . . . . . . . . . . . 90
Ordering Supplies . . . . . . . . . . . . . . . . . . . . . . . . . . . . . . . . . . . . . . . . . . . . . . . . . . . . . . . . . . . 93
Consumables . . . . . . . . . . . . . . . . . . . . . . . . . . . . . . . . . . . . . . . . . . . . . . . . . . . . . . . . . . . . 93
Routine Maintenance Items . . . . . . . . . . . . . . . . . . . . . . . . . . . . . . . . . . . . . . . . . . . . . . . . . 93
Customer Replaceable Parts . . . . . . . . . . . . . . . . . . . . . . . . . . . . . . . . . . . . . . . . . . . . . . . . 94
When to Order Supplies. . . . . . . . . . . . . . . . . . . . . . . . . . . . . . . . . . . . . . . . . . . . . . . . . . . . 94
Recycling Supplies. . . . . . . . . . . . . . . . . . . . . . . . . . . . . . . . . . . . . . . . . . . . . . . . . . . . . . . . 94
Moving the Printer . . . . . . . . . . . . . . . . . . . . . . . . . . . . . . . . . . . . . . . . . . . . . . . . . . . . . . . . . . . 95
Printer Symbols . . . . . . . . . . . . . . . . . . . . . . . . . . . . . . . . . . . . . . . . . . . . . . . . . . . . . . . . . . . . . 96
Dell 7130cdn Professional Color Printer
User Guide
5
Page 6

Contents
5 Troubleshooting
General Troubleshooting . . . . . . . . . . . . . . . . . . . . . . . . . . . . . . . . . . . . . . . . . . . . . . . . . . . . . . 98
Printer Does Not Turn On . . . . . . . . . . . . . . . . . . . . . . . . . . . . . . . . . . . . . . . . . . . . . . . . . . 98
Printing Takes Too Long . . . . . . . . . . . . . . . . . . . . . . . . . . . . . . . . . . . . . . . . . . . . . . . . . . . 99
Printer Resets or Turns Off Frequently . . . . . . . . . . . . . . . . . . . . . . . . . . . . . . . . . . . . . . . . 99
Printer Is Making Unusual Noises . . . . . . . . . . . . . . . . . . . . . . . . . . . . . . . . . . . . . . . . . . . 100
The Date and Time Are Incorrect. . . . . . . . . . . . . . . . . . . . . . . . . . . . . . . . . . . . . . . . . . . . 100
Duplex Problems . . . . . . . . . . . . . . . . . . . . . . . . . . . . . . . . . . . . . . . . . . . . . . . . . . . . . . . . 100
Front Door Will Not Close . . . . . . . . . . . . . . . . . . . . . . . . . . . . . . . . . . . . . . . . . . . . . . . . . 100
Paper Feed Problems . . . . . . . . . . . . . . . . . . . . . . . . . . . . . . . . . . . . . . . . . . . . . . . . . . . . . . . 101
Clearing Paper Jams . . . . . . . . . . . . . . . . . . . . . . . . . . . . . . . . . . . . . . . . . . . . . . . . . . . . . 101
Minimizing Paper Jams . . . . . . . . . . . . . . . . . . . . . . . . . . . . . . . . . . . . . . . . . . . . . . . . . . . 118
Troubleshooting Paper Feed Problems . . . . . . . . . . . . . . . . . . . . . . . . . . . . . . . . . . . . . . . 119
Print-Quality Problems. . . . . . . . . . . . . . . . . . . . . . . . . . . . . . . . . . . . . . . . . . . . . . . . . . . . . . . 121
Using Built-in Troubleshooting Tools . . . . . . . . . . . . . . . . . . . . . . . . . . . . . . . . . . . . . . . . . 121
Troubleshooting Print-Quality Problems . . . . . . . . . . . . . . . . . . . . . . . . . . . . . . . . . . . . . . 123
Getting Help. . . . . . . . . . . . . . . . . . . . . . . . . . . . . . . . . . . . . . . . . . . . . . . . . . . . . . . . . . . . . . . 131
Control Panel Messages . . . . . . . . . . . . . . . . . . . . . . . . . . . . . . . . . . . . . . . . . . . . . . . . . . 131
Online Diagnostics Technical Support . . . . . . . . . . . . . . . . . . . . . . . . . . . . . . . . . . . . . . . . 132
Helpful Websites . . . . . . . . . . . . . . . . . . . . . . . . . . . . . . . . . . . . . . . . . . . . . . . . . . . . . . . . 132
A Printer Specifications
Physical Specifications . . . . . . . . . . . . . . . . . . . . . . . . . . . . . . . . . . . . . . . . . . . . . . . . . . . . . . 134
Base Unit . . . . . . . . . . . . . . . . . . . . . . . . . . . . . . . . . . . . . . . . . . . . . . . . . . . . . . . . . . . . . . 134
Optional Trays 3, 4, and 5 . . . . . . . . . . . . . . . . . . . . . . . . . . . . . . . . . . . . . . . . . . . . . . . . . 134
Clearance Requirements . . . . . . . . . . . . . . . . . . . . . . . . . . . . . . . . . . . . . . . . . . . . . . . . . . 134
Environmental Specifications. . . . . . . . . . . . . . . . . . . . . . . . . . . . . . . . . . . . . . . . . . . . . . . . . . 135
Temperature . . . . . . . . . . . . . . . . . . . . . . . . . . . . . . . . . . . . . . . . . . . . . . . . . . . . . . . . . . . 135
Relative Humidity . . . . . . . . . . . . . . . . . . . . . . . . . . . . . . . . . . . . . . . . . . . . . . . . . . . . . . . . 135
Electrical Specifications . . . . . . . . . . . . . . . . . . . . . . . . . . . . . . . . . . . . . . . . . . . . . . . . . . . . . . 136
Performance Specifications . . . . . . . . . . . . . . . . . . . . . . . . . . . . . . . . . . . . . . . . . . . . . . . . . . . 137
Resolution . . . . . . . . . . . . . . . . . . . . . . . . . . . . . . . . . . . . . . . . . . . . . . . . . . . . . . . . . . . . . 137
Print Speed . . . . . . . . . . . . . . . . . . . . . . . . . . . . . . . . . . . . . . . . . . . . . . . . . . . . . . . . . . . . 137
Controller Specifications . . . . . . . . . . . . . . . . . . . . . . . . . . . . . . . . . . . . . . . . . . . . . . . . . . . . . 138
Memory . . . . . . . . . . . . . . . . . . . . . . . . . . . . . . . . . . . . . . . . . . . . . . . . . . . . . . . . . . . . . . . 138
Interfaces . . . . . . . . . . . . . . . . . . . . . . . . . . . . . . . . . . . . . . . . . . . . . . . . . . . . . . . . . . . . . . 138
Index
Dell 7130cdn Professional Color Printer
6
User Guide
Page 7

Features
This chapter includes:
• Parts of the Printer on page 8
• Printer Configurations on page 10
• Control Panel on page 12
• More Information on page 14
1
Dell 7130cdn Professional Color Printer
User Guide
7
Page 8
Features
Parts of the Printer
This section includes:
• Front View on page 8
• Rear View on page 9
• Internal Components on page 9
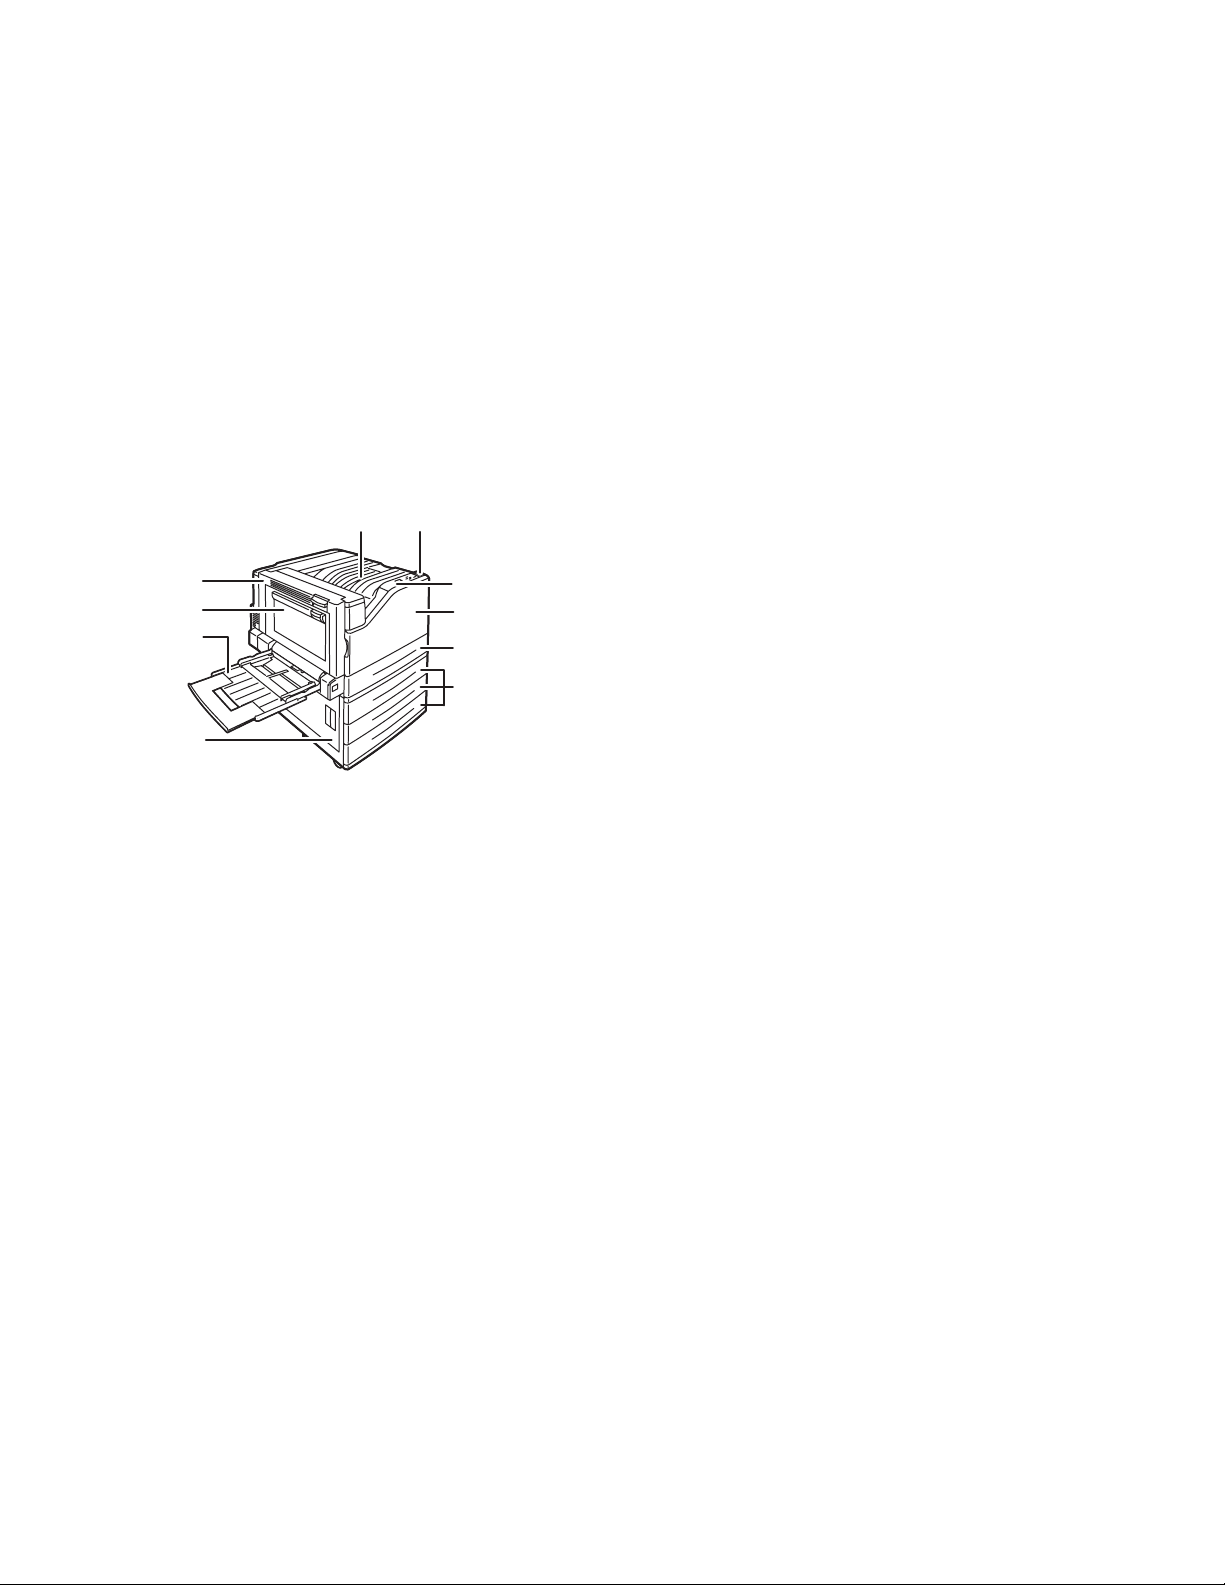
Front View
10
12
7
8
9
3
4
5
6
7130-028
1. Top output tray
2. Power switch
3. Control panel
4. Front door
5. Tray 2
6. Tray 3, 4, & 5 (option)
7. Door A
8. Door B
9. Tray 1 (MPT)
10. Door C
Dell 7130cdn Professional Color Printer
8
User Guide
Page 9
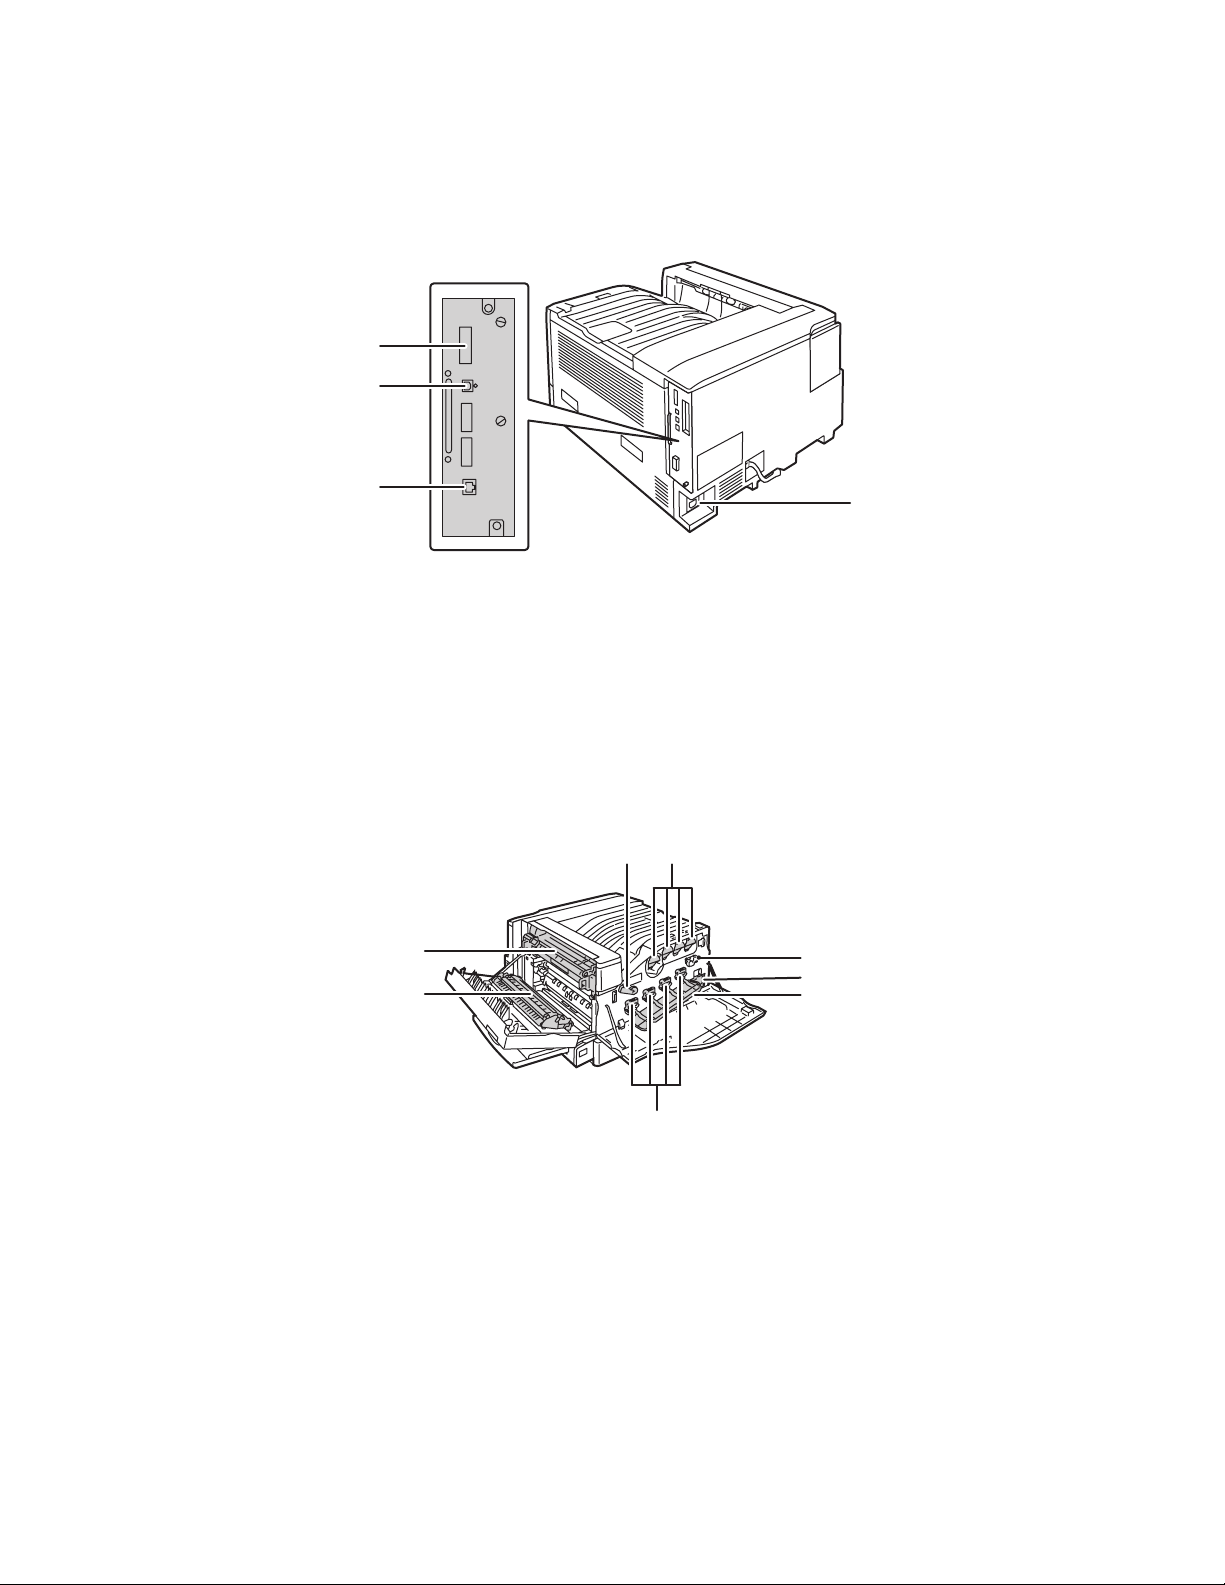
Rear View
Features
1
2
3
1. Configuration card 3. Ethernet connection
2. USB connection 4. Power cord connector
Internal Components
1
2
8
7
3
4
5
4
7130-026
6
1. Imaging unit cover lever 5. Imaging unit cover
2. Toner cartridges 6. Imaging units
3. Belt cleaner 7. Transfer roller
4. Waste cartridge 8. Fuser
Dell 7130cdn Professional Color Printer
7130-027
9
User Guide
Page 10
Features
Printer Configurations
• Standard Features on page 10
• Available Configurations on page 10
• Options on page 11
Standard Features
The Dell 7130cdn Professional Color Printer has many features to meet your printing needs:
• Maximum print speed of 35 pages per minute (ppm) for monochrome printing and 35 ppm for
color printing (on letter-size plain paper)
• 1 GHz processor
• 1200 x 600 dpi (Standard Mode), 1200 x 1200 dpi (Enhanced Mode), and 1200 x 1200 dpi
(Photo Mode)
• Tray 1 (MPT) that holds up to 100 sheets
• Tray 2 that holds up to 500 sheets
• 512 MB RAM memory, expandable to 2 GB
• PostScript and PCL fonts
• USB and Ethernet 10/100/1000Base-TX connections
• Up to 12 x 18 inch paper (SRA3)
• Up to 280 gsm paper weight
• RAM collation
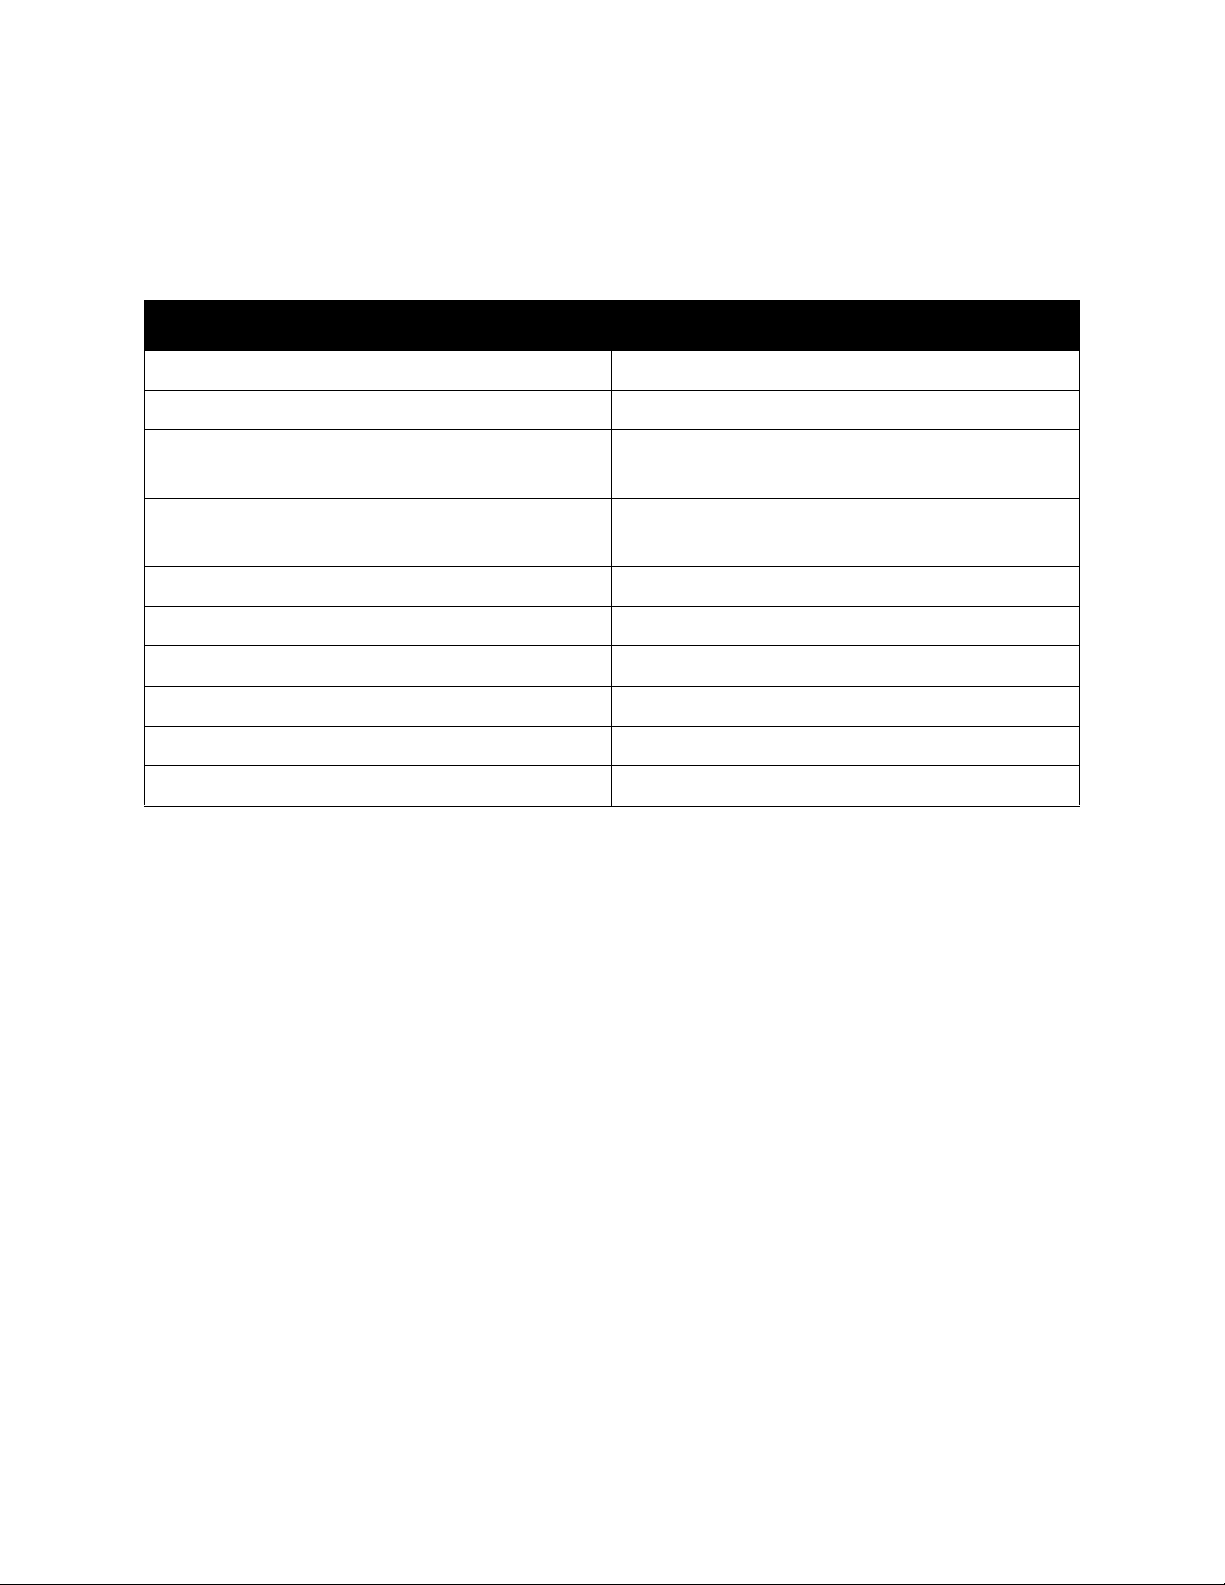
Available Configurations
The Dell 7130cdn printer is available in one configuration.
Features Configuration
7130cdn
Duplex Unit Yes
500-Sheet Feeder Optional
1500-Sheet Feeder Optional
Productivity kit (hard drive) Optional
Stand Optional
Note: The printer supports either the optional 500-Sheet Feeder or the 1500-Sheet Feeder
but not both at the same time.
Dell 7130cdn Professional Color Printer
10
User Guide
Page 11

Features
Options
The following options are available for the Dell 7130cdn printer:
• 500-Sheet Feeder: Provides Tray 3 for extra paper input capacity.
• 1500-Sheet Feeder: Provides Tray 3, 4, and 5 for extra input capacity.
• Productivity kit: Includes an internal hard drive and supports disk collation. Use to enable
printing features:
• Personal Print Jobs
• Personal Saved Print Jobs
• Secure Print Jobs
• Proof Print Jobs
• Saved Print Jobs
• Print With Jobs
• Stand: Provides storage space for supplies. Has casters and extensions to place the printer
and control panel at a convenient height.
For more information on options, go to www.dell.com/supplies.
Dell 7130cdn Professional Color Printer
User Guide
11
Page 12
Features
Control Panel
This section includes:
• Control Panel Layout on page 12
• Information Pages on page 13
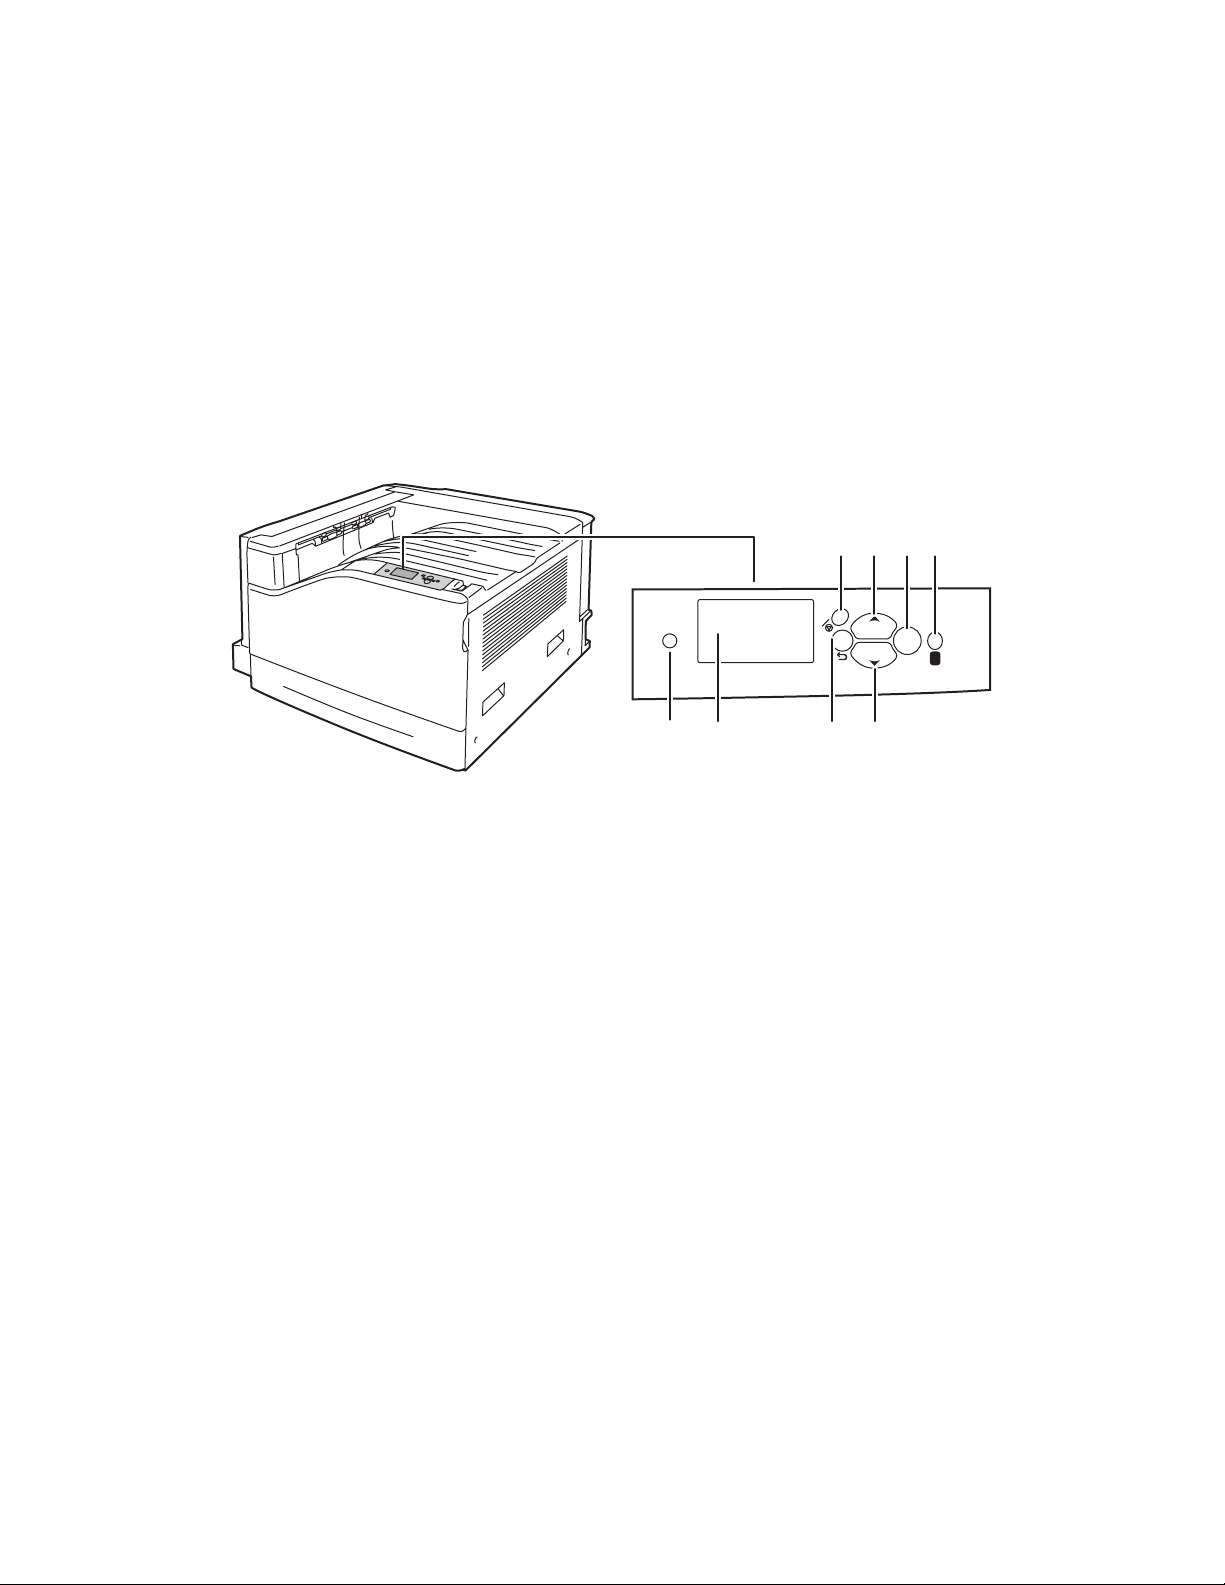
Control Panel Layout
3
5
7 8
C
?
OK
1. Indicator Light
Blinks when the printer is receiving and
printing a job.
2. Graphic display
Indicates status messages and menus.
3. Cancel button
Cancels the current printing job.
4. Back button
Returns to the previous menu item.
12
5. Up Arrow button
Scrolls upward through the menus.
6. Down Arrow button
Scrolls downward through the menus.
7. OK button
Selects the current setting.
8. Help (?) button
Displays a help message with information
about the printer, such as printer status, error
messages, and maintenance information.
6
4
7130-029
Dell 7130cdn Professional Color Printer
12
User Guide
Page 13

Features
Information Pages
Your printer has a set of printable information pages. The information pages provide reference
information about your printer and its current configuration.
To print an information page:
1. On the control panel, press the Down Arrow button to select Information > Information
Pages.
2. Select the information page and press the OK button.
Note: Information pages can also be printed from the Embedded Web Server (EWS).
Menu Map
The Menu Map information page shows you how to navigate to each of the printer’s functions. It
is useful for getting to know the capabilities and setting names of your printer.
Configuration Page
The Configuration Page lists information about the current configuration of your printer, and is
useful for network analysis and general troubleshooting.
Dell 7130cdn Professional Color Printer
User Guide
13
Page 14
Features
More Information
The following links provide more information about your printer and its capabilities.
Information Source
Installation Guide Packaged with printer
Quick Use Guide Packaged with printer
User Guide (PDF) Packaged with printer
Software and Documentation CD
Product Information Guide Packaged with printer
Software and Documentation CD
Video Tutorials www.support.dell.com
Online Diagnostics www.fixyourprinter.com/printerdiagnostics
Technical Support www.support.dell.com
Information about menus or error messages Control panel Help button
Information pages Print from the control panel
System Administrator Guide www.support.dell.com
Dell 7130cdn Professional Color Printer
14
User Guide
Page 15

Network Basics
This chapter includes:
• Overview of Network Setup and Configuration on page 16
• Choosing a Connection Method on page 17
• Configuring the Network Address on page 19
• Printer Management Software on page 23
• Available Printer Drivers on page 24
• Windows 2000 or Later on page 25
• Macintosh OS X, Version 10.3 and Higher on page 31
• UNIX (Linux) on page 34
• IPv6 on page 36
This chapter provides basic information about setting up and connecting to your printer.
Note: For information about setting up and connecting to your printer on an IPv6 network,
see IPv6 on page 36.
2
Dell 7130cdn Professional Color Printer
User Guide
15
Page 16

Network Basics
Overview of Network Setup and Configuration
To set up and configure the network:
1. Connect the printer to the network using the recommended hardware and cables.
2. Turn on the printer and the computer.
3. Print the Configuration page and keep it for referencing network settings.
4. Install the driver software on the computer from the Software and Documentation CD. For
information on driver installation, see the section in this chapter for the specific operating
system you are using.
5. Configure the printer’s TCP/IP address, which is required to identify the printer on the
network.
• Windows operating systems: Run the Installer on the Software and Documentation CD to
automatically set the printer’s IP address if the printer is connected to an established
TCP/IP network. You can also manually set the printer’s IP address on the control panel.
• Macintosh systems: Manually set the printer’s TCP/IP address on the control panel.
6. Print a Configuration page to verify the new settings.
Note: If the Software and Documentation CD is not available, you can download the latest
driver from www.support.dell.com.
Dell 7130cdn Professional Color Printer
16
User Guide
Page 17

Network Basics
Choosing a Connection Method
Connect the printer via Ethernet or USB. A USB connection is a direct connection and is not used
for networking. An Ethernet connection is used for networking. Hardware and cabling
requirements vary for the different connection methods. Cabling and hardware are generally not
included with your printer and must be purchased separately. This section includes:
• Connecting via Ethernet (Recommended) on page 17
• Connecting via USB on page 18
Connecting via Ethernet (Recommended)
Ethernet can be used for one or more computers. It supports many printers and systems on an
Ethernet network. An Ethernet connection is recommended because it is faster than a USB
connection. It also allows you direct access to the Embedded Web Server (EWS), which enables
you to manage, configure, and monitor network printers from your computer.
Network Connection
Depending on your particular setup, the following hardware and cabling is required for Ethernet.
• If you are connecting to one computer, an Ethernet RJ-45 crossover cable is required.
• If you are connecting to one or more computers with an Ethernet hub, or cable or DSL router,
two or more twisted-pair (category 5/RJ-45) cables are required. (One cable for each device.)
If you are connecting to one or more computers with a hub, connect the computer to the hub with
one cable, and then connect the printer to the hub with the second cable. Connect to any port on
the hub except the uplink port.
See also:
Configuring the Network Address on page 19
Available Printer Drivers on page 24
Dell 7130cdn Professional Color Printer
User Guide
17
Page 18

Network Basics
Connecting via USB
If you are connecting to one computer, a USB connection offers fast data speeds. However, a
USB connection is not as fast as an Ethernet connection. To use USB, PC users must have
Windows 2000/XP/Server 2003 or newer. Macintosh users must use Mac OS X, version 10.3 and
higher.
USB Connection
A USB connection requires a standard A/B USB cable. This cable is not included with your
printer and must be purchased separately. Verify that you are using the correct USB (1.x or 2.0)
cable for your connection.
1. Connect one end of the USB cable to the printer and turn it on.
2. Connect the other end of the USB cable to the computer.
See also:
Available Printer Drivers on page 24
Dell 7130cdn Professional Color Printer
18
User Guide
Page 19

Network Basics
Configuring the Network Address
This section includes:
• TCP/IP and IP Addresses on page 19
• Automatically Setting the Printer’s IP Address on page 20
• Dynamic Methods of Setting the Printer’s IP Address on page 20
• Manually Setting the Printer’s IP Address on page 21
TCP/IP and IP Addresses
If your computer is on a large network, contact your network administrator for the appropriate
TCP/IP addresses and additional configuration information.
If you are creating your own small Local Area Network or connecting the printer directly to your
computer using Ethernet, follow the procedure for automatically setting the printer’s Internet
Protocol (IP) address.
PCs and printers primarily use TCP/IP protocols to communicate over an Ethernet network. With
TCP/IP protocols, each printer and computer must have a unique IP address. It is important that
the addresses are similar, but not the same; only the last digit needs to be different. For example,
your printer can have the address 192.168.1.2 while your computer has the address 192.168.1.3.
Another device can have the address 192.168.1.4.
Generally, Macintosh computers use either TCP/IP or the EtherTalk protocol to talk to a
networked printer. For Mac OS X systems, TCP/IP is preferred. Unlike TCP/IP, however,
EtherTalk does not require printers or computers to have IP addresses.
Many networks have a Dynamic Host Configuration Protocol (DHCP) server. A DHCP server
automatically programs an IP address into every PC and printer on the network that is configured
to use DHCP. A DHCP server is built into most cable and DSL routers. If you use a cable or DSL
router, see your router’s documentation for information on IP addressing.
See also:
IPv6 on page 36
Dell 7130cdn Professional Color Printer
User Guide
19
Page 20

Network Basics
Automatically Setting the Printer’s IP Address
If the printer is connected to a small established TCP/IP network without a DHCP server, use the
installer on the Software and Documentation CD to detect or assign an IP address to your printer.
For further instructions, insert the Software and Documentation CD into your computer’s CD
drive. After the Dell Installer launches, follow the prompts for installation.
Note: For the automatic installer to function, the printer must be connected to an established
TCP/IP network.
Dynamic Methods of Setting the Printer’s IP Address
There are two protocols available for dynamically setting the printer’s IP address:
• DHCP (enabled by default on all Dell printers)
•AutoIP
You can turn on/off both protocols using the control panel, or use the Embedded Web Server to
turn on/off DHCP.
Note: You can view the printer’s IP address at any time. On the control panel, select
Information, press the OK button, select Printer Identification, then press the OK button.
Using the Control Panel
To turn on/off either the DHCP or AutoIP protocol:
1. On the control panel, select Printer Setup > Connection Setup > Network Setup >
TCP/IPv4 Setup, then press the OK button.
2. Select DHCP/BOOTP or AutoIP.
3. Press the OK button to turn the selection On or Off.
Using the Embedded Web Server
To turn on/off the DHCP protocol:
1. Launch your Web browser.
2. Enter the printer’s IP address in the browser’s Address field.
3. Select Properties.
4. Select the Protocols folder on the left navigation panel.
5. Select TCP/IP.
6. Click the TCP/IP (v4) button.
7. In the BOOTP/DHCP Settings section, set the BOOTP/DHCP option to On or Off.
8. In the TCP/IP Settings section, enter the static IP address which may be different than the
DHCP or auto IP address listed. Check that the Network Mask and Router/Gateway address
are correct for your network.
9. Click the Save Changes button.
Dell 7130cdn Professional Color Printer
20
User Guide
Page 21

Network Basics
Using Host Names with the Domain Name Service (DNS)
The printer supports DNS through an embedded DNS resolver. The DNS resolver protocol
communicates with one or more DNS servers to resolve the IP address for a given host name or
the host name for a given IP address.
To use an IP host name for the printer, the system administrator must configure one or more DNS
servers and a local DNS domain name space database. To set up the printer for DNS, supply a
maximum of two DNS name server IP addresses.
Dynamic Domain Name Service (DDNS)
The printer supports Dynamic DNS through DHCP. You must have DHCP enabled on the printer
for DDNS to function. Your network’s DHCP server must also support Dynamic DNS updates
through option 12 or option 81 support. See your network administrator for details.
1. Launch your Web browser.
2. Enter the printer’s IP address in the browser’s Address field.
3. Select Properties.
4. Select the Protocols folder on the left navigation panel.
5. Select TCP/IP, and then click the TCP/IP (v4) button.
6. In the BOOTP/DHCP Settings section, set the BOOTP/DHCP option to ON.
7. Click the DNS/WINS button.
8. To enable DDNS, set the following:
• Dynamic DNS Registration - Set to Enabled.
• Hostname - Use the default name provided by Dell or enter another name.
• Primary WINS Server (optional)
• Secondary WINS Server (optional)
9. Click Save Changes when you are finished entering the settings.
Manually Setting the Printer’s IP Address
Note: Verify that your computer has a properly configured IP address for your network.
Contact your network administrator for more information.
If you are on a network without a DHCP server, or in an environment where the network
administrator assigns printer IP addresses, you can use this method to manually set the IP
address. Manually setting the IP address overrides DHCP and AutoIP. Alternatively, if you are in
a small office with a single PC and use a dialup modem connection, you can manually set the IP
address.
Information Required for Manual IP Addressing
Internet Protocol (IP) address of the printer Format is xxx.xxx.xxx.xxx, where xxx represents
a decimal number from 0–255.
Network Mask If you are unsure, leave this blank; the printer
chooses an appropriate mask.
Dell 7130cdn Professional Color Printer
User Guide
21
Page 22

Network Basics
Information Required for Manual IP Addressing
Default Router/Gateway address Router address is required to communicate with
the host device from anywhere other than the
local network segment.
Using the Control Panel
To manually set the IP address:
1. On the control panel, select Printer Setup > Connection Setup > Network Setup >
TCP/IPv4 Setup, then press the OK button.
2. Select DHCP/BOOTP, then press the OK button to select Off.
3. Select IPv4 Address, then press the OK button.
4. Enter the printer’s IP address, then press the OK button.
Changing or Modifying the IP Address Using the Embedded Web Server
The Embedded Web Server provides a simple interface that enables you to manage, configure,
and monitor networked printers from your desktop using an embedded Web server. For complete
information about the Embedded Web Server, click the Help button in the Embedded Web
Server to go to the EWS Online Help.
After setting the printer’s IP address, you can modify TCP/IP settings using the Embedded Web
Server.
1. Launch your Web browser.
2. Enter the printer’s IP address in the browser’s Address field.
3. Click Properties.
4. Select the Protocols folder on the left navigation panel.
5. Select TCP/IP.
6. Enter or modify the settings, and then click Save Changes at the bottom of the page.
See also:
System Administrator Guide at www.support.dell.com
Dell 7130cdn Professional Color Printer
22
User Guide
Page 23

Network Basics
Printer Management Software
Embedded Web Server
The Embedded Web Server (EWS) provides access to the printer’s embedded Web server. It
enables you to easily manage, configure, and monitor network printers using a Web browser on a
network computer. EWS gives administrators access to printer status, configuration, security
settings, and diagnostic functions. It also provides access to special printing functions such as
printing saved jobs.
The Embedded Web Server enables you to:
• Check supplies status from your computer, saving a trip to the printer. Access job accounting
records to allocate printing costs and plan supplies purchases.
• Define a network printer search and view a list of printers using Printer Neighborhood. The
list provides current status information and allows you to manage printers independent of
network servers and operating systems.
• Configure printers from your computer. The Embedded Web Server makes it easy to copy
settings from one printer to another.
• Set up and use a simple Web-browser-based printing system. Marketing collateral, sales
materials, business forms, or other standardized, frequently used documents can be saved
as a group with their original driver settings then reprinted on demand at high speed from any
user's browser. A printer with a hard drive is required to support these functions.
• Troubleshoot print-quality problems using built-in diagnostics.
• Define a link to your local Web server’s support page.
• Access online manuals and technical support information located on the Dell website.
Note: The Embedded Web Server requires a Web browser and a TCP/IP connection
between the printer and the network (in Windows, Macintosh, or UNIX environments). TCP/IP
and HTTP must be enabled in the printer. JavaScript is required to access the pages in
Printer Neighborhood. If JavaScript is disabled, a warning message appears and the pages
do not function properly.
For complete information about the Embedded Web Server, click the Help button in the
Embedded Web Server to go to the EWS Online Help.
Dell 7130cdn Professional Color Printer
User Guide
23
Page 24

Network Basics
Available Printer Drivers
To access special printing options, use a Dell printer driver.
Dell provides drivers for a variety of page description languages and operating systems. The
following printer drivers are available:
Printer Driver Description
Windows PostScript Driver The PostScript driver is recommended to take full advantage of your
system’s custom features and genuine Adobe® PostScript®. (Default
printer driver)
Windows PCL5c Driver The Printer Command Language driver can be used for applications
requiring PCL.
Note: Supported in all Windows operating systems.
Mac OS X (Version 10.3 and
higher) Driver
UNIX Driver This driver enables printing from a UNIX operating system.
This driver enables printing from a Mac OS X (version 10.3 and
higher) operating system.
* Go to the Software and Documentation CD for the latest printer drivers.
Dell 7130cdn Professional Color Printer
24
User Guide
Page 25

Network Basics
Windows 2000 or Later
This section includes:
• Preliminary Steps on page 25
• Quick CD Install Steps on page 25
• Other Methods of Installation on page 26
• Windows 64-Bit Server to 32-Bit Client Installation on page 28
• Windows 2000 or Later Troubleshooting on page 29
Preliminary Steps
These preliminary steps must be performed for all printers:
1. Verify that the printer is plugged in, turned On, and connected to an active network.
2. Verify that the printer is receiving network information by monitoring the LEDs on the back of
the printer. When the printer is connected to a functioning network and receiving traffic, its link
LED is green, and its amber traffic LED is flashing rapidly.
Quick CD Install Steps
To install the printer driver from the Software and Documentation CD:
1. Insert the CD into the computer’s CD drive. If the installer does not launch, do the following:
a. Click Start, then click Run.
b. In the Run window, type: <CD drive>:\Setup.exe.
2. Select Install Printer Driver.
3. Select your desired language from the list.
4. Accept the license agreement.
5. Select your printer in the list of discovered printers, and click Next.
If your printer does not appear in the list of discovered printers:
a. Click the IP Address or DNS Name button near the top of the window.
b. Type the address or name of the desired printer, and click Search.
c. When the printer is displayed in the window, click Next.
6. Select the installation options you want to use, and click Install.
Dell 7130cdn Professional Color Printer
User Guide
25
Page 26

Network Basics
Other Methods of Installation
Your printer can also be installed on a network using one of these methods:
• Microsoft TCP/IP Protocol
• Microsoft IPP Port
You can monitor or configure your printer with the Embedded Web Server and a Web browser if
your printer is connected to a network with the TCP/IP protocol enabled.
Note: The Embedded Web Server methods are not discussed in this section. See Available
Printer Drivers on page 24.
Microsoft TCP/IP Protocol
For Windows XP, select Classic Look or the Windows XP procedures will not match the steps
below. To select Classic Look, click Start > Control Panel > Taskbar and Start Menu. Select the
Start Menu tab, then select the Classic Start menu. Click OK.
To verify that TCP/IP is installed:
1. Right-click the My Network Places icon on the desktop, then click Properties.
2. Right-click Local Area Connection, then click Properties.
3. Click the General tab to verify that Internet Protocol (TCP/IP) is installed.
• If the Internet Protocol (TCP/IP) box is checked, the software is installed.
• If the Internet Protocol (TCP/IP) box is not checked, the software is not installed. Install
TCP/IP software using the documentation provided by Microsoft, and then return to this
document.
Adding the Printer
To add the printer:
1. On the desktop click Start, then click Settings.
2. Select one of these options:
• Windows 2000: Click Printers, double-click Add Printer to launch the Add Printer
Wizard, then click Next.
• Windows XP or Windows Server 2003: Click Printers and Faxes. Double-click Add
Printer to launch the Add Printer Wizard, then click Next.
3. Click the Local Printer button, then click Next.
4. Click the Create a New Port button.
5. Select Standard TCP/IP Port from the New Port Type drop-down menu, then click Next.
6. Click Next.
7. Enter the IP Address of the printer you want to use in the Printer Name or IP Address edit
box. Click Next.
8. Select one of these options:
•Click Finish in the Confirmation window if the data is correct.
• Click the Back button to correct the data if it is incorrect, then click Finish in the
Confirmation window.
Dell 7130cdn Professional Color Printer
26
User Guide
Page 27

Network Basics
Configuring the Printer
To configure the printer:
1. Insert the Software and Documentation CD into the computer’s CD drive and click
Have Disk.
2. Click the Browse button, and then select the directory which contains the Windows 2000 or
Windows XP drivers.
3. Select the *.INF file, then click Open.
4. Verify that the path and filename are correct, then click OK.
5. Enter a name for the printer and select whether you want that printer to be the default. Click
Next.
6. Select one of these options:
• If the printer is not shared, click Next.
• If the printer is shared, enter a Share Name, check the Share box, then click Next.
Printing a Test Page
You are prompted to print a test page.
1. Select one of these options:
•Click Yes to print a test page, then click Next.
•Click No if you do not want to print a test page, then click Next.
2. Select one of these options in the Completing the Add Printer Wizard screen:
• Click the Finish button if the data presented is correct. Proceed to Step 3.
• Click the Back button to correct the data if incorrect, then click Finish in the Add Printer
Wizard when the data is correct. Proceed to Step 3.
3. If you printed a test page, you are prompted to confirm that the test page printed:
•Click Yes if the test page printed successfully.
•Click No if the test page did not print or printed incorrectly.
See also:
Windows 2000 or Later Troubleshooting on page 29
Microsoft IPP Port
Follow these steps to obtain the printer’s URL and create an Internet Printing Protocol (IPP)
printer.
Obtaining the Printer’s URL (Network Path)
To obtain the printer’s URL:
1. Launch your Web browser.
2. Enter your printer's IP address in the browser’s Address field.
3. Select Properties.
Dell 7130cdn Professional Color Printer
User Guide
27
Page 28

Network Basics
4. Select the Protocols folder on the left navigation panel.
5. Select IPP. The Network Path field on the IPP Settings page displays the printer’s URL.
Creating an IPP Printer
To create an IPP printer:
1. On the desktop, click Start > Settings > Printers.
2. Double-click Add Printer to launch the Microsoft Add Printer Wizard.
3. Select Network Printer, then click Next.
4. When prompted for URL (Windows 2000, Windows XP), enter the printer’s URL in the
following format:
http://printer-ip-address/ipp
Note: Substitute your printer’s IP address or DNS name for printer-ip-address.
5. Click Next.
Configuring the Printer
To configure the printer:
1. Insert the Software and Documentation CD into the computer’s CD drive and click
Have Disk.
2. Click the Browse button, and then select the directory which contains the Windows 2000 or
Windows XP drivers.
3. Select the *.INF file, then click Open.
4. Verify that the path and filename are correct, then click OK.
5. Enter a name for the printer and select whether you want that printer to be the default. Click
Next.
6. Select one of these options:
• If the printer is not shared, click Next.
• If the printer is shared, enter a Share Name, check the Share box, then click Next.
7. Click Next.
Windows 64-Bit Server to 32-Bit Client Installation
To install from a 64-Bit Server in Windows XP and Windows Server 2003:
1. Locate and install the 64-bit Windows driver from the Software and Documentation CD.
2. Right-click on My Computer, then select Manage.
3. Expand Local Users and Groups, then double-click the Groups folder.
4. Double-click on Administrators, then click the Add button.
5. Type the 32-bit client’s login name, then click OK.
To install from a 32-Bit Client:
1. Insert the Software and Documentation CD and close the installer window.
2. Open My Network Places, then browse to the 64-bit system.
3. Double-click on Printers and Faxes.
Dell 7130cdn Professional Color Printer
28
User Guide
Page 29

Network Basics
4. Select File, then select Server Properties from the drop-down list.
5. On the Drivers tab, click the Add button.
6. Click Next, select Have Disk, then click OK.
7. Browse to the 32-bit driver on the Software and Documentation CD, and open the Windows
folder.
8. Open the appropriate language folder, select the .inf file, then click OK.
9. Choose your Printer, then click Next.
10. Select Intel Box for Windows XP, then click Next.
11. Click Finish.
12. In the My Network Places dialog box, double-click the 64-bit system, then select Yes.
Windows 2000 or Later Troubleshooting
Note: For Windows XP, select Classic Look or the Windows XP procedures will not match the
steps below. To select Classic Look, click Start > Control Panel > Taskbar and Start Menu.
Select the Start Menu tab, then select Classic Start menu. Click OK.
This Troubleshooting section assumes you have completed the following tasks:
• Loaded a Dell printer PCL or PostScript printer driver.
• Printed and kept a current copy of the Configuration page.
Verifying Settings
To verify settings:
1. Verify the settings on the Configuration page.
• IP Address Source is set to: DHCP, Control Panel, BOOTP, or Auto IP (depending on
your network configuration).
• Current IP Address is set correctly. (Note this address if it is assigned by Auto IP, DHCP,
or BOOTP.)
• Subnet Mask is set correctly (if used).
• Default Gateway is set correctly (if used).
• LPR is enabled. Verify that the LPR and AppSocket settings are set as desired.
• Interpreters: Auto, PCL, or PostScript (depending on your driver).
2. Verify that the client is logged into the network and printing to the correct print queue. The
user should also have access to the Dell printer queue.
Verifying Driver Installation
To verify driver installation:
1. Right-click My Network Places on the desktop, then click Properties.
2. Right-click Local Area Connection, then click Properties.
3. Select the General tab. View the list of installed network protocols to verify that TCP/IP is
installed. (For more information, contact your network administrator.)
4. Click Install to install any components not listed, then restart your computer.
Dell 7130cdn Professional Color Printer
User Guide
29
Page 30

Network Basics
5. Click Start > Settings > Printers.
6. Right-click the printer icon, then click Properties.
7. Select the Advanced tab. Verify that the correct printer driver is installed.
8. Select the Ports tab. Verify that the IP Address in the Print to the Following Ports list is
identical to the one on the Configuration page. You may need to click the Configure Port
button to see the IP address. If necessary, re-select the TCP/IP number used for the printer.
Printing a Test Page
To print a test page:
1. Select the General tab.
2. Click Print Test Page. If the printer does not print, select Online Diagnostics Technical
Support on the Troubleshooting tab of your Windows printer driver to access Online
Diagnostics Technical Support.
Dell 7130cdn Professional Color Printer
30
User Guide
Page 31

Network Basics
Macintosh OS X, Version 10.3 and Higher
This section includes:
• Macintosh OS X, Version 10.3 on page 31
• Macintosh OS X, Version 10.4 and Higher on page 32
• Macintosh Troubleshooting (Mac OS X, Version 10.3 and Higher) on page 33
Macintosh OS X, Version 10.3
Set up your printer using Bonjour (Rendezvous), create a desktop USB connection, or use an
LPD/LPR connection for Macintosh OS X, version 10.3 and higher.
Bonjour (Rendezvous) Connection
To install the printer driver from the Software and Documentation CD:
1. Insert the CD into the CD drive and run the installer package to install the printer software.
2. When installation is complete, open the Printer Setup Utility.
Note: To locate utilities on the Macintosh hard drive, open the Applications folder, and then
open the Utilities folder.
3. Confirm that the first drop-down menu is set to Bonjour (Rendezvous).
4. Select the printer in the window.
5. Select Dell from the list of manufacturers in the lower drop-down menu.
6. Select the appropriate printer model from the list of available devices.
7. Click the Add button.
Dell 7130cdn Professional Color Printer
User Guide
31
Page 32

Network Basics
USB Connection
To install the printer driver from the Software and Documentation CD:
1. Insert the CD into the CD drive.
• Open the Printer Setup Utility.
Note: To locate utilities on the Macintosh hard drive, open the Applications folder, and then
open the Utilities folder.
2. Click the Add button.
3. Select USB from the drop-down menu.
4. Select the printer in the window.
5. Select Dell from the manufacturers in the drop-down menu.
6. Select the appropriate printer configuration from the list of available printers.
7. Click the Add button.
LPD/LPR Connection
To install the printer driver from the Software and Documentation CD:
1. Insert the CD into the CD drive and run the installer package to install the printer software.
2. Once installation is complete, open the Printer Setup Utility.
Note: To locate utilities on the Macintosh hard drive, open the Applications folder, and then
open the Utilities folder.
3. Click the Add button.
4. Select IP Printing from the first pull-down menu. Select LPD/LPR from the second pull-down
menu. Enter the printer’s IP address in the Printer Address field. Verify that the Queue
Name field is blank. Select Dell from the Printer Model pull-down menu, and then select the
corresponding PPD file. Click the Add button. The printer is added to the list.
Macintosh OS X, Version 10.4 and Higher
To install the printer driver from the Software and Documentation CD:
1. Insert the CD into the CD drive.
2. Run the installer package.
3. Follow the prompts in the Install Dell Printer Installation dialog box.
If your printer does not appear in the list of discovered printers:
a. Click the IP Address or DNS Name button near the top of the window.
b. Type the address or name of the desired printer, and click Search.
c. When the printer is displayed in the window, click Continue.
Dell 7130cdn Professional Color Printer
32
User Guide
Page 33

Network Basics
Macintosh Troubleshooting (Mac OS X, Version 10.3 and Higher)
The following procedure eliminates cabling, communication, and connection problems. Once you
complete these steps, print a test page from your software application.
Mac OS X, Version 10.3 and Higher Troubleshooting
Perform these steps only for Mac OS X, versions 10.3 and higher:
1. Open the Network Utility, then click the Ping tab.
2. Enter the printer’s IP address.
3. Click Ping. If you do not get a response, confirm that your TCP/IP settings are correct for
your printer and computer.
4. For AppleTalk, follow the steps below. For TCP/IP proceed to Step 5.
a. From the printer’s control panel, verify that EtherTalk is enabled. If it is not, enable it in
the control panel, and then reset the printer.
b. Print the Configuration page and verify that EtherTalk is enabled.
c. From the Configuration page, verify the Zone. If you have multiple zones on your
network, verify that your printer appears in the desired zone.
5. If you are still unable to print, access Online Diagnostics Technical Support through the
Embedded Web Server:
a. Launch your Web browser.
b. Enter the printer’s IP address in the browser’s Address field.
c. Select Support.
d. Click the Online Diagnostics Tool link to access Online Diagnostics.
Dell 7130cdn Professional Color Printer
User Guide
33
Page 34

Network Basics
UNIX (Linux)
Your printer supports connection to a variety of UNIX platforms through the network interface.
The workstations currently supported by EWS for UNIX/Linux to a network-connected printer are:
• Sun Solaris
• IBM AIX
• Hewlett-Packard HP-UX
• Linux (i386)
The following procedures enable you to connect your printer using any of the supported versions
of UNIX or Linux listed above.
Quick Install Steps
Perform the following procedures to set up the printer and install the appropriate drivers.
From the Printer
To set up the printer:
1. Verify that both TCP/IP protocol and the proper connector are enabled.
2. On the control panel, select one of these IP address options:
• Allow the printer to set up a DHCP address.
• Enter the IP address manually.
3. Print the Configuration page and keep it for reference.
From Your Computer
To install the printer:
1. Go to www.support.dell.com.
2. Click Drivers and Downloads.
3. Select either Choose by Service Tag or Choose a Model option to navigate to
Dell 7130cdn printer.
4. Select Unix from the Operating System drop-down menu, and then click Go.
5. Click the EWS for Unix package for the operating system this will be installed in. This is the
core package and must be installed first before the printer package.
6. Click the Start button to begin downloading.
7. Repeat steps 1 and 2, and then click the Printer Package for use with Services for Unix
link.
Dell 7130cdn Professional Color Printer
34
User Guide
Page 35

Network Basics
8. Click the Start button to begin downloading.
9. In your browser, click the Installation Guide link, and then follow the installation instructions.
Note: If print-quality problems exist, or your job did not print, access Online Diagnostics
Technical Support through the Embedded Web Server.
To access Online Diagnostics Technical Support:
1. Launch your Web browser.
2. Enter the printer’s IP address in the browser’s Address field.
3. Select Support.
4. Click the Online Diagnostics Tool link to access Online Diagnostics.
Installing the Printer When Using CUPS as the Print Spooler
When using CUPS as the print spooler, you need to add the printer’s .ppd file to the
/usr/share/cups/model/Dell directory.
To install the .ppd file:
1. Go to www.support.dell.com.
2. Click Drivers and Downloads.
3. Select either Choose by Service Tag or Choose a Model option to navigate to
Dell 7130cdn printer.
4. Select Unix from the Operating System drop-down menu, and then click Go.
5. Click the PPD Files using CUPS Printing Services link.
6. Click the Start button to begin downloading.
7. In your browser, click the README link, and then follow the installation instructions.
Dell 7130cdn Professional Color Printer
User Guide
35
Page 36

Network Basics
IPv6
This section includes:
• Enabling IPv6 on page 36
• Setting the Interface ID on page 37
• Automatic Address Assignment on page 38
• DHCPv6 on page 38
• Manual Address Assignment on page 39
• Address Precedence on page 40
Enabling IPv6
IPv6 can be enabled or disabled independently of IPv4.
Note: If you disable both IPv4 and IPv6, you will lose your connection to the printer. For
information on restoring the default TCP/IP settings, see Resetting the TCP/IP Configuration
on page 37.
To enable/disable IPv6, use one of the following options:
• The printer’s control panel
• Embedded Web Server
Using the Control Panel
To enable/disable IPv6 on the control panel:
1. Select Printer Setup > Connection Setup > Network Setup > TCP/IPv6 Setup, then press
the OK button.
2. Select IPv6, then press the OK button to switch between On and Off.
Using the Embedded Web Server
To enable/disable IPv6 using the Embedded Web Server:
1. Launch your Web browser.
2. Enter your printer’s IP address in the browser’s Address field.
3. Click Properties.
4. Select the Protocols folder on the left navigation panel, then click TCP/IP.
5. Click the TCP/IP (v6) button.
6. Select the TCP/IP v6 Enabled check box to enable TCP/IP v6.
7. Click the Save Changes button at the bottom of the page.
Dell 7130cdn Professional Color Printer
36
User Guide
Page 37

Network Basics
Resetting the TCP/IP Configuration
Use the following procedure at the control panel to reset the TCP/IP configuration to the default
settings:
Select Printer Setup > Connection Setup > Reset Connection Setup, then press the OK
button.
Setting the Interface ID
Your IPv6-enabled printer has one interface with multiple addresses. The Interface ID is the part
of the address after the prefix. The printer uses the Interface ID when assigning both the LinkLocal address and automatic addresses that use router supplied prefix(es). It is not used in
addresses supplied by DHCPv6. Link-Local addresses are used by nodes to communicate with
other nodes on the same local network. There are two options to set the Interface ID:
• The default is to have the Interface ID automatically computed from the MAC address
associated with the interface. The ID is different for each device. This is the recommended
method for setting the Interface ID.
• The other option is to manually set the interface ID. The Interface ID must be 64 bits (8 bytes)
in length, and must not contain special characters other than colons or valid hexadecimal
digits (0 through 9, a through f, or A through F).
Note: If you change the Interface ID, you will be prompted to reset the printer before the
changes take effect.
The Interface ID can only be set in the Embedded Web Server.
Using the Embedded Web Server
To set the Interface ID using the Embedded Web Server:
1. Launch your Web browser.
2. Enter your printer’s IP address in the browser’s Address field.
3. Click Properties.
4. Select the Protocols folder on the left navigation panel, then click TCP/IP.
5. Click the TCP/IP (v6) button.
6. Do one of the following:
• Select User Interface ID from MAC address.
• Select Use this Interface ID.
7. Click the Save Changes button at the bottom of the page.
Dell 7130cdn Professional Color Printer
User Guide
37
Page 38

Network Basics
Automatic Address Assignment
Addresses can be assigned automatically when a router is found that offers one or more prefixes.
Automatically assigned addresses are routeable. Each router-supplied prefix is combined with
the Interface ID to create an address. The use of router-supplied prefixes is enabled by default.
To enable/disable automatic address assignment, use one of the following options:
• The printer’s control panel
• Embedded Web Server
Enabling/Disabling Automatic Address Assignment with the Control Panel
To set the Interface ID on the control panel:
1. Select Printer Setup > Connection Setup > Network Setup > TCP/IPv6 Setup, then press
the OK button.
2. Select Auto Assign, then press the OK button to turn Auto Assign On or Off.
Enabling/Disabling Automatic Address Assignment with the Embedded
Web Server
To set the Interface ID with the Embedded Web Server:
1. Launch your Web browser.
2. Enter your printer’s IP address in the browser’s Address field.
3. Click Properties.
4. Select the Protocols folder on the left navigation panel, then click TCP/IP.
5. Click the TCP/IP (v6) button.
6. Select/deselect Use router supplied prefixes.
7. Click the Save Changes button at the bottom of the page.
DHCPv6
DHCPv6 is used to acquire TCP/IP information.
The following DHCPv6 options are available in the Embedded Web Server:
• As directed by the router - DHCPv6 is performed according to values in a router
advertisement. This is the default setting.
• Always, for all configuration options (stateful) - Stateful DHCPv6 is always attempted,
and router flags related to how to perform DHCP are ignored. Configuration options and an
IPv6 address will be accepted if DHCPv6 is successful.
• Always, for all configuration options except address (stateless) - Stateless DHCPv6 is
always attempted, and router flags related to how to perform DHCP will be ignored.
Configuration options will be accepted if DHCPv6 is successful, but no IPv6 address will be
assigned.
• Never - DHCPv6 is not used even if directed to do so by a router.
Dell 7130cdn Professional Color Printer
38
User Guide
Page 39

Network Basics
To enable/disable automatic address assignment, use one of the following options:
• The printer’s control panel
• Embedded Web Server
Setting DHCPv6 Options with the Control Panel
To change DHCPv6 options using the control panel:
1. Select Printer Setup > Connection Setup > Network Setup > TCP/IPv6 Setup > DHCPv6
Mode, then press the OK button.
2. Select the DHCPv6 option, then press the OK button.
Setting DHCPv6 Options Using the Embedded Web Server
To change DHCPv6 options using the Embedded Web Server:
1. Launch your Web browser.
2. Enter your printer’s IP address in the browser’s Address field.
3. Click Properties.
4. Select the Protocols folder on the left navigation panel, then click TCP/IP.
5. Click the TCP/IP (v6) button.
6. Select/deselect the DHCPv6 options.
7. Click the Save Changes button at the bottom of the page.
Manual Address Assignment
A manually entered IPv6 address is used in addition to any other IPv6 addresses. To create a
manual address, enter the IPv6 address and prefix length in the fields provided in the Embedded
Web Server. The default prefix length is 64.
To manually set the IPv6 address, use one of the following options:
• The printer’s control panel
• Embedded Web Server
Setting the IPv6 Address with the Control Panel
To set the IPv6 address on the control panel:
1. Select Printer Setup > Connection Setup > Network Setup > TCP/IPv6 Setup, then press
the OK button.
2. Select Manual Address, then press the OK button to turn manual addressing on.
3. Select Manual Address, then press the OK button.
4. To set the address:
a. Use the Up Arrow and Down Arrow buttons to set the first number, then press the OK
button.
b. Continue setting individual numbers, pressing the OK button after setting each one.
When you get to the end of the address, press the OK button to return to the menu.
Dell 7130cdn Professional Color Printer
User Guide
39
Page 40

Network Basics
Setting the IPv6 Address Using the Embedded Web Server
To manually set the IPv6 address using the Embedded Web Server:
1. Launch your Web browser.
2. Enter your printer’s IP address in the browser’s Address field.
3. Click Properties.
4. Select the Protocols folder on the left navigation panel, then click TCP/IP.
5. Click the TCP/IP (v6) button.
6. In the Manual Address Assignment field, select Use this address, and then type the
address.
7. Click the Save Changes button at the bottom of the page.
Address Precedence
Address precedence can be set to prefer IPv6 or IPv4 addresses when both types are available.
The default setting is to prefer IPv6 addresses. Address Precedence can only be set in the
Embedded Web Server.
Using the Embedded Web Server
To set address precedence using the Embedded Web Server:
1. Launch your Web browser.
2. Enter your printer’s IP address in the browser’s Address field.
3. Click Properties.
4. Select the Protocols folder on the left navigation panel, then click TCP/IP.
5. Click the TCP/IP (v6) button.
6. In the Address Precedence field, select the desired option.
7. Click the Save Changes button at the bottom of the page.
Dell 7130cdn Professional Color Printer
40
User Guide
Page 41

Printing
This chapter includes:
• Printing Overview on page 42
• Supported Media on page 43
• Loading Media on page 45
• Printing on Special Media on page 58
• Selecting Printing Options on page 64
• Printing on Both Sides of the Paper on page 67
• Selecting Paper Type to Use on page 70
• Printing Multiple Pages to a Single Sheet (N-Up) on page 71
• Printing Booklets on page 72
• Using Color Corrections on page 74
• Printing in Black and White on page 77
• Printing Separators on page 78
• Printing Cover Pages on page 79
• Printing Watermarks on page 81
• Printing Mirror Images on page 82
• Printing Special Job Types on page 83
3
Dell 7130cdn Professional Color Printer
User Guide
41
Page 42

Printing
Printing Overview
1. Select appropriate media.
2. Load media in the tray, then specify the size and type on the printer’s control panel.
3. Access the print settings in your software application (CTRL+P in Windows, CMD+P on a
Macintosh for most software applications).
4. Select your printer from the list.
5. Access the printer driver settings by selecting Properties or Preferences (Windows), Dell
Features for Macintosh. The title of the button may vary depending on your application.
6. Modify the printer driver settings as necessary and select OK (Windows) or Dell Features
(Macintosh).
7. Select Print (in your application’s print settings dialog) to send the job to the printer.
See also:
Supported Media on page 43
Loading Media on page 45
Selecting Printing Options on page 64
Printing on Both Sides of the Paper on page 67
Printing on Special Media on page 58
Dell 7130cdn Professional Color Printer
42
User Guide
Page 43

Printing
Supported Media
This section includes:
• General Media Loading Guidelines on page 43
• Media That Can Damage Your Printer on page 44
• Paper Storage Guidelines on page 44
Your printer is designed to be used with a variety of media types. Follow the guidelines in this
section to ensure the best print quality and to avoid jams.
For best results, use Dell recommended printing media specified for your Dell 7130cdn printer.
You can also print a summary of supported media (the Paper Tips information page) directly from
the printer.
Ordering Media
To order paper, transparencies, or other specialty media, contact your local reseller or go to:
www.dell.com/supplies.
Caution: Damage caused by using unsupported paper, transparencies, and other specialty
media is not covered by the Dell warranty or service agreement.
General Media Loading Guidelines
Follow these guidelines when loading paper and media in the appropriate trays:
• Use only Dell recommended transparencies; print quality may vary with other transparencies.
• Do not print on sheets of label stock that have labels removed.
• Use only paper envelopes. Print envelopes single-sided only.
• Do not overload the paper trays.
• Adjust the paper guides to fit the paper size.
Dell 7130cdn Professional Color Printer
User Guide
43
Page 44

Printing
Media That Can Damage Your Printer
Your printer is designed to use a variety of paper and media types for print and copy jobs.
However, some media can cause poor output quality, increased paper jams, or damage to your
printer.
Do not use the following:
• Rough or porous media
• Inkjet paper
• Non-laser glossy or coated paper
• Paper that has been photocopied
• Paper that has been folded or wrinkled
• Paper with cutouts or perforations
• Stapled paper
• Envelopes with windows, metal clasps, side seams, or adhesives with release strips
• Padded envelopes
• Plastic media other than supported transparencies
Paper Storage Guidelines
Providing good storage conditions for your paper and other media contributes to optimum print
quality.
• Store paper in dark, cool, relatively dry locations. Most paper is susceptible to damage from
ultraviolet (UV) and visible light. UV radiation, which is emitted by the sun and fluorescent
bulbs, is particularly damaging to paper items. The intensity and length of exposure to visible
light on paper should be reduced as much as possible.
• Maintain constant temperatures and relative humidity.
• Avoid storing paper in attics, kitchens, garages, or basements. These spaces are more likely
to collect moisture.
• Store paper flat, either on pallets, cartons, shelves, or in cabinets.
• Avoid having food or drinks in the area where paper is stored or handled.
• Do not open sealed packages of paper until you are ready to load them into the printer. Leave
stored paper in the original packaging. For most commercial-cut size grades, the ream
wrapper contains an inner lining that protects the paper from moisture loss or gain.
• Some specialty media is packaged inside resealable plastic bags. Store the media inside the
bag until you are ready to use it; keep unused media in the bag and reseal it for protection.
Dell 7130cdn Professional Color Printer
44
User Guide
Page 45

Printing
Loading Media
This section includes:
• Loading Paper in Tray 1 (MPT) on page 45
• Loading Paper in Trays 2–5 on page 50
Most paper sizes can be loaded in the trays either long-edge feed or short-edge feed, however,
printing long-edge feed is recommended to optimize the life of the printer, supplies, and print
speed.
Loading Paper in Tray 1 (MPT)
Tray 1 (MPT) accepts the following paper types:
• Plain paper
• Heavy plain paper
• Transparencies
• Thin Card Stock
• Card Stock
• Thick Card Stock
• Extra Thick Card Stock
• Envelopes
• Labels
• Letterhead
• Thin Glossy Paper
• Glossy Paper
• Thick Glossy Paper
• Preprinted paper
• Prepunched paper
• Recycled paper
• Specialty media
• Custom types
Tray 1 (MPT) accepts a maximum of:
• 100 sheets of plain paper (20 lb. Bond)
• 50 transparencies, postcards, sheets of labels, or sheets of glossy paper
• 10 envelopes
Dell 7130cdn Professional Color Printer
45
User Guide
Page 46

Printing
Long-Edge Feed
Use long-edge feed for faster printing when the paper fits that way.
Note: Use long-edge feed for printing all envelopes except C4.
To load paper or other media in Tray 1 (MPT):
1. Open Tray 1 (MPT).
7130-036
2. Load the paper or other media with the long edge entering the printer first.
• For single-sided printing, place side one facedown, with the top of the page towards the
rear of the printer. Prepunched holes should enter the printer first.
Dell 7130cdn Professional Color Printer
46
User Guide
Page 47

Printing
• For automatic 2-sided printing, place side one faceup, with the top of the page towards
the rear of the printer. Prepunched holes should enter the printer last.
Caution: Do not load paper or media above the fill line indicated on the tray. Overloading the
tray may cause jams.
MAX
3. Adjust the paper guides to fit the paper loaded in the tray.
7130-042
7130-043
Dell 7130cdn Professional Color Printer
User Guide
47
Page 48

Printing
4. When the control panel prompts you to confirm the type and size of paper in the tray, press
the OK button to use the current tray setup. If you loaded a new size or type of paper in the
tray, do the following:
a. Select Change setup, then press the OK button.
b. Select the appropriate paper type, then press the OK button.
a. Select the appropriate paper size, then press the OK button. For some sizes that can be
loaded in either direction, you need to select the size with the letters LEF (Long-Edge
Feed). If you loaded a custom paper size, select it if it is already defined. If not, select
New Custom Size for the paper size and follow the prompts; see Using Custom Size
Paper on page 62 for more information.
Short-Edge Feed
Use short-edge feed for sizes that do not fit long-edge feed or when the media curls or peels, such as
labels.
1. Open Tray 1 (MPT).
7130-036
2. Load the paper or other media with the short edge against the printer.
• For single-sided printing, place side one facedown, with the top of the page entering the
printer first. Prepunched holes should be at the front of the printer.
7130-123
Dell 7130cdn Professional Color Printer
48
User Guide
Page 49

Printing
12.6”
12”
A4 A3
11”
• For automatic 2-sided printing, place side one faceup, with the top of the page entering
the printer last. Place prepunched paper with the holes toward the front of the printer.
7130-117
Caution: Do not load paper or media above the fill line indicated on the tray. Overloading the
tray may cause jams.
3. Adjust the guides to fit the paper.
MAX
7130-047
7130-048
Dell 7130cdn Professional Color Printer
User Guide
49
Page 50

Printing
4. When the control panel prompts you to confirm the type and size of paper in the tray, press
the OK button to use the current tray setup. If you loaded a new size or type of paper in the
tray, do the following:
a. Select Change setup, then press the OK button.
b. Select the appropriate paper type, then press the OK button.
c. Select the appropriate paper size, then press the OK button. For some sizes that can be
loaded in either direction, you need to select the size with the letters SEF (Short-Edge
Feed). If you loaded a custom paper size, select it if it is already defined. If not, select
New Custom Size for the paper size and follow the prompts; see Using Custom Size
Paper on page 62 for more information.
Using Manual Feed in Tray 1 (MPT)
If you are using paper that you do not want others to use, you can have the printer prompt you
when it is time to load the paper for your print job.
Selecting Manual Feed Using Windows
To select manual feed using Windows 2000, Windows XP, or Windows Server 2003:
1. In the Windows printer driver, click the Paper/Output tab.
2. Select the arrow next to the Paper section and select Select By Tray > Manual Feed (Tray 1).
3. When prompted by the control panel, remove the paper from Tray 1 (MPT) (if any).
4. Load the appropriate paper for your job into the tray.
Selecting Manual Feed Using Macintosh
To select manual feed using Macintosh:
1. In the Print dialog box, select Paper Feed from the drop-down list.
2. Select Manual Feed Tray 1 (MPT) in the All pages from drop-down list.
3. Submit your print job.
4. When prompted by the control panel, remove the paper from Tray 1 (MPT) (if any).
5. Load the appropriate paper for your job into the tray.
Loading Paper in Trays 2–5
Use Trays 2–5 for the following paper types:
• Plain paper
• Heavy plain paper
• Transparencies
• Thin Card Stock
• Card Stock
• Thick Card Stock
• Letterhead
Dell 7130cdn Professional Color Printer
50
User Guide
Page 51

Printing
• Thin Glossy Paper
• Glossy Paper
• Thick Glossy Paper
• Preprinted paper
• Prepunched paper
• Recycled paper
• Specialty media
Note: Transparencies cannot be printed from Tray 3, 4, or 5.
Long-Edge Feed
Use long-edge feed for faster printing when the paper fits that way. To load paper or other media
in Trays 2–5:
1. Pull out the tray.
2. Fan the paper to release sheets that are stuck together.
7130-050
7130-049
Dell 7130cdn Professional Color Printer
User Guide
51
Page 52

Printing
MAX
3. Load the paper with the long edge towards the left side of the tray.
• For single-sided printing, insert side one faceup, with the top of the paper at the rear of
the tray. Prepunched holes should be on the left side of the tray.
7130-122
• For automatic 2-sided printing, insert side one facedown, with the top of the paper at the
rear of the tray. Prepunched holes should be on the right side of the tray.
7130-121
Caution: Do not load paper or media above the fill line indicated on the tray. Overloading the
tray may cause jams.
7130-054
Dell 7130cdn Professional Color Printer
52
User Guide
Page 53

4. Adjust the guides to fit the paper.
7130-021
5. Push the tray completely into the printer.
Printing
7130-056
6. When the control panel prompts you to confirm the type and size of paper in the tray, press
the OK button to use the current tray setup. If you loaded a new type of paper in the tray or
loaded a custom size, do the following:
a. Select Change setup, then press the OK button.
b. Select the appropriate paper type, then press the OK button.
c. Select the paper size, then press the OK button.
Dell 7130cdn Professional Color Printer
User Guide
53
Page 54

Printing
Note: If you loaded custom size paper, select it if it is already defined. If not, select
New Custom Size for the paper size and follow the prompts; see Using Custom Size Paper
on page 62 for more information. If you loaded standard-size paper, select Auto Select for
the paper size; the tray guides are then used by the printer to determine the paper size in the
tray.
Short-Edge Feed
Use short-edge feed for sizes that do not fit long-edge feed or when the media curls or peels,
such as labels. To load paper or other media in Trays 2–5:
1. Pull out the tray.
2. Fan the paper to release sheets that are stuck together.
7130-050
7130-049
Dell 7130cdn Professional Color Printer
54
User Guide
Page 55

3. Load the paper with the long edge of the paper facing the front of the tray.
• For single-sided printing, insert side one faceup, with the top of the paper towards the
left of the tray. Prepunched holes should be at the front of the tray.
7130-057
• For automatic 2-sided printing, insert side one facedown, with the top of the paper
towards the right side of the tray. Prepunched holes should be towards the front of the
tray.
Printing
7130-096
Dell 7130cdn Professional Color Printer
User Guide
55
Page 56

Printing
059
MAX
7130-021
Caution: Do not load paper or media above the fill line indicated on the tray. Overloading the
tray may cause jams.
7130-
4. Adjust the guides to fit the paper.
5. Push the tray completely into the printer.
7130-056
Dell 7130cdn Professional Color Printer
56
User Guide
Page 57

Printing
6. When the control panel prompts you to confirm the type and size of paper in the tray, press
the OK button to use the current tray setup. If you loaded a new type of paper in the tray or
loaded a custom size, do the following:
a. Select Change setup, then press the OK button.
b. Select the appropriate paper type, then press the OK button.
c. Select the paper size, then press the OK button.
Note: If you loaded custom size paper, select it if it is already defined. If not, select New
Custom Size for the paper size and follow the prompts; see Using Custom Size Paper on
page 62 for more information. If you loaded standard-size paper, select Auto Select for the
paper size; the tray guides are then used by the printer to determine the paper size in the
tray.
Dell 7130cdn Professional Color Printer
User Guide
57
Page 58

Printing
Printing on Special Media
This section includes:
• Printing on Transparencies on page 58
• Printing on Envelopes on page 59
• Printing on Labels on page 59
• Printing on Glossy Paper on page 60
• Using Custom Paper Types on page 61
• Using Custom Size Paper on page 62
Printing on Transparencies
Transparencies can be printed from Tray 1 (MPT) and Tray 2. They should be printed on one side
only.
To order paper, transparencies, or other specialty media, go to www.dell.com/supplies.
Caution: Damage caused by using unsupported paper, transparencies or other specialty
media is not covered by the Dell warranty or service agreement.
Guidelines
• Remove all paper before loading transparencies in the tray.
• Do not load more than 50 transparencies in Tray 1 (MPT). Do not load more than 100
transparencies in Tray 2. Overloading the tray may cause the printer to jam.
• Handle transparencies by the edges using both hands to avoid fingerprints and creases,
which can cause poor print quality.
• After loading the transparencies in the tray, use the control panel to change the paper type to
Dell recommended Transparency.
Dell 7130cdn Professional Color Printer
58
User Guide
Page 59

Printing
Printing on Envelopes
Envelopes can be printed from Tray 1 (MPT) only.
Guidelines
• Successful envelope printing is highly dependent on the quality and construction of the
envelopes. Use envelopes made specifically for laser printers.
• It is recommended that you maintain constant temperatures and relative humidity.
• Store unused envelopes in their packaging to avoid the effects of moisture and dryness which
can affect print quality and cause wrinkling. Excessive moisture can cause the envelopes to
seal before or during printing.
• Avoid padded envelopes; purchase envelopes that lie flat on a surface.
• Remove air bubbles from the envelopes before loading by setting a heavy book on top of the
envelopes.
• If wrinkling or embossing problems occur, use a different brand of envelopes made
specifically for laser printers.
Caution: Never use envelopes with windows or metal clasps; they can damage the printer.
Damage caused by using unsupported envelopes is not covered under the Dell warranty or
service agreement.
Printing on Labels
Labels can be printed from Tray 1 (MPT) only.
To order paper, transparencies, or other specialty media, go to the Dell Supplies website at
www.dell.com/supplies.
Guidelines
• Do not use vinyl labels.
• Print only on one side of the sheet of labels. Use full sheet labels only.
• Do not use any sheet where labels are missing; it may damage the printer.
• Store unused labels flat in their original packaging. Leave the sheets of labels inside the
original packaging until ready to use. Return any unused sheets of labels to the original
packaging and reseal it.
• Do not store labels in extremely dry or humid conditions or extremely hot or cold conditions.
Storing them in extreme conditions may cause print quality problems or cause them to jam in
the printer.
• Rotate stock frequently. Long periods of storage in extreme conditions can cause labels to
curl and jam in the printer.
• In the printer driver, select either Labels as the paper type or Tray 1 (MPT) as the paper
source.
Dell 7130cdn Professional Color Printer
User Guide
59
Page 60

Printing
Printing on Glossy Paper
Glossy paper can be printed from any tray within the following weight range:
• Thin Glossy Paper: 106–169 g/m
• Glossy Paper: 170–220 g/m
• Thick Glossy Paper: 221–256 g/m
Note: Glossy paper should be printed on one side only.
To order paper, transparencies, or other specialty media, contact your local reseller or go to the
Dell Supplies website for your printer: www.dell.com/supplies.
Guidelines
• Do not open sealed packages of glossy paper until you are ready to load them into the
printer.
• Leave glossy paper in the original wrapper, and store unopened packages in the original
shipping carton until ready to use.
• Remove all other paper from the tray before loading glossy paper.
• Load only the amount of glossy paper you plan to use and remove the unused portion from
the tray when you are finished printing. Replace the unused portion in the original wrapper
and seal for later use.
• Rotate stock frequently. Long periods of storage in extreme conditions can cause glossy
paper to curl and jam in the printer.
2
2
2
Note: Use the Calibrate for Paper menu to adjust the printer for each type of glossy media.
Calibration only uses Tray 1 (MPT). Place at least 9 sheets of the media to be calibrated in
Tray 1 (MPT). Review each of the 9 reference pages printed and adjust the toner transfer
settings for optimal results. For more information, see Calibrating the Paper Type on
page 122.
Dell 7130cdn Professional Color Printer
60
User Guide
Page 61

Printing
Using Custom Paper Types
Use this feature to create your own custom paper type with specific settings that you can reuse
for routine print jobs, for example, monthly reports. Custom paper types are created in the
Embedded Web Server and appear in the printer driver, control panel, and EWS. You can define
up to 5 custom names and assign base paper types to them. The control panel always lists all
five types, but the driver only lists the ones that are not hidden.
Note: Only Windows or Macintosh drivers connected over a network can show the redefined
names and hide the types. Other drivers show all five default names.
To modify custom paper types:
1. Launch your Web browser.
2. Enter the printer’s IP address in the browser’s Address field.
3. Click Properties.
4. Select the General folder on the left navigation panel.
5. Select Custom Paper Types.
6. Enter or modify the settings, then click Save Changes at the bottom of the page.
Notes:
• Uncheck the Hide checkbox in order for the custom paper type to appear in the network
connected Windows or Macintosh printer driver.
• For more information about creating custom paper types, click the Help button on the
Properties tab to view the online help.
To load custom paper types in your printer:
1. Load the paper into the tray of your choice.
2. When the control panel prompts you to confirm the type of paper in the tray, select Change
setup, then press the OK button.
3. Select the appropriate paper type, then press the OK button.
4. Select the appropriate paper size, then press the OK button.
To select custom paper types in your printer driver:
Windows 2000 or newer
1. Select the Paper/Output tab.
2. Click the button to the right of the Paper summary and select Other Type.
3. From the drop-down list, select the custom paper type you want to use.
4. Click the OK button.
Dell 7130cdn Professional Color Printer
User Guide
61
Page 62

Printing
Mac OS X version 10.5
1. Go to the Print menu.
2. In the print drop-down list, select Dell Features.
The Paper/Output drop-down appears.
3. In the Paper drop-down list, select Other Type.
4. From the drop-down list, select the custom paper type you want to use.
5. Click the Print button.
Note: For other drivers, select one of the five default custom paper type names that you set
up in the Embedded Web Server.
Using Custom Size Paper
Custom size paper can print from all trays. Many custom sizes can fit in all trays, but some of the
smallest and largest sizes can fit in only one or some trays. Use the following dimensions for
custom size paper:
Tray 1 (MPT) Tray 2 Trays 3–5
Short
edge
Long
edge
89–320 mm (3.5–12.6 in.) 140–297 mm (5.5–11.7 in.) 140–330 mm (5.5–13 in.)
99–1200 mm (3.9–47.25 in.) 182–432 mm (7.2–17 in.) 182–457 mm (7.2–18 in.)
The best way for custom sizes to work is to do the following:
1. Define the settings in the printer driver or application.
2. Define the size in the printer.
3. Load the paper in the printer.
4. Send the print job.
To define a custom size at the printer:
1. Load the paper into the tray of your choice.
2. When the control panel prompts you to confirm the type of paper in the tray, press the OK
button to use the current tray setup. If you loaded a new type of paper in the tray, do the
following:
a. Select Change setup, then press the OK button.
b. Select the appropriate paper type, then press the OK button.
3. At the Paper Size menu, select New Custom Size, then press the OK button.
4. At the Short Edge menu:
a. Press the OK button if the correct short edge size is displayed as the current setup.
b. Select Change, then press the OK button and use the arrow buttons to enter a new short
edge size. Press the OK button when you are finished.
Dell 7130cdn Professional Color Printer
62
User Guide
Page 63

Printing
5. At the Long Edge menu:
a. Press the OK button if the correct long edge size is displayed as the current setup.
b. Select Change, then press the OK button and use the arrow buttons to enter a new long
edge size. Press the OK button when you are finished.
6. If the paper can be loaded both LEF or SEF, the Paper Orientation menu is displayed.
Select Long-Edge Feed for faster printing. Select Short-Edge Feed when the media curls or
peels.
Note: When you replace the custom size in the tray with a standard size:
• In the Tray 1 (MPT) size list, select the size you loaded.
• In the Tray 2–5 size list, select Auto-Sensed, so that the tray guides determine the
standard size.
To define a custom size in your printer driver:
Windows 2000 or newer
1. Select the Paper/Output tab.
2. Click the button to the right of the Paper summary and select Other Size.
3. In the Paper Size dialog box, select New in the Output Paper Size drop-down list.
4. In the New Custom Size dialog box, enter a descriptive name in the Name box and the
dimensions in the Width and Height boxes.
5. Click the OK button.
Mac OS X version 10.4 and newer
1. Select Page Setup from the File menu.
2. Select the Dell 7130 printer.
3. In the Paper Size drop-down list select Manage Custom Sizes.
4. Click the + button to add a new custom page size.
5. Provide a descriptive name for the custom page size and enter the page size and margin
information.
Set up your document with the custom size so that the driver will select it automatically. If your
document is another size, select the custom size as follows:
1. Select the Paper/Output tab.
2. Click the button to the right of the Paper summary and select Other Size.
3. In the Paper Size dialog box, select the custom size you created in the Output Paper Size
drop-down list.
4. Click the OK button.
Dell 7130cdn Professional Color Printer
User Guide
63
Page 64

Printing
Selecting Printing Options
Printing options, also referred to as printer driver options, are specified as Printing Preferences
in Windows, and Dell Features in Macintosh. Printing Options include 2-sided printing, page
layout, and print quality.
Printing Options for Windows
The following table lists printing options organized in tabs within the Printing Preferences window:
Tab Printing Options
Paper/Output Job type
Paper size, paper type, and tray selection
2-sided printing
Print quality
Covers
Separators
Color Options Color corrections
Black and white conversion
Color adjustments
Layout/Watermark Pages per sheet
Booklet layout
Orientation
2-sided printing
Watermark
Advanced Copies and Collate
Margins
Mirrored Output
RGB Neutral Gray
Black trapping
Halftones and spot colors
True Type Font and True Type Font Download
Print Optimization
Color Configuration
Application Reduce/Enlarge
PostScript Output Option
Send PostScript Error Handler
PostScript Pass-through
Advanced Printing Features
Thin Line Enhancement
Dell 7130cdn Professional Color Printer
64
User Guide
Page 65

Printing
Note: For more information about Windows printer driver options, click the Help button in the
lower left-hand corner of the screen.
Setting Default Printing Options for Windows
When you print from any software application, the printer uses the print job settings specified in
the Printing Preferences window. You can specify your most common printing options and save
them so that you do not have to change them every time you print.
For example, if you want to print to both sides of the paper for most jobs, specify 2-sided printing
in Printing Preferences.
To change Printing Preferences:
1. Click Start, select Settings, and then click Printers and Faxes.
2. In the Printers and Faxes folder, right-click the icon for your printer and select Printing
Preferences.
3. Select a tab in the Printing Preferences window, make selections, and click OK to save.
Note: For more information about Windows printer driver options, click the Help button in the
lower left-hand corner of the screen.
Selecting Printing Options for an Individual Job in Windows
If you want to use special printing options for a particular job, change the Printing Preferences
before sending the job to the printer. For example, if you want to use the Enhanced print-quality
mode when printing a particular document, select this setting in Printing Preferences before
printing that job.
1. With the document open in your application, access the Print dialog box (CTRL+P for most
applications).
2. Select the Dell 7130cdn printer and click the Properties button to open the Printing
Preferences window. This button is labeled Preferences in some applications. Select a tab
in the Printing Preferences window, and make selections.
3. Click OK to save and close the Printing Preferences window.
4. Print the job.
Saving a Set of Commonly Used Printing Options in Windows
You can save and name a set of printing options, so that you can quickly apply them to future
print jobs.
To save a set of printing options:
1. Select Saved Settings at the bottom of the Printing Preferences window, and select Save
As from the list.
2. Name the set of printing options and click OK. The set of options is saved and will appear in
the list. The next time you want to print using these options, just select the name from the list
and click OK.
Dell 7130cdn Professional Color Printer
User Guide
65
Page 66

Printing
Printing Options for Macintosh
See the following table for specific printing options in the Macintosh PostScript printer driver.
Tab Printing Options
Paper/Output Job type
Paper size and paper type
2-sided printing
Print quality
Covers
Separators
Color Options Automatic Color
Black and White
Color adjustments
Vivid Color
Booklet/Watermark Booklet layout
Watermark
Advanced Booklet Image Order
Black Trapping
Mirrored Output
Print Optimization
Thin Line Enhancement
Selecting Options for an Individual Job for Macintosh
To select print settings for a particular job, change the driver settings before sending the job to
the printer.
1. With the document open in your application, select File > Print.
2. Select your printer from the Printer list.
3. Select the desired printing options from the drop-down lists that are displayed.
4. Click Print to print the job.
Saving a Set of Commonly Used Printing Options for Macintosh
You can save and name a set of printing options, so that you can quickly apply them to future
print jobs.
To save a set of printing options:
1. Select the desired printing options from the drop-down lists on the Print menu screen.
2. Select Save As from the Presets menu to save and name the set of printing options.
3. The set of options is saved and will appear in the Presets list. The next time you want to print
using these options, just select the name from the list.
Dell 7130cdn Professional Color Printer
66
User Guide
Page 67

Printing on Both Sides of the Paper
• 2-Sided Printing Guidelines on page 67
• Printing a 2-Sided Document on page 68
• Page Layout Options on page 69
2-Sided Printing Guidelines
To use the printer’s automatic 2-sided printing feature:
• The paper’s leading edge must have a length of 128–322 mm (5.0–12.65 in.).
• The paper’s side edge must have a length of 140–457 mm (5.5–18 in.)
• The paper must have a weight of 67–169 g/m
• The paper type must be: Plain Paper, Heavy Plain Paper, Preprinted, Prepunched,
Letterhead, Thin Card Stock, Card Stock, Thin Glossy Paper, Glossy Paper, Recycled
paper, or Specialty media.
2
(20–40 lb. Bond).
Printing
The following paper and media cannot be used for 2-sided printing:
• Thick and Extra Thick Card Stock
• Thick Glossy Paper
• Transparencies
• Envelopes
• Labels
• Any die-cut specialty media, such as business cards
See also:
Supported Media on page 43
Dell 7130cdn Professional Color Printer
User Guide
67
Page 68

Printing
Printing a 2-Sided Document
To perform automatic 2-sided printing:
1. Load paper into the tray:
Tray 1 (MPT)
• Long-Edge Feed: Insert side one faceup, with the top of the page towards the rear of
the printer. Prepunched holes should enter the printer last.
• Short-Edge Feed: Insert side one faceup, with the top of the page entering the printer
first. Place prepunched paper with the holes toward the front of the printer.
Trays 2–5
• Long-Edge Feed: Insert side one facedown, with the top of the paper at the rear of the
tray. Prepunched holes should be on the right side of the tray.
• Short-Edge Feed: Insert side one facedown, with the top of the paper towards the left
side of the tray. Prepunched holes should be towards the front of the tray.
2. In the printer driver, select 2-sided printing. The location of the selection depends on your
computer’s operating system.
Operating System Steps
Windows Vista, Windows 2000,
Windows XP, or Windows Server
2003
Mac OS X, version 10.5 1. In the Print dialog box, select Dell Features and then
1. Select the Paper/Output tab.
2. Select an option under 2-Sided Printing:
• 2-Sided Print
• 2-Sided Print, Flip on Short Edge
Paper/Output from the drop-down list.
2. Select an option under 2-Sided Printing.
• 2-sided Print
• 2-sided Print, Flip on Short-edge
Dell 7130cdn Professional Color Printer
68
User Guide
Page 69

Printing
Page Layout Options
When you select 2-Sided Printing on the Paper/Output tab, you can specify the page layout
which determines how the pages turn.
Windows and Macintosh
1. Select the Layout/Watermark tab (Windows) or the Layout section (Macintosh).
2. Select Portrait, Landscape, or Rotated Landscape.
3. Select 2-Sided Print, or 2-Sided Print, Flip on Short Edge.
Portrait Landscape
Portrait
2-Sided Print
See also:
Loading Paper in Tray 1 (MPT) on page 45
Loading Paper in Trays 2–5 on page 50
Portrait
2-Sided Print, Flip on
Short Edge
Landscape
2-Sided Print, Flip on
Short Edge
Landscape
2-Sided Print
Dell 7130cdn Professional Color Printer
User Guide
69
Page 70

Printing
Selecting Paper Type to Use
When you send your print job to the printer, you can choose to let the printer automatically select
which paper to use based on your document size and the paper type you select, or you can force
the printer to use paper from a specific tray.
Selecting Paper Type to Use for a Supported Driver
Windows 2000 and newer
1. In the printer driver, select the Paper/Output tab.
2. To change the paper, select the arrow next to the Paper section and select the paper type
from the list.
• To specify a tray, select the tray in the Select by Tray menu.
• To specify a paper type, select the type in the Other Type menu.
• To specify a paper size, select the Other Size menu item and select the Output Paper
Size in the Paper Size dialog box.
• To specify both a paper type and tray, select Advanced Paper Selection.
Macintosh OS X 10.3 and newer
1. In the Print dialog box, select Paper Feed.
2. From the All pages from drop-down list, click Auto Select to select the paper based on your
application settings, or select a specific paper type or tray.
Dell 7130cdn Professional Color Printer
70
User Guide
Page 71

Printing
Printing Multiple Pages to a Single Sheet (N-Up)
When printing a multiple-page document, you can print more than one page on a single sheet of
paper. Print one, two, four, six, nine, or 16 pages per side.
1 2
43
Printing N-Up Using a supported Driver
Windows 2000 or newer
1. Select the Layout/Watermark tab.
2. Select the Pages Per Sheet (N-Up) option.
3. Click the button for the number of pages you want to appear on each side of the sheet.
Mac OS X version 10.3 and newer
1. In the Print dialog box, select Layout.
2. Select the number of Pages per Sheet and Layout Direction.
Dell 7130cdn Professional Color Printer
User Guide
71
Page 72

Printing
Printing Booklets
With 2-sided printing, you can print a document in the form of a small book. Create booklets for
any paper size that is supported for 2-sided (duplex) printing. The driver automatically reduces
each page image and prints four pages per sheet of paper (two on each side). The pages are
printed in the correct order so that you can fold and staple the pages to create a booklet.
When you print booklets, you can also specify the creep and gutter in supported drivers.
• Creep: Specifies how much the page images are shifted inward (in 10ths of a point). This
compensates for the thickness of the folded paper, which otherwise would cause the page
images to shift slightly outward when folded. You can select a value from zero to 1.0 points.
• Gutter: Specifies the horizontal distance (in points) between the page images. A point is .35
mm (1/72 in.).
Creep Gutter
The following additional booklet printing options are available in some drivers:
• Draw Page Borders: Prints a border around each page.
• Target Paper Size: Specifies the size of the paper for the booklet.
• Right to Left: Reverses the order of the pages in the booklet.
Selecting Booklet Printing in a Supported Driver
Windows 2000 or newer and PostScript driver
1. Select the Layout/Watermark tab.
2. Select the Booklet Layout option.
If you are using the PostScript driver, click the Booklet Options button to specify the creep
and gutter.
3. If desired, select Draw Page Borders from the drop-down list.
Dell 7130cdn Professional Color Printer
72
User Guide
Page 73

Printing
Mac OS X 10.5
1. In the Print dialog box, select Dell Features, then the Booklet/Watermark drop-down list.
2. Select Enable for Booklet Printing from the drop-down list.
3. If desired, specify the creep and gutter with the Booklet Options button.
4. If desired, specify the paper size from the Scale to New Size drop-down list.
Dell 7130cdn Professional Color Printer
User Guide
73
Page 74

Printing
Using Color Corrections
This section includes:
• Selecting Color Correction in a Supported Driver on page 74
• Making Color Adjustments in a Supported Driver on page 74
• Making Custom Color Adjustments on page 76
The Color Correction options provide simulations of different color devices. Automatic is the
default correction for general image processing. See the following table to determine what option
you want to use.
Color
Correction
Automatic Color
(Recommended)
Vivid Color Produces brighter and more saturated colors.
Black and White Converts all colors to black and white or shades of gray.
Color
Adjustments
Description
Applies the best color correction to each graphic element: text, graphics, and
images.
Allows you to make minor adjustments, or access Custom... options for Press
Matching.
Selecting Color Correction in a Supported Driver
Windows 2000 or newer and PostScript driver
1. Select the Color Options tab.
2. Select the desired color correction: Automatic, Vivid Color, Black and White, or Color
Adjustments.
Mac OS X 10.5
1. In the Print dialog box, select Dell Features, and then the Color Options drop-down list.
2. Select the desired color correction from the available options.
Making Color Adjustments in a Supported Driver
Windows 2000 or newer driver
1. Select the Color Options tab.
2. Select Color Adjustments.
3. Click the Color Adjustments button.
4. Select the arrow next to the Color Correction section and select Custom.
Dell 7130cdn Professional Color Printer
74
User Guide
Page 75

Printing
5. Make the desired adjustments in the Custom Color Adjustments dialog box.
6. Click the OK button to save your changes.
If you need to make additional color adjustments for your job, move the following sliders in a
supported driver:
• Lightness: Move the slider to the right to lighten or to the left to darken the colors in your
print job. (White remains white and black remains black.)
• Saturation: Move the slider to the right to increase or to the left to decrease the color
intensity without changing the darkness.
• Contrast: Move the slider to the right to increase or to the left to decrease the contrast. With
increased contrast, saturated colors become more saturated, darker colors become more
black, and lighter colors become more white.
• Color Cast:
• Cyan/Red: Move the slider to change the color variation between cyan and red.
Increasing the cyan decreases the red (its complement) and vice versa.
• Magenta/Green: Move the slider to change the color variation between magenta and
green. Increasing the magenta decreases the green (its complement) and vice versa.
• Yellow/Blue: Move the slider to change the color variation between yellow and blue.
Increasing the yellow decreases the blue (its complement) and vice versa.
The sample images change as you move the sliders. To track the adjustments and print the file
name, print-quality mode, and color settings for your job on the edge of the page, select the Print
Settings on Page box on the Color Options tab.
Dell 7130cdn Professional Color Printer
User Guide
75
Page 76

Printing
Making Custom Color Adjustments
The Automatic color correction selection is designed to apply the best color correction to each
element such as text, graphics, or images. If needed, you can select the color table being used
for these elements in your jobs.
You can make adjustments to RGB colors, CMYK colors, and spot colors as shown in the
following table:
Custom Automatic
Color
Office Color Controls the RGB color adjustments.
Press Match Controls the CMYK color adjustments.
Spot Color Controls spot color matching.
CIE Color Controls color output.
Gray Controls which color settings are printed in black.
Note: The Spot Color tab has an option to allow the printer to manage spot colors.
To use the default color table associated with a particular element on the tab, select Automatic
or click the Reset button.
If required in specific circumstances, you can make additional color adjustments to the lightness,
saturation, contrast, cyan/red color variation, magenta/green color variation, and yellow/blue
color variation used for a particular element.
Description
Adjusting the Automatic Color Correction in a Supported Driver
Windows 2000 or newer and PostScript driver
1. Select the Advanced tab.
2. Select Image Options, and select Color Configuration.
3. From the Color Configuration drop-down menu, select Custom.
4. Make adjustments to the Custom Automatic Color Correction settings, and click OK to
save your changes.
Dell 7130cdn Professional Color Printer
76
User Guide
Page 77

Printing
Printing in Black and White
Printing Black and White Using a Supported Driver
Windows 2000 or newer and PostScript driver
1. Select the Color Options tab.
2. Select the Black and White option.
Mac OS X 10.5
1. In the Print dialog box, select Dell Features, and then the Color Options drop-down list.
2. Select Black and White.
Dell 7130cdn Professional Color Printer
User Guide
77
Page 78

Printing
Printing Separators
A separator (a divider page or slipsheet) can be inserted after a print job, between copies of a
print job, or between individual pages of a print job. Specify the tray to use as the source for the
insert pages.
Printing Insert Pages in a Supported Driver
Windows 2000 or newer
1. Select the Paper/Output tab.
2. Click the button to the right of the Paper summary and select Separators.
3. Select the desired options and press the OK button.
Mac OS X 10.5
1. In the Print dialog box, select Dell Features, then Paper/Output from the drop-down list.
2. Select Separators from the Paper Menu
3. Select the desired option from the separator dialog box.
Dell 7130cdn Professional Color Printer
78
User Guide
Page 79

Printing
Printing Cover Pages
A cover page is the first or last page of a document. You can choose a different paper source for
the cover page than for the body of a document. For instance, use your company letterhead for
the first page of a document, or use heavyweight paper for the first and last pages of a report.
• Use any applicable paper tray as the source for printing cover pages.
• Verify that the cover page is the same size as the paper used for the rest of your document.
If you specify a different size in the driver than the tray you select as a cover pages source,
your cover(s) print on the same paper as the rest of your document.
You have several choices for cover pages:
• No Covers: Prints the first and last pages of your document from the same tray as the rest of
your document.
• Front Only: Prints the first page on paper from the specified tray.
• Front and Back: Front and back cover pages print from the same tray.
Cover Page Print Option Pages Printed on Cover
First 1-sided
printing
2-sided
printing
Last 1-sided
printing
2-sided
printing (oddnumbered
pages)
2-sided
printing (evennumbered
pages)
Page 1
Pages 1 and 2
Last page
Last page
Last two pages
For the back of your front cover to remain blank when 2-sided printing, page two of your
document must be blank. For the back cover of your document to remain blank, see the following
table for inserting blank pages.
Print Option
1-sided printing Add one blank page at the end of the document.
2-sided printing Odd-numbered Add two blank pages at the end of the document.
Last Page of
Text
Even-numbered Add one blank page at the end of the document.
Blank Pages
Dell 7130cdn Professional Color Printer
User Guide
79
Page 80

Printing
Printing Cover Pages in a Supported Driver
Windows 2000 or newer
1. Select the Paper/Output tab.
2. Click the button to the right of the Paper summary and select Covers.
3. Select the desired options and press the OK button.
Mac OS X 10.3 and and higher
1. In the Print dialog box, select Paper Feed.
2. Select First page from, and then select the tray to use for the covers.
3. Under Paper Feed Options, select the tray to use for the cover pages from the Last Page
Paper Source drop-down list.
Note: For booklet printing, the cover page needs to be selected as the Last Page Paper
Source.
Dell 7130cdn Professional Color Printer
80
User Guide
Page 81

Printing
Printing Watermarks
A watermark is additional text that can be printed across one or more pages. For example, terms
like Draft and Confidential, which you might stamp on a page before distribution, can be inserted
with a watermark.
DELL
Some Windows Print Drivers allow you to:
• Create a watermark.
• Edit an existing watermark’s text, color, location, and angle.
• Place a watermark on either the first page or every page in a document.
• Print a watermark in the foreground or background or blend with the print job.
• Use a graphic for the watermark.
• Use a time stamp for the watermark.
Note: Not all applications support watermark printing.
Selecting, Creating, and Editing Watermarks in a Supported Driver
Windows 2000 or newer
1. Select the Layout/Watermark tab.
• To use an existing watermark, select it from the Watermark drop-down list.
• To modify the watermark, click the Edit button to display the Watermark Editor dialog
box.
• To create a new watermark, select New, and then use the Watermark Editor dialog box.
2. In the Watermark drop-down list for Options:
• Select an option to print the watermark in the foreground or background or to blend it with
the job.
• Select an option to print the watermark on all pages or only the first page.
Dell 7130cdn Professional Color Printer
User Guide
81
Page 82

Printing
Printing Mirror Images
You can print pages as a mirror image (flips images horizontally on pages when printed).
Selecting Mirror Image in a Supported Driver
Windows 2000 or newer and PostScript driver
1. Select the Advanced tab.
2. Select Yes for Mirrored Output under Image Options.
Dell 7130cdn Professional Color Printer
82
User Guide
Page 83

Printing
Printing Special Job Types
You can select one of the following special job types from the Paper/Output tab:
• Sending Personal, Personal Saved, Secure, Proof, or Saved Print Jobs on page 83
• Sending Print With Jobs on page 84
• Printing or Deleting Secure Print Jobs on page 84
• Printing or Deleting Personal Print Jobs on page 85
• Printing or Deleting Proof and Saved Print Jobs on page 85
• Printing or Deleting Personal Saved Jobs on page 85
Note: A Productivity Kit is required to access these special job types.
• Personal Print Jobs: Prints the job when you select your user name on the control panel or
in the Embedded Web Server.
• Personal Saved Print Jobs: Stores the job on the hard drive, with your passcode so that
only you can print it from the control panel in order to print it. The job is not deleted after
printing.
• Secure Print Jobs: Prints the job only after you enter the four-digit numeric password on the
control panel.
• Proof Print Jobs: Prints only one copy of the job so that you can proof the copy. If you want
to print additional copies, select the job name on the control panel.
• Saved Print Job: Stores the job on the hard drive so you can print it on demand from the
control panel. The job is not deleted after printing.
• Print With Jobs: Prints existing stored personal and/or shared saved jobs along with the
current job.
Sending Personal, Personal Saved, Secure, Proof, or Saved Print Jobs
Use a supported driver to specify a job as a personal, personal saved, secure, proof, or saved
job.
Operating System Steps
Windows 2000 or later 1. Select the Paper/Output tab.
2. Select the job type under Job Type.
3. In the dialog box:
• For a secure job, enter your four-digit passcode.
• For a proof print or a shared saved print job, enter the name you want
to give this job.
• For a personal saved job, enter your four-digit passcode and enter the
name you want to give this job.
4. Click the OK button.
Dell 7130cdn Professional Color Printer
User Guide
83
Page 84

Printing
Operating System Steps
Mac OS X, version 10.5 1. In the Print dialog box, select Dell Features and select Paper/Output
from the drop-down list.
2. Select the job type from the Job Types drop-down list
• For a secure print or personal saved job, enter a four-digit number,
ranging from 0000 through 9999, in the Numeric Password field.
• For a proof print or saved print job, enter a document name (up to 20
alpha characters) in the Document Name field
Sending Print With Jobs
To select jobs to send with your current job in a supported driver:
Operating System Steps
Windows 2000 or later 1. Select the Paper/Output tab.
2. Select Print With under Job Type.
3. In the Print With dialog box, select a personal saved or shared saved
job from the list on the left to be printed with the current job, and then
click the Add button to add it to the Final Job list on the right.
4. To change the order of the jobs to be printed, select a job to be moved
in the list on the right, then click the Move Up or Move Down button.
5. Click the OK button.
Mac OS X (version
10.5)
1. In the Print dialog box, select Dell Features then select
Paper/Output from the drop-down list
2. select Print With from the Job Types drop-down list.
3. Enter a four-digit number, ranging from 0000 through 9999, in the
Numeric Password field and click the Set button.
4. Select a personal saved or shared saved job from the list on the left to
be printed with the current job, then click the Move Right button.
5. To change the order of the jobs to be printed, select a job to be moved
in the list on the right, then click the Move Up or Move Down button.
Note: Print With jobs are not available for AppleTalk or USB connected printers.
Printing or Deleting Secure Print Jobs
To print or delete a secure print job, specify the four-digit password on the control panel:
1. Select Walk-Up Features, then press the OK button.
2. Select Secure Print Jobs, then press the OK button.
3. Scroll to your User Name, then press the OK button.
4. Scroll to the correct number for the first digit of the numeric password, then press the OK
button to accept that digit.
5. Repeat Step 4 for the second, third, and fourth digits.
Dell 7130cdn Professional Color Printer
84
User Guide
Page 85

Printing
Note: If you enter less than four digits in the driver’s Password field, enter zeros before your
password so that there are four digits displayed on the control panel. For example, if your
password is 222, enter 0222 in the driver and on the control panel. Use the Back button to
return to a previous digit.
6. If you submitted more than one secure print job with that password, select the desired job or
select All of Them, then press the OK button.
7. Select Print and Delete or Delete, then press the OK button to print or delete the job.
Printing or Deleting Personal Print Jobs
To print or delete a personal print job, select your user name on the control panel:
1. Select Walk-Up Features, then press the OK button.
2. Select Personal Print Jobs, then press the OK button.
3. Select your User Name, then press the OK button.
4. Select Print and Delete or Delete, then press the OK button to print or delete all of your
personal print jobs.
Printing or Deleting Proof and Saved Print Jobs
To print a saved print job, print the remaining copies of a proof print job, or delete a saved or
proof print job, select the job name on the control panel:
1. Select Walk-Up Features, then press the OK button.
2. Select Proof Print Jobs or Saved Print Job, then press the OK button.
3. Select your job name, then press the OK button.
4. Select Print and Delete (for proof prints), Print and Save (for saved prints), or Delete, then
press the OK button.
5. If you are printing, scroll to the desired number of copies, then press the OK button to print
the job.
Printing or Deleting Personal Saved Jobs
To print or delete a personal saved print job, select the job name on the control panel:
1. Select Walk-Up Features, then press the OK button.
2. Select Personal Saved Print Jobs, then press the OK button.
3. Select your user name, then press the OK button.
4. Scroll to the correct number for the first digit of the numeric password, then press the OK
button to accept that digit.
5. Repeat Step 4 for the second, third, and fourth digits.
Note: If you enter less than four digits in the driver’s Password field, enter zeros before your
password so that there are four digits displayed on the control panel. For example, if your
password is 222, enter 0222 in the driver and on the control panel. Use the Back button to
return to a previous digit.
Dell 7130cdn Professional Color Printer
User Guide
85
Page 86

Printing
6. Select your job name, then press the OK button.
7. Select Print and Save or Delete, then press the OK button.
8. If you are printing, scroll to the desired number of copies, then press the OK button to print
the job.
Dell 7130cdn Professional Color Printer
86
User Guide
Page 87

Maintenance
This chapter includes:
• Maintenance and Cleaning on page 88
• Ordering Supplies on page 93
• Moving the Printer on page 95
• Printer Symbols on page 96
4
Dell 7130cdn Professional Color Printer
User Guide
87
Page 88

Maintenance
Maintenance and Cleaning
This section includes:
• General Precautions on page 88
• Locating the Serial Number and the Service Tag on page 88
• Printing Meters on page 89
• Cleaning the Printer on page 90
• Moving the Printer on page 95
General Precautions
Warning: When cleaning your printer do NOT use organic or strong chemical solvents or
aerosol cleaners. Do NOT pour fluids directly into any area. Use supplies and cleaning
materials only directed in this documentation. Keep all cleaning materials out of the reach of
children.
Warning: Internal parts of the printer may be hot. Use caution when doors and covers are
open.
Warning: Do NOT use pressurized air-spray cleaning aids on or in the printer. Some
pressurized air-spray containers contain explosive mixtures and are not suitable for use in
electrical applications. Use of such cleaners can result in a risk of explosion and fire.
Caution: Do NOT remove the covers or guards that are fastened with screws. You cannot
maintain or service any parts that are behind these covers and guards. Do NOT attempt any
maintenance procedure that is NOT specifically described in the documentation supplied with
your printer.
To avoid damaging the printer, keep the following guidelines in mind:
• Do not place anything on top of the printer.
• Do not leave the covers and doors open for any length of time, especially in well-lit places.
Light exposure can damage the imaging units.
• Do not open covers and doors during printing.
• Do not tilt the printer while in use.
• Do not touch the electrical contacts or gears. Doing so may damage the printer and cause the
print quality to deteriorate.
• Make sure any parts removed during cleaning are replaced before you plug in the printer.
Locating the Serial Number and the Service Tag
When ordering supplies or contacting Dell for assistance, you will be asked to provide your
printer’s serial number and/or service tag.
The serial number is located behind the left hand door on the printer frame.The service tag label
is placed behind the front door below the toner cartridges.
Dell 7130cdn Professional Color Printer
88
User Guide
Page 89

Maintenance
The serial number and service tag can also be found using the printer’s control panel.
On the printer’s control panel, press Information > Printer Identification.
The serial number and service tag are displayed.
Or you can print the Startup page.
On the printer’s control panel, press Information > Information Pages > Startup Page.
Printing Meters
The usage counters feature provides access to the printer’s usage and billing information.
On the printer’s control panel, press the Down Arrow to Information > Printing Meters.
The impressions list is displayed.
Dell 7130cdn Professional Color Printer
User Guide
89
Page 90

Maintenance
7130-080
Cleaning the Printer
• Cleaning the Exterior on page 90
• Cleaning the LEDs on page 90
Cleaning the Exterior
To remove stains, clean the outside of the printer using a soft, damp cloth moistened with a mild
neutral detergent. Do not spray detergent directly onto the printer.
Warning: To prevent electric shock, turn the printer off and unplug the power cord from the
electrical outlet before cleaning the printer.
Use only an approved toner vacuum to clean the printer. Do not lubricate the printer with oil.
Cleaning the LEDs
Note: Each imaging unit has a cleaning rod located inside its slot.
1. Open the front door.
Dell 7130cdn Professional Color Printer
90
User Guide
Page 91

2. Rotate the lever on the front left side to unlock it.
3. Open the imaging unit cover.
Maintenance
7130-081
7130-074
4. Pull the cleaning rod from the lower right corner of the imaging unit slot.
5. Pull out the cleaning rod until it stops, then move it all the way in and out two or three times to
clean the LEDs. Repeat this for all four imaging units.
Note: Make sure to pull the cleaning rods out as far as they will go. Push them in as far as
they will go. Do not use excessive force.
4X
7130-077
Dell 7130cdn Professional Color Printer
User Guide
91
Page 92

Maintenance
7130-082
6. Close the imaging unit cover.
7. Rotate the lever to the right to lock it.
7130-078
8. Close the front door.
7130-083
Dell 7130cdn Professional Color Printer
92
User Guide
Page 93

Maintenance
Ordering Supplies
This section includes:
• Consumables on page 93
• Routine Maintenance Items on page 93
• Customer Replaceable Parts on page 94
• When to Order Supplies on page 94
• Recycling Supplies on page 94
Certain consumables and routine maintenance items need to be ordered occasionally. Each
supply item includes installation instructions.
Note: Grayscale images printed with the composite black setting count as color pages,
because color consumables are used. This is the default setting on most printers.
Consumables
Genuine Dell Toner Cartridges (Cyan, Magenta, Yellow, and Black)
• Standard–Capacity Toner Cartridge (C, M, Y)
• High–Capacity Toner Cartridge (C, M, Y, K)
Note: Each toner cartridge includes installation instructions on the outer box.
Caution: Use of toner other than Genuine Dell Toner may affect print quality and printer
reliability. It is the only toner designed and manufactured under strict quality controls by Dell
for specific use with this printer.
Routine Maintenance Items
Routine maintenance items are printer parts that have a limited life and require periodic
replacement. Replacements may be parts or kits. Routine maintenance items are typically
customer replaceable.
The following items are routine maintenance items:
• Imaging Unit
• Waste Cartridge
• Main Paper Tray Feed Rollers
• Fuser
• Belt Cleaner
Dell 7130cdn Professional Color Printer
User Guide
93
Page 94

Maintenance
Customer Replaceable Parts
Customer replaceable parts are long life items that may occasionally break and require replacement.
• Transfer Roller
• Productivity Kit
• Configuration Card
• Image Processor Board
• Hard Drive
• Paper Trays
• Paper Drawer Feed Rollers
When to Order Supplies
The printer’s control panel displays a warning when the supply nears its replacement time. Verify
that you have replacements on hand. It is important to order these supplies when the messages
first appear to avoid interruptions to your printing. The control panel displays an error message
when the supply must be replaced.
Note: You can set these error messages by going to the control panel and selecting Printer
Setup > Printer Controls.
Order supplies from your local reseller or from the Dell Supplies website at www.dell.com/supplies.
Caution: Use of non-Dell supplies is not recommended. The Dell Warranty and Service
Agreements, do not cover damage, malfunction, or degradation of performance caused by
use of non-Dell supplies, or the use of Dell supplies not specified for this printer.
Recycling Supplies
For information on Dell supplies recycling programs, go to www.dell.com/recycling.
Dell 7130cdn Professional Color Printer
94
User Guide
Page 95

Maintenance
Moving the Printer
• Always turn the printer off and wait for the printer to shut down.
• Disconnect the power cord from the back of the printer.
• Always use three people to lift the printer.
• When lifting the printer, grasp the areas as shown in the figure.
• Keep the printer level to avoid toner spillage.
• Failure to repackage the printer properly for shipment can result in damage to the printer not
covered by the Dell warranty or service agreement.
• Damage to the printer caused by improper moving is not covered by the Dell warranty or
service agreement.
• Toner cartridges and imaging units must remain installed to prevent toner from spilling.
66.0 kg
145.2 lb
7130-032
Dell 7130cdn Professional Color Printer
User Guide
95
Page 96

Maintenance
Printer Symbols
Symbol Description
Warning or Caution:
Ignoring this warning could cause serious injury or even death.
Ignoring this caution could cause injury or damage to the property.
Hot surface on or in the printer. Use caution to avoid personal injury.
Caution: Electrostatic sensitive devices
Verify that you are properly grounded before making contact with the
printer. Ignoring this caution could cause damage to the property.
Do not touch components with this symbol as personal injury could
result.
Do not burn the item.
It may take 40 minutes for the fuser to cool down.
Dell 7130cdn Professional Color Printer
96
User Guide
Page 97

Troubleshooting
This chapter includes:
• General Troubleshooting on page 98
• Paper Feed Problems on page 101
• Print-Quality Problems on page 121
• Getting Help on page 131
• Control Panel Messages on page 131
5
Dell 7130cdn Professional Color Printer
User Guide
97
Page 98

Troubleshooting
General Troubleshooting
This section contains procedures to help you locate and resolve problems. Some problems can
be resolved by simply restarting the printer.
To restart the printer:
1. Locate the power switch to the right side of the control panel.
2. Turn the switch OFF, wait 2 minutes, and turn the switch back ON.
If the problem is not resolved by restarting the printer, see the table in this chapter that best
describes the problem.
• Printer Does Not Turn On on page 98
• Printing Takes Too Long on page 99
• Printer Resets or Turns Off Frequently on page 99
• Printer Is Making Unusual Noises on page 100
• The Date and Time Are Incorrect on page 100
• Duplex Problems on page 100
• Front Door Will Not Close on page 100
Printer Does Not Turn On
Probable Causes Solutions
The power cord is not correctly plugged into the
outlet.
Something is wrong with the outlet connected to
the printer.
The power switch is not correctly turned on. Turn the power switch off, wait two minutes, then
The printer is connected to an outlet with a voltage
or frequency that does not match the printer
specifications.
Caution: Plug the three-wire cord (with grounding prong) directly into a grounded AC outlet
only. Do not use a power strip. If necessary, contact a licensed electrician to install a properly
grounded outlet.
Turn off the printer, and plug the power cord
securely into the outlet.
Plug another electrical appliance into the outlet
and see whether it operates properly.
Try a different outlet.
turn it back on.
Use a power source with the specifications listed
in Electrical Specifications on page 136.
Dell 7130cdn Professional Color Printer
98
User Guide
Page 99

Printing Takes Too Long
Probable Causes Solutions
Troubleshooting
The printer is set to a slower printing mode (for
example, heavyweight stock or transparency).
The printer is in ENERGY SAVE mode. It takes time for printing to start in power saving
The job is very complex. Wait. No action needed.
It takes more time to print with special media.
Make sure that the media type is set properly in
the driver and at the printer’s control panel.
mode.
Printer Resets or Turns Off Frequently
Probable Causes Solutions
The power cord is not correctly plugged into the
outlet.
A system error occurred. Contact your local Dell service representative with
Turn off the printer, confirm that the power cord is
correctly plugged into the printer and the outlet,
and then turn on the printer.
the fault information. Check the fault history. For
more information see Control Panel Messages on
page 131.
Dell 7130cdn Professional Color Printer
User Guide
99
Page 100

Troubleshooting
Printer Is Making Unusual Noises
Probable Causes Solutions
The printer is not level. Place the printer on a flat, hard, level surface.
The tray is not installed correctly. Open and close the tray you are printing from.
There is an obstruction or debris inside the printer. Turn off the printer and remove the obstruction or
debris. If you cannot remove it, contact Technical
Support.
The Date and Time Are Incorrect
Probable Causes Solutions
Did you set the correct date and time? Ensure you have set the correct Date and Time
on the control panel.
Duplex Problems
Probable Causes Solutions
Media or settings are not correct. Make sure that you are using correct media. For
more information see Supported Media on
page 43. Do not duplex envelopes, labels,
heavyweight stock, or transparencies.
Front Door Will Not Close
Probable Causes Solutions
One or more of the consumables are missing or
installed incorrectly.
The imaging unit door latch is not rotated all the
way to the right.
Check the toner cartridges, imaging units and
waste cartridge for correct installation.
Make sure to the latch is rotated all the way to the
right.
Dell 7130cdn Professional Color Printer
100
User Guide
 Loading...