

Page 1

Dell External Hard Drive
User’s Guide
Page 2
Notes, Cautions, and Warnings
NOTE: A NOTE indicates important information that helps you make better use of
your computer.
CAUTION: A CAUTION indicates either potential damage to hardware or loss of
data and tells you how to avoid the problem.
WARNING: A WARNING indicates a potential for property damage, personal
injury, or death.
____________________
© 2012 Dell Inc. All rights reserved.
Trademarks used in this text: Dell™, the Dell logo, Dell Boomi™, Dell Precision™ , OptiPlex™,
Latitude™, PowerEdge™, PowerVault™, PowerConnect™, OpenManage™, EqualLogic™,
Compellent™, KACE™, FlexAddress™, Force10™ and Vostro™ are trademarks of Dell Inc. Intel
Pentium
other countries. AMD
Sempron™ are trademarks of Advanced Micro Devices, Inc. Microsoft
Server
or registered trademarks of Microsoft Corporation in the United States and/or other countries. Red
®
and Red Hat® Enterprise Linux® are registered trademarks of Red Hat, Inc. in the United States
Hat
and/or other countries. Novell
States and other countries. Oracle
Citrix
Systems, Inc. in the United States and/or other countries. VMware
vCenter
or other countries. IBM
2012 - 09 Rev. A01
®
, Xeon®, Core® and Celeron® are registered trademarks of Intel Corporation in the U.S. and
®
, Internet Explorer®, MS-DOS®, Windows Vista® and Active Directory® are either trademarks
®
, Xen®, XenServer® and XenMotion® are either registered trademarks or trademarks of Citrix
®
and vSphere® are registered trademarks or trademarks of VMware, Inc. in the United States
®
is a registered trademark and AMD Opteron™, AMD Phenom™ and AMD
®
and SUSE® are registered trademarks of Novell Inc. in the United
®
is a registered trademark of Oracle Corporation and/or its affiliates.
®
is a registered trademark of International Business Machines Corporation.
®
, Windows®, Windows
®
, Virtual SMP®, vMotion®,
®
,
Page 3

Contents
1 Safety Precautions . . . . . . . . . . . . . . . . . . 5
2 Introduction . . . . . . . . . . . . . . . . . . . . . . . . 7
Package Contents . . . . . . . . . . . . . . . . . . . . . 7
System Requirements
. . . . . . . . . . . . . . . . . . . 7
Specifications . . . . . . . . . . . . . . . . . . . . . . . 7
Physical View
. . . . . . . . . . . . . . . . . . . . . . . 8
3 Setup . . . . . . . . . . . . . . . . . . . . . . . . . . . . . 9
Installing the Drive . . . . . . . . . . . . . . . . . . . . 9
Disconnecting the Drive
. . . . . . . . . . . . . . . . . 10
4 Troubleshooting . . . . . . . . . . . . . . . . . . . . 11
Hard Drive LED States and Description . . . . . . . . . 13
5 Contacting Dell . . . . . . . . . . . . . . . . . . . . 15
Contents 3
Page 4

4 Contents
Page 5
Safety Precautions
Use the following safety guidelines to help protect your external hard drive from
potential damage and to help ensure your personal safety.
WARNING: Do not drop or jolt the drive.
WARNING: Do not disconnect or move the drive during drive activity.
WARNING: Many repairs may only be done by a certified service technician. You
should only perform troubleshooting as authorized in your product documentation,
or as directed by the online or telephone service and support team.
CAUTION: Damage due to servicing that is not authorized by Dell is not covered
by your warranty.
CAUTION: To prevent data loss, save and close all open files and exit all open
programs before you turn off your computer.
Setup Precautions
5
Page 6

Setup Precautions 6
Page 7

Introduction
The Dell portable external hard drive is an affordable storage solution that
provides a total solution for all your backup, data migration, and data-sharing
needs.
This user manual provides step-by-step installation instructions and other
important information regarding your product.
Package Contents
• Dell portable external hard drive — 500 GB /1 TB
• Dell USB 3.0 interface adapter
• 18-inch USB 3.0 cable
•Quick Start Guide
• China Warranty Card
• Safety, Environment, and Regulatory Information Tech Sheet
• Terms and Conditions Sheet
System Requirements
•Windows 8
•Windows 7
•Windows Vista
•Windows XP
Specifications
Hard Drive Specifications
Item
Drive Type
Connector option
Capacity
Specification
12.5-inch external USB hard drive
UBS 3.0
500 GB /1 TB
Introduction
7
Page 8
Item Specification
Software included none
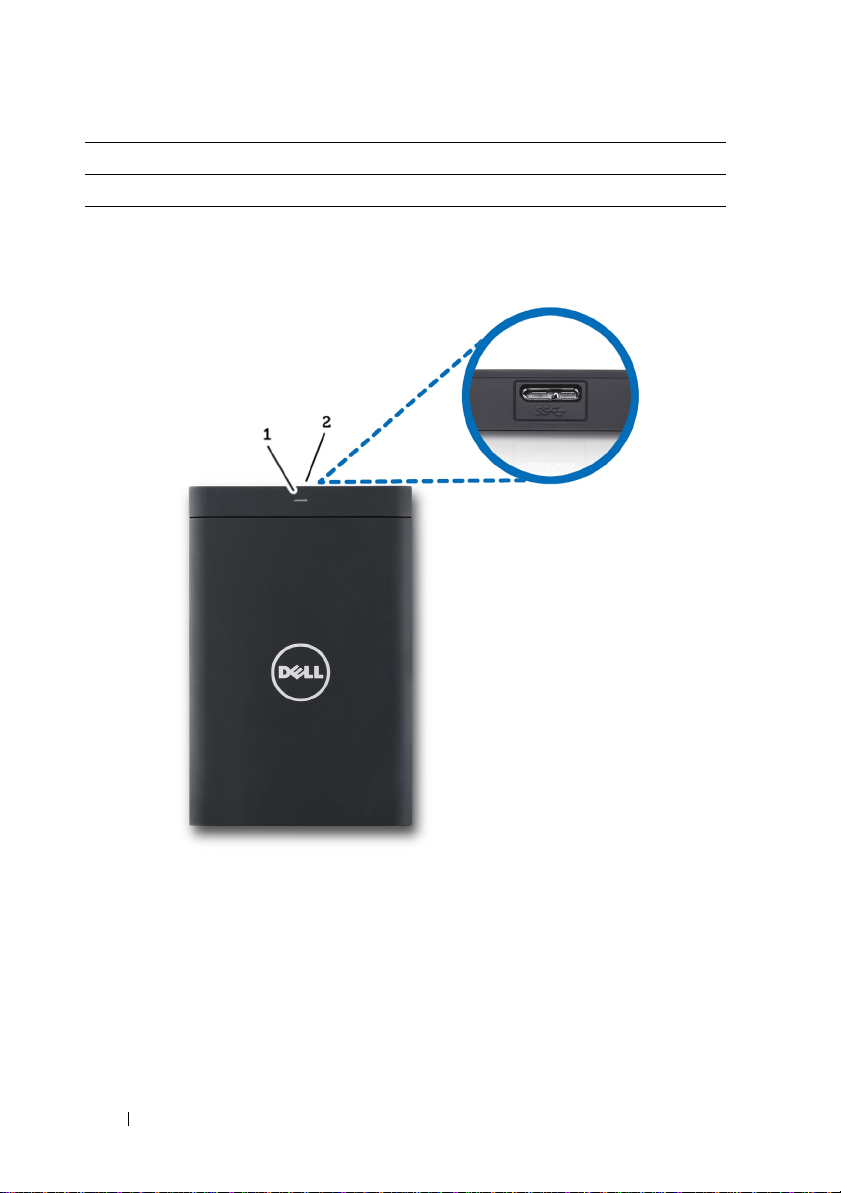
Physical View
1 Hard-drive activity LED 2 Hard-drive cable connector
8
Introduction
Page 9
Setup
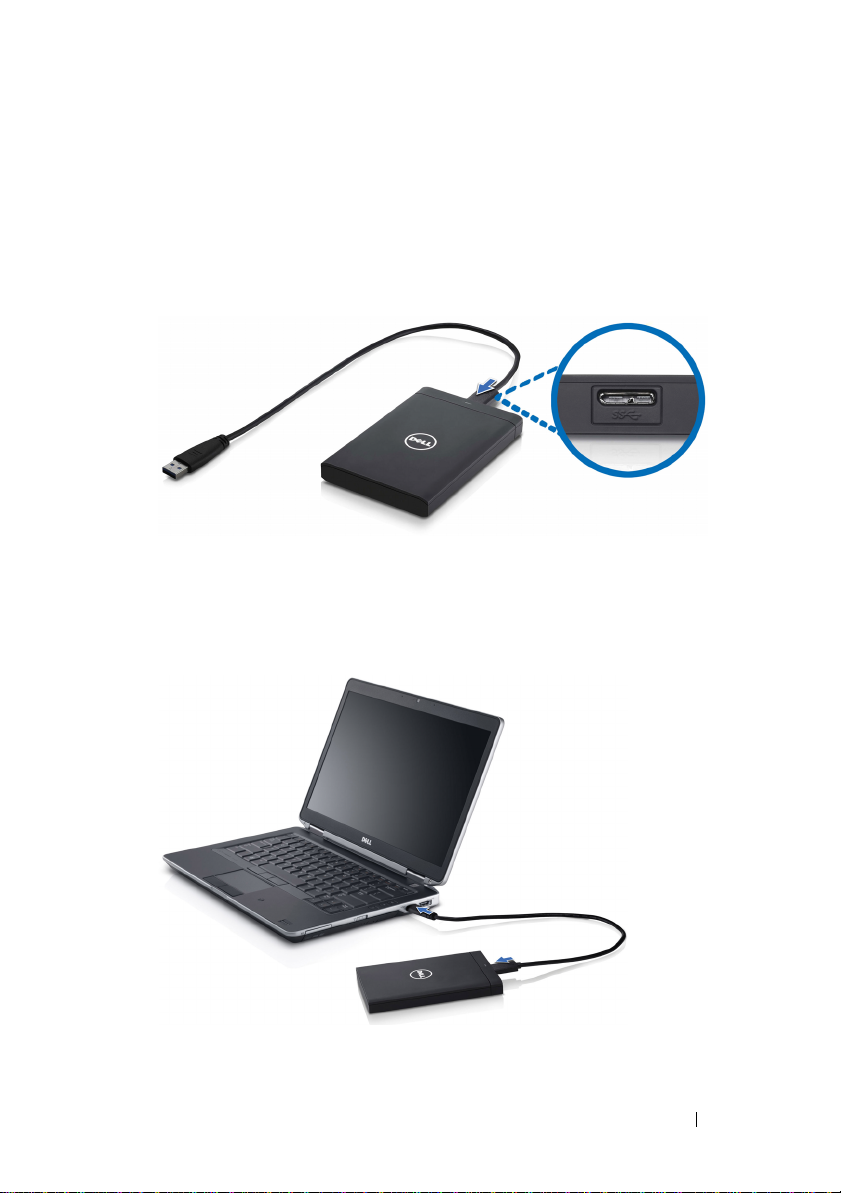
Installing the Drive
1
Connect the Dell USB 3.0 interface adapter to the external hard drive.
Connect the external hard drive to any available USB 3.0 port on your
2
computer. The drive is also compatible with USB 2.0 ports on your
computer.
Setup 9
Page 10
3
After the drive is connected, the drive will appear as a drive letter in
(My) Computer (i.e.: Drive E:, F:, or some other letter) within
approximately 30 seconds of connecting and turning on the drive.
NOTE: The white LED on the interface adapter lights up when you connect
the drive to the computer.
4
Click
Open Folder to View Files Using Windows Explorer
drive letter, or click on the drive letter in
You can now begin copying files to the external hard drive by manually using the
copy and paste options or alternatively by dragging and dropping files into the
external hard drive.
Computer.
to open the
Disconnecting the Drive
CAUTION: You must close all open windows on the external hard drive in order to
disconnect it. To prevent data loss, close all computer applications prior to
disconnecting the external hard drive.
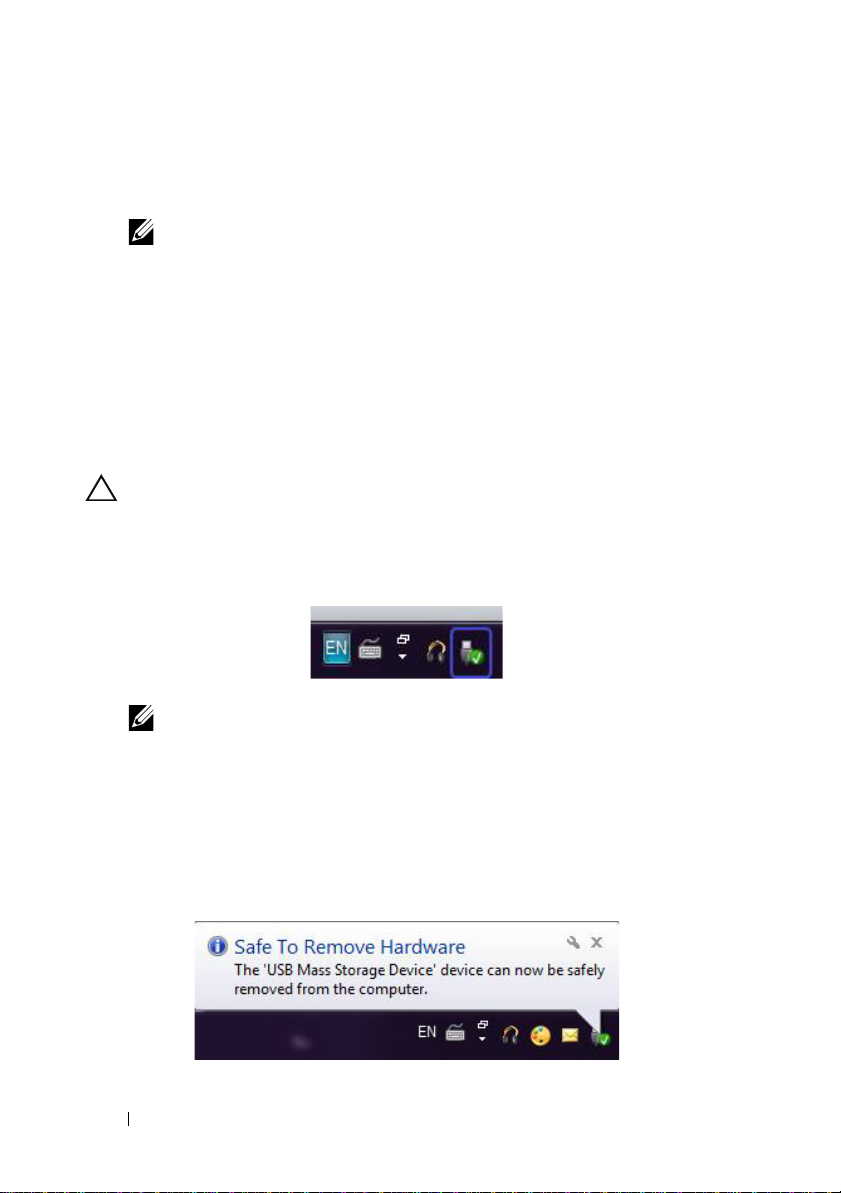
1
Click the S
NOTE: The Safely Remove Hardware icon looks like a USB connector with a
green check mark on it .
2
A pop-up menu will appear listing the devices that can be removed from
the computer.
3
Click the external hard drive on the pop-up menu.
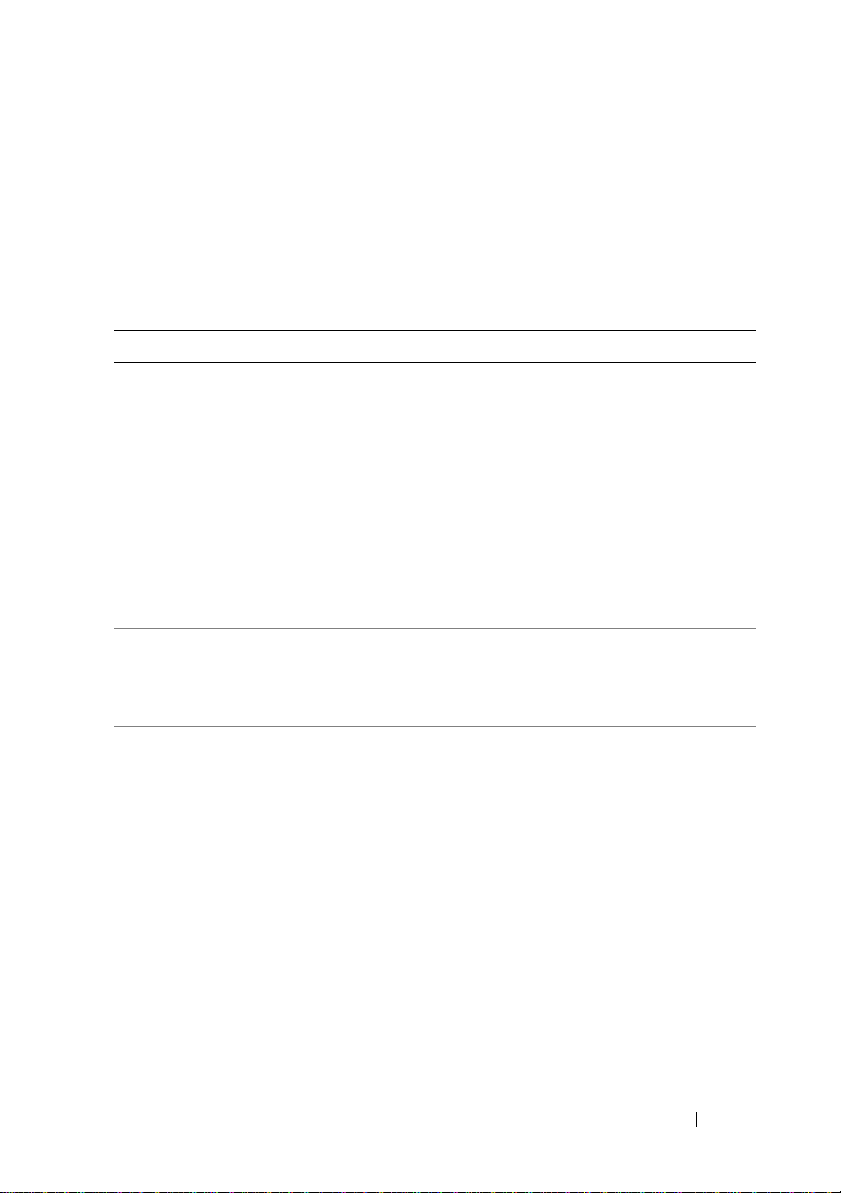
4
When you see a pop-up message saying that it's safe to remove the
hardware, you can unplug the device.
afely Remove Hardware
icon in the system tray, near the clock.
Setup 10
Page 11
Troubleshooting
This section is designed to walk you through troubleshooting steps in order to
identify solutions to commonly experienced issues with USB-connected
external drives.
Issues and Solutions
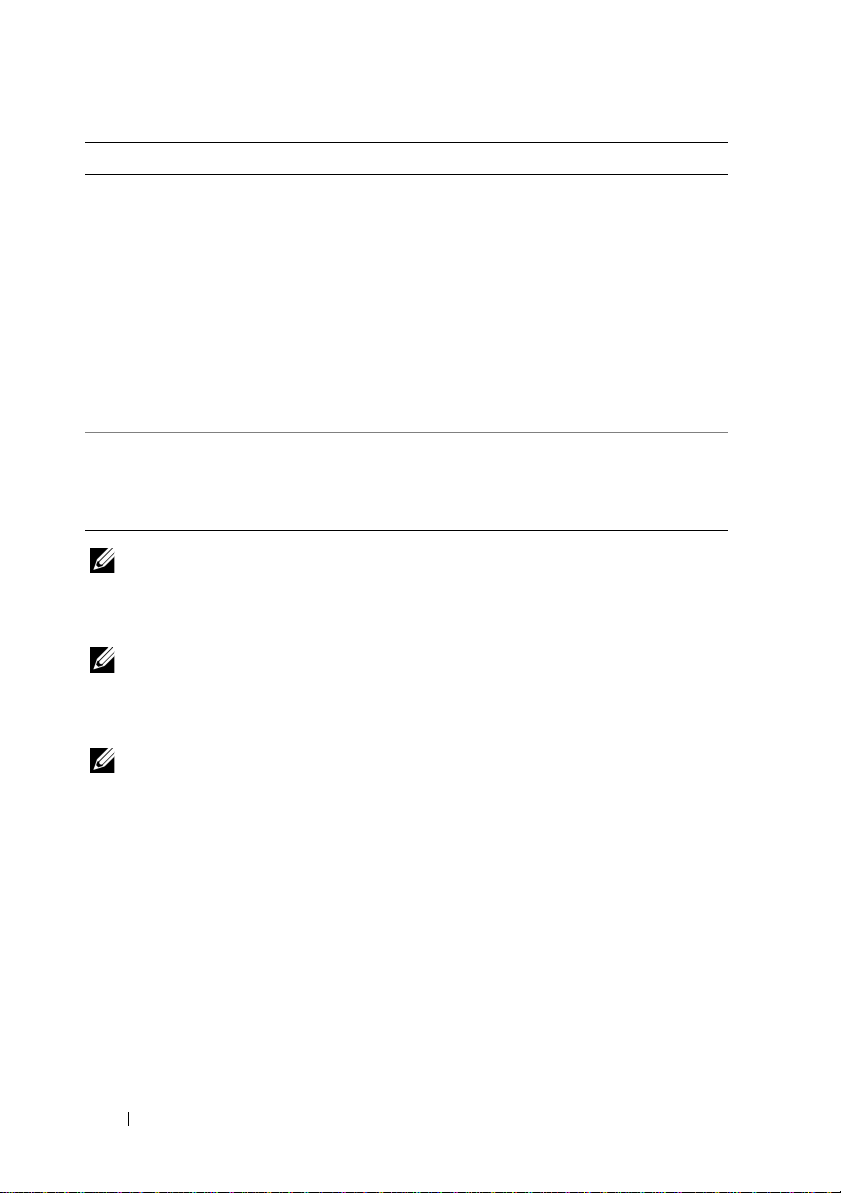
Steps Symptom Solution
Drive is not recognized by
1
the system.
2
Slow data transfer rate Ensure that the drive is connected to a USB 3.0
3
AutoPlay not popping up
a
Check the USB connection.
Disconnect and re-connect to a
different USB port.
b
Check the connection between the
USB 3.0 adapter and the drive. The
hard drive LED should turn on if
the hard drive is receiving adequate
power.
c
Check the USB 3.0 data cable, or try
using an alternate cable.
port. Refer to the user guide of your computer
manufacturer to determine the location of the
USB 3.0 ports on your computer.
a
Check the AutoPlay settings in
Windows.
b
Open
AutoPlay
button, and then clicking
. In the search box, type
Panel
autoplay, and then click
by clicking the
Control
AutoPlay
the options.
c
To turn AutoPlay on, select the
AutoPlay for all media and devices
checkbox.
Start
Use
in
Troubleshooting 11
Page 12
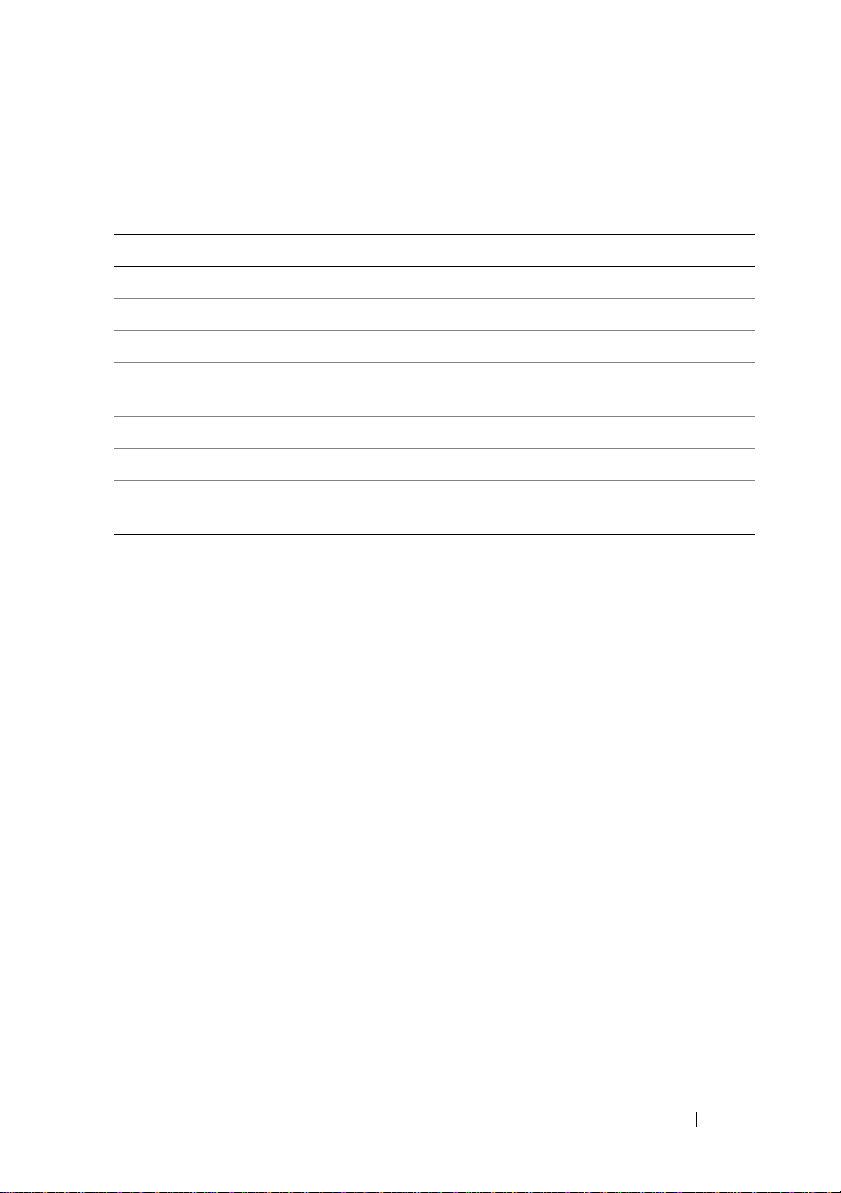
Steps Symptom Solution
4
Hard drive not detected in
BIOS (system setup)
• Press the <CTRL> + <ALT> +
<DELETE> keys together when on the
BIOS screen. This will restart your
computer and the external hard drive
should now be listed under the bootable
device list.
• Restart the computer after logging on to
Windows and then access the BIOS
screen to check if the external hard drive
is listed under the bootable device list.
5
Unable to boot to the Restart the computer after logging on to
operating system from the Windows and then access the BIOS screen to
external hard drive. check if the external hard drive is listed as the first
NOTE: Please ensure that your computer is up to date with the latest drivers and
BIOS version prior to attempting steps 4 and 5. The latest drivers and BIOS version
can be downloaded from the manufacturer's website. For Dell computers, visit
www.support.dell.com.
NOTE: If the solutions listed for steps 4 and 5 above do not resolve the issue, try
connecting the external hard drive to a USB 2.0/eSATA port on the computer. Please
refer to the user guide of your computer's manufacturer to determine the location of
the USB 2.0/eSATA ports on your computer.
boot device.
NOTE: The keystrokes used to invoke the BIOS (system setup) on your computer will
vary depending upon the computer manufacturer. Please refer to the
manufacturer's user guide or website for this information. For Dell computers,
pressing the <F2> key during computer startup will launch the BIOS menu and the
<F12> key will invoke the computer boot menu.
12
Troubleshooting
Page 13
Hard Drive LED States and Description
LED States
Hard drive activity state Hard drive LED status
OFF Hard drive is turned OFF
Hard drive idle LED glowing at maximum brightness
Hard drive reading/writing data LED blinking slowly (every 3 seconds)
Hard drive on standby LED glowing, but with reduced
brightness
Hard drive on hibernate LED is OFF
Hard drive busy LED blinking rapidly
Only the hard drive adapter is connected LED glowing, but with reduced
brightness
Troubleshooting
13
Page 14

14 Troubleshooting
Page 15

Contacting Dell
NOTE: If you do not have an active Internet connection, you can find contact
information on your purchase invoice, packing slip, bill, or Dell product catalog.
Dell provides several online and telephone-based support and service options.
Availability varies by country and product, and some services may not be
available in your area. To contact Dell for sales, technical support, or customer
service issues.
1
Visit support.dell.com.
2
Select your support category.
3
If you are not a U.S. customer, select your country code at the bottom of
the page, or select All to see more choices.
4
Select the appropriate service or support link based on your need.
Contacting Dell 15
Page 16

16 Contacting Dell
 Loading...