

Dell 1815dn, 1815 Mono Laser Owner's Manual
www.dell.com | support.dell.com
Dell™ Laser Multi-Function Printer 1815dn
Owner’s Manual
Look Inside For:
• Preparing Your Multi-Function Printer
• Understanding the Printer Software
• Loading Print Media
• Using Your Multi-Function Printer
• Maintenance
• Troubleshooting
• Installing Options
• Contacting Dell
Temporary

3
Ordering Supplies
Dell™ toner cartridges are available only through Dell. You can order toner cartridges online at
www.dell.com/supplies or premier.dell.com: Dell’s secure, customizable, procurement, and support site for its
larger relationship customers.
NOTE: If your country is not listed, contact your Dell distributor to order supplies.
USA
877-INK-2-YOU
Luxembourg
02.713 1590
Austria
08 20 - 24 05 30 35
Mexico
866-851-1754
Belgium
02.713 1590
Netherlands
020 - 674 4881
Canada
877-501-4803
Norway
231622 64
Colombia
01800-9-155676
Portugal
21 4220710
Denmark
3287 5215
Puerto Rico
866-851-1760
Finland
09 2533 1411
Spain
902120385
France
0825387247
Sweden
08 587 705 81
Germany
0800 2873355
Switzerland
0848 335 599
Ireland
1850 707 407
UK
0870 907 4574
Italy
800602705
Toner cartridge Part number
Dell Standard Capacity Toner Cartridge
a
a. Dell Standard Capacity Toner Cartridge life is 3,000 pages and Dell High
Capacity Toner Cartridge life is 5,000 pages.
NF485
Dell High Capacity Toner Cartridge RF223

4

5
Notes, Notices, and Cautions
NOTE: A NOTE indicates important information that helps you make better use of your printer.
NOTICE: A NOTICE indicates either potential damage to hardware or loss of data and tells you how to avoid the
problem.
CAUTION: A CAUTION indicates a potential for property damage, personal injury, or death.
Information in this document is subject to change without notice.
© 2006 Dell Inc.. All rights reserved.
Reproduction in any manner whatsoever without the written permission of Dell Inc. is strictly forbidden.
Trademarks used in this text: Dell, DELL logo, Dell ScanCenter and Dell Toner Management System are trademarks of Dell Inc.; Microsoft
and Windows are registered trademarks of Microsoft Corporation.; PaperPort
is a registered trademark of ScanSoft, Inc.; Adobe and
PhotoShop
are registered trademarks of Adobe Systems Incorporated.
Other trademarks and trade names may be used in this document to refer to either the entities claiming the marks and names of their products.
Dell Inc. disclaims any proprietary interest in trademarks and trade names other than its own.
Model Laser MFP 1815dn
June 2006 NF 841 Rev. A00

6

Contents 7
Contents
CAUTION: SAFETY INFORMATION. . . . . . . . . . . . . . . . . . . . . . . . . . . . . . . . . . . . . . . . . 13
Czech . . . . . . . . . . . . . . . . . . . . . . . . . . . . . . . . . . . . . . . . . . . . . . . . . . . . . . . . . . . . . . . . . . 14
Danish . . . . . . . . . . . . . . . . . . . . . . . . . . . . . . . . . . . . . . . . . . . . . . . . . . . . . . . . . . . . . . . . . 14
Dutch . . . . . . . . . . . . . . . . . . . . . . . . . . . . . . . . . . . . . . . . . . . . . . . . . . . . . . . . . . . . . . . . . . 14
Finnish. . . . . . . . . . . . . . . . . . . . . . . . . . . . . . . . . . . . . . . . . . . . . . . . . . . . . . . . . . . . . . . . . 14
French . . . . . . . . . . . . . . . . . . . . . . . . . . . . . . . . . . . . . . . . . . . . . . . . . . . . . . . . . . . . . . . . . 14
German . . . . . . . . . . . . . . . . . . . . . . . . . . . . . . . . . . . . . . . . . . . . . . . . . . . . . . . . . . . . . . . . 14
Hebrew . . . . . . . . . . . . . . . . . . . . . . . . . . . . . . . . . . . . . . . . . . . . . . . . . . . . . . . . . . . . . . . . 14
Italian. . . . . . . . . . . . . . . . . . . . . . . . . . . . . . . . . . . . . . . . . . . . . . . . . . . . . . . . . . . . . . . . . . 14
Iberian Portugese . . . . . . . . . . . . . . . . . . . . . . . . . . . . . . . . . . . . . . . . . . . . . . . . . . . . . . . 14
Spanish . . . . . . . . . . . . . . . . . . . . . . . . . . . . . . . . . . . . . . . . . . . . . . . . . . . . . . . . . . . . . . . . 14
Norwegian . . . . . . . . . . . . . . . . . . . . . . . . . . . . . . . . . . . . . . . . . . . . . . . . . . . . . . . . . . . . . 14
Polish. . . . . . . . . . . . . . . . . . . . . . . . . . . . . . . . . . . . . . . . . . . . . . . . . . . . . . . . . . . . . . . . . . 14
Ruaaian . . . . . . . . . . . . . . . . . . . . . . . . . . . . . . . . . . . . . . . . . . . . . . . . . . . . . . . . . . . . . . . . 14
Swedish . . . . . . . . . . . . . . . . . . . . . . . . . . . . . . . . . . . . . . . . . . . . . . . . . . . . . . . . . . . . . . . 14
Turkey . . . . . . . . . . . . . . . . . . . . . . . . . . . . . . . . . . . . . . . . . . . . . . . . . . . . . . . . . . . . . . . . . 14
Understanding Your Multi-Function Printer. . . . . . . . . . . . . . . . . . . . . . . . . . . . . . . . . 15
Front View . . . . . . . . . . . . . . . . . . . . . . . . . . . . . . . . . . . . . . . . . . . . . . . . . . . . . . . . . 15
Rear View. . . . . . . . . . . . . . . . . . . . . . . . . . . . . . . . . . . . . . . . . . . . . . . . . . . . . . . . . . 16
1 Preparing Your Multi-Function Printer
Unlocking the Scanner. . . . . . . . . . . . . . . . . . . . . . . . . . . . . . . . . . . . . . . . . . . . . . . . . . . 19
Using the Operator Panel. . . . . . . . . . . . . . . . . . . . . . . . . . . . . . . . . . . . . . . . . . . . . . . . . 20
Common Keys . . . . . . . . . . . . . . . . . . . . . . . . . . . . . . . . . . . . . . . . . . . . . . . . . . . . . . 20
Key Pad. . . . . . . . . . . . . . . . . . . . . . . . . . . . . . . . . . . . . . . . . . . . . . . . . . . . . . . . . . . . 20
Dell Laser MFP 1815dn Menu Functions. . . . . . . . . . . . . . . . . . . . . . . . . . . . . . . . . . . . 21
Changing the Display Language. . . . . . . . . . . . . . . . . . . . . . . . . . . . . . . . . . . . . . . . . . . 22

8 Contents
Setting Up Faxing . . . . . . . . . . . . . . . . . . . . . . . . . . . . . . . . . . . . . . . . . . . . . . . . . . . . . . . 22
Setting the Printer ID . . . . . . . . . . . . . . . . . . . . . . . . . . . . . . . . . . . . . . . . . . . . . . . . 22
Using the Number Keypad to Enter Characters . . . . . . . . . . . . . . . . . . . . . . . . . 23
Setting the Time and Date. . . . . . . . . . . . . . . . . . . . . . . . . . . . . . . . . . . . . . . . . . . . 24
Storing a Number for Speed Dialing . . . . . . . . . . . . . . . . . . . . . . . . . . . . . . . . . . . 25
Setting Group Dial. . . . . . . . . . . . . . . . . . . . . . . . . . . . . . . . . . . . . . . . . . . . . . . . . . . 25
Preparing Networking . . . . . . . . . . . . . . . . . . . . . . . . . . . . . . . . . . . . . . . . . . . . . . . . . . . 26
Attaching Cables. . . . . . . . . . . . . . . . . . . . . . . . . . . . . . . . . . . . . . . . . . . . . . . . . . . . 26
Printing the Network Configuration Page. . . . . . . . . . . . . . . . . . . . . . . . . . . . . . . 27
Run the Installation Software. . . . . . . . . . . . . . . . . . . . . . . . . . . . . . . . . . . . . . . . . 28
2 Understanding the Printer Software
Software Overview. . . . . . . . . . . . . . . . . . . . . . . . . . . . . . . . . . . . . . . . . . . . . . . . . . . . . . 31
Installing Dell Software For Local Printing . . . . . . . . . . . . . . . . . . . . . . . . . . . . . . . . . 32
Windows XP:. . . . . . . . . . . . . . . . . . . . . . . . . . . . . . . . . . . . . . . . . . . . . . . . . . . . . . . 32
Windows 2000: . . . . . . . . . . . . . . . . . . . . . . . . . . . . . . . . . . . . . . . . . . . . . . . . . . . . . 33
Windows 98: . . . . . . . . . . . . . . . . . . . . . . . . . . . . . . . . . . . . . . . . . . . . . . . . . . . . . . . 33
Windows Me: . . . . . . . . . . . . . . . . . . . . . . . . . . . . . . . . . . . . . . . . . . . . . . . . . . . . . . 34
Assigning an IP Address . . . . . . . . . . . . . . . . . . . . . . . . . . . . . . . . . . . . . . . . . . . . . . . . . 34
Installing Dell Software For Network Printing . . . . . . . . . . . . . . . . . . . . . . . . . . . . . . 35
Uninstalling Software . . . . . . . . . . . . . . . . . . . . . . . . . . . . . . . . . . . . . . . . . . . . . . . . . . . 36
3 Loading Print Media
Print Media Guidelines . . . . . . . . . . . . . . . . . . . . . . . . . . . . . . . . . . . . . . . . . . . . . . . . . . 37
Loading Paper . . . . . . . . . . . . . . . . . . . . . . . . . . . . . . . . . . . . . . . . . . . . . . . . . . . . . . . . . . 40
Using the Paper Tray . . . . . . . . . . . . . . . . . . . . . . . . . . . . . . . . . . . . . . . . . . . . . . . . 40
Using the Bypass Tray . . . . . . . . . . . . . . . . . . . . . . . . . . . . . . . . . . . . . . . . . . . . . . . 43
Setting the Paper Size and Type . . . . . . . . . . . . . . . . . . . . . . . . . . . . . . . . . . . . . . . . . . . 47
Setting the Paper Size . . . . . . . . . . . . . . . . . . . . . . . . . . . . . . . . . . . . . . . . . . . . . . . 47
Setting the Paper Type. . . . . . . . . . . . . . . . . . . . . . . . . . . . . . . . . . . . . . . . . . . . . . . 47
Placing Documents on the Scanner Glass. . . . . . . . . . . . . . . . . . . . . . . . . . . . . . . . . . 48
Loading Documents Into the ADF. . . . . . . . . . . . . . . . . . . . . . . . . . . . . . . . . . . . . . . . . . 49

Contents 9
4 Using Your Multi-Function Printer
Printing . . . . . . . . . . . . . . . . . . . . . . . . . . . . . . . . . . . . . . . . . . . . . . . . . . . . . . . . . . . . . . . . 51
Printing in Windows. . . . . . . . . . . . . . . . . . . . . . . . . . . . . . . . . . . . . . . . . . . . . . . . . 51
Printing in Macintosh. . . . . . . . . . . . . . . . . . . . . . . . . . . . . . . . . . . . . . . . . . . . . . . . 51
Printing in Linux. . . . . . . . . . . . . . . . . . . . . . . . . . . . . . . . . . . . . . . . . . . . . . . . . . . . . 51
Printing from the USB Memory Key. . . . . . . . . . . . . . . . . . . . . . . . . . . . . . . . . . . . 52
Copying . . . . . . . . . . . . . . . . . . . . . . . . . . . . . . . . . . . . . . . . . . . . . . . . . . . . . . . . . . . . . . . . 52
Knowing the Copy Menu . . . . . . . . . . . . . . . . . . . . . . . . . . . . . . . . . . . . . . . . . . . . . 52
Setting the Basic Copy Options . . . . . . . . . . . . . . . . . . . . . . . . . . . . . . . . . . . . . . . 52
Making Copies. . . . . . . . . . . . . . . . . . . . . . . . . . . . . . . . . . . . . . . . . . . . . . . . . . . . . . 54
Special Copy Features. . . . . . . . . . . . . . . . . . . . . . . . . . . . . . . . . . . . . . . . . . . . . . . 54
Selecting a Paper Tray. . . . . . . . . . . . . . . . . . . . . . . . . . . . . . . . . . . . . . . . . . . . . . . 55
Printing Copies on Both Sides of Paper . . . . . . . . . . . . . . . . . . . . . . . . . . . . . . . . 55
Changing the Default Settings . . . . . . . . . . . . . . . . . . . . . . . . . . . . . . . . . . . . . . . . 56
Scanning. . . . . . . . . . . . . . . . . . . . . . . . . . . . . . . . . . . . . . . . . . . . . . . . . . . . . . . . . . . . . . . 57
Knowing the Scan Menu. . . . . . . . . . . . . . . . . . . . . . . . . . . . . . . . . . . . . . . . . . . . . 58
Scanning to an Application. . . . . . . . . . . . . . . . . . . . . . . . . . . . . . . . . . . . . . . . . . . 58
Scanning Using Network Scan . . . . . . . . . . . . . . . . . . . . . . . . . . . . . . . . . . . . . . . 59
Scanning to the USB Memory Key . . . . . . . . . . . . . . . . . . . . . . . . . . . . . . . . . . . . 60
Scanning Using the Windows Image Acquisition (WIA) Driver. . . . . . . . . . . . 63
Scanning and Sending an Email. . . . . . . . . . . . . . . . . . . . . . . . . . . . . . . . . . . . . . . 64
Faxing . . . . . . . . . . . . . . . . . . . . . . . . . . . . . . . . . . . . . . . . . . . . . . . . . . . . . . . . . . . . . . . . . 65
Knowing the Fax Menu . . . . . . . . . . . . . . . . . . . . . . . . . . . . . . . . . . . . . . . . . . . . . . 65
Setting the Basic Fax Options. . . . . . . . . . . . . . . . . . . . . . . . . . . . . . . . . . . . . . . . . 65
Sending a Fax Automatically . . . . . . . . . . . . . . . . . . . . . . . . . . . . . . . . . . . . . . . . . 66
Sending a Fax Manually . . . . . . . . . . . . . . . . . . . . . . . . . . . . . . . . . . . . . . . . . . . . . 67
Receiving a Fax. . . . . . . . . . . . . . . . . . . . . . . . . . . . . . . . . . . . . . . . . . . . . . . . . . . . . 67
Forwarding Faxes to E-mail Addresses . . . . . . . . . . . . . . . . . . . . . . . . . . . . . . . . 68
Setting up the Fax System . . . . . . . . . . . . . . . . . . . . . . . . . . . . . . . . . . . . . . . . . . . . 68
Using Fax Features. . . . . . . . . . . . . . . . . . . . . . . . . . . . . . . . . . . . . . . . . . . . . . . . . . 70
Printing Reports . . . . . . . . . . . . . . . . . . . . . . . . . . . . . . . . . . . . . . . . . . . . . . . . . . . . 70
Using Advanced Fax Features . . . . . . . . . . . . . . . . . . . . . . . . . . . . . . . . . . . . . . . . 71
Using an Answering Machine . . . . . . . . . . . . . . . . . . . . . . . . . . . . . . . . . . . . . . . . 72
Using a Computer Modem . . . . . . . . . . . . . . . . . . . . . . . . . . . . . . . . . . . . . . . . . . . 73
5 Maintenance
Replacement Parts . . . . . . . . . . . . . . . . . . . . . . . . . . . . . . . . . . . . . . . . . . . . . . . . . . . . . . 75

10 Contents
Replacing the ADF Rubber Pad . . . . . . . . . . . . . . . . . . . . . . . . . . . . . . . . . . . . . . . 75
Ordering Supplies . . . . . . . . . . . . . . . . . . . . . . . . . . . . . . . . . . . . . . . . . . . . . . . . . . . . . . . 77
Replacing the Toner Cartridge . . . . . . . . . . . . . . . . . . . . . . . . . . . . . . . . . . . . . . . . . . . . 78
Cleaning Your Multi-Function Printer . . . . . . . . . . . . . . . . . . . . . . . . . . . . . . . . . . . . . . 80
Cleaning the Exterior . . . . . . . . . . . . . . . . . . . . . . . . . . . . . . . . . . . . . . . . . . . . . . . . 80
Cleaning the Interior. . . . . . . . . . . . . . . . . . . . . . . . . . . . . . . . . . . . . . . . . . . . . . . . . 80
Cleaning the Scanner. . . . . . . . . . . . . . . . . . . . . . . . . . . . . . . . . . . . . . . . . . . . . . . . 81
Cleaning the Drum . . . . . . . . . . . . . . . . . . . . . . . . . . . . . . . . . . . . . . . . . . . . . . . . . . 82
6 Troubleshooting
Clearing Jams in the ADF . . . . . . . . . . . . . . . . . . . . . . . . . . . . . . . . . . . . . . . . . . . . . . . . 83
Clearing Jams in the Paper Paths . . . . . . . . . . . . . . . . . . . . . . . . . . . . . . . . . . . . . . . . . 85
Paper Feed Jam (tray 1). . . . . . . . . . . . . . . . . . . . . . . . . . . . . . . . . . . . . . . . . . . . . . 85
Paper Feed Jam (optional tray 2). . . . . . . . . . . . . . . . . . . . . . . . . . . . . . . . . . . . . . 86
Bypass Tray Jam. . . . . . . . . . . . . . . . . . . . . . . . . . . . . . . . . . . . . . . . . . . . . . . . . . . . 87
Fuser Area Jam. . . . . . . . . . . . . . . . . . . . . . . . . . . . . . . . . . . . . . . . . . . . . . . . . . . . . 88
Paper Exit Jam . . . . . . . . . . . . . . . . . . . . . . . . . . . . . . . . . . . . . . . . . . . . . . . . . . . . . 89
Duplex Jam . . . . . . . . . . . . . . . . . . . . . . . . . . . . . . . . . . . . . . . . . . . . . . . . . . . . . . . . 91
Tips for Avoiding Paper Jams. . . . . . . . . . . . . . . . . . . . . . . . . . . . . . . . . . . . . . . . . 94
More Troubleshooting . . . . . . . . . . . . . . . . . . . . . . . . . . . . . . . . . . . . . . . . . . . . . . . . . . . 94
7 Installing Options
Precautions When Installing Printer Accessories. . . . . . . . . . . . . . . . . . . . . . . . . . . 95
Expanding Printer Memory . . . . . . . . . . . . . . . . . . . . . . . . . . . . . . . . . . . . . . . . . . . . . . . 95
Activating the Added Memory in the PS Printer Properties . . . . . . . . . . . . . . . 97
Installing an Optional Tray 2 . . . . . . . . . . . . . . . . . . . . . . . . . . . . . . . . . . . . . . . . . . . . . . 98
Activating the Installed Optional Tray 2 in the Printer Properties . . . . . . . . . 100
8 Contacting Dell
Technical Assistance. . . . . . . . . . . . . . . . . . . . . . . . . . . . . . . . . . . . . . . . . . . . . . . . . . . 101
Automated Order-Status Service . . . . . . . . . . . . . . . . . . . . . . . . . . . . . . . . . . . . . . . . . 102

Contents 11
Contacting Dell . . . . . . . . . . . . . . . . . . . . . . . . . . . . . . . . . . . . . . . . . . . . . . . . . . . . . . . . 102
9 Appendix
U.S. Terms and Conditions of Sale . . . . . . . . . . . . . . . . . . . . . . . . . . . . . . . . . . . . . . . 119
Limited Warranties and Return Policy. . . . . . . . . . . . . . . . . . . . . . . . . . . . . . . . . . . . 121
Limited Warranty for Dell-Branded Hardware Products (U.S. Only) . . . . . . 121
Limited Warranty Terms for Dell-Branded Hardware Products (Canada Only) .
124
Dell Return Policy (U.S. Only). . . . . . . . . . . . . . . . . . . . . . . . . . . . . . . . . . . . . . . . 127
Total Satisfaction Return Policy (Canada Only) . . . . . . . . . . . . . . . . . . . . . . . . 128
Dell Software and Peripherals (Canada Only) . . . . . . . . . . . . . . . . . . . . . . . . . 128
1-Year End-User Manufacturer Guarantee (Latin America and the Caribbean
Only). . . . . . . . . . . . . . . . . . . . . . . . . . . . . . . . . . . . . . . . . . . . . . . . . . . . . . . . . . . . . 129
Angreskjema For Norske Forbrukere. . . . . . . . . . . . . . . . . . . . . . . . . . . . . . . . . 130
Dell™ Printer Consumables Limited Warranties. . . . . . . . . . . . . . . . . . . . . . . . . . . 132
Consumables Limited Warranty (U.S. and Canada Only) . . . . . . . . . . . . . . . . 132
Consumables Limited Warranty (Latin America Only). . . . . . . . . . . . . . . . . . . 132
Dell Software License Agreement . . . . . . . . . . . . . . . . . . . . . . . . . . . . . . . . . . . . . . . 133
Limited Warranty . . . . . . . . . . . . . . . . . . . . . . . . . . . . . . . . . . . . . . . . . . . . . . . . . . 134
U.S. Government Restricted Rights . . . . . . . . . . . . . . . . . . . . . . . . . . . . . . . . . . 134
General . . . . . . . . . . . . . . . . . . . . . . . . . . . . . . . . . . . . . . . . . . . . . . . . . . . . . . . . . . 134
Regulatory Notices . . . . . . . . . . . . . . . . . . . . . . . . . . . . . . . . . . . . . . . . . . . . . . . . . . . . 135
FCC Notice (U.S. Only). . . . . . . . . . . . . . . . . . . . . . . . . . . . . . . . . . . . . . . . . . . . . . . . . . 136
FCC Class B. . . . . . . . . . . . . . . . . . . . . . . . . . . . . . . . . . . . . . . . . . . . . . . . . . . . . . . 136
Industry Canada (Canada Only). . . . . . . . . . . . . . . . . . . . . . . . . . . . . . . . . . . . . . 137
CE Notice (European Union) . . . . . . . . . . . . . . . . . . . . . . . . . . . . . . . . . . . . . . . . 138
NOM Information (Mexico Only). . . . . . . . . . . . . . . . . . . . . . . . . . . . . . . . . . . . . 143
ENERGY STAR
®
Compliance . . . . . . . . . . . . . . . . . . . . . . . . . . . . . . . . . . . . . . . . 144
Recycling Information. . . . . . . . . . . . . . . . . . . . . . . . . . . . . . . . . . . . . . . . . . . . . . 144
Waste Electrical and Electronic Equipment (WEEE) Directive . . . . . . . . . . . 144
SMĚRNICE PRO ELEKTRICKÝ ODPAD A ELEKTRONICKÝ NÁŘADI
(WEEE) . . . . . . . . . . . . . . . . . . . . . . . . . . . . . . . . . . . . . . . . . . . . . . . . . . . . . . . . . 144
Direktiv for bortskaffelse af elektrisk og elektronisk udstyr (WEEE). . . . . . . 145
Richtlijn WEEE, afdanken van elektrische en elektronische apparaten . . . 145
Direktiivi sähkö- ja elektroniikkalaiteromusta (WEEE) . . . . . . . . . . . . . . . . . . 145

12 Contents
Directive sur la mise au rebut des appareils électriques et électroniques
(WEEE) . . . . . . . . . . . . . . . . . . . . . . . . . . . . . . . . . . . . . . . . . . . . . . . . . . . . . . . . . . . 145
Richtlinie für Abfall von elektrischen und elektronischen Geräten (WEEE) . 146
Direttiva Rifiuti di apparecchiature elettriche ed elettroniche (WEEE). . . . . 146
Direktivet for kassert elektrisk og elektronisk utstyr (WEEE) . . . . . . . . . . . . . 146
Dyrektywa dotycząca odpadów urządzeń elektrycznych i
elektronicznych (WEEE). . . . . . . . . . . . . . . . . . . . . . . . . . . . . . . . . . . . . . . . . . 146
Diretiva sobre equipamentos eléctricos e electrónicos a serem descartados
(WEEE) . . . . . . . . . . . . . . . . . . . . . . . . . . . . . . . . . . . . . . . . . . . . . . . . . . . . . . . . . . . 147
Directiva sobre el deshecho de material eléctrico y electrónico (WEEE) . . 147
Direktiv för kassering av elektrisk och elektronisk utrustning (WEEE) . . . . . 147
Index. . . . . . . . . . . . . . . . . . . . . . . . . . . . . . . . . . . . . . . . . . . . . . . . . . 149

13
CAUTION: SAFETY INFORMATION
Use the following safety guidelines to help ensure your own personal safety and to help protect your
system and working environment from potential damage.
• Your product uses a laser.
CAUTION: Use of controls or adjustments or performance of procedures other than those specified herein may
result in hazardous radiation exposure.
• Your product uses a printing process that heats the print media, and heat can cause certain media
to release emissions. You must understand the section in your operating instructions that discusses
the guidelines for selecting appropriate print media to avoid the possibility of harmful emissions.
CAUTION: If your product is not marked with this symbol , it must be connected to an electrical outlet that
is properly grounded.
• The power cord must be connected to an electrical outlet that is near the product and easily
accessible.
• Refer service or repairs, other than those described in the operating instructions, to a professional
service person.
• This product is designed to meet safety standards with the use of specific Dell-authorized
components. The safety features of some parts may not always be obvious. Dell disclaims liability
associated with use of non-Dell-authorized components.
CAUTION: Do not use this product during a lightning storm.

14
Czech
Danish
Dutch
Finnish
French
German
Hebrew
Italian
Iberian Portugese
Spanish
Norwegian
Polish
Ruaaian
Swedish
Turkey
15
Understanding Your Multi-Function Printer
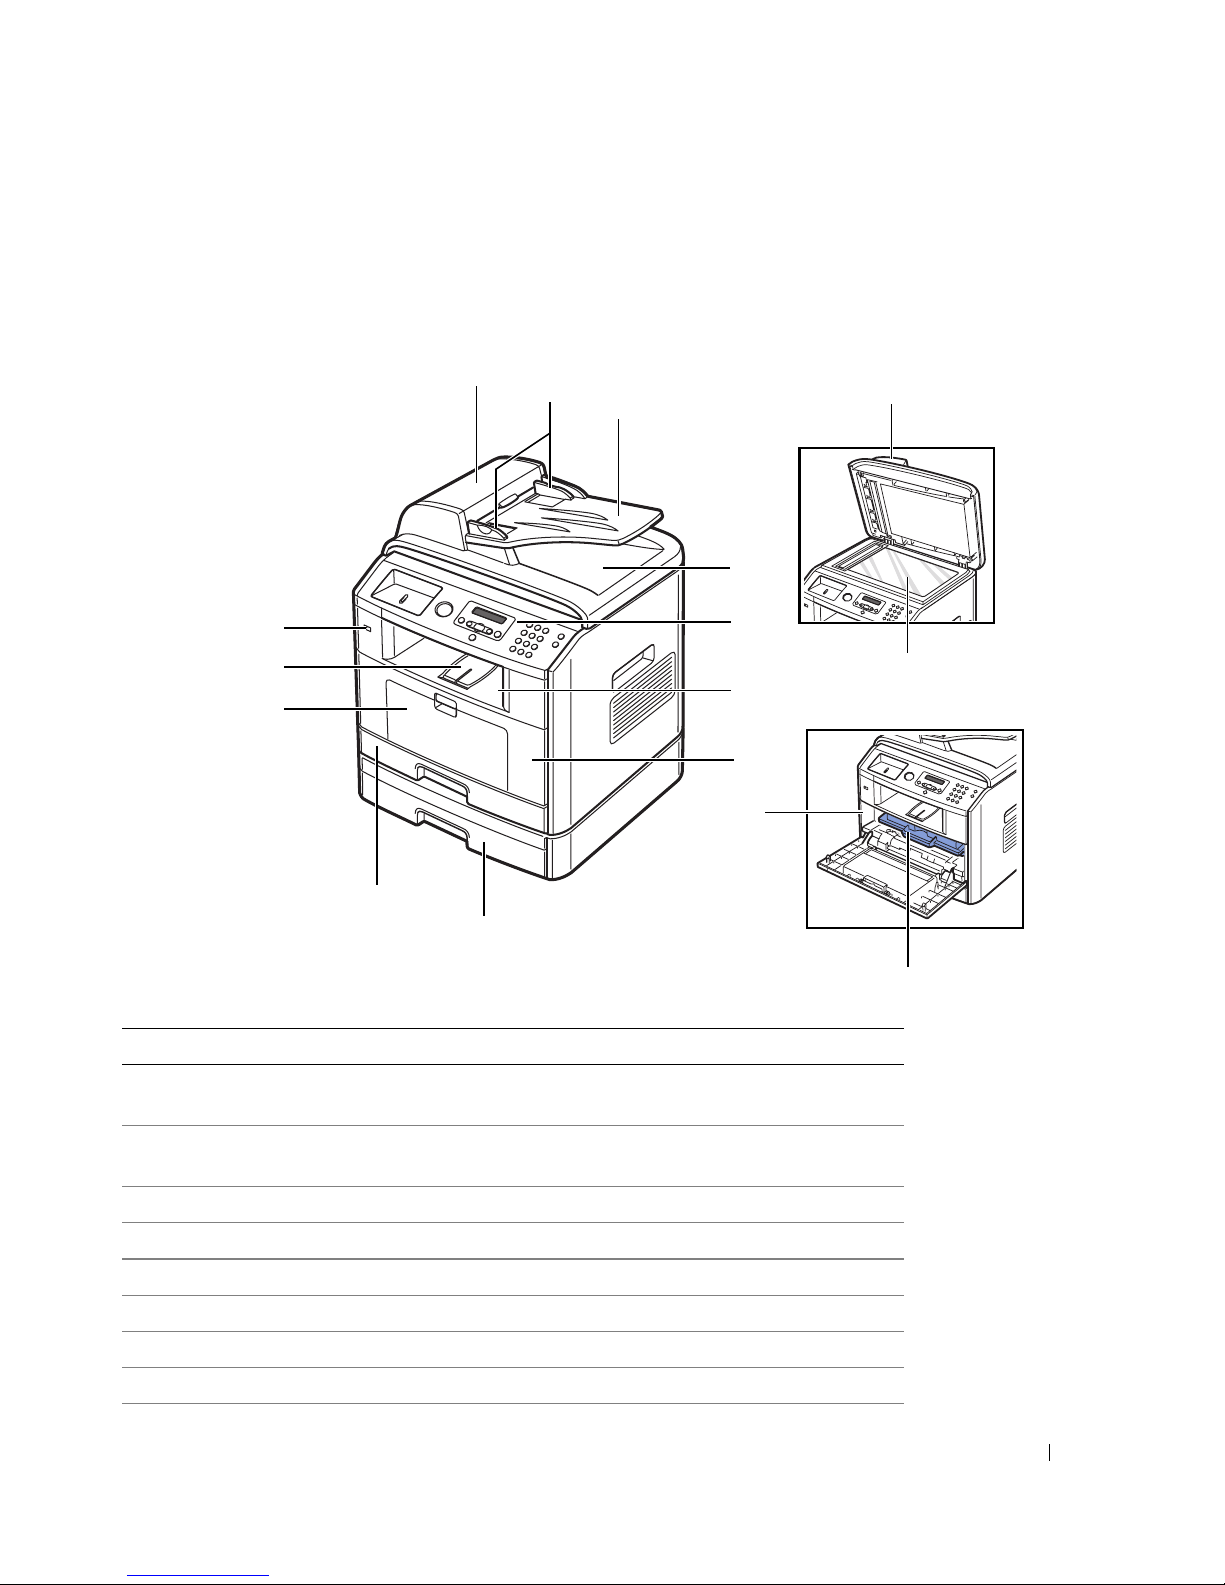
Front View
16
4
15
14
13
12
6
7
8
9
1
2
3
5
10
11
# Use the: When you want to:
1 Automatic Document
Feeder (ADF)
Load the document for copying, scanning, or sending faxes.
2Document Width
Guides
Ensure proper document feeding.
3 Document Input Tray Load the document for copying, scanning, or sending faxes.
4 Document Cover Open to place a document on the scanner glass.
5 Document Glass Place a document for copying, scanning, or sending faxes.
6 Document Output Tray Hold the document as it exits the ADF.
7 Operator Panel Operate the printer.
8 Output Tray Hold paper as it exits the front of the printer.

16
Rear View
9 Front Cover Access the toner cartridge.
10 Express Service Code Identify your printer while using support.dell.com or
contacting technical support.
Enter the Express Service Code to direct your call when
contacting technical support. The Express Service Code is
not available in all countries.
11 Toner Cartridge Use the toner cartridge.
12 Optional Tray 2 Load paper into the optional Tray 2.
13 Tray 1 Load paper into the standard Tray 1.
14 Bypass tray Load print media one sheet at a time.
15 Paper Output Extension Keep print media from falling off the front output tray.
16 USB Memory Port Insert the USB memory key.
# Use the: When you want to:
17 Network Port Connect the printer to the network environment.
18 USB Port Insert the USB cable.
19 Locking Unit Slot Prevent the installed memory card from being remove.
# Use the: When you want to:
26
22
25
2324
17
18
19
20
21

17
20 Optional Tray 2 Cable
Connector
Connect the optional Tray 2 to your printer.
21 Telephone Line Socket
(Line)
Connect the telephone line to your printer.
22 Extension Telephone
Socket (EXT)
Connect additional devices, such as a telephone or
answering machine, to the printer (Optional).
If the phone
communication is serial in your country (such as
Germany, Sweden, Denmark, Austria, Belgium, Italy, France
and Switzerland), remove the plug from the extension
telephone socket (EXT) () and insert the supplied
terminator.
23 Control Board Cover Open to install the optional memory card.
24 Power Receptacle Supply power to the printer.
25 Power Switch Turn the print on.
26 Rear Cover Open to remove the paper jams and use the rear output slot.
# Use the: When you want to:

18
Preparing Your Multi-Function Printer 19
1
Preparing Your Multi-Function Printer
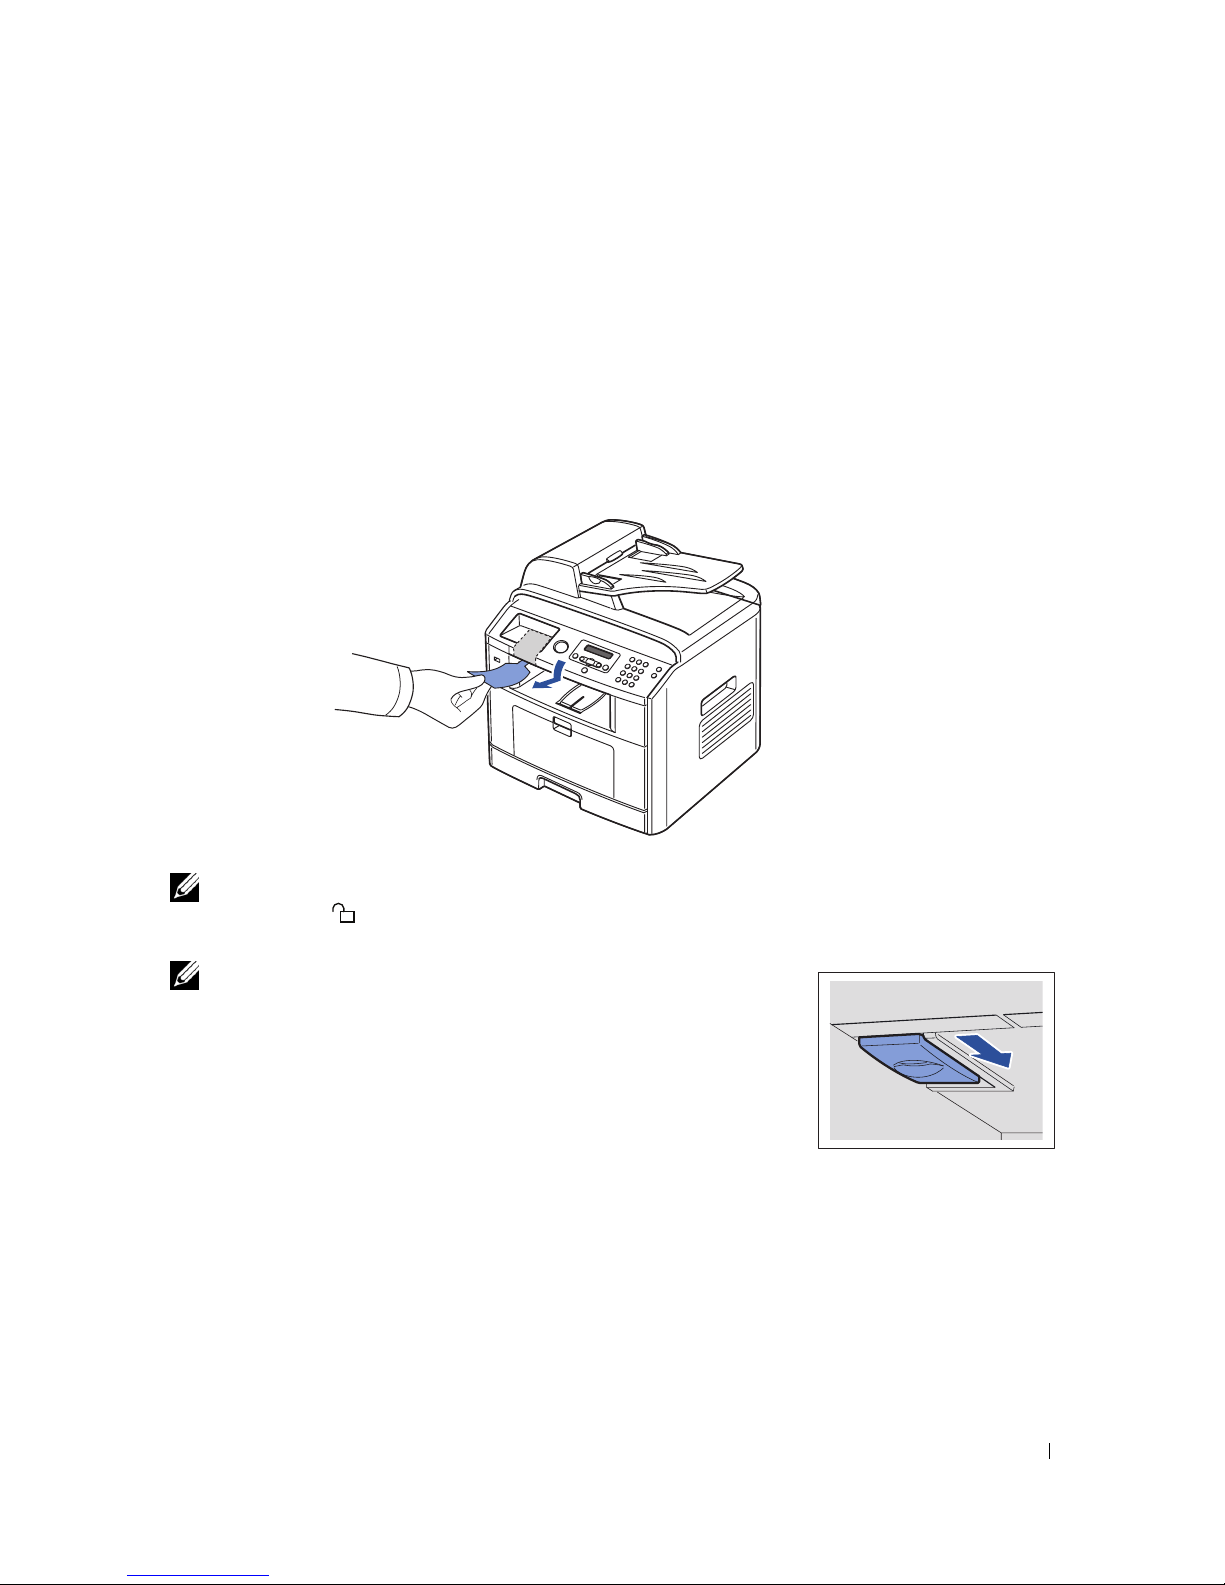
Unlocking the Scanner
1
Remove the label completely from the scanner module by gently pulling it. The scan unlock
switch automatically moves FORWARD to the unlock position.
NOTE: To confirm the scanner is unlocked, open the scanner cover and make sure the blue latch is in
the unlocked ( ) position. If the latch is not in the unlocked position, reach under the operator panel
and pull it forward.
NOTE: When you are moving the printer or do not intend to use it for a
long period of time, move the switch BACKWARD to the lock position, as
shown. To scan or copy a document, the switch must be unlocked.
20 Preparing Your Multi-Function Printer
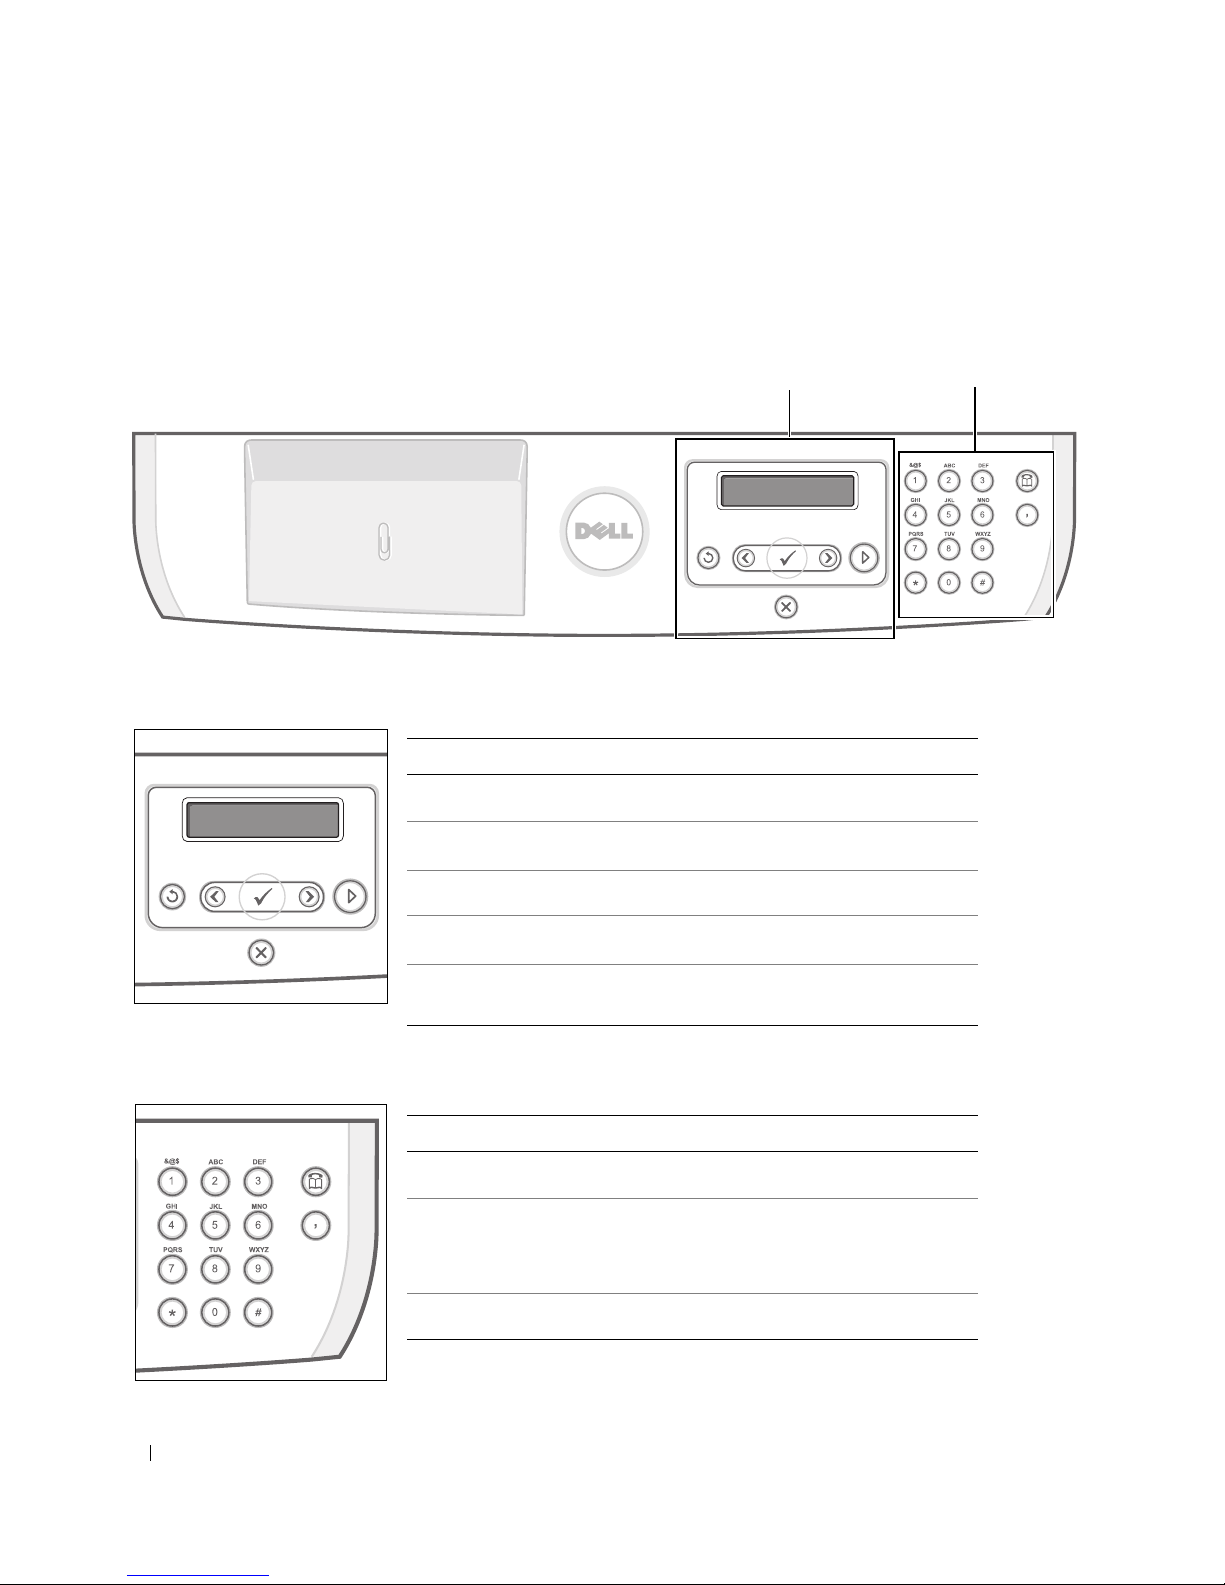
Using the Operator Panel
If you have not already done so, follow the steps on the
Setup Diagram
(poster) to complete the
hardware installation.
Use the printer operator panel to scan, copy, and fax.
Common Keys
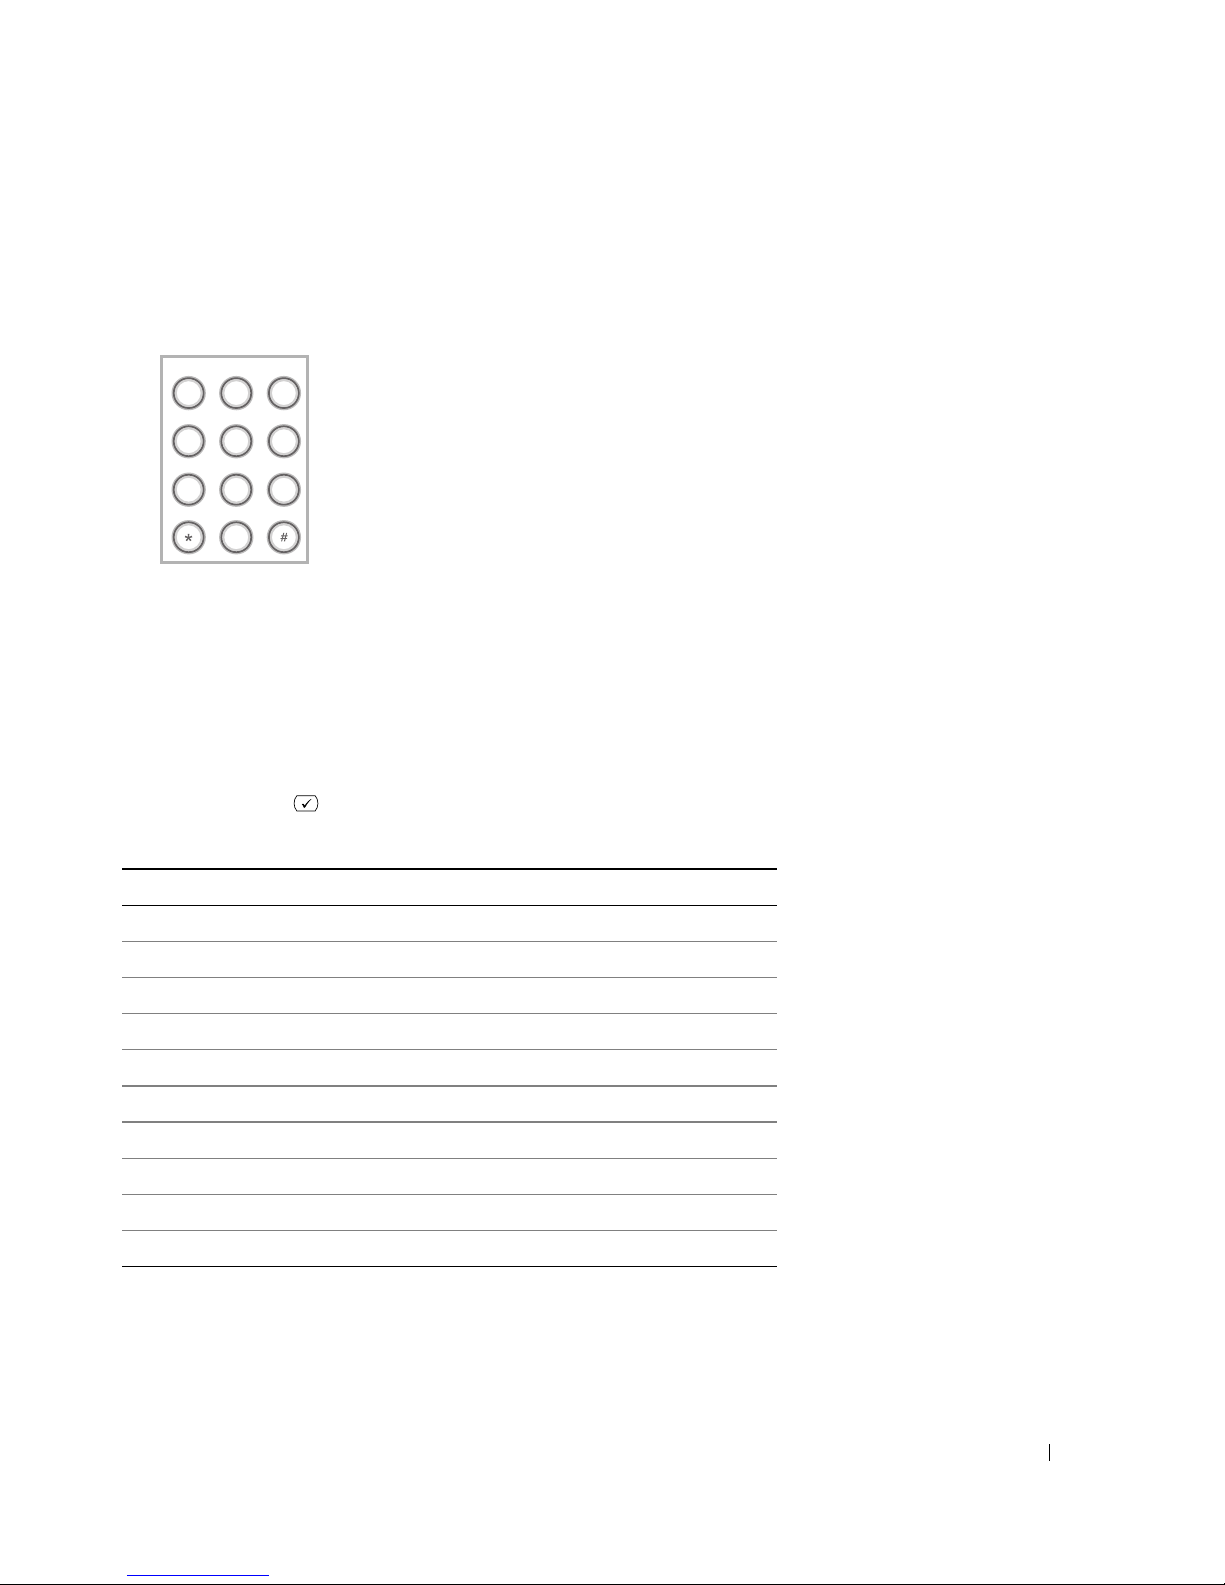
Key Pad
Press: To:
Return to the upper menu.
Scroll through available options.
Confirm the selection on the display.
Start a job.
Stop an operation at any time, or return to main
menu.
Press: To:
Dial/Enter number or enter alphanumeric characters.
Store frequently used fax numbers in memory or
search for stored fax numbers or email addresses.
It also allows you to print a Phonebook list.
Insert a pause into a fax number in edit mode.
Key pad
Common keys
➊
➋
➌
➍
➎
➋
➊
➋
➌
➍
➎
➊
➋
➌
➊
➋
➌

Preparing Your Multi-Function Printer 21
Dell Laser MFP 1815dn Menu Functions
1
Press
Scroll
( or ) to highlight
Menu
and press
Select
().
2
Press
Scroll
( or ) to highlight the desired setting.
3
Press
Select
( ) or select the displayed setting.
1. Paper Setting 2. Copy Defaults 3. Fax Defaults
Paper Size
Paper Type
# of Copies
Zoom
Contrast
Quality
Select Tray
Duplex
Contrast
Resolution
Ring to Answer
Receive Mode
Redial Delay
Redial Attmpts
3. Fax Defaults 4. Scan Defaults 5. Advanced Fax
MSG Confirm
Auto Report
Auto Reduction
Discard Size
Receive Code
DRPD Mode
Duplex
Image Size
File Format
Resolution
Netscan Tm-out
Send Forward
Rcv Forward
Toll Save
Junk Fax Setup
Secure Receive
Prefix Dial
Stamp Rcvd Name
ECM Mode
5. Advanced Fax 6. Directory 7. Reports
Cover Page
Modem Speed
Rcv Disable
PhoneBook
Email
Phone Book
Sent Report
RCV Report
System Data
Scheduled Jobs
MSG Confirm
Junk Fax List
Scan Journal
Email Report
8. Email setup 9. Network CFG 10.Sound/Volume 11. Machine Setup
SMTP Server
User Setup
Send to Self
Default From
Default Subj
Email Forward
Passcode Protect
Change Passcode
Configuration
Clear Settings
Print Sys. Data
Speaker
Ringer
Button
Alarm Sound
Machine ID
Date&Time
Clock Mode
Language
11. Machine Setup 12. Maintenance
Power Save
Timeout
CCD Power Save
Tone r S ave
Select Country
Global Access
Import Setting
Export Setting
Clean Drum
Clear Settings

22 Preparing Your Multi-Function Printer
Changing the Display Language
To change the displayed language that the operator panel displays, follow these steps:
1
Press
Scroll
( or ) to highlight
Menu
and press
Select
().
2
Press
Scroll
( or ) to highlight
Machine Setup
and press
Select
().
3
Press
Scroll
( or ) to highlight
Language
and press
Select
().
4
Press
Scroll
( or ) to display the language you want.
The available languages are English, French, German, Italian, Spanish, Czech, Iberian Portuguese,
Dutch, Polish, Norwegian, Swedish, Finish, Danish and Russian.
5
Press
Select
( ) to save the selection.
6
Press
Cancel
( ) to return to Standby mode.
Setting Up Faxing
Setting the Printer ID
In most countries, you are required by law to indicate your fax number on any fax you send. The printer
ID, containing your telephone number and name or company name, will be printed at the top of each
page sent from your printer.
1
Press
Scroll
( or ) to highlight
Menu
and press
Select
().
2
Press
Scroll
( or ) to highlight
Machine Setup
and press
Select
().
3
Press
Select
( ) to access
Machine ID
.
4
Enter your fax number using the number keypad.
NOTE: If you make a mistake while entering numbers, press the left Scroll ( ) button to delete the last digit.
5
Press
Select
( ) when the number on the display is correct. The display asks you to enter the ID.
6
Enter your name or company name using the number keypad.
7
You can enter alphanumeric characters using the number keypad, including special symbols by pressing
the
1
button.
For details on how to use the number keypad to enter alphanumeric characters, see "Using the Number
Keypad to Enter Characters" on page 23.
8
Press
Select
( ) when the name on the display is correct.
9
Press
Cancel
( ) to return to Standby mode.
Preparing Your Multi-Function Printer 23
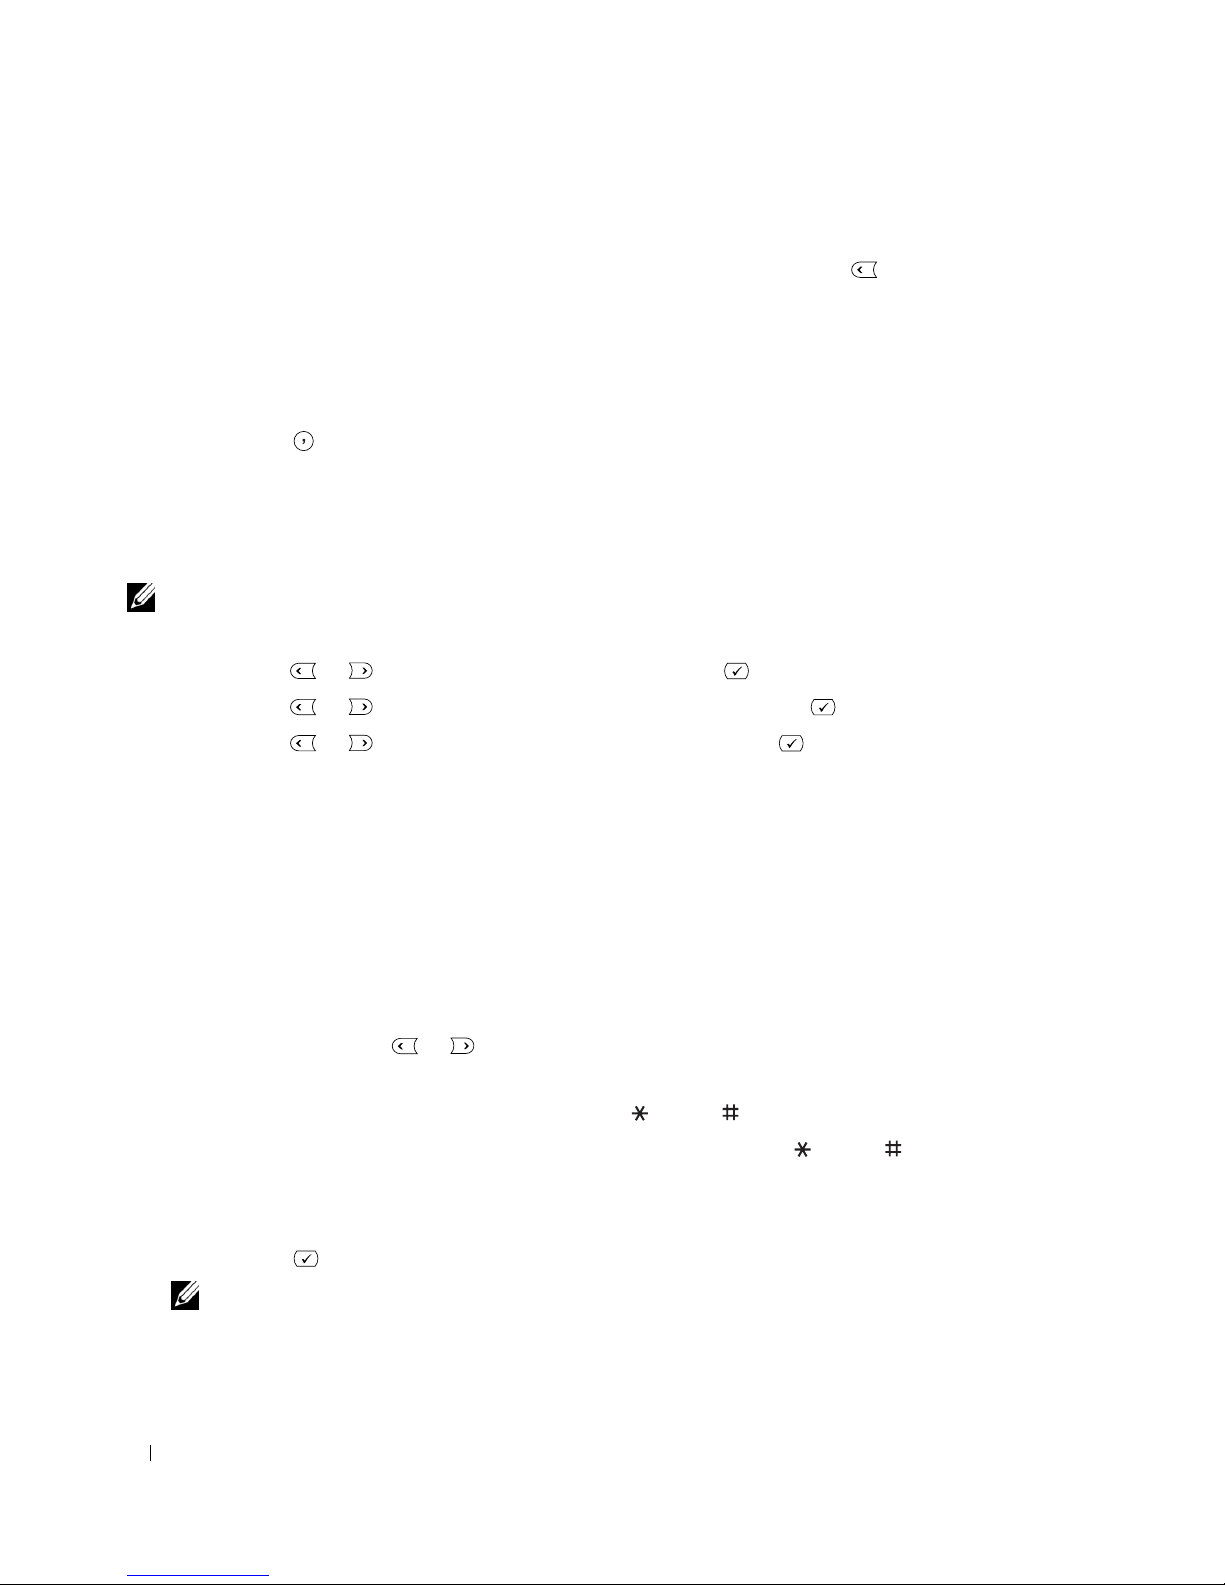
Using the Number Keypad to Enter Characters
As you perform various tasks, you may need to enter names and numbers. For example, when you set up
your printer, you should enter your name or your company’s name and telephone number. When you
store fax numbers in memory, you may also enter the corresponding names.
• When prompted to enter a letter, press the appropriate button until the correct letter appears on the
display.
• For example, to enter the letter
O
, press the 6 button.
• Each time you press the
6
button, the display shows a different letter, M, N, O and finally 6.
• To enter additional letters, repeat the above step.
•Press the
1
button repeatedly to enter a space, and special characters.
•Press
Select
( ) when you are finished.
Keypad Letters and Numbers
Key Assigned Numbers, Letters or Characters
1 1 @ . _ space , / * # & $ + - ‘
2 A B C 2
3 D E F 3
4 G H I 4
5 J K L 5
6 M N O 6
7 P Q R S 7
8 T U V 8
9 W X Y Z 9
00
ABC
&@$
DEF
JKL
GHI
MNO
TUVPQRS WXYZ
12
456
789
0
3
24 Preparing Your Multi-Function Printer
Changing Numbers or Names
If you make a mistake while entering a number or name, press the left Scroll ( ) button to delete the
last digit or character. Then enter the correct number or character.
Inserting a Pause
For some telephone systems, it is necessary to dial an access code and listen for a second dial tone. A
pause must be entered in order for the access code to function. For example, enter the access code 9 and
then press Pause ( ) before entering the telephone number. A “–” appears on the display to indicate
when a pause is entered.
Setting the Time and Date
The time and date are printed on all faxes.
NOTE: You may need to change the correct time and date if loss of power to the printer occurs.
To set the time and date:
1
Press
Scroll
( or ) to highlight
Menu
and press
Select
().
2
Press
Scroll
( or ) to highlight
Machine Setup
and press
Select
().
3
Press
Scroll
( or ) to highlight
Date&Time
and press
Select
().
4
Enter the correct time and date using the number keypad.
Month= 01 ~ 12
Day= 01 ~ 31
Year= 1990 ~ 2089
Hour= 01 ~ 12 (12-hour mode)
00 ~ 23 (24-hour mode)
Minute= 00 ~ 59
You can also use
Scroll
( or ) to move the cursor under the digit you want to correct and enter a
new number.
5
To se lec t AM or PM for 12-hour format, press the or the button.
When the cursor is not under the
AM
or PM indicator, pressing the or the button immediately
moves the cursor to the indicator.
You can change the clock mode to 24-hour format (e.g. 01:00 PM as 13:00).
6
Press
Select
( ) when the time and date on the display is correct.
NOTE: The printer beeps and does not allow you to proceed to the next step if a wrong number is entered.
Preparing Your Multi-Function Printer 25
Storing a Number for Speed Dialing
1
Press
Directory
( ) on the operator panel.
OR
Press
Scroll
( or ) to highlight
Fax
and press
Select
().
OR
Press
Scroll
( or ) to highlight
Menu
and press
Select
().
Press
Scroll
( or ) to highlight
Directory
and press
Select
().
2
Press
Scroll
( or ) to highlight
PhoneBook
and press
Select
().
3
Press
Scroll
( or ) to highlight
Add Person
and press
Select
().
4
Enter a name and press
Select
( ). For details about how to enter names, see "Using the Number
Keypad to Enter Characters" on page 23.
5
Enter a one, two or three-digit speed dial number between 1 and 399, using the number keypad and
press
Select
().
Or select the location by pressing
Scroll
( or ) and then press
Select
().
6
Enter the fax number you want to store using the number keypad and press
Select
().
To insert a pause between numbers, press
Pause
( ) and a “–” appears on the display.
7
To store more fax numbers, repeat steps 3 through 6.
OR
Press
Cancel
( ) to return to Standby mode.
Setting Group Dial
1
Press
Directory
( ) on the operator panel.
OR
Press
Scroll
( or ) to highlight
Fax
and press
Select
().
OR
Press
Scroll
( or ) to highlight
Menu
and press
Select
().
Press
Scroll
( or ) to highlight
Directory
and press
Select
().
2
Press
Scroll
( or ) to highlight
PhoneBook
and press
Select
().
3
Press
Scroll
( or ) to highlight
Add Group
and press
Select
().
4
Enter a group name and press
Select
().
5
Enter a group number between 1 and 199 and press
Select
().
Or select the location you want by pressing
Scroll
( or ) and then press
Select
().

26 Preparing Your Multi-Function Printer
6
Enter a one, two or three-digit speed dial number you want to assign to the group and press
Select
().
Or select the location by pressing
Scroll
( or ) and then press
Select
( ).
7
At the Add Another? prompt, press
Select
( ) to enter other speed dial numbers into the group.
Or press
Scroll
( or ) to display No and press
Select
( ) when you have entered all of the
desired numbers.
8
If you want to assign another group, repeat from step 3.
OR
Press
Cancel
( ) to return to Standby mode.
Preparing Networking
A print server is any designated computer that centrally manages all client print jobs. If you are sharing
your printer in a small workgroup environment and want to control all print jobs on the network, follow
these instructions to attach the printer to a print server.
NOTE: For additional network set-up configurations, see the
User’s Guide
.
Attaching Cables
1
Make sure the printer is powered off and unplugged.
2
Connect one end of a standard category 5 Unshielded Twisted Pair (UTP) network cable into a LAN
drop or hub, and the other end into the Ethernet network port on the back of the printer. The printer
automatically adjusts the network speed.
Preparing Your Multi-Function Printer 27
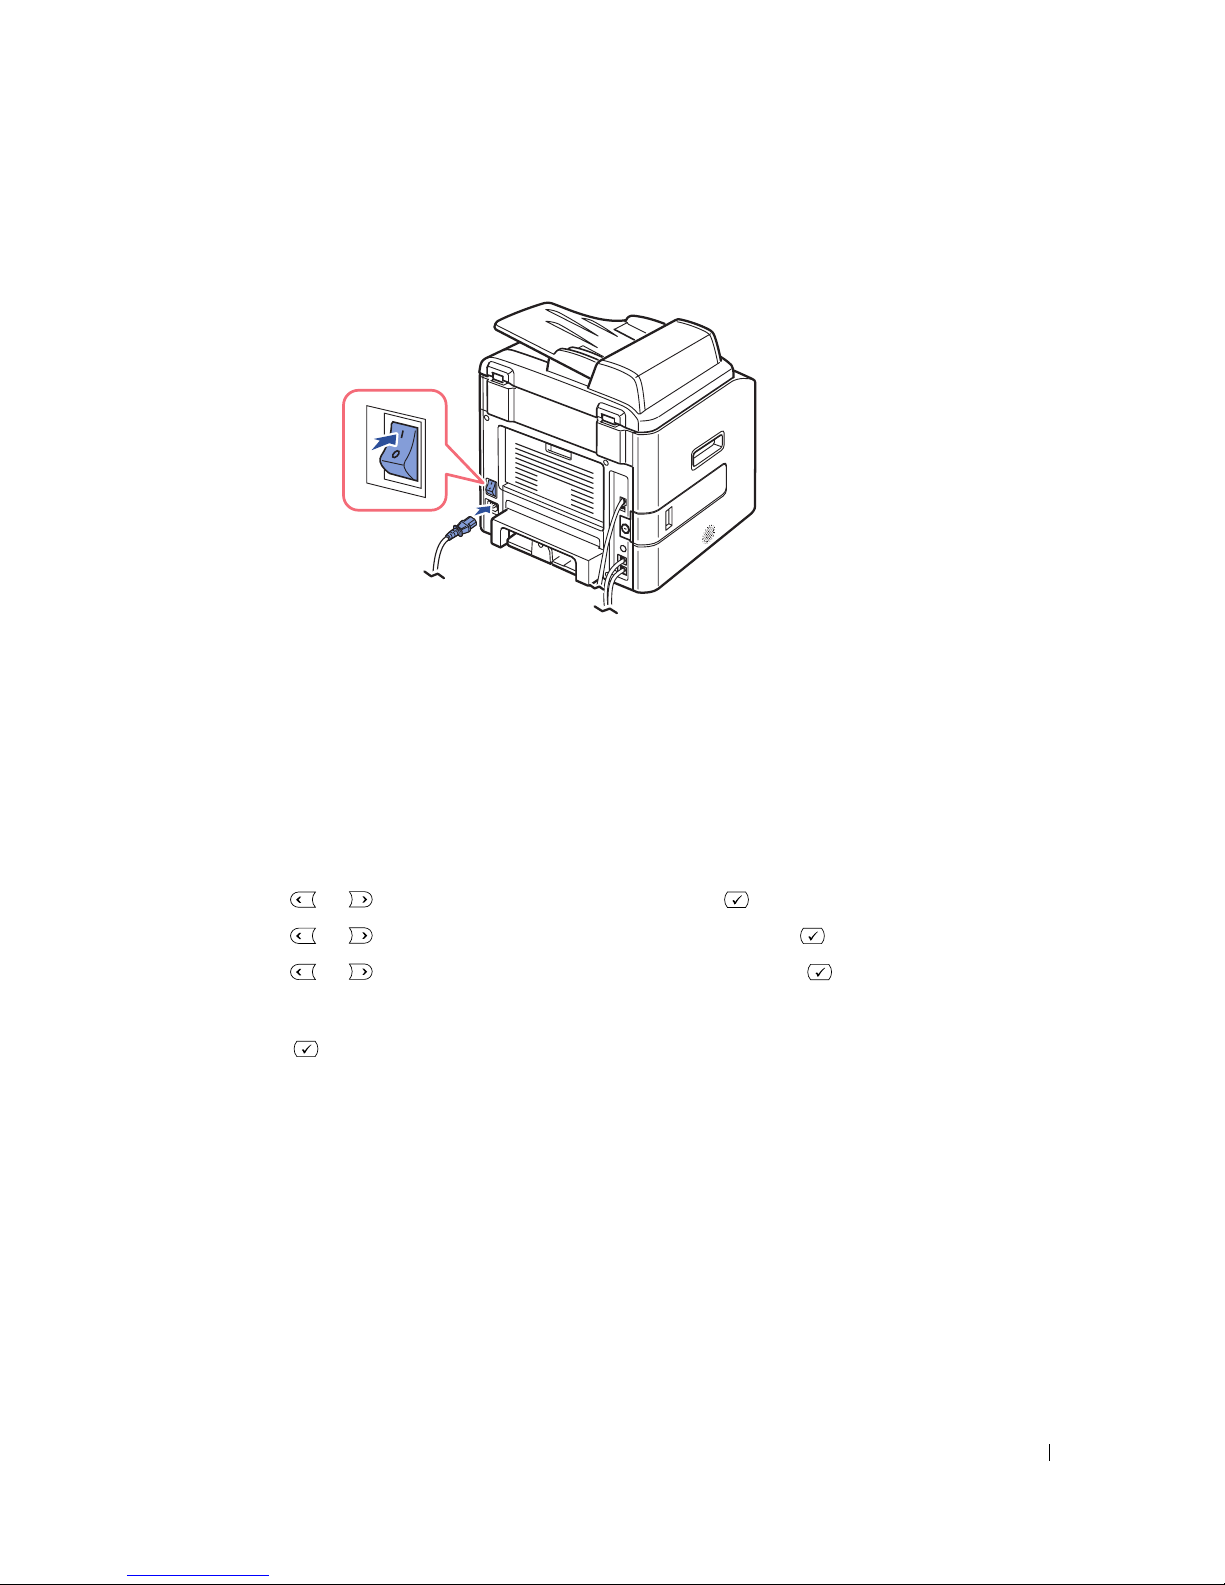
3
Connect one end of the printer power cord into the socket at the back of the printer and the other end
into a properly grounded outlet. Press the switch to power on the printer.
4
Warm in g Up P le ase Wai t
appears on the display indicating that the printer is now on.
If not, make sure the power cord is firmly plugged in to the back of the printer and the electrical outlet.
If the printer is on but does not print, power off the printer and wait 30 seconds. Power on the printer
again, and it should reset and show
Warmin g Up Pl ease Wa it
.
Printing the Network Configuration Page
The Network Configuration page shows how the network interface card on your printer is configured.
1
Press
Scroll
( or ) to highlight
Menu
and press
Select
().
2
Press
Scroll
( or ) to highlight
Network CFG
and press
Select
().
3
Press
Scroll
( or ) to highlight
Print Sys. Data
and press
Select
().
The first available menu item,
Yes
displays on the bottom line.
4
Press
Select
( ) to print a Network Configuration page.
If the Network Configuration pages is not printed:
– Make sure the Ethernet cable is firmly plugged into the back of the printer.
– Plug the Ethernet cable into another wall outlet.
5
Under the “TCP/IP” heading on the Network Configuration page, make sure the IP address, Subnet
mask, and Gateway are what you expected.
6
Ping the printer and verify that it responds. For example, at a command prompt on a network
computer, type
ping
followed by the new printer IP address:
ping xxx.xxx.xxx.xxx
If the printer is active on the network, you may receive a reply.

28 Preparing Your Multi-Function Printer
7
If your printer doesn’t respond, or if the IP address is not what you expected:
a
Insert the
drivers and utilities CD
into your computer.
If setup does not start automatically:
• Launch the
drivers and utilities CD
: click
Start → Run
and browse your CD drive (for example,
type D:\ where D is the drive letter of your CD).
• Select S
ETUP.EXE
, and then click OK.
b
When the drivers and utilities CD screen appears, click
SetIP Address Utility
.
c
Select your printer from the Configure Print Servers list.
d
Make the necessary changes, and then click
Config
.
e
Exit the program.
f
Print and check the Network Configuration page to verify your changes.
Run the Installation Software
1
Insert the
drivers and utilities CD
into your computer.
2
When the
drivers and utilities CD
screen appears, select
Network Installation
and click
Next
.
3
For local installation, select
Local Installation
and click
Next
.
For remote installation:
• Select
Remote Installation
.
• Enter your Administrator user name and password, and then click
OK
.
• Manually enter or browse for the clients or servers and click
Add
.
• When you are finished adding remote computers, click
Next
.
4
Select the network printer you want to install. If you do not see your printer listed, click
Update
to
refresh the list or click
Add Printer
to add a printer to the network.
5
If you are setting up the printer on a server that will provide printing services for client computers,
select
I am setting up this printer on a server
.
6
Click
Next
.
7
Select any additional software or documentation components you want to install, and then click
Next
.
8
To change any of the listed printer names, select the printer from the list. Enter a new name in the
Printer name
field and click
Apply
.
9
If you want other users on the network to access this printer, select
Share this printer with other
computers
, and then enter a share name that users will easily identify.
10
Click
Next
.
11
When the Congratulations! screen appears, you printer software is installed. Click
Finish
to close the
installation window.

Preparing Your Multi-Function Printer 29
Use the Dell Printer Configuration Web Tool, also known as the Printer Embedded Web Server, to
monitor the status of your network printer without leaving your desk. You can view and/or change the
printer configuration settings, monitor toner level, and when it is time to order replacement toner
cartridges, just click the Dell supplies link right from your Web browser.
NOTE: The Dell Printer Configuration Web Tool is not available when the printer is locally attached to a print
server.
To launch the Dell Printer Configuration Web Tool, type the network printer IP address in your Web
browser, and the printer configuration appears on the screen. See the User’s Guide for more information.
You can set up the Dell Printer Configuration Web Tool to send you an email when the printer needs
supplies or intervention.
To set up email alerts:
1
Launch the Dell Printer Configuration Web Tool.
2
Click
Email Alert Setup
.
3
Type your name or the key operator’s name in the email list box to be notified.
4
Click
Submit
.

30 Preparing Your Multi-Function Printer
 Loading...