

Page 1

Dell™ 1800MP Projector
Owner’s Manual
www.dell.com | support.dell.com
Page 2

Notes, Notices, and Cautions
NOTE: A NOTE indicates important information that helps you
make better use of your projector.
NOTICE: A NOTICE indicates either potential damage to
hardware or loss of data and tells you how to avoid the problem.
CAUTION: A CAUTION indicates a potential for property
damage, personal injury, or death.
____________________
Information in this document is subject to change without notice.
© 2006 Dell Inc. All rights reserved.
Reproduction in any manner whatsoever without the written permission of Dell
Inc. is strictly forbidden.
Trademarks used in this text: Dell , the DELL logo, Dimension OptiPlex Dell
Precision Latitude Inspiron DellNet PowerApp PowerEdge PowerConnect
PowerVault are trademarks of Dell Inc.; DLP and Texas Instruments
trademarks of Texas Instruments Corporation; Microsoft Windows
registered trademarks of Microsoft Corporation; Macintosh
trademark of Apple Computer, Inc.
Other trademarks and trade names may be used in this document to refer to either
the entities claiming the marks and names or their products. Dell Inc. disclaims
any proprietary interest in trademarks and trade names other than its own.
Restrictions and Disclaimers
The information contained in this document, including all instructions, cautions, and regulatory approvals and certifications, is based upon statements
provided to Dell by the manufacturer and has not been independently verified
or tested by Dell. Dell disclaims all liability in connection with any deficiencies in such information.
All statements or claims regarding the properties, capabilities, speeds, or
qualifications of the part referenced in this document are made by the
manufacturer and not by Dell. Dell specifically disclaims any kno wledge of the
accuracy, completeness, or substantiation for any such statements.
Model 1800MP
September 2006 Rev. A00
Page 3

Contents
1 Your Dell Projector . . . . . . . . . . . . . . . . . . 5
2 Connecting Your Projector . . . . . . . . . . . . 7
Connecting to a Computer . . . . . . . . . . . . . . . . . 8
About Your Projector . . . . . . . . . . . . . . . . . 6
Connecting to a DVD Player
Connecting a DVD Player with an S-video Cable
Connecting a DVD Player with a Composite Cable
Connecting a DVD Player with a Component Cable
Professional Installation Options: . . . . . . . . . . 12
. . . . . . . . . . . . . . . . 9
. . . 9
. 10
11
3 Using Your Projector . . . . . . . . . . . . . . . . 13
Turning Your Projector On . . . . . . . . . . . . . . . . 13
Turning Your Projector Off
Adjusting the Projected Image
Raising the Projector Height
Lowering the Projector Height
Adjusting the Projector Zoom and Focus
Adjusting Projection Image Size . . . . . . . . . . . . 16
Using the Control Panel
. . . . . . . . . . . . . . . . 13
. . . . . . . . . . . . . 14
. . . . . . . . . . . . 14
. . . . . . . . . . . 14
. . . . . . . . 15
. . . . . . . . . . . . . . . . . 17
Contents 3
Page 4

Using the Remote Control . . . . . . . . . . . . . . . . 19
Using the On-Screen Display
Main Menu
Input Select
Auto-Adjust
. . . . . . . . . . . . . . . . . . . . . 21
. . . . . . . . . . . . . . . . . . . . . 21
. . . . . . . . . . . . . . . . . . . . . 21
. . . . . . . . . . . . . . 20
Set Up . . . . . . . . . . . . . . . . . . . . . . . . 22
PICTURE (in PC Mode)
PICTURE (in Video Mode)
. . . . . . . . . . . . . . . 23
. . . . . . . . . . . . . 23
DISPLAY (in PC Mode) . . . . . . . . . . . . . . . 24
DISPLAY (in Video Mode)
LAMP
. . . . . . . . . . . . . . . . . . . . . . . . 25
. . . . . . . . . . . . . 25
LANGUAGE . . . . . . . . . . . . . . . . . . . . . 26
Preferences
. . . . . . . . . . . . . . . . . . . . 27
4 Troubleshooting Your Projector . . . . . . . 31
Changing the Lamp . . . . . . . . . . . . . . . . . . . 35
5 Specifications . . . . . . . . . . . . . . . . . . . . . 37
Contacting Dell . . . . . . . . . . . . . . . . . . . . 43
Appendix: Regulatory Notices . . . . . . . . . 71
Glossary . . . . . . . . . . . . . . . . . . . . . . . . . . 73
4 Contents
FCC Notices (U.S. Only) . . . . . . . . . . . . . . . 71
NOM Information (Mexico Only)
. . . . . . . . . . 72
Page 5
1
Your Dell Projector
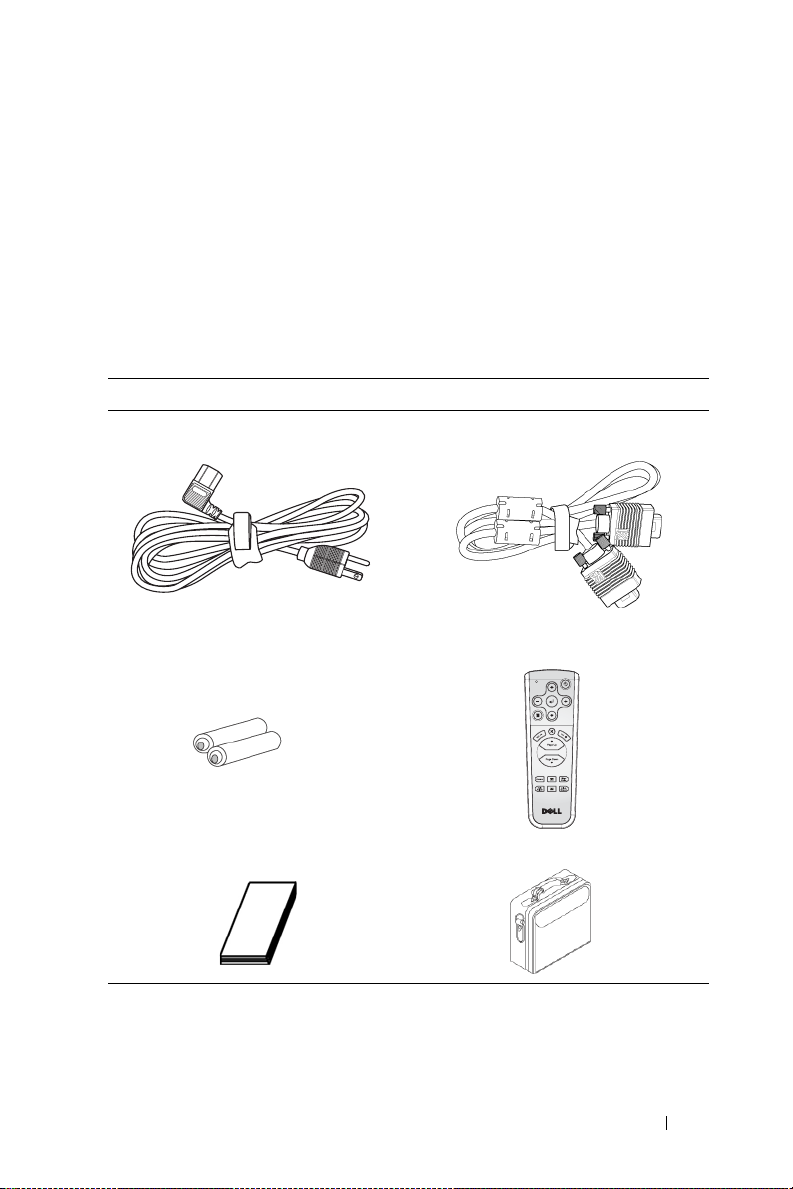
Your projector comes with all the items shown below. Ensure that you have all the
items, and contact Dell if anything is missing.
Package Contents
1.8m power cord (3.0m in Americas) 1.8m VGA cable (VGA to VGA)
Batteries (2) Remote control
Documentation Carrying case
Your Dell Projector 5
Page 6
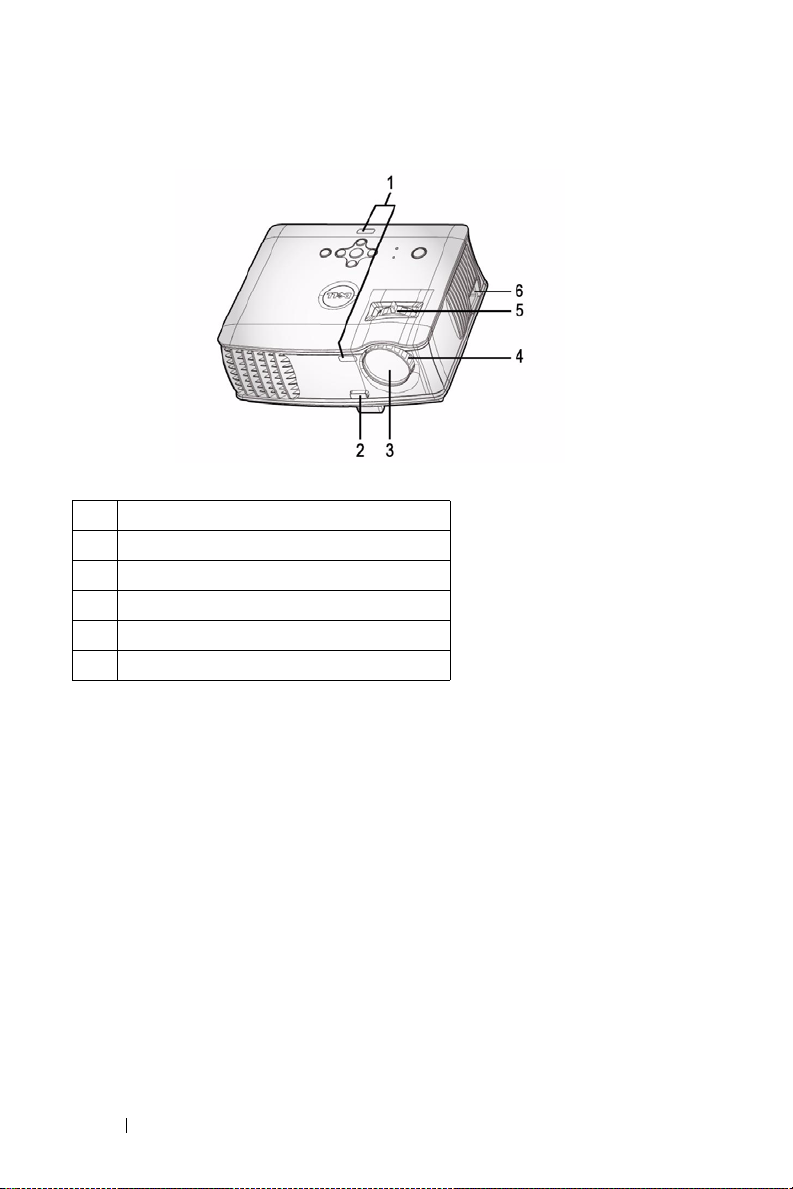
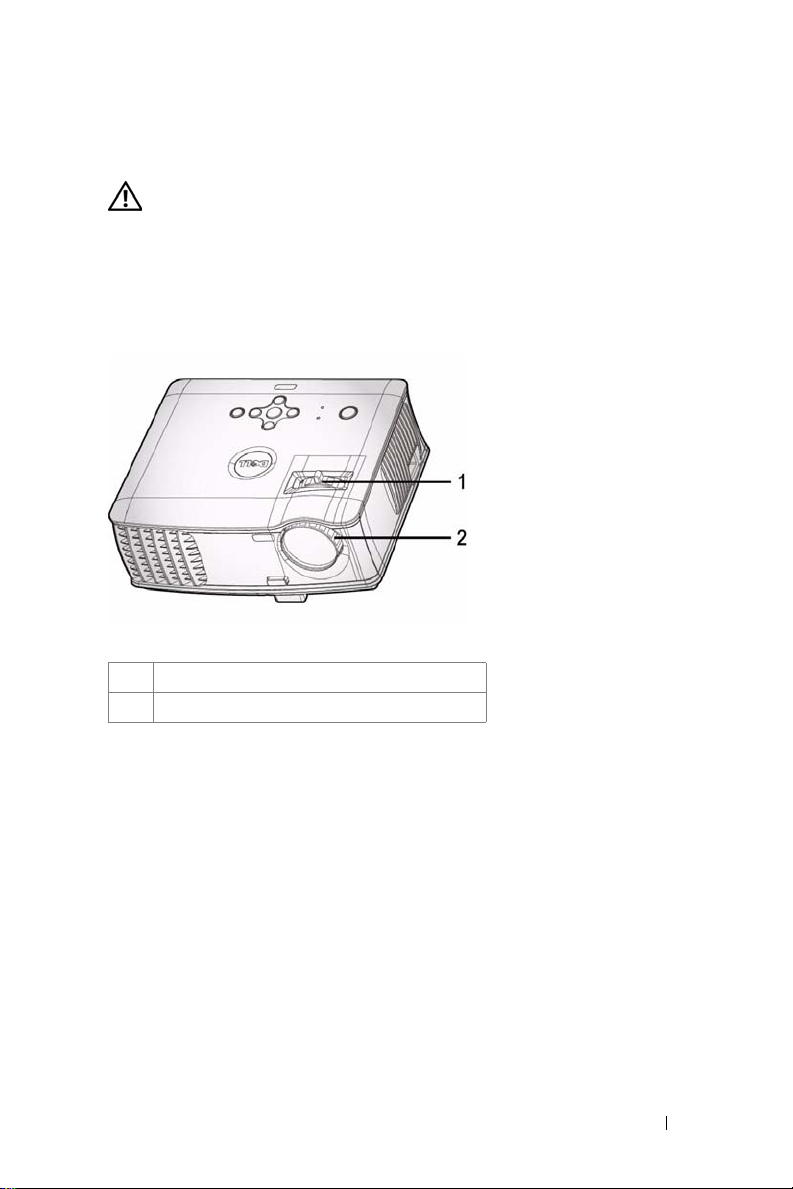
About Your Projector
1 Remote control receiver
2 Elevator button
3 Lens
4 Focus ring
5 Zoom tab
6 Power cord connector
6 Your Dell Projector
Page 7
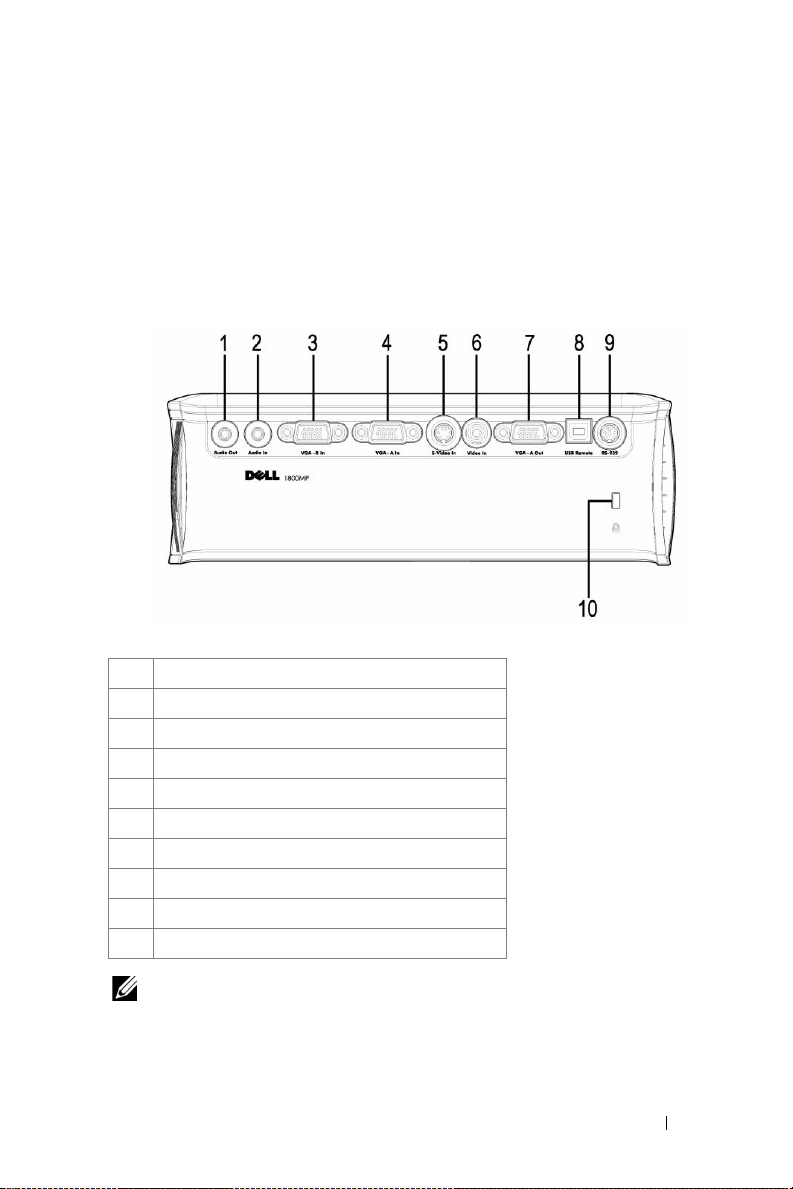
Connecting Your Projector
1 Audio output connector
2 Audio input connector
3 VGA-B In connector
4 VGA-A In connector
5 S-video connector
6 Video input connector
7 VGA-A out connector
8 USB remote connector
9 RS232 connector
10 Kensington lock hole
2
Monitor loop through from VGA-A In to VGA-A Out only.
Connecting Your Projector 7
Page 8

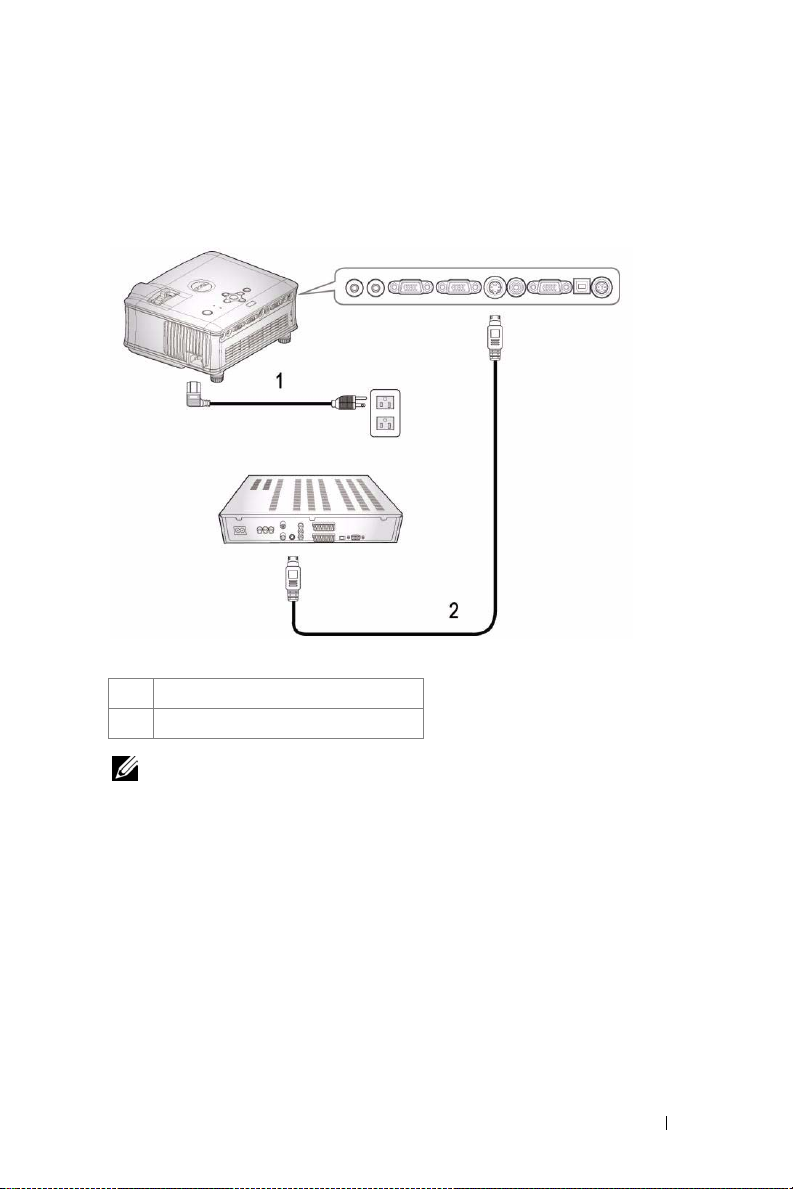
Connecting to a Computer
1 Power cord
2 VGA to VGA cable
3 USB cable
The USB cable is not provided by Dell.
Consult a professional installer for the cable.
8 Connecting Your Projector
Page 9
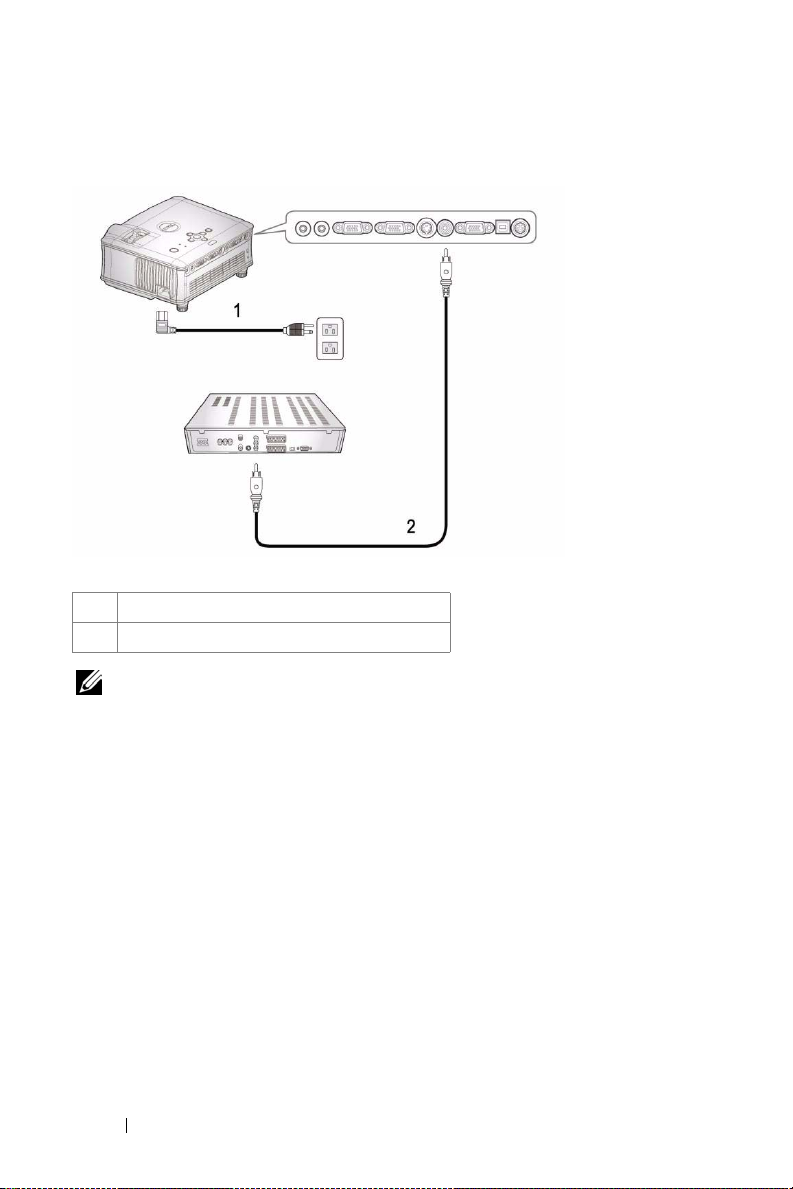
Connecting to a DVD Player
Connecting a DVD Player with an S-video Cable
1 Power cord
2 S-video cable
The S-video cable is not provided by Dell.
Consult a professional installer for the cable.
Connecting Your Projector 9
Page 10
Connecting a DVD Player with a Composite Cable
1 Power cord
2 Composite video cable
The Composite cable is not provided by Dell.
Consult a professional installer for the cable.
10 Connecting Your Projector
Page 11
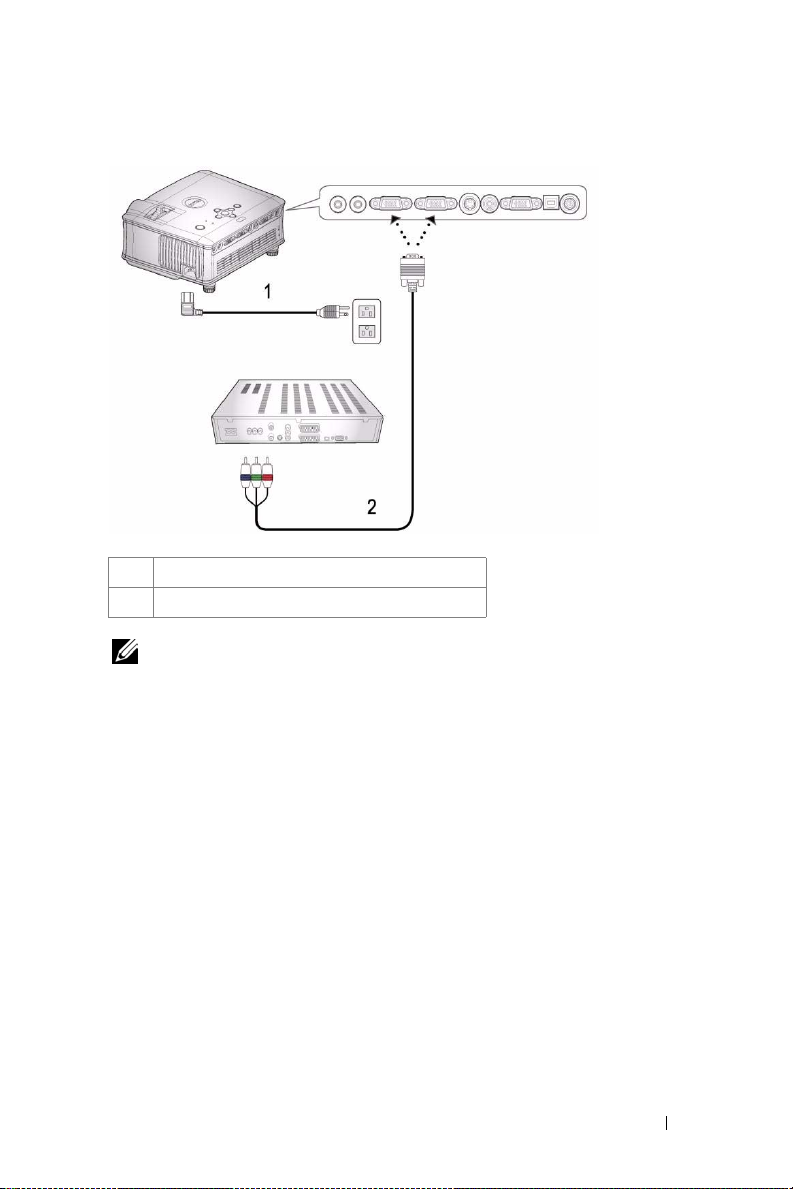
Connecting a DVD Player with a Component Cable
1Power cord
2 VGA to YPbPr cable
The VGA to YPbPr cable is not provided by Dell.
Consult a professional installer for the cable.
Connecting Your Projector 11
Page 12
Professional Installation Options:
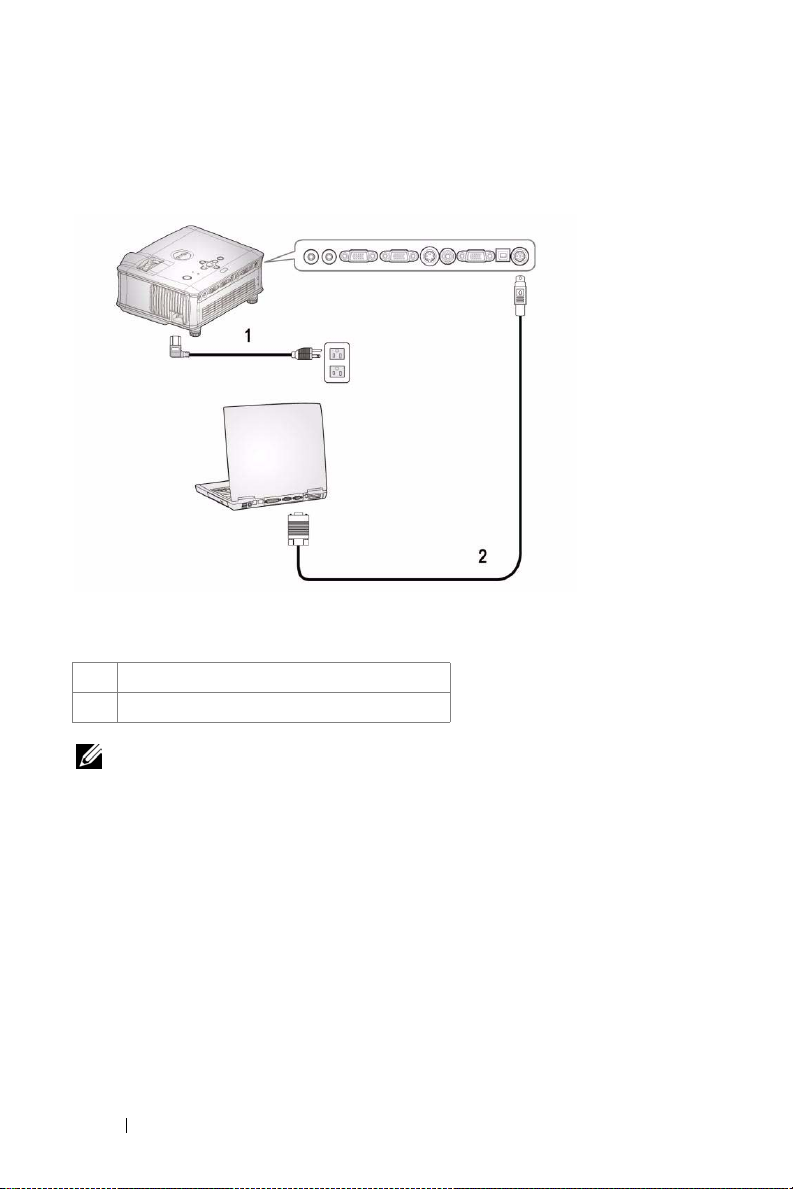
Connecting a Computer with a RS232 Cable
1Power cord
2 RS232 cable
The RS232 cable is not provided by Dell.
Consult a professional installer for the cable.
12 Connecting Your Projector
Page 13

3
Using Your Projector
Turning Your Projector On
NOTE: Turn on the projector before you turn on the source. The power button
light blinks blue until pressed.
1
Remove the lens cap.
2
Connect the power cord and appropriate signal cables. For information about
connecting the projector, see "Connecting Your Projector" on page 7.
3
Press the power button (see "Using the Control Panel" on page 17 to locate the
power button). The Dell logo displays for 30 seconds.
4
Turn on your source (computer, DVD player, etc.). The projector automatically
detects your source.
If the "Searching for signal..." message appears on the screen, ensure
that the appropriate cables are securely connected.
If you have multiple sources connected to the projector, press the Source button
on the remote control or control panel to select the desired source.
Turning Your Projector Off
NOTICE: Unplug the projector after properly shutting down as explained in the
following procedure.
1
Press the power button.
2
Press the power button again. The cooling fans continue to operate for 60 seconds.
3
Disconnect the power cord from the electrical outlet and the projector.
NOTE: If you press the power button while the projector is running, the "Power
Off the Lamp?" message appears on the screen. To clear the message, press any
button on the control panel or ignore the message; the message disappears after 3
seconds.
Using Your Projector 13
Page 14
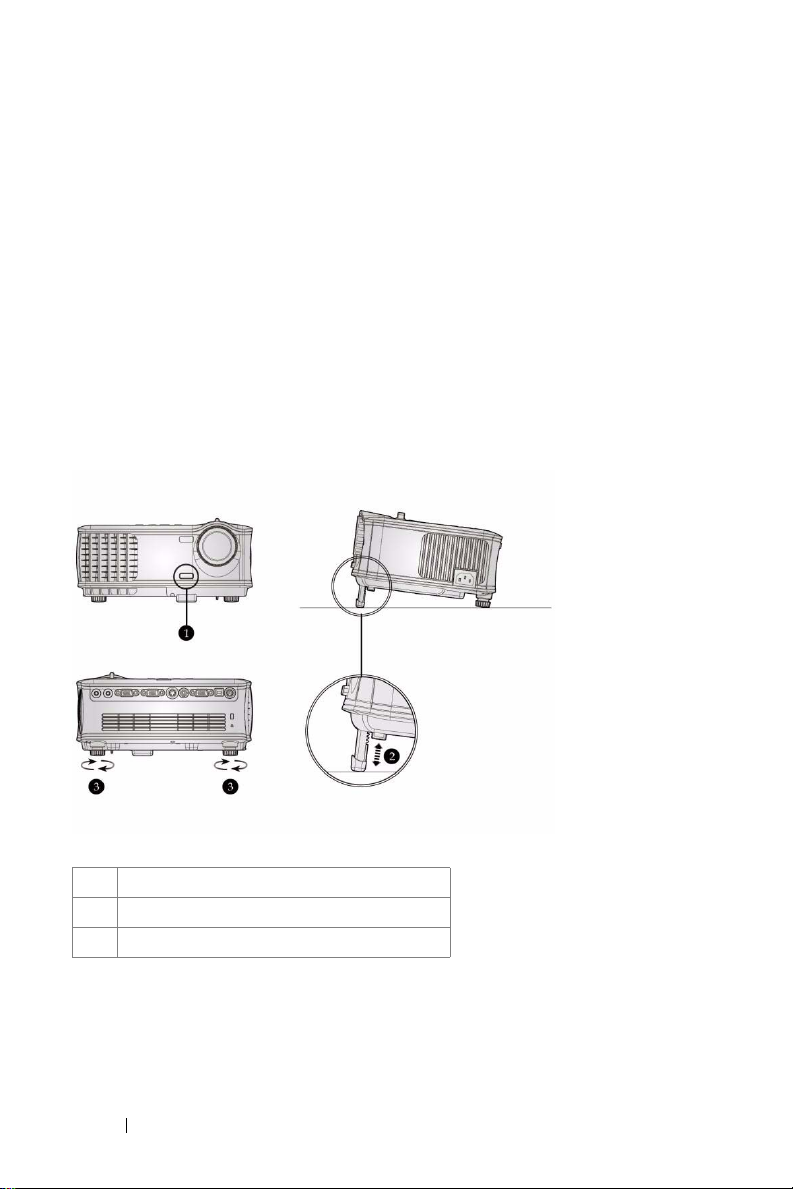
Adjusting the Projected Image
RAISING THE PROJECTOR HEIGHT
1
Press the elevator button.
2
Raise the projector to the desired display angle, and then release the button to
lock the elevator foot into position.
3
Use the tilt adjustment wheel to fine-tune the display angle.
LOWERING THE PROJECTOR HEIGHT
1
Press the elevator button.
2
Lower the projector, and then release the button to lock the elevator foot into
position.
1 Elevator button
2 Elevator foot
3 Tilt adjustment wheel
14 Using Your Projector
Page 15
Adjusting the Projector Zoom and Focus
CAUTION: To avoid damaging the projector, ensure that the zoom lens and
elevator foot are fully retracted before moving the projector or placing the
projector in its carrying case.
1
Rotate the zoom tab to zoom in and out.
2
Rotate the focus ring until the image is clear. The projector focuses at distances
from 4.9 ft to 39.4 ft (1.5 m to 12.0 m).
1 Zoom tab
2 Focus ring
Using Your Projector 15
Page 16
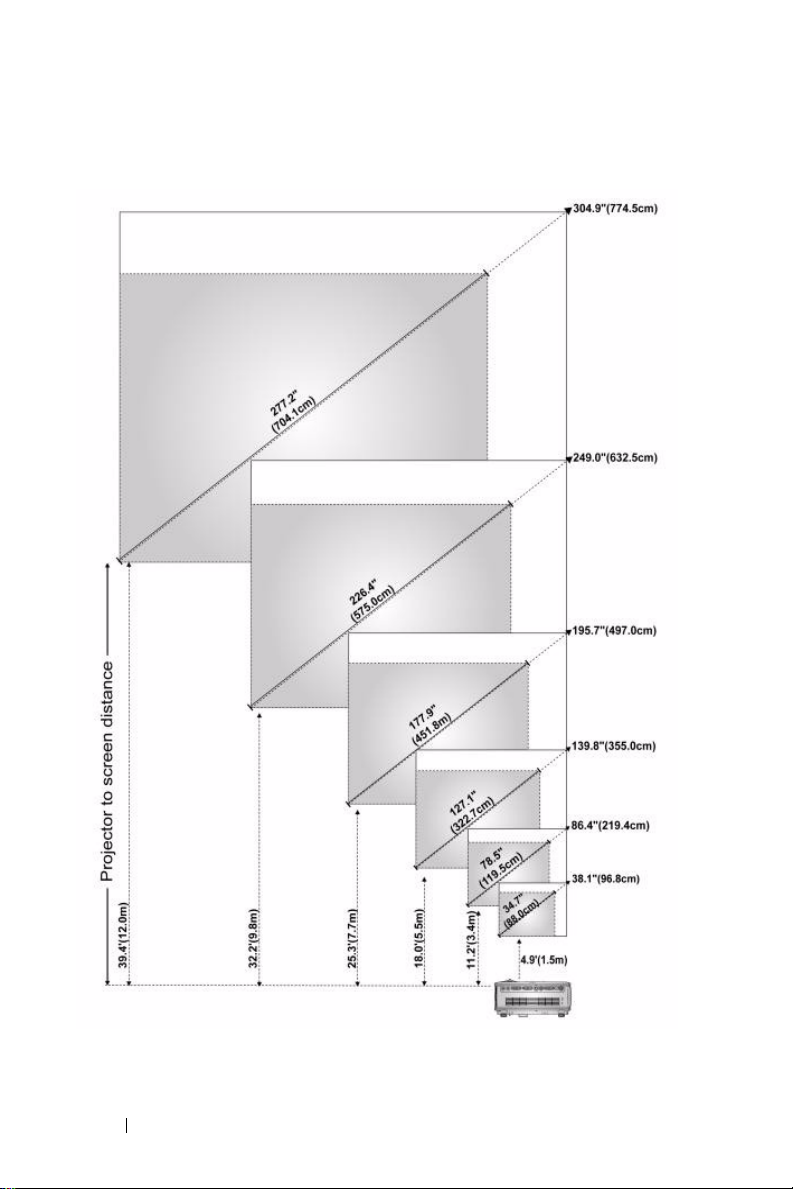
Adjusting Projection Image Size
16 Using Your Projector
Page 17

Screen
11
10
(Diagonal)
Screen Size
Distance 4.9' (1.5m) 11.2' (3.4m) 18.0' (5.5m) 25.3' (7.7m) 32.2' (9.8m) 39.4' (12.0m)
* This graph is for user reference only.
Max. 38.1"
(96.8cm)
Min. 34.7"
(88.0cm)
Max.
30.5"X22.9" 69.1"X51.8" 111.8"X83.9" 156.5"X117.4" 199.2"X149.4" 243.9"X183.0"
(WxH)
(77.5cm X
58.1cm)
Min.
(WxH)
27.7" X
20.8"
(70.4cm X
52.8cm)
86.4"
(219.4cm)
78.5"
(199.5cm)
(175.6cm X
131.7cm)
62.8" X
47.1"
(159.6cm X
119.7cm)
139.8"
(355.0cm)
127.1"
(322.7cm)
(284.0cm X
213.0cm)
101.6" X
76.2"
(258.2cm X
193.6cm)
195.7"
(497.0cm)
177.9"
(451.8cm)
(397.6cm X
298.2cm)
142.3" X
106.7"
(361.4cm X
271.1cm)
249.0"
(632.5cm)
226.4"
(575.0cm)
(506.0cm X
379.5cm)
181.1" X
135.8"
(460.0cm X
345.0cm)
304.9"
(774.5cm)
277.2"
(704.1cm)
(619.6cm X
464.7cm)
221.8" X
166.3"
(563.3cm X
422.5cm)
Using the Control Panel
1
2
11
3
4
7
8
10
9
6
5
1 Power Turn the projector on and off. For more
information, see "Turning Your Projector On" on
page 13 and "Turning Your Projector Off" on
page 13.
Using Your Projector 17
Page 18
2 TEMP warning light
3 Source Press to toggle through Analog RGB, Composite,
4 Keystone adjustment Press to adjust image distortion caused by tilting
5 Resync Press to synchronize the projector to the input
6 Menu Press to activate the OSD. Use the directional
7 and buttons Press to adjust the OSD setting.
8 Enter Press to confirm the selection item.
9 Keystone adjustment Press to adjust image distortion caused by tilting
10 Up and Down Press to select the OSD items.
11 LAMP warning light If the LAMP light is solid orange, replace the
• A solid orange TEMP light indicates that the
projector has overheated. The display
automatically shuts down. Turn the display on
again after the projector cools down. If the
problem persists, contact Dell.
• A blinking orange TEMP light indicates that a
projector fan has failed and the projector
automatically shuts down. If the problem
persists, contact Dell.
Component-i, S-video, and Analog YPbPr sources
when multiple sources are connected to the
projector.
the projector. (±15 degrees)
source. Resync does not operate if the on-screen
display (OSD) is displayed.
keys and Menu button to navigate through the
OSD.
the projector. (±15 degrees)
lamp. If the LAMP light is blinking orange, the
system has failed and the projector will
automatically shut down. If this problem persists,
contact Dell.
18 Using Your Projector
Page 19
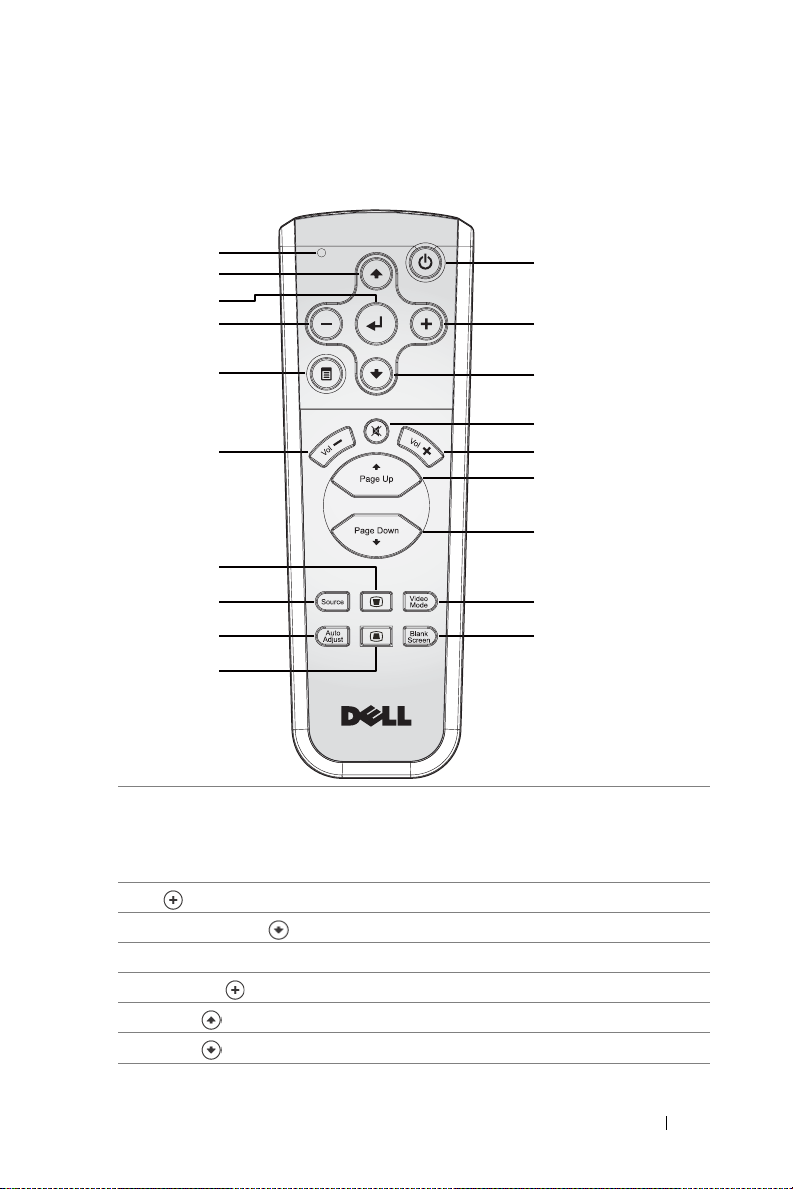
Using the Remote Control
19
18
17
16
15
14
13
11
10
12
10
11
1
12
13
14
2
3
4
15
5
6
7
16
17
18
8
9
19
1 Power Turn the projector on and off. For more
information, see "Turning Your Projector On" on
page 13 and "Turning Your Projector Off" on
page 13.
2 Press to adjust the OSD setting.
3 Down button Press to select OSD items.
4 Mute Press to mute or unmute the projector speaker.
5 Volume Press to increase the volume.
6 Page Press to move to previous page.
7 Page Press to move to next page.
Using Your Projector 19
Page 20
8 Video mode The Dell 1800MP Micro-projector has preset
configurations that are optimized for displaying
data (PC Graphics) or video (movies, games,
etc.). Press Video Mode button to toggle between
PC mode, Movie mode, Game Mode, sRGB, or
CUSTOM mode (for user to setup and save
preferred settings). Pressing the Video Mode
button once will show the current display mode.
Pressing the Video Mode button again will switch
between modes.
9 Blank screen Press to hide the image, press again to resume
display of the image.
10 LED light LED indicator.
11 Up button Press to select OSD items.
12 Enter button Press to confirm the selection.
13 Press to adjust the OSD setting.
14 Menu Press to activate the OSD.
15 Volume Press to decrease the volume.
16 Keystone adjustment Press to adjust image distortion caused by tilting
the projector. (±15 degrees)
17 Source Press to switch between Analog RGB, Digital
RGB, Composite, Component-i, S-video, and
Analog YPbPr sources.
18 Auto adjust Press to synchronize the projector to the input
source. Auto adjust does not operate if the OSD
(On-Screen Display) is displayed.
19 Keystone adjustment Press to adjust image distortion caused by tilting
the projector. (±15 degrees)
Using the On-Screen Display
The projector has a multi-language On-Screen Display (OSD) that can be
displayed with or without an input source present.
In the Main Menu, press or to navigate through the tabs.
In the submenu, press or to make a selection. When an item is selected, the
color changes to dark gray. Use or on the control panel or the remote
control to make adjustments to a setting.
20 Using Your Projector
Page 21
To go back to Main Menu, press Menu button on the control panel or the remote
control.
To exit the OSD, go to Exit tab and press Enter on the control panel or the remote
control.
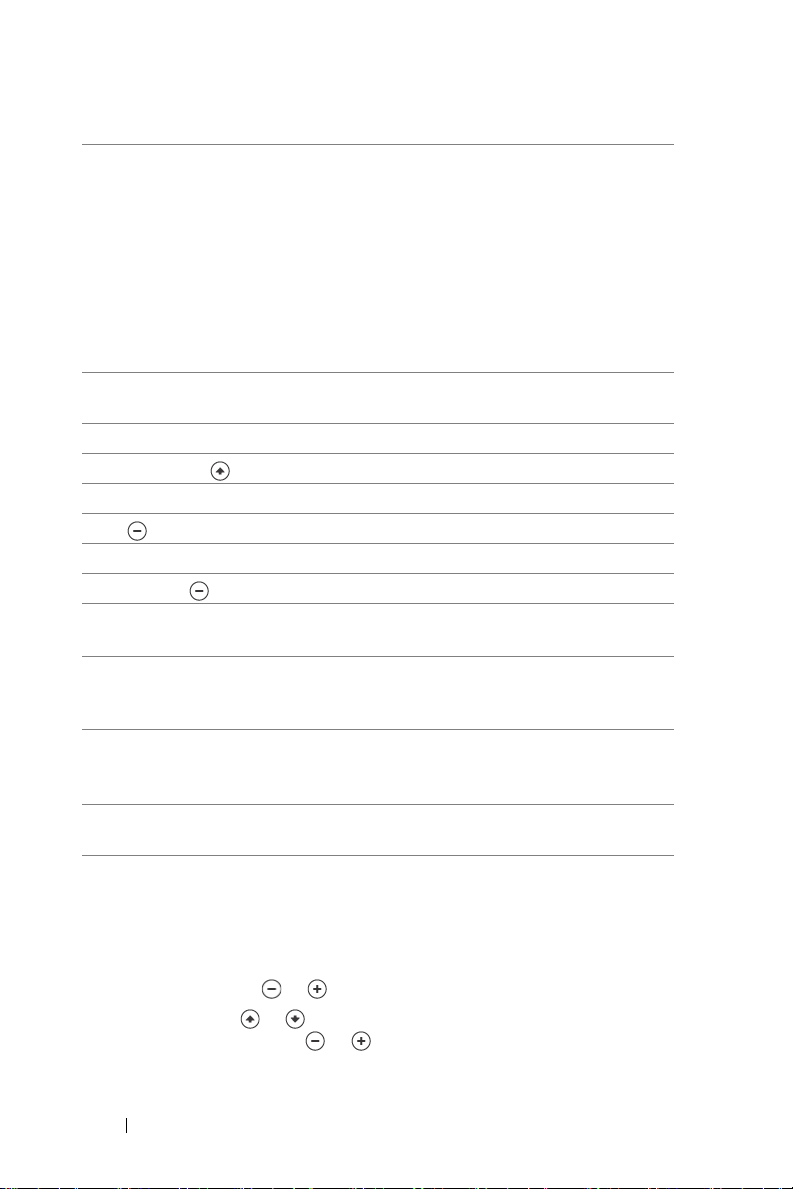
MAIN MENU
INPUT SELECT
AUTO SOURCE—Select ON (the default) to
autodetect the available input signals.
When the projector is on and you press
SOURCE, it automatically finds the next
available input signal. Select OFF to lock
the current input signal. When OFF is
selected and you press SOURCE, you
select which input signal you want to use.
VGA—Press ENTER to detect VGA
signal.
IDEO—Press ENTER to detect S-Video signal.
S-V
OMPOSITE VIDEO—Press ENTER to detect Composite Video signal.
C
AUTO-ADJUST
Select to show "Auto Adjustment in
Progress..." information.
Using Your Projector 21
Page 22
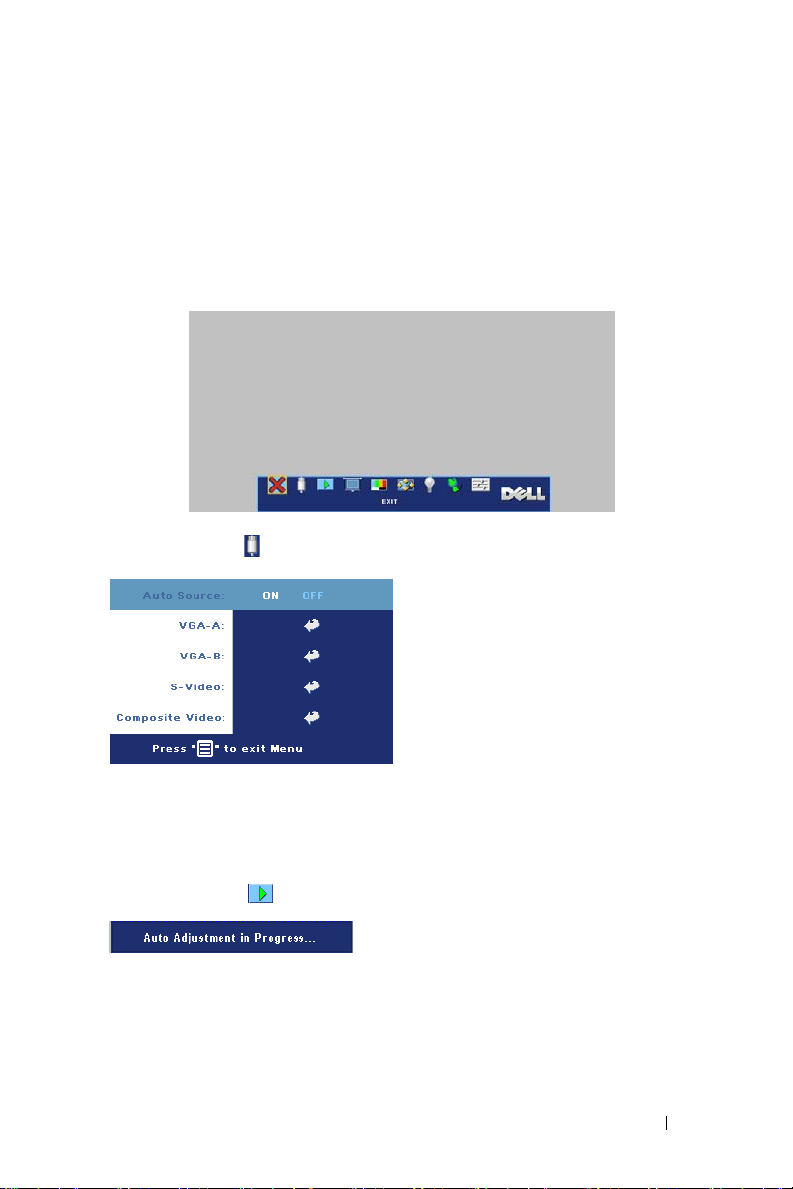
SET UP
V. KEYSTONE—Adjust image
distortion caused by
tilting the projector.
PROJECTOR MODE—Select how the image appears:
• Front Projection-Desktop (the default).
• Front Projection-Ceiling Mount — The projector turns the image upside
down for ceiling-mounted projection.
• Rear Projection-Desktop — The projector reverses the image so you can
project from behind a translucent screen.
• Rear Projection-Ceiling Mount — The projector reverses and turns the
image upside down. You can project from behind a translucent screen with a
ceiling-mounted projection.
ASPECT RATIO—Select an aspect ratio to adjust how the image appears.
• 1:1 — The input source displays without scaling.
Use 1:1 aspect ratio if you are using one of the following:
– VGA cable and the computer has a resolution less than XGA (1024 x 768)
– Component cable (576p/480i/480p)
–S-Video cable
– Composite cable
• 16:9 — The input source scales to fit the width of the screen.
• 4:3 — The input source scales to fit the screen.
Use 16:9 or 4:3 if you are using one of the following:
– Computer resolution greater than XGA
– Component cable (1080i or 720p)
PROJECTOR INFO—Press to show the projector model name, the present resolution,
and projector serial number (PPID#).
22 Using Your Projector
Page 23
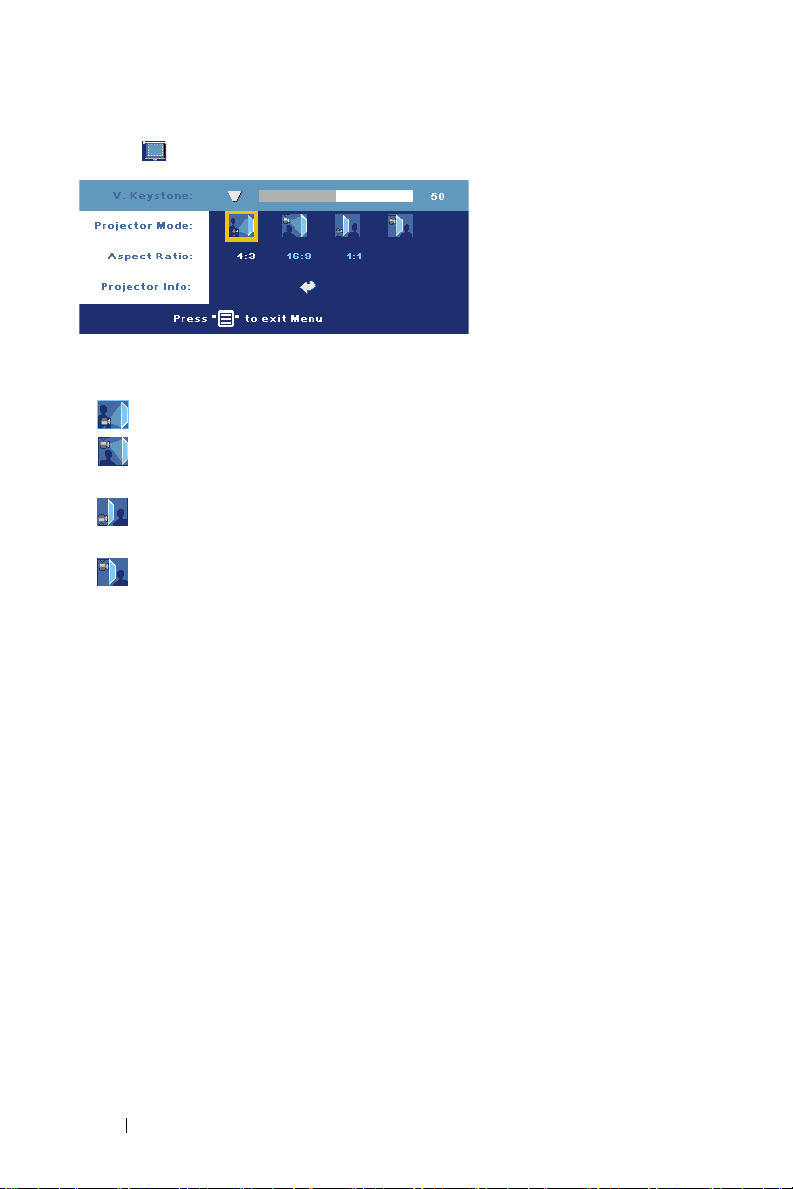
PICTURE (IN PC MODE)
BRIGHTNESS—Use
to
adjust the
brightness of the image.
ONTRAST—Use
C
to control the degree
of difference between the
brightest and darkest parts
of the picture. Adjusting
the contrast changes the
amount of black and white
in the image.
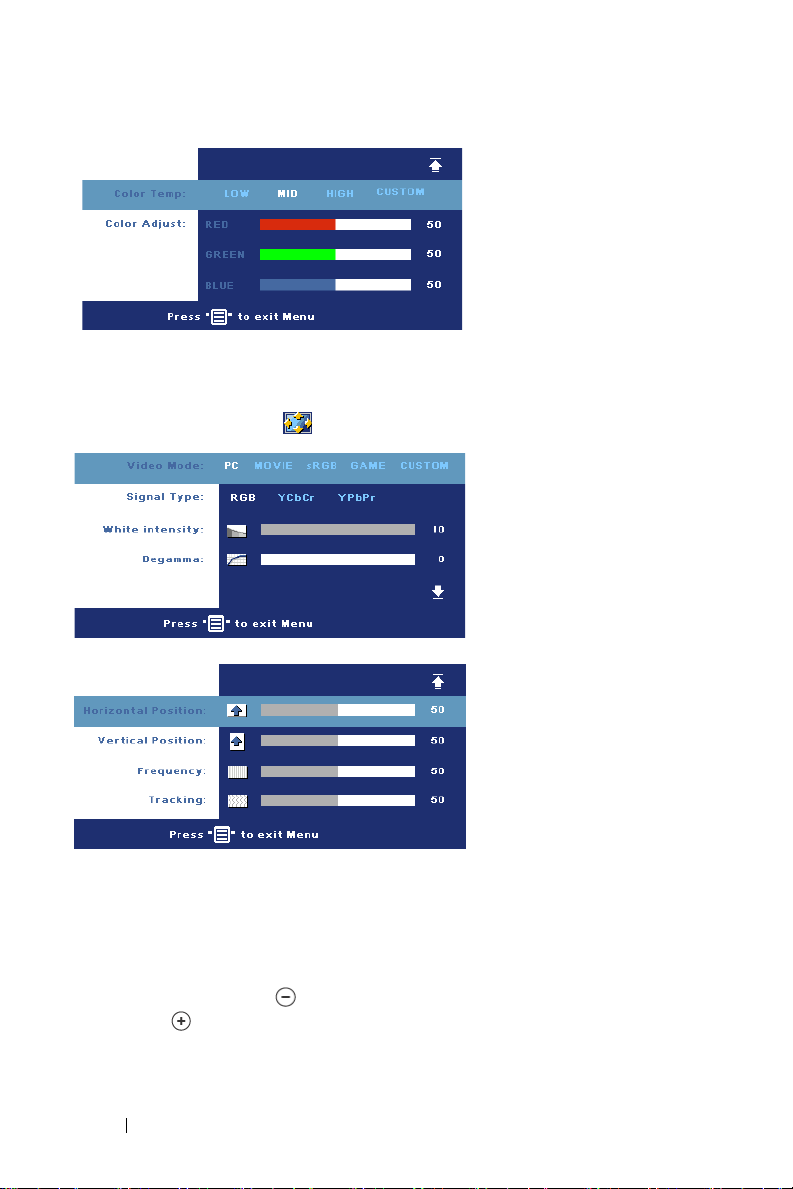
OLOR TEMP—Adjust the color temperature. The higher the temperature, the bluer
C
the screen. The lower the temperature, the redder the screen. User mode activates
the values in the "color setting" menu.
OLOR ADJUST—Manually adjust red, green, and blue color.
C
and
and
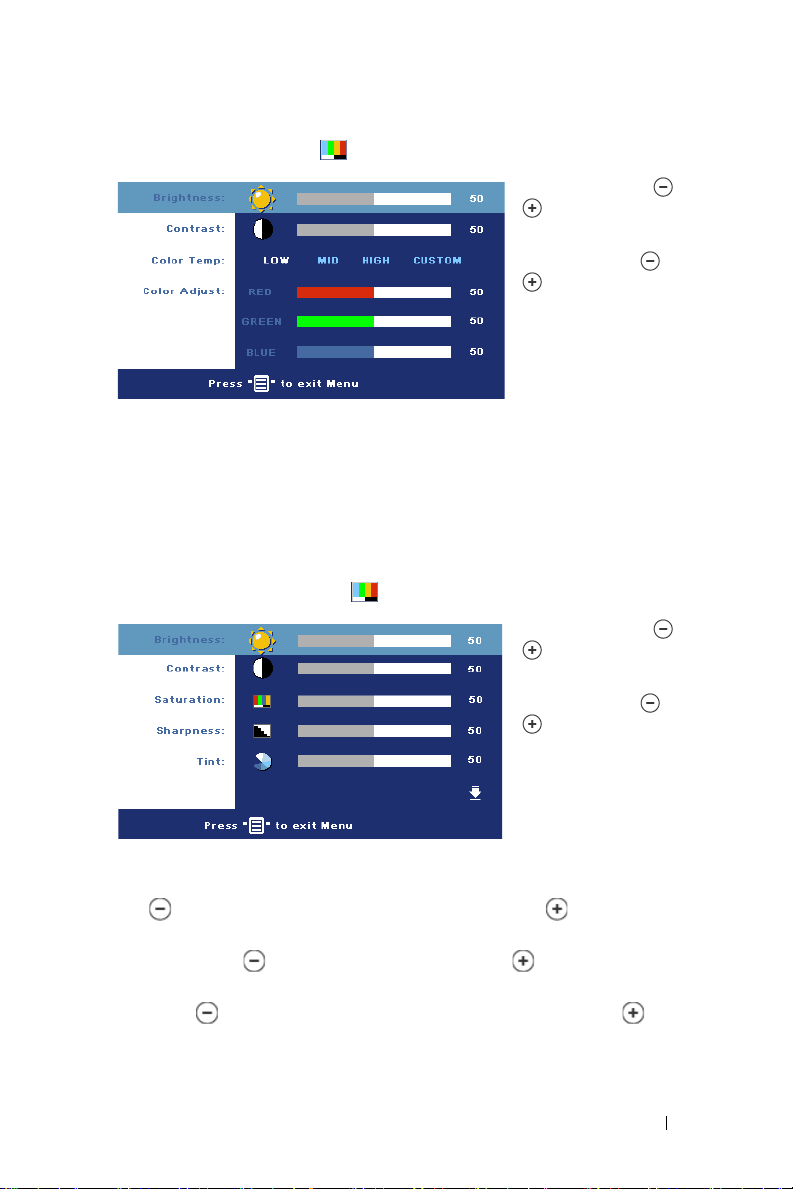
PICTURE (IN VIDEO MODE)
BRIGHTNESS—Use
to
adjust the
brightness of the image.
ONTRAST—Use
C
to control the degree
of difference between the
brightest and darkest parts
of the picture. Adjusting
the contrast changes the
amount of black and white
in the image.
ATURATION—Adjust a video source from black and white to fully saturated color.
S
Press to decrease the amount of color in the image and to increase the
amount of color in the image.
HARPNESS—Press
S
to decrease the sharpness and to increase the
sharpness.
TINT—Press
to increase the amount of green in the image and to
increase the amount of red in the image.
and
and
Using Your Projector 23
Page 24
DISPLAY (IN PC MODE)
COLOR TEMP—Adjust the
color temperature. The
higher the temperature, the
bluer the screen. The lower
the temperature, the redder
the screen. User mode
activates the values in the
"color setting" menu.
OLOR ADJUST—Manually
C
adjust red, green, and blue
colors.
VIDEO MODE—Select a mode
to optimize the display on
how the projector is being
used: PC, MOVIE, sRGB
(provides more accurate
color representation),
GAME , and CUSTOM
(set your preferred
settings). If you adjust the
settings for White
Intensity or Degamma, the
projector automatically
switches to CUSTOM.
IGNAL TYPE—Manually
S
select signal type RGB,
YCbCr, YPbPr.
HITE INTENSITY—Setting 0 to maximize the color reproduction and 10 to
W
maximize the brightness.
EGAMMA—Adjust among the 4 preset values to change the color performance of
D
the display.
ORIZONTAL POSITION—Press
H
to adjust the horizontal position of the image to
the left and to adjust the horizontal position of the image to the right.
24 Using Your Projector
Page 25
VERTICAL POSITION—Press
to adjust the vertical position of the image down
and to adjust the vertical position of the image up.
FREQUENCY—Change the display data clock frequency to match the frequency of
your computer graphics card. If you see a vertical flickering bar, use Frequency
control to minimize the bars. This is a coarse adjustment.
T
RACKING—Synchronize the phase of the display signal with the graphic card. If you
experience an unstable or flickering image, use Tra cki ng to correct it. This is a fine
adjustment.
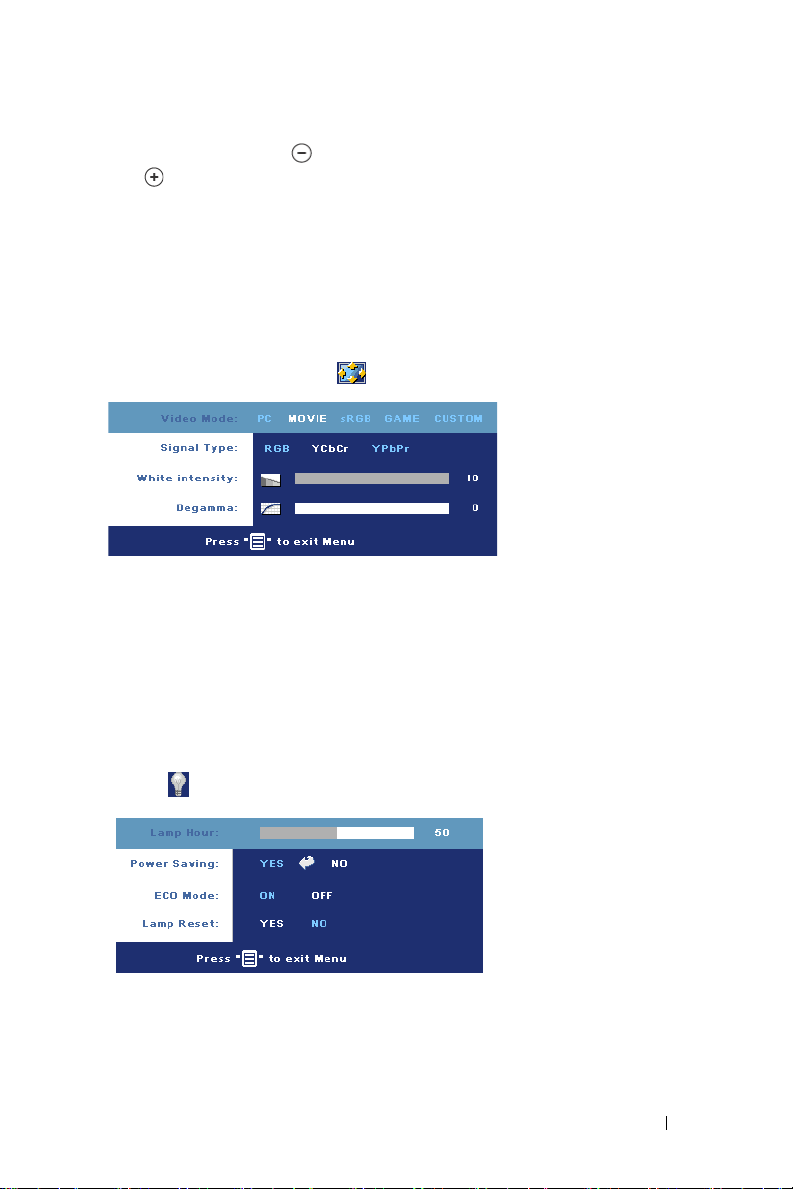
DISPLAY (in Video Mode)
VIDEO MODE—Select a mode
to optimize the display on
how the projector is being
used: PC, MOVIE, sRGB
(provides more accurate
color representation),
GAME , and CUSTOM
(set your preferred settings).
If you adjust the settings for White Intensity or Degamma, the projector
automatically switches to CUSTOM.
IGNAL TYPE—Manually select signal type RGB, YCbCr, YPbPr.
S
HITE INTENSITY—Setting 0 to maximize the color reproduction and 10 to
W
maximize the brightness.
EGAMMA—Adjust among the 4 preset values to change the color performance of
D
the display.
LAMP
LAMP HOUR—Display the
operating hours since the
lamp timer reset.
POWER SAVING—Select ON to
set the power saving delay
period. The delay period is the
amount of time you want the
projector to wait without
signal input. After that set
time, the projector enters power saving mode (Power light in Orange) and turns
off the lamp. The projector turns back on when it detects an input signal or when
you press the power button. After two hours, the projector automatically turns off
(Power light in Blue), press the power button to turn on the projector again.
Using Your Projector 25
Page 26
ECO MODE—Select ON to use the projector at a lower power level (190 Watts),
which may provide longer lamp life, quieter operation, and dimmer luminance
output on the screen. Select OFF to operate at normal power level (255 Watts).
AMP RESET—After you install a new lamp, select Ye s to reset the lamp timer.
L
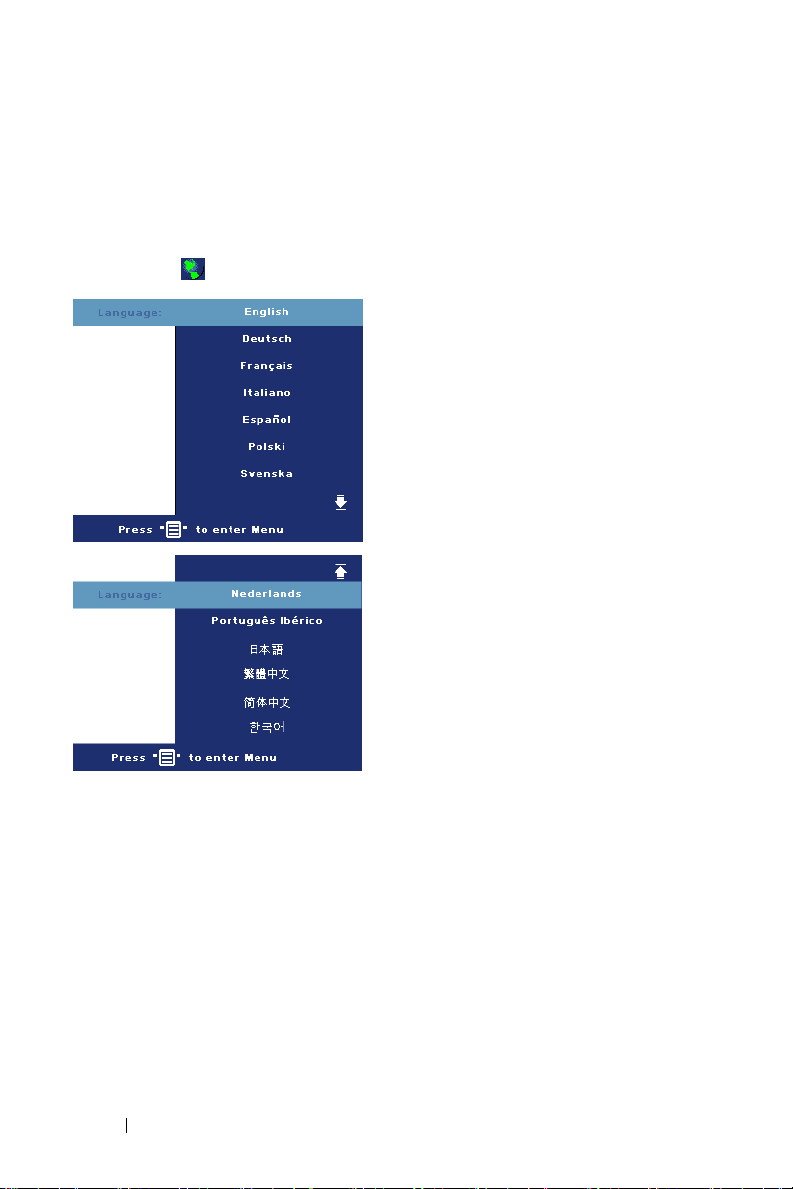
LANGUAGE
26 Using Your Projector
Page 27
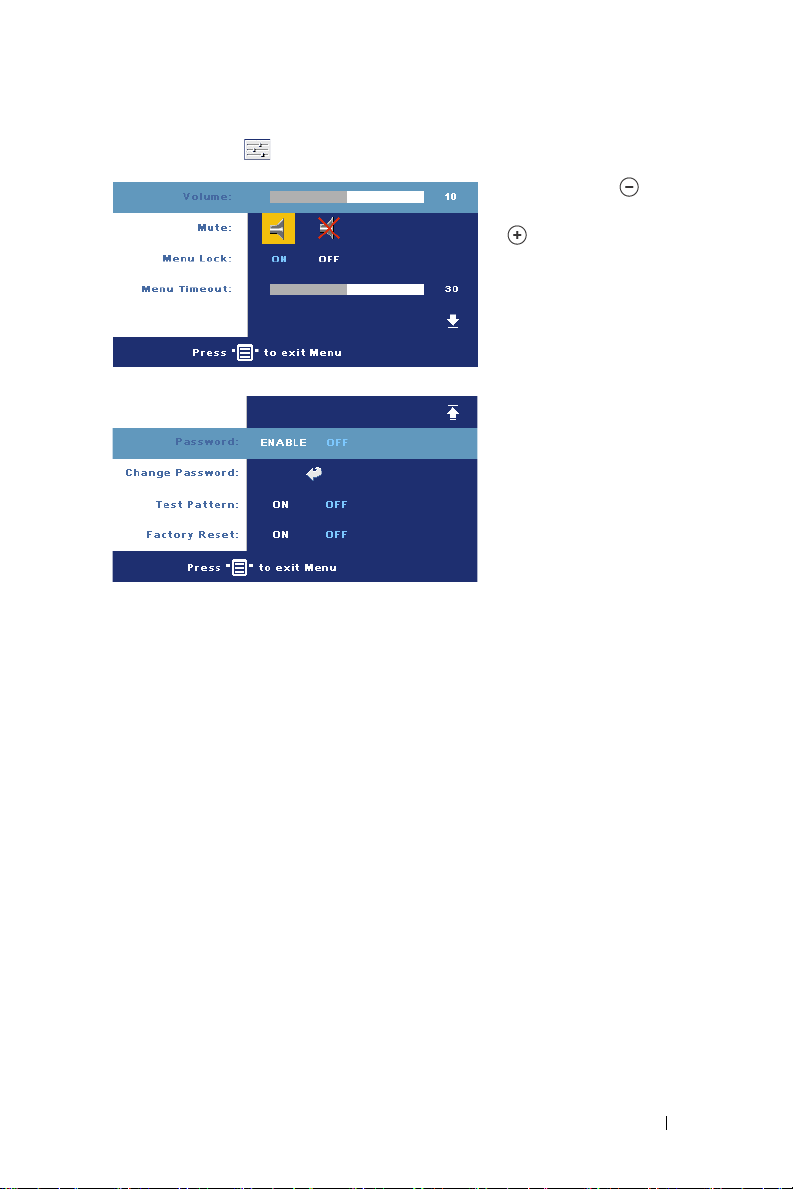
PREFERENCES
VOLUME—Press
to
decrease the volume and
to increase the volume.
MUTE—Allows to mute the
sound.
ENU LOCK—Select ON to
M
enable Menu Lock for
hiding the OSD menu. To
disable Menu Lock, press
the Menu button on the
control panel or the remote
control for 15 seconds.
ENU TIMEOUT—Adjust the
M
time delay of the OSD
Timeout. The Default
setting is 30 seconds.
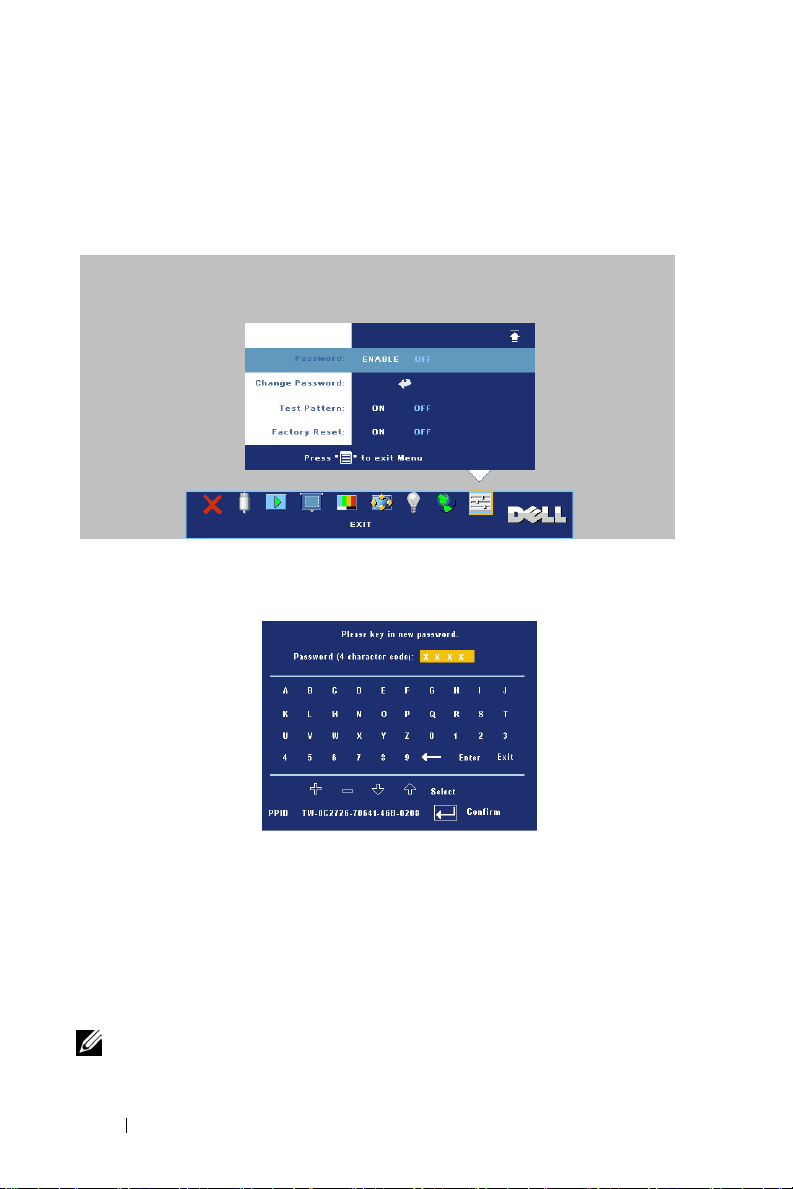
ASSWORD—
P
Protect your projector and restrict access to it with Password
Security feature. This security utility enables you to impose a variety of
access restrictions to protect your privacy and stop others from tampering
with your projector. This means that the projector cannot be used if it is
taken without authorization, and thus serves as a theft-prevention feature.
When Password Protect is enabled (
On
), a Password Protect screen
requesting you to enter a password will be displayed when the power plug is
inserted into the electrical outlet and the power for the projector is first
turned on. By default, this function is disabled. You can enable this feature
using the Password menu. This password security feature will be activated on
the next time you turn on the projector. If you enable this feature, you will
be asked to enter the projector's password after you turn on the projector:
Using Your Projector 27
Page 28
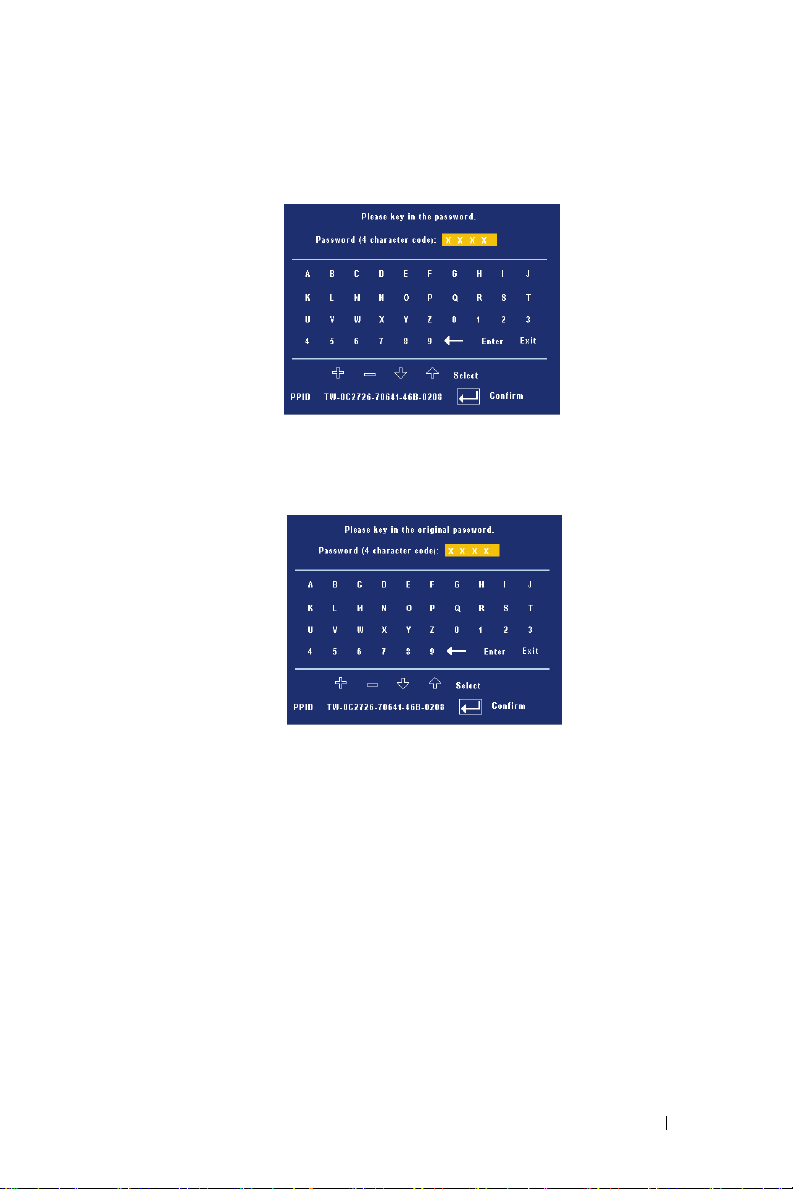
1
1st time password input request:
a
Go to
Preferences
ENABLE
b
Enable the Password function will pop-up a character screen, key in
the password setting.
menu, press
a 4-digit number from the screen and press the
Enter
and then select
Passwo rd
ENTER
to
button.
c
To confirm, reenter the password.
d
If the password verification is successful, you may resume with
accessing the projector's functions and its utilities.
2
If you have entered incorrect password, you will be given another 2
chances. After the three invalid attempts, the projector will
automatically turn off.
NOTE: If you forget your password, contact Dell or qualified service personnel.
28 Using Your Projector
Page 29
3
To cancel the password function, select
disable the function.
OFF
and enter the password to
CHANGE PASSWORD—
Key in the original password, then enter the new password
and confirm the new password again.
TEST PATTERN—
on focus and resolution. Press the
FACTORY RESET —Select ON to reset the projector to its factory default settings.
Reset items include both computer sources and video source settings.
Select ON to activate the built-in
Menu
button to turn off
Test Pattern
for self-testing
Test Pattern
.
Using Your Projector 29
Page 30

30 Using Your Projector
Page 31

4
Troubleshooting Your Projector
If you experience problems with your projector, see the following troubleshooting
tips. If the problem persists, contact Dell.
Problem Possible Solution
No image appears on the
screen
• Ensure that the lens cap is removed and the
projector is turned on.
• Ensure the external graphics port is enabled.
If you are using a Dell portable computer,
press (Fn+F8). For other
computers, see your respective
documentation.
• Ensure that all the cables are securely
connected. See
on page 7.
• Ensure that the pins of the connectors are
not bent or broken.
• Ensure that the lamp is securely installed
Changing the Lamp
(see
Test Pa tte r n
•Use
Ensure that the colors of the test pattern are
correct.
Connecting Your Projector
on page 35).
in the
Preferences
menu.
Troubleshooting Your Projector 31
Page 32

Problem
Partial, scrolling, or
incorrectly displayed image
(continued)
Possible Solution
1
Press the
(continued)
Resync
button on the remote
control or the control panel.
2
If you are using a Dell portable computer, set
the resolution of the computer to XGA
(1024 x 768):
a
Right-click the unused portion of your
Windows desktop, click
then select
b
Verify the setting is 1024 x 768 pixels for
Settings
tab.
Properties
and
the external monitor port.
c
Press (Fn+F8).
If you experience difficulty in changing
resolutions or your monitor freezes, restart all
the equipment and the projector.
If you are not using a Dell portable computer,
see your documentation.
The screen does not display
your presentation
If you are using a portable computer, press
(Fn+F8)
.
Image is unstable or flickering Adjust the tracking in the OSD Display tab
(in PC Mode only).
Image has vertical flickering
bar
Image color is not correct
Adjust the frequency in the OSD Display tab
(in PC Mode only).
• If your graphic card output signal is sync on
Green, and you would like to display VGA at
60Hz signal, please go into OSD select
Display
, select
RGB
•Use
.
Test Pa tte r n
Signal Type
in the
and then select
Preferences
menu.
Ensure that the colors of the test pattern are
correct.
Image is out of focus 1
Adjust the focus ring on the projector lens.
2
Ensure that the projection screen is within
the required distance from the projector
(4.9 ft [1.5 m] to 39.4 ft [12.0 m]).
32 Troubleshooting Your Projector
Page 33

Problem
The image is stretched when
displaying a 16:9 DVD
Image is reversed Select Set Up from the OSD and adjust the
Lamp is burned out or makes
a popping sound
LAMP light is solid orange If the LAMP light is solid orange, replace the
LAMP light and Power light
are blinking orange
LAMP light is blinking
orange and Power light is
solid blue
TEMP light is solid orange
and Power light is solid blue
(continued)
Possible Solution
The projector automatically detects a 16:9
DVD and adjusts the aspect ratio to full
screen with a 4:3 (letter-box) default setting.
If the image is still stretched, adjust the aspect
ratio as follows:
• If you are playing a 16:9 DVD, select 4:3
aspect ratio type on your DVD player.
• If you cannot select 4:3 aspect ratio type on
your DVD player, select 4:3 aspect ratio in
Set Up
the
projector mode.
When the lamp reaches its end of life, it may
burn out and may make a loud popping sound.
If this occurs, the projector does not turn back
on. To replace the lamp, see Changing the
Lamp on page 35.
lamp.
If the LAMP light and the Power light are
blinking orange, the lamp driver has failed and
the projector will automatically shut down.
Unplug the power cord after 3 minutes then
turn the display on again. If this problem
persists, contact Dell.
If the LAMP light is blinking orange and
Power light is solid blue, the system has failed
and the projector will automatically shut
down. Unplug the power cord after 3 minutes
then turn the display on again. If this problem
persists, contact Dell.
The lamp has overheated. The display
automatically shuts down. Turn the display on
again after the projector cools down. If the
problem persists, contact Dell.
(continued)
menu in the OSD.
Troubleshooting Your Projector 33
Page 34

Problem
TEMP light and Pow er light
are solid orange
TEMP light is blinking
orange
The OSD does not appear on
the screen
The remote control is not
operating smoothly or works
only within a limited range
(continued)
Possible Solution
The lamp driver has overheated. The display
automatically shuts down. Turn the display on
again after the projector cools down. If the
problem persists, contact Dell.
A projector fan has failed and the projector
will automatically shut down. If the problem
persists, contact Dell.
Try to press the Menu button on the panel for
15 seconds to unlock the OSD. Check the
Menu Lock on page 27.
The battery may be low. Check if the laser
beam transmitted from the remote is too dim.
If so, replace with 2 new AAA batteries.
(continued)
34 Troubleshooting Your Projector
Page 35

Changing the Lamp
Replace the lamp when the message "Lamp is approaching the end of its useful life
in full power operation. Replacement suggested! www.dell.com/lamps" appears on
the screen. If this problem persists after replacing the lamp, contact Dell. For more
information, see "Contacting Dell".
CAUTION: The lamp becomes very hot when in use. Do not attempt to replace
the lamp until the projector has been allowed to cool down for at least 30
minutes.
1
Turn off the projector and disconnect the power cord.
2
Let the projector cool for at least 30 minutes.
3
Loosen the 2 screws that secure the lamp cover, and remove the cover.
CAUTION: If the lamp has shattered, be careful as broken pieces are sharp
and can cause injury. Remove all broken pieces from the projector and
dispose or recycle according to state, local, or federal law. Go to
www.dell.com/hg for additional information.
4
Loosen the 2 screws that secure the lamp.
CAUTION: Do not touch the bulb or the lamp glass at any time. Projector
lamps are very fragile and may shatter if touched.
5
Pull up the lamp by its metal handle.
NOTE: Dell may require that lamps
replaced under warranty be returned to
Dell. Otherwise, contact your local
waste disposal agency for the address
of the nearest deposit site.
6
Replace with the new lamp.
7
Tighten the 2 screws that secure the lamp.
8
Replace the lamp cover and tighten the 2
screws.
9
Reset the lamp usage time by selecting
"Yes" for
tab. (See
Lamp Reset
LAMP
on page 25)
in the OSD
Lamp
Troubleshooting Your Projector 35
Page 36

CAUTION: Lamp Disposal (for the US only)
LAMP(S) INSIDE THIS PRODUCT CONTAIN MERCURY AND MUST BE
RECYCLED OR DISPOSED OF ACCORDING TO LOCAL, STATE OR FEDERAL
LAWS. FOR MORE INFORMATION, GO TO WWW.DELL.COM/HG OR CONTACT
THE ELECTRONIC INDUSTRIES ALLIANCE AT WWW.EIAE.ORG. FOR LAMP
SPECIFIC DISPOSAL INFORMATION CHECK WWW.LAMPRECYCLE.ORG.
36 Troubleshooting Your Projector
Page 37

Specifications
5
Light Valve Single-chip 0.55" XGA DDR
technology
Brightness 2100 ANSI Lumens (Max.)
Contrast Ratio 2000:1 Typical (Full On/Full Off)
Uniformity 80% Typical (Japan Standard - JBMA)
Lamp 200 watt user-replaceable 2500 hour
lamp (up to 3000 hours in eco mode)
Number of Pixels 1024 x 768 (XGA)
Displayable Color 16.7M colors
Color Wheel Speed 100~127.5Hz (1.5~2X)
Projection Lens F/2.35~2.47, f=21.83~23.81 mm with
1.1x manual zoom lens
Projection Screen Size 34.7~304.9 inches (diagonal)
Projection Distance 4.9~39.4 ft (1.5 m~12.0 m)
Video Compatibility NTSC 3.58, NTSC 4.43, PAL, PAL-M,
PAL-N, SECAM, and HDTV (480i;
480P; 576i; 576P; 720P; 1080i)
compatibility
Composite video, Component video
and S-video capability
H. Frequency 15kHz-94kHz (Analog)
V. Frequency 50Hz-85Hz (Analog)
Power Supply Universal 100-240V AC 50-60Hz with
PFC input
Power Consumption 255 watts typical, 190 watts in eco
mode
5
Specifications 37
Page 38

Audio 1 speaker, 2 watt RMS
6
Noise Level 3
dB(A) Full-on mode, 31 dB(A) Eco-
mode
Weight <4.6 lbs (2.1 kg)
Dimensions (W x H x D) External 9.6 x 8.3 x 4.5 ± 0.04 inches
(244 x 211 x 115 mm)
o
Environmental Operating temperature: 5
(41
o
F- 95oF)
C - 35oC
Humidity: 80% maximum
o
Storage temperature: -20
C to 60oC
(-4oF to 140oF)
Humidity: 90% maximum
Regulatory FCC, ICES-003, CE, VCCI, C-Tick,
MIC/Korea, CCC, UL/cUL, NemkoGS, CB, PSE, PSB, IRAM, NOM,
Gost-R
I/O Connectors Power: one AC power input socket (3-
pins
VGA input: two 15-pins VGA
connectors (Blue), "VGA-A In & VGAB In", for analog RGB/Component,
HDTV input signals
VGA output: one 15-pins VGA
connectors (Black) for "VGA-A Out"
loop through
Video input: one S-video connector,
one Composite Video connector
(RCA-Yellow)
Audio input: one 3.5mm stereo mini
phone jack (Blue)
Audio output: one 3.5mm stereo mini
phone jack (Green)
RS-232 port: one mini-DIN 6-pins for
RS232 support
USB port: one USB slave for remote
mouse support
38 Specifications
Page 39

RS232 Pin Assignment
GND
GND
RXD
TXD
RS232 Protocol
• Communication Settings
Connection settings Va l ue
Baud Rate: 19200
Data Bits: 8
Par ity N one
Stop Bits 1
• Command types
To pop up the OSD menu and adjust the settings.
• Control command Syntax (From PC to Projector)
[H][AC][SoP][CRC][ID][SoM][COMMAND]
• Example: Power ON Command (Send low byte firstly)
--> 0xBE, 0xEF, 0x10, 0x05, 0x00, 0xC6, 0xFF, 0x11, 0x11, 0x01, 0x00, 0x01
• Control Commands List
Go to support.dell.com to view the latest RS232 code.
Specifications 39
Page 40

Compatibility Modes
Mode Resolution
VGA 640X350 70 31.47
VGA 640X350 85 37.86
VGA 640X400 85 37.86
VGA 640X480 60 31.47
VGA 640X480 72 37.86
VGA 640X480 75 37.50
VGA 640X480 85 43.27
VGA 720X400 70 31.50
VGA 720X400 85 37.93
SVGA 800X600 56 35.16
SVGA 800X600 60 37.88
SVGA 800X600 72 48.11
SVGA 800X600 75 46.88
SVGA 800X600 85 53.67
XGA 1024X768 60 48.36
XGA 1024X768 70 56.48
XGA 1024X768 75 60.02
XGA 1024X768 85 68.68
* 1152X864 75 67.50
*UVGA 1280X960 60 60.00
*UVGA 1280X960 85 85.94
*WXGA 1360X768 60 47.71
*SXGA 1280X1024 60 63.98
*SXGA 1280X1024 75 79.98
*SXGA 1280X1024 85 91.15
*SXGA+ 1400X1050 60 65.31
*SXGA+ 1400X1050 75 82.28
*SXGA+ 1400X1050 85 93.88
*UXGA 1600x1200 60 75.00
*UXGA 1600x1200 65 81.25
*UXGA 1600x1200 70 87.50
MAC LC13" 640X480 66.66 34.98
MAC II 13" 640X480 66.68 35.00
V. Frequency (Hz) H. Frequency (KHz)
(ANALOG)
40 Specifications
Page 41

MAC 16" 832X624 75 49.73
MAC 19" 1024X768 75 60.24
*MAC 1152X870 75 68.68
MAC G4 640X480 60 31.35
IMAC DV 1024X768 75 60.00
*IMAC DV 1152X870 75 68.49
*IMAC DV 1280X960 75 75.00
*IMAC DV 1280X1024 85 91.10
*Compressed computer image.
Specifications 41
Page 42

42 Specifications
Page 43

Contacting Dell
To contact Dell electronically, you can access the following websites:
• www.dell.com
•
support.dell.com
For specific web addresses for your country, find the appropriate country
section in the table below.
NOTE: Toll-free numbers are for use within the country for which they are
listed.
NOTE: In certain countries, support specific to Dell XPS™ portable computers
is available at a separate telephone number listed for participating countries. If
you do not see a telephone number listed that is specific for XPS™ portable
computers, you may contact Dell through the support number listed and your
call will be routed appropriately.
When you need to contact Dell, use the electronic addresses, telephone
numbers, and codes provided in the following table. If you need assistance in
determining which codes to use, contact a local or an international operator.
(support)
Country (City)
International Access Code
Country Code
City Code
Anguilla General Support
Antigua and Barbuda General Support
Department Name or Service
Area, Website and E-Mail
Address
Area Codes,
Local Numbers, and
Toll-Free Numbers
toll-free: 800-335-
0031
1-800-805-5924
Contacting Dell 43
Page 44

Country (City)
International Access Code
Country Code
Department Name or Service
Area, Website and E-Mail
Address
City Code
Argentina (Buenos Aires)
International Access
Code: 00
Country Code: 54
City Code: 11
We bs it e : www.dell.com.ar
E-mail:
us_latin_services@dell.com
E-mail for desktop and portable
computers:
la-techsupport@dell.com
E-mail for servers and EMC
storage products:
la_enterprise@dell.com
Customer Care
Hardware and Warranty
Support
Hardware And Warranty
Support Services
Sales
Aruba General Support
Australia (Sydney)
International Access
Code: 0011
Country Code: 61
Website: support.ap.dell.com
E-mail:
support.ap.dell.com/contactus
General Support
City Code: 2
Area Codes,
Local Numbers, and
Toll-Free Numbers
®
toll-free: 0-800-
444-0730
toll-free: 0-800-444-
0733
toll-free: 0-800-444-
0724
0-810-444-3355
toll-free: 800-1578
13DELL-133355
44 Contacting Dell
Page 45

Country (City)
International Access Code
Country Code
City Code
Austria (Vienna)
International Access
Code: 900
Country Code: 43
City Code: 1
Bahamas General Support
Barbados General Support
Department Name or Service
Area, Website and E-Mail
Address
Webs it e: support.euro.dell.com
E-mail:
tech_support_central_europe@
dell.com
Home/Small Business Sales
Home/Small Business Fax
Home/Small Business Customer
Care
Preferred Accounts/Corporate
Customer Care
Support for XPS portable
computers only
Home/Small Business Support
for all other Dell computers
Preferred Accounts/Corporate
Support
Switchboard
Area Codes,
Local Numbers, and
Toll-Free Numbers
0820 240 530 00
0820 240 530 49
0820 240 530 14
0820 240 530 16
0820 240 530 81
0820 240 530 14
0660 8779
0820 240 530 00
toll-free: 1-866-278-
6818
1-800-534-3066
Contacting Dell 45
Page 46

Country (City)
International Access Code
Country Code
City Code
Belgium (Brussels)
International Access
Code: 00
Country Code: 32
City Code: 2
Bermuda General Support
Bolivia General Support
Brazil
International Access
Code: 00
Country Code: 55
City Code: 51
British Virgin Islands General Support
Department Name or Service
Area, Website and E-Mail
Address
We bs it e : support.euro.dell.com
Hardware And Warranty
Support for XPS portable
computers only
Hardware And Warranty
Support for all other Dell
computers
Hardware And Warranty
Support Fax
Customer Care
Corporate Sales
Fax
Switchboard
We bs it e : www.dell.com/br
Customer Support, Hardware
and Warranty Support
Hardware and Warranty
Support Fax
Customer Care Fax
Sales
Area Codes,
Local Numbers, and
Toll-Free Numbers
02 481 92 96
02 481 92 88
02 481 92 95
02 713 15 65
02 481 91 00
02 481 92 99
02 481 91 00
1-800-342-0671
toll-free: 800-10-
0238
0800 90 3355
51 481 5470
51 481 5480
0800 90 3390
toll-free: 1-866-278-
6820
46 Contacting Dell
Page 47

Country (City)
International Access Code
Country Code
City Code
Brunei
Country Code: 673
Canada (North York,
Ontario)
International Access
Code: 011
Department Name or Service
Area, Website and E-Mail
Address
Hardware and Warranty
Support (Penang, Malaysia)
Customer Care (Penang,
Malaysia)
Transaction Sales (Penang,
Malaysia)
Online Order Status:
www.dell.ca/ostatus
AutoTech (automated Hardware
and Warranty Support)
Customer Service (Home
Sales/Small Business)
Customer Service (med./large
business, government)
Customer Service (printers,
projectors, televisions,
handhelds, digital jukebox, and
wireless)
Hardware Warranty Support
(Home Sales/Small Business)
Hardware Warranty Support
(med./large bus., government)
Hardware Warranty Support
(printers, projectors, televisions,
handhelds, digital jukebox, and
wireless)
Sales (Home Sales/Small
Business)
Sales (med./large bus.,
government)
Spare Parts Sales & Extended
Service Sales
Area Codes,
Local Numbers, and
Toll-Free Numbers
604 633 4966
604 633 4888
604 633 4955
toll-free: 1-800-247-
9362
toll-free: 1-800-847-
4096
toll-free: 1-800-326-
9463
toll-free: 1-800-847-
4096
toll-free: 1-800-906-
3355
toll-free: 1-800-387-
5757
1-877-335-5767
toll-free: 1-800-387-
5752
toll-free: 1-800-387-
5755
1 866 440 3355
Contacting Dell 47
Page 48

Country (City)
International Access Code
Country Code
City Code
Cayman Islands General Support
Chile (Santiago)
Country Code: 56
City Code: 2
China (Xiamen)
Country Code: 86
City Code: 592
Department Name or Service
Area, Website and E-Mail
Address
Sales and Customer Support
Hardware and Warranty
Support website:
support.dell.com.cn
Hardware and Warranty
Support E-mail:
cn_support@dell.com
Customer Care E-mail:
customer_cn@dell.com
Hardware and Warranty
Support Fax
Hardware and Warranty
Support (Dell™ Dimension™
and Inspiron)
Hardware and Warranty
Support (OptiPlex™,
Latitude™, and Dell
Precision™)
Hardware and Warranty
Support (servers and storage)
Hardware and Warranty
Support (projectors, PDAs,
switches, routers, and so on)
Area Codes,
Local Numbers, and
Toll-Free Numbers
1-800-805-7541
toll-free: 1230-020-
4823
592 818 1350
toll-
free: 800 858 2968
toll-free: 800
858 0950
toll-free: 800
858 0960
toll-
free: 800 858 2920
48 Contacting Dell
Hardware and Warranty
Support (printers)
Customer Care
Customer Care Fax
toll-
free: 800 858 2311
toll-
free: 800 858 2060
592 818 1308
Page 49

Country (City)
International Access Code
Country Code
City Code
Colombia General Support
Costa Rica General Support
Department Name or Service
Area, Website and E-Mail
Address
Home and Small Business
Preferred Accounts Division
Large Corporate Accounts GCP
Large Corporate Accounts Key
Accounts
Large Corporate Accounts
North
Large Corporate Accounts
North Government and
Education
Large Corporate Accounts East
Large Corporate Accounts East
Government and Education
Large Corporate Accounts
Queue Team
Large Corporate Accounts
South
Large Corporate Accounts West
Large Corporate Accounts Spare
Par ts
Area Codes,
Local Numbers, and
Toll-Free Numbers
toll-
free: 800 858 2222
toll-
free: 800 858 2557
toll-
free: 800 858 2055
toll-
free: 800 858 2628
toll-
free: 800 858 2999
toll-
free: 800 858 2955
toll-
free: 800 858 2020
toll-
free: 800 858 2669
toll-
free: 800 858 2572
toll-
free: 800 858 2355
toll-
free: 800 858 2811
toll-
free: 800 858 2621
980-9-15-3978
0800-012-0435
Contacting Dell 49
Page 50

Country (City)
International Access Code
Country Code
City Code
Czech Republic (Prague)
International Access
Code: 00
Country Code: 420
Denmark (Copenhagen)
International Access
Code: 00
Country Code: 45
Dominica General Support
Dominican Republic General Support
Ecuador General Support
El Salvador General Support
Department Name or Service
Area, Website and E-Mail
Address
We bs it e : support.euro.dell.com
E-mail: czech_dell@dell.com
Hardware and Warranty
Support
Customer Care
Fax
Hardware and Warranty Fax
Switchboard
We bs it e : support.euro.dell.com
Hardware and Warranty
Support for XPS portable
computers only
Hardware and Warranty
Support for all other Dell
computers
Customer Care (Relational)
Home/Small Business Customer
Care
Switchboard (Relational)
Switchboard Fax (Relational)
Switchboard (Home/Small
Business)
Switchboard Fax (Home/Small
Business)
Area Codes,
Local Numbers, and
Toll-Free Numbers
22537 2727
22537 2707
22537 2714
22537 2728
22537 2711
7010 0074
7023 0182
7023 0184
3287 5505
3287 1200
3287 1201
3287 5000
3287 5001
toll-free: 1-866-278-
6821
1-800-148-0530
toll-free: 999-119
01-899-753-0777
50 Contacting Dell
Page 51

Country (City)
International Access Code
Country Code
City Code
Finland (Helsinki)
International Access
Code: 990
Country Code: 358
City Code: 9
France (Paris)
(Montpellier)
International Access
Code: 00
Country Code: 33
City Codes: (1) (4)
Department Name or Service
Area, Website and E-Mail
Address
Webs it e: support.euro.dell.com
Hardware and Warranty
Support
Customer Care
Fax
Switchboard
Webs it e: support.euro.dell.com
Home and Small Business
Hardware and Warranty
Support for XPS portable
computers only
Hardware and Warranty
Support for all other Dell
computers
Customer Care
Switchboard
Switchboard (calls from outside
of France)
Sales
Fax
Fax (calls from outside of
France)
Corporate
Hardware and Warranty
Support
Customer Care
Switchboard
Sales
Fax
Area Codes,
Local Numbers, and
Toll-Free Numbers
09 253 313 60
09 253 313 38
09 253 313 99
09 253 313 00
0825 387 129
0825 387 270
0825 823 833
0825 004 700
04 99 75 40 00
0825 004 700
0825 004 701
04 99 75 40 01
0825 004 719
0825 338 339
01 55 94 71 00
01 55 94 71 00
01 55 94 71 01
Contacting Dell 51
Page 52

Country (City)
International Access Code
Country Code
City Code
Germany (Langen)
International Access
Code: 00
Country Code: 49
City Code: 6103
Greece
International Access
Code: 00
Country Code: 30
Grenada General Support
Guatemala General Support
Department Name or Service
Area, Website and E-Mail
Address
We bs it e : support.euro.dell.com
E-mail:
tech_support_central_europe@
dell.com
Hardware and Warranty
Support for XPS portable
computers only
Hardware and Warranty
Support for all other Dell
computers
Home/Small Business Customer
Care
Global Segment Customer Care
Preferred Accounts Customer
Care
Large Accounts Customer Care
Public Accounts Customer Care
Switchboard
We bs it e : support.euro.dell.com
Hardware and Warranty
Support
Gold Service Hardware and
Warranty Support
Switchboard
Gold Service Switchboard
Sales
Fax
Area Codes,
Local Numbers, and
Toll-Free Numbers
06103 766-7222
06103 766-7200
0180-5-224400
06103 766-9570
06103 766-9420
06103 766-9560
06103 766-9555
06103 766-7000
00800-44 14 95 18
00800-44 14 00 83
2108129810
2108129811
2108129800
2108129812
toll-free: 1-866-540-
3355
1-800-999-0136
52 Contacting Dell
Page 53

Country (City)
International Access Code
Country Code
City Code
Guyana General Support
Hong Kong
International Access
Code: 001
Country Code: 852
India E-mail:
Department Name or Service
Area, Website and E-Mail
Address
Webs it e: support.ap.dell.com
Hardware and Warranty
Support E-mail:
apsupport@dell.com
Hardware and Warranty
Support (Dimension and
Inspiron)
Hardware and Warranty
Support (OptiPlex, Latitude,
and Dell Precision)
Hardware and Warranty
Support (PowerApp™,
PowerEdge™, PowerConnect™,
and PowerVault™)
Customer Care
Large Corporate Accounts
Global Customer Programs
Medium Business Division
Home and Small Business
Division
india_support_desktop@dell.co
m
india_support_notebook@dell.c
om
india_support_Server@dell.com
Hardware And Warranty
Support
Sales (Large Corporate
Accounts)
Area Codes,
Local Numbers, and
Toll-Free Numbers
toll-free: 1-877-270-
4609
2969 3188
2969 3191
2969 3196
3416 0910
3416 0907
3416 0908
3416 0912
2969 3105
1600338045
and 1600448046
1600 33 8044
Contacting Dell 53
Page 54

Country (City)
International Access Code
Country Code
City Code
Ireland (Cherrywood)
International Access
Code: 00
Country Code: 353
City Code: 1
Department Name or Service
Area, Website and E-Mail
Address
Sales (Home and Small
Business)
We bs it e : support.euro.dell.com
E-mail:
dell_direct_support@dell.com
Hardware and Warranty
Support for XPS portable
computers only
Hardware and Warranty
Support for all other Dell
computers
U.K. Hardware and Warranty
Support (dial within U.K. only)
Home User Customer Care
Small Business Customer Care
U.K. Customer Care (dial
within U.K. only)
Corporate Customer Care
Corporate Customer Care (dial
within U.K. only)
Ireland Sales
U.K. Sales (dial within U.K.
only)
Fax/Sales Fax
Switchboard
Area Codes,
Local Numbers, and
Toll-Free Numbers
1600 33 8046
1850 200 722
1850 543 543
0870 908 0800
01 204 4014
01 204 4014
0870 906 0010
1850 200 982
0870 907 4499
01 204 4444
0870 907 4000
01 204 0103
01 204 4444
54 Contacting Dell
Page 55

Country (City)
International Access Code
Country Code
City Code
Italy (Milan)
International Access
Code: 00
Country Code: 39
City Code: 02
Jamaica General Support (dial from
Japan (Kawasaki)
International Access
Code: 001
Country Code: 81
City Code: 44
Department Name or Service
Area, Website and E-Mail
Address
Webs it e: support.euro.dell.com
Home and Small Business
Hardware and Warranty
Support
Customer Care
Fax
Switchboard
Corporate
Hardware and Warranty
Support
Customer Care
Fax
Switchboard
within Jamaica only)
Webs it e: support.jp.dell.com
Hardware And Warranty
Support (servers)
Hardware And Warranty
Support outside of Japan
(servers)
Hardware And Warranty
Support (Dimension and
Inspiron)
Hardware And Warranty
Support outside of Japan
(Dimension and Inspiron)
Hardware And Warranty
Support (Dell Precision,
OptiPlex, and Latitude)
Area Codes,
Local Numbers, and
Toll-Free Numbers
02 577 826 90
02 696 821 14
02 696 821 13
02 696 821 12
02 577 826 90
02 577 825 55
02 575 035 30
02 577 821
1-800-682-3639
toll-free: 0120-198-
498
81-44-556-4162
toll-free: 0120-198-
226
81-44-520-1435
toll-free:0120-198-
433
Contacting Dell 55
Page 56

Country (City)
International Access Code
Country Code
City Code
Department Name or Service
Area, Website and E-Mail
Address
Hardware And Warranty
Support outside of Japan (Dell
Precision, OptiPlex, and
Latitude)
Hardware And Warranty
Support (PDAs, projectors,
printers, routers)
Hardware And Warranty
Support outside of Japan
(PDAs, projectors, printers,
routers)
Faxbox Service
24-Hour Automated Order
Service
Customer Care
Business Sales Division (up to
400 employees)
Preferred Accounts Division
Sales (over 400 employees)
Large Corporate Accounts Sales
(over 3500 employees)
Public Sales (government
agencies, educational
institutions, and medical
institutions)
Global Segment Japan
Individual User
Switchboard
Area Codes,
Local Numbers, and
Toll-Free Numbers
81-44-556-3894
toll-free: 0120-981-
690
81-44-556-3468
044-556-3490
044-556-3801
044-556-4240
044-556-1465
044-556-3433
044-556-3430
044-556-1469
044-556-3469
044-556-1760
044-556-4300
56 Contacting Dell
Page 57

Country (City)
International Access Code
Country Code
City Code
Korea (Seoul)
International Access
Code: 001
Country Code: 82
City Code: 2
Latin America Customer Hardware and
Luxembourg
International Access
Code: 00
Country Code: 352
Department Name or Service
Area, Website and E-Mail
Address
E-mail: krsupport@dell.com
Support
Support (Dimension, PDA,
Electronics and Accessories)
Sales
Fax
Switchboard
Warranty Support (Austin,
Texas, U.S.A.)
Customer Service (Austin,
Texas, U.S.A.)
Fax (Hardware and Warranty
Support and Customer Service)
(Austin, Texas, U.S.A.)
Sales (Austin, Texas, U.S.A.)
SalesFax (Austin, Texas, U.S.A.)
Webs it e: support.euro.dell.com
Support
Home/Small Business Sales
Corporate Sales
Customer Care
Fax
Area Codes,
Local Numbers, and
Toll-Free Numbers
toll-free: 080-200-
3800
toll-free: 080-200-
3801
toll-free: 080-200-
3600
2194-6202
2194-6000
512 728-4093
512 728-3619
512 728-3883
512 728-4397
512 728-4600
or 512 728-3772
3420808075
+32 (0)2 713 15 96
26 25 77 81
+32 (0)2 481 91 19
26 25 77 82
Contacting Dell 57
Page 58

Country (City)
International Access Code
Country Code
City Code
Macao
Country Code: 853
Malaysia (Penang)
International Access
Code: 00
Country Code: 60
City Code: 4
Department Name or Service
Area, Website and E-Mail
Address
Hardware and Warranty
Support
Customer Service (Xiamen,
China)
Transaction Sales (Xiamen,
China)
We bs it e : support.ap.dell.com
Hardware And Warranty
Support (Dell Precision,
OptiPlex, and Latitude)
Hardware And Warranty
Support (Dimension, Inspiron,
and Electronics and
Accessories)
Hardware And Warranty
Support (PowerApp,
PowerEdge, PowerConnect, and
PowerVault)
Customer Care
Tran sact ion Sal e s
Corporate Sales
Area Codes,
Local Numbers, and
Toll-Free Numbers
toll-free: 0800 105
34 160 910
29 693 115
toll-
free: 1 800 880 193
toll-
free: 1 800 881 306
toll-
free: 1800 881 386
toll-
1800 881 306
free:
(option 6)
toll-
free: 1 800 888 202
toll-
free: 1 800 888 213
58 Contacting Dell
Page 59

Country (City)
International Access Code
Country Code
City Code
Mexico
International Access
Code: 00
Country Code: 52
Montserrat General Support
Netherlands Antilles General Support
Netherlands
(Amsterdam)
International Access
Code: 00
Country Code: 31
City Code: 20
Department Name or Service
Area, Website and E-Mail
Address
Customer Hardware And
Warranty Support
Sales
Customer Service
Main
Webs it e: support.euro.dell.com
Hardware and Warranty
Support for XPS portable
computers only
Hardware and Warranty
Support for all other Dell
computers
Hardware and Warranty
Support Fax
Home/Small Business Customer
Care
Relational Customer Care
Home/Small Business Sales
Relational Sales
Home/Small Business Sales Fax
Relational Sales Fax
Switchboard
Switchboard Fax
Area Codes,
Local Numbers, and
Toll-Free Numbers
001-877-384-8979
or 001-877-269-
3383
50-81-8800
or 01-800-888-3355
001-877-384-8979
or 001-877-269-
3383
50-81-8800
or 01-800-888-3355
toll-free: 1-866-278-
6822
001-800-882-1519
020 674 45 94
020 674 45 00
020 674 47 66
020 674 42 00
020 674 4325
020 674 55 00
020 674 50 00
020 674 47 75
020 674 47 50
020 674 50 00
020 674 47 50
Contacting Dell 59
Page 60

Country (City)
International Access Code
Country Code
City Code
New Zealand
International Access
Code: 00
Country Code: 64
Nicaragua General Support
Norway (Lysaker)
International Access
Code: 00
Country Code: 47
Pan ama General Support
Peru General Support
Poland (Warsaw)
International Access
Code: 011
Country Code: 48
City Code: 22
Department Name or Service
Area, Website and E-Mail
Address
We bs it e : support.ap.dell.com
E-mail:
support.ap.dell.com/contactus
General Support
We bs it e : support.euro.dell.com
Hardware and Warranty
Support for XPS portable
computers only
Hardware and Warranty
Support for all other Dell
products
Relational Customer Care
Home/Small Business Customer
Care
Switchboard
Fax Switchboard
We bs it e : support.euro.dell.com
E-mail:
pl_support_tech@dell.com
Customer Service Phone
Customer Care
Sales
Customer Service Fax
Reception Desk Fax
Switchboard
Area Codes,
Local Numbers, and
Toll-Free Numbers
0800 441 567
001-800-220-1006
815 35 043
671 16882
671 17575
23162298
671 16800
671 16865
001-800-507-0962
0800-50-669
57 95 700
57 95 999
57 95 999
57 95 806
57 95 998
57 95 999
60 Contacting Dell
Page 61

Country (City)
International Access Code
Country Code
City Code
Portugal
International Access
Code: 00
Country Code: 351
Puerto Rico General Support
St. Kitts and Nevis General Support
St. Lucia General Support
St. Vincent and the
Grenadines
Department Name or Service
Area, Website and E-Mail
Address
Webs it e: support.euro.dell.com
Hardware and Warranty
Support
Customer Care
Sales
Fax
General Support
Area Codes,
Local Numbers, and
Toll-Free Numbers
707200149
800 300 413
800 300 410 or
800 300 411 or
800 300 412 or
21 422 07 10
21 424 01 12
1-800-805-7545
toll-free: 1-877-441-
4731
1-800-882-1521
toll-free: 1-877-270-
4609
Contacting Dell 61
Page 62

Country (City)
International Access Code
Country Code
City Code
Singapore (Singapore)
International Access
Code: 005
Country Code: 65
Slovakia (Prague)
International Access
Code: 00
Country Code: 421
Department Name or Service
Area, Website and E-Mail
Address
We bs it e : support.ap.dell.com
Hardware and Warranty
Support (Dimension, Inspiron,
and Electronics and
Accessories)
Hardware and Warranty
Support (OptiPlex, Latitude,
and Dell Precision)
Hardware and Warranty
Support (PowerApp,
PowerEdge, PowerConnect, and
PowerVault)
Customer Care
Tran sact ion Sal e s
Corporate Sales
We bs it e : support.euro.dell.com
E-mail: czech_dell@dell.com
Hardware and Warranty
Support
Customer Care
Fax
Tech Fa x
Switchboard (Sales)
Area Codes,
Local Numbers, and
Toll-Free Numbers
toll-
free: 1800 394 7430
toll-
free: 1800 394 7488
toll-
free: 1800 394 7478
toll-free:
1 800 394 7430
(option 6)
toll-free:
1 800 394 7412
toll-
free: 1 800 394 7419
02 5441 5727
420 22537 2707
02 5441 8328
02 5441 8328
02 5441 7585
62 Contacting Dell
Page 63

Country (City)
International Access Code
Country Code
City Code
South Africa
(Johannesburg)
International Access
Code:
09/091
Country Code: 27
City Code: 11
Southeast Asian and
Pacific Countries
Spain (Madrid)
International Access
Code: 00
Country Code: 34
City Code: 91
Department Name or Service
Area, Website and E-Mail
Address
Webs it e: support.euro.dell.com
E-mail:
dell_za_support@dell.com
Gold Queue
Hardware and Warranty
Support
Customer Care
Sales
Fax
Switchboard
Hardware and Warranty
Support, Customer Service, and
Sales (Penang, Malaysia)
Webs it e: support.euro.dell.com
Home and Small Business
Hardware and Warranty
Support
Customer Care
Sales
Switchboard
Fax
Corporate
Hardware and Warranty
Support
Customer Care
Switchboard
Fax
Area Codes,
Local Numbers, and
Toll-Free Numbers
011 709 7713
011 709 7710
011 709 7707
011 709 7700
011 706 0495
011 709 7700
604 633 4810
902 100 130
902 118 540
902 118 541
902 118 541
902 118 539
902 100 130
902 115 236
91 722 92 00
91 722 95 83
Contacting Dell 63
Page 64

Country (City)
International Access Code
Country Code
City Code
Sweden (Upplands
Va s b y )
International Access
Code: 00
Country Code: 46
City Code: 8
Department Name or Service
Area, Website and E-Mail
Address
We bs it e : support.euro.dell.com
Hardware and Warranty
Support for XPS portable
computers only
Hardware and Warranty
Support for all other Dell
products
Relational Customer Care
Home/Small Business Customer
Care
Employee Purchase Program
(EPP) Support
Hardware and Warranty
Support Fax
Sales
Area Codes,
Local Numbers, and
Toll-Free Numbers
0771 340 340
08 590 05 199
08 590 05 642
08 587 70 527
20 140 14 44
08 590 05 594
08 590 05 185
64 Contacting Dell
Page 65

Country (City)
International Access Code
Country Code
City Code
Switzerland (Geneva)
International Access
Code: 00
Country Code: 41
City Code: 22
Department Name or Service
Area, Website and E-Mail
Address
Webs it e: support.euro.dell.com
E-mail:
Tech_support_central_Europe
@dell.com
Hardware and Warranty
Support for XPS portable
computers only
Hardware and Warranty
Support (Home and Small
Business) for all other Dell
products
Hardware and Warranty
Support (Corporate)
Customer Care (Home and
Small Business)
Customer Care (Corporate)
Fax
Switchboard
Area Codes,
Local Numbers, and
Toll-Free Numbers
0848 33 88 57
0844 811 411
0844 822 844
0848 802 202
0848 821 721
022 799 01 90
022 799 01 01
Contacting Dell 65
Page 66

Country (City)
International Access Code
Country Code
City Code
Ta i wa n
International Access
Code: 002
Country Code: 886
Thailand
International Access
Code: 001
Country Code: 66
Department Name or Service
Area, Website and E-Mail
Address
We bs it e : support.ap.dell.com
E-mail: ap_support@dell.com
Hardware and Warranty
Support (OptiPlex, Latitude,
Inspiron, Dimension, and
Electronics and Accessories)
Hardware and Warranty
Support (PowerApp,
PowerEdge, PowerConnect, and
PowerVault)
Customer Care
Tran sact ion Sal e s
Corporate Sales
We bs it e : support.ap.dell.com
Hardware and Warranty
Support (OptiPlex, Latitude,
and Dell Precision)
Hardware and Warranty
Support (PowerApp,
PowerEdge, PowerConnect, and
PowerVault)
Customer Care
Corporate Sales
Tran sact ion Sal e s
Area Codes,
Local Numbers, and
Toll-Free Numbers
toll-
free: 00801 86 1011
toll-
free: 00801 60 1256
toll-
free:
00801 60 1250
(option 5)
toll-
free: 00801 65 1228
toll-
free: 00801 651 227
toll-
free: 1800 0060 07
toll-
free: 1800 0600 09
toll-
free:
1800 006 007
(option 7)
toll-
free: 1800 006 009
toll-
free: 1800 006 006
66 Contacting Dell
Page 67

Country (City)
International Access Code
Country Code
City Code
Trinidad/Tobago General Support
Turks and Caicos Islands General Support
U.K. (Bracknell)
International Access
Code: 00
Country Code: 44
City Code: 1344
Department Name or Service
Area, Website and E-Mail
Address
Webs it e: support.euro.dell.com
Customer Care website:
support.euro.dell.com/uk/en/ECare/Form/Home.asp
E-mail:
dell_direct_support@dell.com
Hardware and Warranty
Support (Corporate/Preferred
Accounts/PAD [1000+
employees])
Hardware and Warranty
Support for XPS portable
computers only
Hardware and Warranty
Support (direct and general) for
all other products
Global Accounts Customer
Care
Home and Small Business
Customer Care
Corporate Customer Care
Area Codes,
Local Numbers, and
Toll-Free Numbers
1-800-805-8035
toll-free: 1-866-540-
3355
0870 908 0500
0870 366 4180
0870 908 0800
01344 373 186
0870 906 0010
01344 373 185
Contacting Dell 67
Page 68

Country (City)
International Access Code
Country Code
City Code
Uruguay General Support
U.S.A. (Austin, Texas)
International Access
Code: 011
Country Code: 1
Department Name or Service
Area, Website and E-Mail
Address
Preferred Accounts (500–5000
employees) Customer Care
Central Government Customer
Care
Local Government & Education
Customer Care
Health Customer Care
Home and Small Business Sales
Corporate/Public Sector Sales
Home and Small Business Fax
Automated Order-Status
Service
AutoTech (portable and desktop
computers)
Hardware and Warranty
Support (Dell TV, Printers,
and Projectors
Relationship customers
Consumer (Home and Home
Office) Support for all other
Dell products
Customer Service
Employee Purchase Program
(EPP) Customers
Financial Services website:
www.dellfinancialservices.com
Financial Services (lease/loans)
Area Codes,
Local Numbers, and
Toll-Free Numbers
0870 906 0010
01344 373 193
01344 373 199
01344 373 194
0870 907 4000
01344 860 456
0870 907 4006
toll-free: 000-413-
598-2521
toll-free: 1-800-433-
9014
toll-free: 1-800-247-
9362
toll-free 1-877-459-
7298
) for
toll-free: 1-800-624-
9896
toll-free: 1-800-624-
9897
toll-free: 1-800-695-
8133
toll-free: 1-877-577-
3355
68 Contacting Dell
Page 69

Country (City)
International Access Code
Country Code
City Code
Department Name or Service
Area, Website and E-Mail
Address
Financial Services (Dell
Preferred Accounts [DPA])
Business
Customer Service and Support
Employee Purchase Program
(EPP) Customers
Printers and Projectors Support
Public (government, education, and healthcare)
Customer Service and Support
Employee Purchase Program
(EPP) Customers
Dell Sales
Dell Outlet Store (Dell
refurbished computers)
Software and Peripherals Sales
Spare Parts Sales
Extended Service and Warranty
Sales
Fax
Dell Services for the Deaf,
Hard-of-Hearing, or SpeechImpaired
Area Codes,
Local Numbers, and
Toll-Free Numbers
toll-free: 1-800-283-
toll-free: 1-800-456-
toll-free: 1-800-695-
toll-free: 1-877-459-
toll-free: 1-800-456-
toll-free: 1-800-695-
toll-free: 1-800-289-
or toll-free: 1-800-
879-3355
toll-free: 1-888-798-
toll-free: 1-800-671-
toll-free: 1-800-357-
toll-free: 1-800-247-
toll-free: 1-800-727-
toll-free: 1-877-
DELLTTY
(1-877-335-5889)
2210
3355
8133
7298
3355
8133
3355
7561
3355
3355
4618
8320
Contacting Dell 69
Page 70

Country (City)
International Access Code
Country Code
City Code
U.S. Virgin Islands General Support
Vene zu el a General Support
Department Name or Service
Area, Website and E-Mail
Address
Area Codes,
Local Numbers, and
Toll-Free Numbers
1-877-673-3355
8001-3605
70 Contacting Dell
Page 71

Appendix: Regulatory Notices
FCC Notices (U.S. Only)
Most Dell computer systems are classified by the Federal Communications Commission
(FCC) as Class B digital devices. To determine which classification applies to your computer
system, examine all FCC registration labels located on the bottom, side, or back panel of
your computer, on card-mounting brackets, and on the cards themselves. If any one of the
labels carries a Class A rating, your entire system is considered to be a Class A digital device.
If all labels carry an FCC Class B rating as distinguished by either an FCC ID number or the
FCC logo, ( ), your system is considered to be a Class B digital device.
Once you have determined your system’s FCC classification, read the appropriate FCC
notice. Note that FCC regulations provide that changes or modifications not expressly
approved by Dell could void your authority to operate this equipment.
This device complies with Part 15 of the FCC Rules. Operation is subject to the following
two conditions:
• This device may not cause harmful interference.
• This device must accept any interference received, including interference that may
cause undesired operation.
Class A
This equipment has been tested and found to comply with the limits for a Class A digital
device pursuant to Part 15 of the FCC Rules. These limits are designed to provide reasonable
protection against harmful interference when the equipment is operated in a commercial
environment. This equipment generates, uses, and can radiate radio frequency energy and, if
not installed and used in accordance with the manufacturer’s instruction manual, may cause
harmful interference with radio communications. Operation of this equipment in a
residential area is likely to cause harmful interference, in which case you will be required to
correct the interference at your own expense.
Class B
This equipment has been tested and found to comply with the limits for a Class B digital
device pursuant to Part 15 of the FCC Rules. These limits are designed to provide reasonable
protection against harmful interference in a residential installation. This equipment
generates, uses, and can radiate radio frequency energy and, if not installed and used in
accordance with the manufacturer’s instruction manual, may cause interference with radio
communications. However, there is no guarantee that interference will not occur in a
particular installation. If this equipment does cause harmful interference to radio or
television reception, which can be determined by turning the equipment off and on, you are
encouraged to try to correct the interference by one or more of the following measures:
Appendix: Regulatory Notices 71
Page 72

• Reorient or relocate the receiving antenna.
• Increase the separation between the equipment and the receiver.
• Connect the equipment into an outlet on a circuit different from that to which the
receiver is connected.
• Consult the dealer or an experienced radio/television technician for help.
FCC Identification Information
The following information is provided on the device or devices covered in this document in
compliance with FCC regulations:
• Product name: DLP Projector
• Model number: 1800MP/DELL
• Company name:
Dell Inc.
One Dell Way
Round Rock, Texas 78682 USA
512-338-4400
NOM Information (Mexico Only)
The following information is provided on the device(s) described in this document in
compliance with the requirements of the official Mexican standards (NOM):
Exporter: Dell Inc.
Importer: Dell Computer de México, S.A. de C.V.
Ship to: Dell Computer de México, S.A. de C.V.
Model Supply Voltage Frequency Current Consumption
1800MP AC 100-240 V 50-60 Hz 2.3 A
One Dell Way
Round Rock, TX 78682
Paseo de la Reforma 2620 - 11° Piso
Col. Lomas Altas
11950 México, D.F.
al Cuidado de Kuehne & Nagel de México S. de R.L.
Avenida Soles No. 55
Col. Peñon de los Baños
15520 México, D.F.
72 Appendix: Regulatory Notices
Page 73

Glossary
ANSI LUMENS —A standard for measuring light output, used for comparing
projectors.
SPECT RATIO —The most popular aspect ratio is 4:3 (4 by 3). Early television and
A
computer video formats are in a 4:3 aspect ratio, which means that the width of
the image is 4/3 times the height.
ACKLIT (BACKLIGHT) —Refers to a remote control, or a projector control panel, that
B
has buttons and controls that are illuminated.
Bandwidth— The number of cycles per second (Hertz) expressing the difference
between the lower and upper limiting frequencies of a frequency band; also, the
width of a band of frequencies.
Brightness— The amount of light emitting from a display or projection display or
projection device. The brightness of projector is measured by ANSI lumens.
Color Temperature— A method of measuring the whiteness of a light source.
Metal halide lamps have a higher temperature compared to halogen or
incandescent lights.
Component Video—A method of delivering quality video in a format that
contains all the components of the original image. These components are referred
to as luma and chroma and are defined as Y'Pb'Pr' for analog component and
Y'Cb'Cr' for digital component. Component video is available on DVD players and
projectors.
Composite Video — The combined picture signal, including vertical and
horizontal blanking and synchronizing signals.
Compression— A function that deletes resolution lines from the image to fit in
the display area.
Compressed SVGA— To project an 800x600 image to a VGA projector, the
original 800x600 signal must be compressed down. The data displays all the
information with only two thirds of the pixels (307,000 vs 480,000). The resulting
image is SVGA page size but sacrifices some of the image quality. If you are using
an SVGA computers, connecting VGA to a VGA projector. provide better results.
Compressed SXGA— Found on XGA projectors, compressed SXGA handling
allows these projectors to handle up to 1280x1024 SXGA resolution.
Compressed XGA— Found on SVGA projectors, compressed XGA handling
allows these projectors to handle 1024x768 XGA resolution.
Glossary 73
Page 74

Contrast Ratio— Range of light and dark values in a picture, or the ratio between
their maximum and minimum values. There are two methods used by the
projection industry to measure the ratio:
1
Full On/Off
— measures the ratio of the light output of an all white image (full
on) and the light output of an all black (full off) image.
2
ANSI
— measures a pattern of 16 alternating black and white rectangles. The
average light output from the white rectangles is divided by the average light
ANSI
output of the black rectangles to determine the
contrast ratio.
Full On/Off contrast is always a larger number than ANSI contrast for the same
projector.
dB— decibel—A unit used to express relative difference in power or intensity,
usually between two acoustic or electric signals, equal to ten times the common
logarithm of the ratio of the two levels.
Diagonal Screen— A method of measuring the size of a screen or a projected
image. It measures from one corner to the opposite corner. A 9FT high, 12FT
wide, screen has a diagonal of 15FT. This document assumes that the diagonal
dimensions are for the traditional 4:3 ratio of a computer image as per the example
above.
DLP— Digital Light Processing—Reflective display technology developed by
Texas Instruments, using small manipulated mirrors. Light passes through a color
filter is sent to the DLP mirrors which arrange the RGB colors into a picture
projected onto screen, also known as DMD.
DMD— digital Micro- Mirror Device— Each DMD consists of thousands of
tilting, microscopic aluminum alloy mirrors mounted on a hidden yoke.
DVI— Digital Visual Interface— Defines the digital interface between digital
devices such as projectors and personal computers. For devices that support DVI, a
digital to digital connection can be made that eliminates the conversion to analog
and thereby delivers an unblemished image.
Focal Length— The distance from the surface of a lens to its focal point.
Frequency— It is the rate of repetition in cycles per seconds of electrical signals.
Measured in Hz.
Hz — Frequency of an alternating signal. See Frequency.
Keystone Correction— Device that will correct an image of the distortion
(usually a wide-top narrow-bottom effect) of a projected image caused by
improper projector to screen angle.
Laser Pointer— A small pen or cigar sized pointer that contains a small battery
powered laser, which can project a small, red (typically), high intensity beam of
light that is immediately very visible on the screen.
74 Glossary
Page 75

Maximum Distance— The distance from a screen the projector can be to cast an
image that is useable (bright enough) in a fully darkened room.
Maximum Image Size— The largest image a projector can throw in a darkened
room. This is usually limited by focal range of the optics.
Metal Halide Lamp— The type of lamp used in many medium and all high end
portable projectors. These lamps typically have a "half-life" of 1000-2000 hours.
That is they slowly lose intensity (brightness) as they are used, and at the "half-life"
point, they are half as bright as when new. These lamps output a very "hot"
temperature light, similar to mercury vapor lamps used in streetlights.. Their
whites are "extremely" white (with slight bluish cast.) and make Halogen lamp's
whites look very yellowish by comparison.
Minimum Distance— The closest position that a projector can focus an image
onto a screen.
NTSC— The United States broadcast standard for video and broadcasting.
PAL— A European and international broadcast standard for video and
broadcasting. Higher resolution than NTSC.
Power Zoom— A zoom lens with the zoom in and out controlled by a motor,
usually adjusted from the projector's control panel and also the remote control.
Reverse Image— Feature that allows you to flip the image horizontally. When
used in a normal forward projection environment text, graphics, etc, are
backwards. Reverse image is used for rear projection.
RGB— Red, Green, Blue— typically used to describe a monitor that requires
separate signals for each of the three colors.
S-Video—A video transmission standard that uses a 4-pin mini-DIN connector to
send video information on two signal wires called luminance (brightness, Y) and
chrominance (color, C). S-Video is also referred to as Y/C.
SECAM— A French and international broadcast standard for video and
broadcasting. Higher resolution than NTSC.
SVGA— Super Video Graphics Array— 800 x 600 pixels count.
SXGA— Super Ultra Graphics Array,—1280 x 1024 pixels count.
UXGA— Ultra Extended Graphics Array—1600 x 1200 pixels count.
VGA— Video Graphics Array—640 x 480 pixels count.
XGA— Extra Video Graphics Array— 1024 x 768 pixels count.
Glossary 75
Page 76

Zoom Lens— Lens with a variable focal length that allows operator to move the
view in or out making the image smaller or larger.
Zoom Lens Ratio— Is the ratio between the smallest and largest image a lens can
projector from a fixed distance. For example, a 1.4:1 zoom lens ratio means that a
10 foot image without zoom would be a 14 foot image with full zoom.
76 Glossary
Page 77

FILE LOCATION: C:\Documents and Settings\Mikan\Ƈ¦±\Coretronic\1800MP\SRC\IX.fm
Index
A
Adjusting Projection Image Size 16
Adjusting the Projected Image
Lowering the Projector Height
14
Elevator button
Elevator foot
Tilt adjustment wheel
Raising the Projector Height
Adjusting the Projector Zoom and
Focus
15
Focus ring
Zoom tab
15
15
14
14
14
14
14
C
Changing the Lamp 35
Connecting a Computer with a
RS232 cable
Connecting the Projector
Composite video cable
Connecting to a computer
Connecting with a Component
Connecting with a Composite
Connecting with an S-video Ca-
VGA to YPbPr cable
Power cord
12
Cable
11
Cable
10
ble
9
8, 9, 10, 11, 12
10
8
11
RS232 cable
S-video cable
USB cable
VGA to VGA cable
Connection Ports
Audio input connector
Audio output connector
Kensington lock hole
RS232 connector
S-video connector
USB remote connector
VGA-A In connector
VGA-A out connector
VGA-B In connector
Video input connector
Contact Dell
Control Panel
12
9
8
7
5, 18, 33, 34, 35
17
D
Dell
Contacting
43
M
Main Unit 6
Elevator button
Focus ring
Lens
6
Power cord connector
6
6
8
7
7
7
7
7
7
7
7
7
6
DELL CONFIDENTIAL – PRELIMINARY 9/12/06
FOR PROOF ONLY
Index 77
Page 78

Remote control receiver 6
Zoom tab
6
O
On-Screen Display 20
Auto-Adjust
DISPLAY (in PC Mode)
DISPLAY (in Video Mode)
Input Select
LAMP
LANGUAGE
Main Menu
PICTURE (in PC Mode)
PICTURE (in Video Mode)
Preferences
Set Up
21
24
21
25
26
21
23
27
22
P
Powering On/Off the Projector
Powering Off the Projector
Powering On the Projector
13
25
23
13
Compatibility Modes
Contrast Ratio
Dimensions
Displayable Color
Environmental
H. Frequency
I/O Connectors
Lamp
37
Light Valve
Noise Level
Number of Pixels
Power Consumption
Power Supply
Projection Distance
Projection Lens
Projection Screen Size
Regulatory
RS232 Protocol
Uniformity
V. Frequency
Video Compatibility
Weight
Support
Contacting Dell
37
38
38
37
38
37
38
37
37
38
39
37
37
38
43
40
37
37
37
37
37
37
R
Remote Control 19
S
Specifications
Audio
38
Brightness
Color Wheel Speed
78 Index
37
37
T
Troubleshooting 31
Contact Dell
31
Page 79

Dell 1800MP プロジェクタ
ユーザーマニュアル
www.dell.com | support.dell.com
Page 80

メモ、注意、警告
メモ :「メモ」は、プロジェクタの使用に際して役立つ
重要な情報を意味します。
注意 :「注意」はハードウェアの破損やデータ損失の可
能性があるため、このようなトラブルを防ぐための方法
について記載しています。
警告 :「警告」は物的損害、人的傷害、もしくは死傷に
つながる可能性のある事項を意味しています。
____________________
本書の内容は予告なく変更される場合があります。
2006 Dell Inc. All rights reserved.
デル社の事前の書面による許可なく本書を再製することは固く禁じら
れています。
商標 : Dell、DELL ロゴ、Dimension、OptiPlex、Dell Precision、Latitude、
Inspiron、DellNet、PowerApp、PowerEdge、PowerConnect、PowerVault
はデル株式会社の商標です。DLP
Instruments の登録商標です。。Microsoft および Windows はマイクロソ
フト社の登録商標です。Macintosh はアップルコンピュータ社の登録商
標です。
本書で使用されているその他の商標および製品名称はそれぞれの所有
者に帰属するものです。 Dell 社は他社の所有する商標や製品名に対し
一切の主張を放棄します。
規制と免責事項
本書に含まれる情報は、その指示、注意事項、規制、認証などを含み、
すべてメーカーから Dell に対し提供されたものに基づいており、Dell
により単独で認証またはテストされたものではありません。 Dell はこ
れらの情報に関連する一切の責任を放棄します。
本書に記載されているプロパティ、性能、速度、品質などはメーカー
が提供したものであり、Dell が提供したものではありません。 Dell はこ
れらの情報の正確性、完全性、確実性についてなんら保証はいたしか
ねます。
®
および DLP ロゴは、Texas
モデル 1800MP
2006 年 9 月 改訂版 A00
Page 81

目次
1 デルプロジェクタについて . . . . . . . . . . 5
2 プロジェクタの接続 . . . . . . . . . . . . . . . . 7
プロジェクタについて . . . . . . . . . . . . . . . 6
コンピュータへの接続 . . . . . . . . . . . . . . . . . . 8
DVD プレーヤへの接続 . . . . . . . . . . . . . . . . . . 9
S ビデオケーブルを使った DVD
プレーヤへの接続
コンポジットケーブルを使った DVD
プレーヤへの接続 . . . . . . . . . . . . . . . . . 10
コンポーネントケーブルを使った DVD
プレーヤへの接続
プロフェッショナル向け取り付けオプション: 12
. . . . . . . . . . . . . . . . . . 9
. . . . . . . . . . . . . . . . 11
3 プロジェクタの使用方法 . . . . . . . . . . . . 13
プロジェクタの電源オン . . . . . . . . . . . . . . . 13
プロジェクタの電源オフ
投影されたイメージの調整 . . . . . . . . . . . . . . 14
プロジェクタの高さを上げる
プロジェクタの高さを下げる . . . . . . . . . . 14
プロジェクタのズームとフォーカスの調整 . . . . 15
投射画像サイズの調整
. . . . . . . . . . . . . . . 13
. . . . . . . . . . 14
. . . . . . . . . . . . . . . . . 16
目次 3
Page 82

コントロールパネルの使用方法 . . . . . . . . . . . 17
リモコンの使用方法 . . . . . . . . . . . . . . . . . . 19
オンスクリーンディスプレイの使用方法
メインメニュー
入力選択
自動調整
. . . . . . . . . . . . . . . . . . 21
. . . . . . . . . . . . . . . . . . . . . . 21
. . . . . . . . . . . . . . . . . . . . . . 22
. . . . . 20
設定 . . . . . . . . . . . . . . . . . . . . . . . . 22
ピクチャ (PC モード )
ピクチャ ( ビデオモード )
ディスプレイ (PC モード )
. . . . . . . . . . . . . . 23
. . . . . . . . . . . . 23
. . . . . . . . . . . 24
ディスプレイ ( ビデオモード ) . . . . . . . . . 25
ランプ
言語
. . . . . . . . . . . . . . . . . . . . . . . 25
. . . . . . . . . . . . . . . . . . . . . . . . 26
環境設定 . . . . . . . . . . . . . . . . . . . . . . 27
4 プロジェクタのトラブルシューティング 31
ランプの交換 . . . . . . . . . . . . . . . . . . . . . . 36
5 仕様 . . . . . . . . . . . . . . . . . . . . . . . . . . . . . 39
6 デルへのお問い合わせ . . . . . . . . . . . . . . 43
7 付録:規定 . . . . . . . . . . . . . . . . . . . . . . . 69
FCC からのお知らせ(米国のみ). . . . . . . . 69
NOM 情報(メキシコのみ)
. . . . . . . . . . . 70
8 用語集 . . . . . . . . . . . . . . . . . . . . . . . . . . . 71
4 目次
Page 83

1
デルプロジェクタについて
お買い上げのプロジェクタには、下記のアイテムが含まれます。すべてのア
イテムが揃っていることをご確認ください。万一、不足品がある場合は、デ
ルまでお問い合わせください。
同梱品
1.8m 電源コード ( 米国では 3.0m) 1.8m VGA ケーブル (VGA 対 VGA)
電池 (2) リモコン
説明書 キャリーケース
プロジェクタについて 5
Page 84

プロジェクタについて
1
リモコンセンサー
2
エレベータボタン
3
レンズ
4
フォーカスリング
5
ズームタブ
6
電源コードコネクタ
6 プロジェクタについて
Page 85

プロジェクタの接続
1
オーディオ出力コネクタ
2
オーディオ入力コネクタ
3
VGA-B 入力コネクタ
4
VGA-A 入力コネクタ
5
S ビデオコネクタ
6
ビデオ入力コネクタ
7
VGA-A 出力コネクタ
8
USB リモートコネクタ
9
RS232 コネクタ
10
Kensington ロック穴
2
VGA-A
入力から
VGA-A
出力へのモニタループのみ。
プロジェクタの接続 7
Page 86

コンピュータへの接続
1
電源コード
2
VGA 対 VGA ケーブル
3
USB ケーブル
USB
ケーブルはパッケージに含まれていません。
8 プロジェクタの接続
Page 87

DVD プレーヤへの接続
S ビデオケーブルを使った DVD プレーヤへの接続
1
電源コード
2
S ビデオケーブル
S
ビデオケーブルはパッケージに含まれていません。
S
ビデオ延長コード
求めいただけます。
(50ft/100ft) は Dell の Web
プロジェクタの接続 9
サイトからお買い
Page 88

コンポジットケーブルを使った DVD プレーヤへの接続
1
電源コード
2
コンポジットビデオケーブル
コンポジットケーブルはパッケージに含まれていません。
コンポジットビデオ用延長コード
トからお買い求めいただけます。
(50ft/100ft) は Dell の Web
サイ
10 プロジェクタの接続
Page 89

コンポーネントケーブルを使った DVD プレーヤへの接続
1
電源コード
2
VGA 対 YPbPr ケーブル
VGA対YPbPr
VGA 対 YPbPr
お買い求めいただけます。
ケーブルはパッケージに含まれていません。
の延長コード
(50ft/100ft) は Dell の Web
サイトから
プロジェクタの接続 11
Page 90

プロフェッショナル向け取り付けオプション:
RS232 ケーブルを使ったコンピュータの接続
1
電源コード
2
RS232 ケーブル
RS232
ケーブルはパッケージに含まれていません。
12 プロジェクタの接続
Page 91

3
プロジェクタの使用方法
プロジェクタの電源オン
メモ : ソースの電源を入れる前に、プロジェクタの電源を入れてくだ
さい。 電源ボタンを押すまで、ボタンは青色で点滅しています。
1
レンズキャップを外します。
2
電源コードと適切な信号ケーブルを接続します。プロジェクタの接続につ
いては、7 ページ"プロジェクタの接続"を参照してください。
3
電源ボタンを押します(電源ボタンの場所については、
ロールパネルの使用方法"を参照してください)。
されます。
4
ソース(コンピュータ、
クタが自動的にソースを検出します。
「信号検出中…」というメッセージが画面に表示された場合は、適切なケー
ブルがしっかりと接続されているかどうかを確認してください。
プロジェクタに複数のソースが接続されている場合は、リモコンまたはコン
トロールパネルの Source(ソース)ボタンを押して、希望のソースを選択
してください。
プロジェクタの電源オフ
17
ページ"コント
30
秒間デルのロゴが表示
DVD
プレーヤなど)の電源を入れます。 プロジェ
注意 : ファンの回転が終わり、電源ボタンが点滅するまでは、電源
コードを抜かないでください。
1
電源ボタンを押します。
2
もう一度電源ボタンを押します。 冷却ファンが
3
コンセントとプロジェクタから電源ケーブルを取り外してください。
メモ : プロジェクタ作動中に電源ボタンを押すと、「ランプを消しま
すか ?」 というメッセージが画面に表示されます。 このメッセージを消すに
は、コントロールパネル上のいずれかのボタンを押すか、メッセージを無視
します。メッセージは 3 秒間表示されて消えます。
60
秒ほど回り続けます。
プロジェクタの使用方法 13
Page 92

投影されたイメージの調整
プロジェクタの高さを上げる
1
エレベータボタンを押します。
2
プロジェクタを任意の高さまで上げ、ボタンを離し、エレベータフットを
固定します。
3
傾斜調整ホイールを使用してディスプレイの角度を微調整します。
プロジェクタの高さを下げる
1
エレベータボタンを押します。
2
プロジェクタを下げ、ボタンを離し、エレベータフットを固定します。
1
エレベータボタン
2
エレベータフット
3
傾斜調整ホイール
14 プロジェクタの使用方法
Page 93

プロジェクタのズームとフォーカスの調整
警告 : プロジェクタを破損する恐れがありますので、ズームレンズと
エレベータフットが完全に引っ込んでいることを確認してから、プロ
ジェクタを移動したりキャリーケースに収納したりしてください。
1
ズームタブを回転させて拡大または縮小します。
2
メージが鮮明になるまでフォーカスリングを回転させます。このプロジェ
クタで焦点が合う距離は
1
ズームタブ
2
フォーカスリング
1.5 ~ 12.0 m(4.9 ft ~ 39.4 ft
)です。
プロジェクタの使用方法 15
Page 94

投射画像サイズの調整
16 プロジェクタの使用方法
Page 95

画面(対角)
1
3
5
2
6
9
8
11
4
7
10
画面サイズ
投射距離 4.9' (1.5m) 11.2' (3.4m) 18.0' (5.5m) 25.3' (7.7m) 32.2' (9.8m) 39.4' (12.0
* このグラフはあくまでも参照用に提供されたものです。
最大
最小
最大
(幅 x 高)
最小
(幅 x 高)
38.1"
(96.8cm)
34.7"
(88.0cm)
30.5"X22.9" 69.1"X51.8" 111.8"X83.9" 156.5"X117.4" 199.2"X149.4" 243.9"X183.0"
(77.5cm X
58.1cm)
27.7" X
20.8"
(70.4cm X
52.8cm)
86.4"
(219.4cm)
78.5"
(199.5cm)
(175.6cm X
131.7cm)
62.8" X
47.1"
(159.6cm X
119.7cm)
139.8"
(355.0cm)
127.1"
(322.7cm)
(284.0cm X
213.0cm)
101.6" X
76.2"
(258.2cm X
193.6cm)
195.7"
(497.0cm)
177.9"
(451.8cm)
(397.6cm X
298.2cm)
142.3" X
106.7"
(361.4cm X
271.1cm)
249.0"
(632.5cm)
226.4"
(575.0cm)
(506.0cm X
379.5cm)
181.1" X
135.8"
(460.0cm X
345.0cm)
304.9"
(774.5cm)
277.2"
(704.1cm)
(619.6cm X
464.7cm)
221.8" X
166.3"
(563.3cm X
422.5cm)
m)
コントロールパネルの使用方法
11
1
電源 プロジェクタの電源のオンとオフを切り替え
10
ます。 詳細については、13 ページ " プロジェ
クタの電源オン " と 13 ページ " プロジェクタ
の電源オフ " を参照してください。
プロジェクタの使用方法 17
Page 96

2
TEMP 警告ライト
•
オレンジ色の
TEMP
ライトの点灯はプロジェ
クタの過熱を示します。ディスプレイは自
動的にシャットダウンします。プロジェク
タの冷却が終わった後に、もう一度ディス
プレイをオンにしてください。問題が継続
する場合は、デルへお問い合わせください。
•
オレンジ色の
TEMP
ライトの点滅はプロジェ
クタのファンが失効し、プロジェクタが自
動的にシャットダウンすることを示します。
問題が継続する場合は、デルにお問い合わ
せください。
3
ソース 複数ソースがプロジェクタに接続されている
場合、アナログ RGB、コンポジット、コン
ポーネント -i、S ビデオ、アナログ YPbPr
ソースを順に切り替えます。
4
キーストーン補正 ボタンを押して、プロジェクタの傾きによっ
て起こるゆがみを調整します ( ± 16°)
5
再同期化 プロジェクタと入力ソースを同期させます。
再同期は、オンスクリーンディスプレイ
(OSD) が表示されている場合は操作できませ
ん。
6
メニュー OSD が表示されます。 方向キーと Menu(メ
ニュー)ボタンで OSD を操作します。
7
と ボタン OSD 設定を調整します。
8
入力 このボタンを押して選択を確定します。
9
キーストーン補正 ボタンを押して、プロジェクタの傾きによっ
て起こるゆがみを調整します ( ± 16°)
10
上と下 OSD 選択を確定します。
11
LAMP 警告ライト LAMP ライトがオレンジ色に点灯している場
合、ランプを交換してください。LAMP ラン
プがオレンジ色に点滅しいる場合は、システ
ムが失効し、プロジェクタが自動的にシャッ
トダウンすることを示します。問題が継続す
る場合は、デルにお問い合わせください。
18 プロジェクタの使用方法
Page 97

1
2
3
4
5
6
7
8
9
19
18
17
16
15
14
13
11
10
12
リモコンの使用方法
10
11
12
13
14
15
16
17
18
19
1
電源 プロジェクタの電源のオンとオフを切り替え
2
3
下ボタン OSD 選択を確定します。
4
消音 プロジェクタのスピーカを消音にするかまた
5
ボリューム ボリュームを上げます。
6
ページ 前のページへ移動します。
ます。 詳細については、13 ページ " プロジェ
クタの電源オン " と 13 ページ " プロジェクタ
の電源オフ " を参照してください。
OSD 設定を調整します。
は消音を解除します。
プロジェクタの使用方法 19
Page 98

7
ページ 次のページへ移動します。
8
ビデオモード Dell 1800MP マイクロプロジェクタにはデー
タ(PC グラフィック)やビデオ(ムービー、
ゲームなど)の表示に最適なプリセット設定
があります。 ビデオモードボタンを押して、
PC モード、ムービーモード、ゲームモード、
sRGB、カスタムモード(好みの設定を設定し
保存してあるユーザーの場合)を切り替えま
す。 ビデオモードボタンを 1 回押すと、現在
のディスプレイモードが表示されます。 もう
一度ビデオモードボタンを押すと、モードが
切り替わります。
9
白紙画面 画像を非表示にし、もう一度押すと画像を表
示します。
10
LED ライト LED インジケータ
11
上ボタン OSD 選択を確定します。
12
Enter ボタン このボタンを押して選択を確定します。
13
14
メニュー OSD が表示されます。
15
ボリューム ボリュームを下げます。
16
キーストーン補正 ボタンを押して、プロジェクタの傾きによっ
OSD 設定を調整します。
て起こるゆがみを調整します ( ± 16°)
17
ソース アナログ RGB、デジタル RGB、コンポジッ
ト、コンポーネント -i、S ビデオ、アナログ
YPbPr ソースを切り替えます。
18
自動調整 同期を押して、プロジェクタと入力ソースを
同期させます。OSD(オンスクリーンディス
プレイ)が表示されている場合、自動調整は
作動しません。
19
キーストーン補正 ボタンを押して、プロジェクタの傾きによっ
て起こるゆがみを調整します ( ± 16°)
オンスクリーンディスプレイの使用方法
プロジェクタには多言語のオンスクリーンディスプレイ(OSD)があり、
入力ソースの有無に関わらず表示されます。
メインメニューで または を押してタブを移動します。
20 プロジェクタの使用方法
Page 99

サブメニューで または を押して選択します。 選択を確定すると、色
が灰色になります。 コントロールパネルまたはリモコンの または を
使って設定を調整します。
メインメニューに戻るには、コントロールパネルまたはリモコンのメニュー
ボタンを押します。
OSD を終了するには、終了タブに進み、コントロールパネルまたはリモコ
ンの Enter ボタンを押します。
メインメニュー
入力選択
自動ソース —オン(既定値)を選択す
ると、使用可能な入力信号を自動検出
します。 プロジェクタの電源が入った
状態で SOURCE(ソース)ボタンを
押すと、自動的に次の入力信号を検出
します。OFF ( オフ ) を選択すると、
現在の入力信号をロックします。OFF
( オフ ) が選択された状態で SOURCE
(ソース)を押すと、使用したい入力
信号を自分で選択することができま
す。
VGA—ENTER を押すと VGA 信号を検出します。
S ビデオ —ENTER 入力を押すと S ビデオ信号を検出します。
コンポジットビデオ —ENTER 入力を押すとコンポジットビデオ信号を検出
します。
プロジェクタの使用方法 21
Page 100

自動調整
選択すると「自動調整実行中」の情報が表
示されます。
設定
垂直キーストーン —プ
ロジェクタの傾きによっ
て起こるゆがみを調整し
ます。
投影モード —画像が表示される方法を選択します。
•
デスクトップ前面投射(既定値)。
前面投射 -天井取り付け- 天井取り付けで投射する場合、プロジェクタ
•
が画像の上下を逆に表示します。
•
デスクトップ背面投射
射する場合に選択します。
•
背面投射 -天井取り付け- プロジェクタが画像を反転し、上下を逆に表
示します。
縦横比 —縦横比を選択し、画像の表示方法を調整します。
• 1:1 -
以下のいずれかの場合、
–VGA
–
コンポーネントケーブル(
–S
–
コンポジットケーブル
• 16:9 -
• 4:3 -
以下のいずれかの場合、
–
コンピュータの解像度が
–
コンポーネントケーブル(
天井取り付けで透過画面の裏面から投射する場合に選択します。
入力ソースを調整なしでそのまま表示します。
ケーブルとコンピュータの解像度が
ビデオケーブル
入力ソースを画面の幅に合わせて調整します。
入力ソースを画面に合わせて調整します。
-
画像を反転表示します。 透過画面の裏面から投
1:1
縦横比を使用します。
576 p/480 i/480 p
16:9
または
XGA
1080 i
4:3
を使用します。
以上の場合
または
XGA (1024 x 768)
)
720 p
)
以下の場合
22 プロジェクタの使用方法
 Loading...