

Page 1

Dell™ Laser Multi-Function Printer 1600n
Owner’s Manual
Look Inside For:
• Preparing Your Multi-Function Printer
• Understanding the Software
• Loading Print Media
• Using Your Multi-Function Printer
• Maintenance
• Troubleshooting
• Installing Options
www.dell.com/supplies | support.dell.com
Page 2
Order Toner Cartridges
Dell™ toner cartridges are available only through Dell. You can order toner cartridges online at
www.dell.com/supplies or by phone.
USA 877-INK-2-YOU
Austria 08 20 - 24 05 30 35
Belgium 02.713 1590
Canada 877-501-4803
Chile 123-0-020-3397
800-20-1385
China 800-858-2920
Colombia 01800-9-155676
Denmark 3287 5215
Finland 09 2533 1411
France 0825387247
Germany 0800 2873355
Ireland 1850 707 407
Italy 800602705
Luxembourg 02.713 1590
Mexico 866-851-1754
Netherlands 020 - 674 4881
Norway 231622 64
Portugal 21 4220710
Puerto Rico 866-851-1760
Spain 902120385
Sweden 08 587 705 81
Switzerland 0848 801 888
UK 0870 907 4574
NOTE: If your country is not listed, contact your Dell distributor to order supplies.
Toner cartridge Part number
3,000 page toner K4671
5,000 page toner P4210
ii
Page 3
Understanding the Multi-Function Printer
1
14
2
3
4
5
6
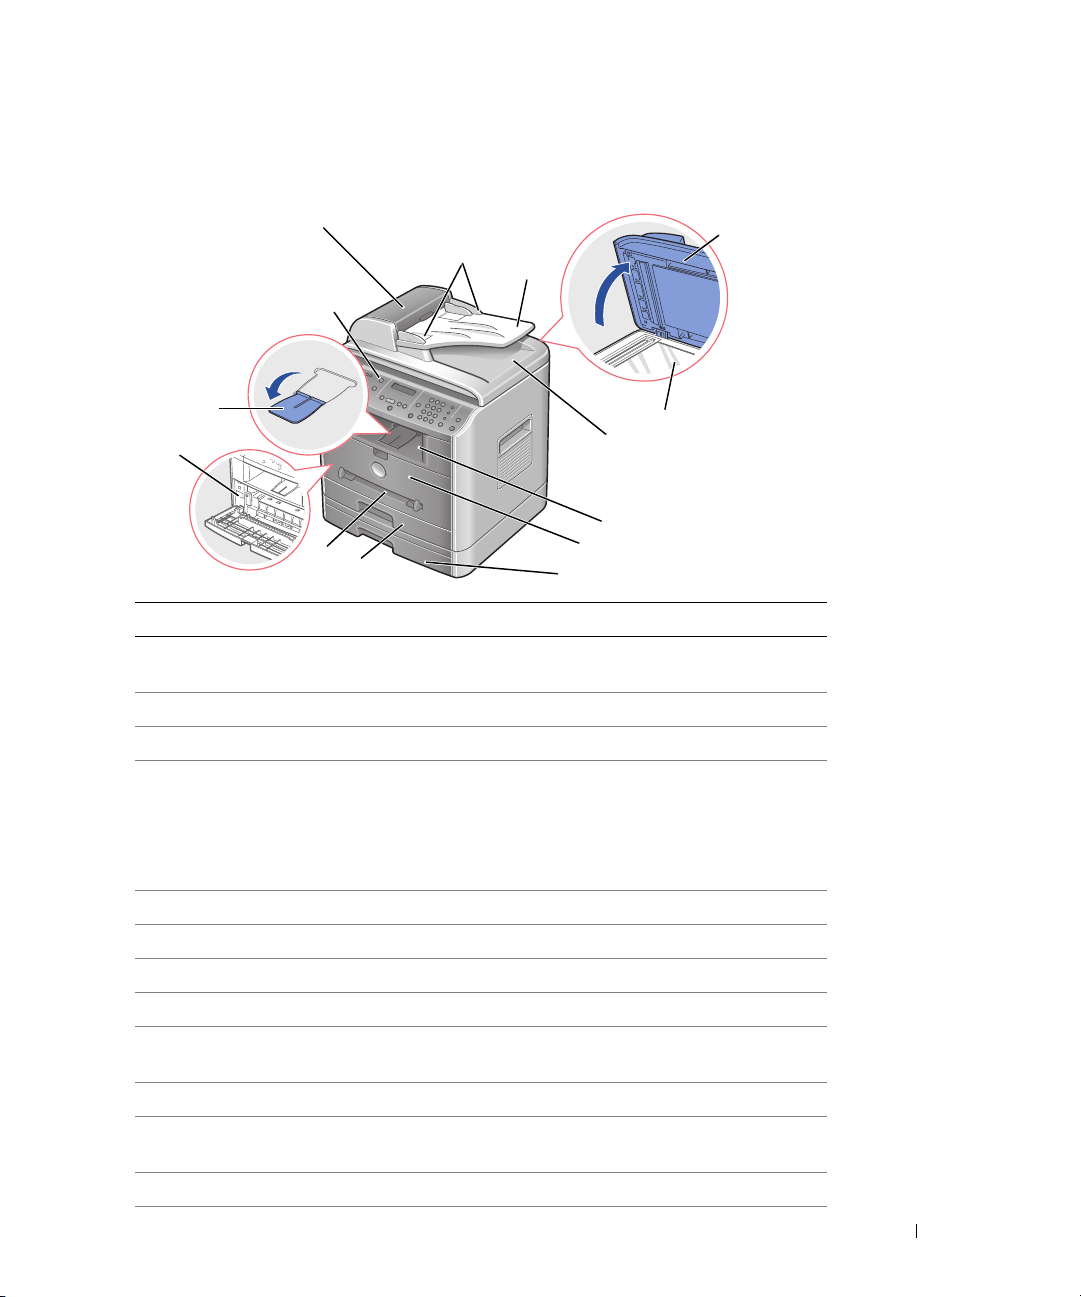
# Use the: When you want to:
1 Automatic Document
Feeder (ADF)
2 Operator Panel Operate the multi-function printer.
3 Paper Output Extension Keep print media from falling off the front output tray.
4 Express Service Code Identify your multi-function printer when you use
Load the document for copying, scanning, or sending faxes.
support.dell.com or contact technical support.
Enter the Express Service Code to direct your call when
contacting technical support. The Express Service Code is
not available in all countries.
13
11
10
9
8
7
12
5 Manual Feeder Load print media one sheet at a time.
6 Tray 1 Load paper into the standard Tray 1.
7 Optional Tray 2 Load paper into the optional Tray 2.
8 Front Cover Access the toner cartridge.
9 Front Output Tray Hold paper as it exits the front of the multi-function
printer.
10 ADF Output Tray Hold the document as it exit the ADF.
11 Scanner Glass Place a document on the scanner glass for copying, scanning
and sending faxes.
12 Cover Open to place a document on the scanner glass.
iii
Page 4
# Use the: When you want to:
13 Document Input Tray Load the document for copying, scanning and sending
faxes.
14 Document Guides Ensure proper document feeding.
15
23
16
17
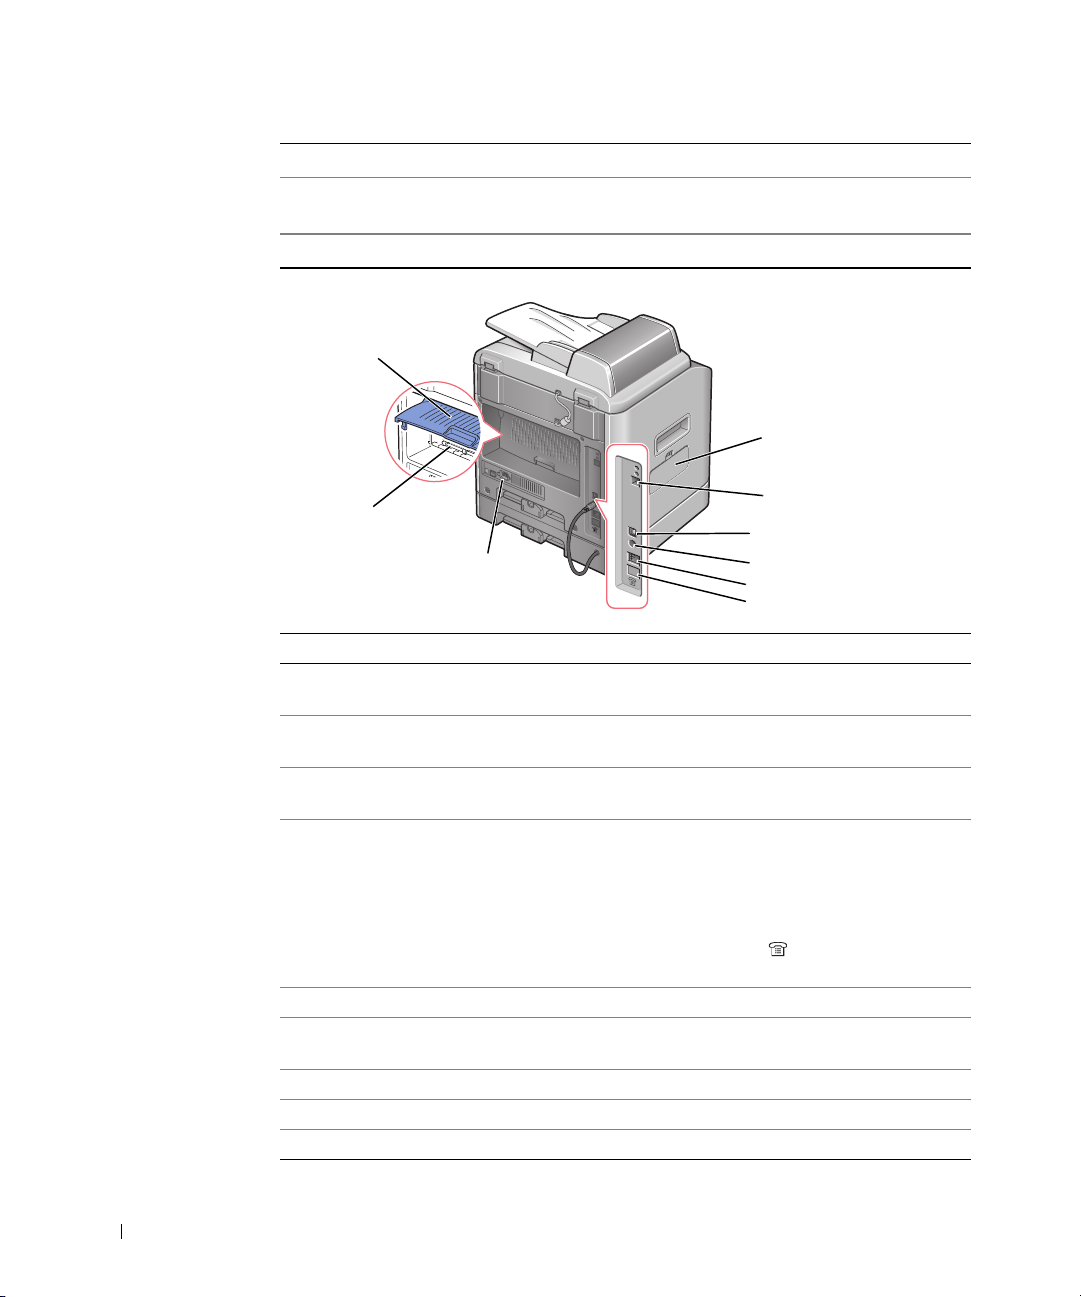
# Use the: When you want to:
15 Rear Cover Open to remove the paper jams and use the rear output slot
when you print the documents from the manual feeder.
16 Rear Output Slot Hold paper as it exits at the rear of the multi-function
printer.
17 Power Switch and AC
Power Cord Connector
18 Phone Connector Connect additional devices, such as a telephone or
Supply power to the multi-function printer.
answering machine, to the multi-function printer
(Optional).
If the phone communication is serial in
your country (such as
Austria, Belgium, Italy, France and Switzerland), remove the
plug from the Phone connector
supplied terminator.
19 Wall Jack Connector Connect the telephone line to your multi-function printer.
20 Optional Tray 2 Cable
Connector
21 USB Cable Connector Insert the USB cable.
22 Network Port Connect the multi-function printer to the network port.
23 Control Board Cover Install the optional memory card.
Connect the optional Tray 2 to your multi-function printer.
22
21
20
19
18
Germany, Sweden, Denmark,
() and insert the
iv
Page 5

Notes, Notices, and Cautions
NOTE: A NOTE indicates important information that helps you make better use of your multi-function printer.
NOTICE: A NOTICE indicates either potential damage to hardware or loss of data and tells you how to avoid the
problem.
CAUTION: A CAUTION indicates a potential for property damage, personal injury, or death.
____________________
Information in this document is subject to change without notice.
© 2004 Dell Inc.. All rights reserved.
Reproduction in any manner whatsoever without the written permission of Dell Inc. is strictly forbidden.
Trademarks used in this text: Dell, DELL logo, Dell ScanCenter and Dell Toner Management System are
trademarks of Dell Inc.; Microsoft and Windows are registered trademarks of Microsoft Corporation.
PaperPort
Adobe and PhotoShop are registered trademarks of Adobe Systems Incorporated.
Other trademarks and trade names may be used in this document to refer to either the entities claiming the
marks and names of their products. Dell Inc. disclaims any proprietary interest in trademarks and trade
names other than its own.
____________________
is a registered trademark of ScanSoft, Inc.
v
Page 6

Contents
Understanding the Multi-Function Printer . . . . . . . . . . . . . . . . . . iii
CAUTION: SAFETY INFORMATION. . . . . . . . . . . . . . . . . . . . . . . 1
1 Preparing Your Multi-Function Printer
Unlocking the Scanner . . . . . . . . . . . . . . . . . . . . . . . . . . . . . . . . 4
Using the Operator Panel . . . . . . . . . . . . . . . . . . . . . . . . . . . . . . 5
Copy Keys . . . . . . . . . . . . . . . . . . . . . . . . . . . . . . . . . . . . . . . . . . 5
Common Keys . . . . . . . . . . . . . . . . . . . . . . . . . . . . . . . . . . . . . . . 6
Changing the Display Language. . . . . . . . . . . . . . . . . . . . . . . . . . 7
Set Up Faxing . . . . . . . . . . . . . . . . . . . . . . . . . . . . . . . . . . . . . . 7
Setting the Machine ID . . . . . . . . . . . . . . . . . . . . . . . . . . . . . . . . 7
Using the Number Keypad to Enter Characters . . . . . . . . . . . . . . . 8
Setting the Time and Date . . . . . . . . . . . . . . . . . . . . . . . . . . . . . . 9
2 Understanding the Software
vi Contents
Set Up Networking. . . . . . . . . . . . . . . . . . . . . . . . . . . . . . . . . . 11
Attach Cables . . . . . . . . . . . . . . . . . . . . . . . . . . . . . . . . . . . . . . 11
Print and Check the Network Set-Up Page . . . . . . . . . . . . . . . . . 12
Run the Installation Software. . . . . . . . . . . . . . . . . . . . . . . . . . . 13
Software Overview . . . . . . . . . . . . . . . . . . . . . . . . . . . . . . . . . . 16
Installing Dell Software For Local Printing . . . . . . . . . . . . . . . . . 17
Windows XP:. . . . . . . . . . . . . . . . . . . . . . . . . . . . . . . . . . . . . . . 17
Windows 2000: . . . . . . . . . . . . . . . . . . . . . . . . . . . . . . . . . . . . . 18
Windows 98SE:. . . . . . . . . . . . . . . . . . . . . . . . . . . . . . . . . . . . . 18
Windows Me:. . . . . . . . . . . . . . . . . . . . . . . . . . . . . . . . . . . . . . . 19
Page 7

Assigning an IP Address . . . . . . . . . . . . . . . . . . . . . . . . . . . . . . 20
Installing Dell Software For Network Printing . . . . . . . . . . . . . . . 20
Uninstalling Software . . . . . . . . . . . . . . . . . . . . . . . . . . . . . . . . 22
3 Loading Print Media
Print Media Guidelines . . . . . . . . . . . . . . . . . . . . . . . . . . . . . . . 24
Loading Paper and Transparencies . . . . . . . . . . . . . . . . . . . . . . . 27
Loading Paper Into the Paper Tray . . . . . . . . . . . . . . . . . . . . . . . 27
Loading Paper Into the Manual Feeder . . . . . . . . . . . . . . . . . . . . 31
Loading Envelopes . . . . . . . . . . . . . . . . . . . . . . . . . . . . . . . . . . 32
Setting the Paper Size and Type. . . . . . . . . . . . . . . . . . . . . . . . . 35
Setting the Paper Size. . . . . . . . . . . . . . . . . . . . . . . . . . . . . . . . . 35
Setting the Paper Type . . . . . . . . . . . . . . . . . . . . . . . . . . . . . . . . 35
Placing Documents on the Scanner Glass . . . . . . . . . . . . . . . . . . 36
Loading Documents Into the ADF. . . . . . . . . . . . . . . . . . . . . . . . 37
4 Using Your Multi-Function Printer
Printing . . . . . . . . . . . . . . . . . . . . . . . . . . . . . . . . . . . . . . . . . . 40
Accessing Printer Properties . . . . . . . . . . . . . . . . . . . . . . . . . . . . 40
Copying . . . . . . . . . . . . . . . . . . . . . . . . . . . . . . . . . . . . . . . . . . 41
Making Copies . . . . . . . . . . . . . . . . . . . . . . . . . . . . . . . . . . . . . . 41
Using Copy Features With the <Layout> Button. . . . . . . . . . . . . 41
Copy Menu Options . . . . . . . . . . . . . . . . . . . . . . . . . . . . . . . . . . . 43
Scanning . . . . . . . . . . . . . . . . . . . . . . . . . . . . . . . . . . . . . . . . . 44
Scanning from Operator Panel. . . . . . . . . . . . . . . . . . . . . . . . . . . 45
Scanning Using the Windows Image Acquisition (WIA) Driver . . . 46
Contents vii
Page 8

Faxing . . . . . . . . . . . . . . . . . . . . . . . . . . . . . . . . . . . . . . . . . . . 47
Sending a Fax. . . . . . . . . . . . . . . . . . . . . . . . . . . . . . . . . . . . . . . 47
Receiving a Fax . . . . . . . . . . . . . . . . . . . . . . . . . . . . . . . . . . . . . 48
Fax Menu Options. . . . . . . . . . . . . . . . . . . . . . . . . . . . . . . . . . . . 49
Using an Answering Machine. . . . . . . . . . . . . . . . . . . . . . . . . . . . 52
Using a Computer Modem . . . . . . . . . . . . . . . . . . . . . . . . . . . . . 53
5 Maintenance
Replacing the ADF Rubber Pad . . . . . . . . . . . . . . . . . . . . . . . . . 56
Ordering Supplies . . . . . . . . . . . . . . . . . . . . . . . . . . . . . . . . . . . 58
Replacing the Toner Cartridge . . . . . . . . . . . . . . . . . . . . . . . . . . 59
Cleaning Your Multi-Function Printer . . . . . . . . . . . . . . . . . . . . . 61
Cleaning the Exterior . . . . . . . . . . . . . . . . . . . . . . . . . . . . . . . . . 61
Cleaning the Interior . . . . . . . . . . . . . . . . . . . . . . . . . . . . . . . . . . 62
Cleaning the scanner . . . . . . . . . . . . . . . . . . . . . . . . . . . . . . . . . . 63
Cleaning the Drum . . . . . . . . . . . . . . . . . . . . . . . . . . . . . . . . . . . 64
6 Troubleshooting
viii Contents
Clearing Jams in the ADF . . . . . . . . . . . . . . . . . . . . . . . . . . . . . 66
Clearing Jams in the Paper Tray. . . . . . . . . . . . . . . . . . . . . . . . . 68
Paper Feed Jam (Tray 1) . . . . . . . . . . . . . . . . . . . . . . . . . . . . . . . 68
Paper Exit Jam. . . . . . . . . . . . . . . . . . . . . . . . . . . . . . . . . . . . . . 70
Fuser Area Jam . . . . . . . . . . . . . . . . . . . . . . . . . . . . . . . . . . . . . 71
Manual Feeder Jam . . . . . . . . . . . . . . . . . . . . . . . . . . . . . . . . . . 73
Paper Feed Jam (Optional Tray 2) . . . . . . . . . . . . . . . . . . . . . . . . 73
Tips for Avoiding Paper Jams . . . . . . . . . . . . . . . . . . . . . . . . . . . 74
More Troubleshooting . . . . . . . . . . . . . . . . . . . . . . . . . . . . . . . . 74
Page 9

7 Installing Options
Precautions When Installing Printer Options . . . . . . . . . . . . . . . . 76
Installing Printer Memory . . . . . . . . . . . . . . . . . . . . . . . . . . . . . 76
Removing the Memory . . . . . . . . . . . . . . . . . . . . . . . . . . . . . . . . 79
Installing an Optional Tray 2 . . . . . . . . . . . . . . . . . . . . . . . . . . . 79
8 Contacting Dell
Technical Assistance . . . . . . . . . . . . . . . . . . . . . . . . . . . . . . . . . 84
Automated Order-Status Service . . . . . . . . . . . . . . . . . . . . . . . . 85
Contacting Dell. . . . . . . . . . . . . . . . . . . . . . . . . . . . . . . . . . . . . 85
9 Appendix
Limited Warranties and Return Policy. . . . . . . . . . . . . . . . . . . . 104
Limited Warranty for Dell-Branded Hardware Products
(U.S. Only) . . . . . . . . . . . . . . . . . . . . . . . . . . . . . . . . . . . . . . . . 104
Total Satisfaction" Return Policy (U.S. Only) . . . . . . . . . . . . . . . 107
Limited Warranty Terms for Dell-Branded Hardware Products
(Canada Only). . . . . . . . . . . . . . . . . . . . . . . . . . . . . . . . . . . . . . 108
"Total Satisfaction" Return Policy (Canada Only). . . . . . . . . . . . . 110
Dell Software and Peripherals (Canada Only) . . . . . . . . . . . . . . . 111
1-Year End-User Manufacturer Guarantee
(Latin America and the Caribbean Only) . . . . . . . . . . . . . . . . . . 112
Dell Inc.
Ink and Toner Cartridges Limited Warranties . . . . . . . . . . . . . . 114
Ink and Toner Cartridges Limited Warranty
(U.S. and Canada Only). . . . . . . . . . . . . . . . . . . . . . . . . . . . . . . 114
Ink and Toner Cartridges Limited Warranty
(Latin America Only). . . . . . . . . . . . . . . . . . . . . . . . . . . . . . . . . 115
Regulatory Notices . . . . . . . . . . . . . . . . . . . . . . . . . . . . . . . . . 116
FCC Notices (U.S. Only) . . . . . . . . . . . . . . . . . . . . . . . . . . . . . . 116
NOM Information (Mexico Only) . . . . . . . . . . . . . . . . . . . . . . . . 119
Contents ix
Page 10

Dell™ Software License Agreement . . . . . . . . . . . . . . . . . . . . . 120
Limited Warranty . . . . . . . . . . . . . . . . . . . . . . . . . . . . . . . . . . . 121
U.S. Government Restricted Rights . . . . . . . . . . . . . . . . . . . . . . 121
General . . . . . . . . . . . . . . . . . . . . . . . . . . . . . . . . . . . . . . . . . . 122
x Contents
Page 11

CAUTION: SAFETY INFORMATION
Use the following safety guidelines to help ensure your own personal
safety and to help protect your system and working environment from
potential damage.
• Your product uses a laser.
CAUTION: Use of controls or adjustments or performance
of procedures other than those specified herein may result
in hazardous radiation exposure.
• Your product uses a printing process that heats the print media,
and heat can cause certain media to release emissions. You must
understand the section in your operating instructions that
discusses the guidelines for selecting appropriate print media to
avoid the possibility of harmful emissions.
CAUTION: If your product is not marked with this symbol , it
must be connected to an electrical outlet that is properly
grounded.
• The power cord must be connected to an electrical outlet that is
near the product and easily accessible.
• Refer service or repairs, other than those described in the
operating instructions, to a professional service person.
• This product is designed to meet safety standards with the use of
specific Dell-authorized components. The safety features of
some parts may not always be obvious. Dell disclaims liability
associated with use of non-Dell-authorized components.
CAUTION: Do not use this product during a lightning storm.
Page 12

www.dell.com/supplies | support.dell.com
2
Page 13

SECTION 1
Preparing Your Multi-Function Printer
Unlocking the Scanner
Using the Operator Panel
Changing the Display Language
Set Up Faxing
Set Up Networking
Page 14

Unlocking the Scanner
1 Remove the label completely from the scanner module by gently pulling it. The scan
unlock switch automatically moves FORWARD to the unlock position.
www.dell.com/supplies | support.dell.com
NOTE: When you are moving the multi-function printer
or do not intend to use it for a long period of time,
move the switch BACKWARD to the lock position, as
shown.
To scan or copy a document, the switch must be unlocked.
4 Preparing Your Multi-Function Printer
Page 15
Using the Operator Panel
If you have not already done so, follow the steps on the Setup Diagram (poster) to complete
the hardware installation.
Use the multi-function printer operator panel to scan, copy, and fax.
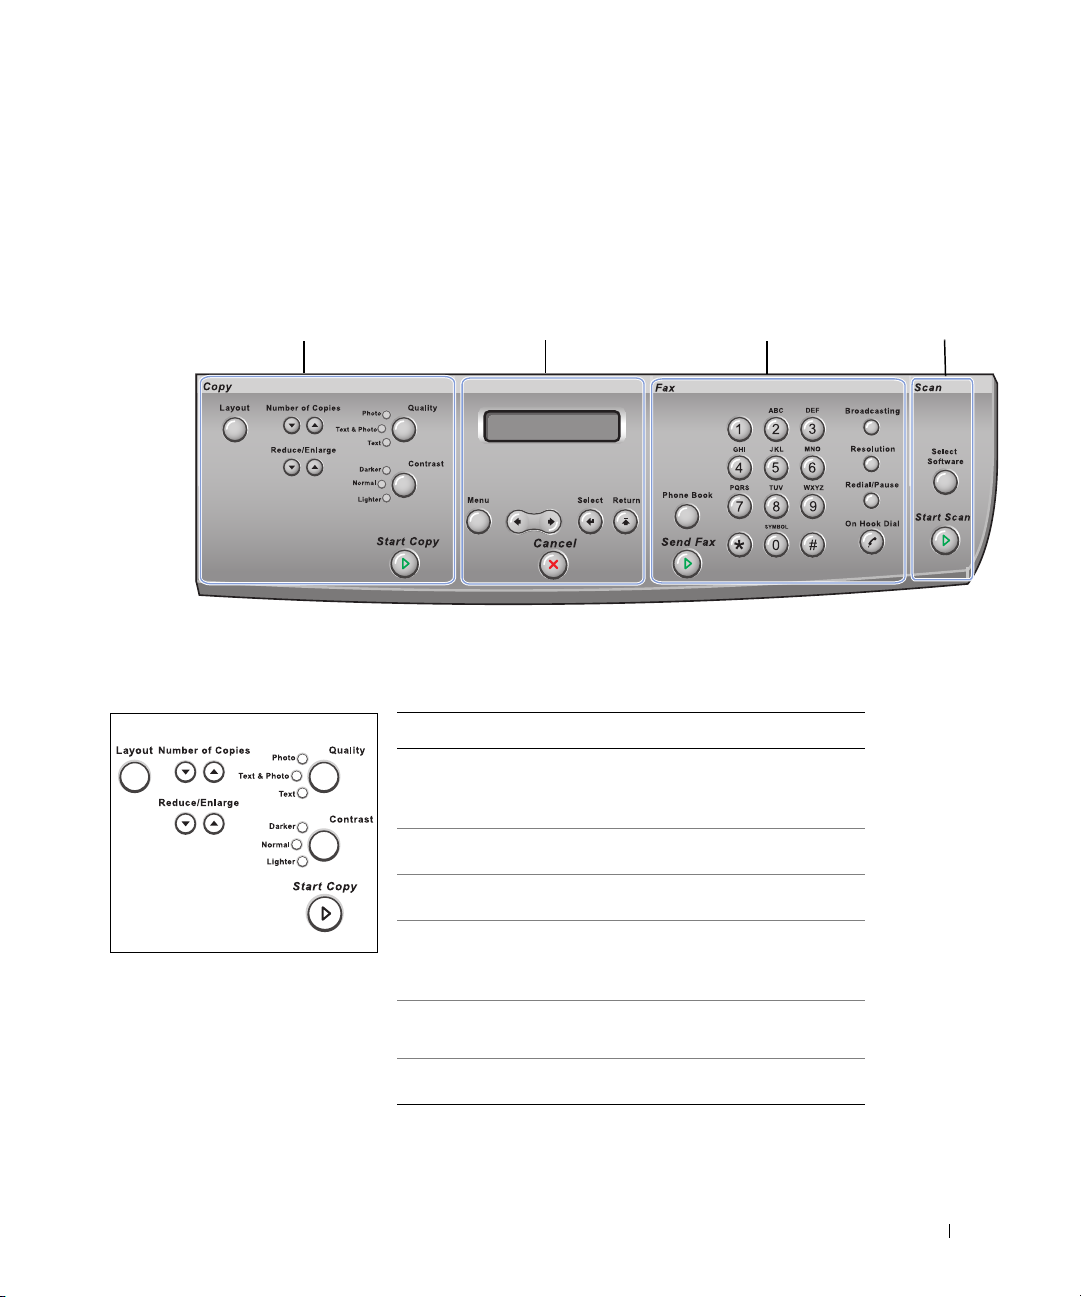
Copy Keys
➋
➊
➀
➌
Copy Keys
➍
➎
➏
Common Keys
Press: To:
➊
➋
➌
➍
Use copy layout features, such as Auto Fit,
Clone, Collation, 2-sided, 2/4 Up (multiple pages
on a sheet), and Poster copying.
Enter the number of copies.
Reduce or enlarge a copy.
Optimize the copy quality for documents
containing photos, text, or mixed photos and
text.
Fax Keys
Scan Keys
➎
➏
Adjust the contrastof the output copy for the
current copy job.
Start a copy.
Preparing Your Multi-Function Printer 5
Page 16
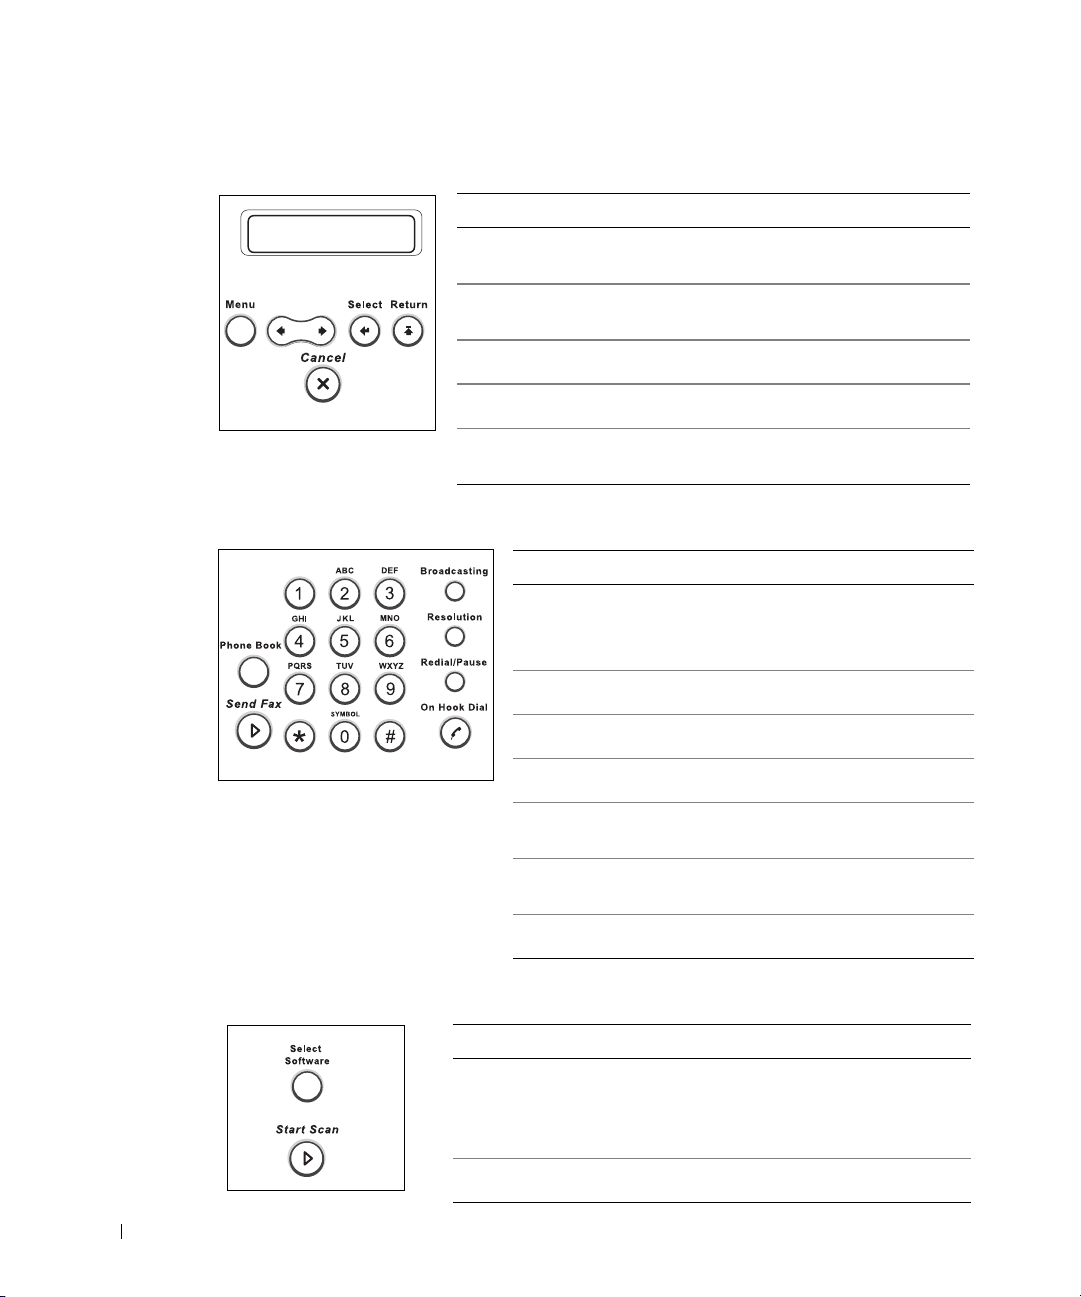
Common Keys
Press: To:
➋
➊
➌➍
➎
www.dell.com/supplies | support.dell.com
Fax Keys
➊
➋
➌
➍
➎
➏
➐
➊
➋
➌
➍
➎
Enter Menu mode and scroll through the available
menus.
Scroll through the options available for the selected
menu item.
Confirm the selection on the display.
Exit the menu and return to Standby mode.
Stop an operation at any time, or return to the default
settings.
Press: To:
➊
➋
➌
➍
➎
Store, edit and search frequently-dialed fax
numbers for automatic speed dialing.
It also allows you to print a Phonebook list.
Send a fax.
Dial a number or enter alphanumeric characters.
Send a fax to multiple destinations.
Adjust the resolution of the scanned document
for the current fax job.
Scan Keys
Press: To:
➊
➊
➋
➋
6 Preparing Your Multi-Function Printer
➏
➐
Redial the last number in Standby mode or insert
a pause into a fax number in edit mode.
Engage the telephone line.
Access a list of your PC software programs that an
image can be scanned to. You must create the scan list
using the Dell software (Printer Settings Utility)
provided with your multi-function printer.
Start a scan.
Page 17

Changing the Display Language
To change the displayed language that on the operator panel displays, follow these steps:
1 Press <Menu> until “Printer Setup” appears on the top line of the display.
2 Press the scroll button ( or ) until “Language” appears on the bottom line of the
display.
3 Press <Select>. The current setting appears on the bottom line of the display.
4 Press the scroll button ( or ) until the language you want appears on the display.
The available languages are English, French, German, Italian, and Spanish.
5 Press <Select> to save the selection.
6 To return to Standby mode, press <Return>.
Set Up Faxing
Setting the Machine ID
In most countries, you are required by law to indicate your fax number on any fax you send.
The Machine ID, containing your telephone number and name or company name, will be
printed at the top of each page sent from your multi-function printer.
1 Press <Menu> until “Printer Setup” appears on the top line of the display. The
first available menu item, “Machine ID” displays on the bottom line.
2 Press <Select>. The display asks you to enter the fax number.
3 If there is a number already set, the number appears.
4 Enter your fax number using the number keypad.
NOTE: If you make a mistake while entering numbers, press the left scroll ( ) button to
delete the last digit.
Press <Select> when the number on the display is correct. The display asks you to
5
enter the ID.
6 Enter your name or company name using the number keypad.
Preparing Your Multi-Function Printer 7
Page 18
7 You can enter alphanumeric characters using the number keypad, including special
symbols by pressing the 0 button.
For details on how to use the number keypad to enter alphanumeric characters, see
below.
8 Press <Select> when the name on the display is correct.
9 Press <Return> to return to Standby mode.
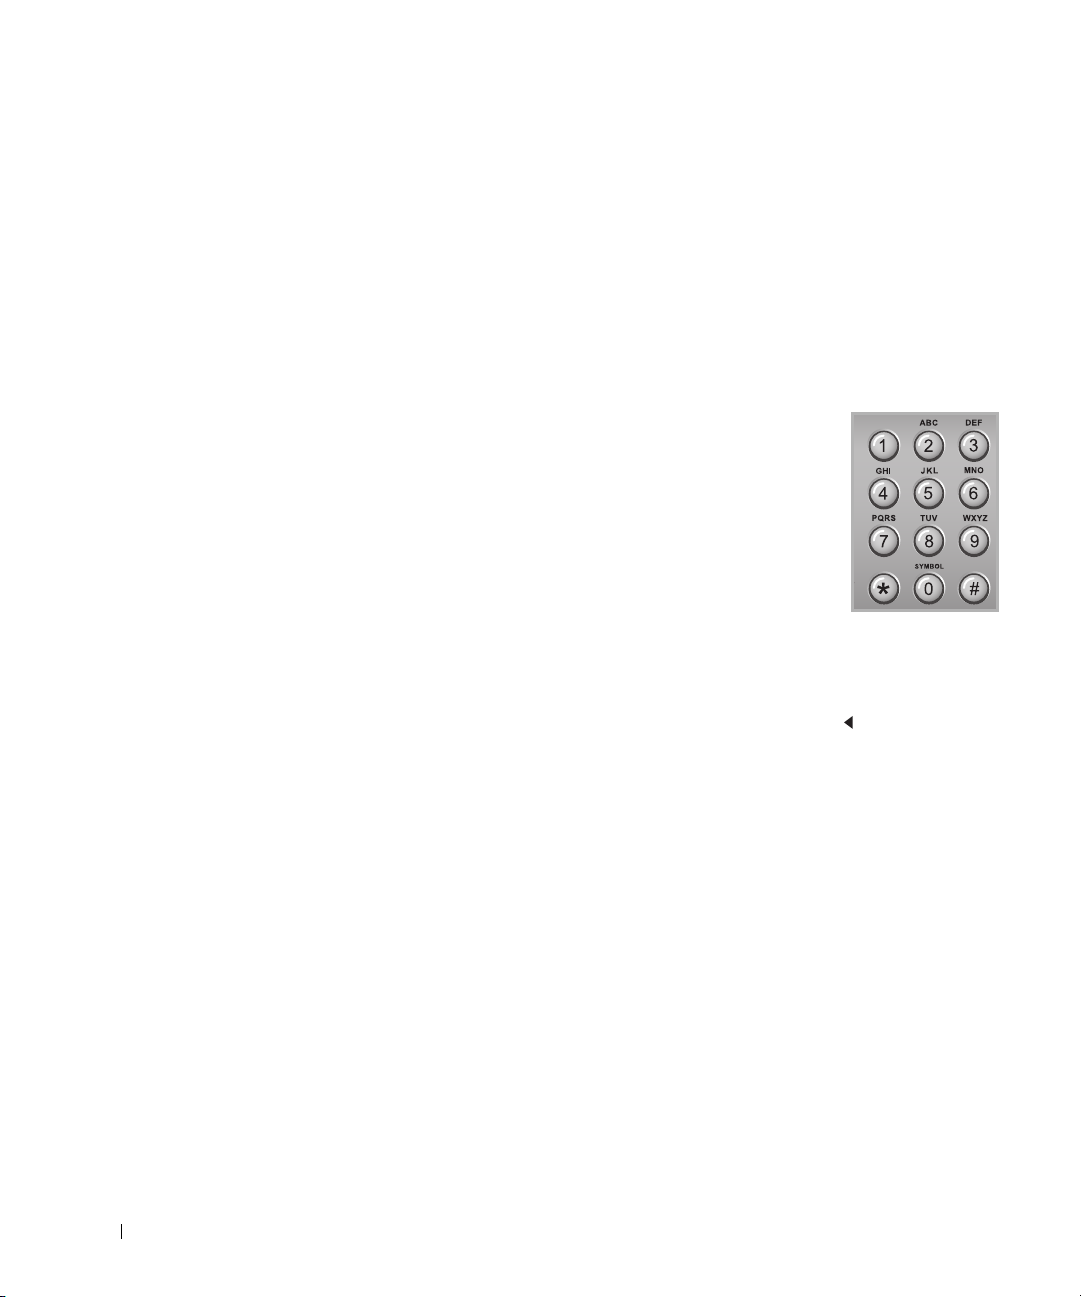
Using the Number Keypad to Enter Characters
• When prompted to enter a letter, press the appropriate button
until the correct letter appears on the display.
For example, to enter the letter O, press 6.
www.dell.com/supplies | support.dell.com
• Each time you press 6, the display shows a different letter, M, N,
O and finally 6.
•Press 1 enter a space, or press 0 to enter special characters.
• Press <Select> when you are finished.
• To enter additional letters, repeat the first step.
Changing Numbers or Names
If you make a mistake while entering a number or name, press the left ( ) button to delete
the last digit or character. Then enter the correct number or character.
Inserting a Pause
For some telephone systems, it is necessary to dial an access code and listen for a second dial
tone. A pause must be entered in order for the access code to function. For example, enter
the access code 9 and then press <Redial/Pause> before entering the telephone number. A
“–” appears on the display to indicate when a pause is entered.
8 Preparing Your Multi-Function Printer
Page 19

Setting the Time and Date
The time and date are printed on all faxes.
NOTE: It may be necessary to reset the correct time and date if loss of power to the
multi-function printer occurs.
Press <Menu> until “Printer Setup” appears on the top line of the display.
1
2 Press the scroll button ( or ) to display “Date & Time” on the bottom line and
press <Select>.
3 Enter the correct time and date using the number keypad.
You can also use the scroll button ( or ) to move the cursor under the digit you want
to correct and enter a new number.
4 To set a 12-hour format, press the or the button and select “AM” or “PM”.
To set a 24-hour format, press <Menu> until “Printer Setup” appears on the
display. Press the scroll button ( or ) to display “Clock Mode” and press
<Select>. Then select the 24-hour format using the scroll button ( or ) and press
<Select>.
5 Press <Select> when the time and date on the display is correct.
NOTE: The multi-function printer beeps and does not allow you to proceed to the next step if a
wrong number is entered.
Storing a Number for Speed Dialing
1 Press <Phone Book> on the operator panel.
2 Press <Phone Book> or the scroll button ( or ) to display “Store&Edit” on the
bottom line of the display. Press <Select>.
3 Press <Select> when “Speed Dials” appears on the display.
4 Enter a one, two or three-digit speed dial number between 0 and 199, using the
number keypad and press <Select>.
Or select the location by pressing the scroll button ( or ) and then press <Select>.
If a number is already stored in the location you chose, the display shows the number
to allow you to change it. To start over with another speed-dial number, press
<Return>.
5 Enter the number you want to store using the number keypad and press <Select>.
Preparing Your Multi-Function Printer 9
Page 20

To insert a pause between numbers, press <Redial/Pause> and a “-” appears on the
display.
6 To assign a name to the number, enter the name. For details about how to enter
names, see "Using the Number Keypad to Enter Characters" on page 8.
OR
If you do not want to assign a name, skip this step.
7 Press <Select> when the name appears correctly or without entering a name.
8 To store more fax numbers, repeat steps 4 through 7.
OR
To return to Standby mode, press <Return> or <Cancel>.
Setting Group Dial
www.dell.com/supplies | support.dell.com
1 Press <Phone Book> on the operator panel.
2 Press <Phone Book> or the scroll button ( or ) to display “Store&Edit” on the
bottom line of the display. Press <Select>.
3 Press the scroll button ( or ) to display “Group Dials” on the bottom line and
press <Select>.
4 Press <Select> when “New” displays on the bottom line.
5 Enter a group number between 0 and 199 and press <Select>.
Or select the location you want by pressing the scroll button ( or ) and then press
<Select>.
If a number is already stored in the location you chose, the display shows the number
to allow you to change it. To start over with another speed-dial number, press
<Return>.
6 Enter a one, two or three-digit speed number you want to assign to the group and press
<Select>.
Or select the location by pressing the scroll button ( or ) and then press <Select>.
If a number is already stored in the location you chose, the display shows the number
to allow you to change it. To start over with another group-dial number, press
<Return>.
7 Repeat step 6 to enter other speed dial numbers into the group.
8 Press <Return> when you have entered all of the desired numbers. The display
prompts you to enter a group name (ID: ).
9 To assign a name to the group, enter the name.
10 Preparing Your Multi-Function Printer
Page 21
OR
If you do not want to assign a name, skip this step.
10 Press <Select> when the name appears correctly or without entering a name.
11 If you want to assign another group, repeat from step 4.
OR
To return to Standby mode, press <Cancel>.
Set Up Networking
A print server is any designated computer that centrally manages all client print jobs. If you
are sharing your multi-function printer in a small workgroup environment and want to
control all print jobs on the network, follow these instructions to attach the multi-function
printer to a print server.
NOTE: For additional network set-up configurations, see your User’s Guide.
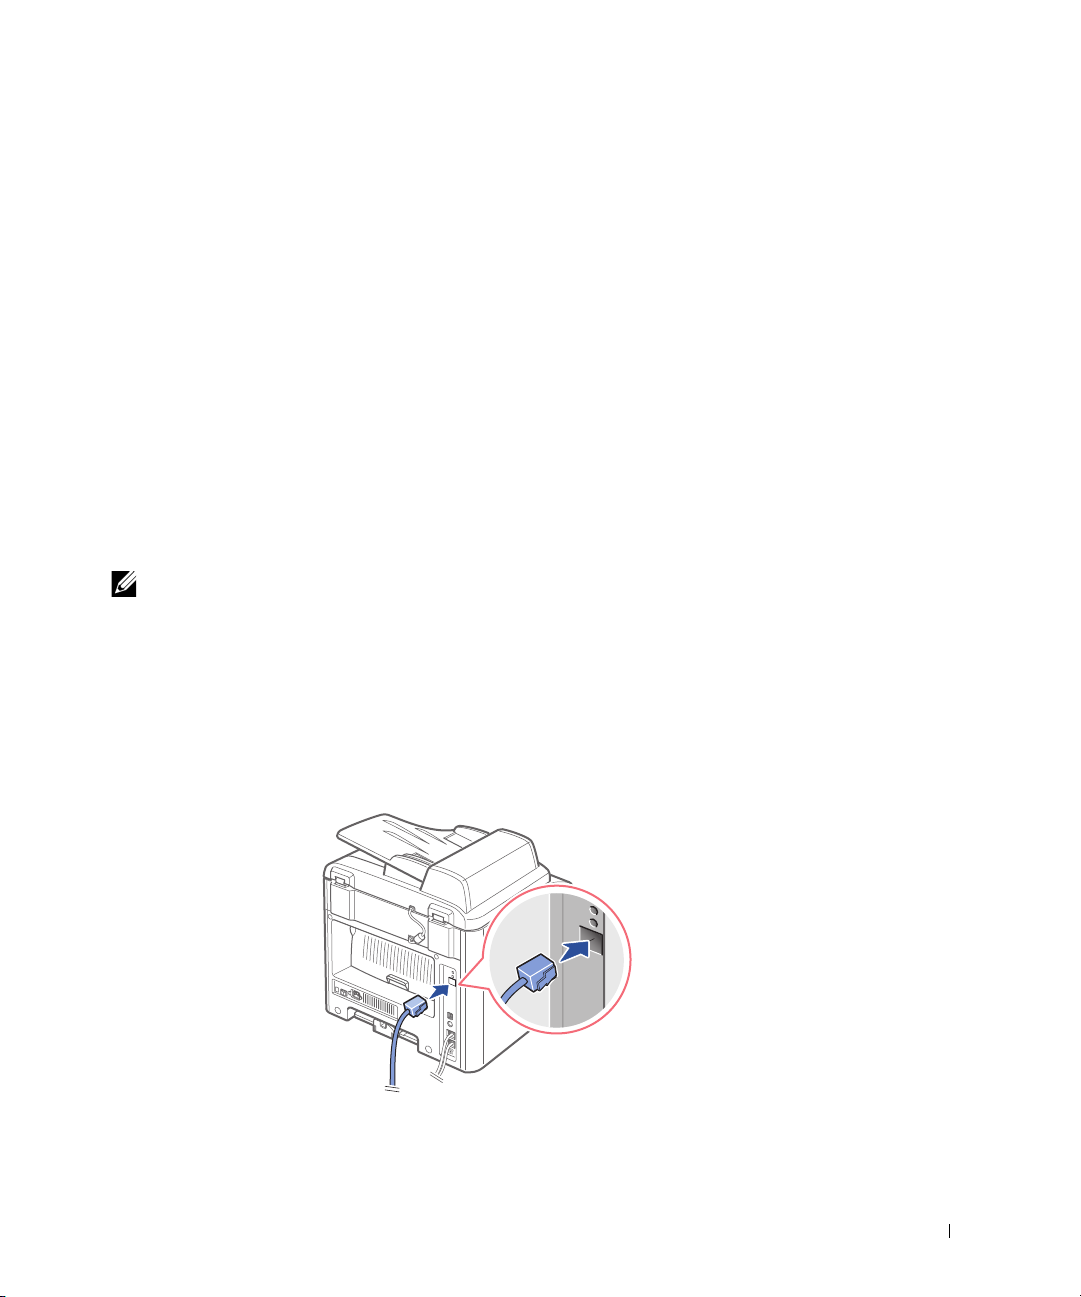
Attach Cables
1 Make sure the multi-function printer is powered off and unplugged.
2 Connect one end of a standard category 5 Unshielded Twisted Pair (UTP) network
cable into a LAN drop or hub, and the other end into the Ethernet network port on
the back of the multi-function printer. The multi-function printer automatically
adjusts for the network speed.
Preparing Your Multi-Function Printer 11
Page 22
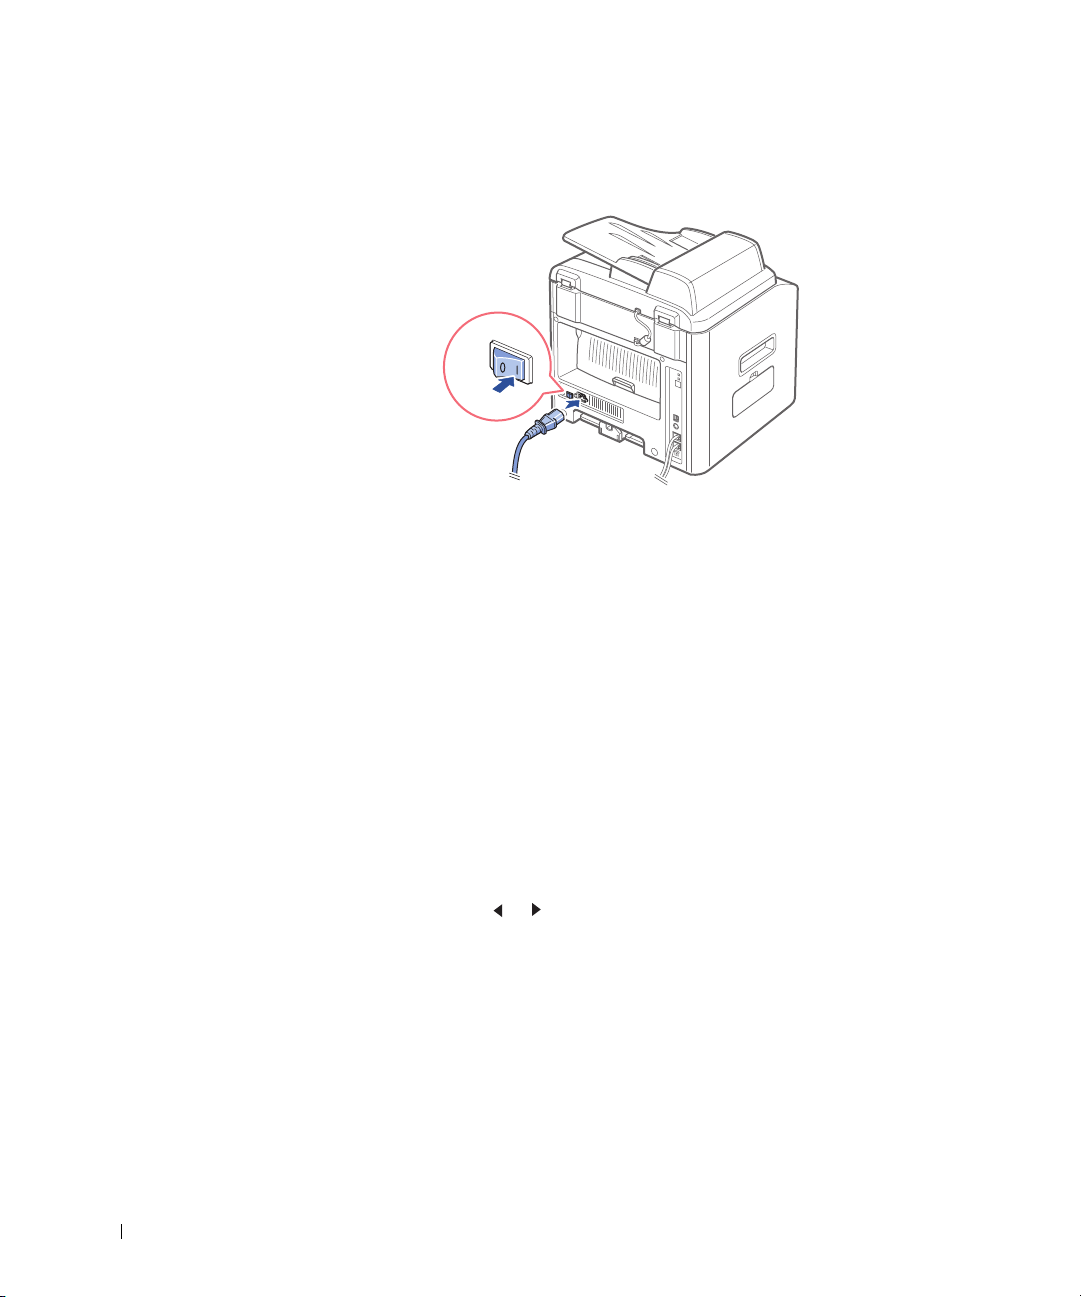
3 Connect one end of the multi-function printer power cord into the socket at the back
of the multi-function printer and the other end into a properly grounded outlet.
www.dell.com/supplies | support.dell.com
4 Power on the multi-function printer.
After the multi-function printer completes its internal tests, the operator panel reports
a “READY” stats.
If the operator panel does not show a “READY” state when the multi-function printer
is powered on, make sure the power cord is firmly plugged in to the back of the
multi-function printer and the electrical outlet.
If the multi-function printer is on but does not print, power off the multi-function
printer and wait 30 seconds. Power on the multi-function printer again, and it should
reset and return to a “READY” state.
Print and Check the Network Set-Up Page
1 When the operator panel displays “READY”, press <Menu> until “Network
Setup” appears.
2 Press the scroll button ( or ) to display “Print Sys. Date” on the bottom line
and press <Select> twice.
If Status is Not Connected:
– Make sure the Ethernet cable is firmly plugged into the back of the multi-function
printer.
– Plug the Ethernet cable into another wall outlet.
3 Under the “TCP/IP” heading on the network setup page, make sure the IP address,
netmask, and gateway are what you expected.
12 Preparing Your Multi-Function Printer
Page 23

4 Ping the multi-function printer and verify that it responds. For example, at a
command prompt on a network computer, type ping followed by the new printer IP
address (for example, 192.168.0.11):
ping xxx.xxx.xxx.xxx
If the multi-function printer is active on the network, you will receive a reply.
5 If your multi-function printer doesn’t respond, or if the IP address is not what you
expected:
a Insert the Drivers and Utilities CD into your computer.
b Launch the Drivers and Utilities CD: click Start → Run and browse your CD drive
(for example, type D:\ where D is the drive letter of your CD).
c Select SETUP.EXE, and then click OK.
d When the Drivers and Utilities CD screen appears, click Set IP Address Utility.
e Select your multi-function printer from the Configure Print Servers list, and then
click TCP/IP Settings.
f Make the necessary changes, and then click OK.
g Click Close.
h Print and check the network setup page to verify your changes.
Run the Installation Software
1 Insert the Drivers and Utilities CD into your computer.
If setup does not start automatically:
• Launch the Drivers and Utilities CD: click Start
drive (for example, type D:\ where D is the drive letter of your CD).
• Select SETUP.EXE, and then click OK.
2 When the Drivers and Utilities CD screen appears, click Network Installation (Install
the printer for use on a network).
3-1 For local installation:
• Select Local Installation (Install printer on this computer or server).
3-2 For remote installation:
• Select Remote Installation (Install printer on remote computers or servers).
• Enter your Administrator user name and password, and then click OK.
• Manually enter or browse for the clients or servers and click Add.
• When you are finished adding remote computers, click Next.
→ Run and browse your CD
Preparing Your Multi-Function Printer 13
Page 24

4 Select the network printer you want to install. If you do not see your multi-function
printer listed, click Update to refresh the list or click Add Printer to add a printer to
the network.
5 If you are setting up the printer on a server that will provide printing services for client
computers, select I am setting up this printer on a server.
6 Click Next.
7 Select any additional software or documentation components you want to install, and
then click Next.
8 To change any of the listed printer names, select the printer from the list. Enter a new
name in the Printer name field and click Apply.
9 If you want other users on the network to access this printer, select Share this printer
with other computers, and then enter a share name that users will easily identify.
www.dell.com/supplies | support.dell.com
10 Click Next.
11 When the Congratulations! screen appears, you printer software is installed. Click
Finish to close the installation window.
Use the Dell Printer Configuration Web Tool, also known as the Printer Embedded Web
Server, to monitor the status of your network printer without leaving your desk. You can
view and/or change the printer configuration settings, monitor toner level, and when it is
time to order replacement toner cartridges, just click the Dell supplies link right from your
Web browser.
NOTE: The Dell Printer Configuration Web Tool is not available when the multi-function printer
is locally attached to a print server.
To launch the Dell Printer Configuration Web Tool, type the network printer IP address in
your Web browser, and the printer configuration appears on the screen. See your User’s
Guide for more information.
You can set up the Dell Printer Configuration Web Tool to send you an email when the
printer needs supplies or intervention.
To set up email alerts:
1 Launch the Dell Printer Configuration Web Tool.
2 Click Email Alert Setup.
3 Type your name or the key operator’s name in the email list box to be notified.
4 Click Submit.
14 Preparing Your Multi-Function Printer
Page 25
SECTION 2
Understanding the Software
Software Overview
Installing Dell Software For Local Printing
Assigning an IP Address
Installing Dell Software For Network Printing
Uninstalling Software
Page 26

Software Overview
After setting up your printer and connecting it your computer, you must install the drivers
and utilities from the Drivers and Utilities CD included with your multi-function printer. If
you purchased a Dell
drivers and utilities are automatically installed. You don’t need to install them. The Drivers
and Utilities CD contains the following:
• Dell Printer Drivers- allows your computer to communicate with your multi-function
printer. To use your multi-function printer as a printer in Windows, you must install
the printer driver(s). For information about installing the printer drivers in Windows,
see page 17.
• Printer Settings Utility- allows you to set up fax phonebook and the machine's other
options from your PC desktop. It also allows you to update the firmware of your
machine. You can also configure the scan destination application which is
www.dell.com/supplies | support.dell.com
automatically launched when you press the <Select Software> button on the
operator panel.
• Dell Toner Management System
the job when you send a job to print. The Dell Toner Management System
also displays the level of toner remaining and allows you to order replacement toner
cartridges.
TM
computer and your multi-function printer at the same time, the
TM
- displays the status of the printer and the name of
TM
window
• PaperPort
- allows you to scan documents, create PDFs, and turn your scanned
images into editable Microsoft
improved scanning features and supports annotations on all image types. PaperPort’s
enhanced search feature allows you to find items by specific item properties.
• Dell ScanCenter
into a variety of applications, such as e-mail, photo editors, and text editors.
• Scan Driver - TWAIN or Windows Image Acquisition (WIA) drivers are available for
scanning documents on your multi-function printer.
• User’s Guide - HTML documentation provides detailed information about using your
multi-function printer.
16 Understanding the Software
Word, Excel, or text files. PaperPort provides
TM
- This is the front-end that enables you to quickly scan documents
Page 27

Installing Dell Software For Local Printing
A local printer is a printer attached to your computer using a USB cable. If your
multi-function printer is attached to a network instead of your computer, skip this step and
go to "Installing Dell Software For Network Printing" on page 20.
NOTE: If you attach a USB printer cable while your multi-function printer and computer are
powered on, the Windows hardware wizard launches immediately. Cancel the screen and use the
Drivers and Utilities CD to install the Dell software.
Make sure that the multi-function printer is connected to your computer and powered
1
on. Close all unnecessary programs.
NOTE: If the multi-function printer is not connected to your computer when you install
the CD-ROM, the No Printer Found screen appears. Follow the instructions to install the
software.
Insert the Drivers and Utilities CD.
2
3 If necessary, select a language by pressing the Language button on the main screen.
4 Select Personal Installation.
5 Select Typical Installation to install the User’s Guide, the printer drivers, scanner
driver and PaperPort as the default settings.
To install selected software including the printer Postscript driver, select Custom
Installation. You can also change the destination folder.
6 When the installation has been completed, you may print a test page. Click Finish to
complete the installation and close the wizard. You are now ready to print.
If you did not cancel the hardware wizards, refer to the following instruction for installing
the printer driver for your operating system.
Windows XP:
1 Make sure that the multi-function printer is connected to your computer and powered
on.
2 When the hardware wizard screen appears, insert the Drivers and Utilities CD and
click Next.
NOTE: For each wizard that appears, select Recommended, click Next, select CD-ROM
Drives, and then click Next through the wizard screens.
The scanner driver is automatically loaded first from
3
D:\1600n\Scan\WINXP2K\p3scan.inf, where “D” is your CD drive.
4 Click Next.
Understanding the Software 17
Page 28

5 Click Finish, and a second hardware wizard appears. The printer driver is
automatically loaded from D:\1600n\Printer\GDI\WinXP\delr1.inf, where “D” is your
CD drive.
6 Click Next, and then click Finish.
Windows 2000:
1 Make sure that the multi-function printer is connected to your computer and powered
on.
2 When the hardware wizard screen appears, insert the Drivers and Utilities CD and
click Next.
NOTE: For each wizard that appears, select Search for a suitable driver for my device
(Recommended), click Next, select CD-ROM Drives, and then click Next through the
wizard screens.
www.dell.com/supplies | support.dell.com
The scanner driver is automatically loaded first from
3
D:\1600n\Scan\WINXP2K\p3scan.inf, where “D” is your CD drive.
4 Click Next.
5 Click Finish, and a second hardware wizard appears. The printer driver is
automatically loaded from D:\ delr1.inf, where “D” is your CD drive.
6 Click Next, and then click Finish.
Windows 98SE:
1 Make sure that the multi-function printer is connected to your computer and powered
on.
2 When the hardware wizard screen appears, insert the Drivers and Utilities CD and
click Next.
3 Select Search for the best driver for your device (Recommended), and click Next.
4 Select Specify a Location, and then click Browse.
5 Select D:\USB, where “D” is your CD drive.
6 Click OK, and then click Next three times. The driver installs.
7 Click Finish, and a second wizard appears.
8 If the CD menu screen appears above the wizard, click Add New Hardware Wizard
from the Windows taskbar.
9 Click Next. Search for the best driver for your device (Recommended) is selected.
10 Click Next. D:\USB is selected.
18 Understanding the Software
Page 29

11 Click Next two times. The driver installs.
12 Click Finish, and a third hardware wizard appears.
13 Click Next. Search for the best driver for your device (Recommended) is selected.
14 Click Next, click Browse, select the location D:\1600n\Scan\WIN98ME, and click
OK.
15 Click Next two times. The driver installs.
16 Click Finish.
Windows Me:
1 Make sure that the multi-function printer is connected to your computer and powered
on. When the hardware wizard screen appears, Automatic search for a better driver for
your device (Recommended) is selected.
2 Insert the Drivers and Utilities CD and click Next. The driver installs.
3 Click Finish, and a second wizard appears.
4 If the CD menu screen appears above the wizard, click New Hardware Wizard from
the Windows taskbar.
5 Click Next. Automatic search for a better driver for your device (Recommended) is
selected.
6 Click Next. The driver installs.
7 Click Finish.
If the CD software installation menu does not appear, follow these instructions:
1 Click Start → Run → Browse to D: (where “D” is your CD drive).
2 Select Setup, click Open, and then click OK.
3 Click Personal Installation.
4 Click Typical or Custom Installation. (If you choose Custom Installation, select from
the available software options and click Next.)
5 After installation, you may click Print Test Page.
6 Click Finish.
Understanding the Software 19
Page 30

Assigning an IP Address
Before using the printer on the network, you must set an IP address, subnet mask, and
gateway for the multi-function printer. If you want DHCP or BOOTP to automatically set
the IP address, a DHCP or BOOTP server must exist on the network.
To configure the IP address manually, you can use the supplied Drivers and Utilities CD.
Print the Configuration page of the printer to see the current network configuration and
MAC address. You will need this information to configure the printer for the network.
1 Make sure that the multi-function printer is connected to your network and powered
on. Close all unnecessary programs.
2 Insert the Drives and Utilities CD.
3 If necessary, select a language by pressing the Language button on the main screen.
www.dell.com/supplies | support.dell.com
4 Select SetIP Address Utility. The list of printers available in the network displays.
5 Select the printer you want to assign an IP to. The printer’s default IP address can be
found on the Configuration page for the printer.
6 When you finish setting the IP address for the printer, exit the program.
Installing Dell Software For Network Printing
When you connect your printer to the network, you must first configure the TCP/IP
settings for the printer. After you have assigned and verified the TCP/IP settings, you are
ready to install the Dell software on each network computer.
You can install the Dell software on the network computers locally or remotely.
NOTE: You need administrative access to install printer drivers on the network computers.
Make sure that the printer is connected to your network and powered on. Close all
1
unnecessary programs. For details about connecting on the network, see page 11.
2 Insert the Drivers and Utilities CD.
3 If necessary, select a language by pressing the Language button on the main screen.
4 Select Network Installation.
5 If you want to install the drivers on this computer for network operation, select Local
Installation, and click Next.
If you want to install the Dell software on the remote computers or network servers on
the same network, select Remote Installation. The domain administrator’s ID and
password are required. Select the client computer(s) in the same domain on a network
and click Next.
20 Understanding the Software
Page 31

NOTE: Both server computer and client computer should be one of the following OS:
Windows XP, Windows 2000, Windows Server 2003, Windows NT4.0
NOTE: The server computer should be able to resolve the client computer name into an IP
address.
The list of printers available on the network appears. Select the printer you want to
6
install from the list and then click Next.
If you do not see your printer in the list, click Update to refresh the list or click Add
Printer to add your printer to the network. To add the printer to the network, enter the
port name and an existing IP address for the printer.
If you want to install it on a server, select the I am setting up this printer on a server
check box.
7 A list of the printer drivers and utilities that will be installed displays. Click Next.
You can change the destination folder by clicking Browser.
8 The next screen shows the printer drivers installed on your computer. You can change
the printer name.
You can also set this printer to be shared on the network and/or set the printer as a
default printer. Click Next.
9 When the installation has been completed, you may print a test page. Click Finish.
Understanding the Software 21
Page 32

Uninstalling Software
You should remove the printer drivers if you are upgrading the software or if your driver
installation fails. You can remove the software using the Drivers and Utilities CD or the
Windows uninstall.
NOTE: Close all programs before uninstalling software, and then restart your computer after
uninstalling software.
From the Start menu, select Programs→ Dell→ Dell Printers→ Dell Laser MFP
1
1600n→ Dell MFP Software Uninstall.
2 Select the software you want to remove.
3 When your computer prompts you to confirm your selection, click Ye s. The selected
driver and all of its components are removed from your computer.
www.dell.com/supplies | support.dell.com
4 Click OK.
5 Restart your computer.
22 Understanding the Software
Page 33

SECTION 3
Loading Print Media
Print Media Guidelines
Loading Paper and Transparencies
Loading Envelopes
Setting the Paper Size and Type
Placing Documents on the Scanner Glass
Loading Documents Into the ADF
Page 34

Print Media Guidelines
The following tables provide information on standard and optional sources, including the
print media sizes you can select from the paper size menu and supported weights.
NOTE: If you use a print media size not listed, select the next larger size.
Print Media Sizes and Support
Legend
Y- indicates Support
Print Media Size
A4 8.27 x 11.7 in.
www.dell.com/supplies | support.dell.com
A5 5.83 x 8.27 in.
A6 card 4.13 x 5.85 in.
JIS B5 7.17 x 10.1 in.
ISO B5 6.93 x 9.84 in.
Letter 8.5 x 11 in.
Legal 8.5 x 14 in.
Dimensions Paper Tray
(Standard Tray 1 and
Optional Tray 2)
Y Y
(210 x 297 mm)
Y Y
(148 x 210 mm)
-Y
(105 x 148.5 mm)
Y Y
(182 x 257 mm)
Y Y
(176 x 250 mm)
YY
(215.9 x 279.4 mm)
YY
(215.9 x 355.6 mm)
Manual Feeder
Executive 7.25 x 10.5 in.
Folio 8.5 x 13 in.
Envelope 7-3/4
(Monarch)
24 Loading Print Media
(184.2 x 266.7 mm)
(216 x 330 mm)
3.875 x 7.5 in.
(98.4 x 190.5 mm)
Y Y
YY
-Y
Page 35

Legend
Dimensions Paper Tray
Manual Feeder
Y- indicates Support
Print Media Size
Envelope COM-10 4.12 x 9.5 in.
(105 x 241 mm)
Envelope DL 4.33 x 8.66 in.
(110 x 220 mm)
EnvelopeC5 6.38 x 9.01 in.
(162 x 229 mm)
Custom 3 x 5 in. to 8.5 x 14 in.
(76 x 127 mm to 216 x
356 mm)
Print Media Supported
Print Media Paper Tray Manual Feeder Standard
Paper YY Y
(Standard Tray 1 and
Optional Tray 2)
-Y
-Y
-Y
-Y
Output bin
Card Stock -Y Y
Transparencies -Y -
Labels -Y Y
Dual-web and Integrated
Labels
Envelopes -Y Y
-Y Y
Loading Print Media 25
Page 36

Print Media Types and Weights
Print Media Type Print Media Weight
Paper Xerographic or
business paper
Card
stock-maximum
(grain long)
a
Index Bristol
Ta g
Cover
Card
stock-maximum
www.dell.com/supplies | support.dell.com
(grain short)
a
Index Bristol
Ta g
Cover
Transparencies Laser printer
Labels-maximum Pap er
Dual-web paper
Polyester
Vinyl
Integrated Forms Pressure-
sensitive area
(must enter the
printer first)
Paper base (grain
long)
Envelopes 100%
Cotton Content
Maximum
Weight- 24 lb
Sulfite,
wood-free or up
to 100% cotton
bonds
Standard Tray 1 and
Optional Tray 2
60-90 g/m
2
grain long
(16-24 lb bond)
2
163 g/m
163 g/m
163 g/m
163 g/m
163 g/m
163 g/m
138-146 g/m
(43 lb) 120 g/m2 (31 lb)
2
(43 lb) 120 g/m2 (31 lb)
2
(43 lb) 135 g/m2 (35 lb)
2
(43 lb) 163 g/m2 (43 lb)
2
(43 lb) 163 g/m2 (43 lb)
2
(43 lb) 163 g/m2 (43 lb)
2
(37-39 lb bond)
2
163 g/m
(43 lb bond)
2
163 g/m
(43 lb bond)
2
163 g/m
(43 lb bond)
2
163 g/m
(43 lb liner)
2
135-140 g/m
(36-40 lb bond)
75-135 g/m
2
(20-36 lb bond)
75-90 g/m
2
(20-24 lb)
Manual Feeder
60-135 g/m2 grain long
(16 to 36 lb bond)
138-146 g/m
2
(37-39 lb bond)
2
163 g/m
(43 lb bond)
2
163 g/m
(43 lb bond)
2
163 g/m
(43 lb bond)
2
163 g/m
(43 lb liner)
135-140 g/m2
(36-40 lb bond)
75-135 g/m
2
(20-36 lb bond)
75-90 g/m
2
(20-24 lb)
a. Grain short is preferred for papers over 135 g/m2.
26 Loading Print Media
Page 37

Loading Paper and Transparencies
Load up to 250 sheets of plain paper in the paper tray.
NOTE: Set the paper type and size after loading paper into the paper tray or the manual feeder.
See page 35 for more information.
Loading Paper Into the Paper Tray
1 Pull open the paper tray and remove it from the multi-function printer.
2 Push down on the pressure plate until it locks into place.
Loading Print Media 27
Page 38

3 If you load longer that is longer than a standard (Letter or A4) size, such as legal paper,
press and unlatch the guide lock, then slide the paper length guide out completely to
extend the paper tray to its full length.
www.dell.com/supplies | support.dell.com
4 Flex the sheets back and forth to loosen them, and then fan them out. Do not fold or
crease the print media. Align the edges on a level surface.
5 Insert the paper stack into the paper tray with the side to be printed on facing down.
28 Loading Print Media
Page 39

6 Do not exceed the maximum stack height indicated by the paper limit marks on both
inside walls of tray. Overloading the paper tray may cause paper jams.
7 Slide in the length guide until it lightly touches the end of the paper stack.
For paper smaller than Letter size, adjust the inner paper length guide so that lightly
touches the paper stack.
Loading Print Media 29
Page 40

8 Pinch the paper width guide, as shown and move it towards the stack of paper until it
lightly touches the side of the stack.
www.dell.com/supplies | support.dell.com
NOTE: Improper adjustment of paper guides can result in paper jams.
9
Insert and slide the paper tray back into the multi-function printer.
10 Set the paper type and size. For details, see page 35.
30 Loading Print Media
Page 41

Loading Paper Into the Manual Feeder
Use the manual feeder to print transparencies, labels, envelopes or postcards in addition to
paper types or sizes that are not currently loaded in the paper tray.
NOTE: Flatten any curl on postcards, envelopes and labels before loading them into the manual
feeder.
Set the paper type and size, referring to page 35.
1
2 Load a sheet of the print media with the print side face up into the center of the
manual feeder.
CAUTION: Open the rear output slot when printing on transparencies or 3 by 5
in. media to prevent the media damage or jam.
Adjust the paper guide to the width of the print media.
3
Loading Print Media 31
Page 42

4 Open the rear cover to use the rear output slot.
5 After printing, close the rear cover.
www.dell.com/supplies | support.dell.com
Loading Envelopes
NOTICE: Never load envelopes with stamps, clasps, snaps, windows, coated linings, or
self-stick adhesives. These envelopes may severely damage the multi-function printer.
1
Load an envelope with the flap side face down and with the stamp area on the top left
side. The end of the envelope with the stamp area enters the manual feeder first.
32 Loading Print Media
Page 43

2 Adjust the paper guide to the width of the envelope.
3 Open the rear cover to use the rear output slot.
4 After printing, close the rear cover.
Loading Print Media 33
Page 44

You can load up to: Make sure:
250 sheets of plain paper in
the paper tray
1 envelope in the manual
feeder
www.dell.com/supplies | support.dell.com
1sheet of labels in the manual
feeder
1 sheet of card stock in the
manual feeder
1 transparency sheet in the
manual feeder
1 sheet of custom sized paper
in the manual feeder
The paper is designed for use with laser printers.
• The envelope is loaded vertically against the right side of the
paper support.
• The stamp location is in the upper left corner.
• The envelope is designed for use with laser printers.
• Squeeze and slide the paper guide to the width of the envelope
(as shown).
NOTE: Do not load envelopes with:
• Holes, perforations, cutouts, or deep embossing.
• Metal clasps, string ties, or metal folding bars.
• Exposed flap adhesive.
The label is designed for use with laser printers.
• The card stock is designed for use with laser printers.
• The thickness should not exceed 0.025 inches.
• The transparency is designed for use with laser printers.
• The rough side faces you.
Your paper size should fit within these dimensions:
Width
3.0-8.5 in. (76-216 mm)
Length
5.0-14.0 in. (127-356 mm)
Your multi-function printer has two output locations; the rear output slot and the front
output tray. Before you begin copying, scanning, printing, or sending faxes, refer to the table
below about how much paper the printer output trays can hold:
Output Location Capacity
front output tray (face down) 150 sheets of paper
rear output slot (face up) one envelope, one label, card stack and transparency sheet
34 Loading Print Media
Page 45

Setting the Paper Size and Type
After loading paper in the paper tray or the manual feeder, you need to set the paper size
and type using the operator panel buttons.
Setting the Paper Size
This setting will apply to Fax and Copy modes. If you load paper in the manual feeder and
set the paper size, this setting will apply to Copy mode. For PC-printing, you need to select
the paper type in the application program you use.
1 Press <Menu>.
2 Press the scroll button ( or ) until “Paper Size” displays on the bottom line.
3 Press <Select>.
The first item, “Tray Paper” displays on the bottom line.
If the optional Tray2 is installed, “Tray1 Paper” displays on the bottom line.
4 Use the scroll button ( or ) to select the paper tray you want to use and press
<Select>.
5 Use the scroll button ( or ) to find the paper size you are using and press <Select>
to save.
6 To return to Standby mode, press <Return>.
Setting the Paper Type
This setting will apply to Fax and Copy mode. For faxing, you can only set the paper type to
the Plain Paper. For PC-printing, you need to select the paper type in the application
program you use.
1 Press <Menu>.
The display shows “Paper Setting” on the top line and the first menu item,
“Paper Type” on the bottom line.
2 Press <Select> to access the menu item.
3 Use the scroll button ( or ) to find the paper type you are using and press <Select>
to save.
4 To return to Standby mode, press <Return>.
Loading Print Media 35
Page 46

Placing Documents on the Scanner Glass
NOTE: Contaminants on the scanner glass may cause black spots on the printout. For best
results, clean the scanner glass before use. See page 63.
NOTE: To get the best scan quality, especially for color or gray scale images, use the scanner
glass instead of the ADF.
Lift and open the document cover.
1
www.dell.com/supplies | support.dell.com
2 Place the document face down on the scanner glass and align it with the registration
guide on the top left corner of the glass.
3 Close the document cover.
36 Loading Print Media
Page 47

Loading Documents Into the ADF
NOTICE: Do not load more than 50 sheets into the ADF or allow more than 50 sheets to be fed
to the ADF output tray. The ADF output tray should be emptied before it exceeds 50 sheets or
your original documents may be damaged.
You can load up to 50 sheets of your original document (text side up with page one on top)
into the ADF for scanning, copying, and faxing. The ADF is recommended for loading
multiple page documents.
1 Place the document(s) face up on the ADF with the top edge of the documents in
first. Then adjust the document guides to the correct document size.
2 Make sure that the bottom of the document stack matches the document size marked
on the document tray.
Loading Print Media 37
Page 48

www.dell.com/supplies | support.dell.com
38 Loading Print Media
Page 49

SECTION 4
Using Your Multi-Function Printer
Printing
Copying
Scanning
Faxing
Page 50

Printing
1 Load paper. See page 27.
2 With your document open, click File→ Print.
3 Select the printer driver you want to use from the Print window.
4 To change the printer settings, click Properties, Preferences, Options, or Setup,
depending on the program or operating system.
The printer properties dialog box displays.
5 From the five tabs on the top of the printer properties screen, confirm the selections.
6 Click OK until the Print window appears.
7 Click OK or Print, depending on the program or operating system, to start printing.
www.dell.com/supplies | support.dell.com
NOTE: Press the <Cancel> button on the operator panel to cancel a print job.
Accessing Printer Properties
Change printer settings in the printer properties tabs. The printer properties window
differs, depending on your operating system.
1 With your document open, click File→ Print.
The Print dialog box appears.
2 Select the printer driver you want to use from the Print window.
3 In the Print dialog box, click Properties, Preferences, Options, or Setup, depending on
your program or operating system.
4 For details about the printer properties tabs, please refer to the HTML user’s guide.
40 Using Your Multi-Function Printer
Page 51

Copying
NOTE: A computer connection is not required for copying.
Use the operator panel to set the paper type and size, contrast, number of copies, and image
quality.
Making Copies
1 Place a single document face down on the scanner glass.
OR
Load the document(s) to be copied face up with top edge in first into the ADF.
For details about loading original document(s), see page 36-37.
2 Customize the copy settings using the operator panel.
To... Press...
Adjust the image quality <Quality> and select the quality mode
from Text, Text & Photo and Photo.
Select from 1 to 99 copies <Number of Copies>.
Reduce or enlarge a copy Reduce/Enlarge.
Adjust the contrast <Contrast> and select the contrast
mode from Darker, Normal and Lighter.
3 Press <Layout> on the operator panel to use special copy features, such as Auto Fit,
Clone, Poster and 2 Sided copying. Refer to detail description below.
4 Press <Start Copy> to begin copying. The display shows the copy processing.
Using Copy Features With the <Layout> Button
Access the following copy features using the <Layout> button on the operator panel.
Auto Fit Copying (available via scanner glass only): Automatically reduces or enlarges the
original image to fit on the paper loaded in the multi-function printer.
Clone Copying (available via scanner glass only): Prints multiple image copies from the
original document on a single page. The number of images is automatically determined by
the original image and paper size.
NOTE: You cannot adjust the copy size using the Reduce/Enlarge button.
Using Your Multi-Function Printer 41
A
Page 52

Collation Copying (available via ADF scanning only): Sorts the copy job. For example, if
you make 2 copies of 3 page documents, one complete 3 page document will print followed
by the second complete document.
Two-Side Copying (available via scanner glass only): Prints a two-sided original document
on one sheet of paper. Use this feature to print one side on the upper half of the paper and
the reverse side on the lower half without reducing the original. This is helpful for copying a
small-sized document as some portions may not be printed if the original is larger than the
printable area.
NOTE: You cannot adjust the copy size for Two-Side copying.
NOTE: The copy job is cancelled if no buttons are pressed for 30 seconds.
www.dell.com/supplies | support.dell.com
2-up or 4-up Copying (available via ADF scanning only): Prints two original images to fit
onto one sheet of paper or prints four original images to fit onto one sheet of paper.
1 2
▲
2-up copying
1 2
3 4
▲
4-up copying
NOTE: You cannot adjust the copy size for making a 2- or 4-up copy.
Poster Copying (available via scanner glass only): Prints an image onto nine sheets of paper
(3 by 3). You can paste the printed pages together to make one poster-size document. Each
portion is scanned and printed one by one.
NOTE: You cannot adjust the copy size for making a poster.
Off: Prints in normal mode.
NOTE: Contaminants on the scanner glass may cause black spots on the printout. For best
results, clean the scanner glass before use.
NOTE: Leaving the cover open while copying may affect the copy quality and toner
consumption.
42 Using Your Multi-Function Printer
Page 53

Copy Menu Options
1.
Paper Setting 2.Copy Setup
Paper Type
Paper Size
1 Press <Menu> to display the menu features.
2 Press the scroll button ( or ) to move the desired setting
3 Press <Select> to select the displayed setting.
Change Default: The copy options -- contrast, image quality, copy size, and the number of
copies -- can be set to the most frequently-used modes. The default settings are used unless
they are changed by using the corresponding buttons on the operator panel.
Change Default
Contrast
Quality
Reduce/Enlarge
Nomber of Copies
Timeout
Select Tray
NOTE: Pressing <Cancel> cancels the changed settings and returns to the default status.
Time Out: To set the time, the multi-function printer waits before it restores the default
copy settings. Select from 15, 30, 60, and 180 seconds. "Off" means that the settings are not
restored to the default until <Start Copy> or <Cancel> is pressed.
Using Your Multi-Function Printer 43
Page 54

Scanning
Use your Dell Laser Multi-Function Printer 1600n to turn pictures and text into editable
images on your computer. After you install the software from the Drivers and Utilities CD,
you can start scanning images using either the operator panel or applications such as Dell
ScanCenter
PaperPort is the scanning program provided with your multi-function printer.
The resolution setting to use when you scan an item using PaperPort depends on the item
type and how you plan to use the image or document after you scan it in to your computer.
For the best results, use these recommended settings.
Item Type Resolution
Documents 300 dpi black-and-white or 200 dpi grayscale or color
Documents of poor quality or that
www.dell.com/supplies | support.dell.com
contain small text
Photographs and pictures 100-200 dpi color or 200 dpi grayscale
Images for an inkjet printer
Images for a high-resolution printer
Scanning above these recommended resolutions may exceed the capabilities of the
application. If you require a resolution above those recommend in the above table, you
should reduce the size of the image by previewing (or pre-scan) and cropping before
scanning the image.
TM
, PaperPort and AdobePhotoShop.
400 dpi black-and-white or 300 dpi grayscale
150 dpi to 300 dpi
300 dpi to 600 dpi
NOTE: You can use PaperPort's built-in OCR software to copy text from scanned documents so
that you can use and edit the text in any text editing, word processing, or spreadsheet program.
The OCR process requires textual images scanned at 150 to 600 dpi and 300 dpi or 600 dpi is
recommended for graphics.
If you prefer to use another application, such as Adobe PhotoShop, you must assign the
application to the multi-function printer by selecting it from the list of available
applications via the <Select Software> button each time you start scanning. If you do not
assign an application to the <Select Software> button, PaperPort is automatically selected
when you start scanning. Refer to the Printer Settings Utility topic in your User’s Guide for
more information.
44 Using Your Multi-Function Printer
Page 55

Dell ScanCenter is a PaperPort application that enables you to scan items and send them
directly to PaperPort or other programs on your computer without first running PaperPort.
Dell ScanCenter runs as a separate application from the Windows Start Menu and displays
the Dell ScanCenter bar. For more information about using Dell ScanCenter, refer to
PaperPort’s Help menu.
Icons on the Dell ScanCenter bar represent the programs that are limited to PaperPort and
to Dell ScanCenter. To scan and send an item to a program, click the program icon and
then scan the item. Dell ScanCenter automatically starts the selected program when the
scan is complete.
Scanning from Operator Panel
1 Place a single document face down on the scanner glass.
OR
Load the document(s) to be copied face up with top edge in first into the ADF.
For details about loading original document(s), see page 36-37.
2 If necessary, press <Select Software> and select an application to which you want to
send the scanned image.
3 Press <Start Scan>. The selected application window opens. Adjust the scan settings
and start scan. For details, please refer to the user’s guide of the application.
Using Your Multi-Function Printer 45
Page 56

Scanning Using the Windows Image Acquisition (WIA) Driver
Your multi-function printer also supports the WIA driver for scanning images. WIA is one
of the standard components provided by Microsoft
cameras and scanners. Unlike the TWAIN driver, the WIA driver allows you to scan an
image and easily manipulate those images without using additional software.
NOTE: The WIA driver works only on Windows XP.
1 Place a single document face down on the scanner glass.
OR
Load the document(s) to be copied face up with top edge in first into the ADF.
For details about loading original document(s), see page 36-37.
2 Click Start → Control Panel → Printers and Other Hardware → Scanners and
www.dell.com/supplies | support.dell.com
Cameras.
3 Double-click the printer icon. The Scanners and Camera Wizard launches.
4 Choose your scanning preferences and click Preview to see how your preferences affect
the picture.
5 Enter a picture name, and select a file format and destination to save the picture.
6 Follow the on-screen instructions to edit the picture after it is copied to your
computer.
Windows XP and works with digital
46 Using Your Multi-Function Printer
Page 57

Faxing
NOTE: A computer connection is not required for faxing.
Sending a Fax
NOTE: The Dell Laser Multi-Function Printer 1600n can send color faxes if the machine to
which you are sending the fax also supports color faxes.
NOTE: Press <Cancel> to cancel a fax job at any time.
Place a single fax document face down on the scanner glass, or load the document(s)
1
face up into the ADF. For information about loading documents, see page 36-37.
2 Adjust the document resolution, if necessary, by pressing <Resolution>.
3 Adjust the document contrast, if necessary, by pressing <Menu>. When “Fax
Setup
” appears, press the scroll buttons to display “Contrast”, and then press
<Select>.
4 To send a fax automatically, enter the fax number or use speed or group dial numbers.
Press <Send Fax>, and the multi-function printer scans and stores the document into
its memory. When the entire document is stored, the multi-function printer dials the
receiving fax machine and sends the fax. If the receiving fax machine is busy or unable
to receive the fax, the multi-function printer redials at a later time.
For more information about speed or group dial numbers, see page 9~10.
NOTE: Only one document at a time is sent from the fax queue.
NOTE: If you are faxing multiple pages automatically from the scanner glass, “Another
Page?” appears on the display after the document is stored into memory. Remove the first
page, place the next page on the glass, and select “1:Yes”. Select “2:No” when all
pages are faxed.
To send a fax manually, press <On Hook Dial> and enter the fax number when you
hear a dial tone. Press <Send Fax> when you hear a high-pitched fax tone from the
receiving fax machine.
NOTE: Use the ADF when manually sending multiple-page faxes. Multiple-page faxes
cannot be sent manually from the scanner glass.
Your machines provides additional optional ways to send faxes such as Broadcasting,
Delay Fax, Priority Fax, and Toll save. You can always cancel the scheduled fax. Refer
to “Fax Feature” and “Advanced fax” in the fax menu options, see
page 50~51.
Using Your Multi-Function Printer 47
Page 58

Receiving a Fax
NOTE: The Dell Laser Multi-Function Printer 1600n cannot receive color faxes.
1
Press <Menu> until “Fax Setup” appears on the top line of the display.
The first available menu item, “Receive Mode” displays on the bottom line.
2 Press <Select>.
3 Use the scroll button ( or ) to select the default receiving mode you want to use.
You can select the following options:
• Fax mode (automatic receive mode): The multi-function printer answers an
incoming call and automatically goes into receive mode. The number of rings
before the multi-function printer answers can be set in the Ring To Answer
option. Please refer to the User’s Guide. If the user memory is full, the
multi-function printer is changed to Tel mode.
www.dell.com/supplies | support.dell.com
• Te l mode (manual receive mode): Automatic fax reception is turned off. You can
receive a fax by picking up the handset of the extension phone and then pressing
the remote receive code (refer to the User’s Guide), or by pressing <On Hook
Dial> (you can hear voice or fax tones from the remote machine) and then
<Send Fax> on the operator panel.
• Ans/Fax mode: The multi-function printer can share one telephone line with an
answering machine. In this mode, the multifunction printer will monitor the fax
signal and pick up the line if there are fax tones. If the phone communication in
your country is serial, this mode is not available.
• DRPD mode: Before using the Distinctive Ring Pattern Detection (DRPD)
option, distinctive ring service must be installed on your telephone line at your
location to dial your fax number from outside.
4 Press <Select> to save the selection.
5 To return to Standby mode, press <Return>.
Your machines provides an additional option, Secure Receive, to receive and print
received faxes. Refer to “Advanced Fax” in the fax menu options, see page 51.
48 Using Your Multi-Function Printer
Page 59

Fax Menu Options
3. Fax Setup 4.Fax Feature 5.Advanced fax 6.Reports 8.Sound/Volume
Receive Mode
Ring to Answer
Contrast
Redial Term
Redials
MSG Confirm
Auto Report
Auto Reduction
Discard Size
Receive Code
DRPD Mode
1 Press <Menu> to display the menu features.
2 Press the scroll button ( or ) to move the desired setting
3 Press <Select> to select the displayed setting.
Delay Fax
Priority Fax
Add Page
Cancel Job
Ignore Toner
Send Forward
RCV Forward
Toll Save
Junk Fax Setup
Secure Receive
Prefix Dial
Stamp RCV Name
Cover Page
ECM Mode
Phone Book
Sent Report
RCV Report
System Data
Scheduled Jobs
MSG Confirm
Junk Fax List
Speaker
Ringer
Key Sound
Alarm Sound
Fax Setup
• Receive Mode: Select the default fax receiving mode.
• Fax mode: The fax machine answers an incoming call and automatically enters
receive mode. The ring count required to enter receive mode is set in the System
Data. If the fax machine memory is full, the receive mode is automatically
changed to Tel mode.
• Tel mode: The fax machine only answers the call if the extension phone is picked
up and the remote receive code is pressed, or if <On Hook Dial> pressed and
then the <Send Fax> button is pressed when fax tones are heard.
• Ans/Fax mode: Share one phone line with Telephone Answering Device (TAD).
The TAD picks up the line but the fax machine automatically monitors and takes
the phone line if fax tones are received.
• DRPD mode: Use one telephone line to answer different phone numbers using
the Distinctive Ring Pattern Detection (DRPD). This selection is only available if
the “DRPD Mode” is set to recognize the ring patterns to automatically answer as
a fax call in the Fax Setup menu.
Using Your Multi-Function Printer 49
Page 60

• Ring to Answer: The number of incoming rings before the fax machine answers ?
see Available Fax Setup Options.
•
Contrast: Select the default contrast mode. This option is not used for Color Fax.
• Lighter Use when the original document is too dark.
• Normal Use when the original is standard typed or printed documents.
• Darker Use when the original document is too light, such as faint pencil markings.
Redial Term: The fax machine automatically redials if the remote fax machine is
•
busy.
•
MSG Confirm: A report that indicates a successful transmission.
Auto Report: A report that provides the previous 50 communications operations.
•
•
Auto Reduction: Automatically reduce the received fax page to fit the paper loaded
in the fax machine.
www.dell.com/supplies | support.dell.com
Discard Size: Discard any excess at the bottom of the page when receiving a
•
document longer than the paper. A received page outside the set margin is printed full
size on two sheets.
•
Receive Code: Initiate fax reception (with a phone plugged into the back of the
machine) by entering a receive code, *9*, when fax tones are heard. The receive code
is preset at the factory. The digit "9" can be changed, 0-9.
•
DRPD Mode: See the description under Receive Mode.
Fax Feature
• Broadcasting: Use the <Broadcasting> button to send a document to multiple
locations. A second broadcast operation is not permitted until the first one is
completed.
•
Delay Fax: Set the fax machine to send a fax at a later pre-defined time. The display
reminds you that you are in Standby mode and that a delayed fax is set.
Priority Fax: Send a high priority document ahead of reserved operations.
•
Add Page: Add documents to the previously reserved delayed transmission in the fax
•
machine's memory.
•
Cancel Job: Delete/cancel a scheduled fax job.
Ignore Toner: Set to print the incomming fax stored in memory when toner
•
cartridge is nearly empty.
50 Using Your Multi-Function Printer
Page 61

Printing Reports
The following reports are available:
•
Phonebook List: A speed dial list of the numbers stored in the memory.
• Sent Fax Report: A list of recently sent faxes.
• Received Fax Report: A list of recently received faxes.
• System Data List: A status list of the user-selectable options.
• Scheduled Job Information: A list of documents stored for Delayed or Toll Save faxes.
• Message Confirmation: Reports the fax number, the number of pages, the elapsed
time of the job, the communication mode, and the communication results.
• Junk Fax Number List: A list of numbers for blocking unwanted faxes, recognized by
the last 6 digits of the junk fax numbers.
• Multi-communication Report: Automatically printed after sending documents to
multiple locations.
• Power Failure Report: Automatically printed to indicate any data loss.
Advanced fax
The following options are available:
•
Send Forward: Set to always forward all outgoing faxes to the specified destination.
RCV Forward: Set to forward incoming faxes to another fax number.
•
• Print Local Copy: Set to print the fax, if fax forwarding is completed with no error.
Toll Save: Set to store ALL scanned faxes in memory and send at the pre-set time.
•
Junk Fax Setup: Set junk fax numbers for blocking any unwanted faxes.
•
• Secure Receive: Set Secure Receive option with or without setting a pas-code to
restrict a printout of received faxes. When a fax is received in this mode, the machine
stores it into memory and displays “Secure Receive”. To print received documents,
access Secure Receive and select "Print" with the four-digit pass-code.
NOTE: When the mode is turned off, any stored faxes are printed.
• Prefix Dial: Set a prefix dial number, up to five digits, to dial before any auto dial
number.
•
Stamp RCV Name: Set to print the page number and the date/time on a received page.
Cover Page: Set to attach the cover page with your fax. Create a cover page using the
•
Printer Settings Utility.
Using Your Multi-Function Printer 51
Page 62

• ECM Mode: Ensures that faxes are sent error free even in poor phone line conditions.
NOTICE:
1 For memory transmission, the Super Fine resolution is unavailable. The resolution
setting is automatically changed to Fine.
2 Sending a color fax is enabled only if the fax is sent manually and if the remote
machine supports color fax reception.
3 The fax machine automatically stores faxes in the memory if faxes are received while
copying, printing, or running out of consumables (paper and toner). Faxes are printed
once the machine is available.
Using an Answering Machine
www.dell.com/supplies | support.dell.com
Line
Telephone Answering
Device
Dell Laser MFP 1600n
You can connect a telephone answering device (TAD) directly to the back of your
multi-function printer as shown in Figure 1.
Set your multi-function printer to Ans/Fax mode and set the Ring to Answer to a digit
greater than the rings to answer setting for the TAD.
• When the TAD picks up the call, the multi-function printer monitors and takes the
line if fax tones are received and then starts receiving the fax.
• If the answering device is off, the printer automatically goes into Fax mode after a
predefined number of rings.
• If you answer the call and hear fax tones, the multi-function printer will answer the fax
call if you
• press <On Hook Dial> and then <Send Fax> button and hang up the receiver,
or
• press the remote receive code *9* and hang up the receiver.
52 Using Your Multi-Function Printer
Line
Figure 1
Phone
Page 63

Using a Computer Modem
Line
LINE
PC
AUX
Dell Laser MFP 1600n
Telephone Answering
Device
Line
Phone
Figure 2
If you want to use your computer modem for faxing or for a dial-up internet connection,
connect the computer modem directly to the back of your multi-function printer with the
TAD as shown here in Figure 2.
• Set your multi-function printer to Ans/Fax mode and set the Ring to Answer to a digit
greater than the rings to answer setting for the TAD.
• Turn off the computer modem's fax-receive feature.
• Do not use the computer modem if your multi-function printer is sending or receiving
a fax.
• Follow the instructions provided with your computer modem and fax application to
fax via the computer modem.
• Refer to the DELL Laser MFP 1600n User's Guide if you want to capture images using
TM
your printer and Dell ScanDirect
and send images using your fax application with
the computer modem.
Using Your Multi-Function Printer 53
Page 64

www.dell.com/supplies | support.dell.com
54 Using Your Multi-Function Printer
Page 65

SECTION 5
Maintenance
Replacing the ADF Rubber Pad
Ordering Supplies
Replacing the Toner Cartridge
Cleaning Your Multi-Function Printer
Page 66

Replacing the ADF Rubber Pad
You can purchase a ADF rubber pad from the DellTM Toner Management System or the
Dell Printer Configuration Web Tool. See your User’s Guide for more information.
1 Open the ADF Cover.
www.dell.com/supplies | support.dell.com
2 Rotate the bushing on one end of the ADF roller toward the ADF(➀) and remove the
roller from the slot(
➁).
56 Maintenance
Page 67

3 Remove the ADF rubber pad from the ADF, as shown.
4 Insert a new ADF rubber pad into place.
5 Push the ADF roller into the slot(➀) and rotate the bushing on one end of the roller
toward the document input tray(
➁).
6 Close the ADF cover.
Maintenance 57
Page 68

Ordering Supplies
You can order supplies using the DellTM Toner Management System or the Dell Printer
Configuration Web Tool.
If your multi-function printer is connected to a network, type your printer’s IP address in
your Web browser or open the Network Status Monitor Center to launch the Dell Printer
Configuration Web Tool and click the toner supplies link. For details, please refer to the
User’s Guide.
1 Click the Dell Toner Reorder Program icon on your desktop.
OR
2 From the Start menu, click Programs→ Dell→ Dell Printers→ Dell Laser MFP
→ Dell Toner Reorder Program. The Order Toner Cartridges window appears.
1600n
www.dell.com/supplies | support.dell.com
Go to www.dell.com/supplies to order supplies online.
If ordering by phone, call the number that appears under the By Telephone heading.
OR
3 If your multi-function printer is connected to a network, type the printer’s IP address
in your Web browser to launch the Dell Printer Configuration Web Tool, and click the
supplies link.
58 Maintenance
Page 69

Replacing the Toner Cartridge
CAUTION: Before performing any of the procedures listed in this section, read
and follow the safety information on page 1.
CAUTION: Do not touch the green underside of the toner cartridge. Use
the handle on the cartridge to avoid touching this area.
When the toner cartridge is near the end of its life, the LCD displays the warning message
“Toner Low”. Additional pages may be printed, but white streaks or light print will occur.
Gently shake the toner cartridge from side-to-side to distribute the toner evenly and
temporarily improve print quality. When the LCD displays the warning message “Toner
Empty Replace Toner”, printing stops and you must insert a new cartridge.
NOTE: The Dell Laser Multi-Function Printer 1600n can print received faxes when the toner is
empty. For more information, see your User's Guide.
To order more toner, go to www.dell.com/supplies.
CAUTION: For best results, use Dell toner cartridges. Print quality and printer
reliability are not guaranteed if you do not use Dell supplies.
To replace the toner cartridge:
1 Open the front cover.
Maintenance 59
Page 70

2 Lightly pull the toner cartridge straight out.
www.dell.com/supplies | support.dell.com
3 Unpack the new toner cartridge and hold the toner cartridge by the handle and gently
roll it from side-to-side to distribute the toner evenly inside the cartridge.
Save the box and the cover for shipping.
NOTE: If toner comes into contact with your clothing, wipe the toner off with a dry cloth
and wash your clothing in cold water. Hot water sets toner into fabric.
60 Maintenance
Page 71

4 Align the toner cartridge with the labeled arrows, then slide it into the multifunction
printer until it locks firmly into place.
5 Close the front cover.
Cleaning Your Multi-Function Printer
To maintain the print quality, follow the cleaning procedures below, each time the toner
cartridge is replaced or if print quality problems occur.
NOTE: Do not touch the transfer roller located under the toner cartridge when cleaning inside
the multi-function printer. Oil from your fingers may cause print quality problems.
CAUTION: Cleaning solvents that contain alcohol or other strong substances may
discolor or crack the multi-function printer cabinet.
Cleaning the Exterior
Clean the multi-function printer cabinet with a soft, damp, lint-free cloth. Do not let water
drip onto the multi-function printer or inside the multi-function printer.
Maintenance 61
Page 72

Cleaning the Interior
Paper, toner, and dust particles can accumulate inside the multi-function printer and cause
print quality problems, such as smearing or toner specks. Clean inside the multi-function
printer to prevent these problems.
1 Power the multi-function printer off and unplug the power cord. Specify the length of
time it takes for the printer to cool down.
2 Open the front cover and lightly pull the toner cartridge straight out. Set it on a clean
flat surface.
CAUTION: Do not touch the green underside of the toner cartridge.
Use the handle on the cartridge to avoid touching this area.
CAUTION: To prevent damage, do not expose the toner cartridge to light for
more than a few minutes.
www.dell.com/supplies | support.dell.com
3
With a dry and lint-free cloth, wipe away any dust and spilled toner from the toner
cartridge area and the toner cartridge cavity.
62 Maintenance
CAUTION: Do not touch the transfer roller inside the multi-function printer.
Oil from your fingers may cause print quality problems.
Page 73

4 Locate the long strip of glass (LSU) inside the top of the cartridge compartment, and
gently swab the glass to see if dirt turns the white cotton black.
5 Reinsert the toner cartridge and close the front cover.
6 Plug in the power cord and power the multi-function printer on.
Cleaning the scanner
Keeping the scanner clean helps ensure the best possible copies. Dell recommends cleaning
the scanner at the start of each day and during the day, as needed.
1 Slightly dampen a soft lint-free cloth or paper towel with water.
2 Open the document cover.
Maintenance 63
Page 74

3 Wipe the surface of the scanner glass and ADF glass until it is clean and dry.
www.dell.com/supplies | support.dell.com
4 Wipe the underside of the white document cover and white sheet until it is clean and
dry.
5 Close the document cover.
1
2
3
4
1 White Sheet
2 Document Cover
3ADF Glass
4 Scanner Glass
Cleaning the Drum
If there are streaks or spots on your print, the Organic Photo Conductor (OPC) drum of the
cartridge may require cleaning.
1 Before setting the cleaning procedure, make sure that paper is loaded in the
2 Press <Menu> on the operator panel until “Maintenance” appears on the top line
3 Press <Select>.
64 Maintenance
multi-function printer.
of the display.
The first available menu item, “Clean Drum”, displays on the bottom line.
The display confirms your selection.
The multi-function printer prints out a cleaning page. Toner particles on the drum
surface are affixed to the paper.
If the problem remains, repeat steps 1 through 3 until toner particles are not affixed to
the paper.
Page 75

SECTION 6
Troubleshooting
Clearing Jams in the ADF
Clearing Jams in the Paper Tray
More Troubleshooting
Page 76

Clearing Jams in the ADF
When a document jams while it passes through the Automatic Document Feeder (ADF),
“Document Jam” appears on the display.
NOTE: To prevent document jams, use the scanner glass for thick, thin or mixed documents.
Remove the remaining documents from the ADF.
1
If the document is jammed in the paper feed area:
a Open the ADF cover.
www.dell.com/supplies | support.dell.com
b Remove the document by gently pulling it straight up.
c Close the ADF cover. Then reload the document into the ADF.
66 Troubleshooting
Page 77

If the document is jammed in the paper exit area:
a Open the document cover and turn the release knob to remove the misfed
documents from the ADF output tray.
b Close the document cover. Then load the documents back into the ADF.
2 If you cannot see the paper or the paper does not move when you pulled, open the
document cover.
3 Turn the release knob so that you can easily seize the misfed document, and remove
the document from the roller or the feed area by carefully pulling it gently to the right.
4 Close the document cover. Then load the documents back into the ADF.
Troubleshooting 67
Page 78

Clearing Jams in the Paper Tray
Operator Panel Message Location of Jam Go to
[Paper Jam 0]
Open/Close Door
[Paper Jam 1]
Open/Close Door
[Paper Jam 2]
Check Inside
[Manual F. Jam] Manual Feeder Jam page 73.
To avoid tearing the paper, pull the jammed paper out gently and slowly. Follow the steps
below to clear the jam.
www.dell.com/supplies | support.dell.com
Paper Feed Jam (Tray 1)
1 Open and close the front cover. The jammed paper automatically exits the
multi-function printer.
If the paper does not exit, continue to step 2.
2 Pull the paper tray open.
Paper Feed Jam (Tray 1)
Paper Feed Jam (optional Tray 2)
Paper Exit Jam
Fuser Area Jam page 71.
Image below.
page 73.
page 70.
68 Troubleshooting
Page 79

3 Remove the paper by gently pulling it straight out.
If you cannot see the paper or the paper does not move when pulled, check the fuser
area. For more information, see page 71.
4 Insert the paper tray into the multi-function printer until it snaps into place.
5 Open and close the front cover to resume printing.
Troubleshooting 69
Page 80

Paper Exit Jam
1 Open and close the front cover. The jammed paper automatically exits the
multi-function printer.
If the paper does not exit, continue to step 2.
2 Gently pull the paper out of the front output tray. Skip to step 6.
www.dell.com/supplies | support.dell.com
3 If you cannot see the paper in the front output tray or the paper does not move when
pulled, open the rear cover.
70 Troubleshooting
Page 81

4 Remove the paper by gently pulling it straight out.
5 Close the rear cover.
6 Open and close the front cover to resume printing.
Fuser Area Jam
NOTE: The fuser area is hot. Take care when removing paper from the multi-function printer.
Open the front cover and lightly pull the toner cartridge straight out.
1
Troubleshooting 71
Page 82

2 Remove the paper by gently pulling it straight out.
www.dell.com/supplies | support.dell.com
3 Replace the toner cartridge and close the front cover. Printing automatically resumes.
72 Troubleshooting
Page 83

Manual Feeder Jam
“Manual F. Jam” appears on the display when you try to print using the manual feeder
and the multi-function printer does not detect paper, due to improper paper loading.
1 Locate the jammed paper in the manual feeder
2 Gently pull the paper straight out of the multi-function printer.
Paper Feed Jam (Optional Tray 2)
1 Pull the optional Tray 2 open.
2 Remove the jammed paper from the multi-function printer.
If you cannot see the paper in this area or the paper does not move when pulled, go to
step 3.
3 Pull the standard Tray 1 open.
Troubleshooting 73
Page 84

4 Pull the paper straight up and out.
www.dell.com/supplies | support.dell.com
5 Insert Tray 1 in the multi-function printer until it snaps into place.
6 Open and close the front cover to resume printing.
Tips for Avoiding Paper Jams
By selecting the correct paper types, most paper jams can be avoided. When a paper jam
occurs, follow the steps outlined in "Clearing Jams in the Paper Tray" on page 68~74.
• Follow the procedures on page 27 to load paper correctly. Ensure that the adjustable
guides are correctly positioned.
• Do not overload the paper tray. Ensure that the paper is below the paper capacity mark
on the inside wall of the paper tray.
• Do not remove the paper from the tray while your multi-function printer is printing.
• Flex, fan and straighten the paper before loading.
• Do not use creased, damp or curled paper.
• Do not mix paper types in the paper tray.
• Use only recommended print materials. Please refer to the User’s Guide.
• Ensure that the recommended print side of print materials is facing down in the paper
tray and facing up in the manual feeder.
More Troubleshooting
For more information about error messages or printing problems, see your User’s Guide.
74 Troubleshooting
Page 85

SECTION 7
Installing Options
Precautions When Installing Printer Options
Installing Printer Memory
Installing an Optional Tray 2
Page 86

Precautions When Installing Printer Options
DISCONNECTING THE POWER CORD:
Never remove the control board while the multi-function printer is plugged in.
To avoid the possibility of an electrical shock, always disconnect the power cord when
installing or removing ANY internal or external printer option.
DISCHARGE OF STATIC ELECTRICITY:
The control board and internal printer memory are sensitive to static electricity. Before
installing or removing an internal printer memory, discharge static electricity from your
body by touching something metal on any device plugged into a grounded power source. If
www.dell.com/supplies | support.dell.com
you walk around before finishing installation, discharge any static electricity once again.
Installing Printer Memory
Additional printer memory is provided on a Dual In-line Memory Module (DIMM).
NOTE: Your multifunction printer supports only Dell DIMMs. Order Dell DIMMs online at
www.dell.com.
1
Power the multi-function printer off and unplug all cables from the multi-function
printer.
2 To remove the control board cover, pull out gently, as shown.
76 Installing Options
Page 87

3 Open the lever on each side of the DIMM slots completely.
4 Remove the memory DIMM from the antistatic package. Locate the alignment
notches on the bottom edge of the DIMM.
Notches
Connection
points
NOTE: Avoid touching the connection points along the edge of the memory.
Hold the memory DIMM. Align the notches on the DIMM with the notches at the
5
top of the DIMM slot.
Installing Options 77
Page 88

6 Insert the ends of the memory DIMM into the slot on the levers.
7 Push the memory DIMM firmly in to make sure you fully insert it into the slot.
www.dell.com/supplies | support.dell.com
8 Replace the control board cover, as shown.
9 Reconnect the power cord and printer cable, and power the multi-function printer on.
78 Installing Options
Page 89

Removing the Memory
1 Follow steps 1 and 2 on page 76 to access the control board.
2 Push the levers at both ends of the DIMM slot away from the DIMM.
3 Place the DIMM in its original packaging or wrap it with paper and store it in a box.
4 Follow from step 8 on page 78.
Installing an Optional Tray 2
You can increase the paper handling capacity of your multi-function printer by installing an
optional Tray 2. This tray holds 250 sheets of paper.
1 Power the multi-function printer off and unplug all cables from the multi-function
printer.
2 Remove the packing tape and the tape fastening the interface cable from the bottom
of the optional Tray 2.
Installing Options 79
Page 90

3 Find the location of the connector and the optional tray positioners.
www.dell.com/supplies | support.dell.com
4 Place the multi-function printer over the tray, aligning the feet on the multi-function
printer with the positioners in the optional Tray2.
80 Installing Options
Page 91

5 Connect the cable into the connector on the back of the multi-function printer.
6 Load paper in the optional Tray 2. For information about loading paper in this tray, see
page 27.
7 Reconnect the power cord and cables and then power the multi-function printer on.
When you print a document on paper loaded in the optional Tray 2, you must configure the
properties of the printer driver.
To access the properties of the printer driver:
1 Click the Windows Start button.
2 For Windows 98/Me/NT 4.0/2000, click Settings and point to Printers.
For Windows XP/Server 2003, click Printers and Faxes.
3 Click the Dell Laser MFP 1600n printer.
4 Right-click the printer icon and:
In Windows 98/Me, click
In Windows 2000/XP/Server 2003, click
to
Printing Preferences.
In Windows NT 4.0, click
5 Click the Printer tab, and select Tray 2 from the Optional Tray drop-down list.
6 Click OK and print the document.
Properties.
Print Setup or click Properties and then point
Document Default.
Installing Options 81
Page 92

www.dell.com/supplies | support.dell.com
82 Installing Options
Page 93

SECTION 8
Contacting Dell
Technical Assistance
Automated Order-Status Service
Contacting Dell
Page 94

Technical Assistance
If you need help with a technical problem, Dell is ready to assist you.
1
Call technical support from a telephone near or at the printer so that technical support
can assist you with any necessary procedures. When calling Dell, use your Express Service
Code to help expedite the routing of your call to the proper support personnel.
The Express Service Code is located on the back of the multi-function printer, as shown
below.
www.dell.com/supplies | support.dell.com
Express Service
Code
NOTE: Dell's Express Service Code system may not be available in all countries.
In the U.S., Business customers should call 1-877-459-7298, and Consumer (Home and
2
Home Office) customers should call 1-800-624-9896.
If you are calling from a different country or are in a different Service area, see
"Contacting Dell" on page 85 for your local telephone number.
3
Follow the menu prompts in the automated telephone system to speak with a technical
support representative.
84 Contacting Dell
Page 95

Automated Order-Status Service
To check on the status of any Dell™ products that you have ordered, you can go to
support.dell.com,
for the information needed to locate and report on your order. See "Contacting Dell" for the
telephone number to call for your region.
Dell™, Dimension™, OptiPlex™, Dell Precision™, Latitude™, Inspiron™, DellNet™,
PowerApp™, PowerVault™, Axim™, Dell ScanCenter™, Dell™ Toner Management System
or you can call the automated order-status service. A recording prompts you
Contacting Dell
To contact Dell electronically, you can access the following websites:
• www.dell.com
•
support.dell.com
premiersupport.dell.com
•
and medium/large business customers, including Premier, Platinum, and Gold
customers)
For specific web addresses for your country, find the appropriate country section in the table
below.
NOTE: Toll-free numbers are for use within the country for which they are listed.
(technical support)
(technical support for educational, government, healthcare,
When you need to contact Dell, use the electronic addresses, telephone numbers, and codes
provided in the following table. If you need assistance in determining which codes to use,
contact a local or an international operator.
Contacting Dell 85
Page 96

Country (City)
International Access Code
Country Code
City Code
U.S.A. (Austin, Texas)
International Access Code: 011
Country Code: 1
Automated Order-Status Service
AutoTech (portable and desktop computers)
Consumer (Home and Home Office)
Technical Support
Customer Service
DellNet™ Service and Support
Employee Purchase Program (EPP) Customers
www.dell.com/supplies | support.dell.com
Financial Services website: www.dellfinancialservices.com
Financial Services (lease/loans)
Financial Services (Dell Preferred Accounts [DPA])
Business
Customer Service and Technical Support
Employee Purchase Program (EPP) Customers
Projectors Technical Support
Public (government, education, and healthcare)
Customer Service and Technical Support
Employee Purchase Program (EPP) Customers
Dell Sales
Dell Outlet Store (Dell refurbished computers)
Software and Peripherals Sales
Spare Parts Sales
Extended Service and Warranty Sales
Fax
Dell Services for the Deaf, Hard-of-Hearing, or
Speech-Impaired
Anguilla General Support
Antigua and Barbuda General Support
Department Name or Service Area,
Website and E-Mail Address
Area Codes,
Local Numbers, and
Toll-Free Numbers
toll-free: 1-800-433-9014
toll-free: 1-800-247-9362
toll-free: 1-800-624-9896
toll-free: 1-800-624-9897
toll-free: 1-877-Dellnet
(1-877-335-5638)
toll-free: 1-800-695-8133
toll-free: 1-877-577-3355
toll-free: 1-800-283-2210
toll-free: 1-877-459-7298
toll-free: 1-800-695-8133
toll-free: 1-877-459-7298
toll-free: 1-800-456-3355
toll-free: 1-800-234-1490
toll-free: 1-800-289-3355
or toll-free: 1-800-879-3355
toll-free: 1-888-798-7561
toll-free: 1-800-671-3355
toll-free: 1-800-357-3355
toll-free: 1-800-247-4618
toll-free: 1-800-727-8320
toll-free: 1-877-DELLTTY
(1-877-335-5889)
toll-free: 800-335-0031
1-800-805-5924
86 Contacting Dell
Page 97

Country (City)
International Access Code
Country Code
City Code
Argentina (Buenos Aires)
International Access Code: 00
Country Code: 54
City Code: 11
Aruba General Support
Australia (Sydney)
International Access Code: 0011
Country Code: 61
City Code: 2
Austria (Vienna)
International Access Code: 900
Country Code: 43
City Code: 1
Bahamas General Support
Barbados General Support
Website: www.dell.com.ar
Tech Support and Customer Care
Sales
Tech Support Fax
Customer Care Fax
E-mail (Australia): au_tech_support@dell.com
E-mail (New Zealand): nz_tech_support@dell.com
Home and Small Business
Government and Business
Preferred Accounts Division (PAD)
Customer Care
Corporate Sales
Transaction Sales
Fax
Website: support.euro.dell.com
E-mail: tech_support_central_europe@dell.com
Home/Small Business Sales
Home/Small Business Fax
Home/Small Business Customer Care
Preferred Accounts/Corporate Customer Care
Home/Small Business Technical Support
Preferred Accounts/Corporate Technical Support
Switchboard
Department Name or Service Area,
Website and E-Mail Address
Area Codes,
Local Numbers, and
Toll-Free Numbers
toll-free: 0-800-444-0733
0-810-444-3355
11 4515 7139
11 4515 7138
toll-free: 800-1578
1-300-65-55-33
toll-free: 1-800-633-559
toll-free: 1-800-060-889
toll-free: 1-800-819-339
toll-free: 1-800-808-385
toll-free: 1-800-808-312
toll-free: 1-800-818-341
0820 240 530 00
0820 240 530 49
0820 240 530 14
0820 240 530 16
0820 240 530 14
0660 8779
0820 240 530 00
toll-free: 1-866-278-6818
1-800-534-3066
Contacting Dell 87
Page 98

Country (City)
International Access Code
Country Code
City Code
Belgium (Brussels)
International Access Code: 00
Country Code: 32
City Code: 2
Website: support.euro.dell.com
E-mail: tech_be@dell.com
E-mail for French Speaking Customers:
support.euro.dell.com/be/fr/emaildell/
Technical Support
Customer Care
Corporate Sales
Fax
Switchboard
Bermuda General Support
www.dell.com/supplies | support.dell.com
Bolivia General Support
Brazil
International Access Code: 00
Country Code: 55
City Code: 51
Website: www.dell.com/br
Customer Support, Technical Support
Tech Support Fax
Customer Care Fax
Sales
British Virgin Islands General Support
Brunei
Country Code: 673
Customer Technical Support (Penang, Malaysia)
Customer Service (Penang, Malaysia)
Transaction Sales (Penang, Malaysia)
Canada (North York, Ontario)
International Access Code: 011
Online Order Status: www.dell.ca/ostatus
AutoTech (automated technical support)
TechFax
Customer Care (Home Sales/Small Business)
Customer Care (med./large business, government)
Technical Support (Home Sales/Small Business)
Technical Support (med./large bus., government)
Sales (Home Sales/Small Business)
Sales (med./large bus., government)
Spare Parts Sales & Extended Service Sales
Department Name or Service Area,
Website and E-Mail Address
Area Codes,
Local Numbers, and
Toll-Free Numbers
02 481 92 88
02 481 91 19
02 481 91 00
02 481 92 99
02 481 91 00
1-800-342-0671
toll-free: 800-10-0238
0800 90 3355
51 481 5470
51 481 5480
0800 90 3390
toll-free: 1-866-278-6820
604 633 4966
604 633 4949
604 633 4955
toll-free: 1-800-247-9362
toll-free: 1-800-950-1329
toll-free: 1-800-847-4096
toll-free: 1-800-326-9463
toll-free: 1-800-847-4096
toll-free: 1-800-387-5757
toll-free: 1-800-387-5752
toll-free: 1-800-387-5755
1 866 440 3355
88 Contacting Dell
Page 99

Country (City)
International Access Code
Country Code
City Code
Cayman Islands General Support
Chile (Santiago)
Country Code: 56
City Code: 2
China (Xiamen)
Country Code: 86
City Code: 592
Colombia General Support
Costa Rica General Support
Sales, Customer Support, and Technical Support
Tech Support website: support.ap.dell.com/china
Tech Support E-mail: cn_support@dell.com
Tech Support Fax
Home and Small Business Technical Support
Corporate Accounts Technical Support
Customer Experience
Home and Small Business
Preferred Accounts Division
Large Corporate Accounts GCP
Large Corporate Accounts Key Accounts
Large Corporate Accounts North
Large Corporate Accounts North Government and
Education
Large Corporate Accounts East
Large Corporate Accounts East Government and
Education
Large Corporate Accounts Queue Team
Large Corporate Accounts South
Large Corporate Accounts West
Large Corporate Accounts Spare Parts
Department Name or Service Area,
Website and E-Mail Address
Area Codes,
Local Numbers, and
Toll-Free Numbers
1-800-805-7541
toll-free: 1230-020-4823
818 1350
toll-free: 800 858 2437
toll-free: 800 858 2333
toll-free: 800 858 2060
toll-free: 800 858 2222
toll-free: 800 858 2557
toll-free: 800 858 2055
toll-free: 800 858 2628
toll-free: 800 858 2999
toll-free: 800 858 2955
toll-free: 800 858 2020
toll-free: 800 858 2669
toll-free: 800 858 2222
toll-free: 800 858 2355
toll-free: 800 858 2811
toll-free: 800 858 2621
980-9-15-3978
0800-012-0435
Contacting Dell 89
Page 100

Country (City)
International Access Code
Country Code
City Code
Czech Republic (Prague)
International Access Code: 00
Country Code: 420
City Code: 2
Website: support.euro.dell.com
E-mail: czech_dell@dell.com
Technical Support
Customer Care
Fax
TechFax
Switchboard
Denmark (Copenhagen)
International Access Code: 00
Country Code: 45
www.dell.com/supplies | support.dell.com
Website: support.euro.dell.com
E-mail Support (portable computers):
den_nbk_support@dell.com
E-mail Support (desktop computers):
den_support@dell.com
E-mail Support (servers):
Nordic_server_support@dell.com
Technical Support
Customer Care (Relational)
Home/Small Business Customer Care
Switchboard (Relational)
Fax Switchboard (Relational)
Switchboard (Home/Small Business)
Fax Switchboard (Home/Small Business)
Dominica General Support
Dominican Republic General Support
Ecuador General Support
El Salvador General Support
Department Name or Service Area,
Website and E-Mail Address
Area Codes,
Local Numbers, and
Toll-Free Numbers
02 2186 27 27
02 2186 27 11
02 2186 27 14
02 2186 27 28
02 2186 27 11
7023 0182
7023 0184
3287 5505
3287 1200
3287 1201
3287 5000
3287 5001
toll-free: 1-866-278-6821
1-800-148-0530
toll-free: 999-119
01-899-753-0777
90 Contacting Dell
 Loading...