

Page 1
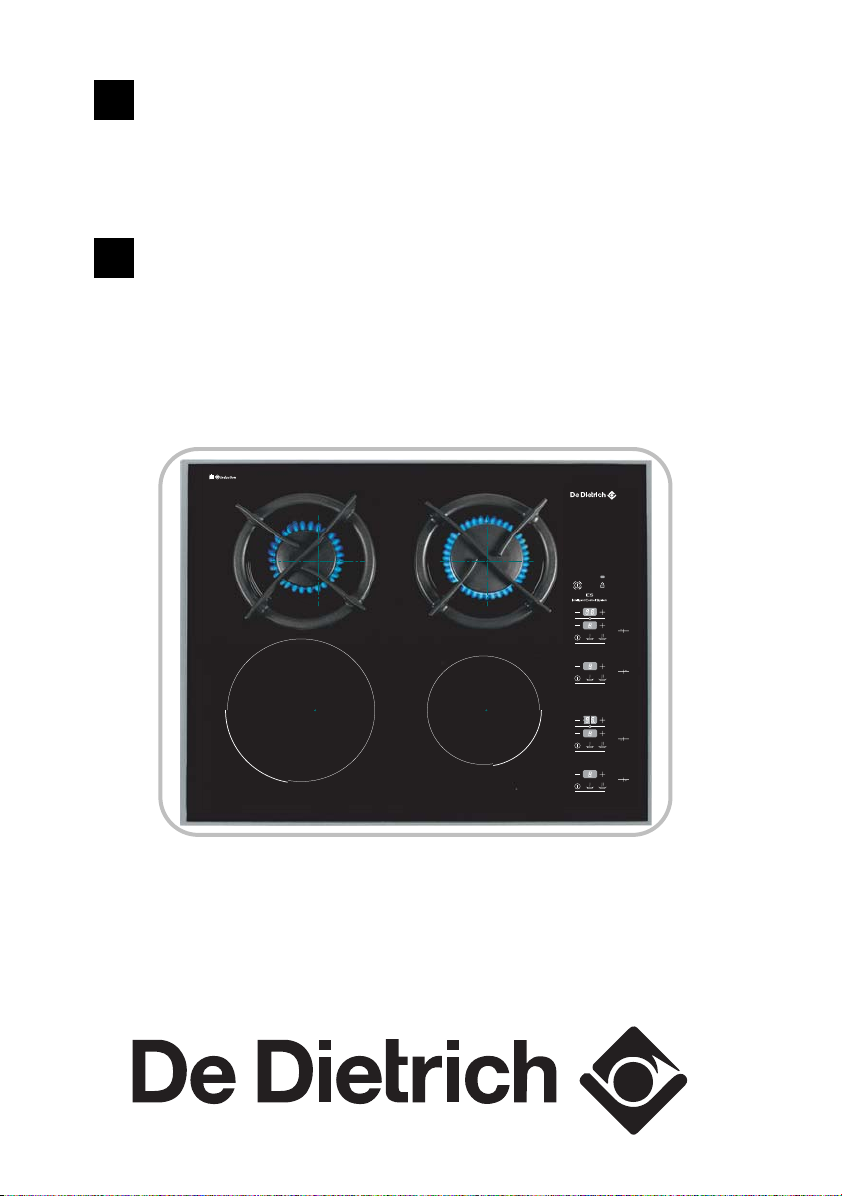
Le guide d’utilisation de
votre table de cuisson
Hob operating guide
FR
EN
Page 2

Throughout the manual,
Indicates safety instructions,
Indicates advice and tips
Contents
Your hob in complete safety 31
What does your hob look like? 32
What does your control panel look like? 33
Easily install your hob 34
Flush-mounting advice 35-37
Connecting the gas supply 38-39
Changing the gas supply 40-43
Connecting the electricity supply 44
Use your hob in complete simplicity 45
How do you switch on and adjust the power of the rings? 45
How do you use the burner/ring timer? 46
Which pans are compatible with gas rings? 47
Choosing pans - induction safety 48-49
How should you clean your hob? 50
Trouble shooting minor faults
and anomalies
51-52
Gas cooking guide 53
Induction ring cooking guide 54
After Sales Service 56
29
EN
Page 3

30
Dear Customer,
You have just bought a DE DIETRICH hob. Thank you for your
custom.
Our research teams have designed a new generation of
appliances, which with their quality, a designer look and a
technological advances are outstanding products revealing a
unique know-how.
With its contemporary, refined lines your DE DIETRICH hob will
blend harmoniously with your kitchen, combining perfect
technological mastery with excellent cooking performances and a
luxury finish.
In the range of DE DIETRICH products, you will also find a vast
choice of ovens, hoods, dishwashers and built-in refrigerators that
you can match up with your DE DIETRICH hob.
Thanks to these "new objects of value", which serve as landmarks
in our daily lives, DE DIETRICH, a benchmark for excellence,
offers a real invitation to a new art of living.
The DE DIETRICH Brand.
Editorial
Page 4
31
YOUR HOB COMES PRESET FOR NATURAL GAS.
Your hob in complete safety
- We have designed this cooking hob for
use by private individuals in their homes.
- As part of our commitment to constantly
improving our products, we reserve the
right to make changes to them based on
technological advances to their technical,
functional and/or esthetic properties.
- These cooking hobs are meant to be
used exclusively for cooking beverages
and foodstuffs and do not contain any
asbestos-based materials.
- All cooking should take place under your
surveillance.
- Consult this guide before installing and
using your appliance.
In the event that a crack becomes
visible in the glass worktop,
immediately unplug the appliance
and contact the After-Sales
Service department.
- Do not store CLEANING products or
FLAMMABLE products (aerosol cans or
containers under pressure, as well as
papers, cookbooks, etc.) in the cabinet
underneath your cooking hob.
- Using a gas cooking appliance results in
the generation of heat and humidity in
the location where it is installed.
Make sure that your kitchen is wellventilated.
- As a safety measure, do not forget to
close the general supply tap for gas
distributed by pipe or the tap of the tank
for butane or propane gas after use.
The CE mark is affixed to these hobs.
- This appliance's packing materials are
recyclable. Recycle them and play a role in
protecting the environment by depositing
them in local authority containers provided
for this purpose.
Your appliance also contains
various recyclable materials. It is
therefore marked with this logo
to indicate that, in European
Union countries, used appliances
must not be mixed with other
waste. Appliance recycling
organised by your manufacturer will thus
be carried out in optimum conditions, in
accordance with European directive
2002/96/CE relating to electrical and
electronic equipment waste. Contact your
local council or your retailer to find out the
drop-off points for used appliances that
are nearest to your home.
We thank you for your help in protecting
the environment.
Caring for the environment
EN
- - This appliance is not intended to
be used by persons (including
children) with reduced physical,
sensory or mental abilities, or persons
lacking experience or awareness,
unless using it with the help of a
person responsible for their safety, or
under supervision and with prior
instruction in its use. Please make
sure that children do not play with
the appliance.
Page 5
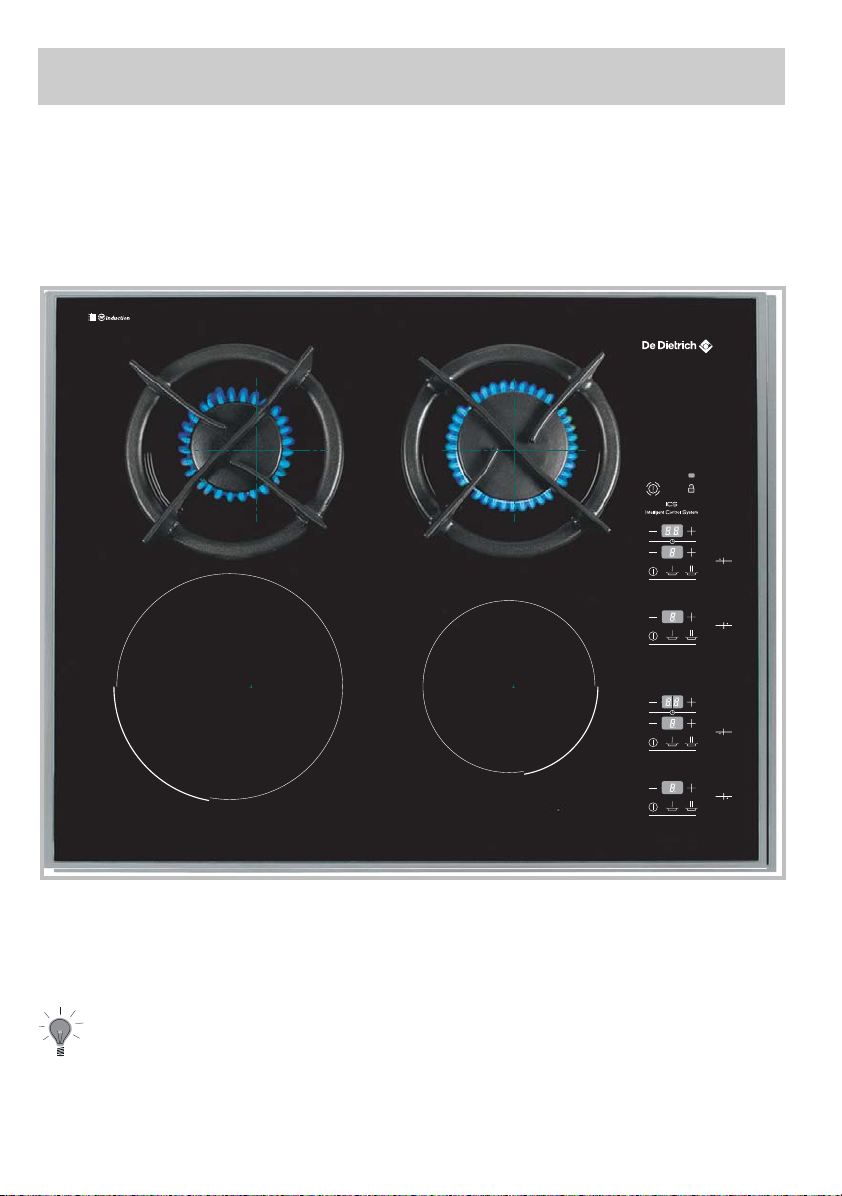
This hob's control panel has touch sensitive controls.
To use a function key...
(*) The powers are given in G20/20 mbar.
32
What does your hob look like?
Semi-fast burner
1.5 kW*
High speed burner
3.1 kW*
Induction ring
(Ø 21 cm)
Induction ring
(Ø 16 cm)
Semi-fast burner 1,5 kW*
High speed burner 3,1 kW*
Induction ring
(Ø 21 cm)
Induction ringÿÿ
(Ø 16 cm)
2 1 5 1
I
N
N
O
D
I
U
T
C
Page 6
33
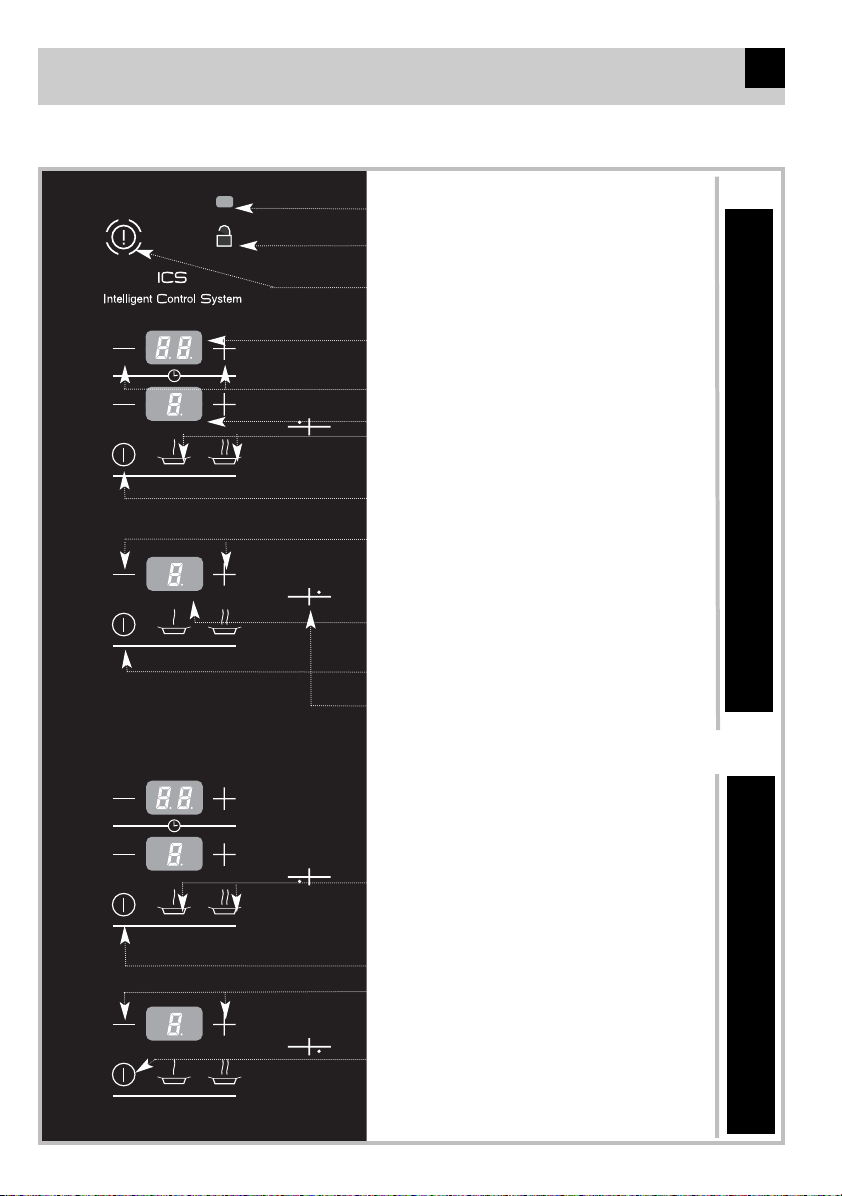
What does your control panel look like?
LOCK WARNING LIGHT
CONTROL PANEL LOCKING/UNLOCKING KEY
BURNER MARKER
REAR LEFT RING ON/OFF KEY
REAR RIGHT RING ON/OFF KEY
DISPLAY OF THE POWER LEVEL SELECTED
FRONT LEFT RING ON/OFF KEY
FRONT RIGHT RING ON/OFF KEY
BURNER POWER LEVEL ADJUSTING KEYS
BURNER POWER LEVEL ADJUSTING KEYS
DIRECT ACCESS TO PRESET FRONT
LEFT RING POWER LEVELS
DIRECT ACCESS TO PRESET REAR
LEFT RING POWER LEVELS
DISPLAY OF THE POWER LEVEL SELECTED AND
RESIDUAL HEAT INDICATORS
MAIN OFF KEY
TIMER TIME DISPLAY
TIMER SETTING
GAS CONTROLS
INDUCTION CONTROLS
EN
Page 7
The hob must only be fitted by
qualified fitters and technicians.
Before installation, check that
the local distribution conditions
(gas type and pressure) and the
appliance's settings are
compatible.
The setting conditions are written on
a label in the pouch and on the
packaging.
As it is not connected to a fume
evacuation device, the hob must be
installed in accordance with current
regulations and used in a well
ventilated location. Particular
attention must be paid to the
provisions relating to ventilation.
Easily install your hob
34
In this regard, as combustion is only
possible thanks to the oxygen in air,
the air must be constantly renewed
and the fumes must be vented (a
minimum air flow of 2 m3/hr per kW
of gas power is required).
Example:
60 cm hob - 2 gas burners
3 + 1.5 = 4.5 kW.
A minimum air flow of 4.5 kW x 2 =
9m3/hr.
These hobs comply with the heating
of units in line with standard EN
60335-2-6 and class 3 with regard to
installation (in accordance with
standard EN 30-1-1).
Flush-mounting advice
Width
Depth
Thickness
Unit cutout
Model
56 cm 49 cm
Depends on the unit
Total dimensions
above the work
surface
65 cm 51.8 cm 5 cm
Total dimensions
below the work
surface
55 cm 47 cm 5.1 cm
Page 8

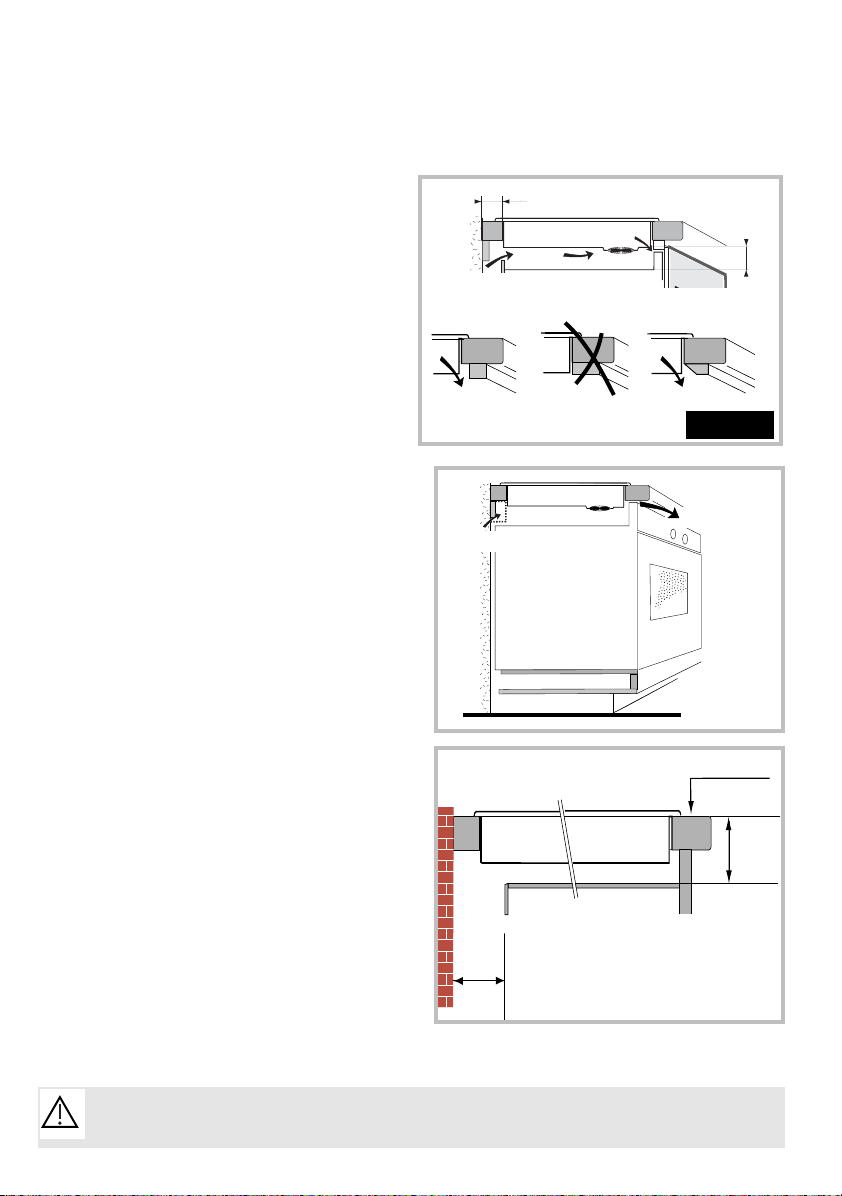
Easily install your hob
The hob must be flush-mounted in the
top of a support unit at least 3 cm
thick, made from a material that is
heat resistant or that is covered in
such a material.
To avoid inhibiting the handling of
cooking utensils, there should be no
units or walls within 30 cm of the hob
to the left and right.
If a horizontal partition is positioned
beneath the hob, it must be fitted
between 100 and 150 mm above the
work surface. In any case, do not
store spray cans or pressurised
containers in any compartments
undereath the hob.
Place the hob in the opening of the
support unit, taking care to pull the
hob towards you.
Put the pan supports and burner caps
and heads into position.
Connect the hob's supply lead to your
kitchen's electricity supply (see "Con-
necting the electricity supply" to
the hob).
If you wish you can lock the hob into
position using attachments that come
with screws (see picture opposite) and
are secured to the corners of the
housing. You must use the holes
provided for this purpose.
Stop screwing when the attachment starts to become distorted.
Do not use a screwdriver.
Flush-mounting advice
Mounting
attachment
Work
surface
35
Mounting
holes
70 cm min
30
cm min
30
cm min
3
cm min
5.3
cm min
EN
70 cm mini
30 cm mini
49 cm
56 cm
5,3 cm mini
3 cm mini
30 cm mini
Page 9
36
Easily install your hob
Flushing-mounting advice (continued)
● Case of flush-mounting above a unit
with a door or draw (Fig. 1).
Make sure that the unit's cross piece
does not prevent the passage of air. If
necessary, create a bevel.
If your hob is mounted above an oven,
you must make sure that it is in a low
position.
You should avoid installing your hob
above an oven that is not ventilated at
the front.
Create a 40 cm2 air inlet in the wall to
the left or right of the oven unit.
.
Ventilation space
Fig. 1
The hob's thermal safety mechanisms prevent it from being used
simultaneously with an oven in pyrolysis mode.
Min 4mm
Gas hob
Front of
unit
Ventilation
space
40 mm
min
100 mm
min
Work surface
Min 40 cm
2
5 cm
min
4 cm min
4 cm mini
5 cm
mini
Page 10

Easily install your hob
To ensure a perfect seal between the housing and the work surface, stick the foam
seal to the frame's outer edge.
Stick down the seal provided in the plastic
bag before installing the hob:
1-Remove the pan supports and burner
caps and heads while marking their position.
2-Turn the hob over and carefully place it
over the opening so as not to damage the
electrodes plugs.
3-Stick the foam seal, delivered with the
appliance, to the frame's outer edge.
This seal ensures a perfect seal between
the glass and the work surface.
4-Put the burner heads, caps and pan
supports back into place.
37
Flush-mounting advice (continued)
Seal
● Case of flush-mounting above an
oven (Fig. 2) in a low position.
IF THE APPLIANCE BENEATH YOUR
HOB CAUSES OVERHEATING (Fig. 3)
The hob is equipped with safety mechanisms, in particular an anti-overheating
device, which will detect a high temperature:
a series of small lines or an F7 will be displayed on the control panel. In this case, we
recommend that you make an opening at
the side to limit the effects of overheating
caused by the appliance installed below.
Opening on the side
of the unit
e.g. 8 cm x 5 cm
Fig. 3
MIN 4 mm
MIN 5 cm
5 cm
mini
8 cm mini
MIN 4 mm
Fig. 2
It is important to make sure that the ventilator grates beneath your hob remain
unobstructed. In all installation scenarios, your induction hob must be well ventilated.
- If the ventilation conditions described above are ensured, your hob may be installed
above any household appliance.
min
min
EN
Page 11

38
Easily install your hob
Connecting the gas supply
Natural gas
Meter
Gas
If the hob is installed above an oven or if
the proximity of other heat generating elements threatens to cause the connection
to heat up, it is vital that the connection be
made using a rigid pipe. If a hose or soft
pipe (case of butane gas) is used, it must
not come into contact with any of the
unit's moving parts or enter an area that is
likely to be obstructed.
● Preliminary remarks
fig.A fig.B
● Possible connections
The gas supply must be connected in line
with current regulations in the country of
installation.
FIXED NATURAL GAS SUPPLY.
For the user's safety, you must only choose one of the 3 following connections:
- Connection with a rigid pipe made
from copper and with screw on mechanical
connectors (G1/2 gas standard mark).
Make the connection directly at the end of
the elbow fitted on the appliance.
- Connection with a wavy metal
(stainless steel) hose with screw on me-
chanical connectors whose lifetime is
unlimited (fig. A).
- Connection with a reinforced rubber
hose with screw on mechanical
connectors whose lifetime is 10 years
(fig. B).
Wavy metal hose with
mechanical connectors
Connection through
hose with
mechanical
connectors
When connecting your hob's gas supply, if you have to change the direction
of the elbow fitted on the appliance:
①
Change the gasket (provided in the plastic bag).
②
Screw on the elbow's nut while not exceeding a torque of 17 N.m.
All soft pipes and hoses whose lifetime is limited must have a maximum length of 2 metres and be accessible along their entire length. They must be re-
placed before the end of their lifetime (marked on the pipe). Whatever the
means of connection chosen, check that the connection is leaktight, after installation, with soapy water.
Page 12

Easily install your hob
39
Connecting the gas supply (continued)
● Possible connections
GAS SUPPLY FROM A CYLINDER
OR TANK (BUTANE/PROPANE
GAS).
For the user's safety, you must only
choose one of the following 3 connections:
- Connection with a rigid pipe made
from copper with screw on mechanical
connectors (G1/2 gas standard mark).
Make the connection directly at the end
of the elbow fitted on the appliance.
- Connection with a wavy metal
(stainless steel) hose with screw on
mechanical connectors whose lifetime
is unlimited (fig. A).
- Connection with a reinforced rub-
ber hose with screw on mechanical
connectors whose lifetime is 10 years
(fig. B).
In an existing system, a soft pipe fitted
with clamps whose lifetime is 5 years
may be used. It is necessary in this case
to use an adaptor without forgetting to
fit a seal between the adaptor and the
hob's elbow (fig. C)
Screw on the adaptor with a torque not
exceeding 25 N.m.
You can obtain the adaptor and the seal
from your After-Sales Service Department.
BUTANE/PROPANE
Compulsory pressure regulator
propane
butanene butanene
Seal
(not provided)
Adaptor
(not included)
Clamp
(not included)
fig. A
Wavy metal hose
with mechanical
connectors
Hose
connection
Connection
through hose
with mechanical
connectors
fig. B
fig. C
EN
Page 13

Easily install your hob
40
Changing the gas supply
During this operation to be performed before connecting, you must:
➊
Turn the gas supply changing
switch TO THE LEFT.
❷
Adapt the gas connection.
❸
Change the injectors.
➍
Connect the electricity supply
➊
TURN THE GAS SUPPLY CHAN-
GING SWITCH.
If your system is to be supplied with
butane/propane gas, you must turn
the gas supply changing switch at the
front right of your hob to the butane
position (fig. 1), in other words to the
left.
❷
ADAPT THE HOB CONNECTION
to the new gas setting. Refer to the
paragraph "Connecting to the gas
supply".
❸
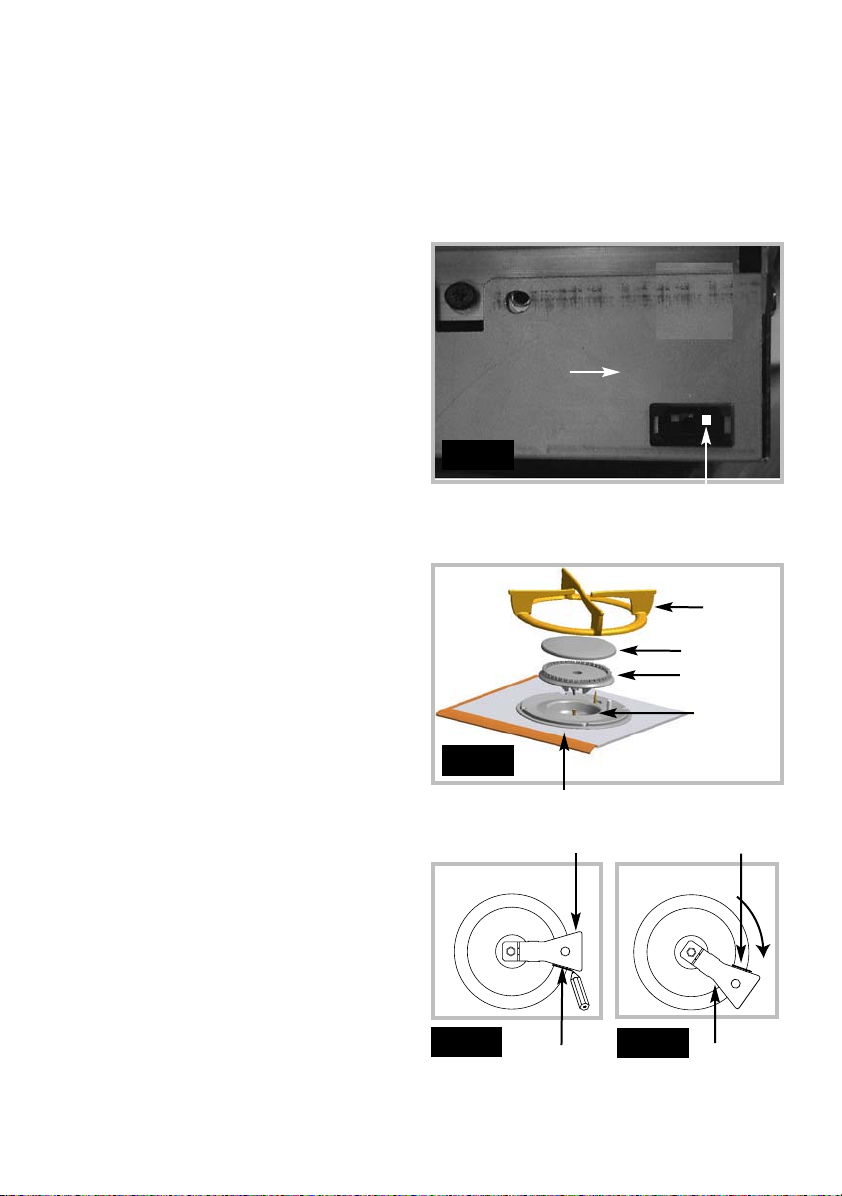
CHANGE THE INJECTORS as fol-
lows:
•
Remove all the pan supports and
burner caps and heads.
•
Using the wrench provided, unscrew the injectors at the bottom of
each dish and remove them
(fig 2).
● Changing from natural gas to
butane/propane.
GAS SUPPLY
CHANGING SWITCH
BUTANE
Network gas
(natural gas)
Fig. 1
Cap
Head
dish
Pan
support
Glass top
Fig. 2
This hob comes preset for natural
gas.
The injectors needed for adaptation to
butane/propane can be found in the
plastic bag containing the instructions.
Refer to the corresponding "Connec-
ting the gas supply" paragraph.
On each gas supply change, tick the
box corresponding to the new gas on
the label in the plastic bag (see the
"gas properties" table in this section).
Page 14

41
Easily install your hob
Changing the gas supply (continued)
•
Replace with the injectors provided
in the plastic bag, in compliance with
the table of gas properties at the end
of this section; to do this:
➪ First of all screw them in manually
until the injector is locked into place.
➪ Apply the wrench to the injector as
far as it will go.
➪ Draw a line on the burner plate
using a pencil at the place indicated
(fig. 3).
➪ Turn the wrench clockwise until the
line appears on the other side (fig.
4). Warning! Exceeding this limit
may damage the product.
•
Refit all the burner heads, caps and
pan supports.
➍
CONNECT the hob's electric lead
to your single phase network (220240 V~). Refer to the paragraph
"Connecting to the electricity
supply".
● Changing from natural gas to butane/propane (continued).
Wrench
Wrench
Line
Line
Fig. 4
Fig. 3
YOUR HOB IS NOW READY TO RUN ON BUTANE/PROPANE GAS.
EN
Page 15
42
Easily install your hob
Changing the gas supply (continued)
During this operation, TO BE PERFORMED BEFORE CONNECTING, you must:
➊
Turn the gas changing switch
TO THE RIGHT.
❷
Adapt the gas connection.
❸
Change the injectors.
❹
Connect to the electricity supply
➊
TURN THE GAS SUPPLY CHANG-
ING SWITCH.
If your system is to be supplied with natural gas, you must turn the gas supply
changing switch at the front right of your
hob to network gas position (natural gas)
(fig. 1), or in other words to the right.
❷
ADAPT THE HOB CONNECTION
to the new gas setting. Refer to the paragraph "Connecting to the gas supply".
❸
CHANGE THE INJECTORS as follows:
•
Remove all the pan supports and burner
caps and heads.
•
Using the wrench provided, unscrew
the injectors in the bottom of each crucible
and remove them (fig 2).
•
Replace with the injectors provided in
the plastic bag, in compliance with the
table of gas properties at the end of this
section; to do this:
➪ First of all screw them in manually until
the injector is locked into position.
➪ Apply the wrench to the injector as far
as it will go.
➪ Draw a line on the burner plate using a
pencil at the place indicated (fig. 3).
➪ Turn the wrench in a clockwise direction
until the line appears on the other side
(fig. 4). Warning! Exceeding this limit
may damage the product.
➪ Refit all the burner heads, caps and pan
supports.
❹
Connect to the electricity supply.
● Changing from Butane/Propane gas
to natural gas
Cap
Head
Crucible
Pan
support
Glass top
GAS SUPPLY
CHANGING SWITCH
BUTANE
Network gas
(natural gas)
Fig. 1
Fig. 2
Wrench
Wrench
Line
Fig. 4
Fig. 3
YOUR HOB IS NOW READY TO RUN ON NETWORK GAS (NATURAL GAS)
Line
Page 16

Appliance intended to be installed for use with: Butane Propane Natural Natural
FR ....................................Cat : II2E+3+ gas gas
GB - ES - PT .....................Cat : II2H3+
G30 G31 G20 G25
Hourly rate below 28-30 mbar 37 mbar 20 mbar 25 mbar
At 15°C under 1013 bar
High speed burner
Mark marked on the injector 88 88 137 137
Nominal heat release rate (kW) 3.10 3.10 3.10 3.10
Reduced heat release rate (with safety mech.) (kW) 0.830 0.870
Hourly rate (g/h) 225 221
Hourly rate (l/h) 295 343
Semi-fast burner
Mark marked on the injector 62 62 94 94
Nominal heat release rate (kW) 1.45 1.45 1.5 1.5
Reduced heat release rate (with safety mech.) (kW) 0.620 0.615
Hourly rate (g/h) 105 104
Hourly rate (l/h) 143 166
Hob total
Total heat release rate (kW) 4.55 4.55 4.60 4.60
Maximum rate (g/h) 330 325
(l/h) 438 509
43
Easily install your hob
Changing the gas supply (continued)
● Gas characteristics
The table opposite shows where the injectors are positioned on your appliance according to
the type of gas used. Each number is marked on the injector.
MARKING OF THE INJECTORS
(1) The heating powers are given
only by way of indication. They de-
pend on the pan's type and shape.
Subject to modifications.
Natural gas
94 137
Butane/propane gas
62 88
MARKING OF THE INJECTORS
Operating voltage 220-240 V~ - 50 Hz
- Standby consumption 2,5 Wh
- Max operating consumption 20 Wh
Total electric power absorbed 3100 W
(1)
Dimensions of the hob:
- Width 650 mm
- Depth 520 mm
Weight 11,4 kg
Dimensions of housing:
- Width 549 mm
- Height 59 mm
- Depth 470 mm
FR-GB FR-GB FR-GB
FR
ES-PT ES -PT ES -PT
EN
Page 17

H05V2V2F - T90
Cross-section of
conductors in mm2
Fuse
220-240 V~ - 50 Hz
3 conductors
including 1 for the
earth
1,5
16 A
CABLE CROSS-SECTION TO BE USED
44
Easily install your hob
•
This hob comes with a power cable
(H05V2V2F, cross-section 1.5 mm2)
with 3 conductors (including 1 for the
earth: yellow/green). These conductors must be connected to the network by means of a CEI 60083 standardised phase + earth + neutral plug
or an omnipolar cutout device conform to the installation guidelines currently in force.
The plug must be accessible after
installation.
Warning:
If the power cable is damaged, it
must be replaced by a cable or a
special kit available from the
manufacturer or its After-Sales
Service Department.
•
Connect the wires to the electricity
system, paying attention to the
colours of the wires (see picture
opposite).
Connecting the electricity supply
The protective wire (green/yellow) is connected to the appliance's earth terminal and must be connected to the electricity system's earth terminal .
If the power cable is damaged, it must only be replaced by the manufacturer, its
After Sales Service department or a similarly qualified person, to avoid danger.
If a hob is used that is not connected to the earth or has a faulty earth connection,
the manufacturer may not be held liable for any accidents and their possible
consequences.
● Gas hob
Neutral
(N)
Live
(L)
Earth
Green/yellow
wire
Blue wire
Black, brown or
red wire
Page 18

45
•
Select the "GAS" or "INDUCTION"
ring that you want to use by pressing the
corresponding key (fig. 1).
➡ The display for the power level selected will show a flashing .
•
Select the heating power by pressing
the ring power level adjusting keys according to choice (direct access) (fig. 2).
Your hob will then automatically ignite.
•
You can adjust the ring's power level
by pressing the or keys.
This power level is shown in the display
by:
➡ Pressing to select position
(fig 3).
➡ Pressing to select position
(fig. 4).
•
Locking: press the control for
around 3 seconds and the indicator will
light up.
The controls will be locked, except for the
rings' on/off keys and the general off key.
•
Unlocking: press the control for
around 3 seconds (fig. 5). The indicator
will go out. All the hob's controls will
again be enabled.
•
Main off control: you can immediately switch off all the rings in operation
by using the main off key .
Use your hob in complete simplicity
How do you switch on and adjust the power of the rings?
In case of accidental extinguishment (e.g. air currents), your hob is equipped with an
automatic reigniting system. This is limited to 2 reignitions.
The gas ring flames are smaller at the pan support bars to protect the enemel of the
pan supports
The cooking area may remain hot for
several minutes.
A
"H"
will be displayed during this
time. While it is shown, avoid touching
the areas concerned.
•
Residual heat indicator
EN
Fig. 3
Fig. 2
Fig. 1
Fig. 4
Fig. 5
Page 19

46
•
The front left "INDUCTION"
rings and rear left "GAS" rings
have a timer (maximum duration of
99 minutes). They may be used
without it, however.
•
Ignite the ring as indicated on the
previous page "How do you switch
on and adjust the power of the
rings?"
•
Press the timer key .
When you press the key , the timer
will start up and the time (in minutes)
will be shown on the display.
•
Keep your finger on the key until
the required time is reached.
When this time has elapsed, the ring
will go out and the timer display will
flash .
You will then hear a series of intermittent "beeps". To stop them press
any timer control key.
•
To modify the cooking time, you
can press the or key at any
time.
•
To stop the timer, press the key
until the timer display goes out. The
burner will continue to function
without the timer.
How do you use the burner/ring timer?
For the last minute, the countdown will be displayed in seconds.
-When the cooking time has elapsed, the burner will automatically go out (the supply of
gas to the burner will be cut off).
Use your hob in complete simplicity
Fig. 1
Page 20

47
Use your hob in complete simplicity
Which pans are compatible with gas rings?
•
Recommended pan diameters:
Adjust the ring of flames so that they
do not go over the edge of the pan.
Do not use pans with concave or
convex bases.
Do not leave a gas ring burning beneath an empty pan.
Do not use pans that partially cover
the control panel.
Do not use diffusers, toasters, steel
meat broilers and stewpots with legs
resting on or touching the glass top.
RIGHT
WRONG
CONVEX
CONCAVE
Keep the natural ventilation holes open, or install a mechanical ventilation device
(mechanical ventilation hood).
Intensive and prolonged use of the appliance may require additional ventilation,
for example, by opening a window or through more effective ventilation, for example by increasing the mechanical ventilation power if such exists (a minimum air flow of 2 m
3
/hr per
kW of gas power if necessary).
Example for this hob:
Total power: 1.5 + 3.1 = 4.5 kW.
A minimum rate of 4.5 kW x 2 = 9 m3/hr
Using a gas cooking appliance causes the production of heat and humidity in the room
where it is installed. Make sure that your kitchen is well ventilated.
As a safety measure, don't forget to turn off the network gas general control or the buta-
ne/propane gas cylinder tap after use.
Large burner
HIGH SPEED
18 to 28 cm
Medium-sized burner
SEMI-FAST
16 to 22 cm
EN
Page 21

48
• Enamelled steel containers
with or without a non-stick
coating: saucepans, deep fryers,
frying pans or grills.
• Cast iron pans: to prevent
scratching of your hob's glassceramic surface, avoid sliding them
on the hob or choose a pan with an
enamel base.
• Stainless steel pans suitable for
induction: the majority of stainless
steel pans are suitable for cooking
through induction (saucepans, stew
pots, frying pans or deep fryers).
• Aluminium pans with a special
base: you should choose pans with a
thick base that provide more
homogeneous cooking (the heat is
more evenly spread).
The hob bears a "class induction"
mark
By choosing a pan marked with the
same logo, you will be assured of its
perfect compatibility with your hob
under normal conditions of use.
To help you to choose, a list of
utensils is provided with these
instructions.
Choosing pans - induction safety
● Which materials are
incompatible?
G
LASS, CERAMIC OR EARTHENWARE
PANS
, THOSE MADE FROM ALUMINIUM
WITHOUT A SPECIAL BASE OR FROM
COPPER OR CERTAIN NON
-MAGNETIC
STAINLESS STEELS
● The "pan" test
Thanks to its cutting edge
technology, your induction hob
is able to recognise the
majority of pans. Place your pan
on a heating area, at power level 4,
for example. If the display
remains fixed your pan is
compatible. If it flashes, your
pan cannot be used for induction
cooking. Even pans whose bases
are not completely flat may be
compatible; providing, however,
that the bases are not too distorted.
● Automatic-Stop
Automatic-stop is one of your hob's
safety functions.
It starts up automatically if the user
forgets to turn off whatever they
are preparing:
The display for the heating area
concerned shows AS and an audible
"beep" is emitted for around 2
minutes. This AS display will remain
visible until you press one of the
keys for the ring in question. An
audible double beep will confirm
your action.
●
Which pans are the most suitable?
You probably already have suitable
pans.
After intensive use, the cooking
area may remain hot for several
minutes.
An " H " will be displayed during this
time. While it is showing, avoid
touching the areas concerned.
● Residual heat indicator
Power level used The ring automatically
goes out after
between 1....4 8 hours
between 5....7 2 hours
above .. 8 1 hour
Use your hob in complete simplicity
Page 22

Small containers
Slowly-cooked preparations
(sauces, creams, etc). Preparing of
small quantities or individual
portions ...
Multiservice
For frying pans for grilling.
Deep fryers and pressure cookers
49
•
When you use a pan with a nonstick inside coating (such as Teflon)
without adding or with very little oil,
preheat it on position 3 or position 6
for a short interval. Never use position
8 or 9.
•
Never heat a closed tin, as it may
explode (this precaution is also valid
for other cooking methods).
•
You are advised against putting
down metal objects such as knives,
forks, spoons and lids on the cooking
surface as they may heat up.
Choosing pans - induction safety (continued)
•
The hob must never be used as
storage space.
For cooking, never use
aluminium foil, or never directly
place products packaged with
aluminium on the induction hob.
The aluminium would melt and
would permanently damage your
appliance.
●
"Electronic" safety mechanism
If the temperature of the electronic
circuits becomes excessive, a safety
mechanism automatically reduces the
power delivered by the hob.
●
"Empty saucepan" safety mechanism
Each heating area is equipped with a
safety mechanism that constantly
detects the temperature of the
heating area. This means that there is
no more risk of overheating owing to
empty saucepans.
● Precautions for use
If there is an oven beneath your hob (see "Flush-mounting" paragraph), the hob's thermal
safety mechanisms prohibit its use while the oven is in "pyrolysis" mode.
While the induction hob is in use, do not place magnetisable objects on the glass top (e.g.
credit cards, cassette tapes, etc).
For wearers of active implants (pacemakers, insulin pump, etc): your induction hob generates an
electromagnetic field in its immediate environment. We therefore recommend that you contact the
manufacturer of your active implant to identify any incompatibilities.
Use the cooking areas according to the pans
Ø 16 cm
Ø10 ..... 18 cm
Ø 21 cm
Ø18 ..... 24 cm
EN
Use your hob in complete simplicity
Page 23
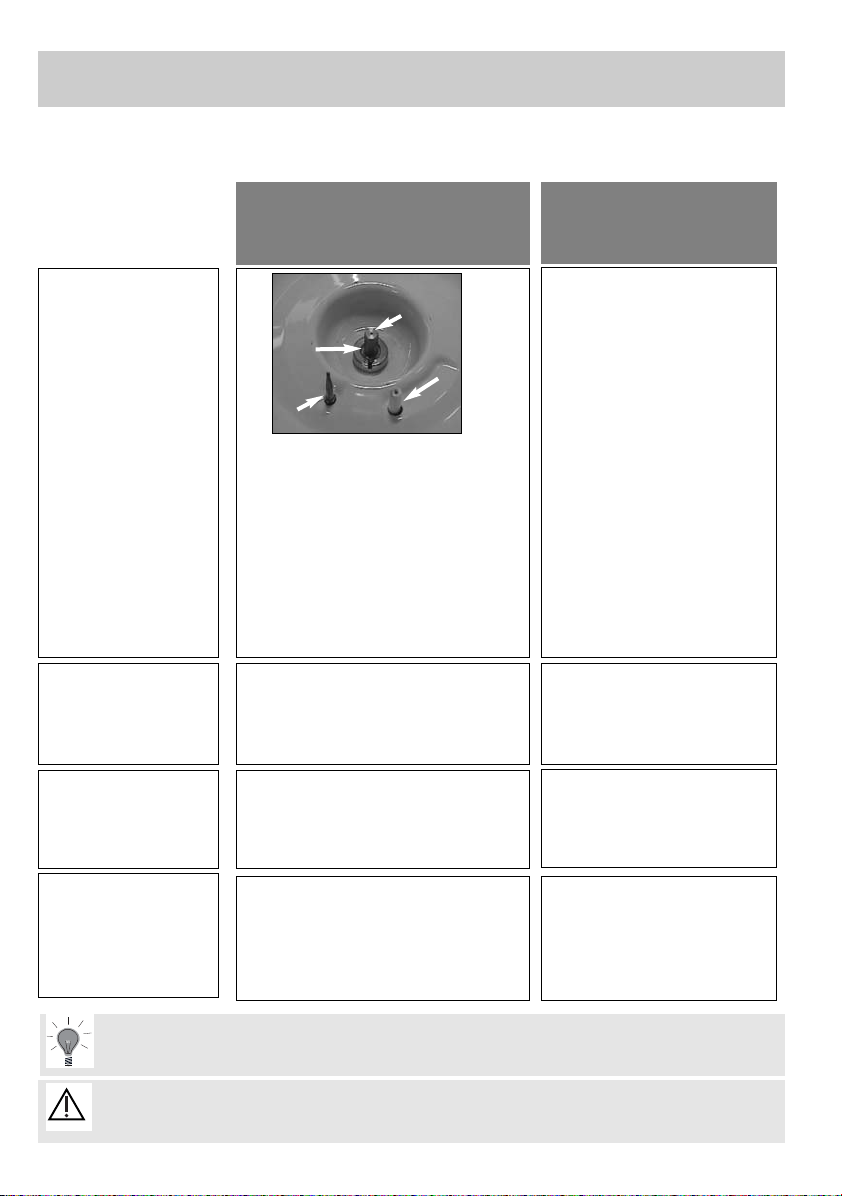
➡ "If the electrodes are clogged, clean
them using a small brush with hard
bristles (non-metallic).
The gas injector is at the centre of the
burner in the form of a crucible. Make
sure that it is not blocked during cleaning, as this would affect the performance of your hob. If the injector becomes blocked, use a safety pin to unblock it.
50
If a crack should appear in the glass top, immediately disconnect the appliance from
its power supply to avoid electric shock, and contact the After Sales Service.
Try to clean the hob's parts by hand rather than in the dishwasher.
- Do not use a rough sponge to clean your hob.
- Do not use steam cleaners.
Thermocouple
Nut
Injector
Electrodes
PRODUCTS AND
ACCESSORIES
TO BE USED
✓ Small brush with hard
bristles.
✓ Soft cream cleanser.
✓ Bathroom sponge.
Your hob is easier to clean before it has completely cooled down. However, you should
never clean your appliance while it is in operation. Set all the controls to zero.
HOW DO I PROCEED?
➤
Cleaning the
electrodes and
injectors
➡ In the case of stubborn stains, use a
non-abrasive cream then rinse with
clean water. Carefully wipe each part of
the burner before reusing your hob.
➤
Cleaning the
pan supports and
gas burners
✓ Bathroom sponge.
✓ Special glass/glass-ceramic
products (you can buy cleaning
products from your After Sales
Service team).
➡ Clean with hot water, then wipe. In
the case of stubborn stains, use special
glass/glass-ceramic products.
➤
Cleaning the
glass top
✓ Bathroom sponge.
✓ Special glass/glass-ceramic
products (you can buy cleaning
products from your After Sales
Service team).
➡ Clean with hot water, then wipe.
Perhaps finish off with the rough side
of a sponge, then wipe. In the case of
stubborn stains, use special glass-ceramic products (example opposite).
➤
Cleaning the
induction rings
How should you clean your hob?
Page 24

51
You may have a doubt about the performance of your hob ...
this doesn't necessarily
mean that there is a fault. In any case, check the following points:
WHAT IS HAPPEN-
ING?
WHAT SHOULD BE
DONE?
ERROR
CODES
➡ This is your hob's powering up procedure.
➡ If you have pressed the main off
key ; this is normal.
✓ Wait for a few seconds until the display showing goes out.
✓Your hob is ready for use.
➤2 beeps then displaying
of F1 or F2 or F3 or F...
on the timer , then
displaying of A1 or A2 or
A...
➡ Power failure.
✓ Check the power.
✓ If the power is on and the fault
persists, call the After Sales Service.
➤ Your hob's controls are
not working and the displays are showing nothing.
➡ Your burner is unable to light up.
✓ Check that the gas tap is open or
that the burners are correctly assembled.
✓ Check that the injectors are correct
for the gas used (see table of technical
properties).
✓ Check that there are sparks on the
corresponding burner.
✓ After all these checks, try switching
on the burner again by pressing
➤ "displays E4
and the hob emits a
beep.
One of the faulty burner's indicators lights up.
➡ You are experiencing a power failure or you have used the main off key
..
✓ Press to use your hob normally.
➤ displays a
time that flashes. (time
remaining before power
failure).
➡ The burner concerned is unusable.
➡ However, you can use the other
burners.
✓ Call your After Sales Service,
specifying the error code displayed.
➡ Your hob is unusable.
✓ Switch off the gas.
✓ Call your After Sales Service,
specifying the error code displayed.
➤ displays E6
Trouble shooting minor faults and anomalies
➡ There is a flame or a hot object on
the safety element (thermocouple).
✓ Switch off the gas.
✓ Call your After Sales Service.
➤ displays E7:
one of the indicators
lights up to indicate the
faulty burner
➡ The hob has 2 faults.
✓ Call your After Sales Service,
specifying the indicators lit.
➤ displays E8 and
several indicators light up
to indicate the faulty burners.
The displaying of an error code automatically inhibits use of the timer .
➤ displays E2 or
E5, one of the faulty burner's indicators is flashing
and a beep is emitted.
EN
Page 25

52
WHAT IS HAPPENING ?
WHAT SHOULD BE DONE?
➡ Igniting of the burners:
No sparks are produced when the keys are pressed
✓ Check the electrical connecting of the hob
✓ Check that the electrodes are clean
✓ Check that the burners are clean and correctly assem-
bled
➡ When a burner is ignited, sparks are produced at all
the burners
✓ This is normal. The ignition function is centralised and
controls all the burners at the same time.
➡ Sparks are produced, but the burners do not ignite.
✓ Check that the gas inlet is not trapped
✓ Check that the inlet length is less than 2 metres.
✓ Check the gas inlet opening.
✓ If the gas is coming from a cylinder or tank, check
that it isn't empty
✓ If you have just installed the hob or changed the gas
cylinder, repeat the ignition process several times until
the gas reaches the burners.
✓ Check that the injector is not blocked, and if this is
the case, unblock it using a safety pin.
✓ Ignite your burner before placing your pan on it.
➡ When in reduced mode, the burner goes out or the
flames remain large
✓ Avoid strong currents or air in the room.
✓ Check the correspondence between the gas used and
the injectors installed (see the marking of the injectors
in the section "gas properties").
Reminder : the hobs are originally set for network gas
(natural gas).
✓Check that the gas supply changing switch is correctly
positioned (see the "Changing the gas supply" para-
graph).
✓Call the After Sales Service team to find out the reduced burner settings.
Trouble shooting minor faults and anomalies
➡ The flames have an irregular appearance.
✓ Check the cleanness of the burners and of the injec-
tors underneath the burners, check that the burners are
correctly assembled, etc…
✓ Check that there is enough gas in your cylinder.
➡ Your hob releases an odour the first few times that it is
used.
✓ Heat up each induction ring for ½ hour with a pan full
of water.
➡ Your hob is making a slight clicking noise
✓ This is normal. This noise is produced by the distribu-
tion of power between the two induction rings.
➡ Your saucepans make a noise when they are used on
the induction rings.
✓ At a high power level, this phenomenon is normal with
some types of saucepan. It presents no threat to the
hob.
Page 26

53
Gas cooking guide
- To adjust your cooking time as effectively as possible, pass the container from one
burner to another (for example: from the high speed burner to the semi-fast one:
blanquette, osso-bucco, etc).
- For grilling requiring a high temperature, select the high speed burner.
- For delicate sauces and to reheat cooked dishes, use the semi-fast burner.
PREPARATIONS Time Hig speed Semi-
fast
SOUPS Broths 8-10 minutes X
Thick soups
FISH Court-bouillon 8-10 minutes X
Frozen fish 8-10 minutes X
SAUCES Hollandaise, bearnaise, X
bechamel, aurore 10 minutes X
VEGETABLES Chicory, Spinach X
Cooked garden peas 25-30 minutes X
Provencale-style tomatoes 15-20 minutes X
Fried potatoes X
Pasta X
MEATS Steak X
Blanquette, Osso-bucco 90 minutes X
Fried escalope 10-12 minutes X
Tournedos (cast iron grill pan) 10 minutes X
FRYING Chips X
Fritters X
DESSERTS Rice pudding 25 minutes X
Fruit compotes X
Pancakes 3-4 minutes X
Chocolate 3-4 minutes X
Custard 10 minutes X
EN
Page 27

S
EALING
/C
OOKING
/B
ROWNING
C
OOKING
/
PREPARATIONS
C
OOKING
RETURNING TO THE BOIL
BRINGING TO THE BOIL GENTLE BOILING SIMMERING
SOUPS Broths 93
Thick soups 72
F
ISH Court-bouillon 9 765
Frozen fish 5
S
AUCES Thick, flour-based 754
Butter-based with 32
eggs (bearnaise, hollandaise)
V
EGETABLES Chicory, Spinach 963
Dried vegetables, 76 3
Boiled potatoes 965
Fried potatoes 765
Sautéed potatoes 75
Defrosting of vegetables 32
Meats
Thin cuts of meat 8
Fried steak 6
Grilling (cast iron grill pan) 8
F
RYING Frozen chips 9
Fresh chips 9
V
ARIATIONS Pressure cooker 95 (from bubbling)
Compotes 4
Pancakes 5
Custard 5
Melted chocolate 32
Jam 6
Milk 6
Fried eggs 6
Pasta 976
Baby food jars (bain marie) 5
Stews 76 3
Creole rice 92
Rice pudding 62
Keep hot 1
Induction ring cooking guide
Depending on the type of cooking, there may be several setting modes. Example for
PASTA: boiling of water mark 9
, addition of pasta and returning to boiling point mark 7,
cooking mark 6
.
54
Page 28

EN
55
Page 29

9964-3062 - 06/07
After Sales Service
Any maintenance on your equipment should be undertaken by:
-either your dealer,
-or another qualified mechanic who is an authorized agent for the brand appliances.
When making an appointment, state the full reference of your equipment (model, type and serial number). This information appears on the manufacturer's nameplate attached to your
equipment.
Brandt Appliances - société par actions simplifiée au capital de 10.000.000 euros RCS Nanterre 440 302 347.
Réf. appareils, Appliance ref: DTI721 */*
To preserve your appliance, we recommend that you use Clearit cleaning products.
Clearit offers you professional products and solutions designed for the daily care of your
household appliances and kitchens.
They are on sale at your regular retailer, along with a complete line of accessories and
consumables.
Professional expertise serving individuals.
 Loading...