

Page 1

DOP460*
Le guide d’utilisation de votre four
User Manual for Your Oven
Betriebsanleitung des Backofens
D
e gebruikshandleiding van uw oven
Brugervejledning til ovnen
Guía de utilización del horno
O
guia de utilização do seu forno
FR
GB
DE
NL
DK
ES
PT
ΟΟδδηηγγίίεεςς χχρρήήσσηηςς ττοουυ φφοούύρρννοουυ σσααςς
EELL
99633824_ML.qxp 12/07/2005 16:39 Page 1
Page 2

2
Tout au long de la notice,
vous signale les consignes de sécurité,
vous signale les conseils et les astuces
Edito P.3
Comment se présente votre four ?
Descriptif de l’appareil P.4
Accessoires P.5
Conseils de sécurité P.6
Comment installer votre four ?
Raccordement électrique P.7
Changement du câble d’alimentation P.8
Dimensions utiles pour encastrer votre four P.9
Comment utiliser votre four ?
Le détail de votre programmateur P.10
Comment mettre à l’heure l’horloge du four ? P.11
Comment faire une cuisson immédiate ? P.12
Comment programmer une cuisson ? P.13
Comment utiliser la minuterie ? P.14
Comment faire une cuisson Economique ? P.15
Comment personnaliser la température de cuisson ? P.16
Comment mettre en veille votre afficheur ? P.16
Comment verrouiller les commandes (sécurité enfants) ? P.16
Comment utiliser EOLYSE P.17
Comment changer l’ampoule ? P.17
Modes de cuisson du four P.18-19
Comment utiliser la fonction ICS ? P.20-27
Comment nettoyer la cavité de votre four ?
Qu’est-ce qu’une pyrolyse ? P.28
Dans quel cas faut-il effectuer une pyrolyse ? P.28
Comment faire une pyrolyse ? P.28-29
Que faire en cas d’anomalies de fonctionnement P.30
Qui contacter ?
P.31
S
ommaire
99633824_ML.qxp 12/07/2005 16:39 Page 2
Page 3

3
FR
Edito
Chère Cliente, Cher Client,
Vous venez d'acquérir un four DE DIETRICH et nous vous en remercions.
Nos équipes de recherche ont conçu pour vous une nouvelle génération d'appareils, qui par leur qualité, leur design et leurs évolutions technologiques en
font des produits d'exception et révèle un savoir-faire unique.
Avec des lignes modernes et raffinées, votre nouveau four DE DIETRICH
s'intègre harmonieusement dans votre cuisine et allie parfaitement la maîtrise
technologique, les performances de cuisson, et le luxe esthétique.
Vous trouverez également dans la gamme des produits DE DIETRICH, un vaste
choix de tables de cuisson, de hottes aspirantes, de lave-vaisselle, de fours
micro-ondes et de réfrigérateurs intégrables, que vous pourrez coordonner à
votre nouveau four DE DIETRICH.
Bien entendu, dans un souci permanent de satisfaire au mieux vos exigences
vis à vis de nos produits, notre service consommateurs est à votre disposition
et à votre écoute pour répondre à toutes vos questions ou suggestions (coordonnées à la fin de ce livret).
Grâce à ces "nouveaux objets de valeurs" qui nous servent de repère dans nos
vies de tous les jours, DE DIETRICH, référence de l'excellence, est une véritable
invitation à un nouvel art de vivre.
La Marque DE DIETRICH.
99633824_ML.qxp 12/07/2005 16:39 Page 3
Page 4
4
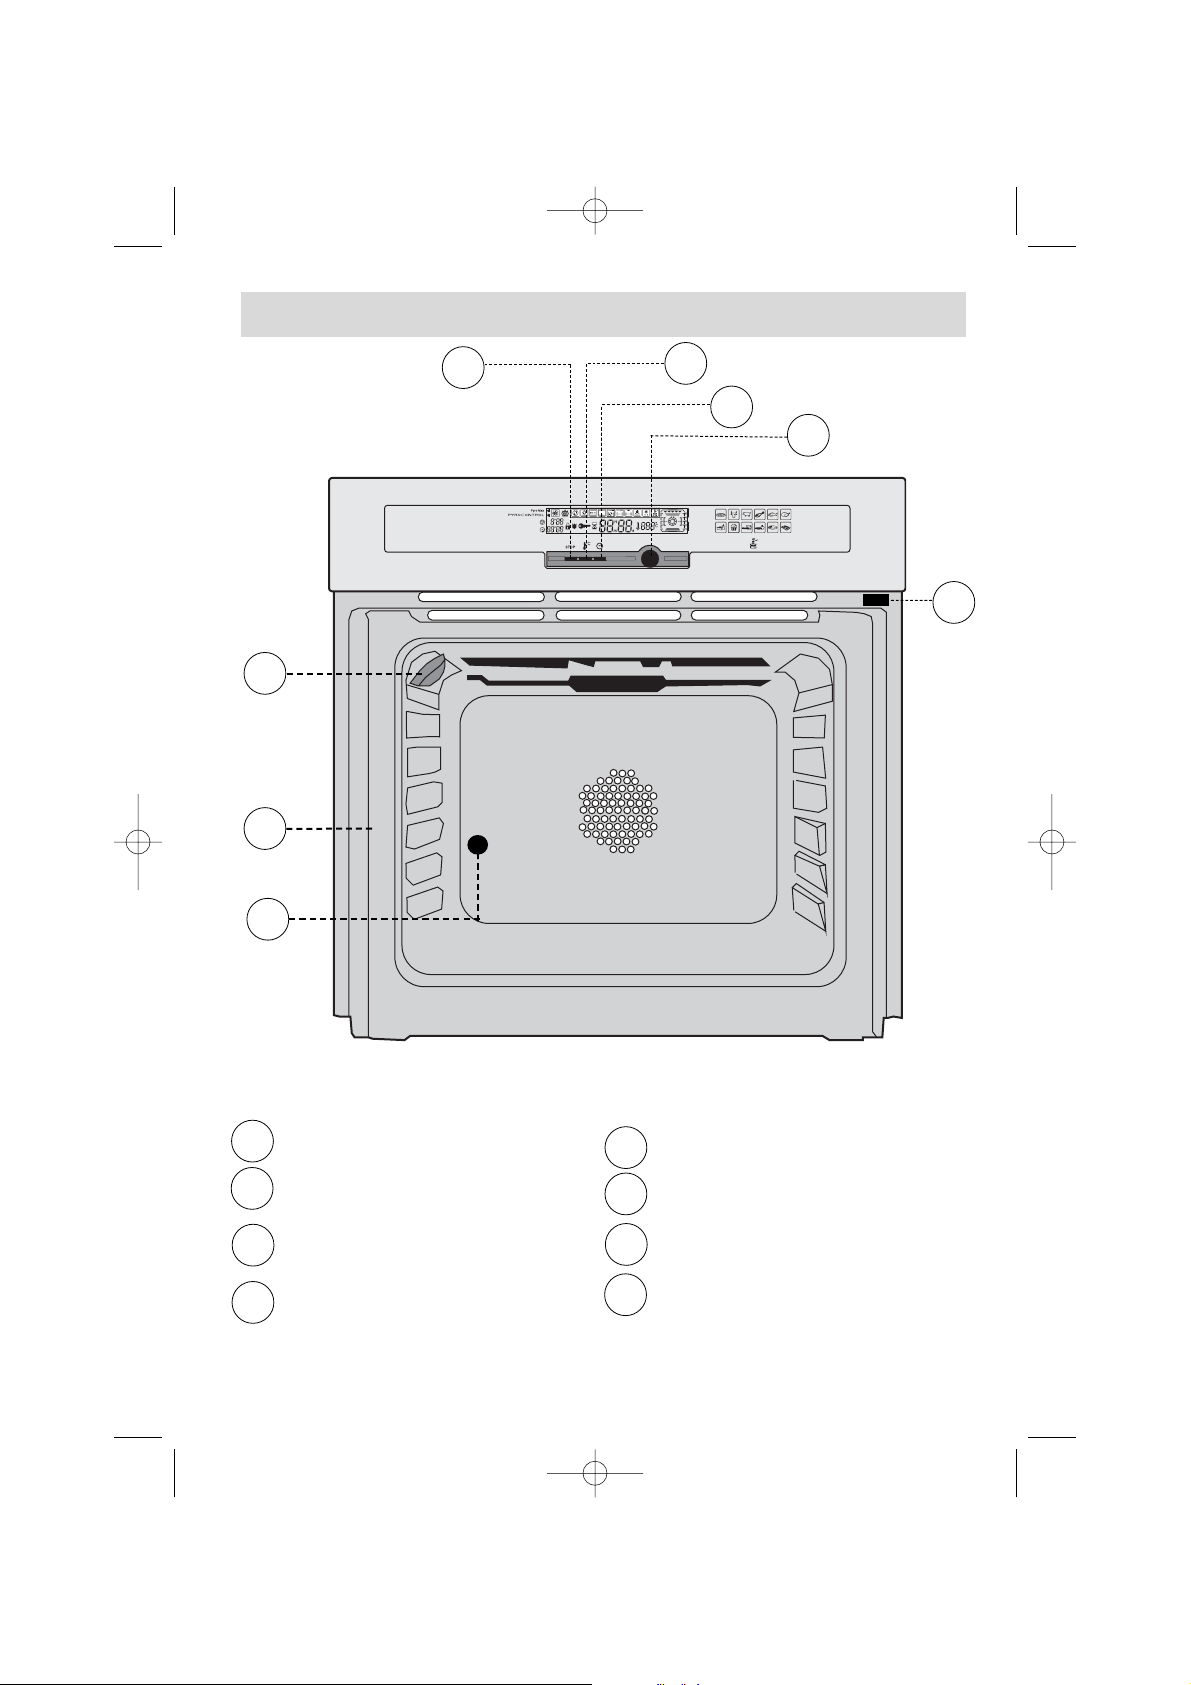
Comment se présente votre four ?
1
3
5
Stop / annulation
Réglage de la température
Réglage des durées / fin de
cuisson et mise à l’heure
Sélecteur de fonctions
DESCRIPTIF DE L’APPAREIL
Contact de détection d’ouverture
de porte
Trou pour tourne broche
Indicateur de gradins
Lampe
1
2
3
4
6
7
8
1
2
3
4
5
5
6
7
8
99633824_ML.qxp 12/07/2005 16:39 Page 4
Page 5
FR
Accessoires
AR
AV
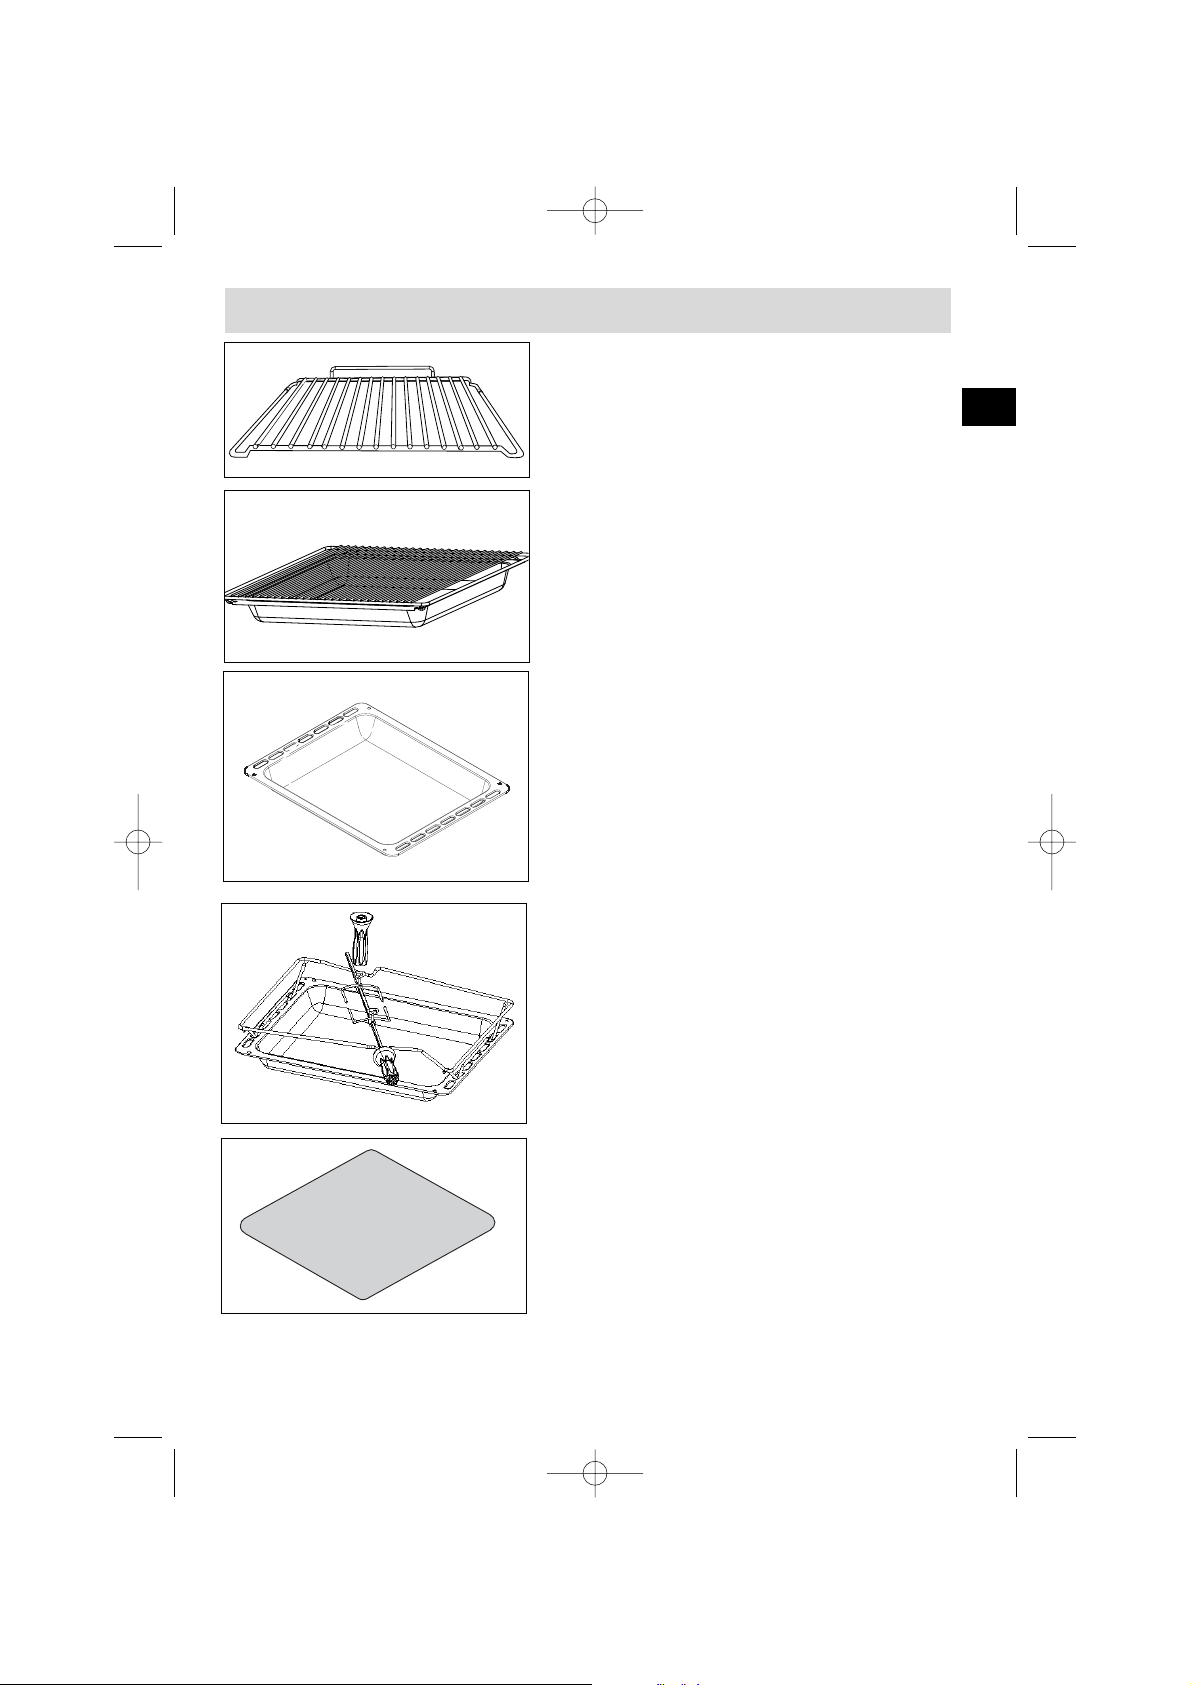
Grille sécurité anti basculement
cambrée
Sa forme est étudiée pour vous permettre de
positionner votre plat entre 2 niveaux de gradin.
Plat + grille (lèchefrite)
Inséré sous la grille, il recueille les jus et les graisses
des grillades. Il peut aussi être utilisé à demi rempli
d'eau pour des cuissons au bain-marie.Evitez de
poser directement dans ce plat des rôtis ou des
viandes car vous aurez automatiquement d'importantes projections sur les parois du four.
Plat multi usages (lèchefrite)
Il sert à recueillir le jus et les graisses de cuisson réalisées en gril fort ou gril pulsé.
Il peut être utilisé comme plat de cuisson en
appropriant la taille du morceau à cuire (ex:une
volaille avec les légumes autour, à température
modérée). Inséré dans les gradins sous la grille,
il recueille les jus et les graisses des grillades.
Il peut aussi être utilisé à demi rempli d'eau
pour des cuissons au bain-marie.
Tournebroche
• Positionnez le support broche dans les encoches
du plat lèche frite (voir dessin).
• enfournez l’ensemble au deuxième gradin(en partant du bas). Après avoir embroché la pièce de viande à rôtir, placez la broche sur le support, glissez l’ensemble jusqu’àce que la pointe de la broche soit dans
le moteur situé au fond du four. Retirez la poignée en
la dévissant. Après la cuisson, sortez l’ensemble. A
l’extrémité de la poignée, une empreinte vous permet
de dévissez les fourchettes.
Plaque pâtisserie anti-adhérente
(
à poser sur grille)
Posée sur la grille support de plat, elle s’utilise pour la
cuisson de pâtisserie, tarte, pizza.
Recouverte d’un revêtement anti-adhérent, les aliments n’accrocheront pas.
Munissez vous de gants isolants pour la manipuler à la
sortie du four. Laissez la refroidir avant de la nettoyer
manuellement à l’évier avec un produit à vaisselle. Evitez les éponges grattantes.
ATTENTION : Ne coupez pas dessus avec un couteau ou une roulette à pizza métallique, utilisez plûtot des ustensiles en plastique ou en silicone.
Ne pas utiliser la plaque au delà de 250°C ainsi qu’en fonction PYROLYSE.
5
99633824_ML.qxp 12/07/2005 16:39 Page 5
Page 6

6
Conseils de sécurité
Merci de prendre connaissance de ces conseils avant d’installer et
d’utiliser votre four. Ce four a été conçu pour être utilisé par des particuliers
dans leur lieu d’habitation. Il est destiné exclusivement à la cuisson des denrées
alimentaires. Ce four ne contient aucun composant à base d’amiante.
PREMIERE UTILISATION :
Avant d’utiliser votre four pour la première fois, chauffer le à vide, porte fermée,
pendant 15 minutes environ sur la position maxi afin de “roder” l’appareil. La laine
minérale qui entoure la cavité du four peut dégager, au début, une odeur particulière due à sa composition. De même, vous constaterez peut-être un dégagement
de fumée. Tout ceci est normal.
UTILISATIONS SUIVANTES :
- Assurez vous que votre porte de four est bien fermée afin que le joint
d’étanchéité remplisse correctement sa fonction.
- Ne laissez personne s’appuyer ou s’asseoir sur la porte du four ouverte.
- Lors de l’utilisation du gril porte entre-ouverte, les parties
accessibles ou les surfaces peuvent devenir chaudes. Eloignez les jeunes
enfants.
- Lors de son utilisation, l’appareil devient chaud. Veillez à ne pas
toucher les éléments chauffants situés à l’intérieur du four.
- Après une cuisson, ne prenez pas à main nue la casserolerie (grille, tournebroche, léchefrite, berceau de tournebroche...), utilisez une manique ou un tissu
isolant.
- Ne pas utiliser de nettoyeur vapeur ou à haute pression.
- Ne garnissez pas votre four de feuilles en aluminium. Sinon, il en résulterait une accumulation de chaleur qui influencerait désavantageusement le résultat de la cuisson et du rôtissage et endommagerait l’émail.
- Pour toute intervention de nettoyage dans la cavité du four, le
four doit être arrêté.
- Pendant une pyrolyse, les surfaces accessibles deviennent plus
chaudes qu’en usage normal. Il y a lieu d’éloigner les jeunes enfants.
- Avant la pyrolyse, retirez toute la casserolerie.
- Si l’appareil est pourvu d’une prise de courant, celle-ci doit rester accessible après encastrement.
99633824_ML.qxp 12/07/2005 16:39 Page 6
Page 7
7
FR
Comment installer votre four ?
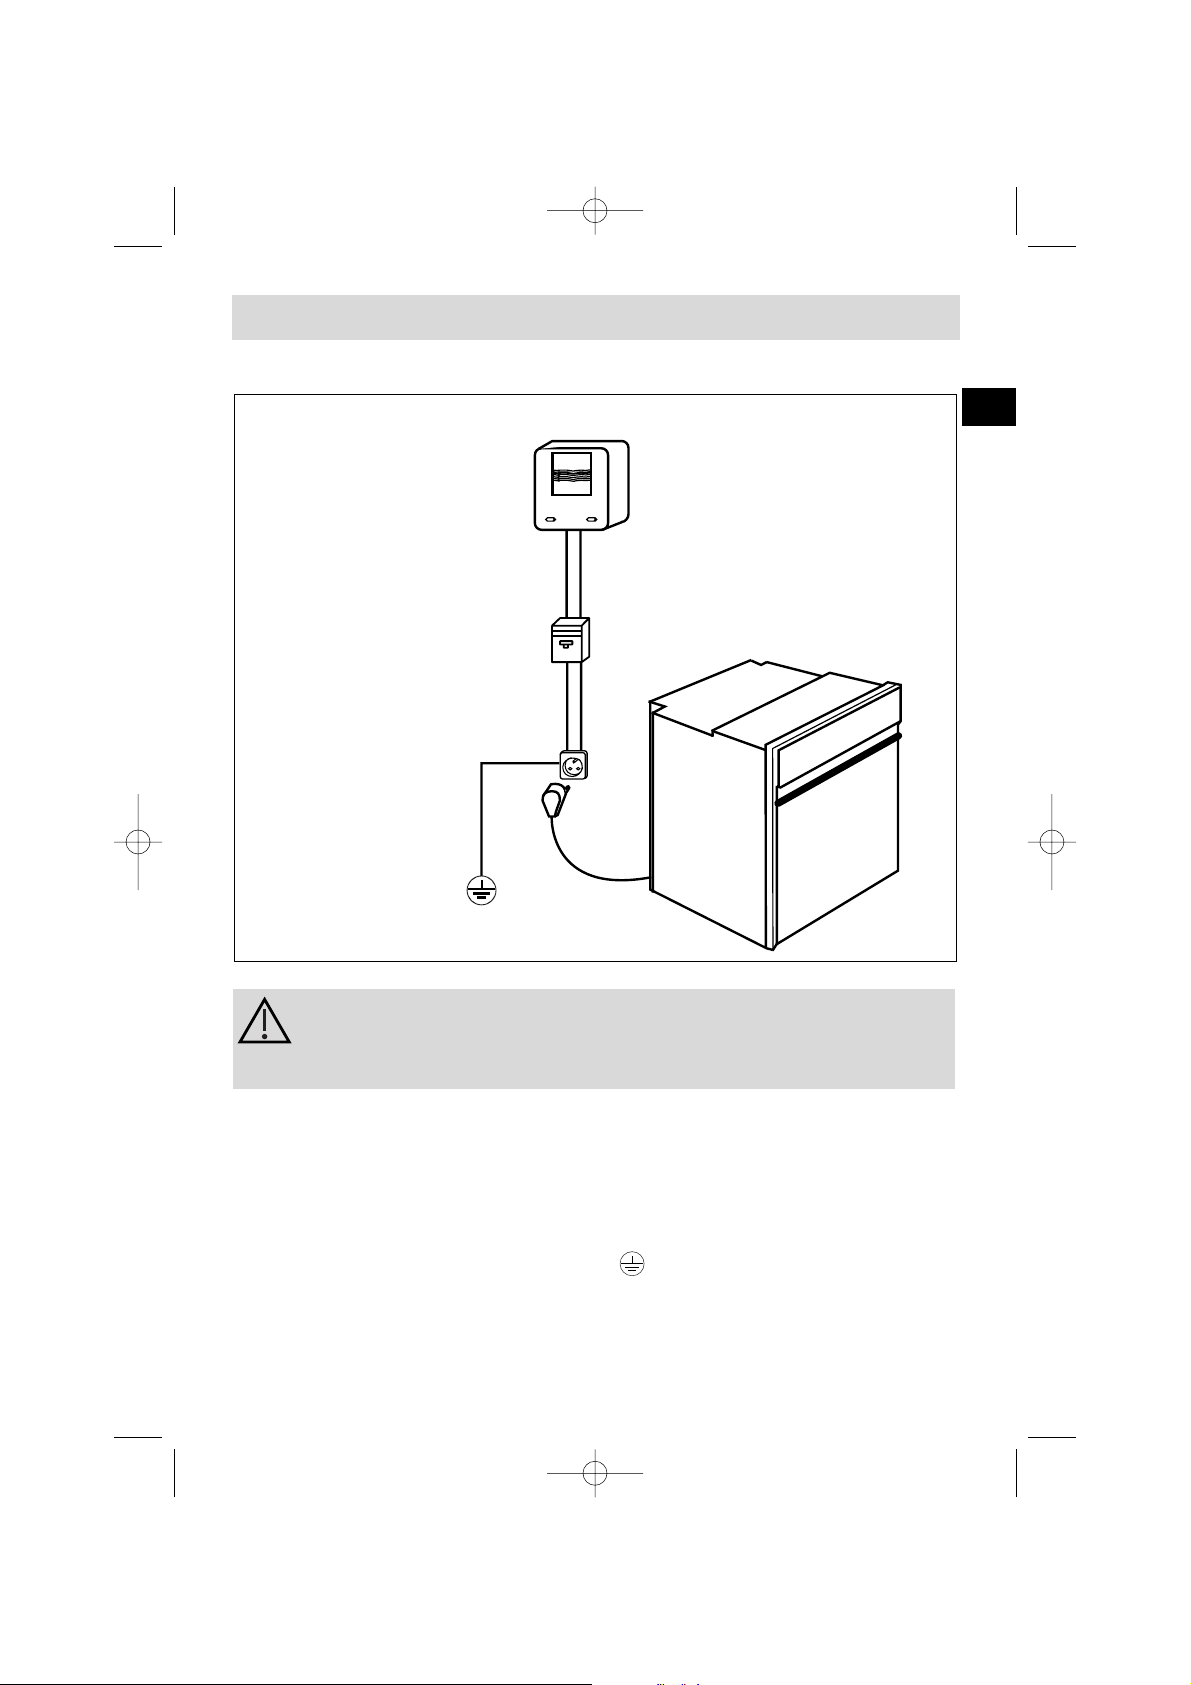
Compteur 20A Mono
220-240 V ~ 50 Hz
Prise de courant
2 pôles + terre
norme CEI 60083
Ligne Mono 220-240 V ~
Raccordement électrique
Câble
d'alimentation
longueur 1,50 m
environ
Disjoncteur différentiel ou
fusible 16A
Avant d'effectuer le branchement, s'assurer que les fils de votre
installation électrique sont d'une section suffisante pour alimenter normalement l'appareil.
Le fusible de votre installation doit être de 16 Ampères.
Le raccordement électrique est à réaliser avant la mise en place de l'appareil
dans le meuble.
• Le four doit être branché avec un câble d'alimentation (normalisé) à 3 conducteurs de 1,5 mm
2
(1 ph +1 N + terre) qui doivent être raccordés sur réseau
220-240 V ~ monophasé par l'intermédiaire d'une prise de courant 1 ph +1 N +
terre normalisée CEI 60083 ou conformément aux règles d’installation. Le fil de
protection (vert-jaune)
est relié à la borne de l'appareil et doit être relié à la
terre de l'installation.
• Dans le cas d’un branchement avec prise de courant,
celle-ci doit rester accessible après l’installation de l’appareil.
• Le neutre du four (fil bleu) doit être raccordé au neutre du réseau.
99633824_ML.qxp 12/07/2005 16:39 Page 7
Page 8

8
• Le câble d’alimentation (H05 RR-F, H05 RN-F ou H05 VV-F) doit avoir une longueur
suffisante pour être raccordé au four à encastrer posé au sol devant le meuble.
Pour cela l’appareil doit être déconnecté du réseau :
• Ouvrez la trappe située en bas à droite du capot arrière en dévissant les 2 vis,
puis faîtes pivoter la trappe.
• Dénudez chaque fil du nouveau câble d’alimentation sur 12mm.
• Torsadez soigneusement les brins.
• Desserrez les vis du bornier et retirez le cordon d’alimentation à changer.
• Introduire le câble d’alimentation par le côté du capot dans le serre-câble situé à
droite du bornier.
• Raccordez les fils du câble conformément au(x) repère(s) écrit(s) sur le bornier.
• Tous les brins des fils d’alimentation doivent être emprisonnés sous les vis.
• Le fil de la phase sur la borne L.
• Le fil de terre couleur vert-jaune doit être relié à la borne .
• Le fil du neutre (bleu) sur la borne N.
• Vissez à fond les vis du bornier et vérifiez le branchement en tirant sur chaque fil.
• Fixez le câble au moyen du serre-câble situé à droite du bornier.
• Refermez la trappe à l’aide des 2 vis.
Changement du câble d’alimentation
Notre responsabilité ne saurait être engagée en cas d'accident
consécutif à une mise à la terre inexistante, défectueuse ou incorrecte.
Comment installer votre four ?
99633824_ML.qxp 12/07/2005 16:39 Page 8
Page 9
9
Comment installer votre four ?
Pour être assuré d’avoir une installation conforme, n’hésitez
pas à faire appel à un spécialiste électroménager.
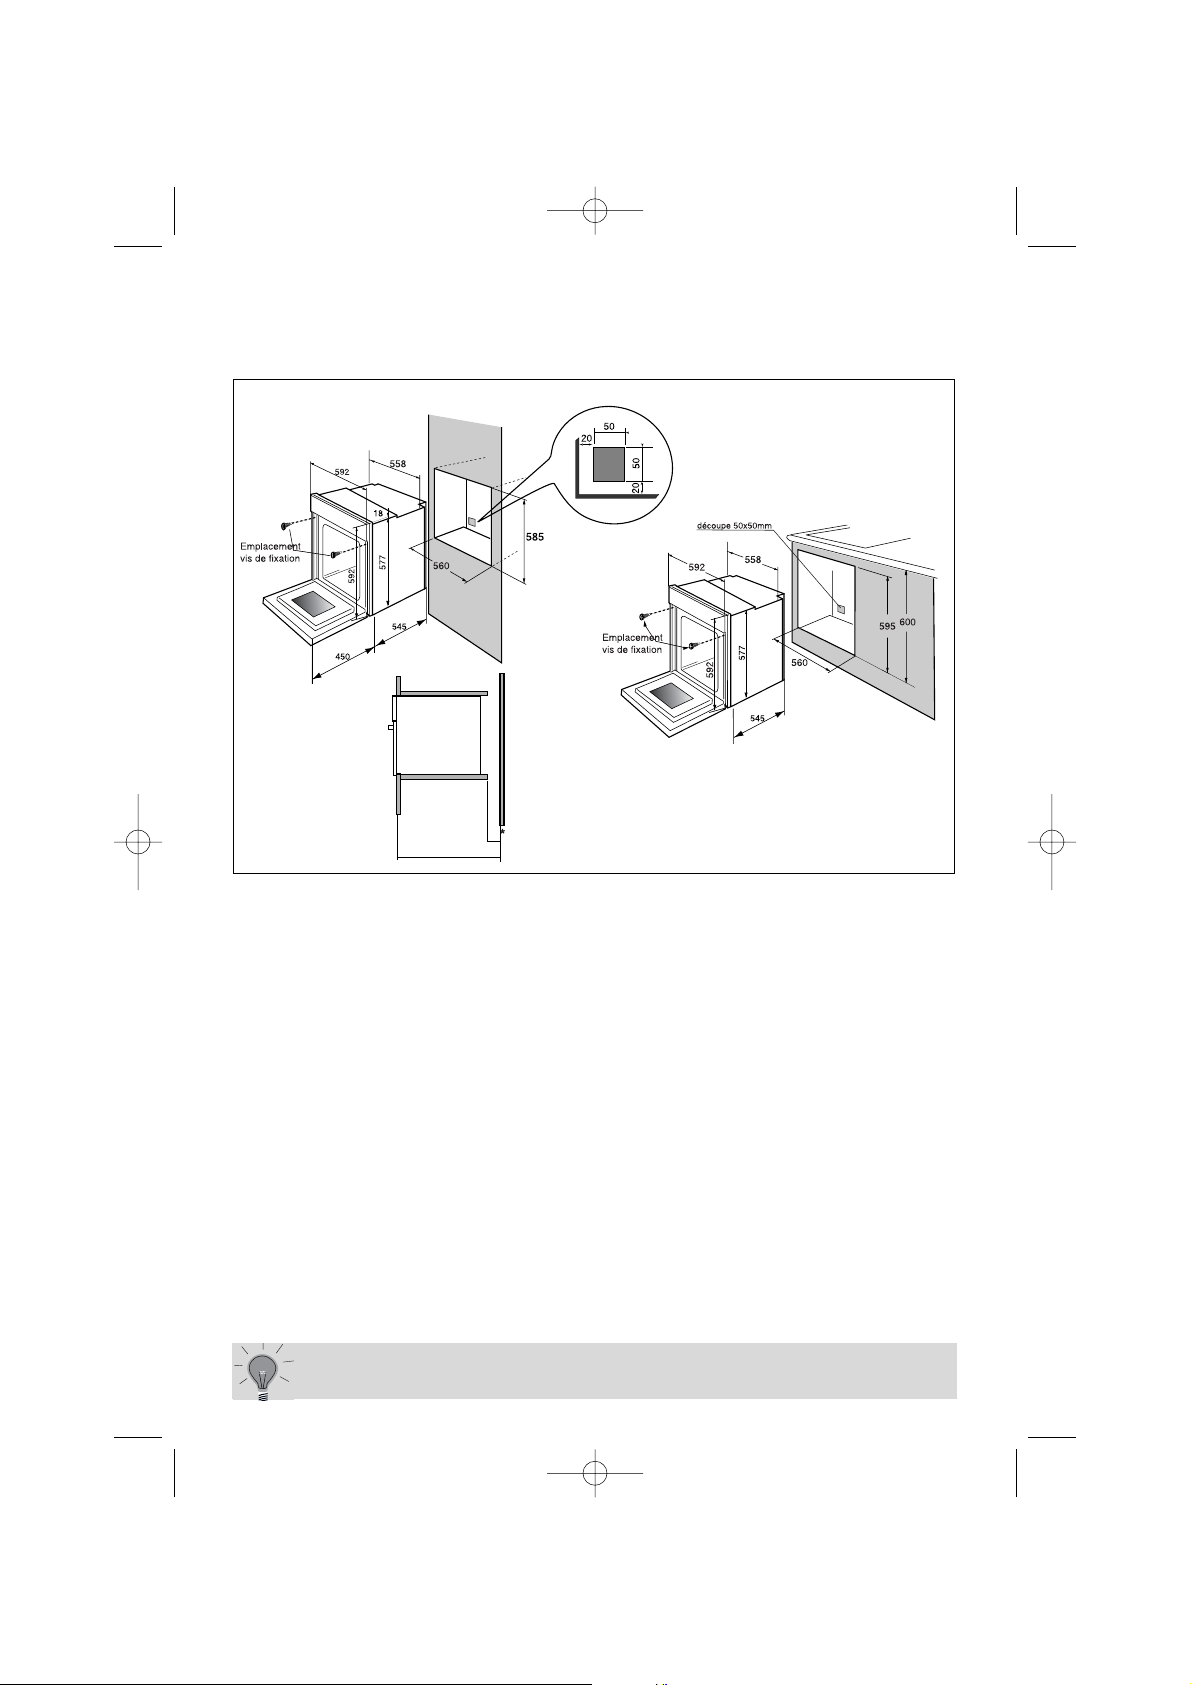
Dimensions utiles pour encastrer votre four
Le four peut indifféremment être installé sous un plan de travail ou dans
un meuble en colonne (ouvert* ou fermé) ayant les dimensions d’encastrement adaptées (voir schéma ci-contre).
Votre four possède une circulation d’air optimisée qui permet d’obtenir des résultats
de cuisson et de nettoyage remarquables en respectant les éléments suivants :
• Centrez le four dans le meuble de façon à garantir une distance mini de 5 mm
avec le meuble voisin.
• La matière du meuble d’encastrement doit résister à la chaleur (ou être revêtu
d’une telle matière).
• Pour plus de stabilité, fixez le four dans le meuble par 2 vis au travers des trous
prévus à cet effet sur les montants latéraux (cf schéma).
Pour ce faire :
1) Retirez les cache vis en caoutchouc pour accéder aux trous de fixation.
2) Effectuez un trou de Ø 3 mm dans la paroi du meuble pour éviter l’éclatement du bois.
3) Fixez le four avec les 2 vis.
4) Remettez les cache vis en caoutchouc (ceux-ci servent également à amortir la
fermeture de la porte du four).
(*) si le meuble est ouvert, son ouverture doit être de 70 mm (maxi).
70
550
99633824_ML.qxp 12/07/2005 16:39 Page 9
Page 10
10
Comment utiliser votre four ?
1. Le détail de votre programmateur
1
2
3
4
5
1
2
3
4
5
7
6
8
10
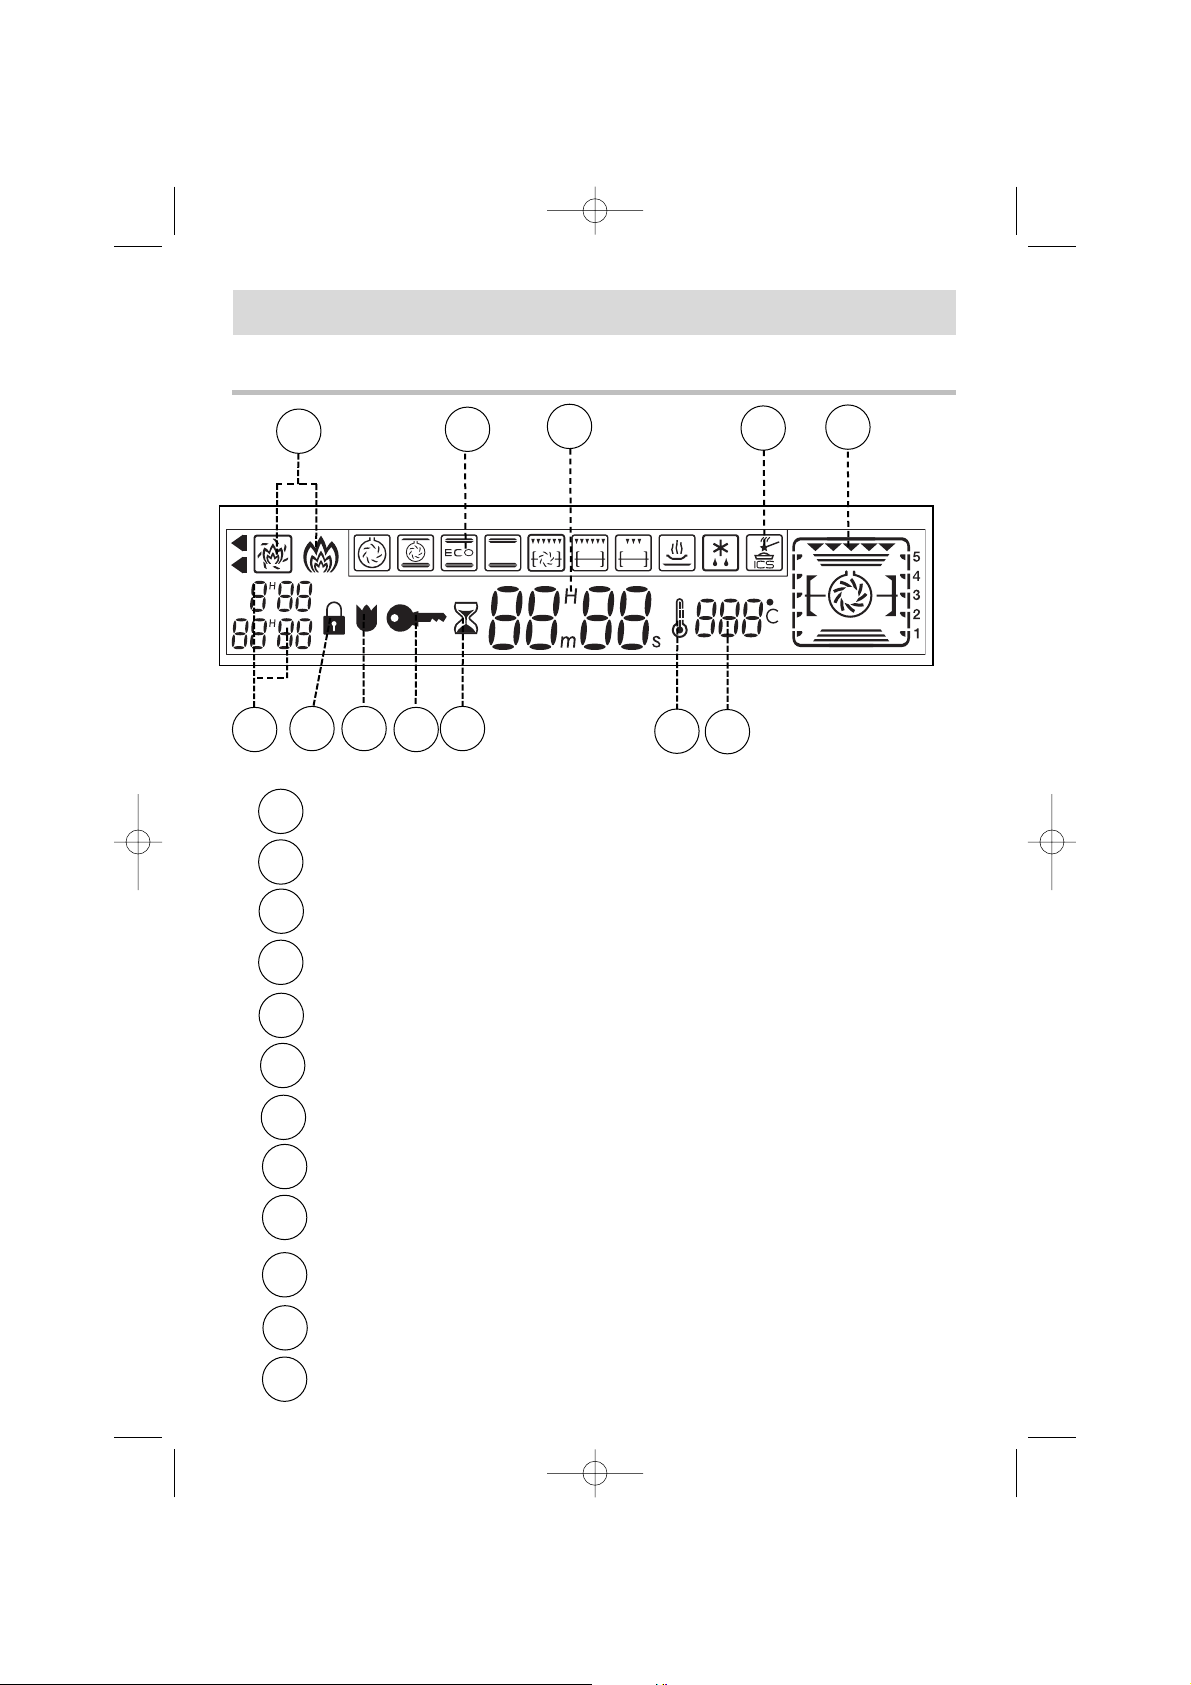
Affichage de l’horloge ou de la minuterie
Affichage des modes de cuisson
Indicateur de gradins et du mode de cuisson choisi.
Affichage des différents programmes de réglage du temps
(durée et fin de cuisson)
Affichage de la température du four
Indicateur de porte verrouillée (lors de la pyrolyse)
Indicateur de la montée en température
Indicateur de minuterie
Indicateurs de pyrolyse
Indicateur de verrouillage clavier(sécurité enfants).
Indicateur de fonction “ICS”
Indicateur de fonction “Eolyse”
9
10
6
7
8
9
11
11
12
12
99633824_ML.qxp 12/07/2005 16:39 Page 10
Page 11
11
FR
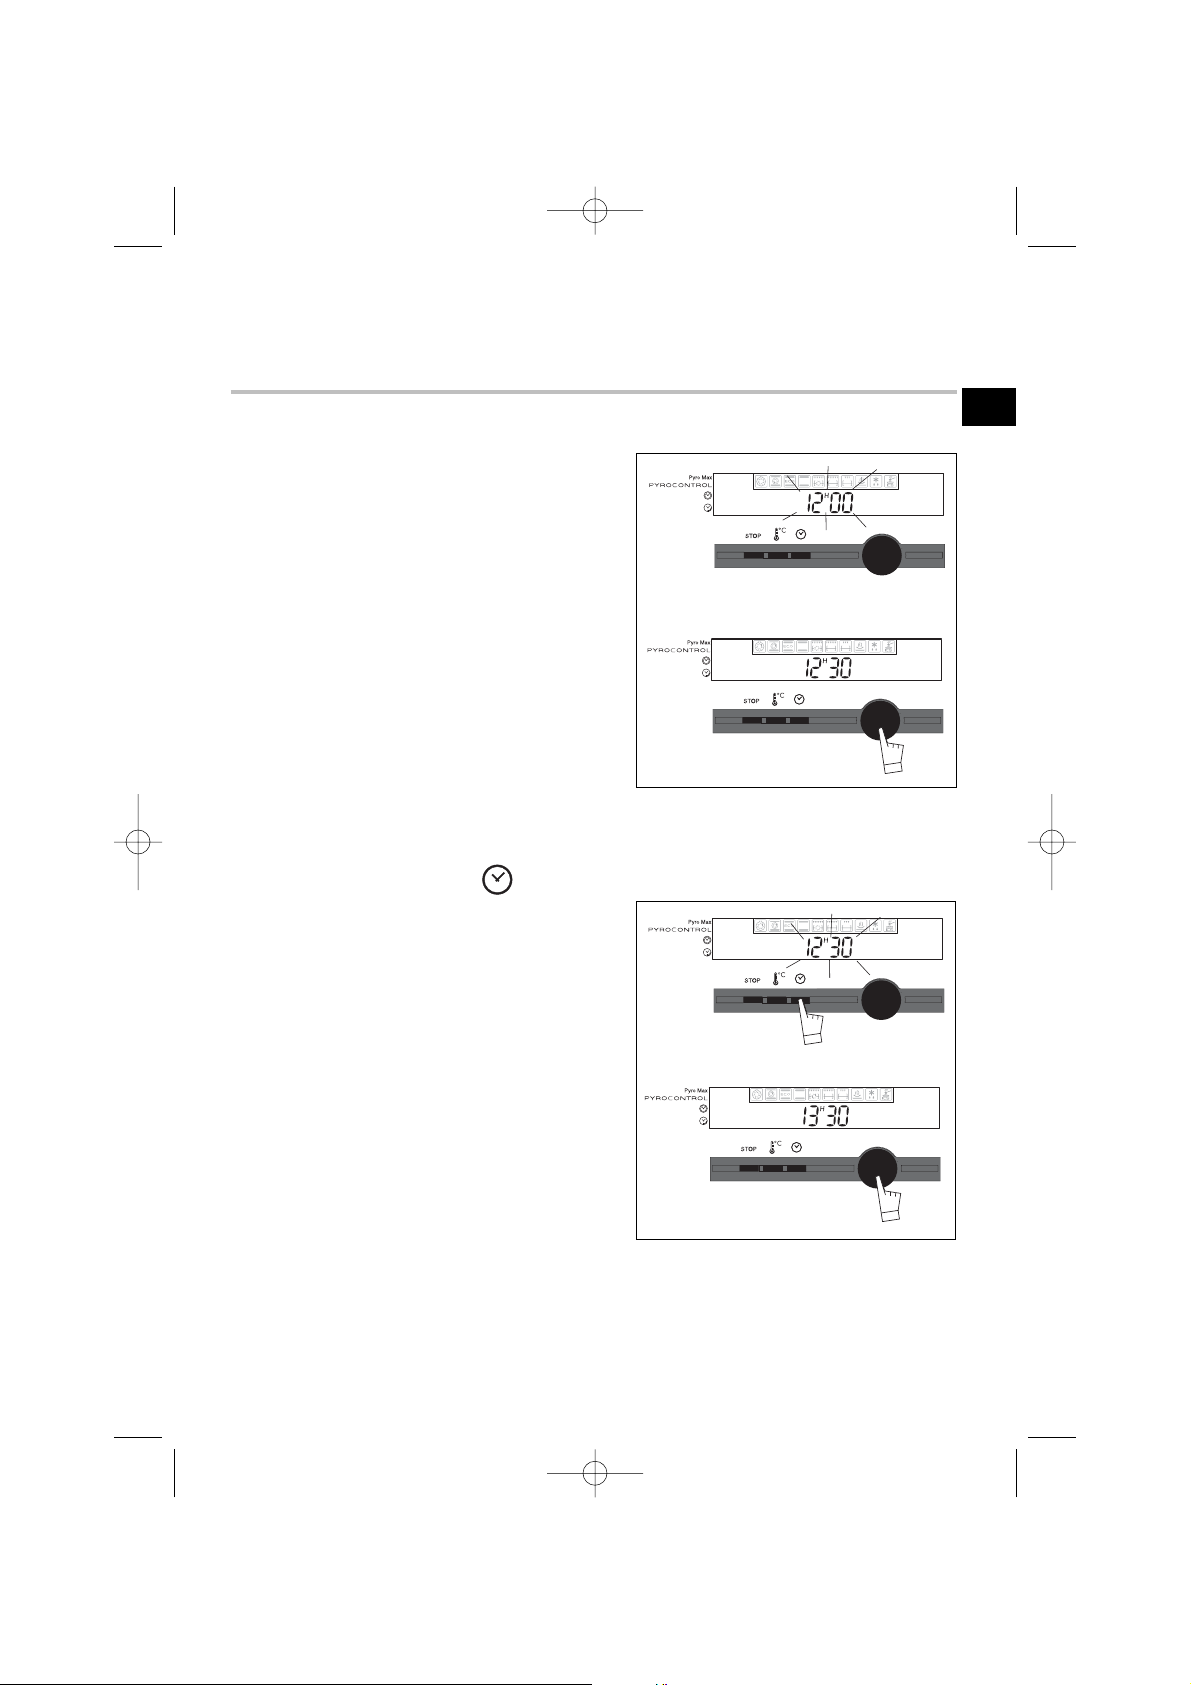
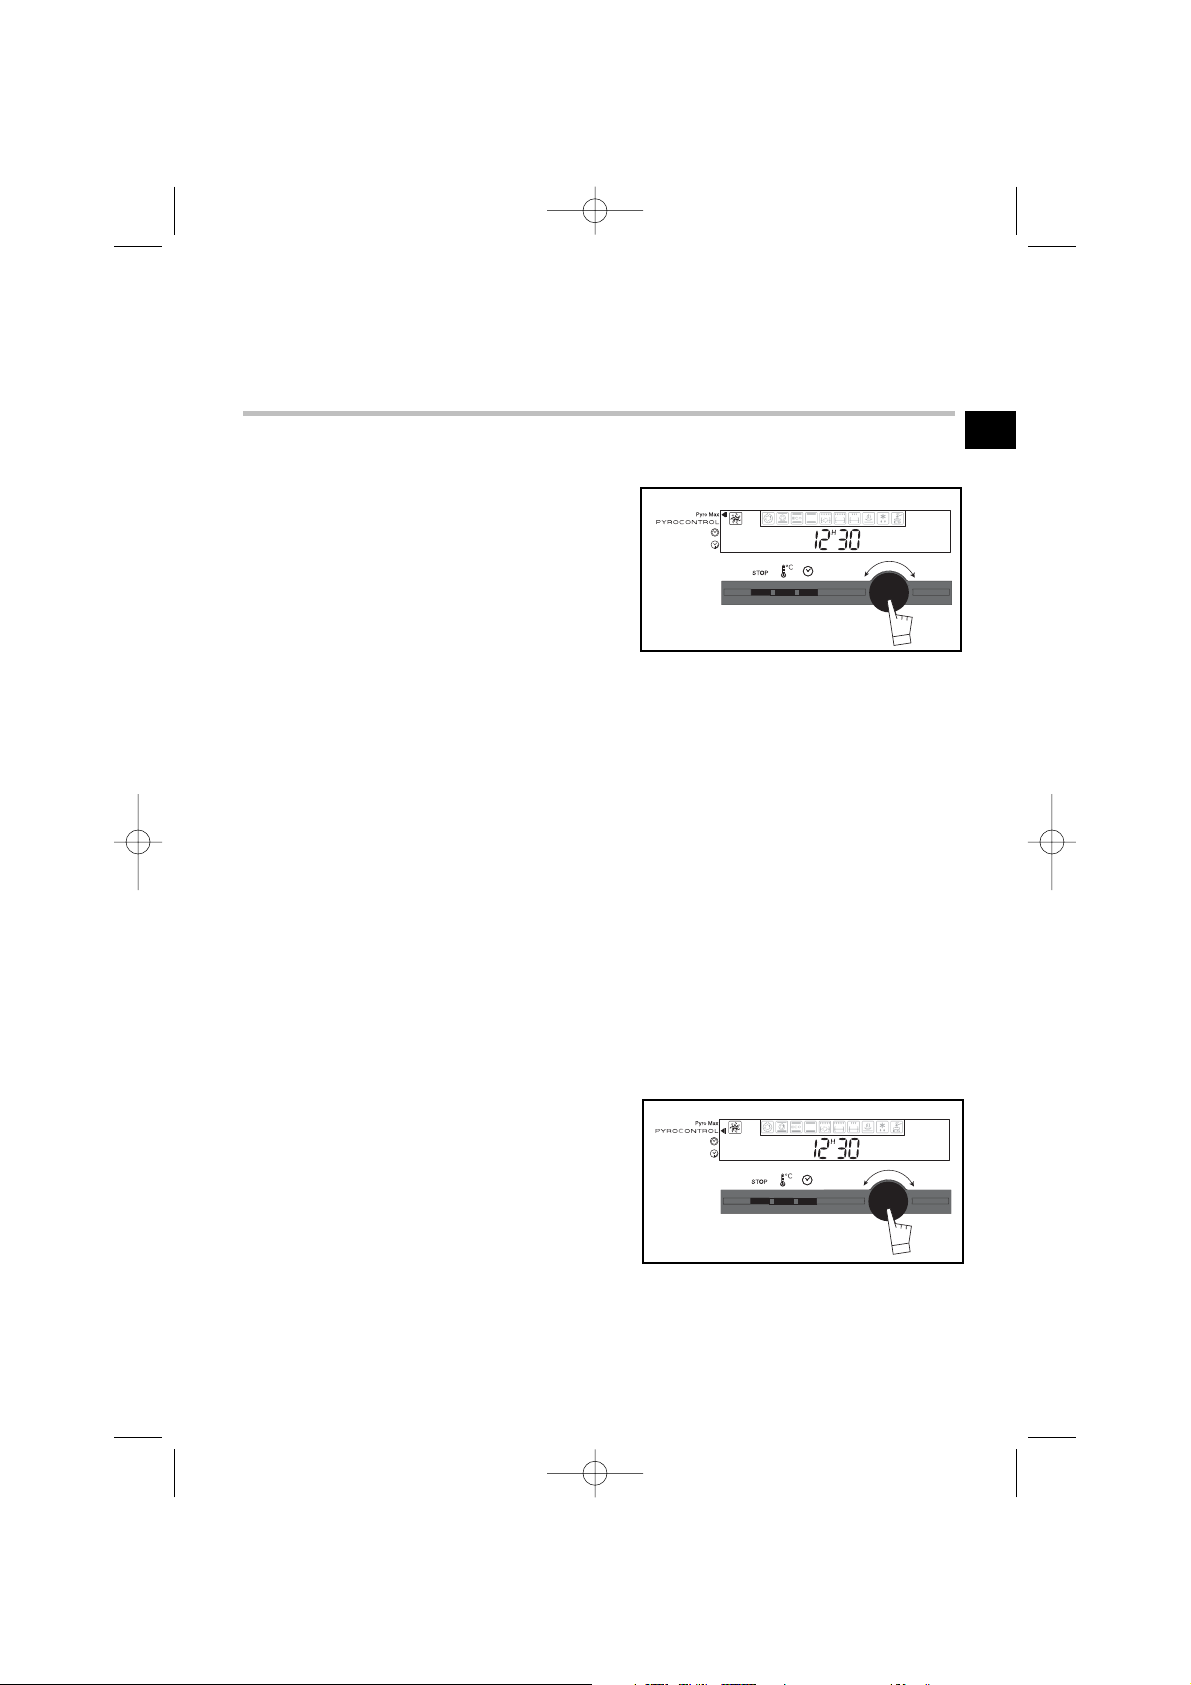
a) A la mise sous tension
• L’afficheur clignote à 12h00.
• Réglez l’heure en tournant le bouton de
réglages dans le sens + ou - (la vitesse de
rotation du bouton fait varier la vitesse de
réglage de l’heure)
Exemple:12h30.
Validez en appuyant sur le bouton de
réglages.
-> l’affichage ne clignote plus
b) Remise à l’heure de l’horloge
Maintenir appuyé le bouton pendant
quelques secondes.
L’affichage de l’heure clignote pour vous
indiquer que le réglage est alors possible.
Pour le réglage, tournez le bouton dans le
sens + ou - de façon à augmenter ou diminuer l’heure affichée.
Après avoir réglé l’heure de votre choix,
validez en appuyant sur le bouton -> l’affichage de l’heure ne clignote plus.
Le réglage de l’heure n’est pas possible en programmation différée.
En cas de coupure de courant inférieure à 36 heures minimum, lors du
rétablissement du secteur, une animation indique que votre four va se
remettre automatiquement à l’heure.
2.
Comment mettre à l'heure l’horloge du four ?
Comment utiliser votre four ?
99633824_ML.qxp 12/07/2005 16:39 Page 11
Page 12
12
Comment utiliser votre four ?
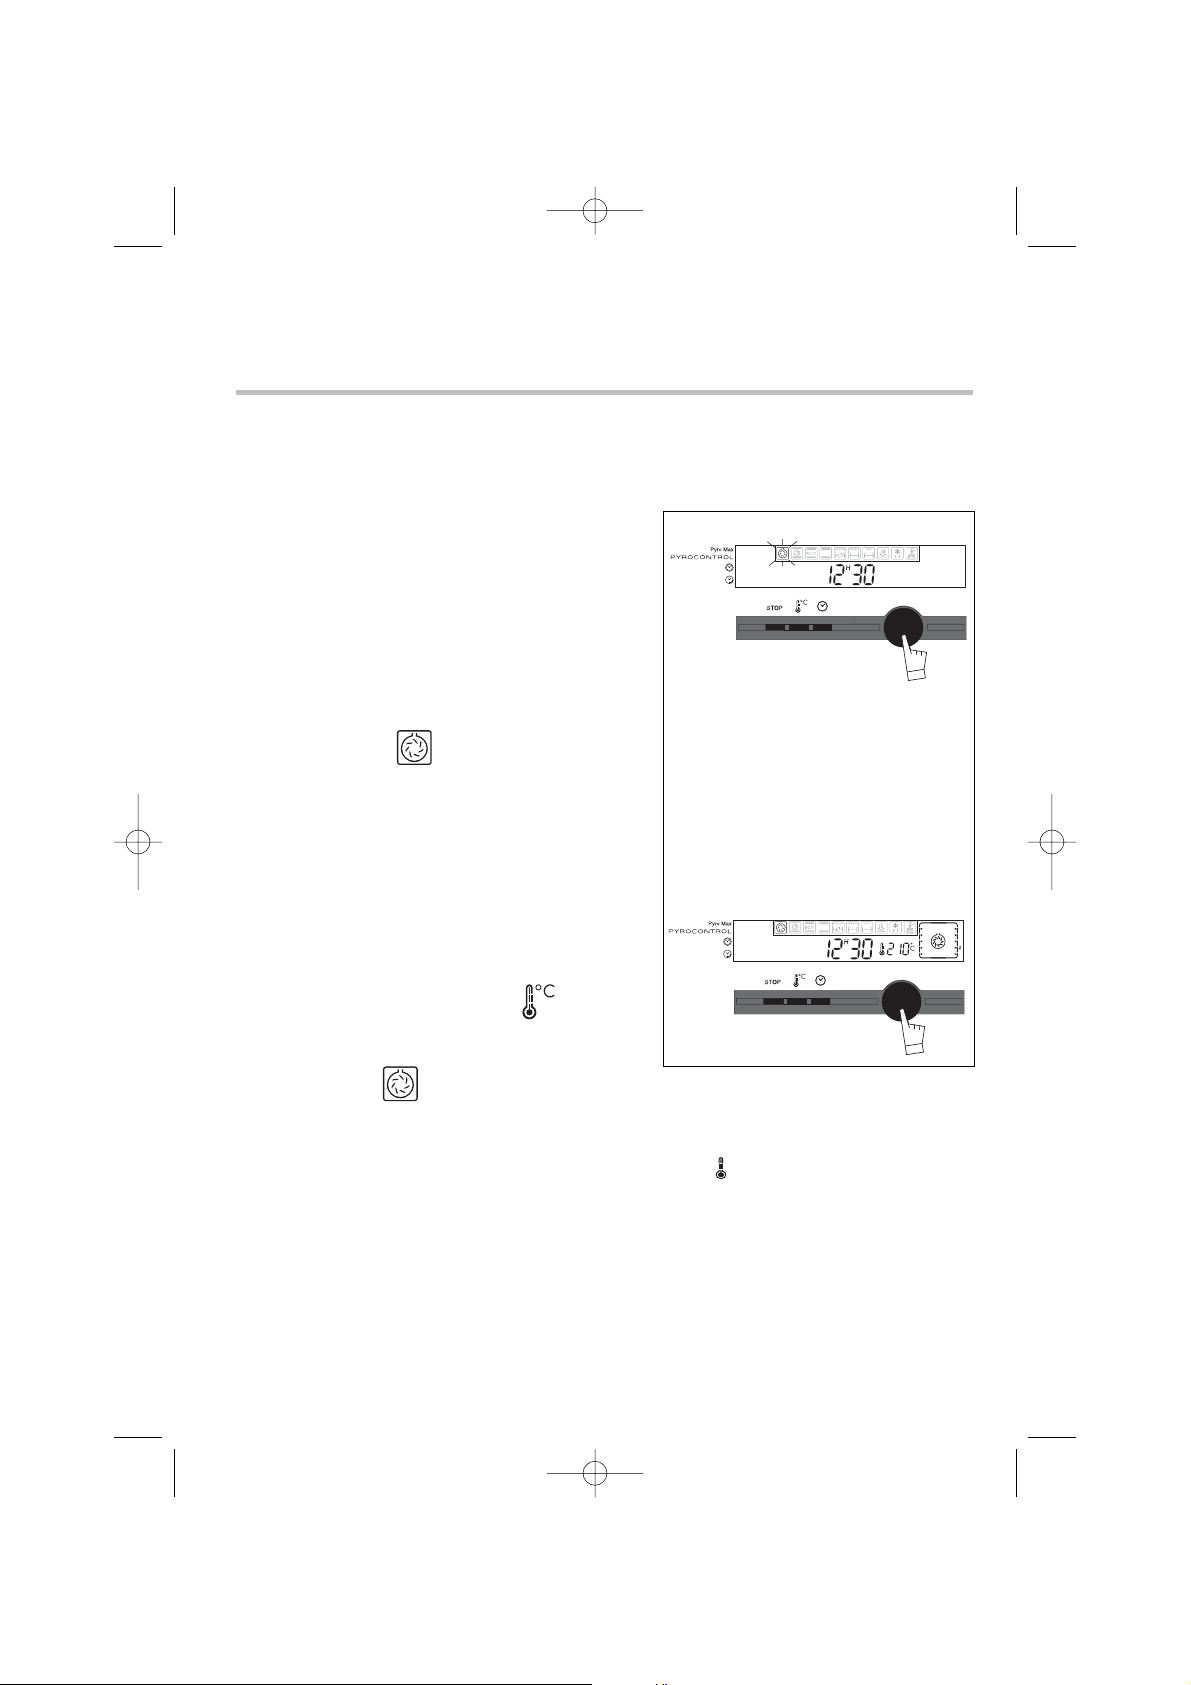
Le programmateur ne doit afficher que l'heure; celle-ci ne doit pas clignoter.
• Appuyez et tournez le bouton vers la droite pour sélectionner la cuisson choisie.
La fonction choisie clignote.
• Validez en appuyant sur le bouton.
L’indicateur de cuisson se fige alors que la tempé-
rature préconisée clignote. Apparaît en même
temps que la température présélectionnée, l’indicateur de gradins et les éléments en fonctionnement. Le four se met en marche.
Placez votre plat dans le four selon la préconisation indiquée dans l’afficheur et les recommandations fournies par le guide de cuisson.
Exemple : “ -> gradins 2 ou 3
conseillés.
Tant que le symbole °C clignote, vous pouvez
modifier à l’aide du bouton de température.
Validez en appuyant sur le bouton.
Votre four vous propose la température optimale pour le plat choisi. Il vous est cependant possible de modifier à tout moment cette tempéra-
ture en appuyant sur la touche “ ” situé
sous l’afficheur.
Exemple “ ” ajustée à 210°.
Après ces actions le four chauffe :
- Ces états de l’indicateur de montée en température signalent la progression
de la température à l’intérieur du four.
- Une série de bips vous indiqueront que la température choisie est atteinte.
Pour arrêter la cuisson, appuyez quelques secondes sur la touche STOP.
Après un cycle de cuisson, la turbine de ventilation continue de fonctionner pendant un certain temps, afin de refroidir le four.
3. Comment faire une cuisson immédiate ?
99633824_ML.qxp 12/07/2005 16:39 Page 12
Page 13
13
Comment utiliser votre four ?
4. Comment programmer une cuisson ?
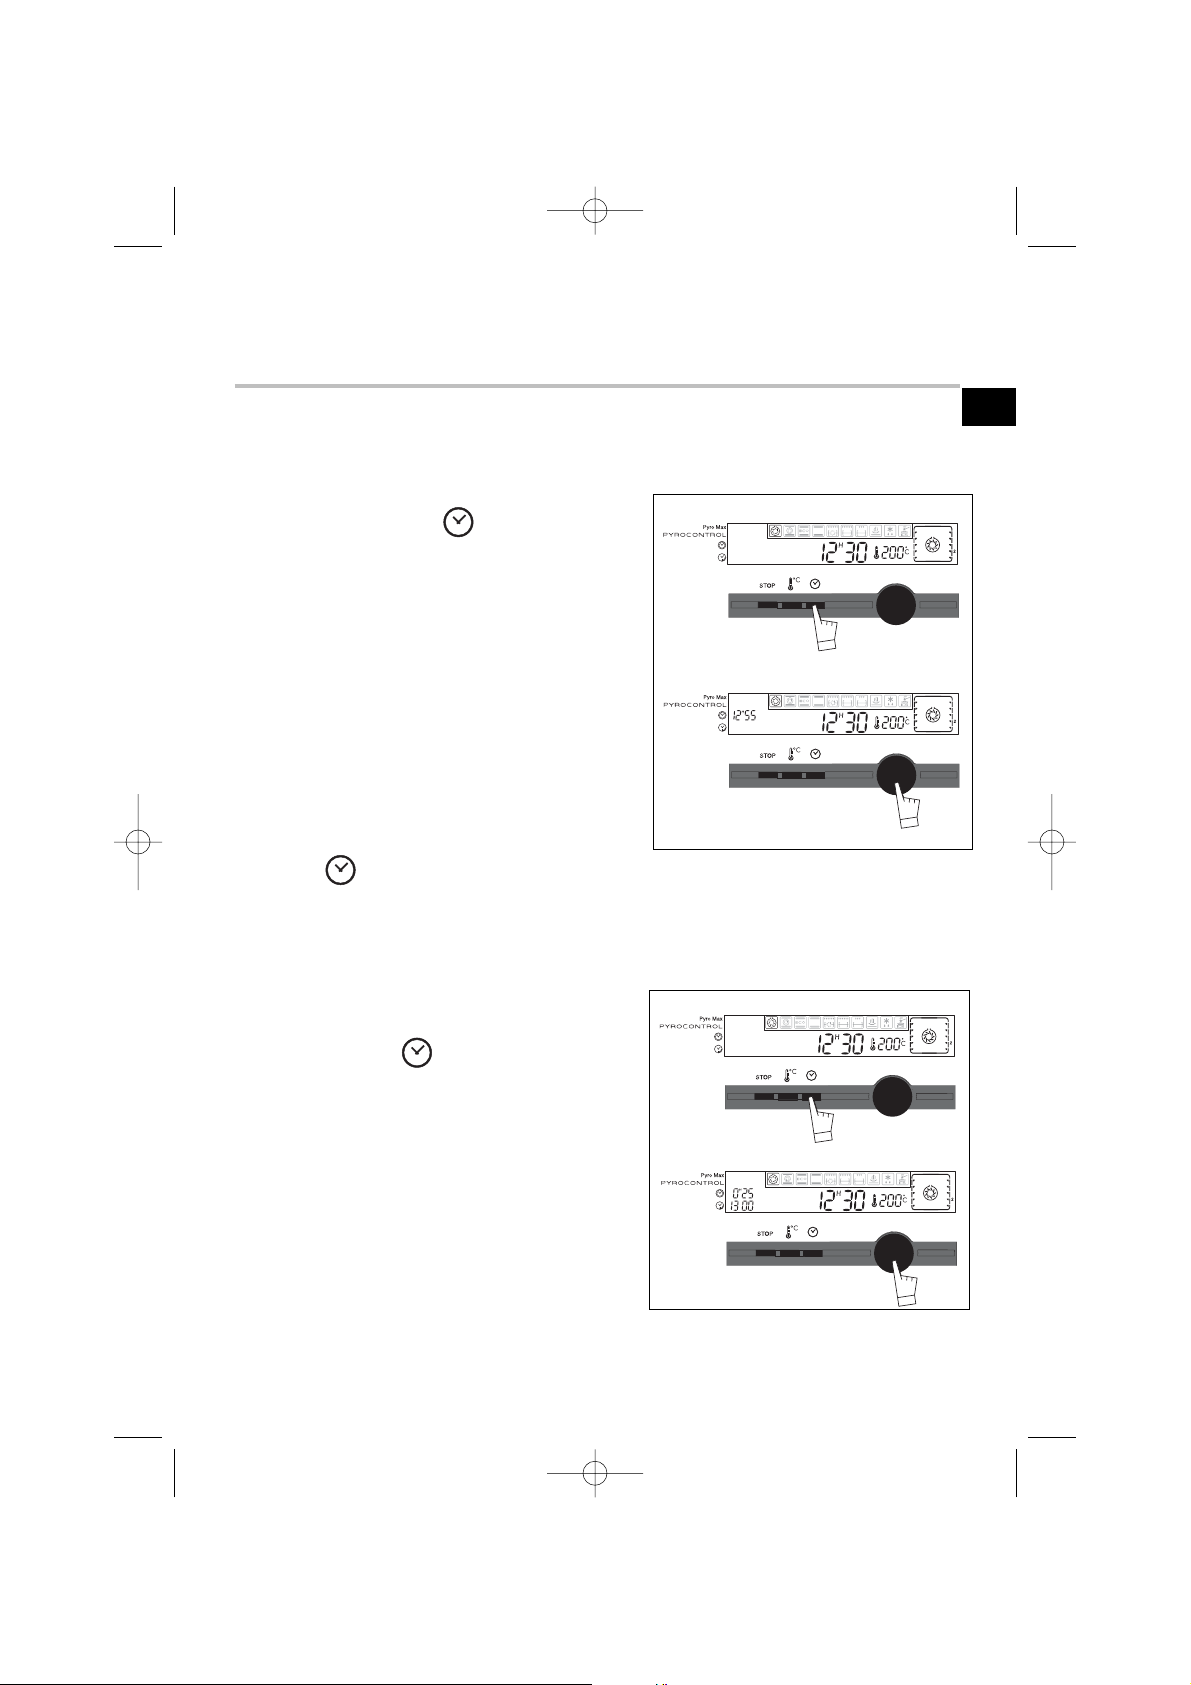
b) Avec départ différé (heure de fin choisie)
Procédez comme une cuisson programmée.
Après avoir réglé la durée de cuisson,
appuyez 2 fois sur pour faire clignoter la
fin de cuisson.
Tournez le bouton dans le sens + ou - pour
régler l’heure de fin de cuisson souhaitée.
Validez en appuyant sur le bouton.
Après ces actions, le départ de la chauffe est
différé pour que la cuisson soit finie à 13h.
Quand votre cuisson est terminée, 3 bips retentissent pendant quelques minutes.
Sinon, les bips s’arrêteront automatiquement.
a) Avec départ immédiat
Procédez comme le paragraphe “Cuisson immédiate”.
Appuyez sur le bouton .
La durée de cuisson clignote à 0h00 pour
indiquer que le réglage est alors possible.
Tournez le bouton pour régler le temps souhaité.
Exemple : 25 min de cuisson.
Validez par un appui sur le bouton.
Le décompte de la durée se fait immédiatement après cette validation. Vous pouvez, à
tout moment, annuler la fonction en mettant
à 0 la valeur affichée (après avoir appuyé sur
la touche ).
FR
99633824_ML.qxp 12/07/2005 16:39 Page 13
Page 14
14
Comment utiliser votre four ?
5. Comment utiliser la minuterie ?
Votre four est équipé d’un minuteur électronique indépendant du fonc-
tionnement du four permettant de décompter un temps.
Dans ce cas, l’affichage de la minuterie est prioritaire sur l’affichage de l’heure du
jour.
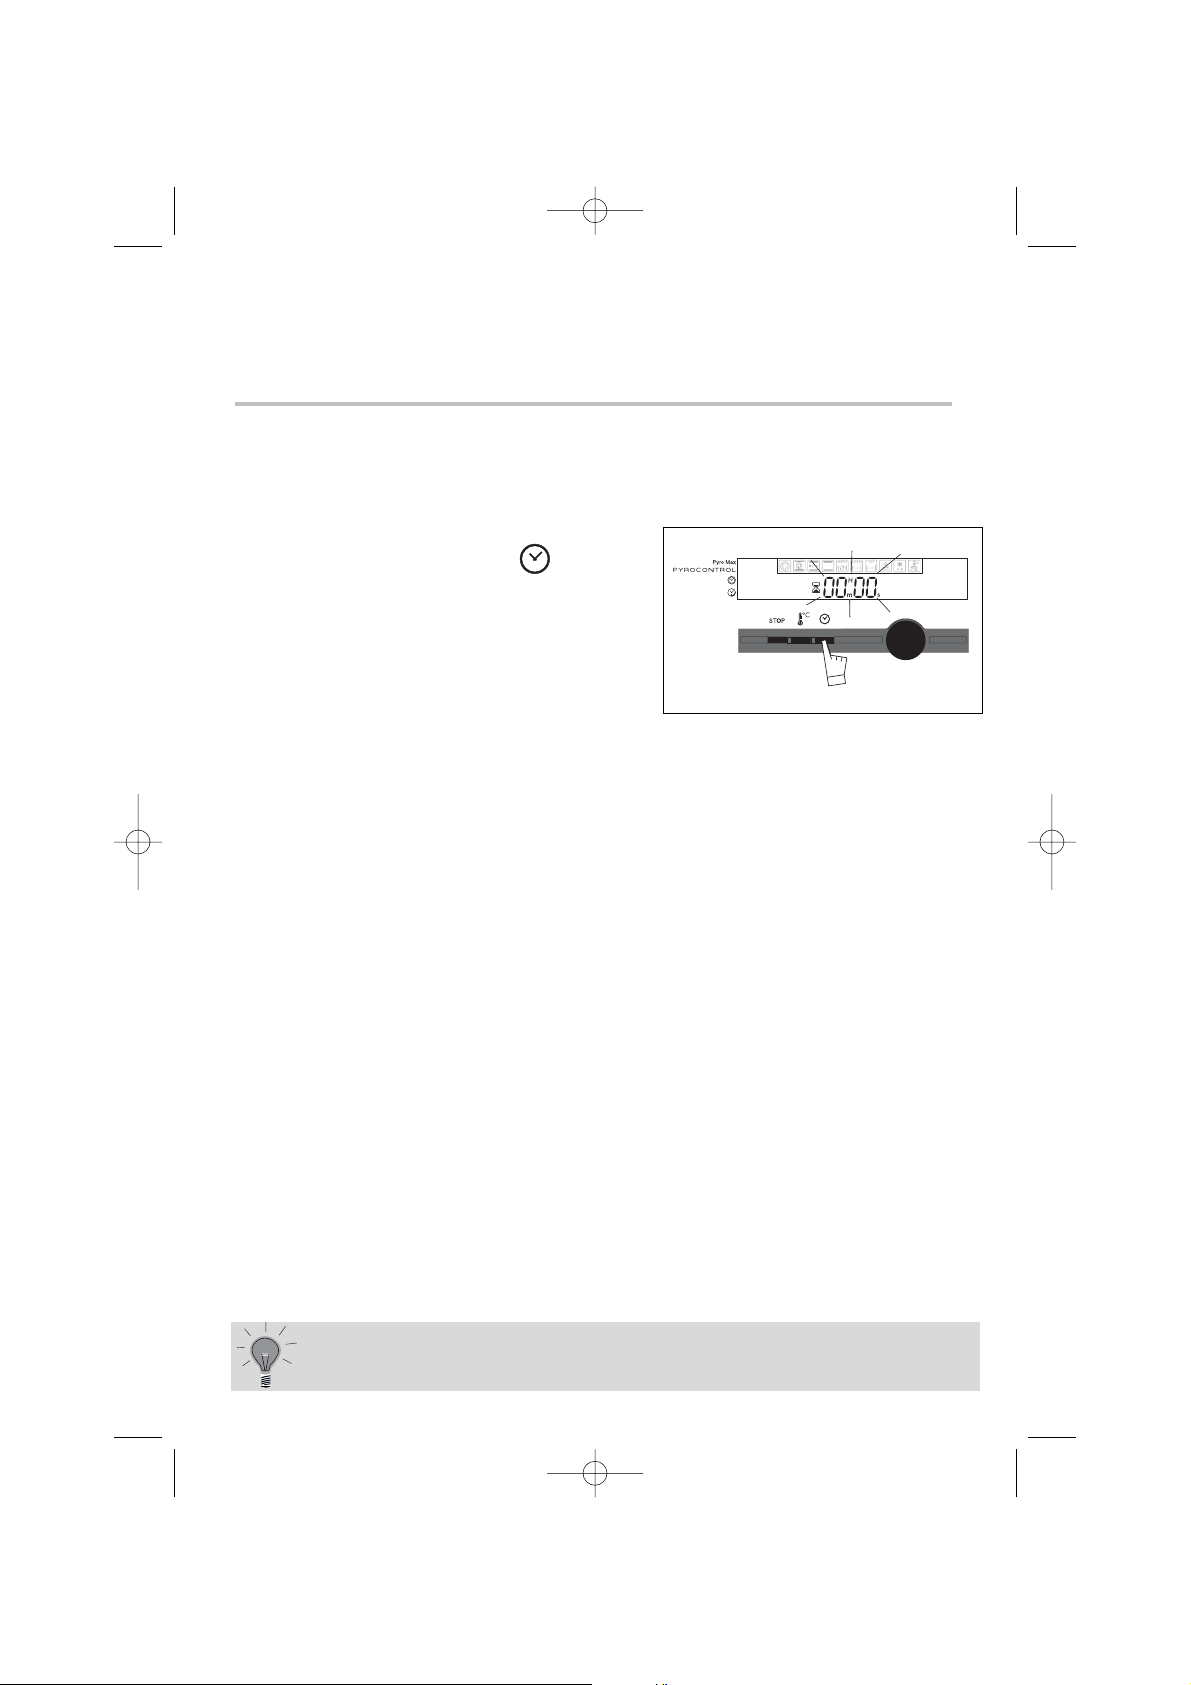
Appuyez 3 fois sur la touche . Le sablier
apparaît et 00
M00S clignote.
Tournez le bouton jusqu’à obtenir la durée voulue ( maxi 59 minutes 59 secondes )
Validez en appuyant sur le bouton.
L’afficheur s’arrête de clignoter, la minuterie se met en marche et décompte le
temps de secondes en secondes. Une fois la durée écoulée, la minuterie émet des
bips pour vous avertir et le sablier clignote.
Il est possible de modifier ou d’annuler à n’importe quel moment
la programmation de la minuterie en la réglant sur 0 et en validant.
99633824_ML.qxp 12/07/2005 16:39 Page 14
Page 15
15
FR
6. Comment faire une cuisson économique ?*
Après un cycle de cuisson, le ventilateur du four continue de
fonctionner pendant un certain temps, afin de garantir un bon
refroidissement des éléments.
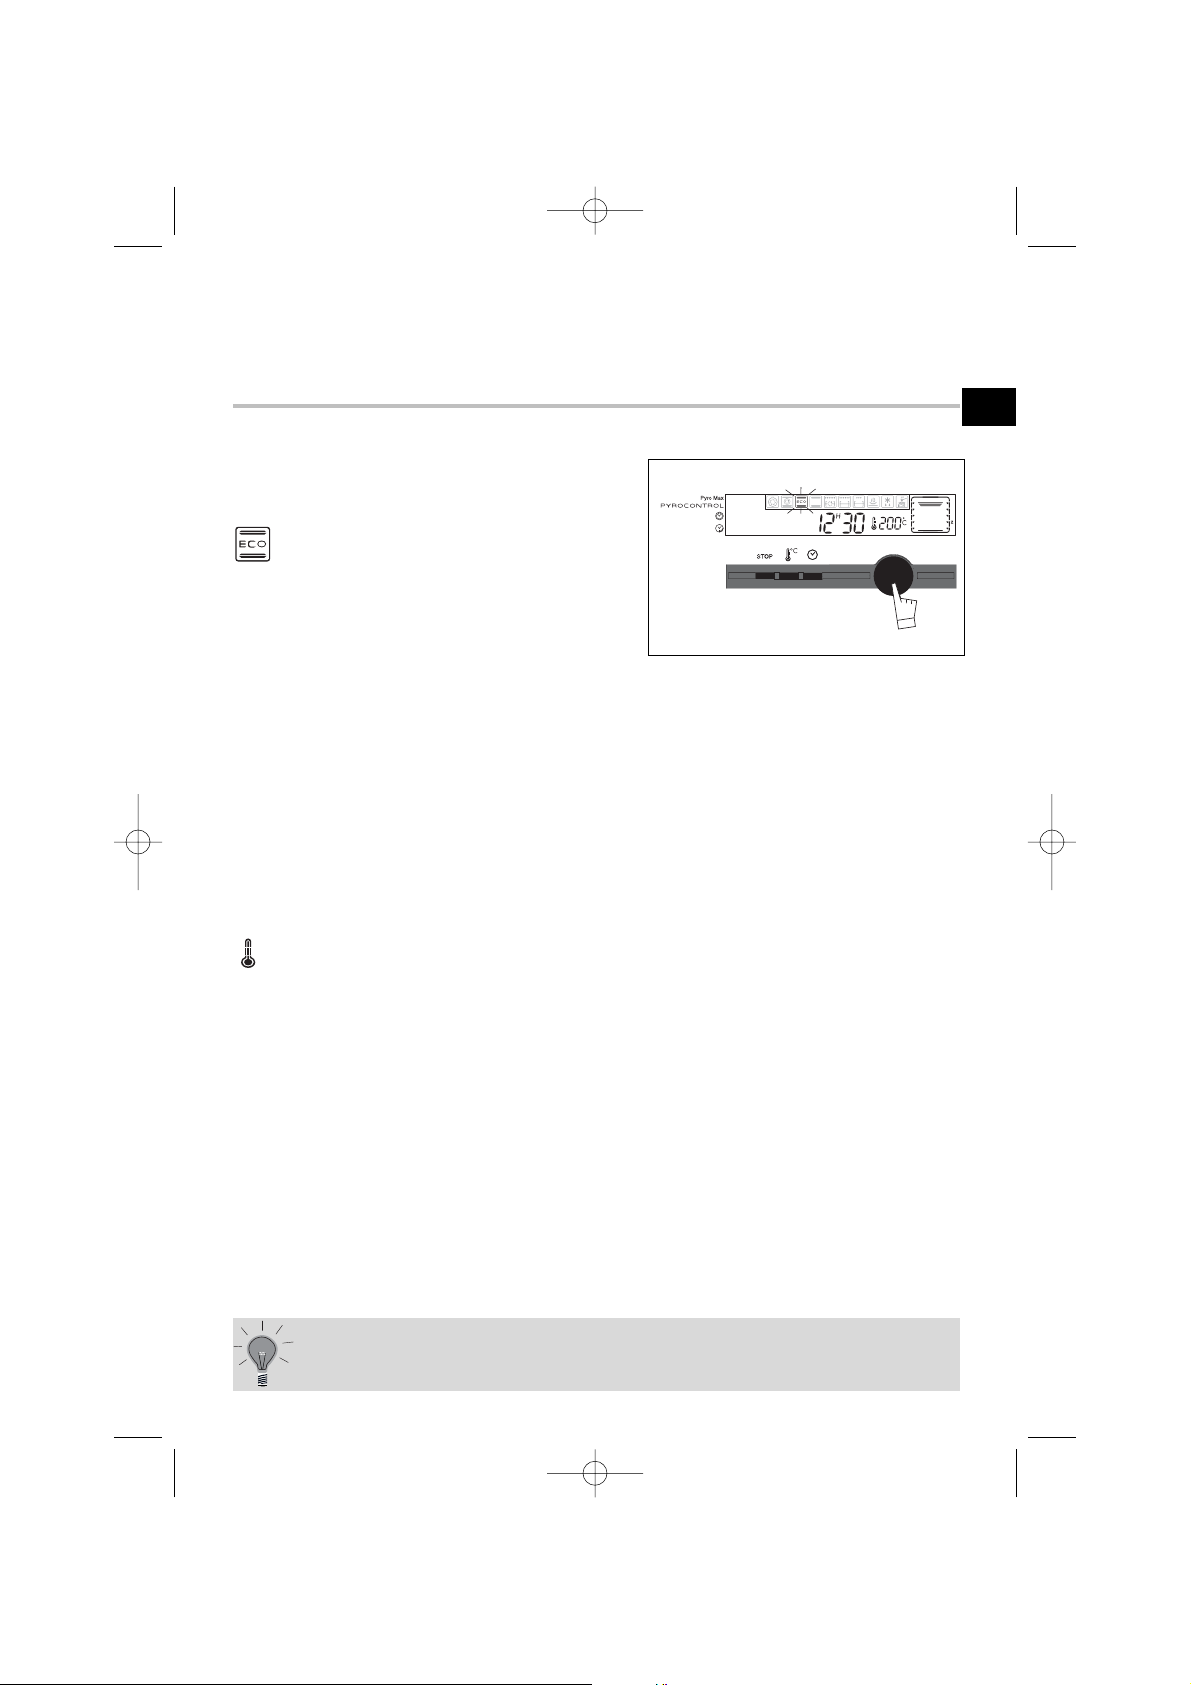
Le programmateur ne doit afficher que l'heure; celle-ci ne doit pas clignoter.
Tournez le bouton jusqu’au type de cuisson
.
Validez en appuyant sur le bouton.
• Placez votre plat dans le four selon la préconisation indiquée dans l’afficheur.
• Votre four vous propose la température optimale pour le mode de cuisson choisi 200°C.
Il vous est cependant possible d’ajuster celle-ci en utilisant le bouton situé sous
l’afficheur.
Exemple : position "Cuisson ECO" ajustée à 190°C.
Après ces actions le four chauffe :
L’indicateur de montée en température s’anime et signale la progression
de la température à l’intérieur du four.
3 bips vous indiqueront que la température de réglage est atteinte.
Pour optimiser la cuisson ECO, ne pas faire de préchauffage et ne pas
ouvrir la porte pendant la cuisson.
*Cette position permet de faire un gain d’énergie jusqu’à 20% tout en
conservant les résultats de cuisson identiques.
La position ECO est utilisée pour l’étiquettage énergétique.
Comment utiliser votre four ?
99633824_ML.qxp 12/07/2005 16:39 Page 15
Page 16
16
Vous pouvez faire varier la luminosité de votre afficheur, pour cela :
- Réglez l’heure de votre progammateur à 12h 10min.
- Maintenez l’appui sur le bouton de “ ” tout en tournant (+ ou -) afin d’obtenir la luminosité choisie.
- Après avoir régler la luminosité de votre choix, remettez votre programmateur à
l’heure du jour.
8.
Le réglage de la luminosité
Comment utiliser votre four ?
7. Personalisation de la température préconisée
Sélectionnez la fonction de cuisson :
Si vous souhaitez personaliser la température préconisée :
- Appuyez sur la touche “ ”jusqu’à faire clignoter la température.
- Tournez le bouton + ou - jusqu’à la température désirée.
- Appuyez pour valider.
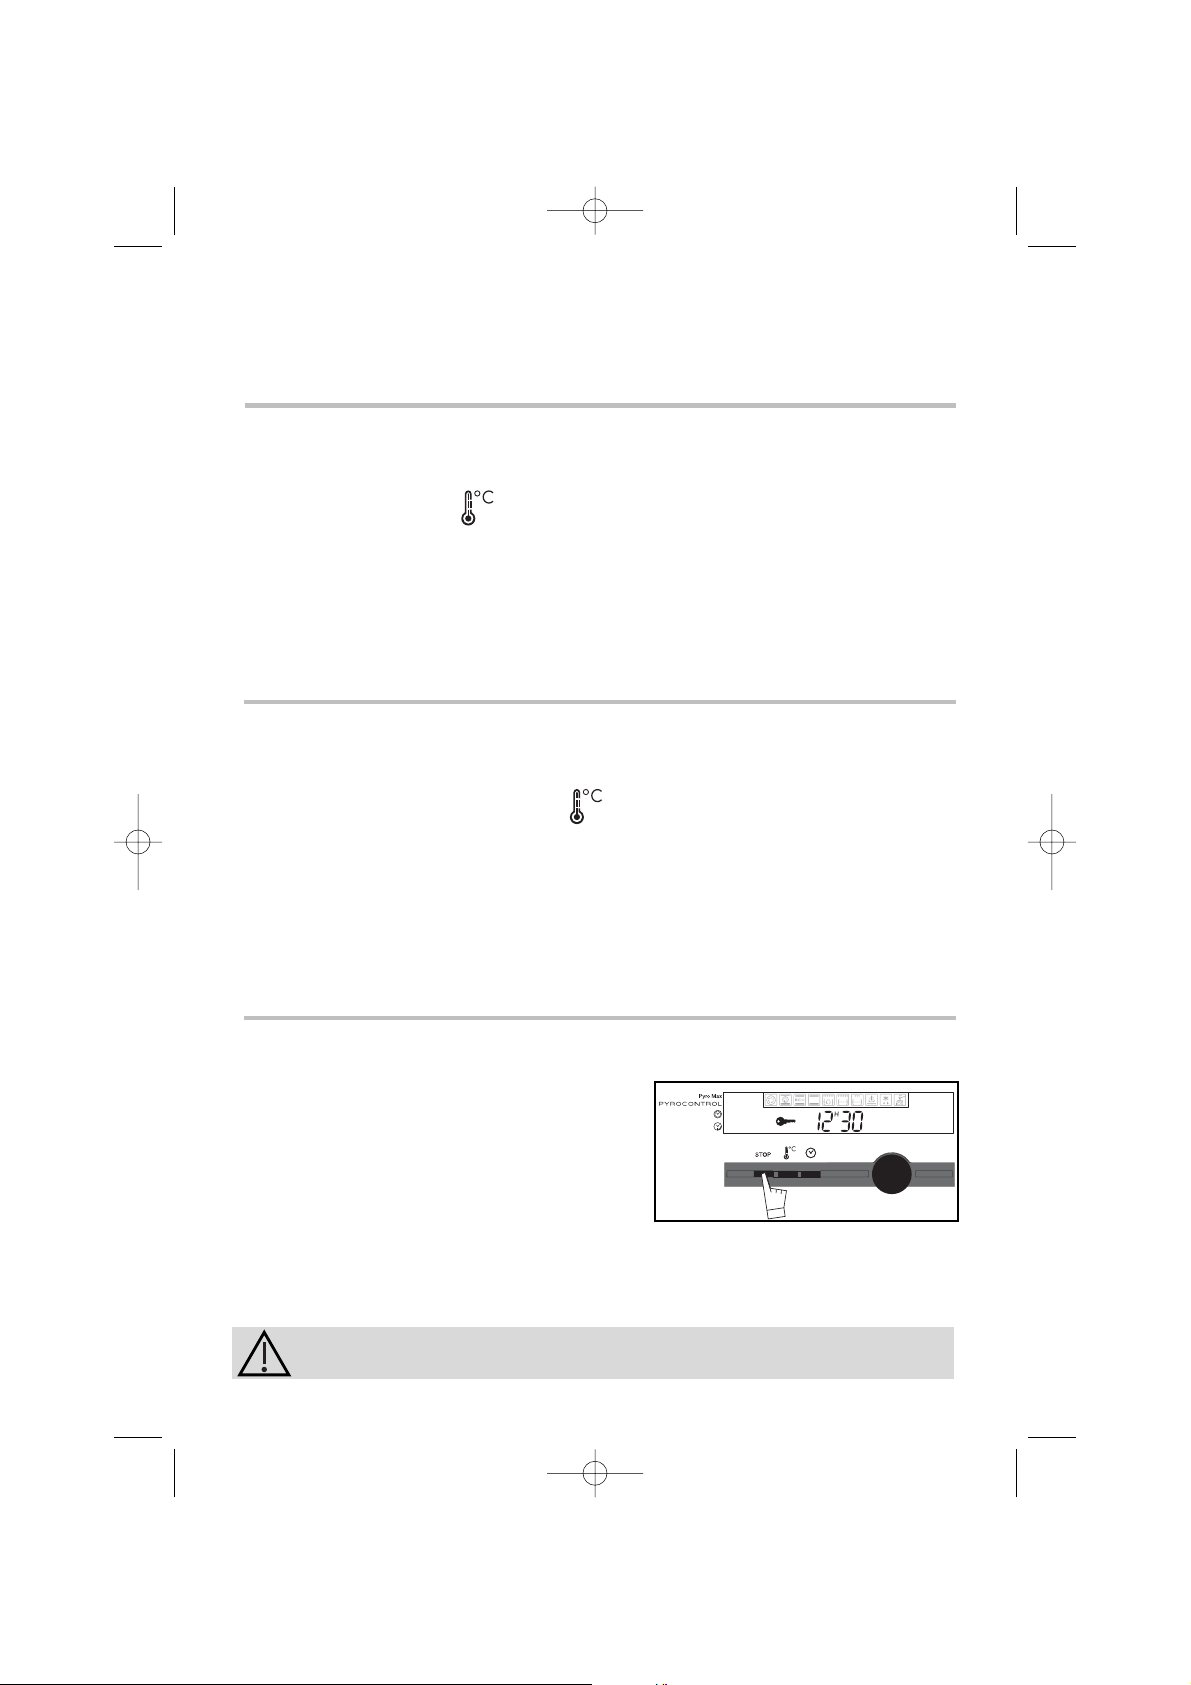
9. Verrouillage des commandes (sécurité enfants)
Vous avez la possibilité d’interdire l’accès aux commandes du four en procédant
de la façon suivante :
le four étant à l’arrêt, appuyez sur la touche
STOP pendant quelques secondes, une “clé”
vient alors s’afficher dans l’écran-> l’accès aux
commandes de votre four est bloqué.
Pour le débloquer, appuyez pendant quelques
secondes sur la touche STOP.
Les commandes de votre four sont à nouveau accessibles.
Vous ne pouvez pas verrouiller le four si vous avez programmé
une cuisson.
99633824_ML.qxp 12/07/2005 16:39 Page 16
Page 17
17
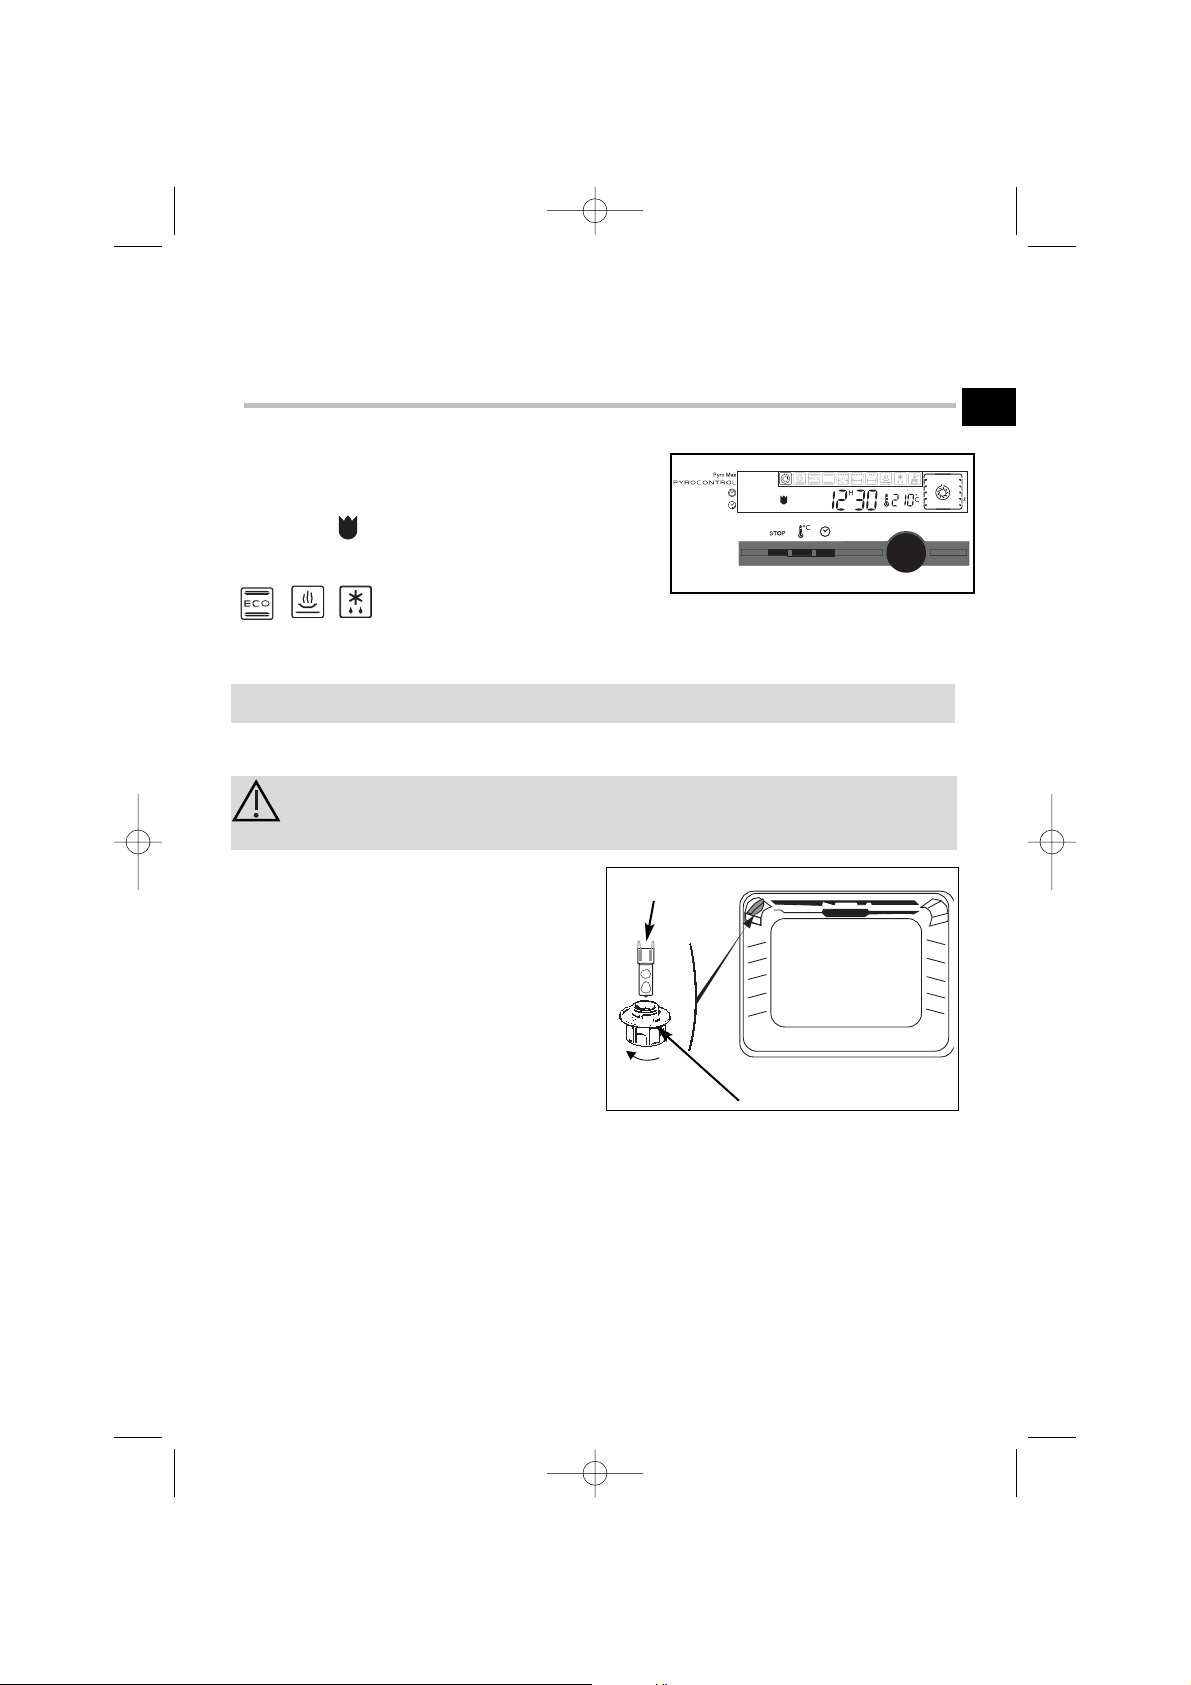
• L’ampoule se situe au plafond de la cavité de votre four.
a) Dévissez le hublot (voir ci-contre).
b) Tirez l'ampoule .
Caractéristiques de l'ampoule halogène :
- 25 W
- 220-240 V
- 300°C
- G9
c) Changez l'ampoule puis remonter le
hublot et rebrancher votre four.
Débrancher votre four avant toute intervention sur l'ampoule
pour eviter tout risque de choc électrique et laisser refroidir si
besoin l’appareil.
C
omment changer l’ampoule ?
Ampoule
Dévissez
Hublot
Comment utiliser votre four ?
La fonction “Eolyse”est toujours active (filtration des graisses et odeurs durant la
cuisson).
Le symbole apparait dans l’afficheur.
Cette fonction n’est pas active dans les positions
,,.
10. La fonction Eolyse
FR
99633824_ML.qxp 12/07/2005 16:39 Page 17
Page 18
18
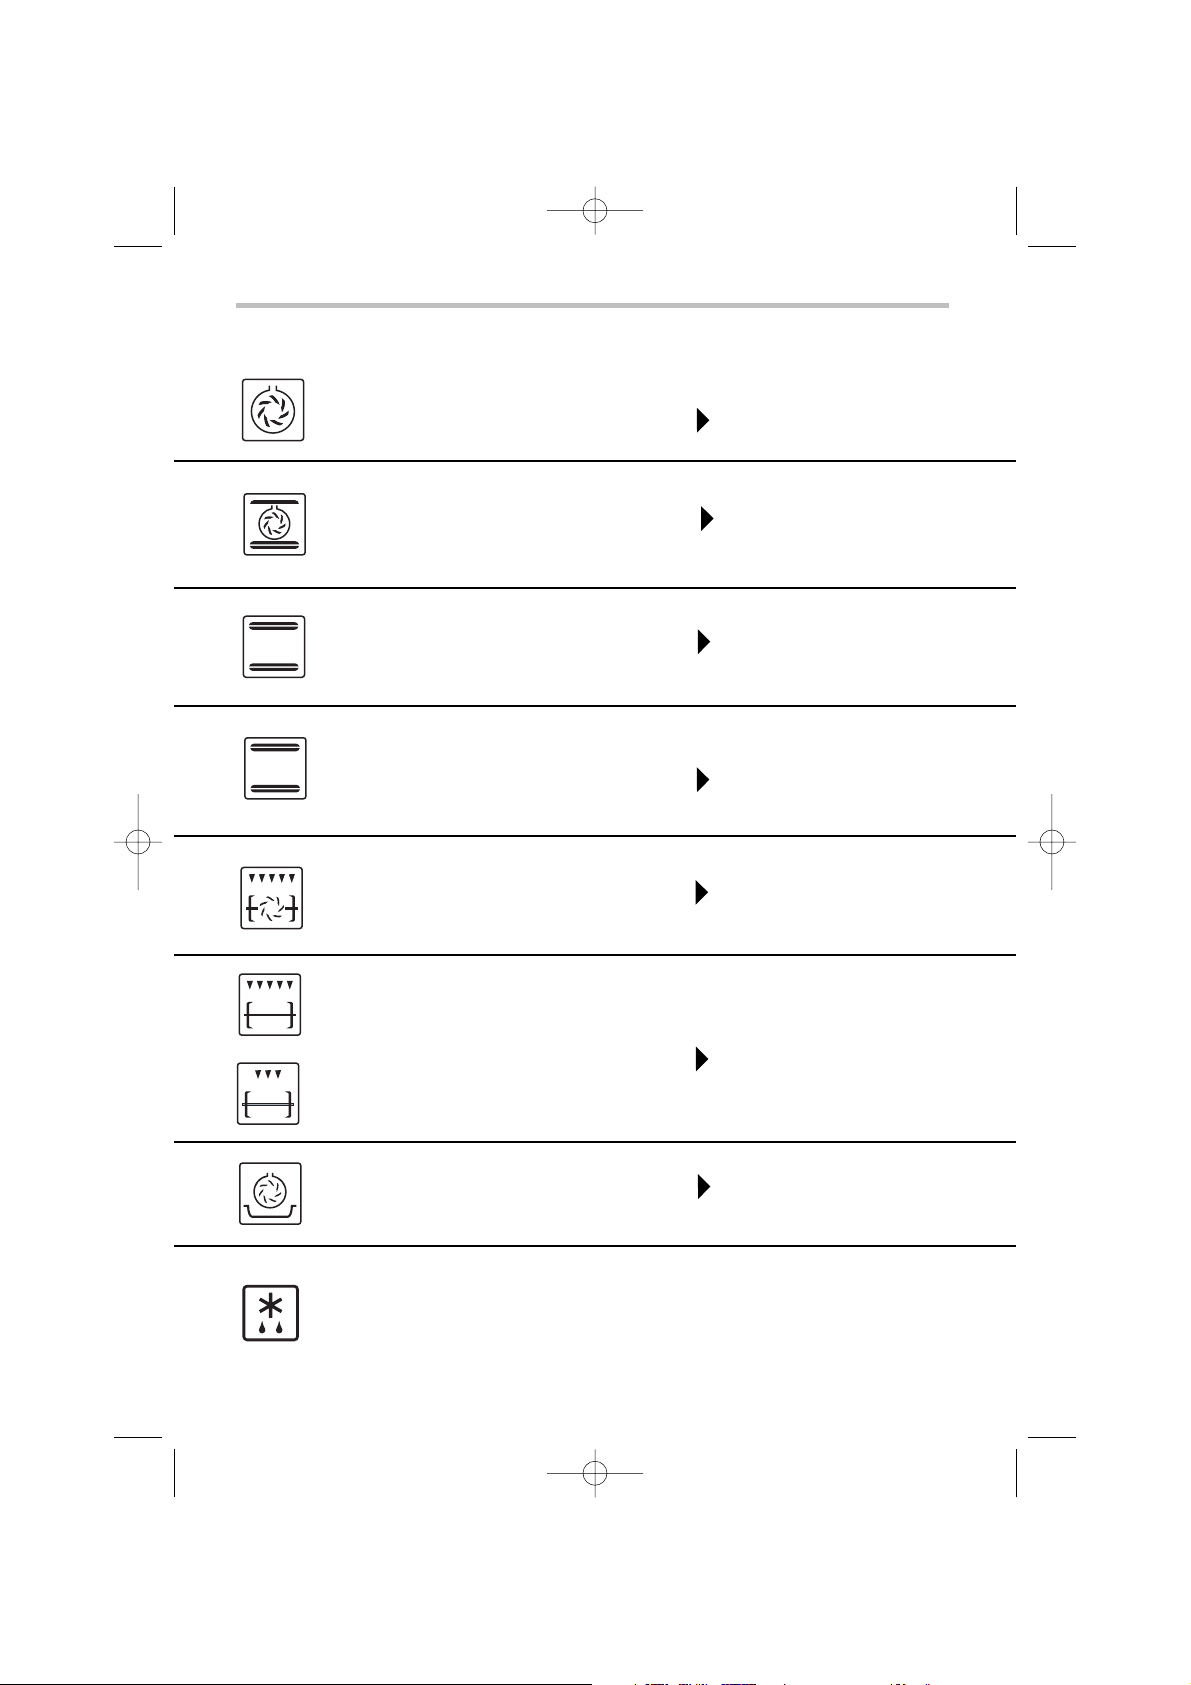
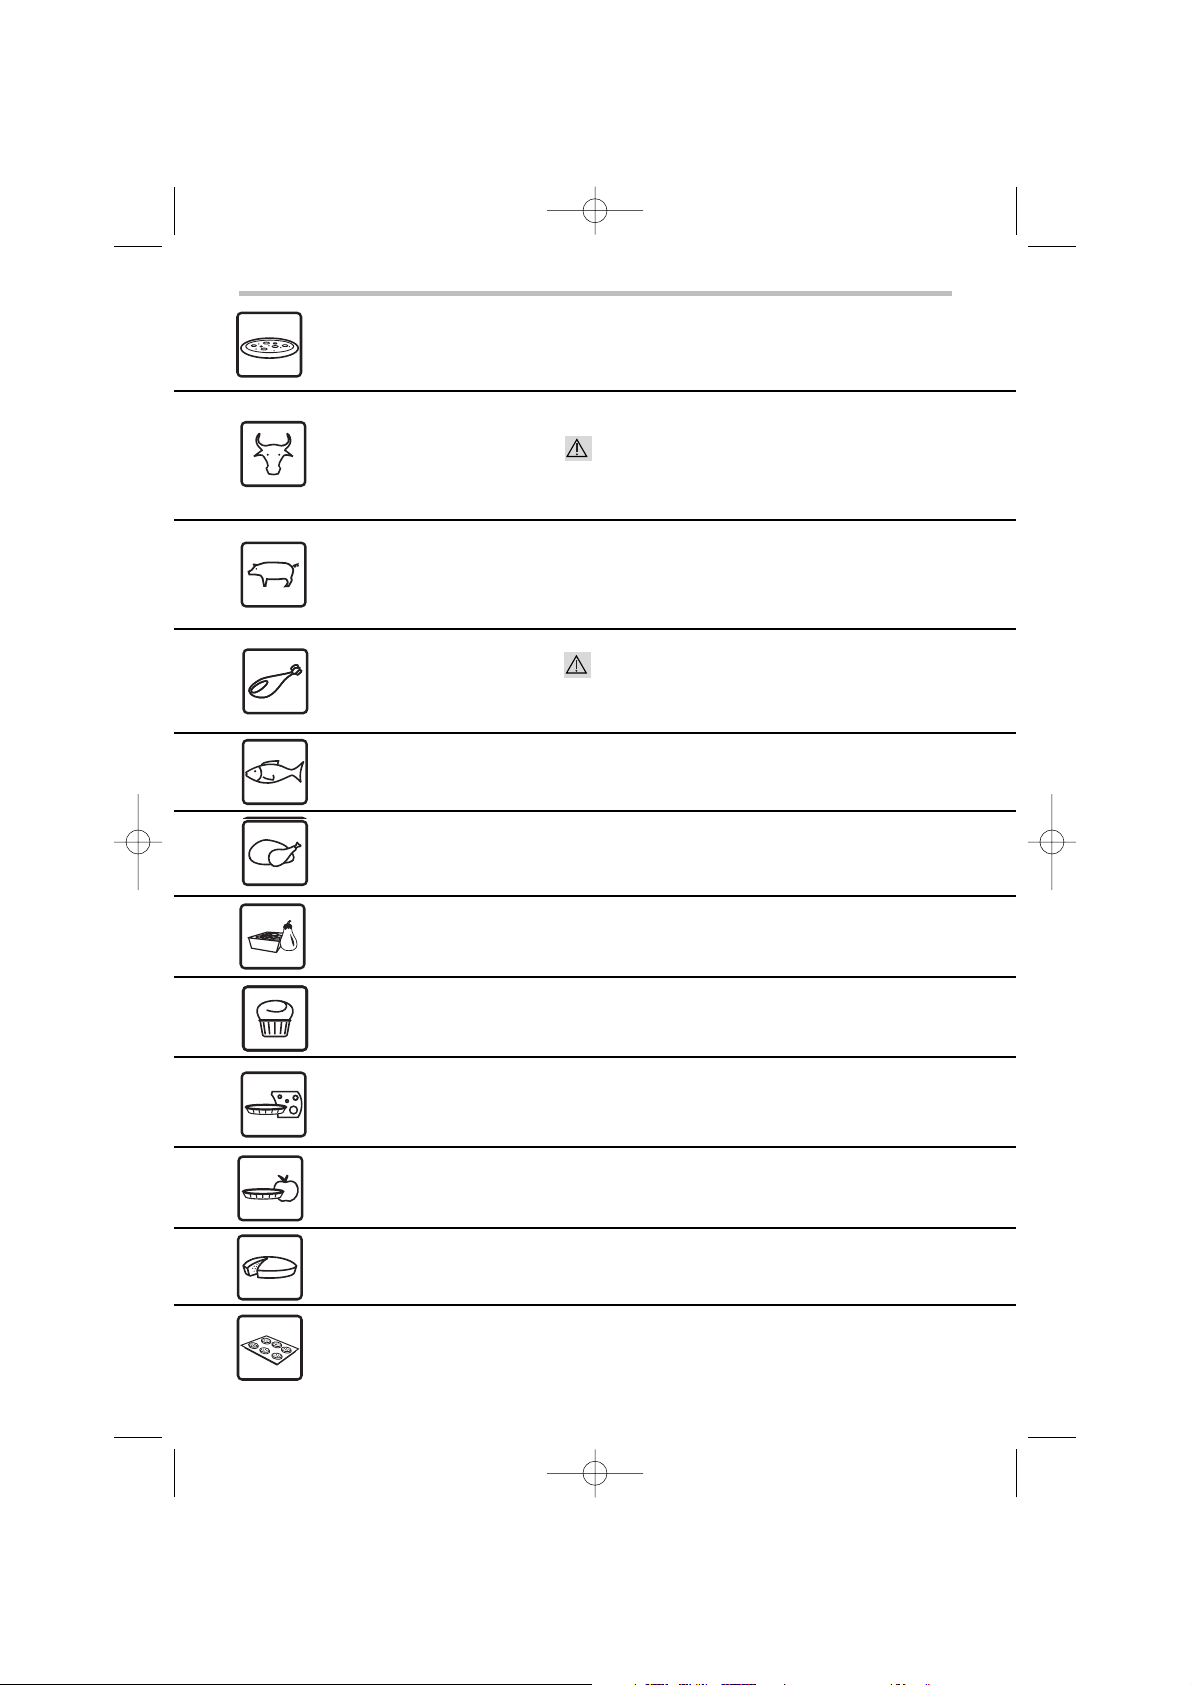
Cuisson combinée
La cuisson s’effectue par les éléments inférieur, supérieur au fond
du four et par l’hélice de brassage
d’air.
Turbo gril
La cuisson s’effectue, alternativement, par l’élément supérieur et
par l’hélice de brassage d’air.
Gril double
La cuisson s’effectue par l’élément
supérieur
Gril simple
La cuisson s’effectue par l’élément
supérieur
.
Cette position permet de faire un
gain d’énergie tout en conservant les qualités de cuisson.
La position ECO est utilisé pour
l’étiquetage énergétique.
Maintien au chaud
Dosage de l’élément situé au fond
du four associé au brassage d’air.
Maintien au chaud.
Symbole
Nom de la fonction Description de la fonction
6. Modes de cuisson du four
*
* Séquences(s) utilisée(s) pour l’annonce écrite sur l’étiquette énergétique conformé
Montée rapide en température. Certains plats peuvent être enfournés four
froid.
Traditionnel ECO
La cuisson s’effectue par les éléments inférieur et supérieur sans
brassage d’air.
Trois sources de chaleur
associés : beaucoup de
chaleur en bas, un peu de
chaleur tournante et un
soupçon de gril.
Le gril double couvre toute
la surface de la grille.
Quand au gril simple, il
montrera une même efficacité pour de plus petites
quantités.
Ce mode combine l’effet de la
turbine et du gril ; le gril fait
rayonner l’infrarouge sur l’aliment et le mouvement d’air crée
par la turbine en attenue l’effet.
Traditionnel
La cuisson s’effectue par les éléments inférieur et supérieur sans
brassage d’air.
Necessite un préchauffage
avant d’enfourner le plat.
Chaleur tournante
La cuisson s’effectue par l’élément
chauffant situé au fond du four et
par l’hélice de brassage d’air.
*
Décongélation
99633824_ML.qxp 12/07/2005 16:39 Page 18
ECO
ECO
Page 19
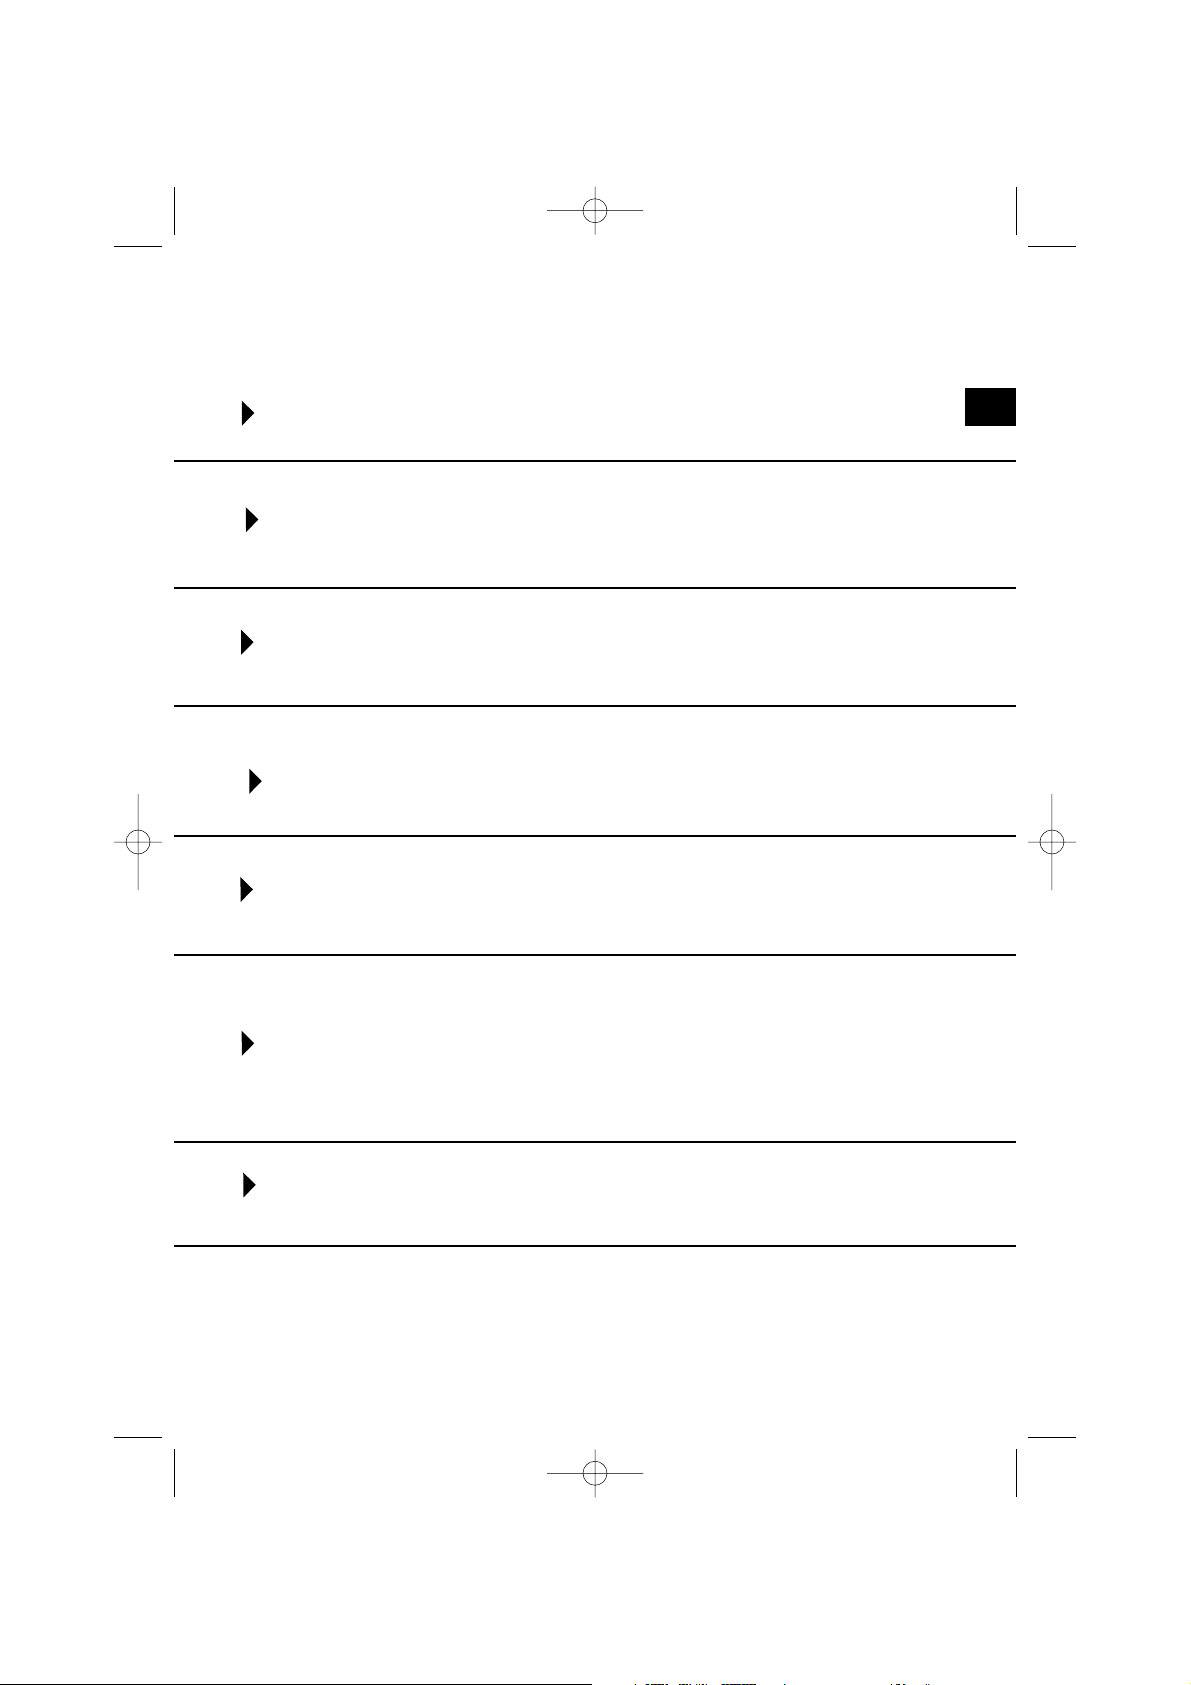
Recommandé pour les quiches,
tourtes, tartes aux fruits juteux.
Recommandé pour griller les
côtelettes, saucisses, tranches de
pain, gambas posées sur la grille.
Recommandé pour faire lever les
pâtes à pain, à brioche, kouglof...en
ne dépassant pas 40°C (chauffeassiettes, décongélation).
Recommandations
Modes de cuisson du four
Recommandé pour garder le moelleux des
viandes blanches, poissons, légumes
Pour les cuissons multiples jusqu’à 3 niveaux.
Nota : toutes les cuissons se font sans
préchauffage.
Recommandé poursaisir et cuire à coeur
viandes rouges et blanches.
Pour cuire doucement les volailles jusqu’à
2 kg
Préco T°
mini
préco
maxi
35
180
235
mini
préco
maxi
35
205
275
mini
préco
maxi
200
230
mini
préco
maxi
35
275
mini
préco
maxi
35
80
100
180
200
Recommandé pour les cuissons lentes et
délicates : gibiers moelleux...
Saisir les viandes rouges
Pour mijoter en cocotte fermée les plats
préalablement démarrés sur table de cuisson (coq au vin, civet...)
mini
préco
maxi
35
240
275
mini
préco
maxi
30
30
50
mini
préco
maxi
1
4
4
mini
préco
maxi
1
2
4
19
FR
99633824_ML.qxp 12/07/2005 16:39 Page 19
Page 20
Comment utiliser votre four ?
TOUTES LES CUISSONS S’EFFECTUENT SANS PRECHAUFFAGE DU FOUR
1.
Avantage et principe ICS
Avec la fonction “ ” vous n’avez plus besoin de sélectionner la température
et le temps de cuisson.
Ces deux paramètres sont calculés automatiquement par votre four, afin d’obtenir une cuisson optimale.
Le mode de cuisson “ ” s’effectue en 2 phases:
1) Une première phase (acquisition) durant laquelle le four va enregistrer, grâce
à ses capteurs électroniques les données de cuisson spécifiques à votre plat.
Cette phase se symbolise par une animation dans la zone droite de l’afficheur:
Elle peut durer entre 5 et 40 minutes selon le plat.
NE PAS OUVRIR LA PORTE PENDANT CETTE PHASE afin de ne pas perturber
l’enregistrement des données.
2) Une deuxième phase où le four a déterminé le temps de cuisson nécessaire.
Le symbole de l’animation s’arrête et “Auto” défile. Le four indique alors le temps
de cuisson restant ainsi que l’heure réelle de fin de cuisson.
A partir de ce moment, le four finalise la cuisson et vous pouvez ouvrir la porte
du four, si vous souhaitez intervenir sur le plat (arrosage, retournement de l’aliment...)
2. Mode d’utilisation ICS
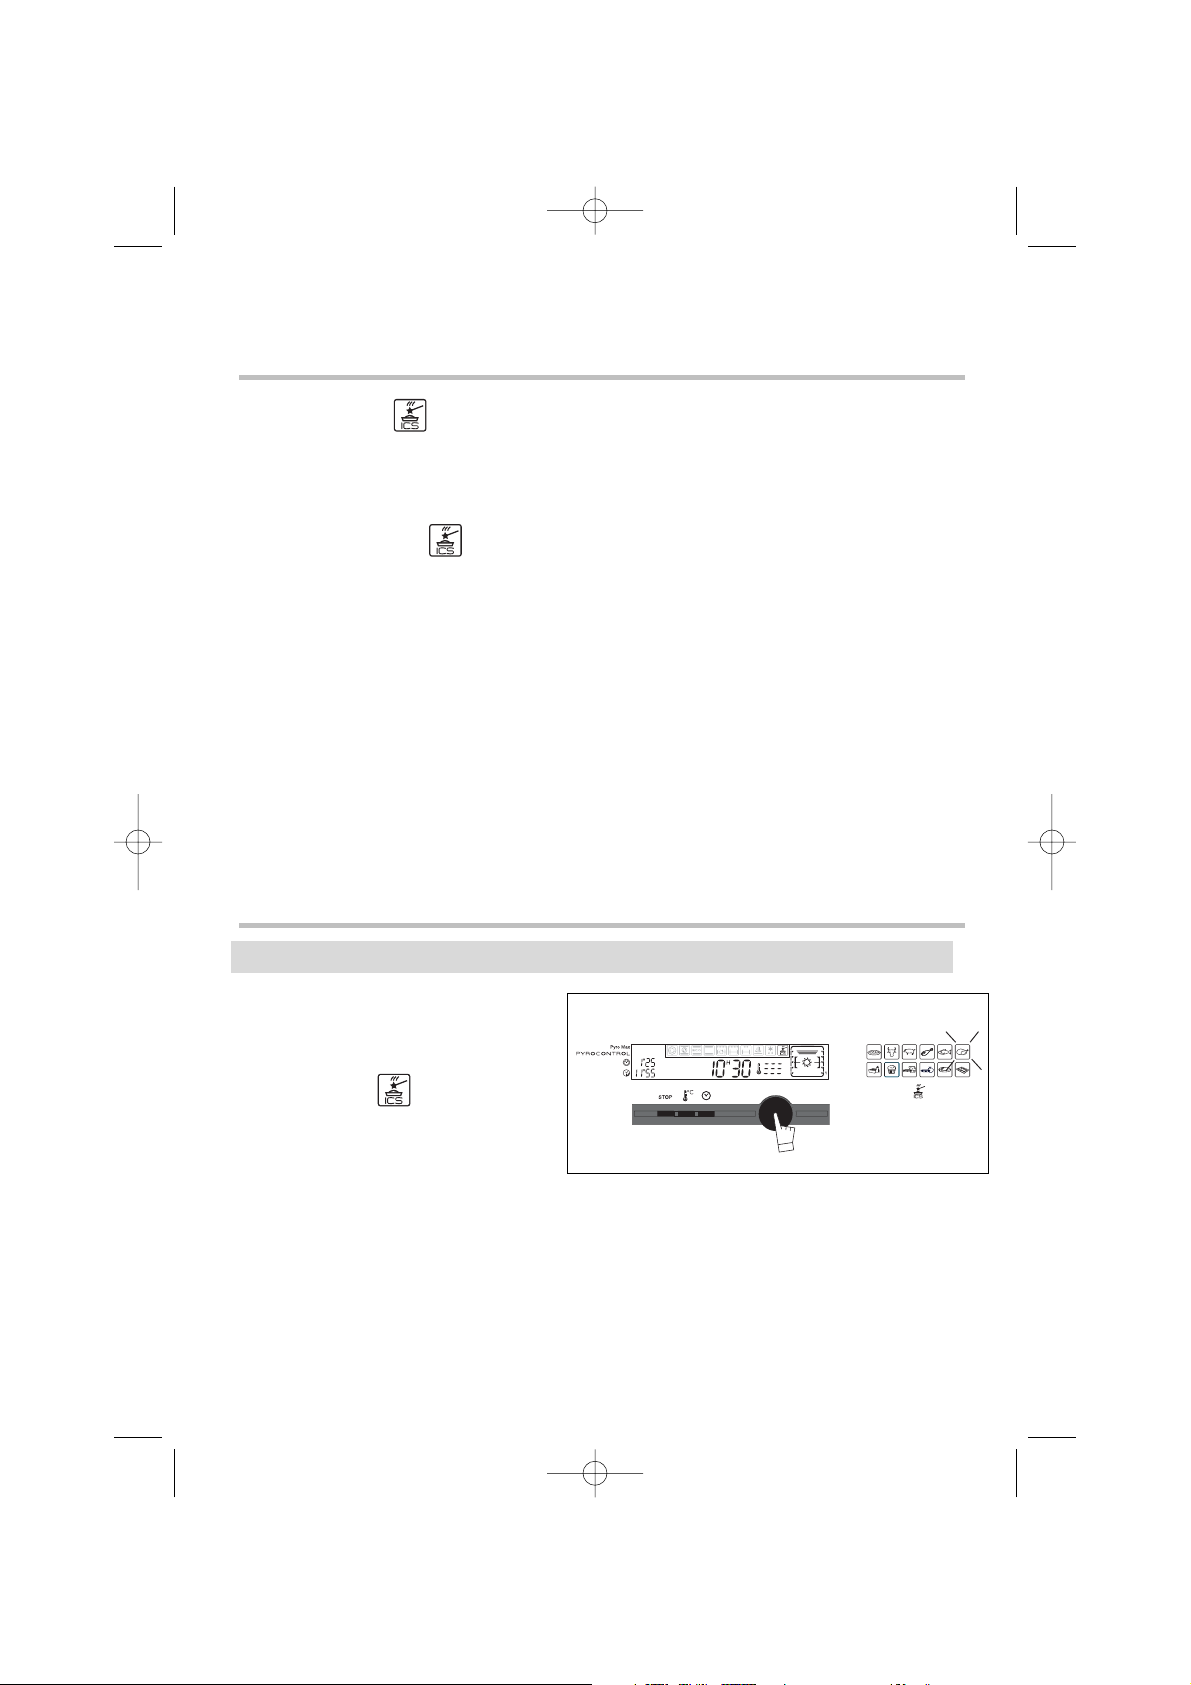
a) Cuisson immédiate :
Positionnez le sélecteur de cuisson
sur la fonction “ ”. Validez en
appuyant sur le bouton
Le choix des différents plats clignote
dans l’afficheur.
A l’aide du bouton, choisissez le plat.
Insérez-le sur le gradin préconisé dans l’afficheur. Fermez la porte. Appuyez sur
le bouton pour valider. Le four débute sa cuisson.
La phase de recherche commence symbolisée par l’animation dans l’afficheur: le
temps de cuisson moyen pour le type de plat sélectionné s’affiche. Une fois que
le four a fini d’analyser l’aliment, le temps de cuisson réel nécessaire s’affiche et
l’animation est remplacé par “ICS”.
La cuisson terminée, le four émet plusieurs bips.
20
99633824_ML.qxp 12/07/2005 16:39 Page 20
Page 21
Comment utiliser votre four ?
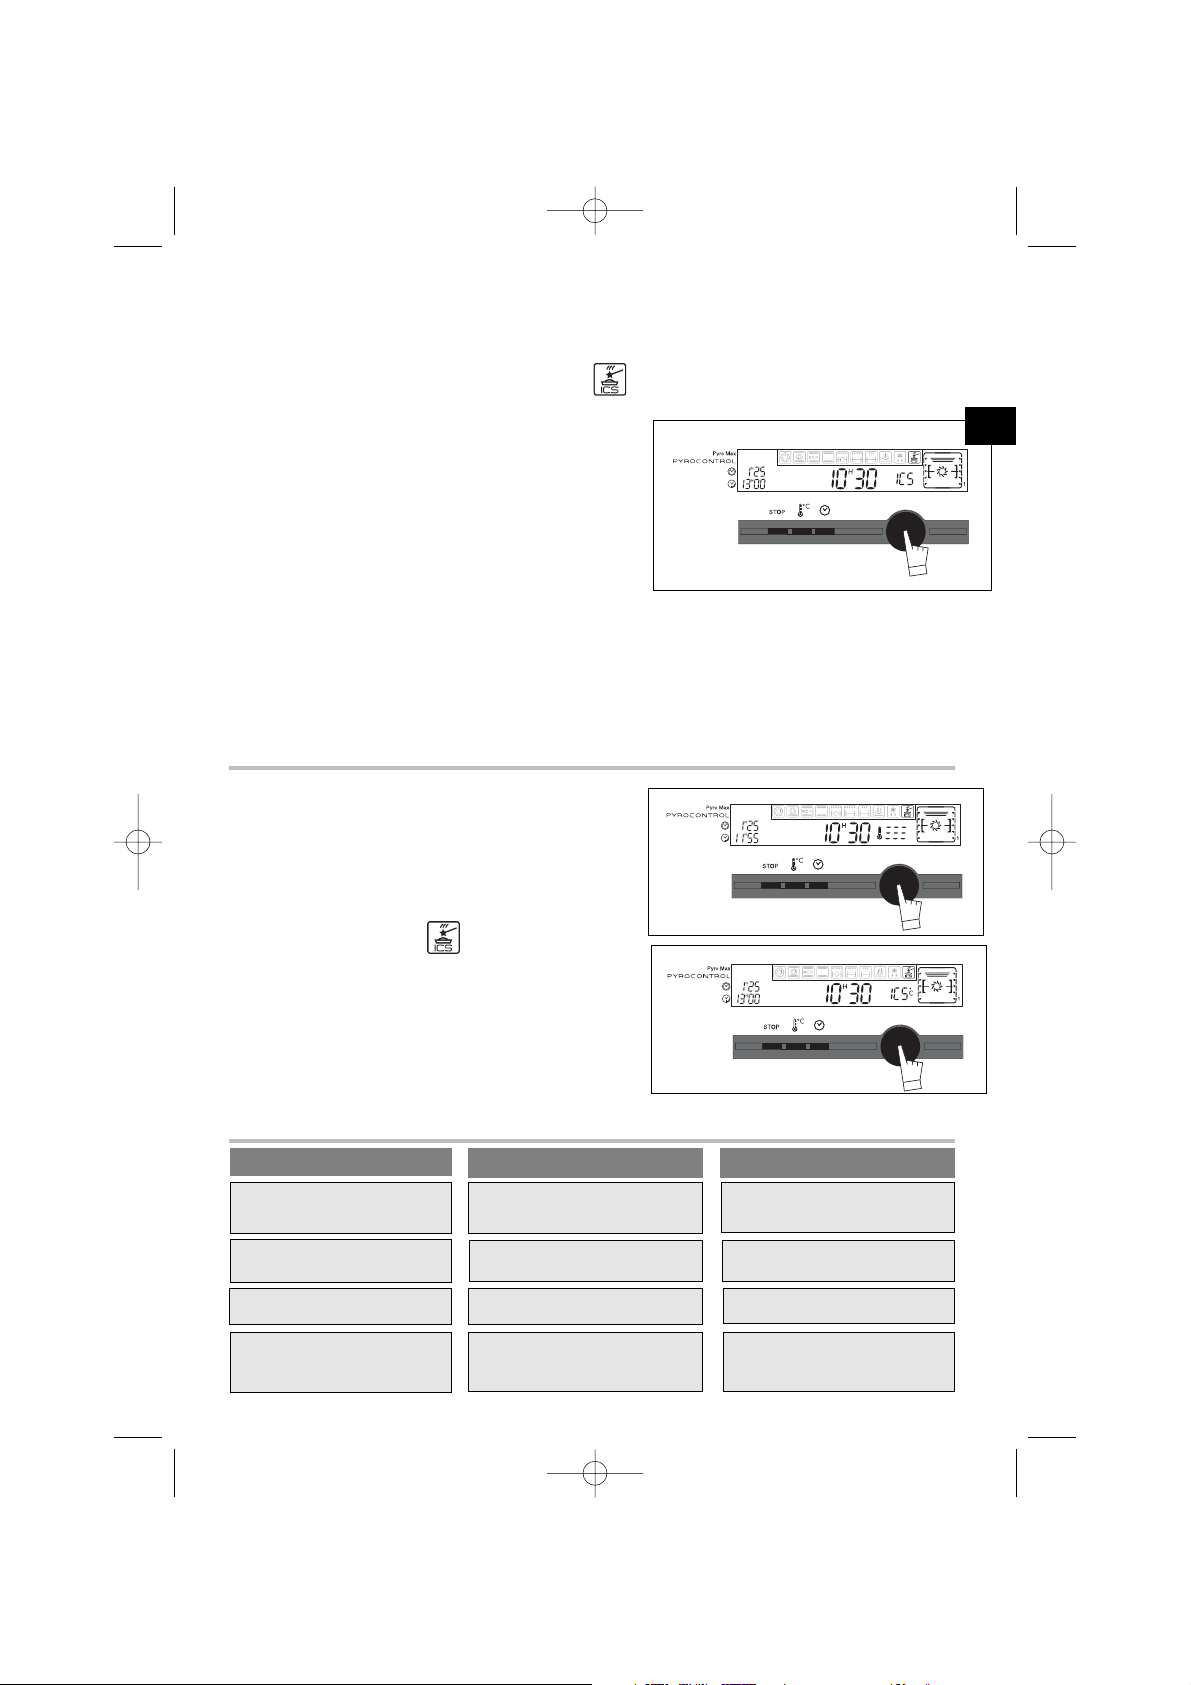
b) Cuisson différée :
Positionnez le sélecteur de cuisson sur “ ”.
Choisissez votre plat à l’aide du bouton de
sélection.
Enfournez votre plat et fermez la porte.
Positionnez le sélecteur de mode sur “Fin de
cuison”.
Tournez le bouton de réglage + ou - pour
régler l’heure de fin de cuisson souhaitée.
ex.: Fin de cuisson 13h00.
Appuyez pour valider votre choix.
Après ces actions, le départ de la cuisson est différé. “ICS” défile jusqu’au début de cuis-
son. La fin de cuisson est estimée à partir du temps moyen de base. De la même façon
qu’une cuisson immédiate, ce temps sera optimisé en cours de cuisson et donc l’heure
peut varier de quelques minutes (en +ou en -) par rapport à la sélection initiale.
3.
Conseils
Si vous ouvrez la porte en phase d’analyse
excepté lors de la première minute, votre four
émet des “bips” d’avertissement et les symboles des plats clignotent.
Dès que le symbole “ICS” est fixe, vous avez
libre accès pour ouvrir la porte du four.
La cuisson en mode “ ” DOIT DEBUTER
AVEC LE FOUR
FROID, il convient d’attendre le refroidissement complet avant d’effectuer une deuxième
cuisson sur ce même mode (dans le cas
contraire les symboles “°C “ et plats clignotent
dans l’afficheur vous empêchant de débuter
4. Que faire en cas d’anomalies ?
Vous constatez que...
Les causes possibles Que faut-il faire ?
Bips.
• Vous avez ouvert la porte pendant
la première minute : le programme
est annulé.
- Laissez refroidir le four pour
redémarrer la cuisson.
Le symbole --- clignote dans
l’afficheur.
• Le four cherche à déterminer le
temps de cuisson idéal.
- C’est une étape normale.
“ICS” s’affiche
• Le four a maintenant déterminé le
temps de cuisson approprié.
- C’est une étape normale.
Le sélecteur de fonctions sur
“ICS” pictogrammes + bip +
°C clignotent
• Le four est trop chaud pour réaliser une cuisson “ICS”.
- Attentez que le four refroidisse
ou utilisez une fonction de cuisson classique.
21
FR
99633824_ML.qxp 12/07/2005 16:39 Page 21
Page 22
5. Modes de cuisson du four
Pizza
• pizza traiteur fraîches
• pizza pâtes prêtes à l’emploi
• pizza pâtes “maison”
• pizza surgelées
• Rôtis de boeuf
(cuisson saignante)
• Posez le rôti sur la grille de l’ensemble grille
+ lèchefrite.
Vous pouvez le retourner lorsque “ICS” devient fixe.
Rôti de
Boeuf
• Rôtis de porc
- échine
- filet
Rôti de
Porc
Agneau
• Gigot de 1kg à 2,500kg
• Posez le gigot sur la grille de l’ensemble grille
+ lèchefrite.
Vous pouvez le retourner lorsque “ICS” devient
fixe.
• Poissons entiers
(dorade, colinot,truites, maquereaux...)
• rôti de poisson
P
oissons
• poulets de 1 kg à 1,700 kg
• canette, pintade...
Poulet
L
égumes
farcis
• tomates, poivrons... farcis
• lasagnes (frais ou surgelés)
• hachis parmentier, brandade...
Soufflé
• utilisez un moule haut à bords droits diamètre 21cm
Tartes
salées
• quiches fraîches
• quiches surgelées
•paniers surgelés
• Tartes fraîches
• Tartes surgelées
Tartes
sucrées
• Gâteaux familiaux : cake (salés, sucrés),
quatre quarts
• Préparations toutes prêtes proposées en sachets.
G
âteaux
• Petits gâteaux individuels : cookies, financiers,
croissants,petits pains, pains au raisins en boîte,
croque-monsieur.
Petits
B
iscuits
22
99633824_ML.qxp 12/07/2005 16:40 Page 22
Page 23

• posez-la sur la grille pour obtenir une pâte croustillante
(vous pouvez intercaler une feuille de papier cuisson entre la grille et la pizza pour protéger
le four des débordements de fromage)
• posez sur la plaque à patisserie pour obtenir une pâte moëlleuse.
• sortez le rôti du réfrigérateur, 1 heure minimum avant de débuter la cuisson :
• vous allez obtenir un rôti saignant; si vous préférez une viande bien cuite, optez pour
une fonction de cuisson traditionnelle.
• Otez le maximum de barde : elle provoque des fumées.
• en fin de cuisson, respectez un temps de repos de 7 à 10 min viande emballée dans une
feuille d’aluminium avant de trancher.
• sortez le rôti du réfrigérateur, 1 heure minimum avant de débuter la cuisson : plus la viande est froide, plus elle le sera en fin de cuisson.
• utilisez un plat en terre. Ajoutez 1 à 2 cuillerées à soupe d’eau.
• en fin de cuisson, respectez un temps de repos de 7 à 10 min viande emballée dans une
feuille d’aluminium avant de trancher. Salez en fin de cuisson.
• sortez la viande du réfrigérateur 1 heure minimum avant la cuisson :
• choisissez le gigot rond et dodu plutôt que long et efflanqué.
• laissez reposer après la cuisson le gigot emballé d’une feuille de papier aluminium.
• réservez cette fonction pour les poissons entiers, cuisinés avec aromates
et vin blanc.
(les poissons grillés ou cuits en papilotte nécessitent un préchauffage du four).
• cuisson au tourne-broche : n’oubliez pas de poser la lèche-frite au 1er gradin pour récupérer les graisses.
• cuisson au plat : préférez les plats en terre pour éviter les projections.
• Piquez la peau des volailles pour éviter les éclaboussures.
• adaptez correctement les dimensions de votre plat à la quantité à la quantité à cuire pour
éviter les débordements de jus.
• beurrez le moule et ne touchez pas l’intérieur avec les doigts, sinon le soufflé ne montera pas.
• utilisez un moule en aluminium non adhésif : la pâte sera croustillante dessous.
• retirez la barquette des quiches surgelées avant de les poser sur la grille.
• utilisez un moule en aluminium non adhésif :
• la pâte sera plus croustillante dessous.
• gâteaux préparés dans un moule à cake, rond, carré... et toujours posés sur la grille.
Possibilités de cuire 2 cakes moules côte à côte.
• petits gâteaux individuels sur la plaque pâtisserie.posée sur la grille.
la pâte à choux doit être cuite sur “GATEAUX”pour obtenir de bons résultats.
23
FR
99633824_ML.qxp 12/07/2005 16:40 Page 23
Page 24

Conseils et astuces
Pizza
Pour éviter au fromage ou à la sauce tomate de couler dans le four, vous
pouvez poser une feuille de papier sulfurisé entre la grille et la pizza.
Tartes / Quiches:
Evitez les plats en verre, en porcelaine: trop épais ils prolongent le temps de
cuisson et le fond de la pâte n’est pas croustillant.
Avec les fruits, le fond de tarte risque de se détremper: il suffit alors d’y
déposer quelques cuillerées de semoule fine, de biscuits écrasés en chape
lure, de poudre d’amandes ou de tapioca, qui en cuisant absorberont le jus.
Avec les légumes humides ou surgelés (poireaux, épinards, brocolis ou
tomates) vous pouvez saupoudrer une cuiller à soupe de fleur de maïs.
Poissons
:
A l’achat, l’odeur doit être agréable et faible de marée.
Le corps ferme et rigide, les écailles fortement adhérentes à la peau,
l’oeil vif et bombé et les branchies brillantes et humides.
Boeuf / Porc / Agneau
Sortez impérativement toute viande du réfrigérateur bien avant la cuisson:
le choc froid-chaud durcit la viande, ainsi vous obtiendrez un rôti de boeuf
doré autour, rouge dedans et chaud à coeur. Ne salez pas avant de cuire: le
sel absorbe le sang et dessèche la chair. Retournez la viande à l’aide de
spatules : si vous la piquez le sang s’échappe. Laissez toujours reposer la
viande après cuisson pendant 5 à 10 minutes: emballez-la dans un papier
d’aluminimum et posez-la à l’entrée du four chaud: ainsi le sang attiré vers
l’extérieur pendant la cuisson va refluer et irriguer le rôti.
Utilisez des plats à rôtir en terre: le verre favorise les projections de gras.
Ne cuisez pas non plus dans la lèche-frite émaillée.
Evitez de piquer le gigot d’agneau de gousses d’ail, sinon il perd son sang ;
glissez plutôt l’ail entre chair et os, ou cuisez les gousses d’ail non épluchées,
à côté du gigot et écrasez-les en fin de cuisson pour parfumer la sauce ;
filtrez et servez très chaud en saucière.
Comment utiliser votre four ?
24
99633824_ML.qxp 12/07/2005 16:40 Page 24
Page 25

Quelques recettes ICS
Pizza Base: 1 pâte pour pizza
*aux légumes:
6 cuillerées à soupe de sauce tomate + 100 g de cour
gettes coupées en dès + 50 g de poivrons coupés en dés + 50 g d’au
bergines en rondelles +2 petites tomates en rondelles + 50 g de gruyère
râpé + origan + sel + poivre.
*au roquefort, poitrine fumée:
6 cuillerées à soupe de sauce tomate +
100 g de poitrine + 100 g de roquefort en dés + 50 g de noix + 60 g
de gruyère râpé.
*aux saucisses, fromage blanc:
200 g de fromage blanc égoutté étalé
sur la pâte + 4 saucisses en rondelles + 150 g de jambon en lanières +
5 olives + 50 g de gruyère râpé + origan + sel + poivre.
Quiches : Base: 1 moule aluminium diamètre 27 à 30 cm
1 pâte brisée prête à l’emploi
3 oeufs battus + 50 cl de crème épaisse
sel, poivre, muscade.
Garnitures variées:
200 g de lardons précuits,
ou - 1 kg d’endives cuites + 200 g de gouda râpé
ou - 200 g de brocolis + 100 g de lardons + 50 g de bleu
ou - 200 g de saumon + 100 g d’épinards cuits égouttés
Rôti de boeuf Sauce SAUTERNES PERSILLEE au ROQUEFORT :
Faites suer 2 cuillers à soupe d’échalotes ciselées au beurre. Ajoutez 10 cl
de Sauternes, laissez évaporer. Ajoutez 100 g de Roquefort, faites fondre
doucement. Ajoutez 20 cl de crème liquide, sel, poivre. Faites bouillir.
Rôti de porc
Porc au pruneaux
Demandez au boucher de faire un trou sur toute la longueur du rôti,
glissez un vingtaine de pruneaux à l’intérieur. Servez coupé en tranches
avec le jus ou froid avec une salade d’endives.
Comment utiliser votre four ?
25
FR
99633824_ML.qxp 12/07/2005 16:40 Page 25
Page 26

Poulet
Farcissez-le avec un beau bouquet d’estragon frais ou enduisez-le d’un
mélange fait de 6 gousses d’ail pilées avec une pincée de gros sel, quelques
grains de poivre.
Agneau
Sauce aux anchois:
Mixez 100 g d’olives noires avec 50g de câpres et 3 anchois, 1/2 gousse
d’ail et 10 cl d’huile d’olive. Ajoutez 10 cl de crème fraîche. Servez avec le gigot
tranché.
Poissons
Dorade grise au cidre brut: 1 dorade de 1,5 kg.
500 g de champignons de Paris.
2 pommes acides.
2 échalotes.
2 cuillerées à soupe de crème épaisse.
100 g de beurre.
1/2 litre de cidre. Sel, poivre.
Videz, écaillez le poisson. Posez-le dans un plat beurré sur les échalotes
hachées fines et les champignons en lamelles. Ajoutez le cidre, sel et poivre et
quelques noisettes de beurre. Enfournez. Cuire dans le beurre les pommes en quartiers non épluchées. A la fin de la cuisson déposez le poisson dans un plat chaud, filtrez le jus et déglacez à la crème. Rajoutez-la crème au jus, servez avec pommes et
champignons.
Légumes farcis
Les restes de pot au feu, de gigot, de rôtis de viandes blanches, de volailles rôtis
finement hachés sont d’excellentes bases.
Tarte feuilletée pralinée aux pommes :
1 pâte feuilletée étalée avec sa feuille, piquée à la fourchette.
200 ml de crème portée à ébullition avec une gousse de vanille.
2 oeufs battus avec 30 g de sucre, ajoutez la crème refroidie.
2 pommes coupées en dès roulés dans 70 g de pralin.
Déposez crème + pommes. Enfournez.
Quelques recettes ICS
Comment utiliser votre four ?
26
99633824_ML.qxp 12/07/2005 16:40 Page 26
Page 27

Quelques recettes ICS
Quatre-quarts aux agrumes
Caramel : 20 morceaux de sucre (200g)
Gâteau : 4 oeufs
200g de sucre semoule
200g de farine
200g de bon beurre
2 cuillerées à café de levure
Fruits : 1 petite boîte d’agrumes au sirop.
Egouttez les fruits. Préparez un caramel. Lorsqu’il a pris couleur, versez-le dans
le moule à manqué ; inclinez-le de façon à bien répartir le caramel. Laissez
refroidir. Dans le bol d’un robot électrique, mélangez le beurre ramolli avec le
sucre. Incorporez les oeufs entiers, l’un après l’autre, puis la farine
tamisée.Terminez par la levure. Disposez les quartiers d’agrumes en rosace sur
le caramel. Versez la pâte. Enfournez sur “GATEAUX”. Démoulez dans un joli
plat, et servez froid.
Les fruits peuvent être des pommes, des poires, des abricots.
Petits gâteaux au chocolat
12 ramequins individuels en aluminium
60 g de beurre
200 g de chocolat amer (plus de 50% de cacao)
100 g de sucre en poudre
4 oeufs
1 sachet de levure chimique
70 g de farine tamisée.
Faîtes fondre le chocolat avec le beurre sur un feu très doux. Travaillez les jaunes
d’oeufs avec le sucre jusqu’à ce que le mélange devienne lisse. Ajoutez le farine,
le chocolat fondu avec le beurre et terminez par la levure. Battez les blancs en
neige et incorporez-les délicatement à la préparation. Beurrez et farinez légèrement les ramequins aluminium, versez la pâte dedans (sans en faire couler sur les
bords). Posez les ramequins sur la plaque à patisserie sélectionnez “BISCUITS”.
Démoulez et laissez refroidir sur une grille. Accompagnez de crème anglaise
vanillée ou de glace à la noix de coco
Soufflés
Base de la béchamel : 1/2 litre de lait
60g de farine
100g de beurre
4 jaunes d’oeufs+ les blancs battus en neige
sel, poivre, muscade.
Selon la nature du soufflé, vous ajouterez 150 g de gruyère rapé ou 1kg d’épinards
cuits broyés ou 1kg de choux fleurs cuits broyés ou 150 g de reste de poisson cuits
écrasés ou 150 g de jambon haché.
Comment utiliser votre four ?
27
FR
99633824_ML.qxp 12/07/2005 16:40 Page 27
Page 28

1.
Qu’est-ce qu’une pyrolyse ?
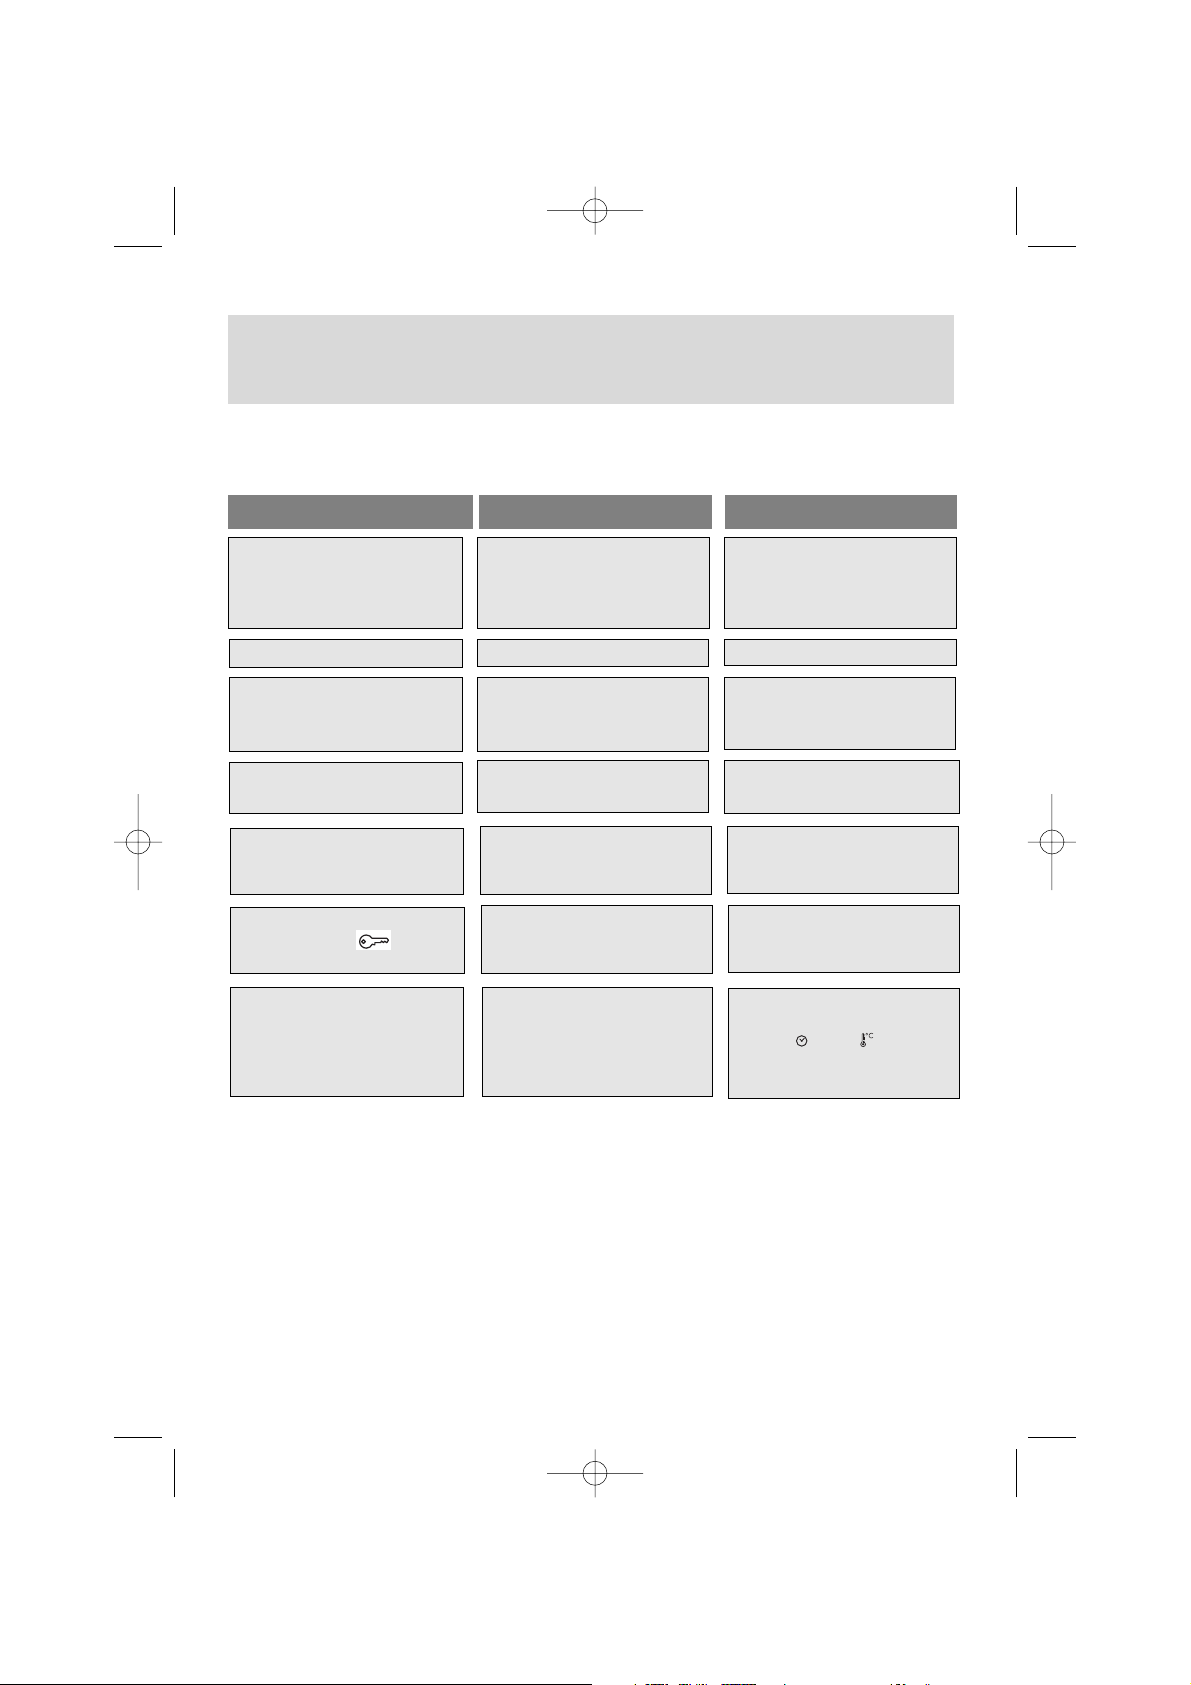
CUISSONS PEU Biscuits, légumes, patisseries Cuissons sans éclaboussures
SALISSANTES quiches, soufflés une pyrolyse n’est pas justifiée
CUISSONS viandes, poissons, la pyrolyse peut se justifier
SALISSANTES (dans un plat) légumes farcis toutes les 3 cuissons
CUISSONS TRES grosses pièces de viandes la pyrolyse peut se faire après
SALISSANTES à la broche 1 cuisson de ce type si les
projections sont importantes
Votre four fume lors d’un préchauffage ou fume énormément lors d’une cuisson.
Votre four dégage une odeur à froid désagréable suite à différentes cuissons
(mouton, poisson, grillades...).
2. Dans quel cas faut-il effectuer une pyrolyse ?
Il ne faut pas attendre que le four soit chargé de graisses pour
effectuer ce nettoyage.
-La pyrolyse est un cycle de chauffe de la cavité du four à très haute température qui permet d’éliminer toutes les salissures qui proviennent des éclaboussures
ou des débordements. Les fumées et odeurs dégagées sont détruites par le passage dans un catalyseur.
- La pyrolyse n’est toutefois pas nécessaire après chaque cuisson, mais seulement si le degré de salissure le justifie.
- Par mesure de sécurité, l’opération de nettoyage ne s’effectue qu’après blocage automatique de la porte. Dès que la température à l’intérieur du four dépasse les températures de cuisson, il est impossible de déverrouiller la porte même
en positionnant la manette «sélecteur de fonctions» sur 0.
Comment nettoyer la cavité de votre four ?
3. Comment faire une pyrolyse ?
Faire une pyrolyse immédiate
a) Retirez la casserolerie du four et enlevez les débordements impor-
tants qui auraient pu se produire.
b) Vérifiez que le programmateur
affiche l’heure du jour et que celle-ci ne clignote pas.
c) Appuyez sur le bouton, puis tournez vers la gauche sur la position .
28
99633824_ML.qxp 12/07/2005 16:40 Page 28
Page 29
29
Comment nettoyer la cavité de votre four ?
3. Comment faire une pyrolyse ?
Votre four propose deux modes de nettoyage: Pyromax et Pyrocontrol.
Choisissez le plus adapté :
a) Pyromax
· Pyromax est un système de pyrolyse dont
la durée est présélectionnée: elle dure 2
heures et permet un nettoyage intense et
parfait de la cavité du four.
Pour différer le départ, sélectionnez l'heure
de fin et modifiez la en entrant l'heure de fin de pyrolyse souhaitée.
Validez en appuyant sur le bouton.
Le nettoyage se met en route. Votre écran indique :
- l’heure (1)
- la durée totale (2)
- l'heure de fin de pyrolyse (3)
- le verrouillage de la porte (4)
b) PYROCONTROL
· PYROCONTROL est un système qui permet au four de calculer automatiquement le
temps de nettoyage en fonction du niveau de salissure, permettant un gain d'énergie
et un temps de pyrolyse adapté au besoin.
Si vous souhaitez différer le départ, sélectionnez l'heure de fin et modifiez la en
entrant l'heure de fin de pyrolyse souhaitée.
Valider en appuyant sur le bouton.
Au début du cycle, le four procéde à un calcul de la durée de pyrolyse en fonction du
degré de salissure, cette phase dure quelques minutes.
L'écran indique:
- la durée totale
- l'heure de fin de pyrolyse prévue
- l'heure
- le verrouillage de la porte
c) Fin de pyrolyse
Retirez simplement les résidus de cendres dans la cavité avec une éponge humide.
FR
99633824_ML.qxp 12/07/2005 16:40 Page 29
Page 30
Que faire en cas d’anomalies de
fonctionnement ?
Vous avez un doute sur le bon fonctionnement de votre four, ceci ne
signifie pas forcément qu'il y a une panne.
Dans tous les cas, vérifiez les
point suivants :
Vous constatez que...
Les causes possibles Que faut-il faire ?
Le four ne chauffe pas.
• Le four n'est pas branché.
• Le fusible de votre installation est
hors service.
• La température sélectionnée est
trop basse.
- Brancher le four.
- Changer le fusible de votre installation et vérifier sa valeur (16A).
- Augmenter la température sélectionnée.
L’indicateur de T°c clignote.
• Défaut de verrouillage de la porte.
- Faire appel au Service Après-Vente.
La lampe du four ne fonctionne plus.
• La lampe est hors service.
• Le four n'est pas branché ou le
fusible est hors service.
- Changer la lampe.
- Brancher le four ou changer le
fusible.
Le nettoyage par pyrolyse ne se
fait pas.
• La porte est mal fermée.
• Le système de verrouillage est
défectueux.
- Vérifier la fermeture de la porte.
- Faire appel au Service Après-Vente.
Votre four émet des bips.
• En cours de cuisson.
• En fin de cuisson.
- La température de consigne de
votre choix est atteinte.
- Votre cuisson programmée est
terminée.
Votre four affiche
Réglages
+
-
• Lors de l’appui sur les touches.
• Verrouillage des commandes
pour la sécurité enfant.
- Fonctionnement normal.
- Pour le supprimer faîtes un appui
long sur Stop jusqu’à disparition du
symbole.
30
Le four ne chauffe pas et “DEMO”
apparaît dans l’afficheur par l’intermmitence environ toutes les
10 secondes.
• Votre four est programmé pour
une démonstration.
- Régler l’heure à 0h00.
Appuyer successivement sur les
boutons"
" puis “ ” puis STOP
tout en les maintenant appuyés jusqu’à l’arrêt du BIP.
99633824_ML.qxp 12/07/2005 16:40 Page 30
Page 31

Dans le souci d’une amélioration constante de nos produits, nous nous réservons le droit d’apporter toutes modifications de leurs caractéristiques liées à
l’évolution technique.
Les éventuelles interventions sur votre appareil doivent être effectuées par un
professionnel qualifié dépositaire de la marque.
Lors de votre appel, mentionnez la référence complète de votre appareil(modèle,
type, numéro de série). Ces renseignements figurent sur la plaque signalétique.
PIECES D’ORIGINE : lors d’une intervention d’entretien, demandez
l’utilisation exclusive de PIÈCES DÉTACHÉES CERTIFIÉES D’ORIGINE.
Service après-vente
Reportez ci-dessous les indications figurant sur la plaque signalétique de votre four :
Qui contacter ?
De Dietrich c’est aussi le minitel...
... pour en savoir plus sur tous les
produits de la marque :
informations, conseils, les points de vente,
les spécialistes après-vente.
... pour communiquer :
nous sommes à l’écoute de toutes vos remarques, suggestions, propositions auxquelles nous vous répondrons personnellement.
Vous pouvez aussi nous écrire :
SERVICE CONSOMMATEURS DE DIETRICH - BP 9526 - 95069 CERGY PONTOISE CEDEX
ou nous téléphoner au :
*0,197 TTC la minute
tarif en vigueur à la date
d’impression du document
Relations consommateurs
3615
à tarif en vigueur à la date d’impression du document.
MADE IN FRANCE
220 - 240V ~ 50 Hz
BRANDT APPLIANCES SAS
7 rue Henri Becquerel
92500 RUEIL MALMAISON
De Dietrich
31
FR
99633824_ML.qxp 12/07/2005 16:40 Page 31
0 825
06 16 04
Page 32

32
Throughout the manual,
indicates safety recommendations,
indicates advice and tips
Introduction P.33
What does your oven look like?
Description of the appliance P.34
Accessories P.35
Safety recommendations P.36
How do you install your oven?
Electrical connection P.37
Changing the power cable P.38
Useful dimensions for installing your oven P.39
How does your oven work?
Close-up of your analog programmer P.40
How do you set the clock on the oven? P.41
How do you program for immediate cooking? P.42
How do you set a cooking programme? P.43
How do you use the timer? P.44
How do you program an Economical cooking cycle? P.45
How do you customise the cooking temperature? P.46
How do you put your display in standby mode? P.46
How do you lock the controls (child safety device)? P.46
How do you use EOLYSIS? P.47
How do you change the bulb? P.47
Oven cooking modes P.48-49
How do you use the ICS mode? P.50-57
How do you clean the cavity of your oven?
What is pyrolysis? P.58
In what situations should pyrolysis be used? P.58
How do you begin a pyrolysis cycle? P.58-59
What to do in case of operating malfunctions P.60
T
able of Contents
99633824_ML.qxp 12/07/2005 16:40 Page 32
Page 33

33
GB
Introduction
Dear Customer,
You have just acquired a DE DIETRICH oven and we would like to thank you.
Our research teams have created a new generation of appliances for you. Their
quality, design and technological advances make them exceptional products
and reveal our unique know-how.
With modern, refined lines, your new DE DIETRICH oven blends harmoniously
into your kitchen and perfectly combines technological expertise, cooking performance and aesthetic luxury.
In the line of DE DIETRICH products, you will also find a wide range of hobs,
ventilation hoods, dishwashers, microwave ovens and refrigerators, all of which
can be built in and all of which can be coordinated with your new DE DIETRICH
oven.
Thanks to these "New Items of Value" that serve as guideposts in our everyday lives, DE DIETRICH, the reference of excellence, is truly an invitation to a
new art of living.
The DE DIETRICH brand.
99633824_ML.qxp 12/07/2005 16:40 Page 33
Page 34

34
What does your oven look like?
1
3
5
Stop/cancel
Temperature setting
Adjust cooking times/cooking
end time and clock settings
Function selector
DESCRIPTION OF THE APPLIANCE
Contact for open door detector
Hole for rotisserie
Shelf support indicator
Light
1
2
3
4
6
7
8
1
2
3
4
5
5
6
7
8
99633824_ML.qxp 12/07/2005 16:40 Page 34
Page 35

GB
Accessories
Rear
Front
Curved anti-tipping safety grid
Its shape was designed to allow you to position
your dish between two shelf support levels.
Dish + grid (drip tray)
Inserted under the grid, it catches barbecue
juices and grease. It can also be used half-full
of water for double-boiler cooling methods.
Avoid placing roasts or meats directly in the
dish because you are certain to have major
spattering on the oven walls
Multi-purpose dish (drip tray)
It is used to collect juices and grease from cooking with the high grill or the pulsed grill. It can be
used as a cooking dish when suitable for the size
of the item to be cooked (e.g. whole poultry surrounded with vegetables, at moderate temperature). Inserted under the grid, it catches barbecue juices and grease. It can also be used halffull of water for double-boiler cooking methods.
Rotisserie
• Position the spit support in the notches of the drip
tray dish (see drawing).
• Place the assembly in the oven on the second wire shelf
support (from the bottom). After placing the piece of
meat to be roasted on the rotisserie, place the spit on the
support piece, sliding the whole until the tip of the spit is
inside the motor located at the back of the oven. Remove
the handle by unscrewing it. After cooking, remove the
entire assembly. At the end of the handle, a grip allows
you to unscrew the forks.
Non-stick baking tray
(to be placed on a grid)
Placed on the dish support grid, it can be used for
cooking pastries, pies and pizza.
Its non-stick coating ensures easy removal of
baked items.
Wear oven mitts to protect your hands when
removing it from the oven. Let it cool before
washing it by hand in the kitchen sink with dish soap. Avoid using scouring sponges.
WARNING: Do not cut on it with a knife or a metallic pizza cutter; use plastic or silicone utensils instead.
Do not use the tray at temperatures above 250°C or during the PYROLYSIS mode.
35
99633824_ML.qxp 12/07/2005 16:40 Page 35
Page 36

36
Safety Recommendations
Please become familiar with these recommendations before installing
and using your oven. This oven was designed for household use only. It is
intended solely for cooking foodstuffs. This oven does not contain any asbestosbased components.
FIRST USE:
Before using your oven for the first time, heat it up while empty with the door
closed for approximately 15 minutes using the maximum setting in order to “cure”
the appliance. The rock wool that surrounds the oven cavity may initially release
a particular odour caused by its composition. Similarly, you may notice the release
of some smoke. All of this is normal.
SUBSEQUENT USES:
- Ensure that the door of your oven is completely closed so that the seal
can properly do its job.
- Do not let anyone lean against or sit on the oven door when it is open.
- When using the grill with the door semi-open, exposed parts
and surfaces may become hot. Keep small children away.
- When in use, the appliance becomes hot. Be careful not to touch
the heating elements located inside the oven.
- After cooking, do not use bare hands to touch the dishes or accessories
(grid, rotisserie, drip tray, rotisserie support, etc.); use a potholder or heat-resistant
material.
- Do not use a steam cleaner or high-pressure cleaner.
- Do not line your oven with sheets of aluminium. Otherwise, the result
could be an accumulation of heat that could have an undesirable effect on cooking
and roasting results and could damage the enamel.
- The oven must be turned off for all attempts to clean the cavity.
- During pyrolysis, the exposed surfaces become hotter than during
normal use. It is advisable to keep small children at bay.
- Before beginning a pyrolysis cycle, remove all grids and trays.
- If the appliance has an electrical outlet, it must remain accessible
after the appliance has been built in.
99633824_ML.qxp 12/07/2005 16:40 Page 36
Page 37

37
GB
How do you install your oven?
Monophase 20A Counter
220-240 V ~ 50 Hz
Electrical outlet
2-prong receptacle
+ ground lead
CEI Standard 60083
Monophase line 220-240 V ~
Electrical connection
Power cable
approximately
1.5 m in length
16A fuse or differential
circuit breaker
Before making the connection, ensure that the wires in your electrical installation have enough cross-sectional area to properly
supply electricity to the appliance.
The fuse in your set-up must be 16 amperes.
The electrical connection should be performed before the appliance is installed in
the cabinet.
• The oven must be connected with a power cable (standardised) with three
1.5 mm
2
conductors (1 ph +1 N + ground) that must be connected to a
monophase 220-240 V network via a CEI 60083 standardised receptacle (1 ph +1 N
+ ground lead) or in accordance with installation rules. The safety wire (green-yel-
low) is connected to the appliance's terminal and must be connected to the
ground lead of the electrical set-up.
• In the case of connections with an electric receptacle, it must remain accessible
after installation of the appliance.
• The oven's neutral conductor (blue wire) must be connected to the network's
neutral conductor.
99633824_ML.qxp 12/07/2005 16:40 Page 37
Page 38

38
• The power cable (H05 RR-F, H05 RN-F or H05 VV-F) must be of sufficient length to
be connected to the build-in oven while it sits on the floor in front of the cabinet.
To do this the appliance must be disconnected from the electrical network:
• Open the inspection flap located at the lower right of the back cover by unscrewing the two screws, then pivot the inspection flap.
• Strip 12 mm along each wire of the new power cable.
• Carefully twist together the strands.
• Loosen the screws from the terminal board and remove the power cord to be replaced.
• Introduce the power cable through the side of the cover in the cable clip located
to the right of the terminal board.
• Connect the power cord wires in accordance with the written markings on the
terminal board.
• All the strands of the electricity wires must be captured under the screws.
• The phase wire on the L terminal.
• The green-yellow coloured ground wire should be connected to the terminal .
• The neutral conductor (blue) on the N terminal.
• Screw down tightly the screws on the terminal board and check the connection
by pulling on each wire.
• Attach the cable with the cable clip located to the right of the terminal board.
o Close the inspection flap using the two screws.
Changing the power cable
We cannot be held responsible for any accident resulting from an
non-existent, defective or incorrect ground lead.
How do you install your oven
99633824_ML.qxp 12/07/2005 16:40 Page 38
Page 39

39
How do you install your oven?
To be certain that you have properly installed your appliance,
do not hesitate to call on a household appliance specialist.
Useful dimensions for installing your oven
The oven can be installed under a work top or in a column of cabinetry
(open* or closed) having the appropriate dimensions for built-in installation (see adjacent diagram).
Your oven has optimised air circulation that allows it to achieve remarkable cooking
and cleaning results if the following guidelines are respected:
• Centre the oven in the cabinet so as to guarantee a minimum distance of 5 mm
between the appliance and the neighbouring cabinet.
• The material of the built-in cabinetry must be heat resistant (or be covered with
such a material).
• For greater stability, attach the oven in the cabinet with two screws through the
holes provided for this purpose on either side of the front inner panel (see diagram).
To do this:
1) Remove the rubber screw covers to access the mounting holes.
2) Drill a Ø 3 mm hole in the cabinet panel to avoid splitting the wood.
3) Attach the oven with the two screws.
4) Replace the rubber screw covers (they also serve to absorb the shock caused
by closing the oven door).
(*) If the cabinet is open, its opening must be 70 mm (maximum).
70
550
Location of
retaining screw
50 x 50 mm cut-out
Location of
retaining screw
GB
99633824_ML.qxp 12/07/2005 16:40 Page 39
Page 40

40
How do you use your oven?
1. Close-up of your programmer
1
2
3
4
5
1
2
3
4
5
7
6
8
10
Clock or timer display
Cooking mode display
Shelf support indicator and selected cooking mode indicator.
Display of various time adjustment programmes (cooking
times and end times)
Oven temperature display
Locked door indicator (during pyrolysis)
Rising temperature indicator
Timer indicator
Pyrolysis indicator
Control lock indicator (child safety device).
“ICS” function indicator
“Eolysis” function indicator
9
10
6
7
8
9
11
11
12
12
99633824_ML.qxp 12/07/2005 16:40 Page 40
Page 41

41
GB
a) When supplied with electricity
• The displays flashes 12:00.
• Program the time by turning the setting
button toward + or - (the speed with which
the button is turned varies the speed with
which the time changes)
Example: 12:30.
Enter the programme by pressing the
selector button.
-> The display stops flashing
b) Resetting the clock time
Press down the button for a
few seconds.
The time display flashes, indicating that
it is now possible to adjust the time.
To set the time, turn the button toward
+ or - so as to advance or turn back the
displayed time.
After entering the time of your choice,
enter it by pushing the button -> the display stops flashing.
The time cannot be set if the oven is in delayed cooking mode.
In the event of a power outage lasting less than 35 hours, when electricity
is restored, a message indicates that your oven will automatically readjust
the time displayed.
2.
How do you set the clock on the oven?
How does your oven work?
99633824_ML.qxp 12/07/2005 16:40 Page 41
Page 42

42
How does your oven work?
The analogue programmer should display only the time; it should not be flashing.
• Press and turn the button toward the right to select the cooking mode.
The selection function flashes.
• Enter the time by pressing the setting button.
The cooking mode indicator stops flashing and
the recommended temperature begins flashing.
When the pre-selected temperature appears, the
shelf support indicator and the heating elements
in use also light up. The oven begins heating.
Place your dish in the oven based on the suggestion indicated in the display and the recommendations provided in the cooking guide.
Example: “ -> Shelf support 2 or 3
recommended.
As long as the °C symbol is flashing, you can
make changes by turning the temperature selector button.
Enter the time by pressing the button.
Your oven recommends the optimal temperature
for the chosen dish. It is, however, possible to
adjust the temperature at any time by using the
“ ” touch control located under the display.
Example “ ” adjusted to 210°.
After these three steps, the oven heats up:
- These rising temperature indicator symbols indicate the incremental temperature increase inside the oven.
- A series of beeps will indicate that the oven has reached the selected temperature.
To stop cooking, press and hold the STOP touch control for a few seconds.
After a cooking cycle, the circulating fan continues to function for a
period in order to cool the oven.
3. How do you program for immediate cooking?
99633824_ML.qxp 12/07/2005 16:40 Page 42
Page 43

43
GB
How does your oven work?
4. How do you set a cooking programme?
b) With delayed start (choose end time)
Proceed as with programmed cooking.
After setting the cooking time, press
two times so that the end time begins flashing.
Turn the selector button toward + or - to
set the desired end of cooking time.
Enter the time by pressing the button.
After these steps, the oven heating is
delayed so that cooking ends at 13:00.
When your cooking programme is finished, a
three-beep pattern will be emitted for a few
minutes. The beeps will stop automatically.
a) With immediate start
Proceed as described in the “Immediate Cooking” section.
Press the button.
The cooking time flashes 0:00 to indicate that
it is now possible to set it.
Turn the button to set the desired time.
Example: 25 min cooking time.
Enter by pressing the button.
The cooking time starts counting down as
soon as the time has been entered. You can
cancel the function at any time by setting
the displayed value to 0 (after having
pressed the touch control ).
99633824_ML.qxp 12/07/2005 16:40 Page 43
Page 44

44
How does your oven work?
5. How do you use the timer?
Your oven is equipped with an electronic timer that is independent of the
oven functions, making it possible to measure times.
In this case, the timer display takes priority over the time of day display.
Press the touch control three times.
The hourglass appears and
00
M00S flashes.
Turn the button until you obtain the desired
length of time (max 59 minutes and 59 seconds)
Enter the time by pressing the button.
The display stops flashing and the timer starts working, counting down the time in
seconds. When the cooking time is finished, the timer starts beeping to alert you
and the hourglass begins flashing.
It is possible to change or cancel the timer programme at any time
by turning it to 0 and pressing the button to enter.
99633824_ML.qxp 12/07/2005 16:40 Page 44
Page 45

45
6. How do you program for energy-saving cooking?*
After a cooking cycle, the circulating fan continues to function
for a period to ensure the heating elements are properly
cooled down.
The analogue programmer should display only the time; it should not be flashing.
Turn the selector button to the
cooking mode.
Enter the time by pressing the button.
• Place your dish in the oven based on the recommendation indicated in the display.
• Your oven recommends the optimal temperature for the chosen cooking mode:
200°C.
It is, however, possible to adjust the temperature by using the button located
under the display.
Example: "ECO Cooking" position adjusted to 190°C
After these three steps, the oven heats up:
The temperature rise indicator is activated and signals the incremental
temperature increase in the oven.
Three beeps will indicate to you that the set temperature has been reached.
To optimise the ECO cooking mode, do not pre-heat and do not open
the door during cooking.
*This position makes it possible to save up to 20% energy while still
offering identical cooking results.
The ECO position is used for the energy label performance.
How does your oven work?
GB
99633824_ML.qxp 12/07/2005 16:40 Page 45
Page 46

46
You can adjust the brightness of your display. To do this:
- Set the time of your programmer to 12:10.
- Depress the “ ” button while rotating it (+ or -) in order to obtain the desired
level of brightness.
- After having adjusted the brightness to your liking, return your programmer to
the current time of day.
8.
Adjusting brightness
How does your oven work?
7. Customising the recommended temperature
Select the cooking function:
If you wish to customise the recommended temperature:
- Press the “ ” touch control until the temperature display begins flashing.
- Turn the + or - button until the desired temperature appears.
- Press to enter.
9. Control panel locking (child safety device)
You have the option of preventing access to the oven controls by taking the following steps:
When the oven is off, hold down the STOP
touch control for a few seconds; a “key” will
then be displayed on the screen -> access to
the oven controls is now blocked.
To unlock access, hold down the STOP touch
control for a few seconds.
The oven controls are once again accessible.
You cannot lock the oven if you have programmed a cooking cycle.
99633824_ML.qxp 12/07/2005 16:40 Page 46
Page 47

47
• The bulb is located on the ceiling of your oven's cavity.
a) Unscrew the view port (see adjacent
diagram).
b) Remove the bulb.
Bulb specifications:
- 25 W
- 220-240 V
- 300°C
- G9
c) Replace the bulb then reposition the
view port and reconnect your oven.
Disconnect your oven before performing any task on the bulb to
avoid the risk of electric shock and, if necessary, let the appliance
cool down.
H
ow do you change the bulb?
Bulb
Unscrew
View port
How does your oven work?
The “Eolysis” function is always active (grease and odours are filtered during
cooking).
The symbol appears in the display.
This function is not active in the
, and positions.
10. Eolysis function
GB
99633824_ML.qxp 12/07/2005 16:40 Page 47
Page 48

48
Combined cooking
Cooking controlled by the upper
and lower heating elements at the
back of the oven and by the fan.
Turbo grill
Cooking controlled, alternately,
by the upper element and by the
fan.
Double grill
Cooking controlled by the upper
element
Simple grill
Cooking controlled by the upper
element.
This position allows for energy
savings while preserving the
quality of the cooking.
The ECO position is used for the
energy label performance.
Hold warm function
Heat dosages from the element at
the back of the oven combined
with fan.
Stabilisation at low temperatures.
Symbol
Name of cooking mode Description of cooking mo
6. Oven cooking modes
*
* Programme(s) used to obtain the results indicated on the energy label in compliance w
Quick temperature
increase. Some dishes can
be placed in the oven
while it is still cold.
Traditional ECO
Cooking controlled by the upper
and lower heating elements with
no fan.
Three combined sources of
heat: a lot of heat from
the bottom, a little circulating heat and a bit from the
grill.
The double grill covers the
entire grid surface.
As for the simple grill,
it is equally effective for
smaller quantities.
This mode combines the effects
of the fan and the grill; the grill
pulses the food with infrared and
the air movement generated by
the fan attenuates the effect.
Traditional
Cooking controlled by the upper
and lower heating elements with
no fan.
Requires preheating before
placing the dish in the oven.
Circular heating
Cooking controlled by the heating
element located at the back of the
oven and by the fan.
*
Defrosting
99633824_ML.qxp 12/07/2005 16:40 Page 48
ECO
ECO
Page 49

Recommended for quiches, potpies
and juicy fruit tarts.
Recommended for grilling chops,
sausages, toast, prawns
placed on the grid.
Recommended for letting dough rise
for bread, buns, cakes, etc. without
exceeding 40° C (plate warming,
defrosting).
Recommendations
Oven cooking modes
Recommended for preserving tenderness in
white meats, fish, vegetables
For cooking multiple items on up to three levels.
Note: All cooking is done without
preheating.
Recommended for sealing and thoroughly
cooking red and white meat.
To slowly cook poultry weighing up to 2
kg.
Recomm. Temp.
mini
recomm.
maxi
35
180
235
mini
recomm.
maxi
35
205
275
mini
recomm.
maxi
200
230
mini
recomm.
maxi
35
275
mini
recomm.
maxi
35
80
100
180
200
Recommended for slow, gentle cooking:
tender game meat, etc.
Sealing red meats
To simmer in a covered stew pan dishes
that were begun on the hob (coq au vin,
stew, etc.)
mini
recomm.
maxi
35
240
275
mini
recomm.
maxi
30
30
50
mini
recomm.
maxi
1
4
4
mini
recomm.
maxi
1
2
4
49
GB
99633824_ML.qxp 12/07/2005 16:41 Page 49
Page 50

How does your oven work?
ALL THE COOKING IS DONE WITHOUT PREHEATING THE OVEN.
1.
ICS Concept and Advantage
With the “ ” function, you no longer have to select the temperature and
cooking time.
These two parameters are automatically calculated by your oven in order to give
you optimal cooking.
The “ ” cooking mode takes place in two phases:
1) The first phase (acquisition) during which the oven will use its electronic sensors
to record the specific cooking data for your dish.
This phase is represented by an animation in the right portion of the display:
This may take between 5 and 40 minutes depending on the dish.
DO NOT OPEN THE DOOR DURING THIS PHASE or you may disturb the recording
of data.
2) During the second phase, the oven has determined the necessary cooking time.
The animated symbol stops and “Auto” scrolls in the display. The oven then indicates the remaining cooking time as well as the real time at which cooking will
be finished.
Starting at this moment, the oven is finalising cooking information and you can
open the door if you want to tend to the dish (basting, turning, etc.)
2.
ICS Cooking Mode
a) Immediate cooking:
Position the cooking selector on the
“ ” function.
Enter the programme by pressing
the selector button.
he various kinds of dish options flash in the display.
Use the selector button, choose the dish.
Place it in the oven on the shelf support level recommended in the display.
Close the door. Press the selector button to enter. The oven begins cooking.
The data search phase begins, as symbolised by the animation in the display:
the average cooking time for the type of dish selected is displayed. Once the
oven has finished analysing the food, the real cooking time required is displayed
and the animation is replaced by “ICS”.
When cooking is complete, the oven emits several beeps.
50
99633824_ML.qxp 12/07/2005 16:41 Page 50
Page 51

How does your oven work?
b) Delayed cooking:
Position the cooking selector at “ ”.
Choose the dish by turning the selector button.
Place your dish in the oven and close the door.
Position the mode selector on “End of
cooking”.
Turn the selector button toward + or - to set
the desired end of cooking time.
e.g. End of cooking 13:00.
Press the selector button to enter your selection.
After these steps, the cooking start time is delayed. “ICS” scrolls in the display until
cooking begins. The cooking end time is estimated based on the average cook time.
Just as for immediate cooking, this time will be optimised during the cooking programme; therefore, the time may vary by a few minutes (more or less) compared to
the initial time selected.
3.
Tips
If you open the door during the analysis
phase (except during the first minute) your
oven will emit warning beeps and the dish
symbols will flash.
As soon as the “ICS” symbol stops flashing,
you are free to open the oven door.
Cooking in “ ” mode MUST BEGIN WITH A
COOL OVEN. You must wait for
the oven to cool down completely before beginning a second cooking programme in the same
mode (otherwise the “°C “ and dish symbols will
flash in
the display and beeps will be emitted to prevent
4. What to do in case of malfunctions?
You notice that...
Possible causes What should you do?
Beeps.
• You opened the door during the
first minute: the programme is cancelled.
- Let the oven cool down in order
to start a new cooking programme.
The --- symbol flashes in the
display.
• The oven is searching to determine the ideal cooking time.
- This is a normal step.
“ICS” is displayed.
• The oven has now determined
the appropriate cooking time.
- This is a normal step.
Function selector on “ICS”
symbol + beeps + °C
is flashing.
• The oven is too hot to set an
“ICS” cooking programme.
- Wait for the oven to cool down
or use a traditional cooking
function.
51
GB
99633824_ML.qxp 12/07/2005 16:41 Page 51
Page 52

5. Oven Cooking Modes Pizza
Pizza
• Fresh store-bought pizza
• Ready-to-use pizza dough
• Home-made pizza dough
• Frozen pizza
• Roast beef (rare)
• Place the roast on the grid using the grid +
drip tray assembly.
You can turn the meat when the “ICS” display
stops flashing.
R
oast
beef
• Pork roasts
- Loin
- Tenderloin
Pork
roast
Lamb
• Leg of lamb weighing 1 to 2.5 kg
• Place the roast on the grid using the grid +
drip tray assembly.
You can turn the meat when the “ICS” display
stops flashing.
• Whole fish (sea bream, cod, trout, mackerel, etc.)
• Roasted fish
F
ish
• Chickens weighing 1 to 1.7 kg
• Duck, guinea fowl, etc.
Chicken
S
tuffed
vegetables
• Stuffed tomatoes, peppers, etc.
• Lasagne (fresh or frozen)
• Shepherd's pie, brandade, etc.
Soufflé
• Use a tall mould with straight edges and a diameter
of 21cm
Savoury
tarts
• Fresh quiches
• Frozen quiches
• Frozen mini-pastry
• Fresh tarts
• Frozen tarts
Sweet
tarts
• Home-style cakes: sweet or savoury loaves,
pound cake
o Ready-to-mix batters in packets.
C
akes
• Small individual pastry: biscuits, wafers, croissants,
rolls, raisin breads, toasted sandwiches.
Small
biscuits
52
99633824_ML.qxp 12/07/2005 16:41 Page 52
Page 53

• Place it on the grid for a crispy crust
(you can place a sheet of baking paper between the grid and the pizza to protect the oven
from cheese drippings)
• Place the pizza on the baking tray for a soft crust.
• Take the roast out of the refrigerator at least one hour before starting the cooking programme
• You will get a rare roast beef; If you prefer meat well-done, opt for a traditional cooking
function.
• Trim as much fat as possible: it causes smoke.
• At the end of cooking, allow the meat to sit for 7 to 10 minutes wrapped in a sheet of aluminium foil before carving.
• Take the roast out of the refrigerator at least one hour before starting the cooking programme: the colder the meat is going into the oven, the colder it will be at the end of cooking.
• Use an earthenware dish. Add one to two tablespoons of water.
• At the end of cooking, allow the meat to sit for 7 to 10 minutes wrapped in a sheet of aluminium foil before carving. Add salt when cooking is finished.
• Take the roast out of the refrigerator at least one hour before starting the cooking programme:
• Select a leg of lamb that is round and plump rather than long and lean
• Wrap the lamb in aluminium and let it sit after cooking.
• Please use this function only for whole fish cooked with herbs and white wine.
(grilled fish or papillote preparations require that the oven be preheated).
• Rotisserie cooking: Do not forget to place the drip tray on the first shelf support to catch
drippings.
• Cooking in a dish: Opt for earthenware dishes to avoid splattering.
• Pierce the skin of poultry to avoid splattering.
• Properly adjust the dimensions of the dish to the quantity of food to be cooked to avoid
juices spilling over.
• Butter the mould and do not touch the inside with your fingers or the soufflé will not rise.
• Use a non-stick aluminium mould: the crust will be crispy on the bottom.
• Remove the tray from frozen quiches before placing them on the grid.
• Use a non-stick aluminium mould: the crust will be crispy on the bottom.
• Cakes baked in a loaf pan, cake pan or other dish... and always placed on the grid.
It is possible to place two cake moulds side by side.
• Small individual cakes made on a pastry tray and placed on the grid.
cream puff pastry must be cooked on “CAKES” to achieve good results.
53
GB
99633824_ML.qxp 12/07/2005 16:41 Page 53
Page 54

Tips and hints
Pizza
To prevent cheese or tomato sauce from dripping in the oven, you can
place a piece of baking paper between the grid and the pizza.
Tarts / Quiches:
Avoid glass and porcelain dishes: because they are too thick, they
extend the cooking time and the bottom of the crust is not crispy.
With fruit, the bottom of the tart risks becoming soggy: just add a few
spoonfuls of fine semolina, crushed biscuit crumbs, almond powder or
tapioca, which will absorb the juice during cooking.
With high-water content or frozen vegetables (leeks, spinach, broccoli
or tomatoes) you can sprinkle a tablespoon of cornmeal.
Fish:
When buying, the odour should be pleasant and not too "fishy".
The body should be firm and rigid and the scales should be firmly stuck
to the skin; the eye should be bright and rounded and gills will appear
shiny and moist.
Beef / Pork / Lamb
It is imperative that you remove all meat from the refrigerator well
before cooking it: cold-hot temperature shocks toughen meat; this way you
will produce a roast beef that is golden outside, red inside and warm in the
middle. Do not salt before cooking: salt absorbs the blood and dries out the
meat. Use spatulas to turn the meat: if you pierce the meat the blood drips
out. Always let meat sit after cooking for 5 to 15 minutes: wrap it in a sheet
of aluminium and place it just inside a warm oven. This allows the blood
drawn toward the outside during cooking to return to the heart and moisten
the roast.
Use earthenware roasting dishes: glass promotes grease splattering.
Do not cook in the enamelled drip tray.
Avoid sticking garlic cloves into the leg of lamb, else it will lose its blood;
rather slip the garlic between the meat and the bone or cook unpeeled
cloves alongside the lamb and crush them when cooking is complete to
season the sauce; strain it and serve it piping hot in a gravy boat.
How does your oven work?
54
99633824_ML.qxp 12/07/2005 16:41 Page 54
Page 55

Some ICS recipes
Pizza Base: 1 pizza crust
*vegetable topping:
6 tablespoons tomato sauce + 100 g diced zucchini
+ 50 g diced bell peppers + 50 g sliced eggplant +2 small sliced tomatoes + 50 g shredded gruyere + oregano + salt + pepper.
*roquefort and smoked bacon topping:
6 tablespoons tomato sauce +
100 g smoked bacon + 100 g roquefort in small chunks + 50 g walnuts
+ 60 g shredded gruyere.
*sausage and fromage frais topping:
200 g drained farm cheese spread
on the crust + 4 sausages, sliced + 150 g ham, slivered + 5 olives + 50
g shredded gruyere + oregano + salt + pepper.
Quiches: Base: 1 aluminium mould, diameter 27 to 30 cm
1 ready-to-use short crust
3 beaten eggs + 50 cl heavy cream
salt, pepper, nutmeg.
Various fillings:
200 g precooked larding bacon
or - 1 kg cooked endives + 200 g shredded gouda
or - 200 g broccoli + 100 g larding bacon + 50 g blue cheese
or - 200 g salmon + 100 g spinach, cooked and drained
Roast beef PARSLEY-SAUTERNES SAUCE WITH ROQUEFORT:
Cook two tablespoons of snipped shallots in butter until translucent. Add
10 cl Sauternes, let it evaporate. Add 100 g Roquefort, let it melt slowly. Add 20
cl liquid cream, salt, pepper. Bring to a boil.
Pork roast Pork with prunes
Ask the butcher to carve a hole through the length of the roast. Stuff 20
prunes inside. Serve sliced with its juices or cold with an endive salad.
How does your oven work?
55
GB
99633824_ML.qxp 12/07/2005 16:41 Page 55
Page 56

Chicken
Stuff it with a generous bouquet of fresh tarragon or rub it with a blend
of six crushed garlic cloves with a pinch of coarse salt and a few peppercorns.
Lamb
with Anchovy Sauce:
Puree 100 g black olives with 50 g capers and 3 anchovies, 1/2 garlic
clove and 10 cl olive oil. Add 10 cl crème fraîche. Serve with sliced leg of lamb.
Fish
Black sea bream with dry cider: 1 black sea bream weighing 1.5 kg.
500 g button mushrooms.
2 sour apples.
2 shallots.
2 tablespoons heavy cream.
100 g butter.
1/2 litre cider. Salt, pepper.
Gut and scale the fish. Place it in a buttered dish on the finely minced shallots
and sliced mushrooms. Add the cider, salt and pepper and a few dollops of butter.
Place in the oven. Cut the unpeeled apples into quarters and simmer them in the butter. When cooking is complete, transfer the fish to a warm dish, strain the juice and
deglaze the dish with the cream. Add the cream to the juice, serve with apples and
mushrooms.
Stuffed vegetables
Leftovers from pot roast, leg of lamb, pork roasts, and roasted poultry can be
finely chopped for an excellent base.
Flaky praline apple tart:
1 flaky pastry crust rolled and pricked with a fork.
200 ml cream brought to a boil with a vanilla bean.
2 beaten eggs with 30 g sugar, add the cooled cream.
2 apples cut into cubes rolled in 70 g crushed pralines.
Add cream and apples to crust. Place in the oven.
Some ICS recipes
How does your oven work?
56
99633824_ML.qxp 12/07/2005 16:41 Page 56
Page 57

Some ICS recipes
Pound cake with citrus fruits
Caramel icing: 20 lumps of sugar (200 g)
Cake: 4 eggs
200 g granulated sugar
200 g flour
200 g good butter
2 teaspoons baking powder
Fruits : 1 small can of citrus fruits in syrup.
Drain the fruit. Prepare a caramel icing. When the colour starts to change, pour
it in a layer cake pan; tilt the pan so that the caramel spreads across the bottom.
Let cool. In the bowl of an electric blender, mix the softened butter with the
sugar. Add the whole eggs one at a time, then the sifted flour. Finish with the
baking powder. Place the citrus sections in a flower pattern on the caramel icing.
Pour in the batter. Place in the oven on the “CAKES” setting. Unmould in a pretty
dish and serve cold.
Other fruits can be used, such as apples, pears or apricots.
Individual chocolate cakes
12 individual aluminium ramekins
60 g butter
200 g bitter chocolate (more than 50% cocoa)
100 g powdered sugar
4 eggs
1 package baking powder
70 g sifted flour.
Melt the chocolate with the butter over very low heat. Work the egg yolks into
the sugar until the mixture becomes smooth. Add the flour, melted chocolate with
butter and finish with the baking powder. Beat the egg whites into stiff peaks and
gently fold them into the mixture. Lightly butter and flour the aluminium ramekins
and pour the batter into them (without dripping any on the edges). Place the
ramekins on the baking tray and choose the “BISCUITS” mode. Unmould and let
cool on a grid. Serve with vanilla crème anglaise or coconut ice cream.
Soufflés
Béchamel sauce base: 1/2 litre milk
60 g flour
100 g butter
4 egg yolks + whites beaten into stiff peaks
salt, pepper, nutmeg.
Depending on the type of soufflé, you will add 150 g shredded gruyere or 1 kg
cooked, chopped spinach or 1 kg cooked, chopped cauliflower or 150 g shredded
leftover cooked fish or 150 g chopped ham.
How does your oven work?
57
GB
99633824_ML.qxp 12/07/2005 16:41 Page 57
Page 58

1.
What is pyrolysis?
If your oven emits smoke during preheating or releases large volumes of smoke
during cooking.
If your oven releases an unpleasant odour when cooled after various cooking
applications (lamb, fish, barbecue, etc.).
2. In what situations should pyrolysis be used?
You should not wait until the oven is coated in grease to initiate a
cleaning cycle.
- Pyrolysis is a cycle during which the oven cavity is heated to a very high
temperature in order to eliminate soiling from splattering and spills. The smoke
and odours released are destroyed as they move through a catalyzer.
- Pyrolysis is not necessary after each cooking cycle, but simply when the dirtiness warrants it.
- As a safety measure, the cleaning operation only begins after the door has
automatically locked. As soon as the internal temperature of the oven exceeds
cooking temperatures, it is impossible to unlock the door--even if the «function
selector» knob is turned to 0.
H
ow do you clean the cavity of your oven ?
3. How do you use the pyrolysis function?
Programming for immediate pyrolysis
a) Remove the grids and trays from the oven and clean any major spill
residue.
b)
Ensure that the programmer is dis-
playing the time of day and that it is not flashing
c) Press the selector button, then
turn the selector button to the left to the
position .
58
RELATIVELY
CLEAN COOKING
APPLICATIONS
DIRTY COOKING
APPLICATIONS
VERY DIRTY
COOKING
APPLICATIONS
Biscuits, vegetables, pastry,
quiches, soufflés
Meats, fish, (in a dish)
stuffed vegetables
Large cuts of meat
on the spit
Splatter-free cooking
pyrolysis is not warranted
Pyrolysis is warranted after
three cooking cycles
pyrolysis can be performed
after one cooking application
of this kind if there is
a lot of splattering
99633824_ML.qxp 12/07/2005 16:41 Page 58
Page 59

59
How do you clean the cavity of your oven ?
3. How do you use the pyrolysis function?
Your oven offers two different cleaning modes: Pyromax and Pyrocontrol.
Choose the appropriate setting:
a) Pyromax
· Pyromax is a pyrolysis system with a preset duration: it lasts two hours and allows
for thorough, intensive cleaning of the oven
cavity.
To delay the start time, select the end time
and change it by entering the desired end time for the pyrolysis cycle.
Enter the time by pressing the button.
The cleaning cycle begins. Your screen indicates:
- Time (1)
- Total duration (2)
- Pyrolysis cycle end time (3)
- Locked door (4)
b) PYROCONTROL
· PYROCONTROL is a system that lets the oven automatically calculate the cleaning
time depending on the amount of soil, which makes it possible to save energy by
adjusting the pyrolysis time to actual need.
If you with to delay the start time, select the end time and change it by entering
the desired end time for the pyrolysis cycle.
Enter the time by pressing the selector button.
At the beginning of the cycle, the oven calculates the duration of pyrolysis
depending on the dirtiness of the oven; this step lasts a few minutes.
The screen indicates:
- Total duration
- Planned pyrolysis cycle end time
- Time
- Locked door
c) End of pyrolysis
Simply remove the ash residue in the cavity with a damp sponge.
GB
99633824_ML.qxp 12/07/2005 16:41 Page 59
Page 60

What do you do in case of operating
malfunctions?
If you have a doubt about the functioning of your oven, this does not ne-
cessarily mean that there is a malfunction.
In any event, check the following items:
You notice that...
Possible causes What should you do?
The oven is not heating.
• The oven is not connected.
• The fuse in your electrical set-up is
not working.
• The selected temperature is too
low.
- Connect the oven.
- Replace the fuse in your electrical
set-up and check its capacity (16A).
- Increase the selected temperature.
The temperature indicator is flashing.
• Problem with the door's locking
mechanism.
- Call the After Sales Service
Department.
The oven light is not working.
• The light is out of order.
• The oven is not connected or the
fuse is not working.
- Replace the light.
- Connect the oven or replace the
fuse.
The pyrolysis cleaning cycle does
not begin.
• The door is not properly closed.
• The locking system is defective.
- Verify that the door is locked.
- Call the After Sales Service Department.
Your oven starts beeping.
• During cooking.
• At the end of a cooking
programme.
- The recommended temperature
of your choice has been reached.
- Your programmed cooking cycle is
finished.
Your oven displays
Réglages
+
-
• When the touch controls are
pressed.
• Controls are locked for child safety.
- Working normally.
- To cancel the lock, hold down the
Stop touch control until the symbol
disappears.
60
The oven is not heating, and
"DEMO" appears in the display
intermittently approximately
every 10 seconds.
• Your oven is programmed for a
demonstration.
- Set the time to 0h00.
Press the "
" and “ ” buttons
successively, then STOP everything
by maintaining pressure until the
BEEPING stops.
99633824_ML.qxp 12/07/2005 16:41 Page 60
Page 61

61
99633824_ML.qxp 12/07/2005 16:41 Page 61
Page 62

62
In der gesamten Betriebsanleitung,
Sicherheitshinweise
Tips und Tricks
Vorwort S.63
Wie sieht der Backofen aus?
Beschreibung des Geräts S.64
Zubehör S.65
Ratschläge zur Sicherheit S.66
Installation des Backofens
Stromanschluss S.67
Austausch des Stromkabels S.68
Nutzabmessungen für den Einbau des Backofens S.69
Benutzung des Backofens
Die Details des Programmierers S.70
Einstellung der Backofenuhr S.71
Das sofortige Backen S.72
Einen Backvorgang programmieren S.73
Benutzung des Zeitschalters S.74
Wirtschaftliches Backen S.75
Die Personalisierung der Backtemperatur S.76
Stand-by des Anzeigers S.76
Sperrung der Bedienvorrichtungen (Kindersicherung) S.76
Benutzung von EOLYSE S.77
Austausch der Glühbirne S.77
Verschiedene Backmöglichkeiten S.78-79
Benutzung der Funktion ICS S.80-87
Die Reinigung des Backofenraums
Was ist eine Pyrolyse? S.88
Wann eine Pyrolyse durchführen? S.88
Wie eine Pyrolyse durchführen? S.88-89
Abhilfe bei Funktionsstörungen S.90
I
nhalt
99633824_ML.qxp 12/07/2005 16:41 Page 62
Page 63

63
DE
Vorwort
Liebe Kundin, lieber Kunde,
Sie haben soeben einen DE DIETRICH Backofen erworben, und wir danken
Ihnen dafür.
Unsere Forschungsteams haben für Sie eine neue Generation von Geräten entwickelt, die aufgrund ihrer Qualität, ihres Designs und ihrer technologischen
Entwicklungen ausserordentliche Produkte mit einzigartigem Know-how darstellen.
Der neue DE DIETRICH Backofen fügt sich mit seiner modernen und raffinierten
Linienführung harmonisch in Ihre Küche ein und stellt eine ideale Verbindung
aus Spitzentechnologie, Garleistung und ästhetischem Luxus dar.
Das Sortiment der DE DIETRICH Produkte beinhaltet außerdem eine große Auswahl
an Kochfeldern, Dunstabzugshauben, Geschirrspülern, Mikrowellenherden und
Einbaukühlschränken, die Sie ideal auf den neuen DE DIETRICH Backofen abgestimmt aussuchen können.
Mit diesen "neuen Wertobjekten", die uns im täglichen Leben begleiten, vermittelt Ihnen das für seine hervorragenden Produkte bekannte Haus DE DIETRICH
ein vollkommen neues Lebensgefühl.
Die Marke DE DIETRICH.
99633824_ML.qxp 12/07/2005 16:41 Page 63
Page 64

64
Wie sieht der Backofen aus?
1
3
5
Stop / Stornierung
Temperatureinstellung
Einstellung der Gardauer/Ende
des Garvorgangs und
Uhrzeiteinstellung
Sélecteur de fonctions
BESCHREIBUNG DES GERÄTS
Kontakt für Türöffnung
Loch für Drehspiess
Anzeiger der Einschubleiste
Lampe
1
2
3
4
6
7
8
1
2
3
4
5
5
6
7
8
99633824_ML.qxp 12/07/2005 16:41 Page 64
Page 65

DE
Zubehör
Hinten
Vorne
Gitter mit Kippschutz
gewölbt
Durch diese Form kann das Kochgeschirr zwischen 2 Einschubleisten positioniert werden.
Pfanne + Gitter
(Fettpfanne)
Wenn sie unter dem Gitter eingeschoben wird,
fängt sie die Grillsäfte und Fett auf. Sie kann
auch zur Hälfte mit Wasser gefüllt werden und
für Kochvorgänge im Wasserbad dienen.
Braten oder andere Fleischstücke sollten nicht
direkt in die Fettpfanne gegeben werden, denn
dies würde automatisch zu starken Spritzern
an den Ofenwänden führen.
Mehrzweckpfanne (Fettpfanne)
Sie dient zum Auffangen von Bratsaft und Fett bei
starkem Grillen oder pulsierendem Grill. Sie kann
als Kochgeschirr benutzt werden wenn die Grösse
des zu bratenden Fleisches darauf abgestimmt ist
(Z.B.: ein Geflügel mit darum herum angeordnetem Gemüse, bei mittlerer Temperatur). Wenn
sie unter dem Gitter eingeschoben wird, fängt sie
die Grillsäfte und Fett auf. Sie kann auch zur
Hälfte mit Wasser gefüllt werden und für
Kochvorgänge im Wasserbad dienen.
Drehspiess
• Den Spiesshalter in die Kerben der Fettpfanne einsetzen (siehe Zeichnung).
•
Das ganze auf die zweite Einschubleiste (von unten) in
den Backofen einschieben. Nach dem Aufspiessen des
zu bratenden Fleischstücks den Spiess auf den Halter
aufsetzen, das ganze so weit in den Backofen schieben,
bis die Spitze des Spiesses in den Motor an der
Rückwand des Backofens eingreift. Den Handgriff durch
Abschrauben entfernen. Nach dem Braten das ganze
aus dem Backofen nehmen. Mit der Prägung am Ende
des Griffs können die Gabeln losgeschraubt werden.
Backblech mit Anti-Haft-Beschichtung
(wird auf das Gitter gestellt)
Es wird auf das Backofengitter gestellt und dient
zum Backen von Gebäck, Torten und Pizzas.
Es ist mit einer Anti-Haft-Beschichtung versehen,
und die Speisen hängen nicht fest.
Für seine Handhabung nach dem Backen
Isolierhandschuhe tragen. Es abkühlen lassen, bevor
es manuell in der Spüle mit einem Geschirrspülmittel
gesäubert wird. Keine Scheuerschwämme benutzen.
ACHTUNG: Nicht darauf mit einem Messer oder einer Pizzascheibe aus Metall schneiden, sondern eher Gegenstände aus Kunststoff oder Silikon benutzen.
Das Blech nicht bei über 250°C und auch nicht bei der Funktion PYROLYSE
benutzen.
65
99633824_ML.qxp 12/07/2005 16:41 Page 65
Page 66

66
Ratschläge zur Sicherheit
Vor der Installation und Benutzung des Backofens sollten folgende
Ratschläge zur Kenntnis genommen werden. Dieser Backofen ist für die
Benutzung durch Privatpersonen in ihrem Haushalt konzipiert worden. Er ist ausschliesslich für das Garen von Lebensmitteln bestimmt. Dieser Backofen enthält
keinerlei asbesthaltige Bestandteile.
ERSTE BENUTZUNG:
Den Backofen vor der ersten Benutzung ca. 15 Minuten lang im Leerzustand bei
geschlossener Tür bei Höchsttemperatur heizen, um das Gerät “einzubrennen”.
Die den Hohlraum des Backofens umgebende Mineralwolle kann anfangs einen
besonderen Geruch abgeben, der auf ihre Zusammensetzung zurückzuführen ist.
Veilleicht zeigt sich auch eine Rauchabgabe. Das ist alles normal.
DIE NÄCHSTEN BENUTZUNGEN:
- Sichergehen, dass die Backofentür richtig geschlossen ist, damit die
Dichtung ihre Aufgabe richtig erfüllt.
- Niemanden sich auf der offenen Backofentür abstützen oder sich darauf
setzen lassen.
- Bei der Benutzung des Grills bei halboffener Tür können die
zugänglichen Teile oder Flächen heiss werden. Kleine Kinder davon fernhalten.
- Das Gerät wird bei Benutzung heiss. Die heissen Elemente im
Backofen nicht berühren.
- Nach einem Garvorgang die Kochgeschirre (Gitter, Drehspiess, Fettpfanne,
Wiege des Drehspiesses, ...) nicht mit nackten Händen anfassen, sondern mit einem
Topflappen oder einem Isolierstoff.
- Keine Reiniger mit Dampf oder unter Hochdruck benutzen.
- Den Backofen nicht mit Aluminiumfolie ausschlagen. Denn sonst entsteht
eine Hitzeansammlung, die sich unvorteilhaft auf das Ergebnis des Garens oder
Bratens auswirkt und das Email beschädigt.
- Bei jedem Säuberungsvorgang im Hohlraum des Backofens
muss dieser abgeschaltet sein.
- Bei einer Pyrolyse werden die zugänglichen Flächen heisser als
beim Normaleinsatz. Kleine Kinder sollten ferngehalten werden.
- Vor der Pyrolyse alle Kochgeschirre herausnehmen.
- Wenn das Gerät eine Steckdose hat, muss diese nach dem
Einbau zugänglich bleiben.
99633824_ML.qxp 12/07/2005 16:41 Page 66
Page 67

67
DE
Installation des Backofens
Zähler 20 A Einphasenstrom
220 - 240 V ~ 50 Hz
Steckdose
2 Pole + Erdung
IEC Norm 60083
Einphasige Leitung 220 - 240 V ~
Stromanschluss
Stromkabel
Länge ca.
1,50 m
Differentialabschalter oder
Schmelzsicherung 16 A
Vor dem Anschluss sichergehen, dass die Drähte der vorhandenen
Stromanlage einen ausreichenden Querschnitt für die normale
Versorgung des Geräts aufweisen.
Die Schmelzsicherung der vorhandenen Anlage muss 16 Ampere aufweisen.
Der Stromanschluss muss vor dem Einbau des Geräts in das Möbel hergestellt
werden.
• Der Backofen muss mit einem (genormten) Stromkabel mit 3 Leitern mit 1,5 mm
2
Querschnitt (1 Ph +1 N + Erdung) angeschlossen werden, die an das einphasige
220 - 240 V ~ Netz über eine Steckdose 1 Ph +1 N + Erdung nach IEC Norm 60083
angeschlossen sein müssen oder gemäss der Installationsregeln. Der Schutzdraht
(grün-gelb) ist an die Klemme des Geräts angeschlossen und muss mit der Erdung
der Anlage verbunden sein.
• Bei Anschluss mit Steckdose muss diese nach Einbau des Geräts zugänglich sein.
• Der Nulleiter des Backofens (blauer Draht) muss an den Nulleiter des Netzes angeschlossen werden.
99633824_ML.qxp 12/07/2005 16:41 Page 67
Page 68

68
• Das Stromkabel (H05 RR-F, H05 RN-F oder H05 VV-F) muss ausreichend lang sein,
damit es an den einzubauenden und auf dem Boden vor dem Möbel stehenden
Backofen angeschlossen werden kann.
Hierfür muss das Gerät vom Netz abgetrennt werden:
• Das Fach unten rechts von der rückwärtigen Haube durch das Losschrauben von
2 Schrauben öffnen und die Klappe wegschwenken.
• Jeden Draht des neuen Stromkabels über 12 mm abisolieren.
• Die Adern sorgfältig verdrehen.
• Die Schrauben des Klemmenhalters lockern und das auszutauschende Stromkabel
entfernen.
• Das Stromkabel von der Seite der Haube in die Kabelklemme rechts vom Klemmenhalter einführen.
• Die Drähte des Kabels gemäss der Markierung(en) auf dem Klemmenhalter
anschliessen.
• Alle Adern der Stromkabel müssen in Schrauben gefasst sein.
• Der Draht der Phase an die Klemme L.
• Der grün-gelbe Erdungsdraht muss an die Klemme angeschlossen sein.
• Der Draht des Nulleiters (blau) an die Klemme N.
• Die Schrauben des Klemmenhalters festschrauben und den Anschluss durch Ziehen
an jedem Draht überprüfen.
• Das Kabel mit der Kabelklemme rechts vom Klemmenhalter fixieren.
• Das Fach wieder mit den 2 Schrauben schliessen.
Austausch des Stromkabels
Bei Unfall durch nicht vorhandene, mangelhafte oder fehlerhafte
Erdung können wir nicht haftbar gemacht werden.
Installation des Backofens
99633824_ML.qxp 12/07/2005 16:41 Page 68
Page 69

69
Installation des Backofens
Sich von einem Fachmann für Haushaltsgeräte die Konformität
der Installation bestätigen lassen.
Nutzabmessungen für den Einbau des Backofens
Der Backofen kann beliebig unter einer Arbeitsfläche oder in einem Säulenmöbel (offen* oder geschlossen) mit den passenden Abmessungen
für den Einbau installiert werden (siehe nebenstehendes Schema).
Der Backofen hat eine optimierte Lüftung, und somit werden beim Backen und Säubern
bemerkenswerte Ergebnisse erzielt, wenn folgende Punkte berücksichtigt werden:
• Den Backofen mittig in das Möbel einbauen, damit ein Mindestabstand von 5 mm
zum benachbarten Möbel eingehalten wird.
• Der Werkstoff des Einbaumöbels muss hitzefest (oder mit einem solchen Material
beschichtet) sein.
• Für bessere Stabilität den Backofen mit 2 Schrauben in den vorgesehenen
Löchern an den Seitenträgern befestigen (siehe Schema).
Hierfür:
1) Für den Zugriff zu den Befestigungslöchern die Schraubenabdeckungen entfernen.
2) Ein Loch mit Ø 3 mm in die Seitenwand des Möbels bohren, um das Aufplatzen des Hol-
zes zu vermeiden.
3) Den Backofen mit den 2 Schrauben befestigen.
4) Die Schraubenabdeckungen aus Gummi wieder aufsetzen (sie dienen auch zur
Dämpfung beim Schliessen der Backofentür).
(*) Bei einem offenen Möbel muss die Öffnung (maximal) 70 mm gross sein.
70
550
Befestigungs-
schrauben
Ausschnitt 50 x 50 mm
Befestigungs-
schrauben
DE
99633824_ML.qxp 12/07/2005 16:41 Page 69
Page 70

70
Benutzung des Backofens
1. Details des Programmierers
1
2
3
4
5
1
2
3
4
5
7
6
8
10
Anzeige der Uhr oder des Zeitschalters
Anzeige der Garmodi
Anzeiger der Einschubleiste und des gewählten Garmodus.
Anzeige der einzelnen Programme für die Zeiteinstellung
(Gardauer und -ende)
Temperaturanzeige du four
Anzeige der gesperrten Tür (bei der Pyrolyse)
Anzeiger für den Temperaturanstieg
Anzeiger des Zeitschalters
Anzeiger der Pyrolyse
Anzeiger für die Tastatursperre (Kindersicherung).
Anzeiger der Funktion “ICS”
Anzeiger der Funktion “Eolyse”
9
10
6
7
8
9
11
11
12
12
99633824_ML.qxp 12/07/2005 16:41 Page 70
Page 71

71
DE
a) Beim Einschalten
• Der Anzeiger blinkt auf 12.00 Uhr.
• Die Uhrzeit mit Drehen des Regelknopfes
nach + oder - einstellen (mit der
Drehgeschwindigkeit des Knopfes variiert
die Regelgeschwindigkeit der Uhrzeit)
Beispiel: 12.30 Uhr
Bestätigen mit Drücken des Regelknopfes.
-> Die Anzeige blinkt nicht mehr
b) Einstellung der Uhrzeit
Den Knopf einige Sekunden lang gedrückt halten.
Die Anzeige der Uhrzeit blinkt zur
Anzeige dessen, dass die Einstellung jetzt
möglich ist.
Für die Veränderung der angezeigten
Uhrzeit den Knopf nach + oder - drehen.
Nach der Einstellung der gewünschten
Uhrzeit bestätigen mit Drücken des
Knopfes -> Die Uhrzeitanzeige blinkt nicht
mehr.
Die Einstellung der Uhrzeit ist bei zeitverschobener Programmierung nicht
möglich.
Bei Stromunterbrechung unter mindestens 36 Stunden zeigt eine
Animation bei Wiederherstellung der Netzversorgung, dass der Backofen
automatisch zur richtigen Uhrzeit übergeht.
2.
Einstellung der Backofenuhr
Benutzung des Backofens
99633824_ML.qxp 12/07/2005 16:41 Page 71
Page 72

72
Benutzung des Backofens
Der Programmierer darf nur die Uhrzeit anzeigen; diese darf nicht blinken.
• Für den gewünschten Garvorgang den Knopf drücken und nach rechts drehen.
Die gewählte Funktion blinkt.
• Bestätigen mit Drücken des Knopfes.
Der Backanzeiger sperrt, und die empfohlene
Temperatur blinkt. Erscheint gleichzeitig mit der
vorgewählten Temperatur, dem Anzeiger der
Einschubleiste und den Funktionsangaben.
Der Backofen startet.
Das Gericht nach den Empfehlungen im
Anzeiger und den Empfehlungen im
Backleitfaden in den Backofen stellen.
Beispiel: “ -> Einschubleisten 2 oder
3 empfohlen.
Solange das Symbol °C blinkt, kann der Wert
mit dem Temperaturknopf verändert werden.
Bestätigen mit Drücken des Knopfes.
Der Backofen schlägt die optimale Temperatur
für das Gericht vor. Diese Temperatur kann
jedoch jederzeit mit Drücken der Taste “ ”
unter dem Anzeiger verändert werden.
Beispiel: “ ” auf 210° eingestellt.
Danach heizt der Backofen auf:
- Diese Zustände des Anzeigers des Temperaturanstiegs weisen auf die
Temperaturentwicklung im Backofen hin.
- Eine Reihe Pieptöne weist darauf hin, dass die gewählte Temperatur erreicht ist.
Zum Abschalten des Garvorgangs einige Sekunden lang die Taste STOP drücken.
Nach einem Garzyklus funktioniert die Gebläseturbine noch einige Zeit
weiter, damit der Backofen abkühlt.
3. Das sofortige Backen
99633824_ML.qxp 12/07/2005 16:41 Page 72
Page 73

73
DE
Benutzung des Backofens
4. Einen Backvorgang programmieren
b) Mit verzögertem Start (gewählte Enduhrzeit)
Wie bei einem programmierten Garvorgang vorgehen.
Nach der Einstellung der Gardauer 2 mal auf
drücken, damit das Garende blinkt.
Für die Einstellung der gewünschten Uhrzeit
des Garendes den Knopf nach + oder - dre-
hen.
Bestätigen mit Drücken des Knopfes.
Nach diesen Aktionen wird der Aufheizbe-
ginn so verschoben, dass der Garvorgang um
13.00 Uhr abgeschlossen ist.
Wenn die Gardauer beendet ist, werden einige Minuten lang 3 Pieptöne abgegeben.
Andernfalls hören die Pieptöne automatisch auf.
a) Sofortiger Start
Wie im Paragraphen “Das sofortige Backen” vorgehen.
Den Knopf drücken.
Die Gardauer blinkt auf 0.00 Uhr zur Angabe
dessen, dass die Einstellung jetzt möglich ist.
Für die Einstellung der gewünschten Zeit den
Knopf drehen.
Beispiel: 25 Min. Garzeit.
Bestätigen mit Drücken des Knopfes.
Nach dieser Bestätigung wird die Dauer rückwärts abgezählt. Mit Rücksetzung des angezeigten Wertes auf 0 kann die Funktion jederzeit storniert werden (nach Drücken der
Taste ).
99633824_ML.qxp 12/07/2005 16:41 Page 73
Page 74

74
Benutzung des Backofens
5. Benutzung des Zeitschalters
Der Backofen ist mit einem elektronischen Zeitschalter ausgerüstet, der
unabhängig vom Ofenbetrieb ist und die Zeit rückwärts zählt.
In diesem Fall hat die Anzeige des Zeitschalters Vorrang vor der Anzeige der Tagesuhrzeit.
3 mal auf die Taste drücken.
Die Sanduhr erscheint, und 00
M00S blinkt.
Den Knopf drehen, bis die gewünschte Dauer
erreicht ist (max. 59 Minuten 59 Sekunden)
Bestätigen mit Drücken des Knopfes.
Der Anzeiger blinkt nicht mehr, der Zeitschalter startet und zählt die Zeit sekundenweise rückwärts. Nach Ablauf der Zeit gibt der Zeitschalter Pieptöne ab, und
die Sanduhr blinkt.
Die Programmierung des Zeitschalters kann jederzeit geändert
oder storniert werden, indem sie auf 0 gestellt und bestätigt wird.
99633824_ML.qxp 12/07/2005 16:41 Page 74
Page 75

75
DE
6. Wirtschaftliches Backen*
Nach einem Garzyklus funktioniert das Gebläse des Backofens
noch einige Zeit weiter, damit die Backofenteile richtig
abkühlen.
Der Programmierer darf nur die Uhrzeit anzeigen; diese darf nicht blinken.
Den Knopf bis zum Garmodus drehen.
Bestätigen mit Drücken des Knopfes.
• Das Gericht nach den Empfehlungen im
Anzeiger in den Backofen stellen.
• Der Backofen schlägt die optimale Temperatur für den gewählten Backvorgang
vor: 200°C.
Mit dem Knopf unter dem Anzeiger kann diese jedoch angepasst werden.
Beispiel: Position "Garen ECO" auf 190°C eingestellt.
Danach heizt der Backofen auf:
Der Anzeiger für den Temperaturanstieg zeigt die Temperaturentwicklung
im Backofen an.
3 Pieptöne weisen darauf hin, dass die eingestellte Temperatur erreicht ist.
Zur Optimierung des ECO Backens nicht vorheizen und die Backofentür
nicht öffnen.
* Mit dieser Position können unter Beibehaltung gleicher Backergebnisse
bis zu 20% Energie eingespart werden.
Die Position ECO wird für die Etikettierung mit Energieangaben benutzt.
Benutzung des Backofens
99633824_ML.qxp 12/07/2005 16:41 Page 75
Page 76

76
Die Helligkeit des Anzeigers kann variiert werden, hierfür:
- Die Uhrzeit des Programmierers auf 12.10 Uhr einstellen.
- Den Knopf “ ” gedrückt halten und ihn bis zur gewünschten Helligkeit (nach
+ oder -) drehen.
- Nach der Einstellung der gewünschten Helligkeit den Programmierer auf die Tagesuhrzeit einstellen.
8.
Die Einstellung der Helligkeit
Benutzung des Backofens
7. Personalisierung der empfohlenen Temperatur
Die Garfunktion wählen:
Wenn die empfohlene Temperatur personalisiert werden soll:
- Die Taste “ ” drücken, bis die Temperatur blinkt.
- Den Knopf bis zur gewünschten Temperatur nach + oder - drehen.
- Ihn zur Bestätigung drücken.
9. Sperrung der Bedienvorrichtungen (Kindersicherung)
Mit folgendem Vorgehen kann der Zugriff zu den Bedienvorrichtungen des
Backofens gesperrt werden:
Bei abgeschaltetem Backofen einige Sekunden
lang die Taste STOP drücken, dann erscheint
ein “Schlüssel” im Bildschirm -> der Zugriff zu
den Bedienvorrichtungen des Backofens ist
blockiert.
Für die Freigabe einige Sekunden lang die Taste STOP drücken.
Die Bedienelemente des Backofens sind erneut zugänglich.
Wenn ein Garvorgang programmiert ist, kann der Backofen nicht
gesperrt werden.
99633824_ML.qxp 12/07/2005 16:41 Page 76
Page 77

77
• Die Glühbirne befindet sich an der Decke des Ofenraums.
a) Das kleine Fenster losschrauben (siehe
nebenstehend).
b) Die Glühbirne herausziehen.
Merkmale der Glühbirne:
- 25 W
- 220-240 V
- 300°C
- G9
c) Eine Glühbirne einsetzen, das kleine
Fenster festschrauben und den Backofen
wieder anschliessen.
Den Backofen vor jedem Eingriff an der Glühbirne von der
Stromversorgung trennen, um jegliches Risiko eines Stromschlags
auszuschliessen, und eventuell den Backofen abkühlen lassen.
A
ustausch der Glühbirne
Glühbirne
Losschrauben
Kleines Fenster
Benutzung des Backofens
Die Funktion “Eolyse” ist immer aktiv (Filtern der Fette und Gerüche während des
Garvorgangs).
Das Symbol erscheint im Anzeiger.
Diese Funktion ist bei folgenden Positionen
nicht aktiv , , .
10. Die Funktion Eolyse
DE
99633824_ML.qxp 12/07/2005 16:41 Page 77
Page 78

78
Kombiniertes Garen
Das Garen erfolgt durch die
Heizelemente unten, oben, an der
Rückwand des Backofens und die
Luftschraube.
Turbo Grill
Das Garen erfolgt abwechselnd
durch das obere Heizelement und
die Luftumwälzung.
Doppelgrill
Das Backen erfolgt durch das obere
Heizelement.
Einfacher Grill
Das Backen erfolgt durch das
obere Heizelement.
Mit dieser Position kann unter
Beibehaltung gleicher Backergebnisse Energie eingespart werden.
Die Position ECO wird für die
Etikettierung mit
Energieangaben benutzt.
Warmhalten von Gerichten
Leistung des Elements an der
Rückseite des Backofens in
Verbindung mit der Luftumwälzung.
Warmhalten von Gerichten.
Symbol
Name der Funktion Beschreibung der Funktion
6. Verschiedene Backmöglichkeiten
*
* Benutzte Sequenz(en) für die Angabe auf dem Energieetikett gemäss der europä
Schneller Temperaturanstieg. Gewisse Gerichte
können in den kalten
Backofen gestellt werden.
Herkömmlich ECO
Das Backen erfolgt durch
Heizelemente unten und oben ohne
Luftumwälzung.
Drei verbundene
Hitzequellen: Viel
Unterhitze, ein wenig
Umlaufhitze und etwas
Grillwirkung.
Der Doppelgrill deckt die
gesamte Fläche des
Gitters ab.
Der einfache Grill hat die
gleiche Wirksamkeit bei
kleineren Mengen.
Bei diesem Modus wird die Wirkung
der Turbine und des Grills kombiniert; Der Grill lässt das IR-Licht auf
das Produkt strahlen, und die von
der Turbine geschaffene
Luftbewegung mildert dessen Effekt.
Herkömmlich
Das Backen erfolgt durch
Heizelemente unten und oben ohne
Luftumwälzung.
Erfordert ein Vorheizen,
bevor das Gericht in den
Backofen gestellt wird.
Umlaufhitze
Das Garen erfolgt durch das
Heizelement an der Rückwand des
Backofens und die Luftschraube.
*
Auftauen
99633824_ML.qxp 12/07/2005 16:42 Page 78
ECO
ECO
Page 79

Empfohlen für Speckkuchen,
Blätterteigpasteten, saftige Torten.
Wird für das Grillen von
Koteletts,Würstchen, Brotscheiben
und Gambas auf dem Grillgitter
empfohlen.
Empfohlen für das Gehen von Teigen
für Brot, Brioche, Napfkuchen...
bei nicht über 40°C empfohlen
(Tellererwärmung, Auftauen).
Empfehlungen
Verschiedene Backmöglichkeiten
Wird zur Erhaltung der vollen Qualität von
weissem Fleisch,Fisch,Gemüse empfohlen
Für Koch- und Backvorgänge auf bis zu 3
Ebenen.
Hinweis: alle Garvorgänge ohne
Vorheizen.
Für das Anbraten und Durchbraten von
rotem und weissem Fleisch.
Für langsames Garen von Geflügel bis 2 kg.
empf. T°
mind.
empf.
max.
35
180
235
mind.
empf.
max.
35
205
275
mind.
empf.
max.
200
230
mind.
empf.
max.
35
275
mind.
empf.
max.
35
80
100
180
200
Für langsame und empfindliche
Garvorgänge empfohlen: weiches Wild ...
Anbraten von rotem Fleisch
Zum Schmoren im geschlossenen Kochtopf
nach der Vorbereitung auf dem Kochfeld
(Hähnchen in Rotweinsosse, Hasenpfeffer, ...).
mind.
empf.
max.
35
240
275
mind.
empf.
max.
30
30
50
mind.
empf.
max.
1
4
4
mind.
empf.
max.
1
2
4
79
DE
99633824_ML.qxp 12/07/2005 16:42 Page 79
Page 80

Benutzung des Backofens
ALLE GARVORGÄNGE OHNE VORHEIZEN DES BACKOFFENS
1.
Vorteil und Prinzip von ICS
Mit der Funktion “ ” brauchen Temperatur und Gardauer nicht mehr gewählt
zu werden.
Zur Erzielung des optimalen Garvorgangs werden diese beiden Parameter automatisch vom Backofen berechnet.
Der Garmodus “ ” läuft in 2 Phasen ab:
1) Eine erste Phase (Erfassung), in der der Backofen durch seine elektronischen
Sonden die Daten zum spezifischen Garen des Gerichts aufzeichnet.
Diese Phase wird mit einer Animation in der rechten Zone des Anzeigers symbolisiert:
Sie kann je nach Gericht 5 bis 40 Minuten dauern.
WÄHREND DIESER PHASE DIE BACKOFENTÜR NICHT ÖFFNEN, damit die
Aufzeichnung der Daten nicht gestört wird.
2) Eine zweite Phase, in der der Backofen die notwendige Garzeit bestimmt hat.
Das Symbol der Animation verschwindet, und “Auto” läuft ab. Der Backofen gibt
dann die restliche Garzeit sowie die Echtuhrzeit des Garendes an.
Ab diesem Moment schliesst der Backofen den Garvorgang ab, und die
Backofentür kann geöffnet werden, wenn auf das Gericht eingegriffen werden
soll (Begiessen, Umdrehen, ...).
2. Benutzung der Funktion ICS
a) Das sofortige Garen:
Den Wahlschalter auf die Funktion
“ ” stellen.
Bestätigen mit Drücken des
Regelknopfes.
Im Anzeiger blinkt die Wahl der verschiedenen Gerichte.
Das Gericht mit dem Knopf wählen.
Es auf die im Anzeiger empfohlene Einschubleiste einschieben. Die Backofentür
schliessen. Zur Bestätigung den Knopf drücken. Der Backofen beginnt mit dem
Garvorgang.
Die Suchphase beginnt und wird durch die Animation im Anzeiger symbolisiert: Die
durchschnittliche Gardauer für die gewählte Gerichteart wird angezeigt. Wenn der
Backofen seine Auswertung der Zubereitung abgeschlossen hat, wird die wirklich
notwendige Gardauer angezeigt, und die Animation wird durch “ICS” ersetzt.
Am Ende des Garvorgangs gibt der Backofen mehrere Pieptöne ab.
80
99633824_ML.qxp 12/07/2005 16:42 Page 80
Page 81

Benutzung des Backofens
b) Zeitverschobenes Garen:
Den Wahlschalter auf die Funktion “ ” stellen.
Das Gericht mit dem Knopf wählen.
Das Gericht in den Backofen schieben und die
Tür schliessen.
Den Moduswähler auf “Garende”stellen.
Für die Einstellung der gewünschten Uhrzeit
des Garendes den Knopf nach + oder - drehen.
Z.B.: Garende 13.00 Uhr.
Ihn zur Bestätigung der Wahl drücken.
Nach diesen Aktionen ist der Start des Garens verschoben. “ICS” läuft bis zum Beginn
des Garvorgangs ab. Das Garende wird ab der durchschnittlichen Basiszeit geschätzt.
Ebenso wie bei einem sofortigen Garvorgang wird diese Zeit während des
Garvorgangs optimiert, und die Uhrzeit kann sich also gegenüber der ursprünglichen
Wahl um einige Minuten (+ oder -) verändern.
3. Ratschläge
Wenn die Backofentür nach der ersten Minute
der Auswertungsphase geöffnet wird, gibt der
Backofen “Pieptöne” zur Warnung ab, und die
Symbole der Gerichte blinken.
Sobald das Symbol “ICS” ständig leuchtet,
kann die Backofentür frei geöffnet werden.
Das Garen im Modus “ ” MUSS BEI KALTEM
BACKOFEN BEGINNEN, es muss also das vollständige Abkühlen
abgewartet werden, bevor ein zweiter
Garvorgang im gleichen Modus durchgeführt
wird (andernfalls blinken die Symbole “°C “ und
die Gerichte im Anzeiger, es kann mit keinem
Garvorgang begonnen werden, und Pieptöne
4. Abhilfe bei Störungen
Feststellung
Mögliche Ursachen Abhilfe
Pieptöne
• Die Backofentür wurde während
der ersten Minute geöffnet: Das
Programm ist storniert.
- Den Backofen abkühlen lassen,
bevor wieder mit dem Garen begonnen wird.
Das Symbol --- blinkt im
Anzeiger.
• Der Backofen versucht, die ideale
Gardauer zu bestimmen
- Dies ist eine normale Etappe.
“ICS” wird angezeigt.
• Der Backofen hat jetzt die
geeignete Gardauer bestimmt.
- Dies ist eine normale Etappe.
Der Funktionswähler auf “ICS”
Piktogrammen + Piepton + °C
blinken.
• Der Backofen ist zu heiss für
einen “ICS” Garvorgang
- Abwarten, bis der Backofen abgekühlt ist, oder eine klassische
Garfunktion benutzen.
81
DE
99633824_ML.qxp 12/07/2005 16:42 Page 81
Page 82

5. Verschiedene Backmöglichkeiten
Pizza
• Frische Pizza vom Feinkostgeschäft
• Pizza aus gebrauchsfertigem Teig
• Pizza aus “Hausmacher” Teig
• Tiefkühl-Pizza
• Rinderbraten
(halb durchgebraten)
• Den Braten auf das Gitter mit der Fettpfan-
ne darunter legen.
Wenn “ICS” ständig leuchtet, kann er umgedreht werden.
Rinderbraten
• Schweinsbraten
- Schweinekamm
- Filet
Schweine-
braten
Lamm
• Keule mit 1 kg bis 2 1/2 kg
• Die Keule auf das Gitter mit der Fettpfanne
darunter legen.
Wenn “ICS” ständig leuchtet, kann sie umgedreht werden.
• Ganze Fische
(Goldbrasse, Hecht, Forelle, Makrele ...)
• Fischbraten
F
isch
• Hähnchen mit 1 kg bis 1.700 g
• Entchen, Perlhuhn ...
Hähnchen
Gefülltes
Gemüse
• Tomaten, Paprikaschoten ... gefüllt
• Lasagne (frisch oder tiefgekühlt)
• Hackfleisch mit Kartoffelbrei, Brandade ...
Soufflé
• Eine hohe Form mit geraden Kanten mit 21 cm
Durchmesser wählen.
Salzige
Torten
• Frischer Speckkuchen
• Tiefgekühlter Speckkuchen
• Tiefgekühlte Körbe
• Frische Torten
• Tiefgekühlte Torten
Süsse
T
orten
• Kuchen für die Familie: Englischer Kuchen (salzig,
süss), Sandkuchen
• Gebrauchsfertige Zubereitungen in der Tüte.
K
uchen
• Kleine Plätzchen: Cookies, andere Kekse, Croissants,
Brötchen, Rosinenbrot in der Dose, Croque-Monsieur.
Kleine
K
ekse
82
99633824_ML.qxp 12/07/2005 16:42 Page 82
Page 83

• Sie auf das Gitter legen, damit ein knuspriger Teig entsteht
(Es kann ein Backpapier zwischen dem Gitter und der Pizza eingeschoben werden,
damit der Backofen vor überlaufendem Käse geschützt wird).
• Sie auf das Backblech legen, damit ein weicher Teig entsteht.
• Den Braten mindestens 1 Stunde vor dem Bratbeginn aus dem Kühlschrank nehmen:
• Dies wird ein halbgarer Braten; Wenn gut durchgebratenes Fleisch gewünscht wird,
eine herkömmliche Bratfunktion einsetzen.
• Möglichst viel von der Speckscheibe entfernen: Sie führt zu Rauchentwicklung.
• Nach dem Garvorgang die Ruhezeit von 7 bis 10 Minuten bei in eine Aluminiumfolie gewickeltem Fleisch einhalten und dann est aufschneiden.
• Den Braten mindestens 1 Stunde vor dem Bratbeginn aus dem Kühlschrank nehmen: Je
kälter das Fleisch ist, um so kälter wird es nach dem Braten sein.
• Einen Tontopf verwenden. 1 bis 2 Suppenlöffel Wasser hinzufügen.
• Nach dem Garvorgang die Ruhezeit von 7 bis 10 Minuten bei in eine Aluminiumfolie gewickeltem Fleisch einhalten und dann est aufschneiden. Nach dem Garvorgang salzen.
• Das Fleisch mindestens 1 Stunde vor dem Bratbeginn aus dem Kühlschrank nehmen:
• Eine runde und pralle Keule anstelle einer langen und dünnen wählen.
• Nach dem Garvorgang die in Aluminiumfolie eingewickelte Keule ruhen lassen.
• Diese Funktion für ganze Fische vorbehalten, die mit Würzstoffen und Weisswein zubereitet
werden.
(Bei gegrilltem oder in Folie gebackenem Fisch ist das Vorheizen des Backofens erforderlich).
• Braten am Drehspiess: Nicht vergessen, die Fettpfanne auf der 1. Einschubleiste einzuschieben, damit das Fett aufgefangen wird.
• Kochen auf dem Teller: Besser Tonteller verwenden, damit Spritzer vermieden werden.
• Die Haut der Geflügel einstechen, damit Spritzer vermieden werden.
• Die Abmessungen des Behälters richtig entsprechend der zu garenden Menge bestimmen,
damit ein Überlaufen von Saft vermieden wird.
• Die Form innen mit Butter bestreichen, die Innenseite nicht mit den Fingern berühren,
denn sonst geht das Soufflé nicht hoch.
• Eine Form aus Aluminium mit Anti-Haft-Beschichtung benutzen: Der Teig wird oben knusprig.
• Die tiefgekühlten Speckkuchen aus der Schale nehmen, bevor sie auf das Gitter gestellt werden.
• Eine Form aus Aluminium mit Anti-Haft-Beschichtung benutzen: Der Teig wird oben knuspriger.
• In einer runden oder quadratischen ... Kuchenform zubereitete Kuchen werden immer auf
das Gitter gestellt.
Es können 2 Kuchen in Formen nebeneinander gebacken werden.
• Kleine Plätzchen: auf dem Backblech auf dem Gitter.
Zur Erzielung guter Ergebnisse muss Brandteig auf “KUCHEN” gebacken werden.
83
DE
99633824_ML.qxp 12/07/2005 16:42 Page 83
Page 84

Ratschläge und Tricks
Pizza
Zwischen dem Gitter und der Pizza Backpapier einlegen, damit der überlaufende Käse oder die Tomatensosse nicht den Backofen verschmutzen.
Torten / Speckkuchen:
Backformen aus Glas, Porzellen vermeiden: Sie sind zu dick, sie verlängern
die Backdauer, und der Teigboden wird nicht knusprig.
Bei Obst kann der Tortenboden aufweichen: Es brauchen nur einige Löffel
feiner Griess, zerbröckelte Kekse, Mandelpulver oder Tapioca aufgestreut zu
werden, damit der Saft beim Backen aufgesaugt wird.
Bei feuchtem oder tiefgekühltem Gemüse (Lauch, Spinat, Brokkoli oder
Tomaten) kann ein wenig Maismehl verstreut werden.
Fisch:
Beim Einkauf muss der Geruch angenehm sein und etwas nach Meer riechen.
Der Körper muss fest und starr sein, die Schuppen fest an der Haut kleben,
das Auge lebhaft und gewölbt und die Kiemen glänzend und feucht sein.
Rind / Schwein / Lamm
Jedes Fleisch unbedingt lange vor dem Braten aus dem Kühlschrank nehmen:
Das Fleisch wird durch den Schock zwischen Kälte und Hitze hart, bei richtigem Vorgehen wird der Rinderbaten goldbraun aussen, rot innen und durchhitzt. Nicht vor dem Braten salzen: Das Salz absorbiert das Blut und trocknet
das Fleisch aus. Das Fleisch mit Spateln umdrehen: Wenn es eingestochen
wird, läuft das Blut aus. Das Fleisch nach dem Braten immer 5 bis 10 Minuten
ruhen lassen: Es in Aluminiumfolie einwickeln und auf dem Eingang zum heissen Backofen ablegen: Das während des Bratens nach innen gezogene Blut
fliesst somit wieder nach aussen und durchtränkt den Braten.
Brattöpfe aus Ton verwenden: Glas fördert Fettspritzer.
Auch nicht in der emaillierten Fettpfanne braten.
Die Lammkeule nicht mit Knoblauch spicken, es verliert sonst sein Blut; Den
Knoblauch besser zwischen Fleisch und Knochen einschieben, oder die
ungeschälten Knoblauchzehen neben der Keule braten und sie danach zerdrücken, um der Sosse Geschmack zu geben; Filtern und sehr heiss in der
Sossenschüssel servieren.
Benutzung des Backofens
84
99633824_ML.qxp 12/07/2005 16:42 Page 84
Page 85

Einige ICS Rezepte
Pizza Basis: 1 Pizzateig
*mit Gemüse:
6 Suppenlöffel Tomatensosse + 100 g Zucchini in Würfel
geschnitten + 50 g Paprikaschote in Würfel geschnitten + 50 g
Aubergine in Scheiben + 2 kleine Tomaten in Scheiben + 50 g geriebener
Greyerzer Käse + Oregano + Salz + Pfeffer.
*mit Roquefort, Räucherbrust:
6 Suppenlöffel Tomatensosse + 100 g
Räucherbrusst + 100 g Roquefort in Würfeln + 50 g Walnüsse + 60 g
geriebener Greyerzer Käse.
*mit Würstchen, Quark:
200 g Quark abgestropft und auf den Teig verteil + 4 Würstchen in Scheiben + 150 g Schinken in Streifen + 5 Oliven
+ 50 g Greyerzer Käse + Oregano + Salz + Pfeffer.
Speckkuchen: Basis: 1 Aluminiumform mit 27 bis 30 cm Durchmesser
1 gebrauchsfertige Mürbeteig
3 geschlagende Eier + 50 cl dicke Creme
Salz, Pfeffer, Muskat.
Verschiedene Beläge:
200 g Speckwürfel vorgebraten,
oder - 1 kg gekochte Chicoree + 200 g geriebener Gouda
oder - 200 g Brokkoli + 100 g Speckwürfel + 50 g Blaukäse
oder - 200 g Lachs + 100 g Spinat gekocht und abgetropft
Rinderbraten SAUTERNES Sosse mit PETERSILIE mit ROQUEFORT:
2 Suppenlöffel feingeschnittene Schalotten in Butter anschwitzen. 10 cl
Sauternes hinzufügen, verdampfen lassen. 100 g Roquefort hinzufügen, langsam
zergehen lassen. 20 cl flüssige Creme, Salz, Pfeffer hinzufügen. Zum Kochen
bringen.
Schweinebraten Schwein mit Backpflaumen
Den Metzger bitten, ein Loch über die ganze Länge des Bratens zu
machen, ca. zwanzig Backpflaumen einschieben. In Scheiben geschnitten mit
dem Saft oder kalt mit Chikoreesalat servieren.
Benutzung des Backofens
85
DE
99633824_ML.qxp 12/07/2005 16:42 Page 85
Page 86

Hähnchen
Es mit einem schönen Sträusschen frischer Estragon stopfen oder mit
einer Mischung aus 6 zerstossenen Knoblauchzehen mit einer Prise Grobsalz und
einigen Pfefferkörnern bestreichen.
Lamm
mit Sardellensosse:
100 g schwarze Oliven mit 50 g Kapern und 3 Sardellen, 1/2
Knoblauchzehe und 10 cl Olivenöl in den Mixer geben. 10 cl Crème fraîche hinzufügen. Mit der Lammkeule in Scheiben servieren.
Fisch
Graue Goldbrasse mit trockenem Apfelwein:
1 Goldbrasse mit 1,5 kg.
500 g Pilze.
2 säuerliche Äpfel.
2 Schalotten.
2 Suppenlöffel dicke Creme.
100 g Butter.
1/2 Liter Apfelwein. Salz, Pfeffer.
Den Fisch ausnehmen und abschuppen. Ihn in ein gebuttertes Kochgeschirr
auf die feingehackten Schalotten und die Pilze in Scheibchen legen. Den Apfelwein,
Salz und Pfeffer und einige Butterflöckchen hinzufügen. In den Backofen einschieben.
Die ungeschälten Apfelviertel in der Butter kochen. Nach dem Kochen den Fisch auf
eine heisse Platte geben, den Saft filtern und mit der Creme löschen. Die Creme zum
Saft hinzufügen, mit Äpfeln und Pilzen servieren.
Gefülltes Gemüse
Die Rest von einem Eintopf, Lamm, Braten aus weissem Fleisch, gebratenes
Gefügel, das alles fein gehackt, sind ausgezeichnete Grundlagen.
Blätterteigtorte mit Nugat und Äpfeln:
1 Blätterteig, mit seinem Blatt ausgebreitet, mit der Gabel eingestochen.
200 ml mit einer Vanilleschote zulm Kochen gebrachte Creme.
2 geschlagene Eier mit 30 g Zucker, die abgekühlte Creme hinzufügen.
2 Äpfel in Würfel geschnitten, in 70 g Nugat gewälzt.
Creme + Äpfel einfüllen. In den Backofen einschieben.
Einige ICS Rezepte
Benutzung des Backofens
86
99633824_ML.qxp 12/07/2005 16:42 Page 86
Page 87

Einige ICS Rezepte
Sandkuchen mit Zitrusfrüchten
Karamell: 20 Zuckerstücke (200 g)
Kuchen: 4 Eier
200 g Streuzucker
200 g Mehl
200 g gute Butter
2 Kaffeelöffel Hefe
Früchte: 1 kleine Dose Zitrusfrüchte im Sirup.
Die Früchte abtropfen lassen. Eine Karamell zubereiten. Wenn sie Farbe angenommen hat, sie in eine Springform giessen; Die Karamellunterlage gut verteilen.
Abkühlen lassen. In der Schüssel einer elektrischen Küchenmaschine die weche
Butter mit dem Zucker mischen. Die ganzen Eier nacheinander einarbeiten, dann
das gesiebte Mehl. Mit der Hefe abschliessen. Die Zitrusfrüchte in Vierteln blütenartig auf dem Karamell verteilen. Den Teig übergiessen. In den Backofen auf
“KUCHEN” geben. Auf einen hübschen Teller geben und kalt servieren.
Das Obst können Äpfel, Birnen, Aprikosen sein.
Schokoladeplätzchen
12 einzelne Schälchen aus Aluminium
60 g Butter
200 g Bitterschokolade (über 50% Kakaoanteil)
100 g Puderzucker
4 Eier
1 Tütchen chemische Hefe
70 g gesiebtes Mehl.
Die Schokolade mit der Butter auf sehr kleiner Flamme zum Schmelzen bringen.
Die Eigelbe mit dem Zucker verarbeiten, bis die Mischung glatt wird. Das Mehl,
die geschmolzene Schokolade mit der Butter hinzufügen und mit der Hefe abschliessen. Die Eiweisse zu Schaum schlagen und sie vorsichtig unter die Zubereitung
heben. Die Schälchen aus Aluminium ausbuttern, leicht mit Mehl ausstreuen, den
Teig hineingiessen, ohne dabei die Ränder zu beschmutzen). Die Schälchen auf
das Backblech stellen und “KEKSE” einstellen.
Aus den Schälchen nehmen und auf einem Gitter abkühlen lassen. Dazu EierMilch-Creme mit Vanille oder Kokosnusseis dazu reichen.
Soufflés
Basis der Béchamel-Sosse: 1/2 Liter Milch
60 g Mehl
100 g Butter
4 Eigelbe + Eiweisse zu Schaum geschlagen
Salz, Pfeffer, Muskat.
Je nach Art des Soufflés 150 g geriebener Greyerzer Käse oder 1 kg gekochten,
zermahlenen Spinat oder 1 kg gekochten, zermahlenen Blumenkohl oder 150 g
zerdrückte Fischreste oder 150 g gehackten Schinken hinzufügen.
Benutzung des Backofens
87
DE
99633824_ML.qxp 12/07/2005 16:42 Page 87
Page 88

1.
Was ist eine Pyrolyse?
Der Backofen raucht beim Vorheizen oder raucht beim Braten stark.
Nach verschiedenen Garvorgängen (Lamm, Fisch, Grillgerichte, ...) gibt der
Backofen im Kaltzustand einen unangenehmen Geruch ab.
2. Wann eine Pyrolyse durchführen?
Mit der Reinigung sollte nicht erst abgewartet werden, bis der
Backofen stark mit Fett belastet ist.
- Die Pyrolyse ist ein Heizzyklus des Backofenraums bei sehr hoher Temperatur,
bei dem alle Verschmutzungen durch Spritzer oder übergelaufene Flüssigkeiten
beseitigt werden. Freigesetzte Dünste und Gerüche werden beim Durchgang
durch den Katalysator vernichtet.
- Die Pyrolyse ist nicht nach jedem Braten erforderlich, sondern erst dann, wenn
der Grad der Verschmutzung dies rechtfertigt.
- Aus Sicherheitsgründen erfolgt der Reinigungsvorgang erst nach automatischer
Sperrung der Backofentür. Sobald die Temperatur im Backofen die
Gartemperaturen übersteigt, kann die Backofentür nicht mehr freigegeben werden, auch nicht, wenn der Hebel «Funktionswähler» auf 0 gestellt wird.
D
ie Reinigung des Backofenraums
3. Wie eine Pyrolyse durchführen?
Eine sofortige Pyrolyse durchführen
a) Die Kochgeschirre aus dem Backofen nehmen und eventuell vorhan-
dene stark übergelaufene Reste entfernen.
b) Prüfen, dass der Programmierer
die Tagesuhrzeit anzeigt und diese nicht
blinkt.
c) Den Knopf drücken und nach links
auf die Position drehen.
88
GERING SCHMUTZENDE BACK- UND
BRATVORGÄNGE
SCHMUTZENDE
BACK- UND
BRATVORGÄNGE
STARK SCHMUTZENDE BACK- UND
BRATVORGÄNGE
Kekse, Gemüse, Gebäck,
Speckkuchen, Soufflés
Fleisch, Fisch, (in einem
Kochgeschirr), gefülltes Gemüse
Grosse Fleischstücke
am Spiess
Braten ohne Spritzer, eine
Pyrolyse ist nicht gerechtfertigt
Die Pyrolyse kann alle 3
Bratvorgänge gerechtfertigt sein
Die Pyrolyse kann nach 1
Bratvorgang dieser Art mit
starken Spritzern
durchgeführt werden
99633824_ML.qxp 12/07/2005 16:42 Page 88
Page 89

89
Die Reinigung des Backofens
3. Wie eine Pyrolyse durchführen?
Der Backofen bietet zwei Reinigungsmodi an: Pyromax und Pyrocontrol.
Den geeigneten wählen:
a) Pyromax
· Pyromax ist ein System der Pyrolyse mit
voreingestellter Dauer: Sie dauert 2 Stunden
und sorgt für intensive und perfekte
Reinigung des Ofenraums.
Für die zeitliche Startverzögerung die Enduhrzeit
wählen und sie durch Eingabe der gewünschten Enduhrzeit der Pyrolyse ändern.
Bestätigen mit Drücken des Knopfes.
Der Reinigungsprozess startet. Im Bildschirm wird angegeben:
- die Uhrzeit (1)
- die Gesamtdauer (2)
- die Enduhrzeit der Pyrolyse (3)
- die Sperrung der Backofentür (4)
b) PYROCONTROL
· PYROCONTROL ist ein System, mit dem der Backofen die Reinigungsdauer automatisch je nach dem Verschmutzungsgrad berechnen kann, was für Energieeinsparung
und eine an den Bedarf angepasste Pyrolysedauer sorgt.
Für die zeitliche Startverzögerung die Enduhrzeit wählen und sie durch Eingabe der
gewünschten Enduhrzeit der Pyrolyse ändern.
Mit Drücken des Knopfes bestätigen.
Zu Beginn des Zyklus berechnet der Backofen die Pyrolysedauer je nach dem
Verschmutzungsgrad, diese Phase dauert einige Minuten.
Im Bildschirm wird angegeben:
- die Gesamtdauer
- die vorgesehene Enduhrzeit der Pyrolyse
- die Uhrzeit
- die Sperrung der Backofentür
c) Ende der Pyrolyse
Nur einfach mit einem feuchten Schwamm die Ascherückstände aus dem Backofen
entfernen.
DE
99633824_ML.qxp 12/07/2005 16:42 Page 89
Page 90

Abhilfe bei Funktionsstörungen
Bei Zweifeln am richtigen Funktionieren des Backofens, das bedeutet nicht
unbedingt, dass eine Panne vorliegt.
Auf jeden Fall folgende Punkte prüfen:
Feststellung
Mögliche Ursachen Abhilfe
Der Backofen heizt nicht.
• Der Backofen ist nicht angeschlossen.
• Die Schmelzsicherung der Stromanlage ist ausser Betrieb.
• Die gewählte Temperatur ist zu
niedrig.
- Den Backofen anschliessen.
- Die Schmelzsicherung der Stromanlage austauschen und ihren
Wert prüfen (16 A).
- Die gewählte Temperatur erhöhen.
Der Temperaturanzeiger blinkt.
• Mangelhafte Sperrung der
Backofentür.
- Den Kundendienst rufen.
Die Lampe des Backofens funktioniert nicht mehr.
• Die Lampe ist ausser Betrieb.
• Der Backofen ist nicht angeschlossen, oder die Schmelzsicherung ist ausser Betrieb.
- Die Lampe austauschen.
- Den Backofen anschliessen
oder die Schmelzsicherung
austauschen.
Die Reinigung durch Pyrolyse
funktioniert nicht.
• Die Backofentür ist schlecht geschlossen.
• Das Sperrsystem ist fehlerhaft.
- Die Schliessung der Backofentür
überprüfen.
- Den Kundendienst rufen.
Der Backofen gibt Pieptöne ab.
• Garvorgang läuft.
• Nach dem Garvorgang.
- Die gewünschte Temperatur ist
erreicht.
- Der programmierte Garvorgang
ist beendet.
Der Backofen zeigt an
Réglages
+
-
• Beim Drücken der Tasten.
• Sperrung der Bedienelemente als
Kindersicherung.
- Normaler Betrieb.
- Zum Löschen lange auf Stop
jdrücken, bis das Symbol verschwindet.
90
Der Backofen heizt nicht, und
"DEMO" erscheint ca. alle 10
Sekunden momentan im
Anzeiger.
• Der Backofen ist für eine
Vorführung programmiert.
- Die Uhrzeit auf 0.00 Uhr einstellen.
Nacheinander die Knöpfe " ", " "
und dann STOP drücken, sie festhalten, bis der Piepton abschaltet.
99633824_ML.qxp 12/07/2005 16:42 Page 90
Page 91

91
99633824_ML.qxp 12/07/2005 16:42 Page 91
Page 92

92
In deze gebruikshandleiding, geeft
de veiligheidsaanwijzingen aan,
geeft u tips en praktische richtlijnen
Inleiding P.93
Indeling van uw oven
Beschrijving van de oven P.94
Oventoebehoren P.95
Veiligheidsaanwijzingen P.96
Installatie van uw oven
Elektrische aansluiting P.97
De voedingskabel verwisselen P.98
Nuttige afmetingen voor de inbouw van uw oven P.99
Gebruik van de oven
De programmaschakelaar P.100
Instellen van de tijd van de oven P.101
Onmiddellijk bakken P.102
Hoe programmeer ik een bakcyclus? P.103
Gebruik van de schakelklok P.104
Eco bakken P.105
Hoe kan ik de baktemperatuur zelf aanpassen? P.106
Hoe kan ik het display in waakstand zetten? P.106
Hoe kan ik de bediening vergrendelen (kinderbeveiliging)? P.106
Gebruik van de EOLYSE P.107
Vervanging van de ovenlamp P.107
Bakwijzen van de oven P.108-109
Gebruik van de functie ICS? P.110-117
Reiniging van de binnenzijde van de oven
Wat is een pyrolyse? P.118
Wanneer is een pyrolysereiniging nodig? P.118
Hoe voer ik een pyrolyse uit? P.118-119
Problemen en oplossingen P.120
I
nhoud
99633824_ML.qxp 12/07/2005 16:42 Page 92
Page 93

93
NL
Inleiding
Geachte Klant,
U heeft net een DE DIETRICH oven aangekocht. We willen u hier graag voor
bedanken.
Onze onderzoeksteams hebben voor u een nieuwe generatie van apparaten
ontworpen, die uitzonderlijk is door de kwaliteit, het ontwerp en de technologische vooruitgang, bovendien getuigen ze van een unieke knowhow.
Dankzij het moderne en verfijnde ontwerp, zal uw nieuwe DE DIETRICH oven
harmonieus in uw keuken worden ingepast. Uw oven is een geslaagde combinatie van technologisch vakmanschap, kookprestaties en esthetische luxe.
In het gamma van DE DIETRICH-producten vindt u tevens een ruime keuze aan
kookplaten, afzuigkappen, afwasmachines, magnetrons en koelkasten, die allemaal harmonieus met uw nieuwe DE DIETRICH oven kunnen worden gecombineerd.
Dankzij deze "nieuwe waardevolle objecten" die ons houvast geven in ons
dagelijks leven, is DE DIETRICH, een merknaam die verwijst naar klasse, een
uitnodiging tot een nieuwe levensstijl.
Het Merk DE DIETRICH.
99633824_ML.qxp 12/07/2005 16:42 Page 93
Page 94

94
Indeling van uw oven
1
3
5
Stop / annuleren
Instelling van de temperatuur
De duur / einde baktijd en tijd
instellen
Keuzeknop
BESCHRIJVING VAN DE OVEN
Detectiecontact voor openen en
sluiten van de ovendeur
Gat voor draaispit
Nummer richel
Lampe
1
2
3
4
6
7
8
1
2
3
4
5
5
6
7
8
99633824_ML.qxp 12/07/2005 16:42 Page 94
Page 95

NL
Oventoebehoren
Achterzijde
Voorzijde
Veiligheids rooster met
kantelbeveiliging met kromming
De vorm is speciaal bedacht om de ovenschotel
tussen 2 richels in te kunnen plaatsen.
Schaal + rooster
(vetvanger)
Dit vangt, als u het onder het rooster plaatst, het
nat en het vet op bij het roosteren. Kan ook half
met water gevuld gebruikt worden om au bainmarie te koken. Plaats vlees niet rechtstreeks in
deze ovenschotel, omdat dan vocht en vet tegen
de wanden van de oven zal opspatten.
Multifunctionele schaal (vetvanger)
Dit dient om het braadnat en het braadvet op te
vangen in de stand "sterke grill" of "grill + hetelucht". Let er wel op dat de grootte van het te bakken gerecht geschikt is (bijv : gevogelte met een
groentenkrans eromheen, bij een matige temperatuur). Dit vangt, als u het in de richel onder de grill
plaatst, het braadnat en het braadvet op bij het
roosteren. Kan ook half met water gevuld gebruikt
worden om au bain-marie te koken.
Draaispit
• Plaats de spitsteun in de gleuven van de vetvanger (zie tekening).
•
plaats het geheel in de oven op de tweede richel (van
onderaf geteld). Nadat u het te braden stuk vlees aan het
braadspit heeft gestoken, plaatst u het spit op de steun,
verschuift u het geheel zo, dat de punt van het spit in de
motor achter in de over komt. Haal het handvat eraf door
dit los te draaien. Als het gaar is, haalt u het geheel uit
de oven. Aan het einde van het handvat vindt u een
matrijs waarmee u de vorken kunt losschroeven.
Gebakplaat met anti-aanbaklaag
(op het rooster te plaatsen)
Deze plaat kunt u op het ovenrooster plaatsen en is
geschikt voor de bereiding van gebak, zoete of hartige taart, pizza.
Omdat er een anti-aanbaklaag op is aangebracht, gaan de
gerechten niet vastzitten aan de plaat.
Gebruik ovenwanten bij het uit de oven halen. Laat
de plaat afkoelen voordat u hem in de gootsteen met
de hand reinigt met een afwasmiddel. Gebruik geen schuursponsjes.
LET OP: Niet op de plaat snijden met een mes of metalen pizza-snijder, gebruik alleen plastic
of silicone gerei.
De plaat niet gebruiken bij temperaturen hoger dan 250°C of in de PYROLYSE
functie.
95
99633824_ML.qxp 12/07/2005 16:42 Page 95
Page 96

96
Veiligheidsaanwijzingen
Lees eerst aandachtig de volgende tips alvorens uw oven te installeren.
Dit apparaat is bestemd voor huishoudelijk gebruik. Deze oven is uitsluitend ontworpen voor het bakken van voedingsmiddelen. Deze oven bevat geen enkel
bestanddeel op basis van asbest
EERSTE GEBRUIK :
Alvorens uw oven voor de eerste maal te gebruiken, laat u de lege oven eerst met
gesloten deur ongeveer 15 minuten in de maximumstand werken om de oven “in
te werken”. Door de specifieke samenstelling van de staalwolbekleding van de
ovenruimte kan de oven in het begin een vreemde geur verspreiden. Bij deze
proefverwarming kan er eveneens rookvorming optreden. Dit is normaal.
AANBEVELINGEN :
- Let erop dat de ovendeur altijd goed gesloten is, alleen dan sluit de
afdichtingvoeg de oven volledig af.
- Let erop dat niemand op een open ovendeur gaat leunen of zitten.
- Indien u de grill met de ovendeur op een kiertje gebruikt, kunnen
de ovenwanden en andere delen van de oven heet worden. Houd kinderen
op een veilige afstand.
- Tijdens het gebruik van de oven wordt de oven warm. Raak
nooit de verwarmingselementen binnen in de oven aan.
- Houd na het bakken nooit het oventoebehoren met de blote hand vast
(rooster, draaispit, vetvanger, onderstel van het draaispit enz.), gebruik een ovenwant
of een hittebestendige doek.
- Gebruik geen hogedrukstoomreiniger.
- Plaats geen aluminiumfolie op de ovenwanden. Aluminiumfolie leidt tot
oververhitting van de oven, hetgeen tot een slecht bak- of braadresultaat en
beschadiging van het email kan leiden.
- Zet de oven altijd uit alvorens een reiniging aan de binnenzijde
van de oven uit te voeren.
- Bij een pyrolyse worden de ovenwanden en andere delen van de
oven heter dan bij normaal gebruik van de oven. Houd kinderen op veilige
afstand.
- Verwijder vóór de pyrolyse, alle oventoebehoren.
- Als het apparaat is voorzien van een stopcontact, moet dat ook
na de aansluiting gemakkelijk toegankelijk blijven.
99633824_ML.qxp 12/07/2005 16:42 Page 96
Page 97

97
NL
Installatie van uw oven
20A Teller Mono
220-240 V ~ 50 Hz
Stopcontact
2 polen + aarding
CEI-norm 60083
Monokabel 220-240 V ~
Elektrische aansluiting
Voedingskabel
lengte :
ongeveer 1,50 m
Differentieelschakelaar of
zekering 16A
Controleer vóór de elektrische aansluiting of de doorsnede van
de elektrische installatiedraden groot genoeg is voor de elektrische voeding van het fornuis.
De zekering van uw installatie moet 16 Ampère zijn.
Voer de elektrische aansluiting uit alvorens de oven in het meubel in te bouwen.
• De oven moet aangesloten zijn met een voedingskabel (genormaliseerd) met 3
geleiders met een doorsnede van 1,5 mm2(1 fasedraad +1 nulleider + aarding).
Deze geleiders worden aangesloten op een elektriciteitsnet van 220-240 V ~ monofasig via een genormaliseerd stopcontact 1 fasedraad +1 nulleider + aarding
overeenkomstig de norm CEI 60083 of overeenkomstig de installatievoorschriften.
De beschermingsdraad (groen-geel) is verbonden met de aardingsklem van
het apparaat en moet worden verbonden met de aarding van de installatie.
• In geval van aansluiting met een stopcontact, moet u ervoor zorgen dat het stopcontact ook na de aansluiting gemakkelijk toegankelijk blijft.
• De nulleider van de oven (blauwe draad) moet met de nulleider van het elektriciteitsnet verbonden worden.
99633824_ML.qxp 12/07/2005 16:42 Page 97
Page 98

98
• De voedingskabel (H05 RR-F, H05 RN-F of H05 VV-F) moet lang genoeg zijn om te
kunnen worden aangesloten op de oven wanneer de oven op de grond voor het keukenmeubel wordt geplaatst.
Koppel daarvoor eerst de oven van het elektriciteitsnet af :
• Open het toegangsplaatje rechts onderaan de achterwand. Draai hiervoor de 2
schroeven los en draai het plaatje weg.
• Ontbloot elke draad van de nieuwe voedingskabel over een lengte van 12mm.
• Tors de draadjes van elke draad voorzichtig ineen.
• Draai de schroeven van het klemmenbord los en verwijder de te vervangen voedingskabel.
• Steek de voedingskabel langs de zijkant van de achterwand in de kabelklem
rechts van het klemmenbord.
• Verbind de draden van de voedingsabel overeenkomstig het (de) schema('s) op
het klemmenbord.
• Alle draadjes van de voedingskabel dienen onder de schroeven vast te zitten.
• De fasedraad moet worden verbonden met de L-klem.
• De aardingsdraad van groen-gele kleur moet worden verbonden met de klem .
• De nulleider (blauw) moet worden verbonden met de N-klem.
• Draai de schroeven van het klemmenbord stevig vast en controleer de stevigheid
van de aansluiting door even aan elke draad te trekken.
• Maak de voedingskabel vast door middel van de kabelklem rechts van het klemmenbord.
• Schroef het toegangsplaatje met de 2 schroeven opnieuw vast.
De voedingskabel verwisselen
Onze aansprakelijkheid vervalt bij een ongeval ten gevolge van
afwezige, defecte of foute aarding.
Installatie van uw oven
99633824_ML.qxp 12/07/2005 16:42 Page 98
Page 99

99
Installie van uw oven
Voor een installatie overeenkomstig de wettelijke richtlijnen raden
wij u aan een beroep te doen op een erkend elektrotechnicus.
Nuttige afmetingen voor de inbouw van uw oven
De oven kan naar keuze worden geïnstalleerd onder een werkblad of
een (open* of gesloten) kolommeubel met de juiste afmetingen voor de
inbouw van de oven (zie schema).
Uw oven beschikt over een optimale luchtcirculatie die perfecte bakresultaten en een
optimale reiniging garandeert. U dient met de volgende punten rekening te houden :
• Plaats de oven centraal in het meubel met een minimale afstand van 5 mm tussen de zijwanden van de oven en die van het inbouwmeubel.
• Het inbouwmeubel moet van hittebestendig materiaal gemaakt worden (of ermee gekleed zijn).
• Voor meer stabiliteit schroeft u de oven vast met 2 schroeven in de schroefgaten die in de zijwand van het meubel zitten (zie schema).
Werkwijze :
1) Verwijder de rubberen schroefkapjes van de schroefgaten.
2) Maak een opening van Ø 3 mm in de wand van het meubel om te voorkomen
dat het hout barst.
3) Bevestig de oven met de 2 schroeven.
4) Plaats de rubberen schroefkapjes opnieuw op de schroeven (de kapjes dempen
tevens het geluid bij het sluiten van de ovendeur).
(*) bij een open meubel dient de opening (maximaal) 70 mm te bedragen.
70
550
Schroefgaten
uitsnijding 50x50mm
Schroefgaten
NL
99633824_ML.qxp 12/07/2005 16:42 Page 99
Page 100

100
Gebruik van uw oven
1. De programmaschakelaar
1
2
3
4
5
1
2
3
4
5
7
6
8
10
Weergave van de klok of van de schakelklok
Weergave van de bakwijzen
Weergave nummer richel en gekozen bakwijze.
Weergave verschillende tijdprogramma's
(bakduur en eindtijd)
Weergave van de temperatuur van de oven
Indicator deurvergrendeling (bij de pyrolyse)
Indicator van de temperatuurstijging
Indicator schakelklok
Indicators pyrolyse
Indicator vergrendeling van de toetsen (kinderbeveiliging).
Indicator van de “ICS” functie
Indicator van de “Eolyse” functie
9
10
6
7
8
9
11
11
12
12
99633824_ML.qxp 12/07/2005 16:42 Page 100
 Loading...