

Page 1
EN INSTRUCTIONS FOR USE
Cooker
Page 2
2
Throughout the manual,
indicates safety recommendations,
indicates advice and tips
Dear Customer,
You have just acquired a
DDEE DDIIEETTRRIICCHH
cooker range and we would like to thank
you.
Our research teams have created this new generation of appliances for you. Their
quality, design, features and technological advances make them exceptional products, and reveal our unique know-how.
Your new
DDEE DDIIEETTRRIICCHH
cooker range will blend harmoniously into your kitchen
and will perfectly combine cooking performance and ease of use. We wanted to
offer you a product of excellence.
In the
DDEE DDIIEETTRRIICCHH
product range, you will also find a wide choice of microwaves, ovens, hobs, hoods, dishwashers, fridges and freezers, that you can coordinate with your new
DDEE DDIIEETTRRIICCHH
cooker range.
Visit our website
wwwwww..ddeeddiieettrriicchh--eelleeccttrroommeennaaggeerr..ccoomm
where you will find our
latest innovations as well as useful and complementary information.
DDEE DDIIEETTRRIICCHH
Setting New Values
As part of our commitment to constantly improving our products, we reserve the right to
make changes to them based on technical advances to their technical and functional features and appearance.
Warning : Before installing and using your appliance, please carefully read
this Guide to Installation and Use, which will allow you to quickly familiarise yourself with its operation.
Page 3

3
• Safety guidelines______________________________________________ 5
• Installing your cooker__________________________________________ 6
• Introduction to your appliance __________________________________ 8
• Accessories _________________________________________________ 9
• The principle of induction ______________________________________ 10
• Using your hob _______________________________________________ 11
• Containers___________________________________________________ 15
• How do you use your oven ? ____________________________________ 17
• “Chef” functions guide _________________________________________ 20
• How do you use your oven ? ____________________________________ 22
Contents
Page 4

4
• Tips and hints ________________________________________________ 30
• How do you clean the cavity of your oven ?________________________ 34
• Replacing the oven lamp _______________________________________ 37
• Preserving and maintaining your hob _____________________________ 38
• Minor troubleshooting _________________________________________ 39
• After-sales service ____________________________________________ 40
Contents
Page 5

5
-
PP
LLEEAASSEE RREEAADD TT HH EE IINNSSTTRRUU CCTTIIOO NN SS BB EEFF OO RR EE
IINNSSTTAALLLLIINNGG AANNDD UUSSIINNGG TTHHIISS AAPPPPLLIIAANNCCEE
..
- We have designed your hob for private domestic use.
- This cooker is designed exclusively for the
cooking of drinks and foodstuffs. This product
do not contain any asbestos-based component parts.
- You must always keep an eye on your
cooking.
- Disconnect your cooker from both
electrical and gas supplies before carrying out
any maintenance operations.
- If you plug in any electrical appliance near
the hob, make sure that its power cable is
not in contact with any source of heat.
- Do not allow anyone to lean or sit on the open
oven door.
-
TThhee aacccceessssiibbllee ppaarrttss oorr ssuurrffaacceess mmaayy ggeett hhoott
dduurriinngg ooppeerraattiioonn.. KKeeeepp yyoouunngg cchhiillddrreenn aaw
waayy..
-
DDuurriinngg uu ss ee,, ddoo nnoott ppiicc kk uu pp tthhee
ssaauucceeppaannss,, ppaannss oorr ootthheerr aacccceessssoorriieess ((ggrriillll,,
ssppiittss,, ddrriippppiinngg ppaann,, ssppiitt ccrraaddllee,, eettcc)) uussiinngg yyoouurr
bbaarree hhaannddss.. AAllwwaayyss uussee aa hhaannddppaadd oorr pprrootteecc--
ttiivvee ccllootthh ttoo pprrootteecctt y
yoouu ffrroomm tthhee hheeaatt..
- Before carrying out the pyrolysis cleaning of
your oven, be sure to take out all utensils and
saucepans, and to remove major grease deposits.
- During pyrolytic cleaning, accessible surfaces become hotter than during normal use.
KKeeeepp yyoouunngg cchhiillddrreenn aawwaayy ffrroomm tthhee ccooookkeerr..
- Do not use a steam cleaner.
- If a knob is difficult to turn,
DDOO NNOOTT FFOORRCCEE IITT
.
Call up your installer.
-
DDuurriinngg uussee,, tthhee aapppplliiaannccee ggeettss hhoott.. EEnnssuurree
tt hh aatt nn eeiitthhee rr yyoouu nn oo rr aannyy oonn ee
eellssee ttoouucchheess tthhee hhoott ppaar
rttss..
- The
EECC
mark of conformity can be found on
this cooker.
Tip
Do not hesitate to call in an electrical
domestic appliance specialist in order to
ensure that your installation is correct.
ENVIRONMENTAL PROTECTION
••
This appliance's packaging material is recyclable. Help recycle it and protect the environment by dropping it off in the municipal receptacles provided for this purpose.
Your appliance also contains a
great amount of recyclable material. It is marked with this label to
indicate the used appliances that
should not be mixed with other
waste. This way, the appliance recycling organised by your manufactu-
rer will be done under the best possible conditions, in compliance with European
Directive 2002/96/EC on Waste Electrical and
Electronic Equipment. Contact your town hall
or your retailer for the used appliance collection points closest to your home.
We thank you doing your part to protect the
environment.
Safety guidelines
Page 6
6
NNOOMMIINNAALL SSEECCTTIIOONN OOFF FFLLEEXXIIBBLLEE MMAAIINNSS CCAABBLLEE
((TTYYPPEE HH 0055 RRRRFF)) AANNDD SSIIZZEE OOFF FFUUSSEE TTOO UUSSEE
AACCCCOORRDDIINNGG TTOO YYOOUURR AAPPPPLLIIAANNCCEE
**
Taking into account the simultaneity coefficient
in compliance with standard EN 60 335.2.6.
Connection
Supply voltage
Monophase
222200--224400 VV
~
Triphase
3 ph + neutral
440000 VV
~
Biphase
2 ph + neutral
440000 VV
~
All-electric or
ceramic
cooker
**
Cable sec-
tion
Fuse
3 x 6 mm
2
32 A
5 x 1,5 mm
2
16 A
4 x 2,5 mm
2
20 A
Connection
Supply voltage
Monophase
222200--224400 VV
~
Triphase
3 ph + neutral
440000 VV
~
Biphase
2 ph + neutral
440000 VV
~
2-generator
induction
cooker and
electric oven
Cable sec-
tion
Fuse
3 x 6 mm
2
40 A
5 x 1,5 mm
2
16 A
4 x 4 mm
2
30 A
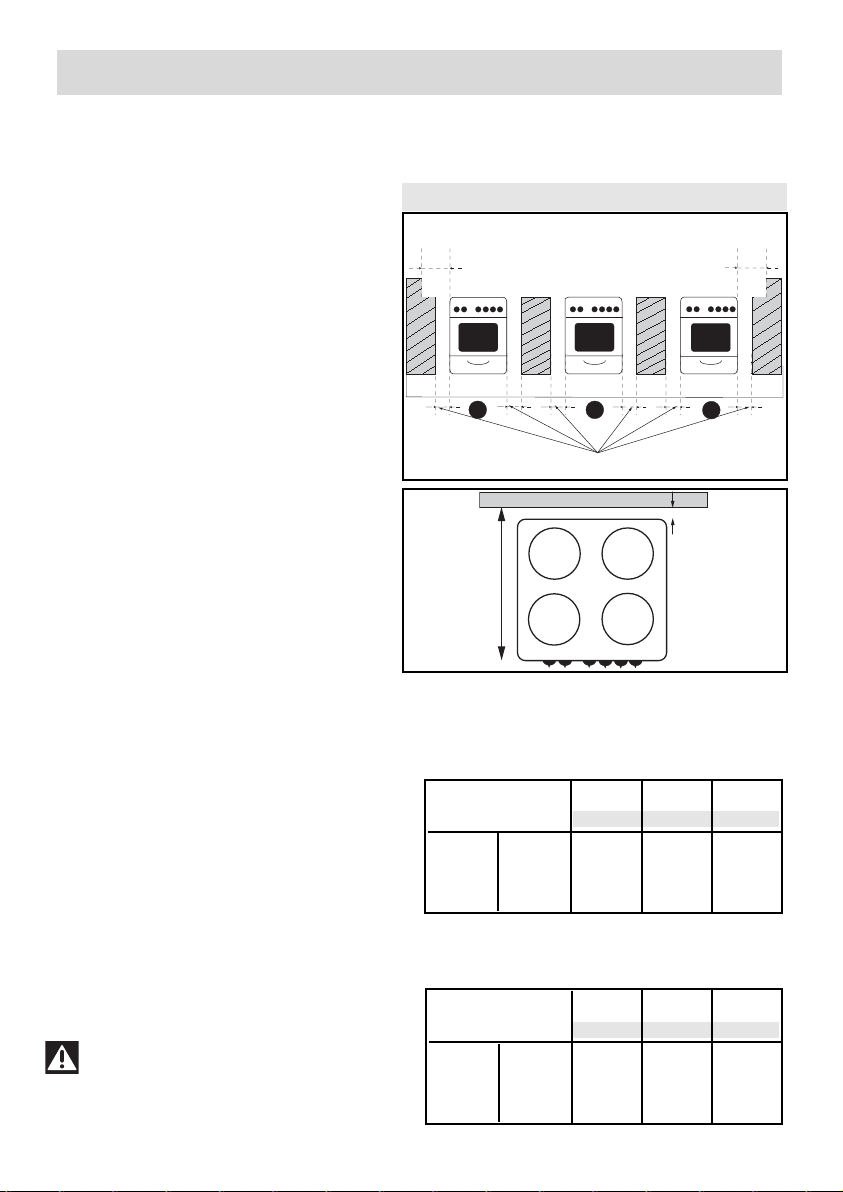
When installing the appliance you should leave
the following minimum gaps between it and its
surroundings (
ffiigg.. 11 aanndd 22
):
-
1100 mmmm
between the sides of the appliance
and the walls or furniture.
-
3300 mmmm
between the wall and the back of the
appliance, with the cover closed.
- The total distance between the front of the
appliance and the wall behind the appliance:
661100 mmmm
(please see the view from above in
fig.2).
- If the cooker is placed on a plinth, make sure
it is securely mounted so that it cannot slip off.
TThhee aapppplliiaanncceess aarree ddeelliivveerreedd wwiitthhoouutt aa ppoowweerr
ccaabbllee.
.
Connection to the network is done using an
H05RRF-type cable and an all-pole switch that
conforms to installation regulations in force.
The guard wire must be linked to the appliance's and the installation's ground tab terminals. If the cable is damaged, it should be
replaced by a similar cable.
Before making the connection, check that the
section of the electrical installation wires is
big enough to supply the cooker correctly.
Use a mains cable with a cross section
suited to the connection (complying with the
chart below).
Fixed appliances including a power cable and
a mains power plug must be positioned in
such a manner as to ensure that the
power plug is accessible.
FITTING RECOMMENDATIONS
••
33 ppoossssiibbllee iinnsseerrttiioonn mmeetthhooddss
fig.2
fig.1
ELECTRICAL CONNECTIONS
••
Warning
We shall not be held responsible in
the event of an accident resulting from an
installation that has not been earthed or
incorrectly earthed.
Installing your cooker
150mm
1
2
10mm
30 mm
610 mm
150mm
3
Page 7
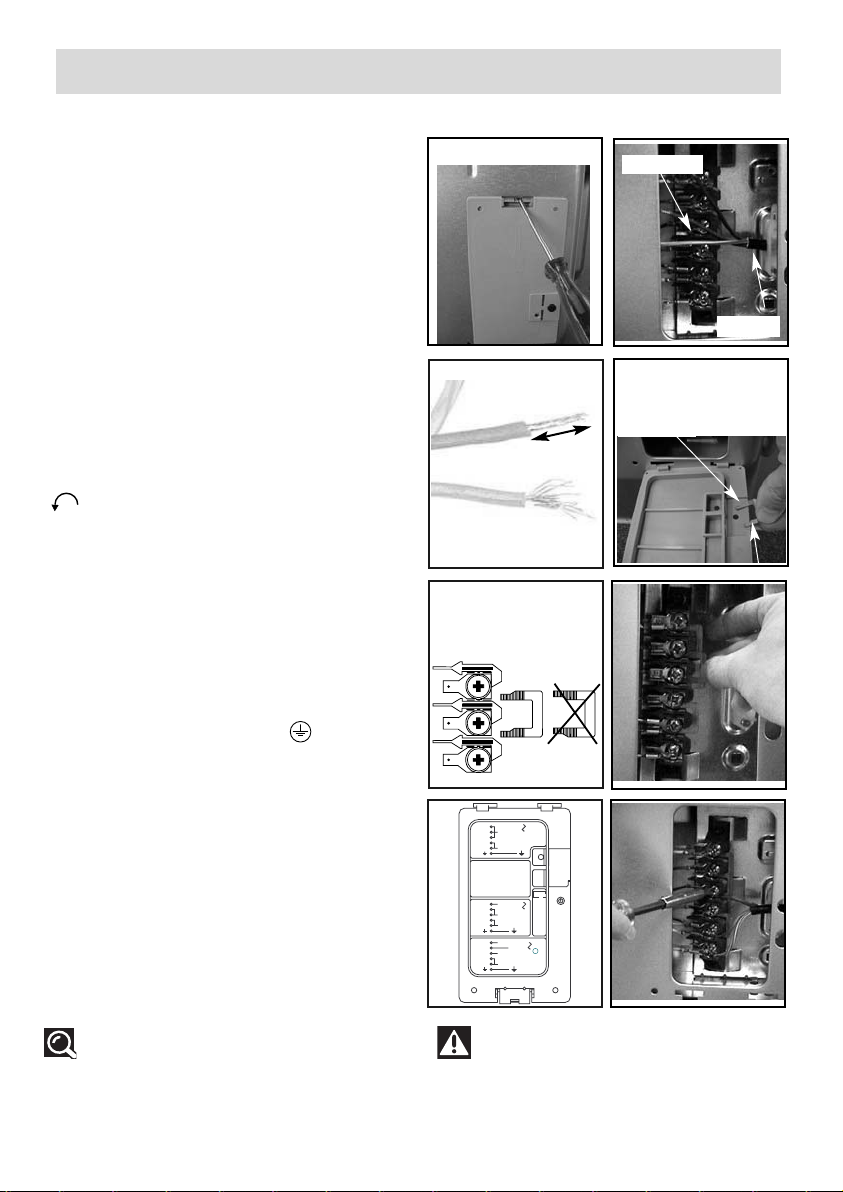
- Open the plastic trap door located in the
lower right hand corner of the rear casing. To
do this :
- stick a screw driver between the metal casing
and the trap door then pivot the trap door
((ffiigg..
11))
.
- Undo the cable clips
((ffiigg.. 22))
- Put the mains cable through the side of the
casing, into the cable tensioner located to the
right of the terminal strip (Refer to previous
chart to find the cable section required)
((ffiigg..22))
.
- Strip 12 mm off each mains cable wire and
carefully twist the strands
((ffiigg.. 33))
.
- Unscrew the screws on the terminal strip
.
- Remove the connection clasps on the cover
by removing the black clip
((ffiigg..44))
.
- Position them in the direction shown in
((ffiigg..
55))
. Refer to the diagram etched on the cover
for fitting the connection clasp(s)
((ffiigg..66))
.
- Connect the cable wires according to the diagram on the cover
((ffiigg.. 77
) and the type of supply. All the strands of the
supply wires must be firmly held under the screws. The green/yellow earth wire must be
connected to the earth terminal .
-
BBeeffoorre
e ttiigghhtteenniinngg,, cchheecckk tthhaatt tthhee tteerrmmiinnaall ssccrreeww iiss
nnoott bbiittiinngg iinnttoo tthhee iinnssuullaattiinngg sshheeaatthh aarroouunndd tthheewwiirreess.
.
- Tighten the screws on the terminal strip and check
that the wires are correctly connected by pulling
each one (
ffiigg..88
).
- Attach the cable by tightening the cable clip.
- Replace the connection clasps not used in the
cover. Replace the black clip and close the
cover.
CONNECTIONS
••
X
12 mm
CCoonnnneeccttiioonn
ccllaassppss
TTeerrmmiinnaall ssttrriipp
CCaabbllee cclliipp
fig.1
Tips
If you observe a problem when you
turn on the appliance, carry out a check to
ensure a satisfactory connection and satisfactory connection and satisfactory positioning of the strips.
Warning
Be sure to follow the above instructions carefully in order to ensure a good
connection. A faulty connection could lead
to dangerous overheating of your cable.
fig.3
fig.5
fig.7
fig.2
fig.4
fig.6
fig.8
Installing your cooker
7
1
2
L1
3
4
5
L2(N)
1
L1
2
3
L2
4
5
N
1
L1
2
L2
3
L3
4
5
N
230V
307
400V2N
9896-
j
400V3N
01
02
12
03
11
04
10
91
05
09
060708
Page 8
8
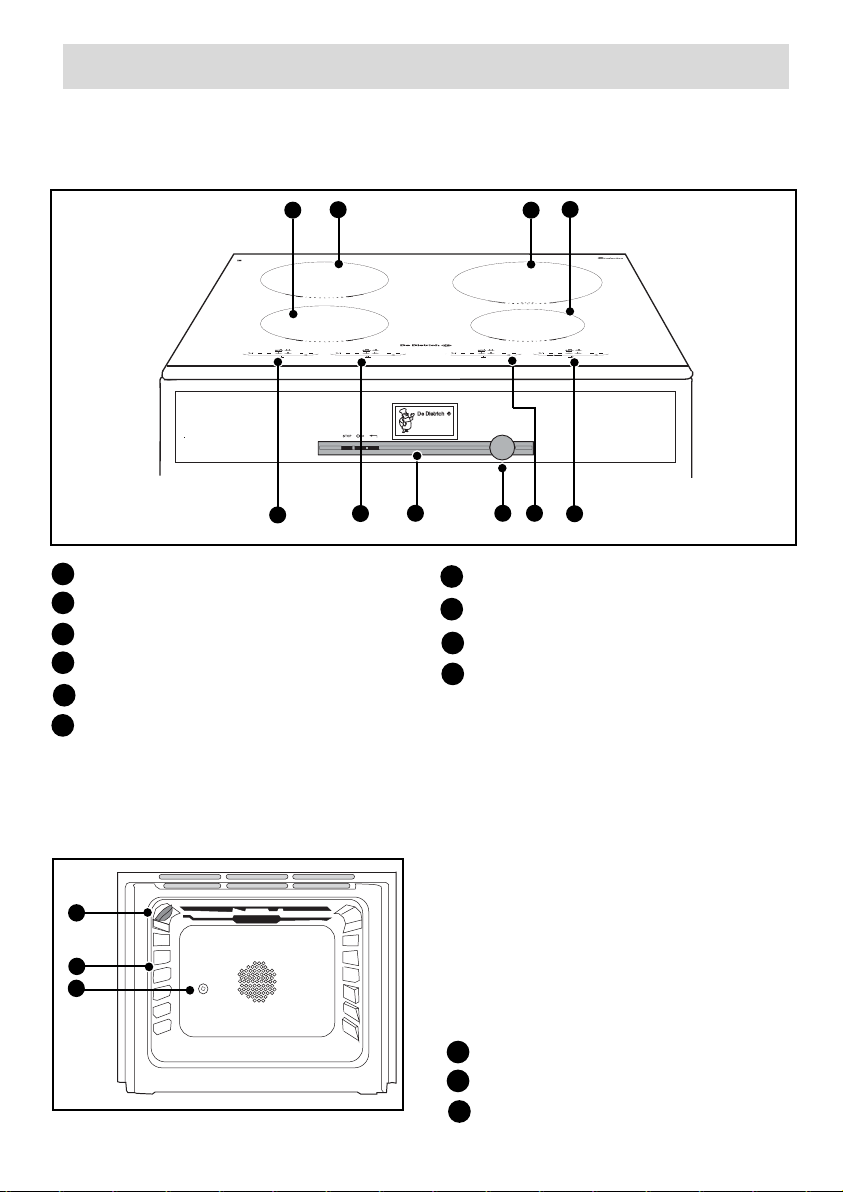
Left front cooking plate 2800 W dia.180 mm
Left rear cooking plate 2800 W dia.180 mm
Right rear cooking plate 3100 W dia. 210 mm
Right front cooking plate 2000 W dia.160 mm
Left front cooking plate touch-sensitive control
Left rear cooking plate touch-sensitive control
A
B
C
D
Electronic programmer
Oven function selector
Right front cooking plate touch-sensitive
control
Right rear cooking plate touch-sensitive
control
E
F
G
H
I
J
DESCRIPTION OF YOUR COOKER
••
DESCRIPTION OF YOUR OVEN
••
Lamp
Shelf support indicator
Turn spit
A
B
B
A
C
C
Bonjour !
B
C
D
A
E
F
G
H I
J
FFiirrsstt uussee
: before using your oven for the first
time, heat it empty with the door closed for
approximately 15 minutes at the MAX. position in order to burn it in. The mineral wool
which surrounds the oven cavity can initially
release a particular smell due to its composition. Similarly, you may notice fumes being
released.
TThhiiss iiss ccoommpplleetteellyy nnoorrmmaall..
Introduction to your appliance
Bonjour !
Page 9
9
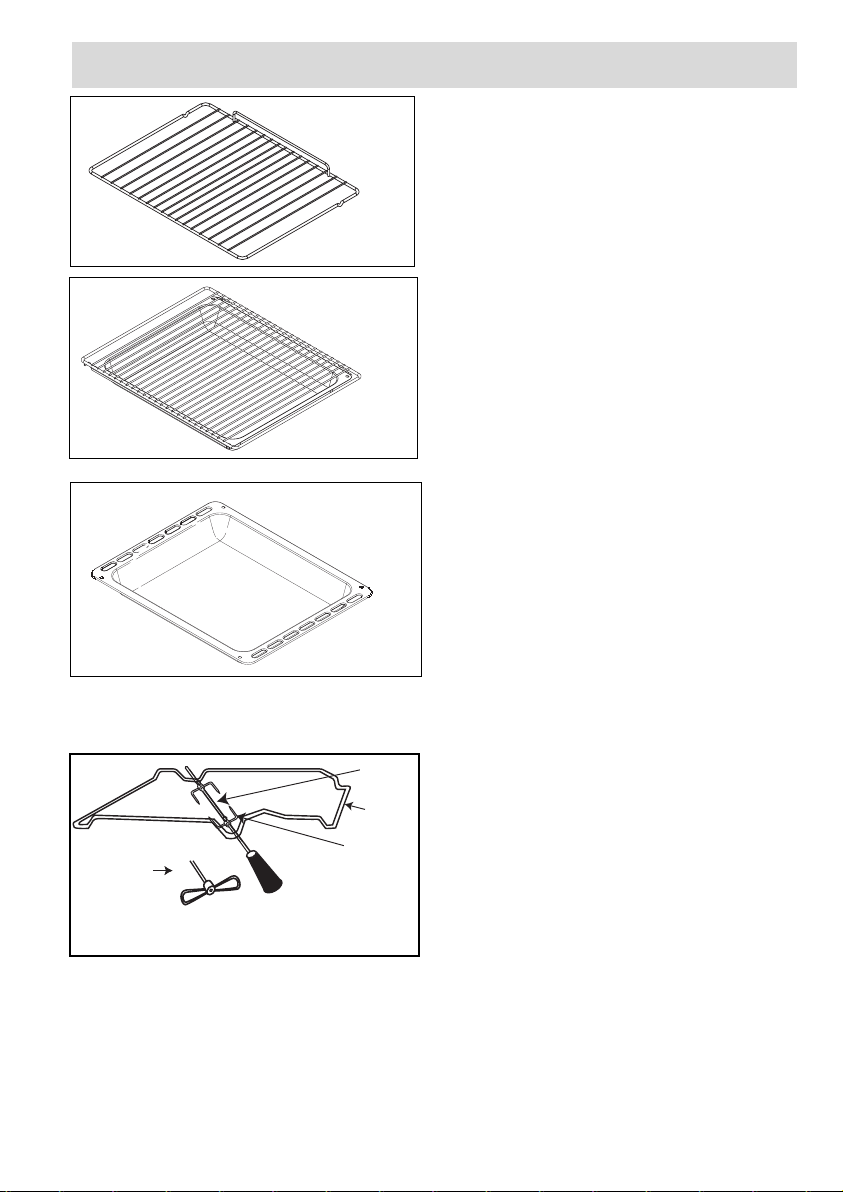
Accessories
Dish + grid (drip tray)
Inserted under the grid, it catches barbecue juices and grease. It can also be used
half-full of water for double-boiler cooking
methods. Avoid placing roasts or meats
directly in the dish because you are certain to have major spattering on the oven
walls.
Multi-purpose dish (drip tray)
It is used to collect juices and grease from
cooking with the high grill or the pulsed
grill.
It can be used as a cooking dish when suitable for the size of the item to be cooked
(e.g. whole poultry surrounded with vegetables, at moderate temperature). Inserted
under the grid, it catches barbecue juices
and grease. It can also be used half-full of
water for double-boiler cooking methods.
Rotisserie
Engage the spit cradle in the 3rd shelf position from the bottom (check the direction)
- slide one of the forks onto the spit, then
the meat for roasting, slide on the second
fork, centre them and twist the forks to
tighten them,
- place the spit on its cradle,
- push gently to engage the point of the
spit in the square bit drive at the back of
the oven,
- place the multi-purpose dripping pan on
the lower shelf position to collect the cooking juices.
AR
AV
Anti-tip safety shelf
Food can either be placed on the shelf
in a dish or cake tin for cooking or
browning.
6600 ccmm mmooddeell mmuullttiippllee ccooookkiinngg
fig.6
Cradle
Spit
Fork
Handle
(depending
on model)
poignée
(suivant modèle)
Broche
Berceau
Fourchette
Page 10
10
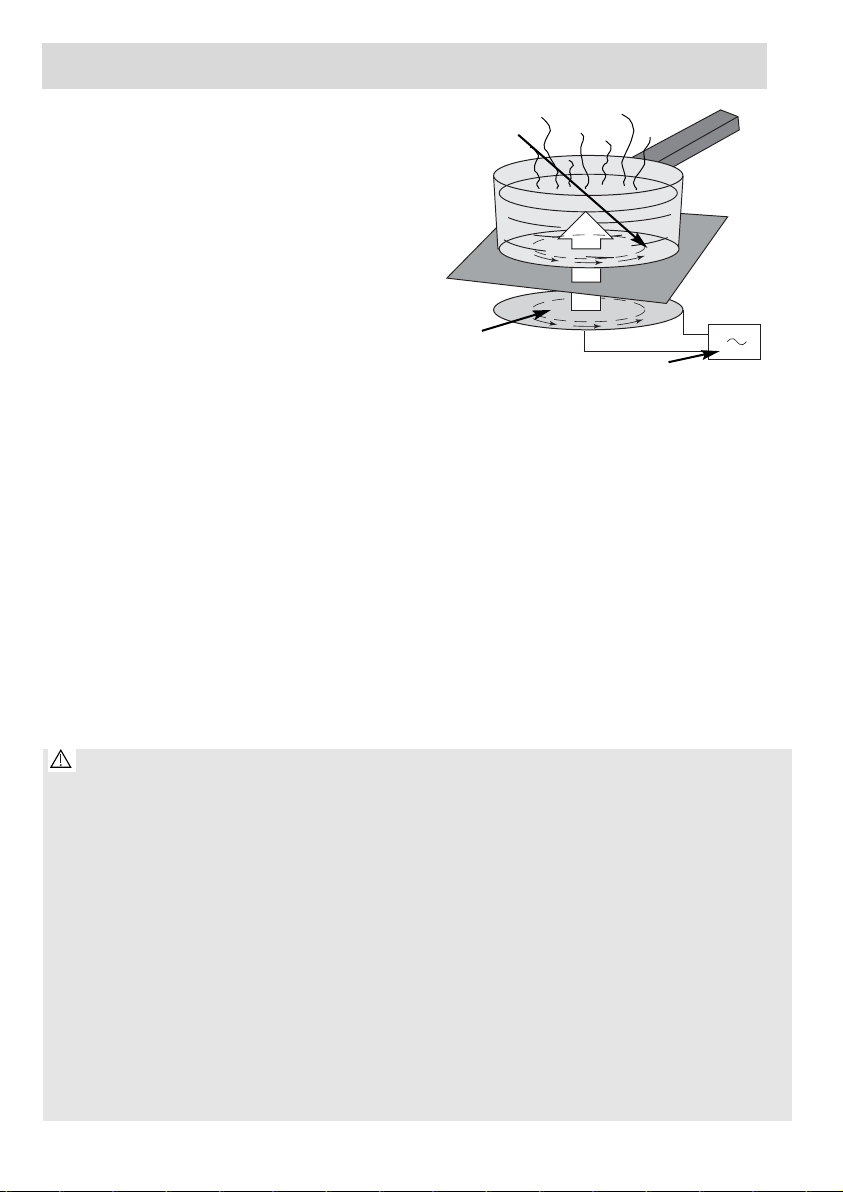
Induced currents
Electronic circuit
Induction coil
For the attention of wearers of pacemakers or other active
implants:
The hob complies with all current standards on electromagnetic interference.
Your induction hob is therefore perfectly in keeping with legal requirements (89/336/CEE directives). It
is designed not to create interference on any other electrical apparatus being used on condition that
the apparatus in question also complies with this legislation.
Your induction hob generates short-range magnetic fields.
To avoid any interference between your induction hob and a pacemaker, the latter must be designed to
comply with relevant regulations.
In this respect, we can only guarantee our own product conformity. Please consult the pacemaker
manufacturer or your doctor concerning its conformity or any possible incompatibility.
L
When your induction hob is switched on and a
heating power has been selected, the electronic
circuits produce induced currents that instantaneously heat the bottom of the pan that transfers
this heat to the food.
Thus cooking takes place with practically no
energy loss between the induction hob and the
food.
If a crack appears in the glass surface, disconnect the appliance immediately to avoid any risk of electric shock.
For disconnecting, remove the fuses or use the cutout switch
Do not re-use your hob until the glass surface has been changed.
Y
our hob must never be used as a storage space or cutting surface for any products whatsoever.
Never allow power cables for other electrical appliances to trail across the hob.
When cooking never use aluminium foil and never place products wrapped in aluminium foil or products
deep-frozen in aluminium packs on the hob. The aluminium will melt and damage your appliance irreparably. Do not leave empty pans on your hob in case of residual heat or if the hob is turned on by mistake.
If your hob is placed above your oven (see "Choice of Installation") thermal protectors prevent it being
used when the oven is being pyro-cleaned.
A steam cleaner must not be used.
The principles of induction
+
-
Page 11

11
0
beeps
low setting
77 == SSIIMMMMEERRIINNGG
medium setting
1111 == CCOOOOKKIINNGG
high setting
1155 ==
RRAAPPIIDD BBOOIILLIINNGG
max. setting
bboo == BBOOIILLIINNGG
FFUULLLL PPOOWWEERR
0....99min
To stop this beeping, press any control button
in the cooking zone concerned, failing which it
will shut down after approximately 1 minute.
mmaannuuaall sshhuuttddoowwnn
aauuttoommaattiicc sshhuuttddoowwnn
0
beep beep
0
USING THE COOKING PLATES
••
••
Start - Stop
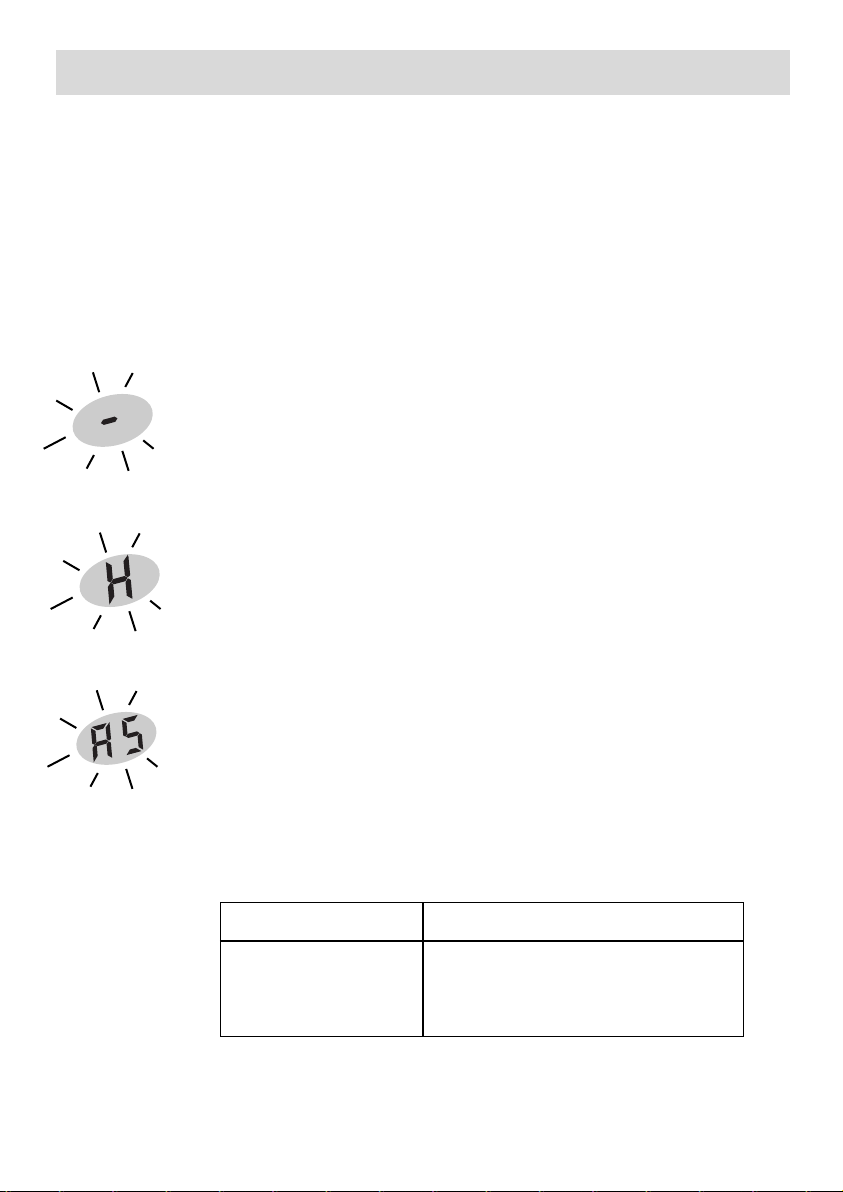
A beep and a flashing
00
indicate that the zone
concerned is switched on.
You can then choose the desired power.
If you do not select a power level, the cooking
zone will automatically turn itself off.
N.B.
On a given side of the hob, using a
cooking plate at maximum power results in
automatic limitation of the other cooking
plate on that side, which is indicated in the
power level display.
••
Power adjustment
••
Timer setting
Works when the cooking zones concerned
are switched on. You can change the cooking
time at any moment.
Using your hob
11......1155
0
Page 12
12
Using your hob
BEEP...BEEP
for the hob
for the
saucepans
••
Thermostat
--
Each cooking zone is equipped with a sensor which constantly monitors the
temperature of the base of the cooking utensil, thus avoiding any risk of overheating (empty saucepan, etc.).
--
A sensor constantly monitors the temperature of the components of your hob.
If this temperature becomes too high, the power delivered by the hob is changed
automatically.
••
Protection in case of boiling over or spills
Switching off of the hob, a special indicator (symbol opposite) and an audible
“beep” **can be activated in any of the 3 following cases:
••
Spill which covers the control keys.
••
Damp towel placed over the touch-sensitive controls.
••
Metallic object placed on the touch-sensitive controls.
Clean the hob or remove the object, then begin cooking again.
**
according to the example
••
Residual heat indicator
After intensive use, the cooking zone that you have just used can remain hot for
several minutes.
A “
HH
” is displayed during this period. Avoid touching the hot areas during this
time.
••
Auto-Stop system
The “Automatic-stop” function is started automatically if the user forgets to
switch off the current dish.
The display for the affected heating zone indicates “
AASS
” and an audible “beep”
is emitted for approximately 2 minutes. This “
AASS
” display remains visible while you
have not pressed any touch-sensitive control on the relevant cooking plate.
A double “audible beep” confirms your manoeuvre.
Power used
Between
11 ..........99
Between
1100 ........1144
Between
1155
..........BBoooosstt
inclusive
The cooking plate turns itself off automatically
after:
88
hours
22
hours
11
hour
Page 13

13
Using your hob
••
How do you unlock it?
Simultaneously press the
((-- ++))
locking controls until the the locking icon disappears from the
display.
••
Key locking
The top of your cooker has a child security system which locks its use:
- either when it is off (cleaning).
- or while cooking (operations in progress continue and the indicated settings remain active).
In this case, for safety reasons, only the “
ssttoopp
” key is always usable.
DDoo nnoott ffoorrggeett ttoo uunnlloocckk tthhee ccooookkeerr bbeeffoorree uussiinngg iitt aaggaaiinn..
••
Automatic pan detection
Your induction hob is capable of recognizing most cookware.
••
T
est container: place your cookware on a heating zone which is set at 44.
If the display remains on, your cookware is compatible.
If the display flashes, your cookware cannot be used on an induction hob.
••
Y
ou can also use a magnet to test the cookware.
If this “sticks” to the base of the cookware, it is compatible with an induction hob.
Taking the pan off the hob stops the power to your hob instantly. You still have to press the “stop”
key to switch the cooking area off completely.
••
“Small objects” safety
A small size object such as: a small pan, a fork, a spoon or even a ring, etc. is not detected as a piece of cookware.
The display flashes and no heat is produced.
••
How do you lock it?
- Identify the touch-sensitive controls
((-- ++))
used for locking and placed above a pad-
lock (or key) icon.
- Press both of these touch-sensitive controls
((-- ++))
simultaneously until the information is displayed
or
The display goes out after a few seconds.
Any attempt to adjust the touch-sensitive controls activates the display.
Page 14

14
Using your hob
••
Which cookware is best suited for
use with induction hobs?
You will undoubtedly have some suitable
cookware already.
--
C
OOKWARE IN ENAMELLED STEEL WITH OR WITHOUT
ANTI
-STICK COATING::casserole, deep fat frier,
frying pan, grillpan, etc..
--
C
AST IRON PANS: in order not to scratch the
ceramic surface of your hob, avoid sliding
these on the hob, or choose a pan with an
enamelled base.
--
S
TAINLESS STEEL COOKWARE SUITABLE FOR INDUC-
TION HOBS: most stainless steel pans are suita-
ble for cooking by induction (saucepans, stewpot, frying pan, deep-fat frier).
--
A
LUMINIUM COOKWARE WITH A SPECIAL BASE:
choose items with a thick base, which provide
more uniform heat distribution for cooking.
••
Which materials cannot be used on
induction hobs?
Glass, ceramic or earthenware pans, aluminium without a special base or copper, certain non-magnetic stainless steels. (the heat
here is better distributed).
••
Test “container”
Our state of the art technology means that
your induction hob is capable of recognizing
most cookware.
Place your pan on a heating zone, set for example at 4. If the indicator stays on
,,
your cookware
is compatible, if it flashes your cookware can-
not be used with an induction hob.
Cookware without perfectly flat bottoms may
work, but it cannot be too misshapen.
••
Electronic safety system
If the temperature of electronic circuits becomes too high, a safety system reduces the
heat supplied to the hob automatically.
••
“Empty saucepan” safety
Each heating zone is equipped with a safety
device which constantly detects the temperature of the heating zone. There is therefore no
risk of overheating caused by empty cookware.
Page 15

15
Containers
You probably already have some suitable pans.
Your induction hob is able to recognize
most types of pans.
Pan test: Place your pan on a zone, for exam-
ple at position 4; you know that your pan is
compatible if the display does not flash, but if
it does flash then you cannot use this pan for induction cooking. You can also test it with a magnet: if the magnet "sticks" to the base of the
pan, then you can use it for induction
cooking.
Pans compatible with induction are:
• pans made of enamel coated steel with or
without a non-stick coating.
• cast iron pans with or without enamel coated
base.
An enamelled coated base will prevent the glass
top of your hob from getting scratched.
• stainless steel pans designed for induction
cooking.
Most stainless steel pans (saucepans, stewpans,
frying pans, deep frying pans, etc.) are suitable
for induction cooking if they pass the pan test.
• aluminium pans with special base.
pans which do not have a flat base may be suitable, however they must not be deformed too
badly.
Choose a pan marked with the
logo on its base or packaging to be sure that it is
perfectly suitable for use on your induction hob
under normal conditions of use.
A list of utensils is supplied with these
instructions to help you make your choice.
• Note
Glass, ceramic, earthenware pans, aluminium
pans (without a special base) and copper
pans, and some non-magnetic stainless steel
pans are incompatible with induction cooking.
You will be informed by the flashing display.
You should choose pans with a thick flat base
for uniform cooking (heat is better distributed).
Using the cooking zones according to the pan (
depending on the model)
Ø18 ..... 24 cm
Ø 21 cm
Ø 16 cm
Ø 18 cm
Ø12 ..... 22 cm
Ø10 ..... 18 cm
Slow cooking (sauces, creams…).
Preparing small
quantities or individual portions…
Multi-service zone
For small pans
Ø 28 cm
Ø 12 ..... 32 cm
This 28 cm cooking zone:
- Automatically adapts to the pan.
- Delivers optimal power.
- Provides excellent heat distribution.
- Supplies an even cooking temperature and
consequently you can prepare big pancakes, large
fish etc…, or large quantities or small amounts,
they will all be cooked in the same way.
Large cooking zone
Page 16

16
add food
boil or fry
fast cooking
slow cooking
boil with cover
maximum power is reserved for frying and quick boiling.
FRYING COOKING/BROWNING COOKING
D
ISHES
BRINGING BACK TO THE BOI
BRINGING TO THE BOIL STEADY SIMMERING
SIMMERING
SOUPS
B
ROTH
T
HICK SOUP
FISH
S
TOCK
F
ROZEN
SAUCES
T
HICK
,
MADE WITH FLOUR
M
ADE WITH BUTTER AND EGGS
(
BEARNAISE
,
HOLLANDAISE
)
VEGETABLES
C
HICORY
,
SPINACH
P
ULSES
B
OILED POTATOES
F
RIED POTATOES
S
AUTE POTATOES
D
EFROSTING VEGETABLES
MEAT
T
HINLY SLICED MEAT
F
RYING STEAKS
G
RILLING
(
CAST IRON GRILL PAN
)
DEEP FRYING
F
ROZEN CHIPSFRESH CHIPS
MISCELLANEOUS
P
RESSURE COOKER
(
ONCE IT HISSES
)
S
TEWED FRUIT
P
ANCAKES
C
USTARD
M
ELTING CHOCOLATE
JAMM
ILK
F
RIED EGGS
P
ASTA
B
ABY FOOD IN JARS
(
BAIN MARIE
)
S
TEWS
C
REOLE RICE
R
ICE PUDDING
10 7
6 5
4 3 2 19 812-1115-13
HEATING POWER
KEEPING
WARM
BOOST TOUCH
*
*
*
*
*
*
*
*
Boost switch some models only for boiling and frying
*
Page 17

17
Bonjour !
How do you use your oven?
1. Close-up of your programmer
2
1
4
3
5
1
3
4
5
2
Turn off oven or your cooking programme
Control panel lock
Back to the previous level
Information display
Selector button
DESCRIPTION OF THE APPLIANCE
Jeudi
19
Septembre
Réglages
+
-
DESCRIPTION OF THE DISPLAY
List of symbols:
Key
Pyrolysis
Programming
Locked
Thursday
19
September
Hello!
Bonjour !
Page 18

18
How does your oven work?
a) When supplied with electricity
The oven automatically displays the following
screen. Turn the selector button to the field to
be adjusted, press the selector button to enter
the desired information, then press again to
record the adjustment.
Date display (1).
Time display (2).
Display in 12:00 or 24:00 format (3).
Time display (4) using one of these formats:
b) Resetting the date and time
Turn the selector button to the “Settings” field and push the selector button.
The “time/date” screen appears. Push again to access the time data screen,
then proceed as described for initial programming when the appliance is
supplied with power.
2. How do you set the time and date on your oven?
Aiguilles
(2)
(3)
(4)
Jeudi
19
Septembre
Jeudi
19
Septembre
Clock with hands or Digital display
Thursday
19
September
Thursday
19
September
Hands
(1)
12 H
3:20
Page 19

19
4. How do you use the various cooking modes?
a) “Chef” function
The Chef function lets you set all the cooking parameters yourself: temperature, type of cooking, cooking time
1. Press the selector button. You access the
“Chef” screen
2. Press again to choose the cooking type from the following list by turning
the selector button (to make this selection, refer to the attached cook book):
· Circulating heat
· Combined heat
· Traditional Eco
· Traditional
· Turbo grill
· High grill
· Medium grill
· Low temperature stabilisation
· Defrosting
Enter your selection by pressing the button.
Chef
Chaleur tournante
Example
How does your oven work?
Circulating heat
3. How do you programme a cooking cycle?
This oven allows you to access three different types of programming depending
on the amount of knowledge you have about preparing the recipe in question:
a) A recipe for which you know all parameters (you will choose on your own the
type of cooking, temperature and cooking time): Choose the “Chef” function
b) A recipe for which you need assistance from the oven (you simply choose the
type of food from a list and the weight; the oven will take care of choosing the
most suitable parameters) temperature, cooking time, type of cooking): Choose
the "Cooking Guide" function.
After a cooking cycle, the circulating fan continues to function
for a period to ensure the heating elements are properly
cooled down.
Page 20

20
C
ombined heat
Cooking controlled by the upper
and lower heating elements and
by the fan at the back of the oven.
Turbo grill
Cooking controlled, alternately,
by the upper element and
by the fan.
High grill
Cooking controlled by the upper
element
Medium grill
Cooking controlled by the upper
element.
This position allows for energy savings while preserving
the quality of the cooking.
The ECO position is used
for the energy label
performance.
Hold warm function
Heat dosages from the element
at the back of the oven combined
with fan.
Stabilisation at low
temperatures.
Symbol
Name of cooking mode Description of cooking mo
*
* Programme(s) used to obtain the results indicated on the energy label in compliance w
Circulating heat
Cooking controlled by the heating
element located at the back of the
oven and by the fan.
Quick temperature
increase. Some dishes
can be placed in the
oven while it is still cold.
ECO Traditional
Cooking controlled by the upper
and lower heating elements with
no fan.
Three combined sources
of heat: a lot of heat
from the bottom, a little
circulating heat and a bit
from the grill.
The double grill covers the
entire grid surface.
As for the simple grill,
it is equally effective for
smaller quantities.
This mode combines the
effects of the fan and the
grill; the grill pulses the food
with infrared and the air
movement generated by the
fan attenuates the effect.
Traditional
Cooking controlled by the upper
and lower heating elements with
no fan.
Requires preheating before
placing the dish in the oven.
CHEF FUNCT
*
ECO
ECO
Page 21

21
Recommended for quiches, potpies
and juicy fruit tarts.
Recommended for letting dough rise
for bread, buns, cakes, etc.
without exceeding 40°C (plate warming,
defrosting).
Recommendations
Recommended for preserving tenderness
in white meats, fish, vegetables
For cooking multiple items on up to three
levels.
Note: All cooking is done without
preheating.
(Sometimes the cooking time may be
slightly longer)
Recommended for sealing and thoroughly
cooking red and white meat.
To slowly cook poultry weighing up
to 2 kg.
Recomm. Temp.
mini
recomm.
maxi
35
180
235
mini
recomm.
maxi
35
205
275
mini
recomm.
maxi
180
200
230
mini
recomm.
maxi
35
200
275
mini
recomm.
maxi
35
80
100
Recommended for slow, gentle cooking:
tender game meat, etc.
Sealing red meats
To simmer in a covered stew pan dishes
that were begun on the hob (coq au vin,
stew, etc.)
mini
recomm.
maxi
35
225°
275
Recommended for grilling chops,
sausages, toast, prawns
placed on the grid.
1 to 4
IONS GUIDE
Page 22

22
How does your oven work?
The oven then asks you to enter the other cooking parameters.
3. Temperature.
Based on the type of cooking you already selected, the
oven will recommend the ideal cooking temperature.
This temperature can be adjusted as follows:
Choose the T° field (1) by turning the button.
Press it: the T° field flashes: select the desired T°
by turning the button. Press to enter. In the grill
position (medium or high), select the “grill power” field
and use the button to adjust the power to the desired level, then press to enter.
4. & 5. Cooking time and end of cooking time.
You can enter the cooking time for your dish by selecting the field.
Turn the button then press it so that this field flashes.
Enter the cooking time by turning the button, then
enter the time by pressing the button. When you set
the cooking time, the end of cooking time ( field)
automatically adjusts. You can change this end of cooking time if you want to delay the programme start. In
this case, select the field and proceed as described
for setting the cooking time. Once you have selected
the cooking end time, press the button to enter.
Your oven goes into standby mode (symbol in the display) until cooking begins (cooking end time minus cooking time).
Note: You may opt not to select a cooking time. In this case, leave the cooking
time and end of cooking time fields empty and go directly to “OK”. Enter to start
the cooking programme. To turn the oven off, press the “STOP” touch control
(or pressing the “STOP” touch control two times) when you feel the dish has
been sufficiently cooked.
6. “Bio Grill+” option
By choosing the “Standard” field and pressing the button, you can access the “Bio Grill+” function. This function lets you finish your cooking programme by browning the dish for the last five minutes of the cooking
time. This function is represented by a flashing grill on
the screen when it is activated five before the end of
cooking.
Note: "Bio Grill+" can be used for all cooking modes except for the grill applications (medium grill, high grill, Turbo Grill), defrosting, low temperature stabilisation and traditional Eco).
Réglages
+
-
Réglages
+
-
Réglages
+
-
-- : --
OK
-- : --
(1)
(2)
(3)
(4)
(5)
-- : --
OK
-- : --
OK
OK
:
Standard
Memorise
Standard
Memorise
Standard
Memorise
Bio Grill+
Memorise
00
Standard
Mémoriser
Standard
Mémoriser
Standard
Mémoriser
Bio Grill+
Mémoriser
Page 23

23
How does your oven work?
7. Memorization option
If you would like to memorise the programme you have just defined, access this
field and push the button:
The MEMORY function makes it possible to memorise three cooking modes that
you have tried with the Chef function. Thus you no longer have to go to the
trouble of always entering the same data. With identical dishes and quantities
prepared, you will always get the same result.
If you would like to memorise the programme you have just defined, access this
field and push the button.
The screen then offers a choice between recording the parameters in an empty
memory cell or replacing the memorised programme of your choice with the
new parameters.
- Upon completion of cooking and before the oven is used again, it is possible to enter into memory the parameters of the last cooking programme. So it is
not too late to record the cooking mode used after you have tasted your culinary
creation.
How to do it:
- Select the "Memory" function
- Select "last dish". The screen then displays the last
settings related to the most recent cooking programme.
- Press OK to enter these parameters.
- Select "Memorise".
Dernier plat
15:30
20 min
200°C
OK
20 min
200°C
19:30
Memory
Bio Grill+
Memorise
Last dish
Bio Grill+
Mémoriser
OK
Page 24

24
How does your oven work?
- Go to the “Memory” option
- Select the number of the memory cell (1, 2 or 3)
- The screen then indicates:
either an empty memory cell
or a memory cell in use
8. Starting a cooking programme
- Press the button to display the memorised parameters,
press “OK” to accept and start cooking.
Once you have pressed “OK”, your cooking programme
starts immediately or goes into standby if you chose to delay the end of cooking
time.
When cooking begins, the following screen is displayed, telling you that the oven is in rapid heating
mode (Booster). You can monitor the progress of the
rising temperature in the oven by watching the shading in the arrow. The current oven temperature is indicated on the left and the recommended temperature is
displayed on the right.
1
20 min
200°C
OK
20 min
200°C
Remplacer
15:30
20 min
200°C
OK
15:30
120 C 200 C
Memory
Replace
Settings
memorised!
BOOSTER
Page 25

25
How does your oven work?
Once this temperature has been reached, the oven goes into cooking mode and
the following screen is displayed:
Cooking with no specified duration
1) Temperature inside the oven
2) Time
3) Type of cooking selected (animation)
Cooking with defined duration
1) Temperature
2) Time
3) Type of cooking selected (animation)
4) Cooking time
5) Cooking time remaining (flashes)
6) End of cooking time
AT THE END OF A COOKING PROGRAMME:
Cooking with no specified duration:
Turn off the oven when cooking is complete by pressing on the “STOP” touch
control. Confirm the completion of cooking by pressing the button.
Cooking with defined duration:
The oven automatically turns off, beeps for two
minutes and tells you that it is ready.
Press the selector button to stop the beeps.
The “Chef” hopes you enjoy your meal!
200˚C
15:30
20 min
15:50
12 min
200˚C
15:30
C'est prêt !
15:50
Bon appétit !
(1)
(2)
(3)
(4) (5)
(6)
It's
ready!
Enjoy your meal!
Page 26

26
b) “Cooking guide” function
The Cooking Guide function selects for you the appropriate cooking parameters
based on the food being prepared and its weight.
1. Press the selector button. Choose "Cooking
Guide". Enter by pressing the selector button.
2. The oven then suggests different food categories. Turn the selector button to choose from the suggested food categories:
· White meat
· Red meat
· Fish
· Vegetables
· Cakes
· Pies and quiches
When you have made your selection, enter it by pressing the selector button.
3. Then choose the specific dish you are cooking and enter it by pressing the button.
4. Once the food type has been chosen, the oven asks you to enter its
weight ( field) or the type of cooking dish (aluminium, porcelain, etc.)
for cakes, quiches, pies and vegetables or the size of the food (buns).
Enter the weight or dish type and the oven will automatically calculate and display the ideal cooking time.
If you wish, you can change the end of cooking time
by selecting the field (“ ”) and displaying the new
end of cooking time.
Once you have entered by pressing “OK”, the oven
recommends the shelf support height on which you should place your dish.
Réglages
+
-
How does your oven work?
Cooking Guide
White
meat
Chicken
Rotisserie chicken
Terrine
0
Page 27

27
5. Place your dish in the oven on the recommended shelf support level (from 1 at the bottom to 5
at the top).
6. Enter by pressing the button; the oven begins heating
7. The oven beeps and turns off when the
cooking time is over and your screen then indicates
that the dish is ready.
C'est prêt !
15:49
How does your oven work?
Insert the
dish on
level 1
It's ready!
niveau
Page 28

28
Cooking Guide food categories
RECIPE
WHITE MEAT
Duck
Turkey leg
Pheasant
Rabbit
Hare - saddle
Terrine
Goose
Guinea fowl
Pork - loin
Pork - Tenderloin
Chicken >1700g
Rotisserie Chicken
Veal - roast
RED MEAT
Lamb - shoulder
Lamb - saddle
Lamb - leg
Roast beef - medium
Roast beef - rare
FISH
Northern pike
Sea bream
Pollock
Salmon
Trout
Roasted fish
Fish terrine
VEGETABLES
Vegetable aspic
Potatoes au gratin
Lasagne
Endives
Stuffed peppers
Stuffed tomatoes
BAKING
Buns
Cake
Puff pastry
Chocolate cake
Yogurt cake
Genoese cake/Savoie cake
Kouglof
Meringue
Pound cake
Biscuits/cookies
PIES/QUICHES
Short crust
Flaky crust
Rising crust
Quiche
Cheese tart
Fruit torte
Meat pies
Soufflé
Page 29

29
Additional details for cooking with the
Cooking Guide
All the cooking is done WITHOUT preheating the oven.
COOKING PROGRAMME: RED MEAT:
- Lamb - saddle
- Lamb - leg
- Roast beef - medium
- Roast beef - rare
Cooking is done with the TURBO-GRILL element.
You should place the meat on the grid using the grid + drip tray assembly
(without a dish). You can turn the meat half-way through cooking.
COOKING PROGRAMME: CAKES/TARTS:
Choosing the type of baking mould:
Aluminium: Coloured anti-stick moulds and flexible silicone moulds are very
suitable for moist batters (quiches or fruit tarts).
COOKING PROGRAMME: TERRINES
Place the terrine in a double-boiler configuration (set it in a larger dish
that is half-full of boiling water).
REFER TO THE BACK OF THE “COOKING GUIDE” LEAFLET FOR FURTHER
RECOMMENDATIONS.
Page 30

30
Tips and hints
Pizza
To prevent cheese or tomato sauce from dripping in the oven, you can
place a piece of baking paper between the grid and the pizza.
Pies / Quiches:
Avoid glass and porcelain dishes: because they are too thick, they
extend the cooking time and the bottom of the crust is not crispy.
With fruit, the bottom of the tart risks becoming soggy: Just add a few
spoonfuls of fine semolina, crushed biscuit crumbs, almond powder or
tapioca, which will absorb the juice during cooking. With high-water
content or frozen vegetables (leeks, spinach, broccoli or tomatoes) you
can sprinkle a tablespoon of cornmeal.
Fish:
When buying, the odour should be pleasant and not too "fishy".
The body should be firm and rigid and the scales should be firmly stuck
to the skin; the eye should be bright and rounded and gills will appear
shiny and moist.
Beef / Pork / Lamb
It is imperative that you remove all meat from the refrigerator well
before cooking it: cold-hot temperature shocks toughen meat; this way you
will produce a roast beef that is golden outside, red inside and warm in the
middle. Do not salt before cooking: salt absorbs the blood and dries out the
meat. Use spatulas to turn the meat: if you pierce the meat the blood drips
out. Always let meat sit after cooking for 5 to 15 minutes: wrap it in a sheet
of aluminium and place it just inside a warm oven. This allows the blood
drawn toward the outside during cooking to return to the heart and moisten
the roast.
Use earthenware roasting dishes: glass promotes grease splattering. Do not
cook in the enamelled drip tray.
Avoid sticking garlic cloves into the leg of lamb, or else it will lose its blood;
rather slip the garlic between the meat and the bone or cook unpeeled
cloves alongside the lamb and crush them when cooking is complete to
season the sauce; strain it and serve it piping hot in a gravy boat.
How does your oven work?
Page 31

31
How does your oven work?
5. Access to the various oven settings
Press the selector button and turn it until you reach
the “Settings” screen
Enter by pressing the selector button again. You will
access the following settings:
· Time/Date (see p. 11)
· Sound
· Display
· Consumption
· Language
· De Dietrich services
a) Adjusting the sound emitted when the
touch controls are used:
If you wish, you can mute the beeps emitted each time
you enter (by pressing the selector button).
To do this, go to this option and select “Beep on”
(active) or “Beep off” (silent). Enter by pressing “OK”.
b) Adjusting the screen contrast and
setting standby mode:
Select this field to put the display on standby
(energy savings) when it is not in use and to adjust
the contrast of the display screen. Turn the selector
button to the right to increase contrast or to the left
to reduce contrast.
Bip off
Bip on
Settings
Sound
Beep on
Beep off
Display
Contrast
Standby
+
-
Veille
Son
Affichage
Page 32

32
d) Adjusting electricity consumption:
By accessing this screen, you will be able to view the
energy consumption of your oven since the last time
it was reset to zero.
If you have an energy bill arrangement with off-peak
hours, you can consult the corresponding time periods and obtain detailed information about your consumption during peak and
off-peak hours.
To enter or modify this data, hit “OK” then enter the times for peak and
off-peak hours.
End time for “'off-peak hours”'
Start time for ”off-peak hours”
You can enter up to three different periods
How does your oven work?
If you entered off-peak hours, whenever you program a pyrolysis cycle your oven
will automatically suggest that you schedule the cycle to begin cleaning during
the next off-peak period.
If you want to program an immediate pyrolysis cycle, you will
have to cancel the programmed off-peak hours.
e) Changing the language:
By choosing the screen, you can select the
language used to communicate with your oven.
7 languages are available:
· French
· English
· German
· Dutch
· Danish
· Spanish
· Portuguese
English
Deutsch
Consumption
Off-peak hours
Period 1
Language
English
German
French
Langue
Page 33

33
f) De Dietrich services
This option lets you obtain contact information for
the Customer Service and After Sales Service
departments.
Service
consommateur
Minuterie
00:20
15:30
00:00
15:30
This option lets you use the timer function.
This function is accessible as long as the oven is
not in pyrolysis mode.
Enter the desired time
The timer counts down the time as soon as it has been
entered by pressing the selector button.
How does your oven work?
6. Timer function
Services
Customer
Service
Timer
Services
0 825
06 16 04
France
Page 34

34
If your oven emits smoke during preheating or releases large volumes of smoke
during cooking.
If your oven releases an unpleasant odour when cooled after various cooking
applications (lamb, fish, barbecue, etc.).
2. In what situations should pyrolysis be used?
You should not wait until the oven is coated in grease to initiate a
cleaning cycle.
How do you clean the cavity of your oven?
1. Cleaning function
This oven is equipped with a pyrolysis cleaning
function:
- Pyrolysis is a cycle during which the oven cavity is
heated to a very high temperature in order to eliminate soiling from splattering and spills. The smoke
and odours released are destroyed by catalysis.
Pyrolysis is not necessary after each cooking cycle,
but simply when the level of dirtiness warrants it,
which your oven indicates on the control panel home
screen.
As a safety measure, the cleaning operation only
begins after the door has automatically locked. Once
the temperature inside the oven exceeds cooking temperatures, it is impossible
to unlock the door.
Nettoyage
Jeudi
19
Septembre
25°C
RELATIVELY
CLEAN COOKING
APPLICATIONS
DIRTY COOKING
APPLICATIONS
VERY DIRTY
COOKING
APPLICATIONS
Biscuits, vegetables, pastry,
quiches, soufflés
Meats, fish, (in a dish)
stuffed vegetables
Large cuts of meat
on the spit
Splatter-free cooking
Pyrolysis is not warranted
Pyrolysis is warranted after
three cooking cycles
Pyrolysis can be performed
after one cooking application
of this kind if there is a
lot of splattering
Cleaning
Thursday
19
September
Page 35

35
Remove the grids and trays from the oven and clean any major spill
residue.
Select "Cleaning" from the main menu.
a) Select “Pyromax”
· Pyromax is a pyrolysis system with a pre-set
duration: it lasts two hours and allows for thorough,
intensive cleaning of the oven cavity.
To delay the start time, select the end time and
change it by entering the desired end time for the
pyrolysis cycle.
Note: If you entered the information on off-peak
hours and peak hours
(see Settings function), your oven recommends a cleaning cycle during off-peak
hours to save energy. However, you can change this recommendation by changing
the end of pyrolysis time and starting the cleaning cycle immediately if you
choose.
Enter by pressing “OK”
The cleaning cycle begins. Your screen indicates:
- Time (1)
- Total duration (2)
- Time remaining (3)
- Pyrolysis cycle end time (4)
- Locked door (5)
How do you clean the cavity of your oven?
3. How do you program a pyrolysis cycle?
(1)
(2) (3)
(4)
(5)
Pyromax
2 hours
2:00
16:45
17:30
Page 36

36
At the beginning of the cycle, the oven calculates the pyrolysis time based on the
level of dirtiness. This step lasts a few minutes and is represented by
rotating arrow on the screen (1).
The screen indicates:
- Rotating arrows (1)
- Time remaining (2)
- Planned pyrolysis cycle end time (3)
- Time (4)
- Locked door (5)
c) End of pyrolysis
Your oven informs you that the pyrolysis cleaning
cycle is complete
Once the door has been unlocked, your oven
informs you that the cleaning cycle is finished.
Simply remove the ash residue in the cavity with a
damp sponge.
Refroidissement
en cours.
4. Control panel locking (child safety device)
You have the option of preventing access to the oven controls by taking the
following steps:
When the oven is off, hold down the
touch control for a few seconds;
a ”key” will then be displayed on the
screen -> access to the oven controls
is now blocked.
To unlock it, press any touch control, select the “Unlock” field and enter by
pressing the selector button.
The oven controls are once again accessible.
Réglages
+
-
Jeudi
19
Septembre
How do you clean the cavity of your oven?
You cannot lock the oven if you have programmed a cooking
cycle.
Cooling
underway.
Cleaning
finished!
thursday
19
September
17:30
Page 37

37
The lamp is accessible (according to the model):
AAtt tthhee bbaacckk ooff tthhee aapppplliiaannccee ffoorr tthhee 5500 ccmm
mmooddeell ((ffiigguurree 22))::
Bulb information:
- Spherical type, diameter 45 mm,
- 40 W,
- 220/240 V
~~
- E14 base with screw fitting.
To remove the lamp, it is necessary to dismantle the rear cover.
IInnssiiddee tthhee oovveenn ffoorr tthhee 6600 ccmm m
mooddeell ((ffiigg.. 33)) ::
The bulb is located on the ceiling of the oven
cavity.
- Unscrew the bulb anti-clockwise.
Characteristics of bulb :
- 15 W,
- 220/240 V
~~
- 300°C,
- E14 base with screw fitting.
- Change the bulb then put back the lamp
cover and plug the oven back in.
Tips
To make it easier to unscrew the
lamp cover put on a rubber glove
Danger
Unplug the cooker before carrying out
work on the bulb in order to avoid any risks
of electric shocks and only carry out this
work when the appliance is cold.
fig.2
fig.3
Lamp
Lamp
Replacing the oven lamp
Page 38

38
Preserving and maintaining your hob
● Avoid banging pots and pans down on the
hob:
The glass surface is very tough but not unbreakable
● Avoid rubbing with any abrasive or with
base of pans etc. as in time this will deteriorate
the markings on the top of your ceramic hob.
● Avoid putting your pans on the surround or
rim (dependng on model)
● Avoid using pans with rough or dented
bases:
They may hold and transport matter liable to
stain or scratch the hob.
● Place your pan in the middle of the heating
zone.
● Do not leave an empty pan on a heating
zone.
Any such faults, which are not the cause
of breakdowns nor make the hob impossible to use, are not included in the guarantee conditions.
● Do not leave metal cooking utensils, kni-
ves and forks, or metal objects on the hob. They
will get hot if left close to any heating zone that
is in use.
● Do not store
M
AINTENANCE
or
I
NFLAMMABLE
products in the cupboard under your hob.
● Do not heat up a closed can. It may
burst; this recommendation applies to all
methods of cooking.
● Do not heat up a closed can. It may
burst; this recommendation applies to all
methods of cooking. Preheat at maximum tem-
perature when using pans with non-stick inside
surfaces (Teflon type). Use very little or no fat at
all.
The maximum heating position is for boi-
ling and frying only.
TYPE OF STAIN
Minor
Accumulated burnt-on
stains
Rings and traces of limes-
cale
Burnt-on stains following
sugar spillage, melted alumi-
nium or plastic.
Soak the area to be cleaned with hot water, then wipe it.
Clean sponges
Soak the area to be cleaned with hot water, use a special
ceramic hob scraper to remove the worst, finish off with the
rough side of a cleaning sponge, then wipe it clean.
Clean sponges
special ceramic hob
scraper
Apply hot white spirit vinegar on the stain, leave to act
then wipe off with a soft cloth.- Use a commercial cleaner.
Special ceramic hob
cleaner.
- Apply a special ceramic hob cleaner on the surface, preferably one which contains silicone (protective action).
Special ceramic hob
cleaner
WHAT TO DO
ACCESSORIES
EMPLOYED
cre
a
m
o
rd
in
a
ry
sp
o
n
g
e
o
r sp
e
c
ia
l
sp
o
n
g
e
fo
r d
e
lica
te
ite
m
s
It is very easy to clean your hob, especially if you follow these few recommendations:
a
b
ra
siv
e
-b
a
ck
e
d
sp
o
n
g
e
p
o
w
d
e
r
Page 39

39
You have doubts about whether your hob is working correctly .... ......
this does not necessari-
ly mean there is a breakdown. Nevertheless, check the following points
Minor troubleshooting
WHAT SHOULD
YOU DO?
POSSIBLE CAU-
SES
IF YOU REALIZE
THAT
Call the After Sales Service
Check the connection and make sure it
complies with requirements.
This is normal.
The electronic circuit is working badly.
Your hob is connected incorrectly
Your hob is connected incorrectly
The electronics are cooling down
See containers.
The saucepan you use is unsuitable for
induction cooking or its diameter is
under 12 cm. (10 cm on the 160 mm
zone).
Inspect the fuses and the cut-out
switch.
The apparatus is not under power.
There is a power or connection problem.
The hob does not work, another message comes
on
When you switch on, the fuse blows
When you switch on, only one side of the hob
works
The fan keeps going for a few minutes after the hob
has been switched off
After having turned on a heating zone, the keyboard
displays continue to flash.
Clean the hob or remove the object in
question and start cooking again.
- Something has overflowed and or an
object is touching the control panel.
La table s’est arrêtée de fonctionner en cours d’u-
tilisation et elle émet un “BIP” toutes les 10 secondes
environ et un ,ou F7 s’affichent.
The hob does not work. Displays on the keyboard do not come on
A series of little (or F7 ) appears
Electronic circuits have overheated.
See "Fitting your hob".
NOTHING: see chapter Remarks on
connections
The hob is working normallyWhen you switch on, the display lights up
If the slightest break or crack appears in the ceramic glass surface, disconnect the
unit immediately and contact your After Sales Service.
This comes from vibrations made by
energy going from the hob to the pan.
The pans make a noise during cooking
Under high power this phenomenon is
normal with certain types of pans. There
is no danger for the hob.
Use each heating zone for ½ hour
with a pan full of water.
A new apparatus
The hob gives off a smell when first used for
cooking
This is caused by power redistribution
The hob makes a slight clicking
noise.
NOTHING, it is quite normal
Page 40

40
After-sales service
Any maintenance on your equipment should be undertaken by:
- either your dealer,
- or another qualified mechanic who is an authorized agent for the brand appliances.
When making an appointment, state the full reference of your equipment (model, type and
serial number). This information appears on the manufacturer's nameplate attached to your
equipment.
99996644--55337711 -- 0011//0088
DDCCII449999**//**
FFaaggoorrBBrraannddtt SSAASS,, MMaannaaggeemmeenntt ccoommppaannyy –– SSAASS:: ssoocciiaall ccaappiittaall ooff 2200,,000000,,000000 eeuurrooss RRCCSS NNaanntteerrrree 444400 330033 119966..
 Loading...