

Page 1

FR GUIDE D’INSTALLATION ET D’UTILISATION
EN INSTRUCTIONS FOR USE
NL GEBRUIKS - EN INSTALLATIEHANDLEIDING
Réfrigérateur-Congélateur
Fridge-Freezer
Ijskast-Diepvrieskast
Page 2

Contents
1 Safety and the environment
• Safety i nstructions........................... .................... .................... .......... .. .......... ... 33
• Respect in g the en vi ro n men t an d sav in g en ergy...... .................... .................... ... 34
• BIOCARE - a nti -b acterial wall s....... .................... ................... .......... ... .......... ..... 34
2 Description of your appliance
• NO FROST: it s s ig n if i c a nce an d operation............. .................... .................... ..... 36
3 How to carry out your initial installation
• Reversing the direction th e d o ors open................ .................... .................... ..... 37
• Install in g you r ap pliance........... .......... ................... .......... ... .......... .................... 40
• Electric a l connection................... .................... .......... .. .......... .................... ........ 41
4 How to use your refrigerator
• Starting an d a dju s ting the applia nce ...................... ... .......... .................... .......... 42
• Mixed or r e gu l ated c ol d (depending on the m od el)...... .......... .................... ........ 45
• Anti-odo u r s ys te m (d ep en di n g on the model)................... .................... ............. 46
• Preparing f oo d f or the refriger a tor............. .......... .................... .................... ..... 47
• Arrangin g f ood in your ref r ig erator.................. ... ......... .................... .......... ... ..... 47
• Automat ic d ef rosting........... .. .......... .......... ... ......... .................... .................... ... 48
5 How to use your freezer
• Frozen an d de e p-frozen foo d..................... .................... .......... .. .......... ............. 49
• Preparing f oo d f or the refriger a tor............. .......... .................... .................... ..... 47
• Food fre e zi ng gu i de..... ... .......... .................... ................... .................... .......... ... 50
• Arrangin g f ood in your ref r ig erator.................. ... ......... .................... .......... ... ..... 48
• Defrosti ng food......... ..... .. ..... ..... ... ..... .. ..... ... ..... .. ..... ..... .. ..... ... ..... .. ..... ..... ... ..... 53
• Automat ic d ef rosting........... .. .......... .......... ... ......... .................... .................... ... 48
6 Ongoing maintenance of your appliance
• Cleanin g y our appliance.............. ... .......... .......... .. .......... .................... ............... 54
• Changing the light bul b......... .......... ... .......... ................... .................... ............. 54
• Clearit..................................................... ..................................... .......... .......... 54
7 Noises, inconveniences and minor breakdowns
• Normal o pe ra ting noises........... .......... ................... .................... .................... ... 55
• Inconve ni en ce s or minor breakdowns................ ................... .................... ........ 55
EN
This guide to installing and using your fridge-freezer is applicable to several models.
There may be slight differences between your appliance's details and features and
those described here.
As you read through the guide, you will come across the following symbols, to warn you of:
Safety precautions that must be observed
Danger of a gas bursting into flame
An electrical danger
Important informati on and advic e
31
Page 3

Dear Customer,
You have just acqui red a DE DIETRICH fridge-freezer and we would like to thank you.
Our research teams have created this new generation of appliances for you. Their
quality, design, features and techn ological advances make them ex ceptional produ cts,
and reveal our unique know- how.
Your new DE DIETRICH fridge-freezer will blend harmoniously into your kitchen and
will perfectly combine food preservationperforma nce and ease of use. We wanted to
offer you a produ ct of excellence.
In the DE DIETRICH product range, you will also find a wide choice of hobs, ovens,
microwaves, hoods, dishwashers, cookers, freezers that you can coordinate with your
new DE DIETRICH fridge-freezer.
Visit our website www.dedietrich-electromenager.com
where you will find our
latest innovations as well as u sef ul and complementary inf ormati on.
DE DIETRICH
Setting New Values
As part of our commitment to constantly improving our products, we reserve the right to make
changes to them based on technical advances to their technical and functional features and
appearance.
Warning :
Before installing and using your appliance, please carefully read this Guide to
Installation and Use, which will allow you to quickly familiarise yourself with its
operation.
32
Page 4

Safet y i nstr uc t io ns
This appliance is intended for domestic use only. It has been designed for preserving and freezi ng
food.
EN
The following instructions are for your own safety and should be observed without
fail. We can neither be held responsible, nor uphold the guarantee in case of
failure to observe these recommendations, which may lead to material damage or
physical injury.
- This appliance is not intended for use by
persons (including children) with reduced
physical , s ensory or ment al ca pabili ties , or la ck
of experience and knowledge, unless they
have been given supervision or instruction
concerning use of the appliance by a person
responsi bl e for th ei r saf ety.
- Children should be supervised to ensure that
they do not play with the appliance.
- Your appliance must be installed, fixed if
necessary and used in compliance with the
instr uctions in this op erating and ins tallation
instructions manual in order to avoid any
damage and/or danger due to any lack of
stabil ity or fault y in stal lati o n.
If the appliance has been delivered
to your home in a horizontal
position, stand it upright and then
wait 2 hours before plugging it in. A
small amount of oil may have
flowed into the refrigeration circuit,
and you must allow time for this to
flow back towards the motor
before connecting the appliance.
Failure to do so may damage the
appliance.
- If you appliance is fit ted with castors, please
remember that they are only designed to
assist in small movements. Do not use them
for longer journeys.
- Carry out an initial cleaning operation (see
the section on "Installing your appliance")
before connecting your appliance to the
electrical supply. Disconnect your appliance
prior to performing any maintenance operation. Grasp the plug directly, instead of
pulling on the power cable.
- Do not place bottles or jars containing
liquids in the freezer unless they are only twothirds full: freezing causes liquids to expand,
which can cause the container to explode.
- Do not use any other method than those we
recommend in this manual for speeding up
defrosting.
- Do not use electrical equipment inside
compartments designed for preserving
frozen food unless the manufacturer
recommends otherwise.
- Do not let children play with the appliance
and keep your pets well away from it.
- Worn out appliances must be rendered
unusable. Unplug and cut the electric cable
flush with the appliance. Render the door
catch unusable or, better still, remove the
door, so as to ensure that no child or animal
risks being shut inside whilst playing.
- If a problem arises that you are unable to
resolve using the advice given (see the
"Noise, inconveniences, minor breakdowns"
section), please contac t an official after-sales
service or a qualified professi onal.
Your appliance's refrigeration
circuit is filled with isobutane
refrigerant (R600a), a natural, nonpolluting gas that is, however,
inflammable. Ensure that none of
the components in your appliance's
refrigeration circuit have been
damaged during transport or
installation. If you detect any
damage, keep your appliance away
from flames or any type of source
of heat or combustion and ventilate
it location.
33
Page 5

Respec ti ng t he e n vir onme nt and s av ing en er g y
To reduce your appliance’s electrical consuption:
- Install it in a suitable plac e see "Inst allatio n of yo ur applianc e" s ection).
- Leave the door open as little as possible. Do no t place food that is still hot in your refrigerat or or
freezer, particularly in the case of so ups or di shes that release a lot of steam.
- Periodically c heck the door seals and make s ure that the doors close firmly. If they do not, lease
contact our After-sale s servic e.
In compliance with the latest l egislation concerning envir onmental protection, yo ur appliance does
not contain any CFCs. Instead it uses a gas called R600a. The exact type of refrigerant used in
your appliance is also clearly indicated on the identification plate inside your applia nce's refrigerator
section, low down on the left-hand wall.
R600a is a non-polluting gas that does not harm the ozone layer and whose contribution to the
greenhouse effect is virtually zero.
EN
ENVIRONMENTAL PROTECTION
This appliance's packaging material is recyclable. Help recycle it and protect the environment by
dropping it off in the municipal rec eptac les pro vided for this purpos e.
Your appliance also contains a great amount of recyclable material. It is marked with
this label to indicate that in countries that are a members of the European Union the
used appliances should not be mixed with other waste. This way, the appliance recycling
organised by your manufacturer will be done under the best possible conditions,
in compliance with European Directive 2002/96/EC on Waste Electrical and Electronic
Equipment. Contact your town hall or your retailer for the used appliance collect ion points cl osest
to your home.
We thank you doing your part to pro tec t the envir onment.
BIOCARE - anti-bacterial walls
This is a specific coating on the lining of your refrigerator consisting of silver ions, which prevent
bacteria from developing.
The anti-bacterial coati ng does not require any part icular treatment and r emains active throughout
your appliance's operating life.
However, you must clean your appliance regularly. See the section on "Cleaning your appliance".
34
Page 6
Descrip tio n of y our a ppli an ce
Speed Freez er
Shelves
EN
Freez er door shelf
Lighting
Ventilation system*
Vacuum box*
Removable shelves
Vegetable drawer
Butter rack with
glass shutter
Thermostat
Door rack
Anti-bacterial walls
Bottle rack
Plinth
* depending on the model
This guide to installing and
using your fridge-freezer is
applicable to several models.
There may be slight differences between your appliance's
details and features and those
described here.
35
Condenser
Wate r c ollection tank
Motor
Page 7

NO FROST: its si gni fic anc e a nd op eration
This appliance has been designed and manufactured to avoid frost accumulating inside it.
A system automatically melts away any frost and the water produced flows through a small pipe into
the conta ine r provi de d, wher e it eva pora te s away.
EN
You do not need to de-ice the appliance yourself.
36
Page 8
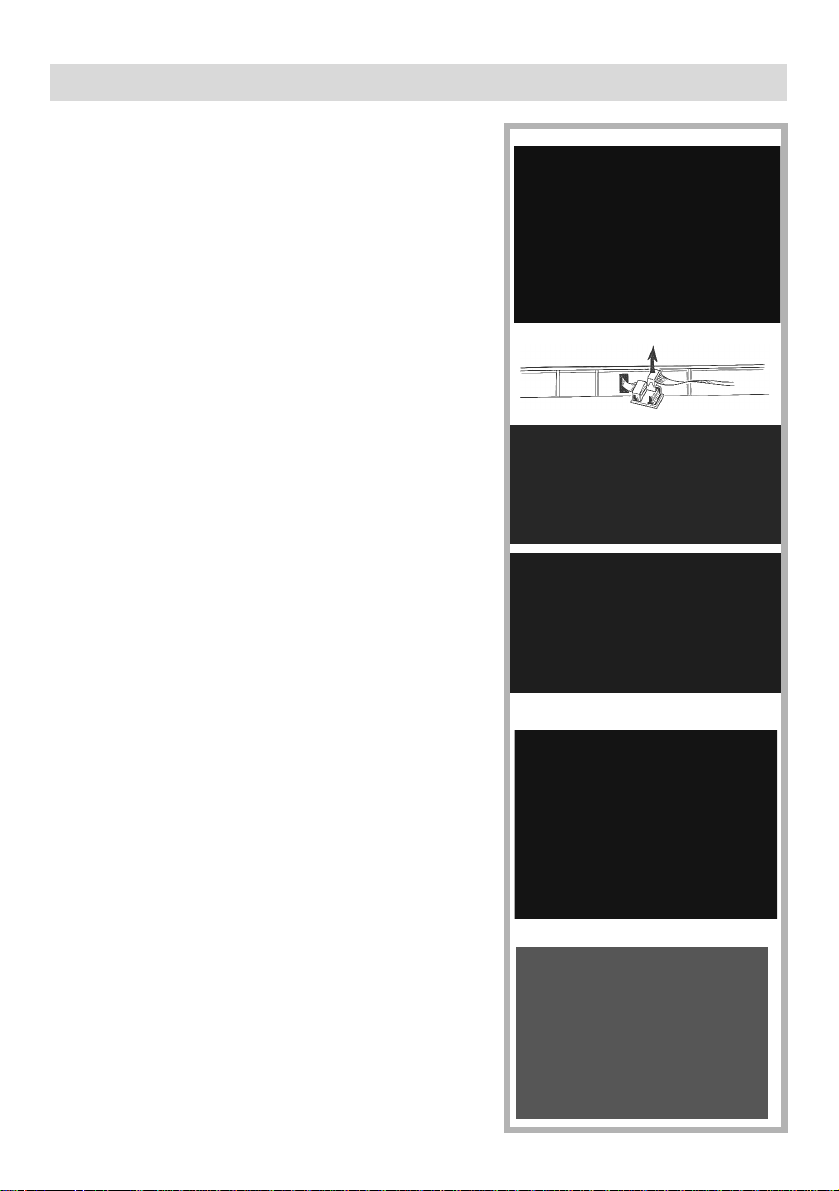
Reve rsi ng th e direction the d oors op en
EN
The doors normally open to the left ( hinges on the right) ;
if you wish to open the door to the right, you can modify
the direction in which it opens by following the instructions below. To ensure correct installation, please scrupulously follow the directions and the sequence of
operations below:
Removing the door
1. Open the freezer's door and remove the covers at the
top A and the back B using a pointed tool (for in-
stance a screwdriver), starting with the side opposite
the hinge (R1).
2. Disc onnect co nnecto r C, remove the cable from its
housing and fasten it with adhesive tape to the appliance's control panel (R2).
3. Close the door again and gently lay the appliance on
its back.
4. Remove the plinth by pulling the lugs D on t he l owe r
part towards you and swivelling the plinth upwards
to disengag e i t (R3). Remove c over E from its housing on the left and insert it in the housing on the
right.
5. Remove the bottom hinge pin and release it from its
housing F; retrieve the plastic distance piece placed
between the door and the hinge on the pin; unscrew
the bottom hinge G and s cr ew the p in in to th e lef thand hole in the hinge (R5).
6. Remove t h e r efrigerator's door (R 5).
7. Unscrew the middle hinge H, taking care not to lose
the plastic distance pieces inse rted o n the pin (R5).
8. Free the freezer's door from the top hinge ( R6).
9. Remove the screw and the covers from the central
section on the left-hand side of the appliance and insert them in the holes on the right-hand side.
Drawing R1
A
B
Drawing R2
C
Drawing R3
D
Drawing R4
E
Drawing R5
H
Drawing R6
A
D
F
G
37
Page 9

Reve rsi ng th e direction the d oors op en
10. Remove the cover s I from t he control panel ( R7).
11. Unscrew and remove the top right-hand hinge L
(R7).
I
12. Unscrew the control panel M and remove it, lifting
the top part from the middle so as to free the three
spikes on the inside. Swivel the control panel downwards and then to the side to free the cabl e (R8).
13. Unscrew the cable guide N and release it from its
housing on the right of the appliance. Remove the
cable from its housing on the right and swivel the cable guide 180°. Insert it in the housing on the left and
screw it in place (R12). Insert the cable in the housings on the left of the crosspiece.
EN
Drawing R7
L
I
Drawing R8
M
Drawing R9
14. Re-install the control panel, fitting the cable and the
cable guide in the housing provided o n the left O. Position the spikes correctly in the central section to the
top and the bottom of the control panel and then
screw the control panel in place (R10).
15. The upper left-hand hinge P is placed inside the
plinth (R11). Remove it and insert it into the housing
on the left on the control panel R. Fasten it with the
two screws (R 12).
16. Insert the covers Q and fasten them onto the control
panel (R12).
17. Thread the cable through the cable guide upwards,
taking care not to twist it and fasten it to the contr ol
panel with adhesive tape.
18. So as not to lose the top right-hand hinge, which you
may need later, store it in the housing in the plinth
(R11).
19. Remove the hole covers S on the left-hand side of
the refrigerator's door (R1 3).
38
N
Drawing R10
O
Drawing R11
P
Drawing R12
R
Q
Q
Page 10

Reve rsi ng th e direction the d oors op en
EN
20. Unscrew the metal door stop T on the right-hand
side of the refr igerator ' s door, turn it ove r and scre w
it to the left-hand side of the freezer's door, aligning
the hole in the plate with the one in the door (R13).
Unscrew the metal door stop T on the right-hand
side of the freezer's door, turn it over and screw it to
the left-hand side of the refrigerator's door, aligning
the hole in the plate with the one in the door (R13).
21. Insert the hole cover S, previously placed on the left-
hand side of the refrigerator's do or on the right-hand
side of the same door (R13).
Fitting the doors
22. Insert the freezer's door in the top hinge ( R14).
23. Insert the middle hinge and screw it in place, check-
ing that the plastic distance pieces are correctly inserted on the pin (R14).
24. Insert the refrigerator's door into the middle hinge
(R14).
25. Insert the bottom hinge into the refrigerator's door,
checking that the plastic distance piece is correctly
inserted on the pin between the hinge and the door.
Screw the hinge in place (R14).
26. Re-install the plinth.
27. Return the appliance to vertical position and open
the freezer's door up to the stop.
28. Remove the adhesive tape to free the cable fro m the
control panel and connect the connector to the bo ard
(R15).
29. Thread the cable through the cable guide upwards,
taking care not to twist it U. Pull it gently to tighten
it and insert it into the labyrinth formed by the ribbing
on the door V,starting from the area close to the
hinge (R16).
30. Use pliers to fit the lower part and the upper part on
the right-hand side of the door's rear cover (R17) .
31. Fasten the rear cove r in plac e B (R 18) .
32. Insert the upper covers A (R18).
Wait two hours before restarting your refrig-
erator.
S
A
Drawing R13
T
Drawing R14
Drawing R15
Drawing R16
U
V
Drawing R17
Drawing R18
A
39
B
Page 11

Installi ng yo ur ap pli anc e
EN
Your appliance must be installed in compliance with the instructions given in this
"Operating and installation instructions manual" in order to keep your food under
optimum conditions and with optimal energy consumption.
- The appliance should be installed in a dry,
well-v enti la ted ro om.
- Avoid balconies, verandas, and patios: the
excessive heat in summer and the cold in
winter could prevent your appliance from
functi oning prop erly , or may ev en dama ge it .
- Do not place your appliance near a heat
source such as an oven or radia tor.
- Your appliance has been designed for optimum functioning at a certain ambient temperature; it is designed for a particular "climate
class". This climate class is clearly indicated on
the identification plate situated on the inside of
your appliance, low down on the left wall.
Outsid e of th is temp erat ure ra nge, the perfo rmance of your appl iance may be reduced .
Climate Class Ambient
temperature
SN +10 °C to +32 °C
SN/ST +10 °C to +38 °C
N +16 °C to +32 °C
T +18 °C to +43 °C
ST +18 °C to +38 °C
- Maintain a minimu m distance between your
appliance and the other units: 3 to 5cm at the
sides, or 10cm if your appliance is close to a
wall, and 10cm above to ensure good circulation of air all around the appliance.
- Positio n th e app li anc e at a su i table di stan ce
from the wa ll using t he spacers pr ovided in the
accessories packet. The spacers should be
mounted on the back of the appliance (see
Drawing).
Once you have installed your appliance, adjust its feet so that it is tilting backwards slightly:
this helps the door to clo se correc tly.
Before placing any food in your appliance, clean it inside and out with a bicarbon-
ate of soda solution (1 dessertspoon of bicarbonate to 4 litres of water). Do not
use alcohol, scouring powder or detergents, which could damage the surfaces.
See the section on "Cleaning your Appliance".
40
Page 12

Electri cal c onn ec ti on
EN
For your own safety, you must comply with the instructions given below.
The electrical installation must comply with Standard NF C *15-100, in particular concerning
the Earth.
Three-core f l ex 3x2.5 mm², 230V single-phas e connected to:
- A 20A single-phase 230V-50Hz supply
- An ELCB and an individual fuse (10 or 16A depending on the model)
We cannot be held responsible for any incident caused by faulty electrical installation.
Recommendations for the electrical installation of your appliance:
- Do not use extension leads, adaptors, or socket strips.
- Always make sure your circuit is earthed.
- The socket must always remain accessible, yet be out of the reach of children.
If you have any doubts, contact your installer.
Your appliance is compliant with European Directives CEE/73/23 (low voltage
directive), CEE/89/336 (electromagnetic compatibility) and CEE/96/57 (energy
efficiency) as well as their modifications.
If the appliance has been delivered to your home in a horizontal position, stand it
upright and then wait 2 hours before plugging it in. A small amount of oil may have
flowed into the refrigeration circuit, and you must allow time for this to flow back
towards the motor before connecting the appliance. Failure to do so may damage
the appliance.
Carry out an initial cleaning operation (see the section on "Installing your appli-
ance") before connecting your appliance to the electrical supply. Disconnect your
appliance prior to performing any maintenance operation. Grasp the plug directly,
instead of pulling on the power cable.
"In case of damage, the supply cord must be replaced by the technical assistance
service or a person with a similar title, in order to prevent any risk."
41
Page 13

Starti ng and a dj us t in g t he ap pl ia nce
selection button
Operation of the electronic
system
The control panel on your appliance's door
contains:
1) LCD screen display
4) “+” button, this serves to:
- To increase the temperature if you are in
"tempe rature s e t ting" mod e.
- Activate a fu nction o n c e selected
EN
2) “>” button
Starting the appliance:
Holding down t his bu tton st arts t he ap plianc e.
Function selection
- The fun cti ons ar e se lec ted by hol di ng do wn
the "> " bu tto n un ti l th e d esir ed fun cti on st a rts
to flash.
- The sequence for selecting the functions is
always t h e same :
1. Star t
2. Set t empe rature
3. Quick chill
4. Quick freeze
3) “-” button, this serves to:
- To reduce the temperature if you are in
"tempe rature se tting" mo de.
- Deactivate a function.
Every time you confirm or deacti-
vate a function a beep sounds.
Setting the temperature
When yo u p ut yo ur a ppl ia nc e into op e ra tio n,
set the refrigerator temperature to a moderate
setting of 5°C.
Setti ng the refri ge rator temperature auto m atically adjust s the set ting for the freezer.
4 hours after starting your appliance or after
any change to the temperature set in the
refrigerator section, check the temperature
"OK" indicator on the screen (see the symbols
table).
- If the indi cator do es not app ear, lowe r the
temperature a little and check the "OK" indicator agai n af ter 4 h our s. R epea t the ope rati on
as many times as required.
- If the "OK" indicator appears on your screen,
your refrigerator's temperature is set correctly.
42
Page 14
Starti ng and a dj us t in g t he ap pl ia nce
EN
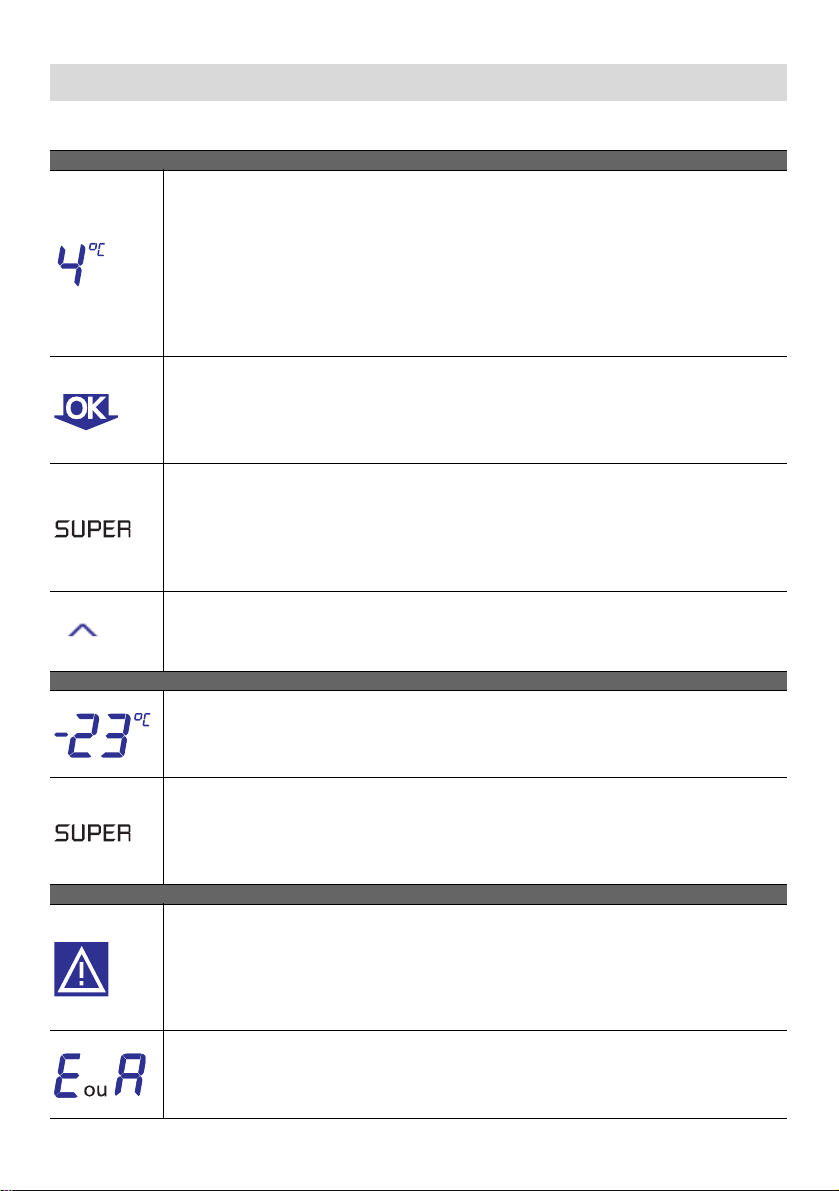
Meaning of the symbols and functions that may appear on your screen
REFRIGERATOR SECTION
Setting the refrigerator's temperature
• Setting to the degree close to 0°C to 8°C.
• After setting the desired temperature, press the ">" button to confirm your
selection.
Stopping the appliance
• When you are setting th e refrigerator tem perature, once you arrive at 8 pressing
down on the "+" button causes the "-" symbol to appear on the screen and a beep
warns you that you are about to enter refrigerator deactivation mode. Pressing the
">" button again confirms deactivation of your appliance and a new beep sounds.
Temperature OK indicator
• The OK indicator appears on your appliance's screen when the temperature in the
coldest area is less than 4°C.This indicates that the temperature is correctly set.
• If the temperature rises, the light goes out and you must set the refrigerator section
again.
Quick Chill function
• This rapidly brings the refrigerator section down to the ideal storage temperature
after it has started up again. If your appliance if equipped with mixed or regulated
cold (see the paragraph on mixed or regulated cold). The Quick Chill function also
activates the fan.
• Manual stop or automatic stop after 6 hours.
Biolyse Function
• Anti-bacteria and anti-odor system.
• For optimum results, the fan must be a ctivated. See chapter “ Mixed or regulated
cold (depending on the model)”.
FREEZER SECTION
Freezer temperature
• The freezer compartment's temperature is set by adjusting the refrigerator's temperature. The most suitable freezer temperature for the refrigerator temperature
selected is set automatically.
Quick Freeze function
• This function enables you to freeze a large quantity of fresh food very quickly
• We recommend that you activate this 24 hours beforehand
• SF appears instead of the temperature when the functi on is activated.
• Manual stop or automatic stop after 52 hours.
ALARMES
Refrigerator door open warning
• An audible beep warns you if you leave the refrigerator's door open for more than
60 seconds.
• At the same time, the warning light comes on.
• Press any button (>/+/-) to switch off the buzzer or close the refrigerator's door
properly; the light remains lit until the door is closed.
• If this signal appears instead of the refrigerator or freezer temperature, it means
that the temperature sensors are probably defective.
• A safety procedure starts automatically to ensure that the appliance can operate but
the Technical Assistance Department must be called.
43
Page 15

Starti ng and a dj us t in g t he ap pl ia nce
ATTENTION
EN
Your refrigerator's internal temperature is strictly dependent on the ambient temperature,
how frequently the appliance's doors are opened and the amount and the temperatu re of the
food you have placed in the refrigerator. You must therefore regularly check the temperature
indicator on your refrigerato r and adjust the temperature setting if necessary.
If the ambient temperature i s very low, we recommend that you leave the Q uick Freeze func-
tion on.
The temperatures that appear on the screen correspond to the requested temperatures and
not the actual temperatures.
Even when the screen is off, there is still mains power to your appliance.
44
Page 16

Mixed or reg ulated cold ( depend ing on th e model) EN
This guide to installing and using
your fridge-freezer is applicable to
several models. Your appliance is
equipped with one or other of these
functions. You can check very
quickly by comparing your refrigerator to the illustrations on this
page.
Your appliance is equipped with a cold air
ventil ation sy st em:
- Mixed cold (A): the fan mixes the air in the
refrig erat or sect ion, pro vid ing grea ter te mper ature homog eneity and avoiding condensation
forming on the glass she lv es.
- Regulated cold (B): a distribution column
directs the air to every level, providing a very
homogeneous temperature and avoiding any
condensation forming on the shelves.
Apart from these everyday advantages,
we recommend that you use the fan:
- When the clim atic conditio ns are extreme
(e.g. a heat wave)
- If you have just placed a large amount of
food in your appli ance 's ref rig erat or sect ion.
A
B
4
3
5
4
3
5
To start the fan:
- Press th e ON butto n (Draw in g C)
- Appliance with electronics: this function is
initia ted by elec tronic sy stem (See the symbols
table in the section "Switching on and
adjust ing the ap pliance") .
The fan does not operate
continuously. When it starts up
depends on the refrigerator's internal temperature. It is therefore
quite normal for the fan not to operate sometimes when the Start
button has been correctly pressed.
C
A. Model wi th mi xe d cold
B. Model with regulated cold
C. Detail of the Start/Stop button
3. Start/Stop button
4. Air suction
5. Air distribution
45
Page 17

Anti-odour sy s tem (d ep endi ng on t he model )
EN
This uses activated carbon to neutralise the
ethylene and therefore increase the storage
life of fru its and vege tables. The cartrid ge lasts
for around 3 mo nths.
On first use:
- Release the cartridge from its support
(drawing R1).
- Remove the plastic film (the instructions are
printe d on the film) (drawing R2).
- Activat e the tim er by pre ssing on the pe llet
(drawing R3).
- Replace the cartridge on its support.
Renewing the cartridge:
- When a red line appears on the timer, you
must change the cartridge (drawing R4).
You can obtain refills:
- From your After-sales Service (contact details
at the end of this booklet).
- from your auth ori ze d Clear it di st ribu to r .
Drawing R1
Drawing R2
Drawing R3
Drawing R4
46
Page 18

Preparing food for the refrigerator
Before placing food in your appliance:
Carefully wrap fresh foods: they will then keep their flavour, colour, humidity content and
freshness. You also avoid the taste of some foods contaminating the taste of others. Only vegetables, fruit and salad vegetabl es can be stored in the vegetable c ompartment without being packed.
Let hot dishes and drinks cool down outside t he appliance .
Remove the cardboard packs from aro und yoghurt po ts.
Check the consume-by dates on the products you have bought. You should not ex ceed thes e.
EN
Arranging food in your refrigerator
The temperature inside your refrigerator is not uniform. Some areas are colder
than others and you must store your food in the appropriate areas according to
their type to ensure that they can be kept safely.
Frozen and deep -frozen
food, ice
Cream desserts, cheese,
yoghurts, crème fraîche,
sauces
47
Eggs, butter
Bottles, milk
Meat, poul try , game and
fresh fish, cook ed m eats
Fresh vegetables, fruit
Page 19

Arranging food in your refrigerator
Leave a space between the food items to allow the air to circulate freely and avoid different
products contaminating each other. D o not put packages and f ood in contac t with th e wall at t he
back of the appliance: this is a particularly cold and damp ar ea of the appliance and water droplets
and frost condense there as part of your ref rig erato r' s normal oper atio n.
EN
"Cold Zone" symbols
The coldest area, indicated by the logo opposite, is designed for delicate, sensitive
and highly perishable food: meat, poultry, fish, cooked meats, prepared dishes,
ready-made salads, egg or cream-based dishes and pastries, fresh pasta, pastry,
pizza/quiches, fresh produce and raw milk cheese, ready-to-use vegetables sold in
plastic bags and, more generally, any fresh product whose consume-by date is linked to its storage
at a temperature of +4°C or below.
Automati c defrosting
The defrosts of your appliance fully automatically. The water created by defrosting flows to a
collection tank situated over the motor. The heat the motor releases evaporates the contents of
this tank.
It is quite normal for droplets of water or frost to appear on the wall at the back
of your refrigerator. This is a particularly cold and damp area in your appliance and
water droplets and frost condense out as part of your appliance's normal
operation. This frost is removed regularly during your refrigerator's automatic
defrosting phases.
48
Page 20

Frozen an d d eep- frozen food
Your domestic appliance enables you to freeze food: it lowers its core temperature rapidly and
you can therefore keep it longer.
Deep-freezing is an industrial process that is quicker and more intense that domestic freezing.
The products you purchase from the shops are deep-frozen.
EN
Biolyse
Thanks to optical energy and its speci al f ilter , the Biolyse System eliminates odors and bacteria in
your refrigerator.
This function is activated through the electro n ic sy stem on the doo r of yo ur refriger ato r.
For maximum effectiveness , the fan m u st b e a ctivated.
Preparing food for freezing
Freezing does not sterilise. It is
therefore important to observe
some simple hygiene rules when
preparing your food for freezing:
wash your hands before you touch
the food and clean the kitchen
tools you have just used before
using them again.
Only freeze fresh, good quality food. Refer to
the table "Food Freezing Guide" to know which
products you can f reeze a nd how long you can
keep t hem .
Blanch fruit and vegetables before freezing
them to pres erve t heir col our , sm ell, tas te and
vitami ns: plunge th em in boiling wa ter for a
few moments.
Divide the food you wish to freeze into small
individual portions corresponding to one meal
each. Small portions freeze quicker at their
core.
Pack the food hermetically so that they do not
lose their flavour or dry up. Use plastic bags,
polyethylene film, aluminium foil or special
freezer conta i ners for this.
If you are using plastic bags, compress them
to eliminate the air before sealing them
hermeti c al ly.
Do not place bottles or jars
containing liquids in the freezer
unless they are only two-thirds
full: freezing causes liquids to
expand, which can cause the
container to explode.
Note on each package:
- The freezing date
- The co nsume-by da te
- The type of food contained
- Th e number of porti ons con tain ed
If you are purcha sing deep- frozen food, pick it
up last when you a re shopping.
Check that:
- Th e pack aging isn' t dama ged
- They are not covered in a layer of frost
(which means that they have partially defrosted)
Pack them in an isothermic bag or in newspaper. T ransport th em quick ly and sto re them
immediately.
Comply with the maximum storage dates
shown on the pack. Your applia nce has a ****
freezer compartment: this enables you to keep
deep-f ro zen food in an optimal mann er .
49
Page 21

Foo d f r eez i ng gui d e
EN
Fresh meat
Product Valid for
Lamb,small pieces 8 months
Roast pork 5 months
Pork ribs 4 months
Boiled beef,roast beef 10 months
Beef steak,entrecotes,in sauce,roast veal 8 months
Veal ste a k s, cu t let s 10 months
Minces meat 4 months
Giblets,offal 3 months
Sausages 2 months
We recommend that you defrost meat completely before cooking it so as to avoid the exterior cooking
quicker than the interior , except in the case of small breadcru mbed items, which can be sautéed directly
over a low to medium heat, and boiled meats.
Farmyard animals
Prepare them plucked/skinned, gutted, cut into pie ces if nec essary, washed and rinsed.
Product Valid for
Duck 4 months
Rabbit 6 months
Boiling fowl 7 months
Goose 4 months
Chicken 10 months
Turkey 6 months
Giblets,offal 3 months
Game
Prepare it plucked/skinned, gutted, cut into pieces if necessary, washed and rinsed.
Product Valid for
Wild duck,woodcock,phe asant 8 months
Hare 6 months
Partridge,quail 8 months
Fish
Product Valid for Preparation
Carp
Pike
Turbot
Salmon
Mackerel
Tench
Trout
Sea bream
2 months Descal e, gut and remo ve the head. Was h, ri nse and freeze
3 months
Descale, gut, remove the head and place in cold salty water for 30 seconds,
rinse and freeze. Sole
50
Page 22

Foo d f r eez i ng gui d e
EN
Cooked food
The length of time you can store cooked dishes reduces if you use bacon or smoked ham to season dishes.
Product Valid for Preparatory
cooking
Sauce with meat j uices
Tomato sauce just-cooked
Minestrone with veg etable s 2 months no pasta
Lasagne 4 months half-cooked
Roasts 2 months just-cooked
Calf’ s l e g 1 months
Meat in sauce 3 months
Stewed game 2 months just-cooked
Boiled fish,grilled/baked fish
Sweet peppers, aube rgi nes,c ourget t es stuf fed with mea t
Sautéed mushrooms with garlic and parsley,ratatouille
Steamed spinach
Pizza 6 months just-cooked
Put them directly on the hob or in the oven without defrosting them.
3 months
2 months half-cooked
half-cooked
half-cooked
Vegetables
We recommend that you blanch the vegetables with steam so that they do not lose their vitamins and
mineral salts in the cooking water. You therefore do not need to wait until they are dry before freezing
them, just until they cool down.
Product Valid for Preparation Blanching time
Asparagus 12months Wash and remove the st rings 2 minutes
Cabbage,cauliflower 6 months Clean an cut into pieces 2 minutes (1)
Artichokes
Beans Shell 3 minutes
Green beans Wash and remov e the end s 4 minutes
Mushrooms Clean 2 minutes (1)
Aubergines Wash and slice 4 minutes (2)
Sweet peppers (3) Wash slice and remove the seeds
Parsley,basil 8 months
Spinach
Mixed vegetabl es fo r
minestrone (céleri, carro ts,
chard,leeks, etc .)
(1) Add a little vinegar or lemon juice to th e cooking water (slightly acid wate r).
(2) Pickle in brine before cooking.
(3) During defrosting, these vegetables reduce to a mush because they contain enormous amounts of water.
We recommend that you defrost them only if you wish to eat them coked.
In general, vegetables are better if they are cooked directly, without being frozen. Reduce the cooking
time, taking into account the blanching time before freezing.
12months
12months
Remove the ex tern al l eav es 6 minutes (1)
Shell and f reeze imm ediately , layi ng them in
a single layer an d then w rapp in g them
Wash
Wash, cut into pi ec es and divid e up into
portions. Do not add potatoes terre: they go
black.
do not blanchPeas,Tomatoes (3)
2 minutes
do not blanch
51
Page 23

Foo d f r eez i ng gui d e
EN
Fruits
Fruit must be covered with sugar or syr up, as app ropri ate. The amo unt of s ugar to use i s around 250g
for 1 kilo of fruit. Syrups are used in varying percentages; these are prepared by boiling sugared
water. The various concentrations are as follows:
- 30% solution, 450g of sugar per litre of water
- 40% solution, 650g of sugar per litre of water
- 50% solution, 800g of sugar per litre of water
So that the fruit's colour does not change, place it in lemon juice before covering it with sugar or pour
lemon juice into the syrup. The receptacles for the fruit to be frozen must remain in the refrigerator for
one hour before being re-inserted into the freezer. The fruit must be completely covered in syrup.
Product Valid for Preparation
Apricots 8 months Wash, pit and cover with 30% syrup
Pineapple
Oranges Peel, sli ce and cove r with 30 % syrup
Cherries Wash, pit and cover with sugar or 30% syrup
Strawberries
Melon Peel, slice , de- see d and cover w ith 30% syrup
Peaches 8 months Peel, pit, sli ce and c over in 50% syrup
Grapefrui t 12 months Peel, slice and cover in 30% syrup
Juice from citrus f rui ts 10 months Press, remove the pi p s and sw eeten to tas te
Plums
Grapes De-seed, wash and cover in sugar or 30% syrup
Bilberries, blackberries,
blackcurrants,raspberries
red currants
10 months
12 months
12 months
10 months Wash, remove the stal k and cover w it h sugar
Peel, slice and cover with 50% syrup
Wash, remove the stal k and cover w it h sugar
Wash, pit and cover in sugar or 50% syrup
Bread
This can be kept for 2 months. Defrost in an oven set to 50°C, switching it on after inserting the bread.
Butter and cheese
Freeze butter and cheese by dividing them up into pieces for weekly consumption.
Butter and hard cheese (e.g. Parmesan) can be kept for 8 months, other cheese 4 months. They must
be defrosted in the refrigerator, keeping an eye on the condensation that forms on these products.
52
Page 24

Arrang i ng f ood i n y our f r ee ze r
Do not put fresh food next to food that has already been frozen to avoid causing the frozen food
to warm up.
EN
Speed Freezer:
This compartment enables you to deep freeze fresh food ver y quickly .
It also proves very useful when storing your shopping.
Additional ice cube container:
Located in the shelf on the inside of the door, this enables you to increase your ice cube storage
capacity.
The maximum weight of food that you can freeze over 24 hours is shown on the
information plate (inside your appliance's refrigerator section near the bottom of
the left-hand wall) under the heading: "CAPACITE DE CONGELATION/ FREEZING
CAPACITY (kg/24h)".
Defrostin g f ood
You can defrost food in five different ways:
- By putting them in your appliance's refrigerator section for several hours
- By leaving them to defrost gently at ambient temperature
- In a conventional oven at a very low temperature (40/50°C)
- In a microwave oven
- By cooking them immediately
Defrosting them in the refrigerator is the sl owest but safest method.
EN
Never refreeze food once it has defrosted, even partially, without cooking it first.
We would advise you not to place any items you have just taken out of the freezer
straight into your mouth (ice cream, ice cubes, etc.): they will be at a very low
temperature and you risk frostbite. Avoid touching frozen or deep-frozen food
with wet hands; you may stick to the food. We recommend that you only defrost
food for immediate use.
Automatic d efrosting of y our f r ee ze r
The defrosting of the freezer part of your machine is completely automatic.
The water resulting from defrosting drai ns int o a reco very tank, loc ated o n the motor.
The heat released by the motor causes the evaporation o f the co ntents of t his tank.
53
Page 25

Ongoing ma int e nan ce o f yo ur app li anc e
EN
Disconnect your appliance prior to
performing any maintenance operation. Grasp the plug directly, instead of pulling on the power cable.
Cleaning your appliance
We recommend that you clean and
disinfect your appliance regularly
for improved hygiene and to keep
your food completely safe.
Remov e all the food from the free zer. Place it
in isother mic bags or wr ap it in newspap er and
store i t in a co ol place.
Clean your appliance inside and out with a
bicarbonate of soda solutio n (1 dessertspoon
of bicarbonate to 4 litres of water). Do not use
alcohol, sc ouri ng po wder or det er gents , wh ich
could damage the surfaces.
Do not use a high-pressure steam
cleaner. The very hot steam could
damage the surfaces and the electrical circuits; you would expose
yourself to a risk of electrocution.
Rinse wi th wate r, dry wit h a clo th.
Periodically check that the drain hole for the
defrosting water is not blocked and clean it
with a stick as shown in the Drawing.
The vegetable compartment is fitted with a
filter for contr olling the leve l of hum idity for
optimum food preservation.
To clean this filter: remove the top of the compartment, remove the lid and then remove the
"K" filter and wa sh it under r unning water. The
slidi ng baske t can be re mov ed as foll ows : pull
the basket out to the stop, lift the front of the
basket and then pull it to wards you.
K
Changing the light bulb
Disconnect your appliance.
Unclip and remove the tr ansparent c o ver.
Replace the bulb with another bulb of the
same model ( 15 WATT ma x.), put the cov er
back in pl ace an d retigh ten it s retai ning scr ew.
Don't forget to clean the condenser from time
to time: this is at the back o f the appli ance
(see the section on "Description of your appliance"). Use a dry paintbrush to do this or, better yet, your vacuum cleaner.
Reconnect your appliance, and adjust the refrigerator's temperature if necessary, as
shown in the secti on on "Adju sting your refrig erator 's te mper atur e ".
Wait 3 or 4 hours before placing the food back
in you r appliance.
Clearit
To keep your appliance in good working order,
we recommend that you use Clearit household
products.
Professional expertise for
the general public
Clearit offers you professional products and
adapted solutions for the daily upkeep of your
househol d and kitc hen applianc es .
You may find them in conventional retail
outlets, along with a complete line of
by-products and consumables.
54
Page 26

Noises, inconveniences or minor breakdowns
EN
Normal operating noises
So that the selected temperature r emains constant, your appli ance regularly switches of f its motor.
The resultant noises are quite normal operating noises. They reduce automatically as soon as your
refrigerator reaches the desir ed temper ature. These noises are as follows:
NOISE CAUSE
Buzzing
Gargling or slight buzzing
Clicks
Slight background noise
Coming from the motor.This buzzing may briefly be louder when
the motor starts.
Coming from circulation of the refrigerant in your refrigerator’s
pipes.
These can always be heard when the thermostat turns the motor
on or off.
If your ap plia nce is fi tted w it h a fan ( dep endi ng o n the mo del) ,t he
air circulating inside your appliance makes a slight background
noise.
Inconveniences or minor breakdowns
Certai n problem s may appe ar when y ou are usi ng your applian ce. Befo re call ing the after- sales
service, use the guide below to see if you can resolve the problem yourself:
PROBLEM ADVICE
- check the adjustement of the feet of your appliance and its
stability.
- check t hat it i s not touc hi ng a wal l.
Unusual noises
The refrigerator does not get
cold enough
Your appliance does not get
cold at all
- check that all the movable parts(trays,racks,etc..)are securely in
place.
- check that the bottles or containers you have placed in your
appliance are no t touc hing eac h o ther.
- ckeck whether the temperature has been set correctly as
indicated in the section "Adjusting your refrigerator’s temperature"
- if you have put a large amount of food in your refrigerator at one
time,ensure that you readjust the thermostat as shown in the
section on "Adjusting your refrigerator’s temperature".
- be careful not to open your appliance’s door too often,and not to
leave it open.
- ckeck w hether the electronic car d is lit.
- chec k that your appl ianc e i s connec ted to the el ec tri cal sup pl y.
- check that the circui t-b reak er f or y our house has not cu t o ut a nd
that the fuse has not blo wn or be en unsc rew ed.
55
Page 27

Noises, inconveniences or minor breakdowns
PROBLEM ADVICE
Frost forms inside your
appliance
The external walls are warm
Drops of water appear on your
appliance’s external wall
Droplets of water or ice forms
on the appliance’s rear wall
Certains foods do not freeze
completely
Droplets stagnate at the back
of the appliance
Frozen meat has white streaks
The door is difficult to open
The light inside the
refrigerator is out
- be careful not to open your appliance’s door too often, and not
to leave it open.
- this is quite normal. It stops c ondensation forming on the outsi de
of your appliance.
- When your home’s heating is not on (for example in spring and
autumn) and the ambient air is humid,some condensation may
form on your appliance’s outside walls. This is not dangerous at all
and your applianc e conti nues to operate qui te corre ctl y.
- this is quite normal. This is a particularly cold and damp area of
the appliance and droplets of water and frost c an form here when
your appliance is operating normally. This frost is regularly
eliminated during yo ur ref ri gera tor s aut omat ic d efr osting cyc les .
- this is quite normal for food that contains a lot of sugar,fat or
alcohol no t to fre eze comple tely and to rem ain par tially s oft (i ce
cream, fruit juice,etc.).
- check that the drain hole is not blocked. If it is, release it with a
stick or a metal wire as shown in the section in "Ongoing
maintenance of your appl ianc e" .
- check that y our mach i ne’s ther m ostat is corr e ctl y se t and is n ot
at too low a temperature (see the section on "Setting your
refrigera tor ’s temp erat ur e" ).
- check that you haven’t kept this meat too long in the freezer
using the table yo u w ill f in d in th e "Fo od Fre ezi ng Gu ide" sec tion.
- it is normal for the door to offer some resistance to being
opened,particularly when you have just shut it: a slight
underpressure forms in your appliance to ensure the door seals
perfectly . All you have to do is wait a few second s before reopening.
- check that your appli anc e is co nnect ed to the el ect rica l sup ply.
- check that the circui t-b reak er f or y our house has not cu t o ut a nd
that the fuse has not blo wn or be en unsc rew ed.
- check that the bulb has not burnt out, and refer to the section
"changing the light bulb".
EN
56
Page 28

Notes
EN
57
Page 29

After sal es serv ice
Any maintenance on your equipment should
be under t aken by:
- either your dealer,
- or another qualified mechanic who is an
author ized age nt for th e brand a ppliances .
When making an appointment, state the full
refere nce of your equip ment (mo del, ty pe and
serial number). This information appears on
the manufacturer's nameplate attached to
your equipment.
EN
Brandt Ap pl ian ces - SAS au ca pi tal d e 4.000.000 euros, RCS Nante rre sous le n 4 40 3 02 347
174.6068.1
58
 Loading...