


9416-095-00/01.09
Thermostat d’ambiance et récepteur mural
réf. 56278
Thermostatd’ambiance programmable et récepteur mural,1 canal,433 MHz
Thermostat d ’ambiance p rogrammable digital, à cycle hebdomadaire et récepteur 1 canal, 433 MHz, 1 contact 16 A AC1, libre de potentiel
FR GB DEIT ES
Ce th ermostat programmable a été conçu pour vous apporter confort et économie d’énergie.
Il permet de programmer et de régulervotre chauffage selon 3 niveaux de température:
•Température con fort : c’est la température que vous souhaitez pendant vos heures de présence.
•Température économique : c’est la tempé rature que vous souhaitez pendant vos absences de courte durée ou pendant la nuit.
•Température hors-gel : c’est la température minimale assurée pendant vos absences prolongées.
Elle protège votre logement des risques du gel.
Ces 3 programmes préenregistrés et son programme libre vont vous permettre jour par jour d’adapter votre chauffage à votre mode de vie.
En parcourant cette notice vous découvrirez comment utiliser les di fférentes fonctions d e votre thermostat programmable.
 Présentation du produit
|
|
|
|
Température |
|
|
Indicateur du |
|
Température |
Témoin d'usure |
|
|
Indicateur |
|||||||||||||||||||||||||||||||||||||
|
|
|
|
économique |
|
|
jour de |
|
|
|
|
ambiante |
|
|
|
des piles |
d’enclenchement |
|||||||||||||||||||||||||||||||||
Température |
|
|
|
|
|
|
|
|
|
|
la semaine |
|
|
|
|
|
|
|
|
|
|
|
|
|
|
|
|
|
|
|
|
|
|
|
|
du chauffage |
||||||||||||||
|
|
|
|
|
|
|
|
|
|
|
|
|
|
|
|
|
|
|
|
|
|
|
|
|
|
|
|
|
|
|
|
|
|
|
|
|
|
|
|
|
|
Sélection |
||||||||
|
|
|
|
|
|
|
|
|
|
|
|
|
|
|
|
|
|
|
|
|
|
|
|
|
|
|
|
|
|
|
|
|
|
|
|
|
|
|
|
|
|
|||||||||
confort |
|
|
|
|
|
|
|
|
|
|
|
|
|
|
|
|
|
|
|
|
|
|
|
|
|
|
|
|
|
|
|
|
|
|
|
|
|
|
|
|
|
|
||||||||
+ |
|
|
|
|
Auto |
Manu |
1 |
|
2 |
3 |
4 |
|
5 |
|
6 |
7 |
|
|
|
|
|
|
|
|
|
|
|
|
|
|
|
|
des modes |
|||||||||||||||||
Touches +/- |
|
|
|
|
|
|
|
|
|
|
|
|
|
|
|
|
|
|
|
|
|
|
|
|
|
|
|
|||||||||||||||||||||||
|
|
|
|
|
|
|
|
|
|
|
|
|
|
|
|
|
|
|
|
|
|
|
|
|
|
|
|
|
|
|
|
|
|
|
|
|
|
|
|
|
|
|
|
|
Absence |
|||||
|
|
|
|
|
|
|
|
|
° c |
|
|
|
|
|
|
|
|
|
|
|
|
|
|
|
|
|
|
|
|
|
|
|
|
|
|
|
|
|
|
|
|
|
|
|||||||
|
|
|
|
|
|
|
|
|
|
|
|
|
|
|
|
|
|
|
|
|
|
|
|
|
|
|
|
|
|
|
|
|
|
|
|
|
|
|
|
|
|
|
|
|||||||
pour les réglages |
|
|
|
|
|
|
|
|
|
° c |
|
|
|
|
|
|
|
|
|
|
|
timer |
|
|
° c |
|
|
|
|
|
|
MODE |
|
|
|
prolongée |
||||||||||||||
|
|
|
|
|
|
|
- |
|
|
|
|
|
|
|
|
|
|
|
|
|
|
|
|
|
|
days |
|
|
|
|
|
|
|
|
|
|
|
|
|
|
|
|
|
|
(vacances) |
|||||
|
|
|
|
|
|
|
|
|
|
|
|
|
|
|
|
|
|
|
|
|
|
|
|
|
|
|
|
|
|
|
|
|
|
|
|
|
|
|
|
|
|
|
||||||||
|
|
|
|
|
|
|
|
|
|
|
|
|
|
|
|
|
|
|
|
|
|
|
|
|
|
|
|
|
|
|
|
|
|
|
|
|
|
|
|
|
|
|||||||||
Indicateur |
|
|
|
|
|
|
|
|
|
|
|
|
|
|
|
|
|
|
|
|
|
|
|
|
|
|
|
|
|
Visualisation |
||||||||||||||||||||
|
0 1 2 |
3 4 |
|
5 6 7 8 9 |
10 11 12 |
13 14 |
15 |
16 17 |
18 19 20 |
21 22 23 |
24 |
|
|
|
|
|
|
|
|
|
des périodes |
|||||||||||||||||||||||||||||
|
|
|
|
|
|
|
|
|
||||||||||||||||||||||||||||||||||||||||||
du niveau |
|
|
|
|
|
|
|
|
|
|
|
|
|
|
|
|
|
|
|
|
|
|
|
|
|
|
|
|
|
|
|
|
|
|
|
|
|
|
|
|
|
confort et |
||||||||
de température |
|
|
|
|
|
|
|
|
|
|
|
|
|
|
|
|
|
|
|
|
|
|
|
|
|
|
|
|
|
|
|
|
|
|
|
|
|
|
|
|
|
|||||||||
|
|
|
|
|
|
|
|
|
|
|
|
|
|
|
|
|
|
|
|
|
|
|
|
|
|
|
|
|
|
|
|
|
|
|
|
|
|
|
|
|
économique |
|||||||||
souhaité |
|
|
|
|
|
|
|
|
|
|
|
|
|
|
|
|
|
|
|
|
|
|
|
|
|
|
|
|
|
|
|
|
|
|
|
|
|
|
|
|
|
|||||||||
confort |
|
|
|
|
|
|
DAYS |
PROG |
|
|
|
|
|
|
|
|
|
|
|
OK |
|
|
|
|
|
|
|
|
|
|
|
|
|
|
|
|
|
|
||||||||||||
ou économique |
|
|
|
|
|
1-7 |
|
|
P1-P4 |
|
|
|
|
|
|
|
|
|
|
|
|
|
|
|
|
|
|
|
|
Res |
|
|
|
|
|
|
|
|||||||||||||
|
|
|
|
|
|
|
|
|
|
|
|
|
|
|
|
|
|
|
|
|
|
|
|
|
|
|
|
|
|
|
|
|
|
|
|
|
|
|
|
|
|
|||||||||
|
|
|
|
|
|
|
|
|
|
|
|
|
|
|
|
|
|
|
|
|
|
|
|
|
|
|
|
|
|
|
|
|
|
|
|
|
|
|
|
|
|
|
|
|
|
|
|
|
|
|
Sélection |
|
|
|
des jours |
|
Choix |
|
du |
|
|
|
|
|
|
|
|
|
|
|
|
|
|
|
|
|
|
|
|
|
|
|
|
|
|
|
|||||||||||||||
|
|
Réglage |
|
|
Réglage |
|
Validation |
|
|
|
|
|
|
|
|
|
|
Mise à zéro |
||||||||||||||||||||||||||||||||
de la semaine |
|
programme |
temp. |
|
|
|
temp. |
|
|
|
|
|
|
|
|
|
|
|
|
|
|
|
|
|
|
|
|
générale |
||||||||||||||||||||||
(1 = lundi, 2 = mardi.. |
|
P1 à P4 |
|
|
confort |
économique |
|
|
|
|
|
|
|
|
|
|
|
|
|
|
|
|
|
|
||||||||||||||||||||||||||
7 = dimanche) |
|
|
|
|
|
|
|
|
|
|
|
|
|
|
|
|
|
|
|
|
|
|
|
|
|
|
|
|
|
|
|
|
|
|
|
|
|
|
|
|
|
|
|
|||||||
|
|
|
|
|
|
|
|
|
|
|
|
|
|
|
|
|
|
|
|
|
|
|
|
|
|
|
|
|
|
|
|
|
|
|
|
|
|
|
|
|
|
|
|
|
|
|
|
|
|
|
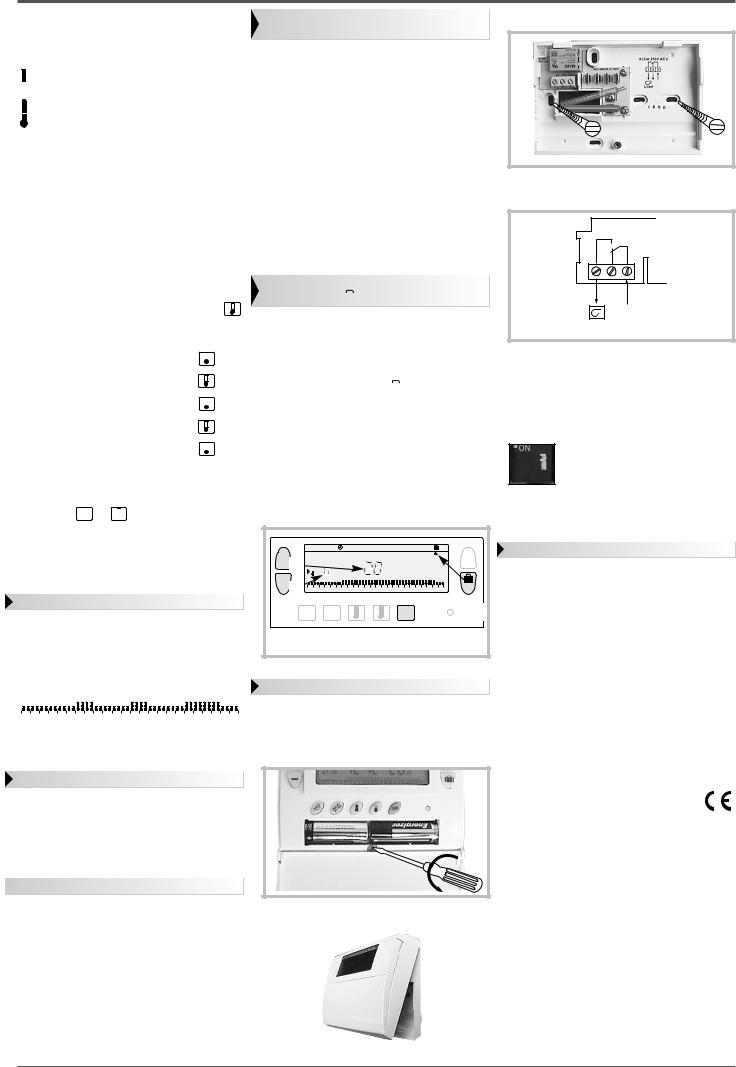
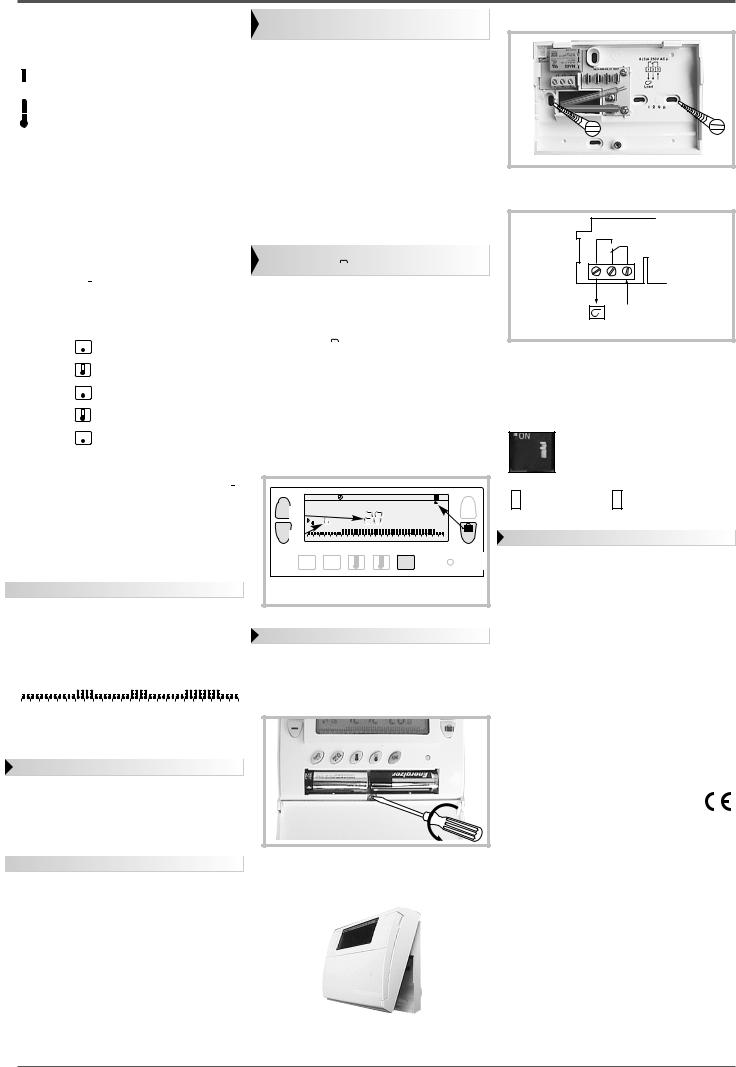
 Mise en place/remplacement des piles
Votre thermostat est pourvu d’un témoin d’usure des piles,veuillez dès son apparition en bas à droite de l’afficheur procéder au remplacement de celles-ci (utilisez 2 piles 1,5 V alcalines LR6 - l’autonomie est d’environ 12 mois).
Lors du remplacement des piles, votre thermostat programmable conserve ses programmes pendant
60 secondes. |
24 |
Avant de commencer la programmation de votre appareil, veuillez abaisser le capot |
|
! et appuyer sur la touche RESET à l’aide d’une pointe de stylo. |
|
|
Res |
|
|
Mise à l’heure et au jour actuel |
|
C’est la première mise en service.Vous venez d’appuyer sur la touche RESET (comme ci-dessus). Les inscriptions 12:00 et le pointeur sous le jour 1 (lundi) clignotent.
Mettez à l ’heure ave c le s touches + ou – (un appui prolongé sur la touche accélèr e le défilement de l’heure).
Réglez le jour actuel par appuissuccessifs sur la |
|
touche |
DAYS1 -7, un poin teur apparaît |
sous le |
jour correspondant (1 = lundi, |
2 = mardi, 3 = mercredi etc.).Validez avec la touche OK.
Pour modifier l’heure ou le jour, appuyez sur la touche MODE jusqu’à l’ap parition du pointeur sous le sigle horloge et procédez comme ci-dessus aux points , et .
+ |
Auto Mau 1 |
6 7 |
|
- |
|
|
|
|
DAYS |
PROG |
OK |
|
1-7 |
P1-P4 |
|
|
|
|
|
MODE
MODE 
Res
 Réglage des températures

Les températures confort et économique sont préréglées : confort = 20°C,
économique = 16°C.
Modification de la température confort
Appuyez sur la touche  .
.
Modifiez la température avec les touches+ ou –.
Validez avec la touche OK.
+
-
A
c
c
DAYS 1-7
PROG |
|
P1-P4 |
|
|
|
|
|
|
OK |
|
|
|
|
MODE
Res
Modification de la températureéconomique
Appuyez sur la touche  .
.
Modifiez la température avec les touches + ou –.
Validez avec la touche OK.
 La programmation PROGP1-P4
Pour programmer votre semaine vous diposez de 4 programmes : P1, P2, P3 qui sont préenregistrés et non modifiables.
P4 : libre, qui vous permet de créer un programme personnalisé et d ifférent pour chaque jour de la semaine.
P1 = Température confort de6h00 à 23h00. Température économique de23h00 à 6h00.
P1 est affecté aux 7 jours de la semaine par défaut. S’il correspond à votre rythme de vie, restez en mode automatique, sinon continuez.
0 |
1 |
2 |
3 |
4 |
5 |
6 |
7 |
8 |
9 |
10 |
11 |
12 |
13 |
14 |
15 |
16 |
17 |
18 |
19 |
20 |
21 |
22 |
23 |
24 |
P2 = Température confort de6h00 à 8h30 et de
16h30 à 23h00.
Température économique de8h30 à 16h30 et de 23h00 à 6h00.
0 |
1 |
2 |
3 |
4 |
5 |
6 |
7 |
8 |
9 |
10 |
11 |
12 |
13 |
14 |
15 |
16 |
17 |
18 |
19 |
20 |
21 |
22 |
23 |
24 |
P3 = Température confort de 6h00 à 8h30 de
11h30 à 13h30 et de 16h30 à 23h00. Température économique de 8h30 à 11h30 de 13h30 à 16h30 et de 23h00 à 6h00.
0 |
1 |
2 |
3 |
4 |
5 |
6 |
7 |
8 |
9 |
10 |
11 |
12 |
13 |
14 |
15 |
16 |
17 |
18 |
19 |
20 |
21 |
22 |
23 |
24 |
P4 = Programme libre vous permettant de créer jusqu’à 12 périodes en température confort et 12 périodes e n te mpérature é conomique e t ce ci pour chaque jour de la semaine.
Sélection d’un programme existant P1, P2, P3 pou r un jour de la semaine (en mo de programmation, toutes les modifications se valident automatiquement).
Exemple P2 pour mercredi:
Appuyez sur la touche PROG P 1-P4 pour passer en mode programmation. Le n° du programme affecté au jour clignote sur la partie droite de l’afficheur.
Appuyez su r l a touche DAYS1- 7 jusqu’à l’apparition du pointeur sous le jour que vous
souhaitez pr ogrammer (d ans no tre e xemple mercredi).
Appuyez sur la touche PROG P1-P4 jusqu’à l’apparition dans la partie droite de l’écran du numéro de programme P2 clignotant.
Appuyez sur la touche OK pour valider, le jour suivant vous est automatiquement proposé.
1
Création d’un programme P4
Un profil de 24 h composé de 48 thermomètres en bas de l ’afficheur vous per met de visualiser aisément la composition de votre programme.
Un thermomètre à moitié vide correspondà  30 minutes en température économique.
Un thermomètre plein correspond à 30 minutes en température confort.
Exemple : création de 3 périodesen température confort pour le vendredi de 6h00 à 8h00, 12h00 à 14h00 et 18h00 à 22h00.
Depuis le mode Auto, appuyez sur la touche
PROG P1-P4.
Appuyez sur la touche DAYS 1-7 jusqu’à l’apparition du pointeur sous le jour quevous
souhaitez pr ogrammer (dans notre exemple vendredi).
Appuyez sur la touche PROG P1-P4 jusqu’à l’apparition dans la partie droite del’écran du n°
de programme P4 clignotant.Votre afficheur indique 0:00 et le premier th ermomètre clignotesur le profil de 24h.
Appuyez plusi eurs fois sur la touche |
|
|
|
|||||
|
|
|
||||||
appui |
||||||||
pour obtenir l ’horaire 6:00 (chaque |
||||||||
bref vous fait progresser de 30 minutes et un |
||||||||
appui prolongé accélère la progression). |
||||||||
• Appuyez plusieurs fo is sur la touche |
|
|
pour |
|||||
|
||||||||
obtenir l’horaire8:00. |
|
|
|
|||||
• Appuyez plusieurs fo is sur la touche |
|
|
pour |
|||||
|
||||||||
obtenir l’horaire12:00. |
|
|
|
|||||
• Appuyez plusieurs fo is sur la touche |
|
|
|
pour |
||||
|
|
|||||||
obtenir l’horaire14:00. |
|
|
|
|||||
• Appuyez plusieurs fo is sur la touche |
|
|
pour |
|||||
|
||||||||
obtenir l’horaire18:00. |
|
|
|
|||||
• Appuyez plusieurs fo is sur la touche |
|
|
|
pour |
||||
|
|
|||||||
obtenir l’horaire22:00. |
|
|
|
|||||
!Si vous avez fait une erreur (ex : 11:30 au lieu de 12:00) utilisez les touches + ou – pour avancer o u re culer et cor riger à l’aide des touches  et
et  .
.
Appuyez sur la touche OK pour valider,le jour suivant vous est automatiquementproposé.
Appuyez sur MODE pour repasser en mode automatique.
Lecture des programmes
Vous pouvez vérifier votre programmation.
Depuis le mode Auto appuyez sur la touche
PROG P1-P4.
Avec la to uche DAYS 1-7 sélectionnez le jour de 1 à 7 et vérifiez votre programme sur le profil de 24h en bas de l’afficheur (exemple ci-dessous).
0 1 2 3 4 5 6 7 8 9 10 11 12 13 14 15 16 17 18 19 20 21 22 23 24
Appuyez sur MODE pour repasser en mode automatique.
Mode automatique Auto
Le passage en mode automa tique se fait en appuyant sur la touche MODE jusqu’à l’apparition du pointeur sous Auto.
En mode automatique votre thermostat s’adapte à vo tre rythm e de vie en r éalisant le ou les programmes que vous avez choisi(s).
 Mode manuel Manu
Le mode manuel transforme votre appareil en un simple t hermostat. Il vous pe rmet de m aintenir une température constante dans votre logement (réglable de 5°C à 30°C).
Appuyez s ur la touche MODE pour positionner le pointeur sous Manu.
Appuyez sur + ou – pour régler latempérature
souhaitée (exemple 22,5 °C). |
Pour qu itter |
le mode Manu, appuyez sur |
MODE et |
positionnez le pointeur sous Auto.
Modification temporaire de la température
En mode automatique, cette fonction très pratique vous permet de modifier temporairement la température ambiante.
Pour augmenter la température
•appuyez sur la touche + (plusieurs appuis si nécessaire).
Pour abaisser la température
• appuyez sur l a touche – (plusieurs appuis si nécessaire).
L’indicateur du niveau de température en cours (confort o u éco nomique) se met à clignoter. Cette modification prendra fin lors du prochain changement de température programmée.
Pour re venir au programme initial, appuyez sur MODE et replacez le pointeur sous Auto. L’arrêt d u clignotement de l’indicateur du niveau de température en cours (confort ou économique) marque la fin de la modification temporaire.
Mode absence prolongée (vacances) 


Ce mode met votre logement à l’abri des risques du gel en maintenant une température minimum réglable dans votre logement durant vos absences (de 1 à 99 jou rs).Vouspou vez programmer la durée de votre absence pour prévoir la remontée en température de votre logement à votre retour.
Appuyez sur la touche 

 .
.
Réglez la durée de votre absence en jour (de 1 à 99 jours) avec les touches + et – (la journée en cours compte pour 1).
Validez avec la touche OK.
Réglez l e ni veau de température souhaité pendant votre absence avec les touches + et
–.
Validez avec la touche OK, restez dans ce mode. Pour annuler et revenir en mode automatique appuyez sur MODE.
Fixez le socle au mur et raccordez l’appareil.
Raccordez le thermostat selon le schéma cidessous.
1 2 3
Borne N° 1 = sortie chauffage
Si votre chaudière possède une entrée thermostat,
supprimez le pontage |
reliant l es 2 bo |
rnes |
thermostat et raccordez les bornes 1 et |
3 de |
|
votre thermostat programmable aux 2 bornes |
||
d’entrée thermostat de |
la chaudière (le sens de |
|
raccordement est indifférent). |
|
|
Réglages éventuels
Fonction anti-blocage de la pompe de circulation (enclenchement d e l a pompe durant 1 minute toutes les 24 heures).
|
Arrêt fonction |
|
Marche fonction |
■ |
|
||
|
antiblocage |
■ |
antiblocage |
+ |
Auto Manu |
1 |
2 |
3 |
4 5 |
6 7 |
|
|
Caractéristiques techniques |
||||||
|
|
|
|
|
|
||||||||||
°c |
|
|
|
|
days |
|
|
MODE |
Plage de réglage de la T°C confort : |
||||||
- |
|
0 1 2 |
3 4 5 6 |
7 8 9 |
10 |
11 12 |
13 14 15 16 17 |
18 19 20 21 22 |
23 24 |
|
|
|
|
+ 5°C à + 30°C |
|
|
|
|
|
|
|
|
|
|
Plage de réglage de la T°C réduite : |
||||||
|
|
|
|
|
|
|
|
|
|
|
|
|
+ 5°C à + 30°C |
||
DAYS |
PROG |
|
|
|
OK |
|
|
|
|
|
|||||
|
|
|
|
Plage de réglage de la T°C vacances : |
|||||||||||
|
1-7 |
P1-P4 |
|
|
|
|
|||||||||
|
|
|
|
|
|
|
|
|
|
Res |
|||||
|
|
|
|
|
|
|
|
|
|
|
|
|
+ 5°C à + 30°C |
||
|
|
|
|
|
|
|
|
|
Plage d’affichage de la T°C ambiante : |
||||||
|
|
|
|
|
|
|
|
|
|
||||||
|
|
|
|
|
|
|
|
|
|
|
|
|
|
+ 0°C à + 40°C |
|
|
|
|
|
|
|
|
|
|
|
|
Différentiel statique : |
|
|
< 0,3 degré |
|
Guide de l’installateur |
|
|
Alimentation : |
2 piles alcalines type LR6 |
|||||||||||
|
|
Pouvoir de coupure : 1 RT - 8 (3) A/230 VAC |
|||||||||||||
Votre thermostat programmable doit être installé à |
Température de fonctionnement : 0°C à + 50°C |
||||||||||||||
Température de stockage : |
– 10°C à + 65°C |
||||||||||||||
environ 1,50 m du sol, sur un mur intérieur,à l’abri |
|||||||||||||||
Hygrométrie : |
|
|
85 % max à + 20°C |
||||||||||||
du rayonnement solaire direct et de toute source de |
|
|
|||||||||||||
Degré de protection : |
|
IP30 |
|||||||||||||
chaleur,telle que téléviseur,lampe, courant d’air, etc. |
|
||||||||||||||
Abaissez le capot, dévissez la vis. |
|
|
Classe d’isolation : |
|
II (normes EN 60730) |
||||||||||
|
|
Raccordement : |
|
|
par bornier à vis |
||||||||||
|
|
|
|
|
|
|
|
|
|
|
|
|
|||
|
|
|
|
|
|
|
|
|
|
|
Made in France |
|
|
jusqu’à 2,5 mm2 |
|
|
|
|
|
|
|
|
|
|
|
|
|
|
|
||
|
|
|
|
|
|
|
|
|
|
|
Utilisable partout en Europe et en Suisse |
||||
Débrochez délicatement la face avant.
|
|
|
|
2

Récepteur mural
réf. 56278
Récepteurmural 1 canal, 433 MHz, 1 contact16 A AC1
Récepteur 1 canal 433 MHz, 1 contact 16 A AC1, libre de potentiel
Le récepteur radio est conçu pour fonctionner avec des t hermostats et t hermostats d’ambiance programmables afin de piloter une chaudière ou un radiateur électrique.
FR GB DEIT ES
 Présentation du produit
Bouton poussoir de configurationet de forçage.
Témoin de mise sous tension e t de codage. Voyant allumé = le produit est alimenté.
Ce voyant cl ignote l ors des opérations de codage.
Témoin de fonctionnement.
Ce voya nt est a llumé lo rsque le contact de sortie du récepteur est fermé = ON.
 Forçage
La co mmande manuelle est disponible sur ce produit.
•Appuyez brièvement sur le bouton poussoir du récepteur (appui < 3 s.).
Chaque appui bref inverse l’état de la sortie.
!La commande radio reste prioritaire.
!L’ensemble émetteur + récepteur est codé en usine, il estdonc immédiatement fonctionnel.
 Configuration
Pour associer un émetteur au récepteur:
•Appuyez pendant plus de 3 secondes sur le bouton poussoir du récepteur.
•Le voyant OK clignote, relâchez latouche. Vous êtes en mode configuration.
•Appuyez pendant 3 secondessur le boutonRESET du thermostat.
•Le voya nt OK du récepteur s'arrête de clignoter au bout de 5 secondes environ.
Le lien émetteur/récepteur est établi.
 Que faire si ?
• Le ch auffage ne se met pas en marche :
-le récepteur n’est pas alimenté : (voyant OK éteint).Vérifiezle fusible et le disjoncteur.
•Le récepteur e st h ors d e p ortée d e l’émetteur :
-rapprochez-vous suffisamment du récepteur.
•Le récepteur ne reconnaît pas le code de l’émetteur:
-reconfigurez le récepteur.
•L'application ne se met pas en marche ou ne s’arrête pas :
-le récepteur ou l'émetteur est dans une zone perturbée par des émissions d'ondes (radio amateur, télévision, borne rése au GSM etc.) : déplacez le récepteur ou l'émetteur hors de la zone perturbée.
Si le problème persiste contactez votre électricien.
 Caractéristiques techniques
 Mise à zéro
Pour effacer tous les liens émetteur/récepteur:
• Appuyez penda nt plus de 10 secondes sur le bouton poussoir du récepteur.
•Le v oyant OK clignote lentement puis plus rapidement.
•Ré-appuyez pendant 3 secondes sur le bouton poussoir du récepteur.
•Le voyantOK arrête de clignoter,tous les liens sont effacés. Le récepteurretourne en mode auto.
Alimentation : |
230V +10 % à -15 % |
|
Charge minimale: |
12V 100 mA |
|
Sortie : |
1 contact inverseur libre de potentiel |
|
Pouvoir de coupure : |
AC1 : 16 A 250 V |
|
|
|
|
|
|
Inductif : 3 A (cos ϕ = 0,6) |
Fréquence radio : |
433.92 MHz |
|
Indice de protection : |
IP43 |
|
Classe d’isolation : |
II |
|
Tenue aux chocs : |
IK04 |
|
T° de fonctionnement : |
-10°C à +60°C |
|
T° de stockage : |
-20°C à +70°C |
|
Raccordement |
|
|
|
Capacité souple : 0,5 à 1,5 mm2 |
|
|
Capacité rigide : 0,5 à 2,5 mm2 |
|
Dimensions : |
|
130 x 60 x 27 mm |
Hygrométrie : |
90% max. à20°C |
|
Receiver class : |
2 |
|
 Installation
!Avant toute intervention, c oupez le courant. Le schéma de c âblage ne représente pas les protections. L’installation doit être réalisée par un professionnel dans le respect des normes en vigueur.
Pour faciliter son installation, le kit est livré avec un câble souple 4 fils de 1,5 mm2, longueur 1,20 m (non raccordé).
Pour le raccordement du récepteur HF, nous vous conseillons d’utiliser ce câble, en respectant le code couleur suivant :
brun= phase bleu = neutre
gris }
noir = liaison vers la chaudière
L |
|
|
|
|
N |
|
|
|
|
|
|
|
L |
N |
5 |
4 |
31 |
2 |
|
Pour convecteurs sans régulation fil pilote
L |
|
|
|
|
N |
|
|
|
|
|
|
|
LN |
|
5 |
4 |
3 |
2 |
1 |
Made in France
Utilisable partout en Europe et en Suisse 
3
Déclaration de Conformité 


 Declaration of Conformity
Fabricant |
.De. . . . . .Dietrich. Thermique. . . . . . . . . . . . . . . . . . . . . . . . . . . . . . . . . . . . . . . . . . . . . . . . . . . . . . . . . . . . . . . . . . . . . . . . . . . . . . . . . . . . . . . . . . . . . . . . . . . |
||
Manufacturer |
57 rue de la Gare |
||
|
|||
|
. . . . . . . . . . . . . . . . . . . . . . . . . . . . . . . . . . . . . . . . . . . . . . . . . . . . . . . . . . . . . . . . . . . . . . . . . . . . . . . . . . . . . . . . . . . . . . . . . . . . . . . . . . . |
||
|
F - 67570 Mertzwiller |
||
|
. . . . . . . . . . . . . . . . . . . . . . . . . . . . . . . . . . . . . . . . . . . . . . . . . . . . . . . . . . . . . . . . . . . . . . . . . . . . . . . . . . . . . . . . . . . . . . . . . . . . . . . . . . . |
||
Marque |
|
|
|
|
|
|
|
Brand |
.AD248 |
||
Produit(s) |
|||
Product(s) |
AD248 |
||
|
|||
|
. . . . . . . . . . . . . . . . . . . . . . . . . . . . . . . . . . . . . . . . . . . . . . . . . . . . . . . . . . . . . . . . . . . . . . . . . . . . . . . . . . . . . . . . . . . . . . . . . . . . . . . . . . . |
||
|
. . . . . . . . . . . . . . . . . . . . . . . . . . . . . . . . . . . . . . . . . . . . . . . . . . . . . . . . . . . . . . . . . . . . . . . . . . . . . . . . . . . . . . . . . . . . . . . . . . . . . . . . . . . |
||
Nous déclarons, sous notre seule responsabilité, que les pr oduits auxquels se réfèrent la présente décla ration sont conformes aux exigeances essentielles des directives européennes suivantes:
We declare, under our sole responsibility, that the products related to this declaration are in compliance with the essential requirements of the following European Directives:
Année d’apposition du marquage
Affixing of the 
 -marking:
0 9
Directive R&TTE 1999/5/EC du 09.03.1999
. . . . . . . . . . . . . . . . . . . . . . . . . . . . . . . . . . . . . . . . . . . . . . . . . . . . . . . . . . . . . . . . . . . . . . . . . . . . . . . . . . . . . . . . . . . . . . . . . . . . . . . . . . .
R&TTE directive 1999/5/EC from 09.03.1999
. . . . . . . . . . . . . . . . . . . . . . . . . . . . . . . . . . . . . . . . . . . . . . . . . . . . . . . . . . . . . . . . . . . . . . . . . . . . . . . . . . . . . . . . . . . . . . . . . . . . . . . . . . .
. . . . . . . . . . . . . . . . . . . . . . . . . . . . . . . . . . . . . . . . . . . . . . . . . . . . . . . . . . . . . . . . . . . . . . . . . . . . . . . . . . . . . . . . . . . . . . . . . . . . . . . . . . .
. . . . . . . . . . . . . . . . . . . . . . . . . . . . . . . . . . . . . . . . . . . . . . . . . . . . . . . . . . . . . . . . . . . . . . . . . . . . . . . . . . . . . . . . . . . . . . . . . . . . . . . . . . .
. . . . . . . . . . . . . . . . . . . . . . . . . . . . . . . . . . . . . . . . . . . . . . . . . . . . . . . . . . . . . . . . . . . . . . . . . . . . . . . . . . . . . . . . . . . . . . . . . . . . . . . . . . .
. . . . . . . . . . . . . . . . . . . . . . . . . . . . . . . . . . . . . . . . . . . . . . . . . . . . . . . . . . . . . . . . . . . . . . . . . . . . . . . . . . . . . . . . . . . . . . . . . . . . . . . . . . .
. . . . . . . . . . . . . . . . . . . . . . . . . . . . . . . . . . . . . . . . . . . . . . . . . . . . . . . . . . . . . . . . . . . . . . . . . . . . . . . . . . . . . . . . . . . . . . . . . . . . . . . . . . .
. . . . . . . . . . . . . . . . . . . . . . . . . . . . . . . . . . . . . . . . . . . . . . . . . . . . . . . . . . . . . . . . . . . . . . . . . . . . . . . . . . . . . . . . . . . . . . . . . . . . . . . . . . .
Conformément aux normes européennes harmonisées suivantes : in compliance with the following harmonised European Standards:
EN 300220-1, EN 300220-3, EN301489-3,
. . . . . . . . . . . . . . . . . . . . . . . . . . . . . . . . . . . . . . . . . . . . . . . . . . . . . . . . . . . . . . . . . . . . . . . . . . . . . . . . . . . . . . . . . . . . . . . . . . . . . . . . . . .
EN60669-1, EN60669-2-1, NFEN 60730-1, NFEN 60730-2-9
. . . . . . . . . . . . . . . . . . . . . . . . . . . . . . . . . . . . . . . . . . . . . . . . . . . . . . . . . . . . . . . . . . . . . . . . . . . . . . . . . . . . . . . . . . . . . . . . . . . . . . . . . . .
Ces produits peuvent être utilisés dans toute l’UE, EEA et la Suisse
These products can be used in all EU, EEA countries and Switzerland.
Mertzwiller, |
Claude FREYD |
le 03 mars (March) 2009 |
Responsable Qualité/Quality Manager |
4

9416-095-00/01.09
Clock the rmostat and Wall-mounting receiver
ref. 56278
Programmable clock thermostat and 1 channel433 MHz receiver
Digital programmable clock thermostat, weekly cycle and 1 channel 433 MHz receiver,1 contact 16A AC1, free of potential
FR GB DEIT ES
Thermostat has been designed to offer you comfort and en ergy sa vings. It allows you to program and adjust you r heating according to 3 temperature levels:
•Comfort temperature: this is the temperature for your hours of presence.
•Reduced temperature: this is the temperature for your brief absences or during the night.
•Frost-protection temperature: this is th e minimum temperature for long absences. It protects your dwelling from the risk of frost.
These 3 prerecorded programs and a blank program will allow you to adapt your heating each day to your life style.
This instruction leaflet introduces you to the di fferent functions of thermostat.
 Product presentation
|
|
|
|
|
Reduced |
|
|
|
|
Pointer |
|
Ambiante |
|
Warning light |
Heating |
|||||||||||||||||||||||||||||||||
|
|
|
|
temperature |
|
|
|
indicating day temperature |
|
to indicate |
start-up |
|||||||||||||||||||||||||||||||||||||
Comfort |
|
|
|
|
|
|
|
|
|
|
of the week |
|
|
|
|
|
|
|
|
|
battery wear |
indicator |
||||||||||||||||||||||||||
|
|
|
|
|
|
|
|
|
|
|
|
|
|
|
|
|
|
|
|
|
|
|
|
|
|
|
|
|
|
|
|
|
|
|
|
|
|
|
|
Mode |
||||||||
|
|
|
|
|
|
|
|
|
|
|
|
|
|
|
|
|
|
|
|
|
|
|
|
|
|
|
|
|
|
|
|
|
|
|
|
|
|
|
|
|||||||||
temperature |
|
|
|
|
|
|
|
|
|
|
|
|
|
|
|
|
|
|
|
|
|
|
|
|
|
|
|
|
|
|
|
|
|
|
|
|
|
|
|
|
||||||||
+ |
|
|
|
|
Auto Manu |
1 |
|
2 |
3 |
4 |
|
5 |
|
6 |
7 |
|
|
|
|
|
|
|
|
|
|
|
|
|
|
|
|
selection |
||||||||||||||||
+/– buttons for |
|
|
|
|
|
|
|
|
|
|
|
|
|
|
|
|
|
|
|
|
|
|
|
|
|
|
||||||||||||||||||||||
|
|
|
|
|
|
|
|
|
|
|
|
|
|
|
|
|
|
|
|
|
|
|
|
|
|
|
|
|
|
|
|
|
|
|
|
|
|
|
|
|
|
Prolonged |
||||||
|
|
|
|
|
|
|
|
° c |
|
|
|
|
|
|
|
|
|
|
|
|
|
|
|
|
|
|
|
|
|
|
|
|
|
|
|
|
|
|
|
|
|
|||||||
|
|
|
|
|
|
|
|
|
|
|
|
|
|
|
|
|
|
|
|
|
|
|
|
|
|
|
|
|
|
|
|
|
|
|
|
|
|
|
|
|
||||||||
|
|
|
|
|
|
|
|
|
|
|
|
|
|
|
|
|
|
|
|
|
|
|
|
|
|
|
|
|
|
|
|
|
|
|
|
|
|
|
|
|
||||||||
adjusting settings |
|
|
|
|
|
|
|
|
° c |
|
|
|
|
|
|
|
|
|
|
timer |
|
|
° c |
|
|
|
|
|
|
MODE |
|
|
|
absence |
||||||||||||||
|
|
|
|
|
|
|
- |
|
|
|
|
|
|
|
|
|
|
|
|
|
|
|
|
days |
|
|
|
|
|
|
|
|
|
|
|
|
|
|
|
|
|
|
(holidays) |
|||||
|
|
|
|
|
|
|
|
|
|
|
|
|
|
|
|
|
|
|
|
|
|
|
|
|
|
|
|
|
|
|
|
|
|
|
|
|
|
|
|
|
||||||||
|
|
|
|
|
|
|
|
|
|
|
|
|
|
|
|
|
|
|
|
|
|
|
|
|
|
|
|
|
|
|
|
|
|
|
|
|
|
|
|
|||||||||
|
|
|
|
|
|
|
|
|
|
|
|
|
|
|
|
|
|
|
|
|
|
|
|
|
|
|
|
|
|
|
|
|
|
|
Viewing of |
|||||||||||||
|
|
|
|
|
|
|
|
0 1 2 |
3 4 |
5 |
6 7 8 9 |
10 |
|
11 12 |
13 14 |
15 |
16 17 |
18 19 20 |
21 22 23 |
24 |
|
|
|
|
|
|
|
|
||||||||||||||||||||
Indicator for |
|
|
|
|
|
|
|
|
|
|
|
|
|
|
|
|
|
|
|
|
|
|
|
|
|
|
|
|
|
|
|
|
|
|
|
|
|
|
|
comfort and |
||||||||
|
|
|
|
|
|
|
|
|
|
|
|
|
|
|
|
|
|
|
|
|
|
|
|
|
|
|
|
|
|
|
|
|
|
|
|
|
|
|
Reduced |
|||||||||
|
|
|
|
|
|
|
|
|
|
|
|
|
|
|
|
|
|
|
|
|
|
|
|
|
|
|
|
|
|
|
|
|
|
|
|
|
|
|
||||||||||
current |
|
|
|
|
|
|
|
|
|
|
|
|
|
|
|
|
|
|
|
|
|
|
|
|
|
|
|
|
|
|
|
|
|
|
|
|
|
|
|
period |
||||||||
|
|
|
|
|
|
|
|
|
|
|
|
|
|
|
|
|
|
|
|
|
OK |
|
|
|
|
|
|
|
|
|
|
|
|
|
|
|||||||||||||
temperature level |
|
|
DAYS |
PROG |
|
|
|
|
|
|
|
|
|
|
|
|
|
|
|
|
|
|
|
|
|
|
|
|
|
|
|
|||||||||||||||||
Comfort |
|
|
|
|
|
|
1-7 |
|
P1-P4 |
|
|
|
|
|
|
|
|
|
|
|
|
|
|
|
|
|
|
|
Res |
|
|
|
|
|
||||||||||||||
|
|
|
|
|
|
|
|
|
|
|
|
|
|
|
|
|
|
|
|
|
|
|
|
|
|
|
|
|
|
|
|
|
|
|||||||||||||||
or Reduced |
|
|
|
|
|
|
|
|
|
|
|
|
|
|
|
|
|
|
|
|
|
|
|
|
|
|
|
|
|
|
|
|
|
|
||||||||||||||
|
|
|
|
|
|
|
|
|
|
|
|
|
|
|
|
|
|
|
|
|
|
|
|
|
|
|
|
|
|
|
|
|
|
|
|
|
|
|
|
|
|
|||||||
|
|
|
|
|
|
|
|
|
|
|
|
|
|
|
|
|
|
|
|
|
|
|
|
|
|
|
|
|
|
|
|
|
|
|
|
|
|
|
|
|
|
|||||||
Days of |
|
the |
|
|
|
|
|
|
|
|
|
|
|
|
|
|
|
|
|
|
|
|
|
|
|
|
|
|
|
|
|
|
|
|
|
|
|
|||||||||||
|
|
|
P1 to P4 |
|
Comfort |
|
|
Reduced |
|
Validation |
|
|
|
|
|
|
|
|
|
|
|
Reset |
||||||||||||||||||||||||||
week selection |
|
programme temperature |
temperature |
|
|
|
|
|
|
|
|
|
|
|
|
|
|
|
|
|
|
|
|
|||||||||||||||||||||||||
(1=Monday, 2=Tuesday.... |
|
selection |
|
|
|
setting |
|
|
setting |
|
|
|
|
|
|
|
|
|
|
|
|
|
|
|
|
|
|
|
|
|
|
|||||||||||||||||
7=Sunday |
|
|
|
|
|
|
|
|
|
|
|
|
|
|
|
|
|
|
|
|
|
|
|
|
|
|
|
|
|
|
|
|
|
|
|
|
|
|
|
|
|
|
||||||
|
|
|
|
|
|
|
|
|
|
|
|
|
|
|
|
|
|
|
|
|
|
|
|
|
|
|
|
|
|
|
|
|
|
|
|
|
|
|
|
|
|
|
|
|
|
|
|
|
 Inserting or re-inserting the batteries
Thermostat is equipped with a warning light to indicate when the batteries need replacing. As soon as this indicator lights up at the bottom right-hand side of the display panel,replace the batteries (use two 1.5V LR6 alkaline batteries - life is approximately 12 months).
Thermostat remains programmed for 60 seconds while batteries are being replaced. 24
! Before beginning the programming of the device, please slide cover down and press
RESET with the tip of a pen.
Res
 Setting to currenttime and day
You are putting the device into operation for the first time.Youhave just pressed the RESET button (see above). 12:00 appears and the pointer flashes under day 1.
Set the time usi ng the + or – buttons (the numbers run o ff more quickly when the button is pressed continuously).
Set the current day by pressingseveral times on the DAYS 1-7 button. A pointer appears
under the |
corresponding day ( 1=Monday, |
2=Tuesday, 3=Wednesday, etc.). |
|
Validate with OK button. |
|
If y ou wish |
to cha nge t he time or the day, |
press the MODE button until the pointer appears under the clock sign and continue as above for points , and .
+ |
Auto Mau 1 |
6 7 |
|
- |
|
|
|
|
DAYS |
PROG |
OK |
|
1-7 |
P1-P4 |
|
|
|
|
|
MODE
MODE 
Res
 Temperature setting

Comfort and reduced temperatures are pre-set: comfort = 20°C,
reduced = 16°C.
Modification of comfort temperature
Press the  .button.
Modify the temperature with the+ or – button.
Validate with OK button.
+
-
A
c
c
DAYS 1-7
PROG |
|
P1-P4 |
|
|
|
|
|
|
OK |
|
|
|
|
MODE
Res
Modification of reduced temperature
Press the  .button.
Modify the temperature with the + or – button.
Validate with OK button.
 Programming PROGP1-P4
You can program your week according to 4 program settings: P1, P2, P3 are prerecorded and cannot be modified.
P4 : is blank and allows you to create a personalized program varying according to the day of the week.
P1 = Comfort temperature from6 a.m.till 11 p.m. Reduced temperature from11 p.m.till 6 a.m.
The default allocation of P1 is to 7 days of the week. If this corresponds to your life style, stay in automatic mode. Otherwise, continue.
0 |
1 |
2 |
3 |
4 |
5 |
6 |
7 |
8 |
9 |
10 |
11 |
12 |
13 |
14 |
15 |
16 |
17 |
18 |
19 |
20 |
21 |
22 |
23 |
24 |
P2 = Comfort temperature from 6 a.m. till 8.30 a.m.and from4.30 a.m.till 11 p.m.
Reduced temperature from8.30 p.m.till 4.30 a.m. and from 11 p.m. till 6 a.m.
0 |
1 |
2 |
3 |
4 |
5 |
6 |
7 |
8 |
9 |
10 |
11 |
12 |
13 |
14 |
15 |
16 |
17 |
18 |
19 |
20 |
21 |
22 |
23 |
24 |
P3 = Comfort temperature from 6 a.m. till 8.30 p.m.from 11.30 a.m.till 1.30 p.m.and from 4.30 p.m.till 11 p.m.
Reduced temperature from 8.30 a.m. till
11.30 a.m.from 1.30 p.m.till 4.30 p.m.and from 11 p.m.till 6 a.m.
0 |
1 |
2 |
3 |
4 |
5 |
6 |
7 |
8 |
9 |
10 |
11 |
12 |
13 |
14 |
15 |
16 |
17 |
18 |
19 |
20 |
21 |
22 |
23 |
24 |
P4 = Blank program allowing you to create up to 12 c omfort t emperature periods and 12 reduced periods for each day of the week.
Selection o f a n e xisting P 1, P2 o r P3 programmefor a day of the week (in programming mode all modifications are automatically validated).
Example - P2 for Wednesday.
Press t he PROG P 1-P4 button to go into programming mode.
The n° of the program assigned to th e day flashes o n the r ight-hand side of the d isplay panel.
Press the DAYS 1-7 until t he pointer appears u nder t he d ay you w ish t o program (Wednesday in our example).
Press the PROG P1-P4 button until the P2 program number flashes in the right side of the screen.
Press the OK button to validate.The following day is automatically proposed.
5
Creating a P4 program
A 24-hour profile composed of 48 thermometers at the botto m o f the display pan el allows y our programme composition to be easily viewed.
A half-empty thermometer corresponds to  30 minutes at reduced temperature.
A full thermometer corresponds to 30 minutes at comfort temperature.
Example:programming 3 temperature periods for Friday: 6 a.m. till 8 a.m., noon till 2 p.m. and 6 p.m. till 10 p.m.
From the Auto,mode press thePROG P1-P4 button.
Press the DAYS 1-7 button until a pointer appears u nder the day you wish to program (Friday in our example).
Press the PROG P1-P4 button until the P4 program number flashes in the right side of the
screen. Your di splay pane l indicates time as 0h00 and the fi rst the rmometer flashes on the 24-hour profile.
Press the  button several times to obtain 6:00 the time to the wall displayed advances by 30 minutes for each short press.
Continuous pre ssing accelerates the time run-off.
• Press the |
|
button several time s to obtain |
|
|
|||
8:00. |
|
|
|
• Press the |
|
|
button several time s to obtain |
|
|
||
12:00. |
|
|
|
• Press the |
|
button several time s to obtain |
|
|
|||
14:00. |
|
|
|
• Press the |
|
|
button several time s to obtain |
|
|
||
18:00. |
|
|
|
• Press the |
|
button several time s to obtain |
|
|
|||
22:00. |
|
|
|
!If you ma ke a mistake (e.g. 11:30 instead of 12:00) use the + or – buttons to advance or return a nd co rrect with the  and
and  thermometer buttons.
Press the OK button.
The following day automatically appears.
Press t he MODE button to retur n to automatic mode.
 Program reading
Youcan check your programming.
From Auto mode press t he PROG P1-P4 button.
With the DAYS 1 -7 button se lect the day from 1 to 7 and check your programming on
|
|
the |
24-hour pro file at the |
bo ttom of the |
||||||||||||||||||||
|
|
display panel (see example above). |
|
|
|
|
|
|||||||||||||||||
0 |
1 |
2 |
3 |
4 |
5 |
6 |
7 |
8 |
9 |
10 |
11 |
12 |
13 |
14 |
15 |
16 |
17 |
18 |
19 |
20 |
21 |
22 |
23 |
24 |
Press the MODE button t o r eturn to automatic mode.
Auto automatic mode
You pa ss into a utomatic mode b y pressing the MODE button until the pointer appears under
Auto.
In automatic mode Thermostat adapts to your life style by running the programs youhave selected.
 Manu manual mode
Manual mode transforms your device into a simple thermostat. It allows you to maintain a cons tant temperature in your dwelling (set to a temperature of between 5°Cand 30°C).
Press the MODE button to position the pointer under Manu.
Press + or – to adjust to the desired tempe -
rature (for instance 22.5°C).
To qu it t he Manu mode, press MODE and reposition the pointer under Auto.
Temporary temperature modification
In automatic mode this very useful function allows you to modify ambient temperature temporarily.
Toincrease the temperature,
• press the + button (several times, if necessary).
Todecrease the temperature,
• press the – button (several times, if necessary).
The curr ent temperature level indicator (com - fort or reduced) will begin flashing.
This mo dification ends with the ne xt change in programmed temperature.
To re turn to the initial program press MODE and reposition the pointer under Auto.
The current temperature level indicator (comfort or reduced) will stop flashing when the temporary modification comes to an end.
Prolonged absence mode (holidays) 


This mode protects your dwelling from freezing by maintaining a minimum adjustable temperature in your dwelling during your absences (from 1 to 99 days).You can program the length of your absence so that the temperature rises for your return.
Press the 

 button.
Set the length of your absence in days (from 1 to 99 days) with the + and – the current day counts as one.
Validate with OK button.
Set the desired temperature level during your absence with the + and – buttons.
Validate with the OK OKbutton.Remain in this mode.To cancel and return to automatic mode, press MODE.
Fix the base on the wall.
Connect t he thermostat following the picture below.
1 2 3
Terminal N°1 - Output heating
If your boiler is equipped with a thermostat input, remove the bypass of 2 t hermostat terminals and connect them respectively to terminals 1 and 3 of the thermostat, to the 2 boiler’s thermostat inputs (any connection scheme will do).
Possible settings
Circulation p ump ant i-lock sy stem (starts the pump for 1 min every 24 hours).
|
Auto Manu |
1 |
2 |
3 |
4 5 |
6 7 |
|
■ Anti-locking |
Anti-locking |
||
+ °c |
|
|
|
|
|
|
MODE |
function off |
■ function on |
||
|
|
|
|
days |
|
|
|
|
|||
- 0 1 2 |
|
|
|
|
|
|
|
|
|
||
3 4 5 6 7 |
8 |
9 10 |
11 12 |
13 14 15 16 17 |
18 19 20 21 22 23 24 |
|
Technical specifications |
||||
|
DAYS |
PROG |
|
|
|
|
|
|
Adjustment range for comfort T°C: |
||
|
|
|
OK |
|
|||||||
1-7 |
P1-P4 |
|
|
|
|
|
+ 5°C to+ 30°C |
||||
|
|
|
|
|
|
|
Res |
|
|
||
|
|
|
|
|
|
|
Adjustment range for reducedT°C: |
||||
|
|
|
|
|
|
|
|
|
|
+ 5°C to + 30°C |
|
|
|
|
|
|
|
|
|
|
Adjustment range for holiday T°C: |
||
|
|
|
|
|
|
|
|
|
|
|
+ 5°C to + 30°C |
Installer’s guide |
|
|
|
Adjustment range for ambient T°C: |
|||||||
|
|
|
|
|
+ 0°C to + 40°C |
||||||
The p rogrammable |
thermostat mu st be |
in stalled |
|
|
|||||||
Static differential: |
< 0,3 degrees |
||||||||||
about 1.5 metres from the floor, on an interior wall, |
Power: |
2 standard LR6 alkalinesbatteries |
|||||||||
away from direct sunlight and any source of heat, |
Breaking power change over contact: |
||||||||||
such asTV set, lighting, draught, etc. |
|
|
|
1 RT - 8 (3) A/230V AC |
|||||||
Pull cover down and remove the screw. |
Operating temperature: |
0°C to + 50°C |
|||||||||
|
|
|
|
|
|
|
|
|
Storage temperature: |
-10°C to + 65°C |
|
|
|
|
|
|
|
|
|
|
Hygrometry: |
|
85 % max to + 20°C |
|
|
|
|
|
|
|
|
|
Degree of protection: |
I30 |
|
|
|
|
|
|
|
|
|
|
Insulation class: |
II (EN 60730 standards) |
|
|
|
|
|
|
|
|
|
|
Connection: by screwed barrier up to 2.5 mm2 |
||
|
|
|
|
|
|
|
|
|
Made in France |
|
|
|
|
|
|
|
|
|
|
|
Usable in all Europe and Switzerland |
||
Remove front face by unplugging it gently from the base.
|
|
|
|
6
 Loading...