

SmartRidge I Directions
Before you start, decide which side the lift edge will be installed. To help with your
decision, the vent maximizes air flow dynamics and principles by placing the lift edge
on the leeward side of the ridge (downwind side). The vent works well with the lift
edge placed in either direction but it works ’best’ with the lift edge towards the
downwind side.
Note SmartRidge vents are designed to be installed on 4/12 and up roof pitches.
Low slope (below 4/12) roofs require additional work to prepare the roof for proper
installation. Contact DCI Products for low slope roof installation techniques and
special job specific instructions at 1-800-622-4455.
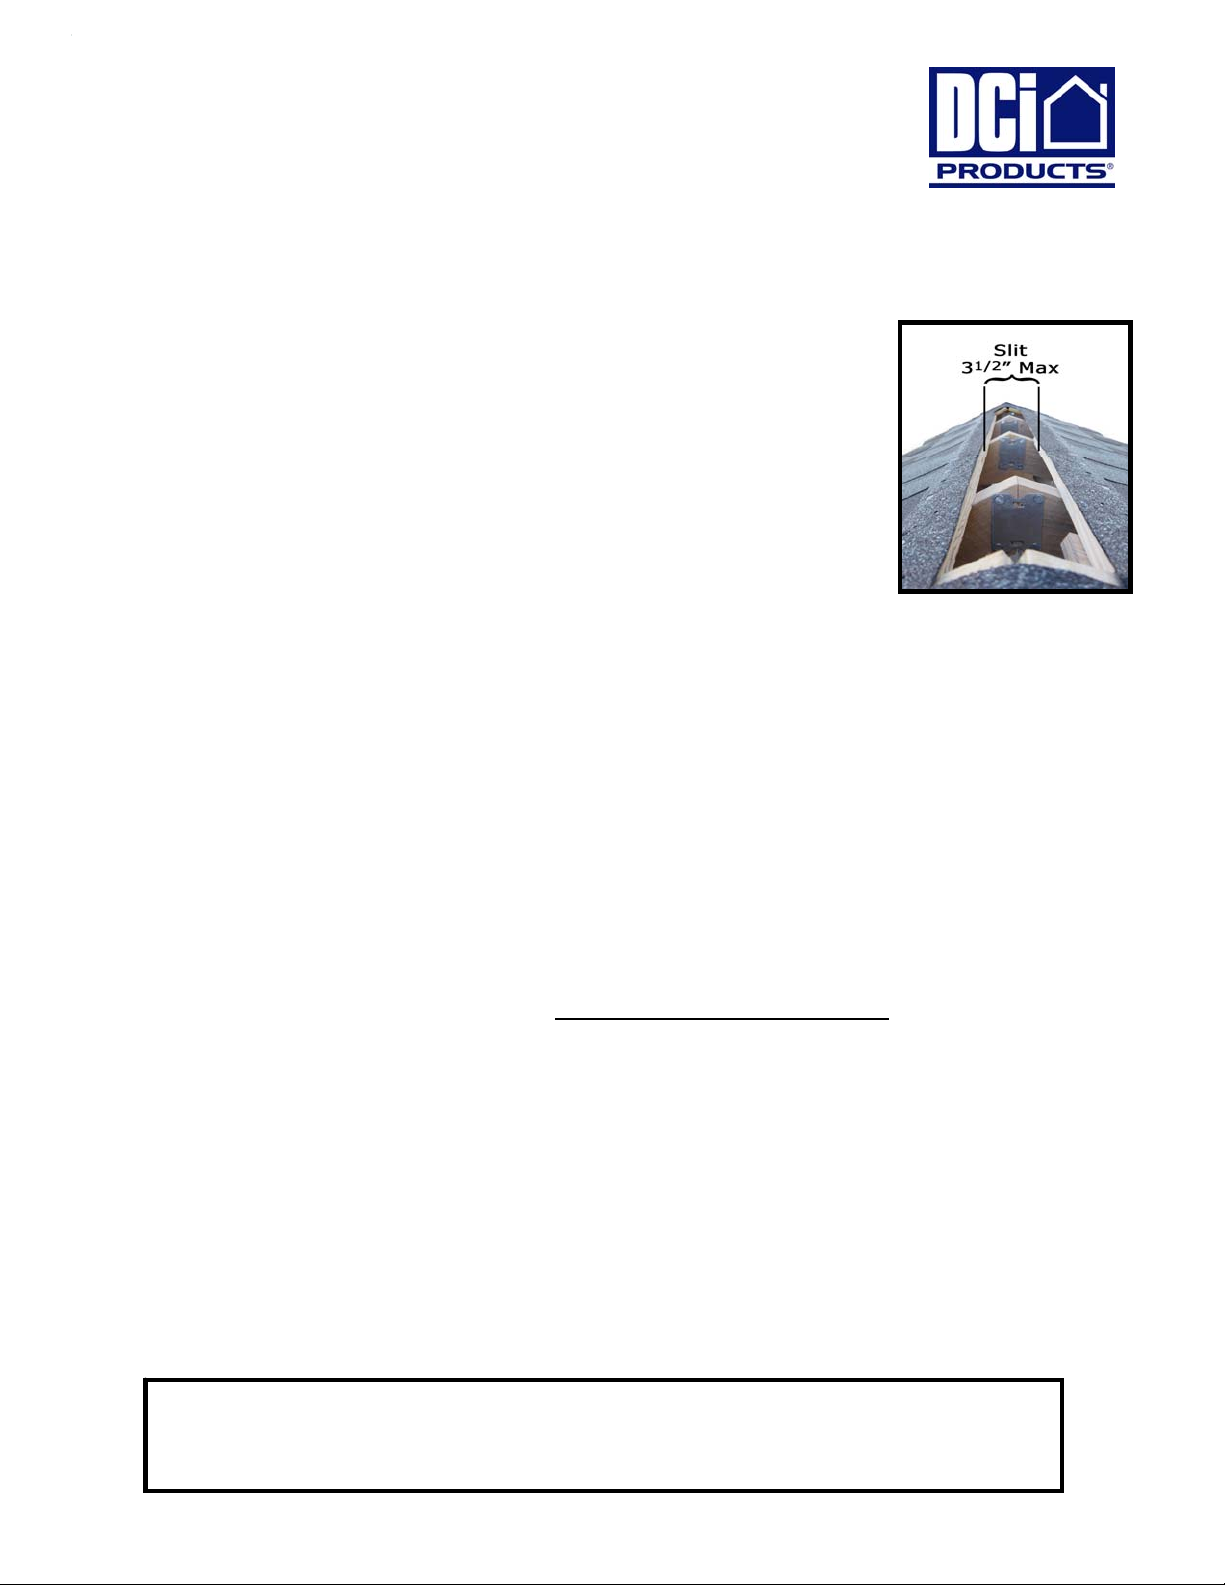
STEP Prepare Roof Decking
The first step installing SmartRidge I is to prepare the roof decking by cutting or leaving a
minimum 1” slit on both sides of the roof peak away from any ridge beam (do not cut at
least 12” in from the gable ends or other obstacles). A total maximum width of 3.5” is
required with or without a ridge beam. If wider ridge beams exist please call DCI with
specific details first. This is most easily done by cutting the last piece of roof decking 1.75”
short of the roof peak on both sides of the ridge leaving a 3.5” gap (see Fig A).
Note: The proper amount of soffit ventilation is required to maximize SmartRidge
effectiveness. Ask about our revolutionary soffit venting system called SmartVent.
Equivalent Rating to 18 NFVA
STEP Attach SmartRidge I End Piece Patent # 6447392
After roof shingles are installed, begin at one end of the roof. In the SmartRidge I box are pieces of fabric (approx. 10 ½”
square) and four end caps that will be used to seal the gable ends. Install end caps as you start or stop a ridge run (or wrap
the fabric around the end of a piece) of SmartRidge I (your choice but the fabric is included if you need more than four end
caps).
Position the SmartRidge I three foot piece over the ridge so that it is nearly centered over the ridge opening. Butt the
SmartRidge I against the end cap (or if using the fabric pieces to seal the end, wrap the fabric tightly around the end of the
SmartRidge I piece ). Fold SmartRidge I over the ridge and secure to the roof decking/shingles using 1 ½” roofing nails
minimum (ensure nail goes through the roof decking). Ensure both long edges of SmartRidge I are tightly nailed to the
roof/shingles with no gaps between the vent and the roof. Use additional nails if necessary.
A nailing area on SmartRidge I is approximately 1.5" in from the edges of the product on either side with minimum six
nails per side equally spaced starting at the end and stopping at the opposite end 1.5” in from each end. This is
where you should nail when attaching SmartRidge I to the roof decking using 1 ½” – 2” roofing nails. Ensure nails
penetrate all the way through the roof decking. (SIX NAILS PER SIDE EVENLY SPACED
nailed tight against the roof with no gaps.
STEP Attach Remaining SmartRidge I Pieces
Attaching the next pieces of SmartRidge I can be done by butting the end of the next piece up tightly against the end of the
previously installed piece. Continue butting 3’ pieces of SmartRidge I until you reach the end of the roof. Cut the final piece to
fit flush with gable end cap and/or repeat step 2 to seal the end & install gable end fabric. Ensure both long edges are nailed
tight against the roof with no gaps.
STEP Install Cap Shingles
Install cap shingles over SmartRidge I as you normally would. Ensure that about ½” of the shingle cap extends past the lift
edge. Note: For aesthetic purposes, you can extend SmartRidge I all the way to the end of the gable roo f without
leaving it short of the gable end. SmartRidge I is strong enough to stand up to nail guns during shingle installation.
Use extra long roof nails (1 ½” to 2” nails) for securing the shingle caps. Shingle Cap Nails should penetrate through
vent and roof deck. Other installation techniques are available by calling DCI Products (engineering department).
(800) 622-4455
(610) 622-4038 FAX
Fig. A
). Ensure both long edges are
Questions or Concerns? Call us Toll Free
1-800-622-4455
www.dciproducts.com
A New Tapered End Cap is Available for Hip, Rafters, Chimneys, Valleys, etc. Call DCI for details or visit www.dciproducts.com
d
p
l
t
u
o
(
¾
g
h
t
e
a
sy
m
u
n
l
a
U
n
f
g
t
a
o
o
y
s
t
p
c
s
S
o
e
R
u
a
o
e
g
m
e
d
d
h
s
m
a
e
d
v
e
ge
y
I
e
h
n
r
g
R
R
gn
a
t
i
u
t
g
e
g
t
r
o
y
s
h
c
k
g
t
s
y
g
g
o
s
y
m
w
n
l
osy
ge
r
o
mst
e
n
n
a
A
a
o
h
s
n
e
l
i
h
S
e
i
v
y
u
a
d
n
m
n
S
0
y
0
0
8
w
S
R
t
a
m
ge
t
n
x
e
d
e
e
g
ge
w
m
r
a
d
a
T
s
e
k
p
s
c
t
g
ge
r
n
a
i
e
o
d
yo
s
o
-
S
X
e
g
y
m
artRidge is a on
S
ri
e ventilation.
install
ation method, S
most
revalent and u
Lift p
us a leak proo
Smar
Ridge is an und
of rid
the ro
elimin
ated from the s
clean
roof lines inste
leave
behind. Use it
roofs
sing a rubber
Wh
e. Becau
t is Smart
e sided ridge v
sing its unique
martRidge I sin
sightly proble
weather barri
er shingle vent
se of the one si
reet side of the
d of the sloppy
n low slope dor
r rolled roofing
idge I ?
nt product that i
patented desi
le sided elimin
s with ridge ven
r!
esigned for ins
ed design, uns
ouse. This res
hingle lift most
er roofs with s
pplied over the
s revolutionizin
and
tes two of the
ts, Street Side
allation along
htly ridge lift i
lts in perfectly
ridge vents
eep slope front
vent to seal.
s
s
atisfy your cust
mers will love t
cust
one
ided design co
ou
But
e don’t stop th
instal
lation and hand
Getti
equa
ventilation at t
cust
mer, combine
ste
m. This patent
ed
of the roof prov
Sma
tRidge’s effecti
cust
mer year after
ventil
ation.
S
rong, DCI warr
Plus,
we stand behin
instal
lation instructio
mark
roofi
Getti
The
a roofing contr
ore profit pote
the best vent
Smart
artRidge is a to
ting to make S
contractors a
started with
martRidg
ctor, you want
mers. And Sm
e look and you
ts less than co
tial.
re! SmartRid
ing and it can s
lation performa
e soffit. To ma
martRidge with
d, under shingl
des guarantee
eness. Togeth
ear of efficient,
idge Bac
h, industrial
nts SmartRid
our products
s, product infor
artRidge the p
d homeowners
martRidge is e
Advantag
o use the right
rtRidge deliver
will love the pri
petitive produc
is sold in 3’ len
and up to powe
ce from a rid
imize your offe
DCI’s SmartVe
vent installed
air flow to max
r they will provi
ffective attic c
ed by DCI
rade plastic pro
for the life of
ith superior cu
ation, distribut
eferred choice
.
sy. Call us toll
roducts to
! Your
e. SmartRidge
s which gives
ths for easy
red nail
vent requires
ing to your
t soffit venting
long the soffit
mize
de
oling and
uct that is so
ur shingles.
tomer service,
ion and
f builders,
free at:
uns.
our
But d
n’t be fooled b
only
roun
d level. If you
half t
e ventilation ca
Smar
Ridge provides
comp
tition. And, be
single
lift, it costs les
stand
rd double lift,
U
Using normal s
ste
, cooler air ent
and o
t of the Smart
venti
creates excell
to be
iterally pulled o
and e
sy to handle m
”) on the back
How D
its appearance
ide of the hous
hink a one-side
acity of two-sid
equal or more
ause there is l
than other rid
martRidge has
es Smart
ffit vents or DC
rs the attic at t
idge I ridge ve
ent “negative ai
t of the house.
akes SmartRid
. SmartRid
is barely notic
ridge vent will
ed rid
enting capacity
ss material in S
vents. If you p
our answer to
e’s
e vents,
idge I Wor
’s revolutionar
e soffit level an
t. SmartRidge’
pressure” cau
Easy to cut wit
e the right choi
low profile lift
able from
onl
provide
hink again!
than its
martRid
efer the
!
?
SmartVent
d is drawn up
s sin
ing hot attic air
a razor knife
e for you.
e
le side
1-8
To le
rn more about
Roof
Ventilation S
(61
(61
(88
ww
0-622
SmartRidge an
st
em contact us
) 622-4455
) 622-4038
) 356-3291
.dciproduct
-4455
our complete
t:
oll Free FA
.com
martRidge
®


 Loading...