


Installation of SmartBaffle16
1- To install the SmartBaffle16 simply bend up the 2” side flanges between a 16” on center rafter space, insert the flanges into the rafter space ensuring that they rest against the underside of the roof decking. The flanges will automatically leave a 2” air space between the roof deck and the lower panel of the SmartBaffle16. Slide the SmartBaffle16 down towards the fascia board to about 3” short of the inner side of the fascia board, this allows room for air flow from under the soffit. SmartBaffle16 is also designed to be used with SmartVent intake ventilation (www.dciproducts.com) to ensure insulation is not blocking the proper airflow through the SmartVent opening.
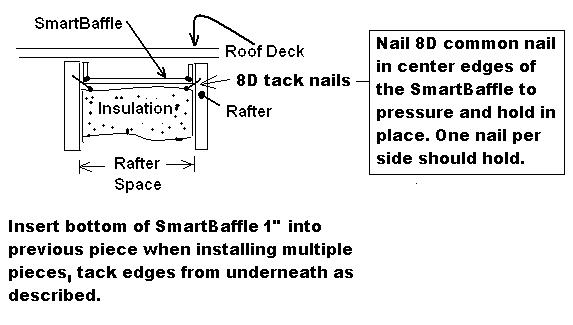
2- The SmartBaffle16 can simply rest in place, or a small nail can be placed proximate the middle on each side, below the baffle, ensuring the flanges are pressure tight to the roof deck. Install as many SmartBaffles as needed to create the rafter air chute ensuring that a clear, continuous air channel is present between the soffit intake air and the roof’s exhaust air or ridge vent and the underside of the roof deck. For multiple chute installations in one rafter bay simply slide one end into the previous end by about 1” and secure with two tack nails as shown or tack the end of each flange. Or SmartBaffles can simply abut each piece tightly without overlapping.
3- To create a smaller size SmartBaffle16 for narrow rafter spaces, simply cut the one long side about four inches (4”) wider than the width of the rafter space. Next, use a utility knife to cut “half way through” a mark made 2” in from the SmartBaffle16 cut off edge. This will create a flange that bends up towards the roof deck.You may practice this cut on a scrap piece of baffle material prior to working on the installed SmartBaffle to become familiar with the ½ cut. Another way is discussed in step #4.
4- Things to remember: ensure insulation is not inside the 2” air chute created between the roof deck and the SmartBaffle16. Install SmartBaffle16 in all rafter spaces that have soffit intake air flow that may be blocked by insulation. Use a utility knife to make cuts. SmartBaffle16 is for use with 16” rafter spacing. Larger spaces can follow the next step #5 (or purchase SmartBaffle24). Tip: To create a smaller baffle, cut the SmartBaffle long ways ½” less than the width of the rafter space (allowing for the flanges bending up). Once separated, overlap at the cut edges creating the size required including the flange allowances. Screw the overlapped long edges together using eight 1” long screws pointed towards the roof deck for safety purposes. Install SmartBaffle16 in the smaller rafter bay and secure as described in #1 & #2 above.
5- To create a larger SmartBaffle16 simply screw two flat SmartBaffles together with maximum length 1” screws (eight screws with screw points toward the roof deck when installed) ensuring the width is 4” wider than the rafter space. Then install per the above directions. Below is a sketch of the SmartBaffle16 installation inside a rafter space.
Any Questions Please Call 1-800-622-4455 (EST) or visit www.smartbaffle.com .
20120822
 Loading...