


Digital Output Card
504X
504X Digital Output Card
®
2
Important Safety Instructions
The dbx 504X should only be used in a dbx 566, 576, 586, or
1086. Please follow the safety instructions contained in the
manual for the product in which the dbx 504X is installed.

Digital Output Card
504X
504X Digital Output Card
®
3
Congratulations on your purchase of the dbx 504X Digital Output Card.
The 504X interfaces with your dbx Silver Series product or dbx 1086 for a
premium analog to digital conversion for use with your digital audio
devices. Below is a list of the features found on the 504X:
•
Sample rates at 44.1kHz or 48kHz
•
Wordlength outputs of 16, 20, or 24 bits
•
Dither to 16 or 20 bits using TPDF or SNR2algorithms
•
dbx Type IV™ A/D Conversion System
•
Sync input/output using low jitter phase-locked loops
•
Two user selectable noise shape algorithms for lower perceived noise
floor
•
Digital output on gold plated connectors
•
Can be installed in a dbx 566 Compressor, dbx 576 Microphone
Preamplifier/Compressor, dbx 586 Microphone Preamplifier, or a dbx
1086 Microphone Preamplifier Processor
If you require technical support, contact dbx Customer Service. Be prepared to accurately describe the problem. Know the serial number of your
unit - this is printed on a sticker attached to the rear panel. If you have not
already taken the time to fill out your warranty registration card and send
it in, please do so now.
Before you return a p roduct to the factory for service, we recommend you
refer to the manual. Make sure you have correctly followed installation
steps and operation procedures. If you are still unable to solve a problem,
contact our Customer Service Department at (801) 568-7660 for consultation. If you need to return a p roduct to the factory for service, you MUST
contact Customer Service to obtain a Return Authorization Number.
Service Contact Information
Introduction

Digital Output Card
504X
504X Digital Output Card
®
4
No returned products will be accepted at the factory without a Return
Authorization Number.
Please refer to the Warranty below, which extends to the first end-user.
After expiration of the warranty, a reasonable charge will be made for
parts, labor, and packing if you choose to use the factory service facility.
In all cases, you are responsible for transportation charges to the factory.
dbx will pay return shipping if the unit is still under warranty.
Use the original packing material if it is available. Mark the package with
the name of the shipper and with these words in red: DELICATE INSTRUMENT, FRAGILE! Insure the package properly. Ship prepaid, not collect.
Do not ship parcel post.
This warranty is valid only for the original purchaser and only in the United
States.
1. The warranty registration card that accompanies this product must be
mailed within 30 days after purchase date to validate this warranty.
Proof-of-purchase is considered to b e the burden of the consumer.
2. dbx warrants this product, when bought and used solely within the
U.S., to be free from defects in materials and workmanship under normal use and service.
3. dbx liability under this warranty is limited to repairing or, at our discretion, replacing defective materials that show evidence of defect,
provided the product is returned to dbx WITH RETURN AUTHORIZATION from the factory, where all parts and labor will be covered up
to a period of two years. A Return Authorization number must be
obtained from dbx by telephone. The company shall not be liable for
any consequential damage as a result of the product's use in any circuit or assembly.
4.
dbx reserves the right to make changes in design or make additions to or
improvements upon this product without incurring any obligation to install
the same additions or improvements on products previously manufactured.
W ar ranty
Service Contact Information (cont.)

Digital Output Card
504X
504X Digital Output Card
®
5
5 The foregoing is in lieu of all other warranties, expressed or implied,
and dbx neither assumes nor authorizes any person to assume on its
behalf any obligation or liability in connection with the sale of this
product. In no event shall dbx or its dealers be liable for special or
consequential damages or from any delay in the performance of this
warranty due to causes beyond their control.
To install the dbx 504X Digital Output Card in a dbx 1086, follow these
instructions:
1. Disconnect all power and audio cables to the 1086.
2. Remove the top cover by removing the 2 screws on each side of the
1086.
3. Locate the option slot on the rear panel and remove the 4 screws and
cover plate.
4. Holding the cards by the edges, remove the 504X cards from the static protective bags.
5. Locate the 4 pin jumper next to the board-to-board connector on the
top board. Move the jumper to the "10 Series" position if it already isn’t
there. See Fig. 3 on page 6 for location of jumper.
6. The card with the rear plate and interface jacks will be installed first.
A. From the inside of the 1086, place the card so that the holes on
the card line up with the threaded standoffs in the chassis bottom.
B. Start, but do not tighten, the two hex male-female threaded stand-
offs (included with the card) through the holes in the card into the
threaded standoffs in the chassis.
C. Use the 4 screws that held the blank cover on the 1086 to secure
the 504X plate to the chassis. Start all four screws before tighten-
ing them completely.
D. Tighten the 2 standoffs on the card.
E. Carefully install the 10 pin cable (noting polarity) from the 1086
main PCB to the 504X.
Installation
Warranty (cont.)
Digital Output Card
504X
504X Digital Output Card
®
6
F. Carefully install the long 14 pin cable (noting polarity) from the
1086 main PCB to the 504X.
G. Install the wire tie down blocks on the upper PCB in the 1086
and then wire tie the long cable.
7 Take the top card of the 504X and mount it carefully to its mating con-
nector on the lower card.
8 Use the two 6-321/4" screws to secure the top card to the threaded
standoff.
9. Install plastic insulator directly above 504X card on the inside of the lid.
10. Replace the cover and 4 screws to the 1086.
To install the dbx 504X Digital Output Card in a dbx Silver Series product,
follow these instructions:
1. Disconnect all power and audio cables to the Silver Series unit.
2. Remove the top cover by removing the 2 screws on each side and 2
screws on the rear, and the top-center hex screw on the front panel.
3. Locate the option slot on the rear panel and remove the 4 screws and
cover plate.
4. Holding the cards by the edges, remove the 504X cards from the static protective bags.
5. Locate the 4 pin jumper next to the board-to-board connector on the
top board. Move the jumper to the “Silver Series” position if it already
isn’t there. Refer to Fig 3 on page 6 for location of jumper.
6. The card with the rear plate and interface jacks will be installed first.
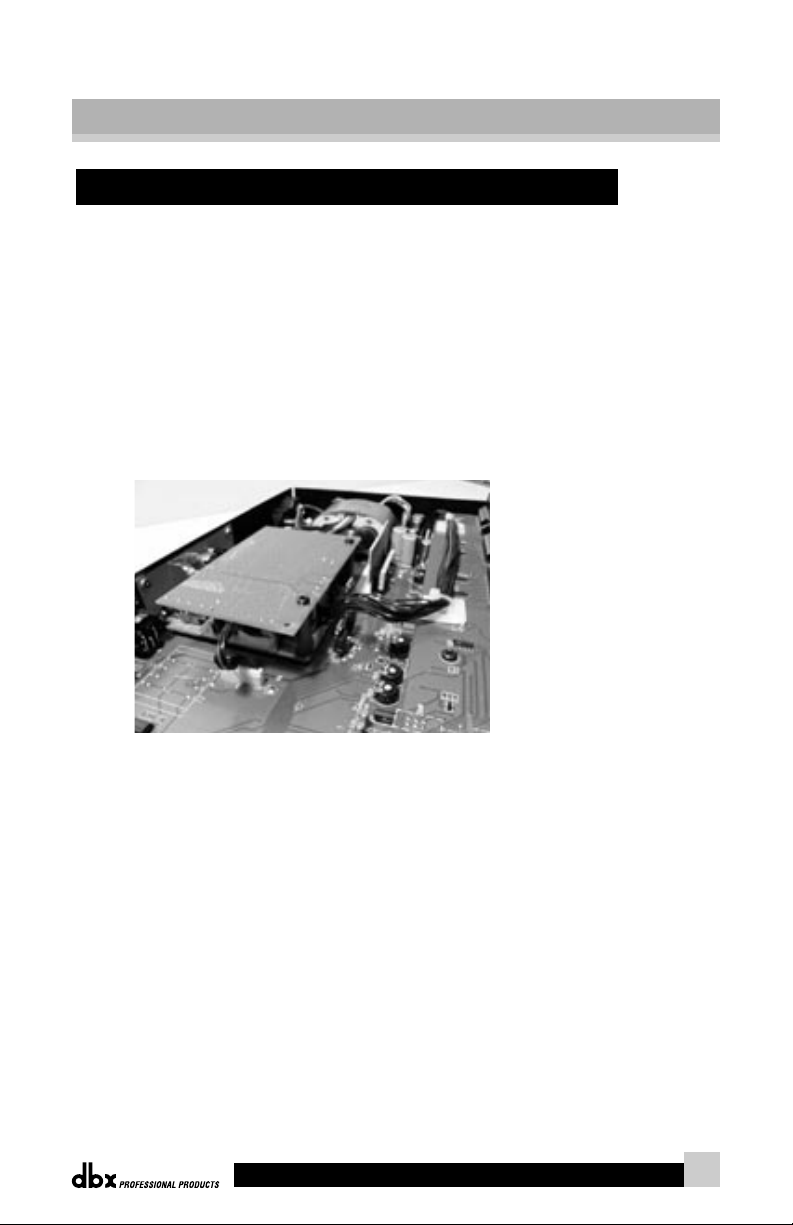
Fig.1
dbx 504X
installed in a
dbx 1086
Installation (cont.)

Digital Output Card
504X
504X Digital Output Card
®
7
A. Remove the two 6-32" screws on the Silver Series main PCB direct-
ly below where the 504X will mount.
B. From the inside of the Silver Series product, place the 504X so that
the holes on the card line up with the holes in the main PCB.
C. Use the 4 screws that held the blank cover to secure the 504X
plate to the chassis. Start all four screws before tightening them
completely.
D. Carefully install the 10 pin cable (noting polarity) from the Silver
Series main PCB to the 504X.
E. Carefully install the short 14 pin cable (noting polarity) from the
Silver Series main PCB to the 504X.
7. Take the top part of the 504X and mount it carefully to its mating connector on the lower card.
8. Line up two 1-3/16" round standoffs to the screw holes between the
lower 504X and the Silver Series main PCB.
9. Line up the other two 1-3/16" round standoffs to the screw holes
between the upper and lower PCBs of the 504X.
10. Place the two 6-32 3" screws through the round standoffs into the
Silver Series Chassis.
11. Install plastic insulator directly above 504X card on the inside of the
lid.
12. Replace the cover and screws to the Silver Series Product.
Fig.2
dbx 504X
installed in a
dbx Silver Series
Installation (cont.)
 Loading...