

Page 1
9DQWDJH3UR
:HDWKHU6WDWLRQ
&RQVROH
0DQXDO
3URGXFW&
Page 2
9DQWDJH3UR&RQVROH'LVSOD\)HDWXUHV
2
WIND
1
N
NW
NE
WE
MPH
SW
Last 24 hrs
14
13
Vertical Scale: X10
SE
S
hr
Every 1
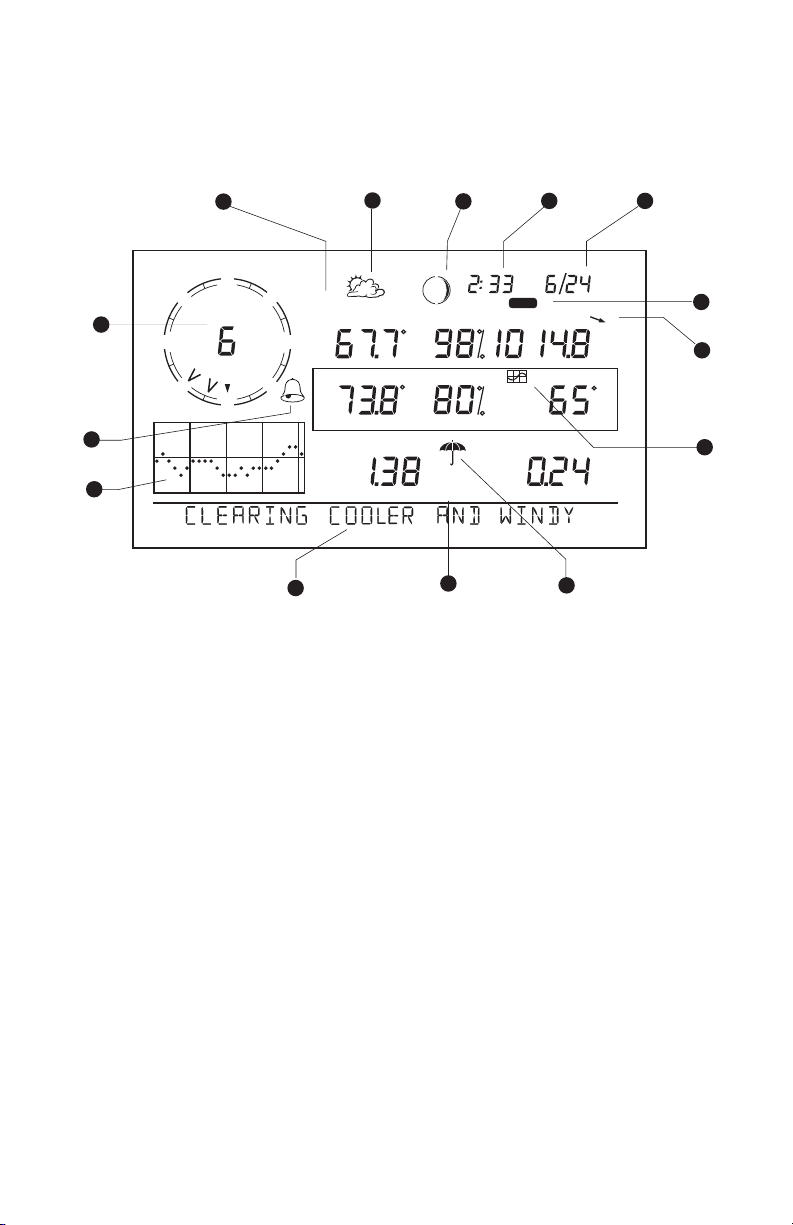
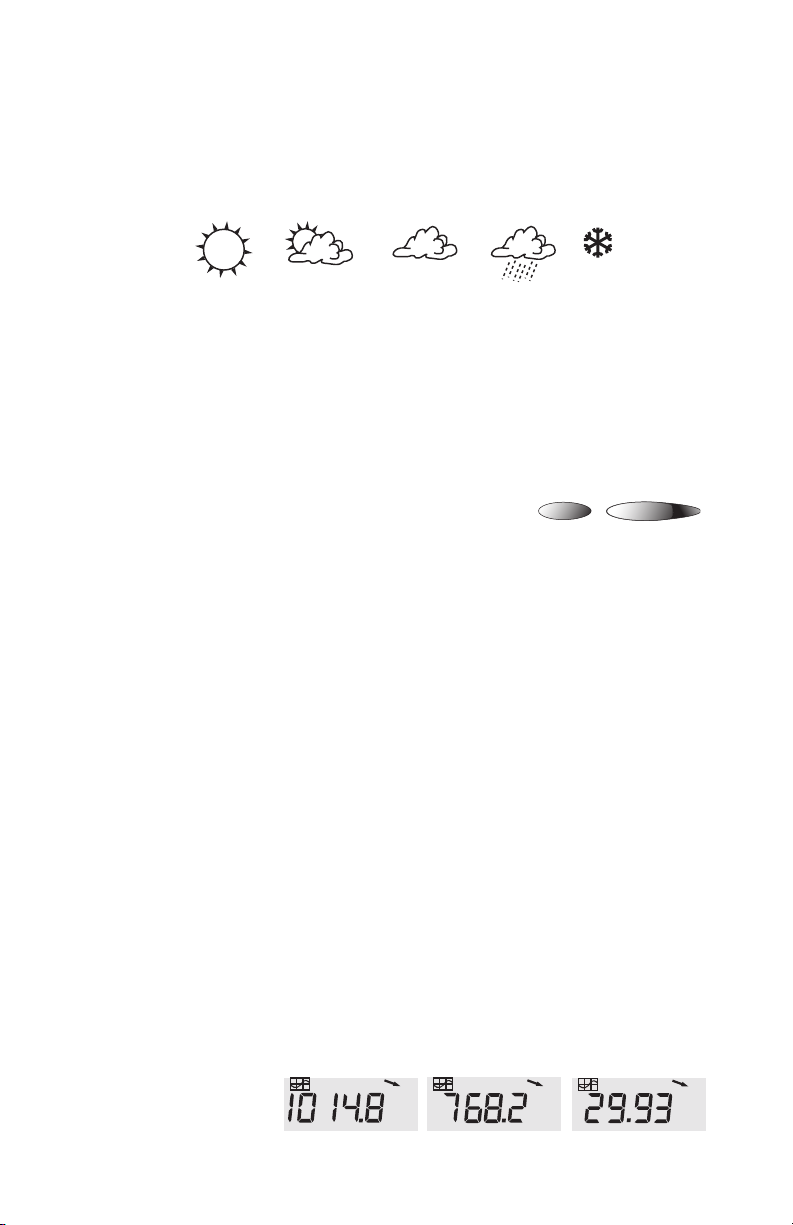
1. Compass Rose
2. Graph & Hi/Low Mode Settings
3. Forecast Icons
4. Moon Phase Indicator
5. Time / Sunrise Time
6. Date / Sunset Time
7. 2ND Button Indicator
3
GRAPH
TEMP OUT
TEMP IN
DAILY
12
HUM OUT
F
HUM IN
F
in
STATION NO.1
4
pm
2nd
BAROMETER
CHILL
RAIN RATE
5
1011
hPa
in/hr
6
7
8
F
9
8. Barometric Trend Arrow
9. Graph Icon
10. Current Rain Icon
11. Station Number Indicator
12. Weather Ticker
13. Graph Field
14. Alarm icon
© Davis Instruments Corp. 2001-2003. All rights reserved.
Vantage Pro Console Manual
Rev. C, October 23, 2003
Document Part Number: 07395.134
Product # 6310 & 6310C
This product complies with the essential protection requirements of the EC EMC
Directive 89/336/EC.
DriveRight is a registered trademark of Davis Instruments Corp., Hayward, CA.
Information in this document subject to change without notice.
Page 3

&217(176
1. Welcome to Vant age Pro . . . . . . . . . . . . . . . . . . . . . . . . . . . . . . . . . . . . . 1
Console Features . . . . . . . . . . . . . . . . . . . . . . . . . . . . . . . . . . . . . . . . . . . . . . 1
Keyboard & Display . . . . . . . . . . . . . . . . . . . . . . . . . . . . . . . . . . . . . . 1
Console Modes . . . . . . . . . . . . . . . . . . . . . . . . . . . . . . . . . . . . . . . . . . 2
Vantage Pro Options . . . . . . . . . . . . . . . . . . . . . . . . . . . . . . . . . . . . . . . . . . . 2
Optional Sensors . . . . . . . . . . . . . . . . . . . . . . . . . . . . . . . . . . . . . . . . 2
Optional WeatherL in k® So ftw are . . . . . . . . . . . . . . . . . . . . . . . . . . . . 3
Optional Accessorie s . . . . . . . . . . . . . . . . . . . . . . . . . . . . . . . . . . . . . 3
2. Installing the Co nsole . . . . . . . . . . . . . . . . . . . . . . . . . . . . . . . . . . . . . . . 5
Powering the Console . . . . . . . . . . . . . . . . . . . . . . . . . . . . . . . . . . . . . . . . . . . 5
Cabled Vantage Pro Stati on s . . . . . . . . . . . . . . . . . . . . . . . . . . . . . . . 5
Wireless Vantage Pro Stations . . . . . . . . . . . . . . . . . . . . . . . . . . . . . . 5
Installing the AC Pow e r Ad ap te r . . . . . . . . . . . . . . . . . . . . . . . . . . . . . 6
Installing Batteries . . . . . . . . . . . . . . . . . . . . . . . . . . . . . . . . . . . . . . . 6
Connecting Cabled Stations . . . . . . . . . . . . . . . . . . . . . . . . . . . . . . . . . . . . . . 7
Console Location . . . . . . . . . . . . . . . . . . . . . . . . . . . . . . . . . . . . . . . . . . . . . . 8
Table & Shelf Placeme nt . . . . . . . . . . . . . . . . . . . . . . . . . . . . . . . . . . 9
Wall Mounting . . . . . . . . . . . . . . . . . . . . . . . . . . . . . . . . . . . . . . . . . . 10
3. Using Your Weathe r Sta tion . . . . . . . . . . . . . . . . . . . . . . . . . . . . . . . . . 11
Setup Mode . . . . . . . . . . . . . . . . . . . . . . . . . . . . . . . . . . . . . . . . . . . . . . . . . 11
Setup Mode Command s . . . . . . . . . . . . . . . . . . . . . . . . . . . . . . . . . . 11
Screen 1: Active Transmitters . . . . . . . . . . . . . . . . . . . . . . . . . . . . . . 12
Screen 2: Configuri ng T r ans m i tte r ID s - W ire le s s On l y . . . . . . . . . . 12
Screen 3: Retransmi t - Wireless Only . . . . . . . . . . . . . . . . . . . . . . . . 14
Screen 4: Time & Date . . . . . . . . . . . . . . . . . . . . . . . . . . . . . . . . . . . 14
Screen 5: Latitude . . . . . . . . . . . . . . . . . . . . . . . . . . . . . . . . . . . . . . 15
Screen 6: Longitude . . . . . . . . . . . . . . . . . . . . . . . . . . . . . . . . . . . . . 15
Screen 7: Time Zone . . . . . . . . . . . . . . . . . . . . . . . . . . . . . . . . . . . . 16
Screen 8: Daylight Savi ngs Setti n gs . . . . . . . . . . . . . . . . . . . . . . . . . 16
Screen 9: Daylight Savi ngs St atus . . . . . . . . . . . . . . . . . . . . . . . . . . 17
Screen 10: Elevation . . . . . . . . . . . . . . . . . . . . . . . . . . . . . . . . . . . . 17
Screen 11: Wind Cup Si ze . . . . . . . . . . . . . . . . . . . . . . . . . . . . . . . . 18
Screen 12: Rain Colle cto r . . . . . . . . . . . . . . . . . . . . . . . . . . . . . . . . . 18
Screen 13: Rain Seaso n . . . . . . . . . . . . . . . . . . . . . . . . . . . . . . . . . . 19
Screen 14: Serial Baud R at e . . . . . . . . . . . . . . . . . . . . . . . . . . . . . . 19
Clear All Command . . . . . . . . . . . . . . . . . . . . . . . . . . . . . . . . . . . . . 20
Current Weather Mode . . . . . . . . . . . . . . . . . . . . . . . . . . . . . . . . . . . . . . . . . 20
Selecting Weather Va ria bl es . . . . . . . . . . . . . . . . . . . . . . . . . . . . . . 20
Displaying the For eca st . . . . . . . . . . . . . . . . . . . . . . . . . . . . . . . . . . 25
Displaying Time & Da te or Sunrise & Sunset . . . . . . . . . . . . . . . . . . 26
Selecting Units of Measure . . . . . . . . . . . . . . . . . . . . . . . . . . . . . . . . 26
Metric Rain Coll ector Settings . . . . . . . . . . . . . . . . . . . . . . . . . . . . . 27
Calibrating, Setting, and Clearing Variables . . . . . . . . . . . . . . . . . . . 27
Setting Weather Varia bl es . . . . . . . . . . . . . . . . . . . . . . . . . . . . . . . . 29
Clearing Weather Var iab le s . . . . . . . . . . . . . . . . . . . . . . . . . . . . . . . 30
L
Page 4

Highs and Lows Mode . . . . . . . . . . . . . . . . . . . . . . . . . . . . . . . . . . . . . . . . . 31
Viewing Highs and L ows . . . . . . . . . . . . . . . . . . . . . . . . . . . . . . . . . . 32
Alarm Mode . . . . . . . . . . . . . . . . . . . . . . . . . . . . . . . . . . . . . . . . . . . . . . . . . . 32
Three Special Alar ms . . . . . . . . . . . . . . . . . . . . . . . . . . . . . . . . . . . . 33
Setting Alarms . . . . . . . . . . . . . . . . . . . . . . . . . . . . . . . . . . . . . . . . . 33
Setting the Time Ala rm . . . . . . . . . . . . . . . . . . . . . . . . . . . . . . . . . . . 34
Clearing Alarm Settings . . . . . . . . . . . . . . . . . . . . . . . . . . . . . . . . . . 34
Silencing Alarms . . . . . . . . . . . . . . . . . . . . . . . . . . . . . . . . . . . . . . . . 34
Graph Mode . . . . . . . . . . . . . . . . . . . . . . . . . . . . . . . . . . . . . . . . . . . . . . . . . 35
Viewing Graphs . . . . . . . . . . . . . . . . . . . . . . . . . . . . . . . . . . . . . . . . 35
4. Troubleshooting & M ainte nance . . . . . . . . . . . . . . . . . . . . . . . . . . . . . . 39
Vantage Pro Troubleshooting Guide . . . . . . . . . . . . . . . . . . . . . . . . . . . . . . . 39
Troubleshooting Re ce p tio n Pr o blems . . . . . . . . . . . . . . . . . . . . . . . . 41
Console Diagnostic Sc r een . . . . . . . . . . . . . . . . . . . . . . . . . . . . . . . 42
Console Firmware Ve rs io n s . . . . . . . . . . . . . . . . . . . . . . . . . . . . . . . 43
Console Maintenance . . . . . . . . . . . . . . . . . . . . . . . . . . . . . . . . . . . . . . . . . . 43
Changing Batteries . . . . . . . . . . . . . . . . . . . . . . . . . . . . . . . . . . . . . . 43
Contacting Davis Technical Support . . . . . . . . . . . . . . . . . . . . . . . . . . . . . . . 44
One Year Lim i te d Warranty . . . . . . . . . . . . . . . . . . . . . . . . . . . . . . . . . . . . . 44
Appendix A: Weat her D ata . . . . . . . . . . . . . . . . . . . . . . . . . . . . . . . . . . . . 45
Wind . . . . . . . . . . . . . . . . . . . . . . . . . . . . . . . . . . . . . . . . . . . . . . . . . . . . . . . 45
Temperature . . . . . . . . . . . . . . . . . . . . . . . . . . . . . . . . . . . . . . . . . . . . . . . . . 45
Apparent Temperatures . . . . . . . . . . . . . . . . . . . . . . . . . . . . . . . . . . . . . . . . 45
Wind chill . . . . . . . . . . . . . . . . . . . . . . . . . . . . . . . . . . . . . . . . . . . . . 45
Heat Index . . . . . . . . . . . . . . . . . . . . . . . . . . . . . . . . . . . . . . . . . . . . 45
Temperature/Humi d ity/Su n /Wind (THSW) Index . . . . . . . . . . . . . . . 46
Humidity . . . . . . . . . . . . . . . . . . . . . . . . . . . . . . . . . . . . . . . . . . . . . . . . . . . . 46
Dew Point . . . . . . . . . . . . . . . . . . . . . . . . . . . . . . . . . . . . . . . . . . . . . . . . . . . 46
Rain . . . . . . . . . . . . . . . . . . . . . . . . . . . . . . . . . . . . . . . . . . . . . . . . . . . . . . . . 47
Barometric Pressure . . . . . . . . . . . . . . . . . . . . . . . . . . . . . . . . . . . . . . . . . . . 47
Solar Radiation . . . . . . . . . . . . . . . . . . . . . . . . . . . . . . . . . . . . . . . . . . . . . . . 47
UV (Ultra Viol e t) Radiation . . . . . . . . . . . . . . . . . . . . . . . . . . . . . . . . . . . . . . 48
UV MEDs . . . . . . . . . . . . . . . . . . . . . . . . . . . . . . . . . . . . . . . . . . . . . 48
UV Index . . . . . . . . . . . . . . . . . . . . . . . . . . . . . . . . . . . . . . . . . . . . . . 49
Evapotranspiration (ET) . . . . . . . . . . . . . . . . . . . . . . . . . . . . . . . . . . . . . . . . 50
Leaf Wetness . . . . . . . . . . . . . . . . . . . . . . . . . . . . . . . . . . . . . . . . . . . . . . . . 50
Soil Moisture . . . . . . . . . . . . . . . . . . . . . . . . . . . . . . . . . . . . . . . . . . . . . . . . . 50
Time . . . . . . . . . . . . . . . . . . . . . . . . . . . . . . . . . . . . . . . . . . . . . . . . . . . . . . . 50
Appendix B: Specif icatio ns . . . . . . . . . . . . . . . . . . . . . . . . . . . . . . . . . . . . 51
Console Specifications . . . . . . . . . . . . . . . . . . . . . . . . . . . . . . . . . . . . . . . . . 51
Wireless Transmission Sp e cifications . . . . . . . . . . . . . . . . . . . . . . . . . . . . . . 51
Console Data Display Specifications . . . . . . . . . . . . . . . . . . . . . . . . . . . . . . 52
Weather Data Specifica tions . . . . . . . . . . . . . . . . . . . . . . . . . . . . . . . . . . . . . 53
LL
Page 5

:(/&20(72
$17$*(352
9
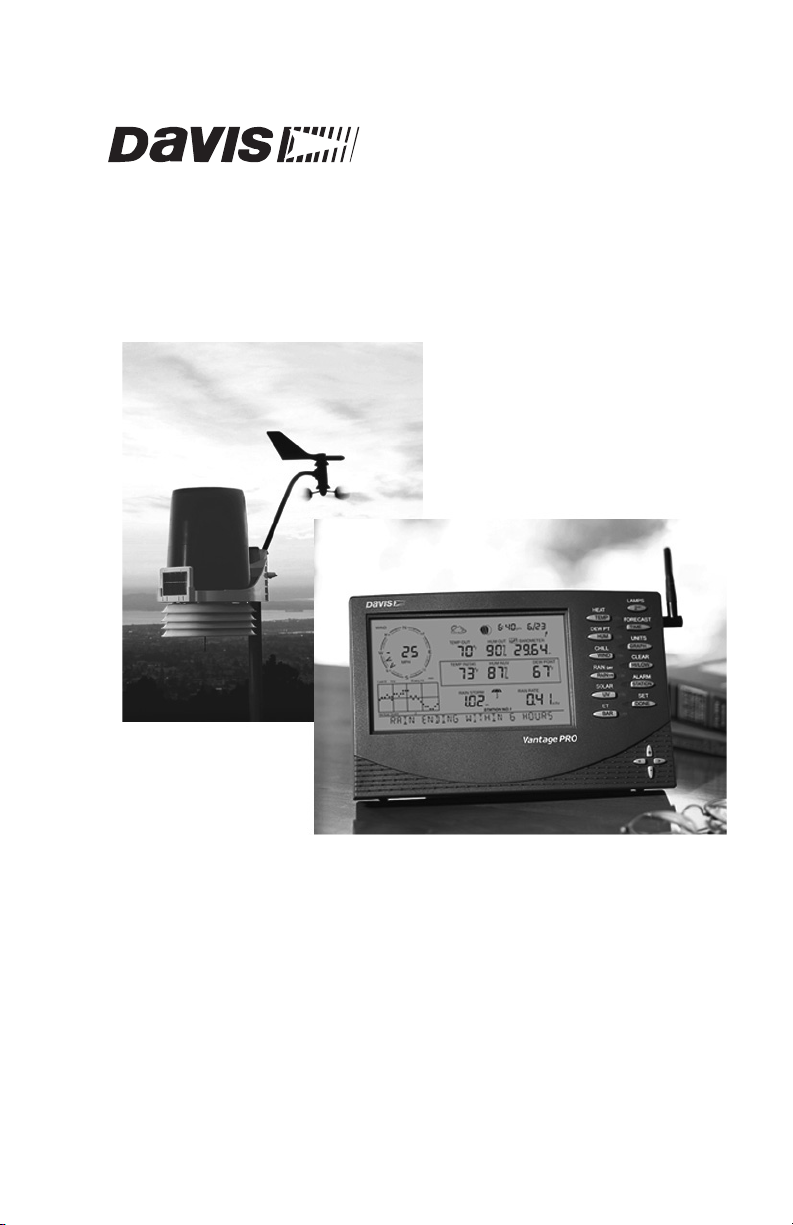
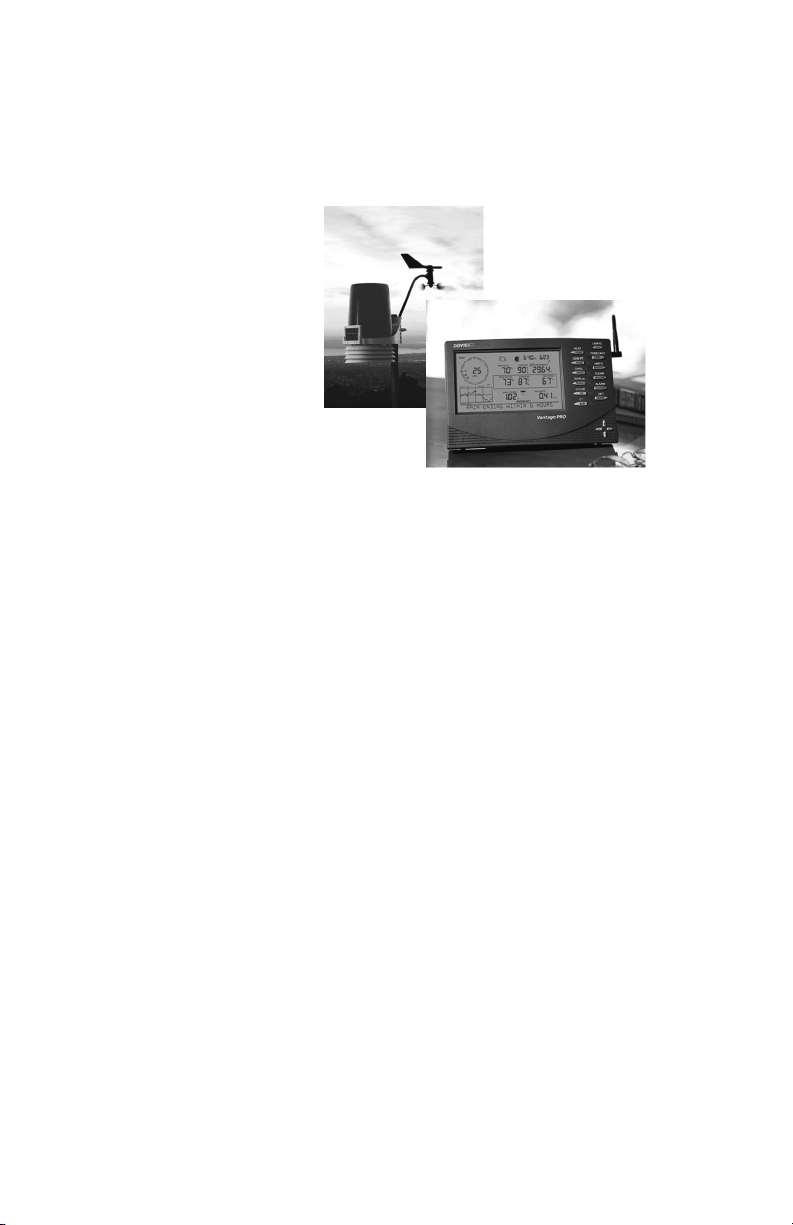
Welcome to your Vantage Pro® Weather S t a tio n con sol e. The co nsole
displays and records your station’s weather data, provides graphing and
alarm functions, and interfaces your weather data to a computer using our
optional WeatherLink software.
Vantage Pro stations are available in two basic versions: Cabled and
Wireless. A Cabled Vantage Pro station transmits outside sensor data from
the Integrated Sensor Suite (ISS) to the console using a standard fourconductor cable. A Wireless Vantage Pro station transmits outside sensor
data from the ISS to the c onsole via a l ow-power radi o. Wireles s stati ons can
also collect data from the optional Vantage Pro stations listed on page 3.
The V antage Pro Quick Refere nce Guide inc luded with you r sta tion provid es
an easy to use reference for most console functions.
Console Features
Keyboard & Dis play
The keyboard let s you v iew current and hi storic al dat a, s et and clear alar ms,
change station modes, enter calibration numbers, set up and view graphs,
select sensors, and read the forecast. The keyboard consists of 12
command keys located next to the screen console and four navigation keys
located below the command keys.
A weather variable or console command is printed on each command key.
Just press a key to select the variable or function printed on that key.
Each command key also has a secondary function which is printed above
the key on the console case. To select the secondary function, press and
release the 2ND key (on the front of the console, upper right corner) and
then immediately press the key for that function.
Page 6
1. Welcome to Vantage Pro
Note: After pressing the 2ND key, the screen displays the 2ND
seconds. All secondary key functions are enabled during this time. Keys resume
normal operation after the icon disappears.
icon for three
The the +, - , <, and > navigat ion ke ys are u sed to s elect comm and opti ons,
adjust values, and to provide additional functions when used in combination
with a command key.
To learn more about the keyboard, see “Selecting Weather Variables” on
page 21.
Console Modes
The Vantage Pro console operates in five different modes:
ABLE 1-1: CONSOLE OPERATING MODES
T
Mode Description
Setup
Current Data
High/Low High/Low mode displays the daily, monthly or yearly high and low readings.
Alarm Alarm mode allows you to set, clear, and review alarm settings.
Graph Graph mode displays your weather data using over 100 different kinds of graphs.
Use Setup mode to enter the time, date, and other information required to calculate
and display weather data.
Use Current Data mode to read the current weather information, change measurement
units, and to set, clear or calibrate weather readings.
Vantage Pro Options
ND
2
Optional Sensors
Vantage Pro stations are extremely flexible. Use the following optional
sensors and wireless stations to enhance the weather monitoring
capabilities of your Vantage Pro. See our website for complete details:
www.davisnet.com.
Note:
Wireless Weather En voy (#6314)
The Wireless Weather Envoy performs much of the same functions as a
V antage Pro cons ole, but in a muc h smaller p acka ge. Use Env oy to interf ace
your wireless s t ati on to a compute r w he n you ’d rather place the co ns ole in a
better location for viewing weather conditions.
Anemometer Transmitter Ki t (#6330)
Provides more flexible anemometer placement for wireless stations.
Wireless Leaf & Soil Moisture/Temperature Station (#6343)
Measures and transmits leaf wetness, soil moisture and temperature data.
Optional wireless stations can only be used with Wireless Vantage Pro Stations.
Page 7

Vantage Pro Options
Wireless Soil Moisture/Temperature Station (#6361)
Measures and transmits soil moisture and temperature data.
Wireless Temperature Station (#6370)
Measures and transmits temperature data.
Wireless Temperature/Humidity Station (#63 80)
Measures and transmits air temperature and humidity data.
Wireless Temperature/Humidity Station with Fan-Aspirated Radiation Shield (# 6385)
Measures and transmits air temperature and humidity data. Uses our patented fan-aspirated radiation shield for much more accurate readings.
Solar Radiatio n Sensor (# 645 0)
Measures solar radiation. Required for calculating evapotranspiration (ET).
Available for cabled and wireless stations. Requires Sensor Mounting Shelf
(#6672).
Ultraviolet ( UV) Radiat ion Sensor ( #6490)
Measures UV radiation. Required for calculating the UV dose. Available for
Cabled and Wireless stations. Requires Sensor Mounting Shelf (#6672).
Optional WeatherLink Software
Our WeatherLin k softwa re and dat a logger con nect your Vantage Pro station
directly to a computer, providing enhanced weather monitoring capabilities
and powerful internet features. The WeatherLink data logger fits neatly on
the console and stores weather data even when the computer is turned off.
®
Weath er L in k
Requires computer running Windows 95, 98, 2000, ME, NT or XP and one
free serial port. Include s dat a logge r, eight foot cable, software, and manu al.
Weath er L in k
Requires a Macintosh comp uter run ning O S X 10.0 1 or new er an d a USB- toserial (DB-9) Cable (#8434) or third-party USB-to-serial port adapter.
Includes data logger, eight foot cable, 9-pin DIN connector, software, and
manual.
for Vantage Pro, Windows version (#6510C )
®
for Vantage Pro, Mac versi on (#652 0C)
Optional Accessor ies
The following accesso rie s are av ail abl e from your de ale r or may be ord ered
directly from Davis Instruments.
Page 8

1. Welcome to Vantage Pro
Sensor Mounti ng Shelf (#66 72)
Required for mounting the optional Solar Radiation and/or UV sensors. The
mounting shelf attaches to the ISS.
Car/Boat/RV Lighter Cord (#6604)
Allows the Vantage Pro to draw power from a standard car cigarette lighter.
USB-to-Seria l (DB-9) Ca ble (#8434)
Allows WeatherLink to connect to a USB port on your computer.
Telephone Modem Adapter (#6533)
Allows a dialup connection between the station and the computer.
Extension Cab les (#7876)
Allows you to place the Cabled Vantage Pro ISS further away from the console. Maximum cable length is 1000’ feet (300 m).
• #7876-040 Cable, 40’ (12 m)
• #7876-100 Cable, 100’ (30 m)
• #7876-200 Cable, 200’ (61 m)
Davis Baseball Cap (#PR725)
100% cotton twill cap is two-toned with a
washed khaki crown, dark blue brim, and
embroidered Davis logo. Self-fabric closure with
brass buckl e. One size fits all.
Page 9
,167$//,1*7+(
2162/(
&
The Vantage Pro console is designed to give extremely accurate readings.
As with any precision instrument, use care in its assembly and handling.
Although installing the console is relatively simple, following the steps outlined in this chapte r and as se mb ling the Vantage Pro correctly from the sta rt
will help ensure that you enjoy all of its features with a minimum of time and
effort.
Powering the Console
Cabled Vantage Pro Stations
Cabled Vantage Pro consoles supply power to the Integrated Sensor Suite
(ISS) through the console cable. Because of the added power consumption
of the ISS, the cabled console requires an AC power adapter or optional
Car/Boat/RV Lighter Cord for the main power supply. The console batteries
will provide backup power for up to four to six weeks.
Wireless Vantage Pro Stations
Wireless Vantage Pro consoles have been optimized to reduce power consumption and do not require the use of an AC adapter. You may use the
included adapter if you wish, but the three C-cell batteries should power a
wireless console for up to one year.
WARNING:
Note: The console does not recharge the batteries. Because of this, and because NiCad batteries will
Be sure to use the power adapter supplied with your Vantage Pro Console. Your console may
be damaged by connecting the wrong power adapter.
not power the console as long as alkaline batteries, we recommend using alkaline batteries in
your console.
Page 10
2. Installing the Console
Installing the AC Power Adapt er
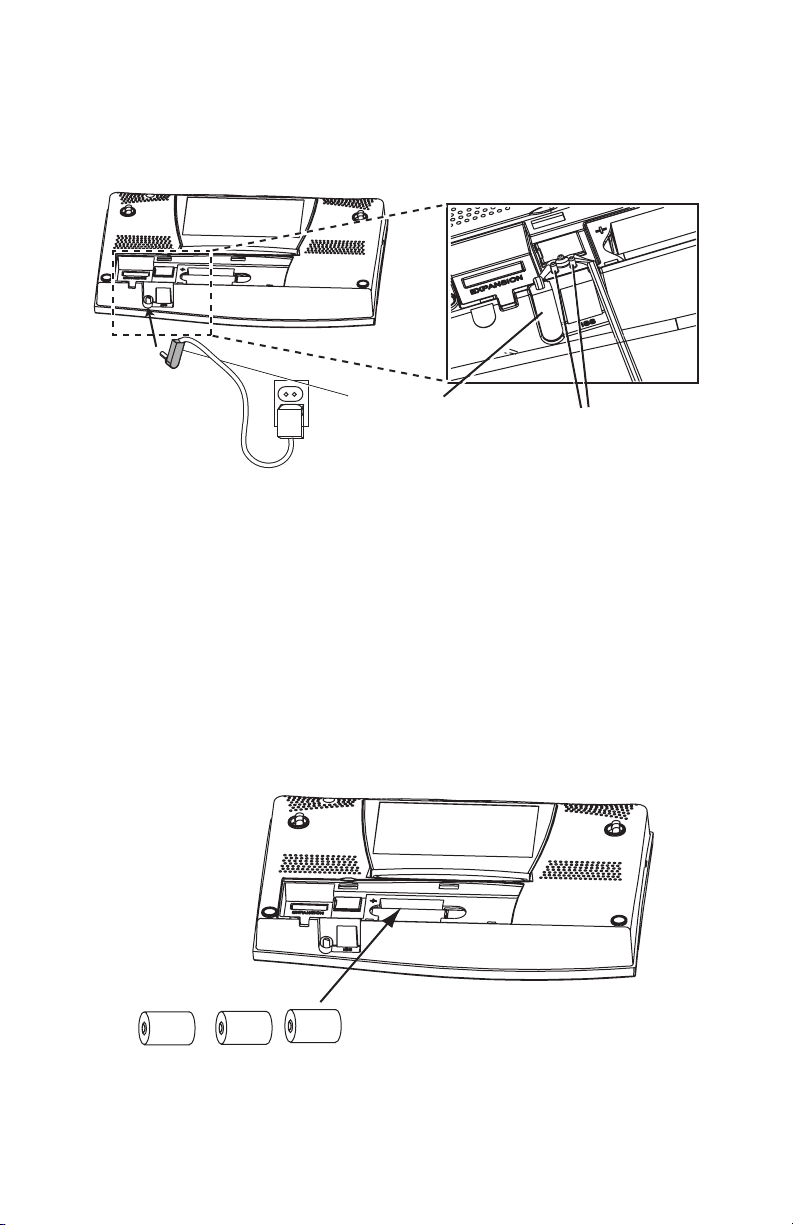
1. Find the power jack located on the bottom of the console case.
Power Plug
Wrap Cord Around Pins
2. Insert the power adapter plug into the console power jack then plug the
other end of the adapter into an appropriate power outlet.
3. Check to make sure the console runs through a brief self-test procedure
successfully. The console will display all the LCD segments and then
beep twice.
4. After power-up the console automatically enters Setup mode. Setup
mode guides you through steps required to configure the station. See
“Setup Mode” on page 11 for more information.
Installing Batteries
1. Remove the battery cover locat ed o n the bac k o f the co nso le by p r es si ng
down on the two latches a t the top of th e cover.
Battery
Battery
Battery
2. Insert three C batteries into the batter y chan nel, ne gative (or flat) t ermina l
first.
Page 11
Connecting Cabled Stations
3. Replace the battery cover.
Note: To remove old batteries, see “Changing Batteries” on page 43.
Connecting Cabled Stations
Cabled Vantage Pro stations come with 100 feet (30m) of cable. Maximum
cable length from ISS to console is 1000 feet. See “Opti onal Accessories ” on
page 3 to purchase additional cable.
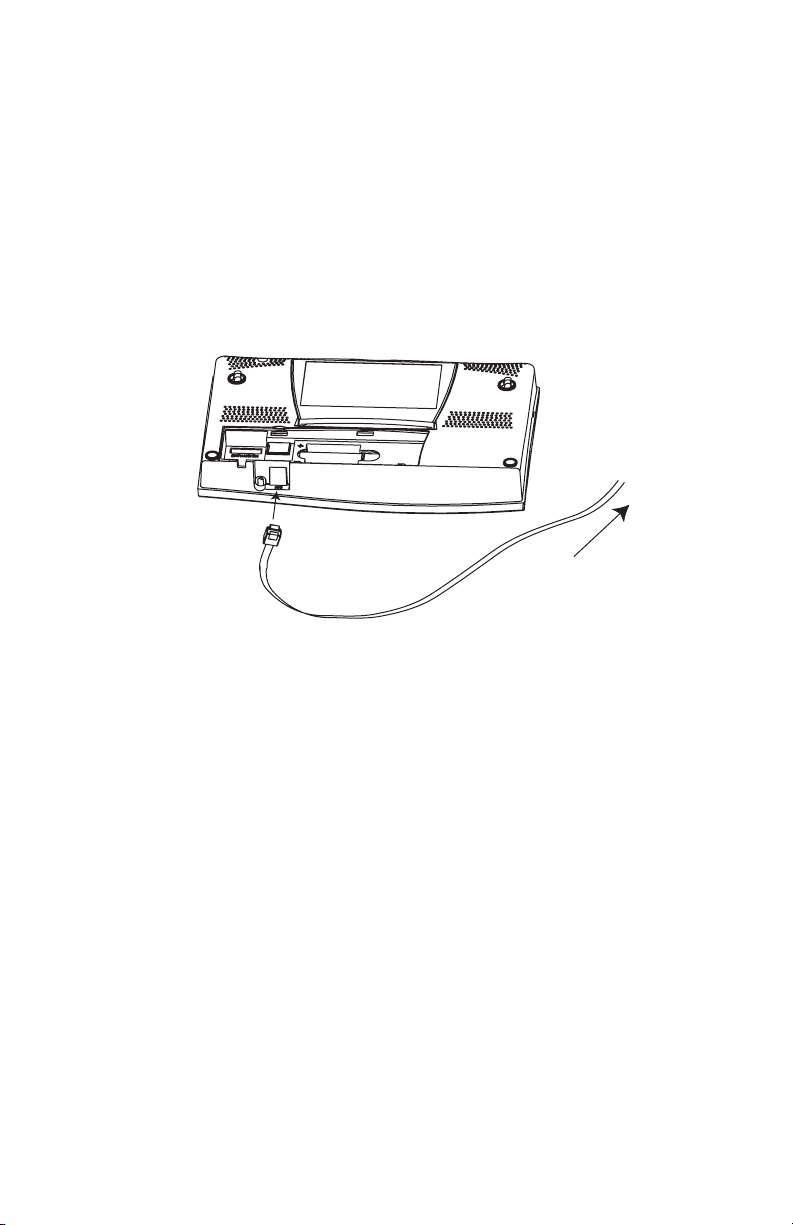
1. Gently insert the console end of the 4-conductor wire into the console
receptacle marked “ISS” until it clicks into place.
To ISS
WARNING:
Do not force the connector into the receptacle.
2. Ensure that the ISS cable is not twisted through the access hole.
Note: The ISS must be assembled and powered before you can test the console connection.
3. Test the connections between the ISS and the console.
Spin the wind cups and change the direction of the vane. If the ISS is
powered and the connection between the ISS and the console is correct,
you should see the wind direction and speed fields changing. Tip the rain
bucket back and forth. You should see rain registering. Also check the
outside temperature and outside humidity readings, as well as readings
for the optional solar and UV sensors, if installed in your station.
If you are installing a wireless station, you will be checking communications between your
Note:
console, ISS and any optional wireless stations when you perform the Setup Mode instructions
located in the next chapter. See “Setup Mode” on page 11.
Page 12

2. Installing the Console
Console Location
You should place the console in a location where the keyboard is easily
accessible and the display is easy to read. For more accurate readings, follow these suggestions:
• Avoid placing the console in direct sunlight. This may cause
erroneous inside temperature and humidity readings and may
damage to the unit.
• Avoid placing the console near radiant heaters or heating and air
conditioning ducts.
• If you are mounting the console on a wall, choose an inner or interior
wall. Avoid walls that heat up or cool down depending on the weather.
• If you have a wireless co nsole , be aware o f p ossible interfe renc e from
cordless phones and other devices. To prevent interference, maintain
a distance of 10 feet bet ween the Vantage Pro console and a cordless
phone (handset and base).
• Avoid positioning a wireles s console near large met allic surf aces such
as beside a refrigerator.
Page 13
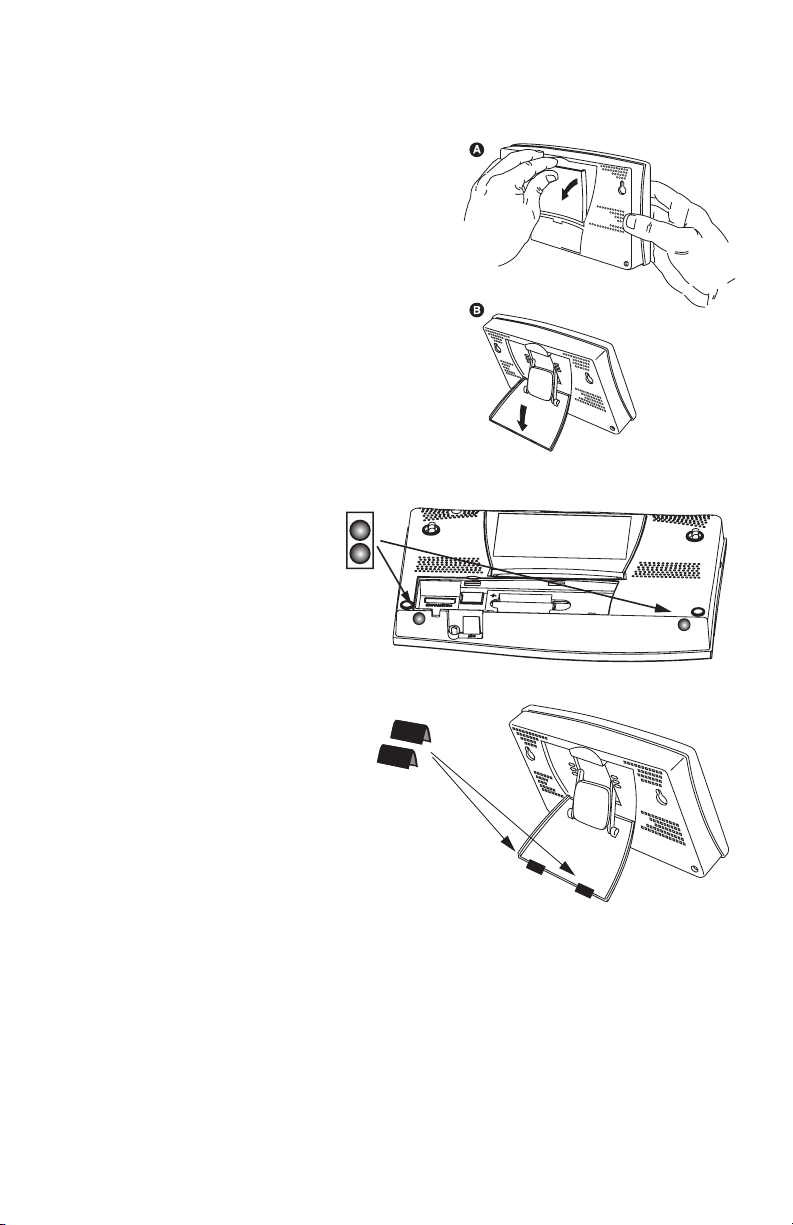
Table & Shelf Place ment
The console kickstand can be set to
five different angles providing five different display angles.
1. Lean the kickstand out by pulling on
its top edge.
You’ll see the indentation for your
finger at the top edge of the consol e.
2. Slide the catch to arrest the kickstand in the appropriate angle.
Choose low angles for display on a
coffee table or other low area.
Choose higher angles for display on
a desk or shelf.
3. Pull up on the stand to close it. It will
be a little tight, so it’s okay to push hard enough to get it to slide.
4. Install the two round
rubber feet on the
bottom of the console.
Console Location
5. Install the two rubber
channel feet on the kickstand.
Page 14
2. Installing the Console
Wall Mounting
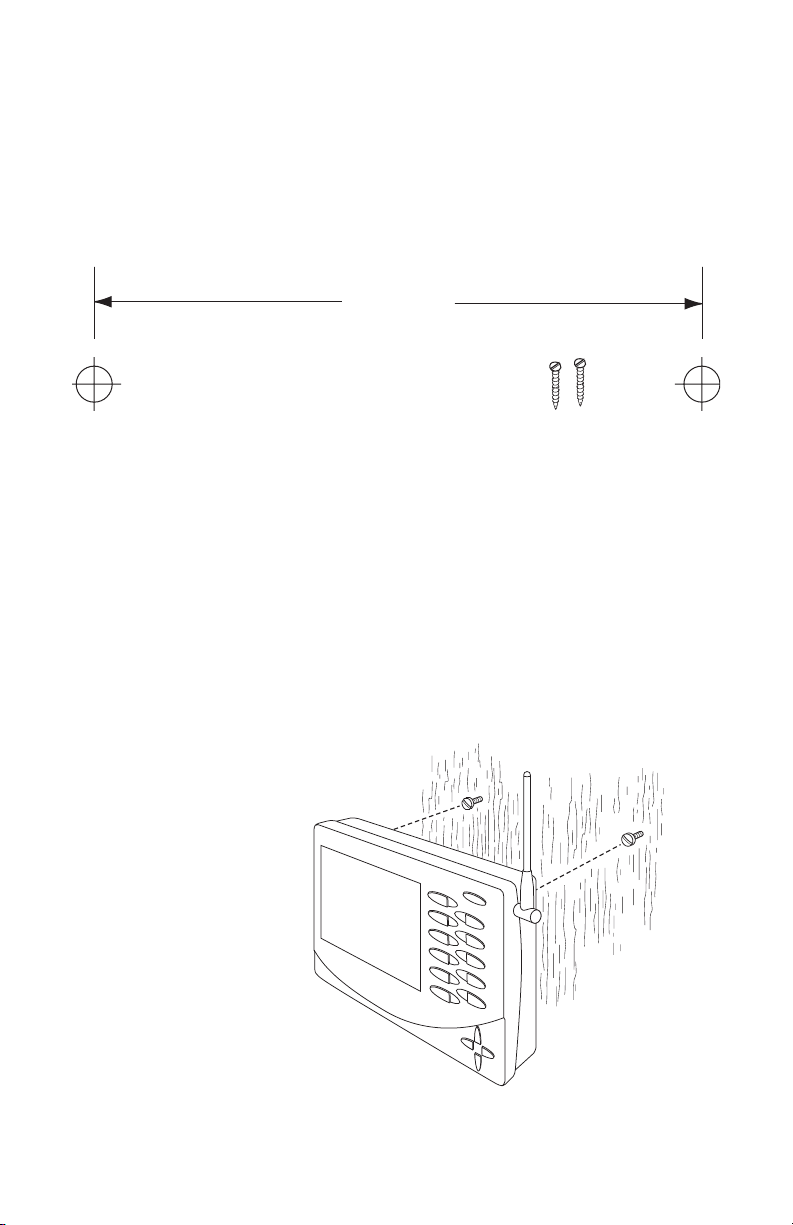
The console mounts to the wall using two k eyholes located on the bac k of
the case.
To mount the console on a wall:
1. Use a ruler to mark two mounting hole position s on the wa ll 8 inch es (203
mm) apart.
Drill two 3/32" or 7/64" (2.4 to 2.8mm) holes
8" (203mm) apart for the #6 x 1" mounting screws.
If you are installing a standard Vantage Pro console with sensor cable
running inside the wall, mount the console over an empty switch box.
2. Use an drill a 3/32 or 7/64” (2.5 mm) drill bit to drill two pilot holes for the
screws.
3. Using a screwdriver , dri ve the two #6 x 1” p an head self-thre ading screw s
into the wall. Leave at least 1/8” (3 m m) between the w all the heads of the
screws.
4. If the kickstand has been pulled out from the case, push it back into its
upright and locked posit ion.
5. Guide the two keyholes on the back of the console over the two screw
heads.
8" (203mm)
Note: Drawing not to scale.
Wall Mounting the
Console
Page 15

86,1*<285
($7+(567$7,21
:
The console LCD sc reen and k eyboard provide ea sy access to your w eather
information. The larg e LCD display shows current and past environmental
conditions as well as a forecast of future conditions.The keyboard controls
console functions allowing you to view current and historical weather information, set and clear alarms, change station modes, view and/or change
station settings, set up and view graphs, select sensors, get the forecast,
and so on.
The console operates in five basic modes: Setup, Current Weather, Highs
and Lows, Alarm, and Graph. Each mode allows you to access a different
set of console functions or to display a a different aspect of your weather
data.
Setup Mode
Setup Mode provide s access to the sta tion confi guratio n settings tha t control
how the station operates.
Setup Mode Commands
Use the following commands to enter, exit and navigate Setup Mode:
• Enter Setup Mode by pressing DONE and - at the same time.
Note: The console automatically enters Setup Mode when first powered.
• Exit Setup Mode by pressing and holding DONE until the Current
Weather screen appears.
• Press DONE to move to the next screen.
• Press BAR to move to the previous screen.
Page 16
3. Using Your Weather Station
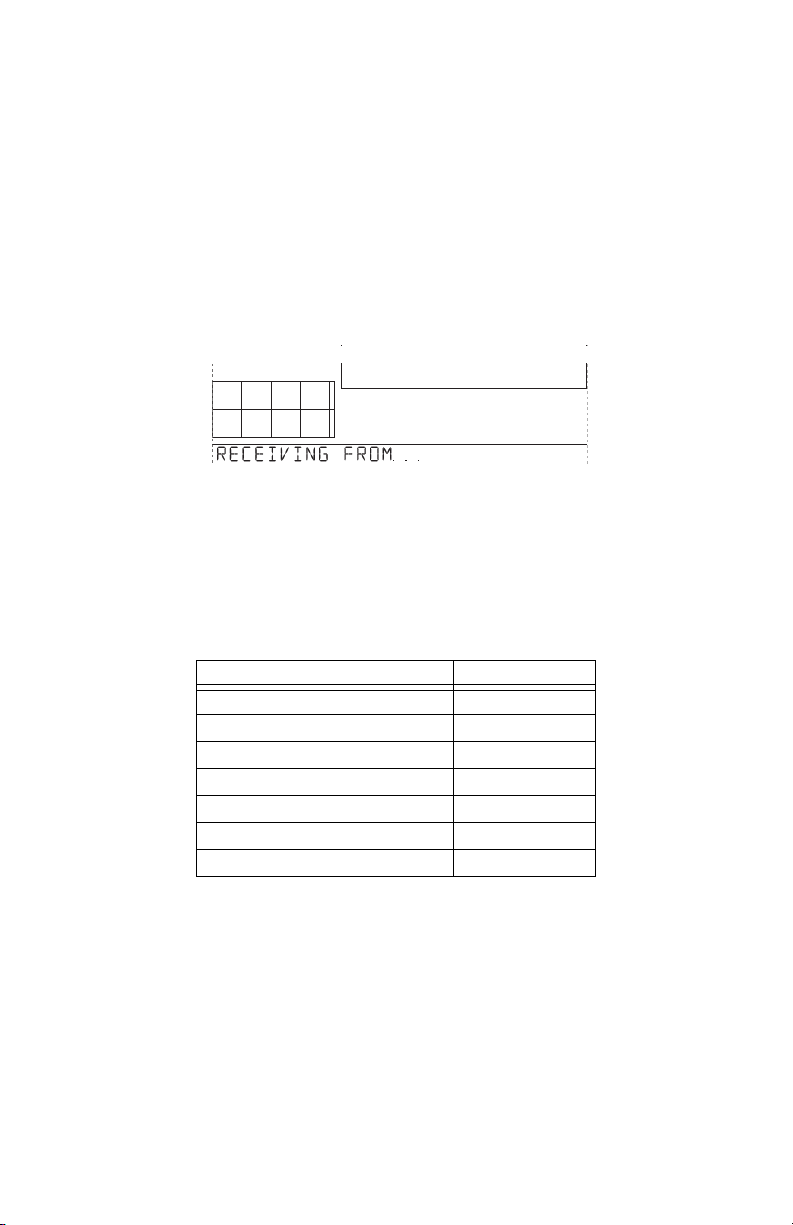
Screen 1: Active Transmitters
Screen 1 displays the message “Receiving from...” and shows the transmitters being received by the console. In addition, an “X” will blink in the lower
right-hand corner of the screen every time the console receives a data
packet from the ISS. The rest of the LCD screen will be blank.
If you have a cabled station, or if your wireless ISS uses the factory settings
and you are r eceiving th e sig nal, t he sc reen d ispla ys “Rec eivi ng from st at ion
No. 1”. Any optional stations you are installing should also appear.
An ISS or optional station must be powered for the Console to recognize it. Refer to the
Note:
installation instructions for the ISS or optional station for more information.
1. Make a note of the station number(s) listed on the screen.
2. Press DONE to move to the next screen.
The console can receive signals from up to eight transmi tters tot al, but there
is also a limit on the number of certain types of transmitters. Table 1 below
lists the maximum number for each type of transmitter:
ABLE 3-1: M AXIMUM NUMBER OF TRANSMITTERS
T
STATION NO.1 4
Transmitter Type Maximum Number
Integrated Sensor Suite (ISS) 1
Anemometer Transmitte r Kit 1
Leaf & Soil Moisture/Temperature Station 1
Soil Moisture/Temperature Station 1
Temperature Station 8
Temperature/Humidity Station 8
SensorLink 1
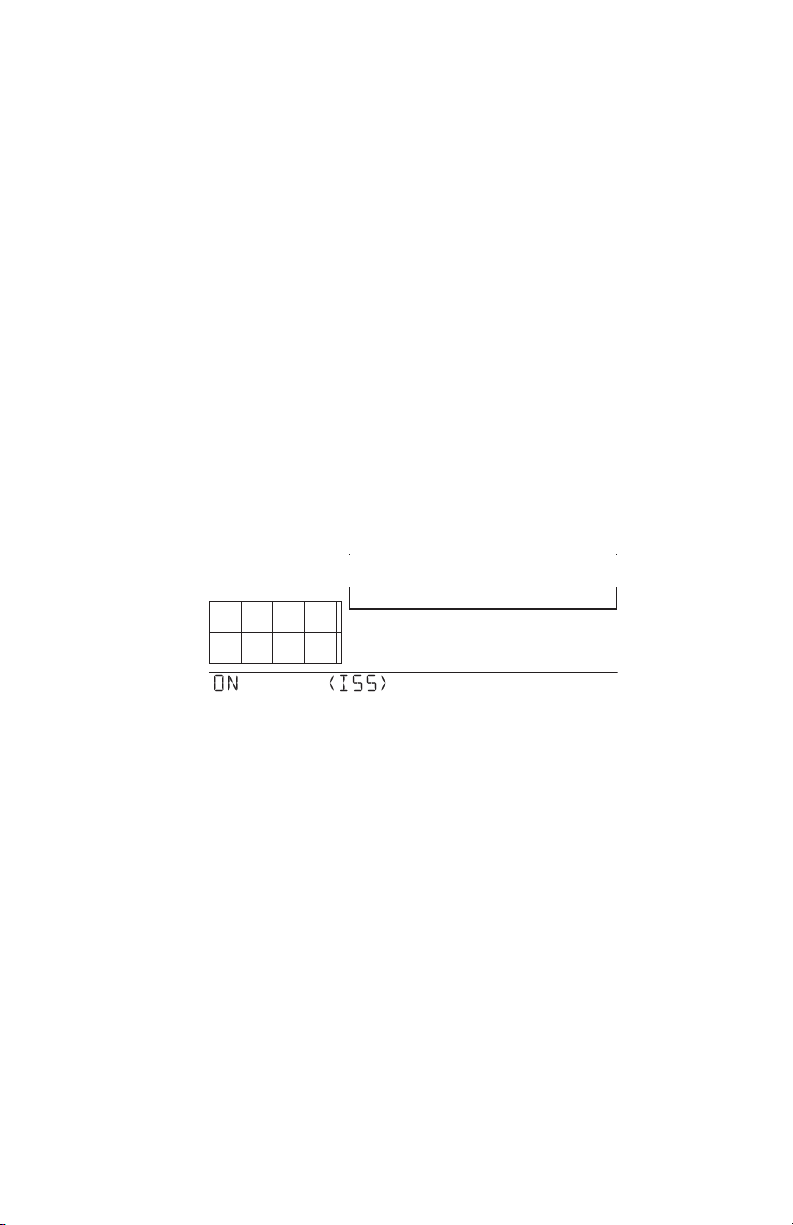
Screen 2: Configurin g Transmitter IDs - Wireless Only
Note: If you have a cabled station, you can press DONE and go to Screen 4: Time & Date.
Setup screen 2 allows you to change the ISS transmitter ID and to add or
remove optional transmitter stations. The default setting works fine for most
installations. The default transmitter ID setting is “1” (ISS).
Vantage Pro Transmission Int ervals
You may also need to set an alternate transmission interval for an ISS
(alternate interval = “.25X”), a Temperature Humidity Station (alternate
interval = “4X”) or Temperature Station (alternate interval = “4X”). A station
Page 17
Setup Mode
may need to use the alternate transmission interval if it is being substituted
for another type of station or because of changes we have made to the
products.
ISS Transmitter ID Settings:
• ISS Station used as an ISS: ISS
• ISS Station used as a Temp/Hum Station: TEMP HUM and 4X
Temperature/Humidity Station Transmitter ID Se ttings:
• Temp/Hum Stations built before April 2003: TEMP HUM
• Temp/Hum Stations built April 2003 or later: TEMP HUM & “4X.”
• Temp/Hum Stations built before April 2003, used as an IS S station:
ISS & “.25x”
• Temp/Hum Stations built April 2003 or later, used as an ISS station:
ISS
Temperature Station Transmitter ID Settings:
• Temperature Stations built before April 2003: TEMP
• Temperature Stations built in April 2003 or later: TEMP HUM & “4X”.
1
1. If you have a cabled station, or if you have a wireless station and are
using the default transmitter ID setting, press DONE to move to the next
screen.
Typically , you can use the default transmitter ID setting of unless you are installing one of the
Note:
optional transmitter stations or unless a nearby neighbor has a Vantage Pro Station that
uses transmitter ID 1 for the ISS.
2. Press the < and > keys to select the transmitter ID.
When you select a transmitter ID, the ID number is displayed on the
screen as well as the current configuration.
3. Press + or - to toggle console reception of signals from transmitters
using that ID ON and OFF.
4. Press GRAPH to change the type of station assigned to each transmitter
number. Scroll through the station types - ISS, TEMP, HUM,TEMP HUM,
WIND, LEAF, SOIL, LEAF/SOIL and SENSORLINK - until the c orrect type
appears.
Select SENSORLINK if the transmitter station is a Wireless Weather Monitor II or Wireless
Note:
Weather Wizard II weather station.
Page 18

3. Using Your Weather Station
5. To change the transmission interval for a transmitter station, press and
hold TEMP then press HI/LOW.
The alternate interval for that station type is indicated on the screen:
“.25X” or “4X”.
6. Press DONE to move to the next screen.
Screen 3: Retransmit - W ireless Only
The console can transmit data from the ISS and other outside sensors to
other Vantage Pro consoles or to the Davis Weather Echo and Weather
Echo Plus.
2
1. Press the +, -, > or STATION key to enab le ret rans m it. The fi rst available
transmitter ID is automatically assigned.
2. Press the + or - key to toggle retransmit ON and OFF.
3. When retransmit has already been enabled, pressing > will change the
transmitter ID used for retransmit.
4. Press DONE to move to the next screen.
Screen 4: Time & Date
The very first time you power-up the console, the time and date are set to
12:00am 1/1 2000. Be sure to enter the correct date and local time.
To change the time and date:
1. Press < and > to select the hour, minute, month, day or year . T he se lected
time or date setting will blink on and off.
2. To change a setting, press + or - to adjust the value up or down.
am
Page 19

3. T o choose a 12-hour or 24-hou r clock , first sel ect eithe r the hour or min ute
setting, then press 2ND and immediately press UNITS. This will switch
the console from one type of clock to the other.
4. To choose a MM/DD or DD/MM display for the date, first select either the
day or month setting, then press 2ND and immediately p ress UNITS. This
will switch the console from date display to the other.
5. When you’re finished, press DONE to move to the next screen.
Screen 5: Latitude
Be sure to enter the correct latitude. The console uses latitude along with
longitude to determine your location, allowing it to adjust the forecast and
calculate the times for sunset and sunrise.
• Latitude measures distance north or south of the equator.
• Latitude is used with longitude to identify your position on earth.
• If you do not know your la titu de and lo ngitude, there are se ve ral wa ys
to find out. Many atlases and maps include latitude and longitude
lines. You can also talk to the reference department of your local
library, call your local airport, or search on the Internet. The more
accurate you are, the better; however, a reasonable estimate will
work, too.
Setup Mode
1. Press < and > to move between fields.
2. Press + and - to change the settings up or down.
3. T o select the Northern or South ern Hemi sp here, press 2ND, then UNITS.
4. Press DONE to move to the next screen.
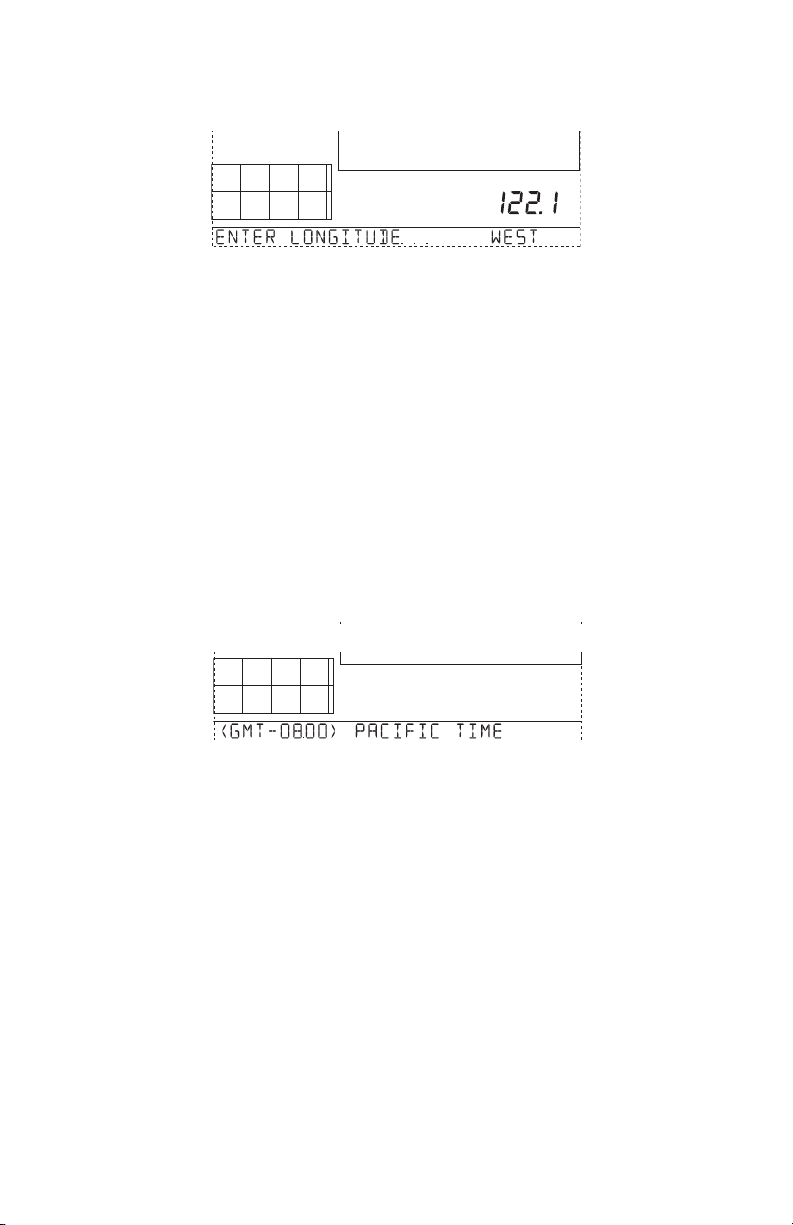
Screen 6: Longitude
Be sure to enter th e correc t longitu de. The console uses lon gitude along w ith
latitude to determine your location, allowing it to adjust the forecast and calculate the times for sunset and sunrise. See Screen 5: Latitude for information on determining your longi tud e.
• Longitude measures distance east or west of the Prime Meridian, an
imaginary line running north and south through Greenwich, England.
• Longitude is used with latitude to identify your position on earth.
Page 20
3. Using Your Weather Station
1. Press < and > to move between fields.
2. Press + and - to change the settings up or down.
3. T o select the Northern or South ern Hemisphere, press 2ND, then UNITS.
4. Press DONE to move to the next screen.
Screen 7: Time Zone
The console is pre-programmed with a combination of US time zones and
the names of majo r cities represent ing time zones a round the world. You can
also configure your time zone using the Universal Time Coordinate (UTC)
offset.
Note: UTC offset measures the difference between the time in any time zone and a standard time,
set by convention as the time at the Royal Observatory in Greenwich, England. Hayward,
California, the home of Davis Instruments, observes Pacific Standard Time. The UTC offset for
Pacific Standard Time is -8:00, or eight hours behind Universal Time (UT). When it’s 7:00 pm
(1900 hours) UT, it’s 19 - 8 = 1100 hours, or 11:00 am in Hayward.
1. Press + and - to cycle through time zones.
2. If your time zone is not show n, p res s 2ND then press + and - to set your
UTC offset.
3. Press DONE to select the time zone or UTC offset shown on the screen
and move to the next screen.
Screen 8: Daylight S avings Setting s
In most of North America, including Mexico (excepting Saskatchewan, Eastern Indiana, Arizona , and Hawa ii), as well as in Austr alia (exc epting W estern
Australia, Northern Territory, and Queensland) and in Europe use the AUT O
Daylight Savings setting. The console is pre-programmed to use the correct
starting and stopping dates for Daylight Savings Time in th es e are as, based
on the time zone setting in screen 7.
Weather stations located in areas not listed above should use the MANUAL
setting.
Page 21

1. Press + and - to choose Auto or Manual.
2. Press DONE to move to the next screen.
Screen 9: Daylight S avings Status
Use this screen to either verify the cor rect autom atic Daylig ht Savings st atus
or to control Daylight Savings manually.
1. If you have a MANUAL Daylight Savings setting, press + and - to turn
Daylight Savings Time on or off on the appropriate days of the year.
2. If you have an AUTO Daylig ht Savings setting, th e consol e will dis play the
appropriate setting based on the current time and date.
3. Press DONE to move to the next screen.
Setup Mode
Screen 10: Elevation
Meteorologists s ta ndardiz e baro metric pre ssure dat a to s ea lev el so that s urface readings are comparable, whether they’re taken on a mountainside or
by the ocean. To make this same standardization and ensure accurate readings, enter your elevation in this screen.
If you do not know your elevation, there are several ways to find out. Many
atlases and almanacs include elevation for cities and towns. You can also
check with the reference department of your local library. The more accurate
you are, the better; but a reasonable estimate works too.
1. Press < and > to move from one numeral in the elevation to another.
2. Press + and - to adjust a numeral up or down.
3. To switch between feet and meters, press 2ND then press UNITS.
Page 22

3. Using Your Weather Station
4. If you are below sea level, such as some places in California like Deat h
Valley, first enter the elevation as a positive number. Then, select the “0”
immediately to the left of the left most non-zero digit (the second zero
from the left in 0026, for example, or the first zero from the left in 0207)
and press + and - to switch from a positive to negative eleva tion.
You can only set the elevation to negative after you have entered a non-zero digit and when
Note:
the zero in the position immediately to the left of the left-most non-zero digit has been
selected.
5. Press DONE to move to the next screen.
Screen 11: Wind Cup Size
Vantage Pro Stations come standard with large wind cups. Switch this setting to small only if you have separately purchased and installed small wind
cups.
Large wind cups are more sensitive to low wind speeds and are the best choice for most users.
Note:
Small wind cups are less sensitive at low wind speeds but can measure much higher wind
speeds. Install small wind cups if you wish to measure winds ov er 150 mph (242 km/h).
1. Press + and - to switch between large and small wind cups.
2. Press DONE to move to the next screen.
Screen 12: Rain Co llector
The tipping bucket in your Vantage Pro rain collector has been calibrated at
the factory to measure 0.01” of rain with each tip. Although the console
provides 0.01”, 0.1mm or 0.2 mm settings, the rain collector requires the
0.01” setting to accurately measure rainfall.
1. Press DONE to use the 0.01” setting and move to the next screen.
See “Metric Rain Collector Settings” on page 27 for instructions on how to set up your station
Note:
to display rain data in millimeters instead of inches.
Page 23

Screen 13: Rain Se ason
Because rainy seasons begin and end at different times in different parts of
the world, you must specify the month you wish your yearly rain data to
begin. January is the default.
1. Press + and - to select the month for the start of the rainy season.
2. Press DONE to move to the next screen.
Screen 14: Serial Baud Rate
The console uses the se rial port to communicate with a computer. If you are
connecting the cons ole d irectl y to yo ur compu ter, leave the setting at 19200,
the highest rate for t he port. If you’re usin g a m odem, use t he hig hest s etting
your modem can handle.
Note:
The baud rate setting on your console must match the serial port setting in the software on your
computer. If you are using WeatherLink for Vantage Pro, refer to WeatherLink help for
instructions on setting the serial port baud rate on your computer.
Note: The console must be equipped with a WeatherLink data logger in order to communicate with a
computer.
Setup Mode
Serial Port Baud Rate
19200
1. Press + and - to select the baud rate.
Vantage Pro supports baud rates of 1200, 2400, 4800, 9600, 14400, and
19200.
2. You have completed the console setup. To exit Setup Mode, press and
hold DONE until the current weather screen appears.
Page 24

3. Using Your Weather Station
Clear All Command
After you have completed the above setup procedures and have exited the
Setup Mode, please use the Clear All command before putting your weather
station into service.
Note:
The Clear All command clears all stored high and low weather data including monthly and
yearly highs and lows and clears the alarm settings.
1. Press the WIND key on the console.
2. Press the 2ND key, then press and hold the CLEAR key for at least six
seconds.
3. Release the CLEAR key when you see the following message displayed
at the bottom of the console’s screen: “CLEARING NOW”.
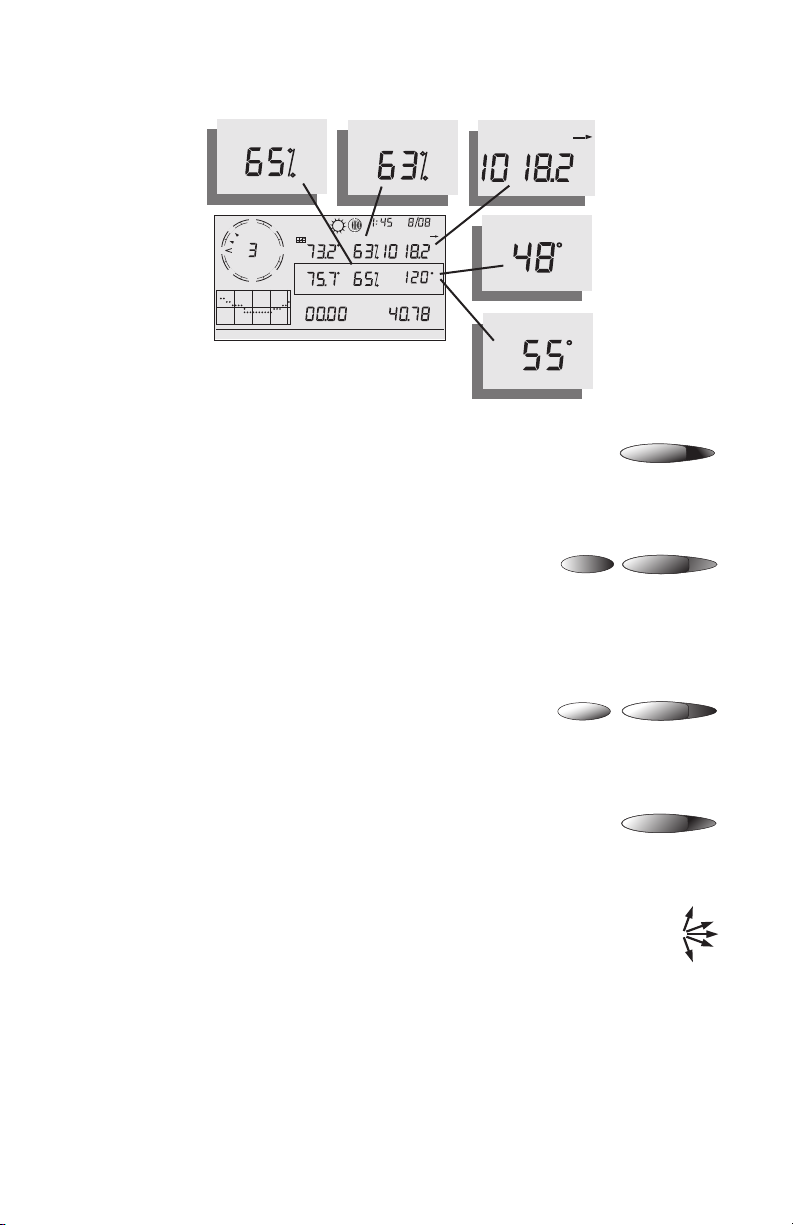
Current Weather Mode
The Current Weather Mo de displ ays the curre nt dat a readin gs from your station, select units of measure, and also to calibrate, set or clear weather variables. You can see up to ten weather variables on the screen at the same
time, as well as the time and date, the moon and forecast icons, a forecast
or special message from your station, and a graph of the currently selected
variable. A few variables are always visible on the console screen while
most variables shared their location with one or more other variables. You
can select any variable not currently on the screen to display it.
Selecting Weather Variables
Select a weather variable to display it’s data on the screen if it isn’t already
visible or to graph the variable in the Current Weather Mode screen.
Weather variables are selected via the console command keys:
• If the variable is printed on a key, just press the key to select the
variable.
• If the variable is printed on the console housing, first press and
release the 2ND
select it.
Note: After pressing the 2ND key, the screen displays the 2ND
seconds. Command key secondary functions are enabled during this time. The
keys return to normal operation after the icon disappears.
• You can also select any variable currently displayed on the LCD
screen using the +, - , <, and > navigation keys. Push + to move up
the screen. Push - to move down the screen. Push < to move left and
push > to move right.
• The console places a graph icon on the screen to indicate
the currently selected variable.
key, then quickly press the key below the variable to
icon for three
ND
2
Page 25

Current Weather Mode
WIND
W
TEMP OUT
N
MPH
NE
WIND
N
NE
NW
E
W
E
MPH
SESW
S
Last 24 hrshrEvery 1
SESW
S
Vertical Scale: X10
NW
F
TEMP OUT
TEMP IN
DAILY RAIN
F
F
in
STATION NO.1
HUM OUT
HUM IN
TEMP IN
pm
BAROMETER
HEAT INDEX
RAIN YEAR
F
hPa
F
in
Wind Speed and Direction
Press WIND to select wind speed. Wind speed may be displayed in miles per hour (mph), kilometers per hour (km/h),
CHILL
WIND
meters per second (m/s), and knots (knots). The 10 minute
average wind speed will be displayed in the ticker. (See item 12, “Weather
Ticker”, on the Inside Front Cover)
A solid arrow within the compass rose indicates t he current
wind direction. Arrow caps indicate up to six different 10minute dominant wind directions to provide a history of the
dominant wind directions for the past hour.
Press WIND a second time to display the wind direction in
degrees instead of the wind speed. Each additional WIND
key press toggles the display between wind speed and wind direction in
degrees.
Outside and Inside Temperature
Press the TEMP key to select outside temperature. Tempera-
HEAT
TEMP
ture may be displayed in degrees Fahrenheit (ºF) or Centigrade (ºC).
Press the TEMP key again to select inside temperature.
Page 26
3. Using Your Weather Station
HUM IN
WIND
N
NE
NW
W
MPH
SW
SE
S
Last 24 hrshrEvery 1
Vertical Scale: X10
TEMP OUT
E
TEMP IN
DAILY RAIN
F
F
in
STATION NO.1
HUM OUT
HUM IN
HUM OUT
pm
BAROMETER
HEAT INDEX
RAIN YEAR
hPa
F
in
BAROMETER
DEW POINT
CHILL
Humidity, Pressure, Dew Point, & Wind
Chill
Humidity
Press the HUM key to select outside humidity. Pressing the
HUM key a second time selects inside humidity. Humidity is
displayed in percent relative humidity.
Wind Chill
Press the 2ND key then press the CHILL key to select
Wind Chill. Wind Chill is displayed in either degrees
Fahrenheit (ºF) or Centigrade (ºC).
The console uses the ten-minute average wind speed to calculate wind chill.
Note:
Dew Point
Press the 2ND key then press the DEW PT key to
select Dew Point. Dew Point is displayed in either
degrees Fahrenheit (ºF) or Centigrade (ºC).
hPa
F
F
DEW PT
HUM
CHILL
ND
2
ND
2
WIND
DEW PT
HUM
Barometric P ressure
Press the BAR key to select barometric pressure. Barometric pressure may be displayed in inches (in), millimeters
(mm), millib ars (mb) or hectoPascals (hPa ).
Pressure Trend
The pressure trend arrow indicates the current barometric trend,
measured over the last 3 hours. The pressure trend requires three
hours of data i n order to be c alculate d so y ou won’ t see it righ t away
on a new station. The pressure trend is always indicated on the console
screen, as long as required data is av ail abl e.
ET
BAR
Page 27

WIND
N
NE
NW
W
MPH
SE
SW
S
Last 24 hrshrEvery 1
Vertical Scale: X10
TEMP OUT HUM OUT
E
TEMP IN
DAILY RAIN
F
UV
F
in
STATION NO.1
index
pm
BAROMETER
THSW INDEX
RAIN YEAR
Current Weather Mode
hPa
F
in
F
HEAT INDEX
UV
F
index
THSW INDEX
Daily Rain, Rain Storm, Rain Year, Rain Month, & Rain Rate
UV (Ultraviolet Ra diation)
Press the UV key to display the current UV Index. Press
SUN
UV
again to see MEDS. See “Apparent Temperatures” on
page 45.
Requires a UV sensor. (See “Optional Sensors” on page 2)
Note:
Heat Index
Press the 2ND key then press HEAT to display the
ND
2
HEAT
TEMP
Heat Index . See “Apparent Temperatures” on
page 45.
THSW Index
After you have selected the Heat Index, press
ND
2
HEAT
TEMP
the 2ND key then press HEAT again to select
the Temperature Humidity Sun Wind (THSW) Index. The THSW Index is
only available on stations equipped with a solar radiation sensor. See
“Apparent Temperatures” on page45.
The Heat Index and the THSW Index appear in the same place on the
screen and are displayed in degrees Fahrenheit (ºF) or Centigrade (ºC).
Page 28

3. Using Your Weather Station
F
F
HUM OUT
HUM IN
in
STATION NO.1
RAIN YEAR
pm
BAROMETER
hPa
F
HEAT INDEX
RAIN YEAR
in
RAIN RATE
in
RAIN MO
in
in/hr
RAIN DAY
RAINYR
Daily Rain, Rain
Storm, Rain
Year, Rain
Month, & Rain
Rain Rate
Press the RAIN
RAIN STORM
in
WIND
N
NE
NW
TEMP OUT
E
W
MPH
TEMP IN
SW
SE
S
Rate
Last 24hrshrEvery 1
Vertical Scale: X10
DAILY RAIN
DAILY RAIN
in
YR key to display the current rain rate.
Rain Rate may be displayed as either inches per hour (in/
hr) or millimeters per hour (mm/hr). Rain Rate will show zero and the
umbrella icon will not appear until 0.02 in (.508mm) of rain falls within a 15–
minute period.
Month-to-date precipitation
Press the RAIN
YR again to select the month-to-date pre-
RAIN DAY
RAINYR
cipitation record. Monthly rain displays the precipitation
accumulated sinc e the c alend ar mon th bega n. Mo nth-t o-date precip ita tion is
displayed in inches (in) or millimeters (mm).
Year-to-date precipitation
Press the RAIN
YR key a thir d time to display the year-to-
RAIN DAY
RAINYR
date precipitation record. Yearly rain displays the precipitation accumulated since the 1st of the month you’ve chosen in Setup Mode
(See “Screen 13: Rain Season” on page 19.) Year-to-date precipitation is
displayed in inches (in) or millimeters (mm).
The “Year-to-date” and “Month-to-date” registers record precipitation accumulation for one year
Note:
and one month respectively; however, you may start each counting period whenever you wish.
Daily Rain
Press and release the 2ND key, then press the
LAMPS
RAIN DAY
ND
RAINYR
2
RAINDAY key. Daily Rain displays the rain accumu-
lated since 12 midnight. Any rain accumulated in the last 24 hours will be
displayed in the ticker.
Rain Storm
Rain Storm displays the rain total of the last rain
LAMPS
RAIN DAY
ND
RAINYR
2
event. It takes two rain cli ck s to begin a storm event
and 24 hours without rain to end a storm event.
Press and release the 2ND key, then press the RAIN
DAY key. Rain Storm
will only increment after 0.02 in (.508mm) rain. Rain accumulation may be
displayed as either millimeters (mm) or inches (in).
Page 29

Current Weather Mode
hPa
F
in
SUN
ET
YEAR
mm
W/m
mm
2
WIND
N
NE
NW
W
MPH
SW
SE
S
Last 24 hrshrEvery 1
Vertical Scale: X10
ET
F
F
STATION NO.1
mm
HUM OUT
HUM IN
in
pm
BAROMETER
HEAT INDEX
RAIN YEAR
ET
MO
GRAPH
YEAR
TEMP OUT
E
TEMP IN
DAILY RAIN
Solar Radiation, Current ET, ET Month & ET Year
Solar Radi ation
Press and release the 2ND key, then press the
LAMPS
ND
2
SUN
UV
SUN key to display the current solar radiation
reading. Solar radiation is displayed as Watts per square meter (W/m
Note:
Requires a solar radiation sensor. (See “Optional Sensors” on page 2)
Current Evapotranspiration (ET)
Press and release the 2ND key, then press the ET
ND
2
ET
BAR
key to display the current evapotranspiration reading.
Monthly Evapot ranspirat ion (ET)
Press the 2ND key then press the ET key, then repeat this key sequence
again to display Monthly ET.
2
).
Yearly Evapotranspirat ion (ET)
Press the 2ND key then pres s the ET key , the n repeat th is key sequenc e two
more times to display the ET reading since January 1st of the current year.
Requires a solar radiation sensor. (See “Optional Sensors” on page 2)
Note:
Displaying the Forecast
Y o ur cons ole ge nerates a weath er forec ast bas ed on the baro metric readin g
& trend, wind speed & direction, rainfall, temperature, humidity, latitude &
longitude, and time of year. Included in the forecast is of a prediction of the
sky condition (s unny, cloudy, etc .) and c hanges i n precip itation , temp erature,
wind direction or wind speed.
Press the 2ND key then press the FORECAST
key to display the forecast.
Note:
The forecast is updated once an hour, on the hour.
2
ND
FORECAST
TIME
Page 30
3. Using Your Weather Station
Forecast Icons
The forecast icons show the predicted weather for the next 12 hours. If rain
or snow is possible but not necessarily “l ik ely ”, y ou wil l s ee the partly cloud y
icon along with the rain or snow icon.
Mostly Clear Partly Cloudy Mostly Cloudy SnowRain Likely
Forecast Ticker Tape Message
The forecast ticker mess age pre dict s the w eather u p to 48 hours in adva nce.
Displaying Time & Date or Sunrise & Sunset
Your console shows the sunrise and sunset time in the same place on the
screen used by the current time and date.
Press the TIME key to toggle the screen
between the curren t ti me a nd dat e or t he sunris e
and sunset times for the current day.
Note:
See “Screen 4: Time & Date” on page 14 to change the console time and date or to select a 12or 24-hour clock.
Selecting Units of Measure
Most weather variables may be displayed in at least two different
measurement units, including US and Metric systems, although some
variables feature more possibilities. Barometric pressure, for example, may
be displayed in mill ibar s, mill imete rs, inch es, or hectoPas cals . Note tha t you
can set each variable’s units independently, and at any time, as you like.
To change units:
1. Select the weather variable.
See “Selecting Weather Variables” on page 20.
2. Press and release the 2ND key.
3. Press the UNITS key .
The selected variable’s units will change. Repeat steps 2 and 3 until the
desired units appear.
For example, to change the Barometric pressure units, first select Barometric pressure by pushing BAR. Next, press and release the 2ND key,
then press the UNITS key . Re peating the se step s cycles through th e units
available for Barometric pressure: millibars, millimeters, inches, and hectoPascals.
Barometric Pressure Units: millibars (mb), millimeters (mm) and
inches (in)
BAROMETER
mb
BAROMETER
mm
2
ND
FORECAST
TIME
BAROMETER
in
Page 31

Current Weather Mode
Metric Rain Collector Se ttings
Use the following procedures to set up your Vantage Pro station to display
rain data in millimeter. See “Rain” on page 47 for more information.
Note: Vantage Pro stations measure rain in 0.01 inch increments and also store rain data in inch
units. When you select metric units for rain data, the logged data is converted from inches to
millimeters at the time it is displayed.
Console Setup: Rain Collector Settings
1. Enter Setup Mode by pressing DONE and - at the same time.
2. Press DONE repeatedly until you see the Rain Collector setup screen.
The rain collector should be set to 0.01 inch.
3. If necessary, press + or - to change the setting to 0.01”.
The rain collector tipping bucket is calibrated at the factory to measure
0.01” of rain with each tip. The 0.1mm and 0.2 mm settings will not
provide accurate rain measurements.
4. Exit Setup Mode by pressing and holding DONE until the Current
Weather screen appears.
To Display Rain in Metric Units on the Consol e
1. Press the RAINYR key to display the current rain rate.
Selecting Metric units for one rain variable will also set
all the other rain variables to Metric units.
2. Press and release the 2ND key.
3. Press the UNITS key once.
The units used to display Rain data will toggle between
inches and millimeters each time you repeat this key
sequence.
To Display Rain in Metric Units in WeatherLink
Refer to WeatherLink Help for instruc tions required to set the rain colle ctor to
0.01” and to select millimeters as the unit for rain.
Calibrating, Setting, and C learing Variables
To fine-tune your station, you can calibrate most of the weather variables.
For example, if your outsid e temperature seems consis tently too hi gh or too
low, you can enter an offset to correct the deviation.
RAIN DAY
RAINYR
LAMPS
2
UNITS
GRAPH
ND
Page 32

3. Using Your Weather Station
Calibrating Temperature And Humidity
You can calibrate inside and outside temperature, inside and outside humidity, as well as any extra temperature or humidity sensors you have transmitting to Vantage Pro.
1. Select the variable to be calibrated.
See “Selecting Weather Variables” on page 20.
2. Press and release 2ND, then press and hold SET.
After a moment, the variable you’ve selected will begin to blink. Keep
holding the SET key until the Calibration Offset message appears in the
ticker.
The ticker displays the current calibration offset.
Note:
3. Press + and - to add to or subtract from the temperature offset value.
Inside and outside temperature are calibrated in 0.1 °F or 0.1 °C
increments, up to a maximum offset of +12.7 (°F or °C) and a minimum
offset of -12.8 (°F o r °C). The var iab le will c hange value a nd the ti cker wil l
show the offset you’ve entered.
4. When you are finished, press DONE to exit calibration.
Calibrate Wind Dir ection Read ing
You can use this procedure to correct your the anemometer reading. This is
useful if the anemometer does not point North in your installation.
1. Check the current direction of the wind vane on the anemometer.
Compare it to the wind direction reading on the console. If the wind vane
is pointing south, for instance, the wind direction reading on the screen
should be 180°.
• If the wind direction reading is greater than 180°, subtract 180 from
the reading and subtract the amount of the offset from the wind
direction reading.
• If the wind direction reading is less than 180°, subtract the reading
from 180 and add the amount of the offset to the wind direction
reading.
2. Press WIND as necessary to display the wind direction in degrees.
3. Press and release 2ND, then press and hold SET.
The wind direction variable will begin to blink.
4. Continue holding the key until the CAL message appears in the ticker.
The ticker displays the current wind direction calibration value.
Note:
5. Press < or > to select digits in the anemometer’s current reading.
6. Press + and - to add to or subtract from the anemometer reading.
7. Repeat steps 4 and 5 until you have entered the offset value from Step 1.
8. When you are finished, press DONE to exit calibration.
Page 33

Current Weather Mode
Calibrating Bar ometric Pressure
Note:
Before calibrating the barometric pressure, be sure the station is set to the correct elevation.
1. Press BAR to select barometric pressure.
2. Press and release 2ND, then press and hold SET.
The pressure variable will blink.
3. Continue holding the key until the ticker reads “set barometer...”.
4. Press < or > to select digits in the variable.
5. Press + and - to add to or subtract from the digit’s value.
6. When you are finished, press DONE to exit calibration.
Setting Weather Variables
To set a weather variable’s value:
1. Select the variable you wish to change.
2. Press and release 2ND, then press and hold SET.
The variable will blink.
3. Keep holding the key until all digits are lit and only one digit is blinking.
4. Press < or > to select digits in the value.
5. Press + and - to add to or subtract from the selected digit.
6. When you are finished, press DONE to exit.
You can set values for the following weather variables:
Daily rain
This sets the daily rain total. Monthly and yearly rain totals are updated.
Monthly rain
This sets the current months total rain. Does not affect yearly rain total.
Yearly rain
The sets the current year’s rain total.
Daily ET
This sets the daily ET total. Monthly and yearly ET totals are updated.
Monthly ET
This sets the current month’s ET. Does not affect yearly total.
Yearly ET
This sets the current year’s total ET.
Page 34

3. Using Your Weather Station
Clearing Weather Variables
To clear a single weather variable:
1. Select the weather variable.
See “Selecting Weather Variables” on page 20.
2. Press and release 2ND, then press and hold CLEAR.
The variable you’v e chos en will blink . Keep holdin g the k ey un til the valu e
changes to zero or, in the case of the barometer, the raw barometer value.
Clear All Command
This command clears all s tored high an d low weat her data includin g monthly
and yearly highs and lows and clears alarm settings all at once:
1. Press the WIND key on the console.
2. Press the 2ND key, then press and hold the CLEAR key for at least six
seconds.
3. Release the CLEAR key when you see the following message displayed
at the bottom of the console’s screen: “CLEARING NOW”.
You can clear the following weather variables:
Barometer
Clearing the barom eter v alue cle ars (a) any p ressu re of f set used to calib rate
the station, and (b) the elevation entry.
Daily rain
Clearing the daily rain value wil l be reflec ted in the da ily r ain to t al, th e las t 15
minutes of rain, the la st th ree ho urs o f rain sent to th e fore cast al gorithm, the
umbrella icon, and the monthly and yearly rain totals.
Clear the daily rain total to correct if your station accidentally recorded rain
when the ISS was installed.
Monthly rain
Clears the monthly rain total. Does not affect yearly rain total.
Yearly rain
Clears the yearly rain total.
Wind
Clears the wind direction calibration.
Daily ET
Clears daily ET and subtracts the old daily ET total from the monthly and
yearly ET totals.
Page 35

Highs and Lows Mode
Monthly ET
Clears the current monthly ET total. Does not affect †he yearly ET total.
Yearly ET
Clears the current yearly ET total.
Highs and Lows Mode
The Vantage Pro records highs and lows for many weather conditions over
three different periods: days, months, and years. Except for Yearly Rainfall,
all high and low registers are cleared automatically at the end of each
period. \
For example, daily highs are cleared at midnight, monthly highs are cleared
at month–end midnight, yearly highs are cleared at year–end midnight. You
may enter the month that you would like the Yearly Rainfall accumulation to
clear. The Yearly Rainfall will clear on the first day of the month you choose.
ABLE 3-2: WEATHER DATA HIGHS AND LOWS
T
Weather Variable High Low
Outside Temperature Yes Yes Yes Yes Yes
Inside Temperature Yes Yes Yes Yes Yes*
Outside Humidity Yes Yes Yes Yes Yes*
Inside Humidity Yes Yes Yes Yes Yes*
Barometer Yes Yes Yes Yes Yes*
Heat Index Yes Yes Yes Yes*
Temp/Hum/Wind/Sun
(THSW) Index
Wind Chill Yes Yes Yes Yes*
Wind Speed Yes Yes Yes Yes Includes direction
Rainfall Rate Yes Yes Yes Yes
Daily Rain Total Total Total
UV Index Yes Yes Yes Yes* requires UV sensor
Solar Radiation Yes Yes Yes Yes* requires solar radiation sensor
Dew Point Yes Yes Yes Yes Yes*
Evapotranspiration Total Total Total requires solar radiation sensor
Soil Moisture Yes Yes Yes Yes Yes* requires soil moisture sensor
Leaf Wetness Yes Yes Yes Yes Yes* requires leaf wetness sensor
* Only stores the yearly high for the current year.
Yes Yes Yes Yes* requires solar radiation sensor
Day,
Time &
Date
Month Year Additional Information
Page 36

3. Using Your Weather Station
Viewing Highs and L ows
1. Press the HI/LOW key to enter the Highs and Lows mode.
The DAY and HIGHS icons light up and the station displays the highs for
all visible fields.
2. Press the + and - keys to scroll between Day Highs, Day Lows, Month
Highs, Month Lows, Year Highs and Year Lows.
The HIGH or LOW icon, as well the DAY, MONTH or YEAR icon will light
to show you which High/Low screen you’ve selected. See “Graph & Hi/
Low Mode Settings” on the inside of the front cover.
3. Press the < and > keys to scroll back and forth through the last 24 days.
Pressing the < key moves you to the previous day’s high s. Ea ch time you
press the < key, the date moves back another day. The 24 dots in the
graph field also represent each of the last 24 days; the right-most dot is
today. As you move backward and forward the flashing dot changes to
show what day you’re looking at.
4. Use the console keys to select a different weather variable.
The console’s time display wil l the show the time of t he selected vari able’s
high or low.
5. When you are finished, press DONE to exit the Highs and Lows mode.
The console screen will switch to the Current Weather mode.
Alarm Mode
The Vantage Pro features more than 30 alarms that can be programmed to
sound whenever a reading exceeds a set value. With the exception of barometric pressure and time, all alarms sound when a reading reaches the
alarm threshold. For example, if the high outside temperature alarm threshold is set at 65 ºF, the alarm will sound when the temperature rises to 65.0
ºF.
When an alarm condition exists, the audible alarm sounds, the alarm icon
blinks repeatedly, and an alarm description appears in the ticker at the
bottom of the screen. The alarm sounds for a maximum two minutes if the
console is battery-powered, but the icon will continue to blink and the
message will stay in the ticke r until yo u clea r the alarm or the condition
clears. If you’re using the AC adapter, the alarm will continue sounding as
long as the condition exists.
The alarm will sound again for each new alarm. If more than one alarm is
active, the description for each active alarm cycles onto the screen every
four seconds. A “+” sym bol app ears at the end of the alarm text if more than
one alarm is tripped.
Low alarms work the same way. For example, if the wind chill threshold is
set for 30 ºF, the alarm condition begins when the temperature drops to 30 º
and will continue until the temperature rises above 30º.
Page 37

Three Special Alarms
ET (Evapotra nspiratio n)
ET is updated only once an hour, on the hour. If during a given hour the ET
Value exceeds the alarm t hreshold, the ET alarm sounds at the end of that
hour. This is true fo r daily, monthly, a nd yearly ET al arms. You must have the
optional Solar Radiation Sensor to use this alarm. See “Evapotranspiration
(ET)” on page 50 for a description of this variable.
Barometric P ressure
The Va ntage Pro allows you to set two barometric pressure alarms: a “rise”
alarm and a “fall” alarm. You may select any rate of change per three hours
between 0.00 and 0.99 Hg; the alarm will sound if the rate of change (in
either direction) exceeds your threshold you set.
Time
The time alarm is a standard “alarm clock” alarm. It will sound at the time
you’ve set. Make sure you choose am or pm, if you’re in 12-hour mode. It will
sound for one minute.
Setting Alarms
1. To view or set the high alarm thresholds, press 2ND then press the
ALARM key enter the Alarm Mode.
The screen shows the current high alarm thresholds. The ALARM and
HIGHS icons also appear.
2. To view or set the low alarm thresholds, first press 2ND then press the
ALARM key enter the Alarm Mode. Then press the HI/LOW key to
display the low alarm threshold settings.
The ALARM and LOWS icons appear. See “Graph & Hi/Low Mode
Settings” on the inside of the front cover.
3. Press the < and > keys to select one of the variables displayed on the
screen or use the console keys to select any weather variable.
4. Press 2ND then press SET to change the selected variable’s alarm
setting.
The right-most digit in the alarm threshold will begin blinking.
5. Press the < and > keys to select digits in the threshold value.
6. Press the + and - keys to change the digit’s value up and down.
7. When you are finished changing the alarm setting, press the DONE key.
8. Repeat steps 3 through 7 to change additional alarm settings.
9. When you are finished, press DONE to exit Alarm Mode.
Alarm Mode
Page 38

3. Using Your Weather Station
Setting the Time Alarm
1. Press 2ND then press the ALARM key to enter the alarm mode.
The ALARM and HIGHS icons appear.
2. Press Time, then press 2ND, and then press SET.
The time field will begin blinking.
3. Press < and > to select hours, minutes, or am/pm.
4. Press the + and - keys to change the digit’s value up and down.
5. When you are finished, press DONE to exit Alarm Mode.
Clearing Alarm Setti ngs
1. Press 2ND then press the ALARM key to enter the alarm mode.
The ALARM and HIGHS icons will appear.
2. Select the alarm setting you wish to clear.
3. Press 2ND, then press and hold CLEAR until the setting changes to all
dashes.
You have cleared the alarm setting.
4. When you are finished, press DONE to exit Alarm Mode.
Silencing Alarms
1. Press DONE to silence an alarm.
T
ABLE 3-3: VANTAGE PRO STATION ALARMS
Variable Alarms
Barometric Pressure Trend
Evapotranspiration ET Alarm - uses total ET for the day
Humidity, Inside High and Low
Humidity, Outside High and Low
Dew Point High and Low
Leaf Wetness High and Low
Rain
Storm Storm Alarm - uses current storm rainfall total
Rain Rate High
Soil Moisture High and Low
Solar Radiation High
Inside Temperature High and Low
Storm Warning - uses trend value rising rate
Storm Clearing - uses trend value falling rate
Flash Flood Alarm - uses current 15 minute rainfall total
24 Hour Rain Alarm - uses current 24 hour rainfall total
Page 39

TABLE 3-3: VANTAGE PRO STATION ALARMS (CONTINUED)
Variable Alarms
Outside Temperature High and Low
Extra Temperature High and Low
Heat Index Temperature High
THSW Index Temperature High
Wind Chill Temperature Low
UV Radiation Index High
UV Radiation MED High -- uses the current total if variable has been reset
Wind Speed High
Time & Date Yes - the alarm sounds for 1 minute.
Graph Mode
The V ant age Pro con sole includ es a pow erful Graph M ode that a llows you to
view over 100 graphs of different kinds right on the screen. - all without connecting to a personal computer.
See Table “Vantage Pro Console Graphs” on page 36 for a list of the
available graphs.
Graph Mode
Viewi ng G rap hs
Although the graphs available may vary for each weather variable, you display the graphs in the same way:
1. Press Graph to enter Graph
Mode.
Only the date, graph, graph
icon, and selected variable
are visible.
Last 24 hrshrEvery 1
The rest of the scre en will be
blank.
2. Select a variable to graph.
Vertical Scale: 2
Values for the each of the last 24 hours are displayed in the graph, each
hour represented by a dot. The dot at right end of the graph is the value
for the current hour. You’ll notice that the dot is blinking.
3. Press the < key and the second dot from the right will start blink.
The screen displays the new dot’s value. The time display will show you
what hour of the last 24 you’re looking at.
4. Press the < and > keys to view the variable’s values for each of the last 24
hours. The console also display the maximum and minimum
temperatures recorded in the last 24 hours.
GRAPH
TEMP OUT
F
am
Page 40

3. Using Your Weather Station
5. Press the + and - keys to shift the graph’s time span.
If you press the - key, the
graph will shift from the last
24 hours to the last 24 days.
Now each dot represents
the high recorded on the
day shown in the date field.
To see the lows recorded in
the last 24 days, press the
HI/LOW key. Press the <
and > keys to move
between days.
If you press the - key again the graph will shift to show the highs of the
last 24 months. As before, use the < and > keys to move between
months. Press the HI/LOW key to shift between the highs and lows.
If you press the - key again, the graph will shift one more time to show
the highs of the last 24 years! U se the HI/LOW ke y to shif t between hig hs
and lows.
The console beeps when you’ve reached the first or last possible value or time span for the
Note:
graph.
Note: Since the console only graphs data collected by your station, the graphs can only show data
collected since your station was first installed.
HIGHS
Last 24 days
Vertical Scale: 5
Every 1
GRAPH
TEMP OUT
F
day
View graphs of all other variables the same way:
1. Enter graph mode.
2. Select the variable you want to view.
3. Use the < and > keys to selec t different variables.
4. Press the + key to shorten the time range.
5. Press the - key to lengthen the time range.
6. Press HI/LOW to shift between highs and lows.
7. Press DONE to exit.
T
ABLE 3-4: VANTAGE PRO CONSOLE GRAPHS
Weather Variable Available Graphs
1 Min
10 Min
Current
15 Min
Barometric Pressure C C C H,L H,L
Evapotranspiration (ET)
b
T TTTT
Humidity, Inside C C H,L H,L
Humidity, Outside C C H,L H,L
a
Daily
Hourly
Yearly
Monthly
Page 41

TABLE 3-4: VANTAGE PRO CONSOLE GRAPHS (CONTINUED)
Weather Variable Available Graphs
Graph Mode
a
1 Min
10 Min
Current
15 Min
Daily
Hourly
Yearly
Monthly
Dew Point C C H,L H,L
Leaf Wetness
c
CCH,LH
Rain T TTTTT
1
Storm
Rain Rate HH HHHH
Soil Moisture C C H,L H,L
Solar Radiation
b
AAHH
Inside Temperature C C H,L H,L
Outside Temperature C C H,L H,L H,L
Heat Index Temperature C C H H
Temp/Hum/Sun/Wi nd (TH SW ) Index
Temperature
b
C CHH
Wind Chill Temperature L L L L
Dose)
d
d
AAHH
TTT
UV Radiation Index
UV Radiation MED (Minimal
Erythemal
Wind Speed A A AH H H H
Direction of High Wind Speed Y Y Y Y
Dominant Wind Direction A A A A
a.A = Average, H = Highs, L = Lows, T = Totals, Y = Yes, C = Current reading at the end of each period
b.Requires solar radiation sensor
c.Requires Wireless Leaf & Soil Moisture/Temperature Station
d.Requires UV sensor
Page 42

3. Using Your Weather Station
Page 43

7528%/(6+227,1*
0
$,17(1$1&(
Vantage Pro Troubleshooting Guide
While your Vantage Pro weather station is designed to provide years of trouble-free operation, occasional problems may arise. If you are having a problem with your station, please consult this troubleshooting guide before
calling the factory. You may be able to quickly solve the problem yourself. If
you need help, please contact Davis Technical Support, page43.
Refer to the ISS Installation Manual for additional troubleshooting information.
Note:
TABLE 4-1: TROUBLESHOOTING GUIDE
Problem Solution
Display is blank
Display shows dashes in
place of weather data
Display
Console is sluggish or does
not work at low temperatures
Display “locks up”
Unit is not receiving power. Check the power adapter connections
and/or replace batteries.
ISS not plugged in (cabled station). See ISS manual.
Sensors not transmitting (wireless station). See ISS (or other transmitter) manual.
Console not receiving (wireless station) - See “Troubleshooting Reception Problems” on page 41.
A reading has exceeded the limits indicated in the specifications table.
Calibrat ion num bers may b e causin g readings to excee d displa y limits. Check calibration number and adju st if nece ssa ry.
The console and display may not work below 32º F (0ºC). Use an
External Temperature sensor in low-temperature locations.
If the console “locks up”, reset the console by removing AC and battery power then restoring power. If this occurs frequently in an ACpowered console, plug the AC power-adapter into a surge suppressor.
Page 44
4. Troubleshooting & Maintenance
TABLE 4-1: TROUBLESHOOTING GUIDE
Problem Solution
Outside temperature sensor
reading seems too high
Inside temperature sensor
reading seems too high
Outside temperature seems
too low
Temperature
Inside temperature sensor
reading seems too low
Check calibration number and adjust if necessary. ISS or temp sensor may need to be relocated. See ISS or other transmitter manual.
Move the console out of direct sunlight. Make sure that the console
or sensor i s no t in con tac t wi t h an ex te r i or wa l l t hat hea t s up in su nlight or when outside temperature rises. Make sure the console or
sensor is not near a heater or other internal heat source (lamps, appliances, etc.). Check calibration number and adjust if necessary.
Check calibration number and adjust if necessary. Sprinklers may
be hitting the ISS radiation shield. Relocate. See ISS manual.
Make sure the console or other temperature sensor is not in contact
with an exterior wall that cools down when outside temperature
drops. Make sure the console or other temperature sensor is not
near an air conditioning vent. Check calibration number and adjust
if necessary.
Inside humidity seems too
high or too low
Humidity
Wind speed reading seems
too high or too low.
Wind speed reads 0 either all
Wind Speed
the time or intermittently
Wind direction reading is
dashed out
Wind direction always says
Wind Direction
North
Wind chill reading seems too
high or too low
Chill
Heat Index reading seems
too high or too low
Heat
Dew Point reading seems
too high or too low
Dew
Make sure the console is not near a humidifier or de-humidifier.
Check calibration number and adjust if necessary. If inside humidity
is low, and inside temperature is too high, see “inside temp” above.
For low readings, remove the wind cups and check for friction sources. Check ISS location. Is it sheltered from the wind? See ISS manual for additional wind speed troubles hoo ting inform ati on
The problem may be with the anemometer. Test anemometer by
spinning wind cups. Check fields one-b and two-b on diagnostic
screen. May require call to tech support.
Wireless model - check reception. See Reception Problems below.
Cabled model - cable may be faulty.
If these steps do not reveal the problem, the anemometer may be
faulty. Call the factory for return authorization.
Usually an ISS problem, especially if outside temperature is dashed
out as well. See the ISS manual for troubleshooting information
Check calibration numbers for temperature. Remember, wind chill
depends on temperature and wind speed. Make sure they’re working.
Check cal ib rat ion nu mber s fo r t empe rat ur e. R eme mber , t he hea t i ndex depends on temperature and outside humidity. Make sure
they’re working.
Check calibration numbers for temperature. Remember, dew point
depends on temperature and outside humidity. Make sure they’re
working.
No rain readings
Rain
Make sure cable-tie is removed from rain collector. See ISS manual.
If you are using wireless sensors from a Weather Monitor II or
Weather Wizard III, set the station type to SensorLink
Page 45

Vantage Pro Troubleshooting Guide
TABLE 4-1: TROUBLESHOOTING GUIDE
Problem Solution
Incorrect times for sunrise
and sunset
Time
Check your latitude and longitude settings. Sunrise and sunset
times are calculated from the console latitude and longitude settings
Troubleshooting Reception Problems
While we have tested the Wireless Vantage Pro radio extensively, each site
and each installation presents its own issues and challenges. Obstructions,
particularly metal, will often cut down your station’s reception distance. Be
sure to test reception between the console and ISS, in the locations you
intend to install them, o r before permanently mounting your ISS or other
transmitter(s).
You can quickly see the console’s reception status by looking at the lower
right corner of the screen:
• An “X” flashes for every data packet received by the console.
• An “R” flashes when the console is trying to re-establish a lost
connection.
• An “L” flashes when the signal has been lost.
• When no data packets have been received for 10 minutes, the
console dashes-out any missing sensor readings
Check Console Reception
Enter Setup mode by pressing DONE, then pre ssing -. Wait a few moment s
while the console list s all the stations transmitting w ithin range. If the cons ole
detects your transmitter, check the following:
• Is the ID you’re receiving configured in the console?
See Table “Maximum Number of Transmitters” on page 12.
• Is the correct station type set?
See “Maximum Number of Transmitters” on page 12.
• Use the diagnostic screen to o bt ain useful signal stre ngth i nformat ion.
See “Console Diagnostic Screen” on page42
• Adjust the console and ISS antennas to be parallel to each other.
• Try turning on the Gain.
See “Diagnostic Screen Commands” on page 42.
• Reduce the distance between the ISS and the console.
Move the console cl oser to the ISS, bu t make su re you’re not s tandin g
directly beneath it. Do you receive a signal?
Check the ISS
Refer to the ISS Inst al lati on Ma nua l for instructions on h ow to c heck the ISS
for potential transmission problems.
Page 46

4. Troubleshooting & Maintenance
6
7
8
9
0
Console Diagno stic Screen
In addition to logging weather data, the console continuously monitors the
station’s radio reception. The signal You may find this information very helpful, especially when you are choosing locations for your console and ISS.
Note: Radio transmission data is cleared each day at midnight.
Diagnostic Scr een Commands
• Press and hold the TEMP key, then press the TIME key to display the
diagnostic screen.
• Press the DONE key to exit the diagnostic screen.
• Press the STATION key to display signal statistics for the next
installed transmitter ID.
• Press the HI/LOW key to toggle Gain on and off. The message in the
ticker indicates the current Gain status. The Receiver Gain setting
provides some control over the receiver sensitivity. If you’re having
trouble with reception, try turning the Gain on.
Diagnostic Scr een Features
12345
am
Last 24 days
14
Vertical Scale: 1 0
(a) Time of day or (b) number of times the reed switch was seen closed
1.
when sampled. The reed switch closes once each rotation. Use the WIND
key to toggle between readings.
Every 1
day
STATION NO. 5
1213
2. (a) Date or (b) number of times the reed switch was seen open when
sampled. The anemometer counts rotations. The reed switch is part of the
anemometer mechanism. WIND key toggles display.
3. (a) Number of CRC errors or (b) 8 bit timer value of next reception. CRC
is an error checking protocol. Toggle display with CHILL.
4. Number of missed data packets.
5. Percentage of scheduled data packets received.
6. Total number of packets received.
7. (a) Number of times the console resynchronized with the transmitter or (b)
maximum number of packets missed in a row without losing synchronization. T oggle usi ng the TEMP key.
1
11
Page 47

Console Maintenance
8. Number of times the console lost communications with the transmitter for
more than 10 minutes.
9. Current number of consecutive misses. The counter increments when the
console is synchronized but the packet is not.
10. Longest streak of consecutive packets received.
11. Current streak of consecutive packets received.
12. Current console battery voltage
13. Receiver Gain Status
14. Graph of last 24 days’ percentage of scheduled ISS data packets.
Console Firmware Versions
In some cases the problem may be that your console firmware doesn’t support what you are trying to do. Use this co mm an d to dete rmi ne the firmware
revision level in your c onsol e. You can find more inform ation on Vantage Pro
console firmware versions and changes in the Weather Software Support
section of our website. See “Contacting Davis Technical Support” on
page 44 for information.
Press and hold the DONE key then press the + key to display the console
firmware version in the ticker at the bottom of the screen.
Console Maintenance
Changing Batter ies
Use this procedure to change console batteries without loosing any stored
weather data or console configuration settings.
1. Plug in the AC adapter
2. Enter Setup Mode by pressing the DONE and - keys.
Entering Setup Mode makes sure the station isn’t writing any data to
memory when you remove power.
3. Remove the battery cover locat ed o n the bac k o f the co nso le by p r es si ng
down on the two latches at the top of the cover
4. Place the console face down on a flat, firm surface.
5. Insert a fingertip between the two expos ed batteries then pres s the middle
battery down toward the notch (toward the “hidden” battery). This will
relieve tension on the first battery and allow you to remove it
Page 48

4. Troubleshooting & Maintenance
Contacting Davis Technical Support
If you have any q uestions , or enc ounter pro blems i nstall ing or o perating y our
Vantage Pro weather station, please contact Davis Technical Support. We’ll
be glad to help.
Please do not return items for repair without prior authorization.
Note:
(510) 732-7814 – Monday – Friday, 7:00 a.m. – 5:30 p.m. Pacific Time. We
are unable to accept collect calls.
(510) 670-0589 – Technical Support Fax.
support@davisnet.com – E-mail to Technical Support.
info@davisnet.com – General e-mail.
www.davisnet.com – Davis Instruments web site. See the Weather Support
section for copies of user ma nuals, pr oduct spec ificatio ns, applica tion notes,
and information on software updates. Watch for FAQs and other updates.
Subscribe to the e-newsletter.et.com
One Year Limited Warranty
For details on our warranty policy, please refer to the Maintenance, Service,
and Repair Information brochure included with your station.
Page 49

$33(1',;$
($7+(5'$7$
:
Refer to this appendix to learn more about the weather variables that are
measured, displayed, and logged by your Vantage Pro Station.
Note:
Some weather variables require optional sensors. See “Optional Sensors” starting on page 2.
Wind
The anemometer measure s wind sp eed and directio n, and is part o f the Integrated Sensor Suite (ISS). The c onsol e also calcul ates a 10-mi nute a verage
wind speed and 10-minute dominant wind direction. The 10-minute average
wind speed is displayed in the console ticker whenever wind has been
selected on the c onsole. The last six 10-minu te domina nt wind directions are
included in the compass rose wind display.
Temperature
The ISS houses the outside temperature sensor in a vented and shielded
enclosure that minimizes the solar radiation induced temperature error. The
console houses the inside temperature sensor. Additional temperature sensors are available for wireless stations and can be used to measure up to
eight locations.
Apparent Temperatures
Vantage Pro calculates three apparent temperature readings: wind chill,
Heat Index, and the Temperature/Humidity/Sun/Wind (THSW) Index.
Apparent temperatures use additional weather data to calculate what a
human body perceives the temperature to be in those conditions .
Wind chill
Wind chill takes into account how the speed of the wind affects our perception of the air temperature. Our bodies warm the surrounding air molecules
by transferring heat from the skin. If there’s no air movement, this insulating
layer of warm air molecules stays next to the body and offers some protection from cooler air molecules. However, wind sweeps that comfy warm air
surrounding the body awa y. The faster the wind blows, the fast er he at i s carried away and the colder you feel.
Heat Index
The Heat Index uses temperature and the relative humidity to determine
how hot the air actually “feels.” When humidity is low, the apparent temperature will be lower than the air temperature, since perspiration evaporates
rapidly to cool the body. However, when humidity is high (i.e., the air is m ore
Page 50

Appendix A: Weather Data
saturated with water vapor) the app arent tem peratu re “feels ” higher th an the
actual air temperature, because perspiration evaporates more slowly.
Note: Vantage Pro measures Heat Index only when the air temperature is above 57° F (14° C),
because it’s insignificant at lower temperatures. (Below 57°, Heat Index = the air temperature.)
The Heat Index is not calculated above 135° F (52° C).
Temperature/Humidity/Sun/Wind (THSW) Ind ex
The THSW Index uses humidity and temperature like the Head Index, but
also includes the heating effects of sunshine and the cooling effects of wind
(like wind chill) to cal culate an apparen t temperatu re of what it “feels” like o ut
in the sun. The THSW Index requires a solar radiation sensor.
Humidity
Humidity itself sim ply refers to the amount of water vapor in the air . Howeve r ,
the amount of water vapor that the air can contain varies with air temperature and pressure. Relative humidity takes into account these factors and
offers a humidity reading which reflects the amount of water vapor in the air
as a percentage of the amount the air i s capable of ho lding. Relative humidity, therefore, is not actually a measure of the amount of water vapor in the
air, but a ratio of the air’s water vapor content to its capacity. When we use
the term humidity in the manual and on the screen, we mean relative humidity.
It is important to realize that relative humidity changes with temperature,
pressure, and water vapor content. A parcel of air with a capacity for 10 g of
water vapor which cont ains 4 g of water vapo r , the relative hum idity would be
40%. Adding 2 g more water vapor (for a total of 6 g) would change the
humidity to 60%. If that same parcel of air is then warmed so that it has a
capacity for 20 g of water vapor, the relative humidity drops to 30% even
though water vapor content does not change.
Relative humidity is an important factor in determining the amount of
evaporation from plants and wet surfaces since warm air with low humidity
has a large capacity to absorb extra water vapor.
Dew Point
Dew point is the temperature to which air must be cooled for saturation
(100% relative humidity) to occur, providing there is no change in water
vapor content. The dew point is an important measurement used to predict
the formation of dew, frost, and fog. If dew point and temperature are close
together in the late afternoon when the air begins to turn colder, fog is likely
during the night. Dew point is also a good indicator of the air’s actual water
vapor content, unlike relative humidity, which takes the air’s temperature into
account. High dew point indicates high water vapor content; low dew point
indicates low water vapor content. In addition a high dew point indicates a
better chance of rain and severe thunderstorms.
Page 51

You can also use dew point to predict the minimum overnight temperature.
Provided no new fronts are expected overnight and the afternoon Relative
Humidity ≥ 50%, the afternoon’s dew point gives you an idea of what
minimum temperature to expect overnight, since the air cannot get colder
than the dew point anytime.
Rain
Vantage Pro incorporates a tipping-bucket rain collector in the ISS that measures 0.01” for each ti p of the bucket. Your station also logs rai n d at a in i nc h
units. If you select millimet ers for the rain m easurement un it, your st ation sti ll
logs rain data in inches but will convert the logged totals from inches to millimeters at the time it is displayed. Converting the logged rain totals reduces
possible conversion losses to a minimum.
Four separate variables track rain totals: “rain storm”, “daily rain”, “monthly
rain”, and “yearly rain”. Rain rate calculations are based on the interval of
time between each bucket tip, which is each 0.01” rainfall increment.
Barometric Pressure
The weight of the air th at makes up our atmos phere exert s a press ure on the
surface of the earth. This pressure is known as atmospheric pressure. Generally , the more air abov e an area, the hig her the at mospheri c pressure, thi s,
in turn, means that atmospheric pressure changes with altitude. For example, atmospheric pressure is greater at sea-level than on a mountaintop. To
compensate for this difference and facilitate comparison between locations
with different altitudes, atmospheric pressure is generally adjusted to the
equivalent sea-level pressure. This adjusted pressure is known as barometric pressure. In reality, the Vantage Pro measures atmospheric pressure.
When you enter your location’s altitude in Setup Mode, the Vantage Pro
stores the necessary offset value to consistently translate atmospheric pressure into barometric pressure.
Barometric pressure also changes with local weather conditions, making
barometric pressure an extremely important and useful weather forecasting
tool. High pressure zones are generally associated with fair weather while
low pressure zones are generally associated with poor weather. For
forecasting purposes, however, the absolute barometric pressure value is
generally less imp ort a nt th an the ch ange in barometric press ure . In gen eral ,
rising pressure indicates imp roving wea ther co ndi tions w hile fallin g pres sure
indicates deteriorating weather conditions.
Rain
Solar Radiation
What we call “ current solar radiation” is technically known as Gl obal Solar
Radiation, a measure of the intensity of the sun’s radiation reaching a horizontal surface. This irradiance includes both the direct component from the
sun and the refle cted comp onent f rom th e rest of the sky. The solar radiation
Page 52

Appendix A: Weather Data
reading gives a measure of the amount of solar radiation hitting the solar
radiation sensor at any given time, expressed in Watts /sq. meter (W/m
Solar radiation requires the solar radiation sensor.
UV (Ultra Violet) Radi ation
Energy from the sun reaches the earth as visible, infrared, and ultraviolet
(UV) rays. Exposure to UV rays can caus e numerous he alt h problem s, such
as sunburn, skin cancer, skin aging, and cataracts, and can suppress the
immune system. The Vantage Pro can help analyze the changing levels of
UV radiation and can advise of situations where exposure is particularly
unacceptable. UV radiation requires the UV radiation sensor. The Vantage
Pro displays UV readings in two scales : MEDs and UV Index .
CAUTION: Your station’s UV readings do not take into account UV reflected off snow, sand, or water,
which can significantly increase your exposure. Nor do your UV readings take into account
the dangers of prolonged UV exposure. The readings do not suggest that any amount of
exposure is safe or healthful. Do not use the Vantage Pro to determine the amount of UV radiation to which you expose yourself. Scientific evidence suggests that UV exposure should be
avoided and that even low UV doses can be harmful.
UV MEDs
MED stands for Minimu m Erythemal Dose, de fined as the amount of su nlight
exposure necess ary to induce a b arely perce ptible redn ess of t he skin with in
24 hours after sun expo sure. In othe r words, expos ure to 1 MED wil l result in
a reddening of the skin. Because different skin types burn at different rates,
1 MED for persons with very dark skin is different from 1 MED for persons
with very light skin.
Both the U.S. Environmental Protection Agency (EPA) and Environment
Canada have developed skin type categories correlating characteristics of
skin with rates of sunburn. See “EPA SKIN PHOTOTYPES” and “ENVIRONMENT
ANADA SKIN TYPES AND REACTION TO THE S UN” for a description of skin types.
C
ABLE A-1: EPA SKIN PHOTOTYPES
T
2
).
Skin Phototype Skin color Tanning & Sunburn history
2 - Sometimes tans, usu-
3 - Usually tans,
sometimes burns
4 - Always tans;
1 - Never tans,
always burns
ally burns
rarely burns
Pale or milky white; alabaster
Very light brown; sometimes
freckles
Light tan; brown, or olive;
distinctly pigmented
Brown, dark brown, or black
Develops red sunburn; painful swelling, skin
peels
Usually burns, pinkish or red colorin g appe ars ;
can gradually develop light brown tan
Rarely burns; shows moderately rapid tanning
response
Rarely burns; shows very rapid tanning re-
sponse
Page 53

UV (Ultra Violet) Radiation
vi-
pe
-
Table A-2: E
NVIRONMENT CANADA SKIN TYPES AND REACTION TO THE SUN
Skin Type Skin Color History of Tanning & Sunburning
I White Always burns eas ily, nev er tans
II White Always burns easily, tans minimally
III Light Brown Burns moderately, tans gradually
IV Moderate Brown Burns minimally, tans well
V Dark Brown Burns rarely, tans profusely
VI Black Never burns, deep pigmentation
a. Developed by T. B. Fitzpatrick of the Harvard Medical School. More about
the Fitzpatrick Skin Types is available in: Fitzpatrick TB. Editorial: the validity and practicality of sun-reactive skin types I through VI. Arch Dermatol
1988; 124:869-871
1
UV Dose that
Causes Sunburn
2
Some burn
3
Skin Phototype (EPA)
All Burn
a
I
II
III
IV
Skin Type (Environment Canada)
V
4
20 40 60 80 100 120
12345
UV Dose (MEDs)
VI
mJ/cm
6
2
UV Dose and Sunburn - Use this plot to estimate the MED dose leading to sunburn. A person with Type II (En
ronment Canada) skin type might choose 0.75 MED as the maximum for the day; in contrast, a person with Ty
V (Environment Canada) Skin Type might consider 2.5 MEDs a reasonable dose for the day. NOTE: the Van
tage Pro assumes a Fitzpatrick (Environment Canada) Skin Type of II.
UV Index
Vantage Pro can also display UV Index, an intensity measurement first
defined by Environment Canada and since been adopted by the World
Meteorological Org anization. UV In dex assigns a number between 0 and 16
to the current UV intensity. The US EPA categorizes the Index values as
shown in 2. The lower the number, the lower the danger of sunburn. The
Index value published by the U.S. National Weather Service is a forecast of
Page 54

Appendix A: Weather Data
the next day’s noontime UV intensity. The Index values displayed by the
V an tage Pro are real-time measurements.
T
ABLE A-3: UV INDEX
Index Values Exposure Category
0 - 2
3 - 4 Low
5 - 6 Moderate
7 - 9 High
10+ Very High
Evapotranspiration (ET)
Evapotranspiration (ET) is a measurement of the amount of water vapor
returned to the air in a given area. It combines the amount of water vapor
returned through evaporation (from wet vegetation surfaces and the stoma
of leaves) with the amount of water vapor returned through transpiration
(exhaling of moisture throu gh plan t skin) to arrive at a total . Effe ctive ly, ET is
the opposite of rainfall, and it is expressed in the same units of measure
(Inches, millimeters).
The Va ntage Pro uses air temperature, relative humidity, average wind
speed, and solar radiation data to estimate ET, which is calculated once an
hour on the hour. ET requires the optional solar radiation sensor.
Minimal
Leaf Wetness
Leaf wetness (see “Optional Sensors” on page 2) provides an indication of
whether the surface o f fo lia ge in the area is wet or dry by in dic at ing ho w wet
the surface of t he sensor is. The lea f w et nes s rea din g ranges from 0 (dry ) to
15. Leaf wetness requires an optional Leaf & Soil Moisture/Temperature
Station and is only available for Wireless Vantage Pro Stations.
Soil Moisture
Soil Moisture, as the name s uggest s, is a measure of the mo isture co ntent of
the soil. Soil moisture is m ea sure d on a sc al e of 0 to 20 0 centibars, and can
help choose times to water crops. The soil moisture sensor measures the
vacuum created in the so il b y th e la ck of m oi stu re. A h igh soi l m ois tu re rea ding indicates dryer s oil ; a lower soil moisture reading mea ns wetter soil. Soil
Moisture requires an optional Leaf & Soil Moisture/Temperature Station or
Soil Moisture Station and is only availabl e f or Wireless Vantage Pro Stati ons .
Time
A built-in clock and calendar track the time and date. The console automatically adjusts for daylight savings time and for leap years.
Page 55

$33(1',;%
3(&,),&$7,216
6
See complete specifications for your Vantage Pro Station at our website:
www.davisnet.com
Console Specifications
Console Operating Temperature . . . . . . . . . . +14° to +140°F (-10° to +60°C)
Display Temperature . . . . . . . . . . . . . . . . . . . +32° to +140° F (0° to +60° C)
Non-operating Temperature . . . . . . . . . . . . . . -5° to +158° F (-20° to +70° C )
Console Current Draw . . . . . . . . . . . . . . . . . Wireless: 0.67 m A average, 15mA peak, (add 80 mA
Power Adapter. . . . . . . . . . . . . . . . . . . . . . . . 5 VDC, 200 mA
Battery Backup . . . . . . . . . . . . . . . . . . . . . . . 3 C-cells
Battery Life (no AC power) . . . . . . . . . . . . . . Wireless: up to 1 year;
Connectors . . . . . . . . . . . . . . . . . . . . . . . . . . Modular RJ-11
Housing Material . . . . . . . . . . . . . . . . . . . . . . UV-resistant ABS plastic
Console Display Type . . . . . . . . . . . . . . . . . . LCD Transflective
Display Backlight. . . . . . . . . . . . . . . . . . . . . . 4 LEDs
Dimensions:
Console (with antenna) . . . . . . . . . . . . . 10.375" x 6.125" x 1.5" (264mm x 156 mm x 38 mm)
Console (no antenna). . . . . . . . . . . . . . 9.625" x 6.125" x 1.5" (244 mm x 156 mm x 38 mm)
Display. . . . . . . . . . . . . . . . . . . . . . . . . 5.94" x 3.375" (151 mm x 86 mm)
Weight (with batteries). . . . . . . . . . . . . . . . . . 1.88 lbs. (.85 kg)
for display lamps, add 0.125 mA for each transmitter
station received by console) at 4 to 6 VDC
Cabled: 10 mA (average), 15 mA (peak) (+80 mA for
illuminated display) at 4 to 6 VDC
Cabled: 1 month (approximately)
Wireless Transmission Specifications
Transmit/Receive Frequency . . . . . . . . . . . . . US Models: 916.5 MHz
Overseas Models: 868.35 MHz
DavisTalk™ ID Codes Available . . . . . . . . . . 8
Output Power . . . . . . . . . . . . . . . . . . . . . . . . 916.5 MHz: FCC-certified low power, less than 1
mW, no license required
868.35 MHz: CE-certified, less than 10 mW, no
license required
Range
Line of Sight. . . . . . . . . . . . . . . . . . . . . up to 400 feet (120 m)
Through Walls . . . . . . . . . . . . . . . . . . . 75 to 150 feet (23 to 46 m)
Page 56

Appendix B: Specifications
Console Data Display Specifications
Historical Data. . . . . . . . . . . . . . . . . . . . . . . .Includes the past 24 values listed unless otherwise
Daily Data . . . . . . . . . . . . . . . . . . . . . . . . . . .Includes the earliest time of occurrence of highs and
Monthly Data . . . . . . . . . . . . . . . . . . . . . . . . .Period begins/ends at 12:00 am on the first of the
Yearly Data . . . . . . . . . . . . . . . . . . . . . . . . . .Period begins/ends at 12:00 am on the first of
Current Data . . . . . . . . . . . . . . . . . . . . . . . . .Current data appears in the right most column in the
Graph Time Interval . . . . . . . . . . . . . . . . . . .1 min., 10 min., 15 min., 1 hour, 1 day, 1 month, 1
Graph Time Span. . . . . . . . . . . . . . . . . . . . . .24 Intervals + Current Interval (see Graph Intervals
Graph Variable Span (Vertical Scale). . . . . . . Automatic (varies depending upon data range);
Alarm Indication. . . . . . . . . . . . . . . . . . . . . . .Alarms sound for only 2 minutes (time alarm is
Update Interval . . . . . . . . . . . . . . . . . . . . . . .Varies with sensor - see individual sensor specs
Forecast:
Variables Used . . . . . . . . . . . . . . . . . . . Barometric Reading & Trend, Wind Speed &
Update Interval . . . . . . . . . . . . . . . . . . .1 hour
Display Format . . . . . . . . . . . . . . . . . . .Icons on top center of display; detailed message in
Variables Predicted . . . . . . . . . . . . . . . . Sky Condition, Precipitation, Temperature Changes,
noted; all can be cleared and all totals reset
lows; period begins/ends at 12:00 am
month
January unless otherwise noted
console graph and represents the latest value within
the last period on the graph; totals can be set or reset
year (user-selectable, availability depends upon
variable selected)
to determine time span)
Maximum and Minimum value in range appear in
ticker
always 1 minute) if operating on battery power. Alarm
message is displayed in ticker as long as threshold is
met or exceeded. Alarms can be silenced (but not
cleared) by pressing the DONE key.
Also varies with DavisTalk transmitter ID code #1=shortest, #8=longest
Direction, Rainfall, Temperature, Humidity, Latitude
& Longitude, Time of Year
ticker at bottom
Wind Direction and Speed Changes
Page 57

Weather Data Specifications
Weather Data Specifications
Note: These specifications include optional sensors that may not be
installed in your Vantage Pro Station.
T
ABLE 3-1: WEATHER DATA SPECIFICATIONS
Variable Required Sensors Resolution Range
2
26” to 32” Hg; 660 to
810 mm; 880 to
1080 hPa; 880 to
1080 mb
5 Arrow Positions:
Rising Rapidly
Rising Slowly
Steady
Falling Slowly
Falling Rapidly
Daily to 99.99”;
999.9mm
Monthly & Yearly to
199.99”; 1999.9mm
-105
° to +130°F; -
° to +54°C
76
° to +130°F; -
-105
° to +54°C
76
to 199.99”;
19,999mm
to 100”/hr;
1999.9 mm/hr
0 to 1800 W/m
° to +140°F; 0 to
+32
+60
°C
Barometric
a
Pressure
Included in Console
Barometric Trend
(3 hour)
Evapotranspiration
(ET)
Inside Humidity Included in Console 1% 10 to 90% 5% RH
Outside Humidity
Extra Humidity
Dew Point (overall)
Frost/Dew Point at
High Humidity
Leaf Wetness Leaf & Soil Station 1 0 to 15 0.5
Soil Moisture
Daily & Storm
Rainfall
Monthly & Yearly
Rainfall
Rain Rate 0.01”; 0.25 m m (
Solar Radiation Solar sensor 1 W/m
Inside
Temperature
ISS or Temp/Hum
Station & Solar
ISS or Temp/Hum
Station
ISS or Temp/Hum
Station
ISS or Temp/Hum
Station
ISS or Temp/Hum
Station
Leaf & Soil Station or
Soil Moisture Station
Rain Collector
Included in Console 0.1
0.01” Hg; 0.1 mm;
0.1 hPa; 0.1 mb
Change Rates
≥.06” Hg;
Rapidly:
1.5 mm Hg; 2 hPa;
2mb
≥.02” Hg;
Slowly:
0.5mm Hg; 0.7 hPa;
0.7 mb
0.01”; 0.25 mm
1% 0 to 100%
1% 0 to 100%
°F; 1°C
1
1
°F; 1°C
1 cb 0 to 200 cb
0.01”; 0.25 mm to 99.99”; 999.9 mm
0.01”; 0.25 mm
(1 mm at totals over
2000 mm)
°F; 0.1°C
Nominal Ac curacy
0.03” Hg; 0.8 mm
Hg; 1.0 hPa; 1.0mb
greater of 5% or
0.01”; 0.25 mm
3% RH; 4% above
3% RH; 4% above
3
2
greater of 4% or
greater of 4% or 1 tip
greater of 5% or
0.04”/hr; 1mm/hr
2
5% of full scale
1
(+/-)
90%
90%
°F; 1.5°C
°F; 1°C
1tip,
°F; 0.5°C
Page 58

Appendix B: Specifications
TABLE 3-1: WEATHER DATA SPECIFICATIONS
Variable Required Sensors Resolution Range
Outside
Temperature
ISS, Temp Station or
b
Temp Hum Station
°F; 0.1°C
0.1
-40 to +150
to+65°C
°F; -40°
Nominal Accuracy
(+/-)
°F; 0.5°C
1
ISS, Temp Station,
Extra Temperature
Temp Hum Station,
Leaf Soil Station or
°F; 1°C
1
-40 to +150
° to +65°C
-40
°F
1
°F (0.5°C)
Soil Station
Heat Index
Temp-Hum-Sun-
Wind index
(THSW)
Time
Date 1 day month/day 8 sec/mon
ISS or Temp/Hum
Station
ISS & Solar
Radiation
Included in Console
UV Index
UV Dose
UV Radiation
Wind Direction
1
°F; 1°C
1
°F; 1°C
1 min 24 hours 8 sec/mon
0.1 Index 0 to 16 5% of full scale
0.1 MED < 20, 1
MED > 20
1
° 0 to 360° 7°
-40 to +135
-40
-90 to +135
-68
°F;
° to +57°C
°F;
° to +64°C
3
°F (1.5°C)
4
°F (2°C)
0 to 199 MEDs 5%
Compass Rose 22.5° 16 compass pts 0.3 compass pt
Wind Speed (large
cups)
Wind Speed (small
Anemometer
1 mph; 1 kt; 0.5 m/s;
1 mph; 1 kt; 0.5 m/s;
cups)
Wind Chill IS S 1
1 km/h
1 km/h
°F; 1°C
2 to 150 mph;
2 to 130 kts
3 to 241 km/h,
1 to 68 m/s
3 to 175 mph;
3 to 150 kts
1.5 to 79 m/s
5 to 282 km/h
-120
° to +130°F
° to +54°C
-84
greater of
2 mph/kts;
1 m/s; 3 km/h
or 5%
greater of
3mph; 3 kts;
1 m/s; 5km/h
or 5%
2
° F;1°C
a Barometric pressure readings are standardized to sea level. The range displayed is for the standardized value.
The console can be set to standardize readings within an elevation range of -1500 to +12,500 (-460 to + 3810
m); however, the console screen limits selection and display of lower elevation to -999’ when using feet as
elevation unit.
b Solar radiation induced error for standard radiation shield: +4°F (2°C) at solar noon; for fan-aspirated radiation
shield: +0.6°F (0.3°C) at solar noon (insolation = 1040 W/m
2
, avg. wind speed ≤ 2 mph (1 m/s), reference: RM
Young Model 43408 Fan-Aspirated Radiation Shield)
.
Page 59

FCC Part 15 Class B Registration Warning
This equipment has been tested and found to comply with the limits for a Class B digital device, pursuant to Part 15 of the FCC Rules. These limits are designed to provide reasonable protection
against harmful interference in a residential installation. This equipment generates, uses, and can
radiate radio frequency energy and, if not installed and used in accordance with the instructions,
may cause harmful interference to radio communications.
However, there is no guarantee that interference will not occur in a particular installation. If this
equipment does cause harmful interference to radio or television reception, which can be determined by turning the equipment on and off, the user is encouraged to try to correct the interference
by one or more of the following measures:
• Reorient or relocate the receiving antenna.
• Increase the separation between the equipment and receiver.
• Connect the equipment into an outlet on a circuit different from that to which the receiver is
connected.
• Consult the dealer or an experienced radio/TV technician for help.
Changes or modification not expressly approved in writing by Davis Instruments may void the warranty and void the user's authority to operate this equipment.
Page 60

9DQWDJH3UR&RQVROH,FRQV
Console icons indicate weather conditions and special functions.
Forecast
Mostly Clear Partly Cloudy Mostly Cloudy SnowRain Likely
Indicates the weather forecast for the next 12 hours.
Moon Phase
New Moon First Quarter Full Moon Last Quarter New Moon
Shows the current moon phase. Sequence shown for Northern
Hemisphere. Reverse sequence for the Southern Hemisphere.
Alarm Bell
Flashes when an alarm is triggered. Also indicates when
the console is in Alarm Mode.
Graph
Appears next to the currently selected weather variable.
Also indicates the graphed variable on most screens.
Second Function
Appears when you press 2ND key. Indicates that console
key secondary functions are enabled.
Rain
Appears when the console is currently detecting rain.
Barometric Pressure Trend
Arrows show direction of pressure change for last three
hours.
3465 Diablo Avenue, Hayward, CA 94545-2778 U.S.A.
510-732-9229 • Fax: 510-732-9188
E-mail: info@davisnet.com • www.davisnet.com
ND
2
 Loading...