

Page 1
Davis InstrumentsDavis Instruments
F
Vantage PRO
Quick
3465 Diablo Ave, Hayward, CA 94545 U.S.A.
Reference
Phone (510) 732 9229 • Fax (510) 732 9188 • www.davisnet.com
E-mail: sales@davisnet.com • support@davisnet.com
Guide
Part Number: 07395.135
Rev A (02/09/01)
© 2001 by Davis Instruments Corp. All rights reserved.
Vantage Pro is a trademark of Davis Instruments Corp.
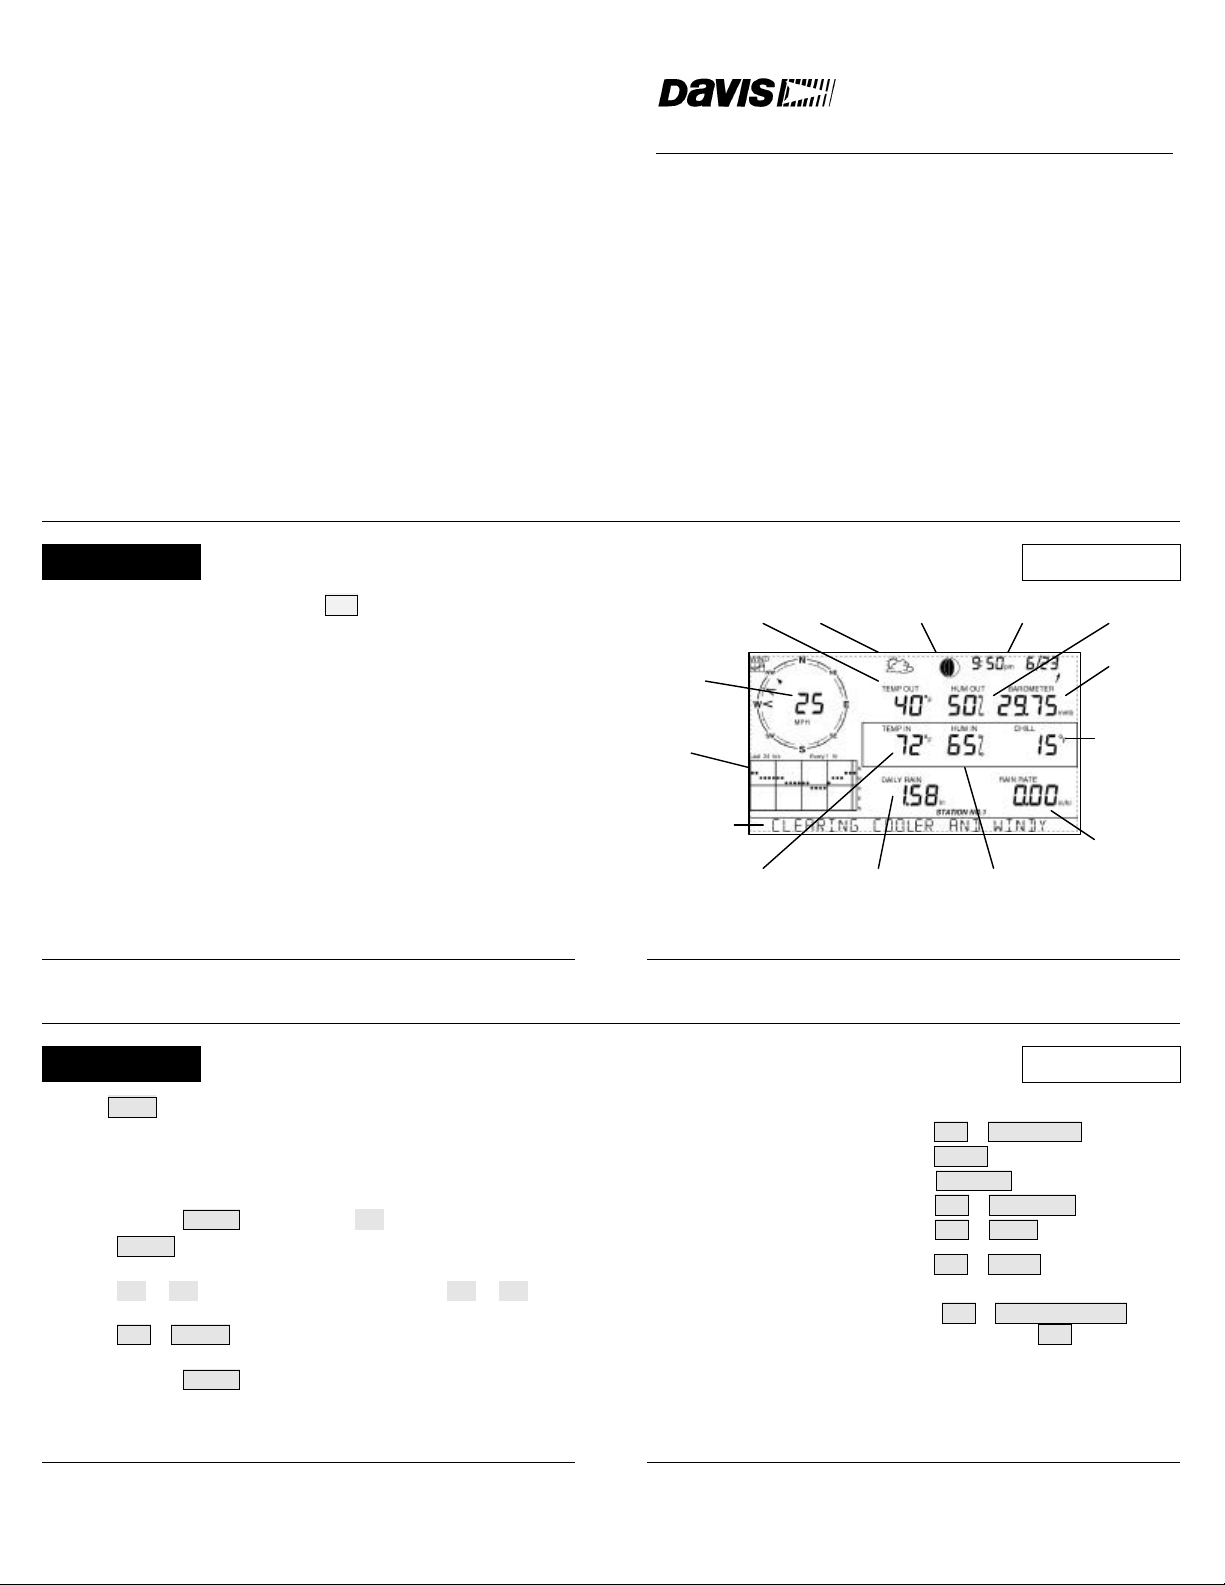
UV LCD
If you have a UV sensor, press UV to toggle between:
• UV Index
• UV Dose (meds)
Temp Out
Temp 1-4 (from Soil
Moisture Station)
Wind Speed
Wind Direction
Graph
Ticker Tape
Temp In
Temp 2–8 (from
Temp or Temp/
Humidity Station)
Soil Moist
30 3
Forecast
Icon
Daily Rain
Rain Storm
ET Daily
Moon
Phase
Time & Date
Sunrise & Sunset
Hum In
Hum 2–8 (from
Temp/Humidity Station)
Leaf Wet
UV Index
UV Dose
Hum Out
Barometer
Wind Chill
Dew Point
Heat Index
THWS Index
Temp 1-4 (from
Leaf Wetness Station)
Rain Rate
Rain Mo
Rain Year
ET Mo
ET Year
Solar
TIME TICKER TAPE
Press TIME to toggle between:
• Current Time & Date
• Time of Sunrise & Sunset
To set the time and date:
1. Press and hold DONE and then press ( − ) to enter the setup screen.
2. Press DONE three times or until you see ENTER TIME in the ticker
tape.
3. Press ( + ) or ( − ) to change the flashing digit. Press ( < ) or ( > ) to
move between fields.
4. Press 2ND & UNITS to change from 12- to 24-hour clock or from
month/day to day/month, if desired.
5. Press and hold DONE to return to the current weather screen.
To correct the time of sunrise and sunset:
Enter latitude, longitude, and time zone in setup screen. See "SETUP."
28 5
Press the appropriate key(s) to view these messages:
Forecast (within 48 hours) . . . . . . . 2ND & FORECAST
10 Min Avg Wind Speed . . . . . . . . . WIND (Wind Speed)
Last 15 Min of Rain . . . . . . . . . . . . . RAIN YR (Rain Rate)
Last 24 Hrs of Rain . . . . . . . . . . . . . 2ND & RAIN DAY (Daily Rain)
Heat Index Warning . . . . . . . . . . . . . 2ND & HEAT
If >=90°F (32°C).
Wind Chill Warning . . . . . . . . . . . . . 2ND & CHILL
If <=0°F (−18°C) and 10-minute average wind speed >=10 mph (16 km/h).
Whenever you see "Press 2ND & ANOTHER KEY " in
this booklet, this means to press and release 2ND and then
immediately press the other key.
For wireless stations:
X flashing in the right corner means you are receiving data packets.
L means the signal has been lost.
R means the console is attempting to reestablish reception.
Page 2
STATION DIAGNOSTICS
%
To receive from a different transmitting station:
1. To enter the setup screen, press and hold DONE and then press ( −− ).
2. In the first setup message, you will see RECEIVING FROM. Wait a few mo-
ments until all the available station IDs are displayed.
3. Press DONE to advance to the next setup message (station 1).
4. Press ( + ) or ( −− ) to set the station ON (to receive from that station) or OFF (to
not receive).
5. Press GRAPH to change the station type: ISS, TEMP, HUM, TEMP HUM,
WIND, RAIN, LEAF, SOIL, SENSORLINK.
6. Press STATION to advance to the next station ID.
7. Repeat steps 4–6 to set multiple stations.
8. Press and hold DONE to return to the current weather screen.
To retransmit data to another wireless console:
1. To enter the setup screen, press and hold DONE and then press ( −− ).
2. Press DONE twice to advance to the RETRANSMIT setup message.
3. Press ( + ) or ( −− ) to set the retransmit capability ON or OFF.
4. Press STATION to advance to the next station ID.
5. Press and hold DONE to return to the current weather screen.
The diagnostic screen is used by our tech support staff to help
diagnose problems. If you are experiencing difficulties, call us at (510)
732 7814, Monday through Friday, 7:00 a.m. to 5:30 p.m., Pacific Time.
To check reception and/or change antenna gain:
1. To enter the diagnostic screen, press and hold TEMP and then
press TIME . You will see GAIN ON or GAIN OFF in the ticker tape.
2. Look for the number with the % sign in the middle of the top row. A
number >= 90% is good or excellent. If the number you see is < 90%,
try changing the gain or relocating the console. Sometimes moving
the console just a few feet can make a big difference.
3. To change the antenna gain, press HI/LOW. Set GAIN OFF if there
are multiple transmitters (including cordless phones or baby monitors) in the area. Set GAIN ON if the transmitter and the console are
far apart from each other or there are physical barriers (such as
trees, walls, or large appliances) between them.
4. To exit the diagnostic screen, press DONE .
26 7
SET ALARM
To set an alarm:
1) Press 2ND & ALARM to enter the alarm screen. The icon will
appear on the screen. In each field, you will either see the alarm setting or, if no alarm has been set, a series of dashes.
2) Press TIME or a weather variable key, or use ( + ), ( – ), ( < ), or ( > )
to move between weather variables. Except for the time alarm, the
graph icon will move to show you which variable you have selected.
3) Press HI/LOW to switch between high and low alarms. Not all
alarms are available for all weather variables. See Console Manual
for details.
4) Press 2ND & SET to enter or change an alarm setting. Use ( + ) or
( – ) to change the digit within a field. Use ( < ) or ( > ) to move to the
next field.
5) Press DONE to accept the alarm setting. Repeat steps 2–4 to set
another alarm, or press DONE again to exit the alarm screen.
The SET key is also used to enter selected daily, monthly, and
yearly totals and to calibrate selected readings. See Console Manual for
details.
24 9
To set an alarm: See "SET." (NOTE: Not all alarms are available for
all weather variables. See Console Manual for details.)
When an alarm is triggered, you will hear an audible alarm:
• Until conditions change (i.e., they rise above or fall below the alarm
thresholds you have set) or you clear the alarm, if the console is being
run on AC power.
• For two minutes, if the console is being run on battery power.
• For one minute, if you have set a time alarm.
And you will see visible alarms:
• The alarm bell icon will blink on and off.
• A message will appear in the ticker tape.
To silence an alarm: Press DONE .
To clear all alarm settings: Press 2ND & ALARM to enter the
alarm screen. Press 2ND and then press and hold ALARM until
dashes appear in all the fields. Press DONE to exit the alarm screen.
To clear individual alarm settings: See “CLEAR.”
RAIN DAY CHILL
Press 2ND & RAIN DAY to toggle between:
• Rain Day (0.00 in, 0.0 mm)
• Rain Storm (0.00 in, 0.0 mm).
Press 2ND & UNITS to change unit of measure.
All rain and ET readings will read in the same unit of measure. Changing one from 0.00 inches to 0.0 mm (or vice versa) changes all others.
To view the last 24 rain storms:
1. Select Rain Storm, then press GRAPH to enter the graph screen.
2. Press ( < ) or ( > ) to move backward or forward in time.
3. Press DONE to exit the graph screen.
On the ticker tape:
LAST 24 HRS OF RAIN . . . will appear on the ticker tape if it has rained
within the last 24 hours and you are currently displaying rain rate.
STORM STARTED ON . . . will appear when you are displaying rain
storm.
22 11
Press 2ND & CHILL to display:
• Wind Chill (°F, °C)
Press 2ND & UNITS to change unit of measure.
All temperature-related readings (inside and outside temperature, wind
chill, heat index, and dew point) will read in the same unit of measure.
Changing one from °F to °C (or vice versa) changes all others.
On the ticker tape:
WIND CHILL WARNING . . . will appear on the ticker tape when you are
displaying wind chill if the reading is <0°F (−18°C) and the 10-minute
average wind speed is >=10 mph (16 km/h).
Page 3

HUM DEW PT
Press HUM to toggle between:
• Outside Humidity (%)
• Inside Humidity (%)
• Hum 2–8 (%) if you have a Temperature/Humidity Station.
• Leaf Wetness & Outside Temperature (0°F, 0.0°F, 0°C, 0.0°C ) if you
have a Leaf Wetness Station. Continue to press HUM to display
each leaf wetness/temperature pair. Maximum is four pairs.
20 13
Press 2ND & DEW PT to display:
• Dew Point (°F, °C)
Press 2ND & UNITS to change unit of measure.
All temperature-related readings (inside and outside temperature, wind
chill, heat index, and dew point) will read in the same unit of measure.
Changing one from °F to °C (or vice versa) changes all others.
HEAT ET
Press 2ND & HEAT to toggle between:
• Heat Index (°F, °C)
• THSW (Temp-Hum-Wind-Sun) Index (°F, °C) if you have solar radia-
tion sensor.
Press 2ND & UNITS to change unit of measure.
All temperature-related readings (inside and outside temperature, wind
chill, heat index, and dew point) will read in the same unit of measure.
Changing one from °F to °C (or vice versa) changes all others.
On the ticker tape:
HEAT INDEX WARNING . . . will appear on the ticker tape when you
are displaying heat index if the reading is >=90°F (32°C).
If you have a solar radiation sensor, press 2ND & ET to
toggle between:
• ET Day (0.00 in, 0.0 mm)
• ET Month (0.00 in, 0.0 mm)
• ET Year (0.00 in, 0.0 mm)
Press 2ND & UNITS to change unit of measure.
All rain and ET readings will read in the same unit of measure. Chang-
ing one from 0.00 inches to 0.0 mm (or vice versa) changes all others.
Update interval:
ET is updated once an hour, on the hour.
18 15
FORECAST GRAPH
Update Interval:
The forecast is updated once an hour, on the hour.
Forecast Icons:
The forecast icons predict the weather within the next twelve hours.
Mostly Partly Mostly Rain Snow
Clear Cloudy Cloudy Likely
If rain or snow is possible (but less certain than "likely"), you will see the
partly cloudy icon along with the rain or snow icon.
Ticker Tape:
Press 2ND & FORECAST to view a detailed forecast in ticker tape.
The ticker tape messages predict the weather up to 48 hours ahead.
16 17
To enter the graph screen: Press GRAPH . You will see the
graph and the min & max readings for the selected weather variable.
The reading in the weather variable field corresponds to the flashing dot
on the graph. To view another weather variable, press the key(s) for
that variable.
To view a selected data point: Press ( < ) or ( > ) to move right or
left on the graph. The selected data point will flash, and the reading in
the weather variable field will change. The time and/or date will also
change as you move back and forward on the graph.
To graph highs & lows: Press ( + ) or ( −− ) to change the graph to
the highs and lows for the last 24 days, months, or years. Press
HI/LOW to switch between highs and lows. The time and date will
change as you move back and forward in time. (NOTE: Not all highs
and lows are available for all weather variables. See Console Manual
for details.)
To exit the graph screen: Press DONE .
Page 4

DONE HI/LOW
Press DONE to:
• Accept an alarm setting.
• Exit the alarm screen.
• Silence an alarm.
• Exit the graph screen
• Exit the high/low screen.
• Go to the next message in the setup screen.
Press and hold DONE and then press ( −− ) to:
• Enter the setup screen.
Press and hold DONE to:
• Exit the setup screen.
14 19
To enter the high/low screen: Press HI/LOW . You will see the
time & date of the DAY HIGHS for the currently selected weather variable, along with a graph showing the highs for the last 24 hours or days.
To view a different weather variable, press the key(s) for that
variable.
To scroll between highs & lows: Press HI/LOW or ( + ) or ( −− )
to scroll between:
Day Highs • Day Lows
Month Highs • Month Lows
Year Highs • Year Lows
The time and date will change as you move between the various highs
and lows. (NOTE: Not all highs and lows are available for all weather
variables. See Console Manual for details.)
To go back or forward in time: Press ( < ) or ( > ). The time and
date will change and the corresponding dot on the graph will flash.
To exit the high/low screen: Press DONE .
CLEAR LAMPS
To clear a daily, monthly, or yearly amount:
1. Select the variable you wish to clear.
2. Press 2ND then CLEAR , holding CLEAR down until the digits
stop flashing and zeroes appear in the field.
To clear an alarm setting:
1. Press 2ND & ALARM to enter the alarm screen.
2. Select the alarm setting (see "ALARM" for detailed instructions).
3. Press 2ND , then CLEAR , holding CLEAR down until the digits
stop flashing and dashes appear in the fields.
4. Press DONE to return to the current weather screen.
To clear highs & lows:
Follow the directions above for clearing alarms, except press HI/LOW
to enter the high/low screen.
To clear ALL (including highs and lows, alarm settings, and daily,
monthly, and yearly amounts):
1. Press WIND .
2. Press 2ND then CLEAR , holding CLEAR down for the entire six-
second countdown until you see CLEARING NOW in the ticker tape.
12 21
Press 2ND & LAMPS to toggle between:
• Backlight on.
• Backlight off.
If the console is running on AC power:
• The backlight will remain on until you turn it off.
If the console is running on battery power,
• The backlight will remain on as long as you continue pressing various
keys or a ticker tape message is scrolling across the screen. It will
automatically turn off if you do not press a key within ten seconds.
• The backlight will not come on when battery power is low.
BAR RAIN YR
Press BAR to select:
•• Barometric Pressure (0.00 in, 0.0 mm, 0.0 hPa, 0.0 mb)
Press 2ND & UNITS to change unit of measure.
To correct for elevation change:
1. Press and hold DONE and then press (−−) to enter the setup screen.
2. Press DONE nine times or until you see ENTER ELEVATION.
3. Press 2ND & UNITS to change from feet to meters, if desired.
4. Press ( + ) or ( −− ) to change the flashing digit. Press ( < ) or ( > ) to
move between fields.
5. Press and hold DONE to return to the current weather screen.
Barometric Trend Arrow shows change over the last three hours:
Increase of 0.06" Hg (2.0 hPa, 1.5 mm Hg) or more.
Increase of 0.02" Hg (0.7 hPa, 0.5 mm Hg) or more.
Change of less than 0.02" Hg (0.7 hPa, 0.5 mm Hg).
Decrease of 0.02" Hg (0.7 hPa, 0.5 mm Hg) or more.
Decrease of 0.06" Hg (2.0 hPa, 1.5 mm Hg) or more.
10 23
Press RAIN YR to toggle between:
• Rain Month (0.00 in, 0.0 mm)
• Rain Year (0.00 in, 0.0 mm)
• Rain Rate (0.00 in, 0.0 mm)
Press 2ND & UNITS to change unit of measure.
All rain and ET readings will read in the same unit of measure. Chang-
ing one from 0.00 inches to 0.0 mm (or vice versa) changes all others.
When it is currently raining:
will appear between the rain day and rain year fields.
On the ticker tape:
LAST 15 MIN OF RAIN . . . will appear in the ticker tape when you are
displaying rain rate.
Page 5

ND
%
F
2
SOLAR
Press 2ND to select the second key function (printed in white type
above each key).
The icon will appear in upper right corner of screen, below the
time and date. After you press another key, the icon will disappear. If
you wish to select another second key function, you must press 2
ND
If you have a solar radiation sensor, press 2ND & SOLAR
to display:
• Solar Radiation (W/m2)
again.
The icon will also time out and disappear from the screen if you do not
press another key within a few seconds.
Whenever you see "Press 2ND & ANOTHER KEY " in
this booklet, this means to press and release 2ND and then
immediately press the other key.
8 25
SETUP TEMP
To enter setup: Press and hold DONE and then press ( −− ). Press
DONE to advance or BAR to reverse through these setup messages:
1. RECEIVING FROM. Displays available transmitting stations.
2. ON/OFF. To set reception for one of the available transmitting stations. See "STATION."
3. RETRANSMIT ON/OFF. To retransmit to another wireless console. See "STATION."
4. ENTER TIME. To change the time and date. See "TIME."
5. ENTER LATITUDE. Press ( + ) or ( −− ) to change the flashing digit. Press ( < ) or ( > ) to
move between fields. Press 2ND & UNITS to change from north to south.
6. ENTER LONGITUDE. Press ( + ) or ( −− ) to change the flashing digit. Press ( < ) or ( > ) to
move between fields. Press 2ND & UNITS to change from west to east.
7. TIME ZONE. Press ( + ) or ( −− ) to view time zones. Press 2ND to enter GMT offset instead
of time zone. Press ( + ) or ( −− ) to change GMT offset.
8. DAYLIGHT SAVINGS AUTO/MANUAL. Press ( + ) or ( −− ). to change the setting.
9. DAYLIGHT SAVINGS OFF/ON. If daylight savings setting = AUTO, displays the current
status. If daylight savings setting = MANUAL, press ( + ) or ( −− ) to change the current status.
10. ENTER ELEVATION. To correct barometric pressure. See "BAR."
11. WIND CUP SIZE SMALL/LARGE. Press ( + ) or ( −− ) to change the setting.
12. RAIN COLLECTOR .01 IN/.2 MM/.1 MM. Press ( + ) or ( −− ) to change the setting.
13. RAIN SEASON BEGINS. Press ( + ) or ( −− ) to change the month.
To exit the setup screen: Press and hold DONE .
Press TEMP to toggle between:
• Outside Temperature (0°F, 0.0°F, 0°C, 0.0°C )
• Inside Temperature (0°F, 0.0°F, 0°C, 0.0°C )
• Temp 2–8 (0°F, 0.0°F, 0°C, 0.0°C ) if you have one or more Tem-
perature and/or Temperature/Humidity Stations.
• Soil Moisture (centibars) & Soil Temperature (0°F, 0.0°F, 0°C, 0.0°C )
if you have a Soil Moisture Station. Continue to press TEMP to display each soil moisture/temperature pair. Maximum is four pairs.
Press 2ND & UNITS to change unit of measure.
All temperature-related readings (inside and outside temperature, wind
chill, heat index, and dew point) will read in the same unit of measure.
Changing one from °F to °C (or vice versa) changes all others.
For temperature from Leaf Wetness Station, see "HUM."
6 27
ICONS UNITS
Forecast Icons. See "FORECAST."
Moon Phase. The icons shown below are for the Northern Hemi-
sphere. For the Southern Hemisphere, the orientation is reversed.
New Moon First Quarter Full Moon Last Quarter New Moon
Alarm Bell. Appears when you are setting an alarm. Blinks on
and off when an alarm is triggered.
Graph Icon. Appears next to a weather variable when you
press that variable's key. On most screens, indicates that that
variable is being shown on the graph. On the alarm screen, indicates that you are setting an alarm for that variable.
Second Function. Appears when you press 2ND . Used to
select the variable or function printed in white above each key.
Umbrella. Appears when it is currently raining.
4 29
Press 2ND & UNITS to change the unit of measure for a
selected variable:
• All temperature-related readings (inside and outside temperature,
wind chill, heat index, and dew point) will read in the same unit of
measure. Changing one from °F to °C (or vice versa) changes all the
others.
• All rain and ET readings will read in the same unit of measure (0.00
inches or 0.0 mm).
In the setup screen, press 2ND & UNITS to:
• Change from 12- to 24-hour clock and from month/day to day/month.
• Change latitude from north to south.
• Change longitude from west to east.
• Change elevation from feet to meters.
• Change wind cup size from small to large.
• Change unit of measure for rain collector.
Page 6

INTRO WIND
F
This “Quick Reference Guide” will provide you with abbreviated
instructions for all functions of the Vantage Pro console. For more detailed instructions, see the Vantage Pro Console Manual.
Pages with:
CLEAR headings provide general instructions and information about the console.
BLACK headings provide instructions for using each key.
They are presented in alphabetical order.
For instructions about:
• LEAF WETNESS, see “HUM.”
• SOIL MOISTURE, see “TEMP.”
REMEMBER: Press and hold DONE at any time to
return to the current weather screen.
Press WIND to toggle between:
• Wind Speed (0 mph, 0.0 m/s, 0 km/h, 0 knots)
• Wind Direction (degrees)
Press 2ND & UNITS to change unit of measure.
On the compass rose:
Current wind direction
Dominant wind direction for a ten-minute period within the last
hour. If dominant wind direction remained constant over the last
hour, only one arrow will be shown. If dominant wind direction
varied, up to six arrows (representing six ten-minute periods) may
be shown.
Current wind direction is the same as one of the dominant wind
directions.
On the ticker tape:
10 MIN AVG WIND SPEED . . . will appear on the ticker tape when you
are displaying wind speed.
31
 Loading...