

Page 1
Davey Water Products Pty Ltd
Member of the G UD Group
ABN 18 066 327 517
Head Office and Manufacturing
6 Lakeview Drive,
Scoresby, Australia 3179
Ph: +61 3 9730 9222
Fax: +61 3 9753 4100
Website: davey.com.au
Customer Service Centre
Ph: 1300 2 DAVEY (1300 232 839)
Fax: 1300 304 850
E-mail: sales@davey.com.au
Interstate Offices
Sydney • Brisbane • Adelaide
Perth • Townsville
Davey Water Products
– New Zealand
7 Rockridge Avenue,
Penrose, Auckland 1061
Ph: +64 9 570 9135
Fax: +64 9 527 7654
Website: daveynz.co.nz
E-mail: sales@daveynz.co.nz
International
6 Lakeview Drive,
Scoresby, Australia 3179
Ph: +61 3 9730 9121
Fax: +61 3 9753 4248
E-mail: export@davey.com.au
Davey Spa – New Zealand
2 Rothwell Avenue,
North Harbour, Auckland 0632
Ph: +64 9 415 8622
Fax: +64 9 415 8621
Website: daveyspa.co.nz
E-mail: service@daveyspa.co.nz
Spa Water Treatment
Recommended Chemical Values
Chlorine......................... 1.5 - 3.0 PPM ( Parts Per Million )
pH.................................. 7.4 - 7.6
Total alkalinity ................ 100 - 120 PPM
It is important to maintain your spa water chemistry to the above values to ensure a
healthy experience both for you as bathers and for your spa pool equipment.
PH
This is a measure of how acid or alkaline the spa water is (below 7.0 is acid, above 7.0 is alkaline).
Low pH will cause corrosion of any metalwork in the water (element, thermostat pockets). High
pH will cause scale formation and cloudy water.
Total Alkalinity
This is a measure of how resistant your spa water is to change of pH. A low TA (0 - 80 ppm) will
allow the pH to fluctuate rapidly normally to the acid end and will make it very hard to correct the
pH back to the ideal range.
Chlorine
Levels of sanitiser are important to prevent the build up of bacteria, and algae in the pool water.
Chlorine is not the only sanitiser available to do this. Other sanitisers are Bromine, Ozone.
Damage to the element, thermostat pockets and associated metalwork due to the poor
maintenance of water chemistry is not covered by warranty.
N376
Pb
RoHS
COMPLIANT
User’s GuideUser’s Guide
Models:
SP800-20,30
Single/ 3 phase Models
kl t Pa b Q91 3 9
0 Us de pd
2 rd No m er 2 0 . rsi 93 ve b 0 9 Ve on
Boo e rt Num er 6 1 -1
SP8 0 er Gui . f
Page 2

Contents
1 Introduction................................................................................................................................................ Pg 1
1.1 - Basic Operation..................................................................................................................... Pg 1
1.2 - SP800 Touch pad................................................................................................................... Pg 1
1.3 - LED Indicators......................................................................................................................... Pg 2
1.4 - Pump Selection Page............................................................................................................. Pg 3
2 User Guide Quick Reference...................................................................................................................... Pg 4
3 Pump Operation......................................................................................................................................... Pg 6
3.1 - Pump 1(Two speed, no 24HR circulation pump fitted)............................................................Pg 6
3.2 - Clean up cycle...................................................................................................................... Pg 6
3.3 - Pump 1 (Two speed, 24HR circulation pump fitted)................................................................Pg 7
3.4 - Pump 1A & 1B (Single speed pumps, no 24hr circulation pump fitted).................................. Pg 7
3.5 - Pump 1A & 1B (Single speed pumps, 24hr circulation pump fitted)....................................... Pg 8
3.6 - 24Hr circulation pump on/off..................................................................................................Pg 8
4 Auxillary on/off............................................................................................................................................. Pg 8
5 Spa Power Variable Speed Blower (SPVSB)................................................................................................... Pg 9
5.1 - Adjustable speed mode(SPVSB).............................................................................................. Pg 9
6 Spa Power Variable Colour Light (SPVCL)..................................................................................................... Pg 10
6.1 - Adjustable light intensity mode...............................................................................................Pg 10
6.2 - Light effect mode...................................................................................................................Pg 11
6.2.1 - Adjusting the light effect mode speed................................................................. Pg 11
7 Menu Structure............................................................................................................................................ Pg 12
7.1 - Main Menu............................................................................................................................. Pg 13
7.2 - Set temp.................................................................................................................................Pg 14
7.3 - User timer................................................................................................................................Pg 15
7.4 - Clock...................................................................................................................................... Pg 15
7.4.1 - Setting the clock.................................................................................................. Pg 16
7.5 - User Alarm.............................................................................................................................. Pg 17
7.5.1 - Configuring a user alarm..................................................................................... Pg 17
7.5.2 - Disabling a user alarm......................................................................................... Pg 18
7.6 - Sleep timer............................................................................................................................. Pg 19
7.6.1 - Configuring a sleep time......................................................................................Pg 19
7.6.2 - Disabling a sleep time period.............................................................................. Pg 21
7.6.3 - Plumbing Purge.................................................................................................... Pg 21
7.7 - Maintenance Timers............................................................................................................... Pg 21
7.7.1 - Maintenance Timer Configuration....................................................................... Pg 22
7.7.2 - Acknowledging a maintenance timer..................................................................Pg 22
7.7.3 - Configuring a maintenance timer........................................................................Pg 23
7.7.4 - Disabling a maintenance timer............................................................................Pg 23
7.8 - Miscellaneous Options Submenu........................................................................................... Pg 24
7.8.1 - Key clicks on/off.................................................................................................... Pg 24
7.8.2 - Main display......................................................................................................... Pg 25
7.8.3 - Changing main display........................................................................................ Pg 25
7.8.4 - Panel colour and intensity.....................................................................................Pg 25
7.8.5 - Changing the touch pad back light colour..........................................................Pg 25
7.8.6 - Changing the touch pad back light intensity....................................................... Pg 25
7.8.7 - Panel and pool light synchronisation (on/off)........................................................ Pg 26
7.8.8 - Enabling/disabling light synchronisation................................................................Pg 26
7.9 - Advanced Options Submenu................................................................................................. Pg 26
7.9.1 - Heat Control......................................................................................................... Pg 27
7.9.2 - Changing heat control setting............................................................................. Pg 27
7.9.3 - Auto filtration/Sanitising (n/a for 24hr circ models)................................................ Pg 28
7.9.4 - Adjusting the filtration time................................................................................... Pg 28
7.9.5 - Adjusting the filtration period................................................................................ Pg 28
7.10 - Load factory Defaults............................................................................................................. Pg 29
7.10.1 - Restoring factory defaults..................................................................................... Pg 29
8 Additional Features..................................................................................................................................... Pg 30
8.1 - Touch pad key lock................................................................................................................ Pg 30
8.2 - Activating the key lock............................................................................................................Pg 30
8.3 - Disabling key lock................................................................................................................... Pg 30
8.4 - Adjusting Touch pad LCD Contrast......................................................................................... Pg 30
8.5 - Display Reversing.................................................................................................................... Pg 31
8.6 - Language Selection............................................................................................................... Pg 31
9 Self Diagnostic Error Codes......................................................................................................................... Pg 32
Error 5 (“OVER TEMP”) Over Temperature
This error indicates that one of the digital temperature sensors in either the heater or pool has detected a
temperature of 45ºC or more. This may not be a problem with the SP800. It may be caused by excessive
pump use in hot weather or pump failure. Turn off the spa and allow time for the water to cool then manually
push the Light Level, Light Effect Mode, Pump 1A and SPVSB buttons simultaneously.
If there is still a problem then contact your spa pool supplier.
Error 6 (“THERMAL CUT OUT”) - Thermal Cut Out Tripped
This error indicates that the safety electromechanical over temperature cut out on the heater has operated.
This is not necessarily a problem with the SP800. It may have occurred from an air lock around the element,
high temperatures during shipping, or pump failure. This automatic cut out will only reset once the element
has cooled below about 38ºC. The unit must then be reset before it will resume operation by manually
pushing the Light Level, Light Effect Mode, Pump 1A and SPVSB buttons simultaneously.
If there is still a problem then contact your spa pool supplier.
Error 7 (“STUCK RELAY”) - Stuck Relay
This error indicates a problem with the heater control circuitry inside the unit. Contact your spa pool supplier.
Error 8 (“NO TEMP DATA”) - No Temperature Data
This error indicates a problem with the digital temperature sensor in the heater or pool wall. The sensor may
have become disconnected or damaged. Try to reset the spa. If there is still a problem then contact your spa
pool supplier.
Error 9 (“CLOCK FAULT”) Real Time Clock Failure
This error indicates a problem with the real time clock within the SP800. Try to reset the spa. If there is still a
problem then contact your spa pool supplier.
Warnings
Warning 1 (“TEMP SENSOR FAILURE”) - Temperature sensor failure
This warning indicates that one of the two digital temperature sensors in either the heater or pool is no
longer functioning correctly. The spa is able to continue operating using the other sensor, however there is
probably a fault. Contact your spa pool supplier.
If this warning appears when first commissioned it maybe that the controller needs to be set back to factory
default. To set load factory defaults see page 29.
Safety Notes
Before using ensure that the spa pool has been connected to a suitable weather protected outlet socket, equipped with a
double pole isolating switch, which is of the correct rating and complies with the local wiring regulations.
When installing, refer to your local wiring code. In particular refer to ECP2 & ECP25 (AS/NZ) and EN60364-4-1 & EN603647-1 (EU). The system must be installed in such a way that live parts are not accessible by a person in the pool. If a supply
cord is not fitted the system must be permanently connected to fixed wiring through a 30mA or less RCD.
It is recommended that the steel reinforcing in any concrete base on which the pool is sitting be equipotential bonded to the
earth conductor in the supply to the spa. This is to protect against the possibility of low voltage shocks caused by differential
earth voltages. Refer to AS/NZS3000:2000 Sections 5.8 & 7.2 or EN 60364.
This appliance is not intended for use by young children or infirm persons without supervision. Young children should be
supervised to ensure they do not play with the appliance.
Page 33
Page 3
9 Self-Diagnostic Error Codes
The Spa Power 800 controller has extensive self diagnostic capabilities. In the event of a problem it will indicate a
warning or error according to the nature of the problem. The spa will continue operating if a warning is produced but
user intervention or service is required for errors.
Errors
1 Introduction
Congratulations on choosing one of the top of the line Spa Power control systems by Spa-Quip.
This controller offers a large range of possible accessories, a user friendly touchpad and superior components. It
makes use of the latest electronics, display and sensor technology to provide you with the most sophisticated
controller in its class.
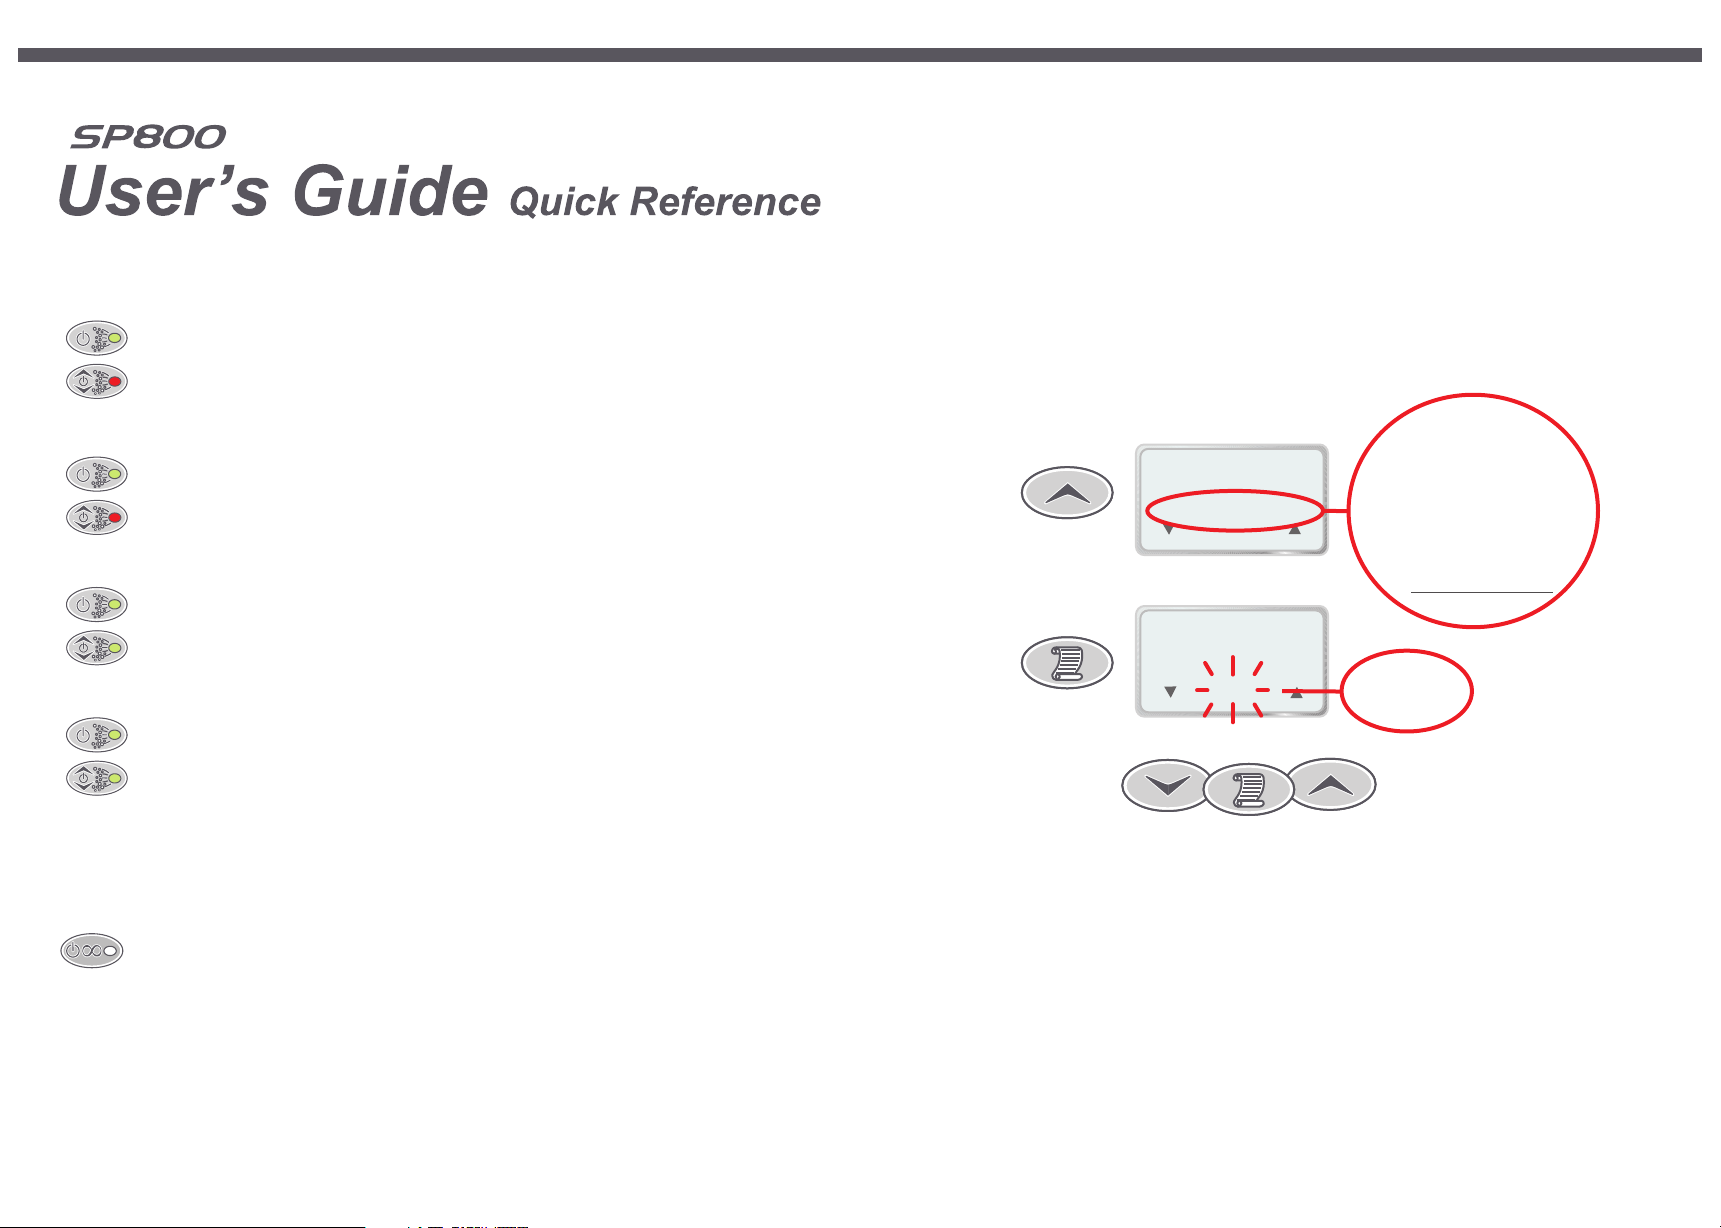
When in an error state the alarm can be silenced by pressing the SCROLL button. The alarm will
automatically silence after four minutes.
Error 1 (“PRIME FAILED”) Water Prime Failed
Prime failed is a special case. This is not necessarily a problem with the SP800 itself, but indicates that no
water is being detected in the heater housing. On a push of the DOWN button the main pump will run for 10
seconds to try to get water to the heater. If successful normal operation will resume. If unsuccessful, the
error will be indicated on the display again. Note: When this error occurs you will also be given the option to
run the SP800 in demo mode, this feature is not intended for end users. If you inadvertently enter demo
mode, reset the spa to start over.
With any Error 3-8, spa operation will stop and not continue until the controller is reset. The controller can
only be reset by pushing the Light Level, Light Effect Mode, Pump 1A and SPVSB buttons simultaneously.
The controller will remain in an error condition even when reset at mains power, controller will only continue
normal operation after the Light Level, Light Effect Mode, Pump 1A and SPVSB buttons are pushed
simultaneously (see below).
O
C
36.75
Mon,
Set temp
12:00
37.00
PM
1.1 Basic Operation
The SP800 touch pad features a large display consisting of four numerical digits and two lines of text. The display
typically shows three quantities - Current pool temperature, Set (Target) pool temperature and clock (weekday and
time). By default the current pool temperature is displayed on the numerical digits leaving the clock and set
temperature on the two lines of text. This configuration may be changed by the user if a different layout is preferred.
Whenever a touch pad button is pressed the two lines of text will temporarily describe the newly selected state.
Likewise when the controller is busy performing a task, text will be displayed to explain what is happening (examples
include sleeping, purging pumps and water priming). Each of these messages and the associated function is
described in the following sections.
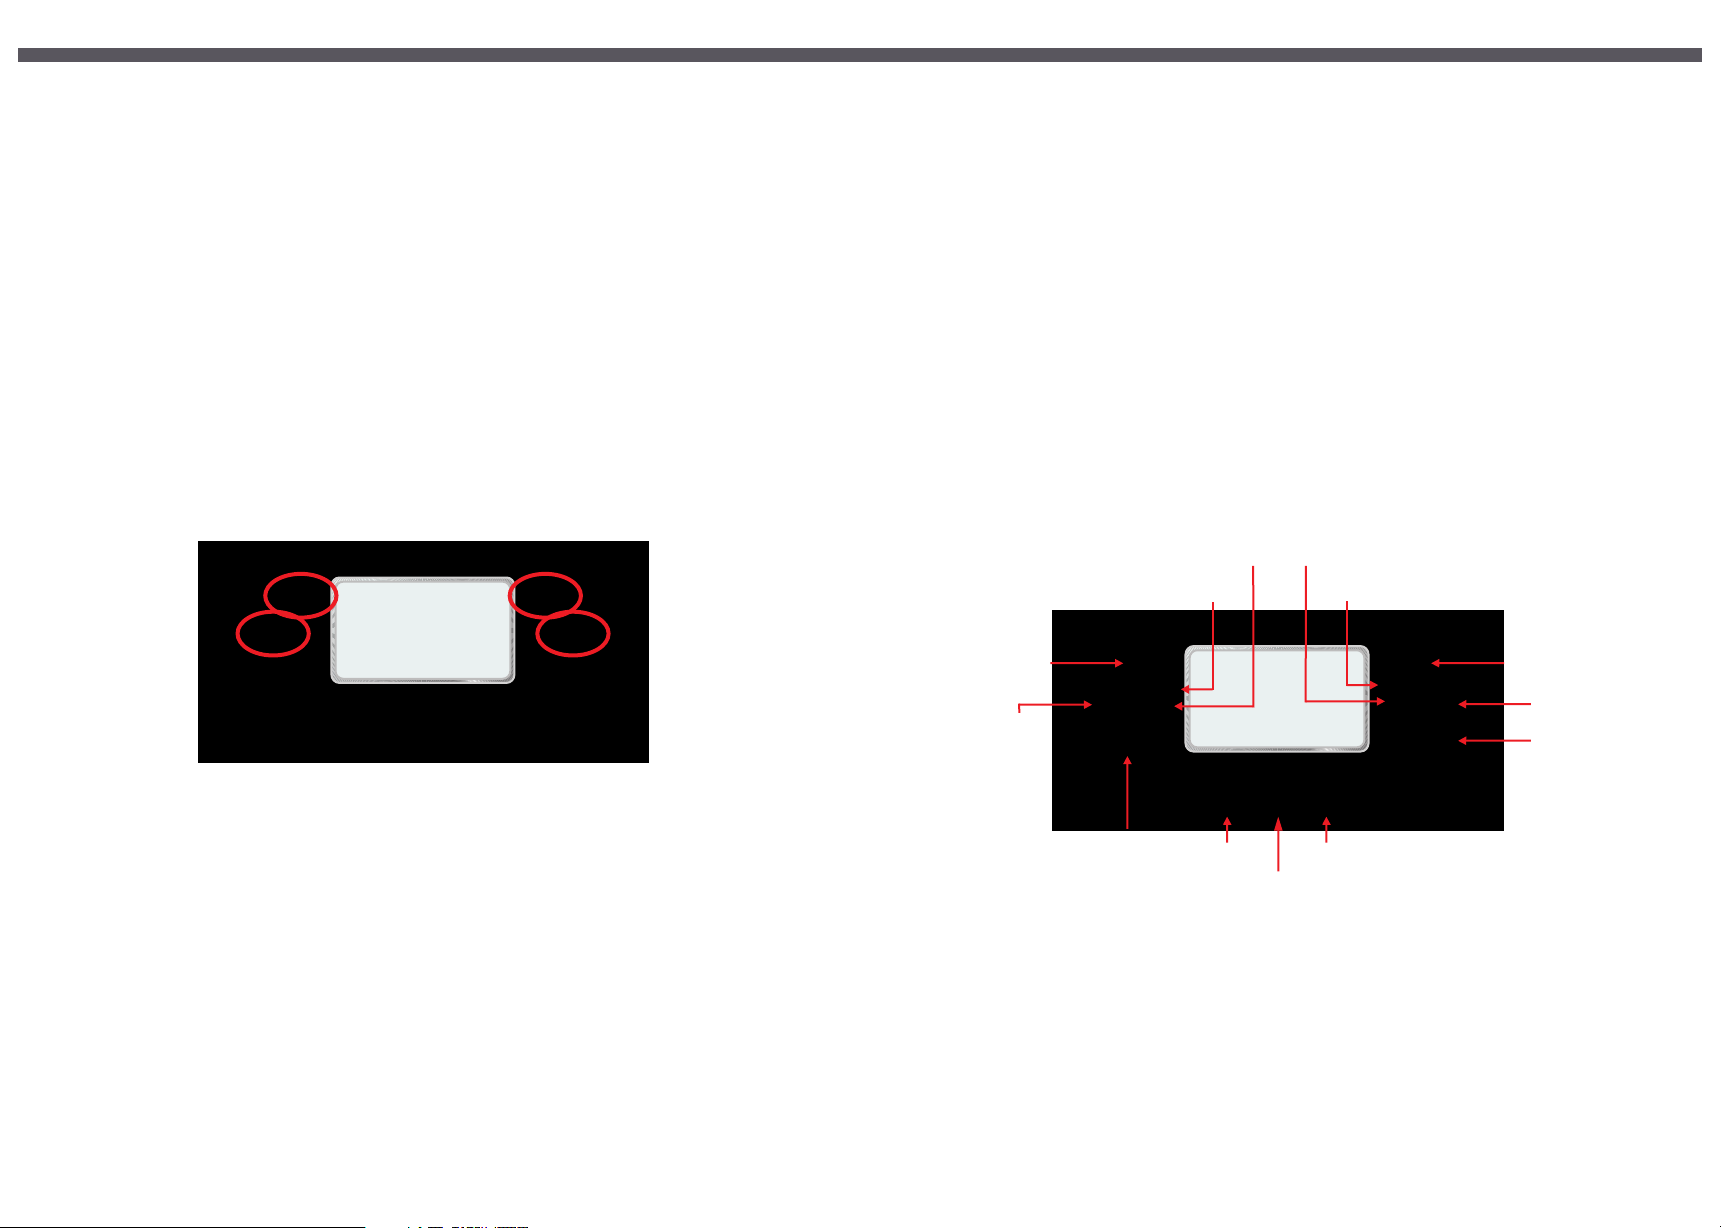
1.2 SP800 Touchpad
Heater LED
O
C
PM
12:00
37.00
Auto LED / Water LED
Light Effect Mode
Pump 1A
Pump 1B
Light Level
Variable Speed Blower
(SPVSB)
Ozone LED
Sleep LED
36.75
Mon,
Set temp
Error 3 (“STUCK BUTTON”) - Stuck Button
This error indicates that one or more of the touch pad buttons is stuck or has been held down for more than
one minute. This may be caused by the pool cover pressing on the touch pad or by water getting into the
touch pad or by damage to the touch pad itself. Try to reset the spa. If there is still a problem then contact
your spa pool supplier.
Error 4 (“NO WATER SENSOR”) - No Water Sensor
This error indicates a problem with the optical water sensor in the heater. The problem may be caused by the
sensor being disconnected or by damage to the sensor. Try to reset the spa. If there is still a problem then
contact your spa pool supplier.
Page 32
Aux
Down Up
Scroll
Page 1
Page 4
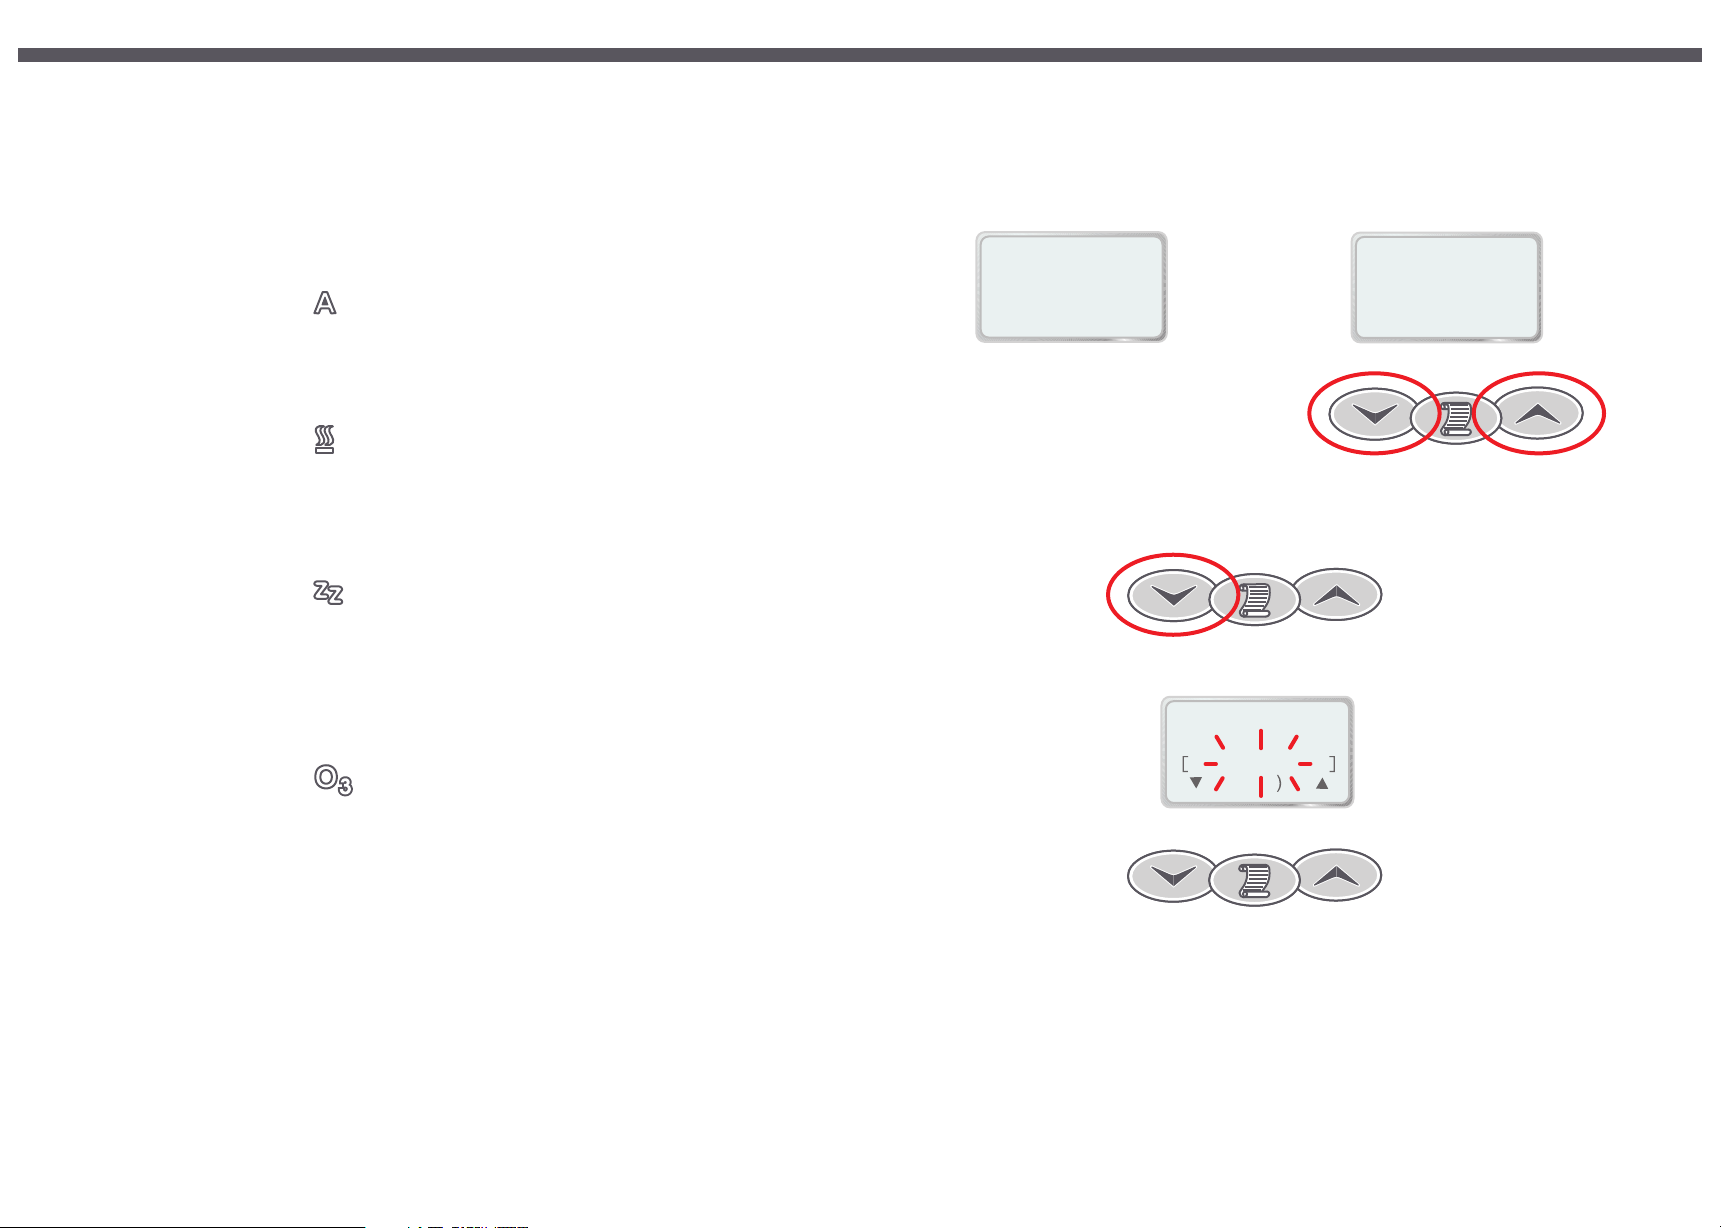
1.3 LED Indicators
Auto (Non-24HR circ model) This LED is green when automatic control is enabled and off when pump 1 is under
manual control. In automatic “PUMP AUTO” pump 1 runs as required to heat the pool and ensure minimum filtration
times are met. If the indicator is blinking it means that the water sensor is not detecting any water in the heater
housing. If no water is being detected the LCD Display will also show “WATER PRIMING, PLEASE WAIT”.
Water (24HR circ model) This LED is green when water is detected. If the indicator is blinking it means that the
water sensor is not detecting any water in the heater housing. If no water is being detected the LCD Display will also
show “WATER PRIMING, PLEASE WAIT”.
Auto Icon/ Water Icon
Heater This LED shows when the heater is on. The heater will turn on and off as required whenever the pump is
running.
Heater Icon
Sleep This LED is on whenever the controller is within a designated sleep period. When the controller is asleep the
LED is green but the LED colour will change to orange if manually awoken. During the sleep state the LCD Display
will also show “SLEEPING, PRESS ANY KEY”.
Sleep Icon
8.5 Display Reversing
The display can be reversed so it can be read from inside or outside of the spa pool, the display will
revert back to default state after 30 minutes of inactivity.
To reverse the display press the UP and DOWN buttons simultaniously
To restore the display press the UP and DOWN buttons again.
Default Display Orientation Reversed Display Orientation
36 75
Mon,
Set temp
.
12:00
PM
37.00
7
O
C
5
.
Mon,
Set temp
12:00
37.00
36
O
C
PM
8.6 Language Selection
The SP800 spa controller can be set to display English (default), French, German, Spanish, Dutch &
Japanese.
To select language press and hold the DOWN button for 4 seconds.
Ozone This LED is green whenever the ozonator (if fitted) is on. Pressing any touch pad button may automatically
turn off the ozonator (depending on installer configuration). If this occurs, the ozonator will not switch back on until
approximately 30 minutes after the last touch pad button press.
Ozone Icon
Page 2
Use the UP or DOWN buttons to select language then press the SCROLL button to set.
- - - -
ENGLISH
( )
(
SET
Scroll to SET
( )
Page 31
Page 5
8 Additional Features
8.1 Touch Pad Key Lock
The SP800 touch pad buttons can be locked to prevent unauthorised people from using the spa or modifying set up
options. While the key lock is active button presses are ignored, however the LCD Display will temporarily show “KEYS
LOCKED” to alert the user that the key lock is engaged.
8.2 Activating The Key Lock
To activate the key lock press and hold down the DOWN, SET and UP buttons together. While you are doing this, the
LCD Display will show “HOLD KEYS TO ACTIVATE LOCK”. You will need to hold the buttons down for approximately
three seconds before the lock is activated. At this point the touch pad will beep and show “KEYS LOCKED”.
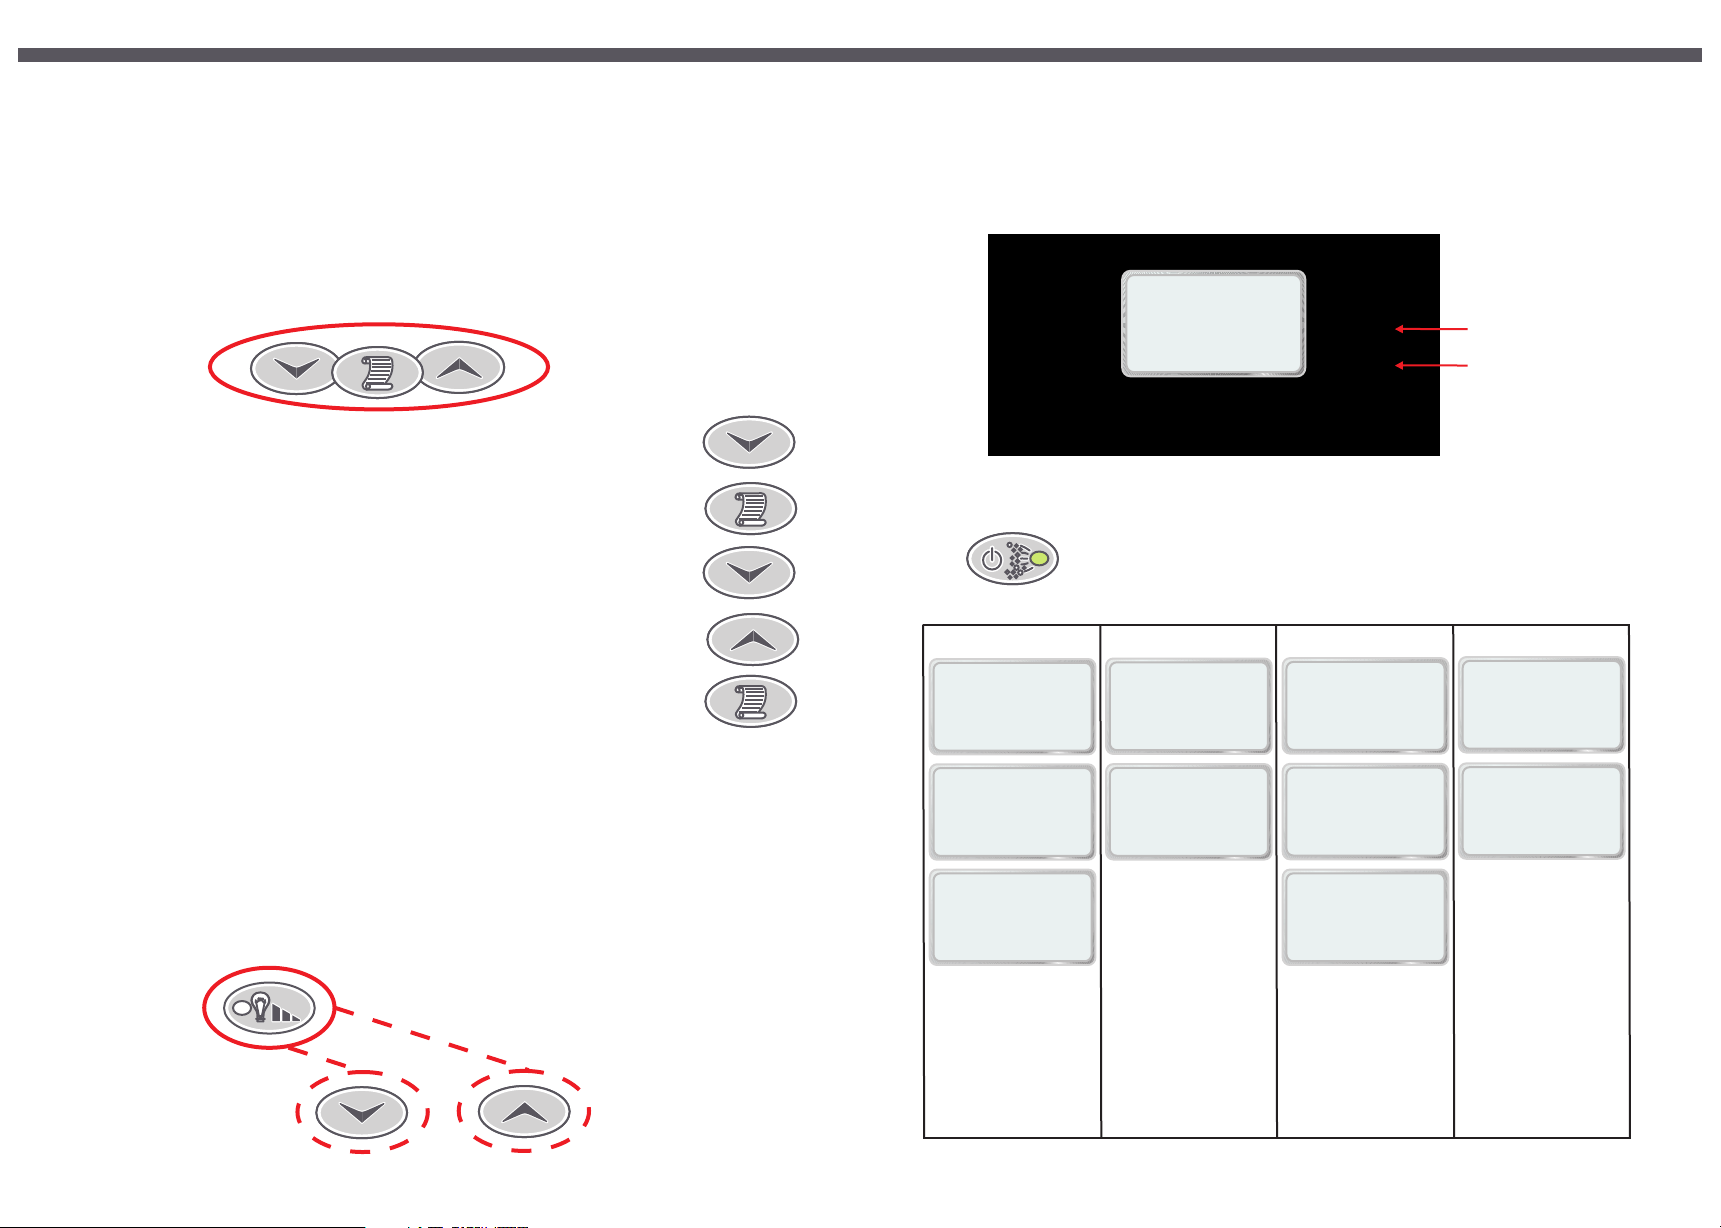
1.4 Pump Selection Page
Before reading the following user,s guide please take note of your pump type then refer to the page stated to learn
how to operate your spa pool controller. Use the table below to determine which pump type you have on your spa.
O
C
36.75
Mon,
Set temp
12:00
PM
37.00
Pump 1A
Pump 1B
8.3 Disabling The Key Lock
Once the key lock has been activated a button press sequence
is required to disable it. Press each of the buttons listed in the
unlock sequence, one at a time. The touch pad will beep and
temporarily display “KEYS UNLOCKED” once the sequence is
correctly entered. If you loose your place or incorrectly enter
one of the buttons start over from the first step.
Unlock sequence: DOWN, SCROLL, DOWN, UP, SCROLL.
Push 1
Push 2
Push 3
Push 4
Note: If the controller is switched off while the key lock is active,
the key lock will not be restored when power is reapplied.
Push 5
8.4 Adjusting Touch Pad LCD Contrast
The touch pad LCD contrast/brightness can be manually adjusted if the display appears too dark or light.
To adjust the contrast, follow these steps:
1) Press and hold down the LIGHT button. This will cycle the light intensity as usual, however you must keep the
button held down before proceeding with the following steps.
2) With the LIGHT button held down, press the UP or DOWN buttons to darken or lighten the contrast as required.
Hold down either button for automatic key press repeat. As you press the UP and DOWN buttons no key clicks
or display changes will occur - this is normal.
3) Once you have finished adjusting the contrast release the LIGHT button and the new setting will be saved.
Push
PUMP LOW
PUMP OFF
PUMP AUTO
(Pump 1A) four times and match the display on your touch pad
to the column in the table below, then refer to the specified section.
Option 1 Option 3Option 2 Option 4
O
C
O
C
O
C
.
36 75
PUMP ON
.
36 75
PUMP OFF
.
36 75
.
36 75
.
36 75
O
C
O
C
O
C
.
36 75
PUMP LOW
.
36 75
PUMP OFF
O
C
PUMP ON
O
C
PUMP OFF
PUMP AUTO
.
36 75
.
36 75
.
36 75
O
C
O
C
Page 30
SEE SECTIONS
2.1.1(page 4)
3.1 (page 6)
SEE SECTIONS
2.1.2(page 4)
3.3 (page 7)
SEE SECTIONS
2.1.3(page 4)
3.4 (page 7)
SEE SECTIONS
2.1.4(page 4)
3.5 (page 8)
Page 3
Page 6
Section 2.0
2.1 Pump 1 Operation
2.1.1 Two Speed (No 24hr circulation pump)
Pump 1A button: Push to change pump mode (PUMP AUTO, PUMP ON, PUMP OFF)
Pump 1B button: Push to change pump speed (LOW, HIGH)
2.1.2 Two Speed (24hr circulation pump fitted)
Pump 1A button: Push to turn pump on/off
Pump 1B button: Push to change pump speed (LOW, HIGH)
2.1.3 Single Speed (No 24hr circulation pump)
Pump 1A button: Push to change pump mode (PUMP AUTO, PUMP ON , PUMP OFF)
7.10 Load Factory Default Settings
The load defaults option provides a way of restoring all factory default settings. These include obvious set up
parameters such as set temperature and sleep times but also settings such as preferred light mode, light effect
speeds and blower speed will be restored to their factory defaults. Only use this option if you are absolutely sure it is
necessary.
7.10.1 Restoring Factory Defaults
1) Select the LD. DEFAULTS item from the main menu.(see below for details)
2) Press the SCROLL button. Note that the confirmation prompt uses a very short timeout (approximately three
seconds) and as such you will have to execute the following steps relatively quickly.
3) Press the UP or DOWN button to select “YES”.
4) Press the SCROLL button to load the defaults. The display will temporarily show “DEFAULTS LOADED” to
confirm that defaults have been loaded.
Select MAIN menu then push UP button nine times
Push 9
- - - -
9. LD. DEFAULTS
( )
(SET)
( )
1. SET TEMP
2. USER TIMER
3. CLOCK
4. USER ALARM
5. SLEEP TIMES
6. MAINT TIMERS
7. MISC OPTIONS
8. ADV. OPTIONS
9. LD. DEFAULTS
Pump 1B button: Push to turn on/off additional pump (if fitted)
2.1.4 Single Speed (24hr circulation pump fitted)
Pump 1A button: Push button to turn pump on/off
Pump 1B button: Push to turn on/off additional pump (if fitted)
For more detailed information please see section 3.
2.2 Aux (Pump, Blower, Light)
Push button to turn Aux outlet on/off
For more detailed information please see section 4
Page 4
- - - -
ARE YOU SURE?
( )
[NO]
Scroll to SET
Notes
1) After the defaults have been loaded, it takes approximately 10 seconds for the controller to save them. Do not
turn off the power before this period elapses.
2) The clock hour, minute and weekday will not be reset when you load the defaults
( )
[
NO
[YES]
]
Page 29
Page 7

7.9.3 Auto Filtration/Sanitising (N/A for 24HR circ installations)
2.3 Variable Speed Blower Operation
Automatic filtration is provided to ensure that the pool water is filtered for at least a minimum time each day
regardless of how often the pool is used for normal operation or how long the pump runs for heat maintenance. If the
pump has not run long enough during normal operation the system will automatically run it for an additional period to
meet the minimum filtration time specified by the user. This feature is especially useful in warmer climates where
very little automatic heating (and hence water filtration) is necessary to keep the pool water at the set temperature.
Automatic filtration consists of two user adjustable settings - Filtration Time and Filtration Period. These settings are
located in the advanced options submenu.
7.9.4 Adjusting The Filtration Time
The Filtration Time setting specifies the minimum filtration time and can be adjusted between 0 and 30 minutes per
hour (effectively 0 to 12 hours per day), default 10 minutes. A setting of 0 minutes totally disables automatic filtration.
1) Select the ADV. OPTIONS submenu from the main menu.
2) Select the FILT. TIME menu item.
3) Press the SCROLL button to begin Filtration Time modification.
4) Use the UP and DOWN buttons to set the desired filtration time in minutes per hour.
5) Press the SCROLL button to confirm the current setting and return to the ADV. OPTIONS submenu.
7.9.5 Adjusting The Filtration Period
The Filtration Period setting specifies how often the system should run the pump to ensure the minimum filtration time
is met. Available settings are 1, 2, 3 or 4 hours. At the default setting of 1 hour, the pump will come on no more than
once an hour to ensure filtration times are met, similarly a setting of 4 hours indicates that a filtration run will occur once
every 4 hours.
1) Select the ADV. OPTIONS submenu from the main menu.
2) Select the FILT. PERIOD menu item.
3) Press the SCROLL button to begin Filtration Period modification.
4) Use the UP and DOWN buttons to set the desired filtration period.
5) Press the SCROLL button to confirm the current setting and return to the ADV. OPTIONS submenu.
Please note that although the filtration period restricts how often filtration-only runs occur, normal heating maintenance
may take place in between the filtration runs. If this occurs it may appear as though the filtration period setting is not
functioning correctly, however this behaviour is normal. Excessive cycling of the spa will not be cured by increasing the
filtration period, please read “Heat Control” for more information.
Notes
1) On every day of the year we experience different ambient temperatures. As a result the spa pump will run for
different periods at different times every day, depending on how often the pump runs to heat the water.
2) Any modification of filtration settings (either time or period) will cause the current filtration timing to be reset and
automatic filtration maintenance will not continue until the first hour of the next filtration period.
3) Filtration cycles will always trigger heating if the pool is below the temperature set point regardless of the heat
mode setting.
4) Filtration does not operate during sleep periods.
Push button to turn blower on/off and select speed
Use the UP and DOWN buttons to adjust blower speed
For more detailed information please see section 5.
2.4 Variable Colour Light Operation
Light level button: Push to turn light on/off and alter brightness.
Light mode button: Push to change the light effects.
For more detailed information please see section 6.
2.5 Setting The Temperature
Push 1 = Main Menu display appears (see below)
- - - -
MAIN MENU
( )
( )
Push 1 = Set Temp display appears (see below)
ESC
38.00
1. SET TEMP
( SET )
( )
Push the SCROLL button to alter temperature
Or
Push the Scroll button to set the desired temperature once selected
For more detailed information please see section 7.2
Use the up and down buttons to select desired temperature
( )
( )
O
C
Page 28
Page 5
Page 8

1. TIGHT 0.25 2.50
2. NORMAL (default setting) 0.50 3.00
3. LOOSE 0.75 3.50
4. EXTRA LOOSE 1.00 4.00
3 Pump Operation
3.1 Pump 1 (Two speed, no 24HR circulation pump fitted)
Pump 1 is controlled via two touch pad buttons - one to turn the pump on/off and another to change its speed. When
the spa is running in PUMP AUTO mode, pressing either button will deactivate that mode and set the pump running
in low speed. The pump speed selected by these buttons are shown for a few seconds on the LCD display as well
as being indicated by several LEDs. The auto LED is green when PUMP AUTO mode is enabled and off when in
PUMP OFF mode, likewise the two pump button LEDs are green, red or off when the pump is on-low, on-high or off
respectively.
Push 1 (Pump On)
7.9.1 Heat Control
In addition to set temp the user may also select one of four heat control settings. The set temp determines the
maximum temperature before the spa will stop heating the water, whereas the heat control setting determines how
far the temperature must drop before heating resumes again. In other words, the heat control setting determines
how closely the spa will maintain the pool temperature to the set temperature.
The four available settings are as follows:
LCD displays “PUMP LOW”, auto LED off, button LEDs green. This mode is used to switch on pump 1 even when
the system is asleep or doesn't need to run the pump in automatic mode for heating or filtration.
Push 1 (Pump Hi)
The Hi/Low speed button can be used to change the pump speed:
Push 2 (Pump Low)
Push 2 (Pump Off)
LCD displays “PUMP OFF”, auto LED off, button LEDs off. This mode is used to turn pump 1 off for quiet relaxation.
The Hi/Low speed button has no effect in this mode.
Push 3 (Pump Auto)
LCD displays “PUMP AUTO”, auto LED green. This is the default start up mode in which pump 1, heating and
filtration are automatically controlled. Pressing the Hi/Low speed button has the same effect as pressing the
On/Off button in this mode.
3.2 Clean Up Cycle
If desired, a clean up cycle can be initiated to filter the water after the pool has been used. To do this, simply press
the pump on/off button to leave auto mode and switch on the pump . This will run the pump for a fixed period of time
(90 minutes) circulating the water through the filter. The system will then return to auto mode and maintain the
temperature ready for the next time the pool is used.
Press the pump button to enter PUMP LOW and filter the water for 90 minutes
The numbers associated with each setting in the table reflect the actual decrease in pool temperature below the set
point before heating will begin (hysteresis). Two sets of values are listed: 0.25 - 1.00 and 2.50 - 4.00. Generally the
first set is used, however if you do not have an in-pool temperature sensor or 24 hour circulation pump fitted the
second set will be used instead.
There is a direct compromise between how often the spa cycles on/off and how closely the temperature is
maintained to the set temperature. Using the “tight” setting will maintain the temperature very closely to the set
temperature but in doing so it will also cause the spa to cycle on/off frequently. Conversely, using the “extra loose”
setting will cause a larger variation in pool temperature but the spa will cycle much less frequently.
Exactly how often the spa will cycle on/off at each setting is a complex function of ambient conditions and the
thermal characteristics of your spa - set temp, spa body insulation, cover insulation, heater rating etc. It is
recommended that you start with the default “normal” setting and only change to another setting if you would prefer a
different compromise of cycling frequency and temperature variation.
7.9.2 Changing The Heat Control Setting
1) Select the ADV. OPTIONS submenu from the main menu.
2) Select the HEAT CONTROL menu item.
3) Press the SCROLL button to begin heat control setting selection.
4) Use the UP and DOWN buttons to select heat control setting (refer table).
5) Press the SCROLL button to confirm the current setting and return to the ADV. OPTIONS submenu.
Notes
1) When the pool is in use the hysteresis is automatically limited to a maximum of 0.50 degrees Celsius to ensure
the water doesn't get too cold.
2) The start of a filtration cycle will always trigger heating if the temperature is below the set point regardless of the
heat control setting.
Notes:
1) The heater will turn on and off as required any time pump 1 is running in either PUMP AUTO or PUMP ON
States.
2) PUMP AUTO will be activated after 90 minutes of touch pad inactivity, if left in PUMP ON or PUMP OFF
states.
Page 6
Page 27
Page 9

7.8.7 Panel And Pool Light Synchronisation (on/off)
The SP800 touch pad backlight has the ability to mirror the colour and intensity of the in-pool Spa Power Variable
Colour Light (SPVCL). This feature is most noticeable when a light effect mode is being used and the light colour is
changing rapidly.
When the pool light is turned off the touch pad backlight will remain one user selectable fixed colour. If desired the
synchronising/mirroring feature can be disabled and the touch pad backlight will remain on the fixed colour even
when the pool light is turned on.
7.8.8 Enabling/Disabling Light Synchronisation
1) Select the MISC OPTIONS submenu from the main menu.
2) Select the PANEL & POOL LT. SYNC menu item
3) Press the SCROLL button modify light synchronisation setting
4) Use the UP and DOWN buttons to toggle between on and off
5) Press the SCROLL button to set.
3.3 Pump 1 (Two speed, 24HR circulation pump fitted)
This pump is controlled via two touch pad buttons one to turn the pump on/off and another to change its speed. The
mode and pump speed selected by these buttons are shown for a few seconds on the LCD display as well as being
indicated by the pump button LEDs. The two pump button LEDs are green, red or off when the pump is on-low, onhigh or off.
Two pushes of the on/off button cycles the pump as follows:
Push 1 (Pump On)
Push 1 (Pump Hi)
The Hi/Low speed button can be used to change the pump speed:
Push 2 (Pump Low)
Note: This option is only available if a SPVCL (Spa Power Variable Colour Light) is in the pool.
7.9 Advanced Options Submenu
The advanced options menu contains settings that should only be modified after you are familiar with the basic
operation of the spa. The defaults will generally be satisfactory and will probably not need to be changed.
Select MAIN menu then push UP button eight times
1. SET TEMP
2. USER TIMER
3. CLOCK
4. USER ALARM
5. SLEEP TIMES
6. MAINT TIMERS
7. MISC OPTIONS
8. ADV. OPTIONS
9. LD. DEFAULTS
Push 8
- - - -
8. ADV. OPTIONS
( )
(SUBMENU)
( )
- - - -
ADV OPTIONS
( )
(ESC)
O.50
1. HEAT CONTROL
( )
(SET)
( )
( )
1. HEAT CONTROL
2. FILT. PERIOD*
3. FILT. TIME*
*N/A circulation pump installations
Push 2 (Pump Off)
LCD displays “PUMP OFF”, button LEDs off. The Hi/Low speed button has no effect in this mode.
3.4 Pump 1A & 1B (Single speed pumps, no 24hr circulation pump fitted)
Three pushes of the Pump 1A button cycles the pump as follows:
Push 1 (Pump On)
Push 2 (Pump Off)
Push 3 (Pump Auto)
Notes:
1) If Pump 1A is left in”PUMP ON or PUMP OFF, this pump will automatically revert to “PUMP AUTO” mode after 90
minutes.
Two pushes of the Pump 1B button cycles the pump as follows:
Push 1 (Pump On)
Push 2 (Pump Off)
LCD displays “PUMP ON”, button and Auto LEDs green.
LCD displays “PUMP OFF”, button and Auto LEDs off.
LCD displays “PUMP AUTO”, button and Auto LEDs green.
LCD displays “PUMP ON”, button LED green.
LCD displays “PUMP OFF”, button LED off.
Page 26
Scroll to SET
Notes:
1) If Pump 1B is left on, this pump will automatically switch off after 25 minutes.
2) If the heater element is on, running pump may cause the heater to load shed and switch off. If this occurs the
heater will come back on approximately 5 seconds after pump is deselected.
Page 7
Page 10

1. POOL TEMP (default setting, set temp and clock on text lines)
2. SET TEMP (clock and pool temp on text lines)
3. CLOCK (set temp and pool temp on text lines)
4. CYCLING (cycles through the above views 1 – 3 for 10 seconds each)
3.5 Pump 1A & 1B (Single speed pumps, 24hr circulation pump fitted)
Two pushes of the Pump 1A button cycles the pump as follows:
Push 1 (Pump On)
Push 2 (Pump Off)
LCD displays “PUMP ON”, button LED green.
LCD displays “PUMP OFF”, button LED off.
7.8.2 Main Display
The SP800 touch pad LCD consists of two lines of text and four numerical digits. The display typically shows three
quantities - pool temperature, set temperature and the clock (weekday and time). By default the pool temperature is
displayed on the numerical digits leaving the clock and set temperature on the two lines of text.
If preferred, the user may change the layout so either the set temperature or clock are shown on the main display (four
numerical digits) rather than on the smaller text lines. In addition a cycling mode can be selected whereby each of the
three possible views is presented for 10 seconds each.
Two pushes of the Pump 1B button cycles the pump as follows:
Push 1 (Pump On)
Push 2 (Pump Off)
Notes:
1) If Pump 1A or Pump 1B are left on, these pumps will automatically switch off after 25 minutes.
2) If the heater element is on, running these pumps may cause the heater to load shed and switch off. If this occurs
the heater will come back on approximately 5 seconds after the pump is deselected.
LCD displays “PUMP ON”, button LED green.
LCD displays “PUMP OFF”, button LED off.
3.6 24Hr Circulation Pump On/Off
If a circulation pump has been fitted the spa manufacturer may have assigned an on/off button on the touch pad to
turn the circulation pump on and off. If a button has been assigned follow the instructions below.
-To switch circulation pump off push the assigned button.
-To switch the circulation pump on push the assigned button.
Note:
If the circulation pump is switched off it will be reactivated after 25 minutes of touch pad inactivity.
4 Auxillary On/Off (pump, blower, light)
Two pushes of the Auxilary button cycles the outlet as follows:
Available options:
7.8.3 Changing The Main Display
1) Select the MISC OPTIONS submenu from the main menu.
2) Select the MAIN DISPLAY menu item
3) Press the SCROLL button to begin main display selection.
4) Use the UP and DOWN buttons to set the desired view.
5) Press the SCROLL button to confirm the current setting and return to the MISC OPTIONS submenu.
7.8.4 Panel Light Colour And Intensity
The user has the ability to change the touch pad backlight colour and intensity to their preferred settings. Note that
these manual settings will only take effect when either the pool light is off or if the “panel and pool light
synchronisation” option has been disabled.
7.8.5 Changing The Touch Pad Backlight Colour
1) Select the MISC OPTIONS submenu from the main menu.
2) Select the PANEL LIGHT COLOUR menu item
3) Press the SCROLL button to begin light colour selection.
4) Use the UP and DOWN buttons to set the desired colour.
5) Press the SCROLL button to confirm the current setting and return to the MISC OPTIONS submenu.
Push 1 (Aux On)
Push 2 (Aux Off)
Notes:
1) If Aux is left on, this oulett will automatically switch off after 25 minutes.
2) If the heater element is on, running this outlet may cause the heater to load shed and switch off. If this occurs
the heater will come back on approximately 5 seconds after the Aux is deselected.
Page 8
LCD displays “Aux On”, button LED green.
LCD displays “Aux Off”, button LED off.
7.8.6 Changing The Touch Pad Backlight Intensity
1) Select the MISC OPTIONS submenu from the main menu.
2) Select the PANEL LIGHT INTENSITY menu item.
3) Press the SCROLL button to begin light intensity adjustment.
4) Use the UP and DOWN buttons to set the light intensity.
5) Press the SCROLL button to confirm the current setting and return to the MISC OPTIONS submenu.
Please note that the backlight intensity setting only has effect when the pool is in use. After 90 minutes of touch pad
inactivity (no button presses) the backlight intensity will automatically return to a fixed 34% setting. This is to ensure
long life of the backlight LEDs. As soon as you press a button on the touch pad your custom setting will be restored.
Page 25
Page 11

7.8 Miscellaneous Options Submenu
The miscellaneous options menu contains convenience options that primarily allow you to customise the look of the
poolside touch panel. None of the options have any effect upon the basic spa control functions such as pump
operation or heating.
Select MAIN menu then push UP button seven times
Push 7
- - - -
7. MISC OPTIONS
( )
(SUBMENU)
( )
1. SET TEMP
2. USER TIMER
3. CLOCK
4. USER ALARM
5. SLEEP TIMES
6. MAINT TIMERS
7. MISC OPTIONS
8. ADV. OPTIONS
9. LD. DEFAULTS
- - - -
MISC. OPTIONS
( )
(ESC)
- - - -
1. KEY CLICKS
( )
(CHANGE)
Scroll to SET
7.8.1 Key Clicks (on/off)
By default the touch pad will beep whenever a button is pressed, however key clicks (beeps) may be turned on and
off as desired using the procedure below:
1) Select the MISC OPTIONS submenu from the main menu.
2) Select the KEY CLICKS menu item
3) Press the SCROLL button
4) Use the UP and DOWN buttons to toggle between on and off
5) Press SCROLL button to set
( )
( )
1. KEY CLICKS
2. MAIN DISPLAY
3. PANEL LIGHT COLOUR
4. PANEL LIGHT INTENSITY
5. PANEL & POOL LIGHT SYNC*
*Only available if a SPVCL is
fitted to pool
5 Spa Power Variable Speed Blower (SPVSB)
The Air Button controls a Spa Power Variable-Speed Blower (if fitted). It is used to turn the blower on/off and select
different operating modes.
Four pushes of the air button cycle the blower as follows:
Push 1 (Blower On)
Push 2 (Blower Ramping)
Push 3 (Blower Speed)
Push 4 (Blower Off)
LCD Displays “BLOWER ON HIGH”, Blower on
full speed
LCD Displays “BLOWER RAMPING”, speed oscillating
LCD Displays “BLOWER SPEED” and bar graph
Showing actual speed setting, Blower on adjustable
speed (see below)
LCD Displays “BLOWER OFF”, (Default State)
5.1 Adjustable Speed Mode (SPVSB)
In the adjustable speed mode the UP and DOWN buttons are used to set the blower to one of 9 different speeds.
On the first press of UP or DOWN the LCD will display “BLOWER SPEED” along with a bar graph showing the
current speed setting. While viewing this display you may press the UP and DOWN button to adjust the speed as
required. Hold down either button for automatic key press repeat. This setting is saved and will be automatically
restored next time you select the adjustable speed mode.
Down
Notes:
1) The UP and DOWN buttons are shared with Light Level, Light Mode, SPVSB speed and the menu system.
When not within the menu system the actual use of the UP and DOWN buttons depends on which of the three
function buttons was pressed last - Light Level, Light Mode or Air.
2) Pressing the Air button while the blower is running will only cycle through the available options when the LCD is
displaying the current selection. This allows the first push of the Air button to set the function of the UP and
DOWN buttons and to show the current Blower setting without changing it.
3) Pressing either the UP or DOWN button while in the full-speed or oscillating mode will automatically change the
SPVSB to adjustable speed mode.
4) If left on, this accessory will automatically switch off after 25 minutes.
5) If the heater element is on, switching on the SPVSB may cause the heater to load shed and switch off. If this
occurs the heater will come back on approximately 5 seconds after the SPVSB is turned off.
Up
Note: Disabling key clicks will not silence user timer beeps etc.
Page 24
Page 9
Page 12

6 Spa Power Variable Colour Light (SPVCL)
The Spa Power Variable Colour Light is controlled via two touch pad buttons - Light Level and Light Effect Mode. If no
SPVCL is fitted then the buttons can still be used to produce lighting effects on the touch pad as though a light was
fitted.
The Light Level button selects the intensity of the light and the Light Effect Mode button selects the light colour and
effect.
Five pushes of the Light level button selects the light intensity as follows:
- - - -
008/008 WEEKS
(ESC)
(CLR)
4) Press the DOWN button to reset the week count to zero.
(CFG)
Push 1 (High)
Push 2 (Medium)
Push 3 (Low)
Push 4 (Adjust)
Push 5 (Off)
Pressing the UP or DOWN button while in high, medium or low mode will automatically change to adjustable mode.
LCD Displays “LIGHT HIGH”, 100% light intensity
LCD Displays “LIGHT MEDIUM”, 66% light intensity
LCD Displays “LIGHT LOW”, 33% light intensity
LCD Displays “LIGHT ADJUST”, adjustable light intensity mode,
button LED colour changes with setting when up or down buttons
are pressed. (Green 2-32, Orange 34-66, Red 68-100%)
(See “Adjustable Light Intensity Mode” in next section for more details.
LCD Displays “LIGHT OFF”, light off
6.1 Adjustable Light Intensity Mode
In the adjustable light intensity mode the UP and DOWN buttons are used to set the light between 2 and 100 percent
of maximum intensity. On the first press of UP/DOWN the LCD will display “LIGHT ADJUST” along with a bar graph
showing the current setting. While viewing this display you may press the UP and DOWN buttons to adjust the
intensity as required. Hold down either button for automatic key press repeat. This setting is saved and will be
automatically restored next time you select the adjustable light intensity mode.
Reset to zero
5) Press the SCROLL button to confirm
and move to the next field.
- - - -
000/008 WEEKS
(ESC)
(CFG)
7.7.3 Configuring A Maintenance Timer
Follow these steps to modify the total number of weeks or the number of elapsed weeks for a given maintenance
timer:
1) Select the MAINT TIMERS submenu.
2) Select the desired maintenance timer using the UP and DOWN buttons.
3) Press the SCROLL button once to view the maintenance timer options.
4) Press the UP button once to begin timer configuration. The Total Weeks field begins to flash.
5) Use the UP and DOWN buttons to adjust the selected field as required. Hold down either button for automatic
key press repeat.
6) Press the SCROLL button to confirm the current setting and move to the next field.
7) Repeat steps 5 and 6 to set the number of weeks already elapsed. Generally you will want to leave this field at 0
- the start of the timed period.
8) Press the SCROLL button once to return to the maintenance timer submenu.
Push 4 (Light Adjust)
Down
Page 10
Up
36.75
LIGHT ADJUST :
100
7.7.4 Disabling A Maintenance Timer
O
C
If you want to disable a maintenance timer follow the procedure outlined above until you reach step 5. At this point
press the DOWN button until the Total Weeks field is 0. Press the SCROLL button once to save the new setting and
return to the maintenance timer options view. This will completely disable the maintenance timer.
Notes:
1) Lowest numbered timers have the highest priority and will be shown first if two or more timers are due at the same
time. Clearing the first maintenance timer will result in the controller notifying you that next highest priority timer is
due.
2) The maintenance timers will not accumulate time while the controller is turned off.
Page 23
Page 13

7.7.1 Maintenance Timer Configuration
The installer, serviceman or owner can fill in the table below to help keep track of what
settings have been entered into the controller.
Timer name Period (weeks) Description/notes
1. General service
2. Cabinet service
3. Replace filter
4. Ozonator
5. Custom #1
6. Custom #2
7. Custom #3
8. Custom #4
9. Custom #5
7.7.2 Acknowledging A Maintenance Timer
Once a timer is due you need to manually clear it - it will not clear by itself. Follow these steps to clear a maintenance
timer that is currently due:
1) Select MAIN menu then push UP button 6 times
Push 6
2) Press the SCROLL button then the UP button as required to select the
maintenance timer to be cleared.
- - - -
6. MAINT. TIMERS
( )
(SUBMENU)
( )
- - - -
1. GENERAL SRVC
( )
(OPTIONS)
Scroll to SET
3) Press the SCROLL button begin to modifying the timer options.
Page 22
( )
1. SET TEMP
2. USER TIMER
3. CLOCK
4. USER ALARM
5. SLEEP TIMES
6. MAINT TIMERS
7. MISC OPTIONS
8. ADV. OPTIONS
9. LD. DEFAULTS
1. GENERAL SRVC
2. CABINET SRVC
3. REPLACE FLTR
4. OZONATOR
5. CUSTOM #1
6. CUSTOM #2
7. CUSTOM #3
8. CUSTOM #4
9. CUSTOM #5
6.2 Light Effect Mode
In addition to being able to change the light colour, the SP800 also has the ability to produce various lighting effects
while cycling through each of the available colours. The Light Effect Mode, UP and DOWN buttons are used to
select the lighting effect or colour of choice.
Seven pushes of the Light Effect Mode button cycle the light mode setting as follows:
Push 1
(Light On)
Push 2
(Change Colour)
Push 3
(Change Effects)
Push 4
(Change Effects)
Push 5
(Change Effects)
Push 6
(Change Effects)
Push 7
(Change Effects)
This setting is saved and will be automatically restored next time you turn on the light.
LCD Displays “FIXED WHITE”, Light is pure white, no light effect.
Pressing either the UP or DOWN button selects the Preset Colour mode (see below)
LCD Displays “PRESET COLOUR”, Light colour depends on previous selection (default white). The UP and
DOWN buttons can be used to select a different colour of choice. Your chosen colour is saved and will be
automatically restored next time you select Preset Colour mode.
LCD Displays “SMOOTH CHANGE”, Light cycles through all of the available colours continuously without any
delay for each colour. The UP and DOWN buttons may be used to change the speed of the light effect (see
section 6.2.1 below).
LCD Displays “FADE UP/DOWN”, Light cycles through all of the available colours one at a time. Each colour is
faded in from zero intensity (light off) and then faded out to zero intensity. The UP and DOWN buttons may be
used to change the speed of the light effect (see section 6.2.1 below).
LCD Displays “BURST UP/DOWN”, Light cycles through all of the available colours one at a time. Very similar
to FADE UP/DOWN, except that the colour fades in very fast and fades out slowly. The UP and DOWN buttons
may be used to change the speed of the light effect (see section 6.2.1 below).
LCD Displays “DELAYED CHANGE”, Light cycles through all of the available colours one at a time. Each colour
is shown for a short period then the light will quickly fade to the next colour. The UP and DOWN buttons may be
used to change the speed of the light effect (see section 6.2.1 below).
LCD Displays “STEP CHANGE”, Light cycles through all of the available colours one at a time without any
smooth fading between different colours. The UP and DOWN buttons may be used to change the speed of the
light effect (see section 6.2.1 below).
6.2.1 Adjusting The Light Effect Mode Speed
When a light effect mode has been selected (“SMOOTH CHANGE” to “STEP CHANGE” see above) the speed at
which the light cycles through the available colours may be manually adjusted. On the first press of UP/DOWN the
LCD will display “EFFECT SPEED” along with a bar graph showing the current setting. While viewing this display you
may press the UP and DOWN buttons to adjust the cycle speed as required. Hold down either button for automatic
key press repeat. At the maximum setting of 100% the speed is approximately 40 times faster than the minimum
setting of 2% and approximately 6 times faster than the default setting of 50%. The setting for each light effect is
saved individually and will be restored next time you select the given light effect mode.
O
C
Down
Notes:
1) The UP and DOWN buttons are shared with Light Level, Light Mode, SPVSB speed and the menu system.
When not within the menu system the actual use of the UP and DOWN buttons depends on which of the three
function buttons was pressed last - Light Level, Light Mode or Air.
2) Pressing either Light Level or Light Mode buttons while the light is on will only cycle through the available options
when the LCD is displaying the current selection. This allows you to set the function of the UP and DOWN
buttons and to view the current Light Level or Light Mode setting without changing them.
3) Pressing Light Mode button when light is off will turn on the light using Light Level High.
4) By default the touch pad panel backlight will mirror the pool setting, but this feature may be disabled. See
section 7.8.7 on page 26
Up
36.75
EFFECT SPEED:
100
Page 11
Page 14

7 Menu Structure
MAIN MENU
7.6.2 Disabling A Sleep Time Period
If you want to disable a sleep period follow the procedure outlined in Configuring a sleep time until you reach step 4.
At this point use the UP and DOWN buttons to adjust the weekday setting until no days are selected. (see pic below)
Press the SCROLL button to save the new setting and return to the sleep time submenu. This will completely disable
the sleep period.
When the sleep period is disabled the start time is shown as below and the stop time cannot be selected within the
sleep submenu.
MISCELLANEOUS OPTIONS
SUB MENU
Key Clicks
Main Display
Panel Light Colour
Panel Light Intensity
Panel & Pool Light Sync
*2
SET TEMP
USER TIMER
CLOCK
USER ALARM
SLEEP TIMES
MAINTENANCE TIMERS
ADVANCED OPTIONS
LOAD DEFAULTS
SUB MENU
Heat Control
Filt Period*1
Filt Time*1
*1 N/A for 24Hr circulation pump installations
*2 N/A if SPVCL not fitted.
SUB MENU
General Service
Cabinet Service
Replace Filter
Ozonator
Custom 1
Custom 2
Custom 3
Custom 4
Custom 5
SUB MENU
Sleep Timer 1
Sleep Timer 9
SUB MENU
User Alarm 1
User Alarm 9
- - - -
1. SLEEP START
DAYS: [ ]
When you disable a sleep period in this manner the start and stop times are still retained and will be restored when
you enable the sleep period by re-selecting one or more weekdays.
7.6.3 Plumbing Purge
After the system resumes from a sleep period it will automatically run each of the accessory pumps one-by-one and
then the blower for 10 seconds to purge the plumbing. This prevents any stagnant water from collecting in the pipes
if the pool is not used for an extended period of time. While a plumbing purge is in progress “PURGING PUMPS,
PLEASE WAIT” will be shown on the LCD display.
Notes
1. For correct sleep operation ensure the clock is set correctly. You will need to set it the first time the controller is
powered up or if the controller has been turned off for a long period.
2. The maximum possible sleep time for one period is 23 hours, 59 minutes. This is achieved when the stop time is
one minute before the start time. If the two times are equal the sleep period will have no effect.
3. It is normal for the spa to run for a long period after sleep to recover temperature lost over night. Because of this
it is advisable to configure the spa to wake up at least one hour before use of the spa is desired.
7.7 Maintenance Timers
The SP800 controller has nine programmable maintenance timers that will remind you when regular scheduled
maintenance is due. Each timer can be configured to expire after 1 to 255 weeks or may be disabled altogether.
All nine timers are disabled by default unless your spa builder/installer has set them.
The first four timers have specific names for specific tasks, but the remaining five are generic. Your spa installer may
have chosen to use one or more of the custom programs for maintenance items not covered by the generic timers.
Once a timer period has expired the touch pad will inform you that maintenance is due in two ways:
1) When the spa has not been used for over an hour the first key press will result in a long beep and text being
displayed indicating which timer has expired. You will need to press the SCROLL button one or more times to clear
this message.
2) When not within the menu system and after approximately 10 seconds of inactivity, the touch pad LCD will
periodically display text indicating which timer has expired. This text is displayed in place of the default main
display text and does not interfere with the normal touch pad interface.
In both cases, the text displayed will be “MAINT REQD:” along with the name of the maintenance timer.
Page 12
Page 21
Page 15

4) Use the UP and DOWN buttons to select the desired weekdays that the sleep period will operate. There are 15
possible weekday settings to choose from -Monday to Sunday and various combinations of each.
5) Press the SCROLL button to confirm the current setting and move to the next field.
[
PM
11 00
:
1. SLEEP START
DAYS: [ MTWTFSS ]
Scroll to SET
6) Repeat steps four and five to carry on adjusting sleep start hours & minutes then sleep stop hours & minutes.
Tip: As you modify the stop time the hours asleep field will change accordingly, use it to verify your new settings
are correct.
PM
:
11 00
1. SLEEP START
DAYS: [ MTWTFSS ]
PM
:
11 00
1. SLEEP START
DAYS: [ MTWTFSS ]
AM
:
7 00
1. SLEEP STOP
08.0 HRS ASLEEP
AM
7 00
:
1. SLEEP STOP
08.0 HRS ASLEEP
11
00
7
00
[
[
[
[
[
[
[
[
SS
MTWTF
M
T
W
T
F
S
Scroll to SET
Scroll to SET
Scroll to SET
Scroll to SET
S
[
]
]
]
]
]
]
]
]
]
MTWTF
[
[
MTWTF
[
MTW
[
[
M W F
[
T
[
TF
T
SS
S
S
S
]
]
]
]
]
]
]
]
Navigating The Menu System
The SP800 menu system provides a simple interface that allows you to view and modify most user options. These
options include set temperature, sleep times, filtration time and filtration period to name a few.
Throughout the entire menu system only three touch pad buttons are used DOWN, SCROLL and UP. Generally,
while you are within the menu system the lower line of text on the LCD Display will show the function of each of these
buttons.
To access the main menu from the default display, press the SCROLL button. The LCD display will change to show
the Main Menu title. Each menu consists of a menu title and several menu items - menu items are numbered
whereas the menu title is not. Use the UP and DOWN buttons to browse through the main menu.
If you do not press any touch pad buttons for over one minute while inside the menu system the display will
automatically return back to the default view, however you do not need to wait for this timeout period. To quickly exit
from the menu system, use the UP and DOWN buttons to select the current menu title and press the SCROLL
button.
Note that while viewing the menu title the LCD Display text above the SCROLL button shows “(ESC)” to indicate that
the function of the SCROLL button is to escape from the menu. The action taken by the SCROLL button is
dependent on which menu item is selected and this is reflected by the LCD Display text above the SCROLL button.
The menu system contains five sub menus - User Alarms Menu, Sleep Times Menu, Maintenance Timers Menu,
Miscellaneous Options Menu and Advanced Options Menu. These sub menus are accessed via main menu items 4
to 8 respectively. Simply select one of these items in the main menu and press the SCROLL button. You will now be
in the given sub menu. Browse sub menus just as you would the main menu - the interface functions exactly the
same.
To select any other item either within the main menu or any of the sub menus simply select the desired menu item
using the UP and DOWN buttons then press the SCROLL button.
7.1 Main Menu
The main menu is the top level of the menu system. It provides quick access to the set temperature setting, user
timer and clock. The five sub menus are also accessed via main menu items 4 to 8.
To access the main menu from the default view, simply press the SCROLL button. Please read “Navigating the menu
system” section above if you have not already done so.
1. SET TEMP
2. USER TIMER
3. CLOCK
Push 1
- - - -
MAIN MENU
( )
( )
ESC
( )
4. USER ALARM
5. SLEEP TIMES
6. MAINT TIMERS
7. MISC OPTIONS
8. ADV. OPTIONS
9. LD. DEFAULTS
Page 20
Page 13
Page 16

7.2 Set Temp (Temperature control)
Select MAIN menu then push UP button once
1. SET TEMP
O
O
C
Push 1
The SP800 automatically controls the main pump and heater to filter the water and maintain it at the desired
temperature set by the user. The user can leave the system to look after the spa and know it will be at the correct
temperature whenever he or she wants to use it.
While viewing the set temp menu item, the current set temperature is displayed on the four numerical digits in
degrees Celsius (default 37.00). The range of adjustment is 10.00 to 41.50 in steps of 0.25 degrees Celsius.
To change the setting press SCROLL while viewing the set temp menu item. The current setting will flash indicating
that the value may now be changed. Use the UP and DOWN buttons to adjust the set temp as required. Hold down
either button for automatic key press repeat. Press the SCROLL button once the desired value is reached. The final
press of the SCROLL button will return you back to the default view (out of the menu system) and the new setting will
take effect immediately.
38.00
1. SET TEMP
( )
( SET )
Scroll to SET
( )
2. USER TIMER
3. CLOCK
4. USER ALARM
5. SLEEP TIMES
6. MAINT TIMERS
7. MISC OPTIONS
8. ADV. OPTIONS
9. LD. DEFAULTS
7.6 Sleep Timer
Sleep is a very handy feature that is used to silence the spa pool during your hours of sleep. While the SP800 is
asleep no automatic heating or filtration maintenance will occur, however the spa can still be used in manual mode
without having to change any settings.
There are a total of nine individual sleep times that can be programmed, each of which can operate on one or more
specified weekdays. You may use as few or many of the sleep periods as you wish.
By default the spa will sleep between 11pm & 7am, Monday to Sunday. This is achieved using only sleep period one,
the remaining eight sleep periods are disabled.
To review the current sleep settings simply select the sleep time submenu from the main menu. Within the submenu
use the UP and DOWN buttons to browse through each of the nine sleep periods
Each of the nine sleep periods consists of a weekday setting, start time and stop time. These three settings are
displayed using two sleep time submenu items: “#. SLEEP START” and “#. SLEEP STOP” (where # is the sleep
period number 1 to 9).
7.6.1 Configuring A Sleep Time
Follow these steps to set an unused sleep period, or to modify an enabled sleep period.
Select MAIN menu then push UP button five times
Push 5
1) Select the SLEEP TIMES submenu by pressing the SCROLL button.
- - - -
5. SLEEP TIMES
( )
(SUBMENU)
( )
1. SET TEMP
2. USER TIMER
3. CLOCK
4. USER ALARM
5. SLEEP TIMES
6. MAINT TIMERS
7. MISC OPTIONS
8. ADV. OPTIONS
9. LD. DEFAULTS
Note: The pool temperature will be maintained close to the set temperature, but how close depends upon the “Heat
Control” setting (see section 7.9.2 for more details).
Page 14
- - - -
SLEEP TIMES
( )
(ESC)
2) Use the UP and DOWN buttons to select the desired sleep period.
PM
11 00
1. SLEEP START
DAYS: [ MTWTFSS ]
3) Press SCROLL to start modifying the sleep start day.
( )
:
Sleep period (1-9)
Page 19
Page 17

- - - -
1. USER ALARM 1
DAYS: [ ]
Scroll to SET
3) Press the SCROLL button to confirm the current setting and move to the next field.
4) Repeat steps 2 & 3 to set the alarm time hours and minutes.
5) Press the SCROLL button to save the new settings and return to the user alarms submenu.
[][
[
MTWTF
[
M
[
T
[
W
[
[
[
[
[
MTWTF
[
[
MTWTF
[
MTW
[
[
M W F
[
T
[
T
F
TF
T
7.5.2 Disabling A User Alarm
SS
S
SS
S
S
S
7.3 User Timer
]
]
]
]
]
]
]
]
]
S
]
]
]
]
]
]
]
]
The user timer is a general-purpose count down minute timer that can be preset to start at anywhere between 1 and
99 minutes. You can set it when you get into the spa to have it remind you when its time to get out.
The timer will count down the specified period and show minutes and seconds remaining on the LCD Display as it
does. A double beep is produced for each of the last 10 seconds, finishing with one long beep and the message
“USER TIMER FINISHED” when the timer is done.
To use the user timer, first select it from the main menu. The total time will flash on the LCD (default 30 minutes).
Use the UP and DOWN buttons to adjust the time as required. Hold down either button for automatic key press
repeat. Press the SCROLL button once the desired time is reached. This will set the timer running and the message
“TIMER STARTED (STOP)” will be displayed. While this message is being displayed you may immediately stop the
timer by pressing SCROLL again. Otherwise wait approximately five seconds for the message to disappear and you
will be returned back to the default view with the timer running in the background.
Select MAIN menu then push UP button twice
Push 2
30 00
2. USER TIMER
( )
:
( START )
( )
O
C
1. SET TEMP
2. USER TIMER
3. CLOCK
4. USER ALARM
5. SLEEP TIMES
6. MAINT TIMERS
7. MISC OPTIONS
8. ADV. OPTIONS
9. LD. DEFAULTS
36.75
Mon,
Usr timer
12:00
29:59
PM
USER TIMER counting down
If you want to disable a user alarm follow the procedure outlined above until you reach step 4. At this point use the
UP and DOWN buttons to adjust the weekday setting until no days are selected (see display below).
- - - -
1. USER ALARM 1
DAYS: [ ]
Press the SCROLL button to save the new setting and return to the user alarms submenu. This will completely
disable the user alarm.
When you disable a user alarm in this manner the alarm time (hour and minute) is still retained and will be restored
when you enable the user alarm by re-selecting one or more weekdays.
Page 18
7.4 Clock
The SP800 contains a real time clock that will retain the correct time even during short power cuts. The clock
provides the user with a convenient way to tell the time and is also used to time sleep periods, filtration timing and
the user timers.
The clock can be configured to operate in either 12 or 24 hour mode. This setting will also determine the way user
alarms, sleep start and sleep stop times are displayed.
1. SET TEMP
2. USER TIMER
3. CLOCK
4. USER ALARM
5. SLEEP TIMES
6. MAINT TIMERS
7. MISC OPTIONS
8. ADV. OPTIONS
9. LD. DEFAULTS
Page 15
Push 3
PM
12 00
3. CLOCK
( )
( SET )
:
( )
Page 18

7.4.1 Setting The Clock
1) Select the clock menu item from within the main menu.
PM
:
12 00
3. CLOCK
( )
( SET )
( )
7.5 User Alarms
The SP800 controller has nine user programmable alarms that you can configure to go off at a preset time while you
are using the spa. These alarms function similarly to a regular clock alarm but with the additional benefit that you can
also specify which days the alarm should operate.
When an alarm goes off the touch pad will beep and display the current time and text indicating which alarm number
is active. Beeping will continue for one minute or until you press a button on the touch pad. There is no effect on any
other spa functions such as pumps, blower, light etc.
2) Press the SCROLL button to begin setting the clock.
3) Use the UP and DOWN buttons to select the desired clock mode (12hr or 24hr).
4) Press the SCROLL button to confirm the current setting and move to the next field.
5) Use the UP and DOWN buttons to adjust the selected field as required. Hold down
Either button for automatic key press repeat.
6) Repeat until Mode, Hours, Minutes and Weekday have been set.
12 00
[ 12Hr ] [ Mon ]
( )
PM
[ 12Hr ] [ Mon ]
( )
PM
[ 12Hr ] [ Mon ]
( )
:
( SET )
12 00
( SET )
12 00
( SET )
( )
:
( )
:
( )
[ ] 12Hr
Scroll to SET
12
Scroll to SET
00
Scroll to SET
The alarms are only active within one hour after the last button press on the touch pad. If you have not used the spa
in over an hour no sound will be produced.
7.5.1 Configuring A User Alarm
Select MAIN menu then push UP button four times
Push 4
1) Select the USER ALARMS submenu by pressing the SCROLL button.
- - - -
4. USER ALARMS
( )
(SUBMENU)
( )
1. SET TEMP
2. USER TIMER
3. CLOCK
4. USER ALARM
5. SLEEP TIMES
6. MAINT TIMERS
7. MISC OPTIONS
8. ADV. OPTIONS
9. LD. DEFAULTS
- - - -
USER ALARMS
( )
(ESC)
2) Use the UP and DOWN buttons to select the desired weekdays that the user alarm will
operate. There are 15 possible weekday settings to choose from - Monday to Sunday
and various combinations of each.
( )
PM
12 00
[ 12Hr ] [ Mon ]
( )
When SCROLL is pressed to set theday of the week the display reverts back to the default display.
Page 16
:
( SET )
( )
[ ] Mon
Scroll to SET
- - - -
1. USER ALARM 1
DAYS: [ ]
Page 17
 Loading...