

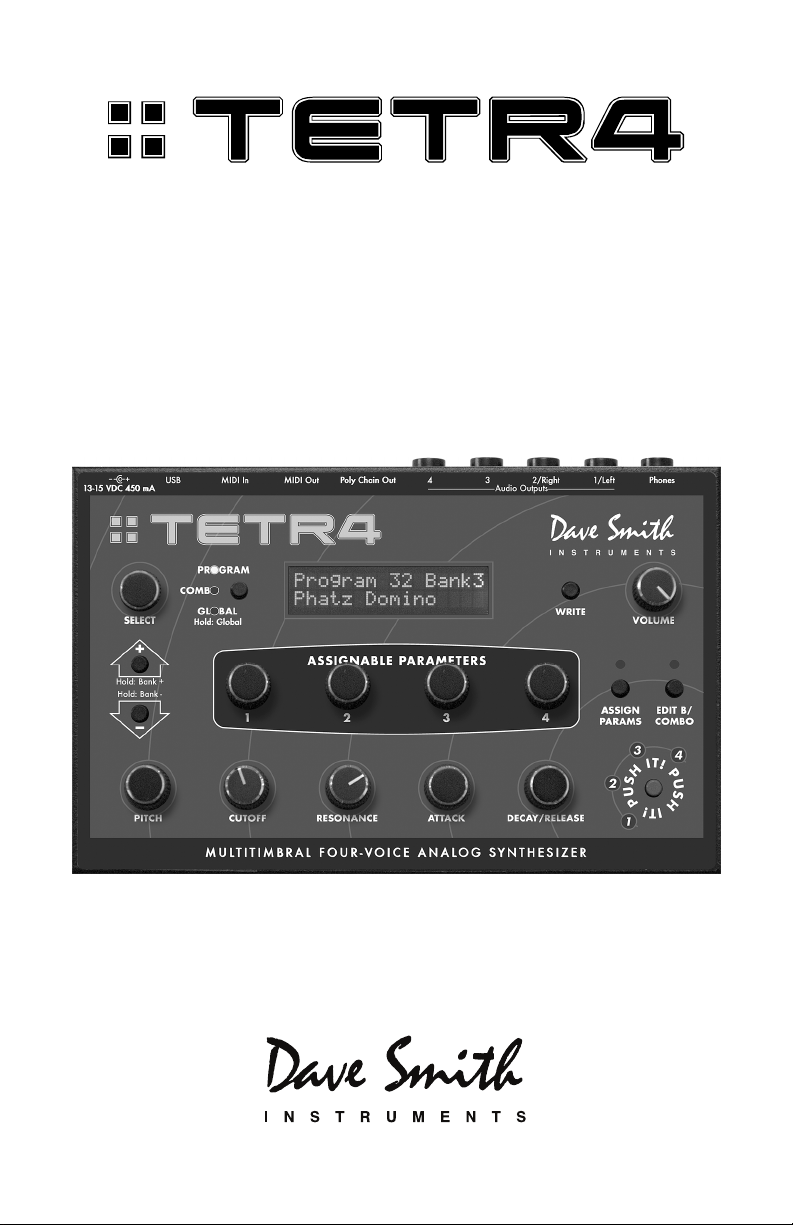
Page 1
Operation Manual
Page 2

Page 3

Tetra
Operation Manual
Version 1.3
September 2010
Dave Smith Instruments
1210 Cabrillo Hwy N
Half Moon Bay, CA 94019-1449
USA
©2010 Dave Smith Instruments
www.DaveSmithInstruments.com
Page 4

Tested To Comply
With FCC Standards
FOR OFFICE USE
This device complies with Part 15 of the FCC Rules.
Operation is subject to the following two conditions:
(1) This device may not cause harmful interference and
(2) this device must accept any interference received,
including interference that may cause undesired
operation.
This Class B digital apparatus meets all requirements of
the Canadian Interference-Causing Equipment Regulations.
Cet appareil numerique de la classe B respecte toutes
les exigences du Reglement sur le materiel brouilleur du
Canada.
For Technical Support, email: support@davesmithinstruments.com
Page 5

Contents
Quick Start................................................................................................. 1
Getting Connected ....................................................................................3
Front Panel Controls .................................................................................5
Basic Operation......................................................................................... 9
Global Parameters ..................................................................................13
Program Parameters...............................................................................17
Oscillator Parameters ..........................................................................17
Miscellaneous Oscillator Parameters .................................................. 18
Mixer Parameters ................................................................................19
Feedback Parameters ......................................................................... 19
Low-pass Filter Parameters................................................................. 19
VCA Parameters.................................................................................. 20
LFO Parameters .................................................................................. 21
Envelope 3 Parameters .......................................................................22
Modulation Parameters .......................................................................23
Unison Parameters..............................................................................24
Push It Switch Parameters .................................................................. 25
Keyboard Mode Parameters................................................................25
Clock Parameters ................................................................................ 26
Arpeggiator Parameters ......................................................................26
Sequencer Parameters........................................................................ 27
Name Parameter .................................................................................32
Combos ...................................................................................................33
Creating a Combo ...............................................................................33
Combos and Multi Mode...................................................................... 35
Using Poly Chain..................................................................................... 36
A Note About Poly Chain and the Mopho Desktop .............................36
Using USB............................................................................................... 39
Modulation Destinations..........................................................................41
Modulation Sources ................................................................................43
Parameter List.........................................................................................44
Page 6

Support....................................................................................................45
MIDI Implementation ............................................................................... 47
MIDI Messages.................................................................................... 47
NRPN Messages ................................................................................. 50
Global Parameter Data........................................................................ 51
Program Parameter Data ....................................................................52
Combo Parameter Data....................................................................... 58
Sysex Messages .................................................................................62
Packed Data Format............................................................................ 67
Hidden Functions ....................................................................................68
Page 7

Quick Start
Thanks for purchasing your Tetra synthesizer! Listen to the sounds, twiddle
some knobs, have some fun!
Please Register!
Please go to www.davesmithinstruments.com and register your synth. If you
purchased directly from us, there is no need to register — we already have your
contact information.
Powering Up
So, plug in the power supply, connect (in stereo!) to your mixer/sound system,
and start playing!
You can use the P
USH IT switch to trigger sounds without a keyboard. If you’re
using a MIDI keyboard, try applying keyboard pressure (aftertouch) and the
mod wheel. Many sounds are fairly simple at first, and then come alive when
you use the controllers. With other sounds, you may need to hold the notes a
while to let the sound unfold. Playing in different ways has a big effect on the
programs.
Selecting and Editing Programs, Combos, and Global Settings
Use S
ELECT or the increment and decrement (+ and -) switches to step through
the programs. Hold the switches down briefly to increment or decrement the
bank. There are 4 banks of 128 programs. Banks 1 and 2 are the Prophet ’08
factory programs.
If you want to edit a program, just turn any knob. The new value will be
displayed in the bottom line of the LCD (the top line displays the programmed
value for handy reference).
After turning knobs, just press the Mode (P
ROGRAM/COMBO/GLOBAL) switch to
exit Edit Mode and return to Program Mode, allowing you to change programs
again.
While in Program Mode, press the Mode switch again to change to Combo
Mode. Combos contain a combination of four different programs—one per
voice—that can be used to play polyphonically or in unison, or to play four
different sequences simultaneously.
Press and hold the Mode switch briefly to display the Global menu and change
higher level parameters such as MIDI channel number, Transpose/Detune, and
so on. The S
ELECT knob changes the displayed page and increment and
1
Page 8

decrement change the values. These settings are remembered when the synth is
turned off.
Summary
You should be up and running now; for more operation information, read on. Or,
just look up specific parameters for detailed notes. Pages 41 through 43 contain
a handy reference for mod destinations and sources. At some point you should
read through the manual to discover all the little features that you might not
notice at first.
Don’t forget you get a free editor for Mac OS or Windows with your purchase.
Download it from www.soundtower.com/tetra.
I should mention that this manual does not include explanations of basic analog
synthesizer functions. It assumes you already know what an oscillator is, how a
low-pass filter affects the sound, what an ADSR envelope looks like, and so on.
Fortunately, these days it is quite easy to find such resources on the Internet. If
you want to learn the lingo and the basics, just try a search in Google (or the
search engine of your choice), something like “analog synthesizer tutorial.”
You’ll find plenty of good reading material.
Have fun!
Dave Smith
Special thanks to:
Tim Ande, Dave Polich, Ravi Sharma, James Terris, Stefan Trippler, and Jason
Ware for their voicing work. Thanks also to the authors of the Prophet ’08
programs, many of which are used in Tetra. Finally, the DSI Team: Chris
Hector, Andrew McGowan, Joanne McGowan, and Tracy Wadley.
2
Page 9

Getting Connected
Tetra has several inputs and outputs on its back panel.
Power Input — Connect the power supply included with your Tetra. The power
supply comes with different AC adaptor prongs that allow it to work anywhere
in the world. If for whatever reason you need to use a different supply, it must
match the specifications printed on the front panel.
Note: The power supply label says “Evolver” on it; we use the same
supply for the mono Evolvers, Mophos, and the Prophets.
USB — Tetra transmits and receives MIDI data via this standard, Type B, USB
receptacle.
MIDI In — To receive MIDI data from another device, connect this to the other
device's MIDI Out.
MIDI Out — To send MIDI data to another device, connect this to the other
device's MIDI In. This output can also be configured as a MIDI Thru using the
MIDI Out Select parameter in the Global menu.
Poly Chain Out — Up to four Tetras can be chained for increased polyphony
and multiple Tetras can be poly chained with a Prophet ’08 or Mopho Keyboard.
For details, see Using Poly Chain on page 36.
Note: When Poly Chain is turned off in the Global menu, the Poly Chain
Out simply mirrors the MIDI Out and transmits the same data.
Audio Outputs — Tetra has four, unbalanced, ¼ inch outputs. 1/Left and
2/Right are the summed outputs of all four voices in Stereo or Mono mode and
are typically used for “normal” polyphonic or unison playing. They are also the
direct outputs of voices 1 and 2 in Quad mode. Outputs 3 and 4 are the direct
outputs of voices 3 and 4, respectively, and are always mono. The individual,
direct outputs are typically used in Multi Mode or Combo Mode, so that each
voice can be mixed and processed separately. For more about the Audio Out and
Multi Mode parameters, see Global Parameters on page 13.
Phones — A ¼ inch stereo headphone jack.
3
Page 10

4
Page 11

Front Panel Controls
Select — Use SELECT to change and scroll through programs and combos.
When ASSIGN PARAMS is on, SELECT changes the value of the current
parameter. Also used to select parameters in Global mode.
Mode (Program/Combo/Global) — Tetra has four modes of operation:
program, combo, global, and edit. Press the button to toggle between Program
and Combo Mode.
When in Program Mode, the display shows the name, number, and bank of the
current program. Editing any of the parameters puts Tetra into Edit Mode and
displays the last parameter edited and its stored and edited values. To return to
Program Mode, simply press the mode switch. See Program Parameters starting
on page 17 for more information.
In Combo Mode, the display shows the name and number of the current combo.
Editing any of the parameters puts Tetra into Edit Mode and displays the voice
(V1, V2, V3, or V4) being edited, the last parameter edited and its edited value.
To return to Combo Mode, simply press the mode switch. See Combos on page
33 for more information.
Global mode is accessed by briefly holding down the mode
button. The Global
menu is displayed. Use SELECT to scroll the Global menu and the increment and
decrement (+ and -) buttons to change the settings. To return to Program or
Combo Mode, simply press
the mode button. See Global Parameters on page 13
for more information.
5
Page 12

Write — Use WRITE to save an edited program or combo to any of Tetra’s
memory locations. To execute the write operation, press the increment (+)
button.
To store a program or combo in a different location, press the W
change the destination using the S
ELECT knob before executing the write.
RITE button and
Note: You can also change program banks by holding the increment (+)
and decrement (-) buttons, but be careful! If you hit the increment button
quickly, it saves the program wherever you are at that point. If you want
to change banks, just be sure to hold the button until you see the bank
change.
To cancel a write, press W
RITE, decrement (-), or the mode button. WRITE is
also used to execute certain operations in the Global menu.
Volume — The master volume control for all of Tetra’s audio outputs and the
headphone output.
Increment/Decrement — The increment and decrement (+ and -) controls are
used to step through programs in Program Mode, combos in Combo Mode, to
change values in the Global menu, and to confirm or cancel various operations.
In Edit Mode they increase/decrease the parameter value. They are also used to
select Tetra’s four program banks. Hold increment briefly to switch to the next
highest bank; hold decrement to switch to the next lowest bank.
Assignable Parameters 1-4 — Any of Tetra’s program parameters can be
edited from the front panel using the ASSIGNABLE PARAMETERS controls and the
assignments for the controls are saved per program, to best suit that program. In
other words, the assignments for the controls can be completely different from
one program to another.
In Combo Mode, each of the four controls is routed to the respective voice. That
is, parameter 1 controls an assigned parameter for voice 1, parameter 2 controls
voice 2, etc.
See also Edit B/Combo below for more information.
Assign Parameters — When the ASSIGN PARAMETERS LED is lit, turn any of
the ASSIGNABLE PARAMETERS controls to select from the list of program
parameters. Press A
SSIGN PARAMETERS again (turn the LED off) to use the
ASSIGNABLE PARAMETERS controls to edit the selected parameters. For a
description of the parameters, see Program Parameters beginning on page 17.
For a list of the parameters, see page 44.
6
Page 13

Alternately, with ASSIGN PARAMETERS on, choose a parameter to edit with any
of the A
using S
Edit B/Combo — This button behaves differently depending upon the current
SSIGNABLE PARAMETERS controls, and change the parameter’s value
ELECT or the increment (+) or decrement (-) buttons.
mode. In Program Mode, it switches between program layers. Each program has
two layers, A and B. Each layer can be a complete, separate patch. The layers
are used in conjunction with the KeyMode parameter for creating stacked or
split programs. When E
DIT B/COMBO is active, the front panel controls the B
layer.
Note: The A
In Combo Mode, E
Press E
DIT B/COMBO once to edit voice 1 parameters. Press the button
SSIGNABLE PARAMETERS are the same for both layers.
DIT B/COMBO is used to access various combo parameters.
repeatedly to cycle through the voices and exit Edit Mode. See Combos on page
33 for more information.
Note: In Combo Mode or when Multi Mode is turned on in the Global
menu, a program’s B layer is ignored.
Pitch — Controls the base frequency of the oscillators. The relative interval
between the two oscillators is in each voice is maintained, even when the
extremes are reached.
Cutoff — Controls the filter cutoff.
Resonance — Controls filter resonance.
Note: The filter will only self oscillate when in 4-pole mode. See Lowpass Filter Parameters on page 19 for more information.
Attack — Simultaneously adjusts the attack portion of all envelope generators:
filter, amplifier, and Envelope 3.
Decay/Release — Simultaneously adjusts the decay and release portions of all
envelope generators: filter, amplifier, and Envelope 3.
Push It! — The PUSH IT button is a manual trigger to play Tetra. In Program
Mode, it can trigger a specific note (at a specific velocity) or a gated sequence,
latch notes or sequences on and off, and manually step through a sequence. For
more information, see Program Parameters, beginning on page 17.
In Combo Mode, the P
USH IT button cycles through the voices for polyphonic
combos and plays all voices simultaneously when unison is on. See Combos on
page 33 for more information.
7
Page 14

Page 15

Basic Operation
Tetra has multiple personalities. It is a four-voice, analog poly synth, a sort of
“mini Prophet.” But the voice architecture is based on Mopho, so it has a couple
of sonic tricks up its sleeve—specifically sub-octave generators and feedback—
that are absent from the Prophet. Tetra is also a four-part, multitimbral synth
with separate outputs, essentially four Mophos in one very compact box. And
it’s a voice expander for other Tetras or for a Prophet ’08. (Program banks 1 and
2 are the Prophet ’08 factory programs.)
In designing Tetra, the goal was to make a great sounding synth that was also
affordable. Toward that end, we wanted to give players enough control over
parameters to make it useful for performance, so we came up with a
combination of “hard-wired” commonly used controls and user-assignable
controls. Any of Tetra’s parameters can be edited in real time from the front
panel controls. But we also recognize that may not be the quickest or easiest
way to program sounds from scratch. A free editor for Mac OS and Windows
gives you easy access to all of Tetra’s program parameters. Download it here:
www.soundtower.com/tetra. Also, an advanced version of the editor with more
features can be purchased from our Web site.
Note: The Prophet ’08’s controls map directly to Tetra’s, so if you have a
Prophet ’08, you can use it as a MIDI control surface for Tetra.
Programs
When Tetra first powers up, it is in Program Mode. The top line of the LCD
shows the Program (1…128) and Bank (1…4) number of the currently selected
program, and the bottom line shows the 16-character name of the program.
S
ELECT changes the program. The program can also be changed by pressing the
increment (+) or decrement (-) switches. To increment to the next bank, hold the
increment switch briefly; to decrement to the previous bank, hold the decrement
switch.
To edit a program, simply turn any knob. The A
SSIGNABLE PARAMETERS knobs
have been preset to useful parameters for the factory programs. To change a
knob’s assignment, press A
SSIGN PARAMETERS to light the LED. Turning any of
the ASSIGNABLE PARAMETERS knobs now will scroll through the list of available
parameters. Choose one or more parameters to edit and then press A
SSIGN
PARAMETERS again to exit the assignment mode (ASSIGN PARAMETERS LED
should now be off). Alternately, turn ASSIGN PARAMETERS on, use any of the
A
SSIGNABLE PARAMETERS knobs to choose a parameter, and change the value
with SELECT or the increment (+) and decrement (-) buttons. See Program
Parameters on page 17 for a detailed list of all parameters and their functions.
After editing parameters, press the Mode (P
ROGRAM/COMBO/GLOBAL) switch to
exit Edit Mode and return to Program Mode.
9
Page 16

Combos
When in Program Mode, press the Mode switch to enter Combo Mode. Combos
are combinations of four programs, one for each voice. In Combo Mode, use
S
ELECT and increment/decrement to change combos. Each of the ASSIGNABLE
PARAMETERS knobs controls a parameter for its respective voice: knob 1 for
voice 1, knob 2 for voice 2, and so on. And the bottom row of knobs affects all
voices and programs in the combo. For more about combos, see Combos on
page 33.
Saving a Program or Combo
To save a program or combo, press W
RITE. To store in a different location, use
SELECT to choose the target destination, and hold the increment or decrement
switch to choose a different bank (programs only; there is only one bank of
combos). Press increment (+) to complete the write operation or decrement (-) to
cancel (or press W
RITE again).
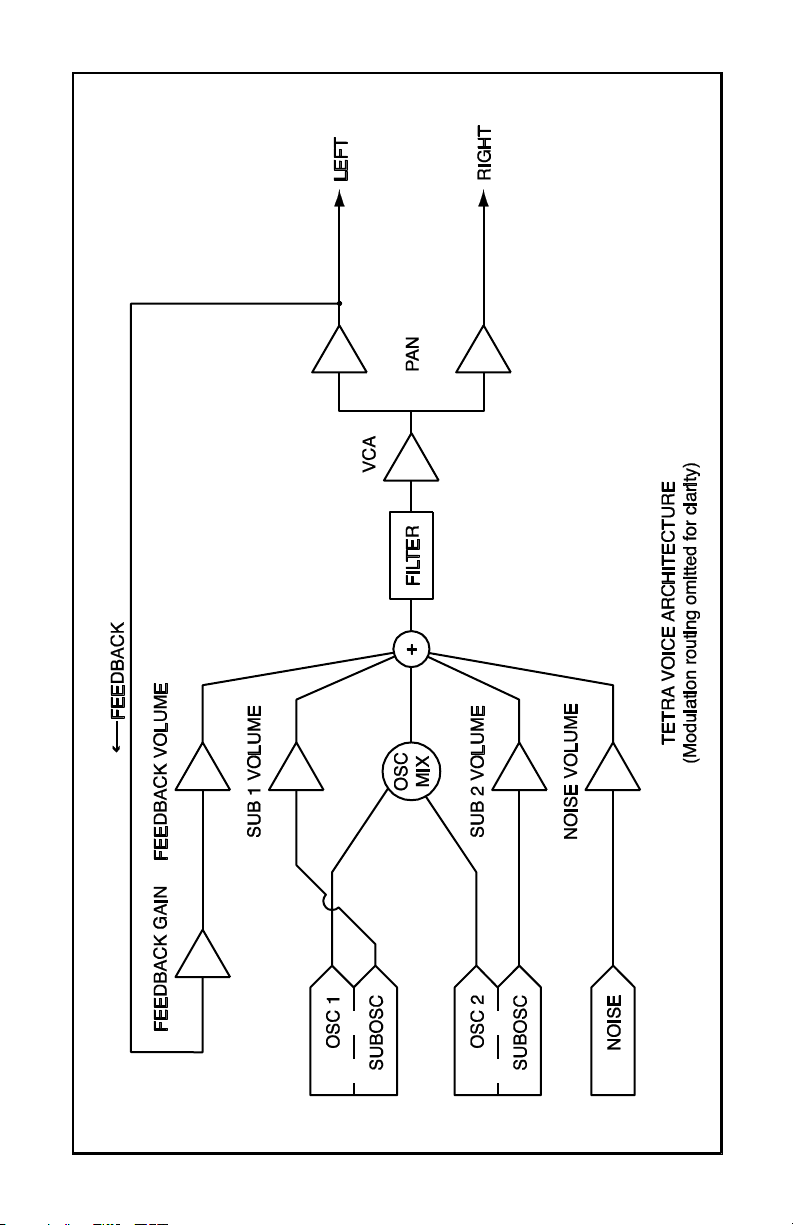
Voice Architecture and Feedback
As you can see from the illustration on the following page, the left Audio Output
goes through a programmable-gain pre-amp (controlled by the Feedback Gain
parameter), then through a VCA for feedback volume control, and then to the
filter input. Turning up the Feedback Volume will cause varying amounts of the
audio output to be mixed back in pre-filter, individually per voice. For most
purposes, small amounts of feedback are most useful and the resulting effect is
similar to an overdrive distortion. Higher levels of feedback can get very
squirrelly and rude (which may be exactly the effect you’re looking for).
F
EEDBACK GAIN also affects the level of the feedback signal, so you’ll typically
want to start with FEEDBACK GAIN turned down.
Several of the factory programs already have some level of feedback
programmed in, as often indicated by the letters “FB” following the name. To
hear the effect of Feedback Volume and Feedback Gain, call up one of those
programs and vary those parameters.
Further Reading
For information about using Tetra multitimbrally, see “Multi Mode” and “Audio
Out” in Global Parameters on page 13.
For information about using Tetra as a voice expander with a Prophet ’08 or
another Tetra, or using Mopho as an additional voice for Tetra, see Using Poly
Chain on page 36.
10
Page 17
11
Page 18

Page 19

Global Parameters
Tetra’s Global parameters affect all programs globally. Examples include MIDI
channel and fine tune. To edit the Global parameters, hold down the Mode
switch (Program/Combo/Global) until the G
knob changes the global parameter and the increment and decrement buttons
change the value.
Transpose: -12…+12 — Master Transpose control, 0 is centered. Steps in
semitones.
Fine Tune: -50…+50 — Master Fine Tune control; 0 centered. Steps in cents (50
cents = 1/2 semitone).
MIDI Channel: ALL, 1…16 — Selects which MIDI channel to send and receive
data, 1 to 16. All receives on all 16 channels.
Clock: see table — Selects the MIDI clock status.
Display MIDI Clock Setting
Internal
V1 Master
MIDI Out
MIDI In
Midi In/Out
MIDI Parameter Send: NRPN, CC, Off — Changes to the values of Tetra’s front
MIDI clock is neither sent nor received
Voice 1 provides the master clock for all 4
voices when in Combo mode.
MIDI clock is sent
MIDI clock is received
MIDI clock is received and transmitted
panel controls are transmitted via MIDI as Non-registered Parameter Number
(NRPN) controllers or as Continuous Controllers (CC). Transmission of
parameters can also be turned off. See MIDI Implementation on page 45 for
details.
LOBAL LED lights. The SELECT
Note: NRPNs are the preferred method of parameter transmission, since
they cover the complete range of all parameters, while CCs only handle
the main parameters.
MIDI Parameter Receive: All, NRPN, CC, Off — Sets the method by which Tetra
receives parameter changes via MIDI. As with transmission, NRPNs are the
preferred method, though some controllers may only be able to send CCs.
MIDI Control: Off, On — When On, the synth will respond to MIDI controllers,
including Pitch Wheel, Mod Wheel, Pedal, Breath, Volume, and Expression.
13
Page 20

MIDI SysEx: Off, On — When On, the synth will respond to received MIDI
SysEx messages, and will transmit them, when prompted, to the MIDI Out. See
Sysex Messages on page 62 for details.
MIDI Out Select: Out, Thru — MIDI Out can be switched to MIDI Thru to
daisychain multiple MIDI devices.
Poly Chain: Off, Out 1, Out 4, Out 8, Out 12, In End, InOut4, InOut8 —
Using
Poly Chain, up to four Tetras can be chained together for increased polyphony.
One or two Tetras can also be chained with a Prophet ’08 for twelve- or sixteennote polyphony. And a Tetra and Mopho can be chained for five-note
polyphony. For a more complete description of Poly Chain and how to use it,
see Using Poly Chain on page 36.
Multi Mode: Off, On — Multi Mode enables Tetra to respond to four separate
MIDI channels for multitimbral playback. With Multi Mode on, voice one
responds to the base MIDI channel and the other three voices respond to the next
three consecutive channels. For example, if Tetra’s base channel setting is 3,
voice one responds to MIDI channel 3, voice two to MIDI channel 4, and so on.
Note: For all four voices to play in Multi Mode, the base channel must
be 13 or lower.
Local Control: Off, On — When on (the default), the front panel controls
directly affect Tetra. When off, the controls are transmitted via MIDI but do not
directly affect the “local” device (that is, Tetra). This is primarily useful for
avoiding MIDI data loops that can occur with some external sequencers.
Mode Lock: Off, Prog, Combo — Prevents Tetra from being switched from
Program mode to Combo mode or vice versa. This prevents the loss of unsaved
edits caused by unintentional mode changes.
Audio Out: Stereo, Mono, Quad, Q LR34 — Tetra has four audio outputs:
1/Left, 2/Right, 3, and 4. Stereo operation is the default. When set to Stereo, a
stereo mix of all voices is available via the Left and Right outputs.
Note: Outputs 3 and 4 are always direct outputs for voices 3 and 4 and
are mono, regardless of the Audio Out mode. Inserting a plug into output
3 or 4 does not remove that voice from the mix outputs when in Stereo or
Mono mode.
When set to Mono, this parameter defeats all pan settings and modulation,
effectively making each of the Left and Right outputs a mono output.
Quad directs each of the four voices to its respective, mono output.
14
Page 21

Note: Outputs 3 and 4 are noticeably louder than the other two outputs.
This is normal. Outputs 3 and 4 are always monophonic and, therefore,
do not require as much headroom as the mix outputs, which have to
accommodate up to four voices at one time without distorting. The higher
level provides optimum signal-to-noise ratio. Compensate for differences
in level with a mixer.
Choosing “Q LR34” is similar to Quad, but voices 1 and 2 retain whatever
panning effects are present in the assigned programs and the stereo outputs of
those voices are present at both the Left and Right outputs.
PotMode: Relative, Passthru, Jump –Tetra’s Cutoff, Resonance, and Volume
controls are potentiometers or “pots.” There are three pot modes to determine
how the synth reacts when the programmable parameters—Cutoff and
Resonance—are edited. (Master volume is not programmable, so these modes
don’t apply.)
When set to Relative, changes are relative to the stored setting. In Relative
mode, the full value range is not available until either the minimum or maximum
value and the respective lower or upper limit of the pot’s travel is reached.
For example, the Resonance parameter has a value range of 0 to 127. Let’s say
the physical position of the Resonance pot is the equivalent of a value of 100. If
you switch to a program that has a stored Resonance setting of 63 and turn the
pot all the way up, it will only go to 90. To get to the maximum value of 127,
you first have to turn down until the value is at the other extreme and the pot is
at the limit of its travel (in this case, 0 and fully counter-clockwise,
respectively).
In Passthru mode, turning the pot has no effect until after the edited value equals
the preset value (that is, until the edited value “passes through” the stored
value).
Jump mode uses an absolute value based upon the position of the pot when
edited: turn a pot and the value jumps immediately from the stored value to the
edited value.
Balance V 1 - 4: -14…+14 — Adjusts the left/right balance of each voice by
approximately +/- 4 dB.
Basic Patch — Press the WRITE button to load a basic patch into the edit buffer.
(The patch will not actually be written to the current program location unless
intentionally written to memory in Program Mode using the W
RITE button.)
15
Page 22

Reset Globals — Tetra does not have a full hardware reset, but select this
parameter and press W
RITE to reset the global parameters to their factory
defaults.
MIDI SysEx Dump: see table — Allows dumping of programs and combos in
SysEx format via MIDI.
Display Data to be dumped to SysEx
Current Program
Current Prog Bank
All Progrm Banks
Current Combo
Combo Bank
All Progs Combos
Current Prog P08
CurrentProgMopho
Program Bank P08
Prog Bank Mopho
Dump current program
Dump all 128 programs in current bank
Dump all programs in all 4 banks
Dump current combo
Dump all combos
Dump all program banks and combos
Dump current program in Prophet ’08 format
Dump current program in Mopho format
Dump current bank in Prophet ’08 format
Dump current bank in Mopho format
Press the WRITE switch to start transmission. This feature is handy for saving
Programs on a computer in SysEx format, or for sending them to another Tetra
via a direct MIDI connection. The dumps include Program and Bank numbers,
so when received, the programs will be stored in the same location.
Programs can also be exported in Mopho and Prophet ’08 formats.
Features/parameters not available on those instruments are stripped out. For
example, Mopho does not support layers, so only layer A is exported. The
Prophet ’08 does not have feedback or sub-octave generators.
Program Copy Utility — Enables layer A or layer B of a program to be copied
to layer A or B of the same or a different program. The top line displays the
current bank and program. Use increment (+) or decrement (-) to choose the
layer to be copied. Then use S
ELECT to select the destination bank, program, and
layer and increment/decrement to change the values.
16
Page 23

Program Parameters
All Program parameters can be edited using any of ASSIGNABLE PARAMETERS
controls. To assign a parameter to a control, press the A
button to light the LED, and then turn any of the knobs (1 through 4) to select a
parameter. A full list of the parameters can be found on page 44. The selected
parameter and value appear in the LCD display. The top line of the LCD
displays the programmed value for reference; the bottom line displays the edited
value.
SSIGN PARAMETERS
To then change the value of the parameter you selected, hit the A
SSIGN
PARAMETERS button again, and the same knob will now change the value. You
can also use the increment and decrement switches to adjust parameter values.
Note: Once you are done editing a program, before you save it, you
should consider what parameters you want to access when playing the
new program. Generally, when making a program, we try to assign each
of the 4 knobs to a different parameter that makes sense for that
particular program, providing extra live control.
Though it is certainly possible to perform detailed program generation and
editing using these controls, it is usually much faster to use the free editor
available for Mac OS or Windows. The minimal front panel of the Tetra is
designed for fast, real-time changes in live performance.
Following are descriptions of each Tetra Program parameter.
Oscillator Parameters
Tetra has two analog oscillators per voice. The basic controls for each oscillator
are the same.
Note: There are additional modulation controls that can affect the pitch
of Oscillators 1 and 2. These are covered in other sections of the
Parameter definitions.
Osc Freq: C 0…C 10 — Sets the base oscillator frequency over a 10 octave
range, from 8 Hz to 8KHz, stepping in semitones. C3 is middle C, the first
octave is 0 (C0, C#0, etc.), the second octave is 1 (C1, C#1, etc.), and so on.
Fine Freq: -50…+50 — Fine Tune control; 0 centered. Steps in cents (50 cents =
1/2 semitone).
Shape: see table — Selects the oscillator waveshape as follows:
17
Page 24

Display Waveshape
Osc Off
Sawtooth
Triangle
Saw-Tri
Pulse xx
No output
Sawtooth
Triangle
Sawtooth — Triangle mix
Pulse Wave, with pulse width ranging from minimum
(0) to maximum (99). The pulse width will turn off at the
two extremes — this allows some interesting
modulation possibilities. A square wave will be at Pulse
50.
Glide: 0…127 — Sets the oscillator glide (portamento) rate. Glide can be set
independently for each oscillator. Low values are faster. See “Glide Mode”
below in Miscellaneous Oscillator Parameters for additional Glide settings.
Keyboard: On, Off — Turns keyboard tracking for the oscillator on and off.
Sub Osc 1: 1...127 — Sub-oscillator 1 generates a square wave pitched one
octave below oscillator 1. This parameter controls the level.
Sub Osc 2: 1...127 — Sub-oscillator 2 generates a square wave pitched two
octaves below oscillator 2. This parameter controls the level.
Miscellaneous Oscillator Parameters
Sync 2-> 1: Off, On — Turns oscillator hard sync on. With sync on, whenever
oscillator 2 resets, it will force oscillator 1 to reset for the classic hard sync
sound.
Glide Mode: see table — Sets the way the oscillators respond to Glide settings.
Display Glide mode
FixRate
FixRate A
FixTime
FixTime A
The Glide rate is fixed. The time to
transition from one note to another varies
depending upon the interval between the
notes.
The same, but Glide is only applied when
played legato; that is, when a new note is
hit while another note is still held.
The Glide time is fixed. The time to
transition from one note to another is the
same, regardless of the interval.
The same, but Glide only is applied when
played legato; that is, when a new note is
hit while another note is still held.
Osc Slop: 0…5 — The amount of random oscillator frequency slop. The analog
oscillators in Tetra are very accurate, and will not drift. This works great for
18
Page 25

accurate sounds, and allows precise de-tuning. The Oscillator Slop parameter
allows subtle amounts of frequency drift. For larger amounts, use a random LFO
or white noise mod.
Pitch Wheel Range: 0…12 — Sets the bend range, in semitones, of the pitch
wheel. The setting is the range in the positive or negative direction. For
example, a setting of 7 lets you bend a note up or down by a fifth.
Mixer Parameters
Osc Mix: 0...127 — Enables the outputs of Oscillators 1 and 2 to be mixed in
varying amounts. A setting of 0 is equivalent to 100% Oscillator 1 and 0%
Oscillator 2. A setting of 127 is just the opposite. A setting of 64 is essentially a
50-50 mix of both oscillators.
Noise Level: 0…127 — Controls the volume of white noise mixed into the
filter.
Feedback Parameters
Feedback Volume: 0...127 — This controls the amount of audio from the left
channel of each voice fed back into that voice's mixer pre-filter. As the value
increases, so does the effect of the feedback.
Feedback Gain: 0…127 — Feedback Gain boosts the level of the feedback
signal and is interactive with and dependent upon Feedback Volume. If
Feedback Volume is set to 0, then Feedback Gain has no effect. (There is no
feedback signal to boost.) However, Feedback Gain combined with higher levels
of Feedback Volume can result in effects ranging from pleasing distortion to
squirrelly harmonic weirdness.
Low-pass Filter Parameters
Each of Tetra’s voices utilizes a switchable, 2- or 4-pole analog low-pass filter
coupled with a 4-stage (plus delay) ADSR envelope generator.
Frequency: 0…164 — Sets the base filter cutoff frequency over more than 13
octaves. This control steps in semitones.
Resonance: 0…127 — Sets the Resonance level of the filter. At high settings
the filter will self-oscillate in 4-pole mode. If the filter does not oscillate, switch
to 4-pole mode.
Keyboard Amount: 0…127 — Sets the amount of keyboard (MIDI note) to the
filter cutoff. A setting of 64 will step the filter one semitone for each note, 32
would be half-semitones, and so on.
19
Page 26

Audio Mod: 0...127 — Controls the amount of audio from Oscillator 1 used to
modulate the filter cutoff frequency. For filter-only audio, set O
to 127, O
SCILLATOR 2 SHAPE to Off, and OSCILLATOR 1 SHAPE to the desired
SCILLATOR MIX
waveshape. This is useful for bell-like FM sounds. A wide range of sounds can
also be made using A
UDIO MOD with the oscillators routed normally through the
filter.
Config: 2 Pole, 4 Pole — Selects either 2- or 4-pole operation for the filter.
Envelope Amount: -127…+127 — Sets the amount of filter envelope routed to
the cutoff frequency. This can be positive or negative, allowing inverted
envelope control of the filter.
Envelope Velocity: 0…127 — Amount of key velocity controlling the level of
the filter envelope.
Delay: 0...127 — Sets a delay between the time the filter envelope is triggered
and when the Attack portion actually begins.
Attack: 0…127 —
Decay: 0…127 — Sets the Decay time.
Sustain: 0…127 — Sets the Sustain level.
Release: 0…127 — Sets the Release time.
Sets the Attack time of the filter ADSR envelope generator.
VCA Parameters
VCA Level: 0…127 — Sets a base level for the VCA (Voltage Controlled
Amplifier). This allows the VCA to be essentially bypassed, which is necessary
for Programs that drone.
Note: If VCA L
normally want VCA LEVEL set to zero. For droning sounds you will
probably turn the VCA Level up.
Env Amount: 0…127 — Sets the amount of VCA envelope to the VCA level.
Env Velocity: 0…127 — Sets the amount of keyboard velocity controlling the
level of the VCA envelope.
Delay: 0...127 — Sets a delay between the time the amplifier envelope is
triggered and when the Attack portion actually begins.
EVEL is on full, Envelope Amount has no effect. You
Attack: 0…127 —
20
Sets the Attack time of the VCA ADSR envelope generator.
Page 27

Decay: 0…127 — Sets the Decay time.
Sustain: 0…127 — Sets the Sustain level.
Release: 0…127 — Sets the Release time.
Pan Spread: 0…127 — There is a pan circuit after the VCA that pans the audio
in the stereo field individually per voice. With a Pan Spread of 0, all four voices
are panned dead center. As you turn up Pan Spread, each voice is gradually
moved away from the center by different amounts. Every other voice goes in a
different direction, left or right. This provides a wide stereo field as the voices
play.
Note: Any modulation to pan will individually move each voice from its
static position as set by Pan Spread.
Program Volume: 0…127 — Sets the volume of the current program to match
volumes between programs.
Note: There is enough gain in the synth voice that with some settings,
some mild clipping distortion may be heard. If this happens, try lowering
the Voice Volume, and/or the VCA Envelope Amount (or VCA Velocity
Amount).
LFO Parameters
Tetra has four Low Frequency Oscillators (LFOs). The same parameters are
available for each.
Frequency: 0…150, sync — Sets the LFO frequency. Range 0—150 for un-
synced LFO; speed ranges from slow (30 seconds) to very fast — at 90 (8 HZ,
C-2) and above the speed steps in semitones, up to 150 (261 Hz, middle C).
Note: Some of the analog functions may not respond well to the fastest
LFO speeds, due to speed limitations of the control voltages; but they
will certainly generate some interesting sounds.
Above 150, the sync speeds are as follows:
Display Timing Sync
32 Steps
16 Steps
8 Steps
6 Steps
4 Steps
Sequence speed divided by 32; i.e. one LFO cycle
takes 32 steps
Sequence speed divided by 16
Sequence speed divided by 8
Sequence speed divided by 6
Sequence speed divided by 4
21
Page 28

Display Timing Sync
3 Steps
2 Steps
1.5 Step
1 Step
2/3 Step
1/2 Step
1/3 Step
1/4 Step
1/6 Step
1/8 Step
1/16Step
Sequence speed divided by 3
Sequence speed divided by 2
Sequence speed divided by 1.5
One cycle per step
Two cycles every three steps
Two cycles per step
Three cycles per step
Four cycles per step
Six cycles per step
Eight cycles per step
Sixteen cycles per step
Shape: see table — Selects the LFO waveshape:
Display LFO Shape
Triangle
Rev Saw
Sawtooth
Square
Random
Triangle
Reverse Sawtooth
Sawtooth
Square Wave
Random — changes once per cycle for
sample-and-hold effects
Amount: 0…100 — Sets the amount of LFO routed to the destination.
Key Sync: Off, On — When on, the LFO is re-started each time a new note is
played. Key Sync is set independently on each LFO.
Destination — See Modulation Destinations on page 39 for a list of possible
destinations.
Envelope 3 Parameters
Envelope 3 is an auxiliary envelope for modulating various destinations. It can
even be used as a sort of LFO using the Repeat parameter, which is unique to
Envelope 3.
Destination — Sets the Envelope 3 destination. See Modulation Destinations on
page 39 for a list of possible destinations.
Amount: -127…+127 — Sets the amount of Envelope 3.
Env Velocity: 0…127 — Sets the amount of key velocity controlling the level of
envelope 3.
22
Page 29

Env Delay: 0…127 — Sets a delay between the time Envelope 3 is triggered and
when the Attack portion actually begins.
Env Attack: 0…127 — Sets the Attack time of Envelope 3.
Env Decay: 0…127 — Sets the Decay time.
Env Sustain: 0…127 — Sets the Sustain level.
Env Release: 0…127 — Sets the Release time.
Repeat: Off, On — When on, causes the delay, attack, decay, and sustain
portions of Envelope 3 to loop for as long as the envelope is gated on.
Modulation Parameters
The Modulation Parameters let you configure the modulation routing and
amount for Tetra’s four general-purpose modulation slots as well as for MIDI
controllers (Mod Wheel, Key Pressure, Breath Control, Velocity, and Foot
Controller).
Since each Tetra mod source has a single destination, the four general purpose
Mods provide a way to send a mod source (such as a sequence or LFO) to
additional destinations, with a different amount. There are also additional mod
sources available here, such as Noise, allowing a wide variety of possibilities.
To configure a general-purpose modulation slot, select the appropriate
modulator (Mod 1, Mod 2, Mod 3, or Mod 4), and use the Source, Destination,
and Amount parameters to route the modulation as desired.
To configure modulation for a standard MIDI controller, select the desired
controller and amount, and then set the destination.
Source — Selects a modulation source. See Modulation Sources on page 43 for
possible sources.
Amount: -127…+127 — Sets the amount of modulation.
Destination — Selects a modulation destination. See Modulation Destinations
on page 39 for a list of possible destinations.
Mod Wheel Amount: -127…+127 — Sets the maximum amount of modulation
that can be applied from MIDI Continuous Controller 1 (mod wheel).
23
Page 30

Mod Wheel Destination — Selects the destination to which the mod wheel is
routed. See Modulation Destinations on page 39 for a list of possible
destinations.
Press Amount: -127…+127 — Sets the maximum amount of modulation that
can be applied from MIDI Channel Pressure (aftertouch).
Press Destination — Selects the destination to which the Channel Pressure is
routed. See Modulation Destinations on page 39 for a list of possible
destinations.
Breath Amount: -127…+127 — Sets the maximum amount of modulation that
can be applied from MIDI Continuous Controller 2 (breath controller).
Breath Destination — Selects the destination to which the breath control is
routed. See Modulation Destinations on page 39 for a list of possible
destinations.
Veloc Amount: -127…+127 — Sets the maximum amount of modulation that
can be applied from MIDI note-on velocity.
Veloc Destination — Selects the destination to which the note-on velocity is
routed. See Modulation Destinations on page 41 for a list of possible
destinations.
Foot Amount: -127…+127 — Sets the maximum amount of modulation that can
be applied from MIDI Continuous Controller 4 (foot controller).
Foot Destination — Selects the destination to which the foot control is routed.
See Modulation Destinations on page 41 for a list of possible destinations.
Unison Parameters
Unison Mode: see table — Sets how voices are allocated and tuned when
unison is on.
Display Key mode
1 Voice
All Voices
AllDetune1-3
24
Classic, two oscillator, monophonic mode
All available voices stacked in unison
All available voices stacked in unison with
increasing levels of detuning among the
voices
Page 31

Unison Assign: see table — Determines how Tetra responds to keyed notes
when unison is on.
Display Key mode
Low Note
LowRetrig
HighNote
HighRetrg
LastNote
LastRetrg
Unison: On, Off — Turns unison on or off. When unison is on, Tetra behaves
Low note priority
Low note priority, re-trigger envelopes
High note priority
High note priority, re-trigger envelopes
Last note hit priority
Last note hit priority, re-trigger envelopes
like a monophonic synth.
Push It Switch Parameters
These parameters determine the behavior of the PUSH IT switch, Tetra’s manual
trigger.
Note: C0…C10 — Sets the note that plays when PUSH IT is pressed.
Velocity: 0…127 — Sets the MIDI note-on velocity.
Mode: Normal, Toggle — When set to Normal, PUSH IT responds like a key:
press it and a note plays, release it and the note ends. But when set to Toggle,
P
USH IT turns the note on with one press and off with a second press. This is
handy for making a note drone or for latching a gated sequence on.
Keyboard Mode Parameters
The keyboard mode parameters determine how programs are mapped to a MIDI
keyboard or other MIDI controller and provide compatibility with the Prophet
’08’s keyboard modes.
Note: These parameters only appear in Program Mode, not Combo
Mode, and only for layer A.
Split Point: C0…C10 — When in Split mode, sets the key at which the split
occurs. Layer A (voices 1 and 2) is mapped below the split point. Layer B
(voices 3 and 4) is mapped to the chosen split point and above.
Key Mode: Normal, Stack, Split — Determines how the layers respond to MIDI
note data in Program Mode. For Normal, layer A plays for the entire key range.
Press E
DIT B/COMBO to switch to layer B.
25
Page 32

For Stack, both layers respond to MIDI notes for the entire key range, enabling
two patches to be played simultaneously with a single key stroke. Voices 1 and
2 are assigned to layer A, 3 and 4 are assigned to layer B.
Split assigns layer A from the lowest note to below the split point (see previous
parameter) and layer B from the split point to the highest note.
Note: In Combo Mode and Multi Mode, layer B is ignored.
Clock Parameters
The sequencer and arpeggiator share the BPM and CLOCK DIVIDE settings.
BPM: 30…250 — Sets the programmed tempo for the sequencer in BPM (beats
per minute).
Clock Divide: see table — Sets the note value for each sequence step relative to
the BPM.
Display Tempo Timing Division
Half
Quartr
Eighth
8 half
8swing
8 trip
16th
16half
16swng
16trip
32nd
32trip
64trip
BPM/2 Half note
BPM Quarter note
BPM x 2 Eighth note
BPM x 2 Eighth note, half swing timing
BPM x 2 Eighth note, full swing timing
BPM x 3 Eighth note triplets
BPM x 4 Sixteenth note
BPM x 4 Sixteenth note, half swing timing
BPM x 4 Sixteenth note, full swing timing
BPM x 6 Sixteenth note triplets
BPM x 8 Thirty-second note
BPM x 12 Thirty-second note triplets
BPM x 24 Sixty-fourth note triplets
Arpeggiator Parameters
Tetra’s arpeggiator has four different operating modes and can be synced to a
MIDI clock source.
Note: If the arpeggiator does not seem to be working, check the G
LOBAL
parameters to make sure Clock is set to Internal. If Clock is set to use an
external clock source, Tetra must be receiving MIDI clock messages in
order for the arpeggiator to run.
The tempo and note value are determined by the Clock Parameters.
26
Page 33

Mode: see table — Sets the order in which the arpeggiator plays notes.
Mode Behavior
Up
Down
Up Down
Assign
Random
2oct Up
2oct Down
2oct UpDown
2oct Assign
2oct Random
3oct Up
3oct Down
3oct UpDown
3oct Assign
3oct Random
Plays from lowest to highest note.
Plays from highest to lowest note.
Plays from lowest to highest and back to lowest.
Plays notes in the order keys were pressed.
Randomly plays notes.
Plays keyed notes and the same notes one octave higher,
from lowest to highest.
Plays keyed notes and the same notes one octave higher,
from highest to lowest.
Plays keyed notes and the same notes one octave higher,
from lowest to highest and back to lowest.
Plays a keyed note, then the same note one octave higher,
in the order keys were pressed.
Randomly plays keyed notes and the same notes one
octave higher.
Plays keyed notes and the same notes one and two octaves
higher, from lowest to highest.
Plays keyed notes and the same notes one and two octaves
higher, from highest to lowest.
Plays keyed notes and the same notes one and two octaves
higher, from lowest to highest and back to lowest.
Plays a keyed note, then the same note one and two
octaves higher, in the order keys were pressed.
Randomly plays keyed notes and the same notes one and
two octaves higher.
On/Off: Off, On — Turns the arpeggiator on and off. Turning it on will turn off
the Sequencer if it is on.
Sequencer Parameters
Seq Trigger: see table — Sets the triggering mode for the Sequencer.
Display Trigger mode
Normal
No Reset
No Gate
NoGateNR
Sequence plays from the first step when a
key is held, and resets to step 1 each time
a new note is played. Each sequence step
retriggers the envelopes.
The same, but does not reset to step 1 on
every note.
The keyboard triggers the envelopes; the
sequence steps do not.
Same, but does not reset with subsequent
notes.
27
Page 34

Display Trigger mode
p
Key Step
On/Off: Off, On — Turns the sequencer on and off.
Seq 1, 2, 3, or 4 Destinations — Sets the destination for each of the four
Striking a key advances the sequencer
one step.
sequence tracks. For a complete list, see Modulation Destinations on page 41.
Seq 1, 2, 3, or 4 Steps: C0…D5+ or 0…125, Reset, Rest — Sets each step value
for each of the four sequence tracks. The values are displayed as both relative
note values and as simple numerical values. Note values are displayed in quarter
tones with a plus sign (+) indicating that the pitch is a quarter tone higher than
the displayed note number. The two highest values are Reset and Rest. Reset
causes the sequence to reset to the first step, enabling sequences of fewer than
16 steps or even sequences in which the tracks are different lengths. Rest inserts
a rest on the selected step.
About the Sequencer
For many musicians, the term sequencer has become synonymous with MIDI
sequencer; that is, a computer-based application or dedicated hardware device
for recording and playing back notes and performance gestures via MIDI. But
sequencers were around long before MIDI. Tetra’s sequencer is much more like
the original analog sequencers typically associated with modular synthesizer
systems. The sequencer comprises four 16-step sequences that play in parallel.
Each sequence can be routed to a chosen destination, and each step in a
sequence can be set to a different value used to modulate that destination. Each
of the four voices has its own sequencer.
Steps
S
1
e
q
2
u
e
3
n
c
4
e
1234
56789
v = ste
10 11 12 13 14 15 16
value
Strictly speaking, Tetra’s sequencer does not play notes, nor does it transmit
MIDI data. If none of the sequence destinations are routed to oscillator
frequency, the sequencer may not even affect the pitch. In Tetra terms, a
sequence is just a series of events at timed intervals that changes the value of
one of the synth’s parameters in discrete steps. Because the four sequences play
in parallel, up to four parameters can be affected by each step, one per sequence.
28
Dest. 1
Dest. 2
Dest. 3
Dest. 4
Page 35

For the most part, the sequence destinations are the same as the modulation
p
destinations, which is appropriate: a sequence is just another modulation source.
For each sequence step, the envelopes are gated on for half the step’s duration.
The duration varies according to the BPM and Clock Divide settings (or the
MIDI clock, if synced to an external source). The envelope settings of the
current program ultimately determine how long each step plays, though, and
longer (more legato) or shorter (more staccato) effects can be achieved by
editing the envelope rates.
Tetra’s sequencer is a gated sequencer. That means it requires a note to be gated
on—that is played from the P
USH IT button or via MIDI—in order for the
sequencer to run. There is no dedicated start or play button and it does not
respond to MIDI start/stop/continue messages, but it can still sync to an external
clock. Simply turn on the sequencer and then play and hold a note to start. Or
use the P
USH IT button’s toggle feature to latch a note on with one push and
release it with another; in this case, the PUSH IT button is essentially a Start/Stop
control.
Reset and Rest
Sequences have a maximum of 16 steps, but they can have fewer—from 1 to
15—using Reset. (Sequences of 16 steps reset automatically.) Reset appears
immediately after the highest value setting for a step. Setting a step to Reset
causes the sequence to jump back to the first step and continue playing.
Reset is set separately for each of the four sequences, so it must be set at the
same step in all four sequences to shorten all the sequences equally. The
following illustration shows an example in which all the sequences are eight
steps in length.
Steps
S
1
e
q
2
u
e
3
n
c
4
e
1234
56789
v = ste
value; R = Reset
10 11 12 13 14 15 16
Tip: Using Reset while programming a sequence can be helpful. For
example, when programming a specific melodic line, start by shortening
the sequence to four or eight steps until those steps are set, and then
gradually move the reset point to lengthen the loop until the desired
number of steps is playing.
Dest. 1
Dest. 2
Dest. 3
Dest. 4
29
Page 36

Sequences do not have to be the same length, however, which makes for some
p
very interesting, less repetitive patterns, particularly when sequences are set to
odd and even numbers of steps.
Steps
S
1
e
q
2
u
e
3
n
c
4
e
1234
56789
10 11 12 13 14 15 16
Dest. 1
Dest. 2
Dest. 3
Dest. 4
v = step value; R = Reset
Sequence one has an additional value, Rest, that appears in the list after Reset.
Rest prevents the envelopes from being gated by the corresponding step, so a
rest in sequence one affects all four sequences. If the sequences are the same
length, rests will occur in the same place in all four sequences as they loop. If
the sequences are different lengths, the rests in sequence one apply to whatever
the current step happens to be in sequences two through four, resulting in a more
random-sounding pattern (which can be really cool). In the following example,
sequence one is 16 steps long and rests occur at steps 2, 6, 9, and 12. However,
sequence two is only eight steps long, so rests occur at steps 2 and 6 the first
time it plays through and then at steps 1 and 4—corresponding to steps 9 and 12
in sequence one—the first time it repeats. As sequence two loops, the rests will
continue in the same alternating pattern.
Steps
S
1
e
q
2
u
e
3
n
c
4
e
1234
v = ste
56789
value; r = rest; R = Reset
10 11 12 13 14 15 16
Programming the Sequencer
Programming the sequencer is easy, but there are a few things to consider before
you start. Most importantly, what do you want the sequence to do and what
modulation destinations will provide the results you’re seeking? For example, is
the sequencer going to control oscillator frequency? One sequence can control
the frequency of both oscillators or one sequence can control oscillator 1 and
another sequence can control oscillator 2 for harmonies or countermelodies. A
typical application of the sequencer might have sequence one routed to the
frequency of both oscillators, sequence two routed to filter cutoff, sequence
30
Dest. 1
Dest. 2
Dest. 3
Dest. 4
Page 37

three routed to filter resonance, and sequence four routed to amplifier envelope
amount for accents. Many of the factory programs have sequences programmed,
so you can refer to those to see how certain effects are being achieved.
To program a sequence:
1. Set the Sequencer On/Off parameter to On.
2. Play a note to start the sequence playing.
To avoid having to hold a key down, set the Push It Mode to Toggle.
Then use P
USH IT to start and stop the sequencer. You may also want to
change the Push It Note, the BPM, and the Clock Divide.
3. Choose a destination for the sequence.
4. Set the step values for the corresponding sequence to the desired
values. To quickly edit a sequence, turn A
SSIGN PARAMS on and use
one of the ASSIGNABLE PARAMETERS knobs to choose the sequence
step and the SELECT or increment (+)/decrement (-) buttons to change
the value.
As the sequence loops, you will hear your edits.
5. Follow the same basic steps to program the other sequences.
6. Don’t forget to write your edits to memory! Sequences are saved with
the related program. Just press W
RITE and then the increment (+)
button to save the program and sequences.
Slew
In modular analog synthesizers, a lag processor or slew limiter is used to create
a time-varying change—a smooth transition—between successive, discrete
control voltage levels. The rate of change is called the slew rate and one
common application is to create a glide (aka portamento) effect between notes.
Among the possible destinations for Tetra sequences two and four is a sequenceonly parameter called Slew. Slew behaves a little differently from the other
modulation destinations, in that it is not really a destination at all; instead, it
affects the sequence above it. That is, if Slew is the chosen destination for
sequence two, it controls sequence one, and Slew in sequence four controls
sequence three.
In Tetra’s sequencer, Slew sets the slew rate between the previous step’s value
and the current step’s value when the step is gated on. Confused yet? This
should help: let’s say sequence one is routed to oscillator frequency and
sequence two to Slew. Increasing the Slew value for step four will cause the
31
Page 38

oscillator frequency to glide from the step three value when step four is gated
on. The higher the Slew value, the slower the slew rate. And the slew rate can be
different for each step. But its not just for oscillator glide. Slew can be applied to
any of the destinations. For example, sequence three could be routed to filter
cutoff with Slew in sequence four used to create a less abrupt transition from
one step to the next.
Note: Depending upon the BPM and Clock Divide settings, the slew rate
can actually exceed the time the envelopes are gated on, causing a step in
the affected sequence to not reach its set value. For example, if Slew is
applied to oscillator frequency, high Slew values may cause a step to
sound flat or sharp. If that’s not what you want, simply reduce the Slew
value.
Syncing an LFO to the Sequencer
One very useful way to modulate a parameter in sync with a sequence is using
an LFO with Clock Sync. A setting of 16 Steps for LFO Frequency with a
triangle wave selected and routed to the filter will provide a clean filter sweep
over a 16-step sequence, perfectly in sync! This is much easier (and smoother)
than manually programming a sequence to sweep the filter.
Name Parameter
Edit Name — The lower LCD line displays the name of the Program with the
active character blinking. When A
control changes the position of the active character and SELECT and the
increment (+) and decrement (-) buttons change the character.
SSIGN PARAMETERS is lit, the parameter
32
Page 39

Combos
A combo is a collection of four programs—one per voice—combined to make a
sort of super program. How a combo responds to MIDI note data depends
largely upon whether or not it is monophonic (that is, unison is on) or
polyphonic. The typical uses for a combo are:
Stacked unison—All four voices play from a single key or the PUSH IT button
with four different programs.
Multitimbral sequence playback—Four different programs and their sequences
play back simultaneously from a single key or the PUSH IT button.
“Modular-style” polyphony—Four-voice polyphony with a different program per
voice.
Tetra has 128 combos. To access them, press the mode button to light the
C
OMBO LED. Change combos using SELECT or increment (+) and decrement (-).
The bottom row of knobs (PITCH, CUTOFF, etc.) affects all the programs in the
combo. Though this may not make sense in all cases, changing all four programs
in a combo with a single control makes for some very interesting live editing
possibilities.
Each of the Assignable Parameters knobs controls one parameter for the
respective voice. That is, knob 1 controls a parameter for voice 1, knob 2 for
voice 2, and so on.
Creating a Combo
It probably goes without saying, but it is generally quicker and easier to create
combos using the editor. It can be done without the editor, though.
To create a combo from scratch, press E
The display looks something like this:
The top line shows the program and the voice to which it is assigned, and the
bottom line shows the program name. Use S
decrement buttons to choose another program. Programs can be selected from
other combos or from the regular program banks. For example, choosing Combo
55 Prt2 loads the program from voice 2 of combo 55 into the current combo
location. To access the regular program banks, hold the increment button briefly
until the next bank is displayed. Then the display will look something like the
following:
DIT B/COMBO while in Combo Mode.
ELECT or the increment or
33
Page 40

The top row shows the current combo, the program, the bank, and the voice
being edited. The bottom row shows the program name.
Note: Though the other combos and program banks can be used as a
starting point for building new combos, the actual programs used are
copies, so any edits made in Combo Mode do not affect the source
programs. The converse is also true. Say a combo is created using the
program “Arid” and then Arid is subsequently edited in Program Mode.
Those changes will not be propagated to the combo. (The edited program
can be reassigned to the combo, though.) In other words, Combos contain
all parameters for all four voices when saved, and do not rely on
referencing or mapping other programs, making organization and
maintenance much easier.
Use the P
USH IT button or a MIDI controller to audition any changes made to
voice 1.
The A
SSIGNABLE PARAMETERS are initially the same as for the chosen program,
but can be reassigned, if desired, without affecting the assignments in the
original program. Simply press A
SSIGN PARAMS and choose the desired
parameters as in Program Mode.
Note: A few parameters do not appear in Combo Mode, or appear only
on certain voices. In addition to the exceptions noted below, Unison
Mode, Split Point, and Key Mode never appear in Combo Mode.
When satisfied with the selections/edits, press E
DIT B/COMBO again to move on
to voice 2. When assignments have been made for all four voices, press EDIT
B/COMBO to exit and play the combo.
To set the relative voice volumes in a combo, press E
DIT B/COMBO to enter
single voice edit mode. The VOLUME knob can then be used to set the Voice
Volume parameter for voice 1. Press EDIT B/COMBO again to move on to voice
2, and so on.
The combo’s name is set using the Edit Name parameter for voice 1
(A
SSIGNABLE PARAMETER 1) only when EDIT B/COMBO is turned off. And, of
course, don’t forget to save changes using W
RITE. The combo can be saved to
the current, or another, memory location. After pressing WRITE, use SELECT to
choose the target combo number.
There are other parameters that affect how combos play back. If Unison is set to
Off for voice 1 (the Unison on/off parameter only appears under voice 1, not
34
Page 41

voices 2 through 4), the combo will play back polyphonically. If the PUSH IT
button is to be used to latch notes on, Push It Mode must be set to Toggle in
each of the voices. To start playback of four sequences simultaneously from the
P
USH IT button, set Unison to On in voice 1, set the Push It Mode to Toggle for
all four voices, and make sure Sequencer is set to On for all four voices. If the
Audio Out parameter in the Global menu is set to Quad, each of the voices in a
combo can be processed separately.
The editor has the ability to copy any combo voice or any program layer (A or
B) to any other combo voice or program layer. This provides a very fast way to
build up combos. For example, say you like the kick drum on voice 1 of a
factory combo. You can copy it and paste it to any voice on a new combo. Then,
you could find a snare from a different combo, and copy it into a different voice
on your new combo. Do the same for the remaining voices and you have a new
customized combo that you can then further edit to your liking.
Combos and Multi Mode
Combos can also be used to “cue up” programs used in Multi Mode. When
Multi Mode is used with an external sequencer, the sequencer typically
determines which programs will play by sending MIDI program change
messages on the relevant tracks and MIDI channels. As an alternative, a
combination of Combo Mode and Multi Mode can be used to recall four
programs—one per voice—and have each voice respond to a different MIDI
channel. For more information about Multi Mode, see Global Parameters on
page 13.
35
Page 42

Using Poly Chain
Poly Chain enables multiple Tetras to be chained together for increased
polyphony, up to 16 voices. MIDI note data from a keyboard, sequencer, or
other controller is intelligently processed so that, when one synth’s maximum
polyphony is reached, additional notes are passed through the Poly Chain Out
jack and routed to another synth. All that is required is a single MIDI cable for
each of the chained synths and a mixer for combining the audio outputs. Tetra
can also be poly chained with a Mopho or Prophet ’08.
The same programs should be loaded into all the chained synths. The easiest
way to do that is to use the Dump command in the Global menu to dump the
programs via MIDI from one synth to the other(s).
Note: Tetra’s program banks 1 and 2 come pre-loaded with the Prophet
’08 factory programs.
On the master instrument—the first Tetra in the chain—set Poly Chain to the
number of additional voices that will be chained: Out 1 (for poly chaining a
Mopho), Out 4, Out 8, or Out 12. To chain three Tetras, set Poly Chain on the
intermediate instrument to InOut4. For four Tetras, set the second instrument in
the chain to InOut8 and the third to InOut4. Regardless of how many are
chained together, the last Tetra is always set to In End. You can also use one or
two Tetras to expand the polyphony of a Prophet ’08. See the illustration at the
end of this section for more information.
You can now virtually ignore the slave unit or units, since the controls on the
master will control all units as if they were a single synth. This includes saving a
program; if you save an edited program on the master, it will also save the
program on the slave(s).
Note: If syncing to an external MIDI clock, set MIDI Clock (Global
menu) on the master and any intermediate units to MIDI In/Out. Set the
last instrument in the chain to MIDI In.
When Poly Chain is set to Off, the Poly Chain MIDI out jack simply duplicates
the MIDI out jack.
A Note About Poly Chain and the Mopho Desktop
Unlike Tetra and the Prophet ’08, Mopho does not have layered programs. It is
only one voice and so can not do stacked or split programs. Because of that,
when slaving a Mopho to a Tetra for poly chaining (for 5 voices total), only
Tetra’s four voices will play when a stacked or split program is selected. In
other words, the Mopho voice will only play in normal keyboard mode.
36
Page 43

Also, Mopho’s INPUT GAIN (similar to Tetra’s FEEDBACK GAIN) is not
programmable, so it may take some tweaking to get feedback to sound the same
on Mopho and Tetra, even if the same programs are loaded in both. Programs
that don’t use feedback should sound the same.
37
Page 44
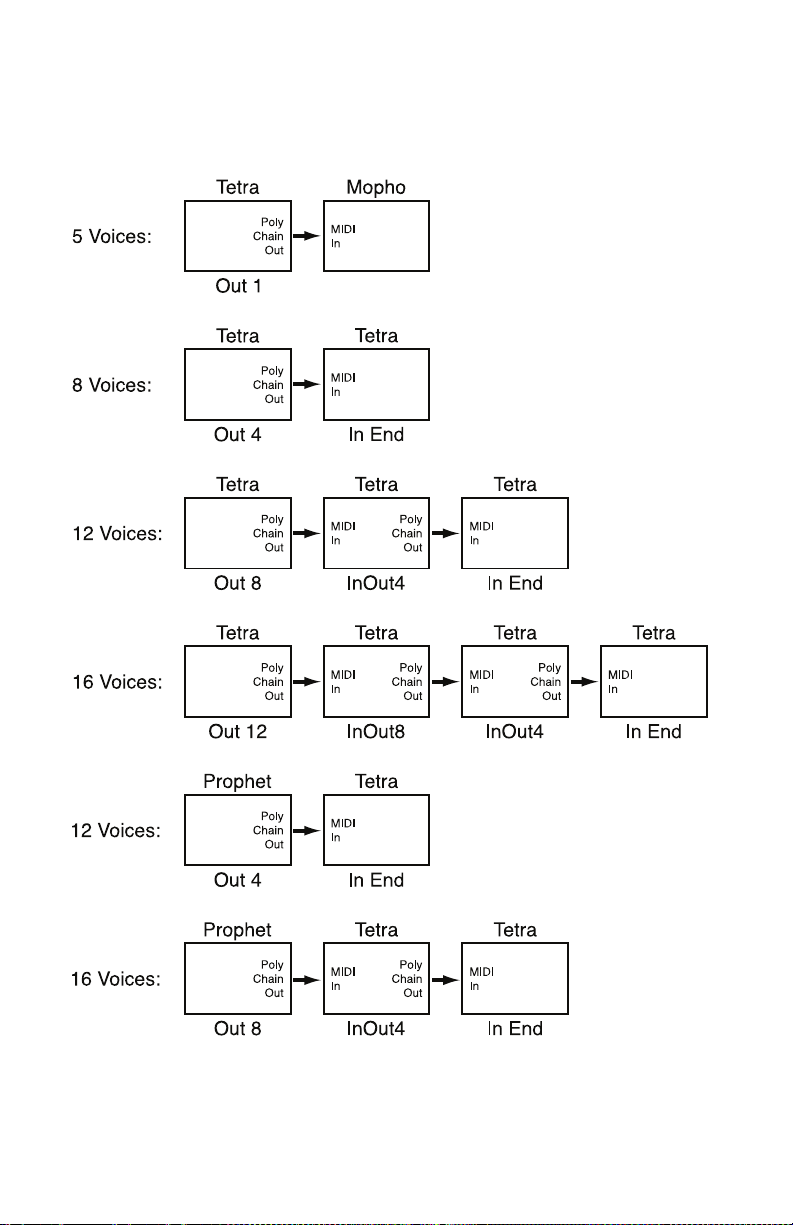
Various Poly Chain Configurations Using
Tetra, Mopho, and the Prophet ’08*
*If Out 4 and Out 8 do not appear as poly chain options on the Prophet, contact
support@davesmithinstruments.com for information about updating the OS.
38
Page 45

Using USB
Tetra’s USB 2.0 port enables bidirectional MIDI communication with a
computer. A MIDI interface and MIDI cables are not necessary, just a USB
cable. Tetra is a Class Compliant USB device. That means it does not require
any additional drivers to be installed to communicate with a Mac or Windows
computer.
Tetra transmits and receives MIDI data via USB, but does not transmit audio.
Note: MIDI In and USB should not be used at the same time, as
overlapping messages from different sources may cause Tetra to respond
unpredictably. MIDI Out and USB can be used at the same time and
transmit the same data. Poly Chain Out is an independent MIDI bus and
can be used regardless of the “normal” MIDI connection.
USB Notes
Under Mac OS X, Tetra will appear as a MIDI port when connected via USB
and can be configured using the Mac’s Audio MIDI Setup application (typically
found in Applications/Utilities).
Under Windows XP, the first time Tetra is connected via USB, the “Found new
hardware” alert appears and Tetra is automatically installed—somewhat
misleadingly—as “USB Audio Device.” If there is already another Class
Compliant USB device installed, Tetra will show up as “USB Audio Device(2)”
(or 3 or 4 or...).
To determine which USB Audio Device is Tetra:
1. Open the System Control Panel
2. Click the Hardware tab.
3. Click Device Manager.
4. Expand “Sound, video, and game controllers.”
5. Right-click any “USB Audio Device” and choose Properties from the
pop-up menu.
The General tab of the USB Audio Device Properties window displays the
Device Type, Manufacturer, and Location. For Tetra, the Location should read
“Location n (DSI Tetra).”
39
Page 46

Windows Vista essentially behaves the same as XP, but the device name is DSI
Tetra rather than USB Audio Device.
In Windows, if you unplug the USB cable and plug it back in while a program
has the Tetra port open, you may have to resync. That usually means going to
the USB Audio Device (or DSI Tetra) Properties, as in the procedure above, and
clicking OK. If Tetra is no longer listed in the Device Manager under “Sound,
video, and game controllers,” power Tetra down and back up again while it is
connected via USB. It should be detected on power up.
40
Page 47

Modulation Destinations
Display Destination
Off
Osc 1 Freq
Osc 2 Freq
OscAllFreq
Osc Mix
NoiseLevel
Osc1 PulsW
Osc2 PulsW
Osc All PW
Low Pass
Resonance
Audio Mod
VCA Level
Output Pan
LFO 1 Freq
LFO 2 Freq
LFO 3 Freq
LFO 4 Freq
LFOAllFreq
LFO 1 Amt
LFO 2 Amt
LFO 3 Amt
LFO 4 Amt
LFOAll Amt
Env 1 Amt
Env 2 Amt
Env 3 Amt
EnvAll Amt
Env1Attack
Env2Attack
Env3Attack
EnvAll Att
Env1 Decay
Env2 Decay
Env3 Decay
EnvAll Dec
Env1Releas
Env2Releas
No destination selected
Oscillator 1 Frequency
Oscillator 2 Frequency
Oscillator 1 and 2 Frequency
Oscillator Mix
Noise Level
Oscillator 1 Pulse Width
Oscillator 2 Pulse Width
All Oscillators Pulse Width
Lowpass Filter Frequency
Resonance
Audio Mod Amount
VCA Amount
Stereo Pan Position
LFO 1 Frequency
LFO 2 Frequency
LFO 3 Frequency
LFO 4 Frequency
All LFO Frequencies
LFO 1 Amount
LFO 2 Amount
LFO 3 Amount
LFO 4 Amount
All LFO Amounts
Envelope 1 Amount (Level)
Envelope 2 Amount (Level)
Envelope 3 Amount (Level)
All Envelope Amounts (Levels)
Envelope 1 Attack Rate
Envelope 2 Attack Rate
Envelope 3 Attack Rate
All Envelope Attack Rates
Envelope 1 Decay Rate
Envelope 2 Decay Rate
Envelope 3 Decay Rate
All Envelope Decay Rates
Envelope 1 Release Rate
Envelope 2 Release Rate
41
Page 48

Env3Releas
EnvAll Rel
Mod 1 Amt
Mod 2 Amt
Mod 3 Amt
Mod 4 Amt
Fback Vol
Sub Osc 1
Sub Osc 2
Fback Gain
Seq1 Slew
Seq2 Slew
Envelope 3 Release Rate
All Envelope Release Rates
Modulator 1 Amount
Modulator 2 Amount
Modulator 3 Amount
Modulator 4 Amount
Feedback Volume
Sub Oscillator 1 Level
Sub Oscillator 2 Level
Feedback Gain
Sequencer 1 Slew Rate (Seq 2 Dest only)
Sequencer 2 Slew Rate (Seq 4 Dest only)
42
Page 49

Modulation Sources
Display Source
Off
Sequence1
Sequence2
Sequence3
Sequence4
LFO 1
LFO 2
LFO 3
LFO 4
Filt Env1
VCA Env 2
Envelope3
PitchBend
Mod Wheel
Pressure
MidBreath
Midi Foot
Midi Exp
Velocity
KeyNumber
Noise
No source selected
Sequence 1
Sequence 2
Sequence 3
Sequence 4
LFO 1
LFO 2
LFO 3
LFO 4
Filter Envelope
Amp (VCA) Envelope
Envelope 3
Pitch Bend
Mod Wheel
Pressure (Aftertouch)
MIDI — Breath Controller
MIDI — Foot Controller
MIDI — Expression
Keyboard Note Velocity
Keyboard Note Number
Noise
43
Page 50

Parameter List
Osc 1 Frequency
Osc 1 Fine Freq
Oscillator 1 Shape
Oscillator 1 Glide
Osc 1 Key Track
Sub Osc 1 Level
Osc 2 Frequency
Osc 2 Fine Freq
Oscillator 2 Shape
Oscillator 2 Glide
Osc 2 Key Track
Sub Osc 2 Level
Osc Hard Sync
Glide Mode
Oscillator Slop
Pitch Wheel Range
Oscillator Mix
Noise Level
Feedback Volume
Feedback Gain
Filter Cutoff Freq
Filter Resonance
Filter Keyboard Amt
Filter Audio Mod
Filter Config/Mode
Filter Env Amount
Filter Env Velocity
Filter Env Delay
Filter Env Attack
Filter Env Decay
Filter Env Sustain
Filter Env Release
VCA Level
VCA Env Amount
VCA Env Velocity
VCA Env Delay
VCA Env Attack
VCA Env Decay
VCA Env Sustain
VCA Env Release
Pan Spread
Program Volume
LFO 1 Frequency
LFO 1 Shape
LFO 1 Amount
LFO 1 Destination
LFO 1 Key Sync
LFO 2 Frequency
LFO 2 Shape
LFO 2 Amount
LFO 2 Destination
LFO 2 Key Sync
LFO 3 Frequency
LFO 3 Shape
LFO 3 Amount
LFO 3 Destination
LFO 3 Key Sync
LFO 4 Frequency
LFO 4 Shape
LFO 4 Amount
LFO 4 Destination
LFO 4 Key Sync
Env 3 Destination
Envelope 3 Amount
Envelope 3 Velocity
Envelope 3 Delay
Envelope 3 Attack
Envelope 3 Decay
Envelope 3 Sustain
Envelope 3 Release
Envelope 3 Repeat
Mod 1 Source
Mod 1 Amount
Mod 1 Destination
Mod 2 Source
Mod 2 Amount
Mod 2 Destination
Mod 3 Source
Mod 3 Amount
Mod 3 Destination
Mod 4 Source
Mod 4 Amount
Mod 4 Destination
Mod Wheel Amount
Mod Wheel Dest
Pressure Amount
Pressure Destination
Breath Amount
Breath Destination
Velocity Amount
Velocity Destination
Foot Control Amt
Foot Control Dest
Unison Mode*
Unison Assign
Unison On/Off**
Push It Note
Push It Velocity
Push It Mode
Split Point†
Key Mode†
Clock BPM
Clock Divide
Arpeggiator Mode
Arpeggiator On/Off
Sequence Trigger
Sequencer On/Off
Seq 1 Destination
Seq 2 Destination
Seq 3 Destination
Seq 4 Destination
Seq 1 Steps 1 - 16
Seq 2 Steps 1 - 16
Seq 3 Steps 1 - 16
Seq 4 Steps 1 - 16
Edit Name
* Program Mode only; not in Combo Mode
** In Combo Mode, voice 1 only
† Program Mode, layer A only
44
Page 51

Support
Troubleshooting
Here are a few suggestions for resolving problems that may occur.
The sequencer has stopped running.
Make sure Clock in the Global menu is set to Internal.
Some of the programs sound different.
Check the Mod Wheel position. The Mod Wheel can do a lot more than just add
vibrato. Also, some of the programs use the sequencer to shape the sound so
make sure Clock in the Global menu is set to Internal.
There is a ground hum in the audio output.
USB can cause ground loops, so try to resolve any grounding issues between the
computer and Tetra. Or use MIDI, which is opto-isolated.
Tetra is behaving erratically.
This is almost always caused by a MIDI data loop. Make sure that any MIDI
Thru functionality is turned off on the MIDI interface/hardware or in the MIDI
software application (sequencer or whatever). Disconnect all Tetra’s MIDI
connections—MIDI and USB cables—and see if the problem persists. You can
also monitor the MIDI traffic with MIDI Monitor (Mac OS) or MIDI-OX
(Windows) to see if Tetra is being overrun with duplicate messages.
An oscillator or the filter sounds strange or out of tune.
Hold down A
SSIGN PARAMS and press the mode switch to run the calibration
routine.
Note: It is not necessary to run the calibration routine on a regular basis.
You should only run it if you are experiencing problems.
Still experiencing a problem with Tetra? Reset the Global parameters (in the
Global menu).
Contacting Technical Support
If you are still having a problem with Tetra, contact Technical Support at
support@davesmithinstruments.com. Please include your Tetra’s serial number,
the version of the operating systems (Main and Voice displayed on startup), and
the purchase date.
Note: If you have not already reset the Global parameters and run the
calibration routine (see Troubleshooting above), you should do it before
45
Page 52

contacting Technical Support. It’s probably the first thing they’ll ask you
to do.
Warranty Repair
Dave Smith Instruments warrants that Tetra will be free from defects in
materials and/or workmanship for 1 year from the date of purchase. Please
register your product online at www.davesmithinstruments.com to establish the
date of purchase. (This is not a requirement for warranty service, but it will help
expedite the process.)
Please contact support@davesmithinstruments.com to determine the best course
of action for getting your Tetra repaired. For your own protection, as well as
ours, please do not return any product to Dave Smith Instruments without a
return authorization (RA) number. To issue an RA number, Technical
Support needs:
• Your name
• Your return address
• Your email address
• A phone number where you can be reached
• Your Tetra’s serial number
• The date of purchase and where purchased
If you need to return your instrument for repair, you are responsible for getting it
to DSI. We highly recommend insuring it and packing in the original packaging.
Damage resulting from shipping a product with insufficient packaging is not
covered by warranty.
46
Page 53

MIDI Implementation
Tetra receives MIDI data according to the mode controls under GLOBAL. In
addition, there is interaction between some of the program parameters that
determine the overall response of Tetra to MIDI data. Note that the following
applies to using both the MIDI jacks and USB.
Following are the Global parameters that affect response to MIDI:
MIDI Channel: ALL, 1…16 — Selects the MIDI channel to send and receive
data, 1 to 16. All receives on any channel.
Clock: see table — Selects the MIDI clock status as follows:
Display MIDI Clock Setting
Internal
MIDI Out
MIDI In
MIDIn/Out
MIDI Parameter Send: NRPN, CC, Off — Changes to the values of Tetra’s front
panel controls are transmitted via MIDI as Non-registered Parameter Number
(NRPN) controllers or as Continuous Controllers (CC). Transmission of
parameters can also be turned off.
MIDI clock is neither sent nor received
MIDI clock is sent
MIDI clock is received
MIDI clock is received and transmitted
MIDI Parameter Receive: All, NRPN, CC, Off — Sets the method by which
Tetra receives parameter changes via MIDI. As with transmission, NRPNs are
the preferred method, though some controllers may only be able to send CCs.
MIDI Control: Off, On — When On, the synth will respond to MIDI controllers,
including Pitch Wheel, Mod Wheel, Pedal, Breath, Volume, and Expression.
MIDI SysEx: Off, On — When On, the synth will respond to received MIDI
SysEx messages, and will transmit them, when prompted, to the MIDI Out.
MIDI Messages
System Real-time Messages
Status Description
1111 1000 MIDI Timing Clock
47
Page 54

Received Channel Messages
Status Second Third Description
1000 nnnn 0kkkkkkk 0vvvvvvv Note Off. Velocity is ignored
1001 nnnn 0kkkkkkk 0vvvvvvv Note On. Note off if vvvvvvv = 0
1010 nnnn 0kkkkkkk 0vvvvvvv Polyphonic Key Pressure
1011 nnnn 0vvvvvvv 0vvvvvvv Control Change; see “Received Controller
1100 nnnn 0ppppppp Program change, 0-127 for Programs 1-128
1101 nnnn 0vvvvvvv Channel Pressure
1110 nnnn 0vvvvvvv 0vvvvvvv Pitch Bend LS Byte then MS Byte
Notes: 0kkkkkkk Note number 0 — 127
nnnn Channel number 0 to 15 (MIDI channel 1-16). Ignored if MIDI
channel set to ALL
0vvvvvvv Value
Messages” table following
within current Bank
Received Controller Messages
Status Second Third Description
1011 nnnn 1 0vvvvvvv Mod Wheel — directly assignable controller
1011 nnnn 2 0vvvvvvv Breath Controller — directly assignable controller
1011 nnnn 4 0vvvvvvv Foot Controller — directly assignable controller
1011 nnnn 7 0vvvvvvv Volume — Combined with Master Volume and
1011 nnnn 74 0vvvvvvv Brightness — Added to low-pass filter cutoff
1011 nnnn 11 0vvvvvvv Expression Controller — directly assignable
1011 nnnn 32 0vvvvvvv Bank Select — 0 -3 select banks 1 – 4; others
1011 nnnn 64 0vvvvvvv Damper pedal — holds envelopes in Sustain if
1011 nnnn 123 0vvvvvvv All Notes Off — clear all MIDI notes
1011 nnnn 121 0vvvvvvv Reset All Controllers — clears all MIDI
Voice Volume
frequency
controller
ignored
0100 0000 or higher
controllers to 0, MIDI volume to maximum
See sections below for additional Continuous Controller (CC) and Nonregistered Parameter Number (NRPN) messages received.
Transmitted Channel Messages
Status Second Third Description
1100 nnnn 0ppppppp Program change, 0 — 127 for Programs 1 —
48
128 within current Bank
Page 55

Transmitted Controller Messages
Status Second Third Description
1011 nnnn 0000 0111 0vvvvvvv Volume knob
1011 nnnn 0010 0000 0vvvvvvv Bank Select — 0 to 2
See sections below for additional Continuous Controller (CC) and Nonregistered Parameter Number (NRPN) messages transmitted.
Additional Continuous Controllers
(CCs) Transmitted/Received
The following table details how CCs are mapped onto Tetra’s controls. They are
transmitted when MIDI Parameter Send is set to CC in Global, and recognized
when received when MIDI Parameter Receive is set to either CC or All in
Global.
Parameter CC
OSC 1 FREQ 20
OSC 1 FREQ FINE 21
OSC 1 SHAPE 22
GLIDE 1 23
OSC 2 FREQ 24
OSC 2 FREQ FINE 25
OSC 2 SHAPE 26
GLIDE 2 27
OSC MIX 28
NOISE LEVEL 29
SUB OSC 1 LEVEL 30
SUB OSC 2 LEVEL 31
FEEDBACK VOLUME 52
FEEDBACK GAIN 53
FILTER FREQ 102
RESONANCE 103
FIL KEY AMT 104
FIL AUDIO MOD 105
FILTER ENV AMT 106
FIL ENV VEL AMT 107
FIL DEL 108
FIL ATT 109
FIL DEC 110
FIL SUS 111
FIL REL 112
VCA LEVEL 113
OUTPUT PAN 114
VCA ENV AMOUNT 115
AMP ENV VEL AMT 116
VCA DEL 117
VCA ATT 118
VCA DEC 119
VCA SUS 75
VCA REL 76
ENV3 DEST 85
ENV3 AMT 86
ENV 3 VEL AMT 87
ENV 3 DELAY 88
ENV3 ATT 89
ENV3 DEC 90
ENV3 SUS 77
ENV3 REL 78
TEMPO 14
TIME SIG 15
49
Page 56

NRPN Messages
The Non-Registered Parameter Number (NRPN) MIDI messages are used to
transmit and receive both global and program parameters. They are transmitted
when MIDI Parameter Send is set to NRPN in Global, and received when MIDI
Parameter Receive is set to either NRPN or All in Global.
The messages are handled in standard MIDI format using the NRPN CC
commands in running status byte format. Below is the format used for
transmitting a NRPN parameter:
Transmitted NRPN Messages
Status Description
1011 nnnn Control Change
0110 0011 NRPN parameter number MSB CC
0vvv vvvv Parameter Number MSB
0110 0010 NRPN parameter number LSB CC
0vvv vvvv Parameter Number LSB
0000 0110 NRPN parameter value MSB CC
0vvv vvvv Parameter value MSB
0010 0110 NRPN parameter value LSB CC
0vvv vvvv Parameter value LSB
The parameter number can be found in the two tables below, one for Global
parameters, and the other for Program parameters. The parameter numbers and
the parameter values are broken into two 7-bit bytes for MIDI transmission; the
LSB has the seven least-significant bits, and the MSB has the seven mostsignificant bits, though in most cases the MSB will be zero or one, and never
more than two.
When receiving an NRPN, all messages do not necessarily need to be
transmitted, since the synth will track the most recent NRPN number, though it
is usually good practice to send the entire message above.
Once an NRPN is selected, the synth will also respond to NRPN Data Increment
and Decrement commands, which some controllers utilize. Finally, it responds
to one RPN (Registered Parameter Number) command, the RPN/NRPN Reset
command, which can be handy for resetting the currently selected parameter to a
known state.
50
Page 57

Received NRPN Messages
Status Second Third Description
1011 nnnn 0110 0011 0vvvvvvv NRPN parameter number MSB CC
1011 nnnn 0110 0010 0vvvvvvv NRPN parameter number LSB CC
1011 nnnn 0000 0110 0vvvvvvv NRPN parameter value MSB CC
1011 nnnn 0010 0110 0vvvvvvv NRPN parameter value LSB CC
1011 nnnn 0110 0000 0xxxxxxx NRPN parameter value Increment
1011 nnnn 0110 0001 0xxxxxxx NRPN parameter value Decrement
1011 nnnn 0010 0101 0111111 RPN parameter number MSB CC - Reset NRPN
1011 nnnn 0010 0100 0111111 RPN parameter number LSB CC - Reset NRPN
parameter number (when both MSB and LSB
received)
parameter number (when both MSB and LSB
received)
Global Parameter Data
The following table shows the Global data sent and received on global
parameter dumps, and the corresponding NRPN numbers.
NRPN Range Description
384 0 - 24 Master Transpose: 0= -12 semitones (1 octave), 12=0 (no
385 0 - 100 Master Fine Tune: 0 = -50 cents, 50 = 0 (centered), 100 = + 50
386 0 - 16 MIDI Channel: if = 0, data received on all MIDI channels.
387 0 - 7 Poly Chain*
388 0 - 4 MIDI Clock Source*
389 0 - 1 Local Control* Off/On
390 0 - 2 Parameter Send*:
transpose), and 24= +12 semitones.
cents
Otherwise = channel number 1 - 16.
0 Off
1 Out 1
2 Out 4
3 Out 8
4 Out 12
5 In End
6 InOut4
7 InOut8
0 Use Internal clock, don’t send MIDI clock
1 Voice 1 is the master clock in Combo mode
2 Use Internal clock, send MIDI clock
3 Use MIDI clock In
4 Use MIDI clock In, and retransmit MIDI clock out
0 NRPN
1 CC
2 Off
51
Page 58

391 0 - 3
Parameter Receive†:
0 All
1 NRPN only
2 CC only
3 Off
394 0 - 1 MIDI Controller Send/Receive Off/On
395 0 - 1 MIDI Sysex Send/Receive Off/On
400 0 - 3 Audio Out:
0 Stereo
1 Mono
2 Quad
3 Q LR34
403 0 - 13 Balance Tweak*: 0 = -7, 7 = 0, and 13 = 7
404 0 - 2 Pot Mode: Relative, Passthru, Jump
406 0 - 1 MIDI Out Select*:
0 MIDI Out
1 MIDI Thru
407 0 - 1 Multi Mode Off/On
411 0 - 1 Select layer A (0) or B (1)
412 0 - 1 Select Program mode (0) or Combo mode (1)
413 0 - 4 Select voice
0 All voices
1 Voice 1
2 Voice 2
3 Voice 3
4 Voice 4
*Received, but not sent.
†Sent, but ignored when received.
Program Parameter Data
The following table lists Tetra’s voice parameters. The parameter number in the
program and edit buffer dumps are different than the NRPN numbers as seen;
this was to maintain NRPN compatibility with the Prophet ’08 as much as
possible.
Parm A B Range Description
0 0 200 0 – 120 Oscillator 1 Frequency, 0 – 120 in
1 1 201 0 – 100 Oscillator 1 Fine Tune; 0 = -50 cents, 50
2 2 202 0-103 Oscillator 1 Shape
3 3 203 0 - 127 Oscillator 1 Glide
52
semitones (10 octave range)
= 0 (centered), 100 = + 50 cents
0 Oscillator Off
1 Sawtooth
2 Triangle
3 Sawtooth/triangle mix
4 – 103 Pulse Wave, Pulse width 0 – 99
Page 59

4 4 204 0 - 1 Oscillator 1 Keyboard Off/On
6 5 205 0 – 120 Oscillator 2 Frequency, 0 – 120 in
semitones (10 octave range)
7 6 206 0 – 100 Oscillator 2 Fine Tune; 0 = -50 cents, 50
= 0 (centered), 100 = + 50 cents
8 7 207 0-103 Oscillator 2 Shape
0 Oscillator Off
1 Sawtooth
2 Triangle
3 Sawtooth/triangle mix
4 – 103 Pulse Wave, Pulse width 0 – 99
9 8 208 0 - 127 Oscillator 2 Glide
10 9 209 0 - 1 Oscillator 2 Keyboard Off/On
12 10 210 0 - 1 Sync off/on
13 11 211 0 - 3 Glide Mode:
0 fixed rate
1 fixed rate auto
2 fixed time
3 fixed time auto
14 12 212 0 - 5 Oscillator Slop
16 13 213 0 - 127 Oscillator 1 - 2 Mix
17 14 214 0 - 127 Noise Level
20 15 215 0 - 164 Filter Frequency, steps in semitones
21 16 216 0 - 127 Resonance
22 17 217 0 - 127 Filter Keyboard Amount
23 18 218 0 - 127 Filter Audio Modulation
24 19 219 0 - 1 Filter Poles 0: 2-pole; 1: 4-pole
25 20 220 0 - 254 Filter Envelope Amount; -127 to +127
26 21 221 0 - 127 Filter Envelope Velocity Amount
27 22 222 0 - 127 Filter Envelope Delay
28 23 223 0 - 127 Filter Envelope Attack
29 24 224 0 - 127 Filter Envelope Decay
30 25 225 0 - 127 Filter Envelope Sustain
31 26 226 0 - 127 Filter Envelope Release
32 27 227 0 - 127 VCA Initial Level
40 28 228 0 - 127 Output Spread
41 29 229 0 - 127 Voice Volume
33 30 230 0 - 127 VCA Envelope Amount
34 31 231 0 - 127 VCA Envelope Velocity Amount
35 32 232 0 - 127 VCA Envelope Delay
36 33 233 0 - 127 VCA Envelope Attack
37 34 234 0 - 127 VCA Envelope Decay
38 35 235 0 - 127 VCA Envelope Sustain
39 36 236 0 - 127 VCA Envelope Release
53
Page 60

42 37 237 0 - 166 LFO 1 Frequency; 0 – 150 unsynced
43 38 238 0 - 4 LFO 1 Shape
frequencies
151 Sequence speed divided by 32
152 Sequence speed divided by 16
153 Sequence speed divided by 8
154 Sequence speed divided by 6
155 Sequence speed divided by 4
156 Sequence speed divided by 3
157 Sequence speed divided by 2
158 Sequence speed divided by 1.5
159 One cycle per step
160 Two cycles per three steps
161 Two cycles per step
162 One cycles per three steps
163 Four cycles per step
164 Six cycles per step
165 Eight cycles per step
166 Sixteen cycles per step
0 Triangle
1 Reverse Sawtooth
2 Sawtooth
3 Pulse (square)
4 Random
44 39 239 0 - 127 LFO 1 Amount
45 40 240 0 - 43 LFO 1 Mod Destination; See Modulation
46 41 241 0 - 1 LFO 1 Key Sync Off/On
47 42 242 0 - 166 LFO 2 Frequency; same as LFO 1
48 43 243 0 - 4 LFO 2 Shape; same as LFO 1
49 44 244 0 - 127 LFO 2 Amount
50 45 245 0 - 43 LFO 2 Mod Destination; See Modulation
51 46 246 0 - 1 LFO 2 Key Sync Off/On
52 47 247 0 - 166 LFO 3 Frequency; same as LFO 1
53 48 248 0 - 4 LFO 3 Shape; same as LFO 1
54 49 249 0 - 127 LFO 3 Amount
55 50 250 0 - 43 LFO 3 Mod Destination; See Modulation
56 51 251 0 - 1 LFO 3 Key Sync Off/On
57 52 252 0 - 166 LFO 4 Frequency; same as LFO 1
58 53 253 0 - 4 LFO 4 Shape; same as LFO 1
59 54 254 0 - 127 LFO 4 Amount
60 55 255 0 - 43 LFO 4 Mod Destination; See Modulation
61 56 256 0 - 1 LFO 4 Key Sync Off/On
62 57 257 0 - 43 Envelope 3 Mod Destination; See Mod
63 58 258 0 - 254 Envelope 3 Amount; -127 to +127
64 59 259 0 - 127 Envelope 3 Velocity Amount
65 60 260 0 - 127 Envelope 3 Delay
Destination list below
Destination list below
Destination list below
Destination list below
Destination list below
54
Page 61

66 61 261 0 - 127 Envelope 3 Attack
67 62 262 0 - 127 Envelope 3 Decay
68 63 263 0 - 127 Envelope 3 Sustain
69 64 264 0 - 127 Envelope 3 Release
71 65 265 0 - 20 Mod 1 Source; See Modulation Source
list below
72 66 266 0 - 254 Mod 1 Amount; -127 to +127
73 67 267 0 - 47 Mod 1 Destination; See Modulation
Destination list below
74 68 268 0 - 20 Mod 2 Source; See Modulation Source
list below
75 69 269 0 - 254 Mod 2 Amount; -127 to +127
76 70 270 0 - 47 Mod 2 Destination; See Modulation
Destination list below
77 71 271 0 - 20 Mod 3 Source; See Modulation Source
list below
78 72 272 0 - 254 Mod3 Amount; -127 to +127
79 73 273 0 - 47 Mod 3 Destination; See Modulation
Destination list below
80 74 274 0 - 20 Mod 4 Source; See Modulation Source
list below
81 75 275 0 - 254 Mod 4 Amount; -127 to +127
82 76 276 0 - 47 Mod 4 Destination; See Modulation
Destination list below
107 77 277 0 - 47 Sequence 1 Destination; See
ModDestination list below
108 78 278 0 - 47 Sequence 2 Destination; See
ModDestination list below
109 79 279 0 - 47 Sequence 3 Destination; See
ModDestination list below
110 80 280 0 - 47 Sequence 4 Destination; See
ModDestination list below
83 81 281 0 - 254 Mod Wheel Amount; -127 to +127
84 82 282 0 - 47 Mod Wheel Destination; See
ModDestination list below
85 83 283 0 - 254 Pressure Amount; -127 to +127
86 84 284 0 - 47 Pressure Destination; See
ModDestination list below
87 85 285 0 - 254 Breath Amount; -127 to +127
88 86 286 0 - 47 Breath Destination; See ModDestination
list below
89 87 287 0 - 254 Velocity Amount; -127 to +127
90 88 288 0 - 47 Velocity Destination; See
ModDestination list below
91 89 289 0 - 254 Foot Control Amount; -127 to +127
92 90 290 0 - 47 Foot Control Destination; See
ModDestination list below
55
Page 62

101 91 291 30 - 250 BPM tempo
102 92 292 0 - 12 Clock Divide:
Half Note
Quarter Note
Eighth Note
Eighth Note half swing
Eighth Note full swing
Eighth Note triplets
Sixteenth Note
Sixteenth Note half swing
Sixteenth Note full swing
Sixteenth Note triplets
Thirty-second Notes
Thirty-second Notes triplets
Sixty-Fourth note triplets
15 93 293 0 - 12 Pitch Bend Range
105 94 294 0 - 4 Sequencer Trigger:
0 Normal
1 Normal, no reset
2 No gate
3 No gate/no reset
4 key step
94 95 295 0 - 5 Key Mode:
0 Low note priority
1 Low note priority with re-trigger
2 High note priority
3 High note priority with re-trigger
4 Last note hit priority
5 Last note hit priority with re-trigger
93 96 296 0 - 4 Unison Mode:
0 1 voice
1 All voices
2 All voices detune1
3 All voices detune2
4 All voices detune3
103 97 297 0 - 3 Arpeggiator Mode:
0 Up
1 Down
2 Up/Down,
3 Assign
4 Random
5 2 Octaves Up
6 2 Octaves Down
7 2 Octaves Up/Down
8 2 Octaves Assign
9 2 Octaves Random
10 3 Octaves Up
11 3 Octaves Down
12 3 Octaves Up/Down
13 3 Octaves Assign
14 3 Octaves Random
70 98 298 0 - 1 Envelope 3 Repear Mode; off/on
95 99 299 0 - 1 Unison; off/on
56
Page 63

104 100 300 0 - 1 Arpeggiator; off/on
106 101 301 0 - 1 Gated Sequencer; off/on
111 105 X 0 - 183 Assignable Parameter 1
112 106 X 0 - 183 Assignable Parameter 2
113 107 X 0 - 183 Assignable Parameter 3
114 108 X 0 - 183 Assignable Parameter 4
19 110 310 0 - 127 Feedback Gain
96 111 311 0 - 127 Push It Note: C0 to C10
97 112 312 0 - 127 Push It Velocity
98 113 313 0 - 1 Push It Mode: Normal, Toggle
5 114 314 0 - 127 Sub Oscillator 1 Level
11 115 315 0 - 127 Sub Oscillator 2 Level
18 116 316 0 - 127 Feeback Volume
117 117 X Editor Byte
99 118 X 0 - 127 Split Point; 60 = C3
100 119 X 0 - 2 Keyboard Mode:
Normal
Stack
Split
120 120-135 320-335 0 - 127 Sequence Track1, steps 1 – 16
0 to 125: Normal sequence step value
126 Reset
127 Rest
136 136-151 336-351 0 - 126 Sequence Track 2, steps 1 – 16
0 to 125: Normal sequence step value
126 Reset
152 152-167 352-367 0 - 126 Sequence Track 3, steps 1 – 16
0 to 125: Normal sequence step value
126 Reset
168 168-183 368-383 0 - 126 Sequence Track 4, steps 1 – 16
0 to 125: Normal sequence step value
126 Reset
184 184-199 X 32 - 127 Name charaters 1 – 16, in ASCII
format
57
Page 64

The following tables list the values used with the program parameters to specify
modulation destinations and sources.
Mod Destinations Value
Off 0
Osc 1 Freq 1
Osc 2 Freq 2
Osc 1 and 2 Freq 3
Osc Mix 4
Noise Level 5
Osc 1 Pulse Width 6
Osc 2 Pulse Width 7
Osc 1 and 2 Pulse Width 8
Filter Frequency 9
Resonance 10
Filter Audio Mod Amt 11
VCA Level 12
Pan Spread 13
LFO 1 Freq 14
LFO 2 Freq 15
LFO 3 Freq 16
LFO 4 Freq 17
All LFO Freq 18
LFO 1 Amt 19
LFO 2 Amt 20
LFO 3 Amt 21
LFO 4 Amt 22
All LFO Amt 23
Filter Env Amt 24
Amp Env Amt 25
Env 3 Amt 26
All Env Amounts 27
Env 1 Attack 28
Env 2 Attack 29
Env 3 Attack 30
All Env Attacks 31
Env 1 Decay 32
Env 2 Decay 33
Env 3 Decay 34
All Env Decays 35
Env 1 Release 36
Combo Parameter Data
Env 2 Release 37
Env 3 Release 38
All Env Releases 39
Mod 1 Amt 40
Mod 2 Amt 41
Mod 3 Amt 42
Mod 4 Amt 43
Feedback Volume 44
Sub Osc 1 Level 45
Sub Osc 2 Level 46
Feedback Gain 47
Slew* 48
*Sequence 2 and 4 only
Mod Sources Value
Off 0
Sequence Track 1 1
Sequence Track 2 2
Sequence Track 3 3
Sequence Track 4 4
LFO 1 5
LFO 2 6
LFO 3 7
LFO 4 8
Filter Envelope 9
Amp Envelope 10
Envelope 3 11
Pitch Bend 12
Mod Wheel 13
Pressure 14
MIDI Breath 15
MIDI Foot 16
MIDI Expression 17
Velocity 18
Note Number 19
Noise 20
Combo Mode has its own set of NRPNs that enable the parameters for each of
the combo’s parts to be addressed on one global MIDI channel. Ranges are the
same as for the previously listed program parameters.
58
Page 65

Note: In Multi Mode, the regular, program NRPNs are received and
transmitted for each of the four voices on their separate MIDI channels.
Quad NRPNs come from/go to all four voices in a combo.
Parm Parameter 1 2 3 4 Quad
0 OSC 1 FREQ 512 768 1024 1280 1536
1 OSC 1 FREQ
FINE
2 OSC 1 SHAPE 514 770 1026 1282 1538
3 GLIDE 1 515 771 1027 1283 1539
4 OSC 1 KEY 516 772 1028 1284 1540
6 OSC 2 FREQ 517 773 1029 1285 1541
7 OSC 2 FREQ
FINE
8 OSC 2 SHAPE 519 775 1031 1287 1543
9 GLIDE 2 520 776 1032 1288 1544
10 OSC 2 KEY 521 777 1033 1289 1545
12 SYNC 522 778 1034 1290 1546
13 GLIDE MODE 523 779 1035 1291 1547
14 OSC SLOP 524 780 1036 1292 1548
16 OSC MIX 525 781 1037 1293 1549
17 NOISE LEVEL 526 782 1038 1294 1550
20 FILTER FREQ 527 783 1039 1295 1551
21 RESONANCE 528 784 1040 1296 1552
22 FIL KEY AMT 529 785 1041 1297 1553
23 FIL AUDIO MOD 530 786 1042 1298 1554
24 FILTER POLES 531 787 1043 1299 1555
25 FILTER ENV
AMT
26 FIL ENV VEL
AMT
27 FIL DEL 534 790 1046 1302 1558
28 FIL ATT 535 791 1047 1303 1559
29 FIL DEC 536 792 1048 1304 1560
30 FIL SUS 537 793 1049 1305 1561
31 FIL REL 538 794 1050 1306 1562
32 VCA LEVEL 539 795 1051 1307 1563
40 OUTPUT PAN 540 796 1052 1308 1564
41 PRESET
VOLUME
33 VCA ENV
AMOUNT
513 769 1025 1281 1537
518 774 1030 1286 1542
532 788 1044 1300 1556
533 789 1045 1301 1557
541
(A)
542 798 1054 1310 1566
X 1053
(B)
X X
59
Page 66

34 VCA ENV VEL
543 799 1055 1311 1567
AMT
35 VCA DEL 544 800 1056 1312 1568
36 VCA ATT 545 801 1057 1313 1569
37 VCA DEC 546 802 1058 1314 1570
38 VCA SUS 547 803 1059 1315 1571
39 VCA REL 548 804 1060 1316 1572
42 LFO 1 FREQ 549 805 1061 1317 1573
43 LFO 1 SHAPE 550 806 1062 1318 1574
44 LFO 1 AMT 551 807 1063 1319 1575
45 LFO 1 DEST 552 808 1064 1320 1576
46 LFO 1 SYNC 553 809 1065 1321 1577
47 LFO 2 FREQ 554 810 1066 1322 1578
48 LFO 2 SHAPE 555 811 1067 1323 1579
49 LFO 2 AMT 556 812 1068 1324 1580
50 LFO 2 DEST 557 813 1069 1325 1581
51 LFO 2 SYNC 558 814 1070 1326 1582
52 LFO 3 FREQ 559 815 1071 1327 1583
53 LFO 3 SHAPE 560 816 1072 1328 1584
54 LFO 3 AMT 561 817 1073 1329 1585
55 LFO 3 DEST 562 818 1074 1330 1586
56 LFO 3 SYNC 563 819 1075 1331 1587
57 LFO 4 FREQ 564 820 1076 1332 1588
58 LFO 4 SHAPE 565 821 1077 1333 1589
59 LFO 4 AMT 566 822 1078 1334 1590
60 LFO 4 DEST 567 823 1079 1335 1591
61 LFO 4 SYNC 568 824 1080 1336 1592
62 ENV3 DEST 569 825 1081 1337 1593
63 ENV3 AMT 570 826 1082 1338 1594
64 ENV 3 VEL AMT 571 827 1083 1339 1595
65 ENV 3 DELAY 572 828 1084 1340 1596
66 ENV3 ATT 573 829 1085 1341 1597
67 ENV3 DEC 574 830 1086 1342 1598
68 ENV3 SUS 575 831 1087 1343 1599
69 ENV3 REL 576 832 1088 1344 1600
71 MOD SOURCE 1 577 833 1089 1345 1601
72 MOD AMT 1 578 834 1090 1346 1602
73 MOD DEST 1 579 835 1091 1347 1603
74 MOD SOURCE 2 580 836 1092 1348 1604
75 MOD AMT 2 581 837 1093 1349 1605
76 MOD DEST 2 582 838 1094 1350 1606
60
Page 67

77 MOD SOURCE 3 583 839 1095 1351 1607
78 MOD AMT 3 584 840 1096 1352 1608
79 MOD DEST 3 585 841 1097 1353 1609
80 MOD SOURCE 4 586 842 1098 1354 1610
81 MOD AMT 4 587 843 1099 1355 1611
82 MOD DEST 4 588 844 1100 1356 1612
107 SEQ 1 DEST 589 845 1101 1357 1613
108 SEQ 2 DEST 590 846 1102 1358 1614
109 SEQ 3 DEST 591 847 1103 1359 1615
110 SEQ 4 DEST 592 848 1104 1360 1616
83 MOD WHEEL
593 849 1105 1361 1617
AMT
84 MOD WHEEL
594 850 1106 1362 1618
DEST
85 PRESSURE AMT 595 851 1107 1363 1619
86 PRESSURE
596 852 1108 1364 1620
DEST
87 BREATH AMT 597 853 1109 1365 1621
88 BREATH DEST 598 854 1110 1366 1622
89 VELOCITY AMT 599 855 1111 1367 1623
90 VELOCITY DEST 600 856 1112 1368 1624
91 FOOT AMT 601 857 1113 1369 1625
92 FOOT DEST 602 858 1114 1370 1626
101 TEMPO 603 859 1115 1371 1627
102 TIME SIG 604 860 1116 1372 1628
15 PBEND RANGE 605 861 1117 1373 1629
105 SEQ TRIGGER 606 862 1118 1374 1630
93 UNISON MODE 607 X X X X
94 UNISON
608 864 1120 1376 1632
ASSIGN
97 ARP MODE 609 X X X X
70 REPEAT MODE 610 866 1122 1378 1634
95 UNISON ON
611 867 1123 1379 1635
OFF
104 ARP ON OFF 612 X X X X
106 SEQ ON OFF 613 869 1125 1381 1637
111 PARAM ENC
617 X X X X
SEL V1
112 PARAM ENC
618 X X X X
SEL V2
113 PARAM ENC
619 X X X X
SEL V3
61
Page 68

114 PARAM ENC
620 X X X X
SEL V4
19 FEEDBACK
622 878 1134 1390 1646
GAIN
96 PUSH IT NOTE 623 879 1135 1391 1647
97 PUSH IT
624 880 1136 1392 1648
VELOCITY
98 PUSH IT MODE 625 881 1137 1393 1649
5 SUB OSC 1 VOL 626 882 1138 1394 1650
11 SUB OSC 2 VOL 627 883 1139 1395 1651
18 FEEDBACK VOL 628 884 1140 1396 1652
117 EDITOR BYTE 629
120 SEQ 1 632 –
647
136 SEQ 2 648 –
663
888 –
903
904 –
919
1144 –
1159
1160 –
1175
1400 –
1415
1416 –
1431
1656 –
1671
1672 –
1687
152 SEQ 3 664 –
679
168 SEQ 4 680 –
695
COMBO NAME 696 –
712
920 –
935
936 –
951
1176 –
1191
1192 –
1207
1432 –
1447
1448 –
1463
X X X X
1688 –
1703
1704 –
1719
Sysex Messages
Universal System Exclusive Message (Device Inquiry)
Status Description
1111 0000 System Exclusive (SysEx)
0111 1110 Non-realtime message
0vvv vvvv If MIDI channel is set to 1-16, 0vvvvvvv must match (unless MIDI Channel
0000 0110 Inquiry Message
0000 0001 Inquiry Request
1111 0111 End of Exclusive (EOX)
Tetra responds with:
Status Description
1111 0000 System Exclusive (SysEx)
0111 1110 Non-realtime message
62
= ALL); always responds if 0vvvvvvv = 0111 1111.
Page 69

0vvv vvvv If MIDI Channel = ALL, 0vvvvvvv = 0111 1111. Otherwise 0vvvvvvv =
0000 0110 Inquiry Message
0000 0010 Inquiry Reply
0000 0001 DSI ID
0010 0110 Tetra ID (Family LS)
0000 0001 Family MS
0000 0000 Family Member LS
0000 0000 Family Member MS
0jjj nnnn Main Software version: jjj — Minor rev; nnnn — Major rev
0000 0000 Zero Byte
0000 0000 Zero Byte
1111 0111 End of Exclusive (EOX)
Channel Number 0-15.
Request Program Dump
Status Description
1111 0000 System Exclusive (SysEx)
0000 0001 DSI ID
0010 0110 Tetra ID
0000 0101 Request Program Transmit
0000 00vv Bank Number, 0 — 1
0vvv vvvv Program Number, 0 — 127
1111 0111 End of Exclusive (EOX)
Tetra will respond by sending out the Program Data in the format described
below in Program Data Dump.
Request Program Edit Buffer Dump
Status Description
1111 0000 System Exclusive (SysEx)
0000 0001 DSI ID
0010 0110 Tetra ID
0000 0110 Request Program Edit Buffer Transmit
1111 0111 End of Exclusive (EOX)
Tetra will respond by sending out the current Program edit buffer in the format
described below in Program Edit Buffer Data Dump.
63
Page 70

Request Global Parameter Dump
Status Description
1111 0000 System Exclusive (SysEx)
0000 0001 DSI ID
0010 0110 Tetra ID
0000 1110 Request Global Parameter Transmit
1111 0111 End of Exclusive (EOX)
Tetra will respond by sending out the current values of Global Parameters in the
format described below in Global Parameters Data Dump.
Request Combo Dump
Status Description
1111 0000 System Exclusive (SysEx)
0000 0001 DSI ID
0010 0110 Tetra ID
0010 0001 Request Combo Transmit
0vvv vvvv Combo Number, 0 - 127
1111 0111 End of Exclusive (EOX)
Tetra will respond by sending out the Combo Data in the format described
below in Combo Data Dump.
Request Combo Edit Buffer Dump
Status Description
1111 0000 System Exclusive (SysEx)
0000 0001 DSI ID
0010 0110 Tetra ID
0011 1000 Request Combo Edit Buffer Transmit
1111 0111 End of Exclusive (EOX)
Tetra will respond by sending out the Combo Data in the format described
below in Combo Edit Buffer Data Dump.
64
Page 71

Program Data Dump
Status Description
1111 0000 System Exclusive (SysEx)
0000 0001 DSI ID
0010 0110 Tetra ID
0000 0010 Program Data
0000 00vv Bank Number, 0 - 3
0vvv vvvv Program Number, 0 - 127
0vvv vvvv 384 bytes expanded to 446 MIDI bytes in “packed MS bit” format
(see page 66.)
1111 0111 End of Exclusive (EOX)
Program Edit Buffer Data Dump
Status Description
1111 0000 System Exclusive (SysEx)
0000 0001 DSI ID
0010 0110 Tetra ID
0000 0011 Edit Buffer Data
0vvv vvvv 384 bytes expanded to 446 MIDI bytes in “packed MS bit” format
(see page 66.)
1111 0111 End of Exclusive (EOX)
Combo Data Dump
Status Description
1111 0000 System Exclusive (SysEx)
0000 0001 DSI ID
0010 0110 Tetra ID
0010 0010 Combo Data
0vvv vvvv Combo Number, 0 - 127
0vvv vvvv 1024 bytes expanded to 1177 MIDI bytes in “packed MS bit” format
(see page 66.)
1111 0111 End of Exclusive (EOX)
65
Page 72

Combo Edit Buffer Data Dump
Status Description
1111 0000 System Exclusive (SysEx)
0000 0001 DSI ID
0010 0110 Tetra ID
0011 0111 Edit Buffer Data
0vvv vvvv 1024 bytes expanded to 1177 MIDI bytes in “packed MS bit” format
(see page 66.)
1111 0111 End of Exclusive (EOX)
Global Parameters Data Dump
Status Description
1111 0000 System Exclusive (SysEx)
0000 0001 DSI ID
0010 0110 Tetra ID
0000 1111 Main Parameter Data
0vvv vvvv 20 nibbles (LS then MS) for 10 Global parameters. Global
Parameters are listed starting on page 51.
1111 0111 End of Exclusive (EOX)
Note: The Global Parameters Data Dump is not recognized when received; it is
only transmitted when requested. NRPN messages are used to change Globals.
Mode Change: Program Mode
Status Description
1111 0000 System Exclusive (SysEx)
0000 0001 DSI ID
0010 0110 Tetra ID
0011 0000 Select Program Mode
1111 0111 End of Exclusive (EOX)
66
Page 73

Mode Change: Combo Mode
Status Description
1111 0000 System Exclusive (SysEx)
0000 0001 DSI ID
0010 0110 Tetra ID
0011 0001 Select Combo Mode
1111 0111 End of Exclusive (EOX)
Packed Data Format
Data is packed in 8 byte “packets”, with the MS bit stripped from 7 parameter
bytes, and packed into an eighth byte, which is sent at the start of the 8 byte
packet.
Example:
Input Data
1 A7 A6 A5 A4 A3 A2 A1 A0 1 00 G7 F7 E7 D7 C7 B7 A7
2 B7 B6 B5 B4 B3 B2 B1 B0 2 00 A6 A5 A4 A3 A2 A1 A0
3 C7 C6 C5 C4 C3 C2 C1 C0 3 00 B6 B5 B4 B3 B2 B1 B0
4 D7 D6 D5 D4 D3 D2 D1 D0 4 00 C6 C5 C4 C3 C2 C1 C0
5 E7 E6 E5 E4 E3 E2 E1 E0 5 00 D6 D5 D4 D3 D2 D1 D0
6 F7 F6 F5 F4 F3 F2 F1 F0 6 00 E6 E5 E4 E3 E2 E1 E0
7 G7 G6 G5 G4 G3 G2 G1 G0 7 00 F6 F5 F4 F3 F2 F1 F0
8 00 G6 G5 G4 G3 G2 G1 G0
This explains why it takes 293 MIDI bytes to transmit 256 Program data bytes.
Packed MIDI data
67
Page 74

Hidden Functions
Hold the ASSIGN PARAMETERS switch and hit the Mode switch to calibrate the
low-pass filter and analog oscillator waveshapes. This should not be necessary
for normal operation.
68
Page 75

Page 76

Dave Smith Instruments
1210 Cabrillo Hwy N
Half Moon Bay, CA 94019-1449
USA
www.DaveSmithInstruments.com
 Loading...