


Module
 Operation Manual

Module
Operation Manual
Version 1.0
January 2014
Dave Smith Instruments 1527 Stockton Street, 2nd Floor
San Francisco, CA 94133
USA
©2014 Dave Smith Instruments www.davesmithinstruments.com
Prophet 12 Operation Manual |
|
i |

This device complies with Part 15 of the FCC Rules. Operation is subject to the following two conditions: (1) This device may not cause harmful interference and (2) this device must accept any interference received, including interference that may cause undesired operation.
This Class B digital apparatus meets all requirements of the Canadian Interference-Causing Equipment Regulations.
Cet appareil numerique de la classe B respecte toutes les exigences du Reglement sur le materiel brouilleur du Canada.
For Technical Support, email: support@davesmithinstruments.com
ii |
|
Dave Smith Instruments |
Table of Contents
Thank You .. . . . . . . . . . . . . . . . . . . . . . . . . . . . . . . . . . . . . . . . . .vii Your Prophet 12 Module is Hot!.. . . . . . . . . . . . . . . . . . . . . . . . . ix
Overview.. .. .. .. .. .. .. .. .. .. .. .. .. .. .. .. .. .. .. .. .. .. .. .. .. .. .. .. .. .. .. .. .. .. .. .. .. .. .. .. .. .. .. .. ..1
Getting Started. . . . . . . . . . . . . . . . . . . . . . 1
Using the Display and “Soft” Controls. . . . |
. . . . . . . . |
2 |
Using Compare . . . . . . . . . . . . . . . . . . . |
. . |
2 |
Saving Programs . . . . . . . . . . . . . . . . . . . . . 3 |
||
Moving to the Next Level . . . . . . . . . . . . . . . . . |
. 3 |
|
Connections. . . . . . . . . . . . . . . . . . . . . . . . . . . . . . . . . . . . . |
. . . . . |
6 |
Global Settings .. . . . . . . . . . . . . . . . . . . |
. . . . . . . . . . . . . . . . . . |
. .8 |
Oscillators.. . . . . . . . . . . . . . . . . . . . . . . |
. . . . . . . . . . . . . . . . . . |
.12 |
Character.. . . . . . . . . . . . . . . . . . . . . . . . |
. . . . . . . . . . . . . . . . . . . |
17 |
Low-Pass Filter.. . . . . . . . . . . . . . . . . . . |
. . . . . . . . . . . . . . . . . . . |
18 |
High-Pass Filter.. . . . . . . . . . . . . . . . . . . . . . . . . . . . . . . . . . . . . . |
21 |
|
Voltage Controlled Amplifier.. . . . . . . . |
. . . . . . . . . . . . . . . . . . . |
22 |
Feedback.. . . . . . . . . . . . . . . . . . . . . . . . |
. . . . . . . . . . . . . . . . . . . |
24 |
Delay. . . . . . . . . . . . . . . . . . . . . . . . . . . . . . . . . . . . . . . . . |
. . . . . . |
25 |
Reverb and Modulation-Based Effects. . |
. . . . . . . . . . |
27 |
Low Frequency Oscillators.. .. .. .. .. .. .. .. .. .. .. .. .. .. .. .. .. .. .. .. .. .. .. .. .. .. .. .. ..28 |
||
Auxiliary Envelopes .. . . . . . . . . . . . . . . |
. . . . . . . . . . . . . . . . . . . |
31 |
Modulation.. . . . . . . . . . . . . . . . . . . . . . . . . . |
. . . . . . . . . . . . . . . . |
32 |
Using the Assign Mod Buttons. . . . . . . . . . . . . . . |
33 |
|
Prophet 12 Operation Manual |
|
iii |
Distortion.. . . . . . . . . . . . . . . . . . . . . . . . . . . . . . . . . . . . . . . . . |
. .34 |
Unison .. . . . . . . . . . . . . . . . . . . . . . . . . . . . . . . . . . . . . . . . . . . |
. .35 |
Glide.. . . . . . . . . . . . . . . . . . . . . . . . . . . . . . . . . . . . . . . . . . . . . |
. .36 |
Hold................................................ |
37 |
Arpeggiator .. . . . . . . . . . . . . . . . . . . . . . . . . . . . . . . . . . . . . . . . |
.38 |
Master Volume/Voice Volume.. . . . . . . . . . . . . . . . . . . . . . . . . . . |
42 |
Pitch and Modulation Wheels........................... |
43 |
Mod Wheel. . . . . . . . . . . . . . . . . . . . . . . 43 |
|
Layers, Split, and Stack .. . . . . . . . . . . . . . . . . . . . . . . . . . . . . . |
.44 |
Managing Layers . . . . . . . . . . . . . . . . . . . . |
44 |
Multi Mode Operation.. . . . . . . . . . . . . . . . . . . . . . . . . . . . . . . . |
.46 |
Using USB.. . . . . . . . . . . . . . . . . . . . . . . . . . . . . . . . . . . . . . . . . |
.47 |
Appendix A: Modulation Sources .. . . . . . . . . . . . . . . . . . . . . . |
.49 |
Appendix B: Modulation Destinations.................... |
50 |
Appendix C: Delay Times.. . . . . . . . . . . . . . . . . . . . . . . . . . . . . . |
52 |
MIDI Implementation.. . . . . . . . . . . . . . . . . . . . . . . . . . . . . . . . . . |
55 |
MIDI Messages . . . . . . . . . . . . . . . . . . . . |
56 |
NRPN Messages . . . . . . . . . . . . . . . . . . . . |
61 |
Sysex Messages. . . . . . . . . . . . . . . . . . . . |
83 |
Packed Data Format . . . . . . . . . . . . . . . . . . |
86 |
Appendix E: Support. . . . . . . . . . . . . . . . . . . . . . . . . . . . . . . . . . |
87 |
Troubleshooting . . . . . . . . . . . . . . . . . . . . . 87 |
|
Contacting Technical Support. . . . . . . . . . . . . . . |
. 88 |
Warranty Repair. . . . . . . . . . . . . . . . . . . . |
. 89 |
iv |
Dave Smith Instruments |
Credits and Acknowledgements
|
For Sound Design: |
|
Alessandro Cortini |
Kevin Lamb |
Robert Rich |
Richard Devine |
Jon Lehmkuhl |
Howard Scarr |
Rory Dow |
Jamie Lidell |
Matia Simovich |
Peter Dyer |
Tim Mantle (Psalm37) |
James Terris |
Robert Henke |
Drew Neumann |
Mitch Thomas |
Tim Koon |
Phil Peskett |
Mark Wilcox |
Kurt Kurasaki |
Lorenz Rhode |
Taiho Yamada |
Special thanks also to: Jeff Pence, Robert Rich, and Riley Smith
And to the DSI crew: Ashley Bellouin, Bob Coover, Carson Day, Chris Hector, Tony Karavidas, Mark Kono, Andrew McGowan, Joanne McGowan, and Tracy Wadley
Prophet 12 Operation Manual |
|
v |
vi |
Dave Smith Instruments |

Thank You
I’ve been designing synthesizers for 35 years now, starting with the Prophet-5 in 1978. Often times over the years, people have asked which instrument is my favorite. I’ve never been able to answer that question; it’s like picking your favorite child. The Prophet-5 since it was the first, and a breakthrough instrument? The Evolvers with their hybrid analog/digital architecture? The Prophet ’08, as a modern analog poly synth, a full-featured followup 30 years
after the Prophet-5? The Prophet VS? Wavestation?
The problem is now resolved: the Prophet 12 is my favorite. No question. It sounds different than my other designs, yet it retains the Prophet vibe. There’s something magical about the combination of a digital front end followed with analog filters and electronics per voice. The Prophet 12 has a sound, a soul of its
own, unlike any other instrument. I love it!
I hope you enjoy playing this instrument as much as we enjoyed designing it. Thanks for the purchase, from the team at DSI!
Cheers,
Prophet 12 Operation Manual |
Thank You vii |
viii Thank You |
Dave Smith Instruments |
Your Prophet 12 Module is Hot!
Figuratively and literally. Under normal operating conditions, that is not a cause for concern. The Prophet 12 Module packs a lot of DSP power and analog circuitry into a very compact instrument and, as a result, it can generate a fair amount of heat.
Since you’re reading the manual, you have probably noticed that the module’s enclosure is well ventilated on both the bottom and rear. Do not obstruct the vents when it’s powered on and avoid placing it in a small enclosed space with little or no air circulation. We also discourage use in direct sunlight under any circumstance, but particularly when the ambient temperature is high.
Prophet 12 Operation Manual |
Your Prophet 12 Module is Hot! |
ix |

x Your Prophet 12 Module is Hot!
Dave Smith Instruments
Overview
This is a brief overview of the Prophet 12 module, describing its capabilities and its operation. More in-depth information about specific parameters can be found in the reference section of the manual. However, don’t let a lack of familiarity with either the instrument or sound synthesis prevent you from turning knobs and pressing buttons—that’s what they’re there for! You won’t break anything and you can always get back to where you started, even if you have no idea what you’re doing. Great things can occur with synthesizers when you don’t quite know what to expect, so start twiddling and keep your ears—and mind—open.
Getting Started
The Prophet 12 module is a twelve-voice, polyphonic synthesizer, which allows up to twelve distinct notes to play simultaneously. We refer to the Prophet 12 as a hybrid synthesizer. That is, it uses a combination of digital and analog audio electronics to generate its sounds, called programs.
The Prophet 12 contains 792 programs organized into eight banks of 99. Half the programs are in four Factory banks and the rest are in four User banks. When a Prophet 12 leaves the factory, the User banks are an exact copy of the Factory banks. Program 1 in bank 1 of the User banks is the same as program 1 in bank 1 of the Factory banks, User program 2 is the same as Factory program 2, and so on. All programs in either the Factory or User banks can be edited using the front panel controls, but the edits cannot be saved to the Factory banks, only the User banks. The Factory banks are read-only, permanent.
Choosing programs is simple. Use the Bank Select knob to choose User banks (U1, U2, U3, U4), or Factory banks (F1, F2, F3, F4), and then use the Program
Select knob to select program number, 01 through 99.
While auditioning programs, it should become obvious that some programs are split—two different sounds can be played from different zones of the keyboard— and some are stacked—one sound is layered on another. The Prophet 12 is bi-timbral. That is, it can play two different sounds simultaneously and each
of those sounds can be routed to its own stereo outputs, if desired. Each of the Prophet 12’s program memory locations is capable of saving and recalling two different programmed sounds, one in layer A and one in layer B. Layers are used to facilitate split and stacked programs.
Prophet 12 Module Operation Manual |
Overview |
1 |
A split program maps the layer A sound to a key zone on the left side of the split point and the layer B sound to the right. Six voices are allocated to each key zone.
A stacked program maps both layers A and B to the entire keyboard, with six voices allocated to each layer. So, when Stack A + B is on, the maximum polyphony is six. (At least two voices play with each keystroke.) The voice activity LEDs indicate how the voices are being used.
If Split A | B or Stack A + B are not on, the layer B sound can still be accessed and edited by pressing Edit Layer B. This also provides a shortcut to switch quickly between two sounds without actually changing programs.
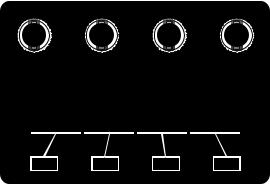
Using the Display and “Soft” Controls
The Prophet 12’s parameters are all accessible by pressing the associated front panel switch, and then editing the parameters via the OLED display. It’s a quick and easy method of getting to the control you want without having to drill down though endless menus. Synth parameters are selected and tweaked using the four soft knobs and soft keys located above and below the display. The soft knobs are detented encoders and are great for dialing in specific values.
The “Soft Knobs”
The “Soft Keys”
Using Compare
At any point while editing a program, turn on Compare to hear the saved, unedited program. Or, to revert to the saved program, just reload it by momentarily selecting another bank using the Bank Select knob. When you switch back to the original bank, the unedited program will be restored.
2 |
Overview |
Dave Smith Instruments |

Saving Programs
Saving an edited program is easy. As mentioned previously, you can compare the edited program to the saved program at any time using Compare. Once you’re ready to commit, press Write. Press the flashing Write button again to save.
A.Write Bank (soft knob 1)—Choose the User Bank (1 through 4) to which the program will be saved.
B.Write Program (soft knob 2)—Choose the program (1 through 99) to which the program will be saved.
C.Select Char (soft knob 3)—Highlight a character in the current layer’s name.
D.Edit Char (soft knob 4)—Choose a character.
E.Copy Name A > B (soft key 1)—Copy the layer A name to layer B.
F.Insert Char (soft key 2)—Insert a character before the selected character.
G.Delete Char (soft key 3)—Delete the selected character.
H.Select A/B (soft key 4)—Switch between the layer A and layer B name.
Saving a program overwrites a previously saved program. While Write is blinking, Compare lets you “audition” the saved program in the bank and program location you have selected, However, Write is disabled when Compare is On.
Moving to the Next Level
This overview just covers basic operation. The Prophet 12 is a deep instrument filled with possibility and playing it is a lot more compelling than reading a manual. But we would like to point you in the direction of a few things that will help you tailor the instrument to your needs. In particular, check out the Global Settings section of the manual. Read about Pot Modes and determine which works best for you. You’ll also find information about MIDI setup to
Prophet 12 Module Operation Manual |
Overview |
3 |
more effectively integrate the Prophet 12 into your rig, as well as information about using a footswitch and expression pedals. Also, look for the tips and notes scattered throughout the manual to gain a better working knowledge of the instrument.
4 |
Overview |
Dave Smith Instruments |
Manual Operation Module 12 Prophet
OSC 1 LEVEL
OSC 1
OSC 2 LEVEL
OSC 2
OSC 3 LEVEL
OSC 3
OSC 4 LEVEL
OSC 4
SUB OSC LEVEL
SUB OSC
FEEDBACK LEVEL
FDBK TUNE |
FEEDBACK LOOP |
|
L
VCA
OSC |
DECI |
AIR |
GIRTH |
DRIVE |
HACK |
LPF |
HPF |
PAN |
MIX |
|
|
|
|
|
|
|
|
CHARACTER |
R |
|
DELAY |
L |
|
PAN |
|
|
1 |
|
|
R |
|
|
DELAY |
L |
|
PAN |
|
|
2 |
|
|
R |
|
|
DELAY |
L |
|
PAN |
|
|
3 |
R |
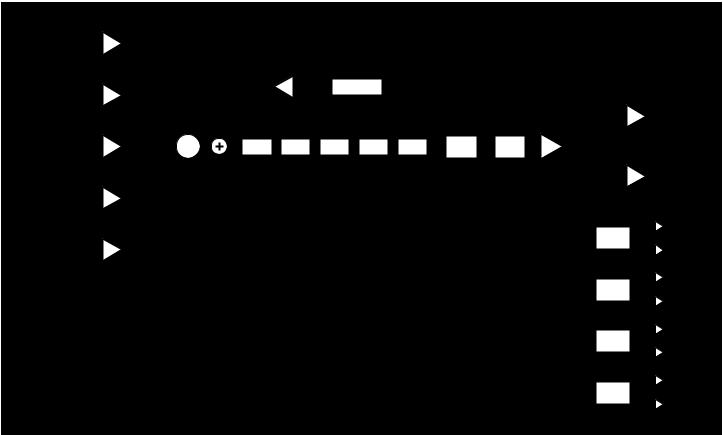
PROPHET 12 VOICE ARCHITECTURE |
DELAY |
L |
PAN |
||
Modulation routing omitted for clarity |
4 |
R |
|
5

Connections
AC Power Inlet—Accepts 13.5VDC at 1400mA from the supplied external power supply. The tip of the plug is positive (body is ground).
|
|
|
|
|
|
|
|
|
|
|
|
|
|
|
|
|
|
|
|
|
|
|
|
|
|
|
|
USB |
Sustain Pedal 1 Pedal 2 |
MIDI In |
MIDI Out |
MIDI Thru |
||
|
|
|
|
|
|
|
USB—For bidirectional MIDI communication with a computer. The Prophet 12 is a Class Compliant USB device and does not require additional drivers when used with Mac OS or Windows. The Prophet 12 transmits and receives data via USB, but does not transmit audio.
Note: MIDI In and USB should not be used at the same time, as overlapping messages from different sources may cause the Prophet 12 to respond unpredictably. MIDI Out and USB can be used at the same time and transmit the same data.
See Using USB on page 47 for more information.
Sustain—Accepts a momentary, normally open or normally closed footswitch to control sustain or to turn the arpeggiator on and off. See “Sustain Footswitch” under Global Settings on page 10 for more information.
Pedal 1 and Pedal 2—Accept a standard expression pedal that has a variable resistor on a TRS (tip-ring-sleeve) ¼″ phone plug. For more information, see “Pedal 1 Function” and “Pedal 2 Function” in Global Settings on page 10.
MIDI In, Out, and Thru—Standard 5-pin MIDI DIN connectors.
6 |
Connections |
Dave Smith Instruments |

Main/A Outputs and B Outputs—Unbalanced, ¼″ audio outputs. The Main outputs are a mix of a program’s A and B layers. When plugs are inserted into the B outputs, only layer A is available from the Main outputs and layer B is routed to the B outputs. See Layers, Split, and Stack on page 44 for more information.
|
|
B Outputs |
Main / A Outputs |
|
||
15VDC, 1400 mA |
On / Off |
Right |
Left |
Right |
Left |
Headphones |
The Prophet 12 sounds great in stereo, but can be switched to mono. See “Mono/ Stereo” in Global Settings on page 9.
Power Switch—Turns the Prophet 12 On of Off.
Headphones—A ¼″ stereo headphone jack.
Prophet 12 Module Operation Manual |
Connections |
7 |

Global Settings
Press Global to set those parameters, such as Master Tune and MIDI Channel, which affect all programs globally.
1..Master Coarse Tune: -12…+12—Master Transpose control, 0 is centered. Steps in semitones as much as one octave up (+12) or down (-12).
2..Master Fine Tune: -50…+50—Master Fine Tune control; 0 centered. Steps in cents as much as a quarter-tone up (+50) or down (-50).
3..MIDI Channel: All, 1…16—Selects which MIDI channel to send and receive data, 1 to 16. All receives on all 16 channels.
4..MIDI Multi Mode: Off, On—Allows the A & B layers to be controlled by separate MIDI channels. When On, the MIDI channel for layer B will be channel (A+1) and shown in parenthesis, i.e. 1(B:2) in the MIDI channel display (above).
5..MIDI Clock Mode: See table—Sets the Prophet 12’s ability to send and receive MIDI clock messages.
Display |
MIDI Clock Setting |
Off |
MIDI Clock is neither sent nor received. |
Master |
MIDI Clock is sent, but not received. |
Slave |
MIDI Clock is received, but not sent. |
Slave Thru |
MIDI Clock is received and passed to MIDI Out. |
Note: In Slave and Slave Thru modes, if no MIDI clock is present at the selected input, the arpeggiator will not function.
6..MIDI Clock Cable: MIDI Port, USB—Sets the port, MIDI or USB, by which MIDI clocks are received.
7..MIDI Param Send: Off, CC NRPN—Changes to the values of front panel controls are transmitted via MIDI as Non-registered Parameter Number (NRPN) controllers or as Continuous Controllers (CC). Transmission of parameters can also be turned off. See MIDI Implementation on page 55 for details.
Note: NRPNs are the preferred method of parameter transmission, since they cover the complete range of all parameters, while CCs are limited to a range of 128.
8 |
Global Settings |
Dave Smith Instruments |
8..MIDI Param Receive: Off, CC NRPN—Sets the method by which parameter changes are received via MIDI. As with transmission, NRPNs are the preferred method.
9..MIDI Control Enable: Off, On—When On, the synth will respond to MIDI controllers, including Pitch Wheel, Mod Wheel, Pedal, Breath, Volume, and Expression.
10..MIDI Sysex Enable: Off, On—When On, the synth will respond to received MIDI SysEx messages, and will transmit them, when prompted, to the MIDI Out. See Sysex Messages on page 83 for details.
11..MIDI Sysex Cable: None, MIDI Port, USB—Sets the port, MIDI or USB, by which System Exclusive data will be transmitted and received.
12..MIDI Out Select: Off, MIDI, USB, MIDI+USB—Sets the port by which MIDI data will be transmitted.
13..Local Control: Off, On—When on (the default), the front panel controls directly affect the Prophet 12. When off, the controls are transmitted via MIDI but do not directly affect the “local” synth (that is, the Prophet 12). This is primarily useful for avoiding MIDI data loops that can occur with some external sequencers.
14..Mono/Stereo: Stereo, Mono—The Prophet 12 defaults to stereo operation. When set to Mono, this parameter defeats all pan settings and modulation, effectively making each of the outputs a mono output.
15..Pot Mode: Relative, Passthru, Jump—The rotary controls on the Prophet 12’s front panel are a mixture of “endless” rotary encoders and potentiometers or “pots.” The pots are identifiable by their lined knobs and the fact that they have about 300° of travel. There are three pot modes to determine how the synth reacts when the programmable parameters are edited. (Master volume is not programmable, so these modes don’t apply.)
When set to Relative, changes are relative to the stored setting. In Relative mode, the full value range is not available until either the minimum or maximum value and the respective lower or upper limit of the pot’s travel is reached.
Prophet 12 Module Operation Manual |
Global Settings |
9 |
the physical |
|
Resonance |
|
|
|
If you switch to a program |
Resonance |
|
|||
For example, the |
|
|
paramet r has a value range of 0 to 127. Let’s say |
||
|
position of the |
|
|
pot is the equivalent of a value of 100. |
|
that has a stored Resonance setting of 63 and turn the pot all the way up, it will only go to 90. To get to the maximum value of 127, you first have to turn down until the value is at the other extreme and the pot is at the limit of its travel (in this case, 0 and fully counter-clockwise, respectively).
In Passthru mode, turning the pot has no effect until after the edited value equals the preset value (that is, until the edited value “passes through” the stored value).
Jump mode uses an absolute value based upon the position of the pot when edited: turn a pot and the value jumps immediately from the stored value to the edited value.
16..Sustain Footswitch: Normally Open, Normally Closed—There are two types of momentary footswitches, normally open and normally closed. Either type can be used with the Prophet 12’s Sustain switch input. Not sure which type you have? If the footswitch’s behavior is the opposite of what’s expected—that is, down is off and up is on—changing this setting will correct that.
17..Sustain Pedal Function: Sustain, Arp On/Off—The footswitch can be used for sustain or to turn arpeggiator hold on and off.
18..Pedal 1 Function: Breath Control, Foot Controller, Expression, Master Volume, Lowpass Filter: Full Range, Lowpass Filter: Half
Range—Sets the function/destination for the Pedal 1 input. An expression pedal can be routed to any destination using the modulation matrix. See Modulation on page 32 for more information.
19..Pedal 2 Function: Breath Control, Foot Controller, Expression, Master Volume, Lowpass Filter: Full Range, Lowpass Filter: Half Range—Sets the function/destination for the Pedal 2 input. . An expression pedal can be routed to any destination using the modulation matrix. See Modulation on page 32 for more information.
20..Basic Patch—Press Write Now (soft key 1) to load a basic, template program into the edit buffer. Use Write to permanently save any changes to memory.
10 Global Settings |
Dave Smith Instruments |
21.. Autotune Filters—Press Start Tuning (soft key 1) and follow the onscreen instructions to tune the lowand high-pass filters.
Note: The filters are calibrated at the factory and under normal circumstances should not require re-calibration or re-tuning.
22..Reset Globals—Sets the global parameters to the factory default settings.
23..Dump Current Program—Transmits the current program in SysEx format via the selected MIDI port. (See “9. MIDI Sysex Cable.”) Dumped programs will load back into the same bank and program location in memory when received by the Prophet 12 via MIDI.
24..Dump Current Bank—Transmits the current bank in SysEx format via the selected MIDI port. (See “9. MIDI Sysex Cable.”) Dumped banks will load back into the same bank location in memory when received by the Prophet 12 via MIDI.
25..Dump All User Banks—Transmits all four User Banks in SysEx format via the selected MIDI port. (See “9. MIDI Sysex Cable.”) Dumped banks will load back into the same bank location in memory when received by the Prophet
12via MIDI.
Prophet 12 Module Operation Manual |
Global Settings 11 |
Oscillators
The Prophet 12 has four oscillators for each of its twelve voices. The oscillators are capable of generating the “classic” analog wave shapes—sine, triangle, sawtooth, square—as well as more complex shapes and different types of noise.
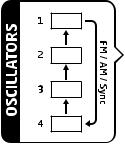
Use the four oscillator buttons to select an oscillator for editing. The arrows that connect the oscillator buttons is a graphic representation showing which oscillator affects another when the Sync, FM (frequency modulation), or AM (amplitude modulation) parameters are used. Oscillator 2 affects oscillator 1, oscillator 3 affects oscillator 2, and so on. For
information about what the Sync, FM, and AM parameters do, see the relevant items later in this section.
Tip: To edit a parameter on all oscillators simultaneously, press and briefly hold any of the oscillator select buttons until all of them are lit. Select the desired parameter using Prev and Next Param (Soft keys 2 & 3). Press and hold, Hold: Edit All (Soft key 1) while adjusting one of the soft knobs. Or use the soft knobs to edit the same parameter for each oscillator individually. Press any oscillator button to exit.
Shape/Noise: Off, Sawtooth, Pulse, Triangle, Sine, Tines, Mellow, Church, Muted, Nasal, Boing, Gothic, Ahhh, Shrill, Ohhhh, Buzzzz, Meh, Red Noise, White Noise, Violet Noise—Used to select the wave shape or type of noise generated by the selected oscillator. Wave shapes include four typical analog synthesizer waves as well as twelve more complex wavetable sounds. There are also three types of noise: red, white, and violet.
Shape Mod/Pulse Width: -64…0…63—Causes the wave shape to be altered. How it changes depends upon the selected shape. A setting of 0 is the default, unaffected shape.
When Sawtooth is the selected shape, Shape Mod/Pulse Width controls the symmetry of the wave, similar to pulse width on the Pulse wave creating the rich sound of two sawtooth oscillators.
12 Oscillators |
Dave Smith Instruments |

Shape Mod/Pulse Width affects the pulse width or duty cycle of the Pulse wave.
-64 |
0 |
63 |
Pulse Width
When Triangle is the selected shape, the width of the wave is changed, similar to Pulse and Sawtooth, adding harmonics and getting more thin sounding when turned in either direction from 0.
With Sine as the selected shape, values less than 0 gradually add another sine an octave higher than the base pitch. Values greater than 0 cause the sine wave to gradually be clipped, adding harmonics and sounding somewhat distorted.
For the 12 wavetable shapes, Shape Mod/Pulse Width crossfades between the selected shape and the Wave Left and Wave Right selections. Let’s say, for example, that the selected wave shape is Mellow, Wave Left is set to Tines, and Wave Right is set to Nasal. A Shape Mod/Pulse Width setting of -64 will be the Tines wave, 0 will be Mellow, and +63 will be Nasal. Values between -64 and 0 will be a mix of Tines and Mellow; values between 0 and +63 will be a mix of Mellow and Nasal. An extremely broad variety of hybrid wave shapes can be
created by mixing two of the wavetable shapes. And, of course, Shape Mod/Pulse Width is a modulation destination, so an LFO or other modulation source can be routed to it. Note that the algorithm used to mix the waves is not simply a mix. If all three are set to the same wave, there will still be a noticeable difference in the sound as Shape Mod changes.
Shape Mod/Pulse Width also works when noise is the selected shape. With a Shape Mod value of 0, the displayed noise type is what is heard. Values less than 0 gradually cause it to change to a second noise type. Values greater than 64 cause it to change to a third noise type. The left and right noise sources are fixed.
Try it. It’s much easier to hear than to explain! The display also provides a visual indication of the change.
Wave Left, Wave Right—Sets the wavetable shapes used in conjunction with the Shape Mod/Pulse Width parameter. Wave Left and Wave Right are only active when one of the twelve wavetables is selected as the primary oscillator shape. See “Shape Mod/Pulse Width” for more information.
Prophet 12 Module Operation Manual |
Oscillators 13 |

Pitch: C 0…C 10—Sets the base oscillator frequency over a 10-octave range, from 8 Hz to 8kHz, stepping in semitones. C3 is middle C, the first octave is 0
(C0, C#0, etc.), the second octave is 1 (C1, C#1, etc.), and so on.
Note: The global Master Tune settings affect the pitch of all oscillators. See Global Settings on page 8 for more information.
Fine: -50…+50—Fine tune control with a range of a quartertone up or down. Zero is centered. Steps are in cents (50 cents = 1/2 semitone).
Key Follow: Off, On—When Key Follow is on, the oscillator tracks the note data received via MIDI. When off, the oscillator plays at its base frequency setting, though the pitch may be affected by modulation from other sources.
Wave Reset: Off, On—When Wave Reset is off, the Prophet 12’s oscillators are free running, which is typically how analog synths behave. That is, the oscillators are running whether a note is being gated on or not. When the amplifier envelope is set for a fast attack, this can cause a soft, but detectable, pop or click at the beginning of a note because the note might be gated on at a point in the wave’s cycle other than a zero crossing. The first cycle to play might be truncated. For some sounds, like monophonic basses, this may actually be desirable. It adds a bit of randomness to the attack that can make it sound, for lack of a better word, more organic. When Wave Reset is on, the wave is always reset to zero—the start of its cycle—when a note is gated on.
Sync: Off, On—Turns oscillator hard sync on. Sync utilizes pairs of oscillators to force one oscillator (the slave) to restart its cycle every time the other oscillator (the master) starts a cycle. This provides a way to create more complex, harmonically rich shapes from simple waveforms.
Oscillator 1 

Oscillator 2 
Oscillator 1
synced to
Oscillator 2
14 Oscillators |
Dave Smith Instruments |

The arrows between the oscillator select buttons show how the oscillators are paired, as does the following table.
Master |
controls |
Slave |
|
Osc |
|
Osc |
|
2 |
|
|
1 |
|
|
||
|
|
|
|
3 |
|
|
2 |
|
|
||
4 |
|
|
3 |
|
|
||
|
|
|
|
1 |
|
|
4 |
|
|
||
|
|
|
|
The effect of Sync is much more easily heard than explained. Here’s a simple example of how to use Sync.
1.Load the Basic Patch from the Global menu. Oscillator 1 and 2 Shape is set to sawtooth and oscillators 3 and 4 are off.
2.Turn oscillator 2 Output Level to 0. Only oscillator 1 should be audible.
3.Turn oscillator 1 Sync on.
4.Now turn oscillator 1 Pitch while playing the keyboard. The harmonic content changes, but not the fundamental pitch. Now do the same thing while turning oscillator 2 Pitch. (Remember: only oscillator 1 should actually be audible.) The fundamental pitch changes, but the harmonic content is relatively consistent. Oscillator 2 is the master and oscillator 1 is the slave.
Tip: Use glide, an envelope generator, an LFO, the mod wheel, or other modulation source to sweep the pitch of a slave oscillator.
Of course, each of the four oscillators can be synced, so it’s possible to have two pairs of synced oscillators or to sync oscillators in series (an oscillator synced to a synced oscillator, synced to a synced oscillator…).
Note: The Oscillator 1 Sub Octave does not sync to oscillator 2. To sync oscillator 1 and have a sub octave that plays in tune with oscillator 2, use one of the other oscillators as a sub.
Output Level: 0…127—Sets the output level for each of the oscillators.
Note: When using three or four oscillators, it may be necessary to reduce the levels of each to avoid clipping.
Prophet 12 Module Operation Manual |
Oscillators 15 |

Frequency Modulation (FM): 0…127—Allows one oscillator—called the modulator, for the purposes of FM synthesis—to modulate the frequency of another oscillator—called the carrier. The arrows between the oscillator select buttons show the modulator/carrier relationship between the oscillators, as does the following table.
Carrier |
Modulator |
Oscillator 1 |
Oscillator 2 |
Oscillator 2 |
Oscillator 3 |
Oscillator 3 |
Oscillator 4 |
Oscillator 4 |
Oscillator 1 |
Turning up FM for oscillator 1 causes it to be modulated by oscillator 2, turning up FM for oscillator 2 causes it to be modulated by oscillator 3, and so on.
Note: The indicated order of modulation is really just a handy shortcut. In fact, you can route any oscillator to another using the modulation matrix. See Modulation on page 32 for more information.
Amplitude Modulation (AM): 0…127—As with FM, AM uses the oscillators as carrier/modulator pairs. But with AM, the modulator modulates the carrier’s amplitude, not its frequency. As with FM, any oscillator routing combination can be configured using the modulation matrix.
Glide Amount: 0...127—Sets the oscillator glide (portamento) amount. Glide can be set independently for each oscillator. Low values are shorter/faster. The Glide switch must be on to hear the effect of Glide Amount. For a detailed explanation, see Glide on page 36.
Tip: To set Glide Amount for all oscillators simultaneously, press and briefly hold any of the oscillator select buttons until all of them are lit. Repeatedly press Prev and Next Param (Soft keys 2 & 3) until Glide is displayed. Press and hold, Hold: Edit All (Soft key 1) while adjusting one of the soft knobs. Press any oscillator button to exit.
Slop: 0…127—Adds random detuning to the oscillator to emulate the tuning instability of voltage controlled analog oscillators, from subtle, barely perceptible amounts to wildly out of tune.
Oscillator 1 Sub Octave: 0…127—Controls the level of a sine wave oscillator pitched one octave below oscillator 1.
16 Oscillators |
Dave Smith Instruments |
Character
The Character controls affect the sonic character of the mixed output of the oscillators. The effect may or may not be subtle and may be dependent upon the frequency and harmonic content of the audio being processed. For example, Girth boosts and enhances low frequencies, so the effect upon high frequency content is minimal.
Girth: 0…127—Alow shelf filter to boost low frequencies, with some extra harmonic modification at higher settings.
Air: 0…127— Ahigh shelf filter to boost high frequencies, with some extra harmonic modification at higher settings.
Hack: 0…127—Reduces the bit depth of the mixed output from the oscillators.
Decimation: 0…127—Reduces the sample rate of the mixed output from the oscillators.
Drive: 0…127— Emulates tape saturation.
Prophet 12 Module Operation Manual |
Character 17 |
Low-Pass Filter
The Prophet 12 features one analog resonant low-pass filter per voice. The filter is switchable between 2- and 4-pole modes and has a dedicated five-stage (delay/ attack/decay/sustain/release) envelope generator, capable of looping the delay, attack, and decay segments. There are also controls for modulating the filter cutoff with the keyboard and envelope amount with keyboard velocity.
4-Pole—Selects the filter configuration. When lighted, the filter is in 4-pole mode.A4-pole, low-pass filter rolls off frequencies above the cutoff frequency at a slope of 24dB per octave. When the button is off, the filter is in 2-pole mode and has a slope of 12dB per octave and a more gradual roll-off of the higher frequencies. Frequencies below the cutoff pass through unaffected, hence the name “low-pass.”
Frequency: 0...164—Sets the low-pass filter’s cutoff frequency over a range of more than 13 octaves, stepping in semitones. The cutoff transitions smoothly across the values when the frequency is swept.
Resonance: 0...127—Emphasizes a narrow band of frequencies around the cutoff frequency. In 4-pole mode, high levels of resonance can cause the filter to self oscillate. In 2-pole mode, resonance is much more subtle and self-oscillation does not occur.
Key Amount: 0...127—Sets the amount of modulation from the note data received via MIDI to Frequency (the filter’s cutoff frequency).Asetting of 64 will step the filter in semitone increments for each note, 32 would be quartertones, and so on.
Velocity Envelope Amount: 0...127—Enables keyboard velocity to modulate the filter Envelope Amount.
Envelope Amount: -127...127—Sets the amount of modulation from the low-pass filter envelope to the low-pass filter frequency. The modulation amount can be positive or negative, allowing for inverted envelope control.
Note: The low-pass frequency setting may limit the effect of the envelope on the filter. For example, if Frequency is all the way up, a positive envelope amount will have no effect on the filter.
Delay: 0...127—Sets a delay between the time the envelope is gated on and
18 Low-Pass Filter |
Dave Smith Instruments |
 Loading...