


8/16-Voice Polyphonic Synthesizer

User’s Guide
Version 1.1
Dec 2017
Dave Smith Instruments LLC 1527 Stockton Street, 3rd Floor San Francisco, CA 94133 USA
©2017 Dave Smith Instruments LLC
www.davesmithinstruments.com

Tested to Comply
With FCC Standards
FOR HOME OR OFFICE USE
This device complies with Part 15 of the FCC Rules. Operation is subject to the following two conditions: (1) This device may not cause harmful interference and (2) this device must accept any interference received, including interference that may cause undesired operation.
This Class B digital apparatus meets all requirements of the Canadian Interference-Causing Equipment Regulations.
Cet appareil numerique de la classe B respecte toutes les exigences du Reglement sur le materiel brouilleur du Canada.
For Technical Support, email: support@davesmithinstruments.com
Table of Contents
A Few Words of Thanks . . . . . . . . . . . . . . . . . . . . . . . . . . . . . . . |
ix |
Getting Started........................................ |
1 |
Sound Banks . . . . . . . . . . . . . . . . . . . . . . 1 Selecting Programs . . . . . . . . . . . . . . . . . . . . 2 Editing Programs . . . . . . . . . . . . . . . . . . . . . 2 Comparing an Edited Program to its Original State. . . . . . . . 3 Creating a Program from Scratch.. . . . . . . . . . . . . . 3 Saving a Program.. . . . . . . . . . . . . . . . . . . . 4 Canceling Save. . . . . . . . . . . . . . . . . . . . . 4 Naming a Program. . . . . . . . . . . . . . . . . . . . 5 Working with Stacked or Split Programs . . . . . . . . . . . . 6 Moving to the Next Level . . . . . . . . . . . . . . . . . 10
Connections. . . . . . . . . . . . . . . . . |
. . . . . . . . . . . . . . . . . . . . . . . . 12 |
Global Settings .. . . . . . . |
. . . . . . . . . . . . . . . . . . . . . . . . . . . . . . .14 |
Oscillators.. . . . . . . . . . . |
. . . . . . . . . . . . . . . . . . . . . . . . . . . . . . .19 |
Oscillator Parameters. . |
. . . . . . . . . . . . . . . . . 20 |
Filter.. . . . . . . . . . . . . . . . |
. . . . . . . . . . . . . . . . . . . . . . . . . . . . . . .22 |
Filter Envelope. . . . . . . . . . . . . . |
. . . . . . . . . . . . . . . . . . . . . . . . . 24 |
Amplifier Envelope.. . . . |
. . . . . . . . . . . . . . . . . . . . . . . . . . . . . . .25 |
Auxiliary Envelope .. . . . |
. . . . . . . . . . . . . . . . . . . . . . . . . . . . . . .28 |
Low Frequency Oscillators.. .. .. .. .. .. .. .. .. .. .. .. .. .. .. .. .. .. .. .. .. .. .. .. .. .. .. .. ..30 |
|
Modulation.. . . . . . . . . . . . |
. . . . . . . . . . . . . . . . . . . . . . . . . . . . . . 32 |
Modulation Parameters. . . . |
. . . . . . . . . . . . . 33 |
Modulation Examples. . . |
. . . . . . . . . . . . . . . . 33 |
Effects.. .. .. .. .. .. .. .. .. .. .. .. .. .. .. .. .. .. .. .. .. .. .. .. .. .. .. .. .. .. .. .. .. .. .. .. .. .. .. .. .. .. .. .. .. ..35
Effects Parameters. . |
. . . . . . . . . . . . . . . . . . 36 |
Arpeggiator .. . . . . . . |
. . . . . . . . . . . . . . . . . |
. . . . . . . . . . . . . . . |
. |
.39 |
Arpeggiator Parameters. . . . . . . . . . . . . . . . . .40 |
||||
Clock Parameters. . |
. . . . . . . . . . . . . . . . . |
. |
41 |
|
Sequencer .. . . . . . . . . |
. . . . . . . . . . . . . . . . |
. . . . . . . . . . . . . . . |
. |
.42 |
Changing Presets While the Poly Sequencer is Running . . . . |
|
43 |
||
Programming the Polyphonic Sequencer. . |
. . . . . . . . |
. |
44 |
|
Editing a Polyphonic Sequence. . . . . . . . . . . . . . |
. 45 |
|||
Copying a Polyphonic Sequence Between Layers.. . . . . . |
. |
46 |
||
Programming the Gated Sequencer.. . . . . . . . . . . . . . |
. |
. 48 |
||
Using Slew. . . . . . . . . . . . . . . . . . . . . . . 49 |
||||
Sequencer Parameters . . . . . . . . . . . . . . . |
. . |
|
50 |
|
Clock Parameters. . |
. . . . . . . . . . . . . . . . . |
. |
51 |
|
Unison .. . . . . . . . . . . . |
. . . . . . . . . . . . . . . . |
. . . . . . . . . . . . . . . |
. |
.52 |
Using Chord Memory. . . . . . . . . . . . . . . . . . . 53 |
||||
Master Volume/Program Volume.. . . . . . . . |
. . . . . . . . . . . . . . |
. |
.55 |
|
Pan Spread. . . . . . . . . . . . . . . |
. . . . . . . . . . . . . . . . . . . . . . . . . . . |
|
|
56 |
Transpose.. .. .. .. .. .. .. .. .. .. .. .. .. .. .. .. .. .. .. .. .. .. .. .. .. .. .. .. .. .. .. .. .. .. .. .. .. .. .. .. .. .. ..56 |
||||
Hold................................................ |
|
|
|
57 |
Glide.. . . . . . . . . . . . . . |
. . . . . . . . . . . . . . . . . |
. . . . . . . . . . . . . . |
. |
.57 |
Pitch and Mod Wheels .. . . . . . . . . . . . . . . . |
. . . . . . . . . . . . . . |
. |
.59 |
|
Pitch Wheel. . . . . . . . |
. . . . . . . . . . . . . . |
|
|
59 |
Modulation Wheel.. . . . . . . . . . . . . . . . . . . |
|
60 |
||
Adding Aftertouch. . . . . . . . . . . . . . . . . . . . . . . . . . . . . . . . . . . . |
60 |
Exporting Programs and Banks. . . . . . . . . . . . . . . . . . . . . . . . . |
65 |
Importing Programs and Banks. . . . . . . . . . . . . . . . . . . . . . . . . |
67 |
Calibrating the Prophet Rev2.. . . . . . . . . . . . . . . . . . . . . . . . . . . |
|
|
68 |
|
Calibrating the Oscillators and Filters.. . . . . . . . . . |
. |
. |
68 |
|
Calibrating the Pitch and Mod Wheels . . |
. . . . . . . . . |
. |
. |
.68 |
Resetting the Global Parameters. . . . . . . . . . . . |
. |
. |
68 |
|
Using USB.. . . . . . . . . . . . . . . . . . . . . . . |
. . . . . . . . . . . . . . . |
. |
. |
. .69 |
Appendix A: |
|
|
|
|
Modulation Sources .. . . . . . . . . . . . . . . |
. . . . . . . . . . . . . . . |
. . |
. |
.70 |
Appendix B: |
|
|
|
|
Modulation Destinations. . . . . . . . . . . . . . . . . . . . |
. . . . . . . . . . . |
|
|
71 |
Appendix C: Alternative Tunings.. . . . . . . . . . . . . . . . . . . . . . . . |
|
|
72 |
|
Appendix D: Troubleshooting and Support.. . . . . . . . . . . |
. . |
. |
.76 |
|
Troubleshooting . . . . . . . . . . . . . . . . . . . . . 76 |
||||
Contacting Technical Support. . . . . . . . . . . . . . |
. |
|
. 78 |
|
Warranty Repair. . . . . . . . . . . . . . . . . . . . . 79 |
||||
Appendix E: MIDI Implementation.. . . . . |
. . . . . . . . . . . . . . . . |
. . |
|
80 |
MIDI Messages . . . . . . . . . . . . . . . . . . . |
. |
|
|
81 |
NRPN Messages . . . . . . . . . . . . . . . . . . |
. |
. |
85 |
|
Control NRPN Data . . . . . . . . . . . . . . . . . |
. |
. |
93 |
|
SysEx Messages . . . . . . . . . . . . . . . . . . |
. |
. |
93 |
|
Packed Data Format . . . . . . . . . . . . . . . . . |
. |
|
. 96 |
|
Sound Design
Joseph Akins, Rory Dow, Peter Dyer, Josh Eustis, Peter Gorges, Mike Hiegemann, Tim Koon, Kurt Kurasaki, Kevin Lamb, Cord Mueller, Drew Neumann, Bob Oxley, Francis Preve, Lorenz Rhode, Nick Semrad, Huston Singletary, James Terris, and Mitch Thomas.
The DSI Crew
ArtArellano, Fabien Cesari, Bob Coover, Carson Day, Chris Hector, Tony Karavidas, Mark Kono, Justin Labrecque,Andy Lambert, Michelle Marshall,Andrew McGowan, Joanne McGowan, Julio Ortiz, Tracy Wadley, and Mark Wilcox.
Special thanks to Robert Rich for the alternative tunings content.

A Few Words of Thanks
Thank you for purchasing the Prophet Rev2, the successor to our popular Prophet ’08 synthesizer, which has been a workhorse in the music industry for nearly 10 years. As enduringly popular as the Prophet ’08 has been, we felt it was time to update it with new technology and new features.
To that end, we designed the Prophet Rev2 by enhancing and improving everything we could about the original Prophet ’08 and, in many cases, doubling its power. We took the classic sound of the Prophet ’08’s DCO and Curtis-filter-based voice and added powerful new features that the original never had, such as waveshape modulation, digital effects, an expanded modulation matrix, a polyphonic step sequencer (in addition to its original gated step sequencer), a more intuitive user interface, USB connectivity, and more. The result is a modern classic revisited.
Creating the Prophet Rev2 has been a very satisfying adventure in making a good synth even better. Create some great sounds with it!
Cheers,
Getting Started
The Prophet Rev2 is a 8/16-voice polyphonic synthesizer with analog oscillators, filters, and amplifiers. The majority of its sound-shaping controls are located on its front panel, putting a tremendous amount of power and versatility within easy reach.
This chapter of your user’s guide provides a brief overview of the Rev2, including such essential tasks as how to edit and save sounds. Later sections of this manual explain each of the Prophet Rev2’s parameters.
Don’t hesitate to dive right in and start turning knobs and pressing buttons before you begin reading. Start exploring and let your ears guide you!
|
|
|
|
Phones |
Left |
Right |
Left |
Right |
|
|
|
Pedal/CV |
Sustain |
Sequencer |
MIDI Thru |
MIDI Out |
|
MIDI In |
USB |
|
|
|
|
|
|
|
|
AC In |
On/Off |
|||
|
|
|
|
MAIN/A OUTPUT |
B OUTPUT |
|
|
|
|
|
|
|
|
|
|
|
|
|
|
|
|
|
|
|
|
|
|
|
|
|||
|
|
|
|
MODULATION |
|
|
CLOCK |
ARP |
|
SEQUENCER |
|
|
|
|
|
|
|
|
|
|
|
|
EFFECT |
|
|
AUXILIARY ENVELOPE |
|
|
||||
|
|
|
|
|
|
|
|
|
|
|
|
|
rest |
|
|
|
|
|
U1 P1 |
|
|
|
|
|
|
|
|
|
|
|
|
|
|
|
|
|
|
|
|
|
|
|
|
|
Gated |
|
|
|
|
|
|
120 |
|
|
|
|
|
|
|
|
|
|
|
|
|
|
|
|
|
|
|
|
|
|
|
|
|
Poly |
|
|
|
|
|
|
Filter Sweep |
|
|
|
|
|
|
|
|
|
|
|
|
|
|
|
MASTER VOLUME |
SOURCE |
SELECT |
BPM |
|
DIVIDE |
MODE |
TYPE |
|
MODE |
TRACK |
PARAMETER |
|
Osc 1 Freq |
PROGRAM |
Global |
Split A | B |
ON/OFF |
SELECT |
MIX |
DESTINATION |
ENV AMOUNT |
VELOCITY |
DELAY |
|
||||||
|
|
|
|
|
|
|
|
|
|
|
|
|
tie |
|
|
|
|
|
C2 |
|
|
|
Write |
Stack A+B |
|
|
|
|
|
|
|
|
|
|
|
|
|
|
|
|
|
|
|
Poly Seq |
|
|
|
|
|
|
|
show |
|
|
|
|
|
|
|
|
|
|
|
||
|
|
|
|
|
|
|
|
|
|
|
Only |
|
|
|
|
|
|
|
|
|
|
|
|
|
|
|
|
|
|
|
|
|
|
|
RATE |
GLIDE |
DESTINATION |
AMOUNT |
|
TAP TEMPO |
ON/OFF |
|
|
DESTINATION |
RECORD |
VALUE |
|
|
|
|
BANK |
Compare |
Edit Layer B |
CLK SYNC |
PARAM 1 |
PARAM 2 |
ATTACK |
DECAY |
SUSTAIN |
RELEASE |
|
||||
|
|
|
|
|
|
|
|
|
|
|
|
|
|
|
|
|
|
MISC PARAMS |
|
|
|
|
|
|
|
|
|
|
||||
|
|
|
|
LOW FREQUENCY OSCILLATORS |
|
|
|
|
OSCILLATORS |
|
|
|
|
|
|
|
|
|
|
LOW-PASS FILTER |
|
|
|
AMPLIFIER |
|
|
||||||
|
|
|
|
1 |
|
Triangle |
|
|
|
|
|
|
Sawtooth |
|
|
|
|
|
|
|
|
|
|
|
|
|
|
|
|
|
|
|
|
|
|
|
|
Sawtooth |
|
|
|
|
|
|
|
|
|
|
|
|
|
|
|
|
|
|
|
|
|
|
|
|
|
||
|
|
|
|
|
|
|
|
|
|
|
|
Saw+Tri |
|
|
|
|
|
|
|
|
|
|
|
|
|
|
|
|
|
|
|
|
|
|
|
|
|
|
Rev Saw |
|
|
|
|
|
|
Triangle |
|
|
|
|
|
|
|
|
|
|
|
|
|
|
|
|
|
|
|
|
|
UNISON |
HOLD |
2 |
SHAPE |
Square |
FREQUENCY CLK SYNC |
OSC 1 FREQ |
FINE TUNE |
SHAPE |
Pulse |
|
|
SUB OCTAVE |
NOISE |
|
CUTOFF |
RESONANCE |
ENV AMOUNT |
VELOCITY |
KEY AMOUNT |
AUDIO MOD |
PAN SPREAD |
ENV AMOUNT |
VELOCITY |
DELAY |
|
|||||
|
|
|
|
|
Random |
SHAPE MOD |
|
|
||||||||||||||||||||||||
|
|
|
|
3 |
|
|
|
|
|
SYNC |
|
|
Sawtooth |
|
|
|
|
|
|
|
|
|
|
|
|
|
|
|
|
|
|
|
|
|
|
|
|
|
|
|
|
|
|
|
Saw+Tri |
|
|
|
|
|
|
|
|
|
|
|
|
|
|
|
|
|
|
|
|
|
|
|
|
|
|
|
|
|
|
|
|
|
Triangle |
|
|
|
|
|
|
|
|
|
|
|
|
|
|
|
|
|
|
|
|
|
|
|
4 |
|
|
|
|
|
|
|
|
Pulse |
|
|
1 |
2 |
|
|
|
|
|
|
|
|
|
|
|
|
|
|
|
PITCH |
MOD |
Down |
Up |
|
DESTINATION |
AMOUNT |
KEY SYNC |
OSC 2 FREQ |
FINE TUNE |
SHAPE |
SHAPE MOD |
OSC MIX |
|
OSC SLOP |
|
4 POLE |
|
DELAY |
ATTACK |
DECAY |
SUSTAIN |
RELEASE |
ATTACK |
DECAY |
SUSTAIN |
RELEASE |
|
|||||
TRANSPOSE |
|
|
|
|
|
|
|
|
|
|
|
|
|
|
|
|
|
|
|
|
|
|
|
|
|
|
|
|
|
|
||
Prophet Rev2 front panel
Sound Banks
The Prophet Rev2 contains a total of 1024 programs. Banks U1-U4 are user banks that can be overwritten. Banks F1-F4 are factory banks that are permanent. As shipped, user banks U1-U4 are identical to permanent factory banks F1-F4. Each bank has 128 programs (x 4 banks = 512 programs each). You can edit the programs of either bank, but you can only save them to user banks U1-U4.
Why do we include banks of non-rewritable permanent sounds? So that they are always available, to be used as is, or as templates for new sounds of your own. It’s easy to design a new sound by tweaking an existing one.
Prophet Rev2 User’s Guide |
Getting Started |
1 |
U1 P1 120
Filter Sweep
Osc 1 Freq |
PROGRAM |
C2
show
BANK
MISC PARAMS
Program and Bank controls
Selecting Programs
Use the bank and program knobs to select and recall programs.
To choose a program:
1.Turn the bank knob to select the bank you want.
2.Turn the program knob to select a program within that bank.
Editing Programs
Because the majority of the sound-shaping controls of the Prophet Rev2 appear on its front panel, editing an existing program is simple: just turn a knob and listen to its effect. Keep turning knobs and pressing buttons. If you like what you’ve created, save the program. (See “Saving a Program” on page 4.)
The rotary controls on the front panel are a mixture of “endless” rotary encoders
(which have no position indicator) and potentiometers or “pots,” which have a position indicator and a finite travel range from left to right. You can choose between three different modes that determine how the synth reacts when you edit its parameters with a pot. For details, see “Pot Mode” on page 16.
2 |
Getting Started |
Dave Smith Instruments |
Comparing an Edited Program to its Original State
When editing a program, it is often useful to compare its edited state to its original state to evaluate your edits. Alternatively, before saving a program to a new location you may want to check the program in the target location before you overwrite it.
To compare an edited program to a saved version:
1.Edit a program.
2.Press the compare button. It lights up, indicating compare mode.
3.Play the keyboard to hear the saved version of the sound.
4.To disable the compare function and return to the edited sound, press the compare button again to turn it off. Programs can’t be written while in compare mode.
It’s also useful to be able to check the value of a parameter for reference. Normally, to make a parameter value appear in the display, you have to turn the parameter’s knob — which will change the parameter value. But there is a way to do this without changing the value:
To check the value of a parameter without changing it:
1.Press and hold the misc parameter button.
2.Turn any parameter knob. The value appears in the display.
3. To check additional parameter values, continue holding d own the misc parameter button and turn other knobs to check their value.
Creating a Program from Scratch
An existing program can be very useful as a jumping off point for new sounds. But it’s also useful (and educational) to create a new sound from scratch. The Prophet Rev2 makes this easy by providing a “basic preset” that you can quickly recall at any time. This preset is very simple, with a single oscillator as its basis.
To recall the basic preset:
•In the transpose section, press and hold the down and up buttons simultaneously, then press the hold button.
Prophet Rev2 User’s Guide |
Getting Started |
3 |

To recall the basic preset using the Global Menu:
1.Press the global button.
2.Use the parameter knob to select basic program.
3.Press the write button.
Saving a Program
If you’ve created a sound that you like, you’ll probably want to save it. Saving a program overwrites a previously saved program. Sound designers often save many incremental versions of a program as they continue to refine it. These intermediate versions often make good jumping off points for new sounds.
To save a program to the same preset location:
1.Press the write button. Its LED begins blinking.
2.Press the write button again. Its LED stops blinking and the program is saved.
To save a program to a different location:
1.Press the write button. Its LED begins blinking.
2.Turn the bank or program knobs to select a new location. You can only save to banks U1-U4.
3.Press the write button again. Its LED stops blinking and the program is saved.
Saving a program saves any edits to programs on both Layer A and Layer B.
Canceling Save
Sometimes you may want to cancel saving a program before you commit.
To cancel the save process before you commit:
•If the write button LED is flashing, press the global button. The write LED stops flashing and saving is canceled. You can return to editing if you want.
4 |
Getting Started |
Dave Smith Instruments |
Comparing Before You Save
Before saving a program to a new location, it’s a good idea to listen to the program in the target location to make sure you really want to overwrite it.
To evaluate a program before you overwrite it:
1.Get ready to save by pressing the write button. It starts flashing.
2.Press the compare button. Its LED lights up.
3.Use the bank and program knobs to navigate to the sound you want to compare and play the keyboard to hear the sound.
4.To disable the compare function and go back to the edited sound, press the compare button again to turn it off. (Programs can’t be written while in compare mode.)
5.If you want to save the edited sound, the write button is still flashing and ready to save, so navigate to a location with the bank and program knobs and press write. The sound is saved.
6.Alternatively, if you want to cancel saving and continue editing, press the global button. Saving is canceled.
Naming a Program
You can rename a program when the write command is active.
To rename a program:
1.Press the write button. Its LED begins blinking.
2.Turn the parameter knob to move the cursor forward or backward
3.Turn the value knob to select a character.
4.When you’re done naming the program, press the write button again. Its LED stops blinking and the program is saved.
Prophet Rev2 User’s Guide |
Getting Started |
5 |

Working with Stacked or Split Programs
The Prophet Rev2 is bi-timbral, meaning that it can produce two different sounds/programs at the same time, either by stacking them, or by allowing you to split the keyboard and assign one sound to the upper section of the keyboard and a different sound to the lower section of the keyboard.
The two layers are referred to as Layer A and Layer B. By default, Layer A is always active when you recall a program. If either the split a|b button or the stack a+b button is lit, then Layer B is also active.
Each Layer can have different Effect, Unison, Arpeggiator, and Sequencer settings. This allows for some very interesting combinations of sounds.
As you scroll through various factory programs, you can tell which are stacked and which are split. On stacked sounds, the stack a+b button is lit. On split sounds, the split a|b button is lit.
All factory programs have a “B” layer, even if that layer isn’t currently enabled.
To hear Layer B in isolation, press the edit layer b button and disable stack or split (if active) by turning off the stack a+b btutton or split a|b button. Pressing edit layer b a second time enables Layer A again.
Button is lit when split is active
|
|
|
|
|
|
|
|
|
|
|
|
|
|
|
|
|
|
|
|
PROGRAM |
|
Global |
Split A | B |
||||||
|
|
|
|
|
|
|
Button is lit when |
||
|
|
|
|
|
|
|
|
||
|
|
|
|
|
|
|
|||
|
|
|
|
|
|
|
|
stack is active |
|
|
|
|
|
|
|
|
|||
|
|
Write |
Stack A+B |
||||||
|
|
|
|
|
|
|
|
Press to enable |
|
|
|
|
|
|
|
|
|||
BANK |
|
|
|
|
|
|
|
Layer B editing |
|
|
|
|
|
|
|
||||
Compare |
Edit Layer B |
||||||||
|
|||||||||
Split and Stack buttons
6 |
Getting Started |
Dave Smith Instruments |

Stacked Programs
Stacking two programs allows you to create extra fat sounds, since you can have two completely different programs layered on top of each other. Polyphony is halved in Stack mode, so if you have a 16-voice Prophet Rev2, in Stack mode, it functions as an 8-voice because it uses two voices for each key played.
To turn Stack mode on:
•If it’s not currently lit, press the stack a+b button. The button becomes lit. The program on Layer B is stacked with the program on Layer A. Polyphony is halved since two voices are used per note.
To turn Stack off:
•If it’s currently lit, press the stack a+b button. The button becomes unlit. Only the program on Layer A is heard.
To edit Layer B:
1.Press the edit layer b button. Layer B editing is enabled.
2.Change any parameters to change the sound of Layer B.
3.Press the edit layer b button again to turn off Layer B editing.
To edit Layer A and B simultaneously:
1.With Stack mode on (stack a+b button is lit) press and hold the edit layer b button. It begins flashing, indicating that you are in “Link” mode.
2.Change any parameters. The parameters are changed on both Layer A and Layer B.
3.To turn off Link mode, press the edit layer b button again. It stops flashing.
Saving a program saves any edits to programs on both Layer A and Layer B.
Prophet Rev2 User’s Guide |
Getting Started |
7 |
To copy Layer A to Layer B:
1.Press both the split a|b button and the stack a+b button simultaneously.
2.Turn the parameter knob and select copy layer a to b.
3.Press the write button. Layer A is copied to Layer B.
To copy Layer B to Layer A:
1.Press both the split a|b button and the stack a+b button simultaneously.
2.Turn the parameter knob and select copy layer b to a.
3.Press the write button. Layer B is copied to Layer A.
To swap Layer A and Layer B:
1.Press both the split a|b button and the stack a+b button simultaneously.
2.Turn the parameter knob and select swap a and b.
3.Press the write button. Layer A and B are swapped.
8 |
Getting Started |
Dave Smith Instruments |

Split Programs
In split mode, playing a key on the left side of the keyboard will play the Layer A sound and playing a key on the right side will play the Layer B sound. Polyphony is allocated equally between the two sounds, with half of the available voices on Layer A and half on Layer B.
The specific key that starts the Layer B sound is called the split point, and is saved with the program.
All factory programs have a “B” layer, even if that layer isn’t currently enabled.
To turn Split on:
•If it’s not currently lit, press the split a|b button. The button becomes lit. The left side of the keyboard plays the Layer A sound and the right side of the keyboard plays the Layer B sound.
To turn Split off:
•If it’s currently lit, press the split a|b button. The button becomes unlit. Only the program on Layer A is heard across the full range of the keyboard.
To set the split point:
1.Make sure the split a|b button is lit.
2.Press and hold the split a|b button and press a key on the keyboard. This sets the start point for Layer B.
3.Release the split a|b button.
To swap Layer A and Layer B sounds:
1.Press both the split a|b button and the stack a+b button simultaneously.
2.Turn the parameter knob and select swap a and b.
3.Press the write button. Layer A and B are swapped.
Prophet Rev2 User’s Guide |
Getting Started |
9 |
Moving to the Next Level
Before you start exploring the sound creation capabilities of the Prophet Rev2 we’d like to point you toward a few things that will help you tailor the instrument to your needs.
First, check out the Global Settings section of this manual. Read about Pot Modes and determine which works best for you when you’re editing sounds. You’ll also find information about MIDI setup. Read this to more effectively integrate the Prophet Rev2 into your MIDI rig. To get the most out of the Prophet Rev2’s live performance capabilities, read up on using a footswitch or expression pedal.
And finally, be on the lookout for tips and notes scattered throughout this manual to gain a better working knowledge of the Prophet Rev2. The better you know it, the more you’ll get out of it. We wish you many hours of musical exploration!
10 Getting Started |
Dave Smith Instruments |
Prophet Rev2 User’s Guide |
Getting Started 11 |

Connections
|
|
|
|
|
|
|
|
|
|
|
|
|
|
|
|
|
|
|
|
|
|
|
|
|
|
|
|
|
|
|
|
|
|
|
|
|
|
|
|
|
|
|
|
|
|
|
|
|
|
|
|
|
|
|
|
|
|
|
|
|
|
|
|
|
|
|
|
|
|
|
|
|
|
|
|
|
|
|
|
|
|
|
|
|
|
|
|
|
|
|
|
|
|
|
|
|
|
|
|
|
|
|
|
|
|
|
|
|
|
|
|
|
|
|
|
|
|
|
|
|
|
|
|
|
|
|
|
|
|
|
|
|
|
|
|
|
|
|
|
1 |
|
|
|
|
|
|
2 |
|
|
3 |
|
||||||||
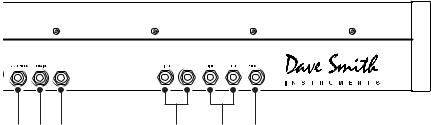
1..AC Power Connector—Accepts a standard, grounded IEC power cord. Operates over a range of 100 to 240 volts and 50 to 60 Hz.
2..USB—For bidirectional MIDI communication with a computer. The Prophet Rev2 is a Class Compliant USB device and does not require additional drivers when used with Mac OS or Windows. See Using USB on page 69 for more information.
3..MIDI In, Out, and Thru—Standard 5-pin MIDI DIN connectors.
4..Sequencer—Accepts a momentary, normally open or normally closed footswitch to turn the sequencer or arpeggiator on and off. Alternatively, an audio signal connected to this jack can be used to either control sequencer/ arpeggiator playback, or to gate the filter and amplifier envelopes while notes are held. See Pedal/CV on page 13 for more information about choosing the appropriate mode for these behaviors.
 Audio signals used to drive the arpeggiator/sequencer should not exceed 5 volts peak-to-peak.
5.. Sustain—Accepts a momentary, normally open or normally closed footswitch to control sustain.
12 Connections |
Dave Smith Instruments |
B OUTPUT MAIN A OUTPUT
PEDAL/CV
4 5 6 7 8 9
6..Pedal/CV—Accepts a standard expression pedal that has a variable resistor on a TRS (tip-ring-sleeve) ¼ inch phone plug. Once connected, you can use the modulation matrix to route the pedal to control a variety of things such as volume or filter cutoff frequency to add expressiveness to live performance.
7..B Audio Outputs—Unbalanced, ¼ inch audio outputs. Connect audio cables to these jacks if you want separate stereo outputs for Layer B. If no cables are connected, Layer B is output on the Main A Outputs.
8..Main/ A Audio Outputs—Unbalanced, ¼ inch audio outputs. These are the main stereo outputs for the synth. They carry Layer A and also Layer B if no cables are connected to the “B Audio Outputs” jacks.
9..Headphones—A ¼ inch stereo headphone jack. Headphone volume is controlled by the master volume knob on the front panel.
Prophet Rev2 User’s Guide |
Connections 13 |

Global Settings
Press the global button and use the parameter and value knobs to scroll through and set parameters such as Master Tune and MIDI Channel that affect all programs globally.
1..Master Coarse Tune: -12…+12—Master Transpose control, 0 is centered. Steps in semitones up to one octave up (+12) or down (-12).
2..Master Fine Tune: -50…+50—Master Fine Tune control; 0 centered. Steps in cents as much as a quarter-tone up (+50) or down (-50).
3..MIDI Channel: All, 1…16—Selects which MIDI channel to send and receive data, 1 to 16. Choosing all receives on all 16 channels.
4..MIDI Clock Mode: Sets the synthesizer’s ability to send and receive MIDI clock messages:
•Off: MIDI Clock is neither sent nor received
•Master: MIDI Clock is sent, but not received.
•Slave: MIDI Clock is received, but not sent.
•Slave Thru: MIDI Clock is received and passed to MIDI Out
•Slave No S/S (no start and stop): Receives MIDI Clock but does not respond to MIDI Start or Stop command.
 In Slave and Slave Thru modes, if no MIDI clock is present at the selected input, the arpeggiator and sequencer will not function.
5..MIDI Clock Cable: MIDI Port, USB—Sets the port, MIDI or USB, by which MIDI clocks are received.
6..MIDI Param Send: Off, CC, NRPN—Changes to the values of front panel controls are transmitted via MIDI as Non-registered Parameter Number (NRPN) controllers or as Continuous Controllers (CC). Transmission of parameters can also be turned off. See MIDI Implementation on page 80 for details.
 NRPNs are the preferred method of parameter transmission, since they cover the complete range of all parameters, while CCs are limited to a range of 128.
14 Global Settings |
Dave Smith Instruments |
7..MIDI Param Receive: Off, CC, NRPN—Sets the method by which parameter changes are received via MIDI. As with transmission, NRPNs are the preferred method.
8..MIDI Control Enable: Off, On—When On, the synth will respond to MIDI controllers, including Pitch Wheel, Mod Wheel, Pedal, Breath, Volume, and Expression.
9..MIDI Program Enable: Off, On—When On, the synth will respond
to received MIDI Program Change and other SysEx messages, and will transmit them (when prompted) to the MIDI Out. See Sysex Messages on page 93 for details.
10..MIDI Sysex Cable: None, MIDI Port, USB—Sets the port, MIDI or USB, by which System Exclusive data will be transmitted and received.
11..MIDI Out Select: Off, MIDI, USB, MIDI+USB—Sets the port by which MIDI data will be transmitted.
12..Multi Mode: On, Off—Multi Mode allows separate MIDI control of voices 1-8 and voices 9-16 on 16-voice systems. (On 8-voice systems this is voices 1-4 and voices 5-8.) This enables independent, bi-timbral control of the Prophet Rev2.
When Multi Mode is on, the Prophet Rev2 responds to MIDI data on two consecutive MIDI channels — the base channel (selected in the Global menu) and the next highest channel. The base channel controls voices 1-8 (or 1-4 on 8-voice systems) and the other channel controls voices 9-16 (or 5-8 on 8-voice systems). Notes, program changes, and other MIDI data received on the specified channels provide independent control of the two parts.
Note that a program change needs to be sent to each of the two channels when setting up Multi Mode. Only Layer A of the selected program is loaded. There are no stacks or splits in Multi Mode. Use CCs or Layer A NRPNs for automation of parameters. Program Layer B data is completely ignored in Multi Mode
Prophet Rev2 User’s Guide |
Global Settings 15 |
13..Local Control: Off, On—When on (the default), the keyboard and front panel controls directly affect the Prophet Rev2. When off, the controls are transmitted via MIDI but do not directly affect the “local” synth (that is, the Prophet Rev2). This is primarily useful for avoiding MIDI data loops that can occur with some external sequencers.
14..Velocity Curve: Curve 1... Curve 8—Sets one of the eight velocity curves for the keyboard to adjust the velocity response to your playing style.
15..Pressure Curve: Curve 1, Curve 2, Curve 3, Curve 4—Sets one of four pressure curves for the keyboard to adjust the aftertouch to your playing style.
16..Mono/Stereo: Stereo, Mono—The Prophet Rev2 defaults to stereo operation. When set to Mono, this parameter defeats all pan settings and modulation, effectively making each of the outputs a mono output.
17..Pot Mode: Relative, Passthru, Jump—The rotary controls on the Prophet Rev2’s front panel are a mixture of “endless” rotary encoders and potentiometers or “pots.” The pots are identifiable by their lined knobs and the fact that they have about 300° of travel. There are three pot modes to determine how the synth reacts when the programmable parameters are edited. (Master volume is not programmable, so these modes don’t apply.)
When set to relative, changes are relative to the stored setting. In Relative mode, the full value range is not available until either the minimum or maximum value and the respective lower or upper limit of the pot’s travel is reached.
For example, the Resonance parameter has a value range of 0 to 127. Let’s say the physical position of the Resonance pot is the equivalent of a value of 100. If you switch to a program that has a stored Resonance setting of 63 and turn the pot all the way up, it will only go to 90. To get to the maximum value of 127, you first have to turn down until the value is at the other extreme and the pot is at the limit of its travel (in this case, 0 and fully counter-clockwise, respectively).
In Passthru mode, turning the pot has no effect until after the edited value equals the preset value (that is, until the edited value “passes through” the stored value).
16 Global Settings |
Dave Smith Instruments |
Jump mode uses an absolute value based upon the position of the pot when edited: turn a pot and the value jumps immediately from the stored value to the edited value.
18.. Alt Tuning: Equal Temperment, 1…17—Selects one of the Prophet Rev2’s built-in tunings. Set to 1. equal temperment, the tuning is standard, chromatic tuning. Choosing 2 through 16 selects an alternative, non-chro- matic, non-Western scale that can be used to emulate ethnic instruments or in other creative ways.
See Appendix A: Alternative Tunings on page 72 for a description of each tuning. Additional tunings can be imported as a SysEx message. For more information, see Appendix A.
19..Screen Saver: On, Off—The Prophet Rev2 display has a builtin screen saver that puts it to sleep when not in use. This features is
designed to prolong the life of the display and we recommend using it. If, however, you want to disable this feature you can do so by setting it to Off.
20..Seq Pedal Mode: Normal, Trigger, Gate, T-G—Selects the mode for signals received on the rear-panel sequencer jack.
•With normal selected, a footswitch will start sequencer playback.
•With trig selected, an audio signal connected to the sequencer jack will step the sequencer when the sequencer’s play button is on.
•With gate selected, an audio signal connected to the sequencer jack will trigger and gate the envelopes while you hold a note or
chord. Additionally, turning on the sequencer or arpeggiator will add sequencer or arpeggiator playback — but controlled by the Prophet Rev2’s clock bpm and value settings and not the audio trigger.
•With t-g (trigger+gate) selected, an audio signal connected to the sequencer jack will trigger and gate the envelopes while you hold a note or chord. Additionally, pressing the sequencer’s play button will also add synchronized sequencer playback.
21..Pedal Polarity: Normal, Reversed—There are two types of momentary footswitches, normally open and normally closed. Either type can be used with the Sustain switch input. This setting allows you to accommodate both models in case yours behaves in a way that is the opposite of what you expect due to its polarity. (Sustain is on until the footswitch
Prophet Rev2 User’s Guide |
Global Settings 17 |
is pressed and then it turns off, which is the opposite of the expected behavior.) Connect your pedal and choose the appropriate setting based on its behavior.
22..Sustain Arp: Arp hold, Sustain—Sets the function for the Sustain pedal input the rear of the synthesizer. Selecting arp hold and pressing the sustain pedal causes the arpeggiator to hold the current arpeggio as if you had pressed the hold button on the front panel. Selecting sustain chooses normal sustain pedal operation.
23..Calibrate Wheels—Calibrates the Pitch and Mod wheels.
24..Basic Program—Loads a basic, template program.
25..Calibrate—Calibrates the oscillators and filters. You shouldn’t need to do this under normal circumstances since the filters are calibrated at the factory and generally don’t require re-calibration or re-tuning.
26..Reset Globals—Sets the global parameters to the factory default settings.
27..Dump Program—Transmits the current program in SysEx format via the selected MIDI port. Dumped programs will load back into the same location in memory when imported back into the synth via MIDI.
28..Dump Bank—Transmits the current bank in SysEx format via the selected MIDI port. (See item 10, “MIDI Sysex Cable.”) Dumped banks will load back into the same location in memory when imported back into the synth via MIDI.
29..Dump All Banks—Transmits all four User Banks in SysEx format via the selected MIDI port. (See item 10, “MIDI Sysex Cable.”) Dumped banks will load back into the same location in memory when imported back into the synth via MIDI.
18 Global Settings |
Dave Smith Instruments |
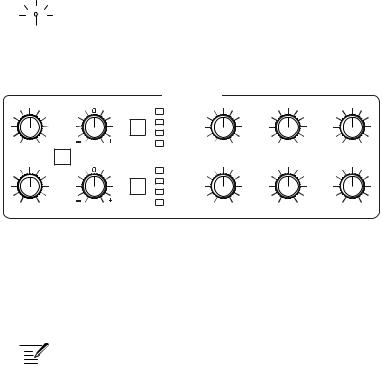
Oscillators
Oscillators provide the raw building blocks of the Prophet Rev2’s sound by producing waveforms, each of which has its own inherent sound character based on its harmonic content. The Prophet Rev2 has two oscillators, plus a sub oscillator and a noise generator, per voice.
Oscillator 1 and 2 are capable of generating sawtooth, sawtooth + triangle, triangle, and pulse waves. You can vary the width of any of these waveshapes using the shape mod parameter. This provides a great variety of different waveshapes and timbres.
 The oscillators on the Prophet Rev2 are extremely stable. To emulate the random pitch drift and oscillator instability of vintage instruments, use the osc slop parameter to dial in as little or as much drift as you like.
OSCILLATORS
|
|
|
Sawtooth |
|
|
|
|
|
|
Saw+Tri |
|
|
|
|
|
|
Triangle |
|
|
|
OSC 1 FREQ |
FINE TUNE |
SHAPE |
Pulse |
SUB OCTAVE |
NOISE |
|
SHAPE MOD |
||||||
|
SYNC |
|
Sawtooth |
|
|
|
|
|
Saw+Tri |
|
|
|
|
|
|
|
|
|
|
|
|
|
|
Triangle |
|
|
|
OSC 2 FREQ |
FINE TUNE |
SHAPE |
Pulse |
1 |
2 |
OSC SLOP |
SHAPE MOD |
|
OSC MIX |
||||
The Oscillator section
Oscillator 1 can be hard-synced to Oscillator 2 for harmonically-complex sounds when modulated. Both oscillators feature a fine tune knob for detuning and thickening sounds.
 You can force either or both of the oscillators to start its wave cycle from its beginning (its zero crossing) each time you press a note on the keyboard by setting note reset to on in the misc parameters menu. This is can be useful for creating sounds that have a very consistent sound each time you trigger them.
Prophet Rev2 User’s Guide |
Oscillators 19 |

Oscillator Parameters
Osc Freq: Sets the base frequency of Oscillator 1 or 2 over a 9-octave range from 16 Hz to 8KHz (when used with the Transpose buttons). Adjustment is in semitones.
 The global master coarse and master fine settings affect the pitch of the oscillators. See “Global Settings” on page page 14 for more information.
Fine Tune: Fine tune control with a range of a quartertone up or down. The 12 o’clock position is centered. Steps are in cents (50 cents = 1/2 semitone).
Shape: Sawtooth, Sawtooth + Triangle, Triangle, Pulse —This button selects the waveshape generated by the oscillator. You can also turn the oscillator off by selecting no waveshape.
Shape Mod: Changes the “pulse” width of the selected waveform, which modifies its harmonic content and timbre. To generate a square wave when pulse is selected as the waveform, set this parameter to 50.
 Applying waveshape modulation using a low frequency oscillator or other modulation source in the mod matrix is a great way to add movement and thickness to a sound.
Sync: Off, On—Turns Oscillator 1 hard sync on. Sync forces Oscillator 1 (the slave) to restart its cycle every time Oscillator 2 (the master) starts a cycle. This provides a way to create more complex, harmonically rich
shapes from simple waveforms—especially when the frequency of Oscillator 1 is set to a different interval than Oscillator 2.
Oscillator 1 

Oscillator 2 
Oscillator 1
synced to
Oscillator 2
Oscillator hard sync
20 Oscillators |
Dave Smith Instruments |
 Loading...