

Page 1
with
Operation Manual
Page 2

Page 3

i
Tempest Operation Manual
Operation Manual
by
Roger Linn, Andrew McGowan & Riley Smith
Version 1.4
Feb 2015
Dave Smith Instruments
1527 Stockton Street, 3rd Floor
San Francisco, CA 94133
USA
©2015 Dave Smith Instruments
www.davesmithinstruments.com
Page 4

ii
Dave Smith Instruments
This device complies with Part 15 of the FCC Rules. Operation is subject to
the following two conditions: (1) This device may not cause harmful interference and (2) this device must accept any interference received, including
interference that may cause undesired operation.
This Class B digital apparatus meets all requirements of the Canadian
Interference-Causing Equipment Regulations.
Cet appareil numerique de la classe B respecte toutes les exigences du
Reglement sur le materiel brouilleur du Canada.
For Technical Support, email: support@davesmithinstruments.com
Page 5

iii
Tempest Operation Manual
Table of Contents
What’s a Tempest? ....................................1
Quick Start ...........................................2
Overview of Panel Controls ................................2
Sounds, Beats, and Projects ...............................3
Going Deeper ...........................................3
The Pad Function Keys .................................4
16 Beats ...............................................4
16 Sounds ..............................................5
Sound Bank B ........................................... 6
Selecting Sounds by Category ..............................6
16 Mutes ...............................................7
16 Time Steps ........................................... 8
16 Tunings .............................................9
16 Levels .............................................10
Pad Options .........................................11
Reverse Playback ....................................... 12
Roll with Arpeggiation ....................................12
The Screens Keys ....................................14
Events Key: The Beat Events screen ........................15
Note Event Parameters ..................................16
Play List ..............................................18
The Sound Controls ..................................23
Undo Sound / Revert Sound ............................... 23
Oscillators ..........................................27
The Analog Oscillators ...................................27
The Digital Oscillators .................................... 30
Lowpass ............................................32
Highpass ...........................................33
Page 6

iv
Dave Smith Instruments
Amp ................................................34
Envelopes. . . . . . . . . . . . . . . . . . . . . . . . . . . . . . . . . . . . . . . . . . .35
A Note About Envelope Shape .............................37
LFO 1 & 2 .............................................37
Free-Running LFOs .....................................39
Modulation Paths .....................................40
Choke and Voice Assign ...............................41
Beat-wide Parameters .................................43
Mixer and Effects .....................................44
Compressor Envelope ...................................45
Real Time FX ........................................46
Beat FX ............................................... 46
Note FX ...............................................47
Rec/Edit Keys. . . . . . . . . . . . . . . . . . . . . . . . . . . . . . . . . . . . . . . .49
The Click key ..........................................49
The Undo Rec key ......................................49
The Erase key ..........................................49
The Copy Key ..........................................50
The Edit Function ....................................53
1. Copy Sound .........................................53
2. Initialize Sound .......................................53
3. Rename Sound ......................................53
4. Copy Beat ..........................................54
5. Initialize Beat ........................................54
6. Rename Beat ........................................ 54
7. Copy Bars ..........................................54
8. Insert Bars Into Beat ..................................54
9. Delete Bars from Beat .................................55
10. Change Time Signature of Beat .........................55
11. Rename Project .....................................55
12. Initialize Project .....................................55
13. Rename Playlist .....................................55
14. Copy Playlist ........................................55
Page 7

v
Tempest Operation Manual
15. Initialize Playlist .....................................56
Turn All Notes Off ....................................... 56
Save/Load. . . . . . . . . . . . . . . . . . . . . . . . . . . . . . . . . . . . . . . . . . .57
Project and Beat Compatibility with Older OS Versions .......... 57
Saving Sounds, Beats, and Projects ........................58
Loading Sounds, Beats, and Projects ........................59
Load Beat Options (including Loading Sound Kits) .............60
Loading sounds quickly from the Pads screen .................61
Exporting Sounds, Beats, and Projects ......................62
Importing Sounds, Beats, and Projects ......................66
Important: Import Notes ..................................66
Renaming Files ......................................... 67
Deleting Files ..........................................67
System Settings. . . . . . . . . . . . . . . . . . . . . . . . . . . . . . . . . . . . . .68
System: General ........................................68
System: Foot Pedals .....................................69
System: MIDI Remote Pad Play ............................70
System: MIDI Polyphonic Keyboard Play .....................72
4. MIDI: Sequencer Out Channel:
Off, 1…16—
Selects the channel used to
output MIDI note number messages from a Sound’s sequencer track. ....73
5. MIDI: Sequencer Sound:
A1…A16, B1...B16—
Used to choose the
Sound that plays on the MIDI: Sequencer Out Channel. ...............73
System: MIDI Clock .....................................73
System: MIDI System Exclusive ............................74
System: BPM/Swing/Comp/Dist Sources .....................74
System: UI Preferences ..................................75
Modulation Sources ..................................78
Modulation Destinations ...............................79
Samples ............................................80
Support .............................................85
Troubleshooting ........................................85
Contacting Technical Support ..............................85
Warranty Repair ......................................86
Page 8

vi
Dave Smith Instruments
Credits and Acknowledgement
For their samples, thanks to:
Angus Hewlett/FXpansion
Audio samples © 2007 FXpansion Audio UK Ltd. Used with permission.
www.fxpansion.com
Hugo Tichborne/Goldbaby
www.goldbaby.co.nz
Haptic Audio
www.hapticaudio.com
For Sound and Beat design:
Special thanks also to: Wade Dawson, Rory Dow, Peter Molettiere, and Riley Smith.
The DSI crew: Ashely Bellouin, Fabien Cesari, Bob Coover, Carson Day, Chris Hector, Tony
Karavidas, Mark Kono, Andrew McGowan, Joanne McGowan, Tracy Wadley, and Mark Wilcox.
Robert Baker
Mark Camp
Kosta Cross
Carson Day
Richard Devine
Michael Dietel
Peter Dyer
Mohamed Espinosa
Derrick Estrada
Shane Etter
Andrew Everding
Joshua Fielstra
Troels Folmann
Reek Havok
Jeremy Jacobs
jaswho?
Nathan Kampf
James Kojac
Kevin Lamb
Joe McGinty
Drew Neumann
Chris Randall
Robert Rich
Brian Tester
Jason Ware
Page 9

vii
Tempest Operation Manual
Page 10

viii
Dave Smith Instruments
Page 11

1
Tempest Operation Manual
What’s a Tempest?
What’s a Tempest?
Tempest is a professional drum machine that generates its sounds using six
powerful analog synthesis voices. It runs an innovative, performance-oriented
operating system that permits an extraordinary level of control to create, edit,
arrange, and manipulate beats and sounds in real time without ever stopping play.
We like to think of Tempest not just as a drum machine but rather as a new musical instrument for the real-time performance of beat-oriented music.
Here is a summary of some of Tempest’s innovative features:
• Complex and rich analog voice structure: two analog oscillators with
sub-oscillator, plus two digital oscillators (with a large bank of included
samples), lowpass lter with audio-rate modulation, highpass lter, VCA
with feedback, ve envelopes, two LFOs, and eight exible modulation
paths. Though optimized for drum sounds, it excels at tuned sounds as well,
and even doubles as a 6-voice analog keyboard synth. In addition to the six
direct voice outputs, there are stereo mix outputs and phones outputs, plus
two inputs for foot switches or expression pedals, MIDI in/out, and USB.
• The performance-oriented operating system, ninety panel controls, and
graphic OLED display work together to provide a tightly integrated, fast,
non-stop workow in which nearly all creation, editing, arrangement, and
manipulation operations occur in real-time without stopping play. A high
priority was given to producing the highest quality human feel, including
the ability to adjust swing timing in real time on playback.
• Sixteen pressure- and velocity-sensitive lit pads are arranged in a 2x8
conguration, providing easy access to all ngers and providing the ideal
compromise between the popular 4x4 and 1x16 arrangements for both realtime and step programming. The pads can be used to play sixteen drum
beats, sixteen sounds (for each of two banks), sixteen sound mutes, sixteen
velocity levels, or sixteen time steps (for step programming). The Roll
button permits creating drum rolls, or repeated groove patterns by varying
pad pressure during record, and doubles as a momentary “stutter” effect
when the pads are assigned to play beats, or as an arpeggiator when multiple
pads are pressed..
• Two pressure- and position-sensitive Real Time FX slide controllers permit
real-time recording of note or beat-wide sound parameter changes into the
drumbeat as you play. Real-time eects include stereo analog distortion
and compression, plus audio delay and beat “stutter”, both produced in the
sequencer in order to maintain the pure analog signal path.
Page 12
2 Quick Start
Dave Smith Instruments
Quick Start
The best way to get started is to watch our Tempest Quick Start video, presented
by Roger Linn. Visit www.davesmithinstruments.com/product/tempest/ to see
this and other helpful videos.
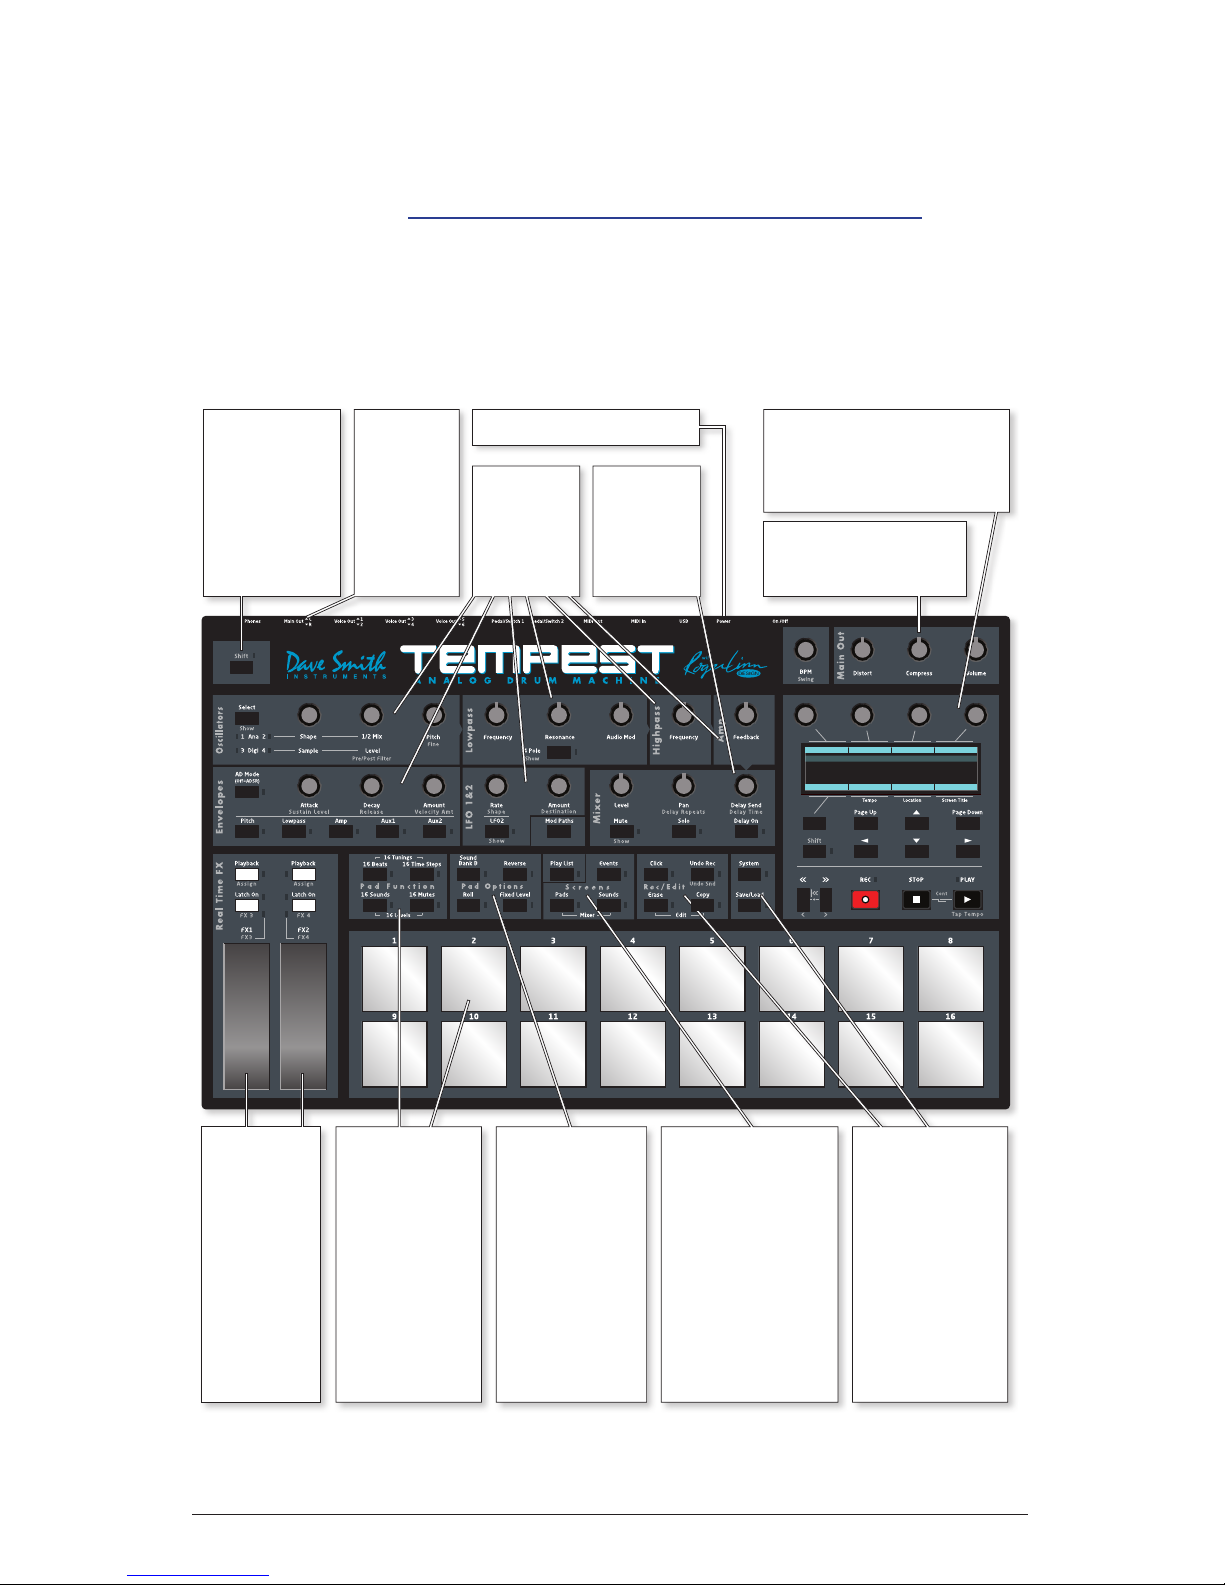
Overview of Panel Controls
Select Value
System
1. Click Level
2. One bar count in
3. Fixed Velocity level
4. Pedal 1 Mode
5. Pedal 1 Expr Pedal Asn
120
Off
120
Expr Pdl
Mod Src Expr Pdl1
Use position
and
pressure
sensitive
touch strips
to alter
either
sounds or
entire beats
in real-time.
The 16 pads
can be used
to play
16 drumbeats,
16 sounds,
16 time steps
for step record,
16 tunings,
16 mutes, or
16 volume
levels.
Select Bank A
or B sounds,
Roll for
repeating notes
or beat stutter,
Fixed Level to
defeat touch
sensitivity, or
Reverse to play
backwards.
Select what’s on
the screen: the
functions of the
pads, a grid
showing drumbeat
or play list events,
Sound settings, or
Mixer settings.
Play List plays a
programmed list
of beats.
Quickly erase
or copy sounds
or beats, undo
last edit, turn
click on/off, a
menu of editing
functions,
save/load to
internal flash or
MIDI/USB, and
system settings.
Hold either
Shift key to
select the
alternate
function
printed below
some controls.
Connect
stereo
outputs or
6 direct
voice
outputs to
mixer.
Adjust
synthesis
settings of
last sound
pad hit.
Adjust mix
settings of
last played
sound
pad.
Graphic OLED screen,
4 Soft Knobs, 1 Soft Key,
screen navigation keys,
Shift and Transport keys.
Set Tempo, Distortion,
Compression,
and Main Volume.
Connect power supply.
Page 13

3
Tempest Operation Manual
Quick Start
Sounds, Beats, and Projects
There are three terms that are important to know:
A Sound is a collection of all settings required to produce a drum or other type
of sound when you play a pad, including settings for samples, oscillators, lters,
VCA, envelopes, LFOs, and more. If the
16 SoundS key is pressed, you can use
the sixteen pads to play the Sound in the selected Beat. After you create a Sound,
you can save it as a Sound le for later reloading into another Beat.
A Beat is a collection of all settings needed to produce a drumbeat—a note
sequence up to eight measures of 4/4 time, thirty-two Sounds (sixteen in pad
bank A and sixteen in pad bank B), mixer settings, effect settings, and more.
Tempest holds sixteen beats in memory at one time. If the
16 BeatS key is
pressed, you can use the sixteen pads to play the sixteen Beats that are loaded in
memory. After you create a Beat, you can save it as a Beat le for later reloading
into another project.
Tempe st allows you to record up to 128 sixteenth notes (8 bars in 4/4 time).
A Project is a collection of nearly everything in memory: all sixteen Beats (each
containing its own thirty-two Sounds), four Play Lists, and various project-related
settings including the playing tempo.
Tempe st includes 928 factory Sounds, 64 Beats, and 16 Projects.
Going Deeper
There is important information throughout the manual, but pay particular attention to “The Pad Function Keys” on page 4 to gain a greater understanding
of Tempest’s pad modes and how to use them, and “The Screens Keys” on page
14 to learn how to access and interact with the various types of data on the
graphic display. It is highly recommended to read “Save/Load” on page 57. It
is extremely important and could save you a lot of grief!
Page 14

4 The Pad Function Keys
Dave Smith Instruments
The Pad Function Keys
16 Beats
If B is pressed, the sixteen pads are
used to play the sixteen Beats in memory. This
is useful for live arrangement and manipula
tion of Beats during performance. One beat
pad is always selected, indicated by its pad
being dimly lit. To start playing a Beat, press
Play. While playing, select another beat pad to
switch to it. To stop playing, press StoP.
If the
PadS key (in the Screens section) is lit, the following screen will be
displayed, showing the beat assigned to each pad, plus related information and
controls:
BtQuant: End Swing: 50.0%
Pad Hold: O
Proj: Saturday night gig
Intro
Busy
SwgBt
Break
SloFil
On2&4
4Kicks
BigBt
FillBt
Quiet
4hats
S wGrv
HlfTm
PwrBt
Brkbt
Endng
BtQuant: End BtRoll: 8thSwing: 50.0%
Pad Hold: O
Proj: Saturday night gig
Intro
Busy
SwgBt
Break
SloFil
On2&4
4Kicks
BigBt
FillBt
Quiet
4hats
S wGrv
HlfTm
PwrBt
Brkbt
Endng
Soft Knob 1:
Beat Quantize
When switching
between beat pads
while playing, the
transition will be
delayed until the
next bar, ½ note,
etc., set here.
Quantizaton can also
be set to “Off.”
Project & Beat
Displays the current
Project name
(everything in
memory) and
selected Beat name.
Soft Key: Pad Hold
If on, beats play only
as long as you hold
down a beat pad.
The Play key is also
momentary.
Short Names
Short names for each of
the 16 pads are shown
here. You can edit these
short names by using
the Edit function.
Soft Knob 2:
Swing
Varies the selected
Beat’s 1/16 note
Swing amount
from 50% (straight
1/16s) to 66%
(triplet swing) and
more.
Soft Knob 4:
Beat Roll
Hold the Roll key for
a Beat Roll, a stutter
effect in which a small
portion of the beat
loops. This setting
controls the duration
of the beat roll.
Page 15
5
Tempest Operation Manual
The Pad Function Keys
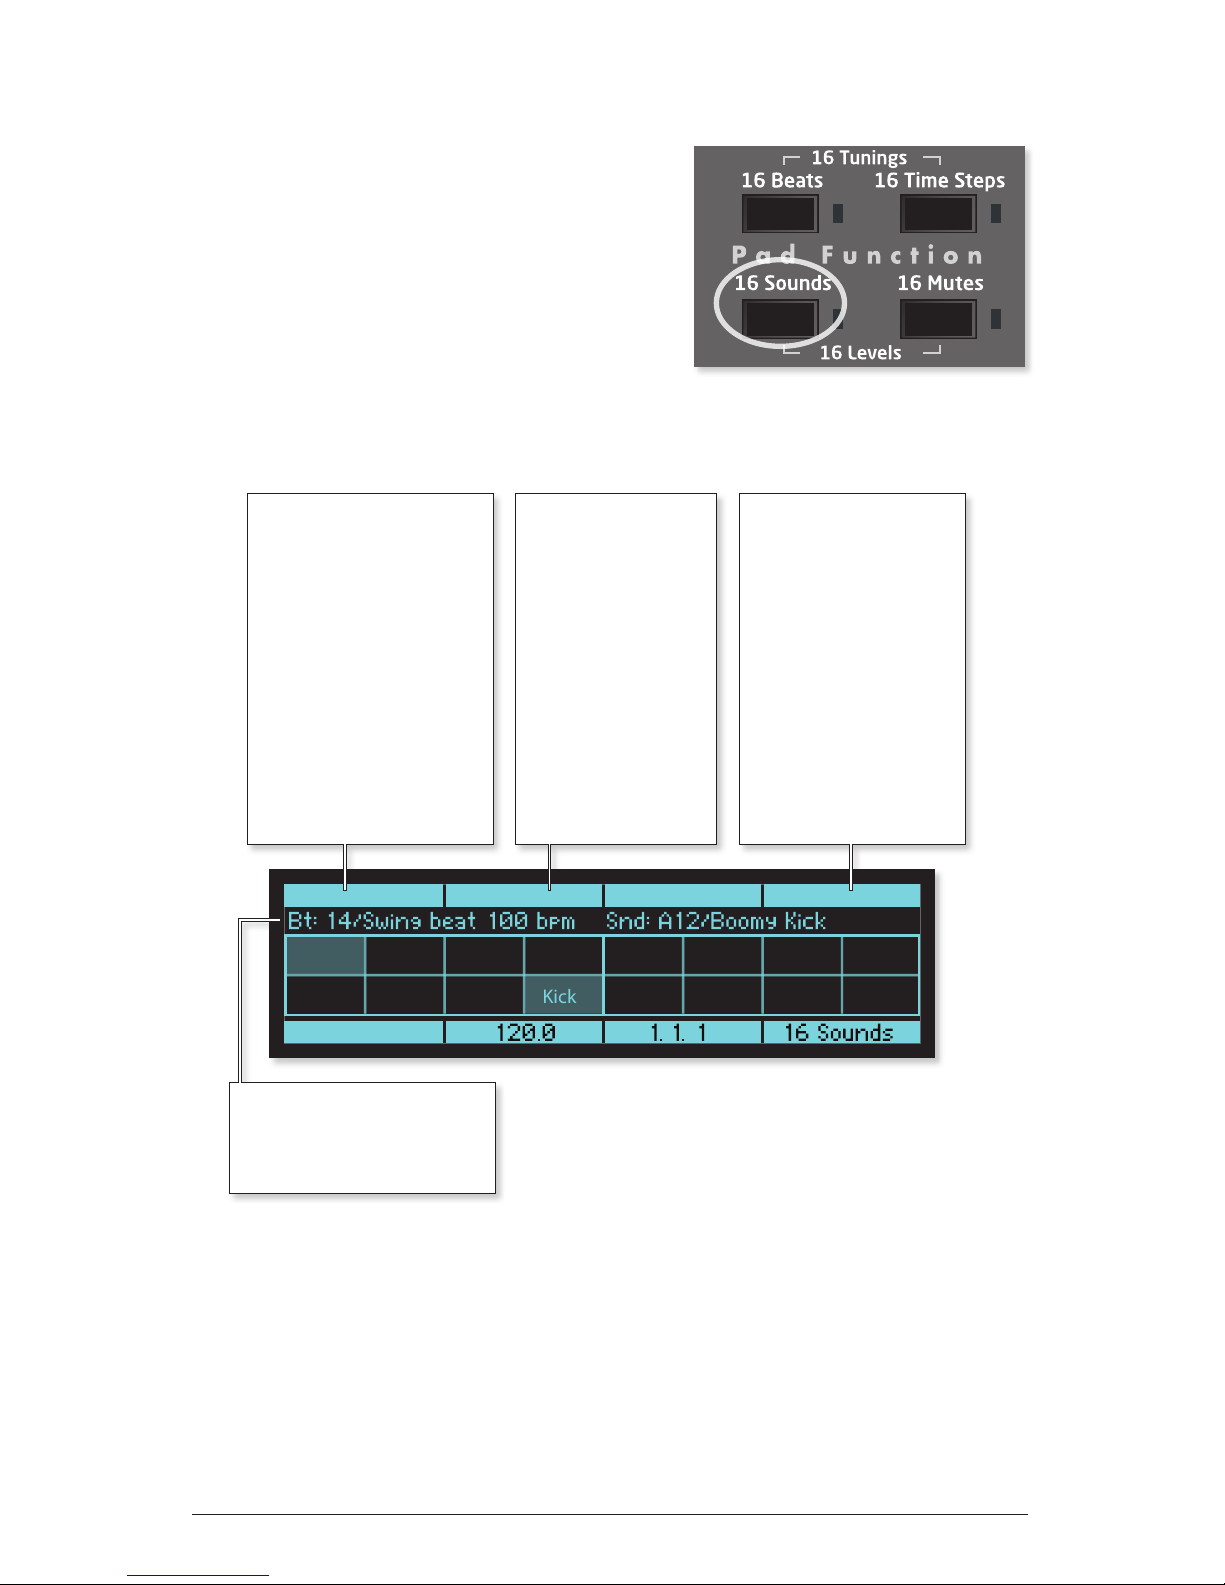
16 Sounds
If S is pressed, the sixteen pads are
used to play the sixteen Sounds (in either
Bank A or B) of the selected Beat. This is
useful for playing sounds, or for recording
sounds into beats in real time.
If the
PadS key (in the Screens section) is lit,
the following screen will be displayed, showing
what’s in each pad and other useful controls:
One sound pad is always selected, indicated by being dimly lit. Press a pad to
select it, or H St+pad to select it without hearing its sound. The sound
controls in the upper half of the panel (oscillators, lters, mixer, etc.) always
apply to the selected sound. Note the arrangement of sound types in the above
screen, which is optimized for playing the drum kit sounds with your hands
placed in the center of the pads. We suggest that you create your beats using this
same arrangement.
Quant: 8th
Revert Snd
Swing: 50.0% Sound Type Load Sound
Tamb
Shaker
Claps
Block
Rim
SftSnr
Snare
Kick
HhOpn
HhTite
TomHi
Crash
TomMid
Ride
TomLo
Splash
Soft Knob 1: Quantize
When recording Beats in
real time, notes are
moved to the nearest 1/8,
1/16 note, etc., set here.
This is also used for the
Note Roll rate, plus the
step size for the ‘Beat
Events’ screen and the
‘16 Time Steps’ pad
function.
Quantizaton can also be
set to “Off.”
Selected Beat & Sound
Displays the pad number
and name of the currently
selected Beat and Sound.
Soft Knob 2:
Swing
Varies the selected
Beat’s 1/16 note
Swing amount from
50% (straight 1/16s)
to 66% (triplet
swing) to 75%
(extreme swing).
54-58% gives a
relaxed 1/16 feel.
Soft Knob 3:
Sound Type
The center area
shows the
Sound Types
(Kick, Snare, etc.) for
the 16 Sounds in the
selected bank.
This knob permits
changing the
assigned sound type.
Page 16

6 The Pad Function Keys
Dave Smith Instruments
Sound Bank B
Sixteen additional Sounds can be stored and accessed per Beat for a total of 32.
Sounds in bank B are designated B1 through B16. Press
Sound Bank B to toggle
between banks A and B.
• While holding
CoPy to copy a sound, use Sound Bank B to switch between
banks.
• To erase a Sound in Sound Bank B from a Beat, select
Sound Bank B
before or after holding eRaSe, and then hit a pad to erase that sound.
Selecting Sounds by Category
For convenience, the sounds in Tempest’s internal sound set are grouped into
categories. This makes it possible to quickly navigate through these categories
to select the general type you’re looking for (kick, snare, etc.), then the specic
sound within that category.
To navigate the list of sounds by category:
1. In the Pad funCtion section, press the 16 SoundS button.
2. In the
SCReen section, press the PadS button.
3. Tap the pad to which you want to assign a sound.
4. In the display, turn soft knob 4 (
load Sound), then turn soft knob 3 (Sound
foldeR) to select a category. Turn soft knob 4 again (load Sound) to select a
sound within that category.
5. Repeat for additional pads as desired.
Page 17
7
Tempest Operation Manual
The Pad Function Keys
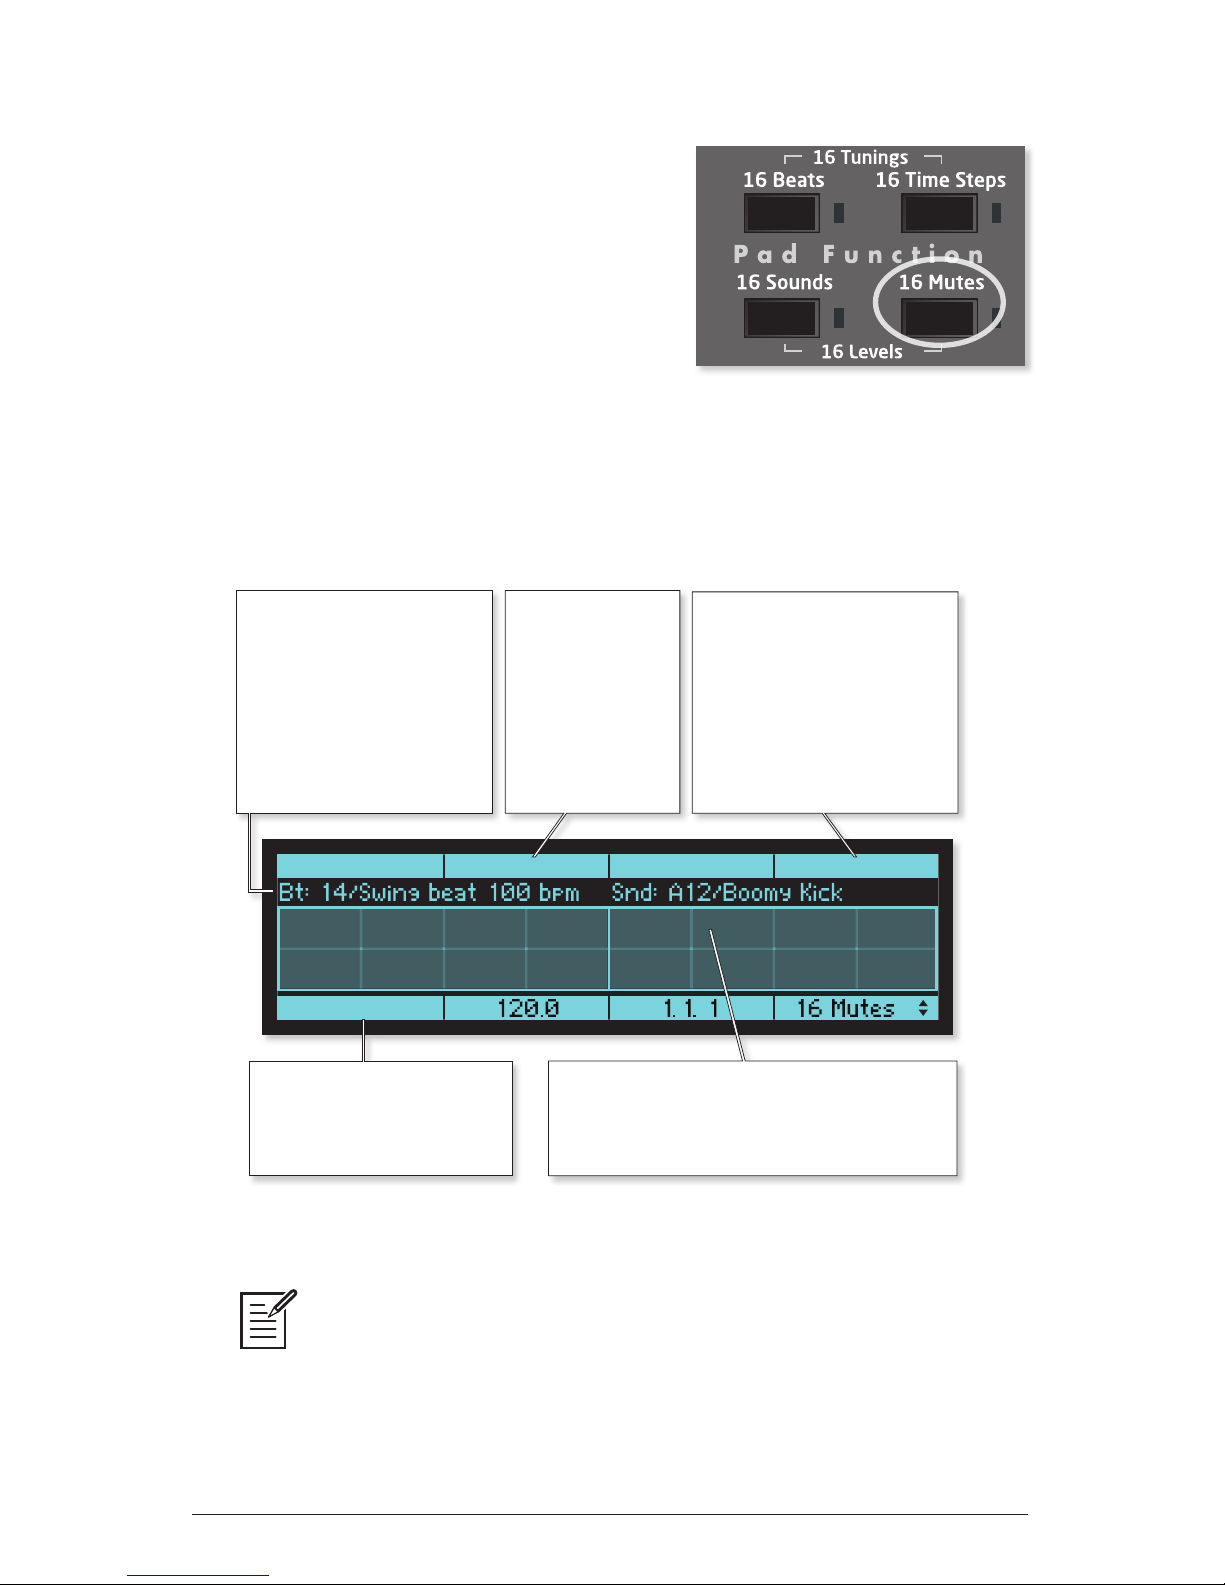
16 Mutes
If M is pressed, the sixteen pads act
as sixteen mute switches for playback of the
sixteen Sounds in the selected Sound bank (A
or B). is is useful for arranging the Beat’s
parts in real time while playing. A lit pad
indicates the Sound’s playback is on; an unlit
pad indicates it is off. Pressing a pad toggles
between on and off states.
If the
PadS key (in the Screens section) is lit, the following screen will be
displayed, showing the assignment of each pad and related controls:
When 16 Mutes is selected, the Real Time FX sliders and sound controls
affect beat-wide effects, just as they do when 16 Beats is selected.
Swing: 54%
All On
BtRoll: 8th
Tom1
Splash
Tom2
Crash
Tom3
Ride
Snare
Bass
HatOp
HatCl
Snar2
Bass2
Shaker
Claps
Tamb
Clave
Soft Key: All On
Pressing this soft key
unmutes all 16 Sounds in
the active bank.
Sound Types
The center area shows the Sound Types
for the 16 loaded Sounds, which can be
changed in the 16 Sounds screen.
Beat & Sound
Displays the selected
Beat and Sound. To
change the selected
sound, hold Shift while
pressing the pad that
holds the desired sound
in the 16 Sounds screen.
Soft Knob 2:
Swing
Varies the
selected Beat’s
1/16 note Swing
amount from
50-75%.
Soft Knob 4:
Beat Roll
Hold the Roll key for a
Beat Roll, a stutter effect
in which a small portion
of the beat loops. This
setting controls the
duration of the beat roll.
Page 18
8 The Pad Function Keys
Dave Smith Instruments
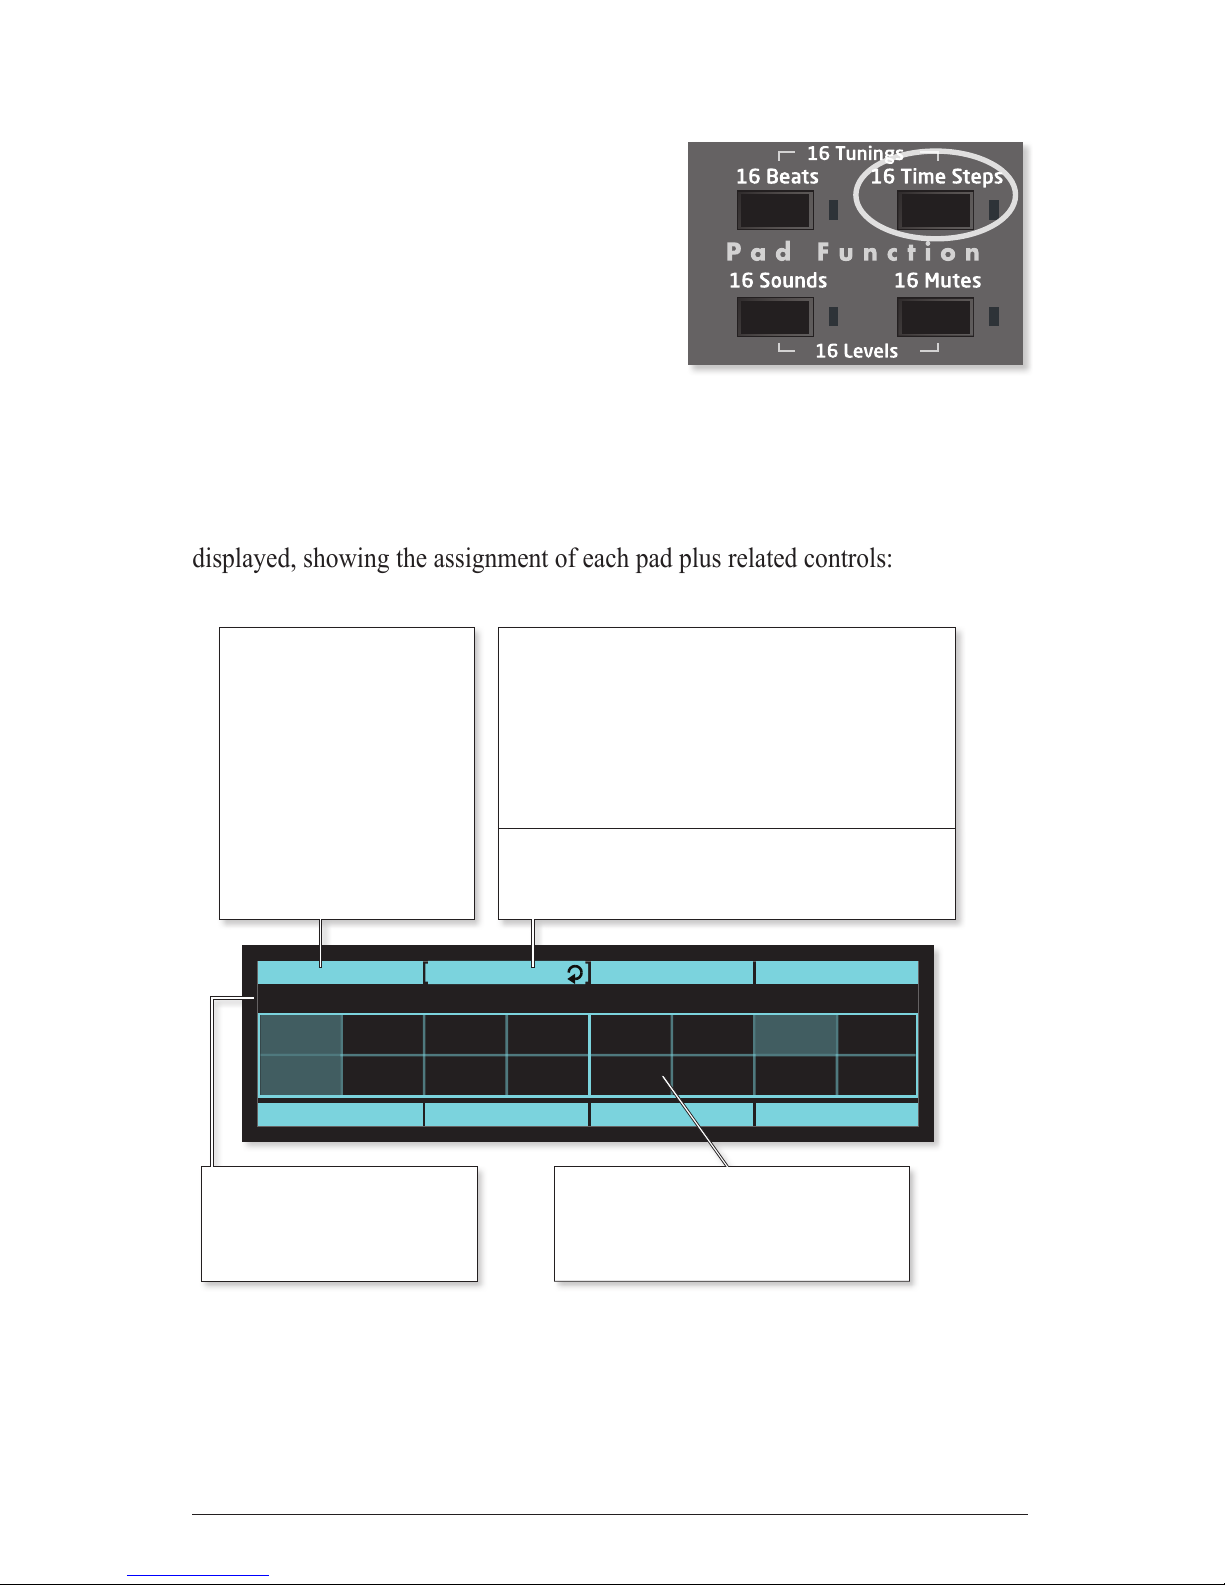
16 Time Steps
If 16 time StePS is pressed, the sixteen
pads represent sixteen time steps within
the beat, useful for step programming. A lit
pad indicates the presence of a note of the
selected sound, and an unlit pad indicates
its absence. Pressing a lit pad toggles
between deleting and inserting a note (of
the selected sound) at the pad’s assigned
location in time and at the velocity level at
which the pad was struck.
If the
PadS key (in the Screens section) is lit, the following screen will be
displayed, showing the assignment of each pad plus related controls:
Note that it is often more useful to view the Beat Events screen while step
programming your beats. See Beat Events on page 15.
Quant: 16th
All O 120.0 1.1. 1 16 Steps
1.1.1
1.3.1
1.1.7
1.3.7
1.1.13
1.3.13
1.1.19
1.3.19
1.2.1
1.4.1
1.2.7
1.4.7
1.2.13
1.4.13
1.2.19
1.4.19
Bt: 14/Swing beat 100 bpm Snd: A12/Boomy Kick
See: 1.1.1
Soft Knob 1:
Quantize
Same as the Quantize
setting in the 16 Sounds
screen, in this case it
sets the Time Step size
for the 16 pads to a value
between 8th notes
through 32nd triplets.
Quantizaton can also be
set to “Off.”
Selected Beat & Sound
Displays the pad number
and name of the currently
selected Beat and Sound.
Soft Knob 2: See
The screen can show only a portion of the
entire beat. For example, if Quantize=16th, the
16 pads show 1 bar of 4/4. Turning this knob
moves between displaying (seeing) sequential
time blocks within the beat. The circular icon
at right appears if LoopScreen is on.
Shift + Soft Knob 2: Loop Screen
If on, the time steps shown in the screen
are played in a loop.
Time Locations
This area shows the Time Location
of each of the 16 pads in
Bar.Beat.Tick format.
Page 19
9
Tempest Operation Manual
The Pad Function Keys
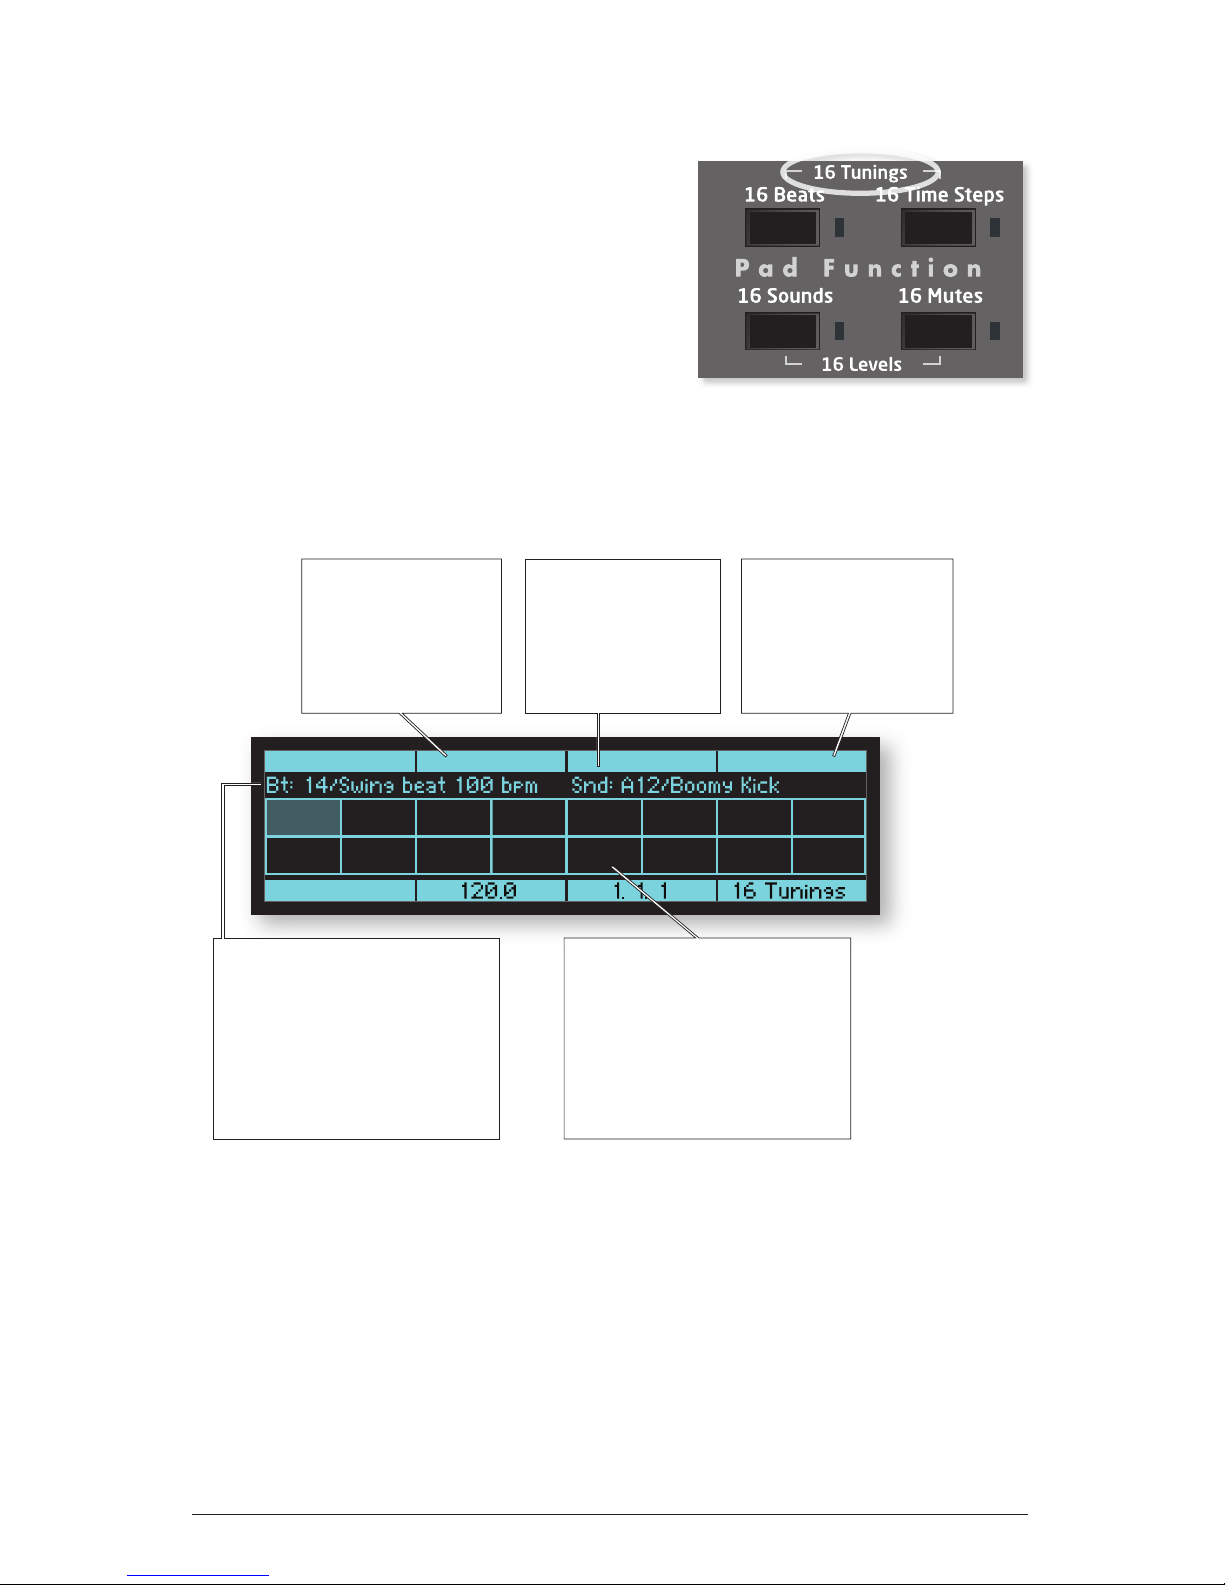
16 Tunings
If T is selected (by pressing the
B and T S keys together), the
sixteen pads play the selected sound at sixteen
different tunings. This is useful for playing
tuned parts like bass or melody lines.
If the
PadS key (in the Screens section) is
selected, the following screen is displayed,
showing the unique tuning for each pad plus
related controls:
C2
D3
D2
E3
E2
F3
F2
G3
G2
A3
A2
B3
B2
C4
C3
D4
MajorQuant: 4th +/- Octave Root: C2
Soft Knob 4:
Scale
Offers a variety of
musical scales for the
16 pads (major, minor,
chromatic, etc.)
Soft Knob 2:
Octave
Permits the pads’
tuning to be shifted
up or down in
octaves.
Beat & Sound
Displays the selected Beat and
Sound. To change the selected
sound (the sound that plays at
the 16 tunings), hold Shift while
pressing the pad that holds the
desired sound in the
16 Sounds screen.
Pad Tunings
Shows the tuning for each of
the 16 pads in the selected
scale.
Note that these won’t be the
actual notes played but rather
serves to indicate the relative
tuning between scale notes.
Soft Knob 3:
Transpose
Selects the root note
of the scale.
Page 20
10 The Pad Function Keys
Dave Smith Instruments
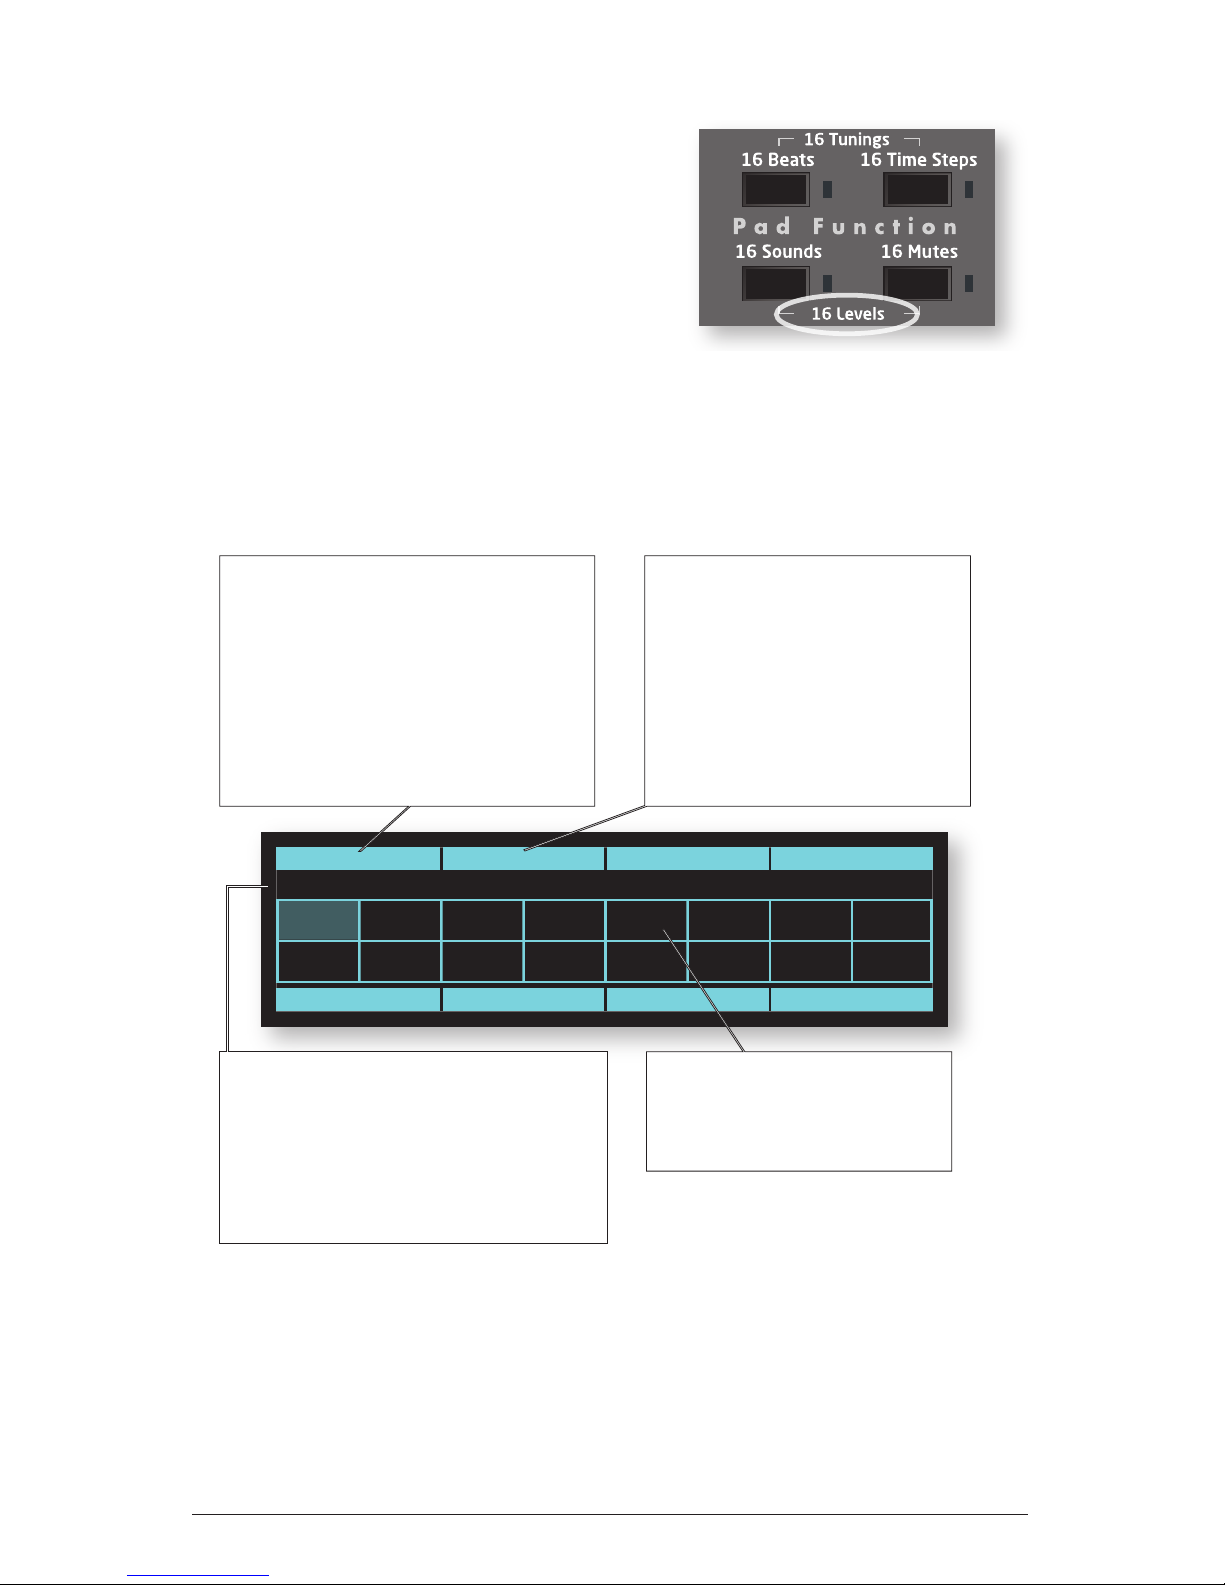
16 Levels
If L is selected (by pressing
S and M together), the sixteen
pads play a single Sound at sixteen evenly
spaced volume (velocity) levels. This is an
alternative to using the pads’ touch sensitivity
for playing and recording dynamics.
If the
PadS key (in the Screens section) is lit,
the following screen will be displayed, showing the velocity level for each pad
plus related controls:
8
72
16
80
24
88
32
96
40
104
48
112
56
120
64
127
Quant: 16 Swing: 50.0%
120.0 1.1.01 16 Levels
Bt: 14/Swing beat 100 bpm Snd: A12/Boomy Kick
Soft Knob 1:
Quantize
When recording Beats in real time,
notes are moved to the nearest 1/8,
1/16 note, etc., set here. This is also
used for the Note Roll rate, plus the
step size for the ‘Beat Events’ screen
and the ‘16 Time Steps’ pad function.
Quantizaton can also be set to “Off.”
Soft Knob 2:
Swing
Varies the selected Beat’s 1/16
note Swing amount from 50%
(straight 1/16s) to 66% (triplet
swing) and more. 54-58% gives
a relaxed 16th note feel.
Beat & Sound
Displays the selected Beat and Sound.
To change the selected sound
(the sound that plays at the 16 volume
levels), hold Shift while pressing the
pad that holds the desired sound in the
16 Sounds screen.
Velocity Levels
Shows the velocity level at
which each of the 16 pads will
play the selected sound.
Page 21
11
Tempest Operation Manual
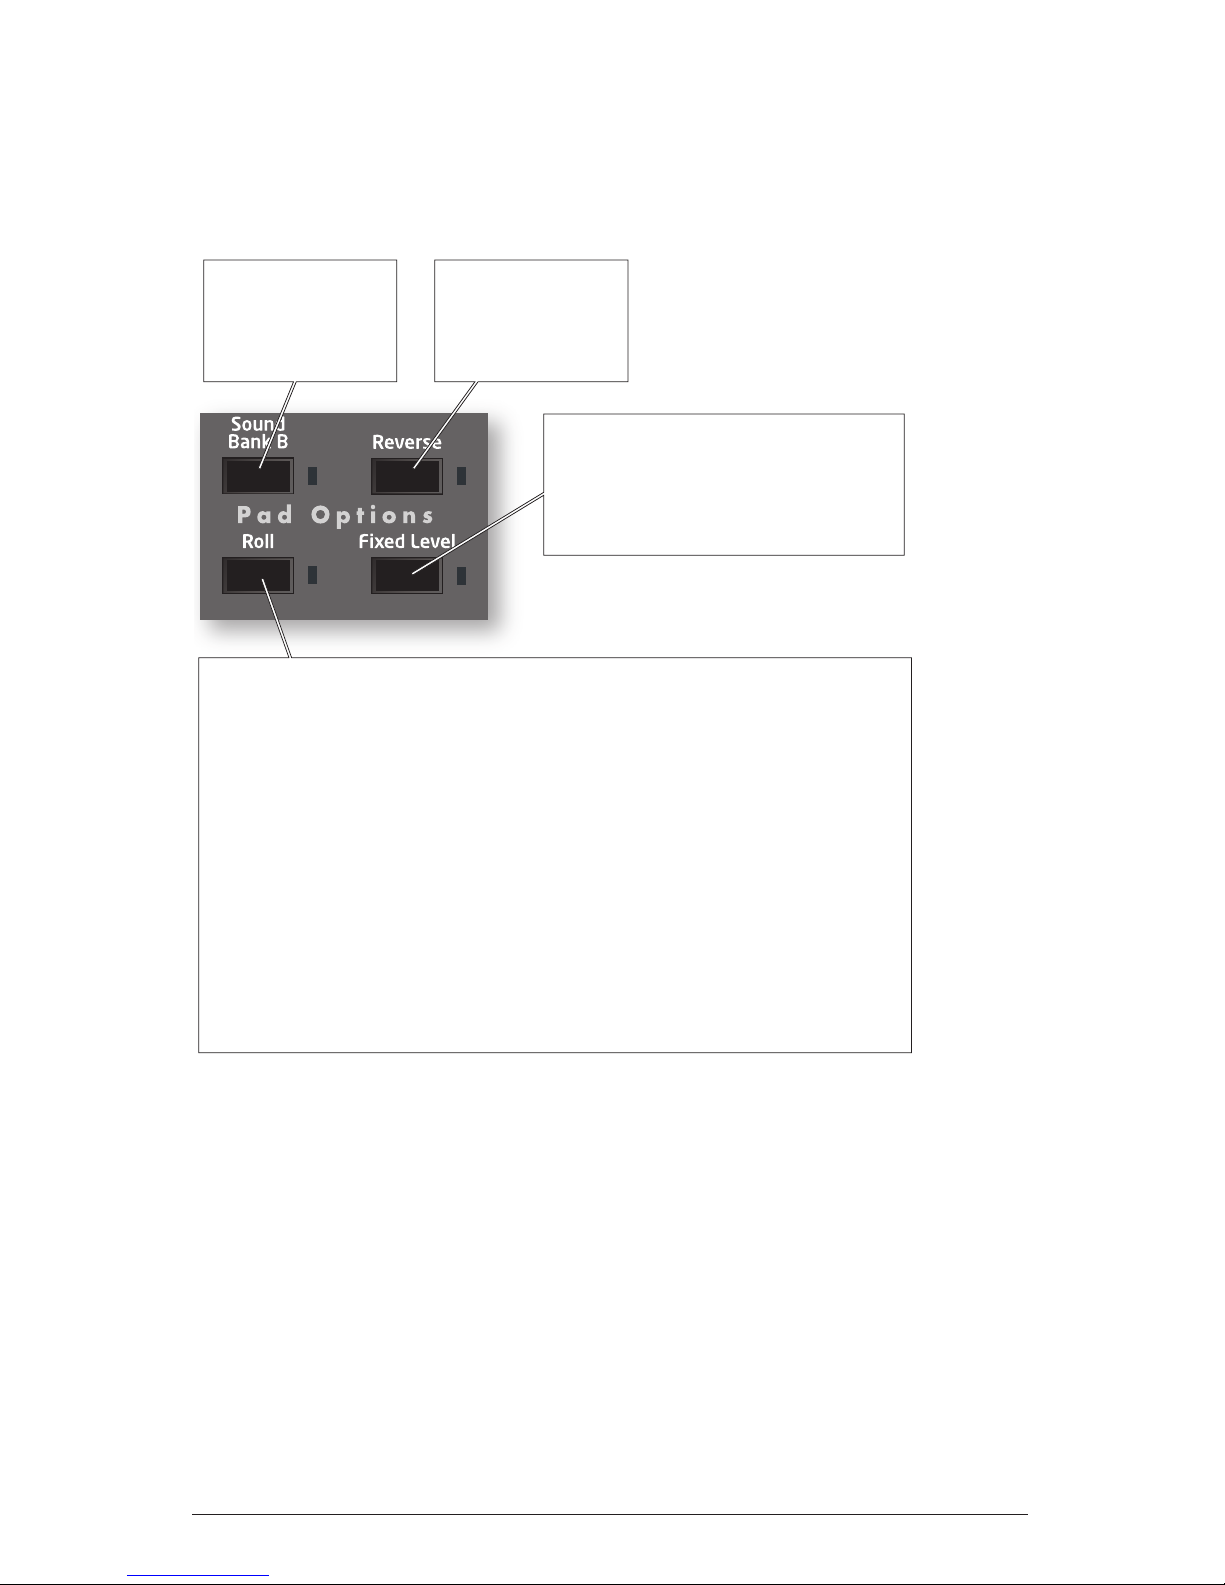
Pad Options
Pad Options
The buttons in this section provide a variety of useful tricks to get the most out of
using the pads for playing both sounds and beats.
Sound Bank B
Press to select an
additional bank of
16 sounds.
Reverse
When on, sounds
will play and record
in reverse.
Fixed Level
If off, sound pads are touch-sensitive,
playing louder when hit harder. If on,
sounds always play at a fixed velocity
level, set in the System settings.
Roll
If Pad Function = 16 Sounds, 16 Tunings or 16 Volumes:
While playing, if Roll is on and a sound pad is held, repeated notes will be
created at the Quantize rate
(Set in the 16 Sounds screen). Varying pad pressure varies the velocity
level of the repeated notes. Use 1/32 or 1/32 Triplet quantize for rolls, or
1/16 note quantize for natural-sounding 1/16 note hihat parts.
If Pad Function = 16 Beats:
If Roll key is held, the beat stutters, looping a short portion until released.
The roll rate of repeat is set by the Beat Roll setting in the 16 Beats screen.
(Select 16 Beats and Pads.)
The Roll key is normally momentary (on while held). However, a quick
press will toggle between on and off states.
Page 22
12 Pad Options
Dave Smith Instruments
Reverse Playback
R causes Sounds—even completely analog, non-sample-based Sounds—to
play in reverse by reversing the envelopes. (Sample-based Sounds also play the
sample in reverse.) ReveRSe is a real-time, performance control in 16 SoundS and
16 BeatS modes and it can also be recorded into a Beat on a per note basis.
While playing a Beat in
16 SoundS mode, turning ReveRSe on and playing a pad
will cause the Sound to play in reverse. While recording a Beat in 16 SoundS
mode, notes recorded with ReveRSe on will record and play in reverse.
Note: Reverse can also be programmed as a Note Event in the Beat Events
screen and can be turned on or off for individual notes. For details about the
Beat Events screen, see “Events key: the Beat Events screen” on page 15.
While playing a Beat in 16 BeatS mode, ReveRSe causes all of the Sounds in a
Beat—but not the Beat itself—to play in reverse.
Roll with Arpeggiation
Tempest’s Roll feature includes an arpeggiator. If you press and hold multiple
pads, the arpeggiator will play a repeating pattern based on the pads held. There
are several arpeggiation modes (up, down, random, etc.) that control the order in
which playback of the pads is repeated.
• In
16 tuningS mode, the arpeggiator will play a single sound but different
pitches depending on the pads held (and the individual tunings of each pad).
• In
16 SoundS mode, the arpeggiator will play different sounds according to the
sounds assigned to each pad held. (A good way to create random drumbeats!)
• In
16 levelS mode, the arpeggiator will play different velocities according to
the levels set on each pad held.
Page 23

13
Tempest Operation Manual
Pad Options
To use the arpeggiator:
1. In the Pad funCtion section, press the 16 tuningS button (or 16 S o u n dS or
16 levelS, depending on your purpose).
2. In the
SCReenS section, press the PadS button.
3. In the
Pad oPtionS section, press the Roll button.
4. Use soft knob 3 (
mode:aSSign) to set the arpeggiator mode.
5. Use soft knob 4 (
oCtaveS) to set the arpeggiator’s octave range (0, 1, 2).
6. Hold down multiple pads and press the
Roll button The arpeggiation rate is
controlled by the
BPm knob.
retrig is the default arpeggiator mode and is Tempest’s original Roll behavior.
Arpeggiator Parameters
Mode: Assign:
Sets the order in which notes play. See the table below.
Retrig Retriggers the sound on the pressed pad. (Tempest’s original roll behavior)
Up Plays from the lowest-numbered pad to the highest-numbered pad
Down Plays from highest-numbered pad to the lowest-numbered pad
Up + Down Plays from lowest to highest and back to lowest
Assign Plays in the order the pads were pressed
Random Plays in random order
Octave Range: 0 Octave, 1 Octave, 2 Octaves—
Set to 0, the sounds are
repeated only within their original octave. Set to 1 Octave, the sounds arpeggiate
in their original octave and one octave above. Set to 1 Octave, the sounds arpeggiate in their original octave plus one and two octaves above.
octave range applies to arpeggiated synth sounds, not drum samples.
Page 24
14 The Screens Keys
Dave Smith Instruments
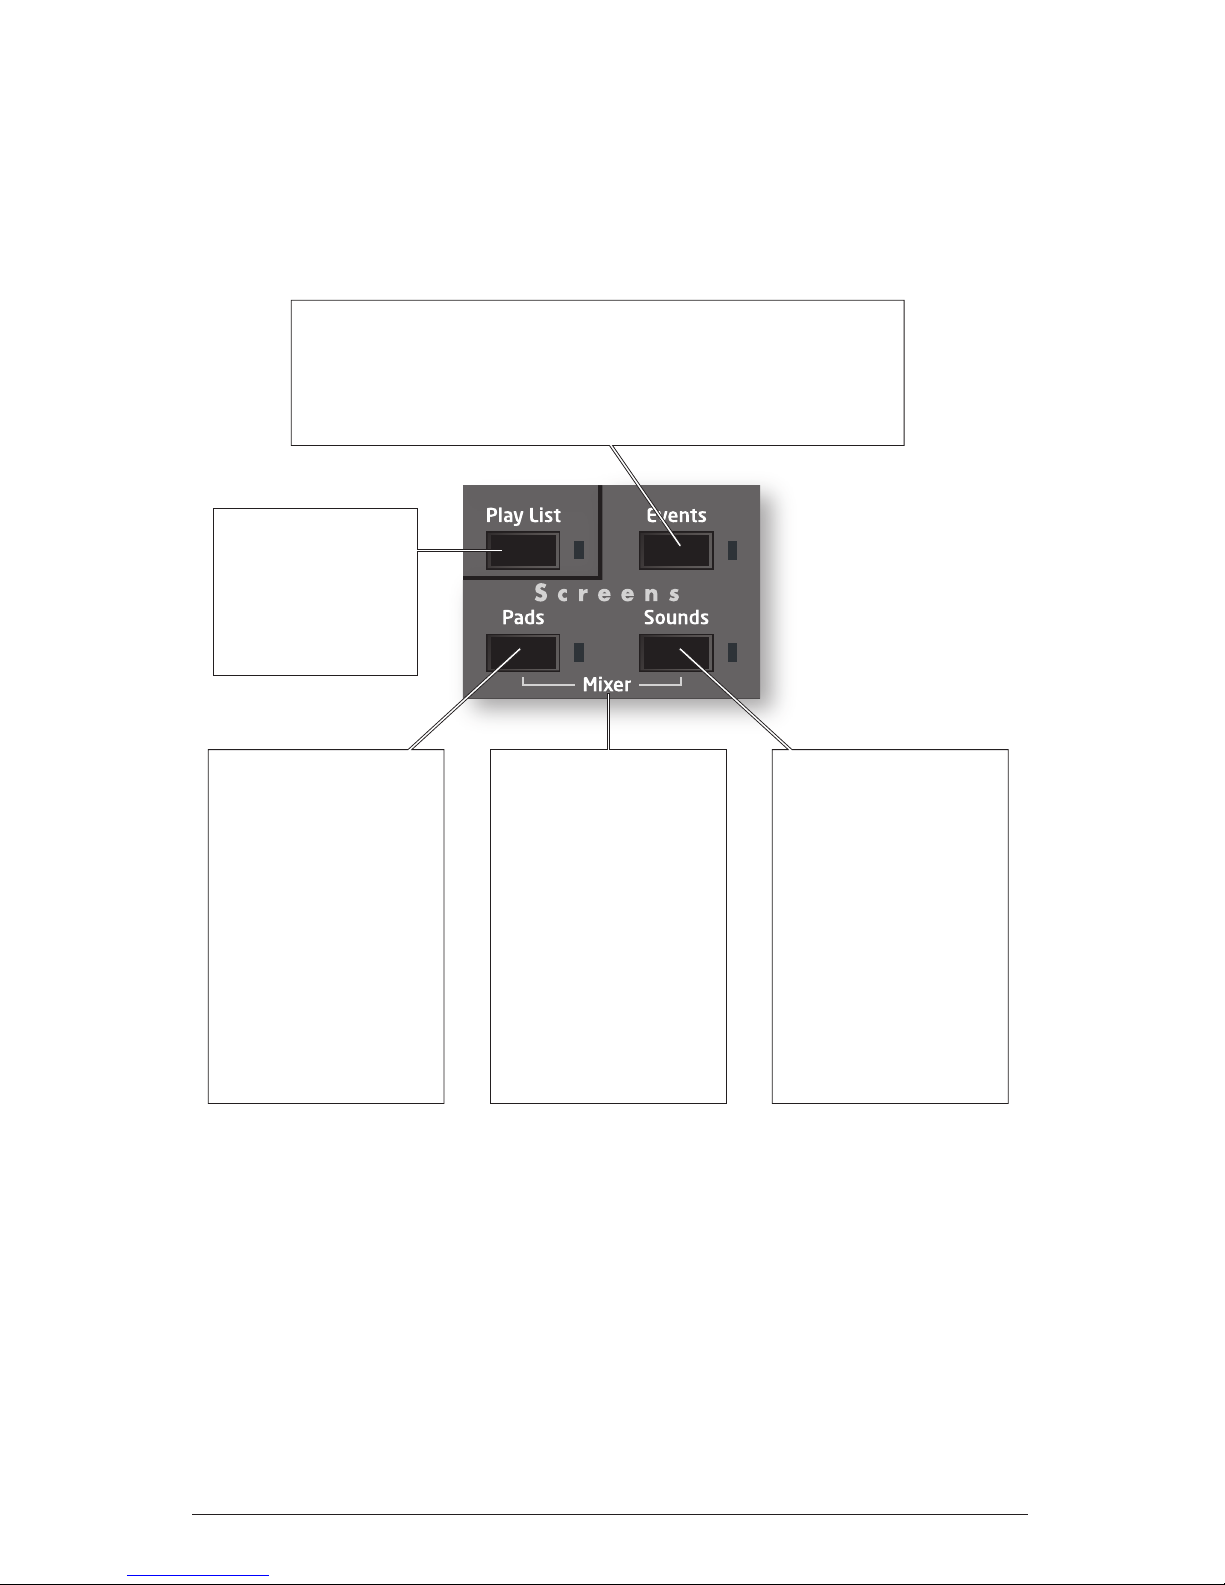
The Screens Keys
Tempest’s graphic OLED screen can display a variety of different types of
information. The keys in this section are used to determine which information it
displays.
The Events key
This displays the Beat Events screen, containing either a grid
view of the beat’s note events (if Play List is off) or a scrolling
list of Play List events (If Play List is on). This is described on
the following page.
The Sounds key
One of many screens
is displayed, showing
the various parameters
for oscillators, filters,
VCA, envelopes, LFO
and modulation paths.
To see and learn about
these screens, read
the Sound Controls
section of the manual.
The Play List key
This function allows
you to create 4 lists
of up to 99 Beats
each that play back
in sequence.
Mixer and Effects
(press Pads and
Sounds together)
One of four screens is
displayed, showing the
various mix param-
eters. To see and learn
about these screens,
read the Mixer and
Effects section of the
manual.
The Pads key
A 2 x 8 matrix is
displayed, showing the
function of each of the
16 pads.
Different information is
displayed depending
on which of the 6 Pad
Functions is selected.
See the description of
each Pad Function to
learn about each
screen.
Page 25

15
Tempest Operation Manual
The Screens Keys
Events Key: The Beat Events screen
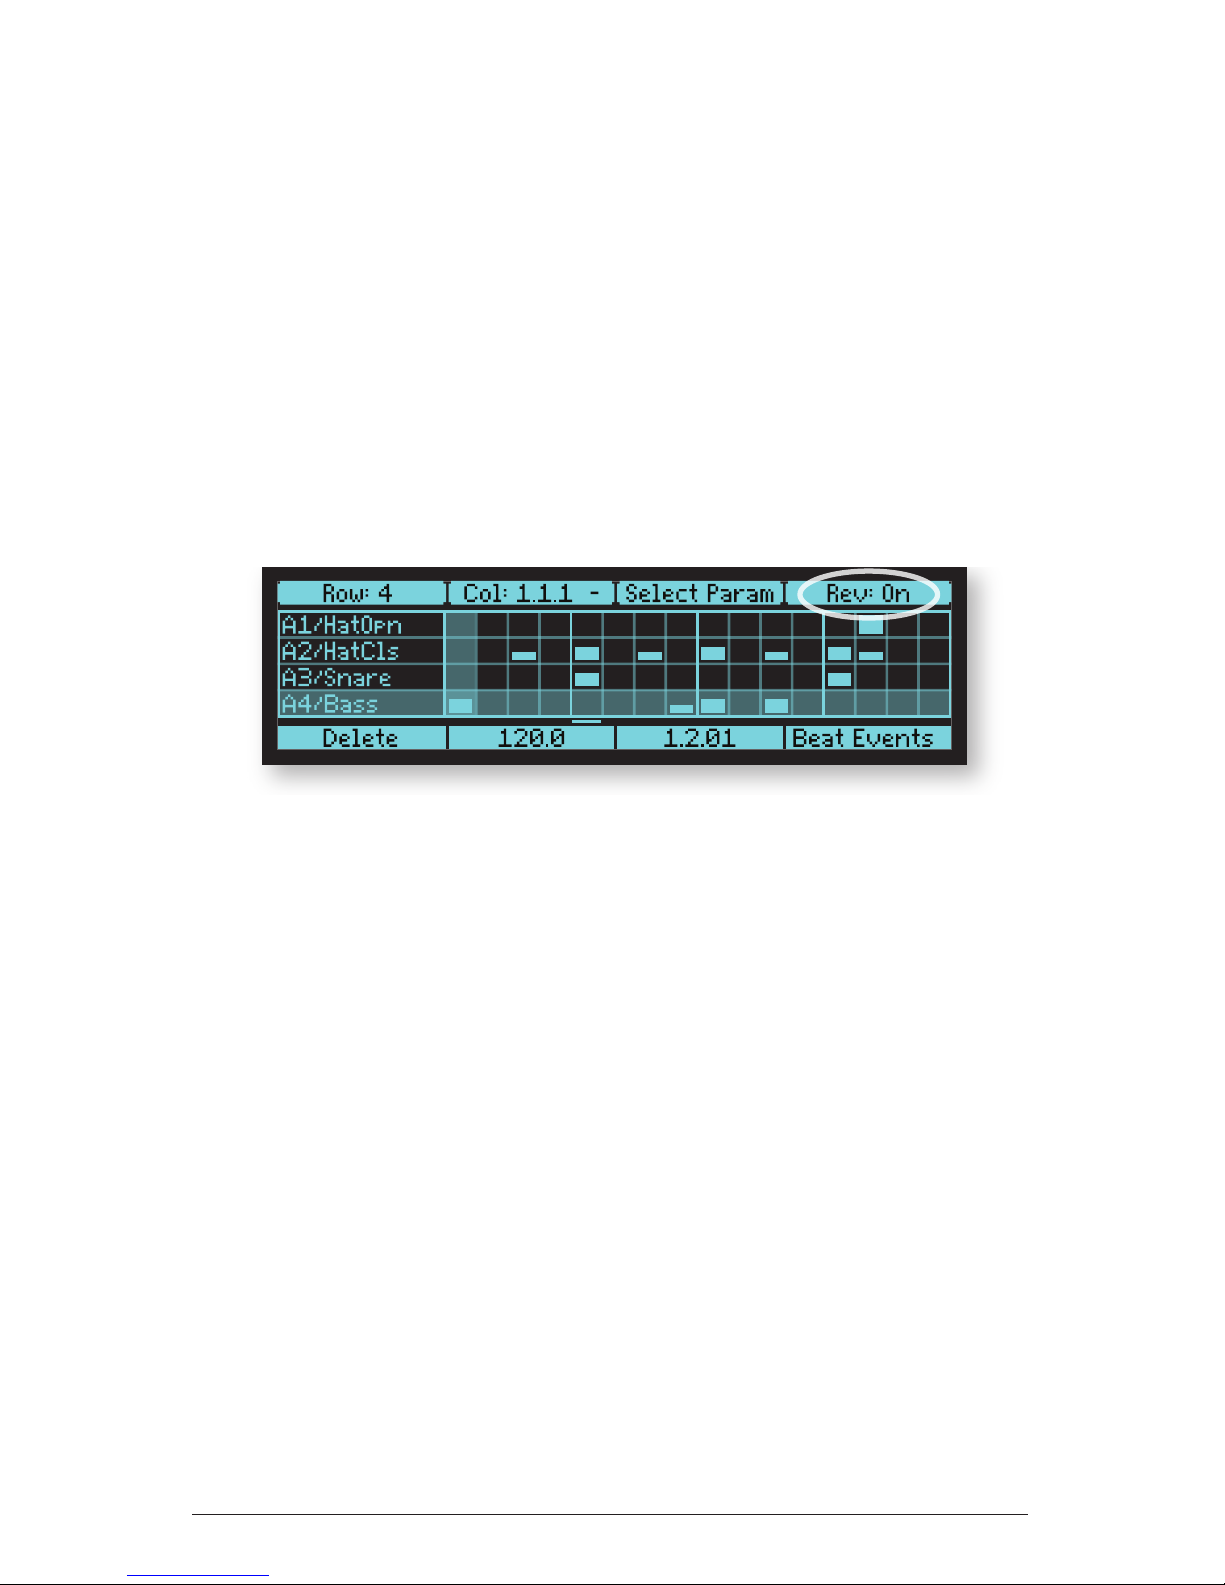
If the eventS key is pressed, the Beat Events screen will be displayed. The Beat
Events screen is used for visual programming and editing of beats. This screen is
displayed on page 17.
The Beat Events screen contains a 4 x 16 grid with a row for each of four Sounds
in the Beat, and sixteen columns representing sixteen time locations within the
Beat. A rectangle in one of the cells indicates the presence of a note event of the
row’s Sound at the column’s time location. The height of this rectangle indicates
the velocity level of the note.
The grid acts as a window into the larger beat, showing four Sounds/rows out of
thirty-two, and sixteen time locations from the total Beat’s length. To view the
previous or next block of time, press the
Page uP or Page down keys. To view
higher or lower rows of Sounds, turn the Row soft knob.
To Edit a Note Event:
• Press Shift + turn Soft Knob 3 (Quantize) to adjust the size of each time
step (column) from 8th notes to 32nd triplets.
• Use the
Row and Column soft knobs to select the note’s row and column.
• Use the
SeleCt PaRam Soft Knob to select which of the note parameters you
wish to view for editing: Velocity, Duration, Tuning, Note FX1, Note FX2,
Note FX3, Note FX4, Time Shift or Reverse).
• The selected parameter of the selected note will appear in the Soft Knob 4
rectangle. Edit the value with Soft Knob 4.
• To play only the displayed region in a loop, hold
Shift and turn Soft Knob 2
to the right to turn on Loop Screen.
• The Soft Key is used either to insert a new note in an empty cell, or to
delete an existing note.
Note that the Beat Events screen can be displayed while any of the six Pad Func
tions is selected. It is especially useful for step programming when Pad Function
is set to 16 time StePS.
Page 26

16 The Screens Keys
Dave Smith Instruments
Note Event Parameters
The nine note event parameters are described below:
•
Velocity
- note veloCity value to be used by various modulation
destinations in the synth engine (0-127).
•
Duration - note duRation in 24 PPQN increments (parts per quarter note),
used to gate the envelope generators (1-255). When ADSR envelopes are
used, the duRation determines the time period before the Release envelope
phase begins.
•
Tuning - Changes the Pitch of the note in semitones (-60 to +60).
•
FX1, FX2, FX3, FX4 - note fX 1-4 directly control the note fX
deStinationS as assigned in the Note FX menu. (See “Note FX” on page
47 for additional details).
•
Time Shift - Tempest’s sequencer resolution is 96 PPQN.
time Shift allows a note to be shifted +/- 3 parts. At 120 BPM, 1 part equals
about 5.2 milliseconds.
•
Reverse - ReveRSe allows you to reverse individual notes in a Beat.
Reverse causes Sounds—even completely analog, non-sample-based
Sounds—to play in reverse by reversing the envelopes.
Page 27
17
Tempest Operation Manual
The Screens Keys
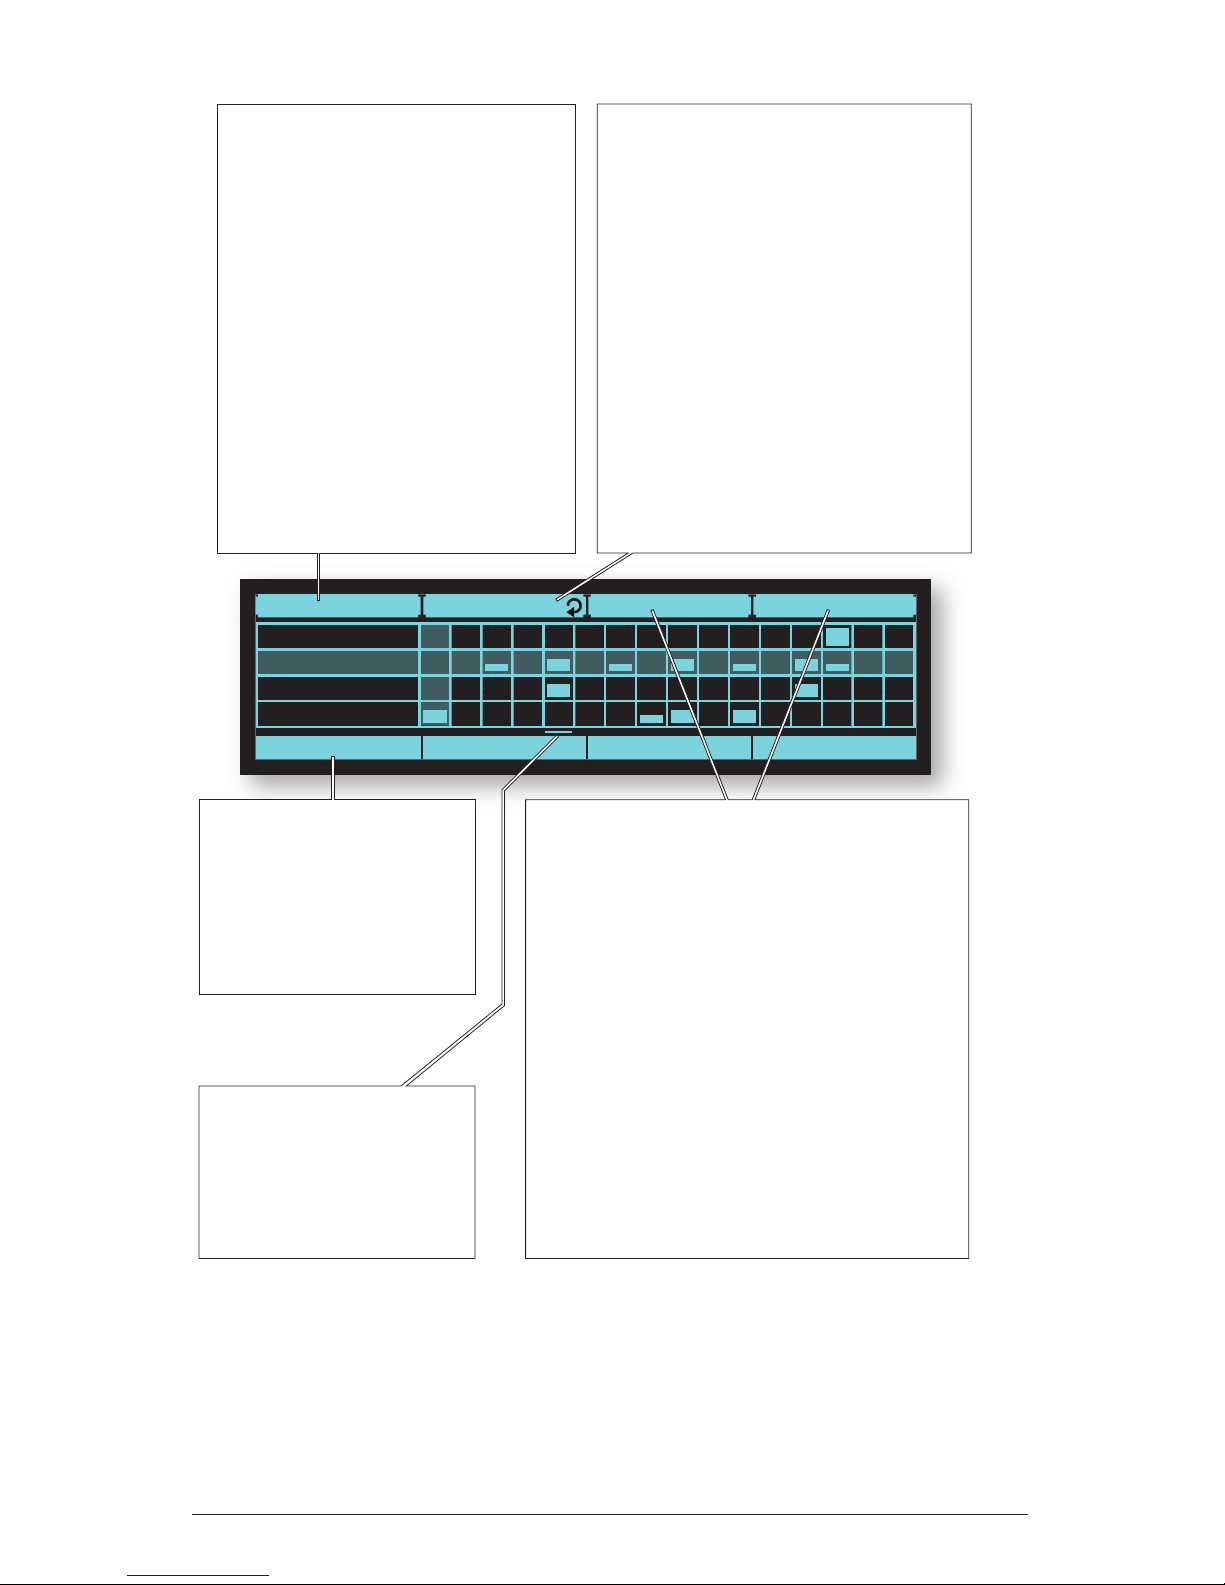
NOTE EVENT CALLOUTS
Select Param Vel: 67Col: 1.1.1
Insert 120.0 1.2.01 Beat Events
A1/HatOpn
A2/HatCls
A3/Snare
A4/Bass
Row: 2
Soft Knob 2: Column
The columns represent time
locations. Turn this knob (or press
the left/right arrow keys) to select a
time location, shown as a
bar.beat.tick number in the Soft Knob
2 rectangle. To view the previous or
next block of time, press the Page
Up/Down keys. The circular icon
indicates the Loop Screen status.
Shift + Soft Knob 2: Loop Screen
If on, the contents of the screen plays
in a loop, useful for fast editing. If on,
the Loop Screen icon appears
whether Shift is on or off.
Soft Knobs 3 & 4: Select Param & Edit
Each note event contains 9 data: velocity,
tuning, duration, FX1, FX2, FX3, FX4, time
shift and reverse. To edit the note event at
the intersection of the selected row and
column, use soft knob 3 to select one of
these 9 parameters, then use soft knob 4 to
edit the current value of the selected
parameter.
Shift + Soft Knobs 3&4: Quantize & Swing
Quantize sets the time resolution of the grid,
from 8th notes to 32nd triplets. Triplet values
show 12 columns instead of 16. This also
sets the note value for real time quantize
recording, Note Roll and the 16 Time Step
pad function.
Soft Key:
Insert or Delete
If no note exists at the
selected grid cell,
this key inserts a new note.
If a note exists in the
selected cell, it deletes it.
The Play Cursor
This horizontal line moves
as the beat plays, indicating
the current playing location
(same as the Location
display) within the beat.
Soft Knob 1: Row
The 4 rows of the grid represent 4
of the beat’s sound pads. Turn this
knob (or press the Up/Down Arrow
keys) to select a different row. If
turned past the bottom or top of the
screen, the screen scrolls up or
down to reveal higher/lower sound
pads.
Shift + Soft Knob 1: Assign Row
Often the 4 sounds you wish to edit
aren’t contiguous and therefore
can’t all be edited in the same
screen. Turning this knob permits
the selected row to be reassigned
to any of the 32 sound pads.
Page 28
18 The Screens Keys
Dave Smith Instruments
Play List
The Play List function enables you to create lists
of beats that automatically play back in sequence.
Though this feature has existed in drum machines
for many years, Tempest takes it further: in addition to manually entering a list of beats, you can
also create play lists by recording your live beat
arrangements (switching between beat pads while
playing) in real time.
Each project in Tempest contains 4 play lists, each of which contains up to 99
steps. Each step contains a beat number (1-16) and the number of bars that beat
will play. Each play list can be set to either stop or loop back to an earlier step
when it plays past its last step. Play lists can not be saved as a separate le, but
rather are saved as part of the project when the project le is saved.
The
Play liSt button toggles Play List mode on or off. If off, the selected beat
will play when Play is pressed. If on, the selected Play List will play when Play
is pressed.
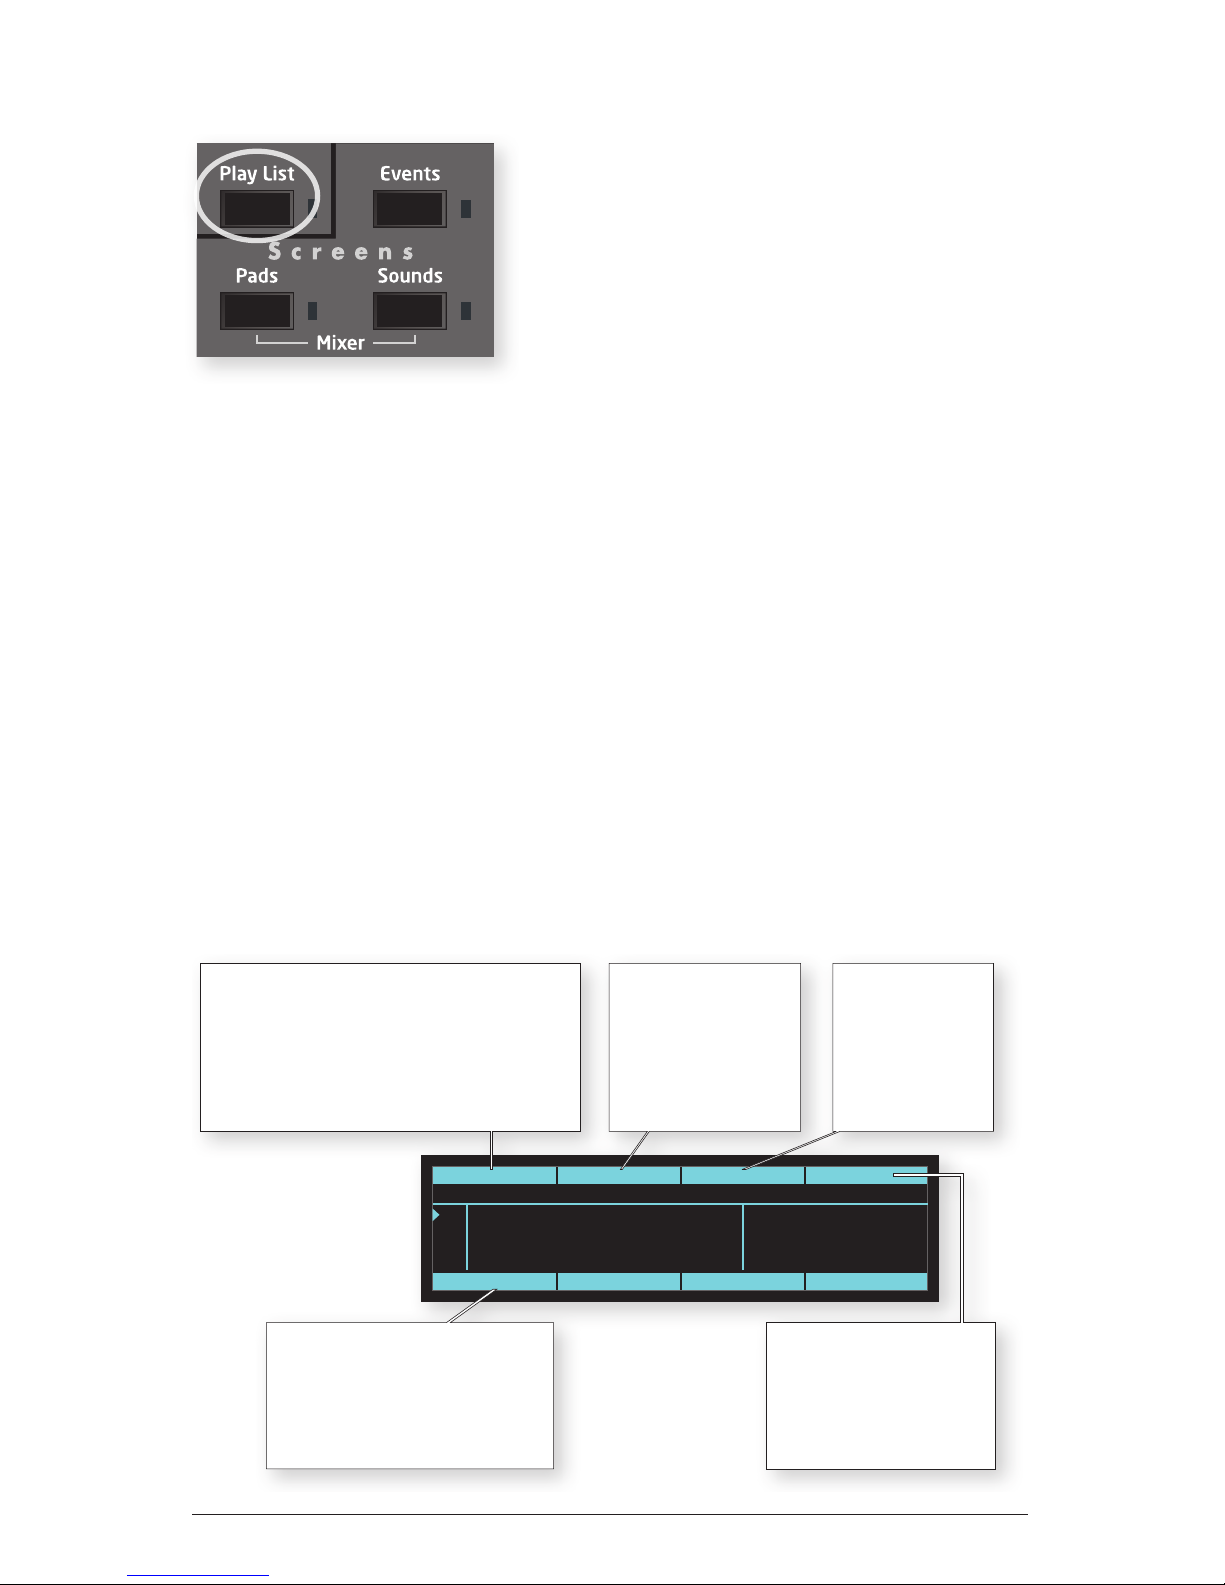
The Play List screen
To view the Play List screen, press the Play liSt button, then press the eventS
button. Note that if Play liSt is off, pressing the eventS key displays the Beat
Events screen. If Play liSt is on, pressing the eventS key displays the Play List
Events screen.
PlyList EvntsInsert Step 120.0 1. 1. 1
Step BarsBeat End
2 5/Basic 4-count beat
1 12/Four hihat ticks
7 bars (Bar 2)
1 bar (Bar 9)
1 bar (Bar 1)
3 3/Basic beat with fill
4 -
Play List: 1/Favorite arrangement End: Loop to Step 2
Soft Key
Insert
Pressing this will insert a new step into
the play list before the selected step.
All subsequent steps will be moved up
(down on the screen) by one step to
make space for the new step.
Soft Knob 1:
Select Step
Turning this knob changes which step is selected
for editing. The selected step is highlighted. Turning
the knob past the bottom or top of the screen
scrolls the screen contents to reveal higher or lower
numbered steps. You can also select a different
step by using the Up and Down Arrow keys.
Soft Knob 2:
Beat
Turning this knob
changes the beat number
for the selected step.
The pad associated with
the selected beat is
illuminated.
Soft Knob 3:
Bars
Turning this knob
changes the number
of bars that the
selected step’s beat
will play.
Soft Knob 4:
End
Turning this knob selects what
will happen when the play list
plays to its end. The options
are Stop or Loop To Step x
(any step within the play list).
Page 29

19
Tempest Operation Manual
The Screens Keys
If Shift is on, the soft key and soft knobs 3 and 4 change their function as shown
below.
The center area of the screen displays a scrolling window of 4 steps within the
selected play list. Each step contains the beat number (1-16) and its name, the
number of bars it will play, and the calculated start bar for that step. A triangle on
the left edge of the screen indicates which step is currently playing. The high
-
lighted step indicates that it is selected for editing. The Location eld (bottom of
the screen) displays the bar.beat.tick location within the play list instead of within
the beat.
PlyList EvntsDelete Step 120.0 1. 1. 1
Step Select ListBeat RT Rec: Off
2 5/Basic 4-count beat 7 bars (Bar 2)
1 bar (Bar 9)3 3/Basic beat with fill
4 -
Play List: 1/Favorite arrangement End: Loop to Step 2
1 12/Four hihat ticks 1 bar (Bar 1)
Soft Knob 3:
Select List
Turning this knob allows
you to select one of the
four Play Lists.
Soft Knob 4:
RT Record Off/On
When Real-time Record is Off, Play Lists can only be created
manually by entering data into the Play List screen.
When RT Rec is On, you may create a Play List by recording a
live beat arrangement, described on page 18.
This is a System parameter so it always remains as set even
after loading a new Project file.
Note: Keep this set to Off when not recording real time play lists,
in order to prevent accidentally overwriting your play list steps.
Soft Key
Delete
Pressing this will delete
the selected step from
the play list.
All subsequent steps will
be moved up by one step
to fill the deleted step.
SHIFT ON
Page 30

20 The Screens Keys
Dave Smith Instruments
Creating a Play List by Manually Entering Steps
To create a play list manually:
1. Press
Play liSt to turn on Play List mode. Display the Play List screen by
pressing the
eventS key.
2. If the play list contains steps, either a) delete all steps one at a time [
Shift +
soft key], or b) select a different, empty play list [Shift + soft knob 3] or c)
from the edit menu, initialize the entire play list.
3. Using the
SteP soft knob, select step 1.
4. Using the
Beat soft knob, select the beat you wish to play during this step.
5. Using the
BaRS soft knob, select the number of bars you want this step to
play within the play list.
6. Using the
SteP soft knob, select the next higher step.
7. Repeat steps 4 through 6 for each additional step you wish to add to the play
list.
8. Using the
end soft knob, select either a) StoP or b) looP to SteP X [any
earlier step], depending on what you wish to happen when the play list plays
past the last step.
9. Press
Play to play your new play list.
Creating a Play List by Recording a Live Beat Arrangement
One of Tempest’s performance features is the ability to switch between beats
during performance by simply pressing beat pads. As an alternative method of
creating a play list, Tempest can automatically record these live beat arrangements, recording each beat change and its duration into successive steps of the
play list. Here’s how to create a Play List in this way:
1. Press
16 BeatS.
2. Press
Play liSt to turn on Play List mode. Display the Play List screen by
pressing the eventS key.
3. Set soft knob 4 (
end) to looP to SteP 1 so that when the new play list plays
past its end, it will automatically loop back to step 1.
4. With
Shift on, set soft knob 4 (Rt ReC) to on, then turn Shift off.
Page 31

21
Tempest Operation Manual
The Screens Keys
IMPORTANT: With Rt ReC set to on, when you start recording your live
beat arrangement, any existing steps in the play list will be overwritten! If
you’re not creating a play list by recording your live beat arrangement, it’s
better to keep this set to
off in order to avoid accidentally erasing your play
list steps by unintentionally entering Record mode.
5. Press the beat pad that you want your play list to start with.
6. Press the
ReCoRd button to turn Record mode on.
7. Press
Play to start recording your live beat arrangement into the play list.
The selected beat will automatically be entered into step 1 of the play list.
8. When you want to hear a different beat, press a new beat pad. Notice that
the previous step’s
BaRS duration is now set to the number of bars that the
previous beat played, and the next step’s Beat eld has been lled with the
new beat you just selected.
The new beat will start playing at the next Beat Quantize boundary. When
recording live beat arrangements into play lists, if Beat Quantize is set to anything
shorter than Bar, it is internally forced to Bar. This is because the play lists can
change between beats only at bar boundaries.
Repeat step 8 for each additional beat change that you want your play list to
contain.
During the last bar of your beat arrangement, do one of the following:
• Press S
toP, then press ReCoRd to turn Record mode off. Press Play and your
newly created play list will start playing from the beginning.
• Press
ReCoRd to turn Record mode off. At the next Bar boundary, your
newly recorded play list will loop back to step 1.
Page 32

22 The Screens Keys
Dave Smith Instruments
Page 33

23
Tempest Operation Manual
The Sound Controls
The Sound Controls
A Sound is a collection of all settings required to produce a drum or other type
of sound when you play a pad, including samples, oscillators, lters, envelopes,
LFOs, and more. This section provides a detailed description of each of these
settings, and is divided into subsections for each of the principal synthesis blocks:
• Oscillators
• Lowpass Filter
• Highpass Filter
• VCA (voltage controlled amplier)
• Envelope Generators
• LFOs (low frequency oscillators)
• Modulation paths
Many of these parameters have dedicated front
panel controls, but many others are accessed only
in special Sounds screens. All sound parameters
can be visually edited by pressing the
SoundS
key (in the Screens section.)
There are a total of sixteen different sound
parameter screens. To move between them, press
the four arrow keys.
On the following two pages is a picture of all sixteen screens, with arrows show
ing which arrow keys to use to move between them. On subsequent pages is a
detailed description of each of the parameters shown in these screens.
Undo Sound / Revert Sound
If you press Shift + undo Snd, the selected sound will be restored to its last
loaded or saved status, undoing any edits since then.
Also, if both
16 SoundS (in the Pad funCtion group) and SoundS (in the SCReenS
group) are selected, the soft key allows you to ReveRt Snd. Pressing it performs
the same function as Shift + undo Snd.
Page 34

24 The Sound Controls
Dave Smith Instruments
If the SoundS key is pressed, one of the following screens appears.
Use the four arrow keys to move between the screens.
Page 35

25
Tempest Operation Manual
The Sound Controls
Use the four arrow keys to move between the screens.
Pre/Post Filter
Page 36

26 Oscillators
Dave Smith Instruments
OSC 1
SUB OSC LEVEL
PRE-POST
FILTER
AMP
VOLUME
FEEDBACK LEVEL
FEEDBACK LOOP
VCA
PAN
L
R
SUB OSC
OSC 2
OSC 3
OSC 3 LEVEL
OSC 4 LEVEL
OSC 4
LPF HPF
OSC
MIX
TEMPEST VOICE ARCHITECTURE
Modulation routing omitted for clarity
Page 37

27
Tempest Operation Manual
Oscillators
Oscillators
Tempest has four oscillators
for each of its six voices.
Oscillators 1 and 2 are
digitally controlled analog
oscillators or DCOs.
“Digitally controlled” does not mean the audio is digitally generated, just that
the oscillators’ frequencies are under digital—rather than voltage—control. The
audio signal path is still completely analog. The advantage of digital control is
that the tuning is exceptionally stable over a ten-octave range without having to
compensate for variables like temperature.
Oscillators 3 and 4 are digital and generate various sample-based sounds, includ
-
ing different types of noise, samples of acoustic and electronic percussion, and
single-cycle waves from the Prophet VS. The digital oscillators are converted to
analog and pass through the same analog sound-shaping circuitry—lters, VCAs,
etc.—as the analog oscillators.
The Oscillators section contains the most commonly used controls for Tempest’s
oscillators. However, there are additional parameters accessed via the display
and its related controls. When the Oscillators screen is displayed, use the 3and
4 keys to view all the available parameters and the 5 and 6 keys to switch
between the different oscillators (and other edit screens).
The Analog Oscillators
Shape:
Osc Off, Sawtooth, Triangle, Saw-Tri, Pulse 0% ... Pulse 99%
—
Selects the oscillator waveshape.
Sawtooth
Triangle
Saw-Triangle
Pulse 50%
Page 38

28 Oscillators
Dave Smith Instruments
The Pulse values ranges from 0 to 99 per cent and set the pulse width or duty
cycle of the Pulse wave. A value of 50 results in a true square wave with equal
alternating high and low levels, as in the preceding illustration.
Increasing or decreasing the value from 50 causes the waveshape to become
asymmetrical. Lower values narrow the positive-going portion of the wave,
higher values widen it. At the extreme values, the pulse goes completely at,
which allows for some interesting possibilities with pulse width modulation.
50
Pulse Width
0 99
1/2 Mix:
100/0…0/100—
Mixes the outputs of oscillators 1 and 2 in varying
amounts. A setting of 100/0 is 100% oscillator 1 and 0% oscillator 2. A setting of
0/100 is just the opposite. A setting of 50/50 is an equal mix of both.
Pitch:
C0…C10—
Sets the base oscillator frequency over a 10-octave range,
from 8 Hz to 8 kHz, in semitones. C3 is middle C, the rst octave is 0 (C0, C#0,
etc.), the second octave is 1 (C1, C#1, etc.), and so on. Note that noise samples
cannot be tuned.
Fine:
-50…+50—
Fine tune control with a range of a quarter tone up or down.
Zero is centered. Steps are in cents (50 cents = ½ semitone).
Glide:
0...127—
Sets the oscillator glide (portamento) rate. Glide is set indepen-
dently for each oscillator. Low values are faster. See also Glide Mode.
Sync 2 >1:
Off, On—
Turns oscillator hard sync on. With sync on, whenever
oscillator 2 resets, oscillator 1 is forced to restart.
Oscillator 1
Oscillator 2
Oscillator 1
synced to
Oscillator 2
Sub Osc:
0...127—
Controls the level of a square wave pitched one octave below
oscillator 1.
Page 39

29
Tempest Operation Manual
Oscillators
Osc Slop:
0...5—
The amount of random oscillator frequency tuning slop. The
analog oscillators in Tempest are very accurate, and will not drift. This works
great for accurate sounds, and allows precise de-tuning. oSCillatoR SloP allows
subtle amounts of frequency drift. For larger amounts, use a random LFO.
Glide Mode:
FixRate, FixRate A, FixTime, FixTime A—
Determines how the
oscillators respond when
glide is on.
•
FixRate: e time to transition between notes varies with the interval
between the notes; the greater the interval, the longer the transition time.
e glide rate is xed.
•
FixRate A: The same as FixRate, but glide is only applied when playing
legato. That is, glide only occurs when a note is held until the next note is
played. This effectively allows glide to be turned on and off just by playing
staccato or legato.
•
FixTime: Glide is set to a xed time, regardless of the interval between
notes.
•
FixTime A: The same as FixTime, but glide only occurs when playing
legato.
Key Follow:
Off, On—
Turns keyboard tracking o or on for oscillator 1 or 2.
When o, the oscillator plays at its base pitch and will not transpose when played
from the pads or via MIDI.
Wave Reset:
Off, On—
When off, the oscillator is free-running and may be
at any point in its cycle when the voice is gated on. Most analog synthesizers
behave this way. The most noticeable effect is that the attack may vary slightly
at very fast settings, adding a slight, variable click that can be desirable for some
sounds. When
wave ReSet is on, the oscillator is restarted—reset to the zero
crossing at the start of its cycle—every time a note is gated on.
Page 40

30 Oscillators
Dave Smith Instruments
The Digital Oscillators
Sample:
Off, sample name 1, sample name 2, …—
Tempest contains
several hundred sampled sounds, including different types of noise, acoustic
drums and percussion, classic analog and digital drum machines, effects, and the
single-cycle waves from the Prophet VS. The sample format is 16-bit, 44.1kHz,
mono. For a complete list of samples, see “Samples” on page 80.
Level:
0…127—
Sets the volume level of oscillator 3 or 4.
Volume level can be set, or affected by modulation, at several points in the
signal path, so clipping distortion may occur if the levels and/or modulation amounts
are set high. If clipping is undesirable, simply turn the level and/or mod amount down
until it stops clipping.
Also, if level is set to 0, the oscillator is effectively off; modulation applied to
the oscillator level will have no effect.
Pitch:
-24…+24—
Osets the base oscillator pitch as much as two octaves up
or down in semitone increments. A setting of 0 indicates there is no offset and the
oscillator plays at its base pitch.
Note: A few of the sounds—for example, some of the noise types—are of a
xed pitch and do not transpose, either from the PitCh control, the pads, or
via MIDI.
Fine:
-50…+50—
Fine tune control with a range of a quarter tone up or down.
Zero is centered. Steps are in cents (50 cents = ½ semitone). fine settings are also
reected in the PitCh value. For example, if PitCh is set to 0, but fine is set to
-50, the displayed PitCh value is -0.50 (-50 cents).
Glide:
0...127—
Sets the oscillator glide (portamento) rate. glide is set indepen-
dently for each oscillator. Low values are faster. See also “Glide Mode,” below.
Reverse: Reverses the playback of the sampled waveform.
Pre/Post Filter:
0...127—
Oscillators 3 and 4 can be processed by Tempest’s
low- and high-pass lters, completely bypass the lters, or be set to a mix of the
two. A value of 0 means all of the output from oscillators 3 and 4 goes through
the lters, 64 is an equal mix of ltered and unltered signal, and 127 bypasses
the lters entirely.
Page 41

31
Tempest Operation Manual
Oscillators
Pre/Post Filter affects both oscillators 3 and 4, not just the currently selected
oscillator
.
Glide Mode:
FixRate, FixRate A, FixTime, FixTime A—
Determines how the
oscillators respond when Glide is on.
•
FixRate: e time to transition between notes varies with the interval
between the notes; the greater the interval, the longer the transition time.
The glide rate is xed.
•
FixRate A: The same as FixRate, but glide is only applied when playing
legato. That is, glide only occurs when a note is held until the next note is
played. This effectively allows glide to be turned on and off just by playing
staccato or legato.
•
FixTime: Glide is set to a xed time, regardless of the interval between
notes.
•
FixTime A: The same as FixTime, but glide only occurs when playing
legato.
Key Follow:
Off, On—
Turns keyboard tracking off or on for oscillator 3 or 4.
Page 42

32 Lowpass
Dave Smith Instruments
Lowpass
Frequency: 0...164—Sets the lter
cutoff frequency over a range of
more than 13 octaves. This control
steps in semitones when turned
slowly, but smoothly controls the
lter without steps when turned at a
faster rate.
4 Pole:
On, Off
—Selects the lter conguration. When on, the lter is in 4-pole
mode. A 4-pole, low-pass lter rolls off frequencies above the cutoff frequency at
a slope of -24dB/octave. When off, the lter is in 2-pole mode and has a slope of
-12dB/octave and a more gradual roll-off of the higher frequencies.
Resonance:
0...127
—Emphasizes a narrow band of frequencies around the
cutoff frequency. In 4-pole mode, high levels of resonance can cause the lter to
self oscillate. In 2-pole mode, resonance is much more subtle.
Audio Mod:
0...127
—Controls the amount of audio from oscillator 1 used
to modulate the lter cutoff frequency. For lter-only audio, set 1/2 miX in the
Oscillators section to 0/100, oscillator 2 Shape to Off, and oscillator 1 Shape to
the desired waveshape. This is useful for bell-like FM sounds. A wide range of
sounds can also be made using audio mod with the oscillators routed normally
through the lter.
Key > Freq:
0...127
—Sets the amount of modulation from the note number—
from either the beat, the pads, or via MIDI—to the lter frequency. Sometimes
called key tracking in keyboard synths, because the cutoff frequency “tracks”
notes played on the keyboard. A setting of 64 will step the lter in semitone
increments for each successive note, 32 is quarter tones, and so on.
Page 43

33
Tempest Operation Manual
Highpass
Highpass
Frequency: 0...127—Sets the lter cutoff frequency for the
2-pole high-pass lter. A setting of 0 passes all frequencies.
Turning the control up attenuates frequencies below the cutoff
at a slope of -12dB/octave.
Key > Freq: 0...127—Sets the amount of modulation from the note number—
from either the beat, the pads, or via MIDI—to the lter cutoff frequency.
Sometimes called key tracking in keyboard synths, because the cutoff frequency
“tracks” notes played on the keyboard.
Page 44

34 Amp
Dave Smith Instruments
Amp
Feedback:
0…127
—The left audio output of each voice
can feed back into the signal path pre-lter. Depending
upon the amount of feedback, this can result in anything
from a pleasing fuzzy distortion-like sound to unpredictable harmonic squealing and widespread pandemonium. A
setting of 0 prevents any of the signal from feeding back.
See “Tempest Voice Architecture” on page 26 for more
information.
Note: Because the feedback loop is taken from the left output, pan settings
and modulation will affect the behavior and level of feedback, so be careful
(and maybe turn down your monitors/headphones while tweaking?)!
Volume:
0…127
—Sets the volume of the current sound before it is sent to the
mixer.
Volume level can be set, or affected by modulation, at several points in the
signal path, so clipping distortion may occur if the levels and/or modulation amounts
are set high. If clipping is undesirable, simply turn the level and/or mod amount down
until it stops clipping.
Page 45

35
Tempest Operation Manual
Envelopes
Envelopes
Tempest has ve six-
stage DAPDSR (delay/
attack/peak hold/decay/
sustain/release) envelope
generators for each of its
six voices. Two of the
envelopes are “hard wired” to specic destinations: low-pass lter and amplier
(VCA). The PitCh envelope uses All Oscillators as a default destination, but it
can be changed. The two auxiliary envelopes are assignable to any modulation
destination. (For a complete list, see “Modulation Destinations” on page 79.)
Additionally, any of the envelopes can modulate any destination using the modulation paths. (See “Modulation Paths” on page 40.)
The envelopes can also be switched to a two-stage APD (attack/peak hold/decay)
type suited to percussive sounds simply by turning
ad mode on.
Envelope Generators:
Pitch, Lowpass, Amp, Aux1, Aux2—
Choose one of
the ve envelope generators to edit.
AD Mode:
Off, On—
Percussive sounds typically have a fast attack and then
decay to silence with no sustain. When ad mode is on, only the attack and
decay portions of the envelopes are used, hence “AD.” ad mode affects all ve
envelopes.
AD Mode is effectively the same as setting
SuStain to 0 and ReleaSe to the same
value as deCay, so the same effect can be achieved when ad mode is off.
Delay:
0...127—
Sets a delay between the time the envelope is gated on and
when the attack portion actually begins.
Attack:
0...127—
Sets the attack time of the selected envelope.
Peak:
0…127—
Peak is short for peak hold. Normally, the decay stage of the
envelope begins immediately after the attack stage reaches its ultimate value.
Peak briey holds the envelope at its peak value, delaying the transition from
attack to decay. This can add extra punch to a Sound’s attack.
Decay:
0...127—
Sets the decay time of the selected envelope.
Page 46

36 Envelopes
Dave Smith Instruments
Sustain:
0...127—
Sets the sustain time of the selected envelope. In AD Mode,
SuStain has no effect.
Release:
0...127—
Sets the release time of the selected envelope. In AD Mode,
ReleaSe has no effect.
Amount:
-127...127—
Sets the amount of modulation from the selected enve-
lope to its destination. Use Amount (and not Velocity Amount) if you don’t want
the Sound to use the velocity sensitivity of Tempest’s drum pads. The modulation
amount can be positive or negative, allowing for inverted envelope control. The
Amp envelope is an exception, with a range of only positive values (0-127), since
VCA gain can’t be negative!
Velocity Amount:
0...127—
For most Sounds, the velocity with which the
pads (or an external MIDI controller) are struck should be used to modulate the
envelope amount. For example,
veloCity amount (and not amount) routed to the
amP envelope will use the drum pads’ velocity sensitivity to control the volume
of the Sound.
amount and veloCity amount work in combination. If amount is set to 127,
veloCity amount will not have any effect regardless of the setting or the velocity
with which the pad is struck because the modulation amount is already maxed
out.
When using
veloCity amount to control the envelope amount of velocity-
sensitive sounds,
amount can be used to set the minimum peak level of the
envelope when note velocity is 1 or close to it. For example, let’s say you wish to
create a drum sound in which the softest-played notes produce a volume ¼ that
of the loudest notes, but when using veloCity amount alone, the softly-played
notes are nearly silent. In this case, you would set the
amP envelope’s veloC-
ity amount to 127 and its amount to around 32. For this reason, when creating
touch-sensitive sounds, you might think of the amount parameter as “Minimum
Envelope Amount.”
Velocity is ignored when 16 levels in Pad Function or Fixed level in Pad
Options is on. See “16 Levels” on page 10 and “Pad Options” on page 11 for
more information.
Destination:
Off, mod destination 1, mod destination 2, …—
Envelopes
PitCh, auX1, and auX2 are assignable to any of Tempest’s modulation destina-
tions. For a complete list, see “Modulation Destinations” on page 79.
Page 47

37
Tempest Operation Manual
Envelopes
A Note About Envelope Shape
Like most synthesizers, Tempest’s envelopes are not linear, but curved. Without
going into too much detail (or math), the curve is based on a logarithmic func
tion. But that curve—and, therefore, the envelope’s shape—can be altered with
modulation.
For example, gure A below shows the “normal” decay of a simple AD envelope
where attack is set to 0.
Using one of Tempest’s Mod Paths (see page 40), an envelope can be used to
modulate itself. Figure B shows what happens when the envelope in gure A is
used as the modulation source and the mod destination is that same envelope’s
decay, with a mod amount of -60; gure C is with a mod amount of 60.
Modulating an envelope segment also changes its length (time). In the previ-
ous examples, gure B’s decay time was decreased and gure C’s decay time was
increased.
LFO 1 & 2
Tempest has two low frequency oscillators (LFOs). The LFOs can be freerunning or synced to the beat.
LFO2:
Off, On—
Chooses the LFO to edit. When off, the panel controls affect
LFO 1; when on, LFO 2.
Rate:
0...162—
Sets the LFO frequency. Speed ranges from slow (30 seconds)
to very fast—at 90 (8 Hz, C-2) and above the speed steps in semitones, up to 162
(523 Hz, C4 or an octave above middle C).
Amount:
0...127—
Sets the amount of LFO routed to the destination.
Page 48

38 Envelopes
Dave Smith Instruments
Shape:
Triangle, Reverse Sawtooth, Sawtooth, Square, Random—
The
waveshape of the LFO. Random (or “sample and hold”) generates a random
value that changes once per cycle.
Destination:
Off, mod destination 1, mod destination 2, …—
Sets the
modulation destination to which the LFO is routed. See “Modulation Destinations” on page 79 for a list of possible destinations.
Sync:
Off, On—
When on, the LFO syncs to the beat based on multiples of
quarter notes, regardless of the time signature.
Rate displays the values in the
following table.
Display Cycles per Quarter Note(s)
32 Qrtr One LFO cycle lasts 32 quarter notes
16 Qrtr One LFO cycle lasts 16 quarter notes
8 Qrtr One LFO cycle lasts 8 quarter notes
6 Qrtr One LFO cycle lasts 6 quarter notes
4 Qrtr One LFO cycle lasts 4 quarter notes
3 Qrtr One LFO cycle lasts 3 quarter notes
1/2 Note One LFO cycle lasts 2 quarter notes
Qrtr Dot One LFO cycle lasts 1.5 quarter notes
1 Qrtr One LFO cycle lasts 1 quarter note
Qr tr Trip Two LFO cycles every three quarter notes
8th Two LFO cycles per quarter note
8th Trip Three LFO cycles per quarter note
1/16 Four LFO cycles per quarter note
16th Trip Six LFO cycles per quarter note
32nd Eight LFO cycles per quarter note
64th Sixteen LFO cycles per quarter note
Use sync to modulate a parameter in time with a beat. For example,
for a beat in 4/4, an LFO set to a triangle wave and a rate of 16 Qrtr can modulate
the lter frequency for a sweep that repeats every 4 bars, precisely.
Page 49

39
Tempest Operation Manual
Envelopes
Free-Running LFOs
By default, the wave cycles of Tempest’s two low frequency oscillators are
restarted by a note on, beat, or play command. However, you can set the LFOs
to be free running so that once triggered, the wave cycle continues without being
restarted.
To disable wavecycle restart for LFO 1 or LFO 2:
1. In the SCReenS section, press the SoundS button.
2. In the
lfo 1&2 section, press the lfo2 button on or off to display the
parameters for the LFO that you want to edit.
3. Press the Page Right (right arrow) soft button to display the
ReStaRt param-
eter for the LFO’s wave cycle.
4. Turn soft knob 4 (
ReStaRt) and set the chosen LFO’s wave cycle to off.
(Conversely, choosing note, Beat, or Play causes the LFO’s wave cycle to
restart each time it receives the selected trigger.)
To use free-running LFO’s you must assign a sound to a voice. To do this,
press the 16 sounds button, then press the sounds button in the Screens section.
Next, tap a pad to select the sound you want to assign to a voice. Finally, press the
Mod Paths button in the LFO section, then press the Page Down button once. Turn
soft knob 3 to assign the voice.
Page 50

40 Modulation Paths
Dave Smith Instruments
Modulation Paths
Tempest has eight general-purpose modulation paths with a great variety of mod
sources and destinations available. Press MOD PATH to display the settings for
the current sound.
Source:
Off, mod source 1, mod source 2, …—
Sets the modulation
source for the selected mod path. See “Modulation Sources” on page 78 for a
complete list.
Use source to route external MIDI controllers to Tempest’s mod
destinations.
Amount:
-127…127—
Sets the amount of the source used to modulate the
destination. The modulation amount can be positive or negative, allowing for
inverted control.
Destination:
Off, mod destination 1, mod destination+ 2, …—
Sets the
modulation destination for the selected mod path. See “Modulation Destinations”
on page 79 for a complete list.
Page 51

41
Tempest Operation Manual
Choke and Voice Assign
Choke and Voice Assign
Each of a Beat’s thirty-two Sounds can be choked by one of two other Sounds in
the Beat. The most obvious use is to enable a pedaled or closed high-hat to choke
off an open high-hat.
To Set Choke for a Sound:
1. In 16 SoundS pad mode and SoundS edit mode, press Shift then mod PathS,
or repeatedly press the Page down or 6 key, to navigate to the Misc screen.
2. Tap any pad to select a Sound.
3. Use the
Choke 1 Soft Knob to choose the Sound/pad that will be choked
whenever this sound plays. If desired, use Choke 2 to specify a second
choke Sound/pad.
voiCe aSSign restricts a Sound to playing on only one of Tempest’s six voices.
By default, Tempest uses dynamic voice allocation. That is, if a voice is already
occupied with playing a Sound, new notes will play on the next available voice.
When all six voices are in use, new notes will steal a voice from one of the
Sounds already playing, causing that Sound to be cut off. Assigning a Sound to a
specic voice guarantees that voice won’t be stolen, at least not by the remaining
dynamically allocated voices. Multiple Sounds can be assigned to a single voice
and will still steal the voice when two or more notes play simultaneously.
Again, using a high-hat as an example, assigning the different high-hat articula
tions to a single voice will guarantee that the high-hat will always sound and its
voice will not be stolen. If a Beat has a steady 8th- or 16th-note pattern, it will be
pretty obvious if the high-hat’s voice is stolen, even for one note.
Be aware, though, that some Sounds—particularly Sounds with longer decays
like crash or ride cymbals—can benet from the voices being dynamically
allocated. These Sounds tend to sound better or, at least, more realistic, if they’re
allowed to overlap and not be cut off by voice stealing, so it may take some
planning and tweaking to achieve a good balance between Sounds assigned to
specic voices and Sounds that use the remaining pool of dynamically allocated
voices.
voiCe aSSign also assigns a Sound to a specic voice output. For example, if the
kick drum is assigned to voice 1, the kick drum will be available for separate
processing via the Voice 1 jack on the rear panel. Inserting a plug in one of the
individual voice output jacks removes that voice from the main outputs. The
voice output jacks are stereo, and so retain any pan settings.
Page 52

42 Choke and Voice Assign
Dave Smith Instruments
To Assign a Sound to a Specic Voice:
1. In 16 SoundS pad mode and SoundS edit mode, press Shift then mod PathS,
or repeatedly press the Page down or 6 key, to navigate to the Misc screen.
2. Tap any pad to select a Sound.
3. Use the
voiCe aSSign Soft Knob to choose one of the six voices.
Page 53

43
Tempest Operation Manual
Beat-wide Parameters
Beat-wide Parameters
Normally the panel sound controls operate on a single sound. However, if Pad
Function is set to 16 BeatS, only eight of these controls are enabled and they
affect the playback of all sounds playing in the beat. These eight parameters are
called Beat-wide parameters:
The eight parameters are Oscillator Pitch, Lowpass Frequency, Lowpass Reso
-
nance, Audio Mod, Highpass Frequency, VCA Feedback, Envelope Attack and
Envelope Decay. For each of these eight parameters, moving the knob causes the
playback of all sounds to be altered simultaneously. Because the parameter values
can be very different for different sounds, the individual parameters are moved
proportionally in a way that results in the overall change sounding very natural.
If the
SoundS key (in the Screens section) is pressed, one of the following two
screens is displayed:
Notice the
ReveRt Soft Key. After any of the Beat-wide parameters is changed,
this soft key appears. Pressing it reverts the beat playback to its original state
before any controls were changed.
Proj:
Saturday night gig Beat: 14/Uptempo beat
Beat: 14/Uptempo beatProj:
Saturday night gig
OSC Pitch LP Freq LP Reson Audio Mod
Revert 120.0 1.1.1 Beat FX1
Beat FX 2
AUDIO MOD
50
OSC PITCH LP FREQ
LP RESON
50+0 50
HP Freq Feedback Env Attack Env Decay
Revert 120.0 1.1.1
ENV ATTACK ENV DECAY
50+0
HP FREQ FEEDBACK
50+0
Page 54

44 Mixer and Effects
Dave Smith Instruments
Mixer and Effects
A 32-input mixer permits unique
mix (volume, mute, solo, pan, delay
send, and delay on/off for each
sound) and effects settings (delay
time, delay feedback, distortion,
compression) for each Beat.
The Delay feature acts like a digital
audio delay but instead creates
additional delayed notes in order to
keep Tempest’s entire signal in the
analog domain.
You can change the mixer settings by adjusting the
controls in the Mixer section of the panel, or by
selecting
miXeR in the Screens section (pressing PadS
and SoundS together), which causes the Mixer screen
to appear.
Use the
Page uP and Page down keys to switch
between the four mixer screens below:
This screen adjusts
volume, Pan,
mute, and Solo for each sound pad.
This screen adjusts
delay amount
and delay on/off for each sound
pad. Note that sounds must be velocity-sensitive for the delayed notes to
have volumes other than full.
This screen adjusts
delay RePeatS
and delay time for the delay send
mix.
This screen shows the Beat’s settings
for the panel’s
diStoRtion and
ComPReSSion controls.
Amt: 0 Delay On
Mixer Del
DELAY REPEATS
DELAY TIME
7
Delay Rpts Delay Time
Delay
1/8 Dot
Mute: Off Solo: Off Pan: C
Mixer
COMPRESSION
64
DISTORTION
70
Distortion Compression
Comp/Dist
Page 55

45
Tempest Operation Manual
Mixer and Effects
Compressor Envelope
The Compressor has its own set of envelope controls that allow you to ne tune
compression characteristics.
To display the Compressor parameters:
1. Press the Shift button and turn the ComPReSS knob.
2. Press the Page Down button to display the
env tRiggeR parameter.
3. Turn soft knob 4 to select the sound that will trigger the compressor envelope.
4. Press the Page Up button to re-display the Compressor parameters and
adjust them as desired.
Attack:
0...127—
Sets the attack time of the Compressor.
Peak Hold:
0…127—
Normally, the decay stage of the envelope begins imme-
diately after the attack stage reaches its ultimate value. Peak briey holds the
envelope at its peak value, delaying the transition from attack to decay. This can
add extra punch to a Sound’s attack.
Decay:
0...127—
Sets the decay time of the Compressor.
Amount:
-127...127—
Sets the amount of modulation from the enveloPe tRig-
geR (see below) to the Compressor. Use amount if you don’t want the Sound to
use the velocity sensitivity of Tempest’s drum pads. The modulation amount can
be positive or negative, allowing for inverted envelope control.
Envelope Trigger:
Off, Sound A1...A16, Sound B1...B16—
Selects a Sound
from Sound Bank A or B to act as a trigger for the Compressor’s envelope. This
functions like a side-chain on a traditional compressor and allows a signal other
than the main input to control the amount of compression.
Beat: 14/Uptempo beatProj:
Saturday night gig
Comp Env
Attack Peak Hold Decay Amount
120.0 1.1.1
DECAY AMOUNT
064
ATTACK PEAK HOLD
640
Page 56

46 Real Time FX
Dave Smith Instruments
Real Time FX
The Real Time FX touch sliders have two modes:
•
Beat FX: The sliders can alter the sound of the
entire Beat playback.
•
Note FX: The sliders can alter parameters of a
single Sound, and those changes can be recorded
into the Beat.
Beat FX
If Pad Function is set to 16 BeatS, Beat FX mode is active, in which slider move-
ments affect Beat-wide sound parameters, altering the sound of the entire Beat’s
playback. In this mode, the PlayBaCk key is always on.
Try it out. Select the
16 BeatS key, press a beat pad and press Play. Now press
either of the sliders and move your nger up and down. Hear how your nger
movements alter the sound of the Beat. Now hold Shift and press the left latCh
on key, then move your nger on the left slider as the Beat plays. Notice that
you hear a different sound change, because you’ve just selected the alternate FX3
function for the left slider.
Here’s what the keys do:
Playback key
The Playback key is always on.
Shift + Playback: Assign
This displays the Beat FX Assign
screen, permitting the viewing or
editing of the Beat FX assignments.
The Latch On key
Normally the sliders are active only when you touch them. If the Latch On
key is on, the sliders remain active at their last touched positions at all times.
Shift + Latch On: FX1/FX3 or FX2/FX4 Select
Pressing Shift + the left Latch On key toggles the left slider between its FX1
and FX3 functions. Pressing Shift + the right Latch On key toggles the right
slider between its FX2 and FX4 functions.
Page 57

47
Tempest Operation Manual
Real Time FX
To view or edit the Beat FX assignments, press Shift + either PlayBaCk key:
Beat FX slider movements are for live performance only and cannot be recorded.
However, Note FX (described in the following section) does permit recording
of slider movements, and Note FX sliders may be assigned to Beat-wide sound
parameters.
Note FX
If Pad Function is not set to 16 BeatS, Note FX mode is active, in which slider
movements affect the sound of a single sound pad, altering one of its sound
parameters. Unlike Beat FX, these movements can be recorded into the Beat.
Try it out. Select the
16 SoundS key, then press a sound pad repeatedly while
moving your nger on one of the sliders. Notice that the sound changes as you
move the slider. (If nothing happens, try another sound pad because the one you
selected may have no Note FX assignment.) Now hold Shift and press the left
latCh on key, then move your nger on the left slider as the Beat plays. Notice
that you hear a different sound change, because you’ve just selected the alternate
FX3 function for the left slider. If you move the sliders while recording a sound
pad into a Beat, the value of the slider at the moment the pad is played will be
recorded into the new note, and these parameter changes will be heard when the
Beat plays back.
Beat: 14/Uptempo beatProj: Saturday night gig
Beat FX1: Slider1 Pos +/- 15 BW All Osc Freq
Beat FX2: Slider2 Pos +/- 42 BW Lowpass Freq
Beat FX3: Slider3 Pos +/- 0 BW All Env Dec
Beat FX4: Slider4 Pos +/- 24 BW Highpass Freq
Edit Beat FX1 Source Amount Destination
120.0 1. 1. 1 Beat FX
Soft Knob 1: Select Row
Select one of 8 Beat FX modulation
paths for editing.
Soft Knob 2: Source
This selects the mod source.
The options are:
“Position +/-” (bipolar with 0 at center,
“Position+” (bipolar with 0 at bottom,
and “Pressure” each for FX Sliders 1-4.
Soft Knob 4: Destination
Options are all Beat-wide sound
parameters: All Osc Freq,
Feedback, Lowpass Cutoff,
Resonance, Audio Mod, Highpass
Cutoff, All Env Attack, All Env
Decay and Beat Roll On/Off
Soft Knob 3: Amount
This control varies the amount of
modulation from -127 to 127.
Page 58

48 Real Time FX
Dave Smith Instruments
Here’s what the panel keys do:
To view or edit the Note FX assignments, select Note FX Assign by holding
Shift while pressing either PlayBaCk key:
Playback key
If on, slider movements also affect any
notes of the selected sound pad that play
back from the beat. If on while recording,
these slider movements are recorded
back into the played notes.
Shift + Playback: Assign
This displays the Note FX Assign screen,
described below.
The Latch On key
Normally the sliders are active only when you touch them. If the Latch On
key is on, the sliders remain active at their last touched positions at all times.
Shift + Latch On: FX1/FX3 or FX2/FX4 Select
Pressing Shift + the left Latch On key toggles the left slider between its FX1
and FX3 functions. Pressing Shift + the right Latch On key toggles the right
slider between its FX2 and FX4 functions.
Bt: 14/Swing beat 100 bpm Snd: A12/Boomy Kick
Note FX1: Slider1 Pos +/- +64 Osc Pitch
Note FX2: Slider2 Pos +/- +25 LP Freq
Note FX3: Slider3 Pos + +43 LP Reson
Note FX4: Slider4 Pos +/- +51 Env Decay
Select Row Source Amount Destination
120.0 1.1.1 Note FX
Soft Knob 2:
Source
This selects the input for the selected
Note FX channel (1-4) within each note.
Options are Slider FX1-4 Position
(either positive or bipolar) or
Slider FX1-4 Pressure.
Soft Knob 4:
Destination
This selects the destination for the
Note FX channel within each note.
A variety of voice modulation
destinations are available.
Soft Knob 1:
Select Row
Select one of the 4
Note FX channels
(within each note
event) for editing.
Soft Knob 3:
Amount
Select the amount
of effect the slider
movement has on
the destination
parameter.
Beat & Sound
Each of the beat’s 32
sounds has a unique
set of 4 Note FX
assignments. Those
displayed apply only to
the selected sound.
Page 59

49
Tempest Operation Manual
Rec/Edit Keys
Rec/Edit Keys
These four keys provide a variety of functions
for editing Sounds, Beats, Play Lists,
and Projects.
The Click key
Pressing this toggles the click (metronome) on
or off. The click volume can be changed in the
System: General menu.
Although Click does use one of the voices, after you have a couple of sounds
recorded you shouldn’t need it and it can be turned off.
The Undo Rec key
If the undo ReC light is on, this means there is something to undo. Pressing undo
ReC will undo all recording changes made during the last recording pass (since
the moment you started the Beat playing with ReC on) and will turn off the light.
Pressing it a second time will Redo whatever was removed by pressing undo
ReC. This is a single-level undo.
Holding
Shift while pressing undo ReC invokes the undo Sound command. This
will restore the selected sound to its last loaded or saved status, undoing any edits
since then. This is a single-level undo.
The Erase key
All notes in a Beat can be erased easily in either 16 SoundS or 16 BeatS mode.
In either
16 SoundS or 16 BeatS, press and hold eRaSe, and then press the eRaSe
all noteS soft key. All notes in the current Beat are erased.
Page 60

50 Rec/Edit Keys
Dave Smith Instruments
To quickly Erase All Notes of a single Sound Pad from a Beat:
1. Press 16 SoundS.
2. While holding
eRaSe, press the sound pad to be erased.
To Erase All Notes of a single Sound Pad from Sound Bank B:
1. To erase a Sound in Sound Bank B from a Beat, select Sound Bank B
before or after holding eRaSe.
2. Hit a pad to erase that sound.
To quickly Erase Only Some Notes from a Beat:
1. Press 16 SoundS.
2. Turn
ReCoRd on and press Play.
3. Hold both
Shift and eRaSe, then during the time that the notes to be erased
are playing, also hold the sound pad for those notes.
The Copy Key
Tempest’s Copy function allows you to be selective about copying other elements
associated with a Sound or a Beat.
For Sounds, you can choose to copy (or not copy):
• the sound’s program parameters
• a sequence associated with the sound
• Note FX associated with the sound
• mixer settings associated with the sound
For Beats, you can choose to copy (or not copy):
• a Kit associated with the Beat
• a sequence associated with the Beat
• parameters associated with the Beat
• Beat FX associated with the Beat
Page 61

51
Tempest Operation Manual
Rec/Edit Keys
Copying a Sound
To selectively copy a Sound and/or its associated elements:
1. In the Pad funCtion section, press the 16 SoundS button.
2. In the
SCReenS section, press the SoundS button.
3. In the
ReC/edit section, press and hold the CoPy button.
4. Use the 4 soft knobs above the display to select the elements that you want
to copy (
Sound, SequenCe, notefX, miXeR).
- Setting an element to
on will include it in the copy operation.
- Setting an element to
off will exclude it.
5. Tap the pad you want to copy from.
6. Tap the pad you want to copy to.
7. When nished, release the
CoPy button.
When choosing a destination for a copied Sound, tapping the same pad twice
swaps Sound layers A+B.
Snd: B1/BasicBt: 1/Intense Bt
Copy Sound
Sound: On Seq: Off NoteFX: Off Mixer: Off
Mode: Copy 120.0 2.1.1
COPY TO
COPY FROM
Hit pad to select sound to copy...
The copied sound is not permanently saved in memory until you save the Beat
and commit the new sound position to memory. To save a Beat, press the save/load
button, use soft knob 1 to scroll to item 2 (save Beat), then press the next button and
use soft knob 1 to select the Beat to save.
Page 62

52 Rec/Edit Keys
Dave Smith Instruments
Copying a Beat
To selectively copy a Beat and/or its associated elements:
1. In the Pad funCtion section, press the 16 BeatS button.
2. In the
SCReenS section, press the SoundS button.
3. In the
ReC/edit section, press and hold the CoPy button.
4. Use the 4 soft knobs above the display to select the elements that you want
to copy (
kitS, SequenCe, PaRamS, BeatfX).
- Setting an element to
on will include it in the copy operation.
- Setting an element to
off will exclude it.
5. Tap the pad you want to copy from.
6. Tap the pad you want to copy to.
7. When nished, release the
CoPy button.
Page 63

53
Tempest Operation Manual
The Edit Function
The Edit Function
Holding Erase and Copy together presents a menu of functions for editing
sounds, beats or projects held in RAM memory (not in ash memory)
Copy Sound Initialize Sound Rename Sound
Copy Beat Initialize Beat Rename Beat
Copy Bars Insert Bars Delete Bars
Rename Project Initialize Project
Turn Soft Knob 1 to select one of the edit functions, then press the Soft Key to
select it. Each screen contains up to four elds that are edited using the 4 soft
knobs. Once the elds are set correctly, pressing the Soft Key performs the edit
-
ing function.
1. Copy Sound
This copies a Sound (in any Beat) over another Sound within the same or a
different Beat. Enter the Source Beat and Sound, the Destination Beat and Sound,
then press the Copy Now soft key.
Note that while Pad Function is set to anything other than 16 Beats, the Copy key
can also be used to copy one Sound pad over another.
2. Initialize Sound
This initializes any Sound (in any Beat) to default settings. Enter the Source Beat
and Sound to initialize, then press the Init Now soft key.
3. Rename Sound
This permits you to rename a Sound (in any Beat). Select the Beat and Sound to
rename, use the Select Char and Edit Char soft knobs to enter the new name, and
press the “Rename Now” soft key.
Note that while this screen is active, the Page Up key becomes Insert Char,
inserting a new character into the name, and the Cursor Up key becomes Delete
Char, deleting a character from the name.
Page 64

54 The Edit Function
Dave Smith Instruments
4. Copy Beat
This copies any Beat over any other Beat. Enter the Source and Destination
Beats, then press Copy Now.
Note that if Pad Function is set to 16 Beats, the Copy key can be used to do the
same thing.
5. Initialize Beat
This initializes any Beat to default settings at the specied time signature, erasing any previous contents. Enter the Beat to initialize, the Time Signature and
Number of Bars, then press the Init Now soft key.
6. Rename Beat
This permits you to rename both the long and short names of any beat. Enter the
Beat to rename, use the Select Char and Edit Char soft knobs to edit the Name
and/or Short Name (the name that appears in the 2x8 matrix of 16 Beats screen),
then press the Rename Now soft key.
Note that while this screen is active, the Page Up key becomes Insert Char,
inserting a new character into the name, and the Cursor Up key becomes Delete
Char, deleting a character from the name.
7. Copy Bars
This copies a range of bars from one Beat to the same or a different Beat, either
inserting into or replacing the destination Beat’s bars. There are two screen pages.
On the rst screen, enter the Source Beat and First and Last Bars to copy, then
press the Next soft key.
On the second screen, enter the Destination Beat and set the Copy Mode to either
Replaces, Insert Before or Insert After. The middle parameter is used to specify
either the First Bar to Replace, the Bar to Insert Before or the Bar to Insert After.
To perform the copy, press the Copy Now soft key.
8. Insert Bars Into Beat
This inserts blank bars into a Beat, using the Beat’s time signature. Enter the
Beat, the Blank Bars to Insert and the Bar to Insert Before, then press the insert
Now soft key.
Page 65

55
Tempest Operation Manual
The Edit Function
9. Delete Bars from Beat
This deletes bars from a Beat. Enter the Beat, the First and Last Bar to delete,
then press the Delete Now soft key.
10. Change Time Signature of Beat
This function allows you to change the time signature of all measures within a
beat. If the new time signature is shorter, the notes at the end of each bar will be
truncated. Or if the new time signature is longer, the notes at the beginning of
each bar will be copied to the end of the bar to ll the new space. You can also
change the number of bars in the beat. If the new number of bars is greater, the
notes in the earlier bars are copied to the new bar(s) at the end. Or if the new
number of bars is lesser, the ending bars are deleted entirely.
To change time signature, enter the beat, new time signature and number of bars,
then press the Set Sig Now soft key.
11. Rename Project
This renames the currently loaded project. Use the Select Char and Edit Char soft
knobs to edit the name, then press the Rename Now soft key. Note that while this
screen is active, the Page Up key becomes Insert Char, inserting a new character
into the name, and the Cursor Up key becomes Delete Char, deleting a character
from the name.
12. Initialize Project
This initializes the entire Project in RAM memory, erasing all 16 Beats and all
of their Sounds, and resetting them to default settings! To perform the initialize,
press the Init Now soft key.
13. Rename Playlist
This utility allows you to Name or Rename one of the four Playlists. Select the
Playlist number to rename, use the Select Char and Edit Char soft knobs to edit
the Name, then press the Rename Now soft key.
14. Copy Playlist
This utility copies one of the four Playlists to another, in order to rearrange the
order or to edit an existing Playlist.
Page 66

56 The Edit Function
Dave Smith Instruments
15. Initialize Playlist
This utility initializes the selected Playlist to the default (blank) settings, allowing you to create a new Playlist.
Turn All Notes Off
Tempest is capable of being played from the internal sequencer, the pads,
and MIDI simultaneously. If a stuck note should occur, simply press
left Shift + Right Shift + StoP to force all the voices off.
Page 67

57
Tempest Operation Manual
Save/Load
Save/Load
Pressing Save/load presents a menu of functions related to saving or loading
les. Like a personal computer, Tempest has both random access memory (RAM)
and permanent non-volatile storage for saved Sounds, Beats, and Projects. The
current Sound, Beat, or Project is always loaded into RAM for playback and edit-
ing. Tempest uses ash memory for non-volatile storage.
It is important to understand the distinction between RAM and ash. As with
most PC-based software applications, edits to les in RAM must be saved to
ash to be recalled later. But, like most synthesizers, Tempest will not prompt
you to save changes when powering down or loading another le. It would be
pretty annoying if in the middle of a frenetic, knob-twisting, performance, a
prompt came up asking you to save changes every time you switched Beats or
loaded a le! But, while you are making beats and sounds, it’s good to get in
the habit of saving your work often and, occasionally, backing your work up via
MIDI.
Beats include all Sounds used in them and Projects include Beats, which, in turn,
include all Sounds in each of the Beats. See “Sounds, Beats, and Projects” on page 3
for a general explanation of the relationship between Sounds, Beats, and Projects.
Project and Beat Compatibility with Older OS Versions
Tempest’s internal le format changed with OS version 1.4. This affects project
and beat compatibility with older versions of the OS.
Please be aware of the following:
• Projects and Beats made on a previous OS versions will load and play
correctly on OS 1.4.
• If Projects and Beats made on a pre-1.4 OS are modied and saved, or
exported from a Tempest with OS 1.4, they will not be compatible with a
Tempest with a pre-1.4 OS.
• If Projects and Beats made on a pre-1.4 OS are NOT modied and saved,
or exported from Tempest with OS 1.4, they will still be compatible with a
Tempest with a pre-1.4 OS (if you downgrade your Tempest OS to an older
version, for example).
Page 68

58 Save/Load
Dave Smith Instruments
Saving Sounds, Beats, and Projects
Sounds are saved to one of several folders in Tempest’s ash memory. They can
also be exported and saved as system exclusive MIDI data.
To Save a Sound to Flash:
1. In
16 SoundS mode, tap a pad to choose the Sound to save.
2. Press
Save/load, choose Save Sound, and press the neXt Soft Key.
3. The current source Beat and Sound are displayed and can be changed, if
desired. Press the
neXt Soft Key.
4. Select the destination Sound folder.
5. Enter the name using the
edit filename Soft Knob to choose characters
and the left and Right cursor keys to move the cursor.
6. Press the
inSeRt ChaR Soft Key to insert a blank space before the cursor. Press
the delete ChaR Soft Key to delete the character highlighted by the cursor.
7. Press the
Save now Soft Key.
Sounds are saved to one of several folders in Tempest’s ash memory. They can
also be exported and saved as system exclusive MIDI data. See page 62.
To Save a Beat to Flash:
1. In 16 BeatS mode, tap a pad to choose the Beat to save.
2. Press
Save/load, choose Save Beat, and press the Next Soft Key.
3. The current source Beat is displayed and can be changed, if desired. Press
the Next Soft Key.
4. Select the destination Beat folder.
5. Enter the name using the
edit filename Soft Knob to choose characters
and the left and Right cursor keys to move the cursor.
• Press the
inSeRt ChaR Soft Key to insert a blank space before the cursor.
Press the delete ChaR Soft Key to delete the character highlighted by the
cursor.
6. Press the
Save now Soft Key.
Beats are saved to one of 10 Beats folders in Tempest’s ash memory. They can
also be exported and saved as system exclusive MIDI data. See page 63.
Page 69

59
Tempest Operation Manual
Save/Load
To Save a Project to Flash:
1. Press Save/load, choose Save Project, and press the neXt Soft Key.
2. Select the destination Projects folder.
3. Enter the Project name using the
edit filename Soft Knob to choose
characters and the left and Right cursor keys to move the cursor. Press the
neXt Soft Key.
• Press the
inSeRt ChaR Soft Key to insert a blank space before the cursor.
Press the delete ChaR Soft Key to delete the highlighted character.
If the Project le name already exists, you will be warned that you are about to
overwrite the existing Project le.
4. Press the Save now Soft Key.
Projects are saved to one of 10 Project folders in Tempest’s ash memory. They
can also be exported and saved as system exclusive MIDI data. See page 64.
Loading Sounds, Beats, and Projects
A Sound is loaded into RAM from ash and assigned to one of Tempest’s pads.
Sounds can also be imported via MIDI. (See “Importing Sounds, Beats, and
Projects” on page 66.)
To Load a Sound:
1. In 16 SoundS mode, tap a pad to choose the destination Sound.
2. Press
Save/load, choose Load File (Sound/Beat/Project), and press the
neXt Soft Key.
3. Choose the Type, Folder, and File, and press the
neXt Soft Key.
4. The selected destination Beat and Sound are displayed, but can be changed,
if desired.
5. Press the
load now Soft Key.
6. Press the
again Soft Key to load another le or Save/load to exit.
The Sound is loaded into the destination pad. Any unsaved edits to the previous
Sound will be lost. Press
Save/load again at any time prior to pressing load
now to cancel the operation.
Page 70

60 Save/Load
Dave Smith Instruments
A Beat is loaded into RAM from ash and assigned to one of Tempest’s pads.
Beats can also be imported via MIDI. (See “Importing Sounds, Beats, and Projects” on page 66.)
Load Beat Options (including Loading Sound Kits)
When loading a Beat, there are ve options to determine what data gets loaded.
Normal
—All Beat data will be loaded into the destination Beat.
Sounds + Mixer
—Only the Sounds and mixer settings will be loaded.
Sounds Only
—Only the Sounds will be loaded.
In Tempest there are no separate “Sound Kit” or “Drum Kit” les. Instead, you
can use this option to load only the sounds from any Beat le. This has the advan-
tage that any Beat le can be used as a sound kit le.
Sequencer + Note FX
—Only sequence and Note FX settings will be loaded.
Beat FX
—Only the Beat FX settings will be loaded.
To Load a Beat:
1. In 16 BeatS mode, tap a pad to select the destination Beat.
2. Press
Save/load, choose Load File (Sound/Beat/Project), and press the
neXt Soft Key.
3. Choose the Type, Folder, and File, and press the
neXt Soft Key.
4. Choose the Beat Load Option: Normal, Sounds + Mixer, Sounds Only,
Sequencer + Note FX, or Beat FX.
5. The selected destination Beat is displayed, but can be changed, if desired.
6. Press the
load now Soft Key.
Free 2.5MBLoad Now 120.0
Load Options Dest Beat
DEST BEAT PAD TO REPLACE
14/Fast beat #2
BEAT LOAD OPTIONS
Normal
Load Beat “A Bouncy C”:
Page 71

61
Tempest Operation Manual
Save/Load
7. Press the again Soft Key to load another le or Save/load to exit.
The Beat is loaded into the destination pad. Any unsaved edits to the previous
Beat will be lost. Press
Save/load again at any time prior to pressing load now
to cancel the operation.
A Project is loaded from ash and replaces the current Project in RAM. (Only
one Project can be loaded at a time.) The last Project saved is loaded by default
on power up. Projects can also be imported via MIDI. (See “Importing Sounds,
Beats, and Projects” on page 66.)
To Load a Project:
1. Press Save/load, choose Load File (Sound/Beat/Project), and press the
neXt Soft Key.
2. Choose the Folder and File, and press the
neXt Soft Key.
3. Press the
load now Soft Key to load the Project.
4. Press the
again Soft Key to load another le or Save/load to exit.
Loading a Project replaces all the Sounds and Beats in RAM with the Sounds and
Beats in the Project. Press
Save/load again at any time prior to pressing load
n
ow to cancel the operation.
Saving and Loading Sound Kits
Tempest doesn’t actually use sound kit les. Instead, you can choose to load
only the sounds from any beat le into the beat you’re working on, so any beat
becomes the equivalent of a “sound kit” le.
Loading sounds quickly from the Pads screen
Sounds can also be loaded directly from the Pads screen in 16 SoundS mode. The
load Sound parameter enables Sounds for the selected pad to be auditioned and
changed.
Page 72

62 Save/Load
Dave Smith Instruments
Quant: 16th Swing: 50.0% Sound Type Load Sound
120.0 1.1.01 16 Sounds
Tamb
Shaker
Claps
Block
Rim
SftSnr
Snare
Kick
HhOpn
HhTite
TomHi
Crash
TomMid
Ride
TomLo
Splash
Bt: 14/Swing beat 100 bpm Snd: A12/Boomy Kick
In Pads view, strike a pad to select a Sound and then turn the load Sound soft
knob clockwise to load the rst available Sound for the current Sound direc
-
tory. Continue scrolling through the list to audition different Sounds or use the
Sound diReCtoRy soft knob to change to a different directory of Sounds. Press the
ReveRt soft key to revert to the saved Sound.
revert is available until another pad is struck in 16 sounds mode. Pads can
be struck in any other Pad Function mode, but once another Sound pad is struck,
revert is unavailable. To return to the saved settings, reload the le. revert sound
always resets the sound to the last loaded or saved setting of it’s Beat.
Exporting Sounds, Beats, and Projects
Sounds, Beats, and Projects can be exported over MIDI to a computer application or hardware device capable of recording SysEx data. Most modern MIDI
sequencers are capable of recording SysEx and there are standalone applications
like SysEx Librarian for Mac OS and MIDI-OX for Windows that make it very
easy to record, name, and store SysEx les. SysEx data can also be dumped
directly from one Tempest to another using a single MIDI cable.
Exporting directly from RAM or from saved les in ash memory yields slightly
different results. Sounds, Beats, and Projects exported from RAM contain no
information about their source or destination. If Sounds/Beats/Projects exported
from RAM are later imported, they are loaded into RAM and must be saved to
ash or they will be lost when power is cycled. Sounds/Beats/Projects exported
from saved les will import into ash in the same folder location from which
they were exported and do not need to be saved. But, they do need to be loaded
into RAM if you want to play them.
Page 73

63
Tempest Operation Manual
Save/Load
To Export a Sound from RAM over MIDI:
1. Connect Tempest to the receiving device (computer running MIDI application, dedicated hardware sequencer, etc.) using either USB or a MIDI
interface. If using a MIDI interface, connecting Tempest’s MIDI out to the
device’s MIDI in is sufcient for exporting.
2. In
16 SoundS mode, tap a pad to choose the Sound to export.
3. Press
Save/load, choose Export Sound in RAM over MIDI, and press the
neXt Soft Key.
4. The current source Beat and Sound are displayed and can be changed, if
desired.
5. Choose the destination (MIDI and/or USB).
6. Enable the receiving device to receive and record SysEx.
7. Press the
eXPoRt now Soft Key.
8. The device records the SysEx data, which can then be named and saved for
backup and importing into Tempest.
9. Press the
again Soft Key to export another le or Save/load to exit.
To Export a Beat from RAM over MIDI:
1. Connect Tempest to the receiving device (computer running MIDI application, dedicated hardware sequencer, etc.) using either USB or a MIDI
interface. If using a MIDI interface, connecting Tempest’s MIDI out to the
device’s MIDI in is sufcient for exporting.
2. In
16 BeatS mode, tap a pad to choose the Beat to export.
3. Press
Save/load, choose Export Beat in RAM over MIDI, and press the
neXt Soft Key.
4. The current source Beat is displayed and can be changed, if desired.
5. Choose the destination (MIDI and/or USB).
6. Enable the receiving device to receive and record SysEx.
7. Press the
eXPoRt now Soft Key.
8. The device records the SysEx data, which can then be named and saved for
backup and importing into Tempest.
9. Press the
again Soft Key to export another le or Save/load to exit.
Page 74

64 Save/Load
Dave Smith Instruments
To Export a Project from RAM over MIDI:
1. Connect Tempest to the receiving device (computer running MIDI application, dedicated hardware sequencer, etc.) using either USB or a MIDI
interface. If using a MIDI interface, connecting Tempest’s MIDI out to the
device’s MIDI in is sufcient for exporting.
2. In
16 BeatS mode, press Save/load, choose Export Project in RAM over
MIDI, and press the neXt Soft Key.
3. Since there can only be one Project in RAM at a time, there is no source to
choose. Choose the destination (MIDI and/or USB).
4. Enable the receiving device to receive and record SysEx.
5. Press the
eXPoRt now Soft Key.
6. The device records the SysEx data, which can then be named and saved for
backup and importing into Tempest.
7. Press the
again Soft Key to export another le or Save/load to exit.
To Export a Sound/Beat/Project from Flash over MIDI:
1. Connect Tempest to the receiving device (computer running MIDI application, dedicated hardware sequencer, etc.) using either USB or a MIDI
interface. If using a MIDI interface, connecting Tempest’s MIDI out to the
device’s MIDI in is sufcient for exporting.
2. Press
Save/load, choose Export saved le over MIDI (Sound/Beat/Project),
and press the neXt Soft Key.
3. Choose the Type, Folder, and File to export.
4. Choose the destination (MIDI and/or USB).
5. Enable the receiving device to receive and record SysEx.
6. Press the
eXPoRt now Soft Key.
7. The device records the SysEx data, which can then be named and saved for
backup and importing into Tempest.
8. Press the
again Soft Key to export another le or Save/load to exit.
Page 75

65
Tempest Operation Manual
Save/Load
To Export from one Tempest (master) to Another (slave) over MIDI:
1. Connect MIDI out on the master to MIDI in on the slave. (Tempest is
incapable of acting as a USB host, so transfers must be done using a MIDI
cable.)
• If exporting a Sound from RAM, put both Tempests into
16 SoundS mode,
tap a pad on the master to select the source Sound, and tap a pad on the
slave to choose the destination.
• If exporting a Beat from RAM, put both Tempests into
16 BeatS mode, tap
a pad on the master to select the source Beat, and tap a pad on the slave to
choose the destination.
• If exporting a Project from RAM, put both Tempests into
16 BeatS mode.
Since there is only one Project in RAM at a time, there is no source or
destination to select.
2. On the master, press
Save/load and choose Export Sound/Beat/Project in
RAM over MIDI or Export Saved File over MIDI (Sound/Beat/Project)
to transfer the data. The slave does not need to be enabled to receive the
transfer. Just press eXPoRt now when ready. Exports from RAM load into
the slave’s RAM; exports from ash load into the slave’s ash.
3. Press the
again Soft Key to export another le or Save/load to exit.
To Export Tempest’s entire le contents for backup (Beats, Projects, Sounds):
1. Connect Tempest to the receiving device (computer running MIDI application, etc.) using either USB or a MIDI interface. If using a MIDI interface,
connecting Tempest’s MIDI out to the device’s MIDI in is sufcient for
exporting.
2. Press the
Save/load button.
3. Use Soft Knob 1 to select item 8, “
eXPoRt file oveR midi.”
4. Press the
neXt Soft Key.
5. Use Soft Knob 4 to select “
all.”
6. Press the
neXt Soft Key again.
7. Use Soft Knob 3 to select the appropriate MIDI port (
midi or uSB).
8. Press the
eXPoRt now Soft Key.
Page 76

66 Save/Load
Dave Smith Instruments
Importing Sounds, Beats, and Projects
Importing data from SysEx les is simple. Connect the transmitting device to
Tempest via USB or MIDI—one MIDI cable from the device’s MIDI out to
Tempest’s MIDI in—and then open and play the les from a MIDI sequencer or
SysEx utility. Files exported from RAM load into the current Sound/Beat/Proj-
ect in RAM; les exported from ash load into ash in the same location from
which they were originally exported. The display will give you the status of the
process and let you know when the le has successfully been saved.
• Keep in mind that importing data exported from RAM replaces the current
Sound, Beat, or Project in RAM. If edits to the current Sound/Beat/Project
have not been saved to ash or exported, they will be lost.
• Files imported into RAM need to be saved to ash or they will be lost when
the power is cycled.
• Files imported into ash need to be loaded into RAM in order to play or
edit them.
Important: Import Notes
Importing a Sound/Beat/Project to ash with the same name as one already in
ash will overwrite the le, so always back up your work before importing a le
if you are not absolutely certain of the imported le’s contents.
Due to the time it takes for Tempest to save a Sound/Beat/Project to ash, you
must have a minimum one-second pause between SysEx les transmitted to the
unit. Otherwise you will get errors from the ash system. SysEx Librarian and
MIDI-OX can both be congured to add a pause or delay when sending multiple
SysEx les.
SysEx les for Projects can be large and take twenty seconds or more to load.
Press the
CanCel Soft Key if you wish to stop a SysEx import.
Page 77

67
Tempest Operation Manual
Save/Load
Renaming Files
Any of the les saved to Tempest can be renamed.
To Rename a File:
1. Press Save/load, choose move/Rename file (Sound/Beat/Project) and press
the neXt Soft Key.
2. Choose the Type, Folder, and File to rename and press
neXt.
3. Use
SeleCt ChaR (Soft Knob 3) and edit ChaR (Soft Knob 4) to select
and edit characters, respectively. Use inSeRt ChaR (Page uP key) to insert
space before the selected character. Use delete ChaR (5 key) to delete the
selected character.
4. When the name is complete, press
Rename now.
5. Press
again to rename another le or Save/load to exit.
Deleting Files
Any of the les saved to Tempest can be deleted.
To Delete a File:
1. Press Save/load, choose Delete File (Sound/Beat/Project) and press the
neXt Soft Key.
2. Choose the Type, Folder, and File to delete and press
neXt.
3. Press
delete now to delete the le
4. Press
again to delete another le or Save/load to exit.
Deleted les cannot be recovered. To cancel a delete operation, press save/
l
oad again prior to step 3.
Page 78

68 System Settings
Dave Smith Instruments
System Settings
Press SyStem to view the System menu. The System menu contains various
global parameters that apply to all operation regardless of the selected Beat or
Sound. Any changes to these settings are remembered even after power is turned
off.
The system parameters are grouped into 9 different categories. Use soft knob 4 to
select the Category, soft knob 1 to select the Line within the category, and adjust
the Parameter Value using soft knob 3.
System Categories
• General
• Foot Pedals
• MIDI Remote Pad Play
• MIDI Polyphonic Keyboard Play
• MIDI Clock
• MIDI System Exclusive
• BPM/Swing/Comp/Dist Sources
• UI Preferences
• System Actions
System: General
1. Master Transpose: -12…+12—
Transposes the pitch of all voices in half-
step increments, as much as one octave up (+12) or down (-12).
2. Fine Tune: -50…+50—
Transposes the pitch of all voices in one cent incre-
ments, as much as a quarter-tone up (+50) or down (-50).
System
Select Line Offset Category
System: General
1. Master Transpose +0
2. Fine Tune +0
3. Click Level 120
4. One bar count in Off
Page 79

69
Tempest Operation Manual
System Settings
3. Click Level: 1...127—
Sets the volume of the metronome click.
4. One bar count in: Off, On, Record Only
— When On, one bar of metro-
nome clicks plays before recording or playback begins. If set to Record Only, the
count in only plays before recording. If Off, no count in plays.
Count in does not play when syncing to an external MIDI clock.
5. Fixed Level Velocity: 2...128—
Sets the velocity value used when Fixed
Level in Pad Options is on.
6. Pad Velocity Curve: 1…4—
Sets the overall velocity response curve for
Tempest’s pads. The velocity curves allow you to tailor the response of the pad to
your personal playing style. The default value is 2.
7. Local Control: Off, On—
Local Control performs a similar function to
MIDI Local Mode on keyboard synthesizers—it internally disconnects the drum
pads from the sound generator. This is useful, for example, if you are using
Tempest with an external MIDI sequencer and wish to avoid sounds playing
twice for each pad hit, due to notes being sent and rerouted back over MIDI to
Tempest. When Off, the pads transmit note and velocity messages via MIDI as
normal, but will not cause Tempest’s internal sounds to play. By default, this is
set to On.
System: Foot Pedals
1 & 3. Pedal 1/2 Mode:
Controller, Switch: Norm Closed, Switch: Norm
Open
2 & 4. Pedal 1/2 Assignment:
See table— Tempest’s two Pedal/Switch
inputs can be congured to work with either momentary footswitches or expression pedals to control various functions.
Use Pedal Mode to choose the input device: Controller for an expression pedal,
Switch, Norm Open for a normally open footswitch, and Switch, Norm Closed
for a normally closed footswitch.
Mod Source Pedal 1 or 2 routes an expression pedal directly to the Foot Pedal 1
or 2 modulation source. (See “Modulation Paths” on page 40 for more infor
-
mation.) Master Volume routes an expression pedal directly to master volume.
Page 80

70 System Settings
Dave Smith Instruments
The following table lists the Pedal Assignment options and the input devices with
which they are typically used.
Controller Footswitch
Mod Source Pedal 1/2 Sequencer Start/Stop
Master Volume Sequencer Start
System: MIDI Remote Pad Play
1. Remote Pad IN Channel: All, 1…16—
Sets the incoming MIDI channel for MIDI note-to-pad playback and recording. The note-to-pad mapping is
programmed using the MIDI Note : Pad mapping described below.
2. Remote Pad OUT Channel: Off, 1…16—
Sets the channel on which
Tempest’s pads transmit MIDI note and velocity data. The pads transmit MIDI
data in 16 Sounds, 16 Tunings, and 16 Levels modes. When 16 Sounds is
selected, pressing a sound pad sends the MIDI note number assigned to the Pad
in “4-35 MIDI Note: Pad A1-B16” described on the following page. When set
to Off, note and velocity messages are not transmitted (but clock and start/stop/
continue messages are).
Note: When ‘16 Tunings’ is selected, the same MIDI note number is sent
for all 16 pads, using the note number assigned to the sound pad playing
from all the pads. However, it is possible to send MIDI note numbers in
the selected tuning as played from the 16 pads in ‘16 Tunings’ mode. To do
this, go to the “MIDI Polyphonic Keyboard Play” screen and set “MIDI:
Synth Sound” to the same sound pad as used in “16 Tunings,” then set the
“MIDI:Synth IN Channel” to a channel other than the one selected above.
3. Pad to Note Mode: Follow Pad Func, Sounds, Beats, Mutes—
Incoming MIDI Note messages can be used for playing the pads, triggering
sounds, selecting beats, or muting sounds. The 4 options are:
•
Follow Pad Func: Incoming MIDI notes will control whatever is selected
by the Pad Function buttons, exactly like the pads.
•
Sounds: Incoming MIDI Notes will always trigger sounds.
•
Beats: Incoming MIDI Notes will always select one of the 16 beats.
•
Mutes: Incoming MIDI Notes will always be used to mute/unmute the 32
sounds [16 each in banks A and B].
Page 81

71
Tempest Operation Manual
System Settings
4-35. MIDI Note: Pad A1-B16: Any MIDI key—
When remotely triggering
sounds from received MIDI Note messages, you can assign which note number
triggers each pad. Assign each of the 16 pads in banks A and B to a MIDI note
number of your choice.
A MIDI note can only be assigned to a single pad. If you try to assign a MIDI
note that has already been assigned, the display will read, (Used:Pad ??) and
show the pad where the MIDI note has been assigned.
The following table shows the General MIDI standard drum mapping.
Note MIDI Note GM Inst
A4 69 Cabasa
F#3 54 Tamborine
E2 40 Electric Snare
D2 38 Acoustic Snare
A#3 46 Open Hi Hat
D3 50 High Tom
B2 47 Low Mid Tom
G2 43 High Floor Tom
F5 77 Low Wood Block
D#2 39 Hand Clap
C#2 37 Side Stick
C2 36 Bass Drum
F#2 42 Closed Hi Hat
D#3 51 Ride Cymbal 1
C#3 49 Crash Cymbal 1
G3 55 Splash Cymbal
Page 82

72 System Settings
Dave Smith Instruments
System: MIDI Polyphonic Keyboard Play
Tempest can double as a 6-voice polyphonic analog keyboard synthesizer, playing the selected sound polyphonically and responding to your MIDI keyboard’s
sustain pedal and pitch bend wheel.
1. MIDI: Synth IN Channel: Off, 1…16—
Sets the channel on which one of
Tempest’s Sounds can be played from an external MIDI keyboard or other MIDI
controller, or a MIDI sequencer. When used strictly as a MIDI sound module,
Tempest behaves as a six-voice analog poly synth. It responds to note messages
and the “standard” controllers (pitch bend, mod wheel, aftertouch, channel pressure, etc.), provided that the Sound has those modulation sources routed to some
destination.
When used to record notes to Tempest’s sequencer, the external keyboard or
controller controls the note’s pitch, but otherwise acts much the same as record
-
ing from a pad: only one note can be recorded at a time. Velocity and duration
are also recorded. Timing is subject to the current Quantize setting. Because the
sequencer is event-based, continuous controllers such as pitch bend, mod wheel,
and aftertouch are ignored.
IMPORTANT! The MIDI: Synth IN Channel must be set to a different
channel than Remote Pad: IN Channel in order to function properly. If they
are set the same, the note-to-pad mapping detailed under “Remote Pad: IN
Channel” overrides the MIDI: Synth functionality.
Notes played via MIDI are prioritized higher than notes played by Tempest’s
sequencer, so the sequencer should not steal voices while notes are playing via
MIDI. Notes played by the pads have the same priority as MIDI notes, so they can
steal voices from MIDI notes and vice versa.
2. MIDI: Synth Sound:
A1…A16—
Used to choose the pad—and its assigned
Sound—that plays on the MIDI: Synth IN Channel. Because this is currently a
system-level setting, MIDI data will be routed to the chosen pad, regardless of
the loaded Beat or Project.
3. MIDI: Synth Root Note:
C0…C10—
Sets the note at which the external MIDI
controller plays the Sound at the same pitch as playing it from the pad in 16 Sounds
mode. For example, the pad plays the sound as an A. In order to play the Sound from
a MIDI keyboard without transposing, MIDI: Synth Root Note should also be set to
an A, perhaps A4 or A5 to play in close proximity to middle C on the keyboard.
Page 83

73
Tempest Operation Manual
System Settings
4. MIDI: Sequencer Out Channel:
Off, 1…16—
Selects the channel used to
output MIDI note number messages from a Sound’s sequencer track.
5. MIDI: Sequencer Sound:
A1…A16, B1...B16—
Used to choose the Sound
that plays on the MIDI: Sequencer Out Channel.
System: MIDI Clock
1. MIDI: Clock Mode:
Off, Master, Slave, Slave Thru—
In Master mode,
Tempest transmits MIDI clock and start, stop, and continue messages.
In Slave mode, Tempest syncs to incoming MIDI clock and responds to start,
stop, and continue messages. When slaved to an external MIDI clock, Tempest’s
Tempo display is preceded by “EXT.” The master BPM (beats per minute) is not
transmitted via MIDI as a numerical value, so Tempest must calculate the BPM
from the incoming clock, and the value displayed by Tempest is subject to round
ing and the accuracy of the master clock. In other words, Tempest’s displayed
BPM value may be slightly different from the master’s, even though they’re
perfectly synced.
In Slave Thru mode, Tempest syncs to MIDI clock and forwards incoming MMC
and clock messages to the MIDI Out port.
In Slave and Slave Thru modes, if no MIDI clock is present at the selected
input, Tempest will not play.
When clock mode is set to Off, MIDI clock is neither transmitted nor received.
2. MIDI: Clock IN Cable:
None, MIDI Port, USB—
MIDI Clock data from
another synthesizer or sequencer can be received through either the MIDI Port or
the USB cable. If set to “None” MIDI clock data is ignored.
3. MIDI: Clock OUT Cable:
None, MIDI Port, USB, MIDI•USB—
MIDI
Clock data can be sent out via the MIDI Out port, the USB Port, or both MIDI
and USB. If “None” is selected, MIDI clock out is disabled.
Page 84

74 System Settings
Dave Smith Instruments
System: MIDI System Exclusive
1. MIDI: Sysex IN-OUT Cable:
None, MIDI Port, USB—
This control allows
you to select either the MIDI port or USB connector for MIDI Sysex data trans
-
fers. If “None” is selected, Sysex will be neither transmitted nor received.
USB Sysex transfers are only supported with Mac OSX and Windows 7.
System: BPM/Swing/Comp/Dist Sources
1. BPM Source:
Project, Beat—
Each Beat has its own unique tempo setting
(in beats per minute or BPM) but there is also a single tempo setting for the Project. If you wish to use the Beat’s tempo setting (and have the tempo change when
a different Beat is selected), set this to Beat (factory default). If you wish to use
the Project’s tempo setting (so that the tempo stays the same regardless of which
Beat is playing), select Project. Saving a Beat with BPM Source set to Beat saves
the Beat with the current BPM. Saving a Project with BPM Source set to Project
saves the Project with the current BPM.
2. Swing Source:
Project, Beat—
Each Beat has its own unique swing setting
(50% to 75%) but there is also a single swing setting for the Project. If you wish
to use the Beat’s setting (and have the swing amount change when a different
Beat is selected), set this to Beat (factory default). If you wish to use the Project’s
swing setting (so that the swing amount stays the same regardless of which Beat
is playing), choose Project. Saving a Beat with Swing Source set to Beat saves
the Beat with the current swing setting. Saving a Project with Swing Source set
to Project saves the Project with the current swing setting.
3. Compression Source:
Project, Beat, Pot Position—
Each Beat has its
own unique compression setting but there is also a single compression setting
for the Project. If you wish to use the Beat’s setting (and have the compression
amount change when a different Beat is selected), set this to Beat. If you wish to
use the Project’s swing setting (so that the compression amount stays the same
regardless of which Beat is playing), choose Project (factory default). If you wish
the Compression setting to always reect the position of the Compression knob,
choose Pot Position. Saving a Beat with Compression Source set to Beat saves
the Beat with the current compression setting. Saving a Project with Compression Source set to Project saves the Project with the current compression setting.
4. Distortion Source:
Project, Beat, Pot Position—
Each Beat has its own
unique distortion setting but there is also a single distortion setting for the
Page 85

75
Tempest Operation Manual
System Settings
Project. If you wish to use the Beat’s setting (and have the distortion amount
change when a different Beat is selected), set this to Beat. If you wish to use the
Project’s distortion setting (so that the distortion amount stays the same regardless of which Beat is playing), choose Project (factory default). If you wish the
distortion setting to always reect the position of the Distortion knob, choose Pot
Position. Saving a Beat with Distortion Source set to Beat saves the Beat with the
current distortion setting. Saving a Project with Distortion Source set to Project
saves the Project with the current distortion setting.
System: UI Preferences
1. Solo/Mute behavior:
Seq+Live, Seq Only—
In Seq+live mode, Solo and
Mute functions always affect a pad that is physically pressed (as well as any
sequenced data for its associated sound). In Seq only mode, Solo and Mute func-
tions affect only sequenced data, allowing you to trigger a sound when a pad is
physically pressed.
2. Sounds slider mode:
Step, Realtime—
In SteP mode, note FX data input
from Tempest’s Sound Sliders is recorded per step. This does not allow for auto-
mating effects such as smooth lter sweeps. In Realtime mode, the two sound
sliders affect Note FX for a sound in realtime during performance. While note
FX data is still recorded in step format when sequencing, this allows you to add
non-stepped, uid, realtime control during live performance.
3. Touch Slider Latch Mode: Active Only, All— When set to Active Only
(the default) and latCh on is active, the latched slider value is reset to 0 when
switching between FX1 and FX3, playing another pad, or switching between 16
SoundS and 16 BeatS modes. FX2 and FX4 behave similarly.
When set to All and
latCh on is active, the slider values stay latched for a given
Sound, even when switching among FX1, FX2, FX3, and FX4, playing other
pads/Sounds, or switching between 16 SoundS and 16 BeatS. Turning latch off
resets all latched values to 0.
For details about the touch sliders, see “Real Time FX” on page 35.
4. Latch Button behavior:
Normal, Shift Switched, Disabled—
In Normal
mode, the touch slider remains at the last value when latCh on is active.
In Shi Switched mode, the un-shifted and shifted behaviors are swapped. That
is, the
latCh on buttons now switch between FX1 and FX3 or FX2 and FX4.
Shift + latCh on turns latch on and off.
Page 86

76 System Settings
Dave Smith Instruments
When set to Disabled, the latCh on buttons simply switch between FX1 and
FX3 or FX2 and FX4 and the latch function is disabled.
For more details about
latCh on, see “Real Time FX” on page 35.
5. Envelope Amount Encoder behavior:
Normal, Shift Switched—
In
Shift Switched mode, the un-shifted (
amount) and shifted (veloCity amount)
behaviors are swapped. That is, when
Shift is off, the encoder controls veloCity
amount and when on, amount.
6. Select Sound behavior:
Shift On + Pad, Shift Held + Pad—
The default
behavior is
Shift Held + Pad. To select a Sound for editing without playing the
Sound, hold
Shift down and press the desired pad. When set to Shift Held + Pad,
the pads can still be played when
Shift is on.
When set to Shift On + Pad,
Shift must either be on or held down to select the
Sound.
7. Tap Tempo behavior:
Shift On + Play, Shift Held + Play—
With
Tempest’s default behavior (Shift Held + Play), must be held to tap the tempo.
Otherwise, Play starts/restarts the Beat, whether Shift is on or not. When set to
Shift On + Play, Play is used to tap the tempo when Shift is either on or held
down.
System: System Actions
1. Calibrate Analog Oscillators and Filters: Tempest’s analog waveshapes
and lters are calibrated at the factory and should not need to be recalibrated
unless you are experiencing problems.
2. Calibrate Slider 1 and 2 Position: Tempest’s Sliders are calibrated at the
factory and should not need to be recalibrated unless you are experiencing prob
-
lems.
3. Calibrate Drumpads: Tempest’s Sliders are calibrated at the factory and
should not need to be recalibrated unless you are experiencing problems.
4. Reset System Parameters: Resets all the system parameters to their default
values.
5. Show System Information: Displays the current versions of the operating
systems.
Page 87

77
Tempest Operation Manual
System Settings
Page 88

78 Modulation Sources
Dave Smith Instruments
Modulation Sources
Pitch Envelope
Filter Envelope
Amp Envelope
Aux 1 Envelope
Aux 2 Envelope
LFO 1
LFO 2
Velocity
Note Number
Noise
Random
Pad Pressure
Slider Position 1
Slider Position 2
Slider Pressure 1
Slider Pressure 2
Foot Pedal 1
Foot Pedal 2
MIDI Pitch Bend
MIDI Mod Wheel
MIDI Breath
MIDI Expression
Page 89

79
Tempest Operation Manual
Modulation Destinations
Modulation Destinations
Osc 1 Frequency
Osc 2 Frequency
Osc 3 Frequency
Osc 4 Frequency
Osc All Freq
Osc 1/2 Mix
Osc 3 Level
Osc 4 Level
Osc 1 Pulsewidth
Osc 2 Pulsewidth
Osc 1/2 Pulsewidth
Sub Osc Volume
Feedback Volume
Lowpass Filter
Resonance
Filter FM
Highpass Filter
VCA
Pan
LFO 1 Frequency
LFO 2 Frequency
LFO All Freq
LFO 1 Amount
LFO 2 Amount
LFO All Amount
Pitch Env Amount
Filter Env Amount
Amp Env Amount
Aux 1 Env Amount
Aux 2 Env Amount
All Env Amount
Pitch Env Attack
Filter Env Attack
Amp Env Attack
Aux 1 Env Attack
Aux 2 Env Attack
All Env Attack
Pitch Env Decay
Filter Env Decay
Amp Env Decay
Aux 1 Env Decay
Aux 2 Env Decay
All Env Decay
Pitch Env Release
Filter Env Release
Amp Env Release
Aux 1 Env Release
Aux 2 Env Release
All Env Release
Mod 1 Amount
Mod 2 Amount
Mod 3 Amount
Mod 4 Amount
Mod 5 Amount
Mod 6 Amount
Mod 7 Amount
Mod 8 Amount
Page 90

80 Samples
Dave Smith Instruments
Samples
White Noise
Pink Noise
Green Noise
Resonant 4K Noise
So Noise
Cicada
Buzzed
Chain Link
Grinder
420 HighPass Noise
Tight Boom
Porky
Hollow ud
Hollow Head
Mid Kick
Slap Kick
wang Kick
Resonant K
Boom Kick
Quickick
Punchy Kick
Nice
Short n Sweet
Bumpy
Loose
Solid ump
Upfront
Good Kick
Metallic
Square
Beefy
Flat
Shorty ud
SCI Tom Cart Kick
LM-1 Bass Drum
LinnDrum Bass
909ish
808ish
Long Time 808
Cut the Mustard
Electron K
Flab
Solid
Early Nineties
DigiBonk
Woosh Kick
Dirty Woosh
Distorted 09
Grain Granny
Bit Reduction
Back Scatter
Crunchy
Distorted Bump
Reversed
Orangey
Snare Add Rim
Mid Head
Acoustic
Good Hit
Some Head
Supra Snare
Loose Ring
Trick Snare Rim
Resonant Loose
Cool Rim
Another Edge
Cut Snare
Muted Half Edge
High Edge
Cracker
Light Rim
Dry Rim
Pickle-O
Woody Side
Side Stick
Dead Side Stick
Sharp Side
Rim Cut
808 Rim
909 Rim
AcouStick
LinnDrum Rim
Tom Cart Rim
SweetDaOneSnare
808ish
Quickie
Short n Tight
High Short
30 Day Snare
Fat 9009
Page 91

81
Tempest Operation Manual
Samples
Funk Sn
LM-1 Snare
LinnDrum SD
Basicly
Beatbox
Machine
Twin
Dry
Short Attack
Digi 8
CompuSnare
Plastic
Snare Trash
Bucket
Toy Drum
Abrupt
What Snare?
Canned
Dead Lid
Tom Cart SD
Classic
DR55 SD
Cold hit
Zippy wack
Crumbly
70s Snare
Bit Reduce SD
Distant
Filtered SD
Oil Can
Digital Sweetness
Noisy Click
Splatted Snare
Broken SD
Ghost of a Snare
Video Game
Caved Perc
Reverse Snare
Edge Heavy
Pedal Edge
Pedaled AM
Half Edge
Open Edge
Sharp Closed
Sharp Pedal
Sharp Half
Sharp Open
Zilch Closed
Zilch Pedal
Zilch Open
Pastey
Pastey Half
Heavy Closed
Heavy Open
Boss Closed
Boss Open
Dark Cl
Dark Opn
Amazon Closed
Amazon Half
Trash Hat
Loose Open Hat
Close Foot Pedal
LM-1 Closed
LM-1 Open
LinnDrum HH Closed
LinnDrum HH
LinnDrum HH Open
Close Tambo
Tight Studio Hat
Crack Hat
Accent
HH Dub Plate
Dry Tap
Peace Corp
Old Timer
Blu Pedal
Fake
Open Fat
Abrasive
Tic Tac
Noise Hat
Reversed
Dirty Pedal
Barely ere
Click
Quiet
Shorty HH
One Foot Pedal
8080 HH
8080 Open
808ish Maraca
9009 HH
Page 92

82 Samples
Dave Smith Instruments
9009 HH2
Perc Hat
DR55 HH
Right Foot Pedal
Another Perc
Closing HH
Small Hi Hat
Unnatural
Trip Hop HH
Aliens
Silver HH
Kicky Hi Hat
Large Edge Cymbal
Zilch Crash
Gong
Pastey Hit
45 Degree Dust
Bell Crash
Oriental Hit
Higher Cymbal
No Name Crash
909ish
LinnDrum Crash
808ish Crash
Hertz Cymbal
Flat Ride
Medium Bell
Blue High Ride
Small Gong
Smooth Ride
Shortcut
LinnDrum Ride
909ish Crash
Tom Splash Cart
Reverse CY
Res Hi
Res Mid
Res Floor
Nice Hi
Nice Mid
Nice Floor
Punchy Hi
Punchy Mid
Punchy Low
Hi Maple
Mid Maple
Low Maple
Blue Tom Hi
Blue Tom Lo
Tonic Tom Hi
Tonic Tom Low
Acoustic Hi
Acoustic Low
Tom Sp lat
udd Tom
Wood Wor ld
SCI Tom Cart
LM-1 Hi Tom
LM-1 Lo Tom
LinnDrum TomHi
LinnDrum TomMid
LinnDrum TomLo
808ish Hi Tom
808ish Mid Tom
808ish Low Tom
909ish Tom Hi
909ish Tom Mid
909ish Tom Low
Reverse Hi
Reverse Mid
Reverse Low
Clap 9090
Layered Clap
Slap Clap
Digi Clap
NotDisClap
PerClapsaLot
LM-1 Clap
LinnDrum Clap
808ish
9090
Reverse Clap
How Now
Real Cow
Tang C ow bel l
Dinky Cow
Short Cow
80s Cowbell
LM-1 CowB
LinnDrum CowB
OG 808 Cow
Reverse Cowbell
Cross Stick
Page 93

83
Tempest Operation Manual
Samples
Light Cross
Low Cross
Jam Block H
Jam Block L
Keys
Guiro
Castanet
Drag at Click
Moon Golf
Real Shaker
Cabasa A
Cabasa B
LM-1 Cabasa
LinnDrum Cabasa
Real Fingers
Cute Drum Robot
Digi Click
Bit-o-Clap
Hot Tabla Lo
Hot Tabla Mid
Hot Tabla Hi
Hot Tabla Highest
Tabla Bounce
Udu Bounce
Udu u Do 1
Udu u Do 2
What Conga
Conga 1
Conga 2
Conga 3
808ish Hi Conga
808ish Lo Conga
LM-1 CongaHi
LM-1 CongaLo
LinnDrum Conga
Tambourine
Tambo Ring
TamBell
Metal Tamb
Wood Tamb
LM-1 Tamb
LinnDrum Tamb
Raucous Tamb
Tri HiFi
Short Triangle
Noisy Bell
Flexi A
Flexi B
Stick on Metal
Clank
Sounds Like?
Abrupt Metal
808ish Clave
Rico Clave
Phazey Click
Coming Up
Choked Perc
Hollow Box Lid
Oil Drum
Canned Perc
Half Full
Pla-stick
Punch n Drag
Nutrino
Solar Explosion
Wrinkled
Quark
Particulate
Hadron
Flutter
Broken Toy
Click Reduction
Fazzle
Grunt
Bucket Bottom
Charged Porceline
Brrrrr
Shorted
BeatBox
Tap at
Boxer2
Flat Perc
Flat Click
Filtered Perc
Vac ant
Hybrid Click
SCI Tom Cart Laser
SCI Tom Scratch
Needle On
Outta Time
Sine 130.81 Hz
Sine
Sawtooth
Page 94

84 Samples
Dave Smith Instruments
Square
WmB el l
RdBell
R2Bell
W2Bell
FmtBell
FzReed
FmtAOh
FmtAhh
Banjo1
TriPlus
DisBel
Pulse2
Pulse3
SqrReed
Oohh
Eehh
Feedback
Piano1
E.Pno
M.Harm
VS 23
Hi Top
WmReed
VS 26
Hollow
BellOrg
BassBell
Tine1
SynBell
VS 32
Orient
HighPipe
Mass
ReedOrg
OrgAhh
MelOrg
Clarinet
AhhFem
AhhHom
AhhBass
RegVox
Voca l1
Voca l2
Harmony
Bass
Guitar
Nice
WWind
Oboe
Harp
Pipe
Hack1
Hack2
Hack3
Pinch
BellHrm
Bel lVox
Hi Harm
Hi Reed
BellReed
WmWhistl
Corn
Flute 2
Med Pure
Tub a
FullBell
Bell
Pinch
Clustr
M.Pinch
Vox Pn ch
OrgPnch
AhhPnch
PnoOrg
BrReed
NoFund
ReedHrm
LiteFund
MelOrg
Bell Partials 1
Bell
VS 84
VS 85
VS 86
VS 87
VS 88
VS 89
VS 90
VS 91
VS 92
Piano2
Bell Partials 2
VS 95
Page 95

85
Tempest Operation Manual
Support
Support
Troubleshooting
Here are a few suggestions for resolving problems that may occur.
The sequencer has stopped running.
Make sure MIDI: Clock Mode in the System menu is set to Auto, Master,
or Off, or—if set to Slave—that MIDI: Clock In is set to MIDI Port or USB
and that MIDI clock is actually available to that port.
An oscillator or lter sounds strange or out of tune.
In the System menu, choose Calibrate Analog Oscillators and Filters.
Note: It is not necessary to run the calibration routine on a regular basis.
You should only run it if you are experiencing problems.
The Real Time FX sliders are not behaving as expected or don’t
seem to go full range.
In the System menu, choose Calibrate Slider 1 and Slider 2 Position and
follow the instructions to calibrate the sliders.
Still experiencing a problem?
From the System menu, choose Reset System Parameters.
Contacting Technical Support
If you are still having a problem with Tempest, contact Technical Support at
support@davesmithinstruments.com. Please include your Tempest’s serial
number, the versions of the operating systems (from the System menu, choose
Show System Information), and the purchase date.
If you have not already reset the Global parameters and run the calibration
routine (see “Troubleshooting,” above), you should do it before contacting Technical
Support. It’s probably the rst thing they’ll ask you to do.
Page 96

86 Warranty Repair
Dave Smith Instruments
Warranty Repair
Dave Smith Instruments warrants that Tempest will be free from defects in materials and/or workmanship for 1 year from the date of purchase. Please register
your product online at www.davesmithinstruments.com to establish the date of
purchase. (This is not a requirement for warranty service, but it will help expedite
the process.)
Please contact support@davesmithinstruments.com to determine the best course
of action for getting your Tempest repaired. For your own protection, as well
as ours, please do not return any product to Dave Smith Instruments without a
return authorization (RA) number. To issue an RA number, Technical Support
needs:
• Your name
• Your return address
• Your email address
• A phone number where you can be reached
• Your Tempest’s serial number
• The date of purchase and where purchased
If you need to return your instrument for repair, you are responsible for getting
it to DSI. We strongly suggest insuring it and packing in the original packaging.
Damage resulting from shipping a product with insufcient packaging is not
covered by warranty.
Page 97

87
Tempest Operation Manual
Warranty Repair
Page 98

88 Warranty Repair
Dave Smith Instruments
Page 99

Page 100

Dave Smith Instruments
1527 Stockton Street, 3rd Floor
San Francisco, CA 94133
USA
www.DaveSmithInstruments.com
DSI-807R 2-23-15
 Loading...