

Page 1

Pro 2 Manual Addendum
OS Version 1.2
Pro 2 OS version 1.2 adds a number of new features not covered in the main
Operation Manual. These features are described in the following Addendum in
the order shown below.
New Features in OS 1.2
• Disable Sequencer Notes (track 1) option
• Copy and Paste Sequencer track data
• MIDI note output for the arpeggiator
• New modulation destinations: Osc 1-4 Slop, Osc All Shape Mod, Delay All Time
• Disable screen saver option for OLED display
• Footswitch starts/stops sequencer
• Sequencer sends MIDI/Start Stop transport commands
• Ignore MIDI Start/Stop commands when slaved option
• New MIDI Clock Out destinations
• Support for MIDI Program Change commands
Checking Your Operating System Version
If you’ve just purchased your Pro 2 new, OS 1.2 should already be installed. If you
purchased your Pro 2 prior to August 17, 2015 and wish to use the new features
described above, you’ll need to update your OS to version 1.2 or later.
To update your Pro 2 OS, you’ll need a computer and a USB cable, or a MIDI cable
and MIDI interface. To download the latest version of the Pro 2 OS along with
instructions on how to perform a system update, visit the DSI website at:
http://www.davesmithinstruments.com/download-latest-pro-2-os/
1
Page 2
To check your OS version:
1. Press the global button. The screen displays the version of the currently
loaded OS.
2. If your OS is out of date, download the latest version from the URL above and
update your instrument using the instructions included with the download.
Disabling the Sequencer’s “Notes” Track
You can now turn off the sequencer’s default “Notes” track. By design, sequencer
Track 1 always controls oscillator frequency, meaning that it is effectively hardwired for recording notes.
However, you may want to use the sequencer to control other parameters without
having it trigger notes. By doing so, you can freely play notes on the Pro 2
keyboard while the sequencer controls other non-note parameters such as lter
cutoff, character effect amount, oscillator shape mod, and so on.
To turn off Notes on the sequencer:
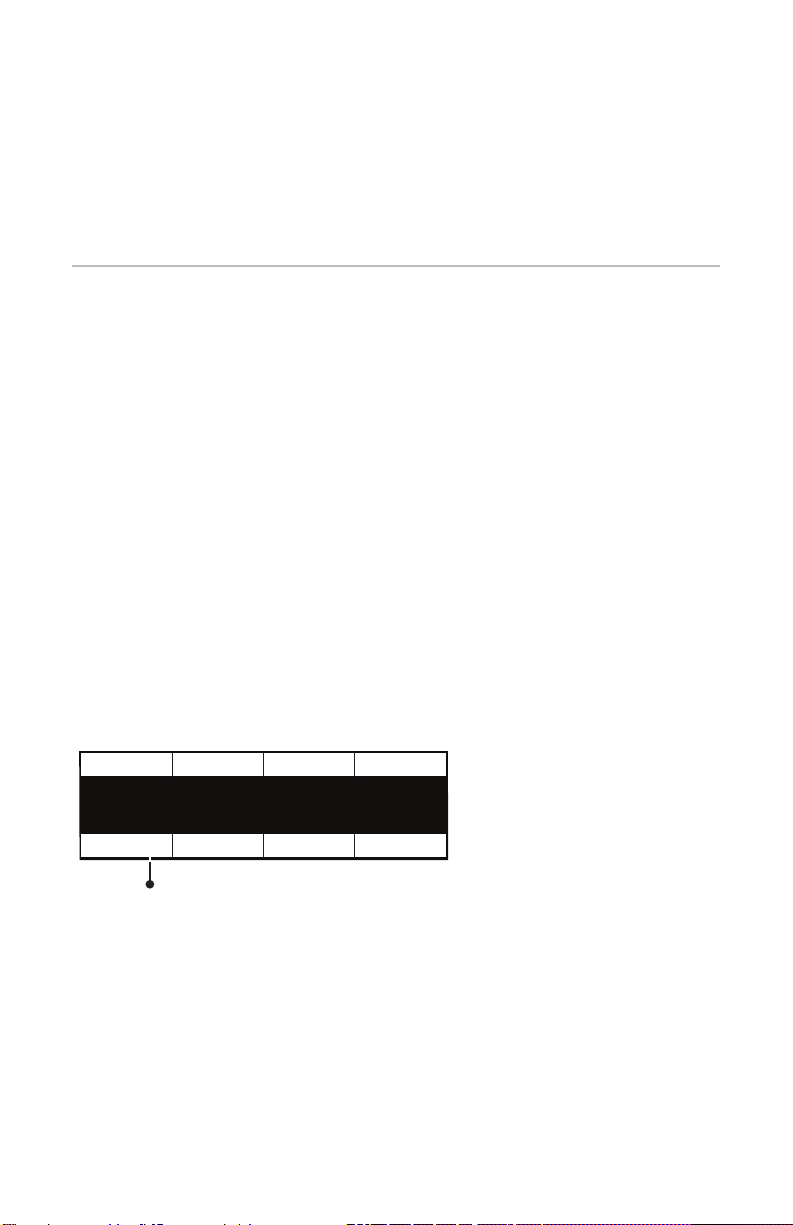
1. Press the front panel sequencer button to enable editing.
2. Press and hold the
3. Press soft button 1 (
Select Track Trk Note: E4 Trk Slew: 0 Trk Vel: 109
track select button then press sequencer Step LED 1.
notes) to set it to off.
Track 1: Seq Note
Press a sequence step button to select that track
Notes: On Copy Track Clear All Clear Track
Turn off Notes here
2
Page 3
Copy and Paste Data Between Sequencer Tracks
The Pro 2 sequencer now allows you to copy and paste data between tracks. This
makes it easy to replicate data on multiple tracks and route each of those tracks to
a different modulation source.
To copy and paste sequencer track data:
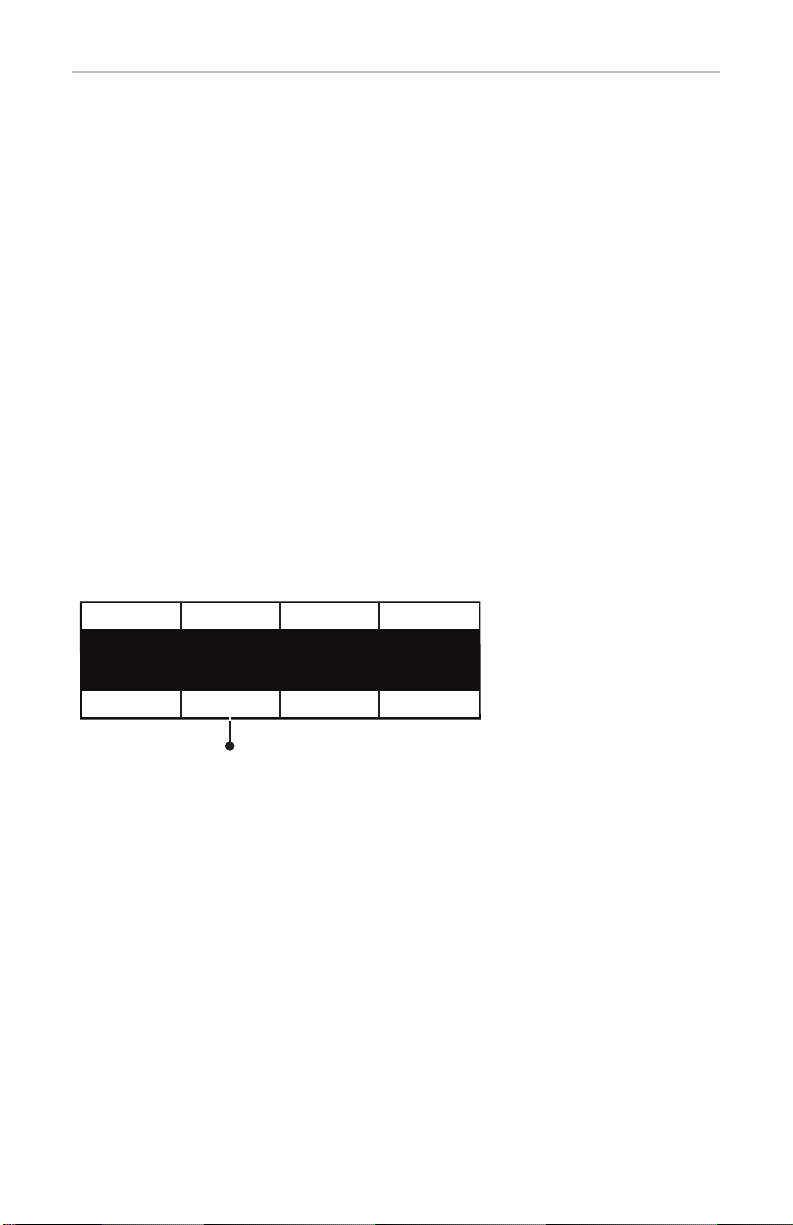
1. Press the front panel sequencer button to enable editing.
2. Press and hold the
track select button then press the sequencer Step LED
of the track that you want to copy data from.
3. Continue to hold down the
track select button and press soft button 2
(copy track).
4. Continue to hold down the
track select button and press the sequencer
Step LED of the track that you want to paste the data onto.
5. Continue to hold down the
track select button and turn soft knob 4 (dest)
to choose the modulation destination for the pasted data.
Select Track Trk Note: E4 Trk Slew: 0 Trk Vel: 109
Track 3: F1 Freq
Press a sequence step button to select that track
Notes: On Copy Track Clear All Clear Track
Press soft knob 2 to
execute the copy command
3
Page 4

MIDI Note Output from the Arpeggiator
The Pro 2’s Arpeggiator now outputs MIDI note numbers. Any notes that you
hold on the Pro 2 keyboard will be arpeggiated according to the current settings
of the Arpeggiator and output over MIDI as MIDI notes. You can use this feature
to drive other MIDI-equipped devices such as synthesizers and drum machines.
To access this feature, use the midi arp notes setting in the global menu.
To enable MIDI Note output from the arpeggiator:
1. Press the global button, then turn soft knob 1 to select midi arp notes
(global item #14).
2. Turn soft knob 3 (
off/on) and select on. Press the global button again to
exit the Global menu.
To control an external MIDI device:
1. Connect the MIDI output of the Pro 2 to the MIDI input of the external
device.
2. On the Pro 2, press the
select (global item #11).
3. Turn soft knob 3 (
global button and turn soft knob 1 to select midi out
off/on) to select midi. Press the global button again to
exit the Global menu.
4. On the external device, set the the MIDI Channel and MIDI Receive port to
match the Pro 2.
5. Hold down a chord on the Pro 2. The external device should be triggered by
the arpeggiated notes.
4
Page 5

New Modulation Destinations
The Pro 2 has several new modulation destinations. These include:
• Slop (“
• Osc All Shape (“
• All Delays (“
To access the new modulation destinations:
osc 1 slop, osc 2 slop, osc 3 slop, osc 4 slop, osc all slop”)
osc all shape mod”)
delay all time”)
• In the mod section, press the assign destination button, then turn soft knob 4
(destination) to select the desired modulation destination.
Disable Screen Saver for the Display
The Pro 2 OLED display has a built in screen saver that puts it to sleep when not
in use. This feature is designed to prolong the life of the display and we recommend using it. If, however, you want to disable this feature, you can now do so.
To disable the screen saver for the OLED display:
1. Press the global button, then turn soft knob 1 and select screen saver (item
#34).
2. Turn soft knob 3 (
exit the Global menu.
off/on) and select off. Press the global button again to
Footswitch Starts/Stops Sequencer
You can now trigger the sequencer to start and stop playback using a footswitch.
To enable a footswitch to trigger the sequencer:
1. Connect a footswitch to the rear-panel footswitch jack.
2. Press the
switch function).
3. Turn soft knob 3 (
again to exit the Global menu.
global button, then turn soft knob 1 and select item #26 (foot-
mode) and select seq start/stop. Press the global button
5
Page 6
Make sure that pedal polarity is set correctly for your footswitch so that it behaves as
expected. If you need to change it, press the global button and use item #20 (pedal polarity).
To congure the sequencer:
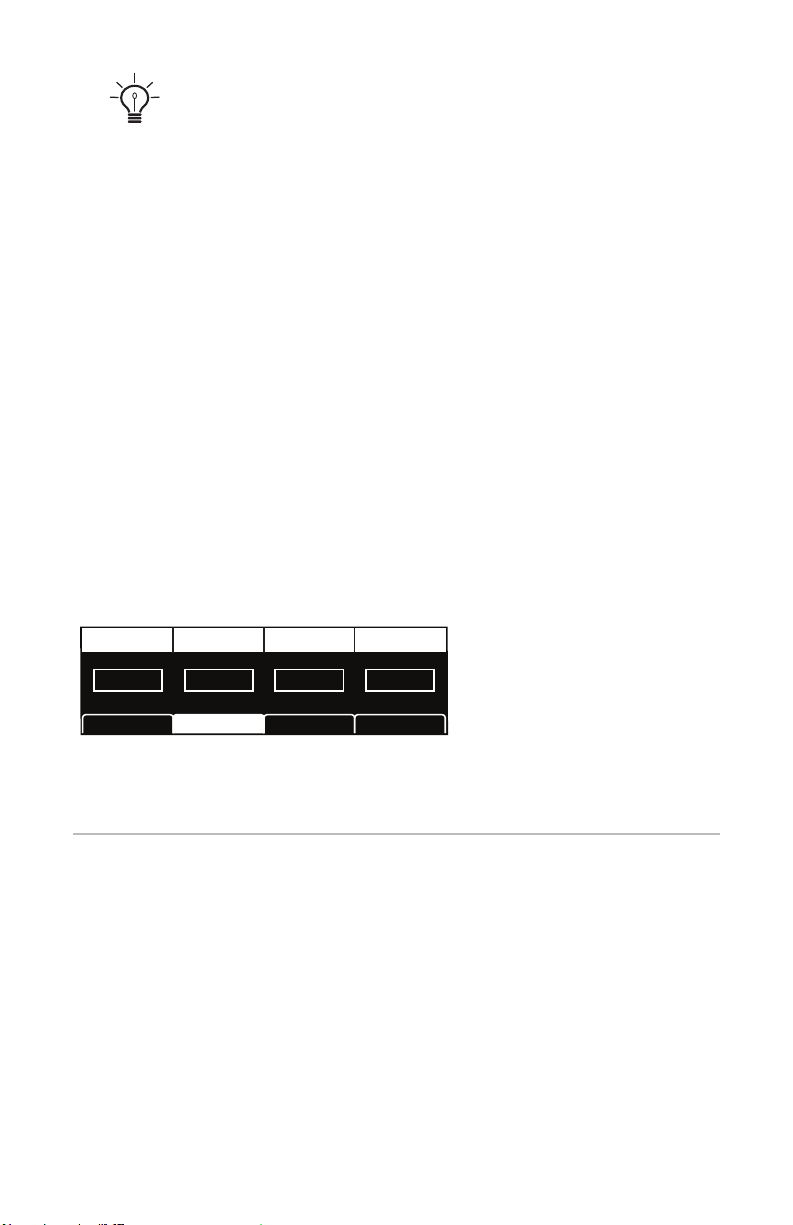
1. Press the front panel sequencer button to enable editing.
2. Press soft button 2 (
3. Turn soft knob 1 (
4. Turn soft knob 2 (
5. Turn soft knob 3 (
seq) to access the sequencer’s triggering parameters.
play source) and select sequencer.
play mode) and select normal.
restart) and select on or off depending on whether you
want the sequence to restart from its beginning each time you trigger it.
6. Turn soft knob 4 (
env trig/step) and select on or off depending on whether
you want the sequence to retrigger the Pro 2 envelopes with each step (on)
or only at the initial sequence trigger (off).
7. Once congured, press the footswitch to trigger sequencer playback. Press
it again to stop playback.
Play Source RestartPlay Mode Env Trig/Step
Sequencer Normal On On
SeqSeq+Arp
Congure the sequencer parameters as shown above
RESTART ENV TRIG/STEPPLAY MODEPLAY SOURCE
Arp Seq Misc
Sequencer Sends MIDI Start/Stop Transport Commands
The Pro 2 sequencer now sends MIDI Start/Stop Transport commands by
default. This makes it easy to control playback of DAWs and other devices using
the Pro 2. Starting sequencer playback on the Pro 2 will automatically start trans
port playback on an external device that is congured to accept MIDI Start/Stop
commands.
6
-
Page 7

Ignore MIDI Start/Stop Transport Commands
The Pro 2 can now be congured to ignore MIDI Start/Stop commands when its
clock is slaved to an external device.
To ignore MIDI Start/Stop messages when slaved to an external MIDI Clock:
1. Press the global button, then turn soft knob 1 and select item #4 (midi
clock mode).
2. Turn soft knob 3 (
3. Press the
global button again to exit the Global menu.
mode) and select slave no s/s.
New MIDI Clock Out Destinations
The Pro 2 now allows you to select among its various rear-panel data ports for
sending MIDI Clock output. Choices include:
• MIDI Port
• USB
• MIDI Port 2
• MIDI Port 1+2
To set the MIDI Clock Out port:
1. Press the global button, then turn soft knob 1 and select item #5 (midi
clock cable).
2. Turn soft knob 3 (
list above.
3. Press the
global button again to exit the Global menu.
midi cable) and select one of the available ports. See the
7
Page 8

Support for MIDI Program Change Commands
The Pro 2 can send MIDI Program Change commands. This makes it easy to
change programs/presets on synthesizers and other devices connected to the Pro 2
using MIDI/USB. When enabled, selecting a program on the Pro 2 will select a
program with a corresponding number on an external synthesizer or device that
is congured to accept MIDI Program Change commands.
OS version 1.2 gives you the ability to turn this function on or off.
To enable or disable MIDI Program Send:
1. Press the global button then turn soft knob 1 and select item #13 (midi
program send).
2. Turn soft knob 3 (
off/on) and select either off or on, depending on your
preference.
3. Press the
commands. Consult the device’s documentation if necessary.
Send parameter allows you to increment or decrement through Pro 2 programs correctly with
Local Control off and without sending the outgoing MIDI stream back to the Pro 2. Though the
program number won’t change on the Pro 2 display, the correct messages will be sent to the
MIDI output.
global button again to exit the Global menu.
Make sure that the external device is congured to accept MIDI Program Change
If you’re using the Pro 2 as a MIDI controller for other devices, the MIDI Program
Dave Smith Instruments
1527 Stockton Street, 3rd Floor
San Francisco, CA 94133
USA
www.davesmithinstruments.com
DSI-10120R
8
 Loading...