

Page 1
Operation Manual
Page 2

Page 3

Mopho SE
Operation Manual
Version 1.1
November 2013
Dave Smith Instruments
1527 Stockton Street
2nd Floor
San Francisco, CA 94133
USA
©2013 Dave Smith Instruments
www.DaveSmithInstruments.com
Page 4

Tested To Comply
With FCC Standards
FOR OFFICE USE
This device complies with Part 15 of the FCC Rules. Operation is subject to the
following two conditions: (1) This device may not cause harmful interference and
(2) this device must accept any interference received, including interference that
may cause undesired operation.
This Class B digital apparatus meets all requirements of the Canadian InterferenceCausing Equipment Regulations.
Cet appareil numerique de la classe B respecte toutes les exigences du Reglement
sur le materiel brouilleur du Canada.
For Technical Support, email: support@davesmithinstruments.com
Page 5

Contents
Quick Start ................................................................................................ 1
Getting Connected .................................................................................... 3
Basic Operation ........................................................................................ 5
Global Parameters .................................................................................... 9
Oscillators ............................................................................................... 13
Mixer ....................................................................................................... 16
Filter ........................................................................................................ 17
Envelopes ............................................................................................... 18
LFO ......................................................................................................... 19
Sequencer ............................................................................................... 21
Modulators .............................................................................................. 27
Miscellaneous Modulators ...................................................................... 28
Clock ....................................................................................................... 29
Miscellaneous Parameters ...................................................................... 31
Modulation Sources ................................................................................ 33
Modulation Destinations .......................................................................... 34
Using USB .............................................................................................. 36
Using Audio In ......................................................................................... 38
Using Poly Chain .................................................................................... 39
Support ................................................................................................... 42
MIDI Implementation ............................................................................... 44
MIDI Messages ................................................................................... 45
NRPN Messages ................................................................................. 47
Global Parameter Data ........................................................................ 49
Program Parameter Data .................................................................... 51
Sysex Messages ................................................................................. 58
Packed Data Format ........................................................................... 60
Pitch Wheel Calibration ........................................................................... 61
Page 6

1
Page 7

Quick Start
Thanks for purchasing your Mopho SE synthesizer! Listen to the sounds,
twiddle some knobs, have some fun!
Please Register!
Please go to www.davesmithinstruments.com and register your synth. If you
purchased directly from us, there is no need to register—we already have your
contact information.
Powering Up
Plug in the power supply, connect (in stereo!) to your mixer/sound system, and
start playing!
Try applying keyboard pressure (aftertouch) and the mod wheel. Many sounds
are fairly simple at first, then come alive when you use the controllers. With
other sounds, you may need to hold the notes a while to let the sound unfold.
Playing in different ways has a big effect on the programs.
Selecting and Editing Programs and Global Settings
You can use the increment and decrement (Inc/Yes and Dec/No) switches to
step through the programs. Use Param 1 to scroll quickly through the programs.
Param 2 changes banks. There are 3 banks of 128 programs.
If you want to edit a program, just turn any knob. The new value will be
displayed in the bottom line of the LCD (the top line displays the programmed
value for handy reference).
After turning knobs, just hit Program
screen, allowing you to change programs again.
Press and hold Program
level parameters such as MIDI channel number, Transpose/Detune, and so on.
The Param 1 knob changes the displayed page and Param 2 or increment and
decrement change the values. These settings are remembered when the synth is
turned off.
Summary
You should be up and running now; for more operation information, read on. Or,
just look up specific parameters for detailed notes. Pages 33 and 34 contain a
handy reference for mod sources and destinations. At some point you should
read through the manual to discover all the little features that you might not
notice at first.
briefly to display the Global menu and change higher
so the LCD goes back to the program/bank
Page 8

Don’t forget you get a free editor for Mac OS or Windows with your purchase.
Download it from www.soundtower.com/mopho.
I should mention that this manual does not include explanations of basic analog
synthesizer functions. It assumes you already know what an oscillator is, how a
low-pass filter affects the sound, what an ADSR envelope looks like, and so on.
Fortunately, these days it is quite easy to find such resources on the Internet. If
you want to learn the lingo and the basics, just try a search in Google (or the
search engine of your choice), something like “analog synthesizer tutorial.”
You’ll find plenty of good reading material.
Have fun!
Dave Smith
Special thanks to:
The DSI Team: Ashley Bellouin, Carson Day, Chris Hector, Tony Karavidas,
Mark Kono, Andrew McGowan, Joanne McGowan, and Tracy Wadley.
2
Page 9

Getting Connected
Mopho has several inputs and outputs on its back panel.
Power Input — Connect the power supply included with your Mopho. The
power supply comes with different AC adaptor prongs that enable it to work
almost anywhere in the world. If for whatever reason you need to use a different
supply, it must match the specifications printed on the front panel.
USB—Mopho transmits and receives MIDI data via this standard, Type B, USB
receptacle. See Using USB on page 36 for more information.
MIDI In—To receive MIDI data from another device, connect this to the other
device's MIDI Out.
MIDI Out/Thru—To send MIDI data to another device, connect this to the other
device's MIDI In. This output can also be configured as a MIDI Thru using the
MIDI Out Select parameter in the Global menu.
Poly Chain—Multiple synths can be poly chained for increased polyphony. For
details, see Using Poly Chain on page 39.
Note: When Poly Chain is turned off in the Global menu, the Poly Chain
output simply mirrors the MIDI Out and transmits the same data.
Sustain—Accepts a momentary, normally open or normally closed footswitch
to control sustain or to latch the arpeggiator. See “Sustain” under Global
Parameters on page 9 for more information.
Pedal/CV—This input can be connected to two types of controllers: a standard
expression pedal that has a variable resistor on a TRS (tip-ring-sleeve) ¼ inch
phone plug, or a synthesizer or other device capable of producing a control
voltage. The control voltage range is 0 to 3.3 volts DC, and the input is protected
against higher and negative voltages. For more information, see “Pedal” in
Global Parameters on page 9 and Miscellaneous Parameters on page 31.
Note: This input is heavily filtered for smooth, clean operation, so there
is a limit to the speed at which it will respond.
Audio In—
filter, envelopes, and VCA and
Mopho can be used as a signal processor. Audio is routed through the
—when the signal level is high enough—a gate is
generated. See Using Audio In on page 38.
Audio can also be used to advance the sequencer when Seq Trigger is set to
Audio In. See Sequencer on page 21 for more information.
3
Page 10

Left Out/Right Out—Mopho’s unbalanced left and right outputs.
Phones—A ¼ inch stereo headphone jack.
4
Page 11

Basic Operation
If you’re familiar with analog, subtractive synthesis there shouldn’t be anything
that looks terribly foreign or strange about Mopho’s front panel. All of the basic
building blocks are there. But one of the challenges of making a compact synth
is giving the user access to all the parameters within a limited amount of panel
area. Mopho has most of the parameters of the Prophet ’08, plus a couple more,
with a front panel that is more than 55% smaller!
Fortunately, several of the synth components have similar control requirements.
For example, Mopho has two oscillators and both oscillators have identical
control parameters. With a switch to select oscillator 1 or 2, one set of controls
can do double duty. Another set of controls handles most of the parameters for
all three envelope generators. And you can select both oscillators or all three
envelopes to edit a parameter simultaneously in all of them.
Other, less frequently used parameter names appear in light gray above the
corresponding knob or switch. Turn on Shift to access those parameters.
And finally, program-level parameters that are not typically performance
oriented are found in the Miscellaneous Parameters section.
The front panel is arranged so that the basic signal path components are in order
from left to right in the row closest to the keyboard: oscillators into mixer into
filter. (The VCA is the last part of the signal chain, but other than the Amplifier
Envelope, the only other control directly associated with the VCA is VCA
Level, which is in Miscellaneous Parameters.) The second row consists of
various modulators, including envelopes, LFOs, and the sequencer. The
remaining programmable parameters are for turning the arpeggiator and
sequencer on and off, setting the tempo and note value, and the aforementioned
Miscellaneous Parameters.
Non-Programmable Controls
The front panel controls can be divided into two groups, programmable and nonprogrammable. Everything contained within a gray “module” is programmable.
The non-programmable controls are for things like selecting programs and
transposing the keyboard. Their state—on, off, transposed, whatever—is not
saved along with the program.
Transpose—Allows the keyboard to be transposed in one octave increments
two octaves up or down. When transposed one octave, the corresponding LED
will be lighted, but dim. If the LED is brightly lit, Mopho is transposed two
octaves.
Shift—Used to access the shifted parameters.
5
Page 12

Program—Press to return Mopho to program mode. Hold to select global mode.
Compare—When editing a Program, press Compare to hear the saved version.
Turn Compare off to return to the edited version. Compare can also be used to
audition write destinations when moving a program.
Write—Press Write to save the program and write any edits to memory. You can
write the program to the same location or choose a different program number
using Param 1; Param 2 chooses the bank. Press Inc/Yes to confirm the write
and Dec/No (or Write again) to abort.
While there is a write pending, press Compare to hear the program in the target
destination prior to saving. Just be sure to turn Compare off before you actually
hit the Inc/Yes switch to save.
Param 1— Used to scroll through programs in program mode. In global mode,
used for scrolling through the global menu items.
Param 2—Used to change banks in program mode and edit the displayed
parameter in edit and global modes.
Inc/Yes and Dec/No—Increment or decrement programs in program mode or
values in edit mode and global mode. Also used to confirm or cancel/abort an
operation.
Push It—Push It is a manual trigger. Its behavior depends upon the Push It
Mode, Note, and Velocity settings, which are programmable. Why is a manual
trigger necessary when there are already 32 other manual triggers (that is, the
keys)? It is surprsingly handy, especially in Toggle mode. It can be used to start
and stop the sequencer or to just latch a droning note on. And that frees up both
hands to twist knobs!
Tap Tempo—With Shift on, Push It becomes Tap Tempo for setting the internal
clock’s BPM.
If Push It is set to Toggle mode and Sequence and Shift are on, tap five times to
set the tempo and toggle the Push It Note on, starting the sequencer. That is, a 4count to set the tempo and then a tap on beat 1 to start. To stop, turn Shift off
and press Push It again.
Tap Tempo can also be used to change the tempo while a sequence is playing. If
Shift is on while a sequence is playing, tap the button 5 times and the sequence
speed will change to the tapped tempo on the fifth hit. You can continue to tap
the button, slowing down or speeding up, and the sequence tempo will adjust
accordingly. The sequence will average and smooth out any small timing
differences.
6
Page 13

Modes of Operation
Mopho has three operating modes: program, edit, and global. In program mode,
Param 1, Param 2, and Inc/Dec are used to change from one saved program to
another. As soon as any of the programmable parameters are edited, that
parameter is displayed on the LCD, with the programmed value on the top line,
and the new, edited value on the bottom line. That is edit mode. To exit edit
mode and return to program mode, just press Program.
To enter global mode, briefly press and hold Program until the light goes off and
a global parameter is displayed on the LCD. Param 1 scrolls through the items in
the global menu and Param 2 and Inc/Dec change the values. For more
information, see Global Parameters on page 9.
7
Page 14

OSC 1
FEEDBACK/
EXT. IN GAIN
FEEDBACK/
EXT. IN VOLUME
FEEDBACK
SUB 1 VOLUME
SUB 2 VOLUME
VCA
PAN
L
R
VOLUME AUDIO OUT
NOISE VOLUME
SUBOSC
OSC 2
SUBOSC
NOISE
FILTER
OSC
MIX
AUDIO IN
MOPHO SIGNAL FLOW DIAGRAM
(Modulation routing omitted for clarity)
8
Page 15
Global Parameters
Display
MIDI Clock Setting
Internal
MIDI clock is neither sent nor received
MIDI Out
MIDI clock is sent
MIDI In
MIDI clock is received
Midi In/Out
MIDI clock is received and transmitted
Mopho’s Global parameters affect all programs globally. Examples include
MIDI channel and fine tune. To edit the Global parameters, hold down the
Program
the global parameter and Param 2 knob and increment and decrement buttons
change the value.
Transpose: -12…+12—Master Transpose control, 0 is centered. Steps in
semitones.
Fine Tune: -50…+50—Master Fine Tune control; 0 centered. Steps in cents (50
cents = 1/2 semitone).
MIDI Channel: ALL, 1…16—Selects which MIDI channel to send and receive
data, 1 to 16. All receives on all 16 channels.
Clock: see table—Sets the clock status.
MIDI Parameter Send: NRPN, CC, Off—Changes to the values of Mopho’s front
panel controls are transmitted via MIDI as Non-registered Parameter Number
(NRPN) controllers or as Continuous Controllers (CC). Transmission of
parameters can also be turned off. See MIDI Implementation on page 44 for
details.
switch until Global Parameter is displayed. The Param 1 knob changes
Note: NRPNs are the preferred method of parameter transmission, since
they cover the complete range of all parameters, while CCs only handle
the main parameters.
MIDI Parameter Receive: All, NRPN, CC, Off—Sets the method by which
Mopho receives parameter changes via MIDI. As with transmission, NRPNs are
the preferred method, though some controllers may only be able to send CCs.
MIDI Control: Off, On—When On, the synth will respond to MIDI controllers,
including Pitch Wheel, Mod Wheel, Pedal, Breath, Volume, and Expression.
MIDI SysEx: Off, On—When On, the synth will respond to received MIDI
SysEx messages, and will transmit them, when prompted, to the MIDI Out. See
Sysex Messages on page 58 for details.
9
Page 16

MIDI Out Select: Out, Thru—MIDI Out can be switched to MIDI Thru to
daisychain multiple MIDI devices.
Poly Chain: Off, Out 1, Out 4, Out 5, Out 8, Out 12, Out 16
—Used to expand the
polyphony via the Poly Chain output and one or more DSI synths—Mopho,
Tetra, or Prophet. See Using Poly Chain on page 39 for more information.
Local Control: Off, On—When on (the default), the keyboard and front panel
controls directly affect Mopho. When off, the controls are transmitted via MIDI
but do not directly affect the “local” synth (that is, Mopho). This is primarily
useful for avoiding MIDI data loops that can occur with some external
sequencers.
Audio Out: Stereo, Mono—Mopho defaults to stereo operation. When set to
Mono, this parameter defeats all pan settings and modulation, effectively
making each of the outputs a mono output.
PotMode: Relative, Passthru, Jump—The rotary controls on Mopho’s front
panel are a mixture of “endless” rotary encoders and potentiometers or “pots.”
The pots are identifiable by their lined knobs and the fact that they have about
330°of travel. There are three pot modes to determine how the synth reacts when
the programmable parameters are edited. (Master volume is not programmable,
so these modes don’t apply.)
When set to Relative, changes are relative to the stored setting. In Relative
mode, the full value range is not available until either the minimum or maximum
value and the respective lower or upper limit of the pot’s travel is reached.
For example, the Resonance parameter has a value range of 0 to 127. Let’s say
the physical position of the Resonance pot is the equivalent of a value of 100. If
you switch to a program that has a stored Resonance setting of 63 and turn the
pot all the way up, it will only go to 90. To get to the maximum value of 127,
you first have to turn down until the value is at the other extreme and the pot is
at the limit of its travel (in this case, 0 and fully counter-clockwise,
respectively).
In Passthru mode, turning the pot has no effect until after the edited value equals
the preset value (that is, until the edited value “passes through” the stored
value).
Jump mode uses an absolute value based upon the position of the pot when
edited: turn a pot and the value jumps immediately from the stored value to the
edited value.
Sustain: Norm +, Norm -, Arp +, Arp - —A momentary footswitch connected to
Mopho’s Sustain input can be used either as a sustain pedal or to latch the
10
Page 17

arpeggiator. Mopho can be configured for use with either normally open (+) or
Display
Pedal Routing
FootCtrl
Routed to the Foot Control Modulation
Breath
Routed to the Breath Control Modulation
Expressn
Routed to the Expression Modulation
Volume
Controls Master Volume
LpFilter
Routed to the low-pass filter
LpF Half
Routed to the low-pass filter, but with half the range
normally closed (-) footswitches. When set to Arp+ or Arp-, the footswitch will
act as a sustain pedal when the Arpeggiator is off.
Pedal: see table—Sets the destination for the Pedal/CV input. Note that this
input is heavily filtered for clean operation, so there is a limit to the speed it will
respond to changes.
The input will also accept control voltages in the range of 0 to 3.3 volts DC. It is
protected against higher or negative voltages.
MIDI Pressure: Off, On—When On, the Mopho will respond to received MIDI
pressure (aftertouch) messages and will transmit pressure from the keyboard to
MIDI Out.
Velocity Curve: 1…4—Sets one of the four velocity curves for the keyboard to
adjust the velocity response to your playing style.
Pressure Curve: 1…4—Sets one of the four pressure curves for the keyboard to
adjust the aftertouch to your playing style.
Arpeggiator Latch Mode: Normal, ReLatch—Sets one of the four pressure
curves for the keyboard to adjust the aftertouch to your playing style.
Basic Patch—Press the Write button to load a basic patch into the edit buffer.
The patch will not actually be written to the current program location unless
intentionally written to memory in program mode using the Write button.
Reset Globals—
Mopho does not have a full hardware reset, but select this
parameter and press Write to reset the global parameters to their factory
defaults.
Balance Tweak: -14…14—Adjusts the left/right output balance by
approximately +/- 4 dB.
MIDI SysEx Dump: see table—Allows dumping of Programs in SysEx format
via MIDI. Also enables the translation of Mopho Keyboard programs into
formats readable by other DSI synths. Tetra’s voice architecture and voice
11
Page 18

program parameters are basically the same as the Mopho Keyboard’s. The
Display
MIDI Transmit Operation
Current Program
Dump current program
Current Bank
Dump all 128 programs in current bank
All Banks
Dump all programs in all 3 banks
Current Prog P08
Dump the current program in Prophet ’08 format
CurrentProgMopho
Dump the current program in desktop Mopho format
CurrentProgTetra
Dump the current program in Tetra format
Current Bank P08
Dump the current bank in Prophet ’08 format
CurrentBankMopho
Dump the current bank in desktop Mopho format
CurrentBankTetra
Dump the current bank in Tetra format
desktop Mopho’s Feedback Gain is not programmable, so some tweaking of that
control may be necessary to match the sound to the keyboard. And the Prophet’s
voice architecture is almost identical, but lacks the sub octave generators and
feedback.
Press Write to start transmission. This feature is handy for saving Programs on a
computer in SysEx format, or for sending them to another Mopho via a direct
MIDI connection. The dumps include Program and Bank numbers, so when
received, the programs will be stored in the same location.
12
Page 19
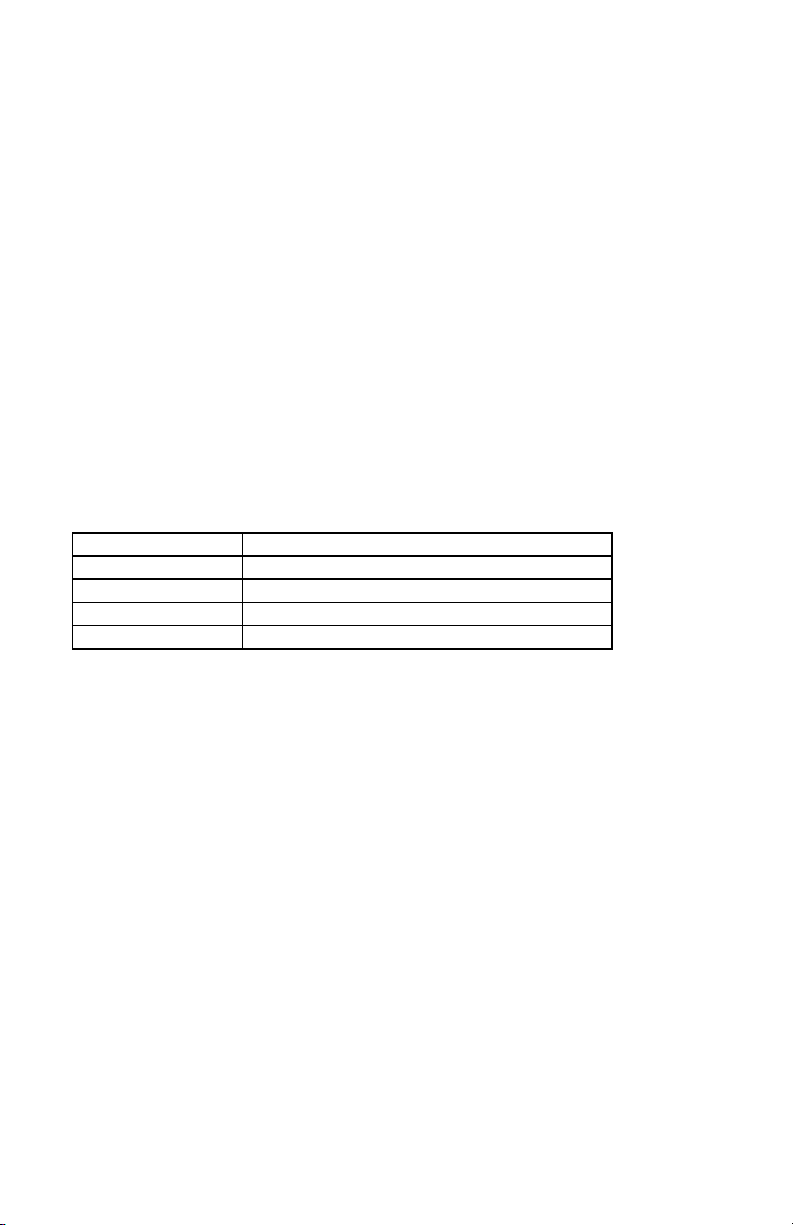
Oscillators
Sawtooth
Triangle
Saw-Triangle
Square
The Oscillators section contains the primary controls for Mopho’s two digitally
controlled analog oscillators or DCOs. “Digitally controlled” does not mean the
oscillators themselves are digital, just that the oscillators’ frequencies are under
digital—rather than voltage—control. The advantage to that is that the tuning is
exceptionally stable over a ten-octave range without having to compensate for
variables like temperature. The audio signal path is still completely analog.
Oscillator Select—Choose oscillator 1, oscillator 2, of both. When both 1 and 2
are selected, changes made to the other oscillator parameters affect both
oscillators.
Frequency: C 0…C 10—Sets the base oscillator frequency over a 10 octave
range, from 8 Hz to 8KHz, stepping in semitones. C3 is middle C, the first
octave is 0 (C0, C#0, etc.), the second octave is 1 (C1, C#1, etc.), and so on.
Fine Frequency: -50…+50—Fine tune control with a range of a quartertone up
or down. Zero is centered. Steps are in cents (50 cents = 1/2 semitone).
Shape Select: Sawtooth, Triangle, Saw-Tri, Square, Off—Selects the oscillator
waveshape. If none of the shapes are lighted, the oscillator is off.
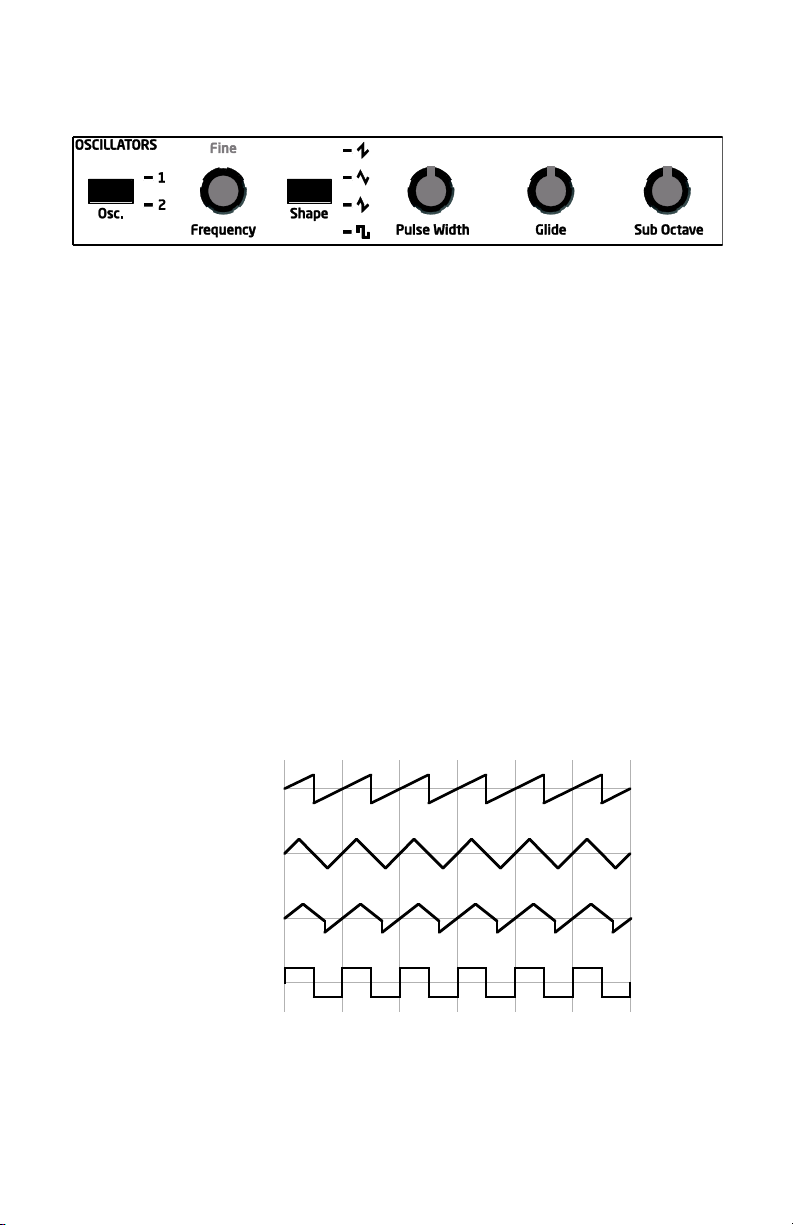
Pulse Width: 0...99—Sets the pulse width or duty cycle of the square wave. A
value of 50 results in a true square wave with equal alternating high and low
levels. Increasing or decreasing the value from 50 causes the waveshape to
become asymetrical. Lower values narrow the postive-going portion of the
13
Page 20
wave, higher values widen it. At the extreme values, the pulse goes completely
50
Pulse Width
0 99
Oscillator 1
Oscillator 2
Oscillator 1
synced to
Oscillator 2
flat, which allows for some interesting possibilities with pulse width modulation.
Glide: 0...127—Sets the oscillator glide (portamento) rate. Glide can be set
independently for each oscillator. Low values are faster. See also “Glide Mode”
in Other Oscillator Parameters.
Sub Octave: 0...127—Controls the level of a square wave pitched one octave
below oscillator 1 or two octaves below oscillator 2.
Other Oscillator Parameters
These additional, less performance-oriented oscillator controls are found in the
Miscellaneous Parameters section.
Oscillator Sync: Off, On—Turns oscillator hard sync on. With sync on,
whenever oscillator 2 resets, oscillator 1 is forced to restart.
Tip: Try routing an envelope or the mod wheel to oscillator 1 frequency
for the familiar sync sweep sound.
Oscillator 1 Keyboard Tracking: Off, On—Turns keyboard tracking off or on
for oscillator 1.
Oscillator 2 Keyboard Tracking: Off, On—Turns keyboard tracking off or on
for oscillator 2.
Oscillator 1 Wave Reset: Off, On—When Wave Reset is off, the Mopho’s
oscillators are free running, which is how analog synths typically behave. That
is, the oscillators are running whether a note is being gated on or not. When the
amplifier envelope is set for a fast attack, this can cause a soft, but detectable,
pop or click at the beginning of a note because the note might be gated on at a
14
Page 21

point in the wave’s cycle other than a zero crossing. The first cycle to play might
be truncated. For some sounds, like monophonic basses, this may actually be
desirable. It adds a bit of randomness to the attack that can make it sound, for
lack of a better word, more organic. When Wave Reset is on, the wave is always
reset to zero—the start of its cycle—when a note is gated on.
Oscillator 2 Wave Reset: Off, On—See “Oscillator 1 Wave Reset” above.
Oscillator Slop: 0...5—The amount of random oscillator frequency tuning slop.
The analog oscillators in Mopho are very accurate, and will not drift. This works
great for accurate sounds, and allows precise de-tuning. Oscillator Slop allows
subtle amounts of frequency drift. For larger amounts, use a random LFO or
white noise mod.
Glide Mode: FixRate, FixRate A, FixTime, FixTime A—Determines how the
oscillators respond when Glide is on.
FixRate: The time to transition between notes varies with the interval between
the notes; the greater the interval, the longer the transition time. The glide rate is
fixed.
FixRate A: The same as FixRate, but glide is only applied when playing legato.
That is, glide only occurs when a note is held until the next note is played. This
effectively allows glide to be turned on and off from the keyboard.
FixTime: Glide is set to a fixed time, regardless of the interval between notes.
FixTime A: The same as FixTime, but glide only occurs when playing legato.
Pitch Wheel Range: 0...12—Sets the bend range, in semitones, of the pitch
wheel. The setting is the range in the positive or negative direction. For
example, a setting of 7 lets you bend a note up or down by a fifth.
Key Assign: Low Note, LowRetrig, HighNote, HighRetrig, LastNote,
LastRetrig
—Key Assign (aka note priority) determines what note gets priority
when more than one note is played on the keyboard or via MIDI. Low-note
priority is most common in vintage synths and is often used for playing trills by
holding a note and repeatedly tapping a lower note. LowRetrig causes the
envelopes to be retriggered with each keystroke. HighNote and HighRetrig are
similar to the low note settings, except that the highest note is given priority.
And LastNote and LastRetrig give priority to the last note played.
15
Page 22
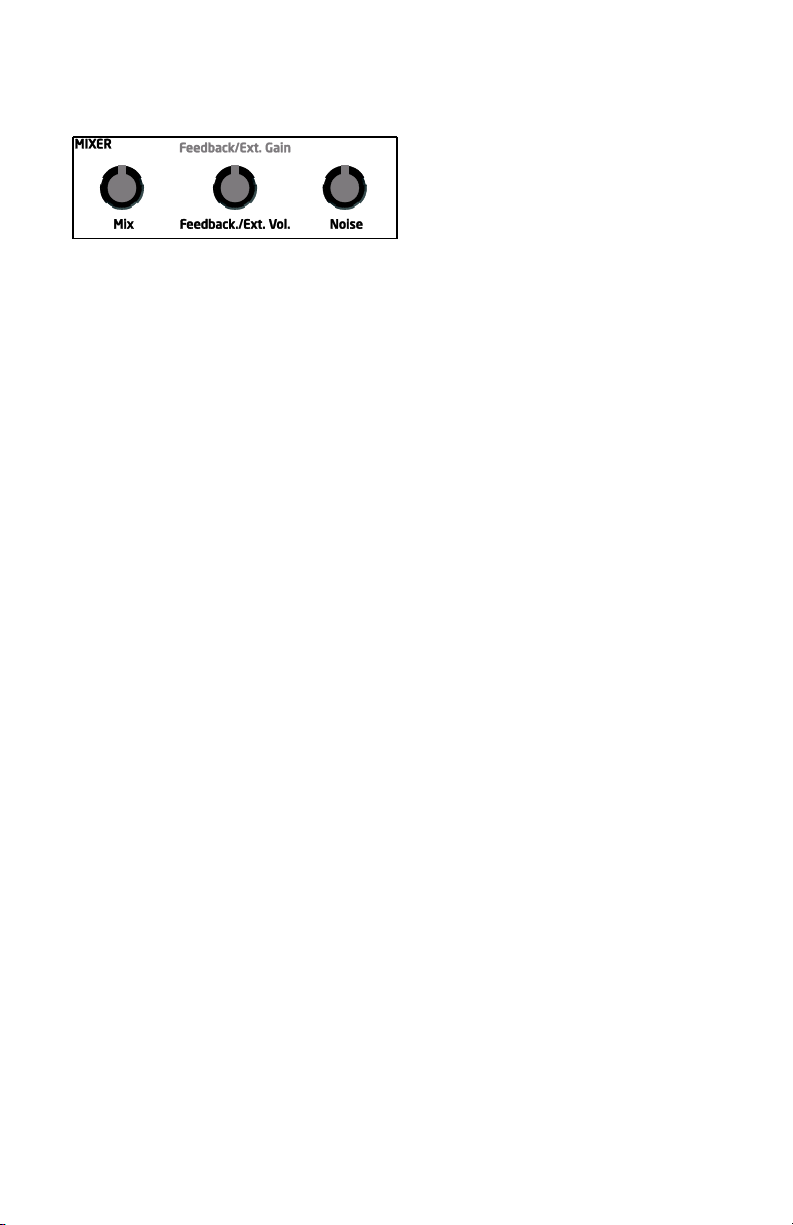
Mixer
The Mixer section balances the levels of the outputs of the Oscillators section
and noise generator, and the Audio In/feedback loop before routing the summed
signals to the low-pass filter.
Mix: 0...127—Mixes the outputs of oscillators 1 and 2 in varying amounts. A
setting of 0 is equivalent to 100% oscillator 1 and 0% oscillator 2. A setting of
127 is just the opposite. A setting of 64 is a 50/50 mix of both oscillators.
Feedback Level/External Volume Level: 0...127—Left Out is normalled to
Audio In. (The Voice Architecture diagram on page 8 details Mopho’s signal
routing.) If nothing is plugged in to the Audio In jack, increasing the Feedback
Level causes more and more of the left output signal to be fed back into the
audio path pre-filter. As the level increases, so does the effect of the feedback.
When an audio cable is inserted in Audio In, the feedback loop is broken and the
audio is processed by Mopho’s filter and VCA. In conjunction with the gain
control, Audio In will accept a fairly wide range of signal levels from low-level
sources like guitars to hotter, line-level signals. For more information, see Using
Audio In on page 38.
Feedback Gain/External Input Gain: 0...127—Feedback Gain boosts the level
of the feedback signal and is interactive with and dependent upon Feedback
Volume. If Feedback Volume is set to 0, then Feedback Gain has no effect.
(There is no feedback signal to boost.) However, Feedback Gain combined with
higher levels of Feedback Volume can result in effects ranging from pleasing
distortion to squirrelly harmonic weirdness.
This control is also used to boost the gain of signals processed via Audio In. For
line-level signals, additional gain is typically unnecessary. For low-level signals,
such as those from passive guitars or basses, External Input Gain boosts the
signal to more useful levels.
Noise: 0...127—Controls the volume of the white noise generator.
16
Page 23

Filter
Mopho features a selectable 2- or 4-pole, low-pass filter.
4-Pole—Selects the filter configuration. When lighted, the filter is in 4-pole
mode. A 4-pole, low-pass filter rolls off frequencies above the cutoff frequency
at a slope of 24dB/octave. When the light is off, the filter is in 2-pole mode and
has a slope of 12dB/octave and a more gradual rolloff of the higher frequencies.
Frequency: 0...164—Sets the base filter cutoff frequency over more than 13
octaves. This control steps in semitones when turned slowly, but smoothly
controls the filter without steps when turned at a faster rate.
Resonance: 0...127—Emphasizes a narrow band of frequencies around the
cutoff frequency. In 4-pole mode, high levels of resonance can cause the filter to
self oscillate. In 2-pole mode, resonance is much more subtle.
Audio Mod: 0...127—Controls the amount of audio from oscillator 1 used to
modulate the filter cutoff frequency. For filter-only audio, set the oscillator Mix
to 127, oscillator 2 Shape to Off, and oscillator 1 Shape to the desired
waveshape. This is useful for bell-like FM sounds. A wide range of sounds can
also be made using Audio Mod with the oscillators routed normally through the
filter.
Key Amount: 0...127—Sets the amount of modulation from the keyboard to the
filter cutoff. A setting of 64 will step the filter in one semitone increments for
each note, 32 would be quartertones, and so on.
17
Page 24

Envelopes
Mopho has three 5-stage (Delay + ADSR) envelope generators. Two are
dedicated—one to the filter and the other to the amplifier—and the third is
assignable to any modulation destination.
Envelope Select—Selects the envelope to edit. When all three are lighted, the
other envelope parameters control all three envelopes simultaneously.
Amount: -127...127—Sets the amount of modulation from the envelope to the
destination: filter, amplifier, or the selected destination for envelope 3. The
modulation amount can be positive or negative, allowing for inverted envelope
control. (For the VCA, the range is 0-127, since you can't have a negative gain
on a VCA!)
Delay: 0...127—Sets a delay between the time the envelope is gated on and
when the Attack portion actually begins
Attack: 0...127—Sets the attack time of the selected envelope(s).
Decay: 0...127—Sets the decay time of the selected envelope(s).
Sustain: 0...127—Sets the sustain level of the selected envelope(s).
Release: 0...127—Sets the release time of the selected envelope(s).
Velocity: 0...127—Sets the amount of key velocity used to modulate the
envelope amount.
Other Envelope Parameters
There are two additional parameters for envelope 3 in the Miscellaneous
Parameters section.
Envelope 3 Destination—Sets the destination modulated by envelope 3. See
Modulation Destinations on page 34 for a list of possible destinations.
Envelope 3 Repeat: Off, On—When on, causes the delay, attack, decay, and
sustain portions of Envelope 3 to loop for as long as the envelope is gated on.
With repeat on, envelope 3 can even be used as a sort of complex LFO.
18
Page 25

LFO
Mopho has four low frequency oscillators (LFOs). The LFOs can be freerunning, synced to keystrokes, or synced to the sequencer and MIDI clock. To
edit the LFO parameters, choose LFO in the Modulation section.
LFO Select: 1, 2, 3, 4—Chooses the LFO to edit.
Tip: The four numbered lights above the Frequency knob pulse at the
frequency of the corresponding LFO. This can be a great aid in knowing
which LFO to select for editing.
Destination—See Modulation Destinations on page 34 for a list of possible
destinations.
Amount: 0...127—Sets the amount of LFO routed to the destination.
Shape: Triangle, Reverse Sawtooth, Sawtooth, Square, Sample and Hold—The
waveshape of the LFO. Sample and Hold generates a random value that changes
once per cycle.
Frequency: 0...150—Sets the LFO frequency. Speed ranges from slow (30
seconds) to very fast—at 90 (8 HZ, C-2) and above the speed steps in semitones,
up to 150 (261 Hz, middle C).
Note: Some of the analog functions may not respond well to the fastest
LFO speeds, due to speed limitations of the control voltages; but they
will certainly generate some interesting sounds.
Clock Sync—When on, the LFO syncs to the sequencer and clock—either the
internal clock or an external MIDI clock. When synced to the internal clock,
BPM and Clock Divide both affect LFO frequency. When synced to an external
clock, the external clock rate and Clock Divide affect the LFO frequency.
Editing Frequency shows the values in the following table.
19
Page 26

Display
Timing Sync
32 Steps
Sequence speed divided by 32; one LFO cycle takes 32 steps
16 Steps
Sequence speed divided by 16
8 Steps
Sequence speed divided by 8
6 Steps
Sequence speed divided by 6
4 Steps
Sequence speed divided by 4
3 Steps
Sequence speed divided by 3
2 Steps
Sequence speed divided by 2
1.5 Step
Sequence speed divided by 1.5
1 Step
One cycle per step
2/3 Step
Two cycles every three steps
1/2 Step
Two cycles per step
1/3 Step
Three cycles per step
1/4 Step
Four cycles per step
1/6 Step
Six cycles per step
1/8 Step
Eight cycles per step
1/16Step
Sixteen cycles per step
Tip: Use Clock Sync to modulate a parameter in time with the sequencer.
For example, an LFO set to a triangle wave and a frequency of 16 steps
can modulate the filter frequency for a sweep that is perfectly synced to
the sequencer.
Key Sync—When on, the LFO is re-started each time a new note is played. Key
Sync is set independently on each LFO.
20
Page 27

Sequencer
1 2 3 4
1
2
3
4
5 6 7 8 9
Steps
v = step value
Dest. 1
Dest. 2
Dest. 3
Dest. 4
10 11 12 13 14 15 16
S
e
q
u
e
n
c
e
For many musicians, the term sequencer has become synonymous with MIDI
sequencer; that is, a computer-based application or dedicated hardware device
for recording and playing back notes and performance gestures via MIDI. But
sequencers were around long before MIDI. Mopho’s sequencer is much more
like the original analog sequencers typically associated with modular synthesizer
systems. The sequencer comprises four 16-step sequences that play in parallel.
Each sequence can be routed to a chosen destination, and each step in a
sequence can be set to a different value used to modulate that destination.
Strictly speaking, Mopho’s sequencer does not play notes, nor does it transmit
MIDI data. If none of the sequence destinations are routed to oscillator
frequency, the sequencer may not even affect the pitch. In Mopho terms, a
sequence is just a series of events at timed intervals that changes the value of
one of the synth’s parameters in discrete steps. Because the four sequences play
in parallel, up to four parameters can be affected by each step, one per sequence.
For the most part, the sequence destinations are the same as the modulation
destinations, which is appropriate: a sequence is just another modulation source.
For each sequence step, the envelopes are gated on for half the step’s duration.
The duration varies according to the BPM and Clock Divide settings (or the
MIDI clock, if synced to an external source). The envelope settings of the
current program ultimately determine how long each step plays, though, and
longer (more legato) or shorter (more staccato) effects can be achieved by
editing the envelope rates.
Mopho’s sequencer is a gated sequencer. That means it requires a note to be
gated on—that is played from the keyboard, the Push It button, or via MIDI—in
order for the sequencer to run. There is no dedicated start or play button and it
21
Page 28

does not respond to MIDI start/stop/continue messages, but it can still sync to an
1 2 3 4
1
2
3
4
5 6 7 8 9
Steps
v = step value; R = Reset
Dest. 1
Dest. 2
Dest. 3
Dest. 4
10 11 12 13 14 15 16
S
e
q
u
e
n
c
e
external clock. Simply turn on the sequencer and then play and hold a note to
start. Or use the Push It button’s toggle feature to latch a note on with one push
and release it with another; in this case, the Push It button is essentially a
Start/Stop control.
Reset and Rest
Sequences have a maximum of 16 steps, but they can have fewer—from 1 to
15—using Reset. (Sequences of 16 steps reset automatically.) Reset appears
immediately after the highest value setting for a step. Setting a step to Reset
causes the sequence to jump back to the first step and continue playing.
Reset is set separately for each of the four sequences, so it must be set at the
same step in all four sequences to shorten all the sequences equally. The
following illustration shows an example in which all the sequences are eight
steps in length.
Tip: Using Reset while programming a sequence can be helpful. For
example, when programming a specific melodic line, start by shortening
the sequence to four or eight steps until those steps are set, and then
gradually move the reset point to lengthen the loop until the desired
number of steps is playing.
Sequences do not have to be the same length, however, which makes for some
very interesting, less repetitive patterns, particularly when sequences are set to
odd and even numbers of steps.
22
Page 29

Sequence one has an additional value, Rest, that appears in the list after Reset.
1 2 3 4
1
2
3
4
5 6 7 8 9
Steps
v = step value; R = Reset
Dest. 1
Dest. 2
Dest. 3
Dest. 4
10 11 12 13 14 15 16
S
e
q
u
e
n
c
e
1 2 3 4
1
2
3
4
5 6 7 8 9
Steps
v = step value; r = rest; R = Reset
Dest. 1
Dest. 2
Dest. 3
Dest. 4
10 11 12 13 14 15 16
S
e
q
u
e
n
c
e
Rest prevents the envelopes from being gated by the corresponding step, so a
rest in sequence one affects all four sequences. If the sequences are the same
length, rests will occur in the same place in all four sequences as they loop. If
the sequences are different lengths, the rests in sequence one apply to whatever
the current step happens to be in sequences two through four, resulting in a more
random-sounding pattern (which can be really cool). In the following example,
sequence one is 16 steps long and rests occur at steps 2, 6, 9, and 12. However,
sequence two is only eight steps long, so rests occur at steps 2 and 6 the first
time it plays through and then at steps 1 and 4—corresponding to steps 9 and 12
in sequence one—the first time it repeats. As sequence two loops, the rests will
continue in the same alternating pattern.
Programming the Sequencer
Programming the sequencer is easy, but there are a few things to consider before
you start. Most importantly, what do you want the sequence to do and what
modulation destinations will provide the results you’re seeking? For example, is
the sequencer going to control oscillator frequency? One sequence can control
the frequency of both oscillators or one sequence can control oscillator 1 and
another sequence can control oscillator 2 for harmonies or countermelodies. A
typical application of the sequencer might have sequence one routed to the
frequency of both oscillators, sequence two routed to filter cutoff, sequence
three routed to filter resonance, and sequence four routed to amplifier envelope
amount for accents. Many of the factory programs have sequences programmed,
so you can refer to those to see how certain effects are being achieved.
23
Page 30

To program a sequence:
1. Turn the sequencer on.
2. Choose Sequencer in the Modulation section.
3. Choose the sequence to program: 1, 2, 3, or 4.
4. Play a note to start the sequence playing.
To avoid having to hold a key down, set the Push It Mode (Misc.
Parameters) to Toggle. Then use Push It to start and stop the sequencer.
You may also want to change the Push It Note, the BPM, and the Clock
Divide.
5. Choose a destination for the sequence.
6. Use the Step and Value controls to enter the desired values.
As the sequence loops, you will hear your edits.
7. Choose another sequence and follow the same basic steps until you’re
happy with the results.
8. Dont forget to write your edits to memory! Sequences are saved with
the related program. Just press Write and then Yes to save the program
and sequences.
More Sequencer Parameters
The previous section covers the basics of sequencer programming, but there are
some additional parameters that affect the sound and user interaction with the
sequencer.
Slew
In modular analog synthesizers, a lag processor or slew limiter is used to create
a time-varying change—a smooth transition—between successive, discrete
control voltage levels. The rate of change is called the slew rate and one
common application is to create a glide (aka portamento) effect between notes.
Among the possible destinations for Mopho sequences two and four is a
sequence-only parameter called Slew. Slew behaves a little differently from the
other modulation destinations, in that it is not really a destination at all; instead,
it affects the sequence above it. That is, if Slew is the chosen destination for
sequence two, it controls sequence one, and Slew in sequence four controls
sequence three.
24
Page 31

In Mopho’s sequencer, Slew sets the slew rate between the previous step’s value
and the current step’s value when the step is gated on. Confused yet? This
should help: let’s say sequence one is routed to oscillator frequency and
sequence two to Slew. Increasing the Slew value for step four will cause the
oscillator frequency to glide from the step three value when step four is gated
on. The higher the Slew value, the slower the slew rate. And the slew rate can be
different for each step. But its not just for oscillator glide. Slew can be applied to
any of the destinations. For example, sequence three could be routed to filter
cutoff with Slew in sequence four used to create a less abrupt transition from
one step to the next.
Note: Depending upon the BPM and Clock Divide settings, the slew rate
can actually exceed the time the envelopes are gated on, causing a step in
the affected sequence to not reach its set value. For example, if Slew is
applied to oscillator frequency, high Slew values may cause a step to
sound flat or sharp. If that’s not what you want, simply reduce the Slew
value.
Sequencer Trigger Modes
The Sequencer Trigger mode determines how the sequencer reacts to triggers
and what constitutes a trigger. Sequencer Trigger is found in the Miscellaneous
Parameters section. The different modes are:
Normal–A note on, from either the local keyboard or via MIDI, causes the
sequencer to play from the first step. The sequencer resets to step one each time
a new note is played. Each sequence step gates the envelopes.
No Reset–As above, but the sequencer does not reset to step one for each note
played. The sequencer is effectively free running.
No Gate–The keyboard gates the envelopes, but the sequencer does not. The
sequencer resets to step one each time a new note is played.
NoGateNR–As above, but the sequencer does not reset to step one for each note
played. Again, the sequencer is effectively free running.
Key Step–Striking any key or playing a note via MIDI advances the sequencer
one step.
Audio In–Steps the sequencer and gates the envelopes when a signal at Audio In
exceeds a preset threshold. External Volume does not affect the trigger and can
be set at minimum. External Gain does boost the signal prior to the threshold
detector and so will affect the triggering. And the level of the input signal will
also have an effect.
25
Page 32

Syncing an LFO to the Sequencer
One very useful way to modulate a parameter in sync with a sequence is using
an LFO with Clock Sync. A setting of 16 Steps for LFO Frequency with a
triangle wave selected and routed to the filter will provide a clean filter sweep
over a 16-step sequence, perfectly in sync! This is much easier (and smoother)
than manually programming a sequence to sweep the filter.
26
Page 33

Modulators
Modulators lets you configure the modulation routing and amount for Mopho’s
four general-purpose modulation slots.
Since each Mopho modulation source has a single destination, the four general
purpose modulators provide a way to send a mod source (such as a sequence or
LFO) to additional destinations, with a different amount. There are also
additional mod sources available here, such as Noise, allowing a wide variety of
possibilities.
To configure a general-purpose modulation slot, select Modulators and choose
the appropriate modulator: 1, 2, 3, or 4. Then use the Source, Destination, and
Amount parameters to route the modulation as desired.
Source—Selects a modulation source. See Modulation Sources on page 33 for
possible sources.
Amount: -127…+127—Sets the amount of modulation.
Destination—Selects a modulation destination. See Modulation Destinations on
page 34 for a list of possible destinations.
27
Page 34

Miscellaneous Modulators
There are certain standard controllers that Mopho consigns to dedicated
modulators, things like mod wheel, pressure (aka aftertouch), and velocity. The
most obvious benefits to doing this is it provides a shortcut to setting up
commonly used controllers and it frees up the four general-purpose mod slots
for other, more Mopho-specific applications. Select Misc Mod in the
Modulation section to get started.
Source: Mod Wheel (MIDI CC#1), Pressure, Breath Controller (MIDI CC#2),
Velocity, Foot Controller (MIDI CC#4)
source can also be changed using the 1-4 button, though the 1-4 LEDs do not
change.
Note: There is a global parameter called Pedal for routing an expression
pedal to various controllers or directly to the filter cutoff. See Global
Parameters on page 9 for more information.
Destination—Chooses the destination to which the modulation source is routed.
See Modulation Destinations on page 34 for a list of possible destinations.
—Selects the modulation source. The
Amount: -127…+127—Sets the amount of modulation.
28
Page 35

Clock
Mode
Behavior
Up
Plays from lowest to highest note.
Down
Plays from highest to lowest note.
Up Down
Plays from lowest to highest and back to lowest.
Assign
Plays notes in the order keys were pressed.
Random
Randomly plays notes.
Plays keyed notes and the same notes one octave higher, from
lowest to highest.
Plays keyed notes and the same notes one octave higher, from
highest to lowest.
Plays keyed notes and the same notes one octave higher, from
lowest to highest and back to lowest.
Plays a keyed note, then the same note one octave higher, in
the order keys were pressed.
Randomly plays keyed notes and the same notes one octave
higher.
Plays keyed notes and the same notes one and two octaves
higher, from lowest to highest.
Plays keyed notes and the same notes one and two octaves
higher, from highest to lowest.
Plays keyed notes and the same notes one and two octaves
higher, from lowest to highest and back to lowest.
Plays a keyed note, then the same note one and two octaves
higher, in the order keys were pressed.
Randomly plays keyed notes and the same notes one and two
octaves higher.
The Clock section contains the controls for the internal clock tempo and the note
value for the arpeggiator and sequencer (and LFO, when Clock Sync is on).
There are also switches to turn the arpeggiator and sequencer on and off.
Arpeggiator—Turns Mopho’s arpeggiator on and off. The tempo and note value
are determined by the BPM and Clock Divide settings. Arpeggiator Mode is set
in Miscellaneous Parameters. The different modes are:
2 Octaves Up
2 Octaves Down
2 Octaves Up Down
2 Octaves Assign
2 Octaves Random
3 Octaves Up
3 Octaves Down
3 Octaves Up Down
3 Octaves Assign
3 Octaves Random
Briefly hold the Arpeggiator switch down to latch the arpeggiated notes. (The
light will blink when latched.) The latched behavior is determined by the
Arpeggiator Latch Mode setting in the Global menu. (See “Arpeggiator Latch
Mode” in Global Parameters on page 9 for more information.) In Normal mode,
29
Page 36

playing additional notes while latched adds them to the notes already playing. In
Display
Tempo
Timing Division
Half
BPM/2
Half note
Quartr
BPM
Quarter note
Eighth
BPM x 2
Eighth note
8 half
BPM x 2
Eighth note, half swing timing
8swing
BPM x 2
Eighth note, full swing timing
8 trip
BPM x 3
Eighth note triplets
16th
BPM x 4
Sixteenth note
16half
BPM x 4
Sixteenth note, half swing timing
16swng
BPM x 4
Sixteenth note, full swing timing
16trip
BPM x 6
Sixteenth note triplets
32nd
BPM x 8
Thirty-second note
32trip
BPM x 12
Thirty-second note triplets
64trip
BPM x 24
Sixty-fourth note triplets
ReLatch mode, removing your hands from all keys and then playing an
additional note or notes causes the latched notes to be released and the newly
played note(s) to be latched on. As long as at least one key is held, pressing
additional keys will add to the arpeggio.
The Arpeggiator can also be latched with a footswitch connected to the Sustain
jack. See “Sustain” in Global Parameters on page 9.
The Arpeggiator (and Sequencer) can also sync to MIDI clock from an external
sequencer or other device. See “Clock” in Global Parameters on page 9 for
more information.
Sequencer—Turns Mopho’s gated sequencer on and off. See Sequencer on
page 21 for more information.
BPM: 30…250—Sets the tempo for the sequencer in BPM (beats per minute).
The accompanying light flashes on the beat. When syncing to an external MIDI
clock source, the BPM control has no effect.
Clock Divide—Sets the note value for each sequencer or arpeggiator step
relative to the BPM. Also affects the LFO frequency when LFO Clock Sync is
on. Clock Divide works with both internal and external clock sources. The
following table lists the Clock Divide values.
Note: BPM is based on quarter notes, so clock divisions are relative to a
quarter-note beat. For example, when Clock Divide is set to Eighth, two
notes or steps will play per beat.
30
Page 37

Miscellaneous Parameters
Miscellaneous Parameters groups together programmable parameters that do not
conveniently fall into any obvious section or, if they do, are parameters that are
less frequently used. They are important, but generally not required for
performance.
Voice Volume: 0…127—Sets the volume of the current program to match
volumes between programs.
Note: There is enough gain in the synth voice that with some settings,
some mild clipping distortion may be heard. If this happens, try lowering
the Voice Volume, and/or the Amp Envelope Amount (or Amp Envelope
Velocity).
Name—The lower line of the LCD displays the name of the current program.
Use the Name parameter to edit the name. When Name is selected, a character
blinks to indicate that it is active. To edit the character, use the Value knob, the
Param 2 knob, or the +/Yes or -/No switches. Use the Param 1 knob to edit
another character.
Oscillator Sync, Keyboard Tracking, Slop, Glide Mode, Pitch Wheel Range,
Key Assign are described under “Other Oscillator Parameters” in
and
Oscillators on page 14.
Sequence Trigger isdescribed under “Sequence Trigger Modes” in Sequencer
on page 25.
Arpeggiator Mode is part of the Arpeggiator description in Clock on page 29.
Envelope 3 Destination and Envelope 3 Repeat are described under “Other
Envelope Parameters” in Envelopes on page 18.
VCA Level: 0…127—Sets a base level for the VCA (Voltage Controlled
Amplifier). This essentially allows the VCA to be bypassed for programs that
drone.
Note: If VCA Level is on full, Envelope Amount has no effect. For
normal operation from the keyboard, VCA Level should be set to 0. For
31
Page 38

droning sounds, or possibly when using Mopho to process external audio,
Display
Mode
1 Voice
Classic, two oscillator, monophonic mode
All Voices
All available voices in unison
All available voices in unison with increasing
levels of detuning among the voices
turn the VCA Level up.
Push It Mode: Normal, Toggle, Audio In—When set to Normal, Push It responds
like a key: press it and a note plays, release it and the note ends. But when set to
Toggle, Push It
turns the note on with one press and off with a second press.
This is handy for making a note drone or for latching a gated sequence on.
Somewhat related, the Audio In setting will generate a gate from Audio In.
When the audio signal gets above a certain fixed level, the gate will go on.
When it drops below that level, the gate will go off.
Push It Note: C0…C10—Sets the note that plays when Push It is pressed.
Push It Velocity: 0…127—Sets the MIDI note-on velocity.
Unison On/Off—Why does a monophonic synthesizer need a Unison switch?
Because it might be poly chained to another DSI synth, the Tetra being the
obvious choice—five voices of analog power, in a very small footprint!
Unison Mode—Sets how voices are allocated and tuned when unison is on.
AllDetune1-3
32
Page 39

Modulation Sources
Display
Source
Off
No source selected
Sequence1
Sequence 1
Sequence2
Sequence 2
Sequence3
Sequence 3
Sequence4
Sequence 4
LFO 1
LFO 1
LFO 2
LFO 2
LFO 3
LFO 3
LFO 4
LFO 4
Filt Env1
Filter Envelope
VCA Env 2
Amp (VCA) Envelope
Envelope3
Envelope 3
PitchBend
Pitch Bend
Mod Wheel
Mod Wheel
Pressure
Pressure (Aftertouch)
MidBreath
MIDI - Breath Controller
Midi Foot
MIDI - Foot Controller
Midi Exp
MIDI - Expression
Velocity
Keyboard Note Velocity
KeyNumber
Keyboard Note Number
Noise
Noise
EnvFollow
Audio In Envelope Follower
Peak Hold
Audio In Peak Hold
33
Page 40

Modulation Destinations
Display
Destination
Off
No destination selected
Osc 1 Freq
Oscillator 1 Frequency
Osc 2 Freq
Oscillator 2 Frequency
OscAllFreq
Oscillator 1 and 2 Frequency
Osc Mix
Oscillator Mix
NoiseLevel
Noise Level
Osc1 PulsW
Oscillator 1 Pulse Width
Osc2 PulsW
Oscillator 2 Pulse Width
Osc All PW
All Oscillators Pulse Width
Low Pass
Lowpass Filter Frequency
Resonance
Resonance
Audio Mod
Audio Mod Amount
VCA Level
VCA Amount
Output Pan
Stereo Pan Position
LFO 1 Freq
LFO 1 Frequency
LFO 2 Freq
LFO 2 Frequency
LFO 3 Freq
LFO 3 Frequency
LFO 4 Freq
LFO 4 Frequency
LFOAllFreq
All LFO Frequencies
LFO 1 Amt
LFO 1 Amount
LFO 2 Amt
LFO 2 Amount
LFO 3 Amt
LFO 3 Amount
LFO 4 Amt
LFO 4 Amount
LFOAll Amt
All LFO Amounts
Env 1 Amt
Envelope 1 Amount (Level)
Env 2 Amt
Envelope 2 Amount (Level)
Env 3 Amt
Envelope 3 Amount (Level)
EnvAll Amt
All Envelope Amounts (Levels)
Env1Attack
Envelope 1 Attack Rate
Env2Attack
Envelope 2 Attack Rate
Env3Attack
Envelope 3 Attack Rate
EnvAll Att
All Envelope Attack Rates
Env1 Decay
Envelope 1 Decay Rate
Env2 Decay
Envelope 2 Decay Rate
Env3 Decay
Envelope 3 Decay Rate
EnvAll Dec
All Envelope Decay Rates
Env1Releas
Envelope 1 Release Rate
Env2Releas
Envelope 2 Release Rate
Env3Releas
Envelope 3 Release Rate
EnvAll Rel
All Envelope Release Rates
Mod 1 Amt
Modulator 1 Amount
Mod 2 Amt
Modulator 2 Amount
34
Page 41

Mod 3 Amt
Modulator 3 Amount
Mod 4 Amt
Modulator 4 Amount
Fback Vol
Feedback Volume
Sub Osc 1
Sub Oscillator 1 Level
Sub Osc 2
Sub Oscillator 2 Level
Fback Gain
Feedback Gain
Slew
Sequencer Slew*
*Appears as a destination in sequences 2 and 4 only.
35
Page 42

Using USB
Mopho’s USB 2.0 port enables bidirectional MIDI communication with a
computer. A MIDI interface and MIDI cables are not necessary, just a USB
cable. Mopho is a Class Compliant USB device. That means it does not require
any additional drivers to be installed to communicate with a Mac or Windows
computer.
Mopho transmits and receives MIDI data via USB, but does not transmit audio.
Note: MIDI In and USB should not be used at the same time, as
overlapping messages from different sources may cause Mopho to
respond unpredictably. MIDI Out and USB can be used at the same time
and transmit the same data. Poly Chain Out is an independent MIDI bus
and can be used regardless of the “normal” MIDI connection.
USB Notes
Under Mac OS X, Mopho will appear as a MIDI port when connected via USB
and can be configured using the Mac’s Audio MIDI Setup application (typically
found in Applications/Utilities).
Under Windows XP, the first time Mopho is connected via USB, the “Found
new hardware” alert appears and Mopho is automatically installed—somewhat
misleadingly—as “USB Audio Device.” If there is already another Class
Compliant USB device installed, Mopho will show up as “USB Audio
Device(2)” (or 3 or 4 or...).
To determine which USB Audio Device is Mopho:
1. Open the System Control Panel
2. Click the Hardware tab.
3. Click Device Manager.
4. Expand “Sound, video, and game controllers.”
5. Right-click any “USB Audio Device” and choose Properties from the
pop-up menu.
The General tab of the USB Audio Device Properties window displays the
Device Type, Manufacturer, and Location. For Mopho, the Location should read
“Location n (DSI Mopho).”
36
Page 43

Windows Vista and Windows 7 behave the same as XP, but the device name is
DSI Mopho rather than USB Audio Device.
In Windows, if you unplug the USB cable and plug it back in while a program
has the Mopho port open, you may have to resync. That usually means going to
the USB Audio Device (or DSI Mopho) Properties, as in the procedure above,
and clicking OK. If Mopho is no longer listed in the Device Manager under
“Sound, video, and game controllers,” power Mopho down and back up again
while it is connected via USB. It should be detected on power up.
37
Page 44

Using Audio In
The Audio In jack on Mopho’s rear panel can take audio from a variety of
sources, including line level signals and guitars. But what happens to it once its
inside and how do you get it out again? Simply plugging a guitar in does not
mean you will actually hear something when you play it.
Mopho’s basic audio signal path goes from oscillators to mixer to filter to VCA.
Audio In goes into the mixer. (Mopho has no pitch detection capability, so the
oscillators cannot track the pitch of the incoming signal. A pitch-to-MIDI
converter is needed to play the synth from a guitar.) So the External Volume
level must be up for Audio In to work. But you probably still won’t be able to
hear it. There are two potential obstacles in the audio signal path: the filter and
the VCA. If the filter’s cutoff frequency is turned down, audio does not pass
through. And if the VCA Level (Misc. Parameters) is down or nothing is gating
the amplifier envelope, no audio will pass through the VCA. The two most
obvious ways around the VCA are to turn the VCA Level up, essentially
bypassing the VCA, or use the sequencer to gate the envelopes. (You could also
use the keyboard to gate the envelopes, but then you start to run out of hands!)
There are two programs in Bank 1 demonstrating ways in which to use Audio
In. Ext In Env Filt (Bank 1 Program 127) is a simple envelope filter. VCA Level
is turned all the way up, allowing the audio to pass through the VCA. Both
oscillators are turned off; if they were on, you’d hear them droning because
VCA Level is turned up. Modulator 1 Source is set to EnvFollow (envelope
follower) and the destination is set to Low Pass (the filter). That means the level
of the incoming audio controls the filter’s cutoff frequency. Resonance is also
set at a moderate level, so you should hear a nice, squirty, blat at the peaks. For
low-level signals like a passive guitar or bass, you will probably need to turn
External Gain up to make it work properly.
The other program, Ext In Sequence (Bank 1 Program 128) uses the sequencer
to gate the envelopes for a pulsing, rhythmic effect. Press Push It! to latch the
sequencer on. Noise level is up, providing little percussive noise bursts. The
oscillators are still turned off. LFO 1 is synced to the sequencer and controlling
the VCA’s output panning. Sequence 1 is controlling filter cutoff. Again, you
may need to turn up External Gain for low-level signals. You can have a ton of
fun playing with just Mopho and patches like this, but if you sync to an external
sequencer or delay or both, things really get interesting!
38
Page 45

Using Poly Chain
Mopho’s Poly Chain output enables it to be connected to other DSI synths for up
to 17-voice polyphony. Products that can be chained include the Tetra, Prophet
'08 (module and keyboard), desktop Mopho, and a second keyboard Mopho. It
will not chain with the Evolvers and Poly Evolvers due to the different voice
structures.
Note data from Mopho’s keyboard is intelligently processed so that, when one
synth’s maximum polyphony is reached, additional notes are passed through the
Poly Chain output and routed to the next synth in the chain. All that is required
is a single MIDI cable for each of the chained synths and a mixer for combining
the audio outputs.
Tetra is the best candidate for poly chaining with the Mopho Keyboard; the
voice architecture and programmable parameters are identical. The desktop
Mopho or Prophet ’08 will also work, but there are some differences between
these synths and the Mopho Keyboard:
The desktop Mopho’s Feedback Gain control is not programmable and may
need to be tweaked manually to match the Mopho Keyboard. Programs that
don’t use feedback sound the same on both models.
The Prophet does not have feedback or sub octave generators.
Both the Prophet and Tetra have two layers for stacked and split programs;
Mopho does not. When Prophet or Tetra programs are loaded into Mopho,
layer B is ignored.
You should have the same programs loaded into all the chained synths. The
easiest way to do that is to use the Dump command in the Global menu to dump
the programs via MIDI from one synth to the other(s).
The Poly Chain parameter is in the global menu. On the Mopho Keyboard, set
Poly Chain to the number of additional voices that will be chained: Out 1 (for
poly chaining a Mopho), Out 4, Out 5, Out 8, Out 12, or Out 16. Refer to the
illustration on page 40 for examples of the Poly Chain settings on the slave
units.
You can now virtually ignore the slave unit or units, since the controls on the
master will control all units as if they were a single synth. This includes saving a
program; if you save an edited program on the master, it will also save the
program on the slave(s).
39
Page 46

Note: If syncing to an external MIDI clock, set MIDI Clock (Global
menu) on the master and any intermediate units to MIDI In/Out. Set the
last instrument in the chain to MIDI In.
When Poly Chain is set to Off, the Poly Chain MIDI out jack simply duplicates
the MIDI out jack.
40
Page 47

9 Voi c e s:
MIDI
In
Prophet
In
Pol y
Ch ain
Out
Mopho Kybd.
Ou t 8
MIDI
In
Pol y
Ch ain
Out
Tet ra
InOut4
9 Voi c e s:
MIDI
In
Tet ra
In End
Pol y
Ch ain
Out
Mopho Kybd.
Ou t 8
MIDI
In
Pol y
Ch ain
Out
Tet ra
InOut4
6 Voi c e s:
Pol y
Ch ain
Out
Mopho Kybd.
Ou t 5
MIDI
In
Mopho
13 Vo ices:
Pol y
Ch ain
Out
Mopho Kybd.
Out 12
MIDI
In
Pol y
Ch ain
Out
Tet ra
InOut8
MIDI
In
Prophet
In
13 Vo ices:
Pol y
Ch ain
Out
Mopho Kybd.
Out 12
MIDI
In
Pol y
Ch ain
Out
Tet ra
InOut8
MIDI
In
Pol y
Ch ain
Out
Tet ra
InOut4
MIDI
In
Tet ra
In End
MIDI
In
Tet ra
In End
5 Voi c e s:
Pol y
Ch ain
Out
Mopho Kybd.
Ou t 4
2 Voi c e s:
Pol y
Ch ain
Out
Mopho Kybd.
Ou t 1
MIDI
In
Mopho
41
Page 48

Support
Troubleshooting
Here are a few suggestions for resolving problems that may occur.
The sequencer has stopped running.
Make sure Clock in the Global menu is set to Internal.
Some of the programs sound different.
Check the Mod Wheel position. The Mod Wheel can do a lot more than just add
vibrato. Also, some of the programs use the sequencer to shape the sound so
make sure Clock in the Global menu is set to Internal.
There is a ground hum in the audio output.
USB can cause ground loops, so try to resolve any grounding issues between the
computer and Mopho. Or use MIDI, which is opto-isolated.
Mopho is behaving erratically.
This is almost always caused by a MIDI data loop. Make sure that any MIDI
Thru functionality is turned off on the MIDI interface/hardware or in the MIDI
software application (sequencer or whatever). Disconnect all Mopho’s MIDI
connections—MIDI and USB cables—and see if the problem persists. You can
also monitor the MIDI traffic with MIDI Monitor (Mac OS) or MIDI-OX
(Windows) to see if Mopho is being overrun with duplicate messages.
An oscillator or the filter sounds strange or out of tune.
Hold Compare and press Osc Shape to run the calibration routine.
Note: It is not necessary to run the calibration routine on a regular basis.
You should only run it if you are experiencing problems.
Still experiencing a problem with Mopho? Reset the Global parameters (in the
Global menu).
Contacting Technical Support
If you are still having a problem with Mopho, contact Technical Support at
support@davesmithinstruments.com. Please include your Mopho’s serial
number, the version of the operating systems (Main and Voice displayed on
startup), and the purchase date.
Note: If you have not already reset the Global parameters and run the
calibration routine (see Troubleshooting above), you should do it before
contacting Technical Support. It’s probably the first thing they’ll ask you
to do.
42
Page 49

Warranty Repair
Dave Smith Instruments warrants that Mopho will be free from defects in
materials and/or workmanship for 1 year from the date of purchase. Please
register your product online at www.davesmithinstruments.com to establish the
date of purchase. (This is not a requirement for warranty service, but it will help
expedite the process.)
Please contact support@davesmithinstruments.com to determine the best course
of action for getting your Mopho repaired. For your own protection, as well as
ours, please do not return any product to Dave Smith Instruments without a
return authorization (RA) number. To issue an RA number, Technical
Support needs:
Your name
Your return address
Your email address
A phone number where you can be reached
Your Mopho’s serial number
The date of purchase and where purchased
If you need to return your instrument for repair, you are responsible for getting it
to DSI. We highly recommend insuring it and packing in the original packaging.
Damage resulting from shipping a product with insufficient packaging is not
covered by warranty.
43
Page 50

MIDI Implementation
Display
MIDI Clock Setting
Internal
MIDI clock is neither sent nor received
MIDI Out
MIDI clock is sent
MIDI In
MIDI clock is received
MIDIn/Out
MIDI clock is received and transmitted
Mopho receives MIDI data according to the mode controls under GLOBAL. In
addition, there is interaction between some of the Program parameters that
determine the overall response of Mopho to MIDI data.
Following are the Global parameters that affect response to MIDI:
MIDI Channel: ALL, 1…16 — Selects the MIDI channel to send and receive
data, 1 to 16. All receives on any channel.
Clock: see table — Selects the MIDI clock status as follows:
MIDI Parameter Send: NRPN, CC, Off —
front panel controls are transmitted via MIDI as Non-registered Parameter
Number (NRPN) controllers or as Continuous Controllers (CC). Transmission of
parameters can also be turned off.
MIDI Parameter Receive: All, NRPN, CC, Off — Sets the method by which
Mopho receives parameter changes via MIDI. As with transmission, NRPNs are
the preferred method, though some controllers may only be able to send CCs.
Changes to the values of Mopho’s
MIDI Control: Off, On — When On, the synth will respond to MIDI controllers,
including Pitch Wheel, Mod Wheel, Pedal, Breath, Volume, and Expression.
MIDI SysEx: Off, On — When On, the synth will respond to received MIDI
SysEx messages, and will transmit them, when prompted, to the MIDI Out.
44
Page 51

MIDI Messages
System Real-time Messages
Status
Description
1111 1000
MIDI Timing Clock
Received Channel Messages
Status
Second
Third
Description
1000 nnnn
0kkkkkkk
0vvvvvvv
Note Off. Velocity is ignored
1001 nnnn
0kkkkkkk
0vvvvvvv
Note On. Note off if vvvvvvv = 0
1010 nnnn
0kkkkkkk
0vvvvvvv
Polyphonic Key Pressure
1011 nnnn
0vvvvvvv
0vvvvvvv
Control Change; see “Received Controller
Messages” table following
1100 nnnn
0ppppppp
Program change, 0-127 for Programs 1-128
within current Bank
1101 nnnn
0vvvvvvv
Channel Pressure
1110 nnnn
0vvvvvvv
0vvvvvvv
Pitch Bend LS Byte then MS Byte
Received Controller Messages
Status
Second
Third
Description
1011 nnnn
1
0vvvvvvv
Mod Wheel — directly assignable controller
1011 nnnn
2
0vvvvvvv
Breath Controller — directly assignable controller
1011 nnnn
4
0vvvvvvv
Foot Controller — directly assignable controller
1011 nnnn
7
0vvvvvvv
Volume — Combined with Master Volume and
Voice Volume
1011 nnnn
74
0vvvvvvv
Brightness — Added to low-pass filter cutoff
frequency
1011 nnnn
11
0vvvvvvv
Expression Controller — directly assignable
controller
1011 nnnn
32
0vvvvvvv
Bank Select — 0 - 2 select banks 1 - 3; others
ignored
1011 nnnn
64
0vvvvvvv
Damper pedal — holds envelopes in Sustain if
0100 0000 or higher
1011 nnnn
123
0vvvvvvv
All Notes Off — clear all MIDI notes
1011 nnnn
121
0vvvvvvv
Reset All Controllers — clears all MIDI
controllers to 0, MIDI volume to maximum
Notes: 0kkkkkkk Note number 0 — 127
0vvvvvvv Value
nnnn Channel number 0 to 15 (MIDI channel 1-16). Ignored if MIDI
channel set to ALL
See sections below for additional Continuous Controller (CC) and Nonregistered Parameter Number (NRPN) messages received.
45
Page 52

Transmitted Channel Messages
Status
Second
Third
Description
1000 nnnn
0kkkkkkk
0000000
Note Off.
1001 nnnn
0kkkkkkk
0vvvvvvv
Note On.
1011 nnnn
0vvvvvvv
0vvvvvvv
Control Change; see “Transmitted Controller
Messages” table following
1100 nnnn
0ppppppp
Program change, 0 – 127 for Programs 1 – 128
within current Bank
1101 nnnn
0vvvvvvv
Channel Pressure
1110 nnnn
0vvvvvvv
0vvvvvvv
Pitch Bend LS Byte then MS Byte
Transmitted Controller Messages
Status
Second
Third
Description
1011 nnnn
0000 0001
0vvvvvvv
Mod Wheel
1011 nnnn
0000 0010
0vvvvvvv
Breath Controller – when assigned to Pedal/CV
1011 nnnn
0000 0100
0vvvvvvv
Foot Controller – when assigned to Pedal/CV
1011 nnnn
0000 0111
0vvvvvvv
Volume – when assigned to Pedal/CV
1011 nnnn
0100 1010
0vvvvvvv
Brightness – when assigned to Pedal/CV
1011 nnnn
0000 1101
0vvvvvvv
Expression – when assigned to Pedal/CV
1011 nnnn
0010 0000
0vvvvvvv
Bank Select – 0 to 2
1011 nnnn
0100 0000
0vvvvvvv
Damper pedal – sends 0 if off, 0100 0000 when
on
1011 nnnn
0000 0111
0vvvvvvv
Volume knob
Notes: 0kkkkkkk Note number 0 - 127
0vvvvvvv Value
nnnn Channel number 0 to 15 (MIDI channel 1-16). Ignored if MIDI
channel set to ALL
See sections below for additional Continuous Controller (CC) and Nonregistered Parameter Number (NRPN) messages transmitted.
46
Page 53

Additional Continuous Controllers
(CCs) Transmitted/Received
Parameter
CC#
Osc 1 Frequency
20
Osc 1 Freq Fine
21
Osc 1 Shape
22
Glide 1
23
Osc 2 Frequency
24
Osc 2 Freq Fine
25
Osc 2 Shape
26
Glide 2
27
Osc Mix
28
Noise Level
29
Sub Oscillator 1
30
Sub Oscillator 2
31 Filter Frequency
102
Resonance
103
Filter Key Amt
104
Filter Audio Mod
105
Filter Env Amt
106
Filter Env Vel Amt
107
Filter Delay
108
Filter Attack
109
Filter Decay
110
Filter Sustain
111
Filter Release
112
VCA Level
113
Amp Env Amt
115
Amp Velocity Amt
116
Amp Delay
117
Amp Attack
118
Amp Decay
119
Amp Sustain
75
Amp Release
76
Parameter
CC#
Env 3 Destination
85
Env 3 Amt
86
Env 3 Velocity Amt
87
Env 3 Delay
88
Env 3 Attack
89
Env 3 Decay
90
Env 3 Sustain
77
Env 3 Release
78 BPM
14
Clock Divide
15
The following table details how CCs are mapped onto Mopho’s controls. They
are transmitted when MIDI Parameter Send is set to CC in Global, and
recognized when received when MIDI Parameter Receive is set to either CC or
All in Global.
NRPN Messages
The Non-Registered Parameter Number (NRPN) MIDI messages are used to
transmit and receive both global and program parameters. They are transmitted
when MIDI Parameter Send is set to NRPN in Global, and received when MIDI
Parameter Receive is set to either NRPN or All in Global.
47
Page 54

The messages are handled in standard MIDI format using the NRPN CC
Transmitted NRPN Messages
Status
Description
1011 nnnn
Control Change
0110 0011
NRPN parameter number MSB CC
0vvv vvvv
Parameter Number MSB
0110 0010
NRPN parameter number LSB CC
0vvv vvvv
Parameter Number LSB
0000 0110
NRPN parameter value MSB CC
0vvv vvvv
Parameter value MSB
0010 0110
NRPN parameter value LSB CC
0vvv vvvv
Parameter value LSB
commands in running status byte format. Below is the format used for
transmitting a NRPN parameter:
The parameter number can be found in the two tables below, one for Global
parameters, and the other for Program parameters. The parameter numbers and
the parameter values are broken into two 7-bit bytes for MIDI transmission; the
LSB has the seven least-significant bits, and the MSB has the seven mostsignificant bits, though in most cases the MSB will be zero or one, and never
more than two.
When receiving an NRPN, all messages do not necessarily need to be
transmitted, since the synth will track the most recent NRPN number, though it
is usually good practice to send the entire message above.
Once an NRPN is selected, the synth will also respond to NRPN Data Increment
and Decrement commands, which some controllers utilize. Finally, it responds
to one RPN (Registered Parameter Number) command, the RPN/NRPN Reset
command, which can be handy for resetting the currently selected parameter to a
known state.
48
Page 55

Received NRPN Messages
Status
Second
Third
Description
1011 nnnn
0110 0011
0vvvvvvv
NRPN parameter number MSB CC
1011 nnnn
0110 0010
0vvvvvvv
NRPN parameter number LSB CC
1011 nnnn
0000 0110
0vvvvvvv
NRPN parameter value MSB CC
1011 nnnn
0010 0110
0vvvvvvv
NRPN parameter value LSB CC
1011 nnnn
0110 0000
0xxxxxxx
NRPN parameter value Increment
1011 nnnn
0110 0001
0xxxxxxx
NRPN parameter value Decrement
1011 nnnn
0010 0101
0111111
RPN parameter number MSB CC - Reset NRPN
received)
1011 nnnn
0010 0100
0111111
RPN parameter number LSB CC - Reset NRPN
received)
Param
NRPN
Range
Description
0
384
0 - 24
Master Transpose; 0 = -12 semitones (1 octave), 12
= 0 (no transpose), and 24 = +12 semitones.
1
385
0 - 100
Master Fine Tune; 0 = -50 cents, 50 = 0 (centered),
100 = + 50 cents
2
386
0 - 16
MIDI Channel; if = 0, data received on all MIDI
channels. Otherwise = channel number 1 - 16.
3
388
0 - 3
MIDI clock select*
3 Use MIDI clock In, and retransmit MIDI clock out
4
390
0 - 2
Parameter Send*:
2 Off
5
391
0 - 3
Parameter Receive†:
3 Off
6
394
0 - 1
MIDI Controller Send/Receive Off/On
7
395
0 - 1
MIDI Sysex Send/Receive Off/On
parameter number (when both MSB and LSB
parameter number (when both MSB and LSB
Global Parameter Data
The following table shows the Global data that is sent and received on global
parameter dumps, and the corresponding NRPN number when sent/received
individually.
0 Use Internal clock, don’t send MIDI clock
1 Use Internal clock, send MIDI clock
2 Use MIDI clock In
0 NRPN
1 CC
0 All
1 NRPN only
2 CC only
49
Page 56

Param
NRPN
Range
Description
8
406
0 - 1
MIDI Out Select*:
0 MIDI Out
1 MIDI Thru
9
387
0 - 6
Poly Chain*:
6 Out 16
10
389
0 – 1
Local Control* Off/On
11
400
0 - 1
Audio Outputs:
1 Mono
12
404
0 - 2
Pot Mode:
2 Jump
13
397
0 - 3
Damper Polarity:
3 Arpeggiator latch, normally closed
14
396
0 - 5
Pedal Destination:
5 Filter Frequency/2
15
393
0 – 1
MIDI Pressure Send/Receive Off/On
16
399
0 – 3
Pressure Curve
17
398
0 - 3
Velocity Curve
18
Basic Patch
19
Reset Globals
20
403
0 - 28
Balance Tweak*
0 Off
1 Out 1
2 Out 4
3 Out 5
4 Out 8
5 Out 12
0 Stereo
0 Relative
1 PassThru
0 Sustain, normally open
1 Sustain, normally closed
2 Arpeggiator latch, normally open
0 Foot Control
1 Breath Control
2 Expression
3 Volume
4 Filter Frequency
*Received, but not sent.
†Sent, but ignored when received.
50
Page 57

Program Parameter Data
Param
NRPN
Range
Description
0 0 0 - 120
Oscillator 1 Frequency, 0 - 120 in semitones (10
octave range)
1 1 0 - 100
Oscillator 1 Fine Tune; 0 = -50 cents, 50 = 0
(centered), 100 = + 50 cents
2 2 0-103
Oscillator 1 Shape
4 - 103 Pulse Wave, Pulse width 0 - 99
3 3 0 - 127
Oscillator 1 Glide
4 4 0 - 1
Oscillator 1 Keyboard Off/On
5
114
0 - 127
Sub Oscillator 1 Level
6 5 0 - 120
Oscillator 2 Frequency, 0 - 120 in semitones (10
octave range)
7 6 0 - 100
Oscillator 2 Fine Tune; 0 = -50 cents, 50 = 0
(centered), 100 = + 50 cents
8 7 0 - 103
Oscillator 2 Shape
4 - 103 Pulse Wave, Pulse width 0 - 99
9 8 0 - 127
Oscillator 2 Glide
10 9 0 - 1
Oscillator 2 Keyboard Off/On
11
115
0 - 127
Sub Oscillator 2 Level
12
10
0 - 1
Sync off/on
13
11
0 - 3
Glide Mode:
3 fixed time auto
14
12
0 - 5
Oscillator Slop
15
93
0 - 12
Pitch Bend Range
16
13
0 - 127
Oscillator 1 - 2 Mix
17
14
0 - 127
Noise Level
18
116
0 - 127
Feedback/External Audio Volume
19
110
0 - 127
Feedback/External Audio Gain
20
15
0 - 164
Filter Frequency, steps in semitones
21
16
0 - 127
Resonance
The following table lists Mopho’s voice parameters. The parameter number in
the program and edit buffer dumps are different than the NRPN numbers as
seen; this was to maintain NRPN compatibility with the Prophet ’08 as much as
possible.
0 Oscillator Off
1 Sawtooth
2 Triangle
3 Sawtooth/triangle mix
0Oscillator Off
1 Sawtooth
2 Triangle
3 Sawtooth/triangle mix
0 fixed rate
1 fixed rate auto
2 fixed time
51
Page 58

22
17
0 - 127
Filter Keyboard Amount
23
18
0 - 127
Filter Audio Modulation
24
19
0 - 1
Filter Poles 0: 2-pole; 1: 4-pole
25
20
0 - 254
Filter Envelope Amount; -127 to +127
26
21
0 - 127
Filter Envelope Velocity Amount
27
22
0 - 127
Filter Envelope Delay
28
23
0 - 127
Filter Envelope Attack
29
24
0 - 127
Filter Envelope Decay
30
25
0 - 127
Filter Envelope Sustain
31
26
0 - 127
Filter Envelope Release
32
27
0 - 127
VCA Initial Level
33
30
0 - 127
VCA Envelope Amount
34
31
0 - 127
VCA Envelope Velocity Amount
35
32
0 - 127
VCA Envelope Delay
36
33
0 - 127
VCA Envelope Attack
37
34
0 - 127
VCA Envelope Decay
38
35
0 - 127
VCA Envelope Sustain
39
36
0 - 127
VCA Envelope Release
41
29
0 - 127
Voice Volume
42
37
0 - 166
LFO 1 Frequency; 0 - 150 un-synced frequencies
151 Sequence speed divided by 32
166 Sixteen cycles per step
43
38
0 - 4
LFO 1 Shape
4 Random
44
39
0 - 127
LFO 1 Amount
45
40
0 - 47
LFO 1 Mod Destination; See Modulation Destination
list below
46
41
0 - 1
LFO 1 Key Sync Off/On
47
42
0 - 166
LFO 2 Frequency; same as LFO 1
48
43
0 - 4
LFO 2 Shape; same as LFO 1
49
44
0 - 127
LFO 2 Amount
152 Sequence speed divided by 16
153 Sequence speed divided by 8
154 Sequence speed divided by 6
155 Sequence speed divided by 4
156 Sequence speed divided by 3
157 Sequence speed divided by 2
158 Sequence speed divided by 1.5
159 One cycle per step
160 Two cycles per three steps
161 Two cycles per step
162 Three cycles per step
163 Four cycles per step
164 Six cycles per step
165 Eight cycles per step
0 Triangle
1 Reverse Sawtooth
2 Sawtooth
3 Pulse (square)
52
Page 59

50
45
0 - 47
LFO 2 Mod Destination; See Modulation Destination
list below
51
46
0 - 1
LFO 2 Key Sync Off/On
52
47
0 - 166
LFO 3 Frequency; same as LFO 1
53
48
0 - 4
LFO 3 Shape; same as LFO 1
54
49
0 - 127
LFO 3 Amount
55
50
0 - 47
LFO 3 Mod Destination; See Modulation Destination
list below
56
51
0 - 1
LFO 3 Key Sync Off/On
57
52
0 - 166
LFO 4 Frequency; same as LFO 1
58
53
0 - 4
LFO 4 Shape; same as LFO 1
59
54
0 - 127
LFO 4 Amount
60
55
0 - 47
LFO 4 Mod Destination; See Modulation Destination
list below
61
56
0 - 1
LFO 4 Key Sync Off/On
62
57
0 - 47
Envelope 3 Mod Destination; See Mod Destination
list below
63
58
0 - 254
Envelope 3 Amount; -127 to +127
64
59
0 - 127
Envelope 3 Velocity Amount
65
60
0 - 127
Envelope 3 Delay
66
61
0 - 127
Envelope 3 Attack
67
62
0 - 127
Envelope 3 Decay
68
63
0 - 127
Envelope 3 Sustain
69
64
0 - 127
Envelope 3 Release
70
98
0 - 1
Envelope 3 Repeat Off/On
71
65
0 - 22
Mod 1 Source; See Modulation Source list below
72
66
0 - 254
Mod 1 Amount; -127 to +127
73
67
0 - 47
Mod 1 Destination; See Modulation Destination list
below
74
68
0 - 22
Mod 2 Source; See Modulation Source list below
75
69
0 - 254
Mod 2 Amount; -127 to +127
76
70
0 - 47
Mod 2 Destination; See Modulation Destination list
below
77
71
0 - 22
Mod 3 Source; See Modulation Source list below
78
72
0 - 254
Mod3 Amount; -127 to +127
79
73
0 - 47
Mod 3 Destination; See Modulation Destination list
below
80
74
0 - 22
Mod 4 Source; See Modulation Source list below
81
75
0 - 254
Mod 4 Amount; -127 to +127
82
76
0 - 47
Mod 4 Destination; See Modulation Destination list
below
83
81
0 - 254
Mod Wheel Amount; -127 to +127
84
82
0 - 47
Mod Wheel Destination; See Modulation Destination
list below
85
83
0 - 254
Pressure Amount; -127 to +127
53
Page 60

86
84
0 - 47
Pressure Destination; See Modulation Destination
list below
86
85
0 - 254
Breath Amount; -127 to +127
88
86
0 - 47
Breath Destination; See Modulation Destination list
below
89
87
0 - 254
Velocity Amount; -127 to +127
90
88
0 - 47
Velocity Destination; See Modulation Destination list
below
91
89
0 - 254
Foot Control Amount; -127 to +127
92
90
0 - 47
Foot Control Destination; See Modulation
Destination list below
93
96
0 - 4
Unison Mode:
4 All voices detune3
94
96
0 - 5
Key Assign Mode:
95
99
0 - 1
Unison; off/on
96
111
0 - 120
Push It Switch Note Number
97
112
0 - 127
Push It Switch Velocity
98
113
0 - 2
Push It Switch Mode:
2 Audio In
101
91
30 - 250
BPM tempo
102
92
0 - 12
Clock Divide:
12 Sixty-Fourth note triplets
0 1 voice
1 All voices
2 All voices detune1
3 All voices detune2
0 Low note priority
1 Low note priority with re-trigger
2 High note priority
3 High note priority with re-trigger
4 Last note hit priority
5 Last note hit priority with re-trigger
0 Normal
1 Toggle
0 Half Note
1 Quarter Note
2 Eighth Note
3 Eighth Note half swing
4 Eighth Note full swing
5 Eighth Note triplets
6 Sixteenth Note
7 Sixteenth Note half swing
8 Sixteenth Note full swing
9 Sixteenth Note triplets
10 Thirty-second Notes
11 Thirty-second Notes triplets
54
Page 61

103
97
0 - 14
Arpeggiator Mode:
0 Up
14 Random 3 Octaves
104
100
0 - 1
Arpeggiator; Off/On
105
94
0 - 5
Sequencer Trigger:
5 Audio In
106
101
0 - 1
Gated Sequencer; Off/On
107
77
0 - 48
Sequence 1 Destination; See Modulation Destination
list below
108
78
0 - 48
Sequence 2 Destination; See Modulation Destination
list below
109
79
0 - 48
Sequence 3 Destination; See Modulation Destination
list below
110
80
0 - 48
Sequence 4 Destination; See Modulation
Destination list below
120 - 135
120 - 135
0 - 127
Sequence Track1, steps 1-16
127 Rest
136 - 151
136 - 151
0 - 126
Sequence Track 2, steps 1-16
126 Reset
152 - 167
152 - 167
0 - 126
Sequence Track 3, steps 1-16
126 Reset
168 - 183
168 - 183
0 - 126
Sequence Track 4, steps 1-16
126 Reset
184 - 199
184 - 199
32 - 127
Name characters 1-16, in ASCII format
1 Down
2 Up/Down
3 Assign
4 Random
5 Up 2 Octaves
6 Down 2 Octaves
7 Up/Down 2 Octaves
8 Assign 2 Octaves
9 Random 2 Octaves
10 Up 3 Octaves
11 Down 3 Octaves
12 Up/Down 3 Octaves
13 Assign 3 Octaves
0 Normal
1 Normal, no reset
2 No gate
3 No gate/no reset
4 Key Step
0 to 125: Normal sequence step value
126 Reset
0 to 125: Normal sequence step value
0 to 125: Normal sequence step value
0 to 125: Normal sequence step value
55
Page 62

The following tables list the values used with the program parameters to specify
Mod Destinations
Value
Off
0
Osc 1 Freq
1
Osc 2 Freq
2
Osc 1 and 2 Freq
3
Osc Mix
4
Noise Level
5
Osc 1 Pulse Width
6
Osc 2 Pulse Width
7
Osc 1 and 2 Pulse Width
8
Filter Frequency
9
Resonance
10
Filter Audio Mod Amt
11
VCA Level
12
Pan Spread
13
LFO 1 Freq
14
LFO 2 Freq
15
LFO 3 Freq
16
LFO 4 Freq
17
All LFO Freq
18
LFO 1 Amt
19
LFO 2 Amt
20
LFO 3 Amt
21
LFO 3 Amt
22
All LFO Amt
23
Filter Env Amt
24
Amp Env Amt
25
Env 3 Amt
26
All Env Amounts
27
Env 1 Attack
28
Env 2 Attack
29
Env 3 Attack
30
All Env Attacks
31
Env 1 Decay
32
Env 2 Decay
33
Env 3 Decay
34
All Env Decays
35
Env 1 Release
36
Env 2 Release
37
Env 3 Release
38
All Env Releases
39
modulation destinations and sources.
56
Page 63

Mod 1 Amt
40
Mod 2 Amt
41
Mod 3 Amt
42
Mod 4 Amt
43
External Audio In Level
44
Sub Osc 1 Level
45
Sub Osc 2 Level
46
Feedback Gain
47
Slew*
48
*Appears as a destination in sequences 2 and 4 only.
Mod Sources
Value
Off 0 Sequence Track 1
1
Sequence Track 2
2
Sequence Track 3
3
Sequence Track 4
4
LFO 1
5
LFO 2
6
LFO 3
7
LFO 4
8
Filter Envelope
9
Amp Envelope
10
Envelope 3
11
Pitch Bend
12
Mod Wheel
13
Pressure
14
MIDI Breath
15
MIDI Foot
16
MIDI Expression
17
Velocity
18
Note Number
19
Noise
20
Audio In Envelope Follower
21
Audio In Peak Hold
22
57
Page 64

Sysex Messages
Universal System Exclusive Message (Device Inquiry)
Status
Description
1111 0000
System Exclusive (SysEx)
0111 1110
Non-realtime message
0vvv vvvv
If MIDI channel is set to 1 - 16, 0vvvvvvv must match (unless MIDI Channel
= ALL); always responds if 0vvvvvvv = 0111 1111.
0000 0110
Inquiry Message
0000 0001
Inquiry Request
1111 0111
End of Exclusive (EOX)
Status
Description
1111 0000
System Exclusive (SysEx)
0111 1110
Non-realtime message
0vvv vvvv
If MIDI Channel = ALL, 0vvvvvvv = 0111 1111. Otherwise 0vvvvvvv =
Channel Number 0 - 15.
0000 0110
Inquiry Message
0000 0010
Inquiry Reply
0000 0001
DSI ID
0010 0111
Mopho Keyboard ID (Family LS)
0000 0001
Family MS
0000 0000
Family Member LS
0000 0000
Family Member MS
0jjj nnnn
Main Software version: jjj - Minor rev; nnnn - Major rev
0000 0000
Voice firmware version LS
0000 0000
Voice firmware version MS
1111 0111
End of Exclusive (EOX)
Request Program Dump
Status
Description
1111 0000
System Exclusive (SysEx)
0000 0001
DSI ID
0010 0111
Mopho Keyboard ID
0000 0101
Request Program Transmit
0000 00vv
Bank Number, 0 - 2
0vvv vvvv
Program Number, 0 - 127
1111 0111
End of Exclusive (EOX)
Mopho keyboard responds with:
Mopho will respond by sending out the Program Data in the format described
below in Program Data Dump.
58
Page 65

Request Program Edit Buffer Dump
Status
Description
1111 0000
System Exclusive (SysEx)
0000 0001
DSI ID
0010 0111
Mopho keyboard ID
0000 0110
Request Program Edit Buffer Transmit
1111 0111
End of Exclusive (EOX)
Request Global Parameter Dump
Status
Description
1111 0000
System Exclusive (SysEx)
0000 0001
DSI ID
0010 0111
Mopho keyboard ID
0000 1110
Request Global Parameter Transmit
1111 0111
End of Exclusive (EOX)
Program Data Dump
Status
Description
1111 0000
System Exclusive (SysEx)
0000 0001
DSI ID
0010 0111
Mopho keyboard ID
0000 0010
Program Data
0000 00vv
Bank Number, 0 - 2
0vvv vvvv
Program Number, 0 - 127
0vvv vvvv
256 bytes expanded to 293 MIDI bytes in “packed MS bit” format (see
page 60.)
1111 0111
End of Exclusive (EOX)
Mopho will respond by sending out the current Program edit buffer in the format
described below in Program Edit Buffer Data Dump.
Mopho will respond by sending out the current values of Global Parameters in
the format described below in Global Parameters Data Dump.
59
Page 66

Program Edit Buffer Data Dump
Status
Description
1111 0000
System Exclusive (SysEx)
0000 0001
DSI ID
0010 0111
Mopho keyboard ID
0000 0011
Edit Buffer Data
0vvv vvvv
256 bytes expanded to 293 MIDI bytes in “packed MS bit” format (see
page 60.)
1111 0111
End of Exclusive (EOX)
Global Parameters Data Dump
Status
Description
1111 0000
System Exclusive (SysEx)
0000 0001
DSI ID
0010 0111
Mopho keyboard ID
0000 1111
Main Parameter Data
0vvv vvvv
42 nibbles (LS then MS) for 21 Global parameters. Global Parameters
are listed starting on page 49.
1111 0111
End of Exclusive (EOX)
Note: The Global Parameters Data Dump is not recognized when received; it is
only transmitted when requested. NRPN messages are used to change Globals.
Packed Data Format
Data is packed in 8 byte “packets”, with the MS bit stripped from 7 parameter
bytes, and packed into an eighth byte, which is sent at the start of the 8 byte
packet.
Example:
Input Data Packed MIDI data
1 A7 A6 A5 A4 A3 A2 A1 A0 1 00 G7 F7 E7 D7 C7 B7 A7
2 B7 B6 B5 B4 B3 B2 B1 B0 2 00 A6 A5 A4 A3 A2 A1 A0
3 C7 C6 C5 C4 C3 C2 C1 C0 3 00 B6 B5 B4 B3 B2 B1 B0
4 D7 D6 D5 D4 D3 D2 D1 D0 4 00 C6 C5 C4 C3 C2 C1 C0
5 E7 E6 E5 E4 E3 E2 E1 E0 5 00 D6 D5 D4 D3 D2 D1 D0
6 F7 F6 F5 F4 F3 F2 F1 F0 6 00 E6 E5 E4 E3 E2 E1 E0
7 G7 G6 G5 G4 G3 G2 G1 G0 7 00 F6 F5 F4 F3 F2 F1 F0
8 00 G6 G5 G4 G3 G2 G1 G0
This explains why it takes 293 MIDI bytes to transmit 256 Program data bytes.
60
Page 67

Pitch Wheel Calibration
The pitch wheel is calibrated at the factory and, generally speaking, should not
have to be calibrated again. If, however, you find that your Mopho is not tuned
to concert pitch when the pitch wheel is centered and the global transpose is set
to 0, try performing a wheel calibration.
To calibrate the pitch wheel:
1. With the pitch wheel held all the way down, hold COMPARE and press
RPEGGIATOR.
A
The display should read “Wheels Calibrated Low.”
2. With the pitch wheel centered, hold C
The display should read “Pitch Wheel Calibrated Mid.”
3. With the pitch wheel held all the way up, hold C
EQUENCER.
S
The display should read “Wheels Calibrated High.”
The pitch wheel is now calibrated.
OMPARE and press OSC.
OMPARE and press
61
Page 68

62 63 64
Page 69

Page 70

Page 71

Page 72

Dave Smith Instruments
1527 Stockton Street
2nd Floor
San Francisco, CA 94133
USA
www.DaveSmithInstruments.com
 Loading...