

Datavideo TLM-170PR, TLM-170PM Instruction Manual
17.3” Full HD LCD Monitor
TLM-170P/ PR/ PM
Instruction Manual
www.datavideo.com

2
Contents
Warnings and Precautions...................................................................................................3
Warranty..............................................................................................................................4
Disposal...............................................................................................................................4
Packing List .........................................................................................................................5
TLM-170P Model Types.......................................................................................................5
Introduction..........................................................................................................................6
Features...............................................................................................................................6
Compatible Resolutions and Formats..................................................................................7
Connections and Controls....................................................................................................8
Front Panel..........................................................................................................................8
Rear Panel...........................................................................................................................9
Function Button - pixel zoom feature.................................................................................10
TLM-170PR: Fitting the 19” Rack Ears to the TLM-170P...................................................16
TLM-170PM: Fitting the monitor to a 19” Rack..................................................................17
Remote Set Up using an existing DHCP Network .............................................................13
Remote Set Up using a direct computer connection..........................................................14
Firmware update procedure...............................................................................................15
Specifications.....................................................................................................................18
Service and Support ..........................................................................................................20
Disclaimer of Product and Services
The information offered in this instruction manual is intended as a guide only. At all times, Datavideo Technologies will try to give correct,
complete and suitable information. However, Datavideo Technologies cannot exclude that some information in this manual, from time to
time, may not be correct or may be incomplete. This manual may c ontain typing errors, omissions or incorrect information. Datavideo
Technologies always recommen d that you double check the information in this document for accuracy before making any purchase
decision or using the product. Datavideo Technologies is not responsible for any omissi ons or errors, or for any subsequent loss or
damage caused by using the information contained within this manual. Further advice on the content of this manual or on the pro duct
can be obtained by contacting your local Datavideo Office or dealer.

3
Warnings and Precautions
1. Read all of these warnings and save them for later reference.
2. Follow all warnings and instructions marked on this unit.
3. Unplug this unit from the wall outlet before cleaning. Do not use liquid or aerosol cleaners . Use a dam p cloth fo r
cleaning.
4. Do not use this unit in or near water.
5. Do not place this unit on an unstable cart, stand, or table. The unit may fall, causing serious damage.
6. Slots and openings on the cabinet top, back, and bottom are provided for ventilation. To ensure safe and
reliable operation of this unit, and to protect it from overheating, do not block or cover these openi ngs. Do not
place this unit on a bed, sofa, rug, or similar surface, as the ventilation openings on the bottom of the cabinet
will be blocked. This unit should never be plac ed near or ov er a heat regist er or radi ator. This unit should not be
placed in a built-in installation unless proper ventilation is provided.
7. This product should only be operated from the type of power source indicated on the marking label of the AC
adapter. If you are not sure of the type of power available, consult your Datavideo dealer or your local po wer
company.
8. Do not allo w anything to rest on the po wer cord. Do not locate this unit where the po wer cord will be walked on,
rolled over, or otherwise stressed.
9. If an extension cord must be used with this unit, make sure that the total of the ampere ratings on the products
plugged into the extension cord do not exceed the extension cord rating.
10. Make sure tha t the total amperes of all the units that are plugged into a single wall outlet do not exceed 15
amperes.
11. Never push ob jects of any kind into this unit throug h the cabinet ventilation slots, as the y may touch danger ous
voltage points or short out parts that could result in risk of fire or electric shock. Never spill liquid of any kind
onto or into this unit.
12. Except as specifically explained elsewhere in this manual, do not attempt to service this product yourself.
Opening or removing covers that are marked “Do Not Remove” may expose you to dangerous voltage points or
other risks, and will void your warranty. Refer all service issues to qualified service personnel.
13. Unplug this product from the wall outlet and refer to qualified service personnel under the following condit ions:
a. When the power cord is damaged or frayed;
b. When liquid has spilled into the unit;
c. When the product has been exposed to rain or water;
d. When the product does not operate normally under normal operating conditions. Adjust only those
controls that are covered by the operating instructions in this manual; improper adjustment of other
controls may result in damage to the unit and may often require extensive work by a qualified
technician to restore the unit to normal operation;
e. When the product has been dropped or the cabinet has been damaged;
f. When the product exhibits a distinct change in performance, indicating a need for service.

4
Warranty
Standard Warranty
• Datavideo equipment is guaranteed against any manufacturing defects for one year from the date of
purchase.
• The original purchase invoice or other documentary evidence should be supplied at the time of any
request for repair under warranty.
• Damage caused by accident, misuse, unauthorized repairs, sand, grit or water is not covered by this
warranty.
• All mail or transportation costs including insurance are at the expense of the owner.
• All other claims of any nature are not covered.
• Cables & batteries are not covered under warranty.
• Warranty only valid within the country or region of purchase.
• Your statutory rights are not affected.
Two Y ear W arranty
• All Datavideo products purchased after 01-Oct.-2008 qualify for a free one year extension to the
standard Warranty, providing the product is registered with Datavideo within 30 days of purchase. For
information on how to register please visit www.datavideo.com
or contact your local Datavideo office or
authorized Distributors.
• Certain parts with limited lifetime expectancy such as LCD Panels, DVD Drives, Hard Drives are only
covered for the first 10,000 hours, or 1 year (whichever comes first).
Any second year warranty claims must be made to your local Datavideo office or one of its authorized
Distributors before the extended warranty expires.
Disposal
For EU Customers only - WEEE Marking.
This symbol on the product indicates that it should not be treated as household waste. It
must be handed over to an applicable take-back scheme for the recycling of Waste
Electrical and Electronic Equipment. For more detailed information about the recycling of
this product, please contact your local Datavideo office or your local recycling centre.
5
Packing List
The following items should be included in the box. If any items are missing please contact your supplier.
Item No. Description Quantity
1
TLM-170P/ PR/ PM Monitor 1
2
Accessory List 1
3
Instruction Manual 1
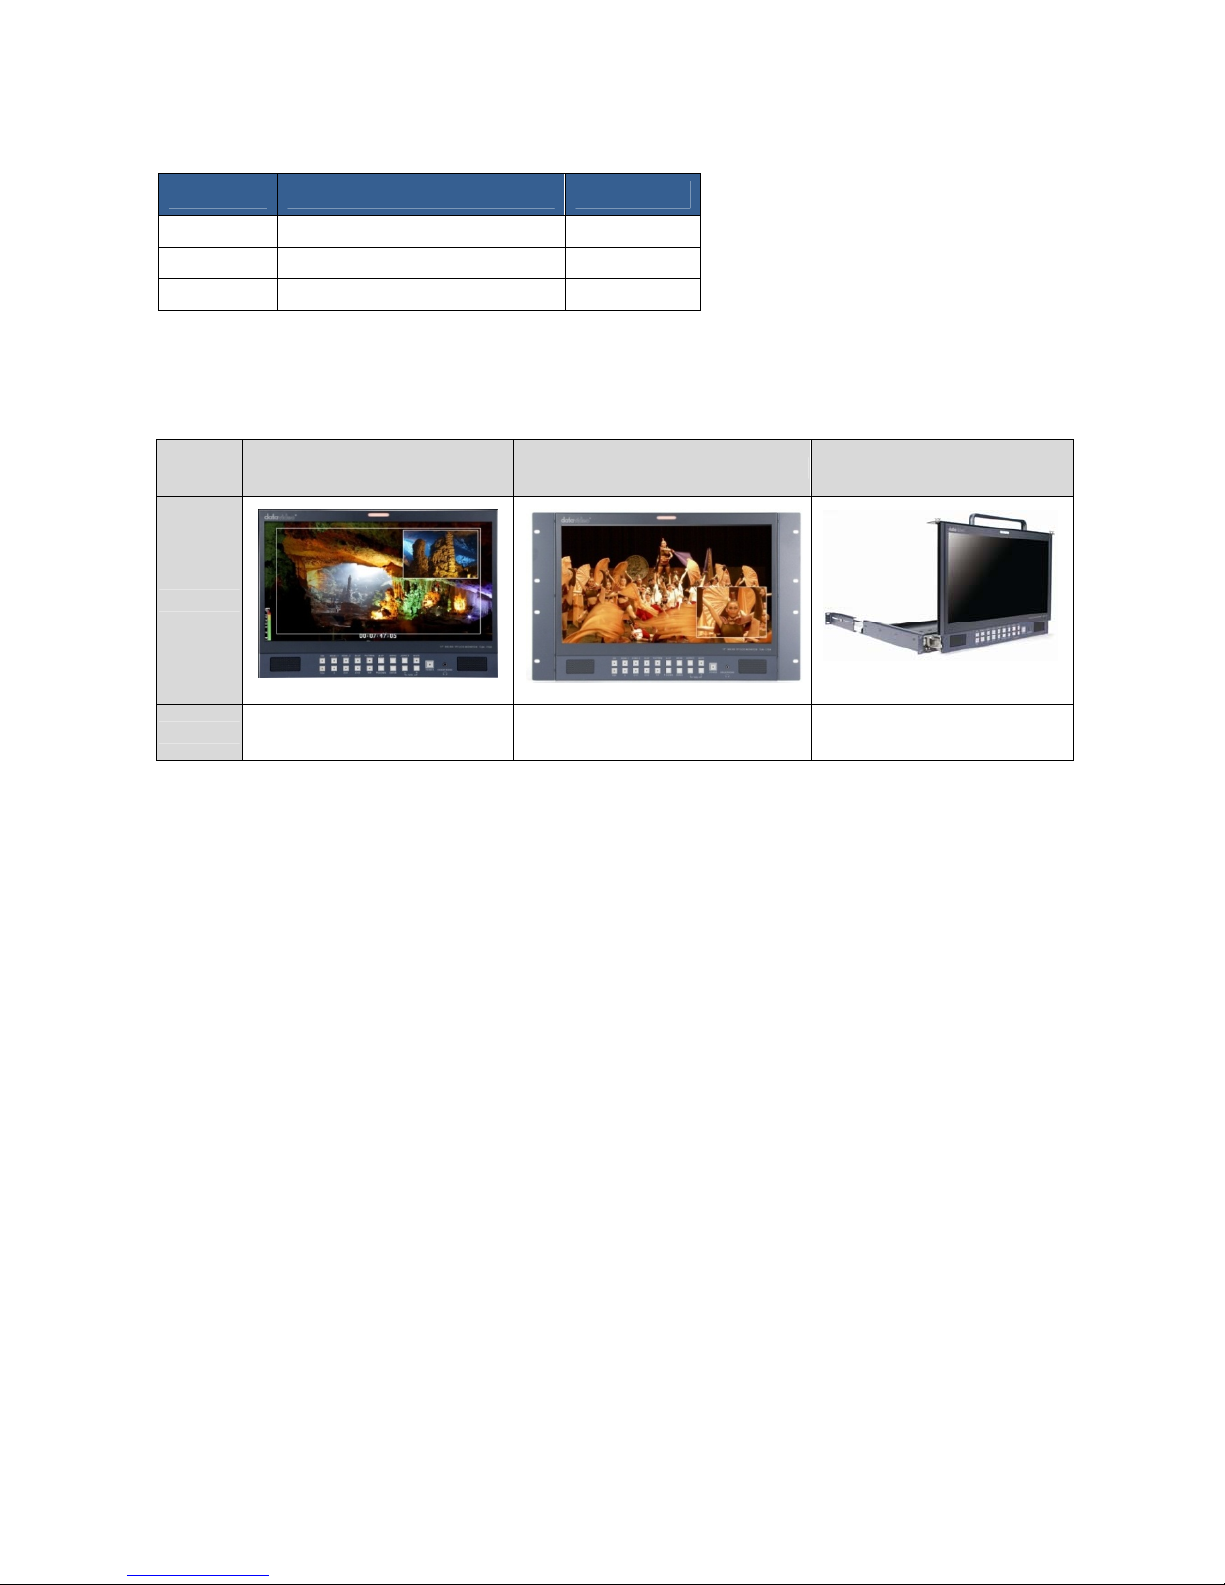
TLM-170P Model Types
Model TLM-170P TLM-170PR TLM-170PM
Image
System
Desktop 7U rack mount 1U mobile tray rack mount

6
Introduction
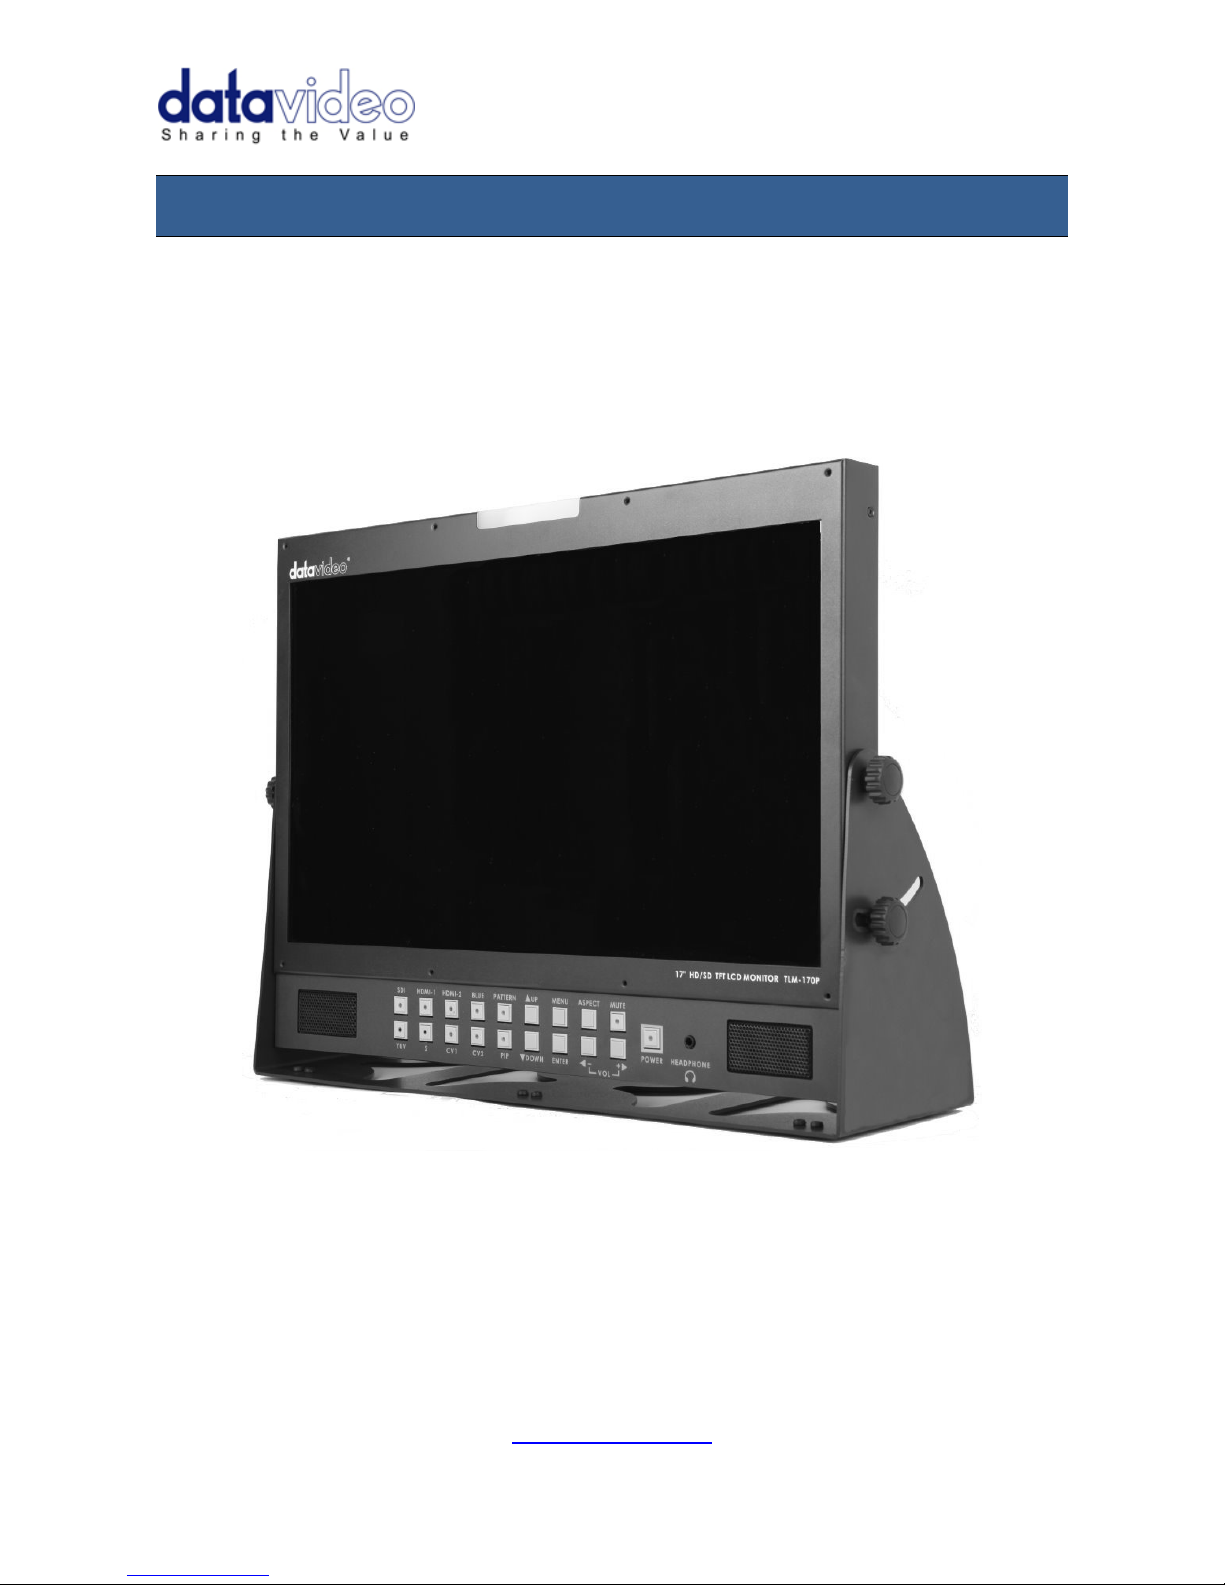
The Datavideo TLM-170P is a 17.3” TFT LCD monitor that delivers superb FULL HD 1080P image quality
from various inputs including 3G-SDI. The monitor is a professional grade panel designed to give excellent
colour and video performance across a range of formats and standards as well as 24/7 operation.
The TLM-170P front panel buttons allow quick and easy selection of source input as well as PIP, Aspect ratio,
Blue only, Pattern (Colour Bars), Menu and audio controls. Input HD/SD sources via the rear panel SDI,
HDMI, Component (Y, Pb, Pr) and Composite connections as well as monitoring RCA phono or embedded
SDI / HDMI audio.
The Datavideo TLM-170P monitor has an on-screen display (OSD) menu which allows control and set up of
brightness, contrast, saturation, hue, sharpness, colour temperature and picture in picture. It also has RJ-45
TCP/IP connector to allow remote set up of the monitor using a PC / Mac based web browser. The menus
can also be used to display onscreen overlays for frame marker, 4:3 marker, 16:9 Marker, Cinema Zone
Marker, Center Point, embedded SDI Timecode and Monitor Title.
The Datavideo TLM-170P monitor can be operated from AC or 12V DC power making it flexible for use in a
Studio, Gallery, Post Production Edit Suite or even in an OB Van.
That’s Datavideo; sharing the value!
To get more value out of this equipment please take a few minutes to read through this manual. This will help
you to familiarise yourself with all the aspects of the TLM-170P monitor.
Features
• 17.3” FULL HD 1080p LCD Panel with Underscan and Overscan menu options.
• Digital Video Inputs: Single BNC HD-SDI or SDI and HDMI x2 [ HDMI1, HDMI 2 ].
• Analogue Video Inputs: Component [ Y,Pb,Pr ], Composite x2 [ CV1, CV2 ].
• Single BNC SDI /HD-SDI loop through / bypass.
• Composite loop through of CV2 input.
• Mono Audio Inputs: Single RCA phono socket for anal ogue inputs.
• Digital Au dio Inputs: via SDI or HDMI inputs.
• Head phone 3.5mm stereo jack socket for discrete audio monitoring.
• Front Panel Buttons allow quick and easy selection of source input as well as PIP, Aspect Ratio, Blue
only, Pattern ( Colour Bars ), Menu and audio controls.
• Colour temperature menu option has 3 modes (6500K, 9300K and user defined)
• OSD audio level peak meter for SDI and HDMI based digital audio inputs.
• On screen overlays for frame marker 80%, 90%, 4:3 marker, 16:9 Marker, Cinema Zone Marker,
Center Point, embedded SDI Timecode and Monitor Title.
• Bi-colour Tally light [Red or Amber] and 3.5mm Jack Tally input socket.
• Analogue Audio external speaker outputs L-, L+ and R-, R+ [Max 5v p - p (2w)].
• RJ-45 TCP/IP connection allows remote set up of the monitor using a PC / Mac based browser.
• USB 2.0 port for easy update of firmware with a USB 2.0 pen drive.
 Loading...