

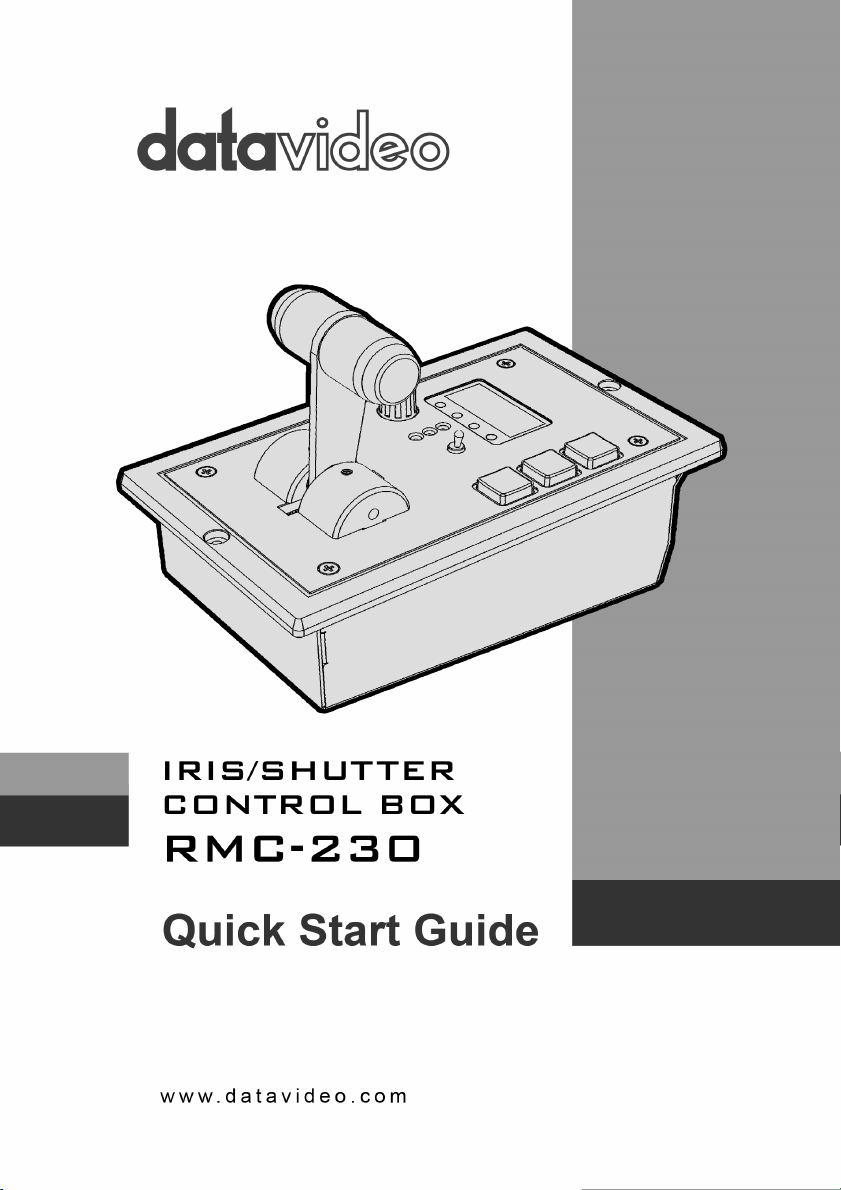
Page 1
Page 2

Contents
Warnings and Precautions ................................................................ 3
Warranty .............................................................................................. 4
Standard Warranty ......................................................................... 4
Two Year Warranty ......................................................................... 4
Disclaimer of Product & Services ................................................... 5
Disposal .......................................................................................... 5
Packing List .................................................................................... 5
Product Overview ............................................................................... 6
Features ............................................................................................... 6
System Diagram .................................................................................. 7
Control Panel ...................................................................................... 9
Rear Panel ......................................................................................... 11
Firmware Upgrade ............................................................................ 12
Dimensions ....................................................................................... 13
Frequently-Asked Questions ........................................................... 14
Specifications ................................................................................... 15
Service & Support ............................................................................. 16
2
Page 3

Warnings and Precautions
1. Read all of these warnings and save them for later reference.
2. Follow all warnings and instructions marked on this unit.
3. Unplug this unit from the wall outlet before cleaning. Do not use liquid or aerosol
cleaners. Use a damp cloth for cleaning.
4. Do not use this unit in or near water.
5. Do not place this unit on an unstable cart, stand, or table. The unit may fall,
causing serious damage.
6. Slots and openings on the cabinet top, back, and bottom are provided for
ventilation. To ensure safe and reliable operation of this unit, and to protect it from
overheating, do not block or cover these openings. Do not place this unit on a bed,
sofa, rug, or similar surface, as the ventilation openings on the bottom of the
cabinet will be blocked. This unit should never be placed near or over a heat
register or radiator. This unit should not be placed in a built-in installation unless
proper ventilation is provided.
7. This product should only be operated from the type of power source indicated on
the marking label of the AC adapter. If you are not sure of the type of power
available, consult your Datavideo dealer or your local power company.
8. Do not allow anything to rest on the power cord. Do not locate this unit where the
power cord will be walked on, rolled over, or otherwise stressed.
9. If an extension cord must be used with this unit, make sure that the total of the
ampere ratings on the products plugged into the extension cord do not exceed the
extension cord’s rating.
10. Make sure that the total amperes of all the units that are plugged into a single wall
outlet do not exceed 15 amperes.
11. Never push objects of any kind into this unit through the cabinet ventilation slots,
as they may touch dangerous voltage points or short out parts that could result in
risk of fire or electric shock. Never spill liquid of any kind onto or into this unit.
12. Except as specifically explained elsewhere in this manual, do not attempt to
service this product yourself. Opening or removing covers that are marked “Do Not
Remove” may expose you to dangerous voltage points or other risks, and will void
your warranty. Refer all service issues to qualified service personnel.
13. Unplug this product from the wall outlet and refer to qualified service personnel
under the following conditions:
a. When the power cord is damaged or frayed;
b. When liquid has spilled into the unit;
c. When the product has been exposed to rain or water;
d. When the product does not operate normally under normal operating
conditions. Adjust only those controls that are covered by the operating
instructions in this manual; improper adjustment of other controls may result in
damage to the unit and may often require extensive work by a qualified
technician to restore the unit to normal operation;
e. When the product has been dropped or the cabinet has been damaged;
f. When the product exhibits a distinct change in performance, indicating a need
for service.
3
Page 4

Warranty
Standard Warranty
• Datavideo equipment is guaranteed against any manufacturing defects for
one year from the date of purchase.
• The original purchase invoice or other documentary evidence should be
supplied at the time of any request for repair under warranty.
• Damage caused by accident, misuse, unauthorized repairs, sand, grit or
water is not covered by this warranty.
• All mail or transportation costs including insurance are at the expense of
the owner.
• All other claims of any nature are not covered.
• Cables & batteries are not covered under warranty.
• Warranty only valid within the country or region of purchase.
• Your statutory rights are not affected.
Two Year Warranty
• All Datavideo products purchased after 01-Oct.-2008 qualify for a free one
year extension to the standard Warranty, providing the product is
registered with Datavideo within 30 days of purchase. For information on
how to register please visit www.datavideo.com or contact your local
Datavideo office or authorized Distributors
• Certain parts with limited lifetime expectancy such as LCD Panels, DVD
Drives, Hard Drives are only covered for the first 10,000 hours, or 1 year
(whichever comes first).
Any second year warranty claims must be made to your local Datavideo office
or one of its authorized Distributors before the extended warranty expires.
4
Page 5
Item No.
Description
Quantity
1
Unit
1
Disclaimer of Product & Services
The information offered in this instruction manual is intended as a guide only.
At all times, Datavideo Technologies will try to give correct, complete and
suitable information. However, Datavideo Technologies cannot exclude that
some information in this manual, from time to time, may not be correct or may
be incomplete. This manual may contain typing errors, omissions or incorrect
information. Datavideo Technologies always recommend that you double
check the information in this document for accuracy before making any
purchase decision or using the product. Datavideo Technologies is not
responsible for any omissions or errors, or for any subsequent loss or damage
caused by using the information contained within this manual. Further advice
on the content of this manual or on the product can be obtained by contacting
your local Datavideo Office or dealer.
Disposal
For EU Customers only - WEEE Marking
This symbol on the product indicates that it will not be
treated as household waste. It must be handed over to the
applicable take back scheme for the recycling of Waste
Electrical and Electronic Equipment. For more detailed
information about the recycling of this product, please
contact your local Datavideo office.
Packing List
The following items should be in the box. If any items are missing please
contact your supplier.
RMC-230
2 Accessory List 1
5
Page 6

Product Overview
RMC-230
RJ-45
The main design purpose of the RMC-230 is to replace camera iris and shutter control
on MCU-100S and MCU-200S. It acts as an interface connected between an MCU
unit and the cameras. One end of the RMC-230 is connected to the camera via
AD-1S and another end of the RMC-230 is connected to the MCU units, which are
cost effective remote controllers designed specifically for remote control of SONY
video cameras and camcorders. However, the RMC-230 can also be used as a
standalone device for just controlling the camera iris and shutter as shown in the
diagram below.
That’s Datavideo, sharing the value!
AD-1S
AD-1S: Sony 8Pin
Features
• Two RJ-45 ports allow connections of one end of RMC-230 to AD-1 and
another end of RMC-230 to MCU-100 Unit.
• Two PWR ports with one providing power connection and another one
allowing cascade of multiple RMC-230 units.
• Control of Shutter adjustment.
• Control of Iris adjustment.
• Iris and Shutter level display
6
Page 7

System Diagram
7
Page 8

Power cascade of multiple RMC-230 Units
Connection to MCU-100/200
1. Use Cat. 5e cable to connect one RJ-45 connector of MCU-100/200 to the RJ-45
connector of the RMC-230
2. Connect the RJ-45 connectors of the RMC-230 and AD-1 via Cat. 5e cable.
3. The DC power adaptor must be connected to the first RMC-230 unit. If the user
has to connect the second or the third unit, the user can use the DC power cable
to cascade the units using another power connector. The user is also allowed to
connect each RMC-230 unit to the DC power independently.
Connection to MCU-100S / 200S
1. Do not need to connect power adaptor to the RMC-230 as the RMC-230 is
powered by Cat. 5e cable.
2. Use Cat. 5e cable to connect the RJ-45 connector of MCU-100S or
MCU-200S to RJ-45 connector of the RMC-230
3. Connect RJ-45 connectors of the RMC-230 and AD-1 via Cat. 5e cable.
8
Page 9

Control Panel
T-Bar
Adjustment of iris value
High iris transition speed button
High iris transition speed
Medium iris transition speed button
Medium iris transition speed
9
Page 10

Slow iris transition speed button
Slow iris transition speed
7-Segment Display Screen
Displays Iris and Shutter values
LEDs
IRIS ON: Manual mode
IRIS OFF: Auto mode
ON: SONY camera shutter ON
OFF: SONY camera shutter OFF
SHTR ON: Shutter speed display
SHTR OFF: IRIS value display
Deg ON: Shutter angle is displayed
Deg OFF: Shutter speed is displayed
Shutter knob
Adjustment of shutter speed for SONY
cameras
Press the knob to turn off the SONY
camera shutter mode
10
Toggle Switch
Toggle Right: Switches between auto and
manual IRIS modes
Toggle Left: Switches between different
shutter modes (SONY camera: SLS/ECS/
SHU)
LED Indicators for shutter modes
SONY camera: SLS/ECS/SHU
Page 11

Rear Panel
RJ-45 Port (AD1)
USB Port
PWR Cascade
DC-IN 12V
RJ-45 Port (MCU)
Connection to AD1
Connection to the PC for F/W Upgrade
Powers another RMC-230 to cascade multiple
RMC-230s
Power supply
Connection to MCU
11
Page 12

rmware Upgrade
Fi
Datavideo usually releases new firmware containing new features or reported bug
fixes from time to time. Customers can either download the firmware from our
official website or contact their local dealer or reseller for assistance.
This section outlines the firmware upgrade process.
1. Turn off the RMC-230.
2. Connect the RMC-230 to the PC via USB cable.
3. Press and Hold the shutter button
4. Turn on the RMC-230.
5. 7-segment display of the RMC-230 will display “L-0.5”, and the PC will detect the
RMC-230 and recognize it as a USB device.
6. Open the “RMC-230_U1” disk drive on the PC.
7. Remove the binary file (fw_0v500.bin) from the “RMC-230_U1” folder.
8. Copy new binary file to the “RMC-230_U1” disk drive.
9. Reboot RMC-230 to complete the firmware update.
.
12
Page 13

Dimensions
All measurements in millimetres (mm)
13
Page 14

Frequently-Asked Questions
No.
Problems
Solutions
1.
What is the maximum
Unit?
The maximum recommended length
This section describes problems that you may encounter while using RMC-230. If you
have questions, please refer to related sections and follow all the suggested
solutions. If problem still exists, please contact your distributor or the service center.
recommended length of Cat. 5e
cable for the connection
between RMC-230 and MCU-100
of Cat. 5e is 50 meters.
14
Page 15

Specifications
Input/Output
Connection
RJ-45 x 2
Power Jack
DC IN x 1
Power Cascade x 1
F/W Upgrade
USB x 1
Display
7-segment Display and LED
Power
DC 12V
Environmental
Conditions
Operating temperature.:0~50°C
Stora ge temperature:-10~60°C
Dimension
150 x 90 x 97.6mm
Weight
0.6kg
15
Page 16

Service & Support
16
 Loading...