

Page 1

Setting up a Datamax E-4205e
1. L oad the ticket stock
• Unlock the printhead and lift it so it is
vertical.
• Push the stock to the left side.
• Close the printhead and push it
down until the turquoise latch
holds it down.
• Push the turquoise guide so it is
guiding the stock and holding it
against the left side of the paper path.
• When you close the cover, here is how
it should look.
Page 2
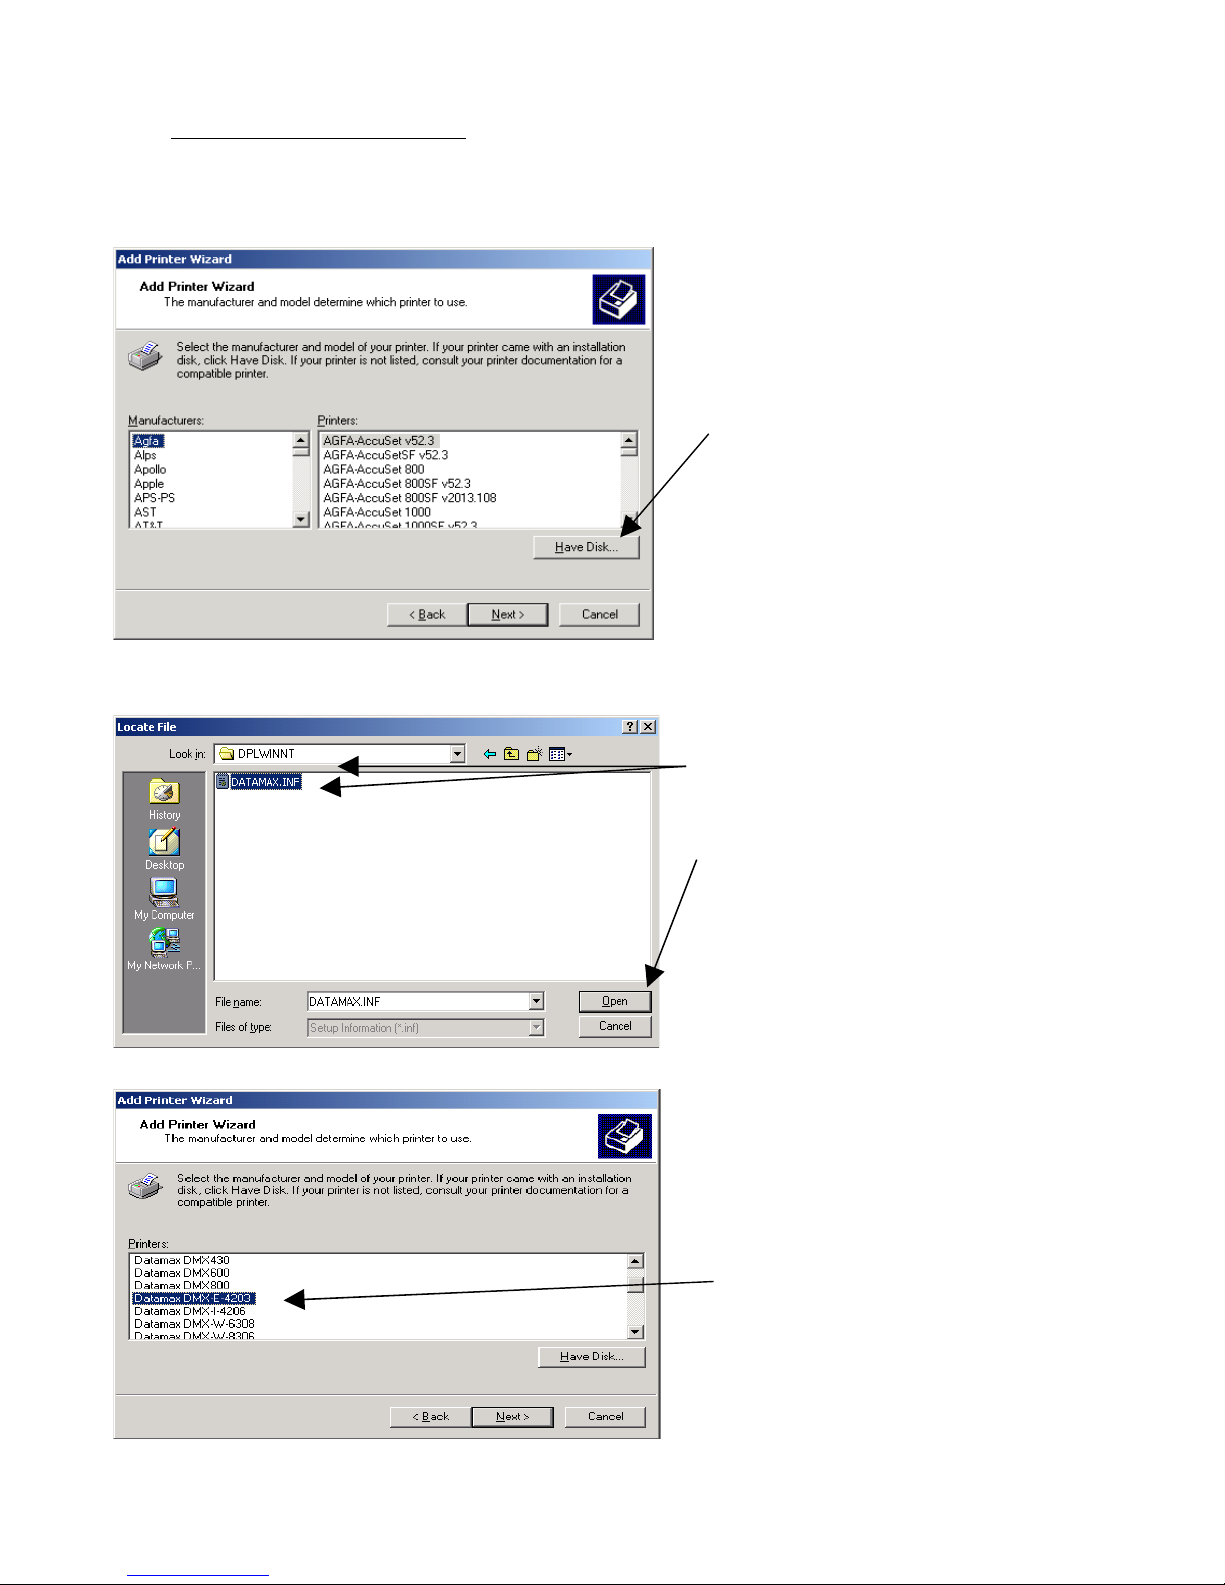
2. Install the printer driver
Start by clicking on the “Add printer” icon
• You will not find Datamax listed in
the list of printers. Click on the “Have
disk” button.
• Browse to the Datamax CD.
Windows XP Pro and Windows 7
• Click on the file DATAMAX.INF in
the \DRIVERS\DPLWINNT
subdirectory.
• Click on Open.
• Select the Datamax DMX-E-4205e.
• Accept all the defaults from here on
and the printer will be installed.
Page 3

3. Setup
(After you have installed the printer driver)
• Right click on this icon and
select “Printing preferences”.
• Set the stock size to be
“Multipurpose, 2¼ x 5½”.
Page 4

Two more important settings to check are SOP Emulation and Present Sensor:
SOP Emulation
• While in the Datamax driver, do a right click under Properties
• Select Tools | Configure | Configure Printer | System tab. Under
• Under SOP Emulation, choose Allegro. Note: this is usually defaulted as “disabled.”
Page 5
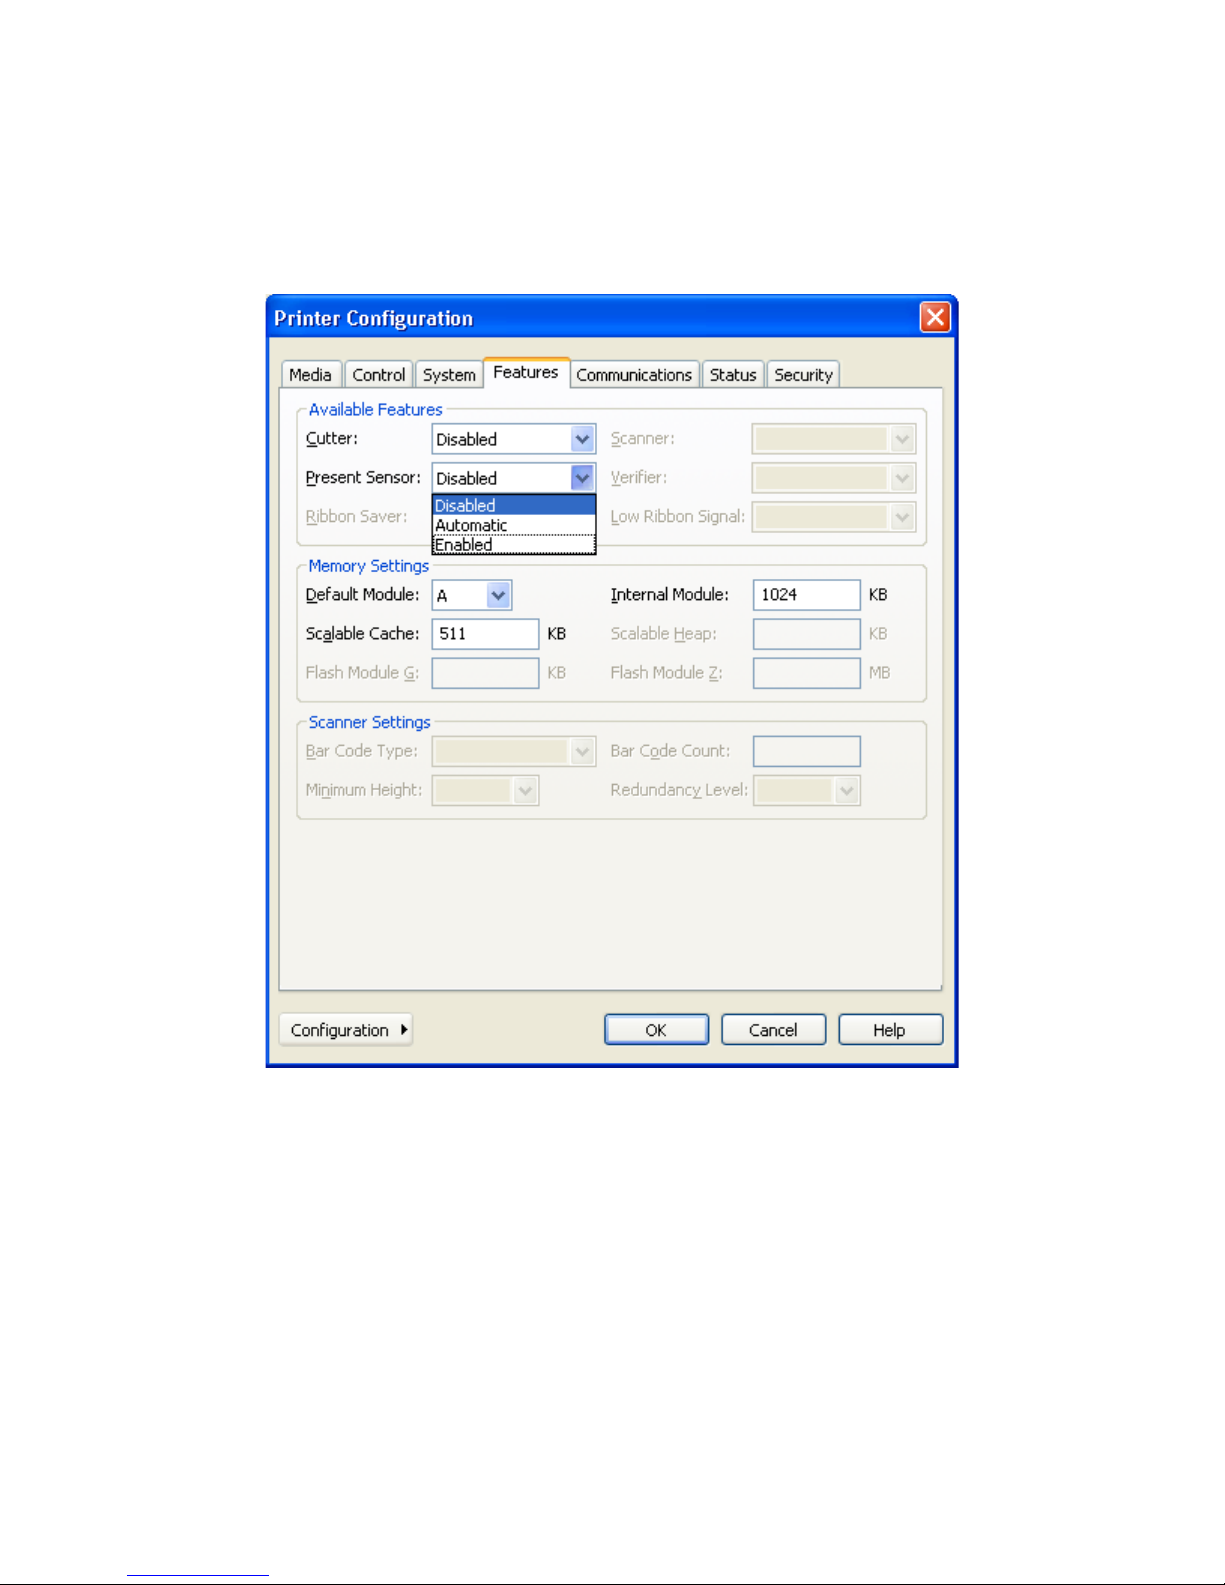
Present Sensor
• Again, while in the Datamax driver, do a right click under Properties.
• Select Features tab.
• Check to make sure “Present Sensor” is enabled. Note: this is usually defaulted as “disabled.”
Page 6

• Set the label sensor to be
‘Label mark.’
Set the top offset to be –1.40.
This setting can be changed.
See Note.
With Datamax v 5 firmware: Top
offset 4.27; Tear offset 4.98.
NOTE: These settings are
guidelines. On Center Stage
Software’s setup, we
changed Top Offset to 0.00.
• Set the post print action to ‘Tear’
and the tear offset to 0.00. This is
one place where you may want
to change things later.
Setting up a Windows printer with Wintix
• Click on this button to bring
up the label designer.
• Select Windows printer (standard)
Yes, that’s right – even though you
are using a Datamax.
Page 7

• Click here on File | Page Setup | Print setup
• This is what attaches the ticket to the ticket printer. You must go through this step so the
tickets will default to the ticket printer and not the report printer.
Some notes:
1. If your logo is upside down, DON’T PANIC. You probably have the stock in backwards. Take
the stock out, turn the stack upside down, and put it back in.
If you have a new batch of stock, the logo really may be in upside down. On the ‘Page setup’
page, change the orientation to 180°.
2. Print drivers change every time Microsoft comes out with a new service pack. For the latest,
check SeagullScientific.com (Hint: Seagull Scientific is a good source for print drivers for all
kinds of printers).
3. If the printer stops between each ticket, make sure the ‘Pause between labels' box is not
checked. Then, turn the printer off and on.
4. The black line sensor is on the bottom left side of the paper path (when you are facing the
printer). Therefore, the black line must be on the bottom left edge of the ticket stock when it
comes out.
5. If one edge of the tickets is printing lightly, adjust the green thumbwheel on the right side of the
printhead.
6. Occasionally, a printer will print fine under Tixsales but print blank tickets with Wintix. If you
have this happen, you need to go to the ‘Storage Memory’ tab and click on the ‘Memory
configuration’ button. Change the 'RAM module allocation’ to 84K and the ‘Scalable font cache’
to 64K.
7. Occasionally, a printer will ignore the black line sensor and insist on using the edge (gap)
sensor. This behavior manifests itself by the printer printing the first ticket properly, ejecting 1½
blank tickets, and stopping with a red error light. If this happens to a printer, look in section 4.4
of the Datamax E-class manual. Use the buttons on the printer to change the sensor type
setting to (REFL) reflective.
Page 8

8. Occasionally, a printer will need to be reset to factory defaults. To do this, turn the printer off.
Then, hold down F1 and F3 while turning it on. This resets the printer.
9. The "Tear offset" is how far the ticket sticks out at the end of the print job. Before the start of
the next print job, it gets pulled back in so the ticket can print from edge to edge. Normally, the
settings in this setup sheet are sufficient. However, the position of the black line can vary up to
1/8”. Occasionally, you will change to a new batch of tickets and the tickets will be pulled back
so far into the printer that the rubber pinch rollers lose their grip of the stock. All the ticket
sellers notice is that the printer is trying and not succeeding in pushing the stock through. The
solution is to adjust the top offset.
Additional notes for Tixsales users and Wintix (using the DPL language):
1. With the Datamax printer codes, you need to know where the start point is. It should be on the
perforation. If not, you probably are feeding the stock from the wrong end of the stack.
2. Datamax printer codes are similar to the FGL codes in that they have a row and column
designator. They are different in that they also contain information about the font, rotation,
horizontal, and vertical multipliers. Take a look on page 65 of EDPL.pdf (on the Datamax CD).
It will give you some vague hints.
The title of the show gets sent to the printer like this:
4911A1400500040Hello Dali
The codes are formatted like this in Tixsales:
4-9-1-1-A14-0050-0040
Here's what it means:
4 = Rotation
9 = Font ID
1 = Width multiplier
1 = Height multiplier
A14 = Font size ID. In this case, the A14 specifies the smooth, proportional font, size 14
point. If you had wanted a monospace font, you would have entered a "005" (see table C-3 in
the EDPL.pdf for examples).
0050 = Row position - measured in inches (0050 corresponds to ½ inch)
0040 = Column position
More notes:
1. The row and column are measured from the top and left edges of the ticket.
2. An explanation of the different types of bar codes available is on page 71.
3. You can print other things on the ticket like lines, boxes, circles and polygons
if you can translate pages 72-75 of EDPL.pdf into English.
4. If you are using Windows XP, you will probably need the Datamax “pass-through”
driver. This is a print driver that does not do anything. It simply takes the characters it
receives and passes them to the printer. This is something that XP refuses to do. The
only catch with this driver is that you need to go to the printer icon properties. Click on
the Settings tab. Select the option, “Add a carriage return and line feed.”
5. In order to use these codes, you will need to install the “Datamax Pass Through” driver.
This is a special print driver that is unique in that it does not do anything. It just passes
the codes to the printer. This is necessary with most versions of Windows (like XP)
because Windows will not allow things like character 2’s to pass. It simply removes
them.
The Pass Through driver is also useful with other printers if you are using a Windows
printing format. Many times, the Windows text drivers give problems that can be fixed
by sending the proper codes to the printer.
Page 9

Why would you bother with all this complication? Speed and reliability. Using the Datamax as a
text based printer will save you about 1½ seconds per ticket. If you are printing more than 250 tickets
per day, you will probably want to do things this way. In general, the Windows printing system is fairly
reliable, but it can cause trouble. In those cases, the only way to get the printer working is with this
method.
Windows 95, 98 , XP Pro and Windows 7 print driver installation:
Most things are the same with Windows 95, 98, XP Pro and Windows 7. You still need to install the
print driver. You still need to set the paper size, orientation, label mark, and black line offset. In fact,
the only difference is that the screens look a little different.
• Start the Add Printer Wizard.
• You will probably want it as a
local printer.
• You will not see Datamax listed
here in the list of printers.
• Click on the Have Disk button.
Page 10

• Now, you need to know
something. You need to know
where the print driver is. This
may be on the original Wintix
CD. You may want to download
and install the latest driver from
http://www.SeagullScientific.com.
• In this case, we have
downloaded a new driver to
C:\Seagull.
• Driver name
• Location of the driver
• Click on the browse button and
we will find the driver.
• Select the hard drive here.
• Windows is ready to copy
the files necessary for the
driver.
Page 11
• Select the model of printer.
• The drivers get copied.
• You need to know
what printer port the
printer gets connected
to.
Page 12

• Give the printer a name
that makes sense to
you.
• No, you do not want the
ticket printer to be the
default printer.
• The default printer needs
to be your report printer.
• Click on Finish and you
are done.
Page 13

Datamax Troubleshooting
1. Turn the printer on. Does it have a green light?
2. Press the Feed button. Does it advance 5½” and stop with a green light? Press the
Feed button again. Does it consistently advance 5½” and stop?
3. Send DmTest.txt to the printer from DOS. Do you get Hello world? Does the printer
stop in the right place? Is the movement consistent?
Here’s what’s in the file DmTest.txt ( “~” stands for a character 2):
* * * * * * * * * * * * * * * * * * * * * * * * * *
* Datamax test file
* Usage: At a command prompt type:
*
* TYPE DMTEST.TXT > LPT1
*
~r reflective sensor
~f190 backfeed 1.9”
~O0100 top of form offset
~L enter label printing command set
H15 heat #15
D11 dot size 1 x 1
4911A4800500100Hello world
4911A1200000150|<-- left margin
E eject the print job
This command HAS to work. If it does not, there is a problem with the printer. Note: USB
printers will not respond. Even when you send these codes with Windows Notepad USB
printers will not respond.
4. Do a test ticket. Look at the printing. Is it consistently dark, across the ticket?
Occasionally, the printer may be a thermal transfer type of E class. You can identify this by the
2 rollers on top of the print head (for the ribbon). If this is the case, the media type needs to
be changed from transfer to direct. Instructions:
1. Power up while holding the F1 button - until pause light goes off
2. Press F1 and release - this prints a status ticket
3. Press F2 until the red light flashes 1 time (for the media type setting) – this prints
setting for the current setting number. If you want different settings, hold the F2 for the
number of flashes corresponding to setting number.
4. Press F1 one time. This changes from thermal transfer to direct thermal (or whatever
setting is selected) F3 will reverse the setting.
5. Press F1+F3 together. When the pause light goes off, do it again. This saves the
settings and returns to the normal mode. The printer is back on line.
"F2 and counting the flashes is the key"
The sensor type (black line) setting is not stored in non-volatile memory. It needs to be re-sent with each print job.
 Loading...