

Page 1

E-3202
Cash Drawer
Operator’s Manual
Corporate Headquarters
4501 Parkway Commerce Blvd.
Orlando, Fl 32808
Phone: 407-578-8007
Fax: 407-578-8377
Asia-Pacific
19 Loyang Way
#01-01 CILC Building
Singapore 508724
Phone: +65 542-2611
Fax: +65 542-3611
Datamax International
Herbert House
12 Elizabeth Way, Pinnacles
Harlow, Essex CM19 5FE UK
Phone: +44 1279 772200
Fax: +44 1279 424448
Page 2

Page 3

Copyright Information:
Firmware (Software) Agreement
The enclosed Firmware (Software) resident in the EPROM’s is owned by Licensor or its
suppliers and is licensed for used only on a single printer in the user’s Trade or Business.
The User agrees not to, and not to authorize or permit any other person or party to,
duplicate or copy the EPROM’s or the information contained in the EPROM’s. The
firmware (Software) is protected by applicable copyright laws and Licensor retains all
rights not expressly granted. In no event will Licensor or its suppliers be liable for any
damages or loss, including direct, incidental, economic, special, or consequential
damages, arising out of the use or inability to use the Firmware (Software).
Trademarks
ESC/POS trademark of EPSON
EPSON, IBM, WINDOWS are respectively registered trademarks from EPSON
Corporation, IBM Corporation and MICROSOFT Corporation. All other trademarks
are trademarks of their respective holders.
Information in this document is subject to change without notice and does not represent a
commitment on the part of Datamax Corporation. No part of this manual may be
reproduced or transmitted in any form or by any means, for any purpose other than the
purchaser's personal use, without the expressed written permission of Datamax
Corporation.
Note: This manual covers E-3202/Cash Drawer printers with version A00.02 firmware
and greater.
All rights reserved. Printed in the United States of America.
© Copyright 2001 by Datamax Corporation
Part Number: 88-2274-01
Revision: B
Page 4

Agency Compliance and Approvals:
This device complies with FCC CFR 47 Part 15
Class B and ICES-003-B.
The manufacturer declares under sole responsibility
that this product conforms to the following standards
or other normative documents:
EMC: EN 55022 (1993) Class B
EN 55024-1 (1998)
C US
Listed
UL1950 Information Technology Equipment
As an Energy Star Partner, the manufacturer has
determined that this product meets the Energy
Star guidelines for energy efficiency.
Page 5

Important Safety Instructions:
This printer has been carefully designed to give you many years of safe, reliable
performance. As with all electrical equipment, there are a few basic precautions
you should take to avoid hurting yourself or damaging the printer:
Ø Carefully read the installation and operating instructions provided with
your printer.
Ø Read and follow all warning instruction labels on the printer.
Ø Place the printer on a flat, firm, solid surface.
Ø To protect your printer from overheating, make sure all openings on the
printer are not blocked.
Ø Do not place the printer on or near a heat source.
Ø Do not use your printer near water, or spill liquid into it.
Ø Be certain that your power source matches the rating listed on your
printer. If you are unsure, check with your dealer or with your local
power company.
Ø Do not place the power cord where it will be walked on. If the power
cord becomes damaged or frayed replace it immediately.
Ø Do not insert anything into the slots or openings on the printer.
Ø Only qualified, trained service technicians should attempt to repair your
printer.
Page 6

Page 7

Printer Overview
1.0 Introduction ...................................................................1
1.1 About this Printer ..........................................................2
Getting Started
2.0 Before using the Printer ................................................3
2.1 Inspecting the Printer ....................................................3
2.2 Media Requirements.....................................................4
Setting up the Printer
3.0 Introduction ...................................................................5
3.1 Connecting the Printer ..................................................5
3.2 Loading Media ..............................................................6
3.3 Optional Mounting Bracket ...........................................7
Printer Operation
4.0 Printer Operation...........................................................9
4.1 Buttons and Indicators ..................................................9
4.1.1 Buttons ............................................................................ 9
4.1.2 Operating Modes and Indicator Status ...................... 10
4.1.3 Button Functions .......................................................... 10
4.1.4 Other Modes................................................................. 12
4.1.5 Autotest Printout........................................................... 14
4.2 Emulation Choices......................................................15
4.3 Common Configurations .............................................16
4.4 Connecting to an ESC POS Terminal .........................19
4.5 Connecting to a PC.....................................................20
4.6 Changing the Default Settings ....................................21
i
Page 8

Maintenance and Troubleshooting
5.0 Introduction .................................................................27
5.1 Cleaning......................................................................27
5.2 Trouble Shooting.........................................................28
5.3 Transportation and Storage ........................................31
Specifications
6.0 Printing........................................................................33
6.1 Media ..........................................................................34
6.2 User Interface .............................................................34
6.3 Communications .........................................................34
6.3.1 Cash Drawer Communications ....................................... 35
6.4 Electrical Characteristics.............................................35
6.5 Mechanical..................................................................35
6.6 Operation ....................................................................36
6.7 List of Accessories ......................................................36
6.8 Options .......................................................................36
Appendix A
Character Sets And Barcodes ..........................................A-1
Appendix B
Printer cable Pin assignment ............................................ B-1
Appendix C
Opening Methods and Warnings ......................................C-1
Appendix D
Warranty Statement .......................................................... D-1
ii
Page 9
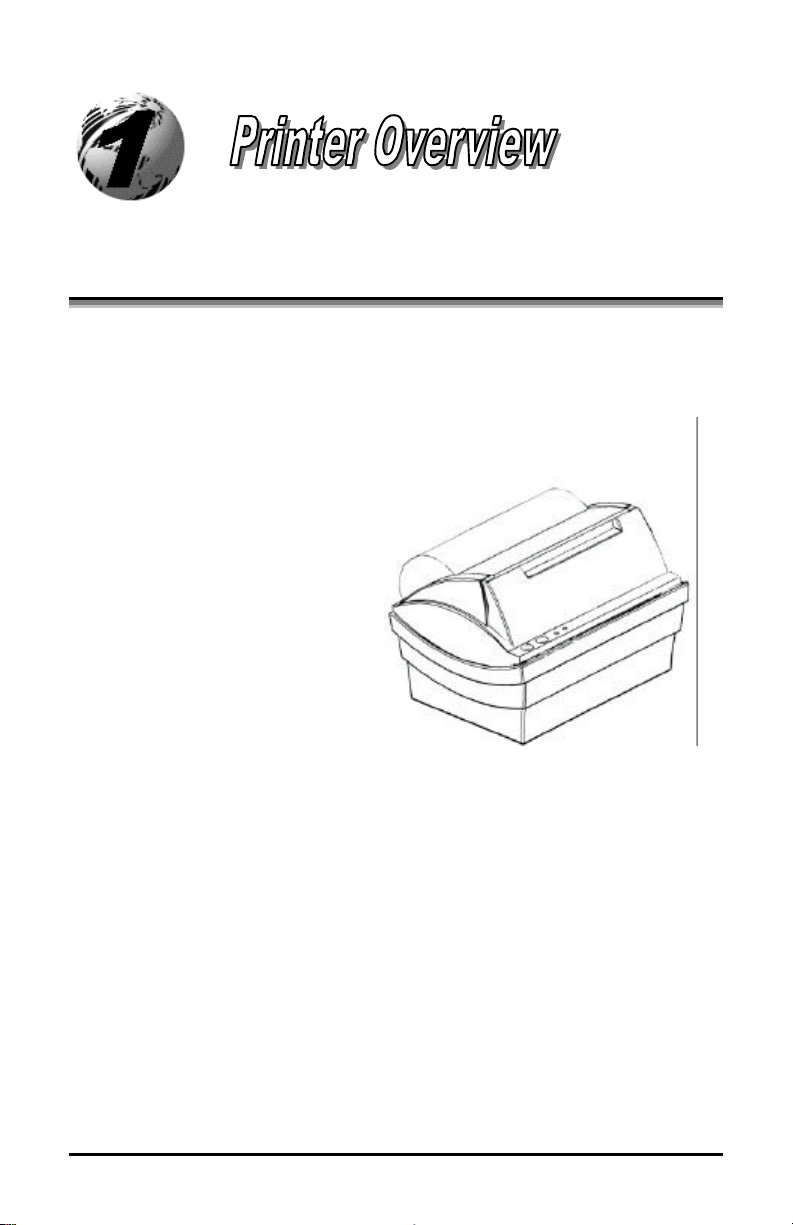
1.0 Introduction
The E3202/Cash Drawer hereafter referred to as ‘the printer’, is a high
quality/low cost direct thermal receipt printer. The printer’s design and
small footprint makes it a perfect choice for applications such as point of
sale receipts, office, warehousing, and barcode applications.
This manual provides all the
information necessary to operate
the printer. Refer to the
instructions included with the
software you have chosen.
If you wish to write a custom
program, visit our website at
http//www.datamaxcorp.com for a
copy of the Programmer’s Manual.
E-3202/Cash Drawer Printer 1
Page 10

1.1 About this Printer
This printer offers the following standard features:
Standard Features
Printing
Ø Direct Thermal Printing
Ø 203 DPI, 8 dots/mm
Memory
Ø SRAM 256 KB
Ø Flash 512 KB
Interfaces
This printer is equipped with:
Ø RS-232 serial interface via a mini-DIN socket.
Ø Epson 24V compatible cash drawer interface
Operational
Ø 2 multifunction buttons
Ø 2 status LEDs
2 E-3202/Cash Drawer Printer
Page 11

2.0 Before using the Printer
Inspect the shipping container(s) for damage, if damage is evident notify
the shipping company to report the nature and extent of the damage.
The printer is carefully packaged to avoid any damage during transit. In
order to operate the printer you will need to remove the packaging
materials, (i.e., tape and foam) that were placed in the printer for
shipment.
2.1 Inspecting the Printer
After removing the printer from the packaging material, check the
contents of the package. The following items should be included:
E-3202/Cash Drawer Printer 3
Page 12
2.2 Media Requirements
The following is a limited overview of media characteristics. For complete
information and advice regarding your specific application needs, always
consult a qualified media specialist or a Datamax Media Representative.
Paper Specifications:
Media Type: Continuous Thermal Receipt Paper
Min. Media Width: 0.55” (14.2mm)
Max. Media Width: 3.34” (85mm)
Max. Media Thickness: 5.7mil (156um)
Max. Outside Roll Diameter: 2.35” (60mm.)
Core:
25mm ± 1mm
4 E-3202/Cash Drawer Printer
Page 13
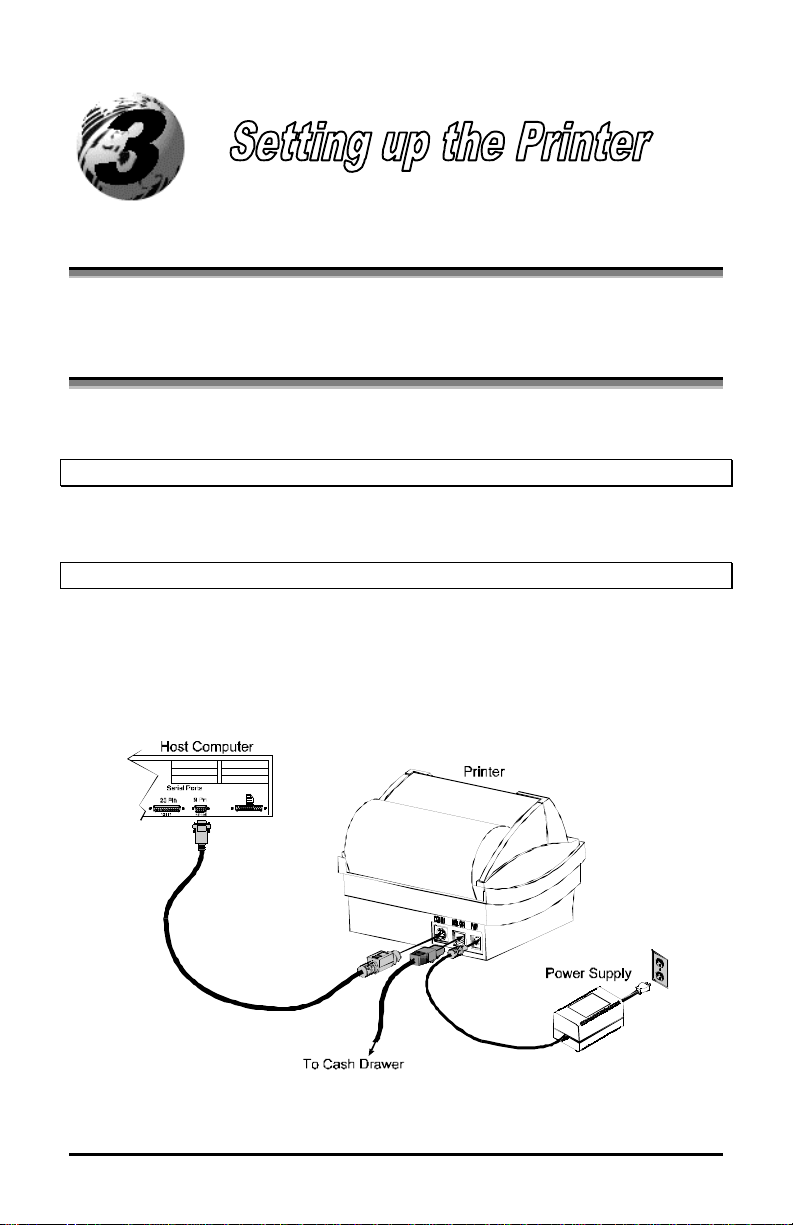
3.0 Introduction
This chapter explains how to connect your printer and load media.
3.1 Connecting the Printer
1. Connect the Communication Cable’s mini-DIN connector to the printer and
the other end (DB9S) to the host.
Warning: DO NOT connect a mouse or other peripheral equipment to this connector.
2. Connect the cash drawer cable (not supplied) to the printer and the other end
to the cash drawer.
Warning: DO NOT connect this printer to any type of telephone line or equipment.
3. Connect the one end of the power supply to the back of the printer and the
other end to a properly grounded outlet.
Once the power supply has been connected the printer will automatically power
up. To remove power simply disconnect the power supply from the printer.
**Cash Drawer & Cash Drawer Cable are not supplied**
E-3202/Cash Drawer Printer 5
Page 14
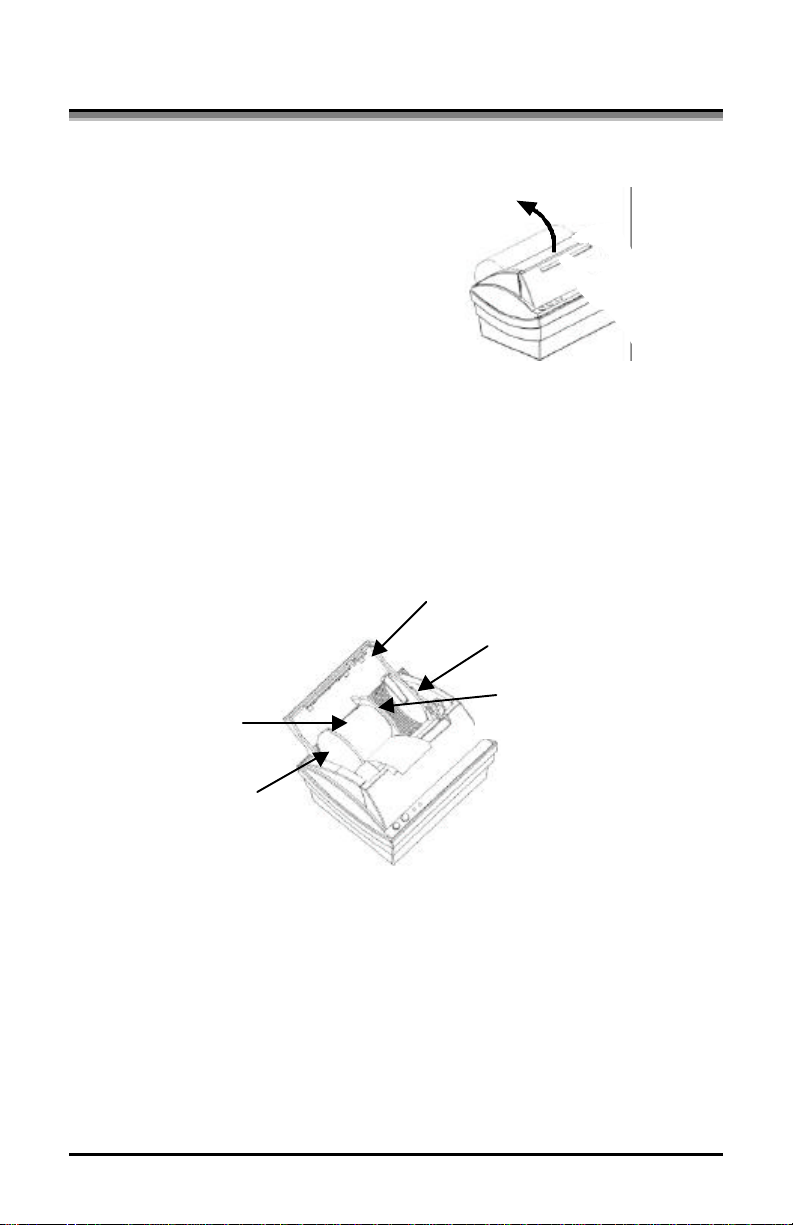
3.2 Loading Media
Media Roll
Left-hand Fixed
Adjustable Paper
Bay Door
Right-hand Fixed
This section explains the loading instructions for loading the printer with
media.
1. Open the Bay Door by pressing
upward with your thumb as
shown. See Appendix C for
more information.
2. Place the Media Roll into the
printer, the edge of the media should be against the
Fixed Paper Guide. The roll should unravel as shown and have the
‘Sense Marks’ (if any) to the left.
3. Move the Adjustable Paper Guide from the far-left side of the media
bay to a slot that accommodates your media. See Appendix C of this
manual for more information of the position of the Paper Guides.
Paper Guide
Paper Guide
4. Pull a few inches of media out of the printer and close the Bay Door.
6 E-3202/Cash Drawer Printer
Guide
Page 15
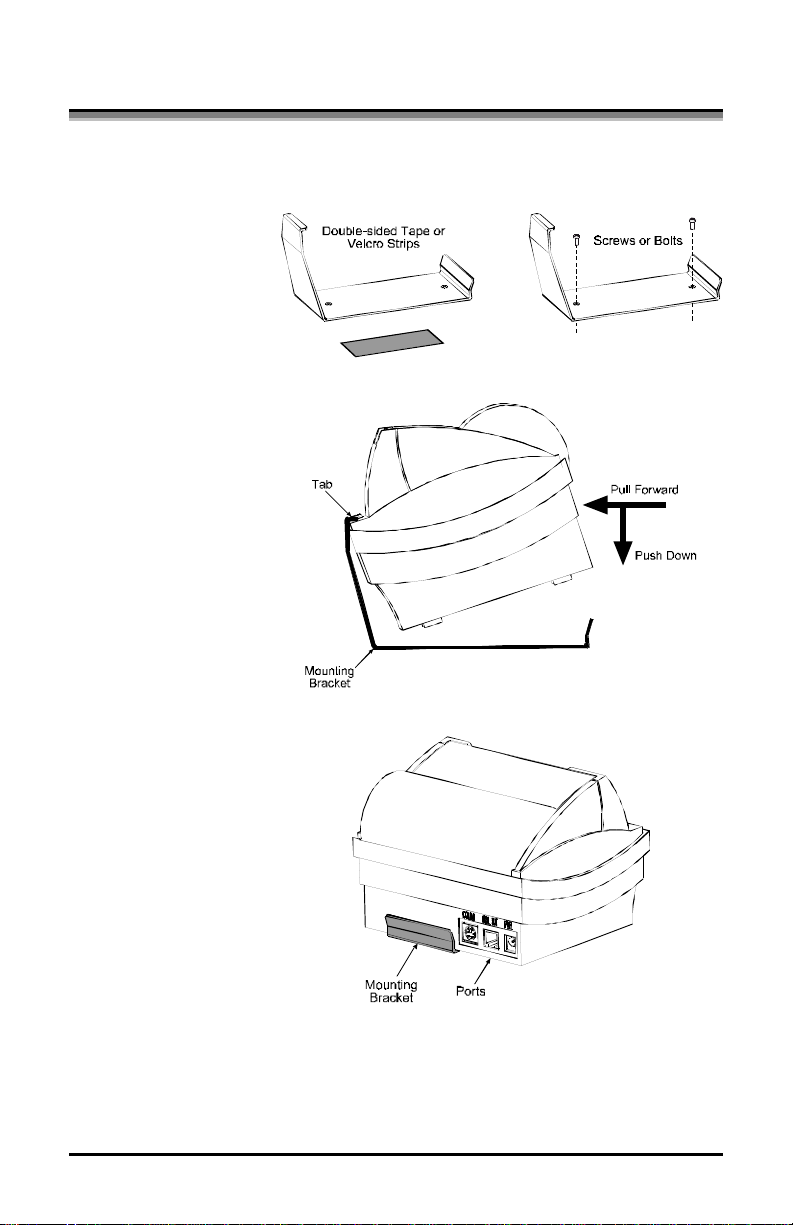
3.3 Optional Mounting Bracket
An optional Mounting Bracket is available for installations that require a solid
fixed mount.
1. Depending on your
mounting surface the
Mounting Bracket
can be secured using
Screws, Bolts,
Double-sided tape, or
Velcro strips.
2. Hook the front of the
printer under the
Mounting Bracket
Tab. Pull forward
and push down to
lock the printer into
the bracket.
3. Be sure the Mounting
Bracket does not
interfere with the
ports on the back of
the printer
E-3202/Cash Drawer Printer 7
Page 16

8 E-3202/Cash Drawer Printer
Page 17
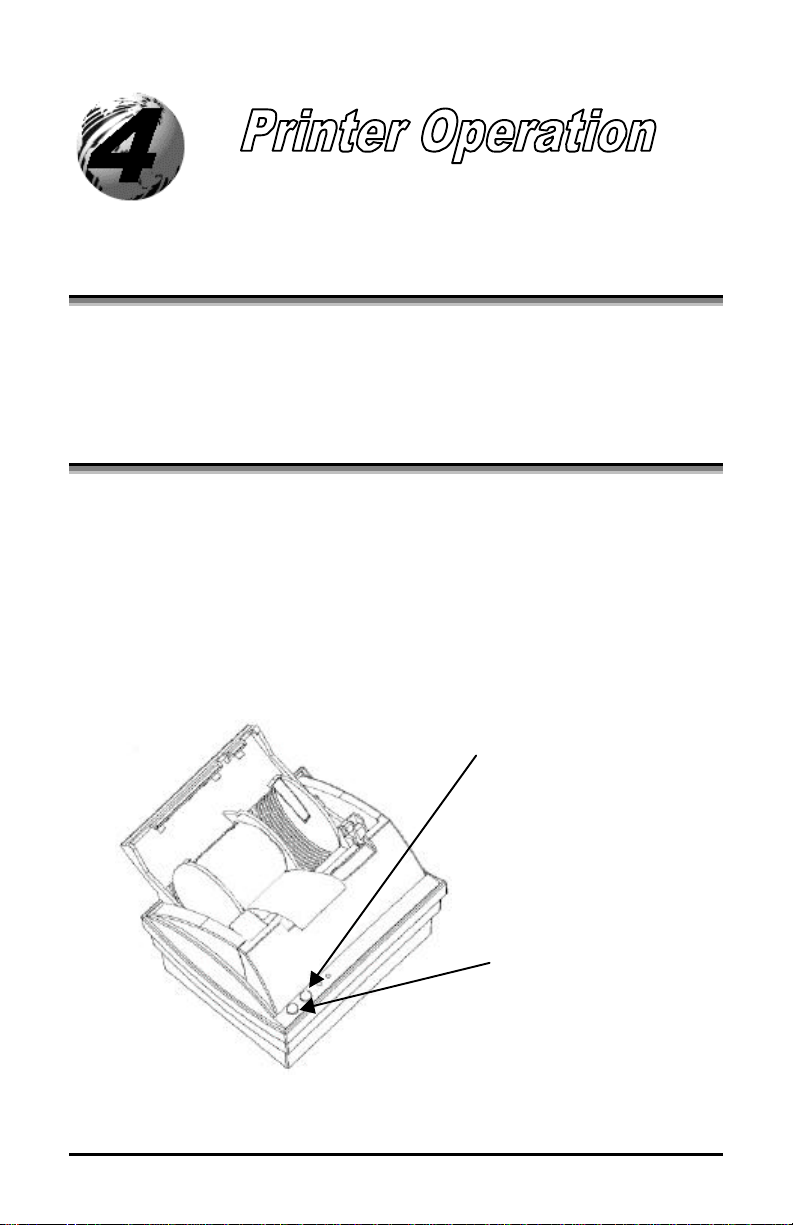
Right-hand button:
Left-hand button:
4.0 Printer Operation
This section will explain in detail the functions of the printer’s buttons
and indicators, operating modes, and settings.
4.1 Buttons and Indicators
4.1.1 Buttons
The printer is equipped with two push buttons. These multi-function
buttons are sensitive to the length of time the button is held down. The
printer recognizes a ‘long push’ when the button is held down for more
than two seconds. A ‘short push’ is when the button is pushed down for
less than one second.
E-3202/Cash Drawer Printer 9
.
Page 18
4.1.2 Operating Modes and Indicator Status
Red
Indicator
OFF OFF PRINTER OFF See Section 4.1.3
OFF Flashing IDLE See Section 4.1.3
ON ON ONLINE See Section 4.1.3
ON OFF OFFLINE See Section 4.1.3
Flashing OFF ERROR See Section 4.1.4
ON ON DUMP See Section 4.1.4
ON Flashing SETTING See Section 4.1.4
Flashing Flashing DOWNLOAD See Section 4.1.4
Green
Indicator
Mode Comments
4.1.3 Button Functions
Short Push:
Turns on the printer
and enters ONLINE
Mode.
Long Push
(Simultaneously):
Turns on the printer and
enters SETTINGS Mode.
Short Push:
Turns on the printer
and enters ONLINE
Mode.
Long Push:
Turns on the printer
and enters DUMP
Mode.
Long Push:
Turns on the printer
and produces an
AUTOTEST* printout.
*See Section 4.1.5 for information and an example of the AUTOTEST printout.
Note: After approximately 60 seconds of inactivity the printer will automatically enter
‘Idle Mode’. In this mode the Red LED will turn off and the Green LED will flash
slowly. Pressing either button will exit this mode and return to the previous mode.
10 E-3202/Cash Drawer Printer
Page 19
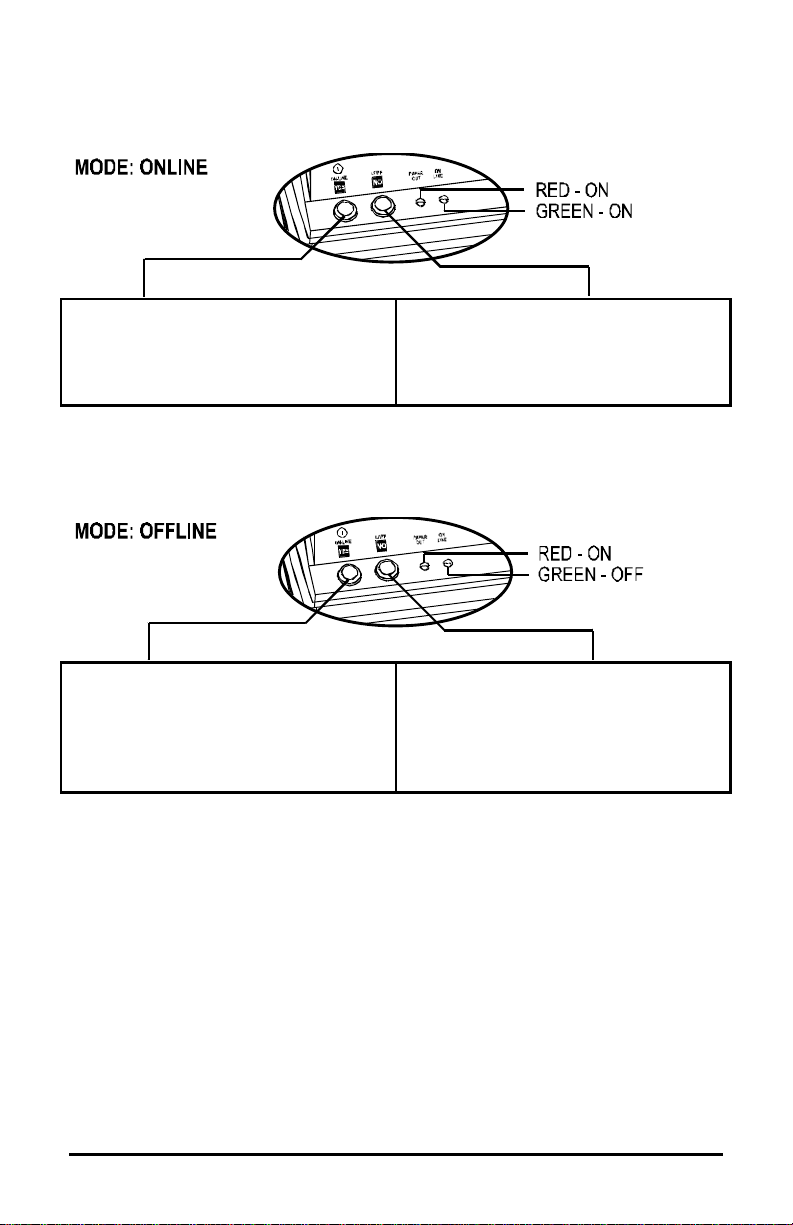
Button Functions Continued…
Short Push:
Toggles ONLINE Mode on and off.
Long Push:
Turns the printer off.
Short Push:
Toggles ONLINE Mode on and off.
Long Push:
Turns the printer off.
Short Push:
Not Used.
Long Push:
Not Used.
Short Push:
Printer will feed one blank line.
Long Push:
Printer will feed one blank page.
E-3202/Cash Drawer Printer 11
Page 20

4.1.4 Other Modes
There are only three possible error conditions, they are as follows:
Error Cause Action
Paper Out The printer is out of media stock or
the stock has been loaded incorrectly.
Head Up The printer ‘Lid’ is not down and
latched.
Printhead
Overheated
The printhead has exceeded normal
operating temperature.
Once the error condition has been satisfied the printer will automatically
exit the ERROR mode and return to the OFFLINE mode. To return to
the ONLINE mode and continue printing, press the Left Button once.
Replace or correctly load
Stock.
Be sure the ‘Lid’ is
down and latched.
Allow 5-10 minutes for
the printhead to cool.
This mode will allow the user to verify the data received by the printer.
While in dump mode, the printer will print the received data in
hexadecimal.
To enter DUMP mode:
With the printer off, (both LED’s off), press and hold the Left Button
until the word “DUMP” is printed.
To exit DUMP mode:
Turn the printer off, (press and hold Left Button) or disconnect power.
12 E-3202/Cash Drawer Printer
Page 21

Other Modes Continued…
Your printer is equipped with a flash memory. The software loaded in
the flash memory can be updated by a downloading procedure. When in
DOWNLOAD mode the printer indicators will alternatively blink and at
the end of the operation the printer will automatically switch to OFF.
As you may change your software using the downloading procedure,
each time you switch your printer on, the software will be verified. If the
software is not operational for any reason, your printer will turn to
download mode (indicators alternatively flashing) waiting for new
software.
Software flash files are available through Datamax Technical Support at
(407) 523-5550. Datamax Technical Support will determine if this
procedure is necessary.
The SETTINGS mode allows the user to modify the printer’s parameters.
See section 4.6 for more information.
E-3202/Cash Drawer Printer 13
Page 22

4.1.5 Autotest Printout
The printer performs an Autotest and prints a test page in order to check
the printhead and diagnose print quality. ‘Autotest’ is printed on the first
line. To perform this test; turn the printer off (both lights off). Then
press and hold the right button until the Autotest begins to print.
14 E-3202/Cash Drawer Printer
Page 23

4.2 Emulation Choices
The table below outlines emulation choices for the E-3202 with Cash
Drawer printer with version A00.02 firmware and greater.
.
Emulation Name Uses
ESC/POS ESC/POS is the native language of the E-3202
• Custom programs designed to control the E-3202
• POS system software that uses Epson POS
printers (or at least Epson ESC/POS printer
language).
• Datamax/Seagull Windows driver.
Epson 24 pin
Custom 1
Reserved 1
Windows “page” mode
• The generic Epson compatible 24-pin printer
driver which ships with Windows95.
• TrueType fonts and graphics, (Factory Default).
Not Used
Windows “line” mode
• Used for Windows applications with printouts
longer than 29cm (11.4”).
E-3202/Cash Drawer Printer 15
Page 24

4.3 Common Configurations
What do you want to do with the E-3202? There are several options. Find the
description that best matches your project and follow the setup directions.
If you want to…. Do this…
Print with application
software written specifically
for the Epson ESC/POS
language.
1. Setup the E-3202 printer and apply AC power.
2. Connect the data cable between the E-3202 and your
PC.
3. Connect the cash drawer cable (not supplied) to the
printer and the other end to the cash drawer.
4. Configure the printer for use with the ESC/POS
emulation.
5. Put a roll of continuous thermal paper into the printer.
6. Print from your application software.
Print with other Windows
applications using the E3202 Windows driver.
1. Setup the E-3202 printer and apply AC power.
2. Connect the data cable between the E-3202 and your
PC.
3. Install the Datamax/Seagull Windows driver from the
E-3202 CD.
4. Configure the E-3202 for ESC/POS emulation.
5. Load the appropriate paper into the E-3202.
6. Start you application software and select the E-3202
Windows driver as the printer for your application.
7. Print from the E-3202 as appropriate.
16 E-3202/Cash Drawer Printer
Page 25

If you want to
configure your E-3202
for this… Do this…
The Datamax/Seagull driver
and ESC/POS applications
all require that you set the
printer to ESC/POS
emulation.
.
1. Make sure that a roll of continuous thermal paper is
installed in your E-3202.
2. With your E-3202 powered up and both lights on,
press the left-hand button (ON-LINE/YES), and
hold it down until both lights go off. The E-3202 is
now off.
3. Hold both buttons (ON-LINE/YES and LF/FF/NO)
down until both lights come back on and the printer
starts to print out the PRESENT SETTINGS.
4. When the printing stops, respond to the printed
message “To keep settings unchanged push the ‘NO’
key. To enter the set-up menu push the ‘YES’ key”
by pressing the left-hand button (ON-LINE/YES).
5. The SET-UP MENU instructions are then printed.
“To change settings: use the ‘NO’ key to move from
chapter to another. Use the ‘YES’ key to enter a
chapter. Within a chapter use the ‘NO’ key to move
from one parameter to another. Use the ‘YES’ key to
validate your parameter.”
6. Move through the communication settings making
sure to set the parameters so that they match those of
your PC’s communication port.
7. When you enter the Emulation chapter be sure to set
it to ESC/POS.
8. In the Character Set chapter the default is code page
850, 12 x 24, USA. You can change it if needed.
9. In the Page chapter the default is six line per inch (6
lpi). You can change it if needed.
10. In the Other chapter you can turn on or off the Auto
Line Feed and Auto Carriage Return if needed. You
can also increase or decrease the contrast of the
thermal print to make it darker or lighter.
11. When finished, all of your changes will be printed. If
you want to save them, press the left-hand (ONLINE/YES) button. If you do not want to save your
changes, press the right-hand (LF/FF/NO) button.
Continued…
E-3202/Cash Drawer Printer 17
Page 26

The generic Epson
compatible 24-pin Windows
printer driver.
1. Make sure that a roll of continuous thermal paper is
installed in your E-3202.
2. With your E-3202 powered up and both lights on,
press the left-hand button (ON-LINE/YES), and
hold it down until both lights go off. The E-3202 is
now off.
3. Hold both buttons (ON-LINE/YES and LF/FF/NO)
down until both lights come back on and the printer
starts to print out the PRESENT SETTINGS.
4. When the printing stops, respond to the printed
message “To keep settings unchanged push the ‘NO’
key. To enter the set-up menu push the ‘YES’ key”
by pressing the left-hand button (ON-LINE/YES).
5. The SET-UP MENU instructions are then printed.
“To change settings: use the ‘NO’ key to move from
chapter to another. Use the ‘YES’ key to enter a
chapter. Within a chapter use the ‘NO’ key to move
from one parameter to another. Use the ‘YES’ key to
validate your parameter.”
6. Move through the communication settings making
sure to set the parameters so that they match those of
your PC’s communication port.
7. When you enter the Emulation chapter be sure to set
it to Epson 24 pin.
8. In the Character Set chapter the default is code page
850, 12 x 24, USA. You can change it if needed.
9. In the Page chapter the default is six line per inch (6
lpi). You can change it if needed.
10. In the Other chapter you can turn on or off the Auto
Line Feed and Auto Carriage Return if needed. You
can also increase or decrease the contrast of the
thermal print to make it darker or lighter.
11. When finished, all of your changes will be printed. If
you want to save them, press the left-hand (ONLINE/YES) button. If you do not want to save your
changes, press the right-hand (LF/FF/NO) button.
18 E-3202/Cash Drawer Printer
Page 27

4.4 Connecting to an ESC POS Terminal
The default configuration of your printer is ESC/POS. Check your
Terminal communication parameters and change the printer settings to
match your terminal settings.
Default Communication parameters
Speed: 9600 baud
Data: 8 bits
Parity: None
Control: Hardware
To check the current emulation and communication parameters of your
printer:
1. Make sure that a roll of paper is loaded.
2. Set the printer to “Off”.
3. Press both buttons simultaneously until the configuration is printed.
If the configuration is not correct see section 4.4 Changing the Default
Settings.
E-3202/Cash Drawer Printer 19
Page 28

4.5 Connecting to a PC
The default configuration of your printer is ESC/POS. In order to use
your printer with a PC you will need to check the setting of your printer
and install the printer driver on your PC. Follow the steps below to
configure your printer for use with a PC.
PC parameters
Your printer will use the Datamax/Seagull Windows Driver, (located
on the Accessories CD). If this printer is already installed on your PC
(see ‘Printers’ in your computers ‘Control Panel’), check that the serial
port is selected and configure it as indicated below.
If the Datamax/Seagull Windows Driver is not installed,
1. Double-click the ‘Printers’ icon in the ‘Control Panel’
2. Double-click on ‘Add a Printer’.
3. Install the ‘Datamax E-3202’ printer driver.
4. Choose the serial port and set the port to the following parameters:
Speed: 9600 baud
Data: 8 bits
Parity: None
Stop bit: 1
Control: Hardware
Printer parameters
1. Make sure that a roll of paper is loaded. Set the printer to the Off
line mode.
2. Simultaneously press both buttons for at least two seconds. The
configuration is printed.
3. Answer Yes to modify the default setting.
4. You are now in the Communication Chapter. Check your PC port
communication setting and match the printer communication settings
to your PC (baud rate, Data, Parity, control, The stop bit is always 1
for the printer, it is not modifiable).
20 E-3202/Cash Drawer Printer
Page 29

5. If the communication settings are correct press No. If they are not
correct press Yes and modify them by pressing Yes to accept the
setting and No to change it.
6. When the desired communication settings are chosen press Yes to
enter the emulation menu.
7. You are now in the emulation menu. Press Yes to print the current
setting.
8. Press No to change to ESC/POS. (If ESC/POS is already printed
press Yes). Press Yes to enter the next section.
9. If no more changes are required press No until the end, and then
press Yes to save your changes.
10. Your printer is now configured to work with your PC. You can use
your favorite text editor to create your printouts.
4.6 Changing the Default Settings
Your printer is shipped with the following standard configuration:
Communication Parameters Emulation Character Sets
Speed: 9600 baud ESC/POS Code page: 850
Data: 8 bits Width: 12x24
Parity: None Country: USA
Control: Hardware
Page Media Other
Line spacing: 6 lpi Media: Paper Auto LF: Off
Auto CR: Off
Contrast (20%): +00%
Contrast (5%): +00%
E-3202/Cash Drawer Printer 21
Page 30

Printing The List Of Parameters
While the printer is turned OFF, switch to the Setting Mode by pushing
simultaneously both buttons for at least two seconds. The printer prints
the following settings (Standard configuration):
Datamax E-3202
Version: AA xx.xx
PRESENT SETTINGS
Communication parameters
Speed: 9600 baud
Data: 8 bits
Parity: None
Control: Hardware
Ø To keep these settings unchanged push the ‘NO’ key.
Ø To enter the set-up menu push the ‘YES’ key.
Set-up menu
To change settings:
Ø Use the ‘No’ key to move from a chapter (section) to another.
Ø Use the ‘YES’ key to enter a chapter (section).
Within a chapter (section):
Ø Use the ‘No’ key to move from a parameter to another.
Ø Use the ‘Yes’ key to validate your parameter.
22 E-3202/Cash Drawer Printer
Page 31

COMMUNICATION PARAMETERS
Data transmission choice of the serial port with the terminal.
1200 baud
2400 baud
4800 baud
9600 baud
19200 baud
38400 baud
57600 baud
115000 baud
To skip push NO. When the selected choice is displayed push YES.
Format of the serial bus
8 bits
7 bits
To skip push NO. When the desired setting is displayed push YES.
Parity
None
Even
Odd
To skip push NO. When the desired setting is displayed push YES.
Flow control of the data transmission
Hardware
DTR low
Xon/Xoff mode
To skip push NO. When the desired setting is displayed push YES.
E-3202/Cash Drawer Printer 23
Page 32

EMULATION
Epson-24 pin
Custom 1
Reserved 1
ESC/POS
To skip push NO. When the desired setting is displayed push YES.
CHARACTER SETS
850 (International)
852 (Latin 2)
857 (Turkish)
860 (Portuguese)
861 (Island)
862 (Hebrew)
863 (French)
858 (International with the ‘Euro’ symbol)
437 (English, USA)
To skip push NO. When the selected choice is displayed push YES.
Width
9x24
12x24
16x24
To skip push NO. When the selected choice is displayed push YES.
Country
USA
France
Germany
United kingdom
Denmark 1
Sweden
Italy
Spain 1
Japan
Norway
Denmark 2
Spain 2
Latin America
To skip push NO. When the selected choice is displayed push YES.
24 E-3202/Cash Drawer Printer
Page 33

PAGE
Line spacing
6 lpi
8 lpi
To skip push NO. When the selected choice is displayed push YES.
MEDIA
Media
Paper
Labels (not used)
To skip push NO. When the selected choice is displayed push YES.
OTHER
Automatic line skip after enter
Yes
No
To skip push NO. When the selected choice is displayed push YES.
Automatic enter after line skip
Yes
No
To skip push NO. When the selected choice is displayed push YES.
Contrast by 20%
The printer will ask you to increase or decrease the contrast. The
contrast can be increased or decreased by steps of 20 %. The limit is
100. (+20%, +40%, +60%, +80% , -80%,-60%, -40%, -20%)
To skip push NO. When the selected choice is displayed push YES.
E-3202/Cash Drawer Printer 25
Page 34

Contrast by 5%
The printer keeps the contrast selected in the preceding menu in
memory and offers you the choice to modify it by steps of 5 % :
example if you have chosen +40 in the precedent menu, the choice
will be +55% +50% +45% +40% –35% – 30% -25%
To skip push NO. When the selected choice is displayed push YES.
Once the desired parameters have been selected:
Ø Push ‘YES’ to save the changes and exit from the setting menu.
Ø Push ‘NO’ to exit without saving.
All new parameter settings will be saved until a new change has been
made. The new settings will be retained even if the printer is turned
OFF.
26 E-3202/Cash Drawer Printer
Page 35

5.0 Introduction
This chapter covers the cleaning recommendations as well as some
printer troubleshooting. Periodic maintenance will guarantee continued
optimum printer performance.
5.1 Cleaning
Ø Turn the printer OFF
Ø Regularly clean the printer case with a damp cloth
Ø Do not use liquid cleaners or aerosol cleaners
Ø Clean the printhead once a month using a cotton swab dampened
with isopropyl alcohol.
E-3202/Cash Drawer Printer 27
Page 36

5.2 Trouble Shooting
Problems are sometimes caused by simple "faults" which can easily be
corrected without the help of a service technician. Listed below are
common problems and their resolutions.
Problem/Symptom Resolution
HARDWARE
Lights do not come on Make sure that the power cable is properly
inserted into the back of the E-3202. Also
make sure that the opposite end of the
power supply cable is connected to an
appropriate AC power source.
Lights are both on, but
the printer does not print.
Paper guide will not
move.
Make sure that the data cable is properly
connected between the E-3202 and the
host computer.
Make sure that you are trying to move the
adjustable paper guide and not one of the
fixed paper guides. The E-3202 ships with
the adjustable paper guide in the far lefthand storage position inside the paper bay.
The other two paper guides are glued into
position.
28 E-3202/Cash Drawer Printer
Page 37

Problem/Symptom Resolution
HARDWARE (Cont.)
Paper bay door will not
close.
It is possible that your roll of paper is too
large. Unwrap enough of the media to
enable the paper bay door to close.
It is also possible that one or both of the
platen clips has closed. Use your thumb to
open the platen clips and then try closing
the paper bay door.
The printer makes a
grinding sound and
produces distorted or
condensed print.
Unplug the printer’s power cable. Open the
paper bay door. Remove the roll of print
media and make sure that the roll is tight
with no loose coils of media. Replace the
media and close the bay door. Power on the
printer and try again. If the problem
continues contact Technical Support.
The printout looks
spotted or dirty.
Clean the printhead as described in the
maintenance section of this manual.
E-3202/Cash Drawer Printer 29
Page 38

Problem/Symptom Resolution
SOFTWARE
The printout includes
linear gaps between
Disable the AUTO LF and AUTO FF in the
E-3202 configuration.
lines of print.
The printer will not print. Make sure that you have configured your
printer correctly. Verify the following
settings:
• Select an emulation that will
accommodate your PC’s software
(ESC/POS or Epson 24 pin).
• Make sure that your printer’s COM port
settings match those of your PC.
• Make sure that you have a roll of print
media properly loaded in the printer.
The printer produces
garbage characters
when it prints.
Make sure that you have selected the
correct emulation. Also make sure that your
printer’s COM port settings match those of
your PC and the printer is not in “Dump”
mode.
30 E-3202/Cash Drawer Printer
Page 39

5.3 Transportation and Storage
Before transporting or storing your printer, please follow the following
steps:
1. Turn the printer OFF
2. Unplug all attached cables
3. Place the printer in its original box
4. If you plan to use the printer in a foreign country, before plugging
your printer to the local power supply, verify that your AC adapter is
compatible with the local standards.
E-3202/Cash Drawer Printer 31
Page 40

32 E-3202/Cash Drawer Printer
Page 41

6.0 Printing
ITEM SPECIFICATION
Printing technology Direct thermal, fixed head
Resolution 203 DPI
8 dots/mm
Printing Mode Text or graphics
Printing width 3.35” (85mm)
Printing speed up to 2”/s (50mm/s)
Character size (H. x V.) 9 x 24 ; 12 x 24 ; 16 x 24
Maximum number of
characters per line
80 mm /640 dots
9x24
12x24
16x24
Resident characters sets (for
each characters size)
Emulation
Print data buffer SRAM 256 KB
Paper out detection Optoelectronic sensor
E-3202/Cash Drawer Printer 33
IBM 437, 850, 852, 857, 860, 861, 862,
ESC POS, WINDOWS EPSON compatible
71
53
40
863,858
24 pin
Flash 512 KB
Page 42

6.1 Media
See Section 2.2 for more information.
ITEM SPECIFICATION
Media type Direct thermal paper
Maximum media width 3.35” (85mm)
Roll dimensions 2.36” (60mm) maximum diameter
6.2 User Interface
ITEM SPECIFICATION
Power supply connector
(rear)
Communication connector
(rear)
Red LED (upper side) « ON / OFF » and error
Green LED (upper side) « ON/OFF LINE » , Menu, idle mode
Left hand push button (upper
side)
Right hand push button
(upper side)
Parameter settings (printout
menu)
« ON/OFF », « ON LINE », « YES » functions
Line and form feed « LF/FF » and « NO »
Push button entry (with a simultaneous push on
Jack type male socket
Mini-DIN socket
function
both buttons)
6.3 Communications
ITEM SPECIFICATION
Communication type RS232C
Parameter settings
(configuration mode)
Baud rate 1200 to 115200 baud (step by step)
Data format 7 or 8 bits data bits
With or w/o parity bit (odd or even)
Data exchange control Xon / Xoff or DTR/RTS
34 E-3202/Cash Drawer Printer
Printout menu
1 Start bit 1 Stop (free)
(active at 0 or 1 level)
Page 43

6.3.1 Cash Drawer Communications
ITEM SPECIFICATION
Communication type Cash Drawer kick-out interface
Emulation Epson 24V (TM-T85, TM-T88) compatible
Connector Type RJ12
Pin Assignments Pin# Signal
1 Frame Ground
2 Drawer kick-out signal 1
3 VCC = +24V
4 VCC = +24V
5 Drawer kick-out signal 2
6 Frame Ground
6.4 Electrical Characteristics
ITEM SPECIFICATION
Printer supply voltage 16 VAC @ 2.2 A
Power consumption <50 W printing mode
<1 W idle mode (automatic)
AC/DC adapter In 16 VAC @ 2.2A
230Vac / 50Hz (CE plug)
230Vac / 50Hz (GB plug)
120Vac / 60Hz (US plug)
6.5 Mechanical
ITEM SPECIFICATION
Material housing Plastic
Weight of printer
Weight of AC/DC adapter
E-3202/Cash Drawer Printer 35
1.43 lbs. (650 g)
1.98 lbs. (900 g)
Page 44

6.6 Operation
ITEM SPECIFICATION
Approvals and Safety CE ; EN55022/B ; EN55024 ; EN60950 ;
FCC15 ; UL1950 (US/C)
Storage conditions
(w/o paper)
Operating conditions 32 to +122°F / RH = 5 to 85%
-4 to +140°F / RH = 5 to 90%
-20 to +60°C / RH = 5 to 90%
0 to +40°C / RH = 5 to 85%
6.7 List of Accessories
ITEM SPECIFICATION
AC/DC adapter 230V CE plug / 2,3 A @16 VAC
230V GB plug / 2,3 A @16 VAC
120V US plug / 2,2 A @16 VAC
Communication cable
6.8 Options
Contact your dealer for availability:
Part # Description
32-2490-01 RS-232 Data Cable
88-2257-01 Programmer’s Manual, (available at our website:
www.datamaxcorp.com).
78-2343-01 Accessories CD
RS232C ( DB9S ⇔ Mini-DIN ; 2m)
36 E-3202/Cash Drawer Printer
Page 45

Character Sets and Barcodes
Character sets
The following character sets are available:
Table 437
E-3202/Cash Drawer Printer A-1
Page 46

Table 850
A-2 E-3202/Cash Drawer Printer
Page 47

Table 852
E-3202/Cash Drawer Printer A-3
Page 48

Table 857
A-4 E-3202/Cash Drawer Printer
Page 49

Table 860
E-3202/Cash Drawer Printer A-5
Page 50

Table 861
A-6 E-3202/Cash Drawer Printer
Page 51

Table 863
E-3202/Cash Drawer Printer A-7
Page 52

ASCII Control Code Chart
Ctrl @
Ctrl A
Ctrl B
Ctrl C
Ctrl D
Ctrl E
Ctrl F
Ctrl G
Ctrl H
Ctrl I
Ctrl J
Ctrl K
Ctrl L
Ctrl M
Ctrl N
Ctrl O
Ctrl P
Ctrl Q
Ctrl R
Ctrl S
Ctrl T
Ctrl U
Ctrl V
Ctrl W
Ctrl X
Ctrl Y
Ctrl Z
Ctrl [
Ctrl \
Ctrl ]
Ctrl ^
Ctrl _
Char Dec Hex Char Dec Hex Char Dec Hex Char Dec He
x
NUL 0 00 32 20 @ 64 40 ` 96 60
SOH 1 01 ! 33 21 A 65 41 a 97 61
STX 2 02 “ 34 22 B 66 42 b 98 62
EXT 3 03 # 35 23 C 67 43 c 99 63
EOT 4 04 $ 36 24 D 68 44 d 100 64
ENQ 5 05 % 37 25 E 69 45 e 101 65
ACK 6 06 & 38 26 F 70 46 f 102 66
BEL 7 07 ‘ 39 27 G 71 47 g 103 67
BS 8 08 ( 40 28 H 72 48 h 104 68
HT 9 09 ) 41 29 I 73 49 i 105 69
LF 10 0A * 42 2A J 74 4A j 106 6A
VT 11 0B + 43 2B K 75 4B k 107 6B
FF 12 0C , 44 2C L 76 4C l 108 6C
CR 13 0D - 45 2D M 77 4D m 109 6D
SO 14 0E . 46 2E N 78 4E n 110 6E
SI 15 0F / 47 2F O 79 4F o 111 6F
DLE 16 10 0 48 30 P 80 50 p 112 70
DC1 17 11 1 49 31 Q 81 51 q 113 71
DC2 18 12 2 50 32 R 82 52 r 114 72
DC3 19 13 3 51 33 S 83 53 s 115 73
DC4 20 14 4 52 34 T 84 54 t 116 74
NAK 21 15 5 53 35 U 85 55 u 117 75
SYN 22 16 6 54 36 V 86 56 v 118 76
ETB 23 17 7 55 37 W 87 57 w 119 77
CAN 24 18 8 56 38 X 88 58 x 120 78
EM 25 19 9 57 39 Y 89 59 y 121 79
SUB 26 1A : 58 3A Z 90 5A z 122 7A
Esc 27 1B ; 59 3B [ 91 5B { 123 7B
FS 28 1C < 60 3C \ 92 5C | 124 7C
GS 29 1D = 61 3D ] 93 5D } 125 7D
RS 30 1E > 62 3E ^ 94 5E ~ 126 7E
US 31 1F ? 63 3F _ 95 5F 127 7F
A-8 E-3202/Cash Drawer Printer
Page 53

Char Dec Hex Char Dec Hex Char Dec Hex Char Dec Hex
Ç 128 80 á 160 A0 192 C0 Ó 224 E0
ü 129 81 í 161 A1 193 C1 ß 225 E1
é 130 82 ó 162 A2 194 C2 Ô 226 E2
â 131 83 ú 163 A3 195 C3 Ò 227 E3
ä 132 84 ñ 164 A4 196 C4 õ 228 E4
à 133 85 Ñ 165 A5 197 C5 Õ 229 E5
å 134 86
ç 135 87 ° 167 A7 Ã 199 C7 p 231 E7
ê 136 88 ¿ 168 A8 200 C8 p 232 E8
è 137 89 ® 169 A9 201 C9 Ú 233 E9
è 138 8A 170 AA 202 CA Û 234 EA
ï 139 8B 1/2 171 AB 203 CB Ù 235 EB
î 140 8C 1/4 172 AC 204 CC ´y 236 EC
ì 141 8D ¡ 173 AD 205 CD ´Y 237 ED
Ä 142 8E 174 AE 206 CE 238 EE
Å 143 8F
É 144 90 176 B0 Ò 208 D0 240 F0
Æ 145 91 177 B1 D 209 D1 ± 241 F1
Æ 146 92
ô 147 93
ö 148 94 ´ 180 B4 È 212 D4 244 F4
ò 149 95 Á 181 B5 213 D5 245 F5
û 150 96 Â 182 B6 Í 214 D6 ÷ 246 F6
ù 151 97 À 183 B7 Î 215 D7 ¸ 247 F7
ÿ 152 98 © 184 B8 Ï 216 D8 ° 248 F8
Ö 153 99
Ü 154 9A 186 BA 218 DA · 250 FA
Ø 155 9B » 187 BB 219 DB 251 FB
£ 156 9C 188 BC 220 DC 252 FC
Ø 157 9D ¢ 189 BD 221 DD 253 FD
x 158 9E ¥ 190 BE Ì 222 DE 254 FE
ƒ 159 9F 191 BF 223 DF 255 FF
166 A6 ã 198 C6 µ 230 E6
a
175 AF 207 CF 239 EF
–
178 B2 Ê 210 D2 242 F2
2
179 B3 Ë 211 D3 3/4 243 F3
3
185 B9 217 D9 ¨ 249 F9
1
E-3202/Cash Drawer Printer A-9
Page 54

Barcodes
The printer supports the following barcode symbologies :
Standard barcodes
n UPC-A (+2, +5)
n UPC-E (+2 +5)
n EAN8 (+2 +5)
n EAN13 (+2 +5)
n Code39 (with/without CS)
n ITF (with/without CS)
n Code 2/5
n Code 93
n CODABAR
n Code 128 (A, B, C, Autoswitching)
n Code 128 EAN
n Postnet (5, 6, 8, 9, 11)
n EAN 128
2D barcodes
n PDF 417
n MaxiCode
n QRCode
These barcodes are "native" , which improves the print speed. But as the
printer is able to print any bitmap image. Other barcodes printed by the
printer will be considered as images.
A-10 E-3202/Cash Drawer Printer
Page 55

Printer cable Pin assignment
Cable part number : 32-2490-01
E-3202/Cash Drawer Printer B-1
Page 56

B-2 E-3202/Cash Drawer Printer
Page 57

Opening Methods and Warnings
There are several different ways to open the E-3202 depending on the
size of the operator’s hand.
Option #1. Grasp the E3202 in the palms of both
hands. Using your thumbs
against the front edge of the
E-3202 paper bay door,
push up to open the door.
Option #2. Hold the base of
the E-3202 in one hand.
Using the other hand, place
your thumb against the
back of the paper bay door.
Using your fingers on the
front edge of the paper bay
door, pull the door open.
E-3202/Cash Drawer Printer C-1
Page 58

Warnings
DO NOT connect this printer to
any type of telephone line,
telephone equipment or any other
peripherals not specifically
designed to operate with this
printer.
Option #3. Hold the base of
the E-3202 in one hand.
Using the other hand, place
your fingers against the
back of the paper bay door.
Using your thumb on the
front edge of the paper bay
door, pull the door open.
DO NOT discard the adjustable
media guide. You will need it
when using different width
media. It is found in the far lefthand position.
C-2 E-3202/Cash Drawer Printer
Page 59

Datamax Barcode Products
Limited Warranty Statement
E-3202/Cash Drawer Printer
Printer
Datamax warrants to Purchaser that under normal use and service, the E-3202,
(with the exception of the thermal printhead) purchased hereunder shall be free
from defects in material and workmanship for a period of (365) days from the
date of shipment by Datamax.
Expendable and/or consumable items or parts such as lamps, fuses, and paper
are not covered under this warranty. This warranty does not cover equipment or
parts which have been misused, altered, neglected, handled carelessly, or used
for purposes other than those for which they were manufactured. This warranty
also does not cover loss, damages resulting from accident, or damages resulting
from unauthorized service.
E-3202/Cash Drawer Printer D-1
Page 60

Thermal Printhead
This warranty is limited to a period of one year, (365 days), or 1,000,000 linear
inches of use, whichever comes first, for the E-3202 thermal printhead. This one
year (365 days) warranty is valid only if a Datamax - approved thermal media is
used, as defined in the then current Datamax list of approved thermal/thermal
transfer media, a copy of which is available from Datamax. Failure to use
Datamax-approved media is justification for invalidation of this thermal
printhead warranty. This warranty does not cover printheads which have been
misused, altered, neglected, handled carelessly, or damaged due to improper
cleaning or unauthorized repairs.
Warranty Service Procedures
If a defect should occur during the warranty period, the defective unit shall be
returned, freight and insurance prepaid, in the original shipping containers, to
Datamax at: 4724 Parkway Commerce Blvd., Orlando, Florida, 32808. A Return
Material Authorization (RMA) number must be issued before the product can be
returned. To open an RMA please call the Datamax Customer Service
Department at (407) 523-5550. Please include your RMA number on the outside
of the box and on the shipping document. Include a contact name, action
desired, a detailed description of the problem(s), and examples when possible
with the defective unit. Datamax shall not be responsible for any loss or
damages incurred in shipping. Any warranty work to be performed by Datamax
shall be subject to Datamax’s confirmation that such product meets Datamax
warranty. In the event of a defect covered by its warranty, Datamax will return
the repaired or replaced product to the Purchaser at Datamax’s cost.
With respect to a defect in hardware covered by the warranty, the warranty shall
continue in effect until the end of the original warranty period, or for sixty (60)
days after the repair or replacement, whichever is later.
D-2 E-3202/Cash Drawer Printer
Page 61

General Warranty Provisions
Datamax makes no warranty as to the design, capability, capacity or suitability
of any of its hardware, supplies, or software.
Software is licensed on an “as is” basis without warranty. Except and to the
extent expressly provided in this warranty and in lieu of all other warranties,
there are no warranties, expressed or implied, including, but not limited to, any
warranties of merchantability or fitness for a particular purpose.
Purchaser shall be solely responsible for the selection, use, efficiency and
suitability of Datamax’s products.
Limitation of Liability
In no event shall Datamax be liable to the purchaser for any indirect, special or
consequential damages or lost profits arising out of or relating to Datamax’s
products, or the performance or a breach thereof, even if Datamax has been
advised of the possibility thereof. Datamax’s liability, if any, to the purchaser or
to the customer of the purchaser hereunder shall in no event exceed the total
amounts paid to Datamax hereunder by the purchaser for a defective product.
In no event shall Datamax be liable to the purchaser for any damages resulting
from or related to any failure or delay of Datamax in the delivery or installation
of the computer hardware, supplies or software or in the performance of any
services.
Some states do not permit the exclusion of incidental or consequential damages,
and in those states the foregoing limitations may not apply. The warranties here
give you specific legal rights, and you may have other legal rights which vary
from state to state.
E-3202/Cash Drawer Printer D-3
Page 62

D-4 E-3202/Cash Drawer Printer
 Loading...