

Page 1

AL5010
Product Line Manual
Page 2

AccuLazr™ AL5010 Product Line Manual
PN 1000068393 2.1 | CMS 11-0023 | 2013.01.31 | RAY
Document Revision Control
This document is under revision control in accordance with Datalogic’s Quality
System. Any addenda or other documents associated with this manual are under
separate revision controls. A revision number is changed by 0.1 whenever
technical information is changed or added to a document.
Copyright Information
Copyright © 2011-2012 DATALOGIC. All rights reserved.
No part of this document is to be reproduced or utilized in any form or by any
means, electronic or mechanical, including photocopying, recording, or by an
information storage and retrieval system without prior written consent of
Datalogic Systems, Inc. All drawings and specifications contained in this manual
are the property of Datalogic Systems, Inc. and shall not be reproduced, copied
or used in whole or in part as the basis for the sale or manufacture of products
without the written permission.
Datalogic and DRX® are registered trademarks and the AS logotype, 1-800BAR-CODE™ is a trademark of Datalogic.
All other company or product names are mentioned for purposes of identification
only, and may be trademarks of their respective owners.
Disclaimer Information
The information contained in this manual is subject to change without notice.
Supplemental information or documentation may be required for certain
applications or usage.
The examples and diagrams in this manual are included solely for illustrative
purposes. Because of the many variables and requirements associated with any
particular installation, Datalogic cannot assume responsibility or liability for
actual use based on the examples and diagrams.
No patent liability is assumed by Datalogic with respect to use of information,
circuits, equipment, or software described in this manual.
In no event will DATALOGIC. be responsible or liable for indirect or
consequential damages resulting from the use or application of this equipment.
Datalogic 511 School House Rd. Telford, PA 18969 1-800-BAR-CODE™
Page 3

AccuLazr™ AL5010 Product Line Manuals Contents iii
Contents
Preface
Intended Audience
Thank
Overview
Other
Conventions
Customer
You
...................................................................................................... vii
of Contents
Sources of Information
Service
.........................................................................................
....................................................................................
........................................................................ viii
.................................................................................................. viii
......................................................................................... viii
vii
viii
1 Introduction
AL5010 Product Line Overview .......................................................................9
The AL5010 Scan Head ................................................................................10
The AL5010 Mounting Base ..........................................................................10
The AL5010 Interface Module
AccuLazr™ User Interface.............................................................................12
Typical AL5010 Mid-Range Bar Code Reading Applications ........................13
Options and Accessories ...............................................................................14
.......................................................................11
2 Safety
Symbols .........................................................................................................15
General Precautions ......................................................................................16
Unpacking, Mounting and Installation Recommendations
Compliance Requirements ............................................................................17
Electrical Safety .............................................................................................17
Electrical Grounding Requirements
Elec
trostatic Discharge ..................................................................................18
Basic
Rules for ESD
Laser Safety...................................................................................................19
Safety Labels and Locations..........................................................................20
Control..........................................................................18
...............................................................18
............................16
3 Mechanical Installation
Prerequisites ..................................................................................................21
Tools Required...............................................................................................21
Additional Information ....................................................................................21
Unpacki
Installation Sequence.....................................................................................22
Orientation Considerations ............................................................................
Read Range...................................................................................................23
Bar Code Orientation to
General Mounting Guidelines ........................................................................
Reader
Dimensions and Clearances..........................................................................
Attaching the Mounting Base.........................................................................26
Attaching
Installing an AL5010
Mounting the Trigger Photoeye .....................................................................29
Mounting
Mounting the Interface Module ......................................................................31
Mounting the I/O
ng Instruct
Positioning.........................................................................................25
the Universal Mounting Bracket (UMB) .........................................
the Tachometer
ions ..................................................................................21
23
Scanning Area .......................................................24
25
26
27
Scan Head ...................................................................28
..............................................................................30
Modules..............................................................................34
00b-AL5010_Table of Contents_R10.doc Accu-Sort Systems, Inc.
Page 4

iv Contents AccuLazr™ AL5010 Product Line Manuals
4 Electrical Installation
Prerequisites ..................................................................................................37
Tools Required.............................................................................................. 37
Additional Information ....................................................................................37
Installation Sequence(s) ................................................................................38
Installing
Multiple Readers.............................................................................38
General Electrical Installation Guidelines and Precautions...........................39
Cable and Conduit Connections ....................................................................40
Wiring
the AL5010 Interface Modules............................................................
41
Power Requirements .....................................................................................45
Power
Supply Connections............................................................................45
Trigger Connections.......................................................................................46
Tachometer Connections...............................................................................
Serial Communications Connections
Ethernet Communications
Connections ........................................................50
(COM1 and COM2) ............................48
47
I/O Module Connections ................................................................................51
DeviceNet ......................................................................................................53
Profibus
Connecting
Wiring to the AL5010 without an Interface Module
..........................................................................................................53
the AL5010 .................................................................................
53
........................................54
Check Installation...........................................................................................55
5 Setup
Getting Started...............................................................................................57
AccuLazr User Interface Basics.....................................................................60
Getting Help ...................................................................................................
60
Modify Settings ..............................................................................................61
Configuration ...........................................................................................62
Codes................................................................................................63
Bar
Modulo Checks........................................................................................65
Stripping/Padding ....................................................................................66
Codes
Match
Serial Communic
...........................................................................................67
ations
...........................................................................68
Network ...................................................................................................71
Trigger .....................................................................................................74
Relay .......................................................................................................75
king
Trac
...................................................................................................76
FAST Monitor™.......................................................................................77
Advanced
Save / Retrieve
.................................................................................................79
..............................................................................................80
Diagnostics ....................................................................................................81
Monitor.....................................................................................................82
Log
Viewer
...............................................................................................
83
Update Firmware.....................................................................................90
6 Operations
First-time Startup ...........................................................................................91
Default Parameters ........................................................................................91
First-time Setup..............................................................................................92
k Operations using Test
Chec
Operations Checklist
......................................................................................93
Control Panel Indicators ................................................................................94
Backup / Restore Procedures........................................................................
Checking Operations with
Mode ..............................................................92
99
User Interface ....................................................100
Accu-Sort Systems, Inc. 00b-AL5010_Table of Contents_R10.doc
Page 5

AccuLazr™ AL5010 Product Line Manuals Contents v
Standalone Operation ..................................................................................102
Tracking Operation ......................................................................................103
Dual X-Scanning Operation .........................................................................104
Multiple-Reader Network Operatio
Scanning Array / Tunnel
Operation .............................................................106
n ............................................................105
7 Maintenance
Laser Shutoff Procedure..............................................................................107
Maintenance Tasks......................................................................................108
Cleaning Exit Window ..................................................................................109
Cleaning Trigger Photoeye ..........................................................................110
Cleaning Tachometer...................................................................................110
Tighten Mounting Hardware ........................................................................
Checking Interface Module Connections.....................................................111
Verify Reader Operation ..............................................................................
Verify Photoeye Operation...........................................................................112
Verify Tachometer Operation.......................................................................112
111
112
8 Troubleshooting
Test Mode ....................................................................................................113
Status Indicators ..........................................................................................113
Control Panel Indicators ..............................................................................114
Diagnostics ..................................................................................................
Log Viewer ...................................................................................................120
Update Firmware .........................................................................................126
Troubleshooting Tables ..............................................................................131
117
9 Service
Replacement Procedures ............................................................................129
AL5010 Field Replaceable Units (FRUs) Spare Parts ...............................130
Interface Module FRU Spare Parts .............................................................131
Appendices
A Specifications
Al5010 Technical Specifications
Interface Module Technical
Basic
Enhanced
Power Supply
Output Modules............................................................................................135
Input Modules ..............................................................................................135
Certifications ................................................................................................
Interface Module Technical
..................................................................
Specificati
...............................................................................................
ons
........................................
Specifications
................................134
133
133
134
136
B Read Charts
AL5010 Read Charts ...................................................................................137
C User Interface
AccuLazr User Interface ..............................................................................149
Modify Settings ............................................................................................150
Configuration .........................................................................................151
00b-AL5010_Table of Contents_R10.doc Accu-Sort Systems, Inc.
Page 6

vi Contents AccuLazr™ AL5010 Product Line Manuals
Bar Codes..............................................................................................153
Modulo Checks......................................................................................155
Stripping/Padding ..................................................................................156
Match Code Patterns.............................................................................157
Serial Communications .........................................................................161
Network .................................................................................................166
Trigger ...................................................................................................170
Relay .....................................................................................................172
Tracking.................................................................................................174
FAST Moni
tor™.....................................................................................176
Advanced...............................................................................................177
Save / Retrieve ............................................................................................
179
Diagnostics ..................................................................................................181
Monitor...................................................................................................182
Log
Viewer
.............................................................................................184
Update Firmware...................................................................................185
D Networking Guide
.................................................................................................................... 187
E FAST Monitor Configuration
.....................................................................................................................207
F Installation Drawings
.....................................................................................................................209
G Test Label for Adjustable Raster Setup
.....................................................................................................................231
Accu-Sort Systems, Inc. 00b-AL5010_Table of Contents_R10.doc
Page 7

!""#$%&'()!$*+,+)-'./#"0)$123)4%2#%56! "#$%&'$! ())!
! !
-'37%"3)
*$+',-$!.,!./$!!""#$%&'()!$*+,+)-'./#"0)$123)4%2#%5!%#,-!0''123,#.!
345.$-56!78'9!:/)5!15$#!-&81&+!)8'+1;$5!./$!)8%,#-&.),8!4,1!8$$;!.,!
)8.$<#&.$!$%%$'.)($+4!./$!!$*+,+)6%')7./3)83%/3'!=)./!4,1#!&>>+)'&.),89!7.!
',8.&)85!;$.&)+$;!)8%,#-&.),8!&?,1.!./$!%,++,=)8<@!
!! "#,;1'.!%$&.1#$56!'&>&?)+).)$56!5>$')%)'&.),85!&8;!&''$55,#)$5!
!! 3&%$.4!)8%,#-&.),8!
!! 785.&++&.),8!<1);$+)8$5!&8;!>#,'$;1#$5!!
!! A,8%)<1#)8<!./$!0BCDED!%,#!4,1#!&>>+)'&.),8!!
!! F&)8.$8&8'$!&8;!:#,1?+$5/,,.)8<!
:/)5!>#$%&'$!$G>+&)85!/,=!./)5!15$#!-&81&+!)5!,#<&8)H$;!&8;!)8.#,;1'$5!
,./$#!5,1#'$5!,%!)8%,#-&.),8!./&.!4,1!=)++!%)8;!15$%1+9!
82032/3/)!#/132"3)
9:%2;)<.#)
!
I,1!5/,1+;!/&($!&!?&5)'!18;$#5.&8;)8<!,%!?&#!',;$!5'&88)8<9!JK1)>-$8.!
)85.&++$#5!-15.!?$!%&-)+)&#!=)./!5.&8;&#;!=)#)8<!.$'/8)K1$5!&8;!.$#-)8,+,<49!
L$'&15$!./$!0''1B&H#!15$#!)8.$#%&'$!5,%.=&#$!#185!,8!&!=$?!?#,=5$#!)8!./$!
F)'#,5,%.
'/,,5$!',--&8;56!&8;!=,#N!=)./!=)8;,=5!&8;!;)&+,<!?,G$59!
:/)5!-&81&+!',8.&)85!5,-$!.$#-5!./&.!-&4!?$!18%&-)+) !!O5$!./$!<+,55!
&.!./$!?&'N!,%!./)5!-&81&+!%,#!&55)5.&8'$9!
:/&8N!4,1!%,#!15)8<!&8!0BCDED!?&#!',;$!5'&88)8<!5,+1.),8!&8;!./)5!-&81&+9!!
*$!(&+1$!4,1#!',--$8.5!&8;!%$$;?&'N9!P$$+!%#$$!.,!+$.!15!N8,=!=/&.!4,1!
+)N$!,#!;)5+)N$!&?,1.!0BCDED!Q,#!./)5!-&81&+R!?4!$2-&)+)8<!15!&.!
"#$%&'()%*')"%#&(+,-')'.%/"0&0%*9!!
I,1!'&8!&+5,!-&)+!4,1#!',--$8.5!.,!,1#!',#>,#&.$!/$&;K1&#.$#5!&;;#$55!,#!
'&++!15!;)#$'.+4!&.!E2SDD2L0T2AUVJ
=>9?@):/$#$!-&4!?$!&;;).),8&+!-&.$#)&+!./&.!=&5!8,.!&(&)+&?+$!=/$8!./)5!
>#,;1'.!-&81&+!=&5!>#,;1'$;9!:,!+$!)%!./$#$!)5!&!;,'1-$8.&.),8!1>;&.$6!
!
<,!.,!,1#!=$?!5).$\5!',##$5>,8;)8<!>#,;1'.!>&<$!&. www.datalogic.com.
!
M
!*)8;,=5M!$8()#,8-$8.6!4,1!5/,1+;!N8,=!/,=!.,!15$!&!-,15$6!
W
!,#!QXECR!YXZ2D[SE9!
>0:3')A.#'"36).7)827.'B%01.2)
00c-AL5010_Preface_R20.doc Accu-Sort Systems, Inc.
I,1!'&8!'/,,5$!%#,-!-&84!)8%,#-&.),8!5,1#'$56!)8'+1;)8<!;,'1-$8.&.),86!
.#&)8)8<6!&8;!51>>,#.!5$#()'$56!.,!)8'#$&5$!4,1#!N8,=+$;<$!&8;!
18;$#5.&8;)8<!,%!./$!0BCDED!?&#!',;$!5'&88)8<!5,+1.),859!7%!./)5!-&81&+!
#$%$#5!4,1!.,!,./$#!;,'1-$8.&.),86!15$!,8+4!./$!+&.$5.!($#5),85!18+$55!
,./$#=)5$!5>$')%)$;9!
Page 8

viii Preface AccuLazr™ AL5010 Product Line Manuals
Conventions
WARNINGS or CAUTIONS: This symbol identifies a hazard or
procedure that, if incorrectly performed, could cause personal injury or
result in equipment damage. It is also used to bring the user’s attention to
details that are considered IMPORTANT.
HIGH VOLTAGE CAUTION: This symbol alerts the user they are about
to perform an action involving, either a dangerous level of voltage, or to
warn against an action that could result in damage to devices or electrical
shock.
LASER CAUTION: This symbol alerts the user they are about to perform
an action involving possible exposure to laser light radiation.
ESD CAUTION: This symbol identifies a procedure that requires you take
measures to prevent Electrostatic Discharge (ESD) e.g., use an ESD wrist
strap. Circuit boards are most at risk. Please follow ESD procedures.
NOTES: This symbol draws attention to details or procedures that may be
useful in improving, maintaining, or enhancing the performance of the
hardware or software being discussed.
NOTE REGARDING DIMENSIONAL REFERENCES: This manual
provides all dimensional references in inches and in most cases Metric
referenced in brackets, for example 10 inches [254 mm].
Customer Service
Training
Accu-Sort Systems offers a complete set of training courses to help you and
your staff get the most out of your investment. We can help you develop a
training plan that provides thorough training for both your project team and
your end users. We will work with you to organize courses appropriate to
your job or area of responsibility. Training professionals can show you how
to plan your training throughout the implementation process so that the right
amount of information is delivered to key people when they need it the most.
You can attend courses at our training center, or you can arrange for our
trainers to teach at your facility. In addition, we can tailor standard courses or
develop custom courses to meet your needs.
Support
From on–site support to central support, our team of experienced
professionals provides the help and information you need to keep your
equipment working for you. This team includes your Account Manager and
Accu-Sort’s large staff of support specialists with expertise in your business
area and managing your hardware and software environment.
NOTE: If you have any problems or questions that require Accu-Sort's
assistance, direct your calls to Customer Service at 1-800-BAR-CODE
(215) 723-0981.
™
or
Accu-Sort Systems, Inc. 00c-AL5010_Preface_R20.doc
Page 9

AccuLazr™ AL5010 Product Line Manual Introduction 1
1 Introduction
This chapter presents an introductory description of the AccuLazr™ AL5010
laser barcode scanner product line including:
AL5010 Product Line Overview
AccuLazr User Interface
AL5010 Product Line Overview
The AL5010 line of laser barcode readers is designed with industrial and
manufacturing applications in mind, providing high-speed scanning and high
reliability in a rugged industrial enclosure. The entire AL5010 product line
offers a large depth of field that provides accurate barcode reading from as
little as 4 inches up to 48 inches.
The AccuLazr AL5010 Mid-Range Laser Barcode Readers include:
AL5010 Scan Head
AL5010 Mounting Base
AccuLazr Interface Module (optional)
Power Supply Module (optional)
AL5010 Barcode Reader
AccuLazr Basic Interface Module
01-AL5010_Introduction_R20.doc Accu-Sort Systems, Inc.
Page 10
2 Introduction AccuLazr™ AL5010 Product Line Manuals
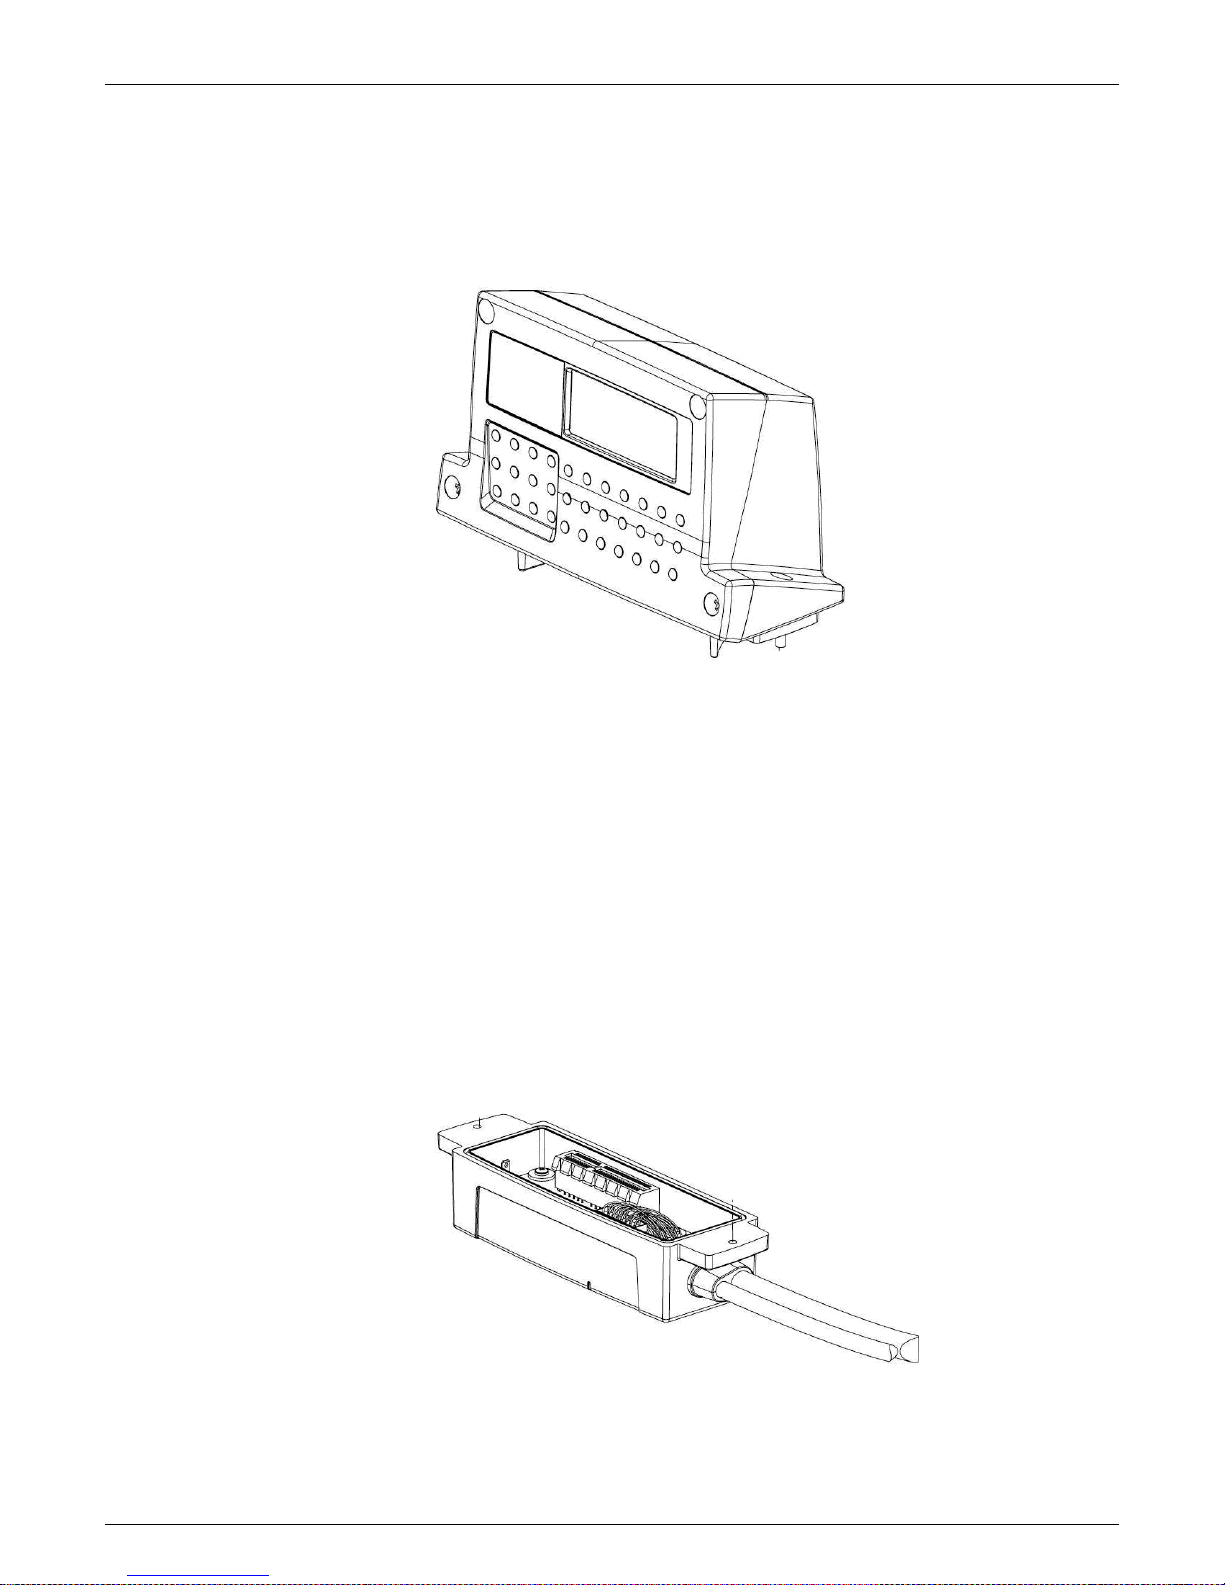
AL5010 Scan Head
The AL5010 Scan Head incorporates the optics and laser module(s) for
scanning barcodes as well as the decoding engine and parameter storage
module. The control panel provides several LED status indicators and three
function buttons.
There are five models of the AL5010 Scan Head (each available with
optional adjustable raster):
One-laser models for standard and high-density
Two-laser models for standard, near-focus high-density and high-density
An optional Adjustable Raster (adjustable up to 20-degrees above or below
0-degrees, variable DOF) is available in the existing scan head housing. No
bolt-on additions are required.
AL5010 Mounting Base
The AL5010 Mounting Base provides for the mounting of the AL5010 as well
as the wiring interface between the scan head and AccuLazr Interface
Module. It includes a parameter storage module that enables parameters to
be uploaded/downloaded with the ‘hot-swappable’ scan head.
Accu-Sort Systems, Inc. 01-AL5010_Introduction_R20.doc
Page 11
AccuLazr™ AL5010 Product Line Manual Introduction 3
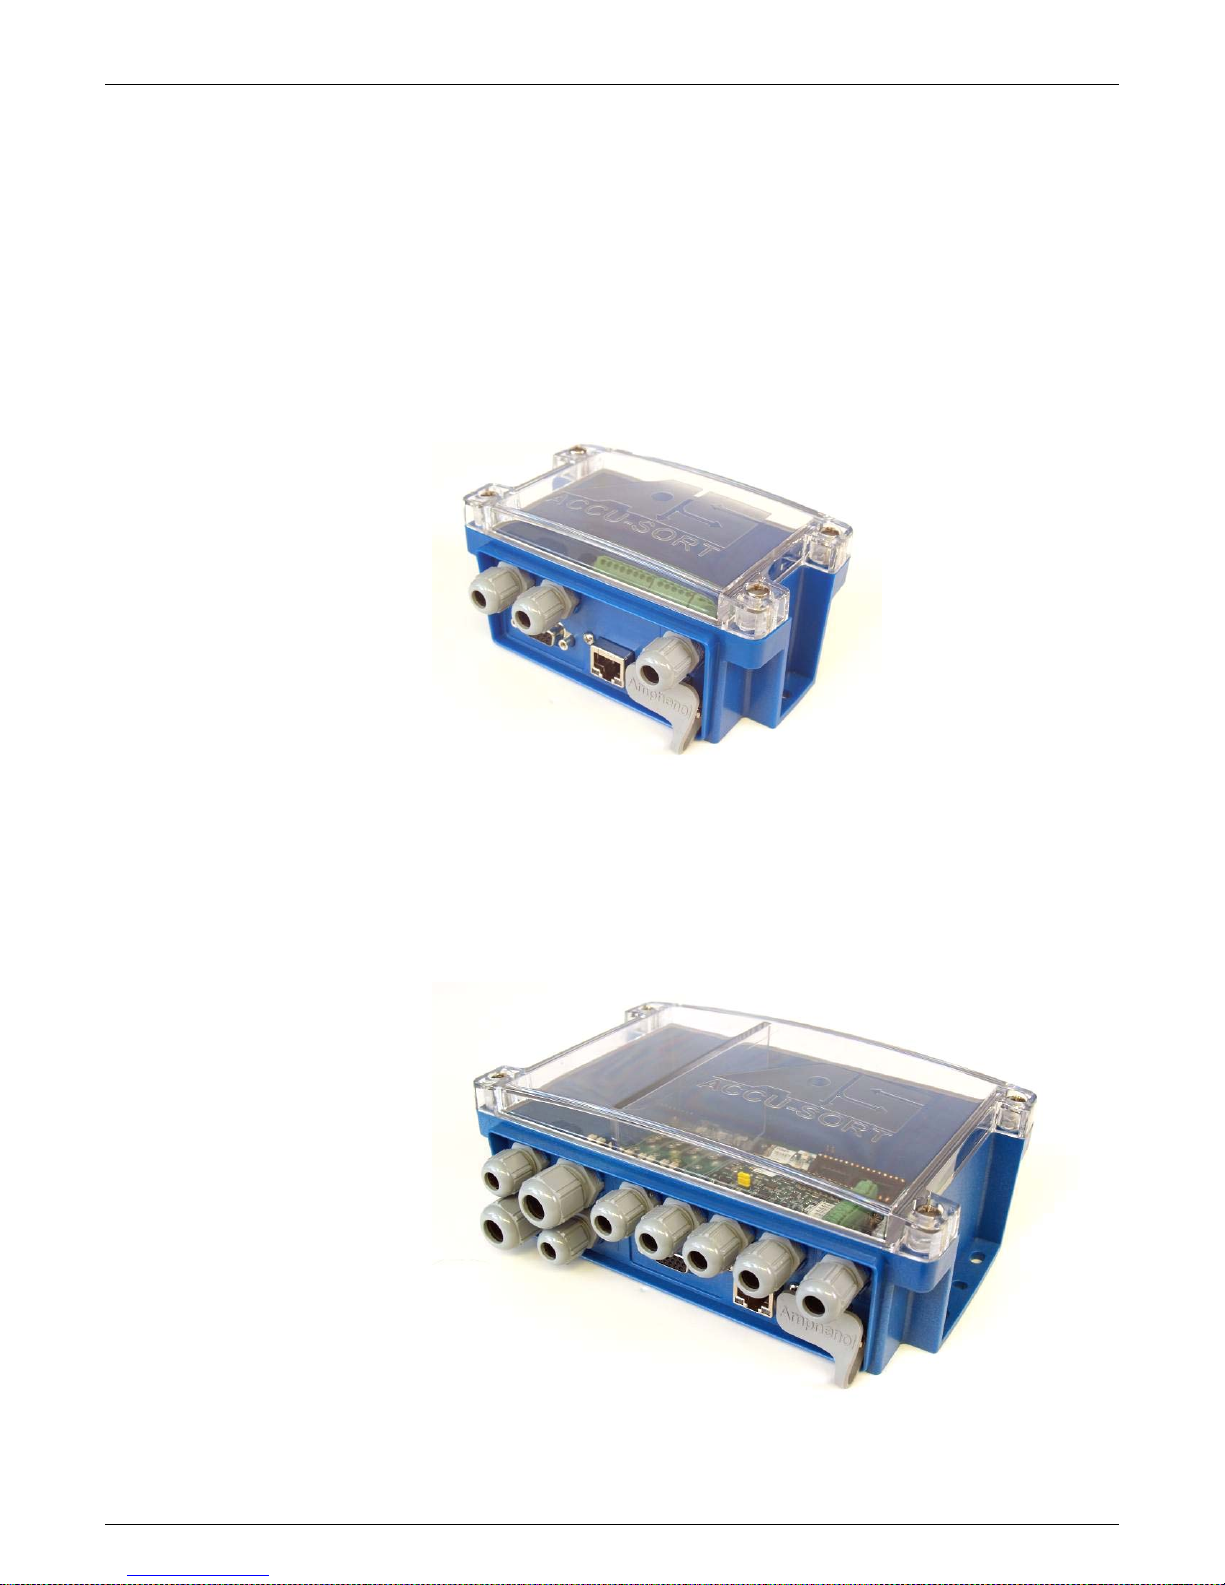
AccuLazr Interface Module
The AccuLazr Interface Module is fully compatible with the AL5010 line of
barcode readers and is available in both a Basic and Enhanced version.
The AccuLazr Basic Interface Module provides the following connections:
Scanner (15-pin and RJ45)
Ethernet / EtherNet/IP (1)
Serial ports (2)
Trigger Input
Power
The Enhanced Interface Module provides the following additional
connections:
Tach Input
Up to four Opto22 I/O modules
Fieldbus communications (either DeviceNet or Profibus)
01-AL5010_Introduction_R20.doc Accu-Sort Systems, Inc.
Page 12

4 Introduction AccuLazr™ AL5010 Product Line Manuals
AccuLazr™ User Interface
The AccuLazr User Interface lets you configure an AL5010 through a series
of intuitive, user-friendly menus, tools and dialog boxes accessed via a web
browser. Context sensitive help is available to assist with use of the software.
With the user interface, you can:
Integrate AL5010 to your system and application without custom
software.
Modify output messages to accommodate your system needs.
Add or modify the barcode symbologies read by AL5010.
Define up to four (4) relay input/outputs.
Monitor AL5010 performance using diagnostic tools.
Fine-tune optional adjustable raster.
You can easily configure your AL5010 reader by using a desktop or laptop
computer, an Ethernet network connection and the browser-based interface.
Accu-Sort Systems, Inc. 01-AL5010_Introduction_R20.doc
Page 13

AccuLazr™ AL5010 Product Line Manual Introduction 5
Typical AL5010 Mid-Range Barcode Reading Applications
Use the AL5010 in the following applications:
single-reader applications (side or top)
pick module scanning
multi-sided scanning
retail distribution centers
industrial manufacturing
With optional Adjustable Raster:
pallet scanning
hard-to-read barcodes
plastic shrink-wrapped barcodes
unknown label positioning
01-AL5010_Introduction_R20.doc Accu-Sort Systems, Inc.
Page 14

6 Introduction AccuLazr™ AL5010 Product Line Manuals
Options and Accessories
Contact your sales representative for assistance in determining which
options and accessories will be applicable to your application.
If you know which items are needed, contact Accu-Sort’s Customer Service
Department (ask for the Spare Parts Coordinator) between 8 AM and
4:30PM (EST) Monday through Friday at 1-800-BAR-CODE (Fax: 215-723-
1515).
Accu-Sort Systems, Inc. 01-AL5010_Introduction_R20.doc
Page 15

AccuLazr™ AL5010 Product Line Manuals Safety 7
2 Safety
Please follow the safety precautions and warnings found in this manual when
installing, setting up, operating, maintaining, troubleshooting or replacing any
Accu-Sort products, parts, or related equipment. Following these precautions
will prevent personal injury or damage to the unit. Failure to follow these
precautions may also void your warranty.
This section provides important information regarding safety and your
AL5010, especially involving issues regarding:
General Precautions during Mounting and Installation
Compliance Requirements
Electrical Safety
Electrical Grounding Requirements
Electrostatic Discharge Precautions and Control
Laser Safety
Contact Accu-Sort at 1-800-BAR-CODE™ if you need more information.
Symbols
Throughout this manual, special safety alerts are indicated by the following
symbols:
WARNINGS or CAUTIONS: This symbol identifies a hazard or
procedure that, if incorrectly performed, could cause personal injury or
result in equipment damage.
HIGH VOLTAGE CAUTION: This symbol alerts the user they are about
to perform an action involving, either a dangerous level of voltage, or to
warn against an action that could result in damage to devices or electrical
shock.
LASER CAUTION: This symbol alerts the user they are about to perform
an action involving possible exposure to laser light radiation.
ESD CAUTION: This symbol identifies a procedure that requires you take
measures to prevent Electrostatic Discharge (ESD) e.g., use an ESD wrist
strap. Circuit boards are most at risk. Please follow ESD procedures.
Alerts help you to:
02-AL5010_Safety_R20.doc Accu-Sort Systems, Inc.
Identify a hazard and its consequences
Avoid a hazard by taking adequate safety precautions
Get the most out of your bar code solution
Page 16

8 Safety AccuLazr™ AL5010 Product Line Manuals
General Precautions
Installation and Service by Qualified Service Technician Only
WARNING: All procedures involving exposure to the inside of the
AL5010 Interface Module must be performed by a trained
technician because of possible exposure to emitted laser radiation,
high voltage, and could reduce the effectiveness of the device’s IP
rating. There are no user-serviceable parts inside. Do not attempt
to open the unit or perform any installation/service procedures
unless you are a trained technician! DO NOT REMOVE the
faceplate from the scan head enclosure. Opening the AL5010 will
void the factory warranty.
Refer all servicing and advanced troubleshooting to a qualified service
technician. Technical training is available from Accu-Sort Systems.
Furthermore, even trained technicians should always reference the specific
product documentation for more detailed service procedures that may not be
described in the AL5010 Product Manual.
Unpacking, Mounting and Installation Recommendations
CAUTION: Firmly fasten mounting structures in place before installing the
equipment to any mounting structure. Avoid using freestanding mounting
structures. If your application requires a freestanding mounting structure,
avoid making the structure top-heavy.
Follow all procedures regarding electrical safety, laser safety, and
electrostatic discharge safety (ESD) as outlined in this manual.
Save all packing material in case you have to transport your readers.
Use steel or aluminum as a mounting structure. An Accu-Sort mounting
structure is recommended for optimum system performance.
Check mounting hardware periodically for tightness and stability.
Do not use sheet rock, plaster board, wood, or other unstable mounting
surfaces.
Do not use mounting surfaces that are subject to high vibrations.
Do not create any obstructions of airflow around the modules. Keep the
area around the modules clean to provide for cooling. (Refer to specific
product manuals for minimum clearances.)
Avoid dropping the readers during unpacking and installation.
Do not touch the window glass of the scan head.
Accu-Sort Systems, Inc. 02-AL5010_Safety_R20.doc
Page 17

AccuLazr™ AL5010 Product Line Manuals Safety 9
Compliance Requirements
FCC NOTICE: The AL5010 has been tested and found to comply with the
limits for a Class A digital device, pursuant to Title 47, Part 15 of the FCC
Rules. These limits are designed to provide a reasonable protection against
harmful interference when the equipment is operated in a commercial
environment. This equipment generates, uses, and can radiate radio frequency
energy and, if not installed and used in accordance with the instruction
manuals, may cause harmful interference to radio communications. Operation
of this equipment in a residential area is likely to cause harmful interference in
which case the user will be required to correct the interference at his own
expense.
WARNING: These are Class A products. In a domestic environment, these
products can cause radio interference, in which case the user may be required
to take adequate measures. (Ref. CISPR 22 = EN 55 022:1995.)
IMPORTANT: Follow the guidelines below to maintain Electromagnetic
Compatibility (EMC) Compliance:
Interconnecting cables must be twisted pair cables.
Electrical Safety
All shielded I/O cables shall have the shield terminated to the chassis.
NOTE: DRAIN WIRE SHIELDING IS NOT ADEQUATE.
Do not remove the shielding covers.
Refer to the details on making custom cables as provided in the specific
technical manual for the component.
AL5010 must be installed in accordance with Canadian Electrical Code, Part I,
CSA C22.1; CSA C22.2 No. 0; and the National Electrical Code, NFPA 70.
For complete requirements, National Electrical Code, ANSI/NFPA 70,
Canadian Electrical Code, Part I, C22.1, or other national standard must be
consulted.
For PERMANENTLY CONNECTED EQUIPMENT/RACK MOUNTED,
incorporate a readily accessible disconnect device in the fixed wiring.
For PLUGGABLE EQUIPMENT/RACK MOUNTED, install the socket-
outlet near the equipment so it is easily accessible.
Make sure that all personnel who work with the equipment know where
the disconnect switches or circuit breakers are located.
Before performing any type of maintenance, turn off power to the unit and
disconnect the power cord.
02-AL5010_Safety_R20.doc Accu-Sort Systems, Inc.
Be certain your hands and the floor of your work area are dry before
touching electrical equipment or connecting cords.
Routinely check all power cords, plugs, wiring, and cable connections for
any signs of exposed wire or deteriorating insulation. If you notice any
damage, make arrangements with service personnel to repair or replace
the damaged item immediately.
Page 18

10 Safety AccuLazr™ AL5010 Product Line Manuals
Electrical Grounding Requirements
Before applying power to any device, ALL components MUST be electrically
grounded. Follow these precautions:
Ensure all AC power outlets have a properly grounded receptacle.
ALL components MUST be properly cabled and grounded with three-
conductor AC power cords.
Use the correct power cord for your country.
Reference specific grounding instructions for each component.
Do not use a two-prong adapter.
Do not cut/remove the round grounding prong from any plug.
Do not use an extension cord to defeat any ground.
Electrostatic Discharge
ESD CAUTION: Measures must be taken to prevent Electrostatic
Discharge (ESD) at all times when handling any product, equipment, unit or
part (e.g. use a grounded ESD wrist strap). It should be noted that circuit
boards are at greatest risk to damage from ESD. Please follow standard
ESD precautions!
Electrostatic discharge (ESD), the transfer of static electricity from one object
to another, is an often-unnoticeable hazard to electronic components.
Boards and other devices with integrated circuits are particularly sensitive to
ESD damage. Product failures may not occur until days or weeks after the
component was damaged.
Static damage to units can take the form of upset failures or catastrophic
failures (direct and latent).
An upset failure occurs when an electrostatic discharge is not significant
enough to cause total failure, but may result in intermittent gate leakage,
causing loss of software or incorrect storage of information.
Direct catastrophic failures occur when a unit is damaged to the point where
it is permanently damaged.
Basic Rules for ESD Control
Below are some keys to effectively control unnecessary ESD damage when
working with ESD-sensitive devices:
Define an ESD protective area and work on the ESD-sensitive devices in
this area only.
Define static sensitivity of devices to be handled in ESD protective area.
Establish suitable static control program that limits static generation to
less than the damage threshold of the most sensitive device and
provides a safe, defined path for static charge dissipation.
Accu-Sort Systems, Inc. 02-AL5010_Safety_R20.doc
Prevent contamination of the protective area by unnecessary non-static
controlled materials.
Audit the ESD protective area regularly to ensure that static control is
maintained. Document the findings for future reference.
Page 19

AccuLazr™ AL5010 Product Line Manuals Safety 11
Refer to the specific ESD precautions for each component.
Laser Safety
The AL5010 uses visible laser diodes and emits a “moving” red beam. Do
not stare into the AL5010’s exit window at the laser light source. Avoid
unintentional exposure to laser light whenever possible. The laser light level
does not constitute a health hazard, however staring at the laser light for
prolonged periods could result in eye damage.
The following appears next to the AL5010 laser exit window:
WARNING! LASER LIGHT EMITTED FROM THIS APERTURE
Warning on AL5010 Laser Exit Window to Avoid Exposure
WARNING: Use of controls, adjustments, or procedures other than those
specified in this document may result in hazardous laser light exposure.
The AL5010 Line Scanning Bar Code Reader is rated as a Class 1 Laser
Product by the International Electrotechnical Commission. Compliances are
as follows: Class 1 Laser Product (IEC-60825-1) 2007.
Before performing any maintenance or service procedures, perform
the laser shutoff procedure provided in Chapter 7.
02-AL5010_Safety_R20.doc Accu-Sort Systems, Inc.
Page 20

12 Safety AccuLazr™ AL5010 Product Line Manuals
Safety Labels and Locations
Refer to the following figures for specific label locations and warnings. When
operating, repairing, or replacing an AL5010, note all label content on the
unit. These labels provide special precautions for operation, usage
specifications, product identification, and service information.
WARNING: LASER LIGHT EMITTED FROM THIS APERTURE.
Label Placement AL5010 Scan Head
Accu-Sort Systems, Inc. 02-AL5010_Safety_R20.doc
Page 21

$FFX/D]U$/3URGXFW/LQH0DQXDOV 0HFKDQLFDO,QVWDOODWLRQ
:$51,1*
0HFKDQLFDO,QVWDOODWLRQ
,03257$177KH$/FRQWDLQVHOHFWURQLFVWKDWPD\EHDIIHFWHGE\
HOHFWURVWDWLFGLVFKDUJH(6'7RSUHYHQWSHUVRQDOLQMXU\RUGDPDJHWRWKH
XQLWSOHDVHIROORZWKHVDIHW\SUHFDXWLRQVDQGZDUQLQJVIRXQGLQ&KDSWHU
)DLOXUHWRIROORZWKHVHSUHFDXWLRQVPD\YRLG\RXUZDUUDQW\
LQWHUQDOFRPSRQHQWVRIWKH$/DUHILHOGUHSODFHDEOHXQLWV)58V
2SHQLQJWKHXQLWZLOOSRWHQWLDOO\H[SRVHWKHXVHUWRHPLWWHGODVHUUDGLDWLRQ
KLJKYROWDJHDQGFRXOGUHGXFHWKHHIIHFWLYHQHVVRIWKHGHYLFH¶V,3UDWLQJ
DO NOT REMOVEWKHIDFHSODWHIURPWKHVFDQKHDGHQFORVXUH2SHQLQJ
WKH$/ZLOODOVRYRLGWKHIDFWRU\ZDUUDQW\
3UHUHTXLVLWHV
5HDGDOOLQVWUXFWLRQVEHIRUHEHJLQQLQJ\RXULQVWDOODWLRQ
7KHUHDUHQRXVHUVHUYLFHDEOHSDUWVLQVLGHWKH$/1R
'HILQHDQGFRQILUPWKHDFFXUDF\RI\RXUDSSOLFDWLRQ¶VUHTXLUHPHQWV
5HYLHZDOOLQVWDOODWLRQVSHFLILFGUDZLQJV
5HYLHZDQGSODQWKHPHFKDQLFDOLQVWDOODWLRQRIDOOGHYLFHVXVHGLQ\RXU
DSSOLFDWLRQ%HVXUHWRDOORZDGHTXDWHFOHDUDQFHIRUPDLQWHQDQFH
5HYLHZDQGSODQWKHSRZHUUHTXLUHPHQWVIRU\RXUDSSOLFDWLRQ
&KHFNWKHFRQWHQWVRIWKHVKLSSLQJFDUWRQVDJDLQVWWKHSDFNLQJOLVW
5HFRUGDOOSURGXFWVHULDOQXPEHUV
7RROV5HTXLUHG
´$OOHQ:UHQFK
PP1XW'ULYHURUER[ZUHQFK
3KLOOLSV6FUHZ'ULYHU[>@
7DSH0HDVXUH
3HQFLORU0DUNHU
$GGLWLRQDO,QIRUPDWLRQ
6HHDOVR4XLFN5HIHUHQFH*XLGHVIRU,QVWDOODWLRQ
$/ZLWK%DVLF,QWHUIDFH0RGXOH
03-AL5010_Mechanical_Installation_R20.doc Accu-Sort Systems, Inc.
$/ZLWK(QKDQFHG,QWHUIDFH0RGXOH
(VWDEOLVKLQJ$&RQQHFWLRQWRWKH8VHU,QWHUIDFH
Page 22

14 Mechanical Installation AccuLazr™ AL5010 Product Line Manuals
Unpacking Instructions
IMPORTANT: The AL5010 packaging is designed to protect the unit(s)
during shipment. Do not throw it away. Save all packing material in case
you need to transport your unit(s).
Accu-Sort Systems, Inc. 03-AL5010_Mechanical_Installation_R20.doc
Page 23

AccuLazr™ AL5010 Product Line Manuals Mechanical Installation 15
Installation Sequence
NOTE: Everything should be MECHANICALLY INSTALLED before
performing any ELECTRICAL INSTALLATION. Reference Chapter 4 for
electrical installation details.
Installing a Single Unit
To install a single unit, follow this sequence of steps:
Complete mechanical installation.
Review the details of your application’s requirements.
Determine and mark the reader mounting location.
Erect mounting frame or other supporting structures.
Attach the Universal Mounting Bracket (UMB) to the frame.
(UMB and mounting frame options are available from Accu-Sort.)
Install the mounting base to the UMB (or frame, if UMB not used).
Mount the AccuLazr Basic or Enhanced Interface Module to
structure.
Mount the Accu-Sort power supply to structure.
Mount Trigger Photoeye (optional).
Mount tachometer (Enhanced Interface Module only).
Complete electrical installation.
Install the scan head to the mounting base and wire interface
module. (See Chapter 4.)
NOTE: To reduce the possibility of damage to the scan head, install it after
the mounting base is mounted, wired, and all wiring checked for accuracy.
Setup your reader.
See Chapter 5.
Check operations.
See Chapter 6.
03-AL5010_Mechanical_Installation_R20.doc Accu-Sort Systems, Inc.
Installing multiple units
To mechanically install multiple units, follow the same sequence of steps, per
reader, as defined in Installing a Single Unit. Your application will define how
the mounting requirements vary for each reader.
Multiple-reader networks may require a different approach to physical
location of the power source, trigger photoeye, and tachometer since they
are most likely being shared by the group of readers.
Page 24

16 Mechanical Installation AccuLazr™ AL5010 Product Line Manuals
Orientation Considerations
Consider the important factors that affect how the reader is oriented in
respect to the barcoded packages (products) and their method of
conveyance.
Mounting the reader for optimum performance depends on these factors:
Read Range defining the distance (and variations) between the reader
and packages, including the near/far distances, and overall depth of field
Barcode Orientation on products (ladder or picket fence) as well as the
angle in which codes will appear (skew, pitch and tilt)
Reader Positioning for type of scanning required to accommodate
picket fence or ladder barcode orientation (yaw, pitch and roll angles)
Read Range
The AL5010 must be positioned in the scanning area to accommodate
reading products over a read range specific to your application. Use the
following diagram to determine the near/optimum/far read distances. These
dimensions result in the overall depth of field your application requires.
Accu-Sort Systems, Inc. 03-AL5010_Mechanical_Installation_R20.doc
Page 25

AccuLazr™ AL5010 Product Line Manuals Mechanical Installation 17
Barcode Orientation to Scanning Area
Picket Fence or Ladder Orientation Barcode placement usually
determines the AL5010’s positioning. The AL5010 can be mounted to read
codes in either a ladder or picket fence orientation.
Picket Fence and Ladder Orientation Illustrated
Barcode Skew, Pitch and Tilt These angles affect barcode readability.
Barcodes pitched or skewed up to 45 degrees are still readable. Although
some skew may occur, it should not exceed 45 degrees.
← DIRECTION OF TRAVEL →
03-AL5010_Mechanical_Installation_R20.doc Accu-Sort Systems, Inc.
Page 26

18 Mechanical Installation AccuLazr™ AL5010 Product Line Manuals
General Mounting Guidelines
As you plan and install the AL5010 barcode solution for your application, be
sure to keep the following mounting guidelines in mind:
Determine the proper orientation and position of the reader.
Leave adequate clearances for maintenance and wiring.
AL5010 Reader: ~ 1-inch [25 mm]
Required for scan head removal from mounting base.
Interface Modules: ~ 8-12 inches [203-305 mm]
Plan mechanical installation based on the application’s electrical require-
ments. See General Electrical Installation Guidelines in Chapter 4.
It is important that you follow all safety precautions when installing, setting
up, operating, maintaining, troubleshooting or replacing any Accu-Sort
products, parts or related equipment. See Chapter 2, Safety.
Reader Positioning: Fixed Laser
IMPORTANT: The AL5010 is able to decode barcodes at a variety of
angles; however significant angular distortion may degrade reading
performance. When positioning the reader, remember that the scan beam
exits the scan window parallel to the mounting base.
When mounting the AL5010, take into consideration your
application’s barcode orientation.
Mount the reader so that the scan beams will intersect barcodes.
10°
0°
IMPORTANT: To avoid the laser reflecting back onto itself
and lowering performance, install at a 10-degree skew.
Accu-Sort Systems, Inc. 03-AL5010_Mechanical_Installation_R20.doc
10°
AL5010’s Range of Motion with Universal
Mounting Bracket (UMB)
Page 27

AccuLazr™ AL5010 Product Line Manuals Mechanical Installation 19
Reader Positioning: Adjustable Raster
The Adjustable Raster version (sometimes referred to as “vibrating vein”) of
the AL5010 uses an additional mirror that oscillates to throw the laser over a
configurable area. This extra functionality has all been engineered into the
original AL5010 housing. As the mirror oscillates, the scan line sweeps
across the target surface in application where greater coverage is needed.
Specifically, the AL5010 Adjustable Raster can be configured to sweep up to
20-degrees above or below zero. When an AL5010 with the adjustable raster
feature is installed, the user interface will include a Raster setup screen (see
chapter 5 Setup).
The adjustable raster is ideal for pallet scanning or other applications when
the position of the barcode is variable, but scan rate (scans/second) is
decreased because of the oscillation of the mirror. The sweep of the raster
and scanner skew angle is adjusted to get the best coverage over the
probable scan area.
03-AL5010_Mechanical_Installation_R20.doc Accu-Sort Systems, Inc.
Page 28

20 Mechanical Installation AccuLazr™ AL5010 Product Line Manuals
Raster Setup
The Adjustable Raster version of the AccuLazr™ AL5010 Laser barcode
scanner requires some extra care during installation. The procedures below
will help achieve the coverage needed for your application while ensuring the
maximum read rate.
AL5010 Adjustable Raster Installation
Mount the Scanner
1. Mount the scanner according to specifications.
2. Tilt the scanner back at a 15-degree angle.
Accu-Sort Systems, Inc. 03-AL5010_Mechanical_Installation_R20.doc
0.
Set Up the Raster Sweep
1. Start the user interface (See chapter 5, Setup).
2. In Modify Settings > Barcode, select Code 128. The test barcode
label is a 12 character, code 128.
3. Print out or photo copy the barcode test label sheet found at the end
of this appendix.
4. Place the barcode test labels on a test box.
Page 29

AccuLazr™ AL5010 Product Line Manuals Mechanical Installation 21
5. Position box at nearest read distance to the scanner.
6. Identify the highest and lowest code placement on the side of a box
in your system. Mark the highest and lowest code positions on the
test box.
03-AL5010_Mechanical_Installation_R20.doc Accu-Sort Systems, Inc.
Page 30

22 Mechanical Installation AccuLazr™ AL5010 Product Line Manuals
7. In the user interface, navigate to Modify Settings > Raster.
8. Type -20 in the Upper Sweep and Lower Sweep text fields.
NOTE: This will stop the raster from
sweeping and lock it in position at the -20
degrees.
9. Adjust the height of the scanner, so that at -20-degrees, the scan
line is aligned with the lowest barcode mark on the test box.
10. With the laser line intersecting the barcode, put the scanner into test
mode using the user interface. To do this, navigate to Diagnostics >
Monitor.
Accu-Sort Systems, Inc. 03-AL5010_Mechanical_Installation_R20.doc
11. On the Monitor screen, click Start Test Mode.
12. Check the read quality on the monitor. The quality should be 100%.
Page 31

AccuLazr™ AL5010 Product Line Manuals Mechanical Installation 23
13. In Modify Settings > Raster, gradually increment your upper and
lower sweep values toward 0%. Try 5% increments first, i.e.: Set
both the Upper Sweep and Lower Sweep to -15, then -10, -5, 0, 5,
and etc. The laser should intersect a barcode at each degree setting.
14. Check the read quality on the monitor at each increment. The quality
should be 100%.
15. Continue incrementing the upper and lower sweep settings until the
scan line reaches or goes just beyond the level of the highest
barcode.
03-AL5010_Mechanical_Installation_R20.doc Accu-Sort Systems, Inc.
16. In Modify Settings > Raster, set the lower sweep at -20 and the
upper sweep to the value determined in step 15.
Page 32

24 Mechanical Installation AccuLazr™ AL5010 Product Line Manuals
17. Click Update, and then click the Save icon ( ) at the top of the user
interface screen. The laser will begin to sweep between your lowest
and highest barcode indicators.
0.
Accu-Sort Systems, Inc. 03-AL5010_Mechanical_Installation_R20.doc
Page 33

AccuLazr™ AL5010 Product Line Manuals Mechanical Installation 25
Run Test Labels
1. Configure the scanner for your application by setting up
communications, barcode types, triggers and relays as applicable to
your system (See Chapter 5 Setup).
2. In the user interface, navigate to Diagnostics > Monitor.
3. Place a test barcode at the front edge of the box in the lowest
position and run the box through the system.
4. Check the Monitor screen to see how the barcode reads. The
quality will likely not be 100%, but it is just important that it reads.
5. Next, place the test barcode at the front edge of the box in the
highest position and run the box through the system.
6. Again, check the Monitor screen to make sure the barcode has
been read.
03-AL5010_Mechanical_Installation_R20.doc Accu-Sort Systems, Inc.
Page 34

26 Mechanical Installation AccuLazr™ AL5010 Product Line Manuals
7. Continue checking for good reads by placing the label at the back
edge of the box, once in the lowest position and then at the highest
position.
Accu-Sort Systems, Inc. 03-AL5010_Mechanical_Installation_R20.doc
Page 35

AccuLazr™ AL5010 Product Line Manuals Mechanical Installation 27
Dimensions and Clearances
The overall dimensions of the AL5010 when the Universal Mounting Bracket
(UMB) is used are shown on the mechanical specification drawings provided
in the drawings folder of the documentation CD. This section also includes
drawings without the UMB.
The reader is a sealed, unventilated unit. No specific clearance is required
for the purpose of cooling. However, ease-of-access should be considered
when locating the mounting position.
NOTE: For installation, maintenance and service reasons, approximately
8-12 inches [203-305 mm] of clearance is recommended.
Attaching the Mounting Base
If your application is not using the universal mounting bracket (UMB), mount
the mounting base to any flat surface with the two mounting screws provided.
The length of the screws must not be greater than 0.5 inch [12.7 mm] plus
the thickness of the mounting surface.
Use the following diagram as a reference to create a mounting template.
03-AL5010_Mechanical_Installation_R20.doc Accu-Sort Systems, Inc.
Mounting Base Dimensions (not actual size)
Page 36

28 Mechanical Installation AccuLazr™ AL5010 Product Line Manuals
Attaching the Universal Mounting Bracket (UMB)
The Universal Mounting Bracket (UMB) is an optional accessory that
simplifies reader mounting and installation. Included with the bracket is the
necessary hardware to attach it to the mounting structure.
1. When using this option in your application, follow the assembly
instructions provided with the universal-mounting bracket (UMB).
2. Attach the UMB to the mounting structure with the provided hardware.
3. Attach the mounting base to the UMB.
Use the two screws provided with the mounting base.
4. Insert the screws through the UMB into the threaded holes on bottom of
mounting base.
5. DO NOT over-tighten screws. Leave the screws slightly loose to allow for
some movement in the mounting base so that final adjustment of the
reader in relation to scanning area can be made after wiring is
completed.
Accu-Sort Systems, Inc. 03-AL5010_Mechanical_Installation_R20.doc
Attaching Mounting Base to Universal Mounting Bracket (UMB)
Page 37

AccuLazr™ AL5010 Product Line Manuals Mechanical Installation 29
Installing an AL5010 Scan Head
Perform the electrical installation as outlined in Chapter 4. Once all wiring is
checked for accuracy, install the AL5010 scan head to the mounting base.
You can install the scan head with or without the power disconnected from
the mounting base.
To install a scan head:
1. Carefully align the scan head (1) alignment tabs to the mounting base.
This automatically assures the correct scan head-to-mounting base
connector alignment.
2. Gently, press the scan head down until it firmly connects with the
connector in the mounting base (2).
3. Tighten the two captive screws to secure the scan head to the base.
Do not over tighten.
4. Adjust the UMB so the reader’s laser exit window faces the approximate
location of where the bar-coded packages will appear.
03-AL5010_Mechanical_Installation_R20.doc Accu-Sort Systems, Inc.
AL5010 Scan Head Installation on Mounting Base
Page 38

30 Mechanical Installation AccuLazr™ AL5010 Product Line Manuals
Mounting the Trigger Photoeye
The standard photoeye works by bouncing a light beam off a reflector and
detecting when something breaks the path of light. In order for photoeyes to
work properly, make sure the following things are done when mounting the
trigger photoeye option:
Mount trigger and reflector so the reader’s scan beam does not strike
either of them.
Mount a reflector directly opposite the photoeye on the other side of the
conveyor.
Install the reflector within the operating range of the trigger photoeye.
The photoeye must be mounted so the light exit window is perpendicular
to the conveyor, facing the reflector.
The reflector must be mounted perpendicular to the conveyor, facing the
photoeye.
Secure the photoeye and reflector to the mounting brackets with the
hardware provided.
IMPORTANT: The trigger photoeye’s beam (between photoeye and
reflector) must be blocked by a package before the barcode is in position
for scanning. The trigger signal should remain active while the symbol is
being scanned. This does NOT apply to tracking applications.
Accu-Sort Systems, Inc. 03-AL5010_Mechanical_Installation_R20.doc
NOTE: The Trigger Photoeye can also be used in a Start/End Trigger
application as the Start Trigger Photoeye. In this instance, an End Trigger
Photoeye Kit (with DC input module) is also required. An End Trigger
photoeye can only be used with an Enhanced Interface Module.
Page 39

AccuLazr™ AL5010 Product Line Manuals Mechanical Installation 31
Mounting the Tachometer
The tachometer (tach) option outputs a set number of pulses for each wheel
rotation. This tells the AL5010 the precise conveyor speed, allowing it to
determine accurate package position. Tracking allows for multiple boxes to
be in the scanning area at the same time. Barcodes on each box are
decoded and assigned to the correct box. Follow the guidelines below:
Mount the anti-static brush to the tachometer as shown in the drawing
provided with the tach. The anti-static brush provided with the tach must
be installed to assure proper operation.
Mount the tach on the conveyor section where scanning is performed.
Mount the tach on the underside of the conveyor, away from areas
where the conveyor bows downward. A good place to mount the tach is
on one end of the conveyor, underneath the drive shaft.
Make sure the tach assembly angles in the same direction that the
underside of the conveyor travels.
The tach must make good contact with the conveyor.
Use the general mounting kit provided with your system to make
tachometer mounting and setup easier.
03-AL5010_Mechanical_Installation_R20.doc Accu-Sort Systems, Inc.
Tachometer Mounting (anti-static brush not shown)
Tachometer with Anti-Static Brush Installed
Page 40

32 Mechanical Installation AccuLazr™ AL5010 Product Line Manuals
Mounting the Interface Modules
Mechanical installation sequence for AL5010 with either the Basic or
Enhanced Interface Module:
1. Determine the location of the scanning system at the installation site.
2. Erect the mounting frame or other supporting structures.
3. Mark the mounting locations for each:
a. AL5010 Reader
b. Basic or Enhanced Interface Module
4. Attach the Universal Mounting Bracket(s) (UMB) to the frame.
(UMB and mounting frame options are available from Accu-Sort.)
5. Attach the AL5010 Mounting Base to the UMB (or frame, if UMB not
used).
6. Mount the Basic or Enhanced Interface Module. (See below.)
7. Mount the Accu-Sort power supply.
8. Mount the Trigger Photoeye (optional).
9. Mount the Tachometer (optional).
Accu-Sort Systems, Inc. 03-AL5010_Mechanical_Installation_R20.doc
Page 41

AccuLazr™ AL5010 Product Line Manuals Mechanical Installation 33
To mount the Basic Interface Module:
1. Position the basic interface module in the desired mounting position.
(Position the cord grips so they are face down or to the side.)
2. Using a Phillips screw driver, attach with the supplied mounting
hardware.
03-AL5010_Mechanical_Installation_R20.doc Accu-Sort Systems, Inc.
Page 42

34 Mechanical Installation AccuLazr™ AL5010 Product Line Manuals
To mount the Enhanced Interface Module:
1. Position the basic interface module in the desired mounting position.
(Position the cord grips so they are face down or to the side.)
2. Using a Phillips screw driver, attach with the supplied mounting
hardware.
Accu-Sort Systems, Inc. 03-AL5010_Mechanical_Installation_R20.doc
Page 43

AccuLazr™ AL5010 Product Line Manuals Mechanical Installation 35
Mounting the I/O Modules
I/O MODULE APPLICATIONS
OUTPUT MODULES
Activate diverter/sorter for no
read, multi-read, match, or no
match conditions.
Activate device (e.g., beacon
light) to indicate any of the above
conditions.
Activate device for use as a “life
condition’ indicator.
Activate device to follow the
trigger condition.
Activate alarm.
INPUT MODULES
Additional photoeye input for
Start/End Trigger
NOTE: The following input module
applications require custom
software.
Transmit photoeye
Divert Accomplished photoeye
Reboot signal
The Enhanced Interface Module supports four (4) optional input or output
modules that can be used for trigger inputs or to operate diverters, alarms,
etc. The optional I/O modules are not installed at the factory.
I/O Module Location in
Enhanced Interface Module
03-AL5010_Mechanical_Installation_R20.doc Accu-Sort Systems, Inc.
Page 44

36 Mechanical Installation AccuLazr™ AL5010 Product Line Manuals
To install your optional I/O module(s):
1. Remove the cover to gain access to the printed circuit board.
2. The I/O modules may be plugged into locations I/O 1 through I/O 4.
These locations run left-to-right, as shown on the circuit board
silkscreen.
3. Plug the appropriate I/O module directly into the interface module’s
circuit board.
4. Using a screwdriver, secure the I/O module by tightening the captive
screw (that goes through the module) into the circuit board. DO NOT
over-tighten screw.
Accu-Sort Systems, Inc. 03-AL5010_Mechanical_Installation_R20.doc
Installing an I/O Module
Page 45

!""#$%&'()!$*+,+)-'./#"0)$123)4%2#%5! "#$%&'(%)#!*+,&)##)&(-+! ./!
! !
6!))753"0'1"%5)8290%55%01.2)
:!;<8<=>!"#$%&'(%)#!*+,&)##)&(-+!./!01)#(2($3!4$'5(%$!6$%7+(%()+,!
8+#/9!0$1$')#!2'-%$34'$,!(+1-#1$!$52-,4'$!&-!1-#&)6$!(+,(3$!&7$!(+&$'8)%$!
!
9-34#$:!;!&')(+$3!&$%7+(%()+!94,&!2$'8-'9!&7$,$!2'-%$34'$,:!<-!+-&!
)&&$92&!&-!2$'8-'9!)+=!$#$%&'(%)#!(+,&)##)&(-+!2'-%$34'$,!4+#$,,!=-4!)'$!)!
&')(+$3!&$%7+(%()+:!
:!;<8<=>!!"#$#%&$#%'(%)*#$%*#$+,-#&./#%0&$1*%,'*,2#%1"#%345676:!>-!
(+&$'+)#!%-92-+$+&,!-8!&7$!;?@ABA!)'$!8($#3!'$2#)%$)C#$!4+(&,!DEFG,H:!
I2$+(+6!&7$!4+(&!J(##!2-&$+&()##=!$52-,$!&7$!4,$'!&-!$9(&&$3!#),$'!')3()&(-+K!
7(67!1-#&)6$K!)+3!%-4#3!'$34%$!&7$!$88$%&(1$+$,,!-8!&7$!3$1(%$L,!*M!')&(+6:!
:8!;86!<"=8>"!&7$!8)%$2#)&$!8'-9!&7$!,%)+!7$)3!$+%#-,4'$:!I2$+(+6!
&7$!;?@ABA!J(##!)#,-!1-(3!&7$!8)%&-'=!J)'')+&=:)
84-?;@!<@>!N7$!;?@ABA!%-+&)(+,!$#$%&'-+(%,!&7)&!9)=!C$!)88$%&$3!C=!
$#$%&'-,&)&(%!3(,%7)'6$!D"0<H:!N-!2'$1$+&!2$',-+)#!(+O4'=!-'!3)9)6$!&-!&7$!
!
4+(&K!2#$),$!8-##-J!&7$!,)8$&=!2'$%)4&(-+,!)+3!J)'+(+6,!8-4+3!(+!"#$%&'(!):!
E)(#4'$!&-!8-##-J!&7$,$!2'$%)4&(-+,!9)=!1-(3!=-4'!J)'')+&=:!
!
-'3'3A#191039)
P$8-'$!9-4+&(+6!)+=!%-92-+$+&,K!2#$),$!3-!&7$!8-##-J(+6Q!
!! F$)3!)##!(+,&'4%&(-+,!C$8-'$!C$6(++(+6!=-4'!(+,&)##)&(-+:!!
!! <$8(+$!)+3!%-+8('9!&7$!)%%4')%=!-8!=-4'!)22#(%)&(-+L,!'$R4('$9$+&,:!!
!! *'+,'-!&#'!.&$/0$(0!'1'2&(,2$1!-,(,/3!0($-,/3.!%(4+,0'0!,/!5%%'/0,6!78!
!! F$1($J!)##!(+,&)##)&(-+S,2$%(8(%!3')J(+6,:!!
!! F$1($J!)+3!2#)+!&7$!2-J$'!'$R4('$9$+&,!8-'!=-4'!)22#(%)&(-+:!
!! F$1($J!)+3!2#)+!&7$!%-994+(%)&(-+,!'$R4('$9$+&,!8-'!=-4'!)22#(%)&(-+:!
!
@..59);3A#1'3/)))
!! M7(##(2,!0%'$J!<'(1$'!DTBH!
!! E#)&!U$)3!0%'$J!<'(1$'!D,9)##H!
!! V('$!W4&&$',!
!! V('$!0&'(22$',!
!! >$$3#$S+-,$!M#($',!
!
!//101.2%5)82B.'C%01.2)
0$$!)#,-Q!8),-9%:#;#$#'-#%<),2#*!8-'!*+,&)##)&(-+!
!! ;?@ABA!J(&7!P),(%!*+&$'8)%$!X-34#$!DBAAAA/AY@ZH!
!! ;?@ABA!J(&7!"+7)+%$3!*+&$'8)%$!X-34#$!DBAAAA/AY@/H!
!! ",&)C#(,7(+6!;!W-++$%&(-+!&-!&7$!G,$'!*+&$'8)%$!DBAAAA/AY@[H!
!! \$&&(+6!0&)'&$3!J(&7!&7$!G,$'!*+&$'8)%$!DBAAAA/AY@]H!
04-AL5010_Electrical_Installation_R20.doc Accu-Sort Systems, Inc.
!
Page 46

38 Electrical Installation AccuLazr™ AL5010 Product Line Manual
Installation Sequence(s)
NOTE: Everything should be MECHANICALLY INSTALLED before
performing any ELECTRICAL INSTALLATION. See Chapter 3 for
mechanical installation details.
Installing a Single Unit
To install a single unit, follow this sequence of steps:
Complete mechanical installation.
See Chapter 3.
Complete electrical installation.
Ground the mounting structure to protective earth (PE) ground.
Connect AL5010 reader to interface module (two connections).
Connect Ethernet network to interface module.
Connect the power supply to interface module.
Connect trigger to interface module.
Connect tachometer to interface module (Enhanced Interface
Module Only).
Connect serial communications to interface module.
Connect wiring for I/O module(s) to interface module (Enhanced
Interface Module Only).
Install Fieldbus if needed- DeviceNet or Profibus (Enhanced
Interface Module Only).
Attach scan head to mounting base.
NOTE: To reduce the possibility of damage to the scan head, install it after
the interface module is mounted, wired, and all wiring is checked for
accuracy. Be sure to perform the polarity check before attaching the scan
head.
Setup your AL5010.
See Chapter 5.
Check operations.
See Chapter 6.
Accu-Sort Systems, Inc. 04-AL5010_Electrical_Installation_R20.doc
Page 47

AccuLazr™ AL5010 Product Line Manual Electrical Installation 39
Installing Multiple Readers
For electrical installation, multiple-reader networks will require a different
approach to wiring, since the trigger photoeye and tachometer are most likely
being shared by the group of readers.
(See drawing 113492 in Appendix F.)
Special instructions for functional set-up of a multi-reader network are
provided in Chapters 5 and 6.
NOTE: If Tracking, Fieldbus and/or I/O Modules are not needed, an
Enhanced Interface Module is not required.
Multiple Readers with EtherNet Communications
Multiple Readers with Serial Communications
04-AL5010_Electrical_Installation_R20.doc Accu-Sort Systems, Inc.
Page 48

40 Electrical Installation AccuLazr™ AL5010 Product Line Manual
Multiple Readers with a Single Interface Module
General Electrical Installation Guidelines and Precautions
It is important that you follow these general precautions when installing,
setting up, operating, maintaining, troubleshooting or replacing any Accu-Sort
products, parts or related equipment.
CAUTION: The AL5010 use lasers for bar code scanning. Do not view
directly with optical instruments (binoculars or telescopes). Avoid
unintentional exposure to laser light whenever possible.
As you plan and install your AL5010 bar code solution application, be sure to
keep the following guidelines in mind:
Determine the reader is in the proper orientation and position as outlined
in Chapter 3.
Leave adequate clearances (approximately 8-12 inches [203.2-
304.8mm]) for wiring.
The interface modules have several cord grip openings. Seal unused
openings with rubber grommet plugs (units ship with rubber plugs in
place). Remove the grommet plugs when inserting cables. Use cord
grips with rubber grommets on cables that enter the interface module.
Route wires carefully to reduce or minimize electrical noise. The
interface modules are designed so power and communication wiring
should not need to cross.
Accu-Sort Systems, Inc. 04-AL5010_Electrical_Installation_R20.doc
WARNING: To assure no ESD damage will occur, be sure to observe the
precautions outlined in Chapter 2, Safety.
Page 49

AccuLazr™ AL5010 Product Line Manual Electrical Installation 41
Cable and Cord Grip Connections
Determine the wiring connections needed for your application. All permanent
connections are made to the basic or enhanced interface module with either
cables or through cord grips. Be sure to follow Accu-Sort’s wiring
recommendations.
Wiring Recommendations
Connection Recommended Wiring Type Max. Length
Safety Earth
Ground
Power #20 AWG minimum
RS232 #24 AWG minimum 50’ [15.2]
RS422 #24 AWG minimum 1000’ [300]
Ethernet #24 AWG CAT5 UTP (unshielded twisted pair) 330’ [100]
Tach / Trigger #24 AWG minimum
I/O Modules Depends upon module rating. See Appendix A.
NOTE: ALL external wiring must be UL listed or recognized rated VW-1 or FT-1 and
conforming to NEC ANSI/NFPA 70.
Cord Grips Recommended Wiring Diameters
Small Diameter Accommodates 0.138 to 0.276 inches (3.5 to 7.0 mm)
Large Diameter Accommodates 0.177 to 0.394 inches (4.5 to 10.0 mm)
Cable Connections to Interface Module
Where the cabling enters the interface module, use the supplied cord
grips with rubber grommets.
Once all cabling is completed, plug all unused interface module
openings.
For 15-20 Amp branch circuit, use #18 AWG min.
For 16-25 Amp branch circuit, use #14 AWG min.
For 26-32 Amp branch circuit, use #12 AWG min.
Wiring the AL5010 Interface Modules
04-AL5010_Electrical_Installation_R20.doc Accu-Sort Systems, Inc.
IMPORTANT: All unused openings must be plugged to maintain the
Interface Module’s IP54 rating.
Proper Wiring to Terminal Blocks inside Interface Modules
1. If necessary, strip the insulation off the end of wire approximately 1/4”
[6,35mm].
2. Use flathead screwdriver to push the spring-cage terminal block open
until it stops.
3. Insert wire into terminal opening.
4. Allow the screwdriver to release the spring-cage terminal block.
5. Confirm the wire is held firmly in place.
After completing mechanical installation, use this section to properly wire
your AL5010 reader for optimal performance in your application. All wiring
connections are made via a basic or enhanced interface module.
Use the conduit openings for running wires into the interface module. Route
your cabling for power, tachometer, trigger, communications, and I/O through
the recommended conduit openings.
Page 50

42 Electrical Installation AccuLazr™ AL5010 Product Line Manual
Basic Interface Module
Basic Interface Module
Wiring tables, printed on the interface module, help simplify installation.
Accu-Sort Systems, Inc. 04-AL5010_Electrical_Installation_R20.doc
Basic Interface Module Terminal Block Locations
See also: Drawing 113491 in Appendix F.
Page 51

AccuLazr™ AL5010 Product Line Manual Electrical Installation 43
Electrical wiring sequence:
1. SCANNER - Mounting base
(two connections, 15-pin ‘D’ and RJ-45)
2. ETHERNET - Host (Network)
3. COM 1 / COM 2 - Serial communications
4. TRIG – Trigger
5. POWER - Power supply or user-supplied
Cable Jacket Stripping Strip All Wires
COM 1 = 3 1/2”, COM 2 = 3” 1/4”
3 1/2” 1/4”
2 3/4” 1/4”
Wiring Installation Sequence (Connection Panel)
Wiring Installation Sequence (Circuit Board) and TB Wiring Tables
04-AL5010_Electrical_Installation_R20.doc Accu-Sort Systems, Inc.
Page 52

44 Electrical Installation AccuLazr™ AL5010 Product Line Manual
Enhanced Interface Module
Enhanced Interface Module
Wiring tables, printed on the interface module, help simplify installation.
Accu-Sort Systems, Inc. 04-AL5010_Electrical_Installation_R20.doc
Enhanced Interface Module Terminal Block Locations
See also: Drawing 113490 in Appendix F.
Page 53

AccuLazr™ AL5010 Product Line Manual Electrical Installation 45
Electrical wiring sequence:
1. SCANNER - Mounting base
(two connections, 15-pin ‘D’ and RJ-45)
2. ETHERNET - Host (Network)
3. COM 1 / COM 2 - Serial communications
4. FIELDBUS (DeviceNet or Profibus, optional)
5. TRIG – Trigger
6. TACH – Tachometer
7. POWER - Power supply or user-supplied
8. I/O 1 through I/O 4 - I/O module(s) (optional)
Wiring Installation Sequence (Connection Panel)
Cable Jacket Stripping Strip All Wires
COM 1 = 3 1/2”, COM 2 = 3” 1/4”
4 3/8” 1/4”
3 1/2” 1/4”
3 1/4” 1/4”
2 3/4” 1/4”
2 1/2” 1/4”
Wiring Installation Sequence (Circuit Board) and TB Wiring Tables
04-AL5010_Electrical_Installation_R20.doc Accu-Sort Systems, Inc.
Page 54

46 Electrical Installation AccuLazr™ AL5010 Product Line Manual
Power Requirements
IMPORTANT: When planning your installation wiring, remember all power
connections must be quick-disconnect. For PERMANENTLY CONNECTED
EQUIPMENT (i.e., AL5010 using DC power) a readily accessible
disconnect device must be incorporated in the building installation wiring.
For PLUGGABLE EQUIPMENT (i.e., AL5010 using AC power supply with
non-detachable power cord), the socket-outlet must be installed near the
equipment and must be easily accessible.
Power Supply Connections
CAUTION: Follow all safety procedures regarding high-voltage as outlined
in Chapter 2, Safety. No power should be applied to any device until all
wiring is completed and checked for accuracy.
REMEMBER: The socket-outlet must be installed near the AL5010’s
power supply. The outlet must be a readily accessible disconnect device.
Using Accu-Sort Power Supplies
Single Reader The AL5010 reader requires 25 watts (maximum) of power.
The Accu-Sort power supplies are IP54 rated for industrial environments.
The supply includes a power cord for either 125V or 230V applications.
1. Locate the POWER terminal blocks on the interface module.
2. Connect the power supply wiring to the terminal blocks as shown below.
3. Make sure wiring cannot come loose from the terminal blocks.
4. Properly tighten the cord grips.
Accu-Sort Systems, Inc. 04-AL5010_Electrical_Installation_R20.doc
Multiple Readers When a multiple reader application uses Accu-Sort power
supplies, each AL5010 is powered by a separate power supply. DO NOT
connect power supplies in parallel. (See drawing in Appendix F.)
Power Connections Using Other Power Supplies
IMPORTANT: All non Accu-Sort power supplies, whether for single or
multiple reader applications, must be an LPS or Class 2 power supply. The
supply must provide 25 watts (10-28 VDC) of power to each AL5010.
Page 55

AccuLazr™ AL5010 Product Line Manual Electrical Installation 47
Trigger Connections
The AL5010 supports three trigger mode
s: hardware, software, and
continuous. When using hardware trigger, one or more input signals “trigger”
the reader. Software trigger is accomplished by sending a specific ASCII
message via serial or network communications. Continuous trigger requires
no external trigger.
When a hardware trigger (i.e., package detector) is required, Accu-Sort’s
retro-reflective photoeye (PN 100020569) is recommended.
Wiring Trigger to the Enhanced Interface Module
Connect trigger wiring to the interface module terminal blocks.
Wire the Accu-Sort photoeye as shown below.
Enhanced Interface Module Basic Interface Module
In applications using a photoeye other than the Accu-Sort standard, follow
the TRIGGER wiring table to assure proper wiring. The trigger must be able
to operate using the +24V DC source (24V) and not draw more than 100mA.
The trigger input must be able to sink (or source) 10mA at +24V DC.
NOTE: To confirm the Trigger photoeye is functioning properly, watch the
Trigger LED while the photoeye’s beam is blocked. (See Chapter 5 for
details.) The Accu-Sort photoeye also includes a status LED.
Multiple Readers In con
troller/client applications, wire the trigger
photoeye
to the AL5010 set up as the controller. (See drawing in Appendix F.)
04-AL5010_Electrical_Installation_R20.doc Accu-Sort Systems, Inc.
Page 56

48 Electrical Installation AccuLazr™ AL5010 Product Line Manual
Tachometer Connections
In applications where product tracki
ng is required, a tachometer is typically
used. When a tachometer is required, the Accu-Sort tachometer is
recommended. Connect the tachometer wiring to the interface module
terminal blocks.
Wiring Tachometer to the Enhanced Interface Module
WARNING: The maximum tachometer current should not be more than
0.3 amps @ 24 volts.
If your application uses a tachometer other than the one available from AccuSort, follow the TACH wiring table to assure proper wiring.
Multiple Readers In controller/client applications, wire the tachometer to
the AL5010
set up as the controller. (See drawing in Appendix F.)
Accu-Sort Systems, Inc. 04-AL5010_Electrical_Installation_R20.doc
Page 57

AccuLazr™ AL5010 Product Line Manual Electrical Installation 49
Serial Communications Connections (COM1 and COM2)
The interfa
ce module provides an
RS232/RS422 terminal block for serial
point-to-point communications. Typically, network communications will use
Ethernet.
04-AL5010_Electrical_Installation_R20.doc Accu-Sort Systems, Inc.
Enhanced Interface Module Basic Interface Module
Serial Communications Wiring (RS232/422)
RS232 Connections
Use RS232 for a direct connection to a controller, personal computer, or
other device. RS232 provides point-to-point communications at distances up
to 50 feet (15.2 meters). If longer cable lengths are needed, use RS422.
RS232 connections are made to the COM1 and COM2 terminal blocks.
Follow the SERIAL COM / RS232 wiring table to assure proper wiring.
Page 58

50 Electrical Installation AccuLazr™ AL5010 Product Line Manual
IMPORTANT: Before attempting to use RS232 communications with
RTS/CTS, contact Accu-Sort Customer Service for additional information.
RS422 Connections
Use RS422 for a direct connection to a controller, personal computer, or
other device. RS422 provides point-to-point communications at distances up
to 1000 feet (300 meters). RS422 connections are made to the COM1 and
COM2 terminal block. Follow the SERIAL COM / RS422 wiring table to
assure proper wiring.
Line Termination The end devices on an RS422 point-to-point connection
must be terminated. A termination resistor is pre-installed in the interface
module. The HOST end of the connection must also be terminated using a
120-ohm resistor between the RECEIVE+ and RECEIVE- terminals.
Ethernet Communications Connections
Use Ethernet for network/host communications or multiple-reader networks.
Ethernet communications cabling can be run up to 330 feet (100 meters).
Ethernet connections are made to the Network connector on the Interface
Module’s connector panel.
Ethernet Connections to Basic Interface Module
NOTE: To simplify network installations, Accu-Sort offers these options:
CAT 6 network cables (7 and 15 ft. lengths)
a 5-port Ethernet switch (dual speed 10/100) and
an 8-port dual speed Ethernet switch (10/100).
Accu-Sort Systems, Inc. 04-AL5010_Electrical_Installation_R20.doc
Multiple Readers Most multi-reader applications will use Ethernet or
EtherNet/IP communications. See drawing 113492 in Appendix F for wiring
details.
Page 59

AccuLazr™ AL5010 Product Line Manual Electrical Installation 51
I/O Module Connections
The Enhanced Interface Module supports up to four (4) optional input or
output (I/O) modules. The modules listed in the table below may be used.
These modules function like switches; they do not supply a voltage.
(See Appendix A.)
Connect I/O wiring to the correct terminal blocks. When using DC modules,
observe the polarity of the connections illustrated on the circuit board.
I/O Module Wiring
Available I/O Modules for use with AL5010
Description Color Rating Current Range Part Number
1000056135 DC Input Module white 3.3 to 32 VDC 32 mA
1000056136 DC Output Module red 3 to 60 VDC 3 A max. *
1000056137 AC Output Module black 12 to 42 VACPeak 3 A max. *
NOTE: Relay modules
also meet the requirements for Class 2.
* Derate 33mA/deg above 25C.
are only for connection to SELV, LPS power source and shall
See also: Drawing 113490 in Appendix F.
04-AL5010_Electrical_Installation_R20.doc Accu-Sort Systems, Inc.
Page 60

52 Electrical Installation AccuLazr™ AL5010 Product Line Manual
Output Module Application
Shown below is a typical output module application. When connecting high
impedance loads, you may need to add a resistor in parallel with the load.
This resistor (typically 300 to 6,000 ohms) provides a continuous minimum
current flow (10 mA DC or 50 mA AC) through the output module in the
closed state.
Output Module TB
+
Recommended
-
Fuse
Load
Optional Re sistor
-+
AC or DC Source
Optional Resistor for High Impedance Loads
Back
Electromotive Force (EMF) is sometimes generated when an
inductive load is switched off. Back EMF may damage the output module. A
diode in parallel with the inductive device dissipates the back EMF.
Inductive
Load
Optional Diode
Output Module TB
-
+
Fuse
Recommended
-+
DC Source
Optional Diode to Dissipate Back EMF
An example output module appli
cation is the use of a Stack Light. The
AL5010 would use three output modules to send signals to the stack light to
visually indicate specific conditions (e.g., green = read, yellow = multiple
codes, red = no read). (See drawing in Appendix F.)
Input Module Application
Input module 1000056135 is most often used for an End Trigger Photoeye
application. (See drawing 113490 sheet 3 in Appendix F.)
NOTE: Any other input module application requires custom software.
Contact Accu-Sort Customer Service for more information.
Accu-Sort Systems, Inc. 04-AL5010_Electrical_Installation_R20.doc
Page 61

AccuLazr™ AL5010 Product Line Manual Electrical Installation 53
DeviceNet
Profibus
Connecting the AL5010
Once all wiring is completed and checked for accuracy, connect the AL5010
Reader’s cable connections to the Interface Module. (See Wiring the
Interface Modules in this chapter.) You can install the scan head with or
without the power disconnected from the interface module. (See Installing the
Scan Head in Chapter 3.)
04-AL5010_Electrical_Installation_R20.doc Accu-Sort Systems, Inc.
Page 62

54 Electrical Installation AccuLazr™ AL5010 Product Line Manual
Wiring to the AL5010 without an Interface Module
AL5010 Pin-Out Table
See also: Drawing 113493 in Appendix F.
Accu-Sort Systems, Inc. 04-AL5010_Electrical_Installation_R20.doc
Page 63

AccuLazr™ AL5010 Product Line Manual Electrical Installation 55
Check Installation
After completing the installation of your AL5010:
Confirm that the reader has been properly installed mechanically and
electrically. Use the Installation Sequence at the beginning of this
chapter and your application specifications to check your installation.
Configure the reader’s parameters to meet the needs of your application.
(See Chapter 5 and online help for details.)
See Chapter 5 and 6 for details regarding first-time startup and an
operations checklist.
Check installations using Basic Interface Module:
1. Apply power to the interface module.
2. Check the following:
Power ‘on’ (POWER LED)
Trigger photoeye operation (TRIGGER LED)
3. Finger-tighten all water-tights.
4. Install cover.
5. Tighten four Phillips screws.
Do not over tighten.
04-AL5010_Electrical_Installation_R20.doc Accu-Sort Systems, Inc.
Page 64

56 Electrical Installation AccuLazr™ AL5010 Product Line Manual
Check installations using Enhanced Interface Module:
1. Plug in the power supply.
2. Check the following:
3. Power ‘on’ (POWER LED)
Trigger photoeye operation (TRIGGER LED)
Tachometer operation (TACH LED)
Serial communications, receive data
(RX1, RX2 LEDs)
Input Relay (if applicable, I/O 1 LED).
4. Finger-tighten all water-tights.
5. Install cover.
6. Tighten four Phillips screws.
Do not over tighten.
Accu-Sort Systems, Inc. 04-AL5010_Electrical_Installation_R20.doc
Page 65

AccuLazr™ AL5010 Product Line Manual Setup 57
5 Setup
Getting Started
The AL5010 line of laser bar code readers is designed for ease-of-setup,
allowing you to program a reader to fit your application seamlessly.
AccuLazr
the tool you will use to define operating parameters, determine bar code read
quality, and construct output messages, including filtering, stripping and
padding capabilities. AccuLazr User Interface enables you to easily
configure, fine-tune, and monitor your AL5010’s operations.
AccuLazr User Interface provides ease-of-use for any operator level. A
beginner operator follows basic setup procedures for a standard
configuration. More experienced operators may use the advanced setup
features that allow access to more complex options.
Prerequisites
Before setting up your AL5010 will need the following:
™
User Interface for AL5010 is a browser-based application. It is
• Computer: Laptop or desktop
• Browser: Internet Explorer 7 or Firefox 3.6 (or later)
• Java: Version 6.0.210 (or later)
05-AL5010_Setup_R20.doc Accu-Sort Systems, Inc.
Page 66

58 Setup AccuLazr™ AL5010 Product Line Manual
Starting the AccuLazr User Interface
To start the AccuLazr™ User Interface software in the Windows
environment:
1. Open your web browser and enter the IP address for your AL5010 unit. If
the correct IP address is entered, the AL5010 Login screen will appear
(If you don’t know the IP address, see Discovering the IP Address in
Chapter 8.)
The default IP address is: 192.168.3.100
2. Enter the User ID and Password for your system in the fields provided.
3. Click Log On. The Home screen appears. 0.
Accu-Sort Systems, Inc. 05-AL5010_Setup_R20.doc
Page 67

AccuLazr™ AL5010 Product Line Manual Setup 59
AccuLazr User Interface Basics
AccuLazr™ User Interface Menu Tree
The functions that you can select are displayed
in a navigation list on the left–hand side of the
AccuLazr™ User Interface. The function list is
organized much like the hierarchy of a file
system, where you can expand items that begin
with a plus sign (+) to further sub–levels until
you find a function of interest.
Sub–levels appear indented below the items
from which they are expanded. Items that are
expanded are preceded by a minus sign (–).
You can expand no further when an item
displays neither a plus or minus sign.
The AccuLazr™ User Interface menu tree
appears with no items expanded. Click the
folders to display the active window for the
setup function and/or expand the folders to
view any additional setup features.
Getting Help
AccuLazr™ User Interface provides complete online help.
To display help for a current window:
Choose Help Index from the Help drop-down menu or press the
the top of the screen. A help window appears, providing you with information
and an index of topics associated with the current application window.
Click on a topic of interest to display more detailed information.
You can use the menus or buttons in the help window to navigate to other
topics of interest, or from the File menu in the help window, you can choose
Exit to quit from Help.
icon at
05-AL5010_Setup_R20.doc Accu-Sort Systems, Inc.
Page 68

60 Setup AccuLazr™ AL5010 Product Line Manual
Modify Settings
Use the Modify Settings menu tree selections during initial setup to configure
your AL5010 Laser Bar Code Reader. If necessary, you can later make
modifications to the reader’s configuration using the same menu selections,
including:
• Configuration
• Bar Codes / Bar Code Groups
• Modulo Checks
• Stripping and Padding
• Match Codes
• Serial Communications
• Network Communications
• Message Definitions
• Trigger
• Relay
• Tracking
• FAST Monitor Setup
• Advanced Settings
• Raster
Accu-Sort Systems, Inc. 05-AL5010_Setup_R20.doc
Page 69

AccuLazr™ AL5010 Product Line Manual Setup 61
Modify Settings > Configuration
Use Configuration to identify and configure an AL5010 bar code reader. This
includes access to reader information as well as configuration options (scan
rate, control panel and network access).
To set the reader Configuration:
1. Click in the Reader Name entry field and enter a unique reader name up
to 15-characters in length. Use of unique reader names is especially
useful in multiple scanner applications.
2. Adjust the scan rate, if necessary.
3. Enable Trigger/Track Controlled Laser, if required by your application.
4. Set the Units of measure for either ENGLISH or METRIC.
5. Assign a unique Username and Password.
6. Click Update. 0.
CAUTION: Changing the scan rate can adversely affect
reader performance. Do not change the scan rate unless
instructed to do so by Accu-Sort Technical Support.
See also: Modify Settings > Configuration in Appendix C.
05-AL5010_Setup_R20.doc Accu-Sort Systems, Inc.
Page 70

62 Setup AccuLazr™ AL5010 Product Line Manual
Modify Settings > Bar Codes
Use Bar Codes to define the symbologies the AL5010 should read for your
application. Modulo check verification within a bar code can also be
specified. Create bar code groups, if needed.
Bar Code Groups
When more than one bar code type is in the Selected Symbologies list, the
Bar Code Groups tab is available. This enables you to define the valid
“groups” of bar codes that are to be transmitted together.
For example, in the Modify Settings > Bar Codes, Bar Code Group tab
shown here, the reader is configured to transmit EITHER:
• Group 1: a code 128 bar code, or
• Group 2: both an Interleaved 2 of 5 code and a Code 39 code.
To add a bar code using Learn Bar Code:
1. Click Learn. The Bar Code Learn screen is displayed.
2. Hold the bar code (as illustrated in the user interface) within the reader’s
depth of field. The reader will attempt to read the bar code for three
minutes to 'learn' all codes in the scan line. After three minutes, the
reader will stop the learn operation. If necessary, click Cancel Learn to
stop Learn Bar Code.
NOTE: When one code is in the scan line, it must be saved
after Learn before another code can be “Learned.”
3. Once the reader has finished ‘learning’ it displays a list of all codes
including the code data.
4. If no codes are found within three minutes, the Learn Bar Code function
will end.
5. Use the checkboxes to select any of the codes learned to the Selected
Symbologies list. 0.
Click ‘Add’. The codes will be added to the Selected Symbologies list.
NOTE: The reader can learn multiple bar codes appearing in
the scan line at the same time.
REMEMBER: These 'learned' codes that are added to
Selected Symbologies will only be added to the reader's
functional parameters after clicking Update. Use the Save to
Reader function (found on the Save/Retrieve screen) to save
the parameters for continuous use.
Accu-Sort Systems, Inc. 05-AL5010_Setup_R20.doc
Page 71

AccuLazr™ AL5010 Product Line Manual Setup 63
To add a bar code manually:
1. To add a bar code, go to the Modify Settings > Bar Code screen.
2. Be sure you know the parameters for the symbology you are adding to
your active list.
3. Select the symbology from the Code Type drop-down list.
4. Assign a unique Code Label, if necessary.
5. Define the minimum and maximum code length.
6. Define the minimum and maximum quantity.
7. Select the Modulo Check.
8. Enter a Filter, if required.
9. Click Add. The code added will appear in the Selected Symbologies list
highlighted in yellow.
10. Click Update. 0.
To edit a bar code:
1. To edit a bar code, go to the Modify > Bar Code screen.
2. Select an option button to highlight any Symbology listed under Selected
Symbologies that you want to edit.
3. To change any of the settings (e.g. Code Label, Min/Max Length,
Min/Max Quantity, Modulo Check, Extension), click in the field and make
the required changes.
4. Click Update and then click the save icon (
).
To move a bar code:
5. To move a bar code, go to the Modify > Bar Code screen.
6. Select an option button to highlight any Symbology listed under Selected
Symbologies that you want to move.
7. Click Move Up to move the selected bar code toward the top (beginning)
of the list.
8. Click Move Down to move the selected bar code further back (toward
the end) of the list.
9. Any changes are highlighted in the list.
10. Click Update and then click the save icon (
NOTE: Bar code data is transmitted in the order that they
appear in the Selected Symbologies list.
).0.
05-AL5010_Setup_R20.doc Accu-Sort Systems, Inc.
To remove a bar code:
1. To remove a bar code, go to the Modify > Bar Code screen.
2. Select an option button to highlight any Symbology listed under Selected
Symbologies that you want to remove.
3. Click Remove to delete the selected bar code from the list.
4. Click Update. 0.
Page 72

64 Setup AccuLazr™ AL5010 Product Line Manual
To create a bar code group:
1. Go to the Bar Code Groups tab.
(This tab becomes available when two or more codes are available
under Selected Symbologies.)
2. Create Group 1 by clicking the checkbox for the codes to be included in
the group.
3. Create any additional groups required.
4. Click Update. 0.
See also: M
odify Settings > Bar Codes in Appendix C.
Accu-Sort Systems, Inc. 05-AL5010_Setup_R20.doc
Page 73

AccuLazr™ AL5010 Product Line Manual Setup 65
Modify Settings > Modulo Checks
Use the Modulo Checks screen to setup the user defined modulo checks for
any bar code symbologies that you have specified need them. If you selected
a User Defined Modulo Check while in the Modify Settings > Bar Codes
setup screen, you will need to define it on the Modulo Checks screen.
To set a user defined modulo check for a bar code:
If a bar code requires a User Defined Modulo Check as defined on the Bar
Codes page, go to the Modify Settings > Modulo Checks page.
1. Find the correct modulo check row (i.e., User Defined 1 through 5) for
the code.
2. Set the Factor.
3. Set a Divisor.
4. Select Remain, if required.
5. Select Right, if required.
6. Select Wrap, if required.
7. Repeat as necessary for all codes with a user defined modulo check.
8. Click Update. 0.
See also: Modify Settings > Modulo Checks in Appendix C.
05-AL5010_Setup_R20.doc Accu-Sort Systems, Inc.
Page 74

66 Setup AccuLazr™ AL5010 Product Line Manual
Modify Settings > Stripping/Padding
For each symbology type (defined in Modify Settings > Bar Codes),
stripping and/or padding of the bar code data can be specified. This stripping
and padding is applied to the bar code before any message formatting.
NOTE: Character stripping is applied before character
padding.
To set the character stripping for a bar code:
1. Select the bar code from the Available Bar Codes drop-down list.
2. Click on the required character stripping option.
3. Proceed to character padding if required.
4. Click Update when finished.
To set the character padding for a bar code:
5. Select the bar code from the Available Bar Codes drop-down list.
6. Click on the required character padding option.
7. Make the necessary entry based on the padding option selected.
8. Click Update. 0.
See also: Modify Settings > Stripping/Padding in Appendix C.
Accu-Sort Systems, Inc. 05-AL5010_Setup_R20.doc
Page 75

AccuLazr™ AL5010 Product Line Manual Setup 67
Modify Settings > Match Codes
Use Modify Settings > Match Codes to define a specific code pattern within
a symbology type that is to be considered a "match condition".
In addition to identifying and reading a symbology you defined (using Modify
Settings > Bar Codes), this feature enables you to configure a reader to
match specific select characters within a bar code.
All bar codes are compared to the complete list of Match Codes. If a bar
code matches ANY of the codes defined in Match Code settings, it is
considered a MATCH. When a match code is read, you can setup your
reader to:
• fire a relay output (Example: Activate a diverter)
• send a user-defined message (Example: Acknowledge match code
found)
The following wildcards are available:
• "*" represents a string with arbitrary length
• If you enter 9* and the AL5010 reads bar code data 91234567890,
then the AL5010 will transmit a valid read to the host because the
leading 9 matches the pre-defined match character. The rest of the
characters in the bar code are not effected because the asterisk
wildcard instructs the AL5010 that the 9 is the only character that
need to be matched.
• If the AL5010 reads bar code data 01234567890 then the AL5010
will transmit a no read because the leading 0 in the bar code did not
match the pre-define 9.
• "?" represents a single character
• With this condition, the AL5010 will ignore the character located in
the designated location in the data string and only match the
identified data.
See also: Modify Settings > Match Codes in Appendix C.
NOTE: If ANY match code pattern is set to “*” ALL codes will
match it.
05-AL5010_Setup_R20.doc Accu-Sort Systems, Inc.
Page 76

68 Setup AccuLazr™ AL5010 Product Line Manual
Modify Settings > Serial Communications
Use the Serial Communications menu tree selections to set the serial port
connection parameters including:
• Baud Rate
• Data Bits
• Stop Bits
• Parity
• Flow Control
• Message Format
Individual settings can be made for Serial Port 1 and Serial Port 2. If the User
Defined Message format is selected, an addition tab screen is supplied for
creating unique message definitions.
Serial Port 1 and 2
Use Modify Settings > Serial Communications > Serial Port 1 (or 2) to
define the format of message the reader sends to your host computer (or
other device) connected to Serial Port 1 (or 2).
To set or modify the communications parameters for Serial Port #1:
1. Go to the Serial Communications Port#1 screen.
2. Click a Baud Rate option group button.
3. Click a Data Bits option group button.
4. Click a Stop Bits option group button.
5. Click a Parity option group button.
6. Click a Flow Control option group button.
7. Select a Message Format from the drop-down list.
8. Click Update. 0.
Message Definitions
When any option, other then the Standard Message selection, under the
Message Format item is selected a Message Definition tab is made
available.
Creating User-defined Messages
NOTE: Use the same procedure to create user-defined
messages for both the serial (Modify > Serial Communications
Port #1 or Port #2) and network communications (Modify >
Network Settings).
Accu-Sort Systems, Inc. 05-AL5010_Setup_R20.doc
Page 77

AccuLazr™ AL5010 Product Line Manual Setup 69
To create user-defined messages:
Under Message Format, select User Defined Message.
A Message Definitions tab becomes available. For the serial port, select
Message Definitions – Port #1(or 2) (example shown below). For network
communications, select Message Definitions – Net#1(or 2).
To define message framing:
Header - Character string specified for the header. Sent at beginning of
every message.
Trailer - Character string specified for the trailer. Use to terminate every
message.
Seq # - When enabled, a sequence number consisting of the specified
number of digits is inserted just after the header.
Check Digit - When enabled, a two-character hexadecimal check character
is inserted just prior to the trailer.
Include Multi-Bar code in single message (checkbox) - Affects how the
reader handles multiple bar code transmissions. If enabled, the bar codes
are sent in one message (between one header and trailer) and each bar
code is separated by the specified “separator.” If disabled, all bar codes are
always sent as a complete message (with a header and trailer).
Bar Code Separator - String used to separate multiple bar codes (see above.
Power Up/Connect Message - String that is always sent on reader
initialization. Note that for a Network connection, this string is always sent
when the socket connection is made.
To define Serial Port 1 message content:
The message drop-down lists define the message options for each bar code.
The message content can be defined for transmissions from the reader’s
serial port #1 as well as any network connection (via Net#1). These
messages are based on various conditions. For each condition, there are
options for what message can be sent. These options include:
Send Bar Code - Bar code (with padding and/or stripping) is sent.
Repeat Character - Send a message consisting of the specified character
repeated for the minimum number of characters for the bar code (example is
“???????” no-read message).
User Specified Message - Send a message defined string for this condition.
Category 1: Read, No Read, or Multiple Bar Code
These three conditions are mutually exclusive, so only one of these three
messages can be sent for any bar code.
05-AL5010_Setup_R20.doc Accu-Sort Systems, Inc.
Read - If disabled, nothing is sent for a valid read; otherwise either the bar
code or a user specified message is sent.
No Read - If disabled, nothing is sent for a no-read; otherwise either the
specified “repeated character” or the user specified message is sent.
Page 78

70 Setup AccuLazr™ AL5010 Product Line Manual
Multiple Bar Code - If disabled, a multiple bar code condition will be reported
as a “Read” of the first bar code reported. Otherwise, the specified
“repeated character” or the user-specified message is sent.
Category 2: Match, No Match, No Match Read
These conditions are IN ADDITION to the conditions specified in Category 1.
If a condition in both categories is met, these messages will be appended. If
you desire to only generate a message based on Category 2 conditions, all
messages in Category 1 should be disabled.
Match - If the bar code matches any of the match codes, this message is
sent. Options include sending the bar code or a user specified message.
No Match - If the bar code does not match any of the match codes (or was a
no-read), this message is sent. Options include sending a “repeated
character” or a user specified message.
No Match Read - If a valid bar code was read, but it does not match any of
the match code, this message is sent. Options include sending the bar code
or a user specified message.
Category 3: Append QQ, Heart Beat Message, and Heart Beat Timeout
Append QQ (code quality) to message (checkbox) - When selected a two
digit “code quality” indication (number from 00 to 99) is appended to the bar
code message. The code quality value is separated from the message with
the specified separator.
Heart Beat Message - When enabled, if no other message is sent for the
time period specified in Heart Beat Time Out, the specified heart beat
message string is sent. A time-out of zero disables the heart beat message.
Heart Beat Time Out (0-30,000 ms) - 0 = Disable Heart Beat Message, 130,000 = Delay before sending Heart Beat Message
Append Distance to Message - allows the AL5010’s measured approximate
distance from the scanner to the bar code read to be in the transmitted
message.
See also: Modify Settings > Serial Communications in Appendix C.
Accu-Sort Systems, Inc. 05-AL5010_Setup_R20.doc
Page 79

AccuLazr™ AL5010 Product Line Manual Setup 71
Modify Settings > Network
Use Modify Settings > Network to specify network settings (including the
IP address) for the reader. Currently, the reader can only be configured to
use a Static IP address. Net Host Port1 and Net Host Port2 define two
network connections for sending bar code messages. The Connection Type
and Message Format for each port can be set independently. Message
formatting is the same as for the serial port.
• IP Address - An IP address specifies a unique host ID for the
reader on a particular TCP/IP network. Consult your network
administrator for a valid IP address for the reader.
• Net Mask - A netmask modifies a standard IP address into subnets.
A default net mask should be valid in most cases (255.255.255.0).
Consult your network administrator for the net mask value.
• Gateway IP Address - A gateway allows the reader to reach other
systems not on the local network and remote systems to reach the
reader. If the reader requires external connectivity, consult your
network administrator for a valid gateway address.
Net Host Port 1 or 2
Connection Type
The following connection types are available for each network port:
• TCP/IP Server: As a TCP/IP server, a Port # must be specified. In
this case it is the TCP/IP client’s responsibility to initiate a reader
connection.
• TCP/IP Client: As a TCP/IP client, aside from the Port #, the Remote
IP Address of the TCP/IP server which is to receive the barcode
messages must be specified. The Reconnect Time specifies the
interval (in seconds) at which the reader attempts to establish a
connection.
• UDP Messaging: In some instances, it may be desirable to use a
connectionless UDP message to send bar code data. In this case,
only the Port # and Remote IP Address of the receiver need to be
specified.
• EtherNet/IP (Net Host Port 1 only): This enables use of the
EtherNet/IP protocol on the reader.
• Message Format - There are four message format options: Custom
Message, Standard Message, User Defined Message, and MUX
(ADP) Message.
05-AL5010_Setup_R20.doc Accu-Sort Systems, Inc.
Controller/Client Configuration
Number of Client Readers - The number of client readers in a multi-reader
network must be defined on the reader acting as the Controller. Drop-down
list selectable for up to 14 readers functioning as “Clients”. Client readers
must be set at zero (0).
Group Number - All readers in a Controller/Client group (both the Controller
and ALL Clients) must be set to the same controller group number. The
default of zero (0) disables a reader from listening for messages to become a
client.
Page 80

72 Setup AccuLazr™ AL5010 Product Line Manual
Ethernet Link
Drop-down list with 5 selections: AutoDetect, 100 Mbps/Full Duplex, 100
Mbps/Half Duplex, 10 Mbps/Full Duplex, 10 Mbps/Half Duplex
• Controller Multicast IP Address: This is the IP address used by
this controller to communicate to its Group (Identified by the Group
No.) to broadcast such messages as tach and trigger.
NOTE: This IP address should not be changed.
• Telnet Port: The port number used to Telnet into the AL5010.
Message Definitions
Whenever you specify a user-defined message format for either serial port
#1 or network settings, Message Definitions become available
Creating User-defined Messages
NOTE: Use the same procedure to create user-defined
messages for both the serial (Modify > Serial Communications
Port #1) and network communications (Modify > Network
Settings).
To create user-defined messages:
Under Message Format, select User Defined Message.
A Message Definitions tab becomes available. For the serial port, select
Message Definitions – Port #1 (example shown below). For network
communications, select Message Definitions – Net#1.
To define message framing:
Header - Character string specified for the header. Sent at beginning of
every message.
Trailer - Character string specified for the trailer. Use to terminate every
message.
Seq # - When enabled, a sequence number consisting of the specified
number of digits is inserted just after the header.
Check Digit - When enabled, a two-character hexadecimal check character
is inserted just prior to the trailer.
Include Multi-Bar code in single message (checkbox) - Affects how the
reader handles multiple bar code transmissions. If enabled, the bar codes
are sent in one message (between one header and trailer) and each bar
code is separated by the specified “separator.” If disabled, all bar codes are
always sent as a complete message (with a header and trailer).
Bar Code Separator - String used to separate multiple bar codes (see above.
Accu-Sort Systems, Inc. 05-AL5010_Setup_R20.doc
Power Up/Connect Message - String that is always sent on reader
initialization. Note that for a Network connection, this string is always sent
when the socket connection is made.
Page 81

AccuLazr™ AL5010 Product Line Manual Setup 73
To define Serial Port 1 message content:
The message drop-down lists define the message options for each bar code.
The message content can be defined for transmissions from the reader’s
serial port #1 as well as any network connection (via Net#1). These
messages are based on various conditions. For each condition, there are
options for what message can be sent. These options include:
Send Bar Code - Bar code (with padding and/or stripping) is sent.
Repeat Character - Send a message consisting of the specified character
repeated for the minimum number of characters for the bar code (example is
“???????” no-read message).
User Specified Message - Send a message defined string for this condition.
User Specified Message - Send a message defined string for this condition.
Category 1: Read, No Read, or Multiple Bar Code
These three conditions are mutually exclusive, so only one of these three
messages can be sent for any bar code.
Read - If disabled, nothing is sent for a valid read; otherwise either the bar
code or a user specified message is sent.
No Read - If disabled, nothing is sent for a no-read; otherwise either the
specified “repeated character” or the user specified message is sent.
Multiple Bar Code - If disabled, a multiple bar code condition will be reported
as a “Read” of the first bar code reported. Otherwise, the specified
“repeated character” or the user-specified message is sent.
Category 2: Match, No Match, No Match Read
These conditions are IN ADDITION to the conditions specified in Category 1.
If a condition in both categories is met, these messages will be appended. If
you desire to only generate a message based on Category 2 conditions, all
messages in Category 1 should be disabled.
Match - If the bar code matches any of the match codes, this message is
sent. Options include sending the bar code or a user specified message.
No Match - If the bar code does not match any of the match codes (or was a
no-read), this message is sent. Options include sending a “repeated
character” or a user specified message.
No Match Read - If a valid bar code was read, but it does not match any of
the match code, this message is sent. Options include sending the bar code
or a user specified message.
Category 3: Append QQ, Heart Beat Message, and Heart Beat Timeout
Append QQ (code quality) to message (checkbox) - When selected a two
digit “code quality” indication (number from 00 to 99) is appended to the bar
code message. The code quality value is separated from the message with
the specified separator.
05-AL5010_Setup_R20.doc Accu-Sort Systems, Inc.
Heart Beat Message - When enabled, if no other message is sent for the
time period specified in Heart Beat Time Out, the specified heart beat
message string is sent. A time-out of zero disables the heart beat message.
Heart Beat Time Out (0-30,000 ms) - 0 = Disable Heart Beat Message, 130,000 = Delay before sending Heart Beat Message
See also: Modify Settings > Network in Appendix C.
Page 82

74 Setup AccuLazr™ AL5010 Product Line Manual
Modify Settings > Trigger
The trigger helps the reader identify when products with bar codes are
entering the scanning area. Use Modify Settings > Trigger Settings to set
the various trigger parameters.
Trigger Source
There are three options for trigger source:
• Hardware Trigger
• Software Trigger
• Continuous Trigger
Since the trigger parameters vary based on trigger type selected, the trigger
parameter options have been defined within the context of the specific trigger
source.
See also: Modify Settings > Trigger in Appendix C.
Accu-Sort Systems, Inc. 05-AL5010_Setup_R20.doc
Page 83

AccuLazr™ AL5010 Product Line Manual Setup 75
Modify Settings > Relay
Use to define functionality of any I/O relay module options utilized by your
reader. For additional information and field descriptions, see Modify
Settings > Relay in Appendix C.
To configure an I/O relay:
1. Select the intended use of the relay (output or input).
2. Select the intended purpose for the relay.
3. Set for either Active High or Active Low.
4. For relay outputs, set an output signal duration.
5. After configuring the relays, click Update.
05-AL5010_Setup_R20.doc Accu-Sort Systems, Inc.
Page 84

76 Setup AccuLazr™ AL5010 Product Line Manual
Modify Settings > Tracking
Use tracking in application that require:
• Tight package spacing
• Transmit point is greater than the "smallest box + minimum box
spacing" distance.
Use Modify Settings > Tracking to define all of the parameters associated
with monitoring package travel on the conveyance system. The tracking
parameters are only available if tracking is enabled, otherwise they are not
shown in this window.
To enable tracking:
1. Click in the Tracking Enabled checkbox. When tracking is enabled, a
checkmark appears in the checkbox and the tracking parameter settings
are visible in the Modify Settings > Tracking screen.
2. Adjust the tracking settings for Tachometer (Encoder), Reader Mounting,
Transmit, and Tracking Configuration.
3. Click Update. 0.
See also: Modify Settings > Tracking in Appendix C.
Accu-Sort Systems, Inc. 05-AL5010_Setup_R20.doc
Page 85

AccuLazr™ AL5010 Product Line Manual Setup 77
Modify Settings > FAST Monitor
™
FAST Monitor is a browser-based application, running on a FAST Monitor
Server, that gives facility managers and maintenance personnel the ability to
monitor multiple Accu-Sort products within their facility or across multiple
facilities from anywhere an internet connection is available. FAST Monitor
provides real time and historical performance data in an easy to use browser
interface as well as automatic status and error condition reporting of all
Accu-Sort products and systems to which it is connected.
Use the FAST Monitor screen to configure an AL5010 reader for FAST
Monitor message format compatibility. For additional information and field
descriptions, see Modify Settings > FAST Monitor in Appendix C.
NOTE: For more information on FAST Monitor functionality,
see the FAST Monitor Product CD, online help or contact us at
1-800-BAR-CODE.
To Configure an AL5010 reader for FAST Monitor messaging:
1. On the Modify Settings > Configuration screen, confirm a unique
Reader Name is set.
2. On the Modify Settings > Network screen, confirm the reader is
properly set as either the Controller or a Client.
3. Go to the Modify Settings > FAST Monitor screen.
4. Under Tunnel Information, assign a Tunnel Name.
5. Select the Reader Position from the drop-down menu. Reference the
illustration for relative positions.
6. If the reader is a standalone unit or controller in a scanning tunnel, be
sure to set the FAST Monitor Port information. The Port No. is always
9899. 0.
IMPORTANT: Be sure to use a unique position that relates to
the reader’s location in the scanning tunnel. Avoid assigning
the same Reader Position to two different readers.
See also: Modify Settings > FAST Monitor in Appendix C.
05-AL5010_Setup_R20.doc Accu-Sort Systems, Inc.
Page 86

78 Setup AccuLazr™ AL5010 Product Line Manual
Modify Settings > Advanced
The Advanced screen provides filters for enhancing the scanners ability to
read a bar code. Adjusting these values may have a negative or positive
effect on the reader’s ability to decode a bar code.
The Data Filtering, DRX (Data Reconstruction) and Transmit QQ settings are
considered advanced settings because they require comprehensive training
to understand how they should be modified.
NOTE: Changing the Advanced settings can adversely
affect reader performance. These settings are to be modified
only under the guidance of Accu-Sort Technical Support.
Data Filtering
The data filtering parameters specify the minimum and maximum pulse width
(in counts) for the bar code data. This important data filter setting assures
optimal reader performance. The Sampling Frequency default of 100 Mhz
assures better decoder resolution for poorly printed bar codes.
Scan Filtering (Skip Scan) –
• This option is used on applications that have slow conveyance
and/or reading bar codes with a large bar height. Under these
conditions the reader fills its memory with so much data that it does
not have time to process all the data before the end of trigger,
causing the reader to no-read. The Scan Filtering (Skip Scan) option
limits the amount of data, allowing the reader to processing less data
and give it a more of an opportunity to read the bar code.
Minimum Transitions –
• There have to be a certain number of bars and spaces detected on a
scan line in order to consider the information valid. This option
restricts data from being placed into memory.
Accu-Sort Systems, Inc. 05-AL5010_Setup_R20.doc
Page 87

AccuLazr™ AL5010 Product Line Manual Setup 79
• Should be at least as long as Start/Stop character. If short Start/Stop
character, use the length of one data character plus the start/stop
character (e.g.;I2 of 5)
• In this subroutine, any group of elements less than the min trans
setting is discarded or ignored.
Laser /Laser 2 DOF: Near Dist (in)/Far Dist (in)
• These options filter out any transitions beyond the entered values.
Any transition (including bar codes) seen beyond these values are
not placed into memory to be processed by the reader.
This also includes valid bar codes.
• As an example the above view shows the closest a bar code can be
processed is six inches for Laser 1 and 27 inches for laser 2. Any
bar code found closer then these values will be filtered out and the
reader will report a No-Read.
Bar Code Size
• Min Narrow Element (mils)/Max Narrow Element (mils)/Maximum Tilt
• These entries are used to identify valid Quite Zones.
DRX Settings
The DRX settings typically will not need to be modified.
Transmit QQ
The Minimum QQ is the smallest allowable QQ value for a code to be
transmitted.
The Maximum QQ forces the transmission of a code after the maximum QQ
value is reached.
See also: Modify Settings > Advanced in Appendix C.
05-AL5010_Setup_R20.doc Accu-Sort Systems, Inc.
Page 88

80 Setup AccuLazr™ AL5010 Product Line Manual
Modify Settings > Raster
Use Modify Settings > Raster to define the laser sweep area of an AL5010
with the optional adjustable raster feature. It also allows you to set the
oscillating frequency (speed) of the vibrating mirror.
The sweep of the laser is determined by the amount of coverage your
application requires (possible label position) and the distance of the laser
scanner from the object being scanned. The laser sweep is adjustable from
20-degrees above 0 (the center laser position) or -20-degrees below 0.
Examples:
• If the Upper Sweep is set to 15-degrees and the Lower Sweep is
set to 10-degrees, the total coverage will be 25-degree
encompassing 0.
• If the Upper Sweep is set to -5-degrees and the Lower Sweep is
set to -15-degrees, the total coverage will be 10-degrees, but below
the 0 position.
• If the Upper Sweep and Lower Sweep are both set to -10 degrees,
the laser will remain static at 10-degrees below the 0 position.
To Set the Sweep of the Laser:
1. Enter a value in the Upper Sweep text field between -20 and 20.
2. Enter a value in the Lower Sweep text field between -20 and 20.
3. Click Update. 0.
To Set the Oscillating Frequency:
1. Enter a value in the Oscillating Frequency text field between 0 and 4. A
value of 0 will stop oscillation, while values above 0 will increase the
speed of the oscillation up to the fastest at a value of 4.
2. Click Update. 0.
See also: Chapter 3: Mechanical Installation > Raster Setup.
Accu-Sort Systems, Inc. 05-AL5010_Setup_R20.doc
Page 89

AccuLazr™ AL5010 Product Line Manual Setup 81
Save / Retrieve
Use Save/Retrieve to save all the settings to the scan head and backup the
settings to the mounting base and/or file.
To use the save/retrieve functions:
1. Select an Action.
Based on the action selected, either the From or To drop-down list
becomes available.
2. Select the required location (either From or To).
3. Follow any additional prompts.
For example: If Retrieve from File is selected, use the Browse function
provided to locate the file.
4. Click OK. 0.
Default
Use to return the reader’s parameters to the hard-coded "default" values built
into the reader software.
USEFUL TIP: Selecting Default will return your reader to the
default factory settings. Since your reader may already be
configured for your application, it is recommended that you
ALWAYS Save to Disk before using the default function.
Retrieve from Base
Use to retrieve the parameters stored in the reader’s mounting base. This is
especially useful when it becomes necessary to load the correct parameters
to a replacement reader module.
Retrieve from File
Use to retrieve a parameters set from a specific file name and location on
your computer.
Save to Base
Use to save the current set of parameters to the mounting base as a backup
copy.
Save to File
Use to specify a file name and location to store the current parameter
settings on your computer.
Save to Reader
Use to save the current set of parameters to the reader. Parameters saved in
the reader are the parameters used during normal operations.
Reboot AL5010
Click Reboot to reinitialize the scanner.
See also: Save / Retrieve in Appendix C.
05-AL5010_Setup_R20.doc Accu-Sort Systems, Inc.
Page 90

82 Setup AccuLazr™ AL5010 Product Line Manual
Diagnostics
The AL5010 includes comprehensive diagnostic that enable you to monitor:
• Status LEDs
• Read Quality
• Messages
• Box Information
• Message Monitor
• Read Rate Log
• Counters Log
• Message Log
• Upload Firmware
Accu-Sort Systems, Inc. 05-AL5010_Setup_R20.doc
Page 91

AccuLazr™ AL5010 Product Line Manual Setup 83
Diagnostics > Monitor
Use the Diagnostics > Monitor as the primary tool to monitor the reader's
operation and bar code readability in real-time. Status indicators and vital
statistics appear on a single screen, enabling you to effectively and efficiently
detect and troubleshoot any problems that may occur.
The Monitor is a Java application and requires Java and the
appropriate browser plug-in.
See also: Diagnostics > Monitor in Appendix C.
05-AL5010_Setup_R20.doc Accu-Sort Systems, Inc.
Page 92

84 Setup AccuLazr™ AL5010 Product Line Manual
Diagnostics > Log Viewer
The Diagnostics > Log Viewer lets you review the performance logs saved
by the reader. The three most commonly viewed logs are available by
selecting one of the three buttons:
• Read Rate
• System Counters
• Message Log
You can also enter a log request in the Command field.
For example: DISPENET will provide Ethernet data.
The log view field remains empty until you select a button or enter a
command.
To determine which log is currently being shown in the log viewer, the log's
name is shown just below the words log view in the window.
For additional information and field descriptions, see Diagnostics > Log
Viewer in Appendix C.
To use commands to view a log:
1. Enter a command in the Log Viewer Command field without using
spaces (i.e., DISPCOUNTERS, DISPMSGLOG, etc.)
2. Click Send Command.
3. Log Viewer displays the most current information for the log you
requested.
4. Click Clear to empty the Log Viewer. 0.
Read Rate Log View
Use the Read Rate Log View to see a summary of the reader’s overall
performance.
To open the Read Rate Log View:
1. Click Read Rate, or
2. Enter DISPREADRATE in the command field. Click Send Command.
3. The Read Rate log is shown in the viewer.
4. Click Clear to empty the viewer and display another log. 0.
Overall Read Rate Statistics
The Read Rate Log Viewer provides information on the overall read rate.
Total Boxes Total number of triggers.
Good Boxes A good box is a box with all required codes. This counter is the
number of good boxes along with the percentage of the total
boxes that were good.
Partial Boxes A partial box is a box were some, but not all required codes were
read. This only applies when the reader is configured to read
multiple codes each trigger.
Bad Boxes A bad box is a box where no codes were read.
Accu-Sort Systems, Inc. 05-AL5010_Setup_R20.doc
Page 93

AccuLazr™ AL5010 Product Line Manual Setup 85
Read Rate Counters by Laser
The Read Rate Log Viewer also provides performance information on each
laser. In order to provide diagnostics on the performance of each laser, the
percentage references here are the percentage of the total codes read by
the particular laser, NOT the percentage of the total packages read by that
laser.
Total Codes Total number of bar codes read.
Laser#x Total number of bar codes read by the particular laser
For a reader configured as a Controller in a multi-reader network, this
command also provides counters for the number of bar codes read, by laser,
for each reader client. The clients are identified by their reader name as
assigned in Modify > Configuration.
REMEMBER: Not every reader is configured with two lasers.
05-AL5010_Setup_R20.doc Accu-Sort Systems, Inc.
Page 94

86 Setup AccuLazr™ AL5010 Product Line Manual
Counters Log View
Use the Counters Log View to display a number of values and counters that
indicate whether the reader is configured and operating properly.
To open the System Counters Log View:
1. Click Counters, or
2. Enter DISPCOUNTS in the command field. Click Send Command.
3. The system counters log is shown in the viewer.
4. Click Clear to empty the viewer and display another log. 0.
Scan Rate and Belt Speed System Counters
Scan Rate This is the total number of scans/second that the reader is
reading. Note the this number does NOT take into account
“laser toggling” if it is enabled. If “laser toggling” is enabled,
the effective scan rate for any laser is half of this value.
Belt Speed
(Tracking)
Speed of the belt (in ft/min) as measured by the tachometer.
Bar Code System Counters
Triggers Total number of packages based on the trigger signal. In self-
trigger mode, this will match the number of good reads.
Good Reads Total number of bar codes read and transmitted. If the reader
is set up to read multiple bar codes each trigger, this counter is
incremented for each bar code read.
No Reads Total number of bar codes that were not read.
Mult Codes Total number of instances where more bar codes of a specific
type were read than expected. This counter will also
increment, regardless of whether the reader is configured to
report “multiple codes” as an error.
Match Codes Total number of bar codes that matched any of the Match
Code criteria.
Bad ModChk Total number of bar codes that were rejected due to an invalid
Mod Check.
Accu-Sort Systems, Inc. 05-AL5010_Setup_R20.doc
Page 95

AccuLazr™ AL5010 Product Line Manual Setup 87
Error Counters
Xfter Ovrflw Transfer Overflow. This counts the number of codes that were
lost due to an overflow in the transfer buffer between the
Decode/DSP processor and the reader/ARM processor.
Xfer BadLen
QData@TX
QData@Trig
ForcedTx Forced Transmit (non-tracking). A forced transmit indicates
Lost Codes Lost Codes (tracking). If a bar code cannot be placed onto
Missed Tx
Transfer Bad Length. Number of codes in the transfer buffer
than contained an invalid length, indicating some sort of
memory corruption.
Queue Data at Transmit (non-tracking). This counter indicates
that the reader had not completed processing all of the scan
data at the user-specified transmit time. This will only happen
if the “transmit time” parameter is set to a value other than
zero. This does not necessarily indicate an error, but does
indicate that either the transmit time is too short or the reader
is seeing a lot of data which may be the result of too much
background noise.
Queue Data at Trigger (non-tracking). This counter indicates
that the reader had not completed processing all of the scan
data prior to the start of the next trigger. This typically can only
happen when the "transmit time” parameter is set to zero;
although it can also happen in conjunction with a Force
Transmit. As with the Queue Data at Transmit counter, this
does not necessarily indicate an error, but it likely indicates
that the reader is seeing a lot of data which may be the result
of too much background noise.
that the start of trigger occurred before the specified transmit
delay time had expired.
any package while in tracking, the code is “lost” and this
counter is incremented. Lost codes are also reported in the
Monitor message window. Lost code occurrences typically
indicate tracking parameters need to be adjusted.
Missed Transmit (tracking). If a bar code is decoded after the
message for that package has been transmitted, the Missed
Transmit counter is incremented.
05-AL5010_Setup_R20.doc Accu-Sort Systems, Inc.
Page 96

88 Setup AccuLazr™ AL5010 Product Line Manual
Decode/DSP Counters
DSP Codes Count of the number of bar codes decoded, per laser, by the
DSP.
Scan Ints Number of scan interrupts detected by the DSP.
Queue Size Current size of the scan data queue within the DSP. This
value changes dynamically.
Num Cluster Current number of DRX clusters in use by the DSP. This
value changes dynamically.
Bad Scan Count of the number of scans in which the data contained
formatting errors.
Pipe Error Count of internal errors on the transfer of scan data from the
scan data buffer.
Full Scans Number of times a scan could not be added to the scan data
buffer because the maximum number of scans was exceeded.
Mem Full Number of times a scan could not be added to the scan data
buffer because the memory was full.
ScanTooLong Number of times a scan was skipped because it contained too
many transitions.
Max Clusters Number of times, the maximum number of DRX clusters was
exceeded.
ARM and DSP Restarts Counters
ARM Restarts Number of times the ARM processor has restarted. This
typically means the hardware watchdog timer expired causing
the ARM processor to restart.
DSP Restarts Number of times the DSP processor has been restarted.
Typically, this happens if the ARM suspects the DSP has
“locked up” for any reason.
Message Log View
The Message Log View contains various text messages that have been
logged by the reader software.
The messages contained in this log typically reflect significant events.
To open the Message Log View:
1. Click Message Log, or
2. Enter DISPMSGLOG in the command field. Click Send Command.
3. The message log is shown in the viewer.
4. Click Clear to empty the viewer and display another log. 0.
Accu-Sort Systems, Inc. 05-AL5010_Setup_R20.doc
Page 97

AccuLazr™ AL5010 Product Line Manual Setup 89
Command
There are several commands that you can use to display reader parameters
and diagnostic information.
Commands can be sent from the Command field on the Log Viewer.
Commands may also be sent from a terminal interface, such as a TELNET
connection to the reader.
Log Viewer
Commands
CLEAR ALL Clears all information from the Message Monitor.
DISP COUNTERS Display the System Counter log view.
DISP ENET Display the Ethernet interface status, including MAC address.
DISP MSGLOG Display the Message log view.
DISP READRATE Display the Read Rate log view.
Definition
05-AL5010_Setup_R20.doc Accu-Sort Systems, Inc.
Page 98

90 Setup AccuLazr™ AL5010 Product Line Manual
Diagnostics > Update Firmware
Use Diagnostics > Update Firmware to reload the reader firmware. For
additional information and field descriptions, see Diagnostics > Update
Firmware in Appendix C.
CAUTION: This function should only be performed under the
guidance of Accu-Sort Technical Support.
To Extract Image
1. Click Extract Image.
2. In Save as window, save the image (*.as) files to your computer.
The graphic on-screen indicates Extract Image is in-process.
3. A message will appear when Extract Image is complete. 0.
To Burn Flash
1. Click Burn Flash.
2. In Open window, open an image file (*.as) to burn to flash.
The graphic on-screen indicates Burn Flash is in-process.
3. A message will appear when Burn Flash is complete. 0.
Accu-Sort Systems, Inc. 05-AL5010_Setup_R20.doc
Page 99

AccuLazr™ AL5010 Product Line Manual Operations 91
6 Operations
This chapter provides details on how the AL5010 bar code scanning
solutions function during normal operation. It also outlines how you can verify
optimal performance through several methods:
Become more familiar with your application
Step-by-step start-up operations checklist
Status Indicator LEDs
AL5010 Reader
AL5010 Interface Module
Diagnostics to confirm normal operations
After configuring your AL5010 reader using the browser-based setup
application, use the operations checklist to verify normal operations.
First-time Startup
Default Parameters
On initial power-up, the AL5010 performs a series of self-diagnostic and LED
tests. The complete power-up sequence takes less than 20 seconds.
When the STATUS LED flashes and turns a steady green the power-up
sequence is complete. The AL5010 is now operational.
NOTE: When an application uses multiple AL5010 readers, you can
provide each reader with a unique reader name using the browser-based
setup application. This makes it easier to keep track of reader parameter
changes when working with several readers on a network. (See Chapter 5.)
The reader is shipped from the factory with these defaults:
Connection Mode: Setup Cable
Reader Name: AL5010
Control Panel Buttons Enabled
Code 128 (10-30 characters)
06-AL5010_Operations_R20.doc Accu-Sort Systems, Inc.
IP address 192.168.3.100
Perform the following setup procedure using these defaults or configure your
AL5010 with your application’s parameters using the browser-based setup
application.
Page 100

92 Operations AccuLazr™ AL5010 Product Line Manual
First-time Setup
Every application is unique. AL5010 is designed for ease-of-setup, allowing
you to program the reader to fit your application seamlessly.
A browser-based setup application on your laptop/desktop computer is the
tool you will use to define operating parameters, set bar code type / length,
and construct output messages, including filtering, stripping and padding
capabilities. AccuLazr’s user interface enables you to easily configure, finetune, and monitor your AL5010’s operations.
AL5010 provides ease-of-use regardless of your experience with bar code
readers. A beginner follows basic setup procedures for a standard
configuration. If you are more experienced, use the advanced setup features
that allow access to more complex options.
First-time Setup Procedure
To setup your AL5010 bar code reader:
1. Connect an RJ45 Ethernet cable to the AL5010.
2. Connect the other end of the cable to your laptop/desktop computer.
3. Apply power to AL5010.
4. Set configuration parameters for bar code symbologies, trigger,
tracking, and communications (serial, Ethernet, and I/O).
5. Check operations using the Test Mode.
Check Operations using Test Mode
NOTE: Perform the following test using a bar code that matches the
default parameters. Or you may wish to perform this test after configuring
the AL5010 to your specifications. If the default parameters have been
changed, you must enable the control panel buttons and the other
parameters listed on page 96. See Chapter 5, Modify > Configuration and
Modify > Bar Code Setup.
To quickly check the operation of an AL5010:
1. Apply power to the AL5010.
2. Position a test bar code symbol approximately 20 inches (0.5 meter)
from the reader. Skew the bar code symbol slightly.
Accu-Sort Systems, Inc. 06-AL5010_Operations_R20.doc
3. Press the Test/Diagnostics button on the control panel to initiate test.
4. The laser(s) should be scanning continuously during normal operations.
(Observe the laser safety warnings in Chapter 2. If it becomes necessary
to shutoff the laser(s), follow procedure outlined in Chapter 6.)
5. Observe the bar graph LEDs on the AL5010 control panel. The read LED
will blink GREEN if it reads a bar code, or RED if it doesn’t.
6. Connect your PC via the network.
 Loading...