

Page 1

L66
L66
VI.JD.T2.02
2006.12
VI.JD.T2.02
2006.12
www.danfoss.com
User's Guide
Installer's Guide
www.danfoss.com
ECL Comfort
Installer's Guide
ECL Comfort
User's Guide
*087R8172*
*VIJDT202*
*087R8172*
*VIJDT202*
(
)
Mixing and DHW controller
Page 2

The shown diagram is a fundamental and simplified example and
does not contain all components that are necessary in a system.
If the system you are about to install differs from the shown
diagram of a standard heating system, feel free to sketch an
outline for comparison. Adaptation of systems, see section 10.
Circuit
indicator
Circuit
selector
Shift
button
Adjust-
ment
Controller
mode
List of components:
ECL Comfort 301
S1 Outdoor temperature sensor
S3 Flow temperature sensor
S4 Return temperature sensor, circuit I
S5 DHW flow temperature sensor, circuit II
S6 DHW return temperature sensor, circuit II
P1-1 Circulation pump 1, heating, circuit I
P2-1 Circulation pump 2, heating, circuit I
P1-2 ECA 73 / 80 / 86, circulation pump 1, DHW, circuit II
P2-2 ECA 73 / 80 / 86, circulation pump 2, DHW, circuit II
M1 Motorized control valve, circuit I
M2 Motorized control valve, circuit II
This guide is associated with ECL Card 087B4875
Installer:
By:
Date:
Controller mode
Manual operation (used only at maintenance
and service)
Scheduled operation
Constant comfort temperature
Constant setback temperature
Standby mode
Arrow buttons. Switch between the lines of the ECL
Card.
Shift button. Switches between temperatures,
changeover points etc.
Adjust temperatures and values etc.
Circuit selector for switching between the circuits.
Safety Note
To avoid injury of persons and damages to the device, it is absolutely
necessary to read and observe these instructions carefully.
Necessary assembly, start-up, and maintenance work must be performed by
qualified and authorized personnel only.
Display indications, controlled units, L66
1
1
ON
2
ON
2
3
ON
A B C D E
A: P1-1 Blank = OFF ON = ON
B: M1 = Opens = Closes
C: P2-1 Blank = OFF ON = ON
D: M2 = Opens = Closes
E: R3 Blank = OFF ON = ON
Page 3

Table of Contents
Sections in the Installer’s Guide
The documentation for the ECL Comfort controller is
composed of numbered sections. Only sections relevant to
your ECL Comfort controller are included here.
Before you start
Installation
10 Identifying the system type
11 Mounting the ECL Comfort controller
12 Electrical connections 230 V a.c.
14 Connecting and placing the temperature sensors
15 Inserting the ECL Card
Basic Set-up
16 Adjusting the ECL Card settings
17 Setting the time and date - line A
18 Monitoring temperatures and system units - line B
19 Manual control - line B
20 Setting the heat curve - line C
21 Heating cut-out - line 1
22 Flow temperature limits - line 2
23 Room temperature influence - line 3
26 Control parameters - lines 4-7
Control & Overviews
29 Check list
30 ECL Card settings
31 Service parameters
Extended Service
32 Adjusting the service parameters
Miscellaneous
34 Copying with the ECL Card
User's Guide (turn the guide over for sections 1-7)
1 Choose your favorite display
2 Select circuit mode
3 Set your room and DHW temperature
4 Set your personal schedule
5 Advantages of the ECL Card
6 Hot points
7 Definitions
Page 4

VI.JD.T2.02
Card L66
2006.12
Sketch your application
The ECL Comfort controller series is designed for a wide
range of heating, domestic hot-water (DHW) and cooling
systems with different configurations and capacities.
If your system differs from the diagrams shown in section
10, you may want to make a sketch of the system about to
be installed. This makes it easier to use the Installer’s Guide,
which will guide you step-by-step from installation to final
adjustments before the end-user takes over.
The controller is pre-programmed with factory settings that are
shown in the relevant sections of this guide.
However, you might come across some settings that are not listed
in this instruc tion. These settings could be related either to recent
updates or the use of optional modules (which are described in
the instructions in question).
How to use this guide
This guide is divided into two parts:
• User’s Guide: Yellow sections 1-7
• Installer's Guide: Grey sections 10 and onwards
The application L66 is very flexible. These are the basic principles:
Both circuits can control two pumps.
Heating :
Typically, the flow temperature is adjusted according to your
requirements.
The flow temperature sensor (S3) is the most important sensor.
The desired flow temperature at S3 is calculated in the ECL
controller, based on the outdoor temperature (S1). The lower the
outdoor temperature, the higher the desired flow temperature.
The motorized control valve (M1) is opened gradually when the
flow temperature is lower than the desired flow temperature and
vice versa.
The return temperature (S4) to the district heating supply should
not be too high. If so, the desired flow temperature can be
adjusted (typically to a lower value), thus resulting in a gradual
closing of the motorized control valve. In boiler-based heating
supply the return temperature should not be too low (same
adjustment procedure as above).
If the measured room temperature does not equal the desired
room temperature, the desired flow temperature can be adjusted.
Circulation pumps are ON when the desired flow temperature is
higher than 20 °C or the outdoor temperature is lower than 2 °C.
DHW:
If the measured DHW temperature (S5) is lower than the desired
DHW temperature, the motorized control valve (M2) is opened
gradually and vice versa.
If the desired DHW temperature cannot be reached, the heating
circuit can be closed gradually.
Before you start
Page 5

Installation
Installation
The ECL Comfort controller is a universal controller that can
be used for various systems. Based on the shown standard
systems, it is possible to configure additional systems.
In this section you find the most frequently used systems. If
your system is not quite as shown below, find the diagram
which has the best resemblance with your system and make
your own combinations.
The functions can only be realized with ECL Comfort 301 and as of
controller version 2.00.
10.1 Indirectly connected heating system and DHW
circuit
System diagrams in this instruction are principal drawings and do
not contain all components which are necessary in your systems.
Identifying the system type
10a
10.2 Directly connected heating system and
indirectly connected DHW circuit
10b
Page 6
Installation
Installation
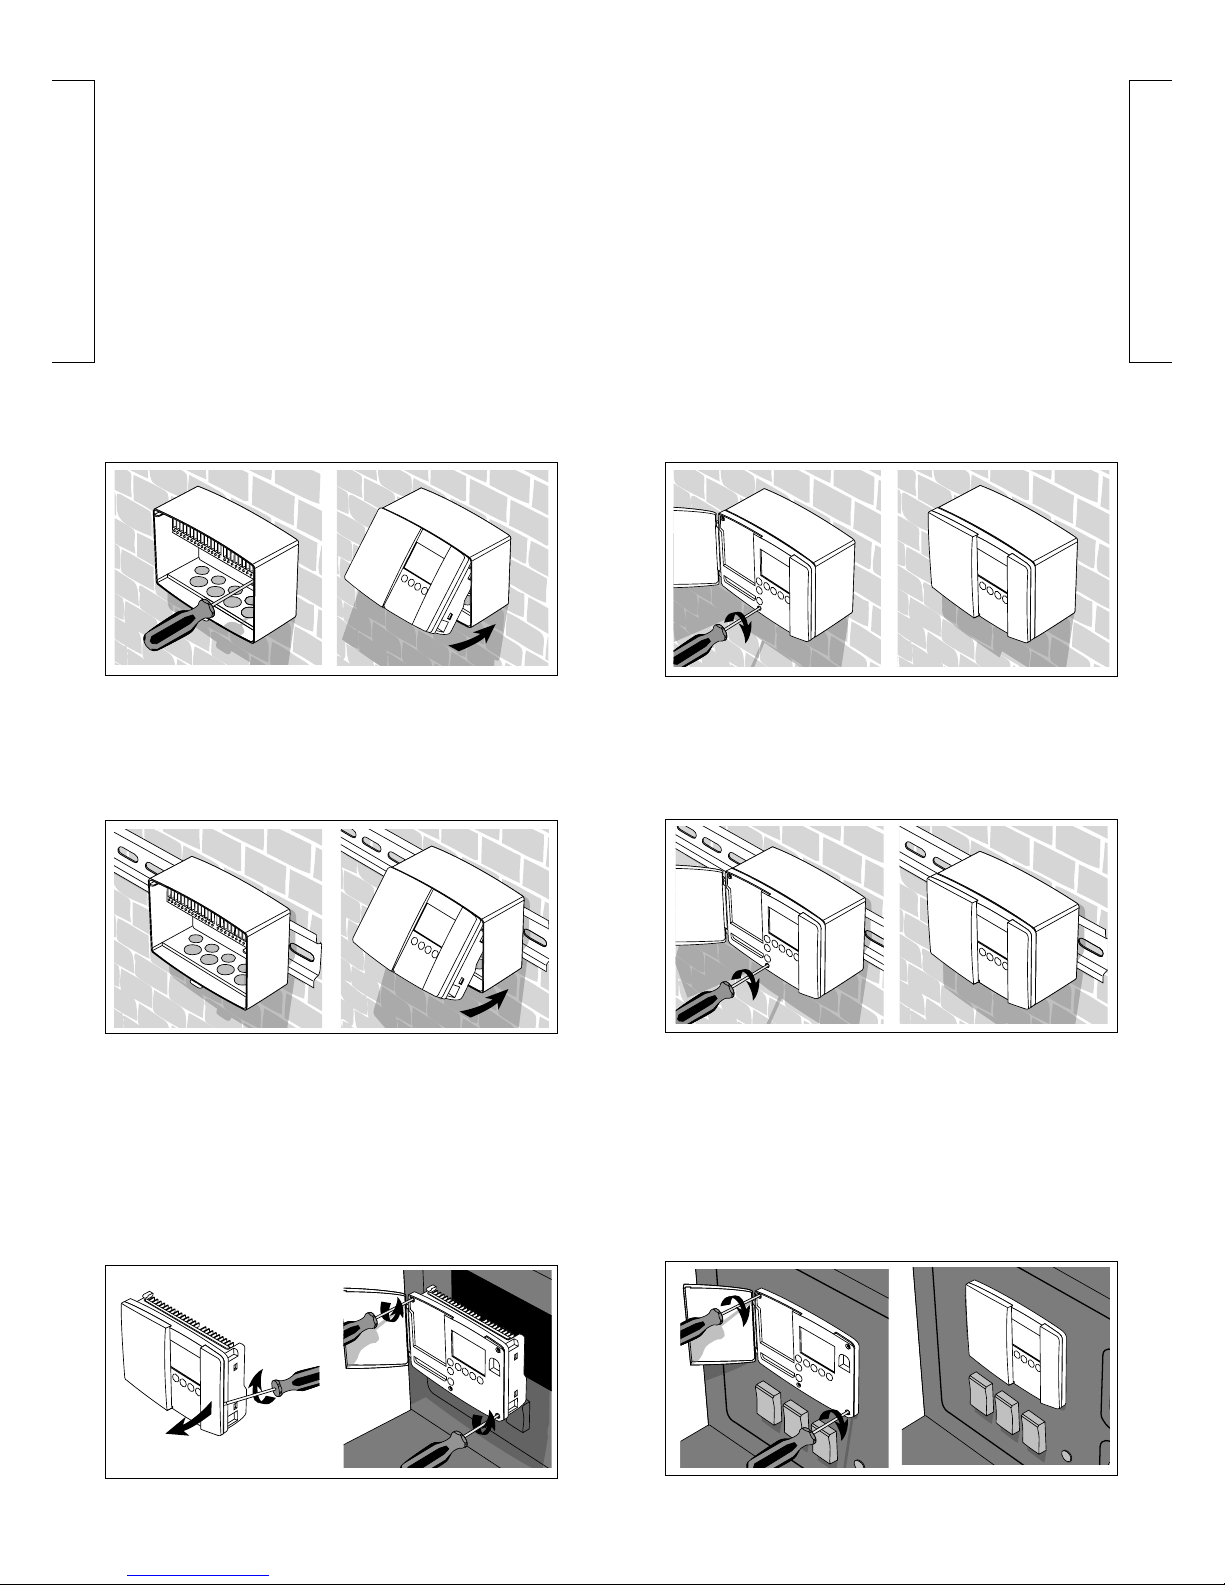
For easy access, you should mount the ECL Comfort
controller near the system. Select one of the three
following methods:
• Mounting on a wall
• Mounting on a DIN rail
• Mounting in a panel
Screws and rawlplugs are not supplied.
Mounting on a wall
Socket for mounting on wall: Order code No. 087B1149.
Mount the terminal box on a wall with a smooth surface.
Establish the electrical connections and position the
controller in the box. Secure the controller with the fixing
screw.
Mounting on a DIN rail
Mounting kit: Order code No. 087B1145.
A mounting kit is necessary to mount the box with the
controller on a DIN rail.
Mounting in a panel
Connector set: Order code No. 087B1148.
The panel plate thickness must not exceed 3 mm.
Prepare a cut-out with the dimensions 93 x 139 mm. Pull off
the right side of the lid by means of a screwdriver.
Insert the controller into the panel cut-out and fix it with the
two locks which are placed diagonally in two corners of the
controller.
Mounting the ECL Comfort
controller
11a
11b
Page 7
Installation
Installation
12a
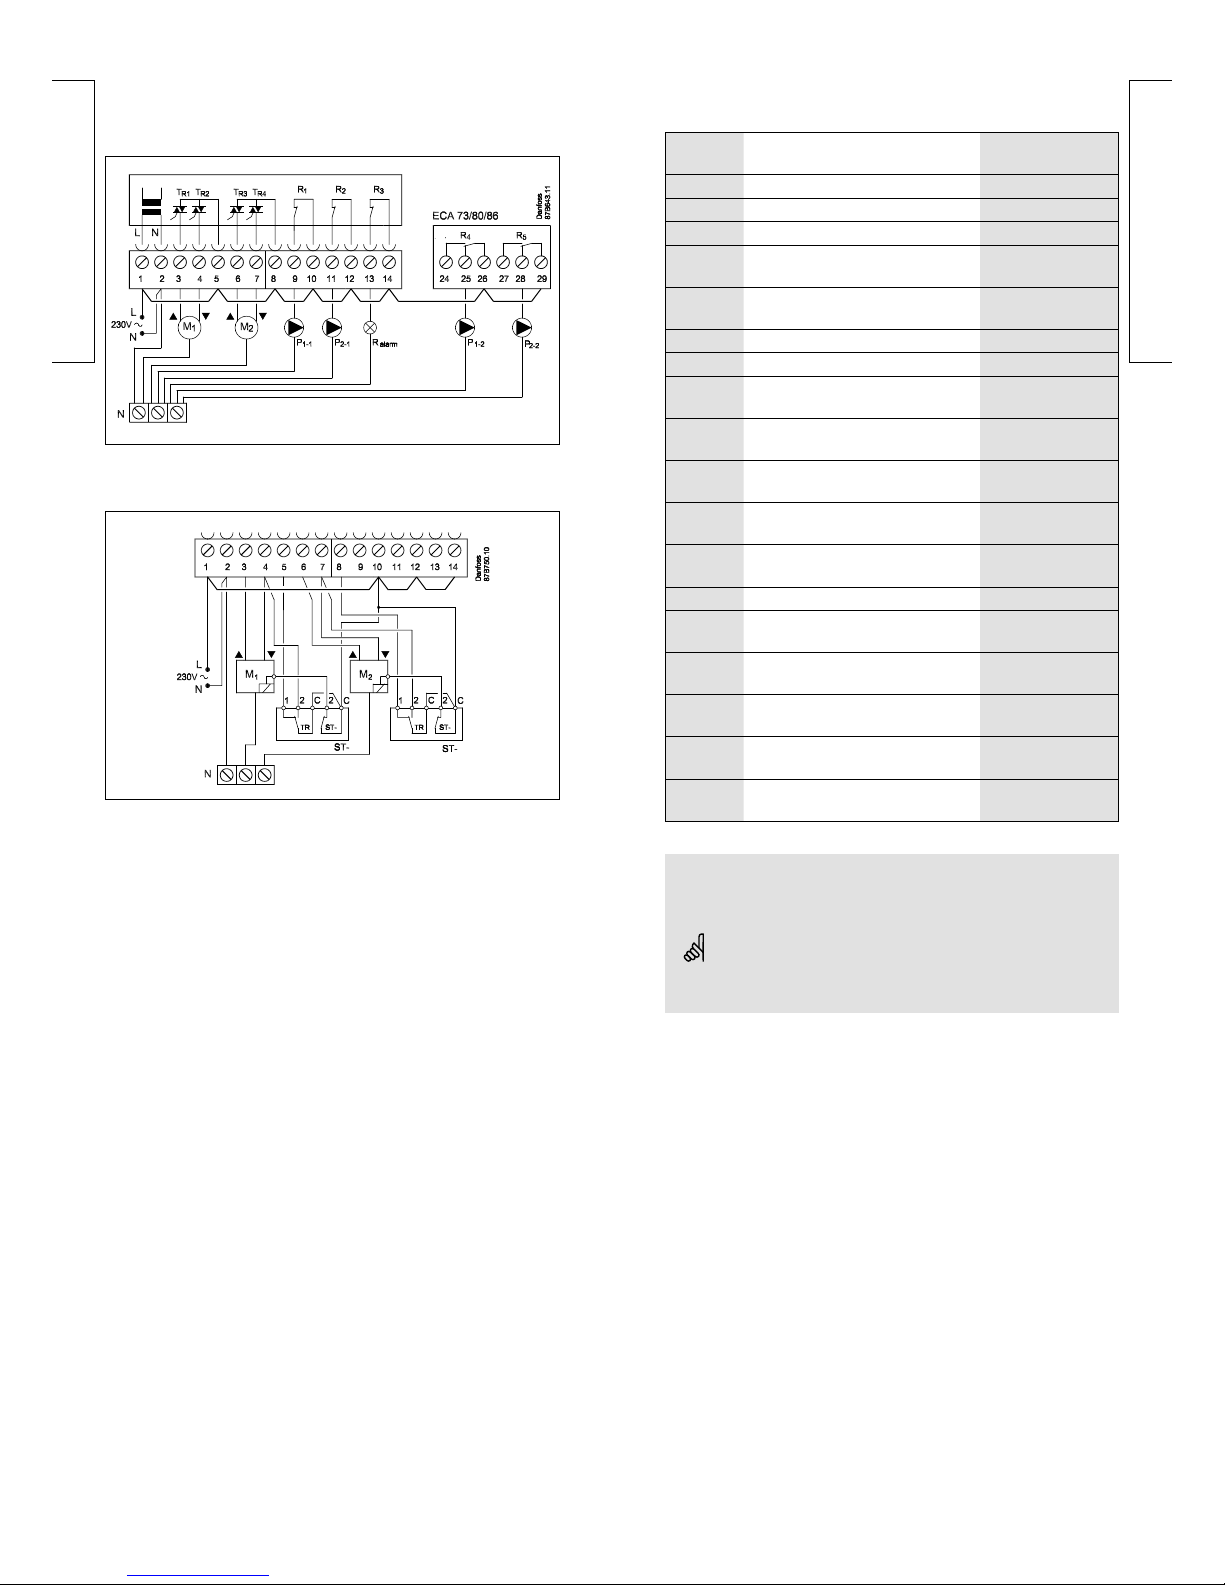
230 V a.c. connections - without safety thermostat
230 V a.c. connections - with safety thermostat
This circuit diagram is only valid if Danfoss actuators are used
The relays are to be connected as in the drawing without
safety thermostat.
Electrical connections 230 V a.c. - in general
Terminal Description Max. load
1 L Supply voltage 230 V a.c.
2 N Supply voltage 230 V a.c.
3 M1 Actuator - open, circuit I 0.2 A / 230 V a.c.
4 M1
Actuator - close, circuit I
alt. thermo actuator
0.2 A / 230 V a.c.
5
230 V a.c. supply voltage for M1,
circuit I
6 M2 Actuator - open, circuit II 0.2 A / 230 V a.c.
7 M2 Actuator - close, circuit II 0.2 A / 230 V a.c.
8
230 V a.c. supply voltage for M2,
circuit II
9 P1-1
Circulation pump I for heating,
circuit I
4 (2) A / 230 V a.c.
10
230 V a.c. supply for pump relay
R1
11 P2-1
Circulation pump II for heating,
circuit I
4 (2) A / 230 V a.c.
12
230 V a.c. supply for pump relay
R2
13 R3 Alarm relay 4 (2) A / 230 V a.c.
14
230 V a.c. supply for alarm relay
R3
25 P1-2
Circulation pump I for DHW,
circuit II
4 (2) A / 230 V a.c.
26
230 V a.c. supply for pump relay
R4
28 P2-2
Circulation pump II for DHW,
circuit II
4 (2) A / 230 V a.c.
29
230 V a.c. supply for pump relay
R5
Wire cross section: 0.75 - 1.5 mm
2
Electrical connections
Max. 2 x 1.5 mm2 wires can be inserted into each screw terminal.
Incorrect connection can damage the TRIAC outputs. Max. load
(terminals 3, 4, (6 and 7)) 0.2 A / 230 V a.c.!
12b
Page 8

Installation
Installation
Connecting the temperature sensors and the bus
Terminal Description Type (recomm.)
15 and 16 System device bus*,
connections for room
panel** / remote control** /
(relay module)
ECA 60 / 62
ECA 61 / 63
17 and 16 S1 Outdoor temperature
sensor
ESMT
18 and 16 S2
R
alarm
19 and 16 S3 Flow temperature sensor,
circuit I
ESM-11 / ESMC /
ESMU
20 and 16 S4 Return temperature sensor,
circuit I
ESM-11 / ESMC /
ESMU
21 and 16 S5 DHW flow temperature
sensor, circuit II
ESM-11 / ESMC /
ESMU
22 and 16 S6 DHW return temperature
sensor, circuit II
ESM-11 / ESMC /
ESMU
* The system device bus / room panel / rem ote control is only ac tive
when the outdoor temperature sensor is conne cted.
** Either room panel or remote control
Establish the jumper from 16 to common terminal.
Wire cross section for sensor connections:
Min. 0.4 mm
2
Total cable length: Max. 125 m (all sensors incl. system device
bus)
Cable lengths of more than 125 m may cause noise sensibility
(EMC).
Terminals 16 and 18
External circuit for alarm contact:
Rx and Ry are external alarm relay contacts, i.e. pressure controlled
switches.. The contacts should be gold-plated. The resistance in
the contacts must be lower than 10 ohm (operating conditions
5 V and 1.7 mA).
Connecting and placing the
temperature sensors
14a
Terminal 16 Terminal 18
-> Alarm input circuit I
-> Alarm input circuit II
It is important that the sensors are mounted in the correct
position in your system.
The temperature sensor mentioned below are sensors used
for the ECL Comfort 200 and 300 series which not all will be
needed for your application!
Outdoor temperature sensor (ESMT)
The outdoor sensor should be mounted on that side of the
building where it is less likely to be exposed to direct
sunshine. It should not be placed close to doors, windows or
air outlets.
Flow temperature sensor (ESMU, ESM-11 or ESMC)
Place the sensor max. 15 cm from the mixing point. In
systems with heat exchanger, Danfoss recommends that the
ESMU-type to be inserted into the exchanger flow outlet.
Make sure that the surface of the pipe is clean and even
where the sensor is mounted.
Return temperature sensor (ESMU, ESM-11 or ESMC)
The return sensor should always be placed in / on a pipe with
return water flow.
Room temperature sensor (ESM-10, ECA 60 / 62 room
panel or ECA 61 / 63 remote control)
Place the room sensor in the room where the temperature is
to be controlled. Do not place it on outside walls or close to
radiators, windows or doors.
DHW temperature sensor (ESMU or ESMB-12)
Place the DHW temperature sensor according to the
manufacturer’s specification.
Boiler temperature sensor (ESMU, ESM-11 or ESMC)
Place the sensor according to the boiler manufacturer’s
specification.
Flow / air duct temperature sensor (ESM-11, ESMB-12,
ESMC or ESMU types)
Place the sensor so that it measures a representative
temperature.
Slab temperature sensor (ESMB-12)
Place the sensor in the slab.
Valid for ESM-11: Do not move the sensor after it has been
fastened in order to avoid damage to the sensor element.
14b
Page 9

Installation
Installation
Comfor t Setbac k
Red
Brown
Green S1 .. . S6 (C14 = S5 only)
14c
Connecting the room panel / remote control
The ECA 60 / 61 / 62 / 63 is activated by the setting in line 10
(section 32).
The ECA 60 / 61 / 62 / 63 is powered by the system device bus
which means that the bus must be active. The bus is activated by
setting the controller address to 15 (section 32, line 199).
Override
For an active override, you have to choose the mode
“scheduled operation”! Input S1 ... S6 (ECL Card C14 only uses
S5) can be used for override purposes (section 32, line 141).
Connection example without ECA 9010
If the override switch has goldplated contacts, you can
choose one of the following solutions or a combination of
both:
(C14 = 21 only) (C14 = 21 only)
Closed switch: Closed switch:
Comfort temperature Setback temperature
Open switch: Open switch:
Scheduled operation Scheduled op eration
Connection example with ECA 9010
The ECA 9010 module is powered by the system device bus,
which means that the bus must be active. The bus is activated
by setting the controller address to 15 (line 199). To avoid
influence from contact resistance, the use of ECA 9010 is
recommended.
Comfor t Setbac k
Red
Brown
Green S1 .. . S6 (C14 = S5 only)
Page 10

Installation
Installation
Understanding the ECL Card
The ECL Card contains factory settings for a standard
system. If the actual system differs from the standard
system, the controller must be adjusted accordingly. After
the adjustment, the new settings should be stored on the
ECL Card.
For ECL Card copying and daily use including adjustment
of temperatures and schedules, insert the ECL Card with
the yellow side facing you.
For system set-up adjustments, the grey side of the ECL
Card - the installer’s side - must be facing you.
As a main rule, the ECL Card should always remain in the
controller during service, maintenance and setting.
If the card is removed or left in the controller with the grey
side facing you, please note that:
• After approx. 25 min.:
- The controller cannot be operated.
- The controller reverts to display C (section 1).
• The ECL Card must not be exposed to direct heat or
sunshine.
If several controllers are installed in the system you can
write a title on the ECL Card with a permanent ink pen.
Do not remove the ECL Card while copying. The data on the
ECL Card can be damaged!
When you store your personal settings on your ECL Card, the
factory settings will be overridden.
15b
How to insert your ECL Card the first time
After the power has been switched on, open the lid on the
front side of the controller.
Place the ECL Card with the yellow side facing you. This
enables the controller to read the ECL Card data. The
controller immediately starts to copy the application type
and factory settings from the ECL Card. After copying, the
display will show you the application type. After approx. 10
sec. the display will change to display line C.
Display example:
Software
version, ECL
Card
Line
Circuit
Time
Outdoor
temp.
C
C 99
Y
0
P
C 73
05 109
8
0 3 6 9 12 15 18 21 24
1
023
5
C
3
Application t ype
Software version,
controller
Desired room temp.
The controller is now ready to be set to control your system.
If the display keeps showing CPY, see section 34b.
Inserting the ECL Card
15a
Page 11

The grey
side of the
ECL Card
Basic set-up
The grey
side of the
ECL Card
Basic set-up
General principles
When the controller is connected and operating you can
check and adjust all or some of the basic settings. Turn the
ECL Card so that the grey side is facing you (see the example
below).
Use the arrow buttons to move from line to line of
the ECL Card, for example line 2:
Circuit
Line
Setting
to be
adjusted
1
1
ON
2
ON
09
2
04
2
3
ON
Value in range indicator
Use the plus / minus buttons to adjust the
settings.
In some displays more than one setting or value
can be adjusted. Use the shift button to switch
between the options.
The circuit selector shifts between circuit I
and II. You can adjust all settings and service
parameters individually.
Update of the ECL Card after maintenance and service
All new settings can be stored on the ECL Card. For details
about copying, see section 34.
Adjusting the ECL Card
settings
16
Actual time
Year
07
01
2 220
5
A
3
1
Month, day
Use the shift button to switch between minutes,
hours, years, months and days.
Set the correct time and date.
In case of a power break, which lasts longer than 12 hours, the
time and the date have to be set again. All other settings are
stored as programmed.
Use the yellow side of the card to change the schedules.
See User’s Guide, section 4.
Setting the time and date line A
17
Page 12

The grey
side of the
ECL Card
Basic set-up
The grey
side of the
ECL Card
Basic set-up
Controlled units
Flow
temp.
(S3)
5 036
B
2
ON
1
1
ON
3
ON
2
Return temp.
(S4)
Push and hold the shift button to see:
- the calculated flow temperature
- the desired return temperature limitation.
This display can also show the actual and desired flow and return
temperatures for circuit II.
The activity of the motorized control valve is shown as arrows
below the valve symbol. When the circulation pump is
operating, it is indicated as ON below the pump symbol.
If a sensor is not mounted or is disconnected, the display will
indicate it as “- -”.
If the sensor is short-circuited, the display will indicate
it as “- - -“.
If you are in doubt, remove the controller and check the
ohmic value between the relevant terminals.
Relationship between temperature and ohmic value
-50
800
900
1000
1100
1200
1300
1400
1500
1600
-25 0 25 50 7
5 100 125 150
°C
Ω
Ω
805
845
883
922
961
1000
1039
1078
1117
1155
1194
1232
1271
1309
1347
1385
1423
1462
1501
1539
1578
°C
-50
-40
-30
-20
-10
0
10
20
30
40
50
60
70
80
90
100
110
120
130
140
150
Monitoring temperatures
and system units - line B
18
Shift to manual mode.
Controlled units
5 036
B
2
ON
1
1
ON
3
2
Controller mode
Choose the unit you want to control. The selected
unit symbol will blink.
Controlled units are switched OFF or ON when
the relevant button is pushed.
The motorized actuator (gear motor)
closes or opens the controlled unit as long as
the relevant button is pushed. If pushed for more
than 3 seconds, the actuator continues to close or
open the valve.
The thermo actuator
activates the valve as long as the button is
pushed. If pushed for more than 3 seconds, the
actuator continues to open the valve.
Check the activation direction of the actuator either by
looking at it or by feeling whether the temperature of the
actual pipe changes as expected.
This operation applies to both circuits, if available.
During manual operation, all control functions are deactivated.
Manual control line B
19
Page 13

The grey
side of the
ECL Card
Basic set-up
The grey
side of the
ECL Card
Basic set-up
1 2
5
C
1
0
3
ON
1ON2
ON
Slope
Displacement
Slope
Circuit Setting range Factory setting
I 0.2 ... 3.4 1.5
The symbol for the slope of the heat curve
will blink. Adjust the slope of the heat curve, if
required.
-20 -10 0 10 20-30
20
30
40
50
60
70
80
90
1.0
1.4
0.6
0.2
1.8 2.2 3.0 3.4
100
110
2.6
10
oC
oC
How to determine another heat curve, if necessary:
Choose the calculated flow temperature for your system and
the determined min. outdoor temperature for your area.
Pick the heat curve closest to the crossing point of these two
values.
The setting of the desired room temperature has an influence
on the calculated flow temperature (heat curve), no matter if
a room temperature sensor is connected or not.
Floor heating systems
This controller is factor y set for radiator systems, which typically
are high flow temperature systems.
To control floor heating systems, which typically are low flow
temperature systems, you need to change the heat curve
according to your type of system.
Slope
Circuit Setting range Typical setting
I / (II) 0.2 ... 3.4 1.0 / (1.0)
Whether it is reasonable to change the slope or parallel
displacement will depend on the individual heat requirement.
Small increases or reductions in the heating temperature can be
implemented by means of the parallel displacement.
Setting the heat curve line C
20a 20b
Parallel displacement
Circuit Setting range Factory setting
I -9 ... 9 K 0 K
If you want to adjust the parallel displacement of
the heat curve, push the shift button. The symbol
for the parallel displacement will blink.
Make your adjustments.
Page 14

The grey
side of the
ECL Card
Basic set-up
The grey
side of the
ECL Card
Basic set-up
8
1
1
1
1
ON2ON
2
1 Limit for heating cut-out
Circuit Setting range Factory setting
I 10 ... 30 °C 18 °C
Set the outdoor temperature limit at which you
want the heating system to stop.
The valve closes and after about 3 min. the heating
circulation pump stops.
The min. limitation set in line 2 will be ignored.
18 °C
Temp.
Actual Accumu lated
outdoor te mp. outd oor temp.
Heati ng OFF
Ti me
Heati ng Hea ting
This function can save energy by stopping the heating system
when the outdoor temperature gets above a set limit. The heating
system switches ON again when the outdoor temperature and
the accumulated outdoor temperature become lower than the set
limit.
The heating cut-out is only active when the controller mode is
scheduled operation. When the limit value is set to 30, there is no
heating cut-out.
Heating cut-out line 1
21
Min. flow
temp.
0
1
1ON2
094
2
3
ON
2
ON
Max. flow
temp.
Setting range
2 Flow temperature limits, min. and max.
Circuit Setting range Factor y setting
I 10 ... 150 °C min. 10 , max. 90 °C
The mentioned setting range and factory settings may vary from
the settings on your ECL Card.
The left end of the setting range blinks. Adjust the
min. limit of your system temperature.
Choose the max. limit. The right end of the setting
range blinks.
Adjust the max. limit.
Flow temperature limits line 2
22
Page 15

The grey
side of the
ECL Card
Basic set-up
The grey
side of the
ECL Card
Basic set-up
23a
Room temperature influence line 3
23a
This section is only relevant if you have installed a room
temperature sensor or ECA 60 / ECA 61 / ECA 62 / ECA 63.
Min.
influence
1
2
ON
0-4
0
3
1
ON
3
ON
Max.
influence
3 Room temperature influence
Circuit Setting range Factory setting
I 0 ... 99 / -99 ... 0 min. 0, max. -40
The bar below the min. value blinks. Adjust the
min. influence.
Select the max. influence.
The bar below the max. value blinks.
Adjust the max. influence.
There are two basic principles for control of the room
temperature influence:
A: Max. room temperature limitation
Use this limitation if your system is fully equipped with
thermostats and you also want to obtain a max. limitation of
the room temperature. The controller will allow for free heat
gains, i.e. solar radiation or heat from a fire place, etc.
Influe nce
Desire d room
tempera ture
Room
tempe rature
Max.
limita tion
The max. influence determines how much the room
temperature should influence the desired flow temperature.
Example
The actual room temperature is 2 degrees too high.
The influence at max. limitation (right corner of the display) is
set to -40.
The influence at min. limitation (left corner of the display) is set
to 0.
Heat curve H is 1.8.
Result:
The desired flow temperature is changed by
2 x -40 x 1.8 x 0.1 = -14.4 degrees.
23b
B: Reference room temperature control
Used if your system is not equipped with thermostats and
you select the room with room temperature sensor as a
temperature reference for the rest of the rooms.
Set a positive value for the min. influence and a negative
value for the max. influence.
The room temperature sensor in the reference room registers
the difference between the desired and the actual room
temperature. The desired flow temperature will be corrected
to eliminate this difference.
Example 1
The actual room temperature is 2 degrees too low.
The influence at max. limitation (right corner of the display) is
set to -35.
The influence at min. limitation (left corner of the display) is set
to 20.
Heat curve H is 1.8.
Result:
The desired flow temperature is changed by
2 x 20 x 1.8 x 0.1 = 7.2 degrees.
Example 2
The actual room temperature is 2 degrees too high.
The influence at max. limitation (right corner of the display) is
set to -35.
The influence at min. limitation (left corner of the display) is set
to 20.
Heat curve H is 1.8.
Result:
The desired flow temperature is changed by
2 x (-35) x 1.8 x 0.1 = -12.6 degrees.
Influenc e
Min. lim itation
Desire d room
temper ature
Room
tempe rature
Max. lim itation
Page 16

The grey
side of the
ECL Card
Basic set-up
The grey
side of the
ECL Card
Basic set-up
4 Proportional band, Xp
Circuit Setting range Factory setting
I / II 1 ... 250 K 80 / 80 K
Set the proportional band.
A higher value will result in a stable but slow
control of the flow temperature.
5 Integration time constant, Tn
Circuit Setting range Factory setting
I / II 5 ... 999 sec. 30 / 20 sec.
Set a high integration time constant to obtain a
slow but stable reaction to deviations.
A small integration constant will make the
controller react fast but with less stability
6 Running time of the motorized control valve
Circuit Setting range Factory setting
I / II 5 ... 250 sec. 35 / 15 sec.
Set the running time of the motorized control
valve according to the example. This is the time it
takes the controlled unit to move from fully closed
to fully open position.
How to calculate the running time of a motorized
control valve
The running time of the motorized control valve is calculated
using the following methods:
Seated valves
Running time = Valve stroke (mm) x actuator speed (sec. / mm)
Example: 5.0 mm x 15 sec. / mm = 75 sec.
Rotating valves
Running time = Turning degrees x actuator speed (sec. / degr.)
Example: 90 degrees x 2 = 180 sec.
Control parameters lines 4-7
26a
7 Neutral zone, Nz
Circuit Setting range Factory setting
I / II 0 ... 9 K 3 / 3 K
Set the neutral zone to a high value if you can
accept a high variation in flow temperature.
When the actual flow temperature is within the
neutral zone, the controller does not activate the
motorized valve.
The neutral zone is symmetrical around the desired flow
temperature value, i.e. half the value is above and half the value is
below this temperature.
Control parameters (lines 4 -7) are overruled if thermo actuator is
chosen (OFF).
If you want to tune the PI regulation precisely, you can
use the following method:
• Set the integration time (line 5) to its max. value
(999 sec.).
• Decrease the value for the proportional band (line 4) until the
system starts hunting with a constant amplitude (it might be
necessary to force the system by setting an extreme value).
• Find the critical time period on the temperature recording or
use a stop watch.
Temp.
Critica l time period
Time
This time period will be characteristic for the system, and you can
evaluate the set tings from this critical period.
Integration time = 0.85 x critical time period
Proportional band = 2. 2 x proportional band value in the
critical time period.
If the regulation seems to be too slow, you can decrease the
proportional band value by 10%.
Make sure there is a consumption when you set the parameters.
26b
Page 17

Control & overviews
Control & overviews
Is the ECL Comfort controller ready for use?
Make sure that the correct power supply is
connected to terminals 1 (Live) and 2 (Neutral). See
section 12 or 13.
Check that the required actuators, pumps, fans,
dampers and burners are connected to the correct
terminals. See sections 12 or 13.
Check that all sensors are connected to the correct
terminals. See section 14.
Mount the controller and switch on the power.
Insert the ECL Card with the yellow side facing you
and push , if necessary. See section 15.
Choose manual operation as controller mode. See
section 2.
Check that valves open and close, and that
required pumps, fans, dampers and burners start
and stop when operated manually. See section 19.
Having completed the manual operation check,
choose scheduled operation as controller mode.
Check that the temperatures shown in display A
and B match the actual sensors. See section 1.
Check list
29a
✓
Adapting the ECL Comfort controller to the
system
Turn the ECL Card so that the grey side faces you
and push , if necessary.
Set the time and the date (line A). See section 17.
Check that all settings in the controller (sections 30
and 31) are set or that the factory settings comply
with your requirements.
If your system differs from the diagram shown on the
cover, you should check and alter your service parameters, if
necessary.
Check that the system settings mentioned in
section 10 have been set correctly.
29b
✓
Page 18

Control & overviews
Control & overviews
ECL Card settings
(circuit I)
30a
A Time and date Section 17
B System information Sections 18 & 19
C Heat curve
Section 20
Setting ranges Factory settings Your settings
Slope
0.2 ... 3.4 1.5
See section 20
Parallel displacement
-9 ... 9 K 0 K
See section 20
1
Limit for heating cut-out
10 ... 30 °C 18 °C
See section 21
2
Flow temperature, min. / max. limits
10 ... 150 °C min. 10, max. 90 °C
See section 22
3
Room temperature influence
0 ... 99 / -99 ... 0 min. 0, max. -40
See section 23
4
Proportional band, Xp
1 ... 250 K 80 K
See section 26
5
Integration time constant, Tn
5 ... 999 sec. 30 sec.
See section 26
6
Running time of the motorized control
valve
5 ... 250 sec. 35 sec.
See section 26
7
Neutral zone, Nz
0 ... 9 K 3 K
See section 26
ECL Card settings
(circuit II)
30b
A Time and date Section 17
B System information Sections 18 & 19
C
Setting ranges Factory settings Your settings
1
2
3
4
Proportional band, Xp
1 ... 250 K 80 K
See section 26
5
Integration time constant, Tn
5 ... 999 sec. 20 sec.
See section 26
6
Running time of the motorized control
valve
5 ... 250 sec. 15 sec.
See section 26
7
Neutral zone, Nz
0 ... 9 K 3 K
See section 26
Page 19

Control & overviews
Control & overviews
Service parameters (10-199)
31a
Circuit I (heating and cooling)
Lines Setting ranges Factory settings Your settings
10 Choice of room panel / remote control
1, 2 1
11 Setback temperature dependent
on outdoor temperature
OFF / -29 ... 10 °C -15 °C °C
12 Boost
0 ... 99% 0 % %
13 Reference ramping
0 ... 99 min. 0 min. min.
14 Optimizing time constant
OFF / 10 ... 59 OFF
15 Adaptive function of room
temperature
OFF / 1 ... 30 OFF
17 Influence on desired flow temperature
OFF / 1 ... 20 K OFF K
20 Optimization based on room /
outdoor temperature
ON / OFF OFF
21 Total stop
ON / OFF OFF
22 Pump exercise
ON / OFF OFF
23 Valve exercise
ON / OFF OFF
24 Gear motor / thermo actuator
ON / OFF ON
31 Return temperature limitation
- upper limit (X-axis)
-60 ... 20 °C 15 °C °C
32 Return temperature limitation
- upper limit (Y-axis)
10 ... 110 °C 40 °C °C
33 Return temperature limitation
- lower limit (X-axis)
-60 ... 20 °C -15 °C °C
34 Return temperature limitation
- lower limit (Y-axis)
10 ... 110 °C 60 °C °C
35 Return temperature influence
- max. limitation
-9.9 ... 0 ... 9.9 -2.0
36 Return temperature influence
- min. limitation
-9.9 ... 0 ... 9.9 0.0
37 Time constant for return temperature
limitation
OFF / 1 ... 50 25
43 Parallel operation of DHW and heating
circuits
OFF / 1 ... 99 K OFF K
52 Closed valve / normal operation
ON / OFF OFF
81 Time constant of input for
sensor S1
1 ... 250 50
31b
Service parameters (10-199)
Circuit I (heating and cooling)
Lines Setting ranges Factory settings Your settings
141 Override input selection
OFF / 1 ... 6 OFF
142 Restart period, TR
OFF / 1 ... 99 min. 20 min. min.
145 Changeover time, TP
0.0 ... 23.9 16.1
146 Pressure stabilization time, TST
1 ... 99 sec. 15 sec.
153 Changeover delay, TCH
OFF / 1 ... 99 sec. 5 sec.
196 Service pin LON
ON / OFF OFF
197 LON reset
ON / OFF ON
198 Daylight saving time changeover
ON / OFF ON
199 Master / slave address
0 ... 9, 15 15
Circuit II (DHW)
Lines Setting ranges Factory settings Your settings
22 Pump exercise
ON / OFF OFF
30 Return temperature limitation
10 ... 110 °C 50 °C °C
35 Return temperature influence
- max. limitation
-9.9 ... 0 ... 9.9 -2.0
36 Return temperature influence
- min. limitation
-9.9 ... 0 ... 9.9 0.0
37 Time constant for return temperature
limitation
OFF / 1 ... 50 25
141 Override input selection
OFF / 1 ... 6 OFF
142 Restart period, TR
OFF / 1 ... 99 min. 20 min. min.
145 Changeover time, TP
0.0 ... 23.9 16.1
146 Pressure stabilization time, TST
1 ... 99 sec. 15 sec.
153 Changeover delay, TCH
OFF / 1 ... 99 sec. 5 sec.
Page 20

The grey
side of the
ECL Card
Extended service
The grey
side of the
ECL Card
Extended service
32a
Service parameter(s) 10-11
In addition to the settings in line 1 to 7 on the grey side of the
ECL Card, there is an extended service menu from line 10 and
onwards.
Push repeatedly to reach the lines numbered 10
and onwards.
Line
0
01
Value
Range indicator
Now you can move to any line of your choice.
Set the parameter value.
You can select any of the two circuits no matter
what line you are in. You will not necessarily enter
the same line number. See the service parameters
in section 31.
Check that you have entered all the required settings in
circuit I - and circuit II, if available.
If you want to copy the new settings to the ECL Card
(recommended by Danfoss), see section 34.
Make a note of your new settings in the parameter list in section
31.
When you have entered all your personal settings, turn the ECL
Card over so that the yellow side faces you.
Adjusting the service
parameters
32
10 Choice of room panel / remote control
Circuit Setting range Factory setting
I 1 ... 2 1
Decides the communication with the room panel or remote
control.
Please note that the room panel / remote control is only active
if the system device bus is active. The bus is active when the
outdoor temperature sensor is connected.
Choose between
1: Room panel ECA 60 / 62 or remote control
ECA 61 / 63 with address A
2: Room panel ECA 60 / 62 or remote control
ECA 61 / 63 with address B
The room panel / remote control has no influence on the DHW
control.
11 Setback temperature dependent on outdoor
temperature
Circuit Setting range Factory setting
I OFF / -29 ... 10 °C -15 °C
Below this outdoor temperature, the setback temperature setting
has no influence.
-29 ... 10:
The setback temperature depends on the
outdoor temperature, when the outdoor
temperature is above the set limit. The
lower the outdoor temperature, the less the
temperature reduction. When the outdoor
temperature is below the set limit, there is
no temperature reduction.
OFF: The setback temperature does not depend
on the outdoor temperature.
100%
0%
-20 -10-29 0 2
010
Reduct ion
Outdo or
tempe rature
°C
Setti ng line 11
Page 21

The grey
side of the
ECL Card
Extended service
The grey
side of the
ECL Card
Extended service
32b
Service parameter(s) 12-13 Service parameter(s) 14-15
32c
12 Boost
Circuit Setting range Factory setting
I 0 ... 99% 0%
Shortens the heating-up period by increasing the desired flow
temperature by the percentage you set.
Set the percentage at which you want the desired
flow temperature increased temporarily.
In order to shorten the heating-up period after a setback
temperature period, the desired flow temperature can be
increased temporarily (max. 1 hour). At optimizing the boost
is active in the optimization period (line 14).
If a room temperature sensor or an ECA 60 / 61 / 62 / 63 is
connected, the boost stops when the room temperature has
been reached.
The boost also stops at the end of an optimizing period.
13 Reference ramping
Circuit Setting range Factory setting
I 0 ... 99 min. 0 min.
The time in which the desired flow temperature increases slowly
to avoid load peaks in the heat supply.
Set the ramping time for the controller.
Temperat ure °C
Setting l ine 13 Ti me (min.)
In order to avoid load peaks in the supply network, the flow
temperature can be set to increase slowly after a period with
setback temperature. This causes the valve to open slowly.
14 Optimizing time constant
Circuit Setting range Factory setting
I OFF / 10 ... 59 OFF
Optimizes the start and stop times for the comfort temperature
period to obtain the best comfort at the lowest energy
consumption. The lower the outdoor temperature, the earlier the
heating cut-in.
Adjust the optimizing time constant. The value
consists of a two digit number.
The two digits have the following meaning:
Digit 1 Heat accumulation of
the building
System type
1
light Radiator
systems
2
medium
3
heavy
4
medium Floor heating
systems
5
heavy
Digit 2 Dimensioning
temperature
Capacity
0
- 50 °C large
1
- 45 °C
•
• • •
5
- 25 °C normal
• • •
9
- 5 °C small
OFF: No optimization. The heating starts and
stops at the times set in the schedule.
Dimensioning temperature:
The lowest outdoor temperature (usually determined by your
system designer in connection with the design of the heating
system) at which the heating system can maintain the designed
room temperature.
15 Adaptive function of room temperature
Circuit Setting range Factory setting
I OFF / 1 ... 30 OFF
Controls how fast the room temperature adapts to the desired
room temperature.
The adaptive funtion will eliminate the difference
between the desired and the actual room
temperature. This is done by integrating the
difference and adjusting the desired flow
temperature.
OFF: The adaptive funtion is cancelled.
1: The desired temperature is adapted quickly.
30: The desired temperature is adapted slowly.
Page 22

The grey
side of the
ECL Card
Extended service
The grey
side of the
ECL Card
Extended service
32d
Service parameter(s) 17-20 Service parameter(s) 21
32e
17 Influence on desired flow temperature (T
flow.ref (I)
)
Circuit Setting range Factory setting
I OFF / 1 ... 20 K OFF
The desired flow temperature in heating circuit I can be influenced
by an external reference.
OFF: The desired flow temperature in circuit I
is not influenced by any other controller
(slave).
1 ... 20:
The desired flow temperature is increased
by the set value (line 17), if the demand of a
slave is higher.
Temp. Setting l ine 17
T
flow.ref (I)
T
flow.ref (II)
Time
Example:
If a slave controller demands a higher temperature
than that of the master controller (T
flow.ref(I)
),
the temperature of the master will be increased
accordingly (T
flow.ref(II)
) + the setting (line 17).
The function of line 17 can compensate for heat losses between
master and slave controlled systems.
20 Optimization based on room / outdoor temperature
Circuit
Setting range Factory setting
I
ON / OFF OFF
The optimized start and stop time can be based on either room or
outdoor temperature.
ON: Optimization based on room temperature, if
measured.
OFF: Optimization based on outdoor
temperature. Use this setting if the room
temperature is not measured.
21 Total stop
Circuit Setting range Factory setting
I ON / OFF OFF
Decide whether you want a total stop during the setback
temperature period.
ON: The desired flow temperature is lowered
to 10 °C. The min. setting of the flow
temperature (line 2, section 22) is overruled.
D esired flow
t emp. (°C)
10 ° C
T ime
OFF: No total stop
D esired flow
t emp. (°C)
10 ° C
T ime
Page 23

The grey
side of the
ECL Card
Extended service
The grey
side of the
ECL Card
Extended service
32f
Service parameter(s) 22-24
31-34 Return temperature limitation
The return temperature limitation is based on the outdoor
temperature. Typically in district heating systems a
higher return temperature is accepted at a decrease in
outdoor temperature. The relationship between the return
temperature limits and outdoor temperature is set in two
coordinates.
The upper limit coordinate is set in lines 31 and 32 and the
lower limit coordinate in lines 33 and 34.
80
60
40
20
-15 0 +15
T
return
Line 34
Line 32
Lower li mit
Upper l imit
Line 33 Line 31
T
out
Service parameter(s) 30-34
32g
22 Pump exercise
Circuit Setting range Factory setting
I / II ON / OFF OFF / OFF
Exercises the pump to avoid blocking in periods without heat
demand.
ON: The pump is switched ON for 1 minute every
third day around noon.
OFF: The pump exercise is not active.
23 Valve exercise
Circuit Setting range Factory setting
I ON / OFF OFF
Exercises the valve to avoid blocking in periods without heat
demand.
ON: The valve receives a signal to open and
close every third day around noon.
OFF: The valve exercise is not active.
24 Gear motor / thermo actuator
Circuit Setting range Factory setting
I ON / OFF ON
Choose the actuator type for your valve.
ON: Gear motor
OFF: Thermo actuator (ABV type)
Control parameters (lines 4 -7) are overruled if thermo actuator is
chosen (OFF).
30 Return temperature limitation
Circuit Setting range Factory setting
II 10 ... 110 °C 50 °C
Set the return temperature you accept for the heating / DHW
circuit.
Set the acceptable return temperature limit.
When the return temperature falls below or gets higher
than the set value, the controller automatically changes the
desired flow temperature to obtain an acceptable return
temperature. The influence is set in lines 35 and 36.
For some applications the return temperature limitation for
heating circuits is set in lines 31-34 (outdoor temperature
dependent limitation).
Page 24

The grey
side of the
ECL Card
Extended service
The grey
side of the
ECL Card
Extended service
Service parameter(s) 31-34 Service parameter(s) 35
32h 32i
31 Return temperature limitation - upper limit (X-axis)
Circuit Setting range Factory setting
I -60 ... 20 °C 15 °C
Set the outdoor temperature value (see drawing).
Set the outdoor temperature value (X coordinate)
for the upper limit.
(The corresponding Y coordinate is set in line 32).
32 Return temperature limitation - upper limit (Y-axis)
Circuit Setting range Factory setting
I 10 ... 110 °C 40 °C
Set the return temperature limitation referring to the outdoor
temperature value set in line 31 (see drawing).
Set the return temperature (Y coordinate) for the
upper limit.
(The corresponding X coordinate is set in line 31).
33 Return temperature limitation - lower limit (X-axis)
Circuit Setting range Factory setting
I -60 ... 20 °C -15 °C
Set the outdoor temperature value (see drawing).
Set the outdoor temperature value (X coordinate)
for the lower limit.
(The corresponding Y coordinate is set in line 34).
34 Return temperature limitation - lower limit (Y-axis)
Circuit Setting range Factory setting
I 10 ... 110 °C 60 °C
Set the return temperature limitation (see drawing).
Set the return temperature (Y coordinate) for the
lower limit.
(The corresponding X coordinate is set in line 33).
35 Return temperature influence - max. limitation
Circuit Setting range Factory setting
I / II -9.9 ... 0 ... 9.9 -2.0 / -2.0
Set the influence from the return temperature on the desired flow
temperature.
Set the influence of the max. return temperature
limitation (set in line 30 or lines 31-34).
Influence higher than 0:
The desired flow temperature is increased, when
the return temperature gets higher than the set
limit.
Influence lower than 0:
The desired flow temperature is decreased, when
the return temperature gets higher than the set
limit.
0
Influe nce
M ax. limita tion > 0
Retur n limit
Re turn temp.
Max. li mitation < 0
Example
The return limit is active from 50 °C.
The influence is set to -2.0.
The actual return temperature is 2 degrees too high.
Result:
The desired flow temperature is changed by -2.0 x 2 = -4 degrees.
Normally, the set ting in line 35 is lower than 0 in district heating
systems to avoid a too high return temperature.
Typically, the setting in line 35 is 0 in boiler systems because a
higher return temperature is acceptable (see also line 36).
Page 25

The grey
side of the
ECL Card
Extended service
The grey
side of the
ECL Card
Extended service
Service parameter(s) 36
32j 32k
Service parameter(s) 37
36 Return temperature influence - min. limitation
Circuit Setting range Factory setting
I / II -9.9 ... 0 ... 9.9 0.0 / 0.0
Set the influence from the return temperature on the desired flow
temperature.
Set the influence of the min. return temperature
limitation (set in line 30 or lines 31-34).
Influence higher than 0:
The desired flow temperature is increased, when
the return temperature gets below the set limit.
Influence lower than 0:
The desired flow temperature is decreased, when
the return temperature gets below the set limit.
0
Influe nce
M in. limita tion > 0
R eturn limi t Return temp.
Min. li mitation < 0
Example
The return limit is active up to 50 °C.
The influence is set to -3.0.
The actual return temperature is 2 degrees too low.
Result:
The desired flow temperature is changed by -3.0 x 2 = - 6 degrees.
Normally, the set ting in line 36 is 0 in district heating systems
because a lower return temperature is acceptable.
Typically, the setting in line 36 is higher than 0 in boiler systems to
avoid a too low return temperature (see also line 35).
37 Time constant for return temperature limitation
Circuit Setting range Factory setting
I / II OFF / 1 ... 50 25 / 25
Controls how fast the actual return temperature adapts to the
desired return temperature limitation.
Adjust the time constant for the return limitation.
The setting will eliminate the difference
between the acceptable and the actual return
temperature.
The difference is integrated to adjust the desired
flow temperature.
OFF: The desired flow temperature will not be
adjusted any further.
1: The desired flow temperature will be
adjusted quickly.
50: The desired flow temperature will be
adjusted slowly.
Page 26

The grey
side of the
ECL Card
Extended service
The grey
side of the
ECL Card
Extended service
32l
Service parameter(s) 43 Service parameter(s) 52
32m
81 Time constant of input for sensor S1
Circuit Setting range Factory setting
I 1 ... 250 50
Set the time constant for the sensor S1 input. A low setting
is equivalent to a fast sampling time and a high setting is
equivalent to a slow sampling time.
1 ... 250:
Setting Time constant
1 ~ 180 sec.
10 ~ 220 sec.
20 ~ 261 sec.
100 ~ 568 sec.
200 ~ 917 sec.
250 ~ 1092 sec.
43 Parallel operation of DHW and heating circuits
Circuit Setting range Factory setting
I OFF / 1 ... 99 K OFF
Choose whether the heating circuit is to operate in dependence of
the DHW circuit.
OFF: Independent parallel operation, i.e. the
DHW and the heating circuits operate
independently of each other. It makes
no difference whether the desired DHW
temperature can be reached.
1 ... 99:
Dependent parallel operation, i.e. the
desired heating temperature depends on
the DHW demand.
Choose how much the DHW temperature
(circuit II) can drop before the desired
heating temperature (circuit I) has to be
decreased.
Temp.
100% para llel
operat ion
Line 43
(accep table deviat ion)
Desir ed DHW temp.
Actua l DHW
temp.
Time
Parall el operatio n with decrea sed
heati ng temp.
If the actual DHW temperature deviates more than the set value
(line 43), the gear motor M1 in the heating circuit will close to
such an extent that the DHW temperature stabilizes at the lowest
acceptable value.
52 Closed valve / normal operation
Circuit Setting range Factory setting
I ON / OFF OFF
The heating circuit can be closed when the controller acts as slave
and when DHW charging is active in the master.
ON: The valve in the heating circuit is closed*
during active DHW charging in the master
controller.
OFF: The flow temperature control remains
unchanged during active DHW charging in
the master controller.
*) The desired flow temperature is set to 10 °C.
The setting in line 52 must be considered if this controller is a
slave.
Page 27

The grey
side of the
ECL Card
Extended service
The grey
side of the
ECL Card
Extended service
32n
Service parameter(s) 141
141 Override input selection
Circuit Setting range Factory setting
I / II OFF / 1 ... 6 OFF / OFF
Choose an unused temperature sensor input for overriding the
schedule for circuit I and / or circuit II.
The override can be activated for comfort or setback mode.
For override the controller's mode must be in 'scheduled
operation'!
OFF: The controller's schedule is not overridden.
1 ... 6: Select an unused sensor input S1 ... S6 for
the override of the circuit in question.
Connection example
If the override switch has gold-plated contacts, you can
choose one of the following solutions:
Closed switch:
Comfort temperature
Closed switch:
Setback temperature
Changeover switch:
Setback or comfor t temperature
Connection example with ECA 9010
(used if the override switch does not have gold-plated
contacts).
16 - Brown
15 - Red
Green (S1 ... S6)
The ECA 9010 module is powered by the system device bus, which
means that the bus must be active. The bus is activated by setting
the controller address to 15 (line 199).
142 Restart period, TR
Circuit Setting range Factory setting
I / II OFF / 1 ... 99 min. 20 / 20 min.
When the controller receives an alarm, the pump stops
and an alarm is shown in the alarm display (the display is
blinking, see section 1c). The restart period is the time which
should elapse before the pump in question is allowed to start
again.
OFF: No restart period.
1 ... 99: The pump will start again after the restart
period has elapsed.
145-153 Pump control , overview
ON
ON
OFF
OFF
PI
PI
I
TP
TCH TST TCH TS
T
TP
ON
ON
OFF
OFF
PI
PI
I
TCH TST TCH TS
T
TP
Pressu re
Limit
P I: Pump I
P II: Pump I I
T P: Cha ngeover time (l ine 145)
T CH: Chan geover delay (l ine 153)
T ST: Pre ssure stabi lization t ime (line 146)
Alarm
Pressu re
Limit
Service parameter(s) 142-153
32o
Page 28

The grey
side of the
ECL Card
Extended service
The grey
side of the
ECL Card
Extended service
145 Changeover time, TP
Circuit Setting range Factory setting
I / II 0.0 ... 23.9 16.1 / 16.1
The changeover time determines the moment when the activated
pump stops and the deactivated pump starts.
Please note this special setting range. The figures
to the left of the decimal point represent the time
in hours and the figure to the right of the decimal
point represents the frequency in days.
Example:
16.1 the change will take place at 16:00 hours
each day
20.3 the change will take place at 20:00 hours
every third day
0.2 the change will take place at midnight every
second day
8.0 the change will take place at 08:00 hours
every tenth day.
The changeover time is automatically deactivated if one pump
has an alarm or if only one pump exists in the heating system.
146 Pressure stabilization time, TST
Circuit Setting range Factory setting
I / II 1 ... 99 sec. 15 / 15 sec.
The pressure stabilization time starts when a pump switches ON.
The pressure stabilization time has to elapse before the controller
can read the pressure control switch.
Choose the pressure stabilization time.
When the chosen pressure stabilization time is too short, the
active pump will stop immediately after the pressure stabilization
time has elapsed.
153 Changeover delay, TCH
Circuit Setting range Factory setting
I / II OFF / 1 ... 99 sec. 5 / 5 sec.
The changeover delay is the time from the first pump stops until
the next pump starts.
OFF: No changeover delay. One pump
application.
1 ... 99: A pump will start when the changeover
delay has elapsed.
The changeover delay has to be chosen in systems with two
pumps.
32q
Service parameter(s) 196-198
198 Daylight saving time changeover
Circuit Setting range Factory setting
I ON / OFF ON
Choose whether you want the change to summer / winter time to
be automatic or manual.
ON: The controller’s built-in clock automatically
changes + / - one hour on the standardized
days for daylight saving time changeover for
Central Europe.
OFF: You change manually between summer and
winter time by setting the clock backward
or forward.
196 Service pin - LON
Circuit Setting range Factory setting
I ON / OFF OFF
This setting is only used in connection with LON communication
(see the documentation for the used communication unit).
197 LON reset
Circuit Setting range Factory setting
I ON / OFF ON
This setting is only used in connection with LON communication
(see the documentation for the used communication unit).
32p
Service parameter(s) 145-153
Page 29

The grey
side of the
ECL Card
Extended service
The grey
side of the
ECL Card
Extended service
199 Master / slave address
Circuit Setting range Factory setting
I 0 ... 9, 15 15
The setting is relevant when more controllers are working in the
same ECL Comfort system (connected via the system device bus
(ECL Comfort BUS)).
0: The slave receives information about the
outdoor temperature (S1), system time, and
signal for DHW demand in the master.
1 ... 9: The slave receives information about the
outdoor temperature (S1), system time, and
signal for DHW demand in the master.
The slave sends information about the
desired flow temperature to the master.
15: The controller is master. The master sends
information about the outdoor temperature
(S1), system time, and the DHW demand
signal.
The master receives the desired flow
temperature information from the slaves
with addresses 1 ... 9.
The bus is active and connected ECAs are
powered.
The ECL Comfort controllers can be connected via the bus to
perform a larger system. The controller, which is physically
connected with the outdoor temperature sensor, is the
master of the entire system and automatically gets the
address 15.
Each slave must be configured with its own address (1 ... 9).
However, more slaves can have the address 0 if they only have
to receive information about outdoor temperature, system
time, and signal for DHW demand in the master.
32r
Service parameter(s) 199
Page 30

The yellow
side of the
ECL Card
Miscellaneous
The yellow
side of the
ECL Card
Miscellaneous
34a
Copying with the ECL Card
Check the ECL Card and the software generations (see
following example).
Insert the ECL Card with the yellow side facing you.
Go to line 8 (is not displayed), which is the first line
below line 7.
Application t ype
Software
version,
ECL Card
C 73
05 109
Software version,
controller
Store new controller settings on the ECL Card
All new settings* can be stored on the ECL Card. Insert the
ECL Card with the yellow side facing you.
Go to line 9 (is not displayed), which is the second
line below line 7.
Card
C
C 99
Y
0
P
Controller
Copying directio n
Accept to copy settings from controller to
ECL Card.
When the copying is finished, the controller returns to display
line C.
* Time a nd date settings are not stored on the ECL Card.
Do not remove the ECL Card while copying. The data on the ECL
Card can be damaged!
If you have copied your personal settings to the ECL Card, you
cannot restore the factory settings!
Copy personal settings to additional controller(s) in
identical systems
Ensure that the other controller(s) use(s) the same ECL Card
type. (If this is not the case, please read section 15).
Insert the ECL Card, which contains the personal settings,
with the yellow side facing you.
Go to line 9 (is not displayed), which is the second
line below line 7.
Select the copying direction (from the card to the
controller).
Card Controller
Copying directio n
C
C 99
Y
0
P
Copy.
Store new ECL Card application in the controller
If you insert an ECL Card with another application type, it is
necessary to copy it to your controller.
Insert the ECL Card with the yellow side facing you. The
controller will keep showing
CPY.
Card Controller
Copying directio n
C
C 99
Y
0
P
Copy.
Do not remove the ECL Card while copying. The data on the ECL
Card can be damaged!
34b
Page 31

7a
Definitions
Air duct temperature
Temperature measured in the air duct where the temperature is
to be controlled.
Balance temperature
This setpoint is the basis for the flow / air duct temperature. The
balance temperature can be adjusted by the room temperature,
the compensation temperature and the return temperature.
The balance temperature is only active if a room temperature
sensor is connected.
Comfort operation
Normal temperature in the system controlled by the schedule.
During heating the flow temperature in the system is higher
to maintain the desired room temperature. During cooling the
flow temperature in the system is lower to maintain the desired
room temperature.
Comfort temperature
Temperature maintained in the circuits during comfort periods.
Normally during daytime.
Compensation temperature
A measured temperature influencing the flow temperature
reference / balance temperature.
Controller mode indicator
Black arrow to the right of the symbols indicating the present
mode.
Desired room temperature
Temperature which is set as the desired room temperature.
The temperature can only be controlled by the ECL Comfort
controller if a room temperature sensor is installed.
If a sensor is not installed, the set desired room temperature
however still influences the flow temperature.
In both cases the room temperature in each room is typically
controlled by radiator thermostats / valves.
Desired temperature
Temperature based on a setting or a controller calculation.
Dew point temperature
Temperature at which the humidity in the air condensates.
Factory settings
Settings stored on the ECL Card to simplify the set up of your
controller the first time.
Flow temperature
Temperature measured in the flow at any time.
Flow temperature reference
Temperature calculated by the controller on basis of the
outdoor temperature and influences from the room and / or
return temperatures. This temperature is used as a reference for
the control.
Heating circuit
The circuit for heating the room / building.
Heat curve
A curve showing the relationship between actual outdoor
temperature and required flow temperature.
DHW circuit
The circuit for heating the domestic hot water (DHW).
7b
Humidity, relative
This value (stated in %) refers to the indoor moisture content
compared to the max. moisture content. The relative humidity
is measured by the ECA 62 / 63 and is used for the calculation of
the dew point temperature.
Limitation temperature
Temperature that influences the desired flow / balance
temperature.
Pt 1000 sensor
All sensors used with the ECL Comfort controller are based
on the Pt 1000 type. The resistance is 1000 ohm at 0 °C and it
changes with 3.9 ohm / degree.
Optimization
The controller optimizes the start time of the scheduled
temperature periods. Based on the outdoor temperature, the
controller automatically calculates when to start in order to
reach the comfort temperature at the set time. The lower the
outdoor temperature, the earlier the start time.
Return temperature
The temperature measured in the return influences the desired
flow temperature.
Room temperature sensor
Temperature sensor placed in the room (reference room,
typically the living room) where the temperature is to be
controlled.
Room temperature
Temperature measured by the room temperature sensor, room
panel or remote control. The room temperature can only be
controlled directly if a sensor is installed. The room temperature
influences the desired flow temperature.
Schedule
Schedule for periods with comfort and setback temperatures.
The schedule can be made individually for each week day and
may consist of up to 3 comfort periods per day.
Setback temperature
Temperature maintained in the heating / DHW circuit during
setback temperature periods.
State / mode indicators
White arrow to the left of the symbols (sun / moon). The white
arrow indicates the present state, comfort (sun) or setback
(moon), when the controller is in scheduled operation mode.
The black arrow symbol indicates the mode of the controller.
Time line / bar
Line with numbers representing the hours. Below the time
line, time bars represent scheduled periods with comfort
temperature. The bar is divided into half hour sections.
Weather compensation
Flow temperature control based on the outdoor temperature.
The control is related to a user-defined heat curve.
The definitions apply to the Comfort 200 as well as ECL Comfor t
300 series. Consequently, you might come across expressions
that are not mentioned in your guide.
Page 32

The time shown in the display is one hour off?
See the summer time changeover in line 198, section 32.
The time shown in the display is not correct?
The internal clock may have been reset, if there has been a
power break for more than 12 hours.
Set time and date.
See section 17.
The ECL Card is lost?
Switch the power off and on again to see the
system type and the software generation of the controller.
Order a replacement from your Danfoss representative.
Insert the new ECL Card with the yellow side facing you and
make sure that you copy your personal settings from the
controller to the ECL Card.
See section 34.
The room temperature is too low?
Make sure that the radiator thermostat does not limit the
room temperature.
If you still cannot obtain the desired room temperature by
adjusting the radiator thermostats, the flow temperature
is too low. Increase the desired room temperature (section
3). If this does not help, adjust the heat curve / balance
temperature (section 20).
The room temperature is too high during setback
periods?
Make sure that the min. flow temperature limitation is not too
high. See section 22.
The temperature is unstable?
Check that the flow temperature sensor is correctly
connected and in the right place. Adjust the control
parameters (section 26).
If the controller has a room temperature signal, see section
23.
The controller does not operate and the control
valve is closed?
Check that the flow temperature sensor is measuring the
correct value, see section 1.
Check the influence from other measured temperatures.
Hot points
6a
How to make an extra comfort period in the
schedule?
You can make an additional comfort period by pushing the
shift and + buttons simultaneously for 2 seconds.
See section 4.
How to remove a comfort period in the schedule?
You can remove a comfort period by pushing the shift and
- buttons simultaneously for 2 seconds.
See section 4.
How to restore your personal settings?
Insert the ECL Card with the yellow side facing you. Go to line
9 (is not displayed), which is the second line below line 7.
Select copy direction 'card to controller' (left to right) by
using the shift button. Push the + button to copy.
See section 5.
This is a collection of frequently asked questions for the ECL
Comfort 200 as well as ECL Comfort 300 series. Consequently,
you might come across some questions that do not apply to your
application.
6b
Page 33

The yellow
side of the
ECL Card
The yellow
side of the
ECL Card
Save your personal settings to the ECL Card
Go to line 9 (is not displayed), which is the second
line below line 7.
Card
C
C 99
Y
0
P
Copying directio n
Controller
Accept to copy personal settings from the
controller to the ECL Card.
The controller will return to display line C when the copying is
completed. This takes approx. 15 seconds.
By saving your personal settings* to the ECL Card, you have
ensured that your settings will not be lost if the controller
settings are changed by mistake.
* Time and date settings are not stored on the ECL Card.
Prevent unauthorized operation
One of the primary advantages of the controller is the
setting security.
If you remove the ECL Card, and the ECL Comfort controller is
not operated during the next 25 minutes (approx.):
- the controller returns to display line C (section 1)
- further changes are not possible
- the controller continues its operation
When the ECL Card is inserted with the yellow side
facing you, the controller can be operated again.
Do not remove the ECL Card while copying. The data on the
ECL Card can be damaged!
If you have copied your personal settings to the ECL Card, you
cannot restore the factory settings!
Advantages of the
ECL Card
5a
Restore ECL Card data
After establishing your favorite temperatures, comfort
periods etc., and after copying these to the ECL Card, you can
set alternative settings.
Insert the ECL Card and make the temporary settings,
e.g. for holidays, but do not copy these. To restore your
favorite settings, copy these from the ECL Card to the
controller. Insert the ECL Card.
Go to line 9 (is not displayed), which is the second
line below line 7.
Card
C
C 99
Y
0
P
Copying directio n
Controller
Choose to copy the ECL Card to the controller
(from left to right).
Copy
Do not remove the ECL Card while copying. The data on the
ECL Card can be damaged!
5b
Page 34

The yellow
side of the
ECL Card
The yellow
side of the
ECL Card
Monitor the current schedules
Select between lines 1-7 (Monday, Tuesday ......
Sunday) to see your individual schedules.
Line
Circuit
Changeover time
Periods with comfort temp. are
shown as black bars
Time line
Change the schedules
Select appropriate day.
The changeover point blinks
Adjust the first blinking changeover point, if
required. The end of the bar moves, extending or
reducing the comfort period.
Shift to next changeover point and adjust
accordingly.
Change the schedule for circuit II
Select circuit II to view or change the schedule.
Use the same method for changes as for circuit I.
4a
Set your personal schedule
4b
Add an extra comfort period
Push the shift and + button simultaneously for
2 seconds.
The new period appears
Adjust the new period.
Remove a comfort period
Select the period to be removed (blinking
changeover point)
Push shift and - buttons simultaneously for
2 seconds.
Cancel changes in your personal settings
Push - and + buttons simultaneously for
2 seconds to restore the factory settings of the
actual schedule.
Page 35

The yellow
side of the
ECL Card
The yellow
side of the
ECL Card
Select circuit mode
2
During scheduled operation (clock), the state indicator (a
white arrow) will show you the control mode of the selected
circuit. The white arrow will blink when this is a heating
circuit and it is in the optimizing period.
The mode can be set differently for each circuit by means of
the function selector. However, if manual operation (hand) is
chosen, this mode will apply to all circuits.
State indicator
(white arrow)
02
Function selec tor
(black arrow)
Function selector. Push the button to change the
mode of the circuit. The black arrow shows you
which of the modes you have chosen.
What do the symbols mean?
Manual operation
Used only at maintenance and service.
Note! The protection against frost is switched off
when this mode is selected.
Scheduled operation
This is the normal mode. The temperature is
controlled according to your schedule with
automatic changeover to / from comfort and
setback temperature periods.
Constant comfort temperature
The schedule is not in operation. Use this mode
when a constant comfort temperature is desired.
Constant setback temperature
The schedule is not in operation. Use this mode
when you are away on holiday, etc.
Standby
The heating circuit is stopped. The system is still
protected against frost.
In the DHW circuit, however, the DHW
temperature is controlled according to the
setback temperature.
Select circuit mode
2
Go to display C.
Circuit I:
Setting the desired room temperature
02
Desired room
temp. in comfort
mode
61
Desired room
temp. in setback
mode
Select the constant comfort mode.
Set the desired room temperature for the comfort
mode.
Select the constant setback mode.
Set the desired room temperature for the setback
mode.
Select the desired mode (section 2).
The setting of the desired room temperature is important even if
a room temperature sensor / room panel / remote control is not
connected.
Is the room temperature too low?
Make sure that the radiator thermostat does not limit the room
temperature.
If you still cannot obtain the desired room temperature by
adjusting the radiator thermostats, the flow temperature is too
low. Increase the desired room temperature.
Circuit II:
Setting the desired DHW temperature
55
Desired DHW
temp. in comfort
mode
01
Desired DHW
temp. in setback
mode
Select the constant comfort mode.
Set the desired DHW temperature for the comfort
mode.
Select the constant setback mode.
Set the desired DHW temperature for the setback
mode.
Select the desired mode (section 2).
3
Set your room and DHW
temperature
Page 36

The yellow
side of the
ECL Card
The yellow
side of the
ECL Card
1a
Choose your favorite display
(circuit I)
Choose the display - A, B, or C - for daily
operations.
Room temperature - display A
Line
Circuit
Outdoor
temp.
(S1)
Room temp.
913
20
A
Desired room
temp.
The display will show the room temperature if a room panel or a
remote control is installed. If not, two bars will be shown.
System information - display B
Line
Circuit
Flow
temp.
State of controlled units
5
1
1
ON
2
036
B
3
2
Return
temp.
Push and hold the shift button to see:
- the calculated flow temperature
- the desired return temperature limitation.
Today's schedule - display C
Line
Circuit
Outdoor
temp.
Time
8
0 3 6 9 12 15 18 21 24
1
023
5
C
3
Today's schedule
Desired room
temp.
The controller automatically reverts to display C if the card has
been reinserted or the power supply has been interrupted.
If the temperature value is displayed as "- -", the sensor in
question is not connected. "- - -" means that the sensor is shortcircuited.
Choose the display - A, B, or C - for daily
operations.
DHW temperature - display A
Line
Circuit
DHW temp. (S5)
55
6
A
5
Desired DHW
temp.
System information - display B
Line
Circuit
DHW
temp.
State of controlled units
5
1
1ON2
036
B
3
2
Return
temp.
Today’s schedule - display C
Line
Circuit
Time
8
0 3 6 9 12 15 18 21 24
1
55
5
C
3
Today's schedule
Desired DHW
temp.
The controller automatically reverts to display C if the card has
been reinserted or the power supply has been interrupted.
If the temperature value is displayed as "- -", the sensor in
question is not connected. "- - -" means that the sensor is shortcircuited.
Is the display blinking? See section 1c.
Choose your favorite display
(circuit II)
1b
Page 37

The yellow
side of the
ECL Card
Choose your favorite display
(alarm)
1c
Choose the alarm settings by pushing the button
until there is no circuit indication (display / lights).
Choose the display - A, B, or C - for daily
operations.
Alarm - display A
Line
Alarm info,
circuit I
2
--
A
on
Alarm status:
ON = active alarm
OFF = inactive alarm
Alarm info,
circuit II
When an alarm is active, the display will blink. Press any
button and the blinking will stop. The display will then revert
to normal.
The following alarms are possible:
- - no pump alarm
1 one pump alarm
2 two pump alarms
Press the minus button to cancel / remove the
alarm.
Alarm - display B
Line
B
--
Alarm input
(sensor S2)
The following alarms are possible:
- - no pump alarm
78 pump alarm from circuit I via relay Rx (1300 Ω)
0 pump alarm from circuit II via relay Ry (1000 Ω)
- - - two pump alarms, both circuits have a pump alarm
Save energy - save money - improve
your comfort temperature
The ECL Comfort controller is designed by Danfoss for the
automatic temperature control of heating, domestic hotwater (DHW), ventilation and cooling systems.
Some of the advantages of the ECL Comfort controller system
are:
• Secure control and the optimum use of energy resources.
• Control of system temperatures according to seasonal
changes and variations in outdoor temperatures.
• Setback temperature periods and low energy consumption
while you are out or asleep save heating costs.
Operating the ECL Comfort controller in general
When operating the controller it is advisable to keep the lid
open in order to view the entire display.
During operation the ECL Card must be inserted with the
yellow side facing you.
The ECL Card, which is equipped with a memory chip, is
simple and easy to handle.
The ECL Card is divided vertically into two columns each
representing a circuit.
Horizontally the ECL Card is divided into lines that
represent the different control and programming options
for the two circuits. Each line is shown in the display of the
controller, which gives you an instant overview of the
operation, settings etc.
How to use the ECL Comfort User's Guide
This guide provides you with an easy instruction for the ECL
Comfort controller.
The Installer's Guide, the grey section (turn the guide over),
contains the complete list of factory settings and various
detailed adjustments that ensure an efficient and continuous
operation of your system.
Page 38

Table of Contents
Daily use
Section
1 Choose your favorite display
2 Select circuit mode
3 Set your room and DHW temperature
4 Set your personal schedule
5 Advantages of the ECL Card
6 Hot points
7 Definitions
The documentation for the ECL Comfort controller is composed
of numbered sections. Only sections that are relevant to your
ECL Comfort controller are included here.
Installer's Guide:
Grey sections 10 and onwards. Turn the guide over.
The functions can only be realized with ECL Comfort 301 and as of
controller version 2.00.
Your personal schedule:
Factory set tings are grey.
6-8
16-22
8-23
5-8 18-22
8-23
DHW 0 3 6 9 12 15 18 21 24
1 Monday
2 Tuesday
3 Wednesday
4 Thursday
5 Friday
6 Saturday
7 Sunday
Heating 0 3 6 9 12 15 18 21 24
1 Monday
2 Tuesday
3 Wednesday
4 Thursday
5 Friday
6 Saturday
7 Sunday
 Loading...