

Page 1
PORTABLE 2-IN-1 HOME COMFORT
Table of contents . . . . . . . . . . . . . . . . . . . . . . . . . 1
APPAREIL PORTABLE DE CONFORT
AU FOYER 2 EN 1
Table des matières . . . . . . . . . . . . . . . . . . . . . . . 14
CONFORT HOGAREÑO 2-EN-1 PORTÁTIL
Índice . . . . . . . . . . . . . . . . . . . . . . . . . . . . . . . . . . 27
Danby Products Limited, Guelph, Ontario Canada N1H 6Z9
Danby Products Inc., Findlay, Ohio USA 45840
03/05 ver.1
OWNER’S MANUAL
MANUEL
D'UTILISATION
MANUAL DEL
USUARIO
Model • Modèle • Modelo
DDR600R
CAUTION:
Read complete installation and
operating instructions before
installing and/or using the
dehumidifier.
MISE EN GARDE :
Lire attentivement les consignes
de sécurité et les instructions
d'utilisation avant l'utilisation
initiale de ce produit.
ADVERTENCIA:
Lea completamente el manual de
instalación y de operación antes
de instalar y/o usar el
deshumidificador.
KEEP THESE INSTRUCTIONS
FOR FUTURE REFERENCE.
If the Dehumidifier changes
ownership, be sure this manual
accompanies the unit.
CONSERVER CES
INSTRUCTIONS POUR LA
RÉFÉRENCE FUTURE
En cas de revente du
déshumidificateur, ce manuel doit
être inclus avec l'appareil.
GUARDE ESTAS
INSTRUCCIONES PARA
REFERENCIA FUTURA.
Si el deshumidificador cambia de
dueño, asegúrese de que este
manual permanezca con la
unidad.
Page 2

Page
Introduction. . . . . . . . . . . . . . . . . . . . . . . . . . . . . . . . . . . . . . . . . . . . . . . . . . . . 2
Warnings, and Important Notices . . . . . . . . . . . . . . . . . . . . . . . . . . . . . . . . . . . 3
Specifications . . . . . . . . . . . . . . . . . . . . . . . . . . . . . . . . . . . . . . . . . . . . . . . . . . 4
Features and Parts . . . . . . . . . . . . . . . . . . . . . . . . . . . . . . . . . . . . . . . . . . . . . . 5
Key Pad Functions . . . . . . . . . . . . . . . . . . . . . . . . . . . . . . . . . . . . . . . . . . . . . . 6
Remote Control. . . . . . . . . . . . . . . . . . . . . . . . . . . . . . . . . . . . . . . . . . . . . . . . . 8
Location and Installation Instructions . . . . . . . . . . . . . . . . . . . . . . . . . . . . . . . . 9
Operating Instructions/Air Filter Removal. . . . . . . . . . . . . . . . . . . . . . . . . . . . . 10
Care and Maintenance . . . . . . . . . . . . . . . . . . . . . . . . . . . . . . . . . . . . . . . . . . . 11
Direct Drain Instructions . . . . . . . . . . . . . . . . . . . . . . . . . . . . . . . . . . . . . . . . . . 11
Storage . . . . . . . . . . . . . . . . . . . . . . . . . . . . . . . . . . . . . . . . . . . . . . . . . . . . . . . 11
Trouble Shooting Guide . . . . . . . . . . . . . . . . . . . . . . . . . . . . . . . . . . . . . . . . . . 12
Warranty . . . . . . . . . . . . . . . . . . . . . . . . . . . . . . . . . . . . . . . . . . . . . . . . . . . . . . 13
1
Table Of Contents
Page 3

2
Introduction
Thank you for choosing this Danby appliance to provide you and your family with all of the “Home Comfort”
requirements for your home, cottage or office. This Owner’s Manual will provide you with valuable information
necessary for the proper usage, care and maintenance of your new appliance. If properly maintained, your
Danby®appliance will give you many years of trouble free operation. Please take a few moments and read
the instructions thoroughly and familiarize yourself with all of the operational aspects of this appliance.
This unit can be conveniently moved from room to room within your home and set-up in just minutes.
For easy reference, may we suggest you attach a copy of your sales slip/receipt to this page, along with the
following information which is located on the manufacturers nameplate located on the rear wall of the water
tank compartment.
Model Number: ___________________________________________________
Serial Number: ___________________________________________________
Date of Purchase: _________________________________________________
Dealer’s Name and Address: ________________________________________
________________________________________
This information will be required if your unit requires servicing and/or for general inquiries. To contact a
Customer Service Representative, telephone
1-800-26-DANBY (1-800-263-2629)
Keep these instructions for future reference.
This symbol denotes a caution or warning
CAUTION
Do not leave this unit unattended or operate in an
area where people or animals may not be able to
react quickly. A failed unit may cause over-heating
reaulting in personal injury or proper ty damage.
Page 4

3
NOTE: The WARNING instructions issued in this manual are not meant to cover all possible conditions and
situations that may occur. It must be understood that common sense, caution and carefulness are factors
that cannot be built into all appliances.These factors must be supplied by the person(s) installing,
maintaining, or operating the appliance. Failure to install, maintain, and/or operate the equipment according
to the manufacturer's instructions may result in conditions which can produce bodily injury and/or property
damage. Contact your dealer, service agent or the manufacturer about any problems or conditions you do
not fully understand. (For Danby Customer Service call 1 800 26 DANBY / 1 800 263 2629)
WARNING - IMPORTANT NOTICES
FOR YOUR SAFETY - To reduce the risk of fire or explosion, do not store or use gasoline or other flammable
vapors or liquids in the vicinity of this or any other appliance.
ELECTRICAL SERVICE INFORMATION -
To reduce the risk of fire, electric shock or personal injury, all wiring
and grounding must conform with the latest edition of Local and National Electrical Codes It is the customer's
responsibility to have the wiring and fuses checked by a qualified electrician to make sure adequate electrical power is
available.
This appliance is designed to operate on a separate branch, polarized, three-wire, effectively grounded, 120 Volt 60
Hertz (alternating current) circuit protected by a 15 ampere fuse, equivalent fusetron or circuit breaker.
The three-prong grounding plug on the power cord should be plugged directly into a polarized three slot effectively
grounded receptacle rated 110/120 V.A.C.
GROUNDING INSTRUCTIONS - Improper connection of the equipment-grounding conductor can result in a risk of
electrical shock. Check with a qualified electrician or serviceman if you are in doubt as to whether your appliance
outlets are properly grounded.
This appliance must be grounded. In the event of malfunction or breakdown, grounding will reduce the risk of
electrical shock by providing a path of least resistance for electrical current. This appliance is equipped with a cord
having an equipment-grounding conductor and 3 prong grounding plug.The plug must be connected into an outlet that
is properly installed and grounded in the accordance with all local codes and ordinances.
Do not modify the plug provided with the appliance. If it will not fit the outlet, have a proper outlet installed by a
qualified electrician.
If the household electrical supply does not meet the above specifications, or if you are not sure your home has an
effective ground, have a qualified electrician or your local electrical utility company check it and correct any problems.
Page 5

Electrical Specifications
1. All wir ing must comply with local and national
electrical codes and be installed by a qualified
electrician. If you have any questions regarding the
following instructions, contact a qualified electrician.
2. Check available power supply and resolve any wiring
problems BEFORE installation and operation of this
unit.
3. For your safety and protection, this unit is grounded
through the power cord plug when plugged into a
matching wall outlet. If you are not sure whether the
wall outlets in your home are properly grounded,
please consult a qualified electrician. DO NOT USE
PLUG ADAPTERS OR EXTENSION CORDS.
4. The manufacturers nameplate is located on the rear
(back) wall of the cabinet.The nameplate contains
electrical and other technical data specific to this unit.
5. To avoid the possibility of personal injury, always
disconnect the power supply before attempting to
clean and/or service the unit.
4
Dehumidifying Capacity (Pints / Liters) 60 / 28.4
Electrical Requirements 115 Volts / 60 Hz
Power Input (watts) 785
Rated Amperage
• Dehumidifying 7.26
• Heating Not Applicable
Air Flow Circulation - High /Low Fan Speed(Cubic Feet per Minute) 183 / 160
Type of Refrigerant R22
Water Tank Capacity (Liters / Pints) 5.3 / 11.2
Operating Noise Level (dB A) 50
Unit Dimensions Width / Height / Depth 13-3/4” x 30-1/2” x 13-3/16”
Net Weight (kg / lbs.) 25 / 55.1
NOTE: Specifications are subject to change without notice, for further improvements.
Unit Specifications: DDR600R
Page 6

5
• Soft Touch (Electronic) Control Key Pads (Illuminated)
• LED Readout
• Auto-Sensing Humidity Control
• Adjustable Humidity Settings (35% ~ 80%, Continuous)
• 2 Fan Speed Settings (High/Low)
• Delay Start Protection (compressor)
• Auto-Defrost (De-Icer)
• Low Temperature Operation
• Energy Star Rated
• Water Full (Bucket) Indicator Light & Audible Signal
• Easy Roll Casters (4)
• Front Mounted Water Tank (Removable)
• Direct Drain Option (Hose not Included)
• Euro-Design Styling
• Quiet Operation
• Removable Air Filter
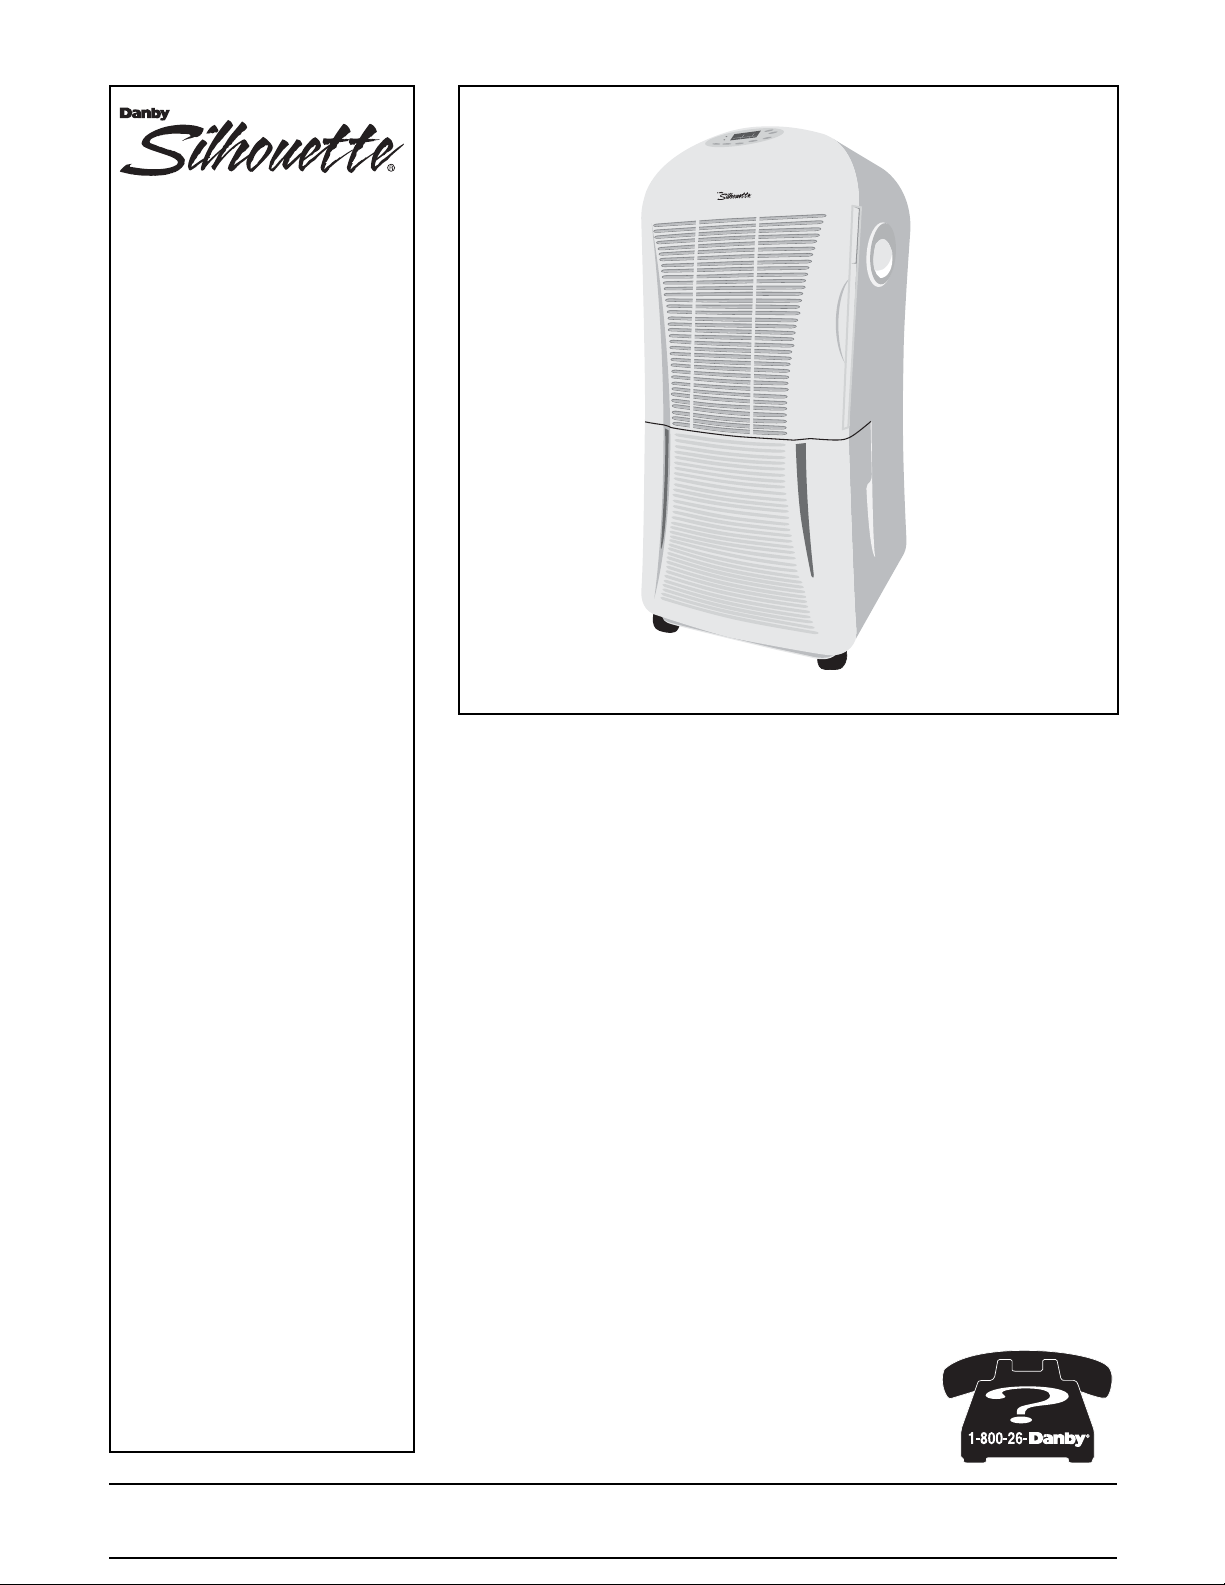
FEATURES
Control Panel
Air Inlet
Front Panel
Side Panel
Handle
Unit Parts Identification
Water Tank
(Front)
Easy-roll Castors
Page 7

I/O Button :
Each time this button is pressed turns the unit On/Off.
Fan Button: Each time this button is pressed the fan speed
will alternate between HIGH FAN & LOW FAN.
Timer Button: Used to initiate a delayed start “on” time
and/or delayed “off ” stop time. Each time the button is
pressed the dalayed start/stop time can be adjusted (between
0.5 hrs ~ 24 hrs.) as follows;
0.5 hr increments. (from 0.5hrs ~ 10 hrs.)
1.0 hr increments (from 10hrs. ~ 24hrs.)
This button allows you to decrease relative humidity settings. Each
time the button is pressed the SET RH% value will decrease by
5%. (adjustable values between 80% ~35%) This button can also
be used to decrease auto timed (delay start / delay stop) programs
This button allows you to increase the relative humidity settings.
Each time the button is pressed the SET RH% value will increase
by 5%. (adjustable values between 35% ~ 80%) This button can
also be used to increase auto timed (delay start / delay stop)
programs
Mode Button: Each time this button is pressed will alternate
between dehumidifier and fan mode.The symbol for the mode
selected will appear in the LED display
LED READOUT:The LED displays the following information:
1. ROOM AIR = Real Time Room Ambient RH% Conditions
2. SET AIR = The Set Operating RH% Value.
3. MODE: = The selected operating mode.
4. FAN SPEED = The selected fan speed.
5. TIMER = The selected delayed start/stop time.
6
Explanation of key pad functions on the electronic control board.
12
5
34
I/O
Page 8

7
Indicator Light Function:
Arrow Symbols (Operation - Blue Light): This light
illuminates and remains illuminated as long as the unit is
operational.
Bucket Symbol (Water Full - Red Light):This light
illuminates under the following conditions;
1.When the inter nal water tank is not properly installed
inside the cabinet.
2.When the inter nal water tank is full.Water tank must be
emptied and replaced back in the cabinet before normal
operating conditions can resume.
Water T ank Operation:
Proper installation of the water tank is crucial in
maintaining reliable dehumidifier operation.
The water tank holds accumulated condensed water
routed from the evaporator (cooling) coil during
dehumidifier operation.The water level inside the tank is
controlled by a float switch mechanism that automatically
stops dehumidifier operation when the water level
reaches a pre-determined level.
When the water tank is full and /or incorrectly positioned
inside the cabinet, the (water full) red light flashes and a
signal (beep) sounds for 10 seconds.This condition
results in the immediate shut down of the dehumidifying
system. (compressor cycle terminated, however the fan
motor will continue to operate) The water tank must be
emptied and/or correctly re-positioned before
dehumidifier operation can resume NOTE: It may take
several minutes before operating conditions resume.
This is normal.
IMPORTANT: Never tamper with or attempt to defeat the
float switch mechanism. (as this will result in flooding)
Factory Default Setting:
When the unit is first connected to a power supply, the
electronic circuit board will automatically default to the
following factory settings;
Mode: Dehumidification
Humidity SET AIR Value: 60%
Fan Speed:Low
Custom Default Setting:
When you modify any or all of the factory default settings , your
new settings become the current default settings. W
hen the unit
is switched "Off” or in the event of a power failure, all
your custom settings are retained and then restored once
the power is switched “On”/resumes.
Page 9

Remote Control Features
The hand held remote unit allows you to control all
operational aspects of your dehumidifer from the
convenience of your favorite armchair. Here are
some things you should know about operating the
unit with the hand held remote.
Control Buttons
I/O: Power switch (On/Off).
MODE: Selects the required operating mode
(Dehumidifier Mode /Fan Mode).
:
Selects the fan speed settings (HIGH FAN / LOW FAN).
Each time the button is pressed will alternate
between HI FAN and LOW FAN speed.
Used to adjust (decrease) relative humidity
settings. Each time the button is pressed the
SET RH% value will decrease by 5%
(adjustable values between 80% ~ 35%) This
button can also be used to decrease the auto
timed (delay start / delayed stop) programs.
0.5 hr increments (from 0.5 hrs. ~ 10hrs.)
1.0 hr increments (from 10hrs. ~ 24hrs.)
Used to adjust (increase) relative humidity
settings. Each time the button is pressed the
SET RH% value will increase by 5%
(adjustable values between 35% ~ 80%) This
button can also be used to increase the auto
timed (delay start / delayed stop) programs.
0.5 hr increments (from 0.5 hrs. ~ 10hrs.)
1.0 hr increments (from 10hrs. ~ 24hrs.)
: Used to initiate a delayed start “on” time
and/or delayed stop “off” time.
F / C: Used to switch temperature readings (LED
readout display) from Celsius to Farenheight.
Each time button is pressed will alternate
between both temperature scales.
To operate the hand held remote control will require
two “AAA”(1.5 volt) Alkaline batteries (included ).
Batteries should be replaced when:
a) No signal (beep) is heard from the main unit
when pressing the buttons on the remote control
while attempting to program the main unit.
b) The main unit does not respond to the any of the
commands issued by the remote control unit.
Battery replacement:
1. Open the rear cover on the backside of the
remote control unit in the direction of the arrow.
Continue pulling (gently) until the cover separates
completely from the unit.
2. Replace the (2) batteries “AAA” (1.5 volts)
following the same orientation (polarity) as
depicted inside the battery chamber.(+/-)
3. Re-install lower cover.
4. If the remote control will not be used for extended
periods of time (vacations etc.), batteries should
be removed.
The remote operates within a range of 7 meters
(23 ft.) from the receiver located inside the main unit.
Any obstruction between the receiver and remote
may cause signal interference, limiting the ability to
program the main unit.
8
Page 10

9
Location:
Select a suitable location, making sure you have easy
access to an electrical outlet. (avoid the use of
extension cords) If it is absolutely necessary to use an
extension cord, use an approved "air conditioner”
heavy duty extension cord only. (available at most local
hardware stores)
Select a suitable location making sure there are no
obstructions restricting airflow through the front air
intake grill. Maintain a minimum clearance of a least
20cm (8”) between adjacent walls and the back of the
unit to allow for proper air circulation and maximum
efficiency.
To obtain maximum operating efficiency from your
dehumidifier, the recommended (room ambient)
operating temperatures should be between 6ºC /
42.8ºF ~ 35ºC / 95ºF.
It is important to remember the efficiency of a
dehumidifier will be effected /influenced by the rate at
which new humid air (moisture) is allowed to infiltrate
the same space/area.To maintain efficiency, the
dehumidifier must be operated in an enclosed area.
Keep all doors and windows closed.
INSTALLATION
Page 11

10
Operating Instructions:
Dehumidifying is a means of removing moisture from the
air.that will help to protect your home and valued
possessions from damage (swelling) caused by moisture
in the air.It also prevents mold and mildew from
accumulating in damp areas of the home. Essentially a
dehumidifier removes moisture from the air, as moist air
passes over a dehumidifying (evaporator cooling) coil.
Moisture is condensed on the evaporator coil, drained
and collected inside an internal (removable) water tank
located at the front of the unit.The exhausted air being
returned into the room environment is elevated several
degrees causing the surrounding air temperature to
increase (slightly).This process contributes to lowering
the relative humidity of the surrounding air.
Factory Default Setting:
When the unit is first connected to a power supply, the
electronic circuit board will automatically default to the
following factory settings.
Mode: Dehumidifier
Humidity Set Air Value:60% RH
Fan Speed:= Low
NOTE:In the event of a power failure or the unit is
switched ‘Off’, the most recent settings are retained and
restored once the power is switched “On”/resumed.
IMPORTANT NOTE: Depending on humidity conditions,
(when power is restored or switched ‘On’) the
dehumidifier may not start automatically under the factory
or custom (
see page 7
) default setting .This is an
indication the RH% level of the surrounding environment
is lower than the current default setting and it may be
necessary to select a lower SET AIR (RH%) value.
DEHUMIDIFYING MODE SELECTION:
1. The unit does not have to be switched on
(operational) to select/set a program. All programs can be
selected with the unit in the “off” position
2. Press the MODE button and select dehumidifier mode
(a rain drop symbol will appear in the display).Each time
the button is pressed, the setting will alternate between
DRY (dehumidifier) mode and FAN (only) mode.
3. Press the “UP” or “DOWN” buttons to select the desired
SET AIR operating value.(between 35% ~ 80%) To
select CONTINUOUS dehumidifying mode, press the
DOWN button until the symbol “- -” appear in the SET
AIR display. NOTE: During CONTINUOUS mode
operation, the humidistat (control) will be by-passed and
the compressor will operate non-stop regardless of
humidity conditions.
FAN SPEED SELECTION:
4. Press the fan symbol on the keypad. Each time the
button is pressed, the mode selection will alternate
between "High Fan" and "Low Fan" speed options.The
fan speed you select will appear in the LED display;
either a 5 blade fan symbol for ‘high fan’or a 3 blade fan
symbol for ‘low fan’ will be shown in the display area.
5.When all settings are complete, press the I/O button to
start dehumidifier operation and the blue operation light
will illuminate.
FAN MODE SLECTION:
1. The unit does not have to be switched on
(operational) to select/set a program. All programs can be
selected with the unit in the “off” position
2. Press the MODE.button and select fan mode (fan blade
symbol will show in display).Each time the button is
pressed, the setting will alternate between dehumidifier
mode and fan (only) mode.
3. Press the "Fan” symbol on the keypad. Each time the
button is pressed, the mode selection will alternate
between "High Fan" and "Low Fan" speed options.
4.When all settings are complete, press the on/off button
to start fan mode operation and the blue operation light
will illuminate.
AIR FILTER:
Your dehumidifier features a removable Air Filter.This
filter is located at the front of the unit (behind the front air
intake grill) The air filter plays an important role in helping
to reduce (minimize) dust/dirt particles from the
surrounding environment. A blocked/clogged air filter
reduces air flow impacting negatively on operating
efficiency. To maintain maximum operating efficiency; The
filter must
be checked and cleaned regularly. (every 2 weeks) More
frequent cleaning may be required depending upon
indoor air quality.
IMPORTANT: Never operate the unit without the air
filter in place.
AIR FILTER REMOVAL:
1. Locate the air filter (handle) tab on the upper right side
of the front air intake grill and slide-out the filter to
the right.
2. Clean the filter thoroughly using a vacuum cleaner or
wash using luke warm water and mild detergent.
Dry thoroughly before re-installing.
3. To re-install the air filter, slide the filter back inside
the tracks until it snaps (locks) into position.
Operating Instructions
Page 12
11
Direct Drain Feature:
This dehumidifier is inclusive of a direct drain feature,
located at the lower (left) rear side of the cabinet. NOTE:
The drain hose is not included with the unit. Use a
standard garden hose with standard female connection.
This type of hose can be purchased at any local
hardware store.The direct drain feature is intended for
use in basements inclusive of a floor drain only.
NOTE: Do not attempt to operate the direct drain
feature using drain/stem pipes above ground level.
CONNECTING THE DIRECT DRAIN:
1. Unscrew the drain cap on the direct drain connection.
at the back of the unit.
2. Cut drain hose to required length. (to suit your needs)
Attach garden hose coupler directly onto the direct
drain and tighten.
3. Position the open end of the drain hose directly over
the floor drain and start the unit.
4. Position the dehumidifier as close as you can to the
floor drain.
5. When the direct drain feature is not being used,
remove the drain hose and re-install cap.
CAUTION: Before attempting to clean and/or service this
unit, always disconnect the power supply cord from the
electrical power supply/outlet.
1. DO NOT use gasoline, benzene, paint thinner, or any
other chemicals to clean this unit, as these substances
will damage/deform both plastic components and
luster finish.
2. Never attempt to clean the unit by pouring water
directly over any of the surface areas, as this will
cause deterioration of electrical components and
wiring insulation.
3. Use only a mild dishwashing detergent, lukewarm
water and a soft cloth to wipe the exterior surface of
the unit and dry throughly.
When the dehumidifier is not being used for long time
periods, please follow these instructions.
1. Disconnect the power cord from the power supply.
2. Empty the water tank and wipe (clean) thoroughly.
3. Clean air filter thoroughly
4. Re-package the unit in the original carton.
5. Store the unit upr ight in a dr y location.
Care and Maintenance
Storage
Fig.3
(Rear View)
DIRECT DRAIN
Page 13

Frequently, some problems are of a minor nature and a
service call may not be necessary. Use this
troubleshooting guide to identify possible problems you
may be experiencing. If the unit continues to operate
improperly, call your local Danby
®
Service Depot or 1-80026-DANBY
(1-800-263-2629) for assistance.
TROUBLE SHOOTING GUIDE
Check power cord connection.
Check electrical outlet for blown fuse.
Check if water tank is full (empty).
Check water tank is properly installed.
Air filter is dirty and/or blocked.
Ambient room temperature too low. (below 5C/41F)
Poor airflow circulation / obstruction of front grill.
Relative Humidity in surrounding environment very low.
Check all doors and windows are closed.
Area/room is too large for the capacity of the dehumidifier.
PROBLEM POSSIBLE CAUSE
Unit will not operate.
Dehumidifying capacity
(moisture removal) low.
Relative Humidity setting not
reached after long period of
operation.
12
Page 14

LIMITED PRODUCT WARRANTY
This quality product is warranted to be free from manufacturer’s defects in material and workmanship, provided that the unit is used under normal operating
conditions intended by the manufacturer.
This warranty is available only to the person to whom the unit was originally sold by Danby or by an authorized distributor of Danby, and is non-transferable.
TERMS OF WARRANTY
Plastic parts (ie. evaporator door, door rails, covers and trays are warranted for thirty (30) days only from purchase date, with no extensions provided.
First Two Years
During the first two years (2), any electrical part(s) of this product found to be defective, including any sealed system units, will be
repaired or replaced, at warrantor’s option, at no charge to the ORIGINAL purchaser. Consumable parts (ie. light bulbs when applicable)
are not warranted or guaranteed for any length of time.
Third Through
During the next three years (3) any part of the sealed system found to be defective (consisting of compressor, condenser, evaporator,
Fifth Year
dryer and all related tubing) will be replaced without charge, however, all labour charges associated with the replacement of the sealed
system componets will be the sole responisbilty of the purchaser. The purchaser shall pay for all labour and retur n freight dur ing this
three year (3) period for repair or replacement of any sealed system components. Any unit being diagnosed as non-repairable due to
sealed system failure and warranting an exchange during the existing three (3) years will be subject to an appropriate depreciation or
user fee, including any and all freight charges being levied against the purchaser.
To obtain Service
Danby reserves the right to limit boundaries of “In Home Service” due to the proximity of an Authorized Service Depot. Any appliance
requiring service outside the limited boundaries of “In Home Service”, it will be the customer’s responsibility to transport the appliance to
the closest Authorized Service Depot at their own expense. Contact your dealer from whom your unit was purchased, or contact your
nearest authorized Danby service depot, where service must be performed by a qualified service technician. If service is performed on
the units by anyone other than an authorized service depot, or the unit is used for commercial application, all obligations of Danby under
this warranty shall be at an end.
The following clause refers to Chest Freezers, (under 7.0 cu.ft.) single and double door refrigerators, supplied with or without a separate freezer section. Nothing
within this warranty shall imply that Danby will be responsible or liable for any spoilage or damage to food or other contents of this appliance, whether due to any
defect of the appliance, or its use, whether proper or improper.
EXCLUSIONS
Save as herein provided, Danby Products Limited (Canada) or Danby Products Inc. (U.S.A.), there are no other warranties, conditions, representations or
guarantees, express or implied, made or intended by Danby Products or its authorized distributors and all other warranties, conditions, representations or
guarantees, including any warranties, conditions, representations or guarantees under any Sale of Goods Act or like legislation or statue is hereby expressly
excluded. Save as herein provided, Danby Products Limited (Canada) or Danby Products Inc.(U.S.A), shall not be responsible for any damages to persons or
property, including the unit itself, howsoever caused or any consequential damages arising from the malfunction of the unit and by the purchase of the unit, the
purchaser does hereby agree to indemnify and save harmless Danby Products Limited from any claim for damages to persons or property caused by the unit.
GENERAL PROVISIONS
No warranty or insurance herein contained or set out shall apply when damage or repair is caused by any of the following:
1) Power Failure.
2) Damage in transit or when moving the appliance.
3) Improper power supply such as low voltage, defective house wiring or inadequate fuses.
4) Accident, alteration, abuse or misuse of the appliance such as inadequate air circulation in the room or abnormal operating conditions,
(extremely high or low room temperature).
5) Use for commercial or industrial purposes.
6) Fire, water damage, theft, war, riot, hostility, acts of God such as hurricanes, floods etc.
7) Service calls resulting in customer education.
Proof of purchase date will be required for warranty claims;so, please retain bills of sale. In the event warranty service is required, present this document to our
AUTHORIZED SERVICE DEPOT.
Danby Products Limited
PO Box 1778, 5070 Whitelaw Road,
Guelph, Ontario, Canada N1H 6Z9
Telephone: (519) 837-0920 FAX: (519) 837-0449
Danby Products Inc.
PO Box 669, 101 Bentley Court,
Findlay, Ohio, U.S.A. 45839-0669
Telephone: (419) 425-8627 FAX: (419) 425-8629
Page 15

Page
Introduction. . . . . . . . . . . . . . . . . . . . . . . . . . . . . . . . . . . . . . . . . . . . . . . . . . . . 15
Avertissement - Avis importants. . . . . . . . . . . . . . . . . . . . . . . . . . . . . . . . . . . . 16
Spécifications de l'appareil. . . . . . . . . . . . . . . . . . . . . . . . . . . . . . . . . . . . . . . . 17
Caractéristiques et pièces de l'appareil . . . . . . . . . . . . . . . . . . . . . . . . . . . . . . 18
Fonctions des touches du tableau de commande électronique. . . . . . . . . . . . 19
Télécommande. . . . . . . . . . . . . . . . . . . . . . . . . . . . . . . . . . . . . . . . . . . . . . . . . 20
Choix de l'emplacement et instructions d'installation. . . . . . . . . . . . . . . . . . . . 22
Instructions d'utilisation / retrait du filtre . . . . . . . . . . . . . . . . . . . . . . . . . . . . . . 23
Soins et entretien . . . . . . . . . . . . . . . . . . . . . . . . . . . . . . . . . . . . . . . . . . . . . . . 24
Drainage direct . . . . . . . . . . . . . . . . . . . . . . . . . . . . . . . . . . . . . . . . . . . . . . . . . 24
Remisage . . . . . . . . . . . . . . . . . . . . . . . . . . . . . . . . . . . . . . . . . . . . . . . . . . . . . 24
Guide de dépannage . . . . . . . . . . . . . . . . . . . . . . . . . . . . . . . . . . . . . . . . . . . . 25
Garantie . . . . . . . . . . . . . . . . . . . . . . . . . . . . . . . . . . . . . . . . . . . . . . . . . . . . . . 26
14
Table des matières
Page 16

15
Introduction
Merci d’avoir choisi un appareil Danby qui vous fournira ainsi qu’à votre famille, le confort au foyer, à la
maison, au chalet ou au bureau. Ce manuel d’utilisation vous offre des renseignements pratiques pour le
soin et l’entretien de votre nouvel appareil.Un appareil Danby
MD
bien entretenu vous fournira plusieurs
années de service sans ennui.
Veuillez prendre quelques moments pour lire attentivement toutes les directives pour vous renseigner et vous
familiariser avec tous les aspects du fonctionnement de votre appareil.
Cet appareil peut être aisément déplacé d’une pièce à l’autre de la maison et il est installé en quelques
minutes seulement. Pour la référence aisée, nous vous suggérons de joindre une copie de votre reçu de
caisse et/ou facture d’achat à cette page, et d’inscrire les renseignements suivants qui sont trouvés sur la
plaque d’identification du fabricant. Celle-ci est située sur la paroi arrière du compartiment du réser voir
d’eau.
Numéro de modèle: _______________________________________________
Numéro de série: _________________________________________________
Date d’achat : ____________________________________________________
Nom du marchand et adresse: _______________________________________
________________________________________
Ces renseignements seront requis si le service est demandé et/ou si vous désirez obtenir des
renseignements supplémentaires. Pour consulter un Représentant du service à la clientèle, composez le
NUMÉRO D’APPEL SANS FRAIS suivant :
1-800-26-DANBY (1-800-263-2629)
Conservez ces directives pour la référence future.
Ce symbole représente une mise en garde ou un avertissement
MISE EN GARDE
Ne jamais laisser cet appareil en marche dans un endroit
fermé où des personnes ou animaux qui ne peuvent pas
réagir à une défectuosité de l’appareil se trouvent. Un
appareil en panne peut occasionner la surchauffe
extrême de cet appareil et causer des blessures
corporelles ou des dommages à la propriété.
Page 17

16
NOTE : Les instructions de sécurité et AVERTISSEMENTS présentés dans ce manuel ne couvrent pas
toutes les conditions possibles et situations qui pourraient se produire. Tous et chacun doivent comprendre
que le bon sens et la prudence sont des facteurs qui ne peuvent être incorporés dans l’appareil lui-même.
Ceux-ci relèvent uniquement du comportement de la personne qui installe ou utilise l’appareil, ou qui en fait
l’entretien.
Le défaut d’observer les directives de l’installation, de l'utilisation ou de l'entretien de l’appareil four nies par
le fabricant pourrait causer des blessures corporelles et/ou des dommages matériels. L’utilisateur devrait
communiquer avec le détaillant ou un agent de service d’après-vente du fabricant au sujet de tout problème
ou situation qui n’est pas parfaitement compris. (Pour le Service à la Clientèle Danby, composez le 1-80026-DANBY / (1-800-263-2629)
AVERTISSEMENT – AVIS IMPORTANTS
POUR LA SÉCURITÉ DES UTILISATEURS – Pour minimiser tout risque d’incendie ou d’explosion, ne
jamais remiser d’essence ou autres produits liquides ou gazeux inflammables à proximité de cet appareil
ou de tout autre appareil ménager.
CIRCUIT ÉLECTRIQUE – Pour réduire le risque d’incendie, de choc électrique ou de dommages corporels,
on doit s’assurer que tout câblage électrique et circuit de mise à la terre soient conformes aux codes
national et local de l’électricité. C’est à l’acquéreur qu’incombe la responsabilité de consulter
éventuellement un électricien qualifié qui pourra inspecter le câblage et les fusibles de la résidence et
déterminer si la source d’électricité disponible est adéquate pour l’alimentation de l’appareil. Cet appareil
est conçu pour être alimenté par un circuit 120 volts CA, 60 Hz (circuit indépendant à 3 conducteurs,
alimentant une prise de courant convenablement polarisée et mise à la terre) protégé par un fusible de 15
ampères (ou disjoncteur ou fusible temporisé équivalent).
La fiche de branchement à trois broches du cordon d’alimentation doit être branchée directement sur une
prise de courant polarisée de même configuration et mise à la terre, conçue pour les circuits 110/120 V CA.
INSTRUCTIONS DE MISE À LA TERRE – La mise à la terre incorrecte de cet appareil peut susciter un
risque de choc électrique. En cas de doute quant à la qualité de la mise à la terre de la prise de courant
disponible, consulter un électricien qualifié.
Cet appareil doit être mis à la terre. Advenant une anomalie de fonctionnement ou une panne, la mise à la
terre réduira le risque de choc électrique, grâce à une voie de moindre résistance disponible pour le
passage du courant électrique. Cet appareil est équipé d’un cordon d’alimentation comportant un
conducteur de mise à la terre et une fiche de branchement à trois broches (pour mise à la terre). La fiche
de branchement doit être branchée sur une prise de courant convenablement installée et mise à la terre
conformément aux prescriptions des codes et règlements locaux en vigueur.
Ne jamais modifier la fiche de branchement de l’appareil. Si la configuration de la fiche de branchement ne
permet pas son branchement sur la prise de courant, il sera nécessaire de faire installer une prise de
courant adéquate par un électricien qualifié.
Si les caractéristiques de la source d’alimentation électrique de la résidence ne correspondent pas aux
spécifications ci-dessus, ou en cas d’incertitude quant à la qualité de la mise à la terre, demander à un
électricien qualifié ou à la compagnie de distribution d’électricité d’inspecter l’installation électrique et
d’effectuer tout travail correctif nécessaire.
Page 18

Capacité de déshumidification (Pintes/Litres) 60 / 28,4
Alimentation électrique 115 Volts / 60 Hz
Consommation d’énergie (watts) 785
Intensité nominale
• Déshumidification 7.26
• Chauffage Non applicable
Circulation d’air – Vitesse de ventilateur haute / basse (pi. cu. /min)(L/min) 183 / 160
Type de réfrigérant R22
Capacité du réservoir d’eau (litres / pintes) 5,3 / 11,2
Niveau de bruit en fonctionnement (dB A) 50
Dimensions (largeur/hauteur/profondeur) 13-3/4 po x 30-1/2 po x 13-3/16 po
Poids net (kg/lb) 25 / 55,1
Circuit d’alimentation électrique - Spécifications
1.Tout câblage doit être réalisé par un électricien
qualifié, en conformité avec les prescriptions des\
codes national et local régissant les installations
électriques. Pour toute question au sujet des instru
tions qui suivent, contacter un électricien qualifié.
2. AVANT l’installation et AVANT l’utilisation de cet
appareil, contrôler les caractéristiques de la source
d’électricité, et résoudre tout problème affectant le
câblage.
3. Pour la sécurité et la protection des utilisateurs, cet
appareil est mis à la terre lorsqu’il est branché sur une
prise de courant de même configuration que la fiche
de branchement. En cas de doute quant à la qualité
de la mise à la terre de la prise de courant, consulter
un électricien qualifié. NE JAMAIS UTILISER UN
CÂBLE DE RALLONGE NI UN ADAPTATEUR SI LA
CONFIGURATION DE LA FICHE DE
BRANCHEMENT NE CORRESPOND PAS À
CELLE DE LA PRISE DE COURANT.
4. La plaque signalétique de l’appareil est située sur la
paroi (arrière) du cabinet. On y trouve les
caractéristiques électriques et techniques spécifiques
de cet appareil.
5. Pour éviter les risques de blessures corporelles, on
doit toujours débrancher l’appareil de la source
d’électricité avant d’entreprendre des travaux de
nettoyage ou d’entretien.
17
NOTE: Les spécifications sont sujettes aux changements sans préavis (pour l'amélioration des produits).
Spécifications de l’appareil:
DDR600R
Page 19

18
• Clavier de commande tactile (électronique) (illuminé)
• Affichage à diodes (LED)
• Auto-détection de l’humidité relative ambiante
• Réglage selon l’humidité relative ambiante (35% - 80%
constante).
• Ventilateur à 2 vitesses (haute/basse)
• Protection de mise en marche temporisée - (compresseur)
• Auto-dégivrage
• Fonctionnement à basse température
• Homologué Energy Star
• Afficheur « réservoir d’eau plein » et signal sonore
• Roulettes pivotantes « Easy Roll » (4)
• Réservoir d’eau monté à l’avant (amovible)
• Option de drainage direct (boyau non compris)
• Style européen
• Fonctionnement silencieux
• Filtre à air amovible
CARACTÉRISTIQUES
Tableau de commande
Entrée d’air
Panneau de
façade
Panneau
latéral
Poignée
Pièces de l’appareil
Réservoir
d’eau avant
Roulettes pivotantes
Easy Roll
Page 20

Touche I/O :
À chaque fois que cette commande est pressée,
l’appareil
se met en marche ou s’éteint.
T ouche V entilateur :
À chaque fois que cette commande est pressée, la
vitesse du ventilateur alternera entre haute et basse.
Touche Minutrie :
Utilisée pour amorcer une mise en service
temporisée et/ou une mise hors de service
temporisée. À chaque fois que cette commande est
pressée l’heure temporisée de la mise en service
et/ou mise hors de service peut être réglée (entre 0,5
heure et 24 heures) comme suit :
En incréments de 0,5 heure (de 0,5 heure à 10
heures)
En incréments de 1 heure (de 10 heures à 24 heures)
Cette touche vous permet de réduire les réglages
d’humidité relative. Avec chaque pression sur la touche,
la valeur SET RH% réduira par 5% (les valeurs réglables
sont entre 80% et 35%).
Cette touche peut aussi être utilisée pour réduire l’heure
de la mise en service et ou hors de service des
programmes temporisés.
Cette touche vous permet d’augmenter les réglages
d’humidité relative. Avec chaque pression sur la touche,
la valeur SET RH% augmentera par 5% (les valeurs
réglables sont entre 80% et 35%). Cette touche peut
aussi être utilisée pour augmenter l’heure de la mise en
service et ou hors de service des programmes
temporisés.
Touche Mode : À chaque fois que cette commande
est pressée, le mode de fonctionnement alternera
entre déshumidificateur et ventilateur. Le symbole
pour la mode choisi apparaîtra sur l’écran d’affichage
à diodes.
AFFICHAGE À DIODES : L’écran d’affichage indique
l’information suivante :
1. ROOM AIR = Conditions actuelles ambiantes du %
d’humidité relative de la pièce.
2. SET AIR = La valeur de fonctionnement réglée du %
d’humidité relative.
3. MODE = Le mode de fonctionnement choisi.
4. FAN SPEED = La vitesse du ventilateur choisie.
5.TIMER = L’heure choisie de la mise en service / hors
de service temporisée.
19
Fonctions des touches du tableau de commande électronique :
12
5
34
I/O
Page 21

Caractéristiques de télécommande
La manette de télécommande vous permet de
contrôler toutes les fonctions de votre
déshumidificateur à partir de votre fauteuil favori.
Voici quelques informations utiles pour l’utilisation de
votre télécommande.
Boutons de contrôle
I/O : Commutateur de courant (En marche / Arrêt)
MODE : Utilisé pour choisir le mode de fonctionnement
(Séchage - déshumidification / ventilateur).
: Utilisé pour choisir la vitesse du ventilateur
(HAUTE / BASSE). À chaque fois que le
bouton est pressé, l’affichage alternera entre
HI FAN et LOW FAN.
Est utilisé pour réduire les réglages
d’humidité relative. À chaque fois que le
bouton est pressé, la valeur SET RH% sera
réduite par 5% (valeurs réglables entre 80%
et 35%). Ce bouton peut aussi être utilisé
pour réduire l’heure de la mise en service et
ou hors de service des programmes
temporisés. En incréments de 0,5 heure (de
0,5 heure à 10 heures). En incréments de 1
heure (de 10 heures à 24 heures).
- Est utilisé pour augmenter les réglages
d’humidité relative. À chaque fois que le bouton
est pressé, la valeur SET RH% sera augmentée
par 5% (valeurs réglables entre 35% et 80%). Ce
bouton peut aussi être utilisé pour augmenter
l’heure de la mise en service et ou hors de service
des programmes temporisés. En incréments de
0,5 heure (de 0,5 heure à 10 heures). En
incréments de 1 heure (de 10 heures à 2 heures).
: Utilisé pour amorcer une mise en service
et/ou une mise hors de service temporisée.
F / C: Utilisé pour changer les lectures de l’affichage
à diodes (LED) de Celsius à Fahrenheit.
À chaque fois que le bouton est pressé,
l’affichage alternera entre les deux échelles
de température.
Deux piles alcalines « AAA » (1,5 volts) sont requises
pour le fonctionnement de la télécommande (incluses).
Les piles devraient être remplacées quand :
a) Aucun signal sonore (bip) n’est entendu durant la
programmation de l’unité principale.
b) L’unité principale ne répond pas à un signal émis
par la télécommande.
Remplacement des piles :
1. Glisser le couvercle du compartiment des piles à
l’arrière de la télécommande dans le sens de la
flèche.Tirer délicatement jusqu’à ce que le
couvercle se sépare complètement de l’unité.
2. Insérer deux (2) piles « AAA » (1,5 volts) en
observant la polarité indiquée dans le
compartiment des piles (+/-).
3. Réinstaller le couvercle.
4. Si la télécommande ne sera pas utilisée pour des
périodes prolongées (vacances, etc.), les piles
devraient être retirées de la télécommande.
La télécommande fonctionnera en dedans d’une
distance de 7 mètres (23 pi) du récepteur situé à
l’intérieur de l’unité principale. Toute obstruction
entre le récepteur et la télécommande pourrait
causer une interférence au signal, ce qui limiterait la
capacité de programmation de l’unité principale.
20
Page 22

21
Fonction des témoins lumineux :
Symboles de Flèche (Fonctionnement -Témoin
lumineux bleu) : Ce témoin lumineux s’illuminera et
demeurera allumé aussi longtemps que l’unité fonctionne.
Symbole de Seau (Réservoir d’eau plein -Témoin
roug e) : Ce témoin lumineux s’illuminera quand l’une ou
l’autre des conditions suivantes existe :
1. Quand le réservoir d’eau interne n’est pas
correctement installé à l’intérieur du cabinet.
2. Quand le réservoir d’eau interne est plein. Le réservoir
d’eau doit être vidé et replacé dans le cabinet avant que
le fonctionnement normal puisse résumer.
Fonctionnement du réservoir d’eau :
L’installation appropriée du réservoir d’eau est critique
pour obtenir un fonctionnement sûr et fiable du
déshumidificateur. Le réservoir d’eau capte et retient
l’eau condensée accumulée et acheminée du serpentin
de l’évaporateur (de refroidissement) durant l’opération
de déshumidification. Le niveau d’eau dans le réser voir
est contrôlé par un mécanisme d’interrupteur du flotteur
qui interrompt automatiquement le procédé de
déshumidification quand le niveau d’eau atteint un niveau
prédéterminé.
Quand le réservoir d’eau est plein et /ou incorrectement
installé dans le cabinet, le témoin lumineux rouge (plein
d’eau) clignote et un signal sonore (bip) est entendu
pendant 10 secondes. Cette condition résulte en une
mise hors de service immédiate du système de
déshumidification (le cycle du compresseur est terminé
mais le moteur du ventilateur continue de fonctionner).
Le réservoir d’eau doit être vidé et/ou correctement
repositionné avant que la déshumidification ne puisse
résumer. REMARQUE : Plusieurs minutes pourraient
être requises avant que les conditions de
fonctionnement normal ne résument. Ceci est
normal.
IMPORTANT : Ne jamais modifier ou tenter de
contourner le mécanisme d’interrupteur du flotteur. (Ceci
causerait le débordement du réservoir.)
Réglage implicite de l’usine :
Quand l’appareil est branchée pour la première fois, la
carte du circuit électronique adoptera automatiquement
par défaut, les réglages implicites de l’usine suivants.
Mode : Déshumidification
Valeur d’humidité : 60%
Vitesse du ventilateur: Basse
REMARQUE : En cas de panne de courant, tous les
réglages antérieurs sont automatiquement
effacés/annulés. Si le réglage était différent de celui
utilisé par défaut (décrit ci-dessus), il sera nécessaire de
reprogrammer l’appareil. Si l’appareil est mis hors de
service manuellement et qu’il est remis en service (en
utilisant la touche « on/off » du clavier) l’unité reviendra
toujours au dernier réglage de programme choisi.
Réglage implicite modifié par utilisateur:
Quand vous modifiez un ou tous les arrangements de
défaut d'usine, vos nouveaux arrangements deviennent
les arrangements de défaut courants.Quand l'unité est
mis hors de service manuellement ou en cas d'une
panne de courant, tous vos arrangements modifié sont
maintenus et puis reconstitués une fois
quel’alimentation de
courant est rétablie
ou l'unité est manuellement mise en
service.
Page 23

Choix de l’emplacement :
Choisir un emplacement approprié, avec accès facile à
une prise de courant (éviter l’emploi d’une rallonge).
S’il est absolument nécessaire d’utiliser une rallonge
pour l’alimentation de l’appareil, utiliser uniquement
une rallonge agréée pour climatiseur (disponible dans
la plupart des magasins de quincaillerie).
Choisir un emplacement où rien n’entravera la
circulation de l’air à travers la grille d’admission avant.
Maintenir une distance de séparation d’au moins 20
cm entre les murs adjacents et l’arrière de l’appareil,
pour optimiser l’efficacité et la circulation de l’air.
L’appareil fonctionne au niveau d’efficacité maximum
lorsque la température ambiante de la pièce est située
entre 5ºC et 35ºC.
Il est important de noter que l’efficacité d’un
déshumidificateur sera influencée par la taux de
réintroduction d’air humide dans la pièce. Pour obtenir
la meilleure efficacité, il convient de faire fonctionner le
déshumidificateur dans un espace fermé. Fermer
toutes les portes et fenêtres.
22
INSTALLATION
Page 24

23
Instructions d’utilisation :
La fonction du déshumidificateur est d’extraire l’humidité
de l’air. L’emploi d’un déshumidificateur protègera la
résidence et les articles qu'elle contient contre les
dommages causés par l’humidité dans l’air. Il préviendra
aussi l’accumulation de la moisissure dans les pièces
humides de la maison. Le déshumidificateur extrait
l’humidité de l’air qui traverse un évaporateur de
refroidissement. L’humidité se condense sur
l’évaporateur de refroidissement et l'eau condensée est
ensuite accumulée dans un réservoir d’eau interne
(amovible) situé à l’avant de l’appareil. La température
de l’air déchargé ensuite dans la pièce est augmentée de
quelques degrés, ce qui cause le léger réchauffement de
la température de l’air ambiant. Ce procédé contr ibue
également à la réduction de l’humidité relative dans la
pièce.
Réglage implicite de l’usine :
Quand l’unité est branchée sur une prise de courant pour
la première fois, l’affichage à diodes s’illumine et indique
le réglage implicite de l’usine.
Mode : Déshumidification :
Valeur d’humidité SET AIR : 60% RH
FAN SPEED = Basse
REMARQUE : En cas de panne de courant, et/ou quand l’unité est
débranchée, les ajustements les plus récents sont maintenus et
reconstitués une fois quel’alimentation de courant est rétablie
ou
l'unité est manuellement mise en service
REMARQUE
IMPORTANTE : Selon les conditions
d’humidité, (quand le courant est rétabli ou l'unité est
manuellement mise en service.), le déshumidificateur
pourrait ne pas démarrer automatiquement avec le
réglage implicite de l’usine ou réglage implicite modifié
(voir pg. 21) . Ceci est une indication que le niveau de
pourcentage d’humidité relative de l’environnement est
inférieur au réglage courant puis par conséquent il
pourrait alors être nécessaire de choisir une valeur SET
AIR de % d’humidité relative moins élevée.
CHOIX DU MODE DE DÉSHUMIDIFICATION :
1. Il n’est pas nécessaire de faire fonctionner l’unité
pour choisir et/ou régler un programme. Tous les
programmes peuvent être choisis avec l’unité à
l’arrêt.
2. Appuyer sur la touche MODE et choisir le mode
déshumidificateur (symbole de goutte d’eau
apparaîtra dans l’affichage à diode) . À chaque fois
que la touche est pressée, le réglage alternera entre
le mode déshumidificateur et le mode ventilateur
(seulement).
3. Appuyer sur les touches ou pour choisir la
valeur de fonctionnement SET AIR désirée (entre
35% et 80%). Pour choisir le mode de
déshumidification CONTINUE, appuyer sur la touche
jusqu’au moment où le symbole « - - » est affiché sur
l’écran. REMARQUE : Durant le fonctionnement en
mode
CONTINU, l’hygromètre (contrôle) sera
contourné et le compresseur fonctionnera sans arrêt
peu importe les conditions d’humidité.
4. Appuyez sur la symbole de ventilateur (sur le panneau
de commande). À chaque fois que la touche est
pressée, la sélection du mode alternera entre l’option
de vitesse « Ventilateur Haute » et « Ventilateur Basse
». Le mode vitesse du ventilateur choisi apparaîtra sur
l’affichage à diodes; un symbole de ventilateur avec 5
pale pour le 'ventilateur haute' ou un symbole de 3 pale
pour le 'ventilateur basse' sera montré dans l’affichage.
5. Quand tous les réglages sont complétés, appuyer sur
la touche en I/O pour commencer le procédé de
déshumidification et le témoin lumineux bleu
s’illuminera.
CHOIX DU MODE DE VENTILATEUR :
1. Il n’est pas nécessaire de faire fonctionner l’unité pour
choisir et/ou régler un programme. Tous les
programmes peuvent être choisis avec l’unité à l’arrêt.
2. Appuyer sur la touche MODE et choisir le mode
ventilateur (symbole de ventilateur apparaîtra dans
l’affichage à diode). À chaque fois que la touche est
pressée, le réglage alternera entre le mode
déshumidificateur et le mode ventilateur (seulement).
3. Appuyez sur la symbole de ventilateur (sur le panneau
de commande). À chaque fois que la touche est
pressée, la sélection du mode alternera entre l’option
de vitesse « Ventilateur Haute » et « Ventilateur Basse
». Le mode choisi apparaîtra sur l’affichage à diodes.
4. Quand tous les réglages sont complétés, appuyer sur
la touche en marche/arrêt pour mettre le ventilateur en
service et le témoin lumineux bleu s’illuminera.
FILTRE À AIR :
Le déshumidificateur comporte un filtre à air amovible,
situé à l’avant de l’appareil (derrière la grille avant de
l’admission d’air). La fonction du filtre à air est de
minimiser la concentration de particules de poussière dans
l’atmosphère environnante. Un filtre à air obstrué réduit la
circulation d’air, ce qui dégrade l’efficacité de
fonctionnement de l’appareil. On doit inspecter et nettoyer
le filtre à des intervalles réguliers (intervalles de deux
semaines) pour que l’appareil puisse toujours fonctionner à
son niveau d’efficacité maximale. Il pourrait être
nécessaire d’augmenter la fréquence des nettoyages, selon
la qualité de l’air à traiter.
IMPORTANT: Ne jamais faire fonctionner l’appareil lorsque
le filtre à air n’est pas en position.
RETRAIT DU FILTRE À AIR :
1. Saisir la poignée du filtre sur le côté droit supérieur de
lagrille avant de l’admission d’air et glisser le filtre vers le
côté droit.
2. Nettoyer soigneusement le filtre en utilisant un aspirateur.
On peut également le laver avec de l’eau tiède et un
détergent doux. Faire sécher le filtre entièrement avant de
le réinstaller.
Instructions d’utilisation
Page 25

24
MISE EN GARDE : Avant de nettoyer ou de faire le service sur
cette unité, il est recommandé de débrancher le cordon
d’alimentation de la prise de courant électrique.
1. NE PAS UTILISER d’essence, de benzène, de diluant ou
tous autres produits chimiques pour nettoyer cette unité.
Ces substances pourraient causer des dommages au fini et
une déformation des pièces en plastique.
2. Ne jamais tenter de nettoyer l’unité en versant de l’eau
directement sur l’une ou l’autre des surfaces car ceci
causera une détérioration des pièces électriques et de
l’isolation des fils.
3. Utiliser uniquement de l’eau tiède, un détergent à vaisselle
et un chiffon doux pour essuyer complètement les surfaces
externes de l’appareil et le sécher soigneusement.
Drainage direct :
Ce déshumidificateur comporte une caractéristique de drainage
direct située au côté gauche inférieur, à l’arrière du cabinet.
REMARQUE : Le boyau de drainage n’est pas fourni avec
l’appareil. Utiliser un boyau d’arrosage de jardin standard avec
raccordement standard. Ce type de boyau d’arrosage est
trouvé dans tout magasin de quincaillerie. Cette fonction de
drainage est destiné à l’usage dans les sous-sols équipés d’un
drain de plancher seulement.
NOTE: Ne pas tenter de raccorder la sortie de drainage
direct à une tuyauterie d’évacuation installée au-dessus du
niveau du sol.
RACCORDEMENT POUR DRAINAGE DIRECT :
1. Dévisser le bouchon du raccord de drainage direct à
l‘arrière de l’unité.
2. Couper un boyau de drainage à la longueur appropriée
selon vos besoins. Raccorder le boyau d’arrosage
directement sur le drain direct et resserrer.
3. Placer l’extrémité ouverte du boyau d’arrosage directement
au-dessus du drain de plancher et mettre l’appareil en
marche.
4. Placer le déshumidificateur aussi près que possible du drain
de plancher.
5. Quand l’option de drainage direct n’est pas utilisée, enlever
le boyau de drainage et réinstaller le bouchon.
Quand le déshumidificateur n’est pas utilisé pour des périodes
prolongées, s’il vous plaît observer les directives suivantes.
1. Débrancher le cordon d’alimentation de la prise de courant.
2.Vider le réservoir d’eau, essuyer soigneusement les surfaces.
3. Nettoyer soigneusement le filtre à air.
4. Remettre l’appareil dans son emballage d’or igine.
5. Remiser l’appareil ver ticalement, dans un endroit sec.
Soins et entretien
Remisage
Fig.3
(Vue arrière)
ORIFICE DE
DRAINAGE DIRECT
Page 26

Fréquemment, des problèmes mineurs peuvent sur venir
et un appel de service pourrait ne pas être nécessaire.
Utiliser ce guide de dépannage pour identifier les
problèmes qui pourraient se manifester. Si l’appareil ne
fonctionne toujours pas correctement, appeler votre
centre de service DanbyMD local ou composer le
1-800-26-DANBY –(1-800-263-2629) pour assistance.
GUIDE DE DÉPANNAGE
Vérifier le branchement du cordon d’alimentation.
Vérifier l’alimentation de la prise de courant (fusible grillé?).
Déterminer si le réservoir d’eau est plein (vider).
Vérifier que le réservoir d’eau est correctement installé dans
l’appareil.
Température ambiante trop basse (inférieure à 5ºC / 41º F)
Circulation d’air médiocre / obstruction de la grille avant.
Humidité relative ambiante très basse.
Vérifier que toutes les portes et fenêtres sont fermées.
La pièce est trop grande pour la capacité de l’appareil.
PROBLÈME CAUSE POSSIBLE
L’appareil ne fonctionne pas.
Capacité de déshumidification
(élimination de l’humidité)
insuffisante.
Le niveau d’humidité relative choisi
n’est pas atteint après une longue
période de fonctionnement.
25
Page 27

GARANTIE LIMITÉE DE PRODUIT
Ce produit de qualité est garanti d’être libre de tous défauts de matériaux et de main d’oeuvre du fabricant, sous réserve que l’unité soit utilisée sous les
conditions normales de fonctionnement prévues par le fabricant.
Cette garantie n’est offerte qu’à la personne à qui l’unité a été vendue originalement par Danby ou par un distributeur autorisé de Danby et elle n’est pas
transférable.
TERMES DE LA GARANTIE
Les pièces en plastique (par exemple, la porte de l’évaporateur, les rampes de porte, les couvercles et les plateaux) sont garanties pour trente (30) jours
seulement à partir de la date de l’achat, sans aucune prolongation prévue.
Deux premières années.
Durant les deux (2) premières années, toute pièce électrique déterminée être défectueuse, y compris toute unité scellée, sera réparée
ou remplacée, à la discrétion du garant, sans frais pour l’acheteur ORIGINAL. Les pièces consommables (par exemple, les ampoules
de lampe le cas échéant) ne sont pas garanties pour aucune période de temps.
Durant les trois (3) années suivantes, toute pièce du système scellé déterminée être défectueuse (comprenant le __________
compresseur, le condensateur, l’évaporateur, le séchoir et tout le tubage relatif) sera remplacée sans frais cependant tous ___
les frais de main d’oeuvre associés au remplacement du système scellé seront la responsabilité unique de l’acheteur. ________
L’acheteur devra payer pour la main d’oeuvre et le transport de retour durant cette période de trois (3) ans pour la _____________________________
réparation ou le remplacement de toutes pièces du système scellé.Toute unité diagnostiquée non réparable en raison d’une _____________________
défectuosité du système scellé et justifiant un échange durant les trois (3) années d’existence, sera assujettie à une charge _____________________
de dépréciation appropriée ou à des frais d’utilisation, y compris tous les frais de transport imposables au _______________________consommateur.
Pour obtenir le service.
Danby se réserve le droit d’établir les limites du « service à domicile » en raison de la proximité d’un centre de service autorisé. Pour
tout appareil exigeant le service en dehors des limites établies pour le « service à domicile », le client aura la responsabilité de
transporter l’appareil à ses propres frais, au centre de service autorisé le plus rapproché. Communiquez avec le détaillant où vous avez
acheté l’unité, ou communiquez avec le centre de service Danby le plus rapproché où le service devra être complété par un technicien
qualifié. Si le service est complété sur les unités par toute autre personne autre qu’un technicien du centre de service autor isé, ou si
l’unité est utilisée pour une application commerciale, toutes les obligations de Danby sous la présente garantie seront annulées.
Les clauses suivantes réfèrent aux congélateurs du type coffre (de moins de 198 L / 7.0 pi3 ), aux réfrigérateurs à simple et doubles portes fournis avec ou sans
section séparée de congélateur. Rien dans cette garantie ne devra suggérer que Danby sera garant ou responsable pour tout dommage ou pour toute perte
d’aliments ou autres contenus de cet appareil ménager, que ces pertes aient été causées par une défectuosité de l’appareil ou par son utilisation, appropriée ou
non.
EXCLUSIONS
À l’exception des provisions prévues aux présentes, Danby Products Limited (Canada). Il n’existe aucune autre garantie, modalité, représentation ou garantie
explicite ou implicite faite ou suggérée par Danby Products Limited ou par ses distributeurs autorisés et toutes autres garanties, modalités, représentations ou
garanties, y compris toutes garanties, modalités, représentations ou garanties applicables sous la Loi sur la vente des marchandises ou législation semblable ou
autre loi, sont expressément exclues par les présentes. Sous réser ve des provisions aux présentes, Danby Products Limited (Canada) ou Danby Products Inc.
(U.S.A.) n’acceptent aucune responsabilité envers tous dommages aux personnes ou à la propriété, incluant l’unité même, causés de toutes manières et pour
tous dommages accessoires causés par la défectuosité de l’unité et par l’achat de l’unité. L’acheteur par la présente convient d’indemniser et de tenir à couvert
la société Danby Products Limited envers toutes réclamations pour dommages aux personnes ou à la propriété causés par l’unité.
DISPOSITIONS GÉNÉRALES
Aucune garantie ou assurance contenue aux présentes ou ainsi établie ne sera applicable quand les dommages ou la réparation sont causés par l’une ou l’autre
des situations suivantes.
1. Panne d’électricité.
2. Dommages durant le transport ou le déplacement d l’unité.
3. Source d’alimentation de courant inappropriée telle qu’une basse tension, le câblage défectueux de la maison, ou des fusibles inadéquats.
4. Un accident, une altération, l’abus ou l’usage inapproprié de l’appareil, telle qu’une circulation d’air insuffisante dans la pièce ou des conditions
anormales de fonctionnement, (des températures de la pièces extrêmement élevées ou basses).
5. L’usage à des fins commerciales ou industrielles.
6. Un incendie, des dommages causés par l’eau, le vol, une guerre, une émeute, des hostilités, les désastres naturels tels que les ouragans et les
inondations, etc.
7. Les appels de ser vice par un technicien résultant en une éducation du client.
La preuve de la date d’achat sera requise pour les réclamations de garantie.Veuillez donc conser ver votre reçu de caisse. Dans l’éventualité où le service de
garantie serait requis, présentez ce document à notre CENTRE DE SERVICE AUTORISÉ.
Danby Products Limited
PO Box 1778, 5070 Whitelaw Road,
Guelph, Ontario, Canada N1H 6Z9
Téléphone : (519) 837-0920 Télécopieur : (519) 837-0449
Danby Products Inc.
PO Box 669, 101 Bentley Court,
Findlay, Ohio, U.S.A. 45839-0669
Téléphone : (419) 425-8627 Télécopieur : (419) 425-8629
Troisième à la
cinquième année :
Page 28

Página
Introducción . . . . . . . . . . . . . . . . . . . . . . . . . . . . . . . . . . . . . . . . . . . . . . . . . . . 28
Advertencias y Notas Importantes . . . . . . . . . . . . . . . . . . . . . . . . . . . . . . . . . . 29
Especificaciones. . . . . . . . . . . . . . . . . . . . . . . . . . . . . . . . . . . . . . . . . . . . . . . . 30
Partes y Características . . . . . . . . . . . . . . . . . . . . . . . . . . . . . . . . . . . . . . . . . . 31
Funciones del Teclado . . . . . . . . . . . . . . . . . . . . . . . . . . . . . . . . . . . . . . . . . . . 32
Control Remoto. . . . . . . . . . . . . . . . . . . . . . . . . . . . . . . . . . . . . . . . . . . . . . . . . 34
Instrucciones de Ubicación e Instalación . . . . . . . . . . . . . . . . . . . . . . . . . . . . . 35
Instrucciones de Operación/Remoción del Filtro . . . . . . . . . . . . . . . . . . . . . . . 36
Cuidado y Mantenimiento. . . . . . . . . . . . . . . . . . . . . . . . . . . . . . . . . . . . . . . . . 37
Instrucciones para Drenaje Directo . . . . . . . . . . . . . . . . . . . . . . . . . . . . . . . . . 37
Almacenamiento. . . . . . . . . . . . . . . . . . . . . . . . . . . . . . . . . . . . . . . . . . . . . . . . 37
Guía para la Localización de Problemas . . . . . . . . . . . . . . . . . . . . . . . . . . . . . 38
Garantía . . . . . . . . . . . . . . . . . . . . . . . . . . . . . . . . . . . . . . . . . . . . . . . . . . . . . . 39
27
Índice
Page 29

28
Introducción
Gracias por elegir este producto Danby para proporcionarle a usted y a su familia todos los requisitos de
"Confort Hogareño" para su hogar, cabaña u oficina. Este manual de usuario le proporcionará información
importante necesaria para el uso, cuidado y mantenimiento adecuados de su nuevo artefacto. Si lo mantiene
correctamente, su artefacto Danby® le proporcionará muchos años de funcionamiento sin problemas. Por
favor, tómese unos minutos y lea completamente las instrucciones para familiarizarse con todos los aspectos
operacionales de este artefacto.
Esta unidad puede transportarse fácilmente de un cuar to a otro en su casa y se instala en solo unos
minutos.
Para una fácil referencia, le suger imos que adjunte una copia de su recibo de compra a esta página, junto
con la siguiente información ubicada en la placa de especificaciones del fabricante, en la pared posterior del
compartimiento del tanque de agua.
Número de Modelo: _____________________________________________________
Número de Serie: ______________________________________________________
Fecha de Compra: ______________________________________________________
Nombre y Dirección del Distribuidor: ________________________________________
________________________________________
Esta información será necesaria si su unidad necesita servicio y/o para consultas en general. Para hablar
con un Representante de Servicio al Cliente, llame al
1-800-26-DANBY (1-800-263-2629)
Guarde estas instrucciones para futura referencia.
Este símbolo indica una advertencia
CUIDADO
No deje esta unidad desatendida o la use en un
área donde haya gente o animales que no
puedan reaccionar rápidamente. Una falla en la
unidad podría causar recalentamiento resultando
en daños personales o materiales.
Page 30

29
ADVERTENCIA - NOTAS IMPORTANTES
NOTA: Las instrucciones de ADVERTENCIA a lo largo de este manual no intentan cubrir todas las posibles
condiciones y situaciones que podrían presentarse. Debe entenderse que el sentido común, cuidado y
precaución son factores que no se pueden incluir en todos los artefactos.Estos factores deberán ser
suministrados por las personas instalando, manteniendo o usando el artefacto. El no instalar, mantener y/o
usar el equipo de acuerdo con las instrucciones del fabricante podría causar riesgo de daños personales o
materiales. Llame a su distribuidor, agente de servicio o el fabricante por cualquier problema o condición
que no comprenda completamente. (Para hablar con el Servicio al Cliente de Danby, llame al
1 800 26 DANBY / 1 800 263 2629)
POR SU SEGURIDAD -
Para reducir el riesgo de incendio o explosión, no almacene o use gasolina u otros vapores o
líquidos inflamables cerca de este o de cualquier otro artefacto.
INFORMACIÓN DEL SERVICIO ELÉCTRICO -
Para reducir el riesgo de incendio, descarga eléctrica o daños
personales, todo el cableado y conexionado a tierra deberá cumplir con la última edición de los Códigos Eléctricos
Locales y Nacionales. Es responsabilidad del cliente el hacer inspeccionar los cables y fusibles por un electricista
calificado para asegurarse de que disponga del suministro eléctrico adecuado.
Este artefacto está diseñado para trabajar en un circuito independiente, polarizado, de tres cables, con conexión a
tierra, de 120 Voltios 60 Hertz (corr iente alternada) protegido por un fusible de 15 amperes o un disyuntor o llave térmica
equivalentes.
El enchufe de tres patas con conexión a tierra del cable de alimentación debe enchufarse directamente en un
tomacorriente polarizado de tres patas con conexión a tierra de 110/120 V C.A.
INSTRUCCIONES DE CONEXIÓN A TIERRA -
La conexión inadecuada del cable de tierra puede causar riesgo de
descarga eléctrica. Consulte con un electricista calificado o representante técnico si tiene dudas acerca de la conexión a
tierra de sus tomacorrientes.
Este artefacto debe ser conectado a tierra. En caso de falla o avería, la conexión a tierra reducirá el riesgo de
descarga eléctrica proporcionando un camino de menor resistencia para la corriente eléctrica. Este ar tefacto viene con
un cable de alimentación que tiene un conductor y pata del enchufe de tierra. El enchufe debe conectarse a un
tomacorriente apropiado que esté instalado y conectado a tierra de acuerdo con las normas y reglamentaciones locales.
No modifique el enchufe que viene con el artefacto.Si no entra en el tomacorriente, haga que un electricista calificado
le instale el tomacorriente adecuado.
Si la instalación eléctrica de su casa no cumple con las especificaciones anteriores, o si no está seguro de tener una
buena conexión a tierra, haga que un electricista calificado o su compañía eléctrica la revisen y arreglen cualquier
problema.
Page 31

Especificaciones Eléctricas
1. Todo el cableado debe respetar las normas eléctricas
locales y nacionales y debe ser instalado por un
electricista calificado. Si tiene alguna duda respecto a
las instrucciones siguientes, consulte con un
electricista calificado.
2. Verifique la disponibilidad de energía de alimentación
y resuelva cualquier problema del cableado ANTES
de instalar y operar esta unidad.
3. Para su seguridad y protección, esta unidad queda
conectada a tierra a través del cable de alimentación
al enchufarla en un tomacorriente compatible. Si no
está seguro de que los tomacorrientes de su casa
están correctamente conectados a tierra, consulte con
un electricista calificado. NO USE ADAPTADORES O
CABLES DE EXTENSIÓN.
4. La placa de especificaciones del fabricante está
ubicada en la pared posterior del artefacto. Esta placa
contiene datos eléctricos y técnicos específicos de
esta unidad.
5. Para evitar la posibilidad de daños personales,
siempre desconecte el cable de alimentación de la
unidad antes de limpiarla y/o repararla.
30
Capacidad de Deshumidificación (Pintas / Litros) 60 / 28.4
Requisitos Eléctricos 115 Voltios / 60 Hz
Consumo de Potencia (vatios) 785
Consumo de Corriente
• Deshumidificador 7.26
• Calefactor No Corresponde
Flujo de Circulación de Aire - Velocidad del Ventilador Alta/Baja (Pies Cúbicos por Minuto) 183 / 160
Tipo de Refrigerante R22
Capacidad del Tanque de Agua (Litros/Pintas) 5.3 / 11.2
Nivel de Ruido (dB A) 50
Dimensiones - Ancho / Alto / Profundidad 13-3/4” x 30-1/2” x 13-3/16”
Peso Neto (kg / lbs.) 25 / 55.1
NOTA: Las especificaciones pueden cambiar sin aviso previo, debido a mejoras posteriores.
Especificaciones
:
DDR600R
Page 32

31
• Panel de Control (Electrónico) al Tacto (Iluminado)
• Indicador Digital
• Control Automático de Humedad
• Ajuste de Humedad (Continuo, de 35% a 80%)
• 2 Ajustes de Velocidad de Ventilador (Alto/Bajo)
• Protección de Arranque con Retardo (para compresor)
• Descongelado Automático
• Operación a Baja Temperatura
• Bajo Consumo de Energía (Energy Star)
• Indicador Luminoso y Sonoro de Tanque de Agua Lleno
• Ruedas (4) para Facilitar el Movimiento
• Tanque de Agua (Removible) de Montaje Frontal
• Opción de Drenaje Directo (Manguera no Incluida)
• Diseño de Estilo Europeo
• Silencioso
• Filtro de Aire Removible
CARACTERÍSTICAS
Panel de Control
Entrada de aire
Panel Frontal
Panel Lateral
Mango
Identificación de las partes de la unidad
Tanque de
Agua
(Frente)
Rueditas
Page 33

Botón I/O :
Enciende/Apaga la unidad cada vez que se presiona
este botón.
Botón del Ventilador: Cada vez que se presione
este botón, la velocidad del ventilador alternará entre
ALTA y BAJA.
Botón de Temporizador: Se usa para iniciar el
arranque retardado y/o la parada retardada. Cada
vez que se presiona este botón se puede ajustar el
tiempo de arranque/parada de retardo (entre 0,5 y 24
horas) como sigue;
En incrementos de 0,5 hora (desde 0,5 hasta 10
horas)
En incrementos de 1,0 hora (desde 10 hasta 24
horas)
Este botón permite disminuir el ajuste de humedad
relativa. Cada vez que se presiona el botón, el valor
ajustado de la humedad disminuirá 5%. (Valores
ajustables entre 80% y 35%). Este botón también se
puede usar para disminuir el tiempo programado del
temporizador (arranque/parada con retardo)
Este botón permite aumentar el ajuste de humedad
relativa. Cada vez que se presiona el botón, el valor
ajustado de la humedad aumentará 5%. (Valores
ajustables entre 35% y 80%). Este botón también se
puede usar para aumentar el tiempo programado del
temporizador (arranque/parada con retardo)
Botón de Modo: Cada vez que se presione este
botón, se alternará entre el modo deshumidificador y
ventilador. El símbolo del modo seleccionado
aparecerá en el indicador digital
INDICADOR DIGITAL: Muestra la siguiente información:
1. ROOM AIR = Condición de Humedad Relativa
Ambiente en Tiempo Real
2. SET AIR = El Valor Seleccionado de Humedad
Relativa.
3. MODE:= Modo Seleccionado de Operación.
4. FAN SPEED = La Velocidad Seleccionada del
Ventilador.
5. TIMER = El Tiempo Seleccionado de retardo de
arranque/parada.
32
Explicación de las funciones del teclado del panel electrónico de control.
12
5
34
I/O
Page 34

Significado de los Indicadores Luminosos:
Flechas (Operación - Luz Azul): Esta luz se enciende y
permanece encendida mientras la unidad está
funcionando.
Balde (Tanque Lleno - Luz Roja): Esta luz se enciende
bajo las siguientes condiciones;
1. Cuando el tanque de agua interno no está instalado
correctamente dentro del gabinete.
2. Cuando el tanque de agua interno está lleno. Deberá
vaciar y volver a instalar el tanque de agua para poder
seguir usando el equipo.
Funcionamiento del Tanque de Agua:
La correcta instalación del tanque de agua es crucial
para mantener la operación confiable del
deshumidificador.
El tanque de agua acumula el agua condensada enviada
desde la serpentina del evaporador durante la
deshumidificación. El nivel de agua dentro del tanque
está controlado por un interruptor flotador que detiene
automáticamente el deshumidificador cuando el agua
llega hasta un nivel predeterminado.
Una vez que el tanque de agua esté lleno y/o mal
colocado dentro del gabinete, la luz roja (tanque lleno)
parpadea y se emite una señal sonora (pitido) durante 10
segundos. Esto hace que el sistema deshumidificador se
apague instantáneamente. (Se detiene el compresor,
pero el ventilador seguirá funcionando). Deberá vaciar
y/o instalar correctamente el tanque de agua para poder
seguir usando el deshumidificador.NOTA: Puede tardar
varios minutos en volver a funcionar. Esto es normal.
IMPORTANTE: Nunca modifique o intente anular el
mecanismo del interruptor flotador.(Ya que esto
provocará el desborde)
Ajuste Inicial de Fábrica:
Al conectar la unidad por primera vez, el controlador
electrónico se ajustará automáticamente a los siguientes
valores iniciales;
Modo: Deshumidificador
Valor de Humedad del Aire: 60%
Velocidad del Ventilador: Baja
Ajuste Inicial Personalizado:
Si modifica cualquiera de los ajustes iniciales de fábrica,
su nuevo ajuste se convierte en el ajuste inicial actual.
Al apagar la unidad, o si se corta la corriente, sus ajustes
personalizados se mantienen y son reestablecidos al
volver a encender la unidad.
33
Page 35

Funciones del Control Remoto
El control remoto portátil le per mite controlar todos
los parámetros de operación de su deshumidificador
cómodamente desde su sillón preferido. A
continuación se detallan algunas cosas que debe
saber al operar su unidad con el control remoto.
Botones de Control
I/O: Llave de Encendido (Encendido / Apagado).
MODE: Selecciona el modo deseado de
funcionamiento (Deshumidificador/Ventilador).
Selecciona la velocidad del ventilador
(ALTA/BAJA). Cada vez que presiona este
botón, se alternará entre ALTA y BAJA
.
Se utiliza para reducir el ajuste humedad
relativa. Cada vez que se presiona el botón, el
valor ajustado de la humedad disminuirá 5%
(valores ajustables entre 35% y 80%).Este
botón también se puede usar para disminuir el
tiempo programado del temporizador
(arranque/parada con retardo).
En incrementos de 0,5 hora (desde 0,5 hasta
10 horas)
En incrementos de 1,0 hora (desde 10 hasta
24 horas)
Se utiliza para aumentar el ajuste de
humedad relativa. Cada vez que se presione
el botón, el valor ajustado de la humedad
aumentará 5% (valores ajustables entre 35%
y 80%). Este botón también se puede usar
para aumentar el tiempo programado del
temporizador (arranque/parada con retardo).
En incrementos de 0,5 hora (desde 0,5 hasta
10 horas).
En incrementos de 1,0 hora (desde 10 hasta
24 horas)
Se usa para iniciar el arranque retardado y/o
la parada retardada.
F / C Se usa para cambiar la indicación de la
temperatura de la pantalla digital entre grados
Celsius y Fahrenheit.Cada vez que se
presione este botón, se alternará entre las
dos escalas de temperatura.
Para utilizar el control remoto portátil necesita dos
pilas alcalinas (1,5 voltios) tipo "AAA" (incluidas).
Las pilas deben reemplazarse cuando:
a) no se escucha ningún pitido desde la unidad
principal al presionar los botones del control
remoto al intentar programarla.
b) La unidad pr incipal no responde a ningún
comando enviado por el control remoto.
Reemplazo de las pilas
1. Abra la tapa del lado de atrás del control remoto
en el sentido de la flecha. Continúe tirando (con
cuidado) hasta que la tapa se separe
completamente de la unidad.
2. Reemplace las (2) pilas (AAA) siguiendo la
orientación (polaridad) indicada dentro del
compartimiento para las pilas. (+/-)
3. Vuelva a colocar la tapa posterior.
4. Debe quitar las pilas del control remoto si no lo
va a utilizar por mucho tiempo (vacaciones, etc.).
El control remoto funciona dentro de un rango de 7
metros (23 pies) del receptor ubicado dentro de la
unidad principal. Cualquier obstrucción entre el
receptor y el control remoto puede interferir con la
señal, limitando la capacidad de programar la unidad
principal.
34
Page 36

35
Ubicación:
Escoja una ubicación apropiada, asegurándose de que
tenga fácil acceso a un tomacorriente. (Evite usar cables
de extensión). Si necesita utilizar un prolongador, use
únicamente uno para trabajo pesado aprobado para
"acondicionadores de aire". (Disponible en la mayoría de
las tiendas de artículos eléctricos).
Elija la ubicación deseada asegurándose de que no haya
obstrucciones que restrinjan el flujo de aire por la rejilla
delantera. Mantenga una separación mínima de 20cm
(8") entre la unidad y las paredes de los costados y de
atrás para permitir la correcta circulación de aire y la
máxima eficiencia.
Para obtener la mayor eficiencia de operación de su
deshumidificador, la temperatura recomendada de
operación (del ambiente) deberá estar entre 6ºC / 42,8ºF
y 35ºC / 95ºF.
Es importante recordar que la eficiencia de un
deshumidificador estará afectada/influenciada por la
cantidad de humedad nueva que se deje entrar al
ambiente. Para mantener la eficiencia, el
deshumidificador deberá usarse en un ambiente cerrado.
Mantenga todas las puertas y ventanas cerradas.
INSTALACIÓN
Page 37

36
Instrucciones de Operación:
La deshumidificación es una forma de sacar la humedad
del aire. Esto le ayudará a proteger su hogar y
posesiones valiosas contra daños causados por la
humedad en el aire.También previene la acumulación de
moho en los lugares húmedos de la casa.
Esencialmente un deshumidificador saca la humedad del
aire, al hacerlo pasar por una serpentina
deshumidificadora (serpentina evaporadora).La
humedad se condensa en la serpentina evaporadora, se
drena y se acumula dentro de un tanque de agua interno
(removible) ubicado en el frente de la unidad.El aire de
salida que se retorna al ambiente está calentado unos
pocos grados causando que se eleve (levemente) la
temperatura de sus alrededores.Este proceso ayuda a
disminuir la humedad relativa del aire de los alrededores.
Ajuste Inicial de Fábrica:
Al conectar la unidad por primera vez, el controlador
electrónico se ajustará automáticamente a los siguientes
valores iniciales.
Modo: Deshumidificador
Valor de Humedad del Aire: 60% HR
Velocidad del Ventilador: Baja
NOTA: Si se llegara a cortar la corriente o se apagara la
unidad, se mantienen los últimos ajustes y son
reestablecidos al volver a encender la unidad.
NOTA IMPORTANTE: Dependiendo de las condiciones
de humedad (al volver la corriente o al encender el
equipo) el deshumidificador puede no arrancar
automáticamente con los ajustes iniciales de fábrica o
personalizados (ver página 7). Esto indica que la
humedad relativa del ambiente es menor que el ajuste
inicial y puede ser necesario ajustar un valor menor de
humedad (RH%).
SELECCIÓN DEL MODO DEL DESHUMIDIFICADOR:
1. No hace falta encender la unidad para seleccionar un
programa.Todos los programas se pueden seleccionar
con la unidad apagada.
2. Presione el botón MODE y elija el modo de operación
(aparecerá el símbolo de una gota de agua en la
pantalla). Cada vez que presione el botón, el modo
cambiará entre DRY (deshumidificador) y FAN (sólo
ventilador).
3. Presione las flechas hacia arr iba o hacia abajo para
elegir el valor de la HUMEDAD (entre 35% y 80%).
Para seleccionar el modo CONTINUO de
deshumidificación, presione la flecha hacia abajo
hasta que aparezca "- -" en la pantalla. NOTA: En el
modo CONTINUO de operación, el control de
humedad (humidistato) es desactivado y el compresor
funciona constantemente sin importar las condiciones
de humedad.
SELECCIÓN DE LA VELOCIDAD DEL VENTILADOR:
4. Presione el símbolo del ventilador en el teclado. Cada
vez que se presiona el botón, la selección alternará
entre las velocidades ALTA y BAJA. La velocidad
seleccionada aparecerá en la pantalla digital; ya sea
un símbolo de ventilador con 5 paletas para ALTA o
uno con 3 paletas para BAJA.
5. Una vez que todos los ajustes estén ingresados,
presione el botón I/O para encender el
deshumidificador y se encenderá la luz azul de
encendido.
SELECCIÓN DEL MODO VENTILADOR:
1. No hace falta encender la unidad para seleccionar un
programa.Todos los programas se pueden seleccionar
con la unidad apagada
2. Presione el botón de MODE y elija el modo ventilador
(aparecerá el símbolo del ventilador en la pantalla).
Cada vez que presione el botón, el modo cambiará
entre los modos deshumidificador y ventilador.
3. Presione el símbolo del ventilador en el teclado. Cada
vez que se presione el botón, la selección alternará
entre las velocidades ALTA y BAJA.
4. Una vez que todos los ajustes estén ingresados,
presione el botón I/O para encender el ventilador y se
encenderá la luz azul de encendido.
FILTRO DE AIRE:
Su deshumidificador tiene un filtro de aire removible.Este
filtro está ubicado en el frente de la unidad (detrás de la
rejilla de entrada de aire). El filtro de aire juega un papel
importante ayudando a reducir (minimizar) las partículas
de polvo/tierra del ambiente.Si el filtro de aire se tapa
reducirá el flujo de aire produciendo un efecto negativo
en la eficiencia del equipo.Para mantener la máxima
eficiencia de operación, deberá revisar y limpiar
regularmente el filtro (cada 2 semanas). Puede necesitar
más limpieza dependiendo de la calidad del aire interior.
IMPORTANTE: Nunca use la unidad sin el filtro de aire
colocado.
REMOCIÓN DEL FILTRO DE AIRE:
1. Ubique la pestaña (el mango) del filtro de aire en el
extremo superior derecho de la rejilla interna de
entrada de aire y deslice el filtro hacia la derecha.
2. Limpie bien el filtro con una aspiradora o lávelo con
agua tibia y detergente suave.Séquelo
completamente antes de volver a instalarlo.
3. Para volver a instalar el filtro de aire, deslice el filtro
nuevamente dentro de sus guías hasta que se trabe
en su lugar.
Instrucciones de Operación
Page 38

Fig.3
(Parte Posterior)
37
Función de Drenaje Directo:
Este deshumidificador posee una conexión para drenaje
directo, ubicada en la parte trasera (izquierda) del
gabinete. NOTA: La manguera de drenaje no se incluye
con la unidad. Use una manguera común de jardín con
conector hembra estándar.Este tipo de manguera puede
adquirirse en cualquier ferretería. La función de drenaje
directo es para usar únicamente en sótanos que tengan
una rejilla de drenaje.
NOTA: No intente usar la función de drenaje directo
con una rejilla/cañería por encima del nivel del piso.
CONEXIÓN DEL DRENAJE DIRECTO:
1. Desator nille la tapa del drenaje de la conexión directa
ubicada en la parte posterior de la unidad.
2. Corte la longitud necesaria de manguera de drenaje.
(de acuerdo a sus necesidades). Conecte el acople de
la manguera directamente al conector del drenaje
directo y ajústelo.
3. Coloque el otro extremo de la manguera directamente
sobre la rejilla del piso y encienda la unidad.
4. Coloque el deshumidificador lo más cerca posible de
la rejilla de drenaje.
5. Cuando no se use la función de drenaje directo,
saque la manguera y vuelva a colocar la tapa.
CUIDADO: Antes de intentar limpiar y/o reparar esta
unidad, siempre desenchufe el cable de alimentación del
tomacorriente.
1. No use gasolina, bencina, diluyente de pintura o
ningún otro producto químico para limpiar la unidad ya
que estas substancias producirán
daños/deformaciones en los componentes plásticos y
en la terminación.
2. Nunca intente limpiar la unidad vertiendo agua
directamente sobre cualquiera de sus partes, ya que
esto causaría el deterioro de componentes eléctricos
y del aislamiento de los cables.
3. Use únicamente un detergente liviano para
lavavajillas, agua tibia y un trapo suave para repasar
el exterior de la unidad y séquelo completamente.
Cuando no use el deshumidificador por mucho tiempo,
siga estas instrucciones.
1. Desenchufe el cable de alimentación del
tomacorriente.
2. Vacíe el tanque de agua y límpielo bien.
3. Limpie bien el filtro de aire.
4. Vuelva a empacar la unidad en su caja original.
5. Guarde la unidad parada en un lugar seco.
Cuidado y Mantenimiento
DRENAJE DIRECTO
Almacenamiento
Page 39

La unidad no funciona.
Baja capacidad de
deshumidificación (remoción
de humedad).
No se llega al nivel de
humedad seleccionado luego
de funcionar mucho tiempo.
Por lo general, los problemas son menores y no hace
falta llamar por reparaciones.Use esta guía de
localización de problemas para identificar los posibles
problemas que pudiera tener. Si la unidad sigue
funcionando mal, llame a su Centro de Servicio Denby®
local o al 1-800-26-DANBY (1-800-263-2629) para que lo
ayuden.
GUÍA DE DIAGNÓSTICO DE PROBLEMAS
PROBLEMA POSIBLE CAUSA
38
Verifique la conexión del cable de alimentación.
Verifique si el fusible está quemado.
Verifique si el tanque de agua está lleno.
Verifique que el tanque de agua esté correctamente instalado.
Filtro de aire sucio y/o tapado.
Temperatura ambiente muy baja. (Menor a 5C/41F).
Mala circulación de aire / obstrucción de la rejilla frontal.
Humedad relativa del ambiente muy baja.
Verifique que todas las puertas y ventanas estén cerradas.
El ambiente es demasiado grande para la capacidad de
este deshumidificador.
Page 40

GARANTÍA LIMITADA
Este producto de calidad está garantizado contra defectos de fabricación, incluyendo partes y mano de obra, siempre y cuando la unidad se utilice bajo las
condiciones normales de funcionamiento para las que fue diseñado.
Esta garantía está solamente disponible para la persona que haya comprado originalmente esta unidad directamente de Danby o uno de sus distribuidores
autorizados, y no es transferible.
CONDICIONES DE LA GARANTÍA
Las partes plásticas (como la puer ta del evaporador, rieles de la puerta, cubiertas y bandejas) tienen una garantía de treinta (30) días a partir de la fecha de
compra, sin ninguna excepción.
Primeros Dos Años
Durante los primeros dos (2) años, cualquier parte eléctrica de este producto que resulte defectuosa, incluyendo cualquier sistema sellado, será reparado o reemplazado, a opción del fabricante, sin cargo para el comprador ORIGINAL. Los insumos (como lámparas
eléctricas si la hay) no están garantizadas por ningún período de tiempo.
Del Tercer al
Durante los siguientes tres (3) años cualquier parte del sistema sellado que resulte defectuosa (compresor, condensador, evaporador,
Quinto Año secador y todas las cañerías relacionadas) serán reemplazadas sin cargo, sin embargo, toda la mano de obra relacionada con el reem-
plazo de las partes del sistema sellado serán responsabilidad del cliente. El comprador deberá pagar por toda la mano de obra y gastos de envío durante este período de tres (3) años por la reparación o reemplazo de los sistemas sellados. Cualquier unidad que se
diagnostique como no-reparable debido a un sistema sellado y que deba ser reemplazada durante este período de tres (3) años estará
sujeta a un cargo por depreciación o cargo de usuario, incluyendo todos los costos de transporte que deba pagar el usuario.
Para obtener Servicio
Danby se reserva el derecho de limitar la cobertura de "Servicio en Domicilio" sujeto a la proximidad de un Taller de Servicio
Autorizado. Para todo artefacto que requiera servicio fuera del área limitada de "Servicio en Domicilio", el cliente será responsable por
transportar dicho ar tefacto hasta el Taller de Servicio Autorizado mas cercano. Comuníquese con el distribuidor donde haya comprado
la unidad, o llame al Taller de Servicio Autorizado más cercano, donde debe ser reparada por un técnico calificado. Si esta unidad es
reparada en otro lugar que no sea un Taller de Servicio Autorizado, o si la unidad se utiliza para aplicaciones comerciales, Danby no se
hará responsable de ninguna forma y la garantía será anulada.
La siguiente cláusula se refiere a congeladores tipo arcón (de menos de 7,0 pies cúbicos) y refrigeradores de puerta simple y doble, que tengan o no una
sección separada para un congelador. Ninguna parte de esta garantía implica que Danby se hará responsable por el daño de ningún alimento u otros
contenidos de este artefacto, ya sea debido a un defecto del artefacto, o a su uso, ya sea apropiado o no.
EXCLUSIONES
Salvo lo aquí indicado por Danby Products Limited (Canadá) o por Danby Products Inc.(U.S.A.), no existen otras garantías, condiciones o representaciones,
explícitas o implícitas, concretas o intencionales por parte de Danby Products o sus distribuidores autorizados y todas las demás garantías, condiciones o
representaciones, incluyendo cualquier garantía, condiciones o representaciones bajo cualquier Acta de Venta de Productos o legislación o estatuto similar,
quedan de esta forma expresamente excluidas. Salvo lo aquí indicado, Danby Products Limited (Canadá) o Danby Products Inc.(U.S.A) no serán responsables
por ningún daño a personas o bienes, incluyendo la propia unidad, sin importar su causa, o de ningún daño indirecto causado por el desperfecto de la unidad, y
al comprar esta unidad, el comprador acepta por la presente, indemnizar y proteger a Danby Products Limited contra cualquier reclamo por daños a personas o
bienes causados por la unidad.
CONDICIONES GENERALES
No se considerará ninguna de estas garantías o seguros cuando el daño o la necesidad de reparación sea el producto de los siguientes casos:
1) Falla del suministro eléctrico.
2) Daños en tránsito o durante el transporte de la unidad.
3) Alimentación incorrecta, como bajo voltaje, instalación eléctrica defectuosa o fusibles inadecuados.
4) Accidente, modificación, abuso o uso incorrecto del artefacto, tal como insuficiente ventilación del ambiente o condiciones de operación anor males
(temperatura ambiente extremadamente alta o baja).
5) Utilización comercial o industrial.
6) Incendio, daños por agua, robo, guerra, disturbios, hostilidades, actos de fuerza mayor como huracanes, inundaciones, etc.
7) Pedidos de servicio debido a desinformación del usuario.
Para acceder a la garantía se solicitará un comprobante de compra; por lo tanto, guarde su recibo. En caso de necesitar servicio de garantía, presente ese
documento al TALLER DE SERVICIO AUTORIZADO.
Danby Products Limited
PO Box 1778, 5070 Whitelaw Road,
Guelph, Ontario, Canada N1H 6Z9
Teléfono: (519) 837-0920 FAX: (519) 837-0449
Danby Products Inc.
PO Box 669, 101 Bentley Court,
Findlay, Ohio, U.S.A. 45839-0669
Teléfono: (419) 425-8627 FAX: (419) 425-8629
 Loading...