

Page 1

Danby Products Limited, Ontario, Canada N1H 6Z9
Danby Products Inc., Findlay, Ohio, USA 45840
Model • Modèle • Modelo
•
Owner’s Use and Care Guide
•
Guide d’utilisation et soin de Propriètaire
•
Guía a utilizar y a cuidar del Proprietario
AIR CONDITIONER
CLIMATISEUR
AIRE ACONDICIONADO
V1 11.10 DM
DAC10000
DAC12011
Page 2

Model • Modèle • Modelo DAC10000 / DAC12011
Contents
CAUTION:
PRECAUTION:
Read and follow all safety rules and operating instructions before first use of this product.
Veuillez lire attentivement les consignes de
sécurité et les instructions d’utilisation avant
l’utilisation initiale de ce produit.
CLIMATISEUR
Guide d'utilisation et d'entretien ........................
• Bienvenue ...........................................................
• Consignes de Sécurité Importantes ....................
• Installation ...........................................................
• Consignes d’utilisation ........................................
• Soins et Entretien ...............................................
• Dépannage ..........................................................
• Garantie ...............................................................
2-13
2
3-4
4-8
9-10
11
12
13
AIR CONDITIONER
Owner’s Use and Care Guide .............................
• Welcome .............................................................
• Important Safety Information ...............................
• Installation ...........................................................
• Operation Instructions .........................................
• Care and Maintenance ........................................
• Troubleshooting ...................................................
• Warranty ..............................................................
14-25
14
15-16
16-20
21-22
23
24
25
26-37
26
27-28
29-32
33-34
35
36
37
AIRE ACONDICIONADO
Guía a utilizar y a cuidar del Proprietario..........
• Bienvenida ...........................................................
• Instruciónes de Seguridad Importantes ..............
• Instrucciones d’instalación ..................................
• Instruciónes Operadoras .....................................
• Limpieza y Mantenimiento ..................................
• Solución Sugeridad .............................................
• Garantia................................................................
PRECAUCION
Lea y observe todas las reglas de seguridad
y las instrucciones de operación antes de
usar este producto por primera vez.
Page 3
Welcome
Thank you for choosing a Danby appliance to provide you and your family with all of the “Home Comfort” requirements
for your home. This Owner’s Use and Care Guide will provide you with valuable information necessary for the proper
care and maintenance of your new appliance. If properly maintained, your Danby appliance will give you many years of
trouble free operation. Please take a few moments to read the instructions thoroughly and familiarize yourself with all of
the operational aspects of this appliance.
For easy reference, may we suggest you attach a copy of your sales slip/receipt to this page, along with the following
information, located on the manufacturers nameplate on the side of the unit.
NOTE: THIS UNIT IS NOT DESIGNED FOR “THROUGH-THE-WALL” INSTALLATION.
Model Number:
Serial Number:
Date of Purchase:
This information will be necessary if your unit requires servicing and/or for general inquiries. To contact a Customer
Service Representative, call Danby TOLL FREE: 1-800-263-2629
2
WARNING
Improper connection of the grounding plug can result in risk of
Fire, Electric Shock and/or injury to Persons associated with the
appliance. Check with a qualified service representative if in doubt
that the appliance is proplery grounded.
Page 4
Important Safety Information
READ AND FOLLOW ALL SAFETY INSTRUCTIONS
ELECTRICAL
SPECIFICATIONS
FOR YOUR SAFETY: Read these instructions carefully before operating the unit.
1) All wiring must comply with local and national electrical codes and must
be installed by a qualified electrician. If you have any questions
regarding the following instructions, contact a qualified electrician.
2) Check available power supply and resolve any wiring problems
BEFORE installing and operating this unit.
3) For your safety and protection, this unit is grounded through the power
cord plug when plugged into a matching wall outlet. If you are not sure
whether your wall outlet is properly grounded, please consult a qualified
electrician.
4) The wall outlet must match the 3-prong plug on the service cord
supplied with the unit. DO NOT use plug adapters. If it is necessary to
use an extension cord to connect your air conditioner, use an
approved “air conditioner” extension cord only (available at most
local hardware stores).
5) The rating plate on the unit contains electrical and other technical data.
The rating plate is located on the right side of the unit, above the power
cord.
3
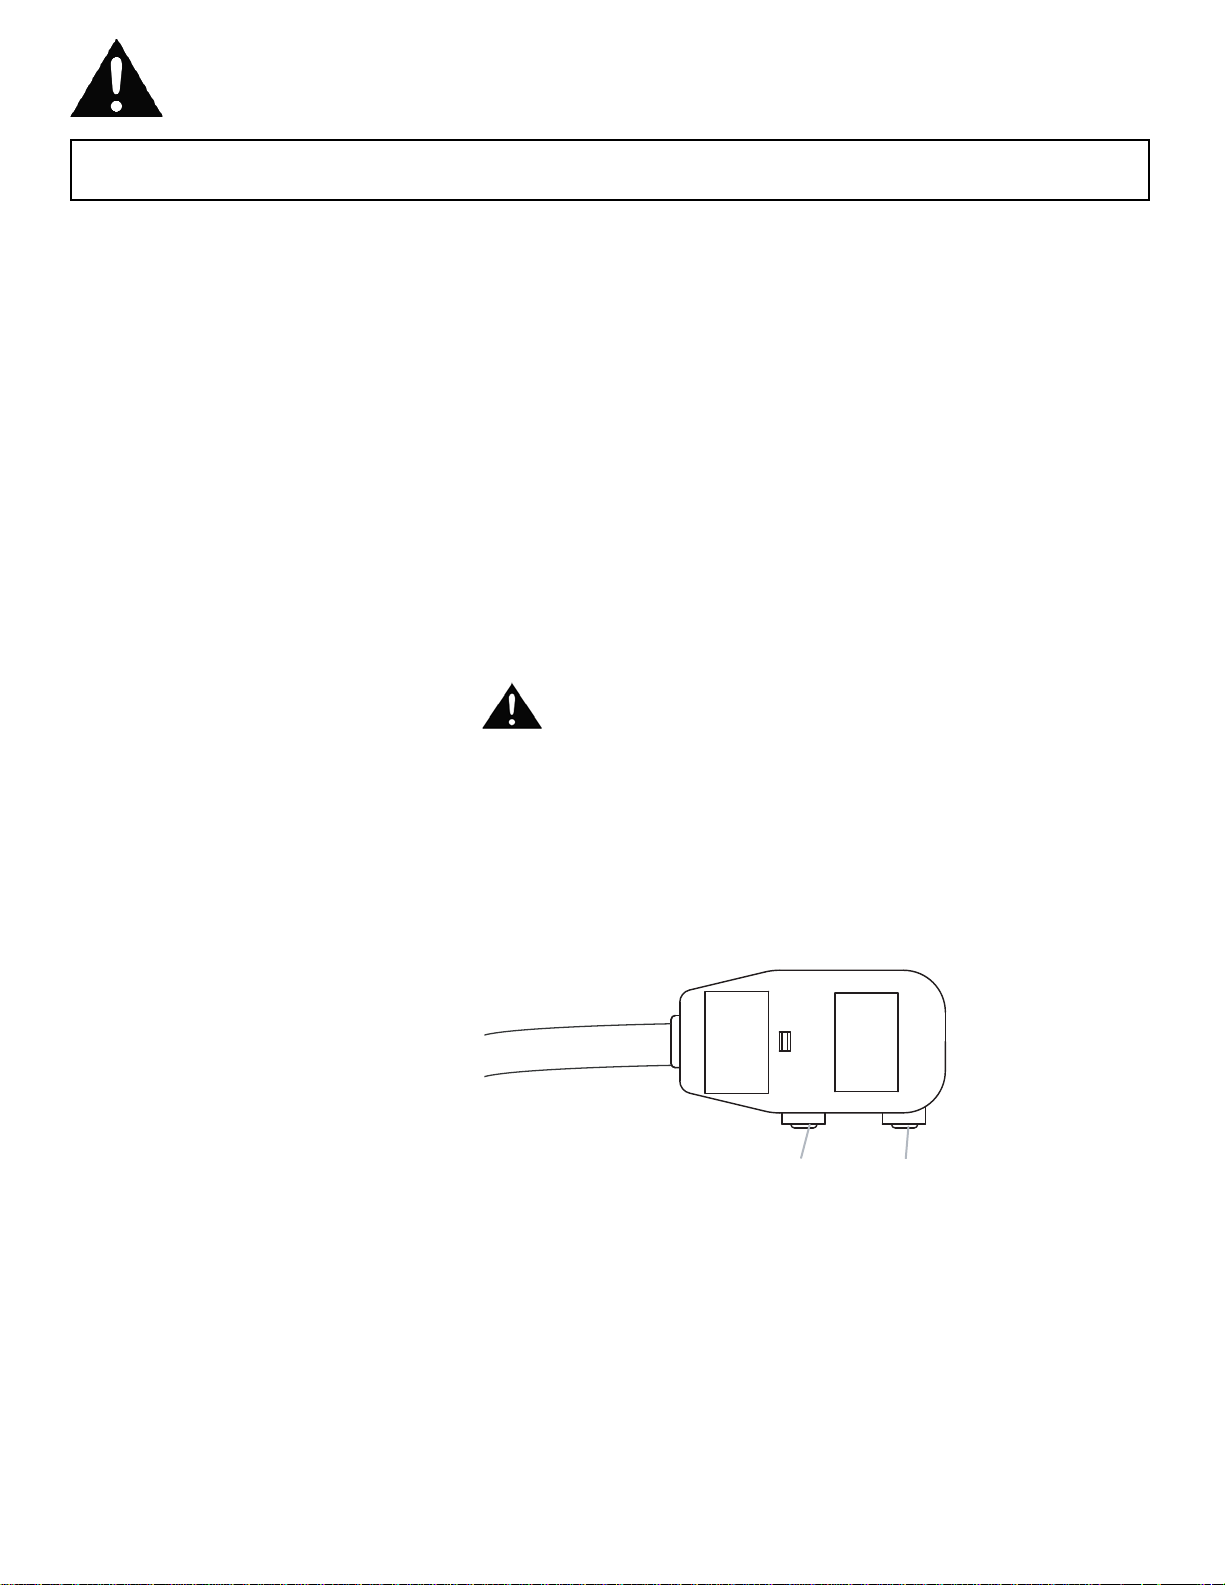
POWER SUPPLY CORD
NOTE: Your unit’s device may differ from the one shown.
This room air conditioner is equipped with a power supply cord required by
ULC. This power supply cord contains state-of-the-art electronics that
sense leaking current. If the cord is crushed, the electronics detect leaking
current and power will be disconnected in a fraction of a second.
To test your power supply cord:
1. Plug power supply cord into a grounded 3 prong outlet.
2. Press RESET (on some devices, a green light will turn on).
3. Press TEST (listen for a click; Reset button will trip, and on some
devices, a green light will turn off).
4. Press and release RESET (listen for a click; Reset button will latch, and
on some devices, a green light will turn on). The power supply cord is
ready for operation.
LCDI
TEST
RESET
POWER
B A
ELECTRICAL
SPECIFICATIONS
WARNING: To reduce the risk of fire, electrical shock or injury
when using your air conditioner, follow these basic precautions:
• Plug into a grounded 3 prong outlet.
• Do not remove ground prong.
• Do not use an adapter.
• Do not use an extension cord.
• Unplug air conditioner before servicing.
• Use two or more people to move and install air conditioner.
Page 5
Important Safety Information
READ AND FOLLOW ALL SAFETY INSTRUCTIONS
ENERGY SAVING TIPS
FOR YOUR SAFETY: Read these instructions carefully before operating the unit.
Your Danby appliance is designed to be highly efficient in energy
savings. Follow these recommendations for greater efficiency.
1) Select a thermostat setting that suits your comfort needs and leave at
that chosen setting.
2) The air filter is very efficient in removing airborne particles. Keep the air
filter clean at all times. (usually cleaned every 2 weeks depending on
indoor air quality).
3) Use drapes, curtains or shades to keep direct sunlight from penetrating
and heating the room, but do not allow drapes or curtains to obstruct
the air flow around the unit.
4) Start your air conditioner before the outdoor air becomes hot and
uncomfortable, to avoid an initial period of discomfort while the unit is
cooling off the room.
5) When outdoor temperatures are cool enough, use HIGH or LOW FAN
only. This circulates indoor air, providing some cooling comfort, and
utilizes less electricity than when operating on a cooling setting.
4
Installation Instructions
Lower sash must open sufficiently to allow a clear vertical opening of 15
8/16 inches (394 mm). Side louvers and the rear of the AC must have
clear air space to allow enough airflow through the condenser, for heat
removal. The rear of the unit must be outdoors, not inside a building or
garage.
NOTE: SAVE CARTON and these INSTALLATION INSTRUCTIONS for
future reference. The carton is the best way to store unit during winter, or
when not in use.
Some assembly is required. Please read these instructions
carefully.
ELECTRIC SHOCK HAZARD
To avoid the possibility of personal
injury, disconnect power to the unit
before installing or servicing.
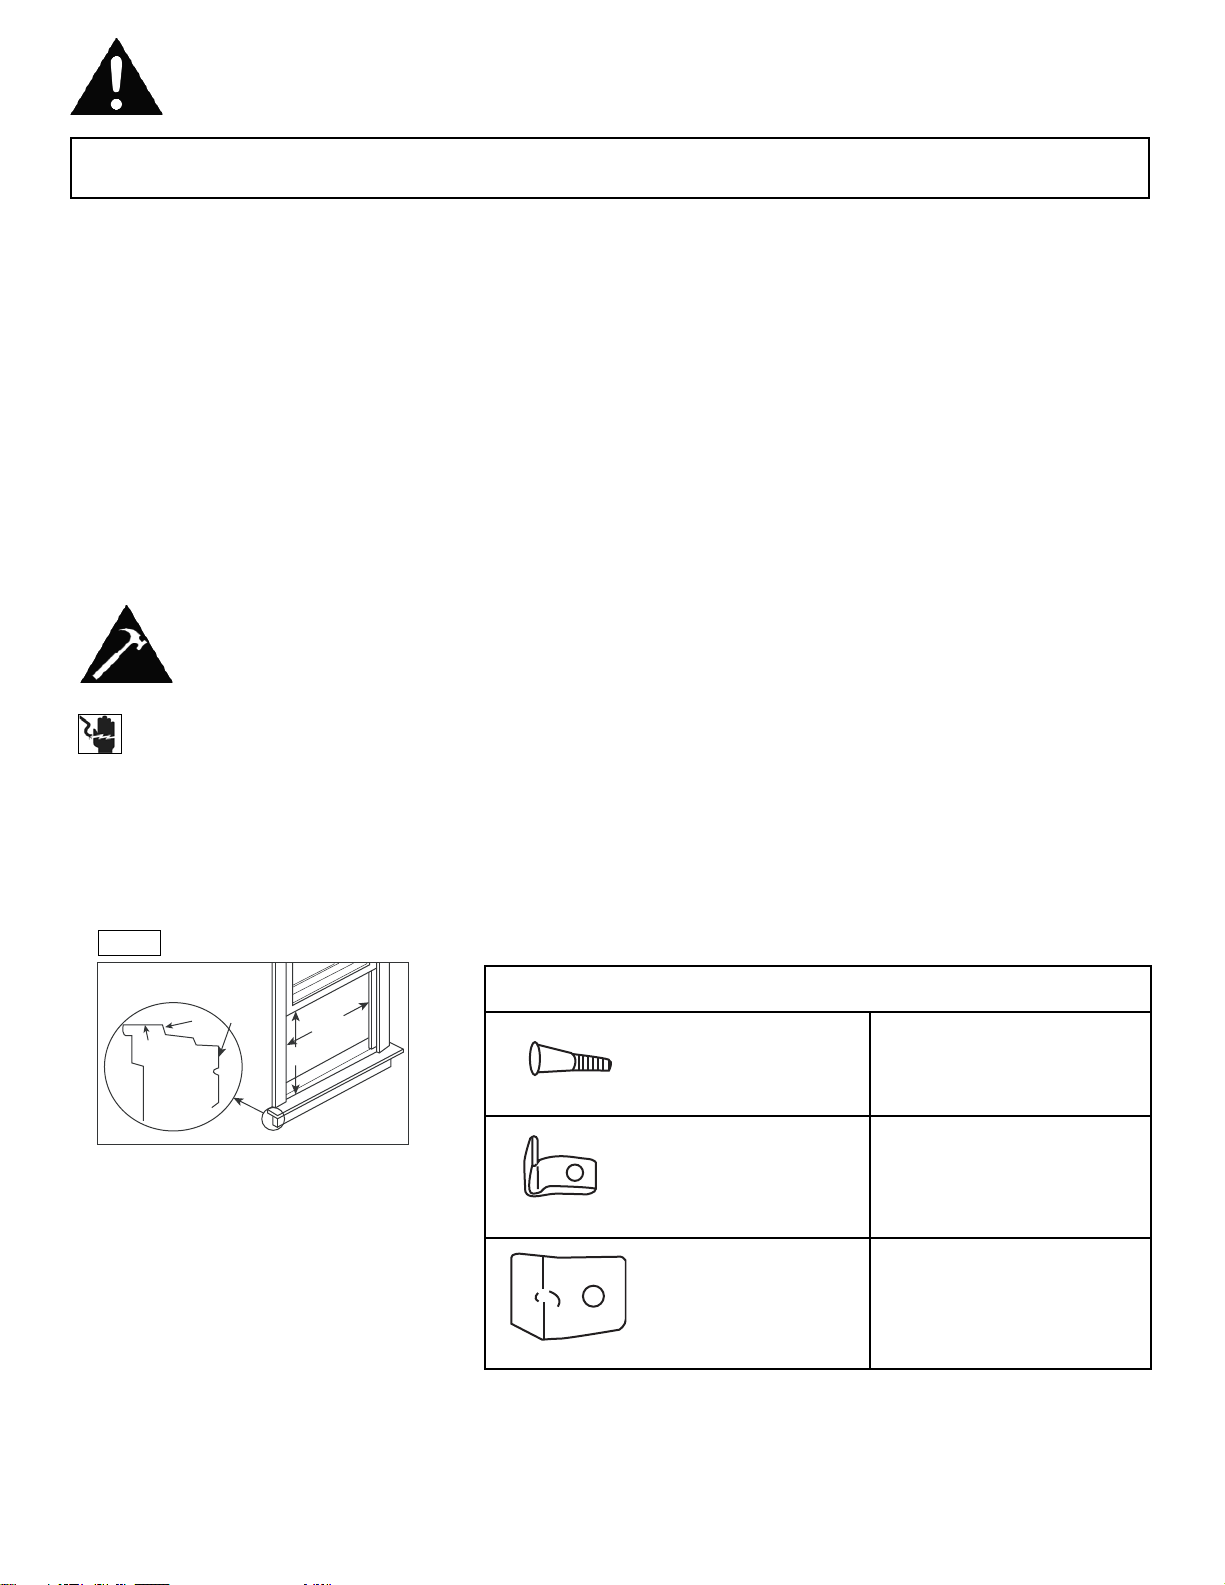
NOTE: Your air conditioner is designed
for installation in a standard double hung
window with an opening width of 22 to 36
inches (550 mm to 914 mm) (FIG. 1)
INTERIOR
WALL
STOOL
SILL
OFFSET
EXTERIOR
WALL
22” to 36”
550mm to 914mm
15 8/16”
(394mm)
Fig. 1
MOUNTING HARDWARE
3/4"screws 6
QUANTITY
Lock Frame 2
Sash Lock 1
Page 6
Installation Instructions
5
WARNING
When handling unit, be careful to
avoid cuts from sharp metal edges
and aluminum fins on front and rear
coils.
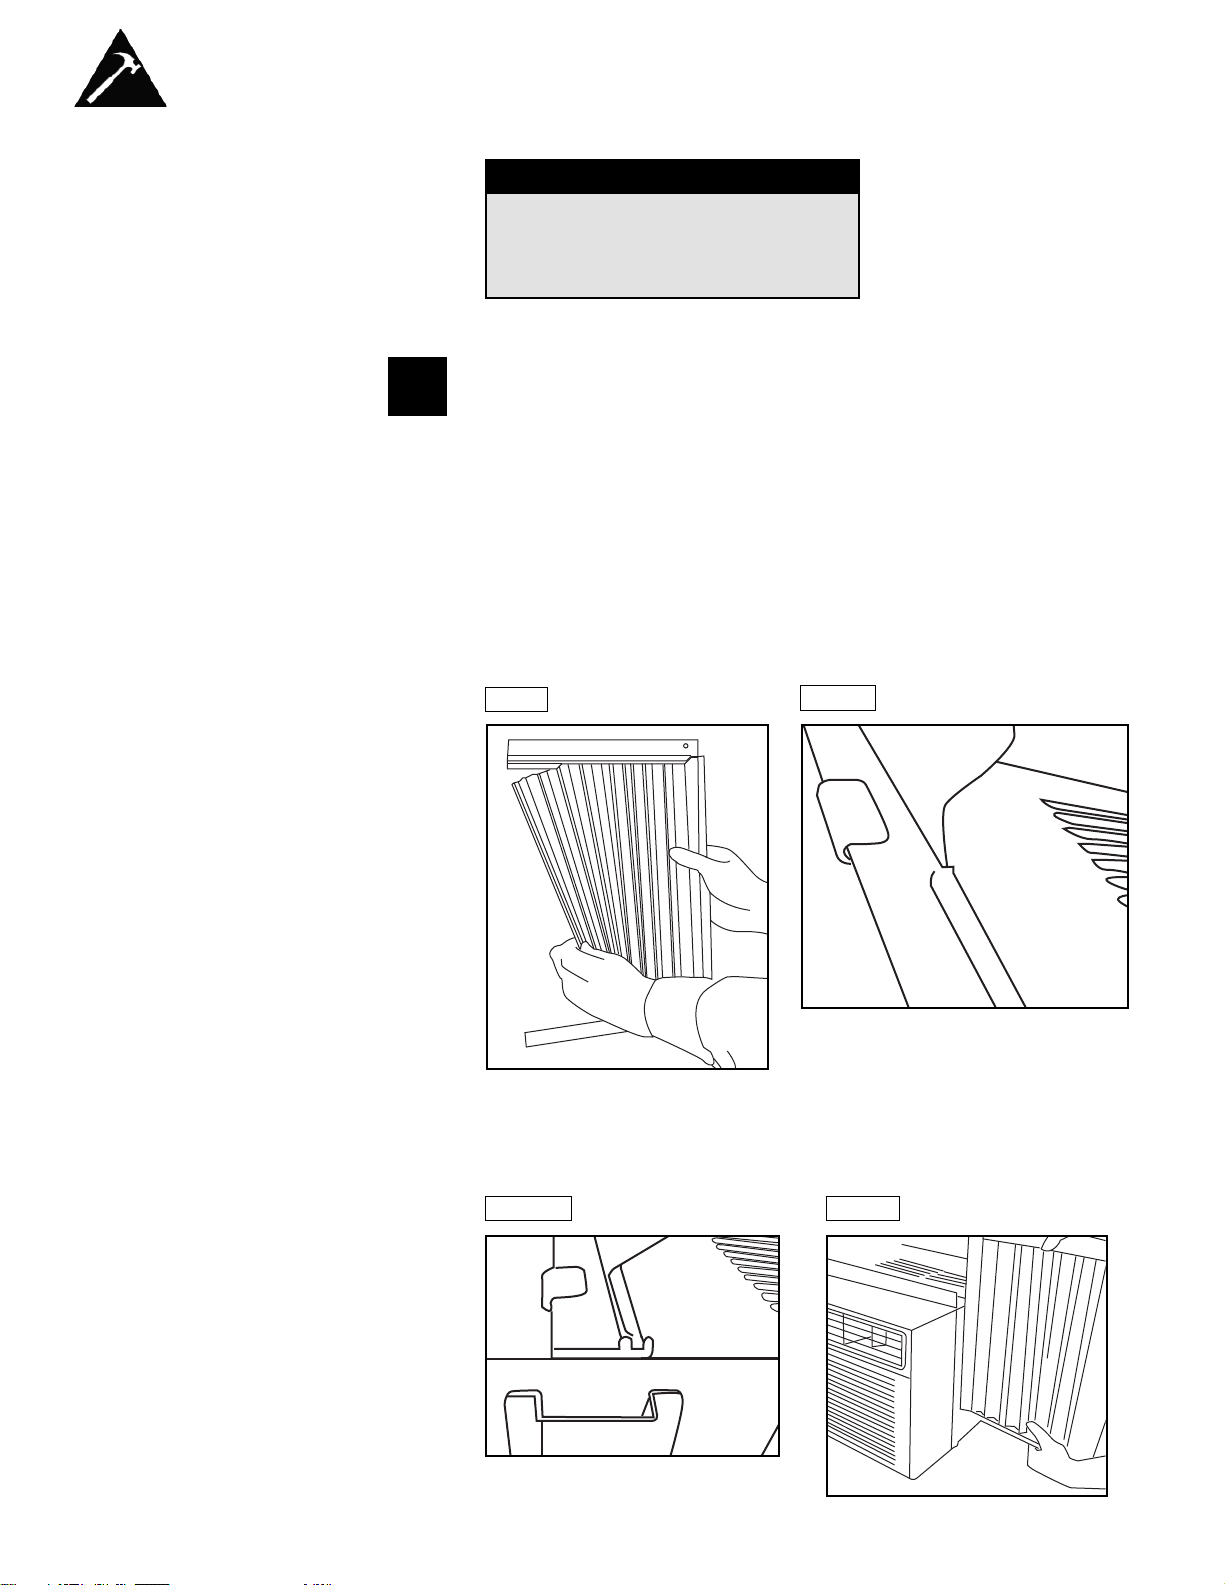
HOW TO
INSTALL
NOTE: Top Rail and Sliding Panels at each side are offset to provide the
proper pitch to the rear of (5/16"). This is necessary for proper condensed
water utilization and drainage. If you are not using the Side Panels for
any reason, this pitch to the rear must be maintained to allow water build
up in humid conditions to drain outside.
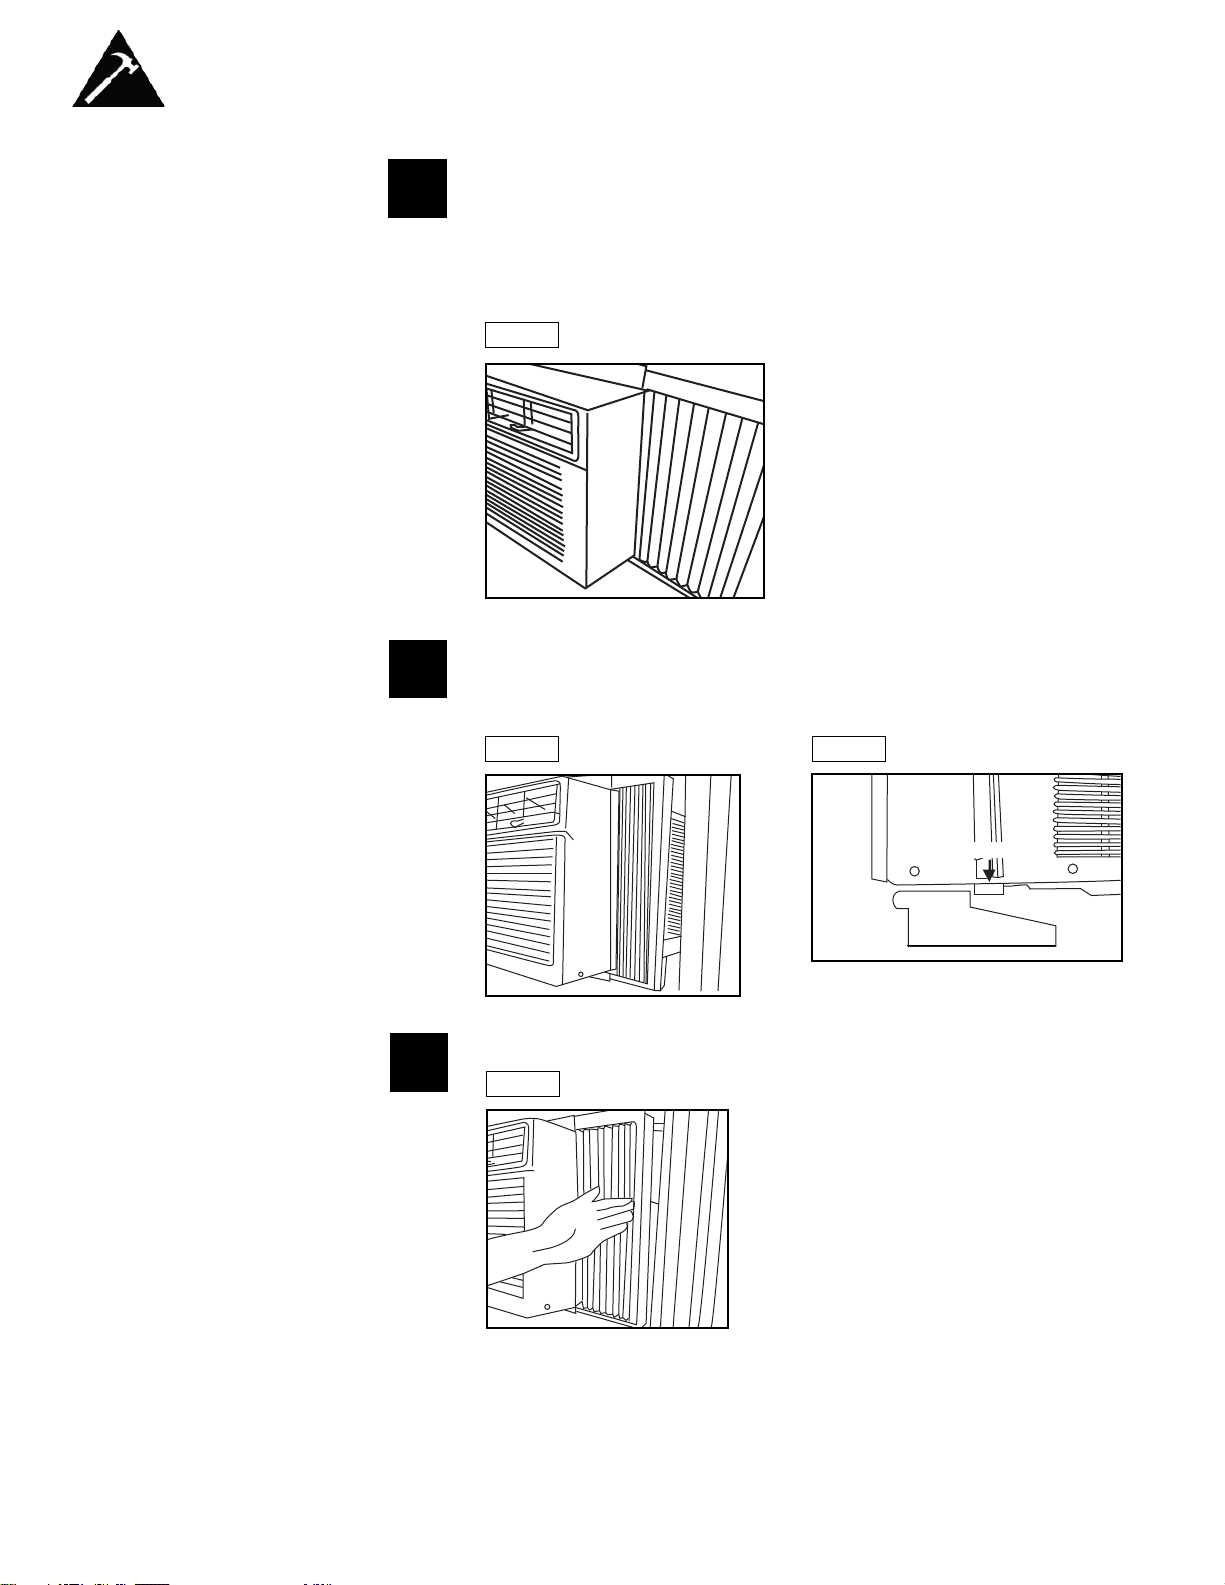
A. Place unit on floor, a bench or a table. There is a Left and Right
Window Filler Panel - be sure to use the proper panel for each
side.When installed the flange for securing the panel in place to the
window sill will be facing into the room.
Hold the accordion panel and gently pull out past the open end of the
frame. See Figure 2.
TOOLS NEEDED
• Phillips Screw Driver
• Drill (If pilot holes are needed)
1
Fig. 2
Fig. 3A
B. Slide the free end (“I”section) of the panel into the cabinet as shown in
Figures 3A, 3B & 4. Slide the panel down. Be sure to leave enough
space to slip the top and bottom of the frame into the rails on the
cabinet.
Fig. 3B
Fig. 4
* See www.danby.com for
video instructions.
Page 7
Installation Instructions
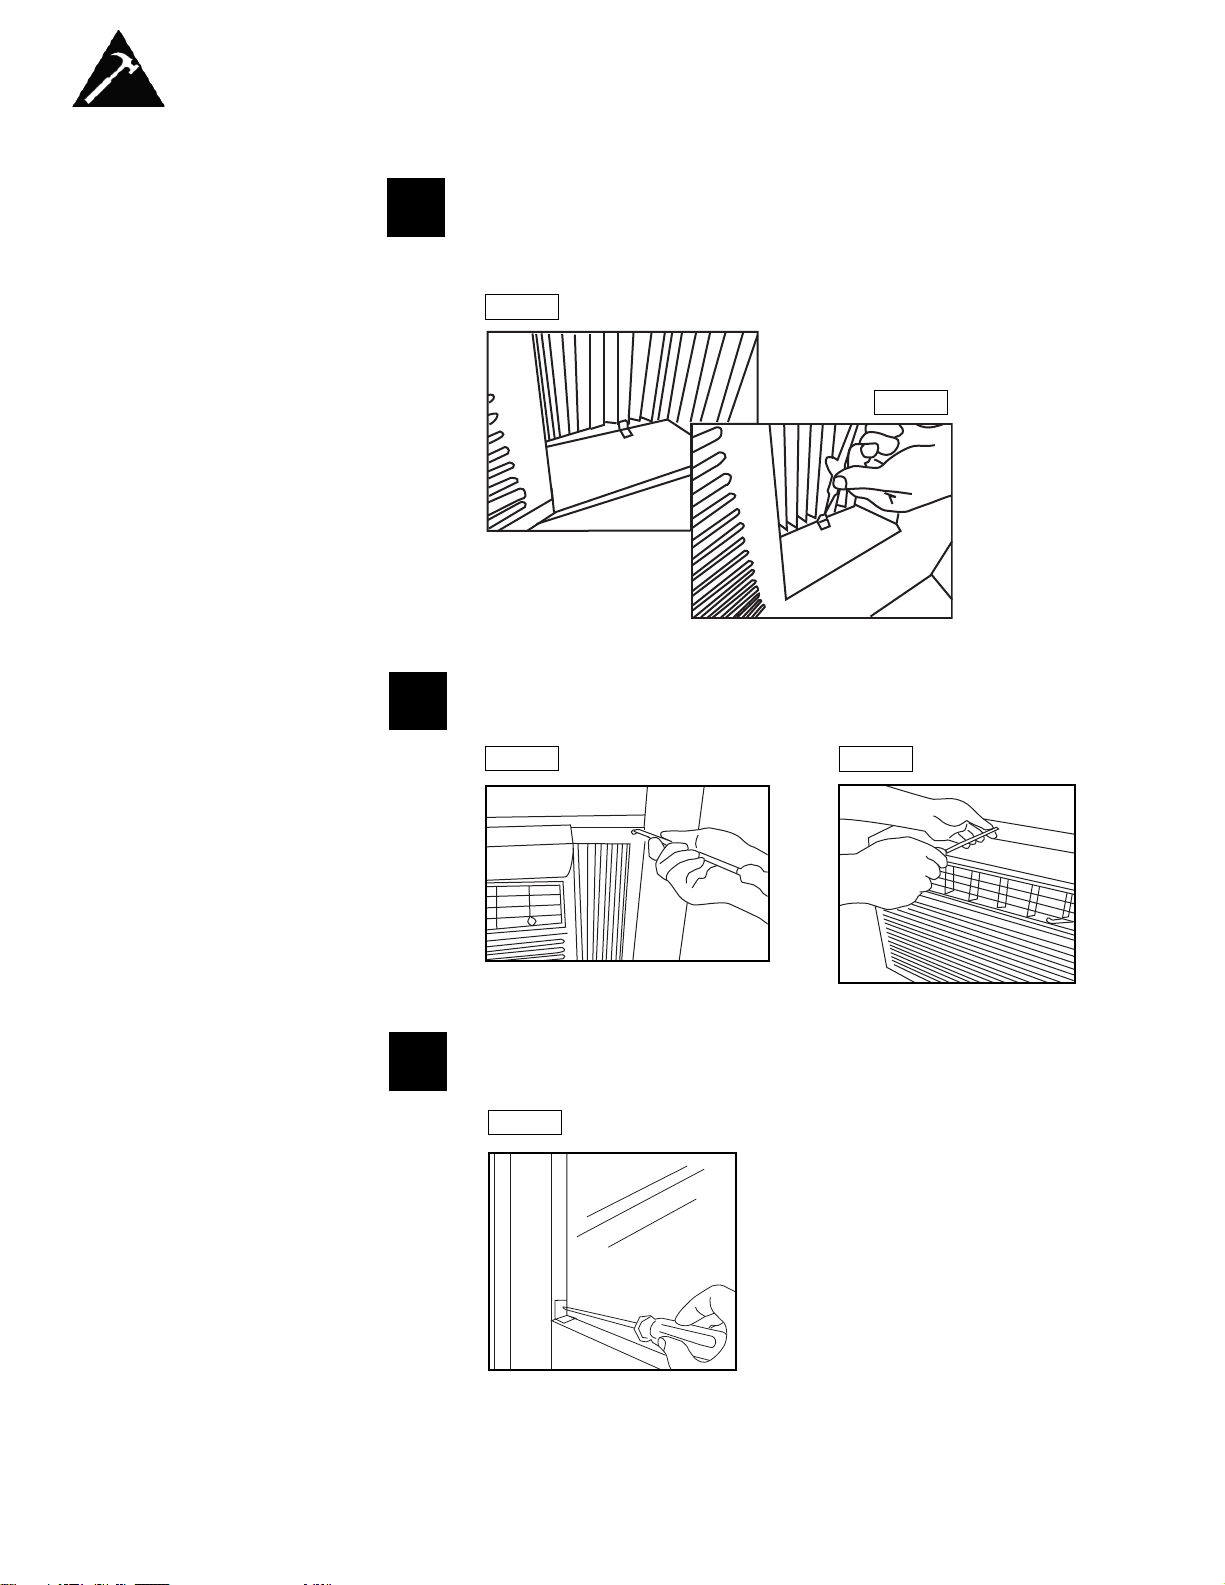
C. Once the panel has been installed on the side of the cabinet, make
sure it sits securely inside the frame channel by making slight
adjustments. Slide the top and bottom ends of the frame into the top
and bottom rails of the cabinet. Figure 5.
D. Slide the panel all the way in and repeat on the other side.
Fig. 5
6
HOW TO
INSTALL
1
Keep a firm grip on the air conditioner, carefully place the unit into the
window opening so the bottom of the air conditioner frame is against the
window sill (FIG. 6 & FIG. 6A). Carefully close the window behind the top
rail of the unit.
2
Fig. 6 Fig. 6A
Bottom Rail
Inside
Window Sill
Outside
Extend the side panels out against the window frame (FIG. 7).
3
Fig. 7
Page 8
Installation Instructions
7
4
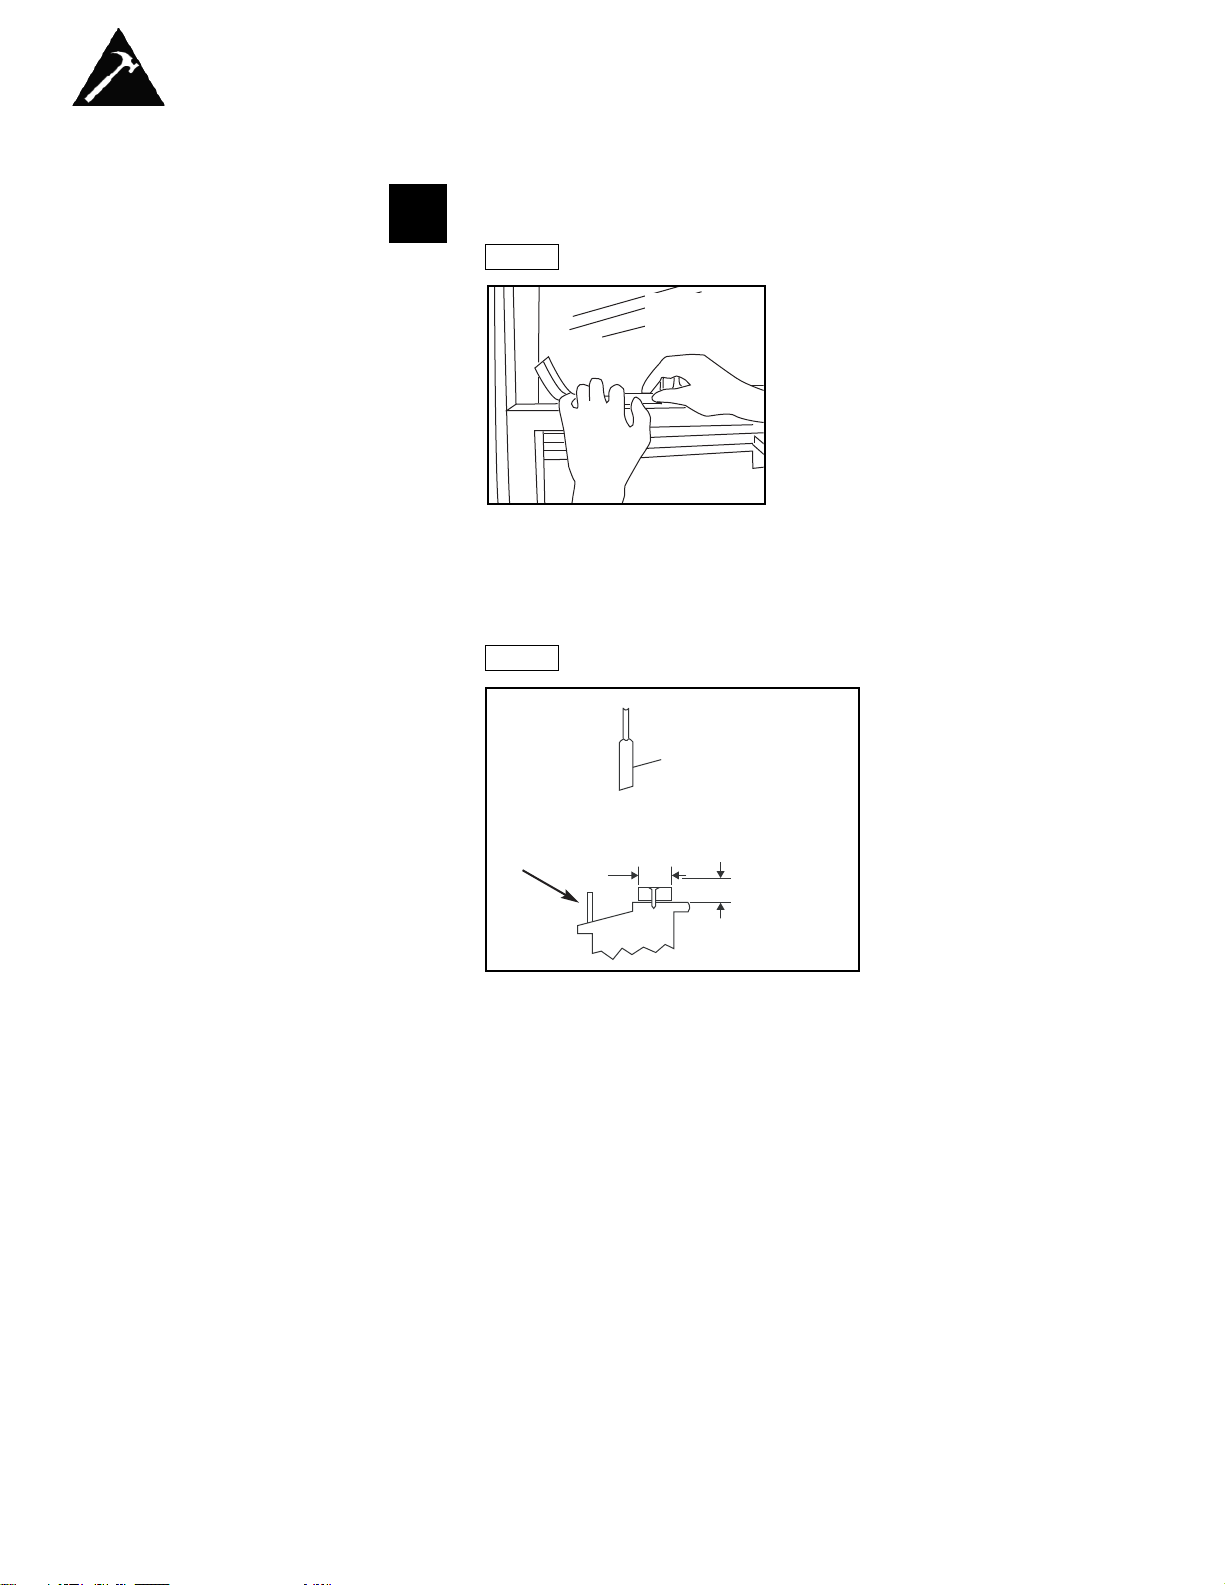
Place the frame lock between the frame extensions and the window sill as
shown (Fig. 8). Drive 3/4” (19 mm) locking screws through the frame lock
and into the sill (FIG. 9). NOTE: To prevent window sill from splitting, drill
1/8” (3 mm) pilot holes before driving screws.
Fig. 8
5
To secure lower sash in place, attach right angle sash lock with 4/5”
(19mm) screw as shown (Fig.12).
Fig. 12
HOW TO
INSTALL (cont)
Fig. 9
Drive 3/4” (19 mm) locking screws through frame holes into window sash
(FIG. 10/11).
Fig. 10
Fig. 11
6
Page 9
Installation Instructions
8
HOW TO
INSTALL (cont)
Cut foam seal and insert in the space between the upper and lower
sashes. (Fig.13).
7
Fig. 13
1 1/2” min
(38mm)
IF AC IS BLOCKED BY
STORM WINDOW
Add wood as shown in Fig.14 or remove storm window before air
conditioner is installed.
Fig. 14
STORM
WINDOW
FRAME
OR OTHER
OBSTRUCTION
SASH
BOARD
THICKNESS
AS REQUIRED,
FOR PROPER
PITCH TO
REAR, ALONG
ENTIRE SILL.
FASTEN WITH
NAILS OR
SCREWS.
If Storm Window Frame must remain, be sure the drain holes or slots are
not caulked or painted shut. Accumulated Rain Water or Condensation
must be allowed to drain out.
REMOVING AC FROM
WINDOW
• Turn AC off, and disconnect power cord.
• Remove sash seal from between windows, and unscrew safety lock.
• Remove screws installed through frame and frame lock.
• Close (slide) side panels into frame.
• Keeping a firm grip on air conditioner, raise sash and carefully “rock”
air conditioner backward to drain any condensate water in base of unit.
Be careful not to spill any remaining water while lifting unit from window.
Store parts WITH air conditioner.
Page 10
9
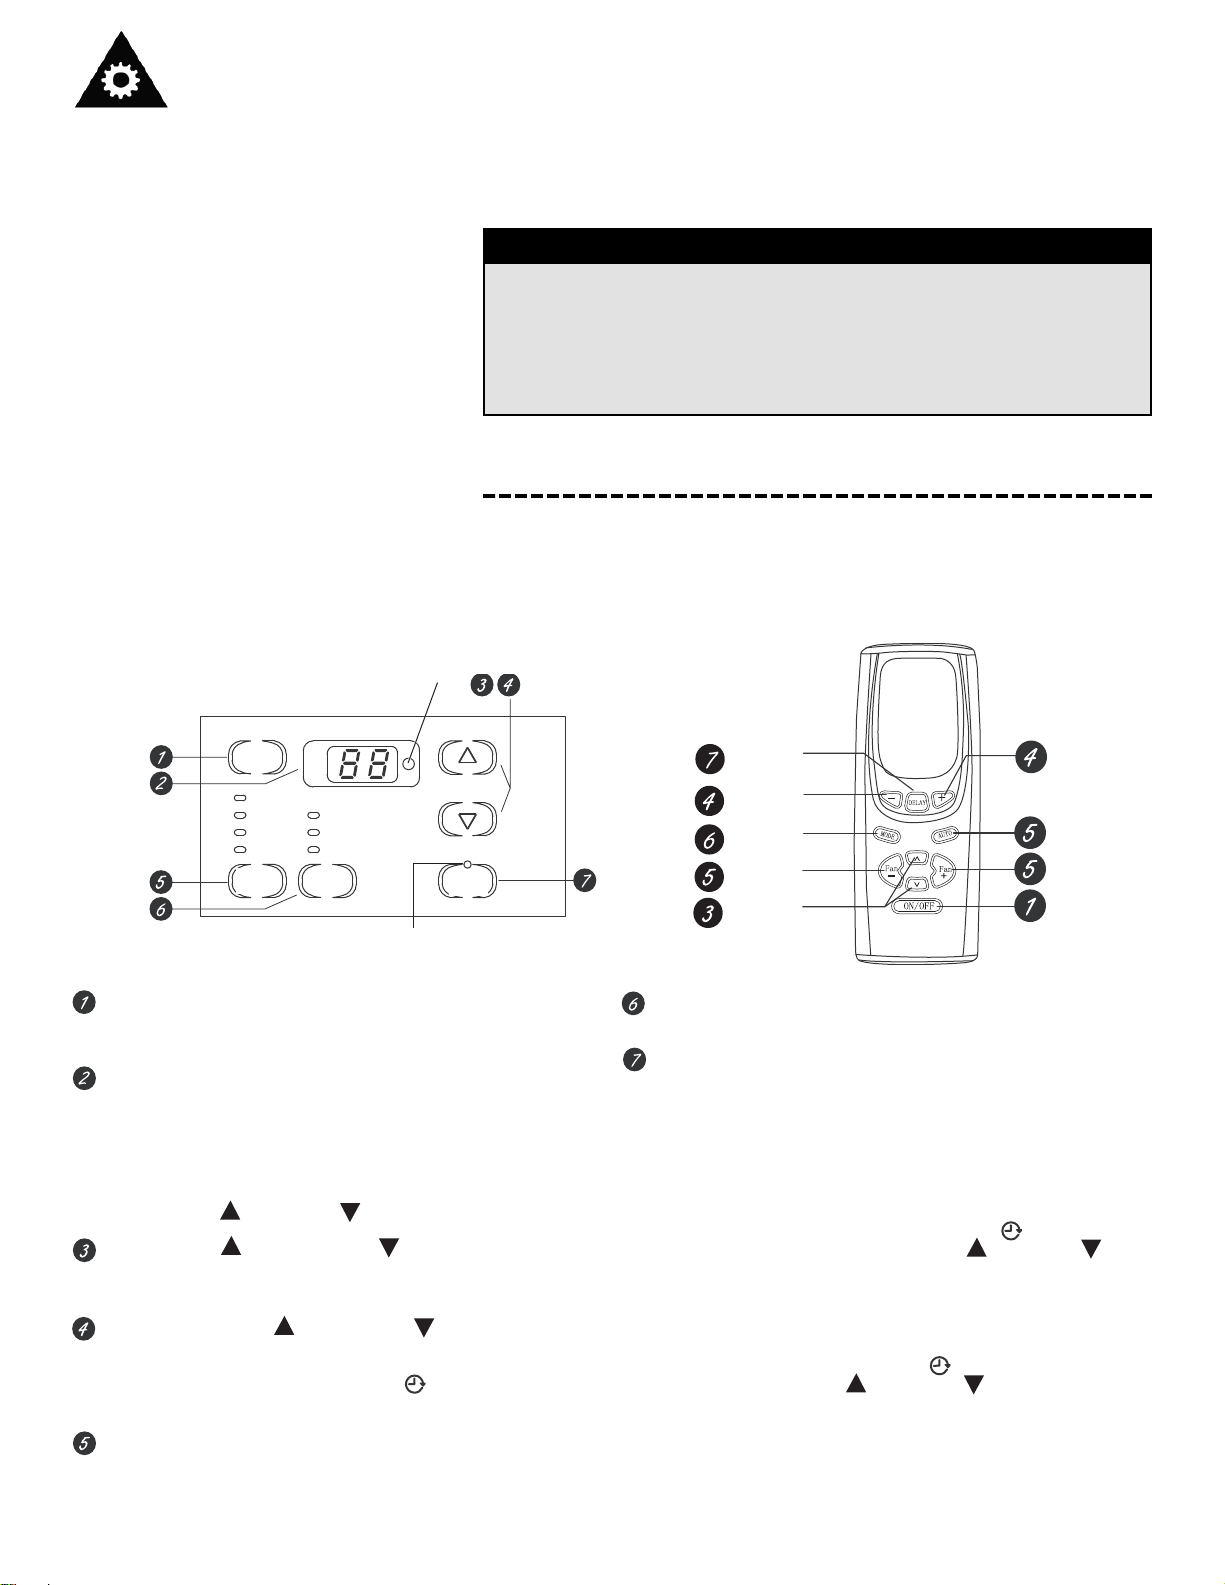
The display always shows the room
temperature except when setting the
Set temperature or the delay timer.
Light indicates the unit
is in the temperature or
delay time Set mode.
Power
Auto
High
Med
Low
Cool
Energy Saver
Fan only
Set
Temp/Delay
Delay
1-24hr
Fan
Speed
Mode
Light indicates the
delay timer is set.
Delay 1–24hr
Delay timer
Decrease
Mode select
Fan speed
Decrease
Temperature
set Increase
and Decrease
Delay timer
Increase.
Auto Fan on
Fan speed
Increase
Unit power
on/off
AIR CONDITIONER CONTROLS
REMOTE CONTROL
Operating Instructions
AIR CONDITIONER
USE
Operating your air conditioner properly helps you to obtain the
best possible results.
This section explains proper air conditioner operation.
IMPORTANT
If you turn off the air conditioner, wait at least 3 minutes before
turning it back on. This prevents the air conditioner from blowing a
fuse or tripping a circuit breaker.
Do not try to operate your air conditioner in the cooling mode when
outside temperature is below 65°F (18°C). The inside evaporator coil
will freeze up, and the air conditioner will operate properly.
NOTE: In the event of a power failure, your air conditioner will operate at
the previous settings when the power is restored.
DIGITAL CONTROLS
Lights next to the touch pads on the air conditioner control panel
indicate the selected settings.
Power Pad
Turns air conditioner on and off. When turned on, the display will
show the room temperature.
Display
Shows the room temperature or time remaining on the Delay timer.
Shows the Set temperature while setting the temperature in Cool or
Energy Saver modes. The Set light will turn on while setting.
NOTE: The display will change to show the room temperature after
settings have been made. To change the Set temperature, press the
Temp increase or decrease buttons
Temp Increase / Decrease Pads
Use to set temperature when in Cool or Energy Saver mode.
The Set light will turn on while setting.
Delay Timer Increase (+) /Decrease (–) Pads
Each touch of the Increase / Decrease pads on the unit or the
Increase + / Decrease – pads on the remote control will set the delay
time when using the Delay 1–24hr timer ( ). The Set light will turn
on while setting.
Fan Speed Buttons
Use to set the fan speed to Low, Med, High or Auto on the unit.
NOTE: On the remote control, use the fan speed Increase + /
Decrease – pads to set the fan speeds to Low, Med or High. Use
the Auto pad to turn Auto fan on.
Mode Button
Use to set the air conditioner to Cool, Energy Saver or Fan Only
mode.
Delay Buttons
Delay ON— When the air conditioner is off, it can be set to
automatically come on in 1 to 24 hours at its previous mode and
fan settings.
Delay OFF— When the air conditioner is on, it can be set to
automatically turn off in 1 to 24 hours.
How to set
Press the Delay 1–24hr pad on the unit or the ( ) pad on the
remote control. Each touch of the Increase / Decrease pads
on the unit or the Increase + / Decrease – pads on the remote
control will set the timer in 1-hour intervals. The Set light will turn on
while setting.
To review the remaining time on the Delay 1–24hr timer, press the
Delay 1–24hr pad on the unit or the ( ) pad on the remote
control. Use the Increase / Decrease pads on the unit or
the Increase + / Decrease – pads on the remote control to set a new
time if desired.
During preview of timer or timer setting, press Delay 1-24hr button
on the panel or Delay button on the remote controller to cancel the
timer setting.
Page 11

Operating Instructions
DIGITAL CONTROLS
REMOTE CONTROL
• To ensure proper operation, aim the remote control at the signal receiver
on the air conditioner.
• The remote control signal has a range of up to 20 feet.
• Make sure nothing is between the air conditioner and the remote control
that could block the signal.
• Make sure batteries are fresh and installed correctly as indicated on the
remote control.
Use the Cool mode at Low, Med, High or Auto Fan Speed for cooling.
Use the Temperature Increase / Decrease pads to set the desired
temperature between 64°F and 86°F in 1°F increments.
An electronic thermostat is used to maintain the room temperature. The
compressor will cycle on and off to keep the room at the set level of comfort. Set the thermostat at a lower number and the indoor air will become
cooler. Set the thermostat at a higher number and the indoor air will
become warmer.
NOTE: If the air conditioner is off and is then turned on while set to a Cool
setting or if turned from a fan setting to a Cool setting, it may take approximately 3 minutes for the compressor to start and cooling to begin.
Cooling Descriptions
For Normal Cooling — Select the Cool mode and High or Med fan with
a middle set temperature. For Maximum Cooling — Select the Cool
mode and High fan with a lower set temperature. For Quieter &
Nighttime Cooling — Select the Cool mode and Low fan with a middle
set temperature.
COOL MODE
ENERGY SAVER MODE
The fan will cycle on and off with the compressor. This results in wider
variations of room temperature and humidity. Normally used when the
room is unoccupied.
NOTE: The fan may continue to run for a short time after the compressor
cycles off.
FAN ONLY MODE
Use the Fan Only Mode at Low, Med or High fan speed to provide air circulation and filtering without cooling. Since fan only settings do not
provide cooling, a Set temperature cannot be entered. The room
temperature will appear in the display.
NOTE: Auto Fan Speed cannot be used when in the Fan Only Mode.
AUTO FAN SPEED
Set to Auto fan speed for the fan speed to automatically set to the speed
needed to provide optimum comfort settings with the set temperature.
If the room needs more cooling, the fan speed will automatically increase.
If the room needs less cooling, the fan speed will automatically decrease.
NOTE: Auto Fan Speed cannot be used when in the Fan Only Mode.
POWER OUTAGE
RECOVERY FEATURE
In the case of a power outage or interruption, the unit will automatically restart in the settings last used after the power is restored. If the Delay
1–24hr feature was set, it will countdown according to the memorized
time. You may need to set a new time if desired.
10
Page 12
11
Care and Maintenance
Your new air conditioner is designed to give you many years of dependable service. This section tells you how
to clean and care for your air conditioner properly.
CLEAING THE
AIR FILTER
The air filter is removable for easy cleaning. A clean filter helps remove
dust, lint, and other particles from the air and is important for best cooling
and operating efficiency. Check the filter every 2 weeks to see whether it
needs cleaning.
1. Turn off air conditioner.
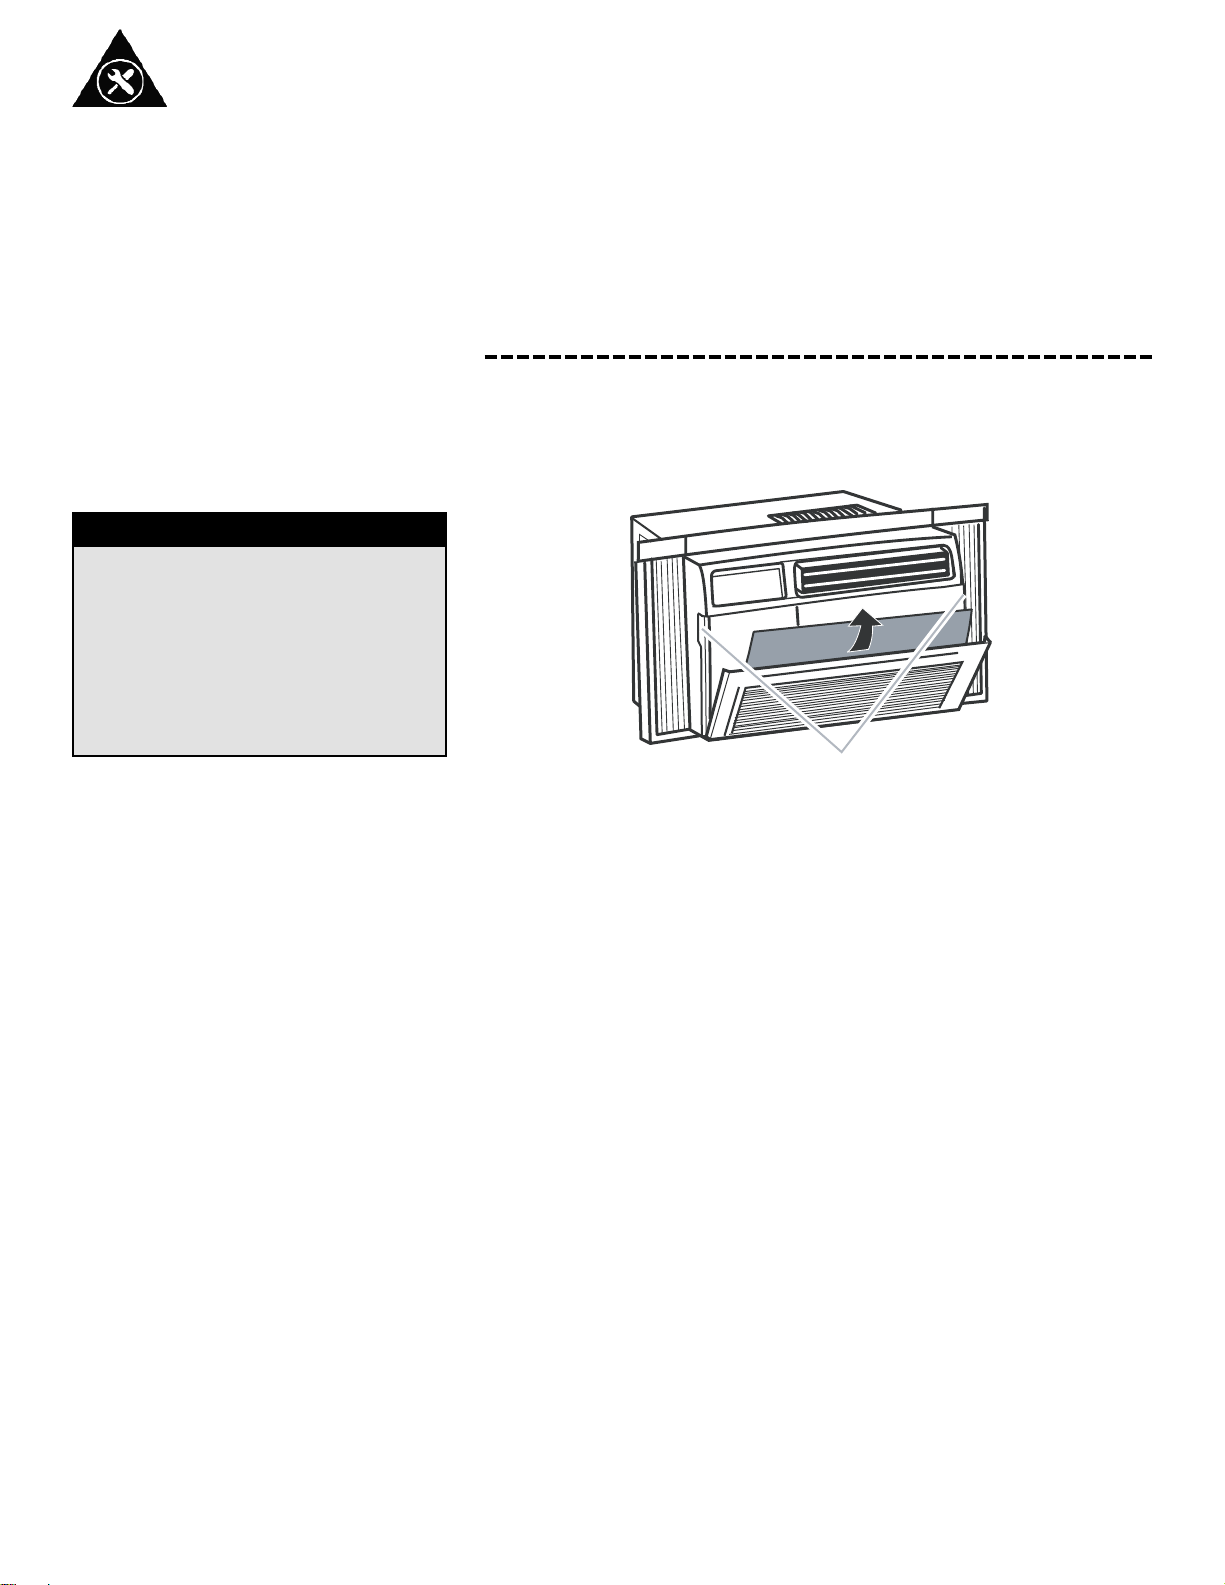
2. Remove air filter by pulling down on the indents in the top or
sides of filter door and sliding air filter up and out. Filter door
is not removable.
IMPORTANT
DO NOT forget to install the air filter. If the
air conditioner is left to operate without
the air filter, dust is not removed from the
room air and may result in machine
failure.
When the air inlet grill and cabinet are
dirty, wipe with lukewarm water (below
40°C). Use of a mild detergent is recommended.
CLEANING THE
FRONT PANEL
1. Unplug air conditioner or disconnect power.
2. Clean front panel with a soft, damp cloth.
3. Air dry front panel completely.
4. Plug in air conditioner or reconnect power.
A
A. Indents
3. Use a vacuum cleaner to clean air filter. If air filter is very dirty, wash it
in warm water with a mild detergent. Do not wash air filter in the
dishwasher or use any chemical cleaners. Air dry filter completely
before replacing to ensure maximum efficiency.
4. Replace air filter by sliding filter down into filter door and
closing filter door.
REPAIRING PAINT
DAMAGE
Check once or twice a year for paint damage. This is very important, especially in areas near oceans or where rust is a problem. If needed, touch up
with a good grade enamel paint.
NOTE: To reduce paint damage during the winter, install a heavyduty
cover over air conditioner cabinet. For information on ordering a
heavy-duty cover, see “Accessories.”
ANNUAL
MAINTENANCE
Your air conditioner needs annual maintenance to help ensure steady, top
performance throughout the year. Call your local authorized dealer to
schedule an annual checkup. The expense of an annual inspection is your
responsibility.
Page 13

PROBLEM POSSIBLE CAUSE SOLUTIONS
1) Air conditioner will not
operate.
• No power to the unit.
• Check connection of power cord to power
source.
• Check fuse or circuit breaker.
• Set SELECTOR SWITCH to position other
than “OFF”.
• The power cord “RESET” button must always
be pushed in (engaged) for correct operation.
2) Inefficient or no cooling.
• Dirty air filter.
• Unit size inappropriate for application.
• Blocked air flow.
• Power interruption, settings changed
too quickly, or compressor overload
tripped.
• Clean/replace air filter.
• Check with dealer to determine proper unit
capacity for application.
• Remove obstruction from grill or outdoor
louvres.
• Turn the unit off and wait 5 minutes before
attempting to restart.
3) Noisy unit.
• Loose parts.
• Inadequate support.
• Tighten loose parts.
• Provide additional support to unit.
4) Odors.
• Formation of mold, mildew, or algae on
wet surfaces.
• Clean unit thoroughly.
• Place algaecide tablet in base pan.
5) Water dripping outside. • Hot and humid weather.
• Condensation run-off is normal under these
conditions.
6) Water dripping inside.
• Unit is not properly angled to allow
water to drain outside.
• Unit must be installed on an angle for proper
condensation run-off. Check the unit and
make any adjustments.
7) Ice or frost build-up
• Low outside temperature.
• Unit air filter is dirty.
• When outdoor temperature is approximately
18.3°C (65°F) or below, frost may form
when unit is in cooling mode. Switch unit to
FAN (only) operation until frost melts.
• Remove and clean filter.
Troubleshooting
Occasionally a problem may arise that is minor in nature, and a service call may not be neccessary. Use this troubleshooting guide for a possible solution. If the unit continues to operate improperly, call an authorized service depot or
Danby’s Toll Free Number 1-800-263-2629 for assistance.
PROBLEM
POSSIBLE CAUSE SOLUTION
12
NOTES:
1) If circuit breaker is tripped repeatedly, or fuse is blown more than once, contact a qualified technician.
2) When unit is installed using proper installation steps, unit is properly tipped toward the outdoors to allow for
condensation run-off.
Page 14

LIMITED IN-HOME APPLIANCE WARRANTY
This quality product is warranted to be free from manufacturer’s defects in material and workmanship, provided that the unit is used under the normal operating
conditions intended by the manufacturer.
This warranty is available only to the person to whom the unit was originally sold by Danby Products Limited (Canada) or Danby Products Inc. (U.S.A.) (hereafter
“Danby”) or by an authorized distributor of Danby, and is non-transferable.
TERMS OF WARRANTY
Plastic parts, are warranted for thirty (30) days only from purchase date, with no extensions provided.
First Year
During the first twelve (12) months, any functional parts of this product found to be defective, will be repaired or replaced, at warrantor’s
option, at no charge to the ORIGINAL purchaser.
To obtain
Danby reserves the right to limit the boundaries of “In Home Service” to the proximity of an Authorized Service Depot. Any appliance
Service
requiring service outside the limited boundaries of “In Home Service” ,
it will be the consumer’s responsibility to transport the appliance
(at their own expense) to the original retailer (point of purchase) or a service depot for repair. See “Boundaries of In Home Service”
below. Contact your dealer from whom your unit was purchased, or contact your nearest authorized Danby service depot, where service
must be performed by a qualified service technician.
If service is performed on the units by anyone other than an authorized service depot, or the unit is used for commercial application, all
obligations of Danby under this warranty shall be void.
Boundaries of
If the appliance is installed in a location that is 100 kilometers (62 miles) or more from the nearest service center your unit must be
In Home Service
delivered to the nearest authorized Danby Service Depot, as service must only be performed by a technician qualified and certified for
warranty service by Danby. Transportation charges to and from the service location are not protected by this warranty and are the
responsibility of the purchaser.
Nothing within this warranty shall imply that Danby will be responsible or liable for any spoilage or damage to food or other contents of this appliance, whether
due to any defect of the appliance, or its use, whether proper or improper.
EXCLUSIONS
Save as herein provided, Danby, there are no other warranties, conditions, representations or guarantees, express or implied, made or intended by Danby or its
authorized distributors and all other warranties, conditions, representations or guarantees, including any warranties, conditions, representations or guarantees
under any Sale of Goods Act or like legislation or statue is hereby expressly excluded. Save as herein provided, Danby shall not be responsible for any damages
to persons or property, including the unit itself, howsoever caused or any consequential damages arising from the malfunction of the unit and by the purchase of
the unit, the purchaser does hereby agree to indemnify and hold harmless Danby from any claim for damages to persons or property caused by the unit.
GENERAL PROVISIONS
No warranty or insurance herein contained or set out shall apply when damage or repair is caused by any of the following:
1) Power failure.
2) Damage in transit or when moving the appliance.
3) Improper power supply such as low voltage, defective house wiring or inadequate fuses.
4) Accident, alteration, abuse or misuse of the appliance such as inadequate air circulation in the room or abnormal operating conditions
(extremely high or low room temperature).
5) Use for commercial or industrial purposes (ie. If the appliance is not installed in a domestic residence).
6) Fire, water damage, theft, war, riot, hostility, acts of God such as hurricanes, floods etc.
7) Service calls resulting in customer education.
8) Improper Installation (ie. Building-in of a free standing appliance or using an appliance outdoors that is not approved for outdoor application).
Proof of purchase date will be required for warranty claims; so, please retain bills of sale. In the event warranty service is required, present this document to our
AUTHORIZED SERVICE DEPOT.
Danby Products Limited
PO Box 1778, Guelph, Ontario, Canada N1H 6Z9
Telephone: (519) 837-0920 FAX: (519) 837-0449
Danby Products Inc.
PO Box 669, Findlay, Ohio, U.S.A. 45840
Telephone: (419) 425-8627 FAX: (419) 425-8629
04/09
1-800-263-2629
Warranty Service
In-home
Page 15

Bienvenue
Merci d’avoir choisi un appareil Danby pour bénéficier, vous et votre famille, de tous les « conforts ménagers » de votre
maison, de votre chalet ou de votre bureau. Ce guide d’utilisation et d’entretien vous fournira des renseignements utiles
nécessaires pour prendre soin de votre nouvel appareil et en assurer l’entretien. S’il est entretenu convenablement,
vous pourrez utiliser votre appareil Danby sans problème pendant des années. Veuillez prendre quelques minutes pour
lire les instructions d’un bout à l’autre et vous familiariser avec tous les aspects du fonctionnement de cet appareil.
Pour faciliter la consultation, nous vous suggérons d’agrafer une copie de votre reçu/facture sur cette page, ainsi que
d’inscrire les renseignements suivants, situés sur la plaque signalétique du fabricant qui se trouve sur le côté de
l’appareil.
REMARQUE : CET APPAREIL N’EST PAS CONÇU POUR UNE INSTALLATION DANS LE MUR.
Model Number:
Serial Number:
Date of Purchase:
Ces renseignements seront nécessaires si votre appareil a besoin de réparations ou d’entretien ou si vous avez des questions
générales. Pour communiquer avec un représentant du service à la clientèle, appelez Danby au numéro
SANS FRAIS : 1-800-263-2629
14
AVERTISSEMENT
Une fiche de mise à la terre mal branchée peut entraîner un risque
d’incendie, de choc électrique ou de blessures aux personnes qui
utilisent l’appareil. Si vous n’êtes pas certain que l’appareil est
correctement mis à la terre, consultez un préposé du service qualifié.
Page 16

Consignes de sécurité important
LISEZ TOUTE L'INFORMATION DE SÉCURITÉ AVANT UTILISATION
POUR VOTRE SÉCURITÉ: Lire attentivement ces instructions avant d'utiliser l'appareil.
15
CORDON
D’ALIMENTATION
REMARQUE : le dispositif de votre appareil peut différer de celui qui est illustré.
Ce climatiseur individuel est doté d’un cordon d’alimentation homologué ULC.
Ce cordon d’alimentation contient des composants électroniques de pointe qui
détectent le courant de fuite. Si le cordon est écrasé, les composantes
électroniques détectent le courant de fuite et l’alimentation sera coupée en
une fraction de seconde.
Pour tester votre cordon d’alimentation :
1. Branchez le cordon d’alimentation sur une prise à 3 trous mise à la terre.
2. Appuyez sur RESET (sur certains dispositifs, un témoin vert s’allume).
3. Appuyez sur TEST (un déclic se fera entendre; le bouton de réinitialisation
sera déclenché et, sur certains appareils, le témoin vert s’éteindra).
4. Appuyez et relâchez le bouton RESET (un déclic se fera entendre; le
bouton de réinitialisation s’enclenchera et, sur certains appareils, le témoin
vert s’allumera). Le cordon d’alimentation est prêt à être utilisé.
LCDI
TEST
RESET
POWER
BA
SPÉCIFICATIONS
ÉLECTRIQUES
1) La totalité du câblage doit respecter les codes de l’électricité locaux et
nationaux et être installée par un électricien qualifié. Si vous avez des
questions concernant les instructions suivantes, communiquez avec un
électricien qualifié.
2) Vérifiez l’alimentation disponible et réglez tout problème relatif au câblage
AVANT d’installer et d’utiliser cet appareil.
3) Pour assurer votre sécurité et votre protection, cet appareil est mis à la
terre par l’entremise de la fiche du cordon d’alimentation lorsqu’il est
branché sur une prise murale correspondante. Si vous n’êtes pas sûr que
votre prise murale est correctement mise à la terre, veuillez consulter un
électricien qualifié.
4) La prise murale doit correspondre à la fiche à 3 broches du cordon
d’alimentation fourni avec l’appareil. N’UTILISEZ PAS d’adaptateurs de
fiche. Lorsque vous devez vous servir d’une rallonge pour brancher votre
climatiseur, utilisez uniquement une rallonge approuvée pour
climatiseurs (disponible dans la plupart des quincailleries).
5) La plaque signalétique qui se trouve sur l’appareil contient les données
relatives à l’électricité et les autres données techniques. La plaque
signalétique est située sur le côté droit de l’appareil, au-dessus du cordon
d’alimentation.
SPÉCIFICATIONS
ÉLECTRIQUES
AVERTISSEMENT : Pour réduire le risque d’incendie, de choc
électrique ou de blessure lors de l’utilisation du climatiseur, observez
ces précautions de base :
• Branchez l’appareil sur une prise à 3 trous mise à la terre.
• N’enlevez pas la broche de mise à la terre.
• N’utilisez pas d’adaptateur.
• N’utilisez pas de rallonge.
• Débranchez le climatiseur avant de procéder à l’entretien ou aux réparations.
• Le climatiseur doit être déplacé ou installé par au moins deux personnes.
Page 17

Consignes de sécurité important
LISEZ TOUTE L'INFORMATION DE SÉCURITÉ AVANT UTILISATION
CONSEILS RELATIFS
AUX ÉCONOMIES
D’ÉNERGIE
POUR VOTRE SÉCURITÉ: Lire attentivement ces instructions avant d'utiliser l'appareil.
Votre appareil Danby est conçu pour être très économe en matière de
consommation d’énergie. Pour une plus grande efficacité, suivez ces
recommandations.
1) Sélectionnez un réglage du thermostat que vous trouvez confortable, et ne
le modifiez plus.
2) Le filtre à air enlève les particules aériennes de façon très efficace. Le filtre
doit toujours rester propre. (En général, il doit être nettoyé toutes les deux
semaines, selon la qualité de l’air à l’intérieur.)
3) Utilisez des rideaux ou des stores pour éviter que la lumière directe du
soleil pénètre dans la pièce et la réchauffe, mais ne les laissez pas bloquer
la circulation de l’air autour de l’appareil.
4) Mettez votre climatiseur en marche avant que l’air extérieur devienne
chaud et inconfortable pour éviter la période d’inconfort initiale, pendant
que l’appareil refroidit la pièce.
5) Lorsque les températures extérieures sont assez fraîches, utilisez HIGH
(VENTILATEUR ÉLEVÉ) ou LOW FAN (VENTILATEUR BAS) seulement.
Cela permet de faire circuler l’air intérieur, ce qui procure un certain
refroidissement, et consomme moins d’énergie qu’un réglage de
refroidissement.
16
Installation
Le châssis inférieur doit être ouvert suffisamment pour fournir une ouverture
verticale de 15 8/16 po (394 mm). Les évents latéraux et l’arrière du
climatiseur doivent disposer d’un dégagement suffisant pour permettre la
circulation de l’air au travers du condensateur, afin d’éliminer la chaleur.
L’arrière de l’appareil doit se trouver à l’extérieur, pas dans un bâtiment ou un
garage.
REMARQUE : CONSERVEZ LA BOÎTE et cette NOTICE D’INSTALLATION
pour pouvoir vous y reporter ultérieurement. La boîte est ce qu’il y a de mieux
pour entreposer l’appareil en hiver ou lorsque vous ne vous en servez pas.
Assemblage requis. Veuillez lire ces instructions attentivement.
RISQUE DE CHOC ÉLECTRIQUE
Pour éviter les blessures,
débranchez l’appareil avant de
l’installer ou de procéder à son
entretien ou à sa réparation.
REMARQUE : Votre climatiseur est conçu
pour être installé dans une fenêtre à
guillotine double standard ayant une
ouverture de 22 à 36 po (550 à 914 mm).
(fig. 1)
MUR
INTÉRIEUR
REBORD DE FENÊTRE
APPUI DE FENÊTRE
DÉCALAGE
MUR
EXTÉRIEUR
22 po à 36 po
550 mm à 914 mm
15 8/16 po
(394 mm)
Fig. 1
QUINCAILLERIE DE FIXATION
6 vis de 3/4 po 6
QUANTITÉ
2 verrous du cadre 2
1 serrure de châssis 1
Page 18

Installation
17
AVERTISSEMENT
Lorsque vous manipulez l’appareil,
évitez de vous couper sur les bords en
métal et les ailerons en aluminium
tranchants sur les serpentins avant et
arrière.
COMMENT
INSTALLER
L’APPAREIL
REMARQUE : Le rail supérieur et les panneaux coulissants sur chaque côté
sont décalés afin de fournir l’inclinaison correcte vers l’arrière (5/16 po). Cela
est nécessaire pour l’utilisation et le drainage corrects de l’eau condensée. Si
vous n’utilisez pas les panneaux latéraux pour une raison quelconque, cette
inclinaison vers l’arrière doit être maintenue pour permettre à l'eau de
s'accumuler dans des conditions humides à vidange à l'extérieur.
Posez l’appareil sur le sol, un banc ou une table. Il existe un panneau de
remplissage de fenêtre droit et un panneau correspondant gauche - assurezvous d’utiliser le bon panneau pour chaque côté. Après l’installation, la
collerette permettant de fixer le panneau à l’appui de fenêtre fait face à la
pièce.
A Tenez le panneau en accordéon et tirez légèrement sur le passé de
l'extrémité ouverte de la trame. Voir la figure 2.
1
Fig. 2
Fig. 3A
B. Glissez l’extrémité ouverte (section en I) du panneau dans la carrosserie,
tel qu’illustré dans les figures 3A, 3B et 4. Glissez le panneau vers le bas.
Assurez-vous de laisser suffisamment d’espace pour passer le dessus et le
dessous du cadre dans les rails qui se trouvent sur la carrosserie.
Fig. 3B
Fig. 4
OUTILS REQUIS
• Tournevis cruciforme
• Perceuse (si des avant-trous
sont requis)
*voir aussi www.danby.com
pour des instructions vidéo.
Page 19

Installation
C. Une fois le panneau installé sur le côté de la carrosserie, assurez-vous qu’il
est assis solidement dans la rainure du cadre en apportant de légers
ajustements. Passez les extrémités supérieure et inférieure du cadre dans
les rails supérieur et inférieur de la carrosserie. Figure 5.
D. Glissez le panneau jusqu’au fond, puis recommencez de l’autre côté.
Fig. 5
18
COMMENT
INSTALLER
L’APPAREIL
(suite)
1
En tenant fermement le climatiseur, placez l’appareil prudemment dans
l’ouverture de la fenêtre, de sorte que le bas du cadre du climatiseur repose
sur l’appui de fenêtre (fig. 6 et fig. 6A). Fermez prudemment la fenêtre
derrière le rail supérieur de l’appareil.
2
Fig. 6 Fig. 6A
Rail inférieur
Intérieur
Appui de fenêtre
Extérieur
Étendez les panneaux latéraux jusqu’au cadre de la fenêtre. (fig. 7)
3
Fig. 7
Page 20

Installation
19
4
Placez le verrou de châssis entre les extensions de cadre et le rebord de
la fenêtre comme le montre (Fig. 8). Drive 3 / 4 po (19 mm) vis de blocage
à travers la serrure cadre et le seuil (figure 9). REMARQUE: Pour éviter
rebord de la fenêtre de fendillement, percer des 1 / 8 po (3 mm) trous
avant de conduire vis.
Fig. 8
5
Pour fixer le châssis inférieur en place, fixez la serrure de châssis à angle
droit au moyen d’une vis de 4/5 po (19 mm), tel qu’illustré (fig. 12).
Fig. 12
COMMENT
INSTALLER
L’APPAREIL
(suite)
Fig. 9
Pour fixer le châssis inférieur en place, fixez la serrure de châssis à angle
droit au moyen d’une vis de 3/4 po (19 mm), tel qu’illustré (fig. 10/11).
Fig. 10
Fig. 11
6
Page 21

Installation
20
HOW TO INSTALL
(cont)
Taillez le joint d’étanchéité en mousse et insérez-le dans l’espace entre le
châssis inférieur et le châssis supérieur. (fig. 13).
7
Fig. 13
1 1/2 po min
(38mm)
SI LE CLIMATISEUR
EST BLOQUÉ PAR LA
CONTRE-FENÊTRE
Ajoutez des morceaux de bois, tel qu’illustré dans la fig. 14 ou enlevez la
contre-fenêtre avant d’installer le climatiseur.
Fig. 14
CADRE DE LA
CONTREFENÊTRE OU
AUTRE
OBSTRUCTION
CHÂSSIS
ÉPAISSEUR DE
LA PLANCHE TEL
QUE REQUIS
POUR OBTENIR
LA BONNE
INCLINAISON
VERS L’ARRIÈRE,
SUR TOUTE LA
LONGUEUR DE
L’APPUI DE
FENÊTRE. FIXEZ
AU MOYEN DE
CLOUS OU DE
VIS.
Si le cadre de la contre-fenêtre doit rester en place, assurez-vous que les
orifices ou les fentes de drainage ne sont pas bloquées par du matériau
d’étanchéité ou de la peinture. La pluie ou la condensation accumulée doit
pouvoir se drainer.
RETRAIT DU
CLIMATISEUR DE LA
FENÊTRE
• Fermez le climatiseur et débranchez l’alimentation.
• Enlevez le joint d’étanchéité du châssis qui se trouve entre les fenêtres, et
dévissez la serrure de sécurité.
• Enlevez les vis installées dans le cadre et le verrou du cadre.
• Fermez (glissez) les panneaux latéraux dans le cadre.
• En tenant fermement le climatiseur, levez le châssis et inclinez
prudemment le climatiseur vers l’arrière afin de drainer l’eau condensée qui
se trouve dans la base de l’appareil. Faites attention de ne pas renverser les
résidus d’eau lorsque vous soulevez l’appareil pour le sortir de la fenêtre.
Entreposez les pièces AVEC le climatiseur.
Page 22

21
Consignes d’utilisation
L’afficheur indique toujours la température de la
pièce, sauf lors du réglage de la température
sélectionnée ou du démarrage différé.
Le témoin indique que l’appareil est
en mode de réglage de la
température ou du démarrage différé.
Alimentation
Auto
Élevé
Moyen
Bas
Refroidissement
Économie d’énergie
Ventilateur seulement
Réglage
Température/
Démarrage différé
Delay
1-24 h
Ventilateur
Vitesse
Mode
Le témoin indique que le minuteur
de démarrage différé est réglé.
Démarrage
différé 1-24 h
Diminution du
minuteur de
démarrage différé
Sélection du
mode
Réduction de la
vitesse du
ventilateur
Augmentation
et diminution de
la température
réglée
Augmentation
du minuteur de
démarrage
différé
Ventilateur
automatique
activé
Augmentation de
la vitesse du
ventilateur
Mise en
marche/arrêt de
l’appareil
COMMANDES DU CLIMATISEUR
TÉLÉCOMMANDE
UTILISATION DU
CLIMATISEUR
Lorsque vous utilisez votre climatiseur correctement, vous pouvez obtenir des
résultats optimaux.
Cette section explique l’utilisation correcte du climatiseur.
IMPORTANT
Si vous éteignez le climatiseur, attendez au moins 3 minutes avant de
le remettre en marche. Cela empêche le climatiseur de faire sauter un
fusible ou de déclencher un disjoncteur.
N’essayez pas de faire fonctionner votre climatiseur en mode
refroidissement lorsque la température extérieure est inférieure à 65 °F
(18 °C). Le serpentin d’évaporateur intérieur gèlera et le climatiseur ne
fonctionnera pas correctement.
REMARQUE : En cas de panne de courant, votre climatiseur fonctionnera
avec les réglages précédents lorsque l’alimentation sera rétablie.
COMMANDES
NUMÉRIQUES
Des témoins adjacents au clavier numérique du panneau de commande
du climatiseur indiquent les réglages sélectionnés.
Touche marche/arrêt
Met en marche et arrête le climatiseur. Lorsque l’appareil est en
marche, l’afficheur indique la température de la pièce.
Afficheur
Indique la température de la pièce ou la durée restante pour le
minuteur de démarrage différé. Indique la température sélectionnée
lors du réglage de la température en mode Refroidissement ou
Économie d’énergie. Le témoin Réglage s’allume lors du réglage.
REMARQUE : L’afficheur change pour indiquer la température de
la pièce après que les réglages sont effectués. Pour changer la
température sélectionnée, appuyez sur les touches Augmentation
de température ou Diminution de température
Touches Augmentation de température / Diminution de
température
Utilisez ces touches pour régler la température en mode
Refroidissement ou Économie d’énergie. Le témoin Réglage s’allume
lors du réglage.
Augmentation du minuteur de démarrage différé Touches
(+) / Diminution (-)
Chaque pression sur les touches Augmentation / Diminution de
l’appareil ou les touches Augmentation + / Diminution de la
télécommande règle le démarrage différé lors de l’utilisation du
minuteur de démarrage différé 1-24 h ( ). Le témoin Réglage
s’allume lors du réglage.
Boutons de réglage de la vitesse du ventilateur
Utilisez ces boutons pour régler la vitesse du ventilateur à Bas,
Moyen, Élevé ou Auto sur l’appareil. REMARQUE : Sur la
télécommande, appuyez sur les touches Augmentation + /
Diminution de la vitesse du ventilateur pour régler la vitesse du
ventilateur à Bas, Moyen ou Élevé. Appuyez sur la touche Auto
pour mettre le ventilateur en mode Auto.
Bouton Mode
Appuyez sur ce bouton pour mettre le climatiseur en mode
Refroidissement, Économie d’énergie ou Ventilateur seulement.
Boutons de démarrage différé
Démarrage différé ACTIVÉ Lorsque le climatiseur est éteint, il peut
être réglé pour se mettre en marche automatiquement au bout de 1 à
24 heures, avec le mode et le réglage du ventilateur précédents.
Démarrage différé DÉSACTIVÉ Lorsque le climatiseur est en
marche, il peut être réglé pour s’éteindre automatiquement au bout
de 1 à 24 heures.
Comment régler le démarrage différé
Appuyez sur la touche Démarrage différé 1-24 h sur l’appareil ou la
touche ( ) sur la télécommande. Chaque pression sur la touche
Augmentation / Diminution sur l’appareil ou Augmentation
+ / Diminution sur la télécommande règle le minuteur par intervalles
d’une heure. Le témoin Réglage s’allume lors du réglage.
Pour consulter la durée restante sur le minuteur de démarrage différé
1-24 h, appuyez sur la touche Delay 124h sur l’appareil ou sur la
touche ( ) de la télécommande. Sélectionnez le mode
Augmentation / Diminution sur l’appareil ou Augmentation
+ / Diminution de la télécommande pour sélectionner une nouvelle
durée, au besoin.
Pendant la consultation du minuteur ou de la durée du minuteur,
appuyez sur la touche Delay 1-24h du panneau ou Delay de la
télécommande pour annuler le minuteur.
Page 23

Consignes d’utilisation
22
TÉLÉCOMMANDE POUR
COMMANDES
NUMÉRIQUES
• Pour assurer le bon fonctionnement de l’appareil, orientez la télécommande
vers le récepteur de signal situé sur le climatiseur.
• Le signal de la télécommande a une portée maximale de 20 pieds.
• Assurez-vous que rien ne pouvant bloquer le signal ne se situe entre le
climatiseur et la télécommande.
• Assurez-vous que les piles sont neuves et installés correctement, tel
qu’indiqué sur la télécommande.
Utilisez le mode Refroidissement avec une vitesse du ventilateur basse,
moyenne, élevée ou auto pour le refroidissement. Augmentation /
Diminution de la température pour sélectionner une température entre 64
°F et 86 °F, par intervalles de 1 °F.
Un thermostat électronique sert au maintien de la température de la pièce. Le
compresseur s’allume et s’éteint de façon cyclique pour maintenir la pièce au
niveau de confort choisi. Réglez le thermostat à une valeur inférieure, et l’air
intérieur sera plus frais. Réglez le thermostat à une valeur supérieure, et l’air
intérieur sera plus chaud.
REMARQUE : Si le climatiseur est éteint puis allumé lorsqu’il est en réglage
de refroidissement, ou s’il passe d’un réglage de ventilation à un réglage de
refroidissement, il se peut que le climatiseur mette environ 3 minutes pour
démarrer le compresseur et commencer le refroidissement.
Descriptions des réglages de refroidissement
Pour le refroidissement normal Sélectionnez le mode Cool
(refroidissement) et une vitesse du ventilateur High (élevée) ou Med
(moyenne) avec une température réglée à un point milieu. Pour un
refroidissement maximal Sélectionnez le mode Cool (refroidissement) et
une vitesse du ventilateur High (élevée) avec une température plus basse.
Pour un refroidissement plus silencieux et pendant la nuit Sélectionnez le
mode Cool (refroidissement) et une vitesse du ventilateur Low (basse) avec
une température réglée à un point médian.
MODE
REFROIDISSEMENT
MODE ÉCONOMIE
D’ÉNERGIE
Le ventilateur s’allume et s’éteint en même temps que le compresseur. Cela
produit des variations plus importantes de la température de la pièce et de
l’humidité. Normalement utilisé lorsqu’il n’y a personne dans la pièce.
REMARQUE : Le ventilateur peut continuer à fonctionner pendant une courte
période après que le compresseur s’éteint.
MODE VENTILATEUR
SEULEMENT
Sélectionnez le mode Fan Only (Ventilateur seulement) avec une vitesse du
ventilateur Low (basse), Med (moyenne) ou High (élevée) pour recirculer et
filtrer l’air sans refroidissement. Puisque les réglages de ventilateur seulement
ne fournissent aucun refroidissement, une température Set (réglée) ne peut
pas être saisie. La température de la pièce est visible sur l’afficheur.
REMARQUE : La vitesse du ventilateur Auto ne peut pas être utilisée en mode
Ventilateur seulement.
VITESSE DU
VENTILATEUR AUTO
Réglez la vitesse du ventilateur à Auto pour qu’elle sélectionne
automatiquement la vitesse requise pour maintenir un niveau de confort
optimal avec la température sélectionnée.
Lorsque la pièce doit être refroidie davantage, la vitesse du ventilateur
augmente automatiquement. Lorsque la pièce a besoin de moins de
refroidissement, la vitesse du ventilateur diminue automatiquement.
REMARQUE : la vitesse du ventilateur Auto ne peut pas être utilisée en
mode Ventilateur seulement.
FONCTION DE REPRISE
APRÈS UNE PANNE DE
COURANT
En cas de panne ou d’interruption du courant, l’appareil se remet
automatiquement en marche, selon les derniers réglages utilisés, après le
rétablissement du courant. Si la fonction Démarrage différé 1-24hr était
activée, le décompte sera effectué conformément à la durée sauvegardée. Si
vous le souhaitez, sélectionnez une nouvelle durée.
Page 24

23
Soins et entretien
Votre nouveau climatiseur est conçu pour vous donner un service fiable pendant des années. Cette section vous
indique comment nettoyer et entretenir votre climatiseur correctement.
NETTOYAGE DU
FILTRE À AIR
Le filtre à air est amovible et peut être nettoyé facilement. Un filtre propre
enlève la poussière, les peluches et les autres particules contenues dans l’air;
la propreté est importante pour assurer l’efficacité du refroidissement et du
fonctionnement. Vérifiez le filtre toutes les 2 semaines pour voir s’il a besoin
d’être nettoyé.
1. Éteignez le climatiseur.
2. Enlevez le filtre à air en tirant les indentations qui se trouvent sur le dessus
ou les côtés de la porte du filtre vers le bas, puis en faisant glisser le filtre
vers le haut pour le sortir. La porte du filtre ne peut pas être enlevée.
IMPORTANT
N’OUBLIEZ PAS d’installer le filtre à air. Si le
climatiseur fonctionne sans filtre à air, la
poussière n’est pas enlevée de l’air de la
pièce, ce qui peut entraîner la défaillance de
l’appareil.
Lorsque la grille d’entrée d’air et la
carrosserie sont sales, essuyez-les à l’eau
tiède (température inférieure à 40 °C).
L’utilisation d’un détergent doux est
recommandée.
NETTOYAGE DU
PANNEAU AVANT
1. Débranchez le climatiseur ou débranchez l’alimentation.
2. Essuyez le panneau avant à l’aide d’un chiffon humide et doux.
3. Laissez le panneau avant sécher complètement à l’air libre.
4. Rebranchez le climatiseur ou l’alimentation.
A
A. Indentations
3. Nettoyez le filtre à air au moyen d’un aspirateur. Si le filtre à air est très
sale, lavez-le dans l’eau chaude avec un détergent doux. Ne lavez pas le
filtre au lave-vaisselle et n’utilisez pas de produits nettoyants chimiques.
Pour assurer l’efficacité maximale, laissez le filtre sécher complètement à
l’air libre avant de le remettre en place.
4. Réinstallez le filtre en le glissant dans la porte du filtre, puis en fermant la
porte.
RÉPARATION DES
DOMMAGES CAUSÉS
À LA PEINTURE
Vérifiez une ou deux fois l’an les dommages possibles à la peinture. C’est très
important, surtout aux endroits situés près de l’océan ou là où il y a des
problèmes de rouille.. Au besoin, faites des retouches au moyen d’une
peinture-émail de bonne qualité.
REMARQUE : Pour réduire les dommages causés à la peinture pendant
l’hiver, installez une housse résistante sur la carrosserie du climatiseur.
Pour obtenir des renseignements relatifs à la commande d’une housse
résistante, voir « Accessoires ».
ENTRETIEN ANNUEL
Votre climatiseur doit être entretenu tous les ans afin d’obtenir un rendement
régulier et supérieure toute l’année. Appelez le détaillant autorisé de votre
région pour une vérification annuelle. C’est à vous qu’incombent les coûts de
cette inspection annuelle.
Page 25

24
PROBLEM POSSIBLE CAUSE SOLUTIONS
1) Le climatiseur ne fonctionne pas. • Aucun courant n’est fourni à l’appareil.
• Vérifiez le branchement du cordon d’alimentation dans
la source d’alimentation.
• Vérifiez le fusible ou le disjoncteur.
• Réglez le sélecteur sur une position autre que OFF
(Arrêt).
• Pour assurer le bon fonctionnement, le bouton « RESET
» du cordon d’alimentation doit toujours être enfoncé.
2) Peu ou pas de refroidissement.
• Filtre à air sale.
• La taille de l’appareil ne convient pas à
l’utilisation qu’on en fait.
• Circulation de l’air obstruée.
• Panne de courant, réglages changés trop
rapidement ou déclenchement du protecteur du
surcharge du compresseur.
• Nettoyez/remplacez le filtre à air.
• Vérifiez auprès du détaillant la capacité de l’appareil en
fonction de l’utilisation prévue.
• Enlevez les obstructions bloquant la grille ou les évents
extérieurs.
• Éteignez l’appareil, puis attendez 5 minutes avant de
tenter de le remettre en marche.
3) Appareil bruyant.
• Pièces mal fixées.
• Support inadéquat.
• Serrez les pièces mal fixées.
• Fournissez un support supplémentaire à l’appareil.
4) Présence d’odeurs.
• Formation de moisissure, de champignons ou
d’algues sur les surfaces mouillées.
• Nettoyez l’appareil à fond.
• Placez une pastille d’algicide dans le plateau inférieur.
5) De l’eau s’égoutte à l’extérieur. • Température chaude et humide.
• L’écoulement de la condensation est normale dans ces
conditions.
6) De l’eau s’égoutte à l’intérieur.
• L’appareil n’est pas incliné de façon à drainer
l’eau à l’extérieur.
• L’appareil doit être incliné lors de l’installation afin que la
condensation s’écoule correctement. Vérifiez l’appareil
et apportez les correctifs nécessaires.
7) Accumulation de glace ou de
givre
• Température extérieure basse.
• Le filtre à air de l’appareil est sale.
• Lorsque la température extérieur est à environ 18,3 °C
(65 °F) ou moins, du givre peut se former lorsque
l’appareil est en mode refroidissement. Réglez l’appareil
en mode Ventilation seulement jusqu’à ce que le givre
fonde.
• Enlevez le filtre et nettoyez-le.
Dépannage
PROBLEM
POSSIBLE CAUSE SOLUTION
Il peut arriver qu’un problème mineur se produise qui ne nécessite pas d’appel de service. Consultez ce guide de dépannage
pour trouver une solution possible. Si l’appareil continue de mal fonctionner, appelez un atelier de réparation autorisé ou le
numéro sans frais de Danby, au 1-800-263-2629 , pour obtenir de l’assistance.
REMARQUES :
1) Si le disjoncteur se déclenche à plusieurs reprises ou le fusible saute plus d’une fois, consultez un technicien qualifié.
2) Lorsque l’appareil est installé en suivant correctement les étapes d’installation, il est incliné vers l’extérieur afin de permettre
l’écoulement de la condensation.
Page 26

GARANTIE LIMITÉE SUR
APPAREIL ÉLECTROMÉNAGER À DOMICILE
Cet appareil de qualité est garantie exempt de tout vice de matière première et de fabrication, s’il est utilisé dans les conditions normales recommandées par
le fabricant.
Cette garantie n’est offerte qu’à l’acheteur initial de l’appareil vendu par Danby Products Limited (Canada) ou Danby Products Inc. (E.- U. d’A) (ci-après “Danby”)
ou par l’un des ses distributeurs agréés et elle ne peut être transférée.
CONDITIONS
Les pièces en plastique sont garanties pour trente (30) jours seulement à partir de la date de l’achat, sans aucune prolongation prévue.
Première 12 mois
Pendant les douze (12) mois, toutes pièces fonctionnelles de ce produit s’avèrent défectueuses, seront réparées ou remplacées, selon le
choix du garant, sans frais à l’acheteur INITIAL.
Pour bénéficier du
Le client sera responsable pour le transport et tous les frais d’expédition de tout appareil exigeant le service au dépot de service
Service
autorisé le plus proche. S’adresser au détaillant qui a vendu l’appareil, ou à la station technique agréée de service la plus proche, où
les réparations doivent être effectuées par un technicien qualifié. Si les réparations sont effectuées par quiconque autre que la station
de service agréée où à des fins commerciales, toutes les obligations de Danby en vertu de cette garantie seront annulées.
Limites de l’entretien
Si l'appareil est installé à plus de 100 kilomètres (62 milles) du centre de service le plus proche, il doit être livré à l'atelier de
à domicile
réparation autorisé par Danby le plus proche, car l'entretien doit uniquement être réalisé par un technicien qualifié et certifié pour
effectuer un entretien couvert par la garantie de Danby. Les frais de transport entre votre domicile et le lieu de l'entretien ne sont pas
couverts par la présente garantie et doivent être acquittés par l'acheteur.
Cette garantie indique en aucun temps la responsabilité de Danby de l’avarie ou dommage de la vin ou autre contenu, soit par les vices de l’appareil, ou soit
parl’utilisation convenable ou inexacte.
EXCLUSIONS
En vertu de la présente, il n’existe aucune autre garantie, condition ou représentation, qu’elle soit exprimée ou tacite, de façon manifeste ou intentionnelle, par
Danby ou ses distributeurs agréés. De même, sont exclues toutes les autres garanties, conditions ou représentations, y compris les garanties, conditions ou
représentations en vertu de toute loi régissant la vente de produits ou de toute autre législation ou règlement semblables.
En vertu de la présente, Danby ne peut être tenue responsable en cas de blessures corporelles ou des dégâts matériels, y compris à l’appareil, quelle qu’en soit
les causes. Danby ne peut pas être tenue responsable des dommages indirects dus au fonctionnement défectueux de l’appareil. En achetant l’appareil,
l’acheteur accepte de mettre à couvert et de dégager Danby de toute responsabilité en cas de réclamation pour toute blessure corporelle ou tout dégât matériel
causé par cet appareil.
CONDITIONS GÉNÉRALES
La garantie ou assurance ci-dessus ne s’applique pas si les dégâts ou réparations sont dus aux cas suivants:
1) Panne de courant.
2) Dommage subis pendant le transport ou le déplacement de l’appareil.
3) Alimentation électrique incorrecte (tension faible, câblage défectueux, fusibles incorrects).
4) Accident, modification, emploi abusif ou incorrect de l’appareil tel qu'une circulation d'air inadéquate dans la pièce ou des conditions de fonctionnement
anormales (température extrêmement élevée ou basse).
5) Utilisation dans un but commercial ou industriel (à savoir, si l'appareil n'est pas installé dans un domicile résidentiel).
6) Incendie, dommage causés par l’eau, vol, guerre, émeute, hostilités, cas de force majeure (ouragan, inondation, etc.).
7) Visites d’un technicien pour expliquer le fonctionnement de l’appareil au propriétaire.
8) Installation inappropriée (par exemple, encastrement d'un appareil autoportant, ou utilisation extérieure d'un appareil non conçu à cet effet).
Une preuve d’achat doit être présentée pour toute demande de réparation sous garantie. Prière de garder le reçu. Pour faire honorer la garantie, présenter ce
document à la station technique agréée ou s’adresser à:
Danby Products Limited
PO Box 1778,Guelph, Ontario, Canada N1H 6Z9
Telephone: (519) 837-0920 FAX: (519) 837-0449
Danby Products Inc.
PO Box 669, Findlay, Ohio, U.S.A. 45840
Telephone: (419) 425-8627 FAX: (419) 425-8629
04/09
1-800-263-2629
Service sous-garantie
Service au domicile
Page 27

Bienvenida
Gracias por elegir un aparato Danby para disfrutar junto con su familia de todo el “confort hogareño” que necesita en su
casa, cabaña u oficina. Este Manual de uso y mantenimiento del propietario le ofrece la información útil que necesita
para cuidar y mantener de forma adecuada su nuevo aparato. Si lo cuida con esmero, su aparato Danby funcionará por
muchos años sin presentar fallas. Tómese unos momentos para leer detenidamente las instrucciones y aprender todos
los aspectos del funcionamiento del aparato.
A fines de consultas rápidas, le sugerimos que adjunte una copia de su recibo/comprobante a esta página, y llene los
siguientes datos que hallará en la placa del fabricante ubicada a un lado de la unidad.
NOTA: ESTE EQUIPO NO ESTÁ DISEÑADO PARA INSTALARLO A TRAVÉS DE LA PARED.
Número de modelo:
Número de serie:
Fecha de la compra:
Deberá tener estos datos a mano cuando necesite reparar o dar mantenimiento al equipo, y/o para hacer indagaciones
de índole general. Para comunicarse con un representante del servicio de atención al cliente, llame a Danby por el
NÚMERO GRATUITO: 1-800-263-2629
26
ADVERTENCIA
El conectar indebidamente el enchufe de conexión a tierra puede
crear riesgos de incendio, descarga eléctrica y/o ocasionar
lesiones a las personas que usen el aparato. Si tiene dudas sobre
la debida conexión a tierra del aparato, consulte un representante
de servicios calificado.
Page 28

Instruciónes de Seguridad Importantes
LEA Y SIGA LAS INSTRUCCIONES DE SEGURIDAD
PARA SU SEGURIDAD: Lea atentamente las instrucciones antes de operar la unidad.
27
CABLE DE SUMINISTRO
ELÉCTRICO
NOTA: El dispositivo de su unidad puede ser distinto al que se ilustra.
Este equipo de aire acondicionado para habitación viene con un cable de suministro
eléctrico exigido por ULC. Dicho cable tiene componentes electrónicos de avanzada
que detectan fugas de corriente. Si el cable queda atrapado, los componentes
electrónicos detectan la fuga de corriente e interrumpen el suministro en fracciones de
segundo.
Cómo someter a prueba el cable de suministro eléctrico:
1. Enchufe el cable de suministro eléctrico a un tomacorriente de 3 aberturas,
conectado a tierra.
2. Pulse REINICIALIZACIÓN (en algunos dispositivos se encenderá una luz de color
verde).
3. Pulse PRUEBA (esté atento a un chasquido; el botón de Reinicialización se liberará
y, en algunos dispositivos, se apagará una luz de color verde).
4. Oprima y suelte el botón de REINICIALIZACIÓN (esté atento a un chasquido; el
botón de Reinicialización se trabará en posición y, en algunos dispositivos, se
encenderá una luz de color verde). El cable de suministro eléctrico está listo para su
uso.
LCDI
TEST
RESET
POWER
BA
ESPECIFICACIONES
ELÉCTRICAS
1) Todo el cableado debe cumplir con los códigos eléctricos locales y
nacionales, y debe ser instalado por un electricista calificado. Si tiene
alguna pregunta respecto a las instrucciones siguientes, comuníquese con
un electricista calificado.
2) Verifique el suministro eléctrico disponible y resuelva cualquier problema de
cableado ANTES de instalar y usar esta unidad.
3) Para su seguridad y protección, esta unidad está puesta a tierra a través
del enchufe del cable de alimentación cuando está enchufado en un
tomacorriente de pared adecuado. Si no está seguro de que el
tomacorriente de pared de su vivienda esté debidamente puesto a tierra,
consulte a un electricista calificado.
4) El tomacorriente debe poder recibir el enchufe de 3 patas del cable que
viene con la unidad. NO USE adaptadores de enchufes. Si necesita usar
un cable de prolongación para conectar su aire acondicionado, use
únicamente un cable aprobado para aires acondicionados (disponible
en casi todas las ferreterías de su zona).
5) La placa de datos de la unidad contiene datos sobre el suministro eléctrico
y otros datos técnicos. Esta placa se encuentra al lado derecho de la
unidad, arriba del cable de suministro eléctrico.
ESPECIFICACIONES
ELÉCTRICAS
ADVERTENCIA: Para reducir el riesgo de incendios, descargas
eléctricas o lesiones al usar el aire acondicionado, siga estas medidas
básicas de precaución:
• Enchufe la unidad en un tomacorriente de 3 aberturas, conectado a tierra.
• No elimine la pata de conexión a tierra.
• No use un adaptador.
• No use un cordón de prolongación.
• Desenchufe el aire acondicionado antes de prestarle servicio.
• Solicite que dos o más personas le ayuden a mover y a instalar el aire
acondicionado.
PRUEBA
REINICIALIZACIÓN
Page 29

Instruciónes de Seguridad Importantes
LEA Y SIGA LAS INSTRUCCIONES DE SEGURIDAD
CONSEJOS PARA
AHORRAR ENERGÍA
PARA SU SEGURIDAD: Lea atentamente las instrucciones antes de operar la unidad.
Su aparato Danby está diseñado para usar energía de manera sumamente
eficiente. Para ahorrar mucha más energía, siga estos consejos.
1) Elija un ajuste de termostato que le resulte confortable y déjelo en ese valor de
ajuste.
2) El filtro de aire es muy eficaz para eliminar las partículas suspendidas en el
aire. Manténgalo limpio en todo momento. (generalmente se debe limpiar cada
dos semanas, según la calidad del aire interior).
3) Use tapices, cortinas o persianas para evitar que la luz directa del sol entre y
caliente la habitación, pero no permita que las telas o cortinas impidan el flujo
libre de aire alrededor de la unidad.
4) Ponga su aire acondicionado en marcha antes de que el aire de afuera se torne
muy cálido y molesto, para evitar el desagradable período inicial mientras la
unidad enfría la habitación.
5) Cuando la temperatura exterior sea lo suficientemente fresca, use el ajuste de
VELOCIDAD DE VENTILADOR ALTA o de VELOCIDAD DE VENTILADOR
BAJA únicamente. Eso hace circular el aire de la habitación, lo que ofrece algo
de alivio, y usa menos electricidad que al usar el aparato en modo de
enfriamiento.
28
Instrucciones de instalación
La hoja móvil inferior de la ventana debe abrir lo suficiente para permitir un
espacio vertical de 15 8/16” (394 mm). Las aberturas laterales y la parte posterior
del A/A deben tener espacio libre para permitir un flujo de aire adecuado por el
condensador, para eliminar el calor. La parte posterior de la unidad debe dar al
exterior, no al interior de una edificación o garaje.
NOTA: GUARDE EL EMBALAJE y estas INSTRUCCIONES DE INSTALACIÓN
para consultarlos en el futuro. El embalaje de cartón es la manera ideal de guardar
la unidad durante el invierno o cuando no se use.
Requiere armado parcial. Sírvase leer estas instrucciones detenidamente.
RIESGO DE DESCARGA
ELÉCTRICA
Para evitar la posibilidad de sufrir
lesiones, corte el suministro eléctrico
a la unidad antes de instalarla o darle
mantenimiento.
NOTA: Su aire acondicionado está diseñado
para ser instalado en una ventana de dos
secciones, con una abertura de 22 a 36” de
ancho (550 mm a 914 mm) (FIG. 1
PARED
INTERIOR
ASIENTO
SILLAR
INCLINACIÓN
PARED
EXTERIOR
22 a 36 pulgadas
Entre 550 mm y 914 mm
15 8/16 pulgadas
(394 mm)
Fig. 1
HERRAJES PARA EL MONTAJE
Tornillos de 3/4” 6
CANTIDAD
Marcos de sujeción 2
Seguro para hoja 1
móvil de ventana
Page 30

Instrucciones de instalación
29
ADVERTENCIA
Tenga cuidado al manipular la unidad,
para evitar cortarse con los bordes filosos
de metal y las aletas de aluminio en las
espirales delantera y trasera.
CÓMO INSTALAR
EL APARATO
NOTA: El carril superior y los paneles deslizantes a cada lado están descentrados,
de modo que el aparato quede debidamente inclinado en 5/16” por la parte
posterior. Eso es necesario para el uso y drenaje correcto del agua condensada.
Si por algún motivo no usa los paneles laterales, ¡debe seguir manteniendo esta
inclinación posterior para permitir la acumulación de agua en condiciones de
humedad para drenar fuera.
A. Coloque la unidad sobre el piso, un banco o una mesa. La unidad tiene
paneles de relleno de ventana derecho e izquierdo; asegúrese de usar el panel
indicado para cada lado. Cuando el mismo esté instalado, la brida para fijar el
panel en su sitio en el sillar de la ventana debe quedar de cara a la habitación.
Sujetar el panel acordeón y tire suavemente hacia fuera más allá del extremo
abierto del marco. Vea la fig. 2.
1
Fig. 2
Fig. 3A
B. Deslice el extremo libre del panel (perfil en I) hacia adentro del recinto, como
se ilustra en las figuras 3A, 3B y 4. Deslice el panel hacia abajo. Asegúrese de
dejar suficiente espacio para deslizar las partes superior e inferior del marco en
los carriles del recinto.
Fig. 3B
Fig. 4
HERRAMIENTAS
NECESARIAS
• Destornillador Phillips
• Taladro (en caso de necesitar
agujeros piloto)
* Ver también www.danby.com
para obtener instrucciones de
vídeo.
Page 31

Instrucciones de instalación
C. Después de instalar el panel en un lado del recinto, verifique que quede bien
asentado en el canal del marco y haga los ajustes necesarios. Deslice los
extremos superior e inferior del marco sobre los carriles superior e inferior del
recinto. Figura 5.
D. Meta el panel hasta el tope y repita el proceso para el otro lado.
Fig. 5
30
CÓMO INSTALAR
EL APARATO
(Cont.)
1
Agarre firmemente el aparato de aire acondicionado y colóquelo con cuidado
en la abertura de la ventana, de modo que su parte inferior quede contra el sillar
de la ventana (FIG. 6 Y FIG. 6A). Cierre con cuidado la ventana por detrás del
carril superior de la unidad.
2
Fig. 6 Fig. 6A
Carril inferior
Parte
interior
Sillar de la
ventana
Parte
exterior
Extienda los paneles laterales contra el marco de la ventana (FIG. 7).
3
Fig. 7
Page 32

Instrucciones de instalación
31
4
Coloque el bloqueo de cuadros entre las extensiones del marco y el
alféizar de la ventana como se muestra (Fig. 8). Unidad de 3 / 4 "(19 mm)
de los tornillos de fijación a través de la cerradura del marco y en el
umbral (Fig. 9). NOTA: Para evitar el alféizar de la ventana de la escisión,
taladro de 1 / 8 "(3 mm) agujeros piloto antes de conducir los tornillos.
Fig. 8
5
Para fijar la hoja móvil inferior en su sitio, fije el seguro en ángulo recto con
tornillos de 4/5” (19 mm), como se ilustra (FIG. 12).
Fig. 12
CÓMO INSTALAR
EL APARATO
(Cont.)
Fig. 9
Instale los tornillos de sujeción de 4/5” (19 mm) a través de los agujeros del
marco, hacia la hoja móvil de la ventana (FIG. 10/11).
Fig. 10
Fig. 11
6
Page 33

Instrucciones de instalación
32
CÓMO INSTALAR
EL APARATO
(Cont.)
Corte el sello de espuma y métalo en el espacio entre las hojas móviles superior e
inferior de la ventana (FIG. 13).
7
Fig. 13
1 1/2 po min
(38mm)
SI EL A/A ESTÁ
BLOQUEADO POR
CONTRAVENTANAS
Instale una pieza de madera como se ilustra en la Fig. 14 o quite la contraventana
antes de instalar el aire acondicionado.
Fig. 14
MARCO DE
CONTRAVENTAN
A U OTRA
OBSTRUCCIÓN
HOJA MÓVIL DE
LA VENTANA
TABLA DEL
GROSOR
NECESARIO
PARA LA
INCLINACIÓN
CORRECTA EN
TODO EL SILLAR
DE LA VENTANA.
FÍJELO CON
CLAVOS O
TORNILLOS.
Si debe dejar la contraventana, asegúrese de que los agujeros o ranuras de
drenaje no estén tapados con masilla ni pintura. Debe dejar un drenaje adecuado
para el agua condensada o de lluvia.
CÓMO RETIRAR EL
APARATO DE A/A DE
LA VENTANA
• Apague el aire acondicionado y desconecte el cable de suministro eléctrico.
• Retire el sello de la hoja móvil de entre las ventanas y desenrrosque el cierre de
seguridad.
• Quite los tornillos instalados en el marco y el seguro del marco.
• Cierre (deslice) los paneles laterales hacia el marco.
• Sujete firmememte el aire acondicionado, levante la hoja móvil y mueva
cuidadosamente el aparato hacia atrás para dejar salir el resto de agua
condensada en la base de la unidad. Tenga cuidado de no derramar agua
cuando levante la unidad de la ventana. Guarde las piezas JUNTO con el
aparato de aire acondicionado.
Page 34

Instruciónes Operadoras
La pantalla siempre indica la
temperatura ambiente salvo cuando se
fija la temperatura de ajuste o el
temporizador de demora.
La luz indica si la unidad está
en modo de temperatura o de
ajuste de tiempo de demora.
Suministro
eléctrico
Automático
Alta
Media
Baja
Fresca
Ahorrador de energía
Sólo ventilador
Ajuste
Temp. / Demora
Demora
1 - 24 h
Ventilador
Velocidad
Modo
La luz indica que se ha ajustado el
temporizador de demora.
Demora de
1-24 h h
Disminución del
temporizador
de demora
Selección de
modo
Disminución de
velocidad de
ventilador
Aumento y
disminución de
ajuste de
temperatura
aumento del
temporizador
de demora.
Encendido de
ventilador
automático
Aumento de
velocidad de
ventilador
Encendido /
apagado de la
unidad
CONTROLES DEL AIRE ACONDICIONADO
CONTROL REMOTO
CÓMO USAR EL
AIRE
ACONDICIONADO
El uso correcto del aparato le permitirá disfrutar de su funcionamiento óptimo.
El uso correcto del aire acondicionado se indica en esta sección.
IMPORTANTE
Si apaga el aire acondicionado, espere al menos tres minutos antes de
volverlo a encender. Eso evita que el aparato queme un fusible o active un
disyuntor eléctrico.
No trate de usar el aire acondicionado en modo de enfriamiento si la
temperatura exterior es menor que 65 °F (18 °C). La espiral del evaporador
interno se congelará y el aire acondicionado no funcionará correctamente.
NOTA: Si hay un corte de electricidad, al restablecerse el suministro su aparato de
aire acondicionado funcionará en el modo de ajuste anterior.
CONTROLES
DIGITALES
Las luces al lado del tablero del panel de control del aire acondicionado le
indican los ajustes elegidos.
Teclado de suministro eléctrico
Enciende y apaga el aire acondicionado. Cuando está encendido, la pantalla
indica la temperatura ambiente.
Pantalla
Muestra la temperatura ambiente o el tiempo que queda en el temporizador de
demora. Muestra la temperatura de ajuste cuando la misma se ajusta en los
modos de temperatura fresca o de ahorro de energía. La luz de ajuste se
encenderá mientras se esté haciendo el ajuste.
NOTA: Después de hacer los ajustes, la pantalla pasará a mostrar la
temperatura ambiente. Para cambiar la temperatura de ajuste, pulse los
botones de aumento o disminución de temperatura
Teclados de aumento / disminución de temp.
Se usan para ajustar la temperatura en los modos de temperatura fresca o de
ahorro de energía. La luz de ajuste se encenderá mientras se esté haciendo el
ajuste.
Teclado de aumento (+) / disminución (-) del temporizador de
demora Cuando se usa el temporizador de demora de 1-24 h ( ), cada vez
que se pulsa el teclado de aumento / disminución en la unidad, o el teclado de
aumento + / disminución en el control remoto, se ajusta el tiempo de demora.
La luz de ajuste se encenderá mientras se esté haciendo el ajuste.
Botones de velocidad del ventilador
Se usan para ajustar la velocidad del ventilador, a baja, media, alta velocidad
o Modo Automático en la unidad. NOTA: Para el control remoto, use el
teclado de Aumento + / disminución para ajustar la velocidad del ventilador a
baja, media o alta velocidad. Use el teclado de función automática para
encender el ventilador en modo automático.
Botón de modo
Úselo para pasar el aire acondicionado a modo de temperatura fresca, de
ahorro de energía o de sólo ventilador.
Botones de demora
Demora ACTIVADA Cuando el aparato está apagado, se puede ajustar para
que se active automáticamente en 1 a 24 horas, en los ajustes de modo y
ventilación anteriormente establecidos.
Demora DESACTIVADA Cuando el aire acondicionado está encendido, se
puede ajustar para que se desactive automáticamente en 1 a 24 horas.
Cómo hacer el ajuste
Pulse el tablero de demora de 124 h de la unidad, o el tablero de ( ) en el
control remoto. Cada vez que se pulsen los botones de Aumento /
disminución en la unidad o los botones de Aumento + / disminución en
el control remoto, el temporizador se ajustará en incrementos de 1 hora, La luz
de ajuste se encenderá mientras se esté haciendo el ajuste.
Para consultar el tiempo restante del temporizador de demora de 1-24 h, pulse
el tablero de demora de 124 h de la unidad, o el tablero de ( ) en el control
remoto. Use el modo de Aumento / disminución en la unidad o los
botones de Aumento + / disminución del control remoto para fijar otro tiempo,
si lo desea.
Al ver o ajustar el temporizador, pulse el botón de Demora 1 - 24 h en el panel
o el botón de Demora en el control remoto, para cancelar el ajuste del
temporizador.
33
Page 35

Instruciónes Operadoras
34
CONTROL REMOTO DE
LOS CONTROLES
DIGITALES
• Para un buen funcionamiento, apunte el control remoto al receptor de señales del
aire acondicionado.
• La señal del control remoto tiene un alcance hasta de 20 pies de distancia.
• Verifique que no haya nada entre el aire acondicionado y el control remoto, que
pueda bloquear la señal.
• Verifique que las pilas tengan carga y estén bien instaladas, como se indica en el
control remoto.
Para refrescarse, use el modo de velocidad baja, media, alta o automática del
ventilador. Use el teclado de Aumento / disminución de temperatura para
fijar la temperatura deseada entre 64 °F y 86 °F en incrementos de 1 °F.
Para mantener la temperatura ambiente se usa un termostato electrónico. El
compresor arrancará o parará en ciclos para mantener la habitación al nivel de
comodidad elegido. El fijar el termostato a un numero más bajo enfriará el aire de
la habitación. El fijar el termostato a un numero más alto calentará el aire de la
habitación.
NOTA: Si el aire acondicionado se apaga y vuelve a encenderse en modo de
enfriamiento o si se pasa de modo de ventilador a enfriamiento, el compresor
podrá tardar unos 3 minutos en ponerse en marcha y empezar a enfriar.
Descripción de los modos de enfriamiento
Para un enfriamiento normal Elija el modo de Enfriamiento y el ajuste de
velocidad alta o media para el ventilador, con una temperatura a medio nivel. Para
enfriar al máximo Elija el modo de Enfriamiento y el ajuste de velocidad alta del
ventilador, ajustando la temperatura a un punto más bajo. Para enfriar con menor
ruido y durante la noche Elija el modo de Enfriamiento y el ajuste de velocidad
baja para el ventilador, con una temperatura a medio nivel.
MODO DE
ENFRIAMIENTO
MODO DE AHORRO DE
ENERGÍA
El ventilador se encenderá y apagará al mismo tiempo que el compresor. Eso
produce mayor variación de la temperatura ambiente y la humedad. Generalmente
se usa cuando la habitación está vacía.
NOTA: Es posible que el ventilador funcione por un rato corto después de
apagarse el compresor.
MODO DE VENTILADOR
ÚNICAMENTE
Use el modo de ventilador únicamente a la velocidad baja, , media o alta del
ventilador, para permitir que circule el aire y se filtre sin enfriarlo. Puesto que los
ajustes de Ventilador Únicamente no enfrían el aire, no es posible fijar una
temperatura dada. La temperatura ambiente aparecerá en la pantalla.
NOTA: En el modo de ventilador únicamente no se puede usar la velocidad de
ventilador automática.
VELOCIDAD DE
VENTILADOR
AUTOMÁTICA
Fije la velocidad del ventilador al ajuste automático para que este pase a la
velocidad requerida para ofrecerle comodidad óptima a la temperatura establecida.
Si hace falta refrescar más la habitación, el ventilador aumentará de velocidad
automáticamente. Si no hace falta refrescar tanto la habitación, el ventilador bajará
de velocidad automáticamente.
NOTA: La velocidad automática del ventilador no se puede usar en el modo de
ventilador únicamente.
CARACTERÍSTICA DE
RECUPERACIÓN EN
CASO DE CORTES DE
SUMINISTRO
ELÉCTRICO
Si falla o se interrumpe el suministro eléctrico, cuando este se reinicie, la unidad
volverá a encenderse automáticamente en el último tipo de ajuste hecho. Si se fijó
la función de demora de 1-24 h el temporizador hará una cuenta regresiva de
acuerdo al tiempo en memoria. Si lo desea, quizás deba establecer un nuevo
período de demora.
Page 36

35
Limpieza y Mantenimiento
Su nuevo aparato de aire acondicionado está diseñado para darle muchos años de servicio fiable. Esta parte le indica cómo
limpiar y dar mantenimiento debido a su aparato de aire acondicionado.
CÓMO LIMPIAR EL
FILTRO DE AIRE
El filtro de aire se puede retirar para facilitar su limpieza. El tener un filtro limpio
ayuda a eliminar el polvo, la pelusa y demás partículas del aire, y es importante
para mantener la mejor eficiencia de enfriamiento y de uso. Revise el filtro cada
dos semanas para ver si necesita limpiarlo.
1. Apague el aparato de aire acondicionado.
2. Quite el filtro jalando hacia abajo las salientes que se encuentran en la parte
superior o en los lados de la tapa del filtro, y deslizando el filtro hacia arriba y
hacia afuera. La tapa del filtro no se puede retirar.
IMPORTANTE
NO se olvide de volver a poner el filtro de
aire. Si el aparato se hace funcionar sin el
filtro de aire, no se podrá eliminar el polvo
de la habitación y es posible que el
aparato falle.
Cuando la rejilla de entrada del aire y el
recinto del aparato estén sucios, frótelos
con un paño humedecido en agua tibia (a
menos de 40 °C). Se recomienda usar un
detergente suave.
CÓMO LIMPIAR EL
PANEL DELANTERO
1. Desenchufe el aire acondicionado o corte el suministro eléctrico.
2. Limpie el panel delantero con un paño suave y húmedo.
3. Deje que el panel delantero se seque completamente al aire.
4. Conecte el aire acondicionado o vuelva a conectar el suministro eléctrico.
A
A. Salientes
3. Use una aspiradora para limpiar el filtro de aire. Si éste está muy sucio, lávelo
en agua tibia con un detergente suave. No lave el filtro de aire en el lavavajillas
ni use productos químicos de limpieza. Para garantizar un funcionamiento
óptimo, deje que el filtro se seque completamente al aire antes de volverlo a
instalar.
4. Vuelva a colocar el filtro de aire deslizándolo hacia abajo en su recinto y
cerrando la tapa.
CÓMO REPARAR LOS
DAÑOS A LA PINTURA
Revise el aparato una o dos veces al año para verificar que la pintura de acabado
no esté dañada. Eso resulta muy importante, en especial en áreas costeras o
cuando la oxidación sea un problema común. Si es necesario, retoque el acabado
con pintura de esmalte de buena calidad.
NOTA: Para reducir los daños a la pintura durante el invierno, instale una
cubierta de material resistente sobre el recinto del aire acondicionado. Para
saber cómo pedir una cubierta de material resistente, consulte la sección de
“Accesorios”.
MANTENIMIENTO
ANUAL
Es necesario dar mantenimiento anual a su aire acondicionaldo para que funcione
bien y uniformemente durante todo el año. Llame al distribuidor de su zona para
fijar una cita de control anual. Usted es responsable de pagar el costo de la
inspección anual.
Page 37

36
Solución Sugeridad
PROBLEMA POSIBLE CAUSA SOLUCIONES
1) El aparato de aire acondicionado
no funciona.
• La unidad no recibe suministro eléctrico.
• Verifique que el cable de suministro esté conectado a la
fuente de suministro eléctrico.
• Revise los fusibles o el disyuntor eléctrico.
• Pase el INTERRUPTOR SELECTOR a una posición
distinta a “APAGADO”.
• El botón de “REINICIALIZACIÓN” del cable debe estar
siempre presionado (activado) para que funcione
correctamente.
2) Enfriamiento deficiente o falta de
enfriamiento.
• El filtro está sucio.
• El tamaño de la unidad no es el adecuado para
este uso.
• Obstrucción en el flujo de aire.
• Corte de suministro eléctrico, cambio rápido de
los ajustes o activación de protección por
sobrecarga del compresor.
• Limpie o cambie el filtro de aire.
• Consulte al distribuidor para conocer la capacidad
correcta de una unidad para el uso que le desea dar.
• Elimine la obstrucción de la rejilla o de las aberturas
exteriores.
• Apague la unidad y espere cinco minutos antes de
volverla a encender.
3) La unidad hace mucho ruido.
• Piezas flojas.
• Soporte insuficiente.
• Apriete las piezas flojas.
• Instale soportes adicionales para la unidad.
4) Malos olores.
• Se forma moho, manchas de humedad o salen
algas en las superficies mojadas.
• Limpie a fondo la unidad.
• Ponga una pastilla algicida en la bandeja de la base.
5) Gotea agua fuera de la unidad. • Clima caliente y húmedo.
• En esas condiciones es normal que caigan gotas de
agua condensada.
6) Goteo de agua en el interior.
• La unidad no está debidamente inclinada para
que el agua drene hacia afuera.
• La unidad se debe instalar con cierta inclinación para
que la condensación escape hacia afuera. Revise la
unidad y haga los ajustes necesarios.
7) Se forma hielo o se acumula la
escarcha
• Baja temperatura exterior.
• El filtro de aire de la unidad está sucio.
• Cuando la temperatura exterior es de unos 18.3 °C (65
°F) o menor, se puede formar escarcha cuando la
unidad está en modo de enfriamiento. Pase la unidad al
modo de VENTILACIÓN (únicamente) hasta que se
derrita la escarcha.
• Retire y limpie el filtro.
De vez en cuando se pueden presentar problemas menores, que no requieren tener que llamar para solicitar servicio. Use
esta guía de solución de problemas para tratar de resolverlos.
NOTAS:
1) Si el disyuntor del circuito se activa varias veces o si el fusible se quema más de una vez, comuníquese con un técnico calificado.
2) Cuando la unidad se instala siguiendo los pasos correctos, la unidad queda debidamente inclinada hacia el exterior para permitir el
escape del agua condensada.
PROBLEM
POSSIBLE CAUSE SOLUTION
Page 38

GARANTÍA LIMITADA PARA
ELECTRODOMÉSTICO
Este producto de calidad está garantizado contra defectos de fabricación, incluyendo partes y mano de obra, siempre y cuando la unidad se utilice bajo las
condiciones normales de funcionamiento para las que fue diseñado.
Esta garantía está solamente disponible para la persona que haya comprado originalmente esta unidad directamente de Danby Products Limited (Canada) o
Danby Products Inc. (U.S.A.) (en adelante “Danby”) o uno de sus distribuidores autorizados, y no es transferible.
CONDICIONES DE LA GARANTÍA
Las piezas plásticas, se autorizan por treinta (30) días solamente a partir de la fecha de la compra, sin las extensiones proporcionadas.
Primeros 12 Meses
Durante los primer 12 meses, cualquier parte en buen estado de este producto que resulte defectuosa, incluyendo cualquier sistema
sellado, será reparado o reemplazado, a opción del fabricante, sin cargo para el comprador ORIGINAL.
Para obtener
Danby se reserva el derecho de limitar la cobertura de "Servicio en Domicilio" sujeto a la proximidad de un Taller de Servicio Autorizado.
Servicio
Para todo artefacto que requiera servicio fuera del área limitada de "Servicio en Domicilio", el cliente será responsable por transportar
dicho artefacto hasta el Taller de Servicio Autorizado mas cercano. Consulte "Límites del servicio técnico a domicilio", a continuación.
Comuníquese con el distribuidor donde haya comprado la unidad, o llame al Taller de Servicio Autorizado más cercano, donde debe ser
reparada por un técnico calificado. Si esta unidad es reparada en otro lugar que no sea un Taller de Servicio Autorizado, o si la unidad se
utiliza para aplicaciones comerciales, Danby no se hará responsable de ninguna forma y la garantía será anulada.
Límites del servicio
Si el electrodoméstico está instalado en un lugar que se encuentra a 100 kilómetros (62 millas) o más del centro de servicios más
técnico a domicilio
cercano, se debe llevar la unidad al Centro de servicios Danby autorizado más cercano, ya que dicho servicio sólo puede realizarlo un
técnico calificado y certificado por Danby para prestar servicios de garantía. Los cargos por transporte desde y hacia el lugar en que se
efectúe el servicio técnico no están cubiertos por esta garantía y son de responsabilidad del comprador.
Nada dentro de esta garantía implica que Danby será responsable por cualquier daño que hayan sufrido los alimentos u otros contenidos de este aparato, ya sea
debido a un defecto del aparato, o su uso, adecuado o inadecuado.
EXCLUSIONES
Salvo lo aquí indicado por Danby, no existen otras garantías, condiciones o representaciones, explícitas o implícitas, concretas o intencionales por parte de
Danby o sus distribuidores autorizados y todas las demás garantías, condiciones o representaciones, incluyendo cualquier garantía, condiciones o
representaciones bajo cualquier Acta de Venta de Productos o legislación o estatuto similar, quedan de esta forma expresamente excluidas. Salvo lo aquí
indicado, Danby no serán responsables por ningún daño a personas o bienes, incluyendo la propia unidad, sin importar su causa, o de ningún daño indirecto
causado por el desperfecto de la unidad, y al comprar esta unidad, el comprador acepta por la presente, indemnizar y proteger a Danby contra cualquier reclamo
por daños a personas o bienes causados por la unidad.
CONDICIONES GENERALES
No se considerará ninguna de estas garantías o seguros cuando el daño o la necesidad de reparación sea el producto de los siguientes casos:
1) Falla del suministro eléctrico.
2) Daños en tránsito o durante el transporte de la unidad.
3) Alimentación incorrecta, como bajo voltaje, instalación eléctrica defectuosa o fusibles inadecuados.
4) Accidente, modificación, abuso o uso incorrecto del artefacto, tal como insuficiente ventilación del ambiente o condiciones de operación anormales
(temperatura ambiente extremadamente alta o baja).
5) Utilización comercial o industrial (v.g., si el electrodoméstico no está instalado en una vivienda particular).
6) Incendio, daños por agua, robo, guerra, disturbios, hostilidades, actos de fuerza mayor como huracanes, inundaciones, etc.
7) Pedidos de servicio debido a desinformación del usuario.
8) Instalación inadecuada (v.g., instalación empotrada de un electrodoméstico diseñado como unidad independiente o uso de un electrodoméstico al aire
libre que no esté aprobado para dicho fin).
Para acceder a la garantía se solicitará un comprobante de compra; por lo tanto, guarde su recibo. En caso de necesitar servicio de garantía, presente ese
documento al TALLER DE SERVICIO AUTORIZADO.
Danby Products Limited
PO Box 1778, Guelph, Ontario, Canada N1H 6Z9
Telephone: (519) 837-0920 FAX: (519) 837-0449
Danby Products Inc.
PO Box 669, Findlay, Ohio, U.S.A. 45840
Telephone: (419) 425-8627 FAX: (419) 425-8629
04/09
1-800-263-2629
Servicio de Garantía
Servicio en Domicilio
Page 39

Danby Products Limited, Guelph Ontario Canada N1H 6Z9
Danby Products Inc., Findlay, Ohio USA 45839-0669
Model • Modèle • Modelo
DAC10000 / DAC12011
Danby Products Limited, Ontario, Canada N1H 6Z9
Danby Products Inc., Findlay, Ohio, USA 45840
Model • Modèle • Modelo
AIR CONDITIONER
The model number can be found on the serial plate
located on the back panel of the unit.
All repair parts are available for purchase or special
order when you visit your nearest service depot. To
request service and/or the location of the service
depot nearest you, call the TOLL FREE NUMBER.
When requesting service or ordering parts, always
provide the following information:
• Product Type
• Model Number
• Part Number
• Part Description
CLIMATISEUR
Le numéro de modèle se trouve sur la plaque d'information
sur le panneau arrière de l’appareil.
Toutes les pièces de rechange ou commandes spéciales
sont disponibles à votre centre de service régional autorisé.
Pour obtenir le service et/ou la localité de votre centre de
service régional, signalez le NUMÉRO D’APPEL SANS
FRAIS.
Ayez les renseignements suivants à la portée de la main lors
de la commande de pièce ou service:
• Type de produit
• Numéro de modèle
• Numéro de pièce
• Description de la pièce
AIRE ACONDICIONADO
El número de modelo se puede encontrar en la placa serial
situada en el panel trasero de la unidad.
Todas las piezas de reparación disponibles para la compra o
la orden especial cuando usted visita su depósito más
cercano del servicio. Para pedir servicio y/o la localización
del depósito del servicio lo más cerca posible usted, llama
Danby gratis.
Al pedir servicio o pidiendo piezas, proporcione siempre la
información siguiente:
• Tipo de Producto
• Número de Modelo
• Pieza número
• Descripción de la Parte
Tel: 1-800-26-
(1-800-263-2629)
 Loading...