

Page 1
StatVision for Baseball Quick Start Guide 1 of 7
201 Daktronics Drive PO Box 5128, Brookings, SD 57006-5128
Tel: 1-800-DAKTRONICS (1-800-325-8766) Fax: 605-697-4700
Web: www.daktronics.com
ED-17884 Rev 3
12 April 2012
This guide will assist you with installing and configuring your StatVision software to display situational stats and league leaders/standings. For more
detailed program operation, refer to the StatVision for Baseball Installation & Operation Manual (ED-17506).
StatVision Functions
Reduces pre-game preparation
Provides an enormous amount of pregame content and in-game
statistics from DakStats, MLB.com, and Elias Sports Bureau (ESB)
Situational prompts ensure the most relevant stats are visible
Sends control commands for starting & stopping display
sequences, blanking signs, and more
StatVision Installation
StatVision can be installed on and operated from multiple computers.
1. Open an Internet browser, and type
http://dakfiles.daktronics.com/downloads/Sports_Products/Stat
Vision/ into the address box.
2. Click on the “StatVision Install.exe” file.
3. Click Run. If a security warning pops up, click Run again.
4. Click Finish when done.
5. Repeat steps 1-5 on each computer that must
have StatVision installed. The “StatVision
Install.exe” file may be downloaded and saved to
be transferred to other computers without
Internet access.
After installation, an icon should appear on the desktop. Double-click
this icon to open the program. Alternately, go to Start > All Programs >
Daktronics > GameDay Baseball.
Note: On Windows 7, it will be necessary to run the program as an
administrator to operate correctly. Right-click the StatVision icon and
select Properties. Click on the Compatibility tab, and ensure Run this
program as an administrator is checked. Be sure to also do this for
DakStats, DSTI, and GameDay for best compatibility.
Set Up DakStats
For StatVision to work correctly with DakStats Baseball, the user must set
up messaging and share the folder.
Set Up Messaging
1. In the DakStats Baseball program, go to Configure > Messaging.
2. Ensure Different Machine (IP Network Messaging) is selected if
DakStats is on a different computer than StatVision (most common).
3. Click OK.
Page 2
StatVision for Baseball Quick Start Guide 2 of 7
201 Daktronics Drive PO Box 5128, Brookings, SD 57006-5128
Tel: 1-800-DAKTRONICS (1-800-325-8766) Fax: 605-697-4700
Web: www.daktronics.com
ED-17884 Rev 3
12 April 2012
Sharing the Daktronics Folder
If the DakStats and StatVision programs are on different computers, the
directory where the DakStats database is located must be shared:
1. Go to the computer with the DakStats program.
2. Browse to the C:\Daktronics directory.
3. Right-click the folder.
4. Select Sharing and Security.
5. Share the folder with full permissions.
*Note for Windows 7 users: After right-clicking the folder, select
Properties, and click on the Sharing tab. Click on Advanced
Sharing, select Share this folder and click OK.
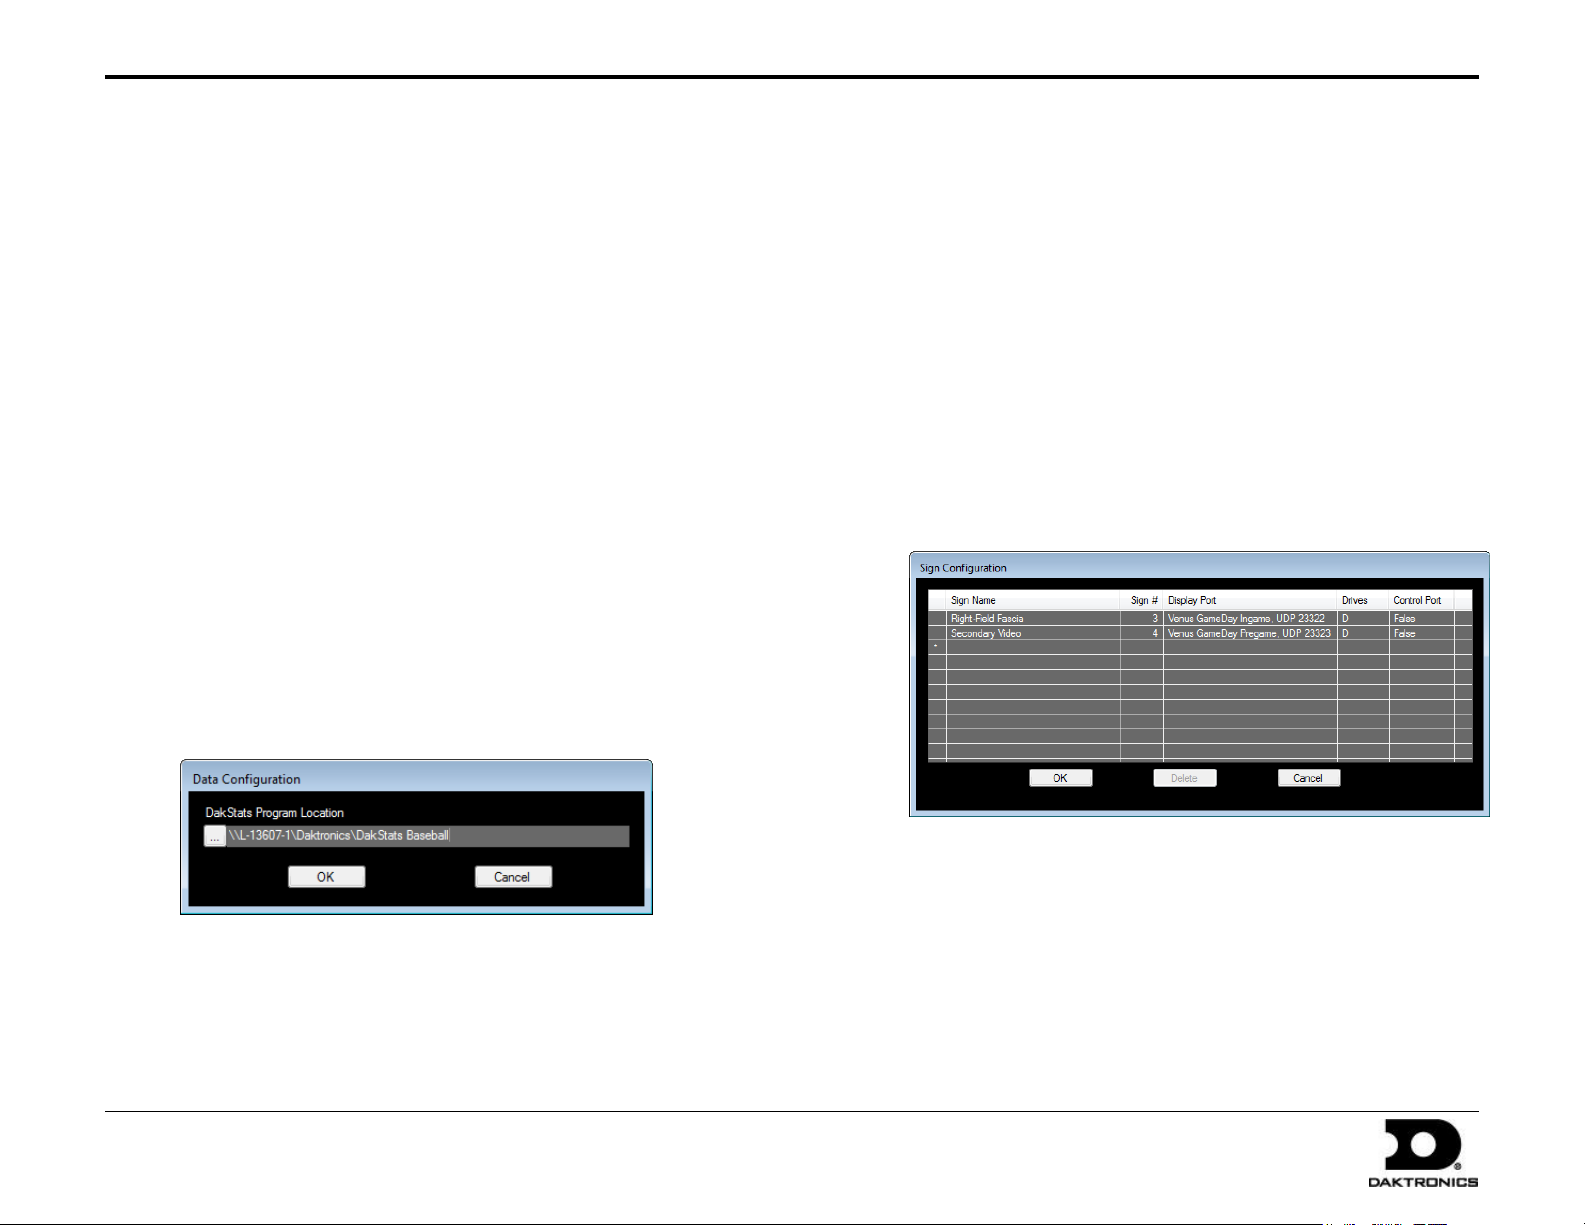
Set Up Data Configuration
Note: Open a demo game in DakStats before performing the following steps.
1. Open StatVision.
2. Go to Edit > Data Configuration.
3. In the Data Configuration window, click the […] button.
4. Locate the “Baseball” folder within the “Daktronics” folder that
was just shared on the DakStats computer.
Set Up Signs
Sign configuration allows the user to configure the display that StatVision
will control and send information to. At least one sign must be configured.
Configuring Signs
1. Open the Daktronics Scoring-Timing Interface (DSTI), if not already
running, by clicking on the DSTI icon on the desktop.
DSTI is typically installed on the same computer as DakStats.
The RTD ports available in StatVision are configured in DSTI by
Daktronics.
2. Open StatVision, either on the same computer as DSTI or on a
separate computer.
3. Go to Edit > Signs, and the Sign Configuration window will appear.
5. Click OK to save the data configuration.
4. In the Sign Name column, enter a descriptive name for the sign. The
name of the sign can be anything that makes sense to the operator.
5. In the Sign # column, select the sign number of the sign that
StatVision will controll.
To check the sign number in Venus 7000:
a. On the Venus 7000 computer, open the Venus 7000 Shell.
b. Go to Configure > Signs.
c. Double-click the desired sign, and go to the Advanced tab.
Page 3
StatVision for Baseball Quick Start Guide 3 of 7
201 Daktronics Drive PO Box 5128, Brookings, SD 57006-5128
Tel: 1-800-DAKTRONICS (1-800-325-8766) Fax: 605-697-4700
Web: www.daktronics.com
ED-17884 Rev 3
12 April 2012
To check the sign number in V-Net:
a. On the V-Net computer, right-click the V-Net Manager
icon in the task bar ( ) and select Control Panel.
b. Click on the Edit Configuration Settings tab.
Note: If the sign number is 0, change it to any number that is
not already being used. If multiple signs are set to 0, the same
data and commands will be sent to every sign on the network
configured with that sign number.
6. In the Display Port column, select the port to be used for the sign
from a list of available ports supplied by DSTI.
Note: A display port can only be selected once. If more than two
signs are controlled, contact Daktronics to have the DSTI
configuration file modified.
7. Use the Drives column to select the drive letter(s) where content is
stored for the selected sign.
8. If using a V-Net controller, be sure to click in the Control Port
column and then click Yes.
9. Click OK to save the sign.
After a sign has been configured, it will appear as a button on the top of the
StatVision screen. Click a sign once to enable it (green). Click a sign again to
turn it off (red). At least one sign must be checked to output stats/messages.
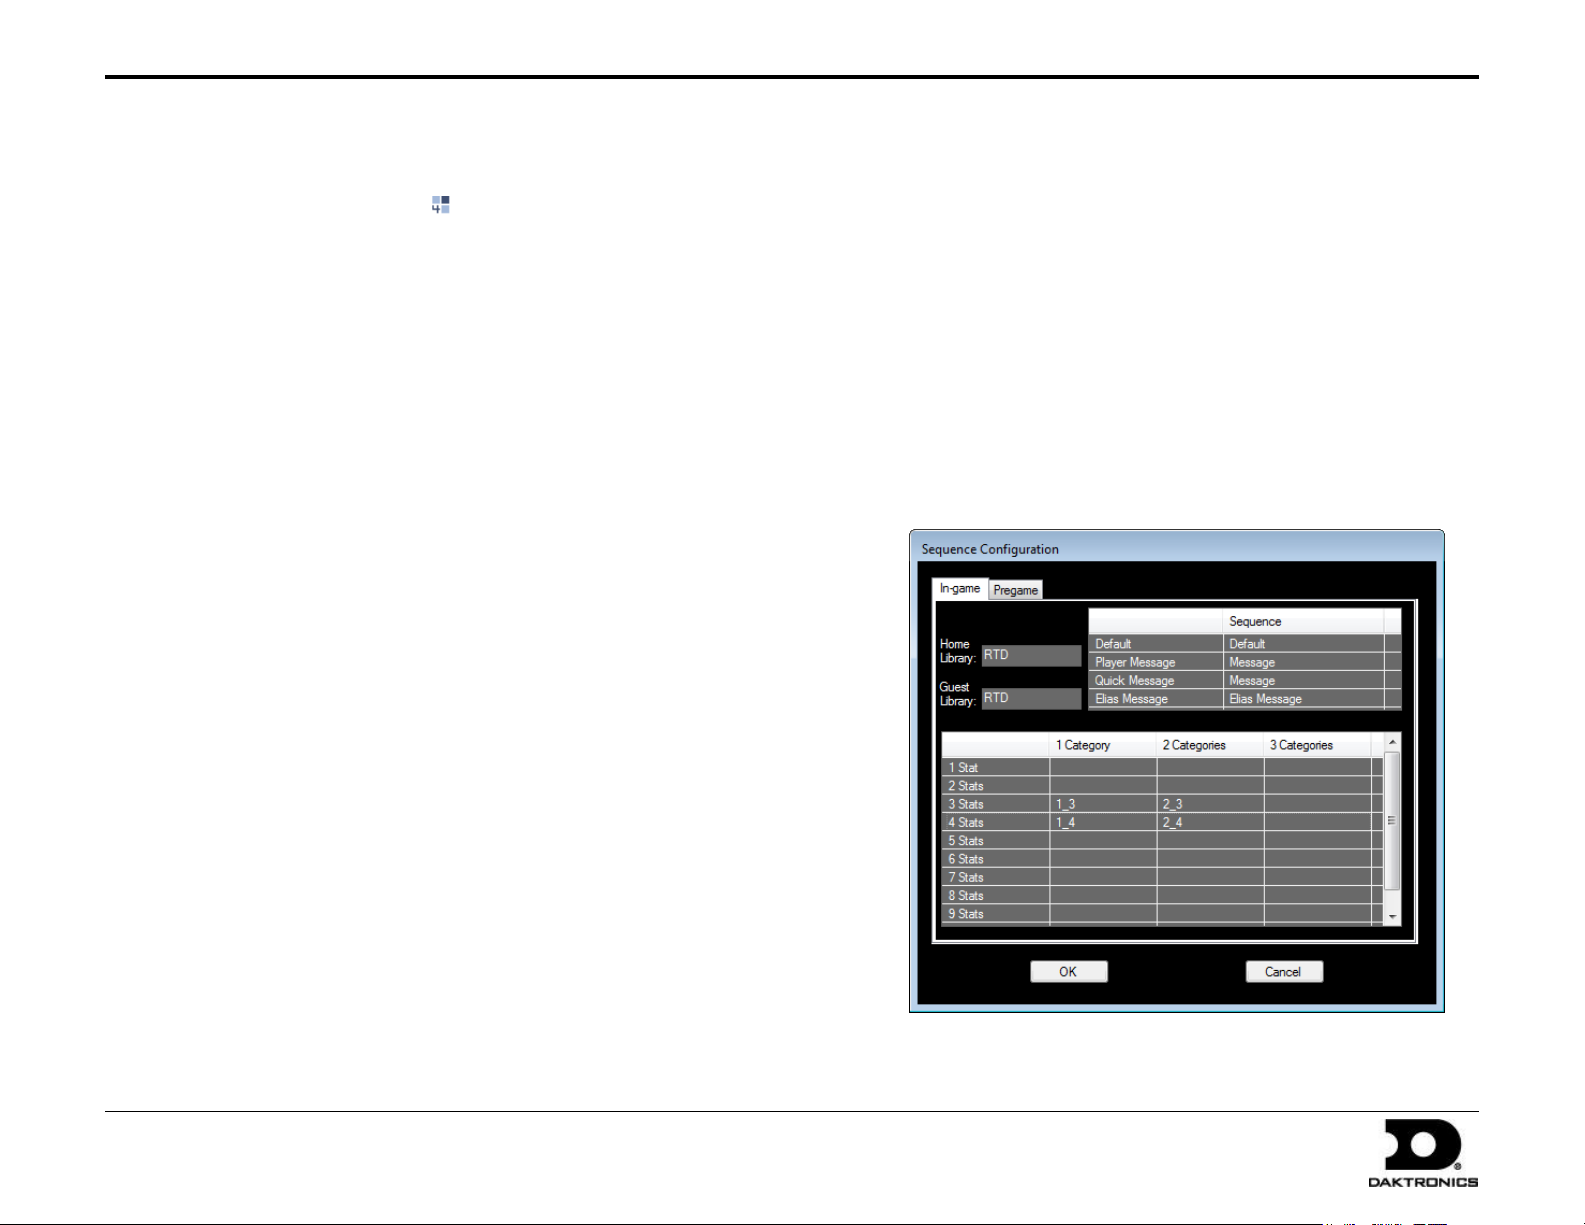
Creating Sequences
Sequences are built on the Venus 7000 or Show Control computer. They
determine the layout of the statistics and standings on the sign, including
how many and what statistics are to be displayed. Separate sequences are
required to display leaders and standings. Refer to the manual for further
assistance with creating display sequences.
Setting Up In-game Sequences
1. Go to Edit > Sequences.
2. Type in the name of each desired sequence into the table as named
on the Venus 7000 or V-Net computer.
Note: Any file name may be used for the sequences, but it is
recommended to use names such as “1_3” for simplicity.
Set Up Sequences
When a certain combination of stats is to be displayed, StatVision tells the
display controller to play a sequence that matches the selected data.
Note: At a minimum, there must be a sequence for 1 Category/3 Stats
and 1 Category/4 Stats. It is not necessary to create sequences for every
possible category/stat combination.
Page 4

StatVision for Baseball Quick Start Guide 4 of 7
201 Daktronics Drive PO Box 5128, Brookings, SD 57006-5128
Tel: 1-800-DAKTRONICS (1-800-325-8766) Fax: 605-697-4700
Web: www.daktronics.com
ED-17884 Rev 3
12 April 2012
Home Library
Guest Library
The library name indicates the library/folder where
the StatVision sequences are stored. If the same
sequences will be used for the Home and Guest
teams, enter the same library name.
Default
If a Default sequence is entered, StatVision will
automatically play this sequence when the
batter/pitcher changes.
Player
Message
Enter the name of the sequence to use for player
messages.
Quick
Message
Enter the name of the sequence to use for quick
messages.
Elias Message
Enter the name of the sequence to use for messages
from ESB.
Stat/Category
Table
Enter the names of each sequence for every category
and statistic combination that will be used.
Libraries
The library name indicates the library/folder where the
StatVision sequences are stored. If the sequences reside
in the same library for multiple leagues, the library
name will need to be typed into each league.
Sequences
Indicates the sequences to be used for displaying
Individual League Leaders, Standings, and Wildcard
Standings. Wildcard Standings are separate from
Division Standings because up to 13 teams are possible
for Wildcard Standings, while only 6 are included in
Division Standings. If the sequence for both is the same,
the name will need to be entered in both rows.
The fields on the In-game tab of the Sequence Configuration window are
described below:
Note: If configuring multiple signs, the sequences must have the exact
same names and be in a library with the same name for each sign.
Setting Up Pregame Sequences
The pregame sequences control how to display league leaders and
standings.
1. Go to Edit > Sequences.
2. In the Sequence Configuration window, click the Pregame tab.
3. Type in the appropriate names for the Libraries and Sequences.
The fields on the Pregame tab of the Sequence Configuration window are
described below:
Page 5

StatVision for Baseball Quick Start Guide 5 of 7
201 Daktronics Drive PO Box 5128, Brookings, SD 57006-5128
Tel: 1-800-DAKTRONICS (1-800-325-8766) Fax: 605-697-4700
Web: www.daktronics.com
ED-17884 Rev 3
12 April 2012
Pregame Operation
The Pregame tab configures how and what league leaders and standings
are displayed through playlists.
Creating Playlists
To display any of the information on the Pregame tab, users must set
up a playlist that defines what specific leaders and standings
categories to show.
1. Go to Pregame > Add Playlist. Note that the Pregame menu is
only accessible while on the Pregame tab.
2. In the Pregame Playlist Configuration window, type in a descriptive
playlist Name.
Select the sign(s) to send the playlist to. Hold [Ctrl] while
clicking to select more than one sign.
Enter the Hold Time in seconds for how long each page will
remain on display.
Enter the number of Stat Categories per Page to display. Set this
to “2” to show AL and NL stat leaders at the same time.
Enter the number of Leaders to Show per Category at one time.
3. Click OK, and the new playlist will appear in the Playlists section.
Adding League Leaders to a Playlist
Click in the space next to a Batting or Pitching stat category under the
available league to mark it with a check. At the same time, the stat
category will appear in the Playlist.
Adding Standings to a Playlist
1. Click the Standings tab
2. Choose a League if necessary.
3. Check the box(es) to add different division and wildcard standings
to the Playlist.
4. Click Extended to show a list of all available stats for the division
and wildcard standings in the lower half of the screen.
5. If needed, click Edit to modify the standings.
Arranging & Removing Stat Categories
1. Select the leader or standing entry in the playlist.
2. Use the up and down arrow buttons to rearrange the order of the
stats as needed, or simply click and drag them to the desired
location. Click the trash can icon to remove the stat category.
Note: Hold [Ctrl] while clicking to select and view, move, or delete
multiple categories at the same time.
Outputting Playlists
Leaders and standings are outputted by using StartPlaylist and
StopPlaylist Script Buttons. Refer to the manual for more information.
Page 6

StatVision for Baseball Quick Start Guide 6 of 7
201 Daktronics Drive PO Box 5128, Brookings, SD 57006-5128
Tel: 1-800-DAKTRONICS (1-800-325-8766) Fax: 605-697-4700
Web: www.daktronics.com
ED-17884 Rev 3
12 April 2012
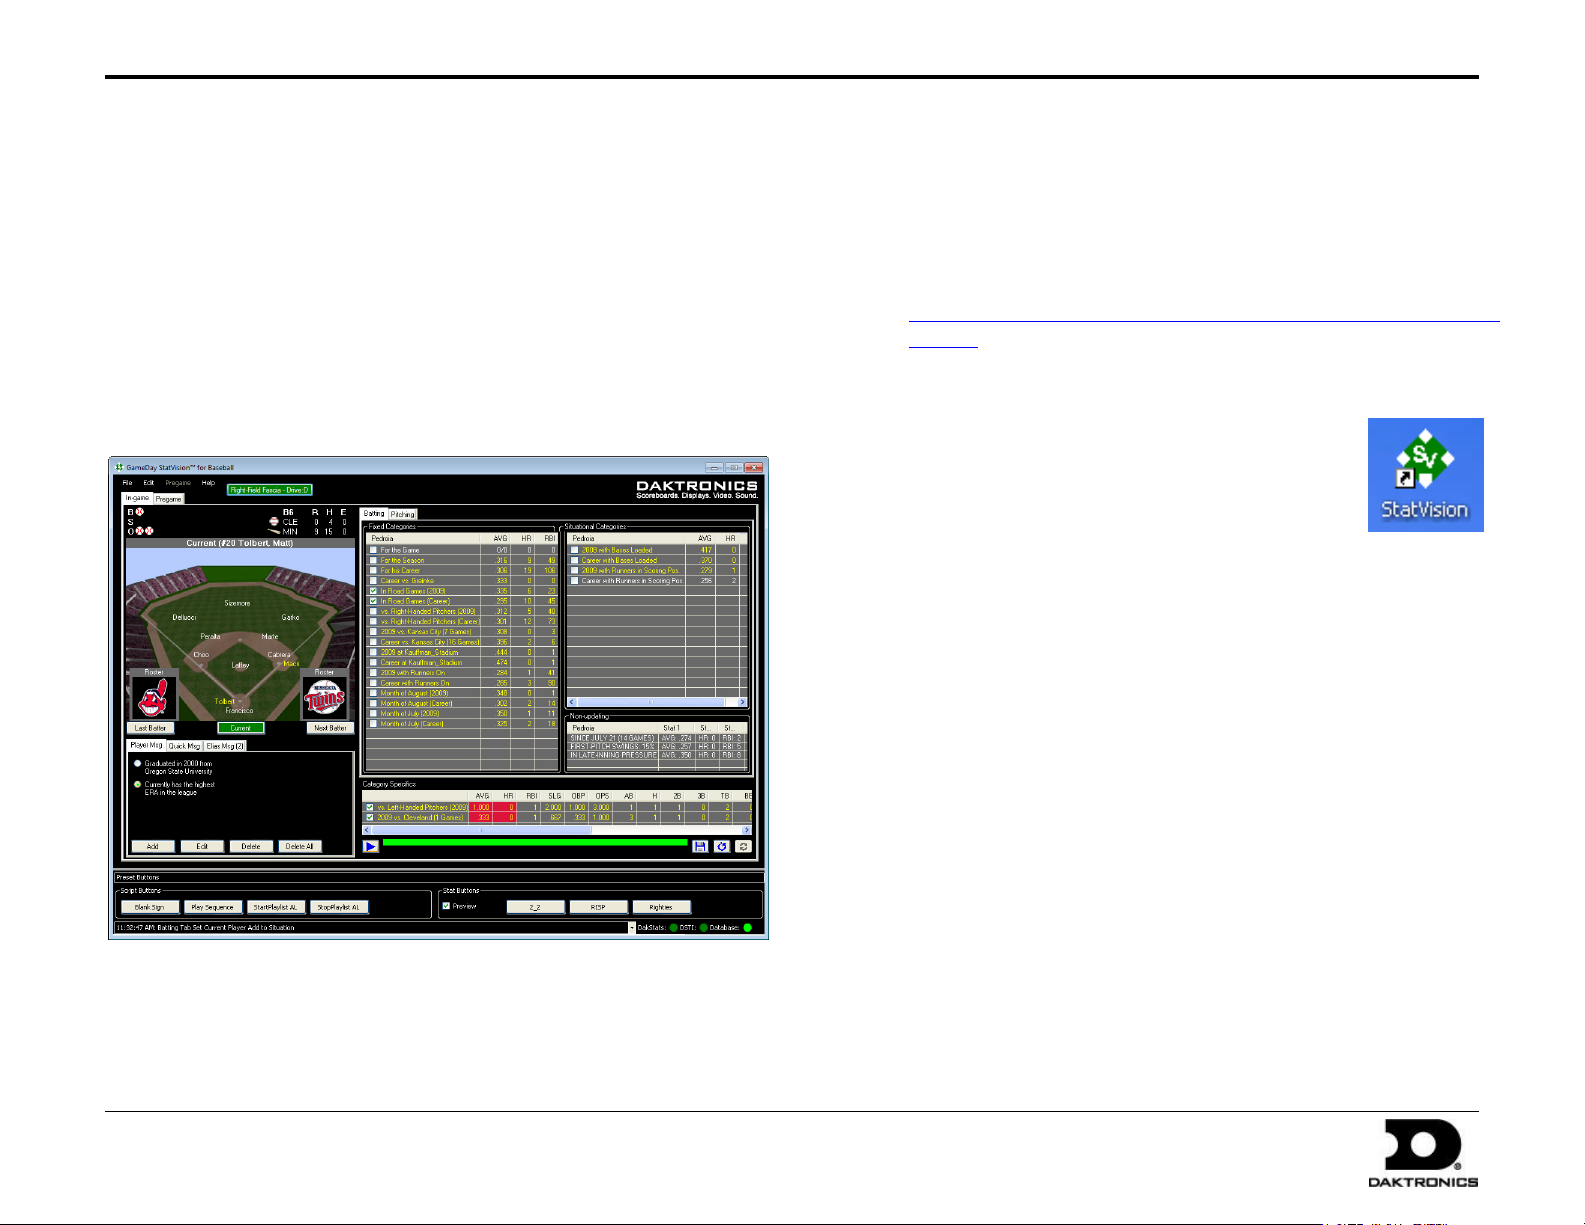
In-Game Operation
Statistics are displayed under three main categories for batters & pitchers:
Fixed Categories are always displayed on StatVision no matter the
player or the situation.
Situational Categories apply to the current game situation based on
the GIP information received from DakStats Baseball. This
ensures that the most relevant information is available.
Non-Updating categories are only valid before the players’ first at
bat. Unlike the other two categories, these stats do not update
throughout the game.
Viewing Player Stats
To select batter modes, click Last Batter, Current Batter, or Next
Batter. The selected mode will be highlighted in green.
To view a team roster, click the team’s logo. Select a player from
the roster by clicking the player’s name.
To view statistics about players that are currently playing on the
field, running the bases, or batting, simply click the player’s name
shown on the baseball diamond image
Selecting Stats for Display
There are three ways to output stats for display:
Double-click a single category to quickly display the default stats.
Use the Category Specifics window to select multiple categories to
play at once.
Create Stat Buttons to preview and send frequently used stats.
Checking a Fixed or Situational category shows its available stats in the
Category Specifics area. Up to ten statistics in 3 separate categories may be
sent at a time. If a fourth category is selected, the first category in the list
will be deselected.
Make sure the proper sequence has been configured to display
the desired number of statistics and categories (see page 3).
1. Check the box next to one or more categories from the Fixed or
Situational lists. The categories appear in the Category Specifics area
in the order they were clicked.
2. Under Category Specifics, click the desired stats and the entire
column will be highlighted. To deselect a statistic, click anywhere
within the column.
3. When all of the desired stats are selected, click the play button
to display the stats. Only the categories that are checked
will be sent.
4. To clear all the categories in the box, click the Clear Categories
button.
5. If desired, click the floppy disk icon to save the setup as a
Stat Button.
Note: Click and drag the column headers to change the default order of
the stat columns.
Messages
StatVision provides three different types of messages: Player Messages,
Quick Messages, and Elias Messages. Click the appropriate tab to create,
view, and display the available messages.
The Player Msg tab displays all the player messages configured
in DakStats. Double-click a message to send it to the display.
Click Add to create a new message, or click Edit to modify an
existing message.
The Quick Msg tab allows users to create a brief message and
send it to the display without first saving it to a specific player.
After entering the text of the message, click Send.
The Elias Msg tab shows messages directly from ESB.
Double-click a message to send it to the display. Elias messages
may not be edited.
Page 7

StatVision for Baseball Quick Start Guide 7 of 7
201 Daktronics Drive PO Box 5128, Brookings, SD 57006-5128
Tel: 1-800-DAKTRONICS (1-800-325-8766) Fax: 605-697-4700
Web: www.daktronics.com
ED-17884 Rev 3
12 April 2012
Game Day Setup
Be sure to perform the following steps before every game:
1. Open the GameDay Baseball program and perform a successful
download.
2. Open DakStats Baseball and open the day’s game that GameDay
created.
3. Ensure DSTI is open and communicating with DakStats.
4. Open StatVision and ensure the connection status indicators in
the lower-right corner of StatVision are all green.
For more information about the above programs, refer to the following
manuals, which may be included in the software Help menu or requested
from Daktronics:
DakStats Baseball Software Operation Manual (DD1385420)
DakStats Baseball Software Display Manual (DD1533474)
Daktronics GameDay Baseball Software Operation Manual
(ED-13979)
 Loading...