

Page 1
Sportsound SSR-100 Quick Start Guide 1 of 3
This guide will assist with starting up and operating a Sportsound® SSR-100
audio rack. For detailed operation, conguration, and troubleshooting,
refer to the Sportsound Rack SSR-100 Operation Manual (DD2746938).
Startup
Before Beginning: Place the rack on a at, sturdy surface. Remove the
front and rear cover pieces by releasing all latches; set the covers aside.
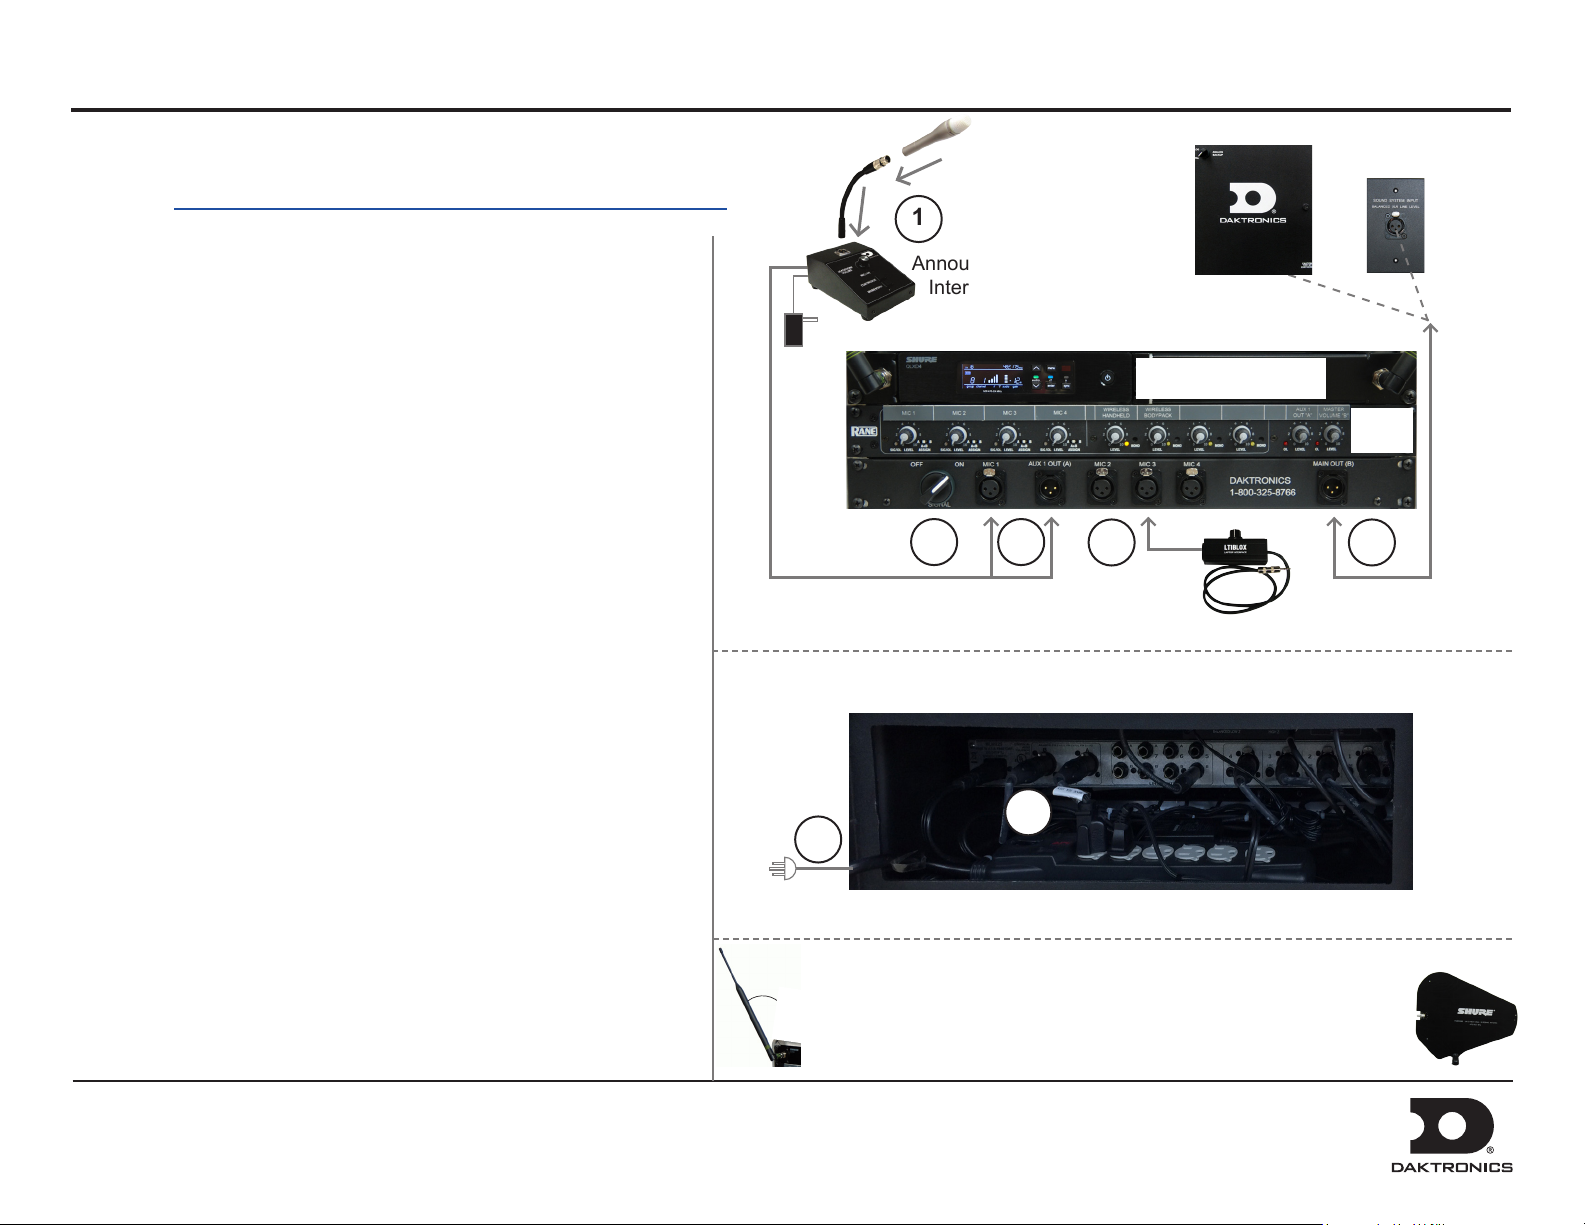
1. Connect one end of the XLR gooseneck to the wired microphone
and the other end into the jack on top of the announcer’s interface.
Optional headset microphone may be plugged here instead.
2. Connect the 15' (4.6 m) XLR cable from MIC 1 & AUX 1 on the
announcer’s interface to MIC 1 & AUX 1 OUT (A) on front of rack.
3. Connect one end of the 2' (0.6 m) or 5' (1.5 m) XLR cable to the
LTIBLOX interface and the other end to MIC 2. The 3.5 mm plug
may be connected to the headphone jack of a laptop or MP3 player.
4. Connect the 25' (7.6 m) XLR cable between the MAIN OUT (B)
jack on the front of the rack and the SYSTEM AUDIO jack on the
bottom of the ber box. If there is no ber box, as in an indoor
audio system, the cable will typically connect to a wall plate
junction box instead.
1
Announcer’s
Interface
7
2
Fiber Box
(outdoor)
Front View
Wireless Mic System
3
Laptop
Interface
Rear View
(optional)
OR
Wall Plate
(indoor)
Audio
Mixer
4
5. Locate the 3-prong power cord in the rear of the rack and plug into
a standard outlet. Ensure the announcer’s interface and ber box (if
included) also have power.
6. Turn on the power strip.
7. Switch the SIGNAL to ON.
Power Down
Follow the above steps in reverse order to power down the system.
Place all accessories in a secure location to avoid damage/theft.
DD2753515 Rev 1
23 January 2015
201 Daktronics Drive PO Box 5128, Brookings, SD 57006-5128
Tel: 1-800-DAKTRONICS (1-800-325-8766) Fax: 605-697-4746
Web: www.daktronics.com/support
6
5
Ensure any antennas are angled outward at ~45◦. Alternately, coaxial
◦
45
cable from the high gain antenna kit may be connected into WRX A
and WRX B. The antennas should be located within 50' (15.2 m) of
the rack, using desktop stands or mounted to the ceiling.
Page 2
Sportsound SSR-100 Quick Start Guide 2 of 3
Audio Mixer Operation
• Ensure all source equipment is turned on and operational.
If any optional wireless microphone systems are included,
refer to page 3.
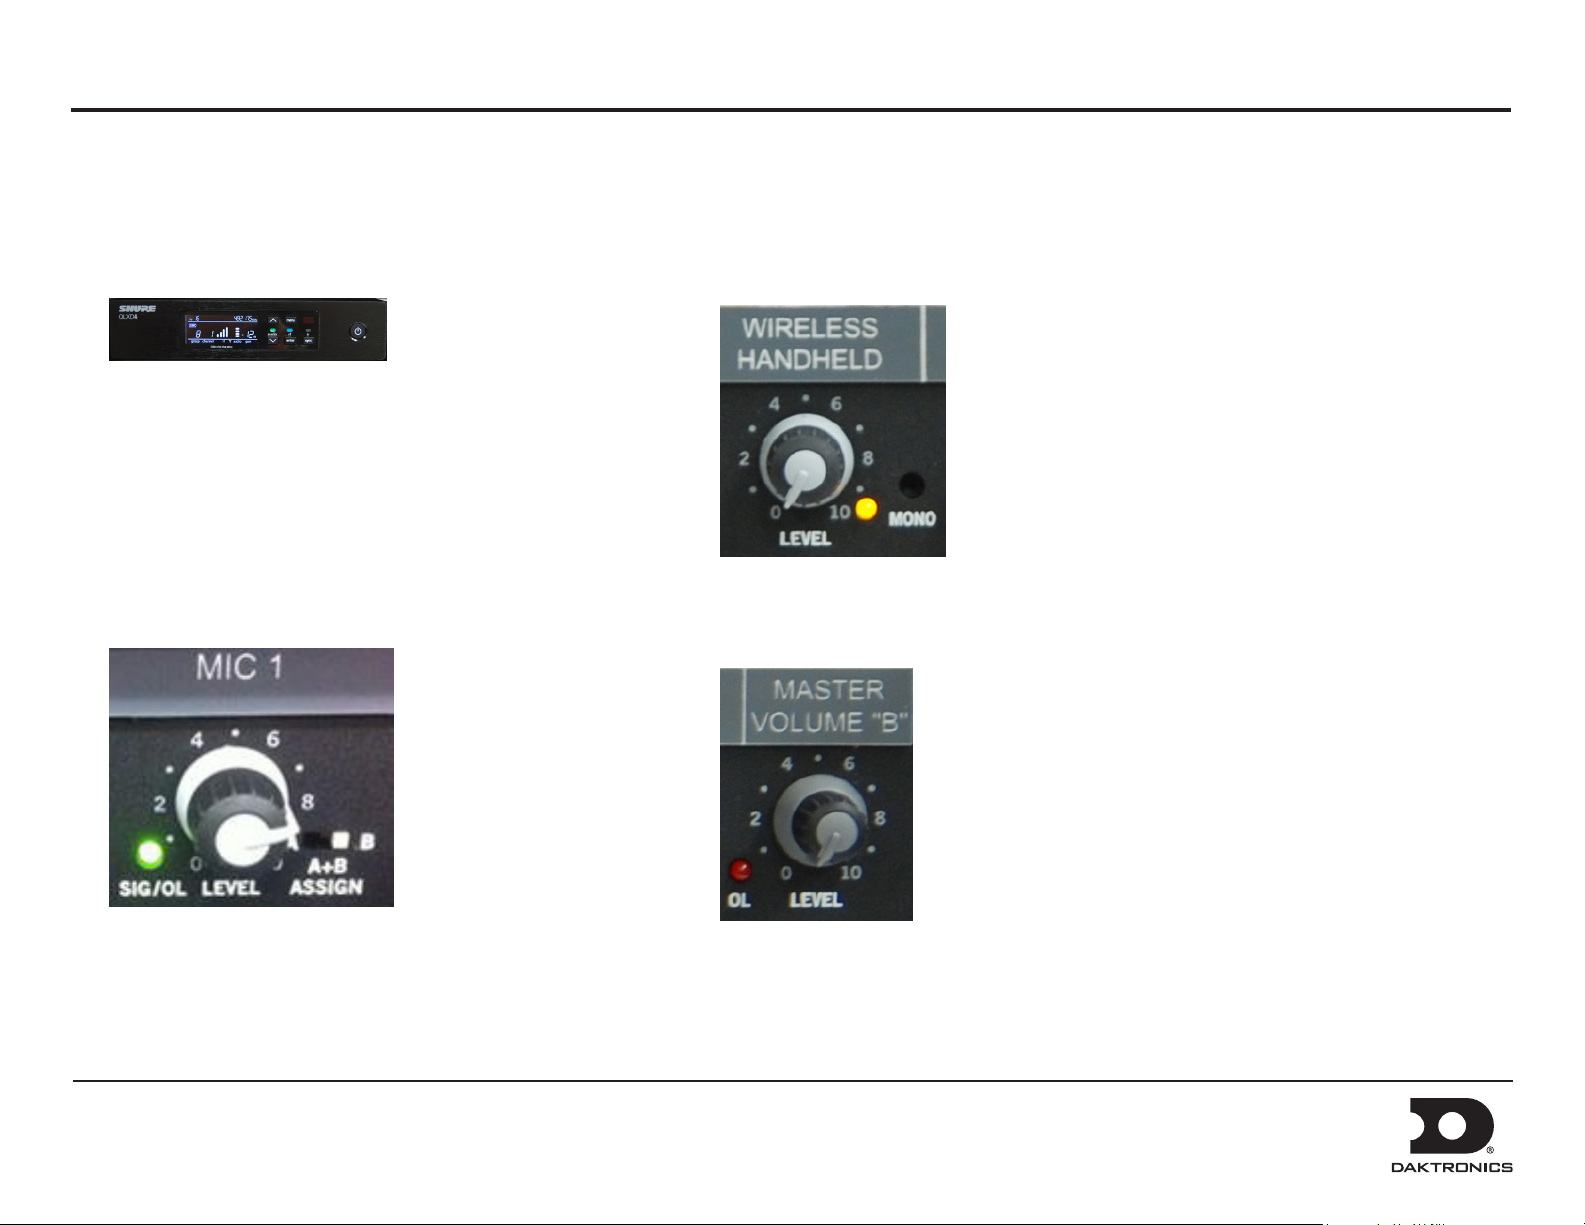
• For each input channel (source) in use, verify:
- SIG/OL light is green; if this light is red,
decrease the level
- ASSIGN is set to “A+B” or “B”
Note: Inputs set to “A” will only be heard
through the announcer’s console headphones.
This may be used to listen to each input
without interrupting the main mix.
• In the factory, the four stereo line inputs are set to MONO mode. This sends the signal to
both “A” and “B” outputs, and illuminates the amber LED. If MONO mode is disabled,
the input signal will only go to the output that matches the jack in the back of the mixer.
• Adjust MASTER VOLUME “B” level to achieve the nal output. If the OL light is red,
decrease the level.
REMEMBER: Bad input = bad output. No adjustment
on the mixer can make a poor source sound better.
For best results, be sure to use high-quality audio les
from your MP3 player or laptop, and set the device to
near full volume.
DD2753515 Rev 1
23 January 2015
201 Daktronics Drive PO Box 5128, Brookings, SD 57006-5128
Tel: 1-800-DAKTRONICS (1-800-325-8766) Fax: 605-697-4746
Web: www.daktronics.com/support
Page 3

Sportsound SSR-100 Quick Start Guide 3 of 3
Optional Wireless Receiver System Operation
b c
a
h
e
d
The unit displays the following information:
a) Transmitter Battery Life
b) TV Channel
c) Frequency
d) Group Number
Single Receiver
1. Ensure all transmitters are powered off. Press the power button to
turn on the receiver if it is not already on.
2. Press menu until “scan” displays on the LCD.
3. Press enter to start frequency scan. When scan is complete, Group
and Channel will display on the LCD.
g
f
e) Channel Number
f) RF Signal Strength
g) Transmitted Audio Level
h) Gain Level
PowerIR Window
Wireless Microphone & Bodypack Operation
Power
ON/OFF
IR Window
Power
ON/OFF
1. Open the battery cover. Insert new or fully-charged AA batteries prior to
each use, and always have spares on hand.
2. Power on the transmitter device.
3. Hold the transmitter device up close to one receiver in the rack, ensuring the
infrared (IR) windows are aligned.
Network Receivers
1. Ensure all transmitters are powered off. Turn on all receivers and
wait one minute to allow time to connect to the network.
2. Press menu on one receiver until group number ashes.
3. Use the arrow buttons to select a group to scan.
4. Press enter, wait for channel, and then press enter again
5. Press menu until “network scan” displays on the LCD.
6. Press enter twice to deploy channels to other receivers.
Note: Perform a scan on all of the wireless units just minutes before the
game! If a scan is performed too far ahead of time, frequencies set up by
the media later on may interfere with previously congured settings.
DD2753515 Rev 1
23 January 2015
201 Daktronics Drive PO Box 5128, Brookings, SD 57006-5128
Tel: 1-800-DAKTRONICS (1-800-325-8766) Fax: 605-697-4746
Web: www.daktronics.com/support
4. Press sync on the receiver; “good” will display if sync was successful.
5. Repeat steps 1-4 to pair another transmitter device with an additional
receiver (if present).
Note: Plug the referee mute switch into the jack on top of the bodypack unit
and plug headphones/lapel mic into the referee mute switch.
Verify Reception: With a transmitter and the receiver both turned on and
having matching GROUP and CHANNEL numbers, the RF meter on the receiver
should be indicating signal. Speak into the microphone and the audio meter
should indicate signal presence.
 Loading...