

Page 1
Sportsound Announcer’s Console Quick Start Guide
This guide will assist with starting up and operating a Sportsound® Announcer’s console. For detailed console operation, conguration, and troubleshooting,
refer to the Sportsound Announcer’s Console Operation Manual (DD1798480).
Startup
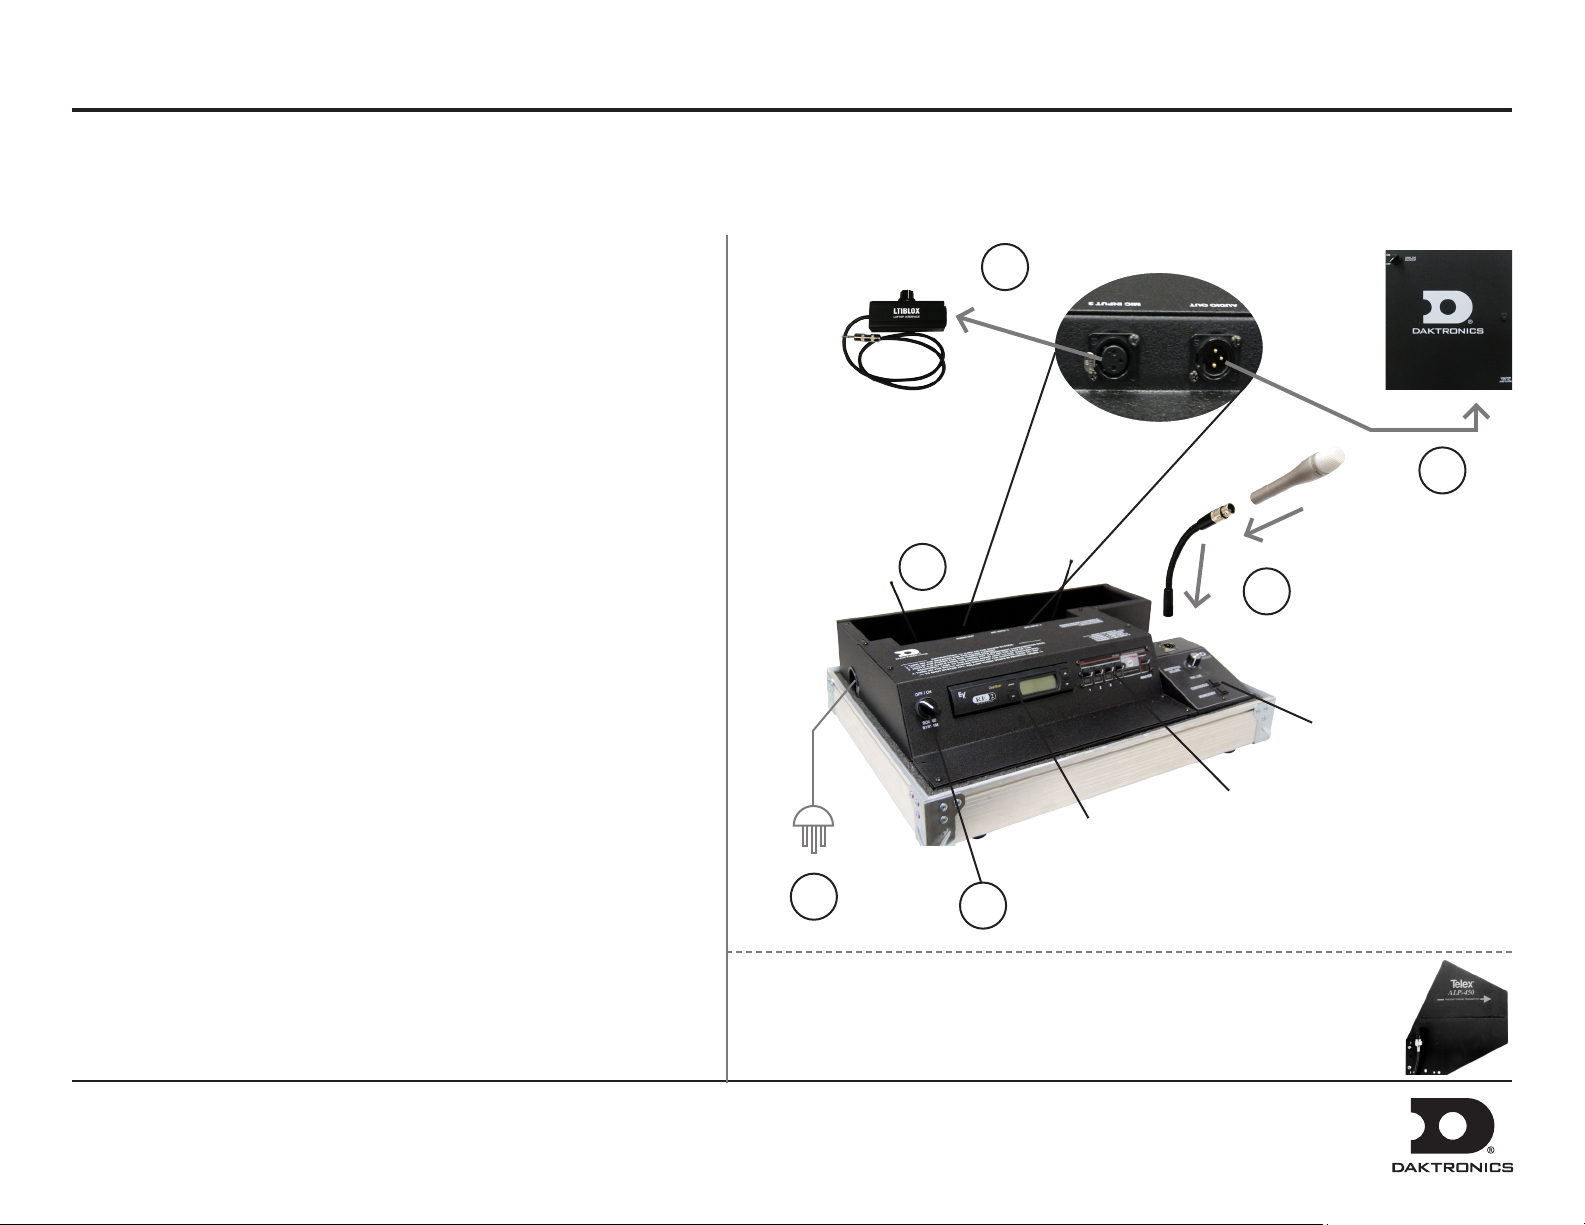
Before Beginning: Place the console on a at, sturdy surface and open
the cover. The cover may be completely removed and set aside if desired.
1. Connect one end of the XLR gooseneck to the wired microphone and
the other end into the jack on top of the announcer’s interface. A head set microphone may be plugged here instead.
Note: The announcer’s interface may be taken out of the case and
placed up to 3' (1 m) away.
2. Connect the 25' (7.6 m) XLR cable between the AUDIO OUT jack on
back of the console and the SYSTEM AUDIO jack on the bottom of
the ber box. If there is no ber box, the cable will typically connect to
a junction box instead.
3. Connect one end of the 5' (1.5 m) XLR cable to the LTIBLOX Laptop
Interface and the other end to MIC INPUT 3. The 3.5 mm plug may
be connected to the headphone jack of a laptop or MP3 player.
4. Locate the 3-prong power cord and plug into a standard outlet.
Ensure the MIC LIVE LED on the announcer’s console is not active
and all gain knobs on the mixer are turned down at this time.
5. Turn the SOUND SYSTEM switch to ON.
Power Down
Follow the above steps in reverse order to power down the system.
Place all accessories in the storage compartment in the rear of the case
and ensure nothing is pinched or squished when the lid is closed.
Laptop
Interface
3
!
1
Announcer’s
Interface
Pro Audio
Optional
Mixer
Wireless
4
! ) If using the optional wireless microphone receiver, make sure the two
antennae on the back are each angled outward at ~45◦. Alternately, the
coaxial cable from the high gain antenna kit may be connected here instead.
Refer to the Antenna Instruction Manual for more information.
5
Receiver
Fiber Box
2
DD2222114 Rev 0
16 February 2012
201 Daktronics Drive PO Box 5128, Brookings, SD 57006-5128
Tel: 1-800-DAKTRONICS (1-800-325-8766) Fax: 605-697-4700
Web: www.daktronics.com
Page 2
Sportsound Announcer’s Console Quick Start Guide
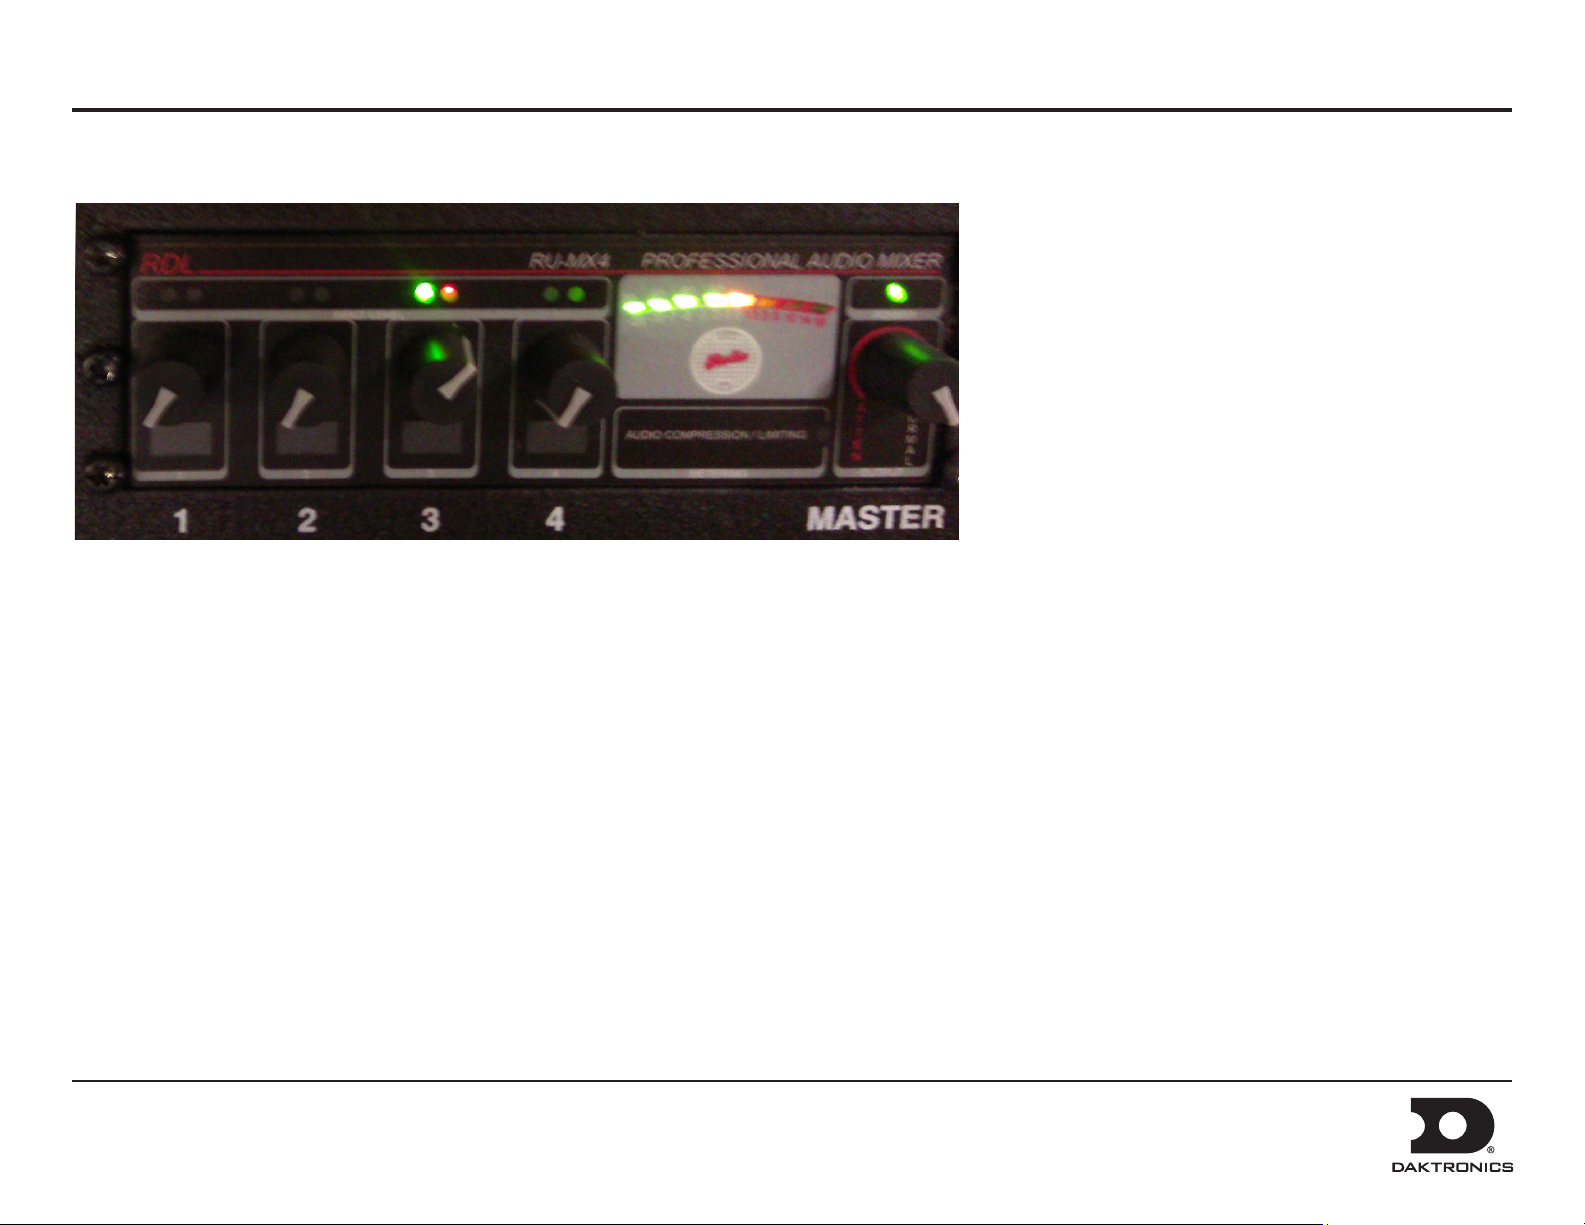
Pro Audio Mixer Operation
• With an input source playing or while speaking into the microphone, adjust the gain knob for the input (1-4) for brightest green LED with minimal ashing
of the red LED.
• Set the MASTER knob to NORMAL unless output needs to be turned down.
• Ensure the peak signal indicator LEDs are green and into orange. Red LEDs indicate that the signal leaving the mixer is clipped or clipping is imminent.
REMEMBER: Bad input = bad output. No adjustment on the mixer can make a poor source sound better. For best results, be sure to use high-quality audio
les from your MP3 player or laptop, and set the device to near full volume.
DD2222114 Rev 0
16 February 2012
201 Daktronics Drive PO Box 5128, Brookings, SD 57006-5128
Tel: 1-800-DAKTRONICS (1-800-325-8766) Fax: 605-697-4700
Web: www.daktronics.com
Page 3

Sportsound Announcer’s Console Quick Start Guide
For more information about the optional wireless receiver system operation and troubleshooting, refer to the wireless Microphone System User Guide.
Wireless Receiver Operation
a b
c d
1. Press POwER to turn on the receiver. The display can show the
following information:
a) Group Number
b) Channel Number
c) Frequency
d) Transmitter Battery Status
e) Antenna Diversity Status
f) Audio Meter
g) RF Signal Strength
2. Perform a ClearScan: This function nds the clearest group and
channel with the press of a button. With nothing ashing, press
and hold SET until “CLEAR SCAN” appears on the right side of
the screen. When the scan is complete, the receiver will be set to
the clearest channel in the clearest group.
e f
g
Wireless Microphone or Bodypack Operation
Power
ON/OFF
Control
Buttons
1. Open the battery cover to expose the control buttons. Insert new or fully charged batteries prior to each use, and always have spares on hand.
2. Power on the unit.
3. Press SET and use the UP/DOwN buttons to modify the Group (GP)
number to match the receiver.
4. Press SET again and modify the Channel (CH) number match the receiver.
5. Press SET a third time to save the settings.
Note: Plug the antenna and mic into the jacks on top of the bodypack unit.
Verify Reception: With a transmitter and the receiver both turned on and
having matching Group and Channel numbers, the main receiver display
should be indicating an RF signal. Speak into the microphone and the Audio
Meter should indicate signal presence.
DD2222114 Rev 0
16 February 2012
201 Daktronics Drive PO Box 5128, Brookings, SD 57006-5128
Tel: 1-800-DAKTRONICS (1-800-325-8766) Fax: 605-697-4700
Web: www.daktronics.com
Page 4

Sportsound Announcer’s Interface Quick Start Guide
1
2
3
4
5
1. XLR input jack - connect gooseneck or headset microphone
2. HEADPHONE VOLUME – Turn this knob clockwise to increase and
counter-clockwise to decrease headphone volume.
3. MIC LIVE – This LED indicator lights up when the microphone is live.
4. CONTINUOUS – Press this button once to activate the microphone
and turn on the MIC LIVE indicator. Press this button again to
deactivate the microphone and turn off the MIC LIVE indicator.
5. MOMENTARY – Hold down this button to activate the microphone.
Release this button to deactivate the microphone. The MIC LIVE
indicator will remain on as long as the button is pressed.
6
7
9
6. HEADPHONES – ¼" jack for headphones
7. MIC 1 – XLR output jack to audio mixer
8. AUX 1 – XLR input jack from audio mixer
9. POWER INPUT – plug in provided 24 VDC wallpack transformer
10. MIC ONLY/MIXED AUDIO – Located on the bottom
of the console, this switch determines whether the
announcer can hear only their microphone or all audio
sources through the headphones.
Leave this set to MIC ONLY unless there is a source
plugged into the AUX 1 jack.
10
8
DD2222104 Rev 0
16 February 2012
201 Daktronics Drive PO Box 5128, Brookings, SD 57006-5128
Tel: 1-800-DAKTRONICS (1-800-325-8766) Fax: 605-697-4700
Web: www.daktronics.com
 Loading...