

Page 1

DD2003514 – D13Q3-December 10, 2012
www.daktronics.com email: helpdesk@daktronics.com
DAKTRONICS SHOW CONTROL SYSTEM
USER HANDBOOK
201 Daktronics Drive, PO Box 5128, Brookings, SD 57006
Tel: 800-325-8766 or 605-697-4000 Fax: 605-697-4700
Page 2

About this Handbook
The purpose of this handbook is to help facilitate a new Show Control System operator’s orientation and
training on the system. It is laid out in a way that would follow a typical Show Control training session.
This document assumes that the user has basic working knowledge of Microsoft Windows, including using
menus and navigating a directory. If you are unfamiliar with using Microsoft Windows, there are many
resources commercially available which can assist you in becoming acquainted with it.
Terms that describe typical personal computer operations will be used frequently. These terms, and their
definitions, are as follows:
Point: Move the mouse pointer to a specified place.
Click: Press and release the left button of your mouse. A click will position a text cursor, activate a
window, or select a choice.
Double-click: Press and release the left mouse button twice in rapid succession.
Right-click: Press and release the right button of your mouse.
Choose: Activate an item by clicking on it in order to tell the program what to do.
Select: Click to specify which files, windows, or text the software should act on.
The > character is sometimes used in place of then choose in descriptions of user interface paths.
For example, Settings > Account Preferences means Click Settings, then choose Account
Preferences.
Press: Press key(s) on your keyboard.
DAKTRONICS, INC.
Copyright 2012
All rights reserved. While every precaution has been taken in the preparation of this handbook, the publisher assumes no
responsibility for errors or omissions. No part of this document covered by the copyrights hereon may be reproduced or
copied in any form or by any means – graphic, electronic, or mechanical, including photocopying, taping, or information
storage and retrieval systems – without written permission of the publisher.
All trademarks are the property of their respective companies.
i Daktronics Show Control System About this Manual
Page 3

Table of Contents
About this Handbook ......................................................................................................................................... i
Getting to know your Show Control System ................................................................................................. 1
Your User Station .................................................................................................................................................................................. 1
Your Control Rack ................................................................................................................................................................................ 1
Digital Media Players .......................................................................................................................................................... 2
Video/Image Processors ................................................................................................................................................... 2
Navigating the Show Control software .......................................................................................................... 3
How do I open Display Studio? ...................................................................................................................................................... 3
Display Studio’s Interface .................................................................................................................................................................. 3
Opening Content Studio ................................................................................................................................................................... 5
Some Content Studio Terminology............................................................................................................................................... 6
Content Studio’s Interface ................................................................................................................................................................ 7
Interface Components ....................................................................................................................................................... 7
Content Studio Ribbon ...................................................................................................................................................... 8
Content Studio Plug-Ins .................................................................................................................................................... 9
Creating a presentation: Part 1 ......................................................................................................................11
Create a new presentation ............................................................................................................................................................. 11
Open an Existing Presentation ..................................................................................................................................................... 13
Adding and deleting layouts ........................................................................................................................................................ 14
Adding a layout ................................................................................................................................................................. 14
Inserting a layout .............................................................................................................................................................. 15
Deleting a layout ............................................................................................................................................................... 15
Adding images and video to a presentation .......................................................................................................................... 15
Image Import ...................................................................................................................................................................... 17
Video Import ....................................................................................................................................................................... 19
Adding text elements....................................................................................................................................................................... 22
Create a text box ............................................................................................................................................................... 22
Formatting text .................................................................................................................................................................. 23
Formatting paragraphs ................................................................................................................................................... 26
Add Scrolling Text ............................................................................................................................................................ 28
Adding Real-Time Data (RTD) fields .......................................................................................................................................... 30
Locating the correct RTD field ..................................................................................................................................... 31
Adding an RTD field to your presentation .............................................................................................................. 32
Changing the length of an RTD field ........................................................................................................................ 32
Adding Media RTD to your presentation ................................................................................................................ 33
Adding Color RTD to your presentation .................................................................................................................. 35
Creating a presentation: Part 2 ......................................................................................................................36
Adding element effects ................................................................................................................................................................... 36
ii Daktronics Show Control System Table of Contents
Page 4

Adding gradients ............................................................................................................................................................................... 36
Aligning elements ............................................................................................................................................................................. 38
Arranging elements .......................................................................................................................................................................... 40
Content Studio Timeline ................................................................................................................................................................. 40
Adjusting element and layout durations ................................................................................................................. 41
Additional Layout and Element Options ................................................................................................................. 41
Adjusting the Timeline View ......................................................................................................................................... 42
Layout Storyboard............................................................................................................................................................................. 43
Changing the order of layouts .................................................................................................................................... 43
Adding layout transitions .............................................................................................................................................. 43
Viewing your presentation............................................................................................................................................................. 45
Layout zoom control ....................................................................................................................................................... 45
Previewing your presentation ...................................................................................................................................... 46
Saving your presentation ...............................................................................................................................47
Media organization recommendations .................................................................................................................................... 47
DMP-7000 ............................................................................................................................................................................ 47
DMP-8000 ............................................................................................................................................................................ 48
DMP-1500 ............................................................................................................................................................................ 48
Mapping a network drive ............................................................................................................................................................... 49
Windows XP User Station .............................................................................................................................................. 49
Windows 7 User Station ................................................................................................................................................. 49
Saving your presentation ............................................................................................................................................................... 50
Media File Recommendations ........................................................................................................................51
Display Studio preliminary setup ..................................................................................................................52
Create a new workspace ................................................................................................................................................................. 52
Create workspace pages ................................................................................................................................................................. 53
Rename workspace pages ............................................................................................................................................................. 54
Updating your Show Control Server .......................................................................................................................................... 54
Configuring your Monitor Wall .................................................................................................................................................... 55
Introduction to Containers .............................................................................................................................58
Create a container ............................................................................................................................................................................. 58
Create container pages ................................................................................................................................................................... 59
Rename containers and container pages ................................................................................................................................ 60
Renaming containers....................................................................................................................................................... 60
Renaming container pages ........................................................................................................................................... 60
Setting button sizes .......................................................................................................................................................................... 61
Quick Display Containers and Buttons .........................................................................................................62
Create a quick display container ................................................................................................................................................. 62
Manage quick display container properties ........................................................................................................................... 63
iii Daktronics Show Control System Table of Contents
Page 5

Create quick display buttons ........................................................................................................................................................ 65
Automatic method: linking a container to a library ............................................................................................ 65
Manual method: creating quick display buttons individually ......................................................................... 66
Manage quick display buttons ..................................................................................................................................................... 72
Using the Display Queue ................................................................................................................................................................ 73
Scripting Containers and Buttons .................................................................................................................75
Create a scripting container .......................................................................................................................................................... 75
Manage scripting container properties .................................................................................................................................... 76
Create scripting buttons ................................................................................................................................................................. 77
Manage scripting buttons .............................................................................................................................................................. 84
Custom scripting ................................................................................................................................................................................ 84
Common scripting buttons ............................................................................................................................90
Control multiple displays................................................................................................................................................................ 90
Play a media file ................................................................................................................................................................................. 91
Queue a Playlist .................................................................................................................................................................................. 92
Blank one or more signs ................................................................................................................................................................. 93
Show video from an external source ......................................................................................................................................... 93
Initialize VIP Button .......................................................................................................................................................... 94
Key Video Button .............................................................................................................................................................. 95
Stats Request....................................................................................................................................................................................... 95
Include scripting from another button ..................................................................................................................................... 98
Set a Display’s Dimming Level ..................................................................................................................................................... 98
Audio containers and buttons .................................................................................................................... 100
Create an audio container ........................................................................................................................................................... 100
Manage audio container properties ........................................................................................................................................ 101
Create audio buttons ..................................................................................................................................................................... 102
Automatic method: linking a container to a library .......................................................................................... 102
Manual method: creating audio buttons individually ...................................................................................... 104
Manage audio buttons .................................................................................................................................................................. 108
Using the display queue ............................................................................................................................................................... 109
Display Studio Dashboard ........................................................................................................................... 110
Status Button ..................................................................................................................................................................................... 110
Display Studio Widgets ................................................................................................................................................................. 111
Open a Widget ................................................................................................................................................................ 111
Volume Control ............................................................................................................................................................... 111
Dimming Control ............................................................................................................................................................ 112
M3 File Manager ............................................................................................................................................................. 113
Daktronics Scoring and Timing Interface (DSTI) Widget ................................................................................ 114
Display Studio Workspace Management .................................................................................................. 116
iv Daktronics Show Control System Table of Contents
Page 6

Saving and opening your workspaces .................................................................................................................................... 116
Saving your workspace ................................................................................................................................................. 116
Saving your workspace with a different name .................................................................................................... 116
Opening a workspace ................................................................................................................................................... 116
Working from multiple user stations ....................................................................................................................................... 117
Backing up and restoring your workspaces .......................................................................................................................... 117
Backup your workspaces ............................................................................................................................................. 117
Restore saved workspaces .......................................................................................................................................... 118
System Startup, Shutdown and Maintenance .......................................................................................... 121
Startup ................................................................................................................................................................................................. 121
Shutdown............................................................................................................................................................................................ 122
Routine Maintenance ..................................................................................................................................................................... 122
Antivirus/Antispyware ................................................................................................................................................... 123
V7ChkRif Utility ................................................................................................................................................................ 123
SyncBack ............................................................................................................................................................................. 124
Firewall Settings ............................................................................................................................................................................... 124
Uninterruptible Power Supplies (UPSs)................................................................................................................................... 124
Third-Party Software ...................................................................................................................................................................... 125
Software Licensing ........................................................................................................................................ 126
Verifying License Status ................................................................................................................................................................ 126
Requesting License Code ............................................................................................................................................................. 127
Calling Daktronics ........................................................................................................................................................... 127
Emailing Daktronics ....................................................................................................................................................... 127
Activating Software License ........................................................................................................................................................ 129
Troubleshooting ............................................................................................................................................ 132
Display Studio Status Errors ........................................................................................................................................................ 132
Data Store .......................................................................................................................................................................... 132
Show Control Server ...................................................................................................................................................... 132
ERTD errors........................................................................................................................................................................ 133
File Server ........................................................................................................................................................................... 133
Venus 7000 (DMP-7000) .............................................................................................................................................. 134
DMP-8000 .......................................................................................................................................................................... 134
M3 (DMP-1500) ............................................................................................................................................................... 135
Sync Server ........................................................................................................................................................................ 135
Video Processor ............................................................................................................................................................... 136
Software Licensing ......................................................................................................................................................... 136
Troubleshooting Scenario: Video/Image Processor Error ............................................................................................... 136
Troubleshooting Scenario: Single button click adds multiple files to display queue .......................................... 137
Troubleshooting Scenario: Dynamic Content “jitters” or “jumps around” when playing ................................... 138
Contact Daktronics ....................................................................................................................................... 139
Mail ....................................................................................................................................................................................................... 139
v Daktronics Show Control System Table of Contents
Page 7

Phone ................................................................................................................................................................................................... 139
Internet ................................................................................................................................................................................................ 139
vi Daktronics Show Control System Table of Contents
Page 8

Getting to know your Show Control System
Congratulations on your purchase of the latest and greatest in interactive display control system
technology! We are confident that you will find your new Show Control System to be powerful yet userfriendly, innovative yet intuitive, and most of all, exactly what you’ve been waiting for.
Before we get started, you should get familiar with a few different components of your system. It will be
helpful to understand these “pieces of the puzzle” and the role they play, and also because we will be
referring to them throughout your system documentation.
Section Contents
Your User Station
Your Control Rack
Digital Media Players
Video/Image Processors
Your User Station
At the forefront of your system is your Show Control user station – the computer from which you will
operate your Show Control software to create, plan, prepare and execute your digital shows. Your user
station likely includes one or two touchscreen monitors. You will use this computer to run Daktronics
Content Studio, Display Studio, and the rest of your Show Control user experience.
Your Control Rack
1 Daktronics Show Control System Getting to know SCS
Page 9

Identifies features which are available for systems containing a DMP-7000 display
Identifies features which are available for systems containing a DMP-8000 display
Identifies features which are available for systems containing a DMP-1500 display
Note: Sections which have no icon(s) preceding it are available for all Show Control Systems.
Your control rack holds the “brains” of your digital sign system. Here is where you can find your digital
media player(s), video/image processor(s), scoring/timing machines, and other components involved in
connecting all the pieces of your system together.
Digital Media Players
A digital media player (sometimes referred to simply as a “player”) is a device used to store and deliver
content files to a display. In other words, think of your digital media players like how you think of a DVD
player. If you want your television to play a DVD, without a DVD player your TV simply does not know
what the disc is or what to do with it. With a DVD player, however, your TV now knows what the disc is,
how to retrieve the content from that disc, and the proper way to display that content.
Like many pieces of your Show Control System, different digital media players have different features and
capabilities. In various sections of this handbook, features and functionality are discussed which are only
available for systems with certain types of players. These sections are identified by the below icons:
Video/Image Processors
A video/image processor is a device used to accept and process live video and/or computer graphics
feeds before sending them to a display. This allows your display to communicate with video production
equipment such as video switchers, character generators, and/or cameras, and other devices which output
video feeds to display high quality video content clearly, smoothly and vibrantly.
2 Daktronics Show Control System Getting to know SCS
Page 10

Navigating the Show Control software
Now that you have a good idea of what is in your system, we can get into how to use it. In this section,
we’ll help you acquaint yourself with Display Studio and Content Studio and how to get around within
them.
Section Contents
How do I open Display Studio?
Display Studio’s Interface
Opening Content Studio
Some Content Studio Terminology
Content Studio’s Interface
How do I open Display Studio?
A better first question may be “What is Display Studio?” Display Studio is the “face” of your new display
control system – the primary user interface you will interact with to run your digital signs. From Display
Studio you will be able to trigger content, send commands, monitor many aspects of your system’s health,
and monitor what is playing on your displays.
Display Studio can be launched by either of two available navigation paths:
A) Double-click its icon on your Windows desktop, or
A) Open the Start Menu and in the Search box type Display Studio, then press [Enter].
Display Studio’s Interface
Display Studio contains many parts that can help you execute an amazing digital presentation, but these
are the most important ones:
3 Daktronics Show Control System Navigating SCS
Page 11

Display Studio
Workspace
Workspace Page
Container
Container Page
Button
Workspace: The Workspace is where everything happens in Display Studio. This is where your Monitor
Wall is docked and where your containers and buttons are arranged.
As you become acquainted with Display Studio’s other components, keep in mind that Display Studio was
designed for versatility and flexibility. The user gets complete control over how they create and organize
their control interface, so that they can execute their shows in the most efficient manner possible. The
illustration below represents Display Studio’s organizational framework: Display Studio can contain one
or more Workspaces, each of which can contain one or more Workspace Pages, each of which can
contain one or more Containers, each of which can contain one or more Container Pages, each of which
can contain one or more Buttons (and Buttons can contain one or more media files or script commands,
by the way).
4 Daktronics Show Control System Navigating SCS
Page 12

Monitor Wall: The Monitor Wall holds your signs’ display monitors, each of which provides a
regularly updating snapshot of what is appearing on that sign.
Containers and Buttons: There are two flavors of containers and buttons – Scripting containers and
buttons and Quick Display containers and buttons. Buttons are what you will use to operate your
control system – clicking a button is what sends a command to your display, your player, or your
video/image processor. And containers are what you can use to store and organize your buttons.
Quick Display Container and Buttons: Quick Display buttons are used to simply play one or more media
files on a display. Each quick display button is linked to one or more files and when clicked, will play the
file(s) on the sign. Think of it as quick and easy access to your entire media library.
Scripting Container and Buttons: Scripting buttons are used to send script commands.
These commands can provide instructions to your display (Display Control commands), to
your player (Player Control commands), to your video/image processor (Video Processor
commands), or to other parts of your system (System Control commands).
Dashboard: As the name implies, your Display Studio dashboard is a lot like the dashboard in your
vehicle. This is where Display Studio’s status indicators and widgets are kept. The status button is a helpful
tool for letting you know whether all systems are go, or if there might be something wrong. Display
Studio’s widgets are also handy tools and utilities that help expand Display Studio’s functionality to bring
all of your control needs to within a single environment.
Display Studio Hub: The final piece of this puzzle is the Display Studio Hub. This provides access to
Display Studio’s main menu, from which a variety of important operation functions are accessed. The
button can be found in the upper left corner of the window – simply click it to open the menu.
Opening Content Studio
Sorry, are we getting ahead of ourselves again? Just in case you’re asking “What is Content Studio”, we’ll
introduce you now. Content Studio is Show Control’s powerful digital content creation and editing
application – the perfect complement to Display Studio’s powerful control interface. In Content Studio,
you will be creating and editing engaging, content-rich digital presentations in no time!
5 Daktronics Show Control System Navigating SCS
Page 13

Tip: When switching between Display Studio and Content Studio (after you have
Content Studio open already), we don’t recommend pressing the Launch Content
Studio Button each time, as this will open a new instance of Content Studio each time.
Instead, simply press the Windows button on your keyboard to reveal the
Windows taskbar, and select your already-open Content Studio window from there! It
will be faster, and require less system resources!
Content Studio can only be opened from within Display Studio by clicking the Launch Content Studio
Button.
Some Content Studio Terminology
We will be using a lot of terminology when discussing Content Studio, so perhaps it would be a good idea
to introduce you to a few of those terms:
1. Workspace: Yes, we did discuss workspaces already when we were talking about Display Studio, but
Content Studio has workspaces too, and yes, they are different. A workspace in Content Studio refers
to the collection of tools and options that you have set up for creating presentations for a particular
player type. If you have a DMP-7000 display and a DMP-8000 display, for example, you’ll find that
those respective player types have different options available for them in Content Studio. Therefore,
the tools and options which are available for creating DMP-7000 presentations make up the DMP7000 workspace; the tools and options which are available for creating DMP-8000 presentations make
up the DMP-8000 workspace; and the tools and options which are available for creating DMP-1500
presentations make up the DMP-1500 workspace.
2. Presentation: Presentations are what you create in Content Studio – a collection of layouts and
(perhaps) pages which can contain images, text, RTD fields, animations, colors, and videos and which
are played in a particular sequence. If comparing to a typed document, a presentation is similar to the
entire document.
3. Layout: A layout is a single “slide”, and one or more layouts can make up a presentation. Layouts are
where you can arrange a set of elements that you want to appear on your display during the same
block of time. If continuing with the typed document comparison, a layout is similar to an individual
page or section of that document.
4. Element: An element is an individual component which can be placed within a layout. Elements
include textboxes, images, animations, videos, RTD fields, and paging elements.
5. Paging Element (DMP-8000 and DMP-1500 only): A paging element is a “layout within a layout”.
It allows you to place multiple “slides” of elements within a single layout.
6. RTD Field: A placeholder which is inserted into a presentation which contains the placement and
formatting instructions for the inclusion of a specific type of dynamic data into that presentation
when it is played on a display.
6 Daktronics Show Control System Navigating SCS
Page 14

Content Studio’s Interface
Content Studio is where you’ll find all of the tools you need to create digital content that will inform,
entertain and amaze.
Interface Components
These are the most important parts of the Content Studio interface (so they’re the main ones you should
be aware of):
Ribbon: A menu pane which contains many of the tools you will use to create content in Content Studio.
Refer to Content Studio Ribbon for more information.
Library Pane: The portion of Content Studio which contains the Dynamic Data Library, which provides
access to all of your RTD and other dynamic data fields, and the Media Library, which provides access to
your image and video collections.
Work Area: The “canvas” that provides a representation of your display which you use to assemble your
presentation.
7 Daktronics Show Control System Navigating SCS
Page 15

Content Studio Home tab
Insert tab
Timeline & Storyboard Pane: The portion of Content Studio which contains your Timeline Editor, which
allows you to control the sequencing and duration of all of the elements of your presentation, and your
Storyboards, which allow you to control the sequencing and transitioning between layouts and paging
elements.
Content Studio Ribbon
If you’re familiar with Microsoft Office 2007 or later, you already know how to use the Ribbon. The Ribbon
gives you easy access to an enormous quantity of tools, options, and features without the need to waste
time sifting through menus or clutter up your workspace with toolbars all over the place. Content Studio’s
Ribbon consists of five tabs: Home, Insert, Format, Effects, and View.
NOTE: The tools that are available in the Ribbon depend on the type of display you are creating content
for. For the sake of completeness, the below graphics will show all Content Studio features. The tools
available on your Ribbon may vary.
The Home tab contains many of the most commonly used features in Content Studio, including:
Clipboard: Tools for cutting, copying, and pasting items in your presentations
Layout: Buttons which allow you to Add, Insert, and Delete presentation layouts
Fonts: Options for customizing your presentations’ font elements
Paragraph: Options for customizing the paragraph formatting of your presentations’ font elements
Quick Insert: Quick and easy access to inserting a new image, video, or text box
Color: A selection of preset color schemes that you can apply to a layout or element
Review: Button which provides access to Content Studio’s Spell Check tool
The Insert tab contains tools which are used to insert various types of elements into a presentation,
including:
Drawing: A set of drawing tools which can be used to modify images that have been inserted into a
presentation
Media: Tools for inserting images, videos, and paging elements into presentations
Text: Tools for inserting text elements into presentations
Data: Tools for inserting data fields, such as the current time, temperature, or date into presentations
8 Daktronics Show Control System Navigating SCS
Page 16

Format tab
Effects tab
View tab
The Insert tab holds a set of tools which can be used to make adjustments to how presentation elements
look and are arranged, such as:
Fills: Options for adding color to a background or other transparent areas of a presentation
Borders: Options for adding borders to an element or other portion of a presentation
Arrange: Tools which provide help with aligning and arranging elements within a presentation
The Effects tab allows you to apply a transition effect, such as Fade In, to an element in a presentation.
The View tab helps you customize your Content Studio work area to make it as easy as possible to work
with your content. Features include:
Zoom: Zoom controls for adjusting the level of detail you will be able to see in working with your
presentation
Show/Hide: Preferences for showing or hiding tools which can prove helpful in creating your
presentations, including gridlines, field indicators, and being able to select all elements
Preview: Preview controls for being able to view what your presentation, or portions of it, will look
like when it is played
Content Studio Plug-Ins
Content Studio plug-ins are features of the Content Studio interface that provide specialized functionality
for a particular purpose, and can be either enabled or disabled to suit your preferences. The following
plug-ins are available:
Dynamic Data Library: provides access to real-time data which can be imported into a
presentation
9 Daktronics Show Control System Navigating SCS
Page 17

Presentation File Size plug-in: tool which provides an up-to-date calculation of the storage
space that the presentation is going to consume
Media Library: provides quick access to media files which can be imported into a presentation
Timeline: visual representation of the durations and sequencing of items contained within a
presentation
Complete the following steps to enable or disable Content Studio plug-ins.
1. Click the Content Studio Button to open the Main Menu.
2. In the Main Menu, click the Content Studio Options button to reveal the Daktronics Content
Studio Options window.
3. From the left column, select the Plug-ins option set.
4. In the right pane of the window, select the tab of the digital media player workspace you wish to
configure.
5. Check the boxes of the plug-ins that you wish to enable in the workspace (or uncheck boxes of the
plug-ins you wish to disable).
10 Daktronics Show Control System Navigating SCS
Page 18

Creating a presentation: Part 1
Now that you and Content Studio are properly introduced, it is time to begin making some presentations.
By the time you complete this section, you should be comfortable with the basics of creating a
presentation – adding layouts and creating elements. We’ll cover how to manipulate and add effects to
the elements in part two.
Section Contents
Create a new presentation
Adding and deleting layouts
Adding images and video to a presentation
Adding text elements
Adding Real-Time Data (RTD) fields
Create a new presentation
The first step of creating content in Content Studio is starting a new presentation. Keep in mind that each
player type has its own workspace with its own tools and options available. Creating a new presentation
loads up the workspace for the type of content you are creating, and gives you the blank canvas with
which to make your masterpiece.
1. From within Content Studio, create a new presentation by either: (a) clicking the Content Studio
Button and selecting New; (b) clicking the New button; or (c) by pressing [CTRL+N] on your
keyboard. Any of these actions will open the New Presentation Wizard.
2. The first question that the New Presentation Wizard will have for you is How do you want to
create a presentation? Select to create a presentation for a particular Display or for a Display Type.
To help you with the decision, consider the following:
If you want to create content that you intend to only play on one specific display, select Display.
If you have multiple displays that use the same type of digital media player and have the same
dimensions, and you want to create content that will be able to be played on any of those
displays, select Display Type.
11 Daktronics Show Control System Presentations 101
Page 19

3. Next, the New Presentation Wizard will ask you to pick the display or display type that you wish to
create a presentation for. Click the desired display or display type, and click Next to continue.
4. After selecting the display or display
type you wish to create a presentation
for, Content Studio will load the
appropriate player’s workspace and
create a blank layout for you to get
started with.
12 Daktronics Show Control System Presentations 101
Page 20

Open an Existing Presentation
1. Click the Content Studio button, and click Open (CTRL + O). Or click the Open icon in the Content
Studio Toolbar.
2. From the Content Studio pop-up select the player’s Content Studio workspace from the drop down
menu. Click OK.
3. From the Open Presentation pop-up select a display to open a presentation from and click OK.
4. Use the file browser window to locate the desired presentation.
a. Go to last folder visited : While navigating through the folder structure, click the button
to return to the last folder visited.
b. Up one Level : While navigating through the folder structure, click the button move the
search up a level.
c. Delete : Click the button to delete the selected file or folder.
d. Create new folder : Click the button to create a new folder within the current folder.
13 Daktronics Show Control System Presentations 101
Page 21

5. After selecting the desired presentation, click Open.
Adding and deleting layouts
The first of the many groups of buttons available on the Content Studio ribbon that we will explore is the
Layout group, available on the Home tab of the Ribbon. This part of the ribbon allows you to Add, Insert,
and Delete layouts – important tools for creating any presentation.
Adding a layout
To add a layout to your presentation, on the Home tab of the Content Studio ribbon, in the Layout
group, click . A new blank layout will be added to the end of your presentation.
14 Daktronics Show Control System Presentations 101
Page 22

Note: In this example, “Second Layout” is selected prior to clicking Insert.
In this example, if “Layout – [2]” is deleted, “Layout – [3]” would be moved from playing from 6s – 8s to
playing from 3s – 5s.
Inserting a layout
Adding a layout simply adds the layout to the end of your presentation. Inserting a layout, on the other
hand, inserts the new blank layout into your presentation before the currently selected layout. To insert a
layout into your presentation, on the Home tab of the Content Studio ribbon, in the Layout group, click
.
Deleting a layout
If you’ve decided that you and your layouts just cannot settle your differences, you can delete it. Deleting
a layout will completely remove it from your layout, including any elements there were on it. To delete a
layout, make sure that the offending layout is selected, and click . Any layouts which are after
the deleted layout will be moved up in the presentation by an amount of time equal to the duration of the
deleted layout.
Adding images and video to a presentation
Any discussion of adding images or video to a Content Studio presentation must start with the Media
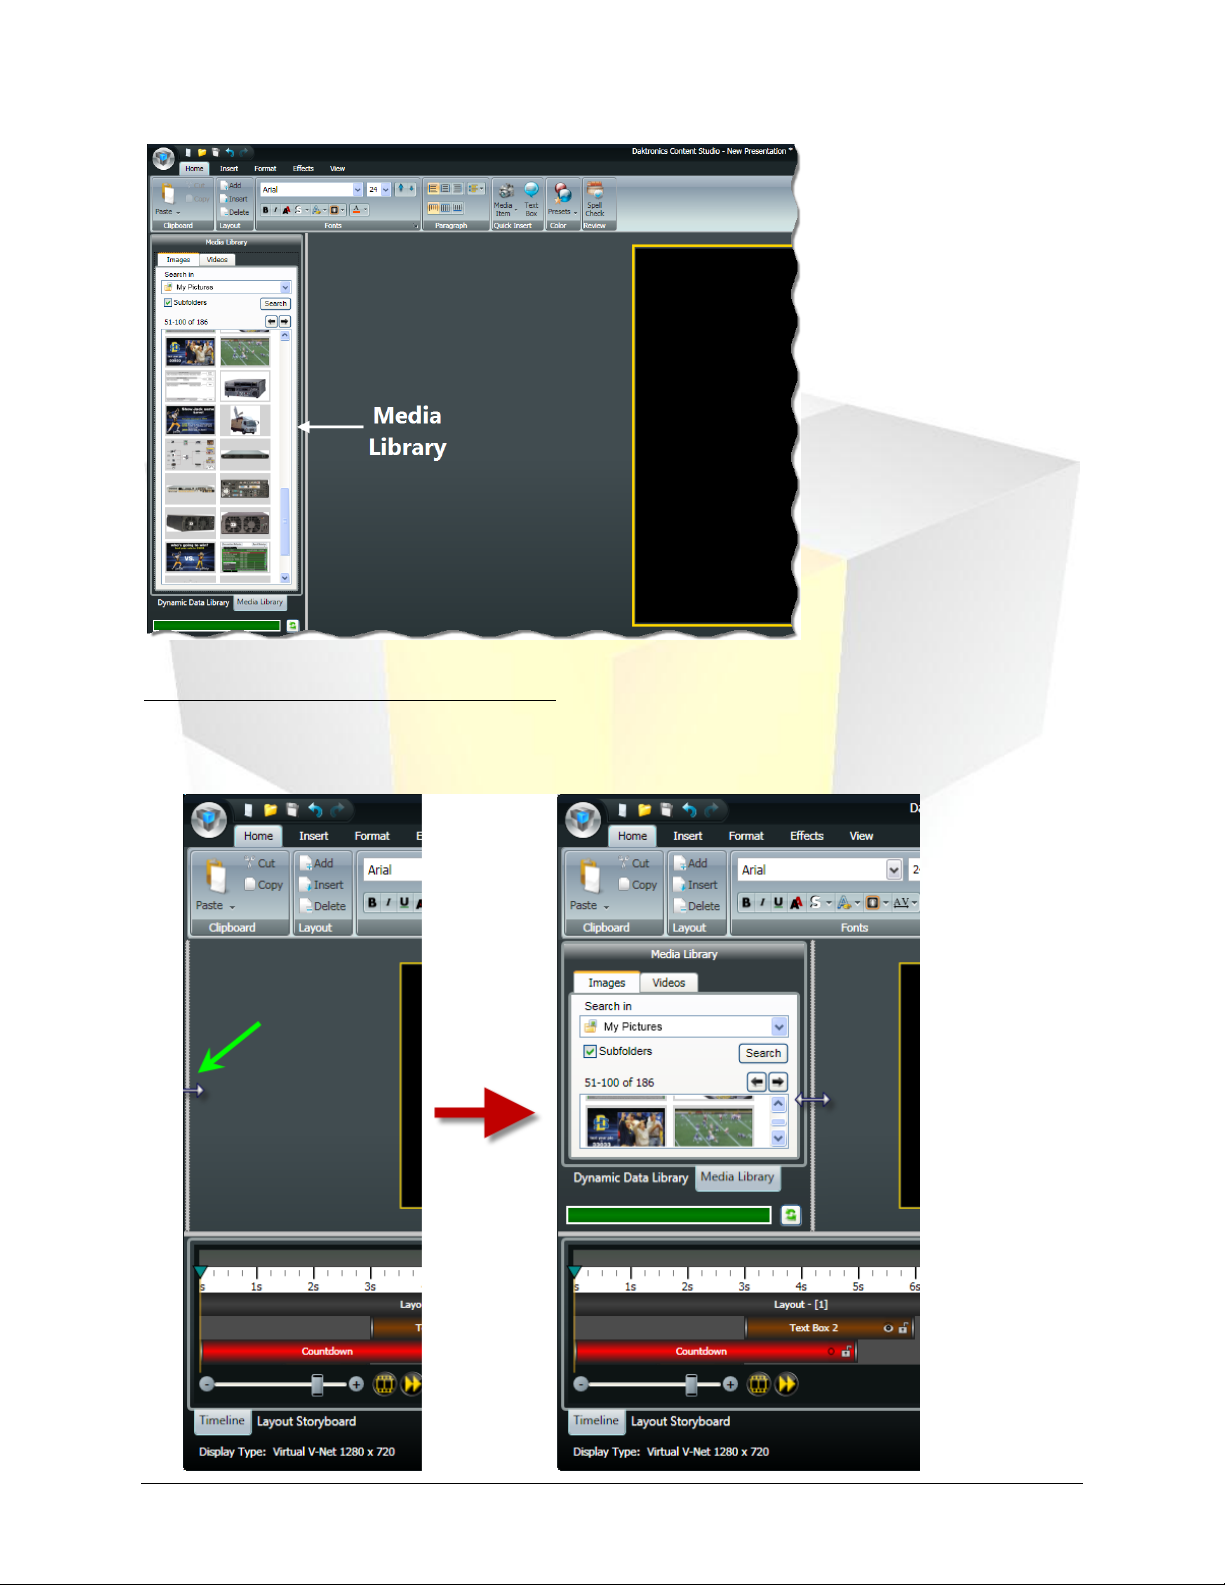
Library. The Media Library is your one-stop shop for these types of elements, allowing simple and efficient
drag-and-drop access to importing them into a layout. The media library is located on the left pane of
your Content Studio window.
15 Daktronics Show Control System Presentations 101
Page 23
Some tips for opening your Media Library…
If the Media Library pane is not visible, expand it by clicking and dragging it from the left border of
the Content Studio window.
16 Daktronics Show Control System Presentations 101
Page 24

If the pane is expanded, but Dynamic Data Library appears at the top instead of Media Library, click
the Media Library tab toward the bottom of the pane to open the Media Library.
And now how to use your Media Library…
1. Select the appropriate Media Library tab for the type of element you want to add to your layout –
Images or Videos.
2. Confirm that the Media Library is looking for your desired media item in the correct location by
ensuring that that location appears in the Search in box.
3. Locate the image or video that you wish to add to your presentation. Click the and buttons
to browse through different pages of items.
4. Click and drag the desired image or video onto your layout. The Image Import or Video Import
window will appear.
Image Import
a. If you are importing a picture from a video file, use the Video Timeline slider bar to locate the
frame you wish to use as an image in your presentation by clicking and dragging the slider until
the desired image appears in the preview window.
b. Next, use the image import tools to select the area of the picture that you want to import. The
adjustable box that surrounds the picture (the Selector Box) represents the area that will be
imported into your presentation. The following steps describe how to use each of the image
import tools, identified in the below graphic.
17 Daktronics Show Control System Presentations 101
Page 25

Dock left: Aligns the picture with the left side of the selector box
Dock top: Aligns the picture with the top of the selector box
Center: Centers the picture within the selector box
i. Resizing Handles: Use the blue resizing handles located around the selector box to adjust
the box’s size
ii. Click and drag the picture to adjust its position within the selector box.
iii. Import Properties: Provide the current location and dimensions of the selector box
iv. Import Mode: Located on the Options tab, the picture’s Import Mode determines how,
and whether, the picture will be able to be resized after it is imported into your presentation
Best fit import mode allows you to resize the picture and keep the aspect ratio. Best fit
is the default import mode. A black area adds to the side of the video to keep the aspect
ratio correct
Stretch import mode allows you to resize the picture, but it does not keep the aspect
ratio. The picture stretches across the resizing square. Pictures imported in Stretch
import mode are often distorted
Normal import mode imports the picture exactly. You are not able to enlarge the
picture, but you can crop the picture to allow only certain parts of the picture to display.
The picture anchors to the left side of the resizing square. You cannot transform the
picture itself; only the resizing square that contains the picture
v. Crop Tools: Use the crop tools to align the picture within the selector box
18 Daktronics Show Control System Presentations 101
Page 26

Dock bottom: Aligns the picture with the bottom of the selector box
Dock right: Aligns the picture with the right side of the selector box
Select All: Sizes the selector box to surround the entire image
Display dimensions: Sizes the selector box to match the current display’s
dimensions
vi. Zoom Tool: Use the Zoom drop-down menu to adjust the zoom level of the picture, which
increases or decreases its size
vii. Image Properties: The full dimensions of the image
viii. Color Correction: Located on the Options tab, the Color Correction tools allow you to
adjust the picture’s color
Checking the Grayscale box will convert the image from color to grayscale.
Use the Contrast slider to change the contrast of the image. Contrast options range
from -50 to 50. -50 makes the image the same color as the background; 50 makes the
image much lighter and brighter. 0 is the default setting for contrast.
Use the Brightness slider to change the brightness of the picture. Brightness options
range from -50 to 50. -50 makes the picture darker, 50 makes the picture brighter. 0 is
the default setting for brightness.
Press the Defaults button to restore the picture to the default settings for brightness,
contrast, and color settings.
c. After the picture looks the way you want it, click Import. The picture will appear on your layout.
Video Import
a. In the Video Import window, use the video import tools to select the how you wish to import the
video into your presentation. The adjustable box that surrounds the video (the Selector Box)
represents the area that will be imported into your presentation. The following steps describe
how to use each of the video import tools, identified in the below graphic.
19 Daktronics Show Control System Presentations 101
Page 27

i. Resizing Handles: Use the blue resizing handles located around the selector box to adjust
the box’s size
ii. Click and drag the video preview to adjust its position within the selector box.
iii. Import Properties: Provide the current location and dimensions of the selector box
iv. Import Mode: Located on the Options tab, the video’s Import Mode determines how, and
whether, the video will be able to be resized after it is imported into your presentation.
Best fit import mode allows you to resize the video and keep the aspect ratio. Best fit is
the default import mode. A black area adds to the side of the video to keep the aspect
ratio correct.
Stretch import mode allows you to resize the video, but it does not keep the aspect ratio.
The video stretches across the resizing square. Videos imported in Stretch import mode
are often distorted.
Normal import mode imports the video and does not manipulate size. You are not able
to enlarge the video, but you can crop the video to allow only certain parts of the video
to display. The video anchors to the left side of the resizing square. You cannot transform
the video itself; only the resizing square that contains the video.
20 Daktronics Show Control System Presentations 101
Page 28

Dock left: Aligns the video with the left side of the selector box
Dock top: Aligns the video with the top of the selector box
Center: Centers the video within the selector box
Dock bottom: Aligns the video with the bottom of the selector box
Dock right: Aligns the video with the right side of the selector box
Select All: Sizes the selector box to surround the entire video
Display dimensions: Sizes the selector box to match the current display’s
dimensions
v. If you wish to import only a portion of the video, set the duration of the clip by using the
Video Timeline slider bar. Click and drag the left slider to the desired starting point of the
clip. Click and drag the right slider to the desired ending point of the clip.
vi. Zoom tools: Use the Zoom Tools to adjust the zoom level of the video, which increases or
decreases its size
vii. Crop Tools: Use the crop tools to align the picture within the selector box
viii. Use the Preview Buttons to view a preview of the video clip. Press to play the clip using
the start and end points selected on the Source video slider bar. While the clip is playing,
press to pause the clip and press to stop the clip.
ix. Video Properties: Provides the full dimensions, length, and other information about the
video
x. Final Frame Rate: If the frame rate of the video is able to be modified, use the Final Frame
Rate drop-down menu to select the frame rate of the clip.
xi. Color Correction: Located on the Options tab, the Color Correction tools allow you to
adjust the picture’s color.
Checking the Grayscale box will convert the video from color to grayscale.
Use the Contrast slider to change the contrast of the video. Contrast options range from
-50 to 50. -50 makes the video the same color as the background; 50 makes the video
much lighter and brighter. 0 is the default setting for contrast.
Use the Brightness slider to change the brightness of the video. Brightness options range
from -50 to 50. -50 makes the video darker, 50 makes the video brighter. 0 is the default
setting for brightness.
Press the Defaults button to restore the video to the default settings for brightness,
contrast, and color settings.
b. After the video looks the way you want it, click Import. The video will be inserted onto your
layout.
21 Daktronics Show Control System Presentations 101
Page 29

Adding text elements
In this section we’ll go over how to add text to your Content Studio presentations, and how to perform
some of the most common management functions of text that you will use.
Create a text box
The most frequently used way to add text to presentations in Content Studio is by using textboxes.
Textboxes allow you to create text which you can then edit, move, resize, and arrange as much as you like.
1. On the Insert tab, in the Text group, click Text Box. A square cursor will appear.
2. Click on a location within the layout where you would like the text to be. A yellow box with a blinking
cursor will appear.
3. Type your message.
To resize or move the text box:
4. After entering the message, click outside of the text box, and then click back inside it. A green box
with resizing handles will appear.
5. To resize, move your cursor over a green resizing handle and click and drag the box to the desired
size.
6. To move, click inside the green box and drag it to the desired location.
22 Daktronics Show Control System Presentations 101
Page 30

Notes:
If creating dynamic content in which it is important for the positioning and
spacing of characters to be static as it changes (such as game clock feeds),
using fixed-width fonts will ensure that the text does not “jump around”.
For example, compare the following fonts. In the first font, notice how every
character is the same width – even 1’s and 0’s. This is not the case in the 2nd
font.
Courier New (Fixed width) 09:11
Courier New (Fixed width) 10:00
1111
2222
Berlin Sans FB (Variable width) 09:11
Berlin Sans FB (Variable width) 10:00
1111
2222
Not all fonts are supported by each player type. For more information on
supported font types, refer to Media File Recommendations.
Venus Fonts are Daktronics-created fonts. You cannot change the size or
bold, italicize, or underline Venus fonts. TrueType Fonts are the most
flexible fonts. You can change the font size and bold, italicize, and underline
TrueType fonts.
Formatting text
There are a number of font appearance attributes which can be managed in Content Studio. These
characteristics may be used to directly customize the appearance of text characters so that your message
appears exactly how you want it.
1. Select the text you wish to modify.
Note: Selecting an entire text box will modify all text within the box.
2. Go to the Home tab, in the Fonts group, to change the following attributes:
Font Face: Click to open the Font Face drop-down menu. Select a listed font face to change the
selected text’s font face.
Font Size: Click to open the Font Size drop-down menu. Select the desired font size to resize the
selected text.
23 Daktronics Show Control System Presentations 101
Page 31

Note: Font appearance attributes may also be managed in the Font Properties
dialog box. To open the Font Properties dialog box, click the button.
Increase/Decrease Font Size: Click the appropriate arrow to increase or decrease the size
of the selected text one increment at a time.
Bold: Click to toggle boldface for the selected text.
Italics: Click to toggle italics for the selected text.
Underline (DMP-8000 & DMP-1500 Only): Click to toggle underlining for the selected
text.
Smooth Text: Click to toggle anti-aliasing to smooth the edges of the selected text.
Shadow Text: Click the to open the Shadow Text options box. Refer to Shadow Text.
Outline Text: Click the to open the Outline Text options box. Refer to Outline Text.
Flashing Text: Click the to open the Flashing Text options box. Refer to Flashing Text.
Character Spacing (DMP-8000 Only): Click the to open the Character Spacing options
box. Refer to Character Spacing.
Font Color: Click the to open the Font Color options box. Refer to Font Color.
Shadow Text
1. Select the text to which you want to add a shadow.
2. Click the arrow on the button to open the Shadow Text options
box.
3. Select the desired attributes of the text shadowing:
a. Shadow Depth: Select the desired depth (in pixels) of the shadow.
b. Shadow Direction: Select the direction in which you want the
shadow to extend.
c. Colors: Choose the desired color of the shadow.
i. Standard Colors: Select from the listed colors.
ii. More Colors…: Click to open up a palette from which to
specify the desired color.
iii. Select a Color: Click to use the color selector tool to choose an
existing color from the layout.
24 Daktronics Show Control System Presentations 101
Page 32

Outline Text
1. Select the text to which you want to add outlining.
2. Click the arrow on the button to open the Outline Text options
box.
3. Select the desired attributes of the text outlining:
a. Outline Depth: Select the desired depth (in pixels) of the outline.
b. Colors: Choose the desired color of the outline.
i. Standard Colors: Select from the listed colors.
ii. More Colors…: Click to open up a palette from which to
specify the desired color.
iii. Select a Color: Click to use the color selector tool to choose an
existing color from the layout.
Flashing Text
1. Select the text to which you want to add the flashing effect.
2. Click the arrow on the button to open the Flashing Text
options box.
3. Select the desired Flash Rate for the text.
Character Spacing
The Character Spacing menu allows you to specify the amount of space (in pixels) you want to appear
between characters of text.
1. Select the text for which you want to modify the character spacing.
2. Click the arrow on the button to open the Character Spacing options box.
3. Select the desired character spacing (in pixels) for the text.
25 Daktronics Show Control System Presentations 101
Page 33

Font Color
1. Select the text of which you want to change the color.
2. Click the arrow on the button to open the Font Color
options box.
3. Select the desired font color from the following options:
a. Standard Colors: Select from the listed colors.
b. Custom Colors: Select from the listed colors, or:
i. More Colors…: Click to open up a palette from which to
specify the desired color.
ii. Select a Color: Click to use the color selector tool to choose an existing color from the layout.
Formatting paragraphs
Content Studio also contains options to aid the user in making sure that paragraphs of text are aligned
correctly.
Horizontal Text Alignment
Horizontal text alignment involves managing how a paragraph of text is lined up in relation to the left and
right sides of a text box or layout.
1. Select the text you wish to modify the alignment of.
Note: Modifying alignment changes the alignment of the whole paragraph that text is a part of. If a
text box is chosen, it will modify the alignment for all of the text within the text box.
2. On the Home tab, in the Paragraph group, click the appropriate horizontal alignment button.
Left Align: Aligns the selected text to the left side of the layout or text box
Center Horizontally: Centers the selected text between the left and right sides of the layout or
text box
Right Align: Aligns the selected text to the right side of the layout or text box
3. After clicking the appropriate alignment button, the selected text will be aligned according to your
selection.
26 Daktronics Show Control System Presentations 101
Page 34

Vertical Text Alignment
Vertical text alignment involves managing how text is lined up in relation to the top and bottom of a text
box or layout.
1. Select the text you wish to modify the alignment of.
Note: Modifying vertical alignment changes the alignment of all of the text within the selected text
box or layout.
2. On the Home tab, in the Paragraph group, click the appropriate vertical alignment button.
Top Align: Aligns the selected text to the top of the layout or text box
Center Vertically: Centers the selected text between the top and bottom of the layout or text
box
Bottom Align: Aligns the selected text to the bottom of the layout or text box
3. After clicking the appropriate alignment button, the selected text will be aligned according to your
selection.
Line Spacing
The Line Spacing option allows the user to adjust the space (in pixels) which is left between the lines of
text in a selected text box or layout.
1. Select the text you wish to modify the line spacing of.
Note: Modifying line spacing changes the line spacing of all of the text within the selected text box or
layout.
2. On the Home tab, in the Paragraph group, click the on the button to open the Line
Spacing options box.
27 Daktronics Show Control System Presentations 101
Page 35

Tip: To get a better look at the preview of your scrolling text, use the Zoom Slider, located
in the bottom left corner of the window. Click the + and – buttons to increase or decrease
the zoom level.
3. Choose the desired line spacing (in pixels). The spacing between all lines of text in the selected text
box or layout will be aligned accordingly.
Add Scrolling Text
As you may have already guessed, scrolling text is text which scrolls across the display when it appears.
Content Studio provides a wide variety of options for customizing scrolling text, including changing the
font appearance, scrolling direction, and scrolling speed.
1. On the Insert tab, in the Text group, click Scrolling Text to open the Scrolling Text Import window.
2. In the text box, type the message. To include symbols and special characters in your message, use the
Character Map .
3. If you wish to check the spelling of your scrolling text message, use the Spell Check function .
4. Use the available tools to adjust the appearance of the font. For help with using the font appearance
tools, refer to Managing Font Appearance.
28 Daktronics Show Control System Presentations 101
Page 36

5. When finished creating the message, click Next to proceed to the next step.
6. Select the preferred Scrolling Direction to identify the direction in which the text will scroll. Click the
appropriate radio button.
7. Select the Text Offset to identify where on the layout the text will scroll across. Click one of the
standard setup buttons or choose a value from the drop-down menu.
8. Choose whether or not you want to Scroll text completely off the screen.
In the above example, if Scroll text completely off is activated, the message would continue to scroll
until the ‘s’ in Daktronics scrolls off the left side of the screen before the message reappears on the
right side of the screen. If Scroll text completely off is not activated, once the message reaches the
left side of the screen, it will restart scrolling from the right side of the screen.
9. Click Next to proceed to the next step.
10. Select the Scrolling Speed of the text by choosing the appropriate radio button. To preview what the
scrolling speed will look like, use the Start preview and Stop preview buttons.
11. To save the scrolling text as an image file, click the Save button.
12. When finished creating your scrolling text, click Import to import it into your layout.
29 Daktronics Show Control System Presentations 101
Page 37

Adding Real-Time Data (RTD) fields
Remember how we mentioned that adding images and video to a presentation had to start with talking
about the Media Library? Well adding RTD fields to a presentation has to start with the Dynamic Data
Library. The Dynamic Data Library is your one-stop shop for all of your needs when it comes to adding
statistics, game-in-progress data, and other dynamic information to your presentations.
30 Daktronics Show Control System Presentations 101
Page 38

Tip: If your Dynamic Data Library isn’t visible, remember that it could either be
collapsed on the left edge of the Content Studio window, or if you only see the Media
Library, you may need to click the Dynamic Data Library tab to reveal it.
Step 1 – Profile: The first step of locating the correct RTD field is
determining which RTD Profile it belongs to. In the Dynamic Data Library,
click the Profile: drop-down list. Each profile corresponds to a different
source of data, and they are typically separated according to sport and
level of play. Select the desired profile.
Step 2 – Template: After selecting the correct RTD profile, you will need
to select the appropriate RTD template which contains that field. Each RTD
template is a subdivision of the selected profile which contains a group of
related information. In the graphic to the right, showing templates in a
high school football profile, there are templates for game in progress data,
out of town scores data, individual statistics data, and other categories of
data. Locate the desired RTD template and click the button to reveal its
list of fields.
Locating the correct RTD field
31 Daktronics Show Control System Presentations 101
Page 39

Step 3 – Field: After selecting the correct RTD template, you can now
locate the RTD field which contains the data you wish to insert into your
presentation.
Adding an RTD field to your presentation
Once you’ve selected the RTD field you want to add to your presentation, inserting it into your layout
simply requires clicking and dragging it to the desired location. The field will appear as a placeholder
which represents the maximum number of characters which will be able to appear in the field.
Changing the length of an RTD field
Suppose you want to shorten the length of a data field to save some space in your layout. For example,
you notice that the “Total Score” data field (see the image to the right) is five characters long, but when
you consider the likelihood of a team scoring more than 99 points in a single football game, you’re pretty
confident that two or three characters would be sufficient. By modifying the Length property for the data
field, you can reduce the number of characters that are reserved for that field’s information.
1. Add an RTD field to your presentation.
32 Daktronics Show Control System Presentations 101
Page 40

Note: Adjusting the Length property also causes the Item property to be adjusted.
Ensure that the field’s starting point remains in the correct spot to avoid cutting off
the beginning of your data.
Tip: An RTD field type which usually benefits from shortening its length is one that
is for persons’ names. Since field lengths for last names are generally 15 characters
long, if the longest last name in your league is 8 characters long, you can shorten
this field to 8 characters and free up that extra space on your layout.
Note: Presentations containing multiple animated or video media RTD fields that play
simultaneously may cause degraded system performance. If you notice that your system
lags or is otherwise slow to respond when playing such presentations, please consider
reducing the number of RTD elements in your content.
2. With the RTD field selected, open the Field Properties context tab in the Content Studio Ribbon.
3. Locate the Length property, and adjust its value to the desired number.
Adding Media RTD to your presentation
Suppose you want to show a headshot of your team’s players anytime they are mentioned on your video
board during a game, or whenever they are introduced at the beginning of the game. Or, suppose there
are other situations when you would like an image or video file to be played in an RTD field instead of the
text which would otherwise appear. Media RTD can make this happen.
1. Add an RTD field to your presentation.
2. With the RTD field selected, open the Field Properties context tab in the Content Studio Ribbon.
3. Click the Is media RTD checkbox. This will open the Select Sample Media file browser window.
33 Daktronics Show Control System Presentations 101
Page 41

Tip: Transparency can be incorporated into your media RTD files to help seamlessly
incorporate them into your layouts by following the following guidelines:
For DMP-7000, any areas which are black (RGB 0,0,0) will be transparent when
played.
For DMP-8000, images which have transparent areas and are saved as a PNG
file will retain that transparency. Videos must be saved as an uncompressed AVI
file with an alpha channel to have transparency.
4. Navigate to and select the desired sample media file, and then click Open.
The sample media file is any file that is representative of the media RTD files that will appear in the
content. It will be added to your Content Studio editor canvas to assist you with creating the rest of
your presentation.
5. Ensure that the media files you wish to use for Media RTD are supported by the digital media player
you are creating the content for, and are stored in the proper folder for the player. Follow the below
guidelines:
For DMP-7000, media RTD supports the following file types: BMP, JPG, PNG, GIF, and TIF. The media
files must be stored in the Bitmaps subfolder of the DMP-7000’s C:\V7000 or D:\V7000 folder.
For DMP-8000, media RTD supports the following file types: VMPL, VMPF, AVI, BMP, JPG, JPEG, PNG,
MPG, MPEG, and SWF. The media files must be stored in the MediaRTD subfolder of the player’s
content folder. Note that the file types are listed in their order of priority – if multiple files with the
same name are in the MediaRTD folder, the DMP-8000 will use the file that is of the type listed first
above (i.e. if the MediaRTD folder contained both Player Name.JPG and Player Name.AVI, it would
insert Player Name.AVI into the content.
34 Daktronics Show Control System Presentations 101
Page 42

Adding Color RTD to your presentation
Another feature that you can use to accent your dynamic data is Color RTD. Suppose you’re preparing
content for a baseball game and want an easy and creative way to communicate what player is at bat
(other than “At Bat: Insert name here”). By using Color RTD, you can display a team’s full lineup and
instruct the system to show the current batter in a different font color. This allows you to communicate
two helpful pieces of information at once: the current batter and where they are in the lineup.
Note: Color RTD must be configured in DakStats before it can appear on your display. After configured,
complete the following steps to activate Color RTD for a data field in your presentation.
1. Add the Color RTD-configured RTD field to your presentation.
2. With the RTD field selected, open the Field Properties context tab in the Content Studio Ribbon.
3. In the ERTD section, place a check the Color checkbox.
35 Daktronics Show Control System Presentations 101
Page 43

Creating a presentation: Part 2
Now that you’ve managed to successfully create layouts and elements for your presentation, we can
discuss how to make each of those pieces of your puzzle come together to form an organized, coherent,
and engaging professional presentation.
Section Contents
Adding element effects
Adding gradients
Aligning elements
Arranging elements
Content Studio Timeline
Layout Storyboard
Viewing your presentation
Adding element effects
Element effects give you a simple way to add eye-catching animated effects to your presentations by
specifying a particular manner in which you want an element to appear in the presentation. Effects can
include having the element gradually zoom in to its full size, gradually scroll into view from top to bottom,
gradually appear in a circular fashion like a radar scan, or many other options.
1. Select the text or picture element for which you want to set an effect.
2. On the Effects tab, in the Element Effects menu, choose the effect you wish to apply. To view more
effect options, click the button.
Adding gradients
Another tool that Content Studio offers to help you apply your own personal touch to your presentations
is the gradient tool. Gradients can be applied to any background in your presentation – whether it is a
layout’s background or an individual element’s background.
1. Select the element(s) on which you want to apply the gradient, or deselect all elements to apply the
gradient to the layout.
2. On the Format tab, in the Fills group, click the Gradients button to open the Gradients menu.
36 Daktronics Show Control System Presentations 201
Page 44

3. Select a gradient color and pattern from the Gradients drop-down menu.
Note: To change the background color, go to the Format tab and select a color from the Fills group.
4. To choose a color that is not available in the Gradient Colors palette, click More Colors… to open
the color selector.
5. Customized gradients, including multiple color gradients, may be applied by using the Format
Background dialog box. To open the Format Background dialog box, click the button.
6. Click Gradient to display the gradient tool set.
7. Choose the orientation of the gradient from the Gradient Orientation drop down box.
37 Daktronics Show Control System Presentations 201
Page 45

Note: Use the Preview box to see a preview of what the gradient will look like when it is
applied to your presentation.
8. To add additional color(s) to the gradient, click the Add Stop button. The additional color will be
added to the gradient, and an additional slider will be added to the Stop Position slider bar.
Note: Maximum number of stops is 10.
9. Click and drag the Stop Position sliders to adjust the distribution of the gradient’s colors until you
reach the desired look.
10. To remove a gradient stop, select the stop you wish to remove on the Stop drop-down menu, and
then click Remove Stop. That stop’s color will be removed from the gradient.
11. When finished creating the gradient, click OK.
Aligning elements
After you have all the elements you want added to your presentation and looking the way you want, it is
important to get them properly aligned to ensure a neat and organized appearance on your display.
Content Studio provides a number of tools to allow you to achieve this result by assisting with aligning
elements both with other elements and within a layout.
38 Daktronics Show Control System Presentations 201
Page 46

Tips:
To show gridlines on your layout (to assist with arranging your elements), on the
View tab, in the Show/Hide group, select Gridlines. Note that it may be necessary
to zoom in on your layout to view the gridlines.
To easily select all elements contained on a layout, on the View tab, in the
Show/Hide group, select Select All Elements.
Note: The following options are only available when multiple elements are selected.
1. Select the elements you want to align.
2. On the Format tab, in the Arrange group, click Align
to open the Alignment menu.
Note: You can also right-click the element(s) to access
alignment options.
3. Click the desired alignment option(s).
Align to Top: Moves the selected element to the top
of the layout.
Center Vertically: Moves the selected element to the
vertical center of the layout.
Align to Bottom: Moves the selected element to the
bottom of the layout.
Align to Left: Moves the selected element to the left side of the layout.
Center Horizontally: Moves the element to the horizontal center of the current line.
Align to Right: Moves the selected element to the right side of the layout.
Center: Places the selected element in the direct center of the layout.
Align to Top Element: Moves all selected elements to the top-most selected element.
Align to Bottom Element: Moves all selected elements to the bottom-most selected element.
Align to Left Element: Moves the selected elements to the left-most selected element.
Align to Right Element: Moves the selected elements to the right-most selected element.
Make Elements Same Width: Changes the width of all the selected elements to the same width of
the widest element.
Make Elements Same Height: Changes the height of all the selected elements to the same height of
the highest element.
Space Elements Evenly Horizontal: Spaces all selected elements evenly between the farthest-left
and the farthest-right elements.
Space Elements Evenly Vertical: Spaces all selected elements evenly between the farthest-top and
the farthest-bottom elements.
39 Daktronics Show Control System Presentations 201
Page 47

Tip: When lining up elements horizontally, it is recommended to select the elements, and
then Align to Top Element to line each of them up with the top-most selected element.
When lining up elements vertically, it is recommended to select the elements, and then
Align to Left Element to line each of them up with the left-most selected element.
Arranging elements
When multiple elements are placed on a layout, Content Studio allows those elements to overlap over
each other in a series of layers. This helps you create effects (such as by combining text and picture
elements) that otherwise would not be possible, or would be more difficult to achieve. Arranging
elements involves the managing of multiple layers of elements – bringing elements toward the front of
other elements, or sending them behind other elements.
1. Select the element you want to move forward or back.
2. On the Format tab, in the Arrange group, select either Bring Forward or Send Back (or right-click
on the element and go to the Order submenu) to open their respective submenus.
3. Choose the appropriate option:
Bring to Front: Brings the selected element in front of all other elements, making it the top-most
layer
Bring Forward One Layer (or Bring Forward): Brings the selected element forward by one layer,
placing it on top of the layer immediately above it
Send to Back: Sends the selected element behind all other elements, making it the bottom-most
layer
Send Back One Layer (or Send Backward): Sends the selected element back by one layer,
placing it behind the layer immediately below it
Content Studio Timeline
At this point you may be asking yourself “what if I don’t want all of the elements on a layout to appear at
the same time?” or “what if I want certain layouts to last longer than other layouts?” Those are very good
questions, and the answer to them is the Content Studio Timeline (the bars at the bottom of the window
that you may have noticed).
40 Daktronics Show Control System Presentations 201
Page 48

Adjusting element and layout durations
First, there are a few pieces of the timeline that you should be familiar with:
The example above is of a layout containing an image and two text boxes. The bar on top (labeled
“Layout – [1]”) represents the layout’s duration, which is currently set at five seconds. The bars below the
layout’s bar represent each element on the layout, and designate each element’s start and end times.
They will cause the elements to be displayed as follows:
00:00.00 – “Layout – [1]” starts, “Countdown” image appears and the transition set for “Text Box 1” begins
00:01.52 – “Text Box 1” transition completes
00:03.00 – “Text Box 1” disappears, “Text Box 2” appears
00:05.00 – “Text Box 2” and “Countdown” disappear and layout ends
To adjust the duration of a layout, and the start and end times of elements, click and drag the appropriate
Start or End Bar to set the desired start or end point for the element or layout.
Additional Layout and Element Options
1. Right-click on an element or layout to open its context menu.
2. Choose from the following menu options to assist in adjusting an element’s duration:
Size To Longest: Adjust the element’s duration to match the element with the longest duration.
Size To Shortest: Adjust the element’s duration to match the element with the shortest duration.
Size Selected To Me: Adjust multiple selected elements’ duration to match this element’s
duration.
41 Daktronics Show Control System Presentations 201
Page 49

Work Area View: Click and drag the arrow to view elements active at a certain
point in time in the Work Area.
Scroll bar: Click and drag the Scroll bar to view earlier or later in the Timeline.
Presentation/Layout View: Click to toggle viewing the entire presentation or
only the current layout on the Timeline.
Zoom level: Click the and buttons to adjust the time increment in which
you want to view the Timeline.
Scroll to Current: Click to scroll the Timeline to the currently selected layout.
Resizing Cursor: The Timeline may be resized vertically to reveal more of or
conceal the line items on it. Move your mouse to the top border of the Timeline
until it changes into a resizing cursor, and then click and drag the Timeline to
the desired height.
Match Layout: Adjust the element’s duration to match the layout’s duration.
3. Select Properties to view additional options.
4. Edit the layout’s or element’s options as desired.
Name: Edit the name of the layout or element, as it appears in the Timeline.
Duration: Adjust the duration of the layout or element.
Visible: Designate whether or not an element should be visible when the presentation is played.
Locked: Place a checkmark in the Locked checkbox to prevent an element’s start time, end time,
duration, size or position from being modified.
5. When finished, click OK to save changes or Cancel to discard any changes.
Adjusting the Timeline View
Content Studio also provides options for customizing the Timeline to best meet your needs. Use the
following Timeline Options:
42 Daktronics Show Control System Presentations 201
Page 50

Layout Storyboard
Now that you’ve used the Timeline, you may have also noticed the tab labeled “Layout Storyboard”. This
is another useful little tool in Content Studio that it would be worth acquainting yourself with. As you
would probably expect from a tool called a storyboard, the Layout Storyboard provides a graphical
representation of your presentation’s layouts to give you a quick preview of what’s going to play and in
what order it’s going to play, so that you can easily rearrange the sequencing of your layouts. The
storyboard also allows you to apply and manage transition effects that may be put in place between
layouts.
Changing the order of layouts
Using the Layout Storyboard, rearranging the order of the layouts in your presentation is as easy as
clicking and dragging or copying/cutting and pasting – depending on which method you prefer.
1. Click the Layout Storyboard tab at the bottom of the window.
2. Select the layout you wish to move.
3. Move the layout to the desired location by one of the following methods:
Click and drag
Click and drag the layout to the desired new location. A gray line will appear to indicate where in the
sequence the layout will be placed.
Copy/Cut and Paste
4. After selecting the layout you wish to move, click the Copy or Cut button.
5. Select the layout which is in the desired location for the layout you are moving.
6. Click the Paste button.
Adding layout transitions
Similar to how Content Studio allows you to apply effects to elements for when they are introduced in the
presentation, it also allows transition effects to be applied to layouts to smooth the progression from
layout to layout. This can be managed from the layout storyboard.
1. Open the Transitions menu by selecting the place in your presentation where you wish to add or edit
a transition, as follows:
To add or make changes to a single transition, click the Transition Placeholder which is
located between the layouts where you wish to apply a transition.
To add or make changes to all transitions, click the Apply Transition to All button.
43 Daktronics Show Control System Presentations 201
Page 51

2. Click the corresponding icon of the transition you wish to apply to the presentation.
a. (DMP-8000 and DMP-1500 Only) To change the transition’s duration, click the Change
Duration button to open the Edit Transition Properties dialog box.
b. Enter the Desired Duration Time (in seconds) in the text box.
c. Click OK.
To clear a single transition:
1. Click on the transition you want to clear to open the Transition menu.
2. On the Transitions menu, under the Miscellaneous group, select No Transition .
To clear all transitions:
Click the Clear All Transitions button .
44 Daktronics Show Control System Presentations 201
Page 52

Viewing your presentation
In addition to its extensive set of tools and features that allow you to get everything you want into your
presentation, Content Studio offers multiple options for helping you to verify that all of your work will pay
off. These tools can assist you with verifying the accuracy and precision of your entire presentation – from
viewing minute details in a small corner of a layout to viewing an entire layout all at once; and from
previewing your entire presentation at once to view a single moment in time. Content Studio allows you
to perform as broad or as narrow of an inspection as you would like.
Layout zoom control
The layout zoom control allows you to zoom in or out on your layout to make detailed or broad edits to
your work. This can be particularly helpful when working with very small or very large display sizes.
Content Studio offers three methods that you can use to adjust your current zoom factor when working
with a layout.
Method #1: Zoom Ribbon Tools
Zoom In: Click to zoom in on your layout. Each click will increase the zoom factor by 25 percent.
Zoom Out: Click to zoom out on your layout. Each click will decrease the zoom factor by 25 percent.
Best Fit: Click to restore your layout to its default zoom level – only sufficiently zoomed out to allow
the entire layout to fit in the available space.
Method #2: Zoom Slider Bar
Zoom In: Click the button to increase the zoom factor by 5-10 percent.
Zoom Out: Click the button to decrease the zoom factor by 5-10 percent.
Method #3: Mouse Scroll Wheel
Your mouse can also be used to zoom in and out on your layout. Just hold down
[CTRL] on your keyboard while rolling your mouse’s scroll wheel forward to zoom in
on your layout, or roll backward to zoom out. Rolling the wheel one notch will
increase or decrease the zoom factor by 25 percent.
45 Daktronics Show Control System Presentations 201
Page 53

Ribbon button
Footer button
Function
Play: Shows a preview of the entire presentation
Play Current: Shows a preview of the current layout
Pause: Pauses playback of the preview in progress
Stop: Stops playback of the preview in progress
Previewing your presentation
To get the most accurate idea of how your presentation will look on your sign, you can preview your
content from directly within Content Studio. This preview can be used to see what an entire presentation
will look like, or what an individual layout will look like.
The Preview Controls can be found in two locations:
On the View tab of the Ribbon, in the Preview group
On the bottom of the Content Studio window, next to the Zoom Control
Click the control buttons to perform the following functions:
46 Daktronics Show Control System Presentations 201
Page 54

Saving your presentation
Saving a presentation serves many important functions, such as preserving the presentation’s creation
progress, making the presentation accessible to your digital media player to play it on a display, and
preventing the agony and frustration of redoing lost work. This section will address how to save your
presentation in such a way as to allow your digital media player to access the file and play it on your sign.
Section Contents
Media organization recommendations
Mapping a network drive
Saving your presentation
Media organization recommendations
This is just a shorter way of saying “Daktronics’ recommendations for how to organize the folders that
store your displays’ media files, and where to store your media files in them”. First and foremost, we will
cover the guidelines that ensure your digital media player is able to access all of your media files.
Secondly, we will provide you Daktronics’ best recommendations to help you with run your show
effectively and efficiently.
DMP-7000
Content must be located on the DMP-7000 computer and placed within a library folder named and
located according to the following requirements:
Drive Letter\V7000\Sign Folder\Library folder
Drive Letter: C: or D:, depending on where your DMP-7000 folder is located
Sign Folder: The folder created for the display type your content is intended for, named
according to ‘height x width’.’color technology’.’pixel technology’.Sign (e.g.
720x1280.RGB16MB.L.Sign)
Library Folder: Your content library folder, which must be named according to ‘Library name’.Lib
(e.g. Sponsors.Lib)
The full path of the example library would be D:\V7000\720x1280.RGB16MB.L.Sign\Sponsors.Lib\
Guidelines:
The library folder can be created by you and named according to your preferences; however its
name must have “.Lib” at the end.
The sign folder may have multiple library folders, but library folders may not have any subfolders
within them. Therefore, content can be stored within Sign Folder\Sponsors.Lib but it cannot be
stored within Sign Folder\Sponsors.Lib\Corporate.
It is recommended to map a drive letter on your Show Control user station to your DMP-7000
content folder. For help with doing this, refer to Mapping a network drive.
47 Daktronics Show Control System Saving presentations
Page 55

DMP-8000
Content must be located on the DMP-8000 computer and placed within the following folder:
For Windows XP machines: C:\Documents and Settings\All Users\Application
Data\Daktronics\VNET4\Content
For Windows 7 machines: C:\ProgramData\Daktronics\VNET4\Content
Guidelines:
Content may be placed within the C:\…\Content folder or within a subfolder of this folder. Note
that you may only place content one subfolder deep from the Content folder to use the files with
Display Studio. (i.e. C:\...\Content\Sponsors would be OK; C:\...\Content\Sponsors\Corporate
would not work)
It is recommended to map a drive letter on your Show Control user station to your DMP-8000
content folder. For help with doing this, refer to Mapping a network drive.
DMP-1500
Content must be created and stored in the following manner:
(1) Content which is created outside of the Show Control environment must be stored on a portable
storage medium or on your Show Control user station.
(2) Content must next be saved to your system’s database. This must be done in Content Studio –
either by creating the content in Content Studio and saving it, or by importing the content into a
Content Studio presentation and saving that presentation. Here, content may be simply saved in
your display’s root folder, or in a subfolder.
(3) Prior to when content is anticipated to be played on the display, it needs to be transferred from
the database to the digital media player. This is done with the help of the Display Studio M3 File
Manager widget.
For step-by-step help with getting content onto your digital media player, refer to Adding content
to digital media player.
Guidelines:
Content may be stored in any imaginable manner when it is saved on your portable storage
medium or user station.
When saving content to your system’s database, you may place content within your display’s root
folder or within a subfolder. Note that you may only create subfolders one level deep from the
root folder, however. (i.e. you can create a GalaxyPro 256x512 RGB68B\Sponsors folder, but not a
…\Sponsors\Corporate folder)
There is no way to organize content which is transferred to your digital media player – it all gets
placed within a single storage area.
Be aware of the storage limitations of the digital media player when deciding which, and how
many, files to copy to it.
48 Daktronics Show Control System Saving presentations
Page 56

Note: When selecting a drive letter to associate with a shared network location, it is
recommended to choose letters that are lower in the alphabet.
Mapping a network drive
If your Show Control System consists of multiple computers, you will find that you will routinely be
working on one computer, generally a user station, and need to access files or folders on another
computer, such as a digital media player. The easiest way to access these network drives is by “mapping”
to them, whereby a local drive’s identifying letter (A through Z) is associated with a shared storage area
on another computer. This allows quick and easy access to shared files and folders and eliminates the
need to browse through an entire list of network resources to locate the desired file or folder.
A common mapping scenario is making media items stored on a DMP-8000 computer accessible by a
Display Studio User Station. By mapping, instead of needing to locate the correct DMP-8000 on your list
of network computers, and then navigate to C:\Documents and Settings\All Users\Application
Data\Daktronics\VNET4\Content; you can simply navigate to (for example) F:\Video Board Content on the
user station, and the rest of the work will be done for you.
The below sections detail the proper steps for mapping a network drive on computers using Windows XP
and Window 7 operating systems.
Windows XP User Station
1. On the computer from which you wish to access the shared folder, click Start, and then click My
Documents.
2. Click the Tools menu, and then click Map Network Drive.
3. In the Map Network Drive dialog box, select the Drive letter you wish to associate with the shared
folder (if desired).
4. Click Browse.
5. In the Browse For Folder dialog box, click the folder you want to connect to, and then click OK.
6. In the Map Network Drive dialog box, note the drive letter which was selected, and then click Finish.
The selected folder can now be accessed from My Computer by selecting the appropriate drive letter.
Windows 7 User Station
1. On the computer from which you wish to access the shared folder, click Start, and then click
Computer.
2. Click Map Network Drive.
3. In the Map Network Drive dialog box, select the drive letter you wish to associate with the shared
folder (if desired).
4. In the Folder text box, type the path of the shared folder, or click Browse to locate the folder.
5. In the Browse For Folder dialog box, click the folder you want to connect to, and then click OK.
In the Map Network Drive dialog box, note the drive letter which was selected, and then click Finish.
The selected folder can now be accessed from Computer by selecting the appropriate drive letter.
49 Daktronics Show Control System Saving presentations
Page 57

Saving your presentation
Once you’ve got your plan figured out for where you need to save your presentation, Content Studio
makes actually doing it very simple.
1. When ready to save, either click the Content Studio Button and select Save or click the Save
shortcut button. The Save As dialog box will appear.
Note: If you wish to save your presentation with a new filename, click the Content Studio Button
and select Save As…
2. Use the navigation tools to locate the proper destination for the presentation file.
Go to last folder visited : Click to return to the last folder you visited.
Up one Level : Click to go up one level in the folder structure.
Delete : Click to delete the selected file or folder.
Create new folder : Click to create a new folder within the current folder.
3. Type the presentation name in the File Name text box.
4. Click Save to save the presentation or click Cancel to return to the presentation without saving.
50 Daktronics Show Control System Saving presentations
Page 58

Media File Recommendations
The recommended practices for working with media files in a Show Control System are addressed in a
standalone document Daktronics Media File Recommendations available from:
DakInfo @ Media File Recommendations – DD2175346
Show Control Installer
It discusses helpful guidelines to follow when creating media files; what types of files a system can
support; tips and guidelines for working with different types of fonts; and steps for how to import media
files from a portable storage device.
It also includes video file conversion with recommendations for converting video files into a format
supported by the Show Control System.
The Media File Recommendations includes:
Media Item Creation Guidelines
Image and Video File Support
Text Input Support
Media File Batch Conversion
Loading Media from Portable Storage
Installation, Configuration and Use of Conversion Applications:
Quicktime
VirtualDub
ffmegX
Dak Video File Converter Utility
Media File Recommendations – DD2175346
51 Daktronics Show Control System Display Studio Setup
Page 59

Tip: Keep in mind that much of the upcoming sections consist of simply our
recommendations for how to set up your workspaces. Once you understand the
mechanics of how Display Studio works, you are encouraged to experiment and adapt
your workspaces as you see fit to make them work for you.
Display Studio preliminary setup
Now that you’ve created your presentations, you are probably interested in learning how to get those
presentations to play on your sign. That is where Display Studio comes in. In the upcoming sections, we
will introduce you to many of the exciting and powerful tools and features that Display Studio has to offer
and provide recommendations for using them to put on an excellent show. Before you begin putting
together containers and buttons, though, there are a few preparation steps to take to help get your
Display Studio workspace ready.
Section Contents
Create a new workspace
Create workspace pages
Rename workspace pages
Adding content to digital media player
Updating your Show Control Server
Configuring your Monitor Wall
Create a new workspace
The first part of getting started in Display Studio is creating your workspace. As we discussed in
Navigating the Show Control software, your Display Studio workspace is what organizes all of your
containers and buttons for your digital display show. You can create as many workspaces as you need, for
whatever purposes you need them for, such as different workspaces for different types of events; different
workspaces for different operators; different workspaces for different facilities; workspaces based on
combinations of these scenarios; or workspaces for any other possible type of scenario.
1. From within Display Studio, click the Display Studio Hub to open the Display Studio Main Menu.
2. On the menu, select New and click Workspace. The Workspace Name dialog box appears.
52 Daktronics Show Control System Display Studio Setup
Page 60

3. Enter a name for your new workspace in the Name textbox.
4. If you would like for the new workspace to automatically open after it is created, ensure there is a
checkmark in the Load new workspace checkbox.
5. Click Save. If you chose to Load new workspace, your new workspace will open automatically.
Create workspace pages
After creating your new workspace, we recommend first creating your desired workspace pages according
to how you would like to divide up your workspace, such as having a workspace page for each group of
displays you intend to control at the same time.
1. From within Display Studio, click the Display Studio Hub to open the Display Studio Main Menu.
2. On the menu, select New and click Workspace Page.
3. The new page is added to your workspace. For help with renaming your workspace pages, proceed to
the next section.
53 Daktronics Show Control System Display Studio Setup
Page 61

Rename workspace pages
To assist with keeping your workspace organized so that you can keep straight which containers and
buttons belong on each page, Display Studio allows you to rename your workspace pages. This provides
another layer of categorization to help make operating your signs as efficient as possible.
1. Right-click on the workspace page you wish to rename to open its context menu.
2. Select Rename Page. The page name becomes editable.
3. Enter the desired new name of the workspace page, and press [Enter].
Updating your Show Control Server
The Update Server tool in the Service Configuration window provides a quick way to update Display
Studio with any changes to your DMP-7000 configuration. Anytime changes are made to your sign
configuration in the Venus 7000 Shell, complete the below steps to update your Show Control Server.
1. From within Display Studio, click the Display Studio Hub to open the Display Studio Main Menu.
2. On the menu, select Properties and click Service Configuration.
3. Select the server you wish to update, and click Update Server.
54 Daktronics Show Control System Display Studio Setup
Page 62

Note: Keep in mind that the Monitor Wall does not show display content in real time – it
merely shows a regularly updating snapshot of the display’s content during a particular
moment in time. It is recommended that the Monitor Wall’s Monitor Refresh Rate be
set to Low to ensure optimum system performance.
Configuring your Monitor Wall
The last step of getting ready to put together your workspace in Display Studio is configuring your
monitor wall. The monitor wall is a very useful tool, as it allows you to see what is playing on any of your
DMP-7000 or DMP-8000 displays without actually needing to see the display. This is particularly handy for
venues where the Show Control user station is located in an area without a direct line of sight to all
displays.
1. Right-click in the monitor wall (the black bar appearing at the top of the Display Studio window) and
select Properties to open the Monitor Wall Properties pane.
2. To add a display to the monitor wall, select the display from the drop-down list and click the
button. The display will appear on the monitor wall.
3. Display Studio allows you to add multiple displays to the monitor wall. To do this, simply repeat step
2 for each display that you wish to add.
4. The monitor wall can be organized by reordering, resizing, and stacking the displays. These tasks
can be completed as follows:
55 Daktronics Show Control System Display Studio Setup
Page 63

a. Displays can be reordered by simply clicking and dragging them to their desired new location.
b. Displays can be resized by clicking a display’s border and using the resizing cursor to drag it to
the desired size.
c. The zoom level of the displays can be adjusted to give you a more complete view of the content
being played. In the below image, the portion of the content in the red box is all that would be
visible at 100% zoom level (the default setting. By reducing the zoom level, more of the content
can be seen. Adjust the zoom level by selecting a display and using the Zoom control to change
the view as desired.
d. Displays can be stacked by clicking a display and dragging it over top of the display you wish to
stack it with.
56 Daktronics Show Control System Display Studio Setup
Page 64

5. To remove a display from the monitor wall, select the display on the monitor wall and click the
button. The display will be removed from the monitor wall and returned to the drop-down list.
57 Daktronics Show Control System Display Studio Setup
Page 65

Introduction to Containers
After your workspace and workspace pages, containers and container pages are the next levels we come
to on the metaphorical pyramid of storage offered by Display Studio. There are two types of containers
supported – Quick Display and Scripting containers – and depending on what type of digital media player
you wish to control; one or both of these may be available for your display. Regardless of which type of
container you are using, however, there are a few pointers that you should know about using them.
Section Contents
Create a container
Create container pages
Rename containers and container pages
Setting button sizes
Create a container
1. Right-click within the workspace page where you want to create a container to open its context menu.
2. On the context menu, select New, and then click Scripting Container or Quick Display Container.
3. After selecting the container type, you will be taken to the appropriate container creation window.
58 Daktronics Show Control System Containers
Page 66

4. For more information on working with the specific container types, refer to Quick Display containers
and buttons or Scripting containers and buttons.
Create container pages
Display Studio was designed to provide control system operators with access to as much control
functionality as they need for their displays, while at the same time permitting them to set up their control
interface to only require looking at what they want to look at at any given time. Container pages allow
you to divide up the buttons you want to create into separate groups, preventing the workspace from
getting too cluttered.
Example: Suppose you have a group of buttons that you only use during pre-game, a separate group of
buttons that you only use during the game, and a separate group of buttons that you only use after the
game. You might not want to put all of these buttons together, because it would just clutter up your
workspace and give you unneeded buttons to sort through while your show is in progress. If you put the
buttons on three different container pages, however, you can still only use the space of one container, but
only have to look at the page of buttons you’re using at a given moment.
1. Right-click the container to which you want to add a page to open its context menu.
2. Select New Page.
3. The new page will be added, accessible via a tab on the bottom of the container.
59 Daktronics Show Control System Containers
Page 67

Rename containers and container pages
To assist with keeping your workspace organized and easy to use, Display Studio permits the renaming of
both containers and container pages. Complete the steps in this section.
Renaming containers
1. Right-click the container you wish to rename to open its context menu.
2. Select Properties to open the container’s Properties page.
3. Enter the desired name for the container in the Container Name textbox.
4. Click Save to save the new name, or Cancel to discard changes.
Renaming container pages
1. Right-click the page tab of the container page you wish to rename to open its context menu.
2. Select Rename. The container page name becomes editable.
60 Daktronics Show Control System Containers
Page 68

3. Enter the desired new name of the container page, and press [Enter].
Setting button sizes
As you create buttons, you may decide that you would like to make the buttons larger or smaller. Display
Studio allows buttons within a container to be scaled larger or smaller so that operators can achieve the
exact look they want.
To make buttons within a container larger or smaller, simply use the Button Scale tool located at the top
of the container. Click the button to make the buttons larger (and easier to read) or the button to
make the buttons smaller (and allow more buttons to fit in a smaller area of workspace).
The below graphic illustrates the same scripting container at three different button size settings. Note the
differences in the size of the buttons, and the number of buttons that can be visible in the same size of
container.
61 Daktronics Show Control System Containers
Page 69

Quick Display Containers and Buttons
If you’re looking for clip server-type control over your signs, look no further. Quick display containers and
buttons are designed to give you quick and easy, single-click access to your library of media files for a
sign. Just click a clip’s button and it will be (depending on your settings) immediately played on the sign,
or immediately added to the sign’s queue.
Section Contents
Create a quick display container
Manage quick display container properties
Create quick display buttons
Manage quick display buttons
Using the quick display queue
Create a quick display container
1. Right-click from within the workspace page where you wish to create a container to open its context
menu.
2. Select New Quick Display Container. The Quick Display Container Properties screen appears.
3. In the Quick Display Container Properties screen, select the display with which you want the
container to be associated from the drop-down list.
62 Daktronics Show Control System Quick Display
Page 70

4. After you have selected the display, the display name will be inserted into the Container Name text
box. If you wish to change the name of the container, enter the new name into the text box.
5. Click Save to save the container and close the Quick Display Properties, or proceed to Manage
Quick Display Container Properties.
Manage quick display container properties
Various options are available to customize the way a quick display container stores quick display buttons
and to configure the default behavior of quick display buttons. Use the steps below to assist you in setting
up your quick display container how you would like.
1. From within the Quick Display Container Properties screen, manage the container using the below
options.
Note: If you’re not already in the quick display container properties screen, right-click from within the
quick display container to open its context menu, and then click Properties.
63 Daktronics Show Control System Quick Display
Page 71

Tip: Note that the selections you make for the above options will only be applied to the
active container page. Different container pages can be set up differently.
Add/Delete Page: Click the appropriate button to add or delete a container page
Show/Hide Page: Click to designate whether a container page should be visible or hidden
Display Name: Name of the display associated with the container
Container Name: Name of the container. By default, the display name will be inserted as the
container name.
Visible Thumbnails: Checking this box makes the thumbnails for each button visible in the container.
Immediate Play Checkbox: Checking this box makes buttons in this container, by default,
immediately play on the display when clicked, instead of being added to the end of the queue.
Playmode: Select the default playmode for buttons in this container – Continuous, Number of
Times, Selected Frames, or Single Step.
Button Scale: Click the appropriate button to increase or decrease the default size of the buttons
within the container.
Thumbnail Location: Click the appropriate button to set the default location within a media file
which will determine the thumbnail preview of the button.
Link To Library: Click to link the container to a display library. Selecting this option will automatically
create Quick Display Buttons for each media file in that library.
Switch Pages: Click to switch between different container pages. Different pages may also be
accessed by clicking the page’s Container Page Tab.
2. When finished, click Save to close the scripting container properties, or click Cancel.
64 Daktronics Show Control System Quick Display
Page 72

Create quick display buttons
To create quick display buttons, there are two methods available: automatic and manual. The differences
between these methods are as follows:
Automatic
Quick display buttons are created by linking a container page to a display’s media file library,
which automatically creates a button for each media file in that library.
Buttons are created according to the default properties of the container, however after a button is
added, its individual properties can be managed as needed.
As media files are subsequently added to or removed from the library, the quick display container
buttons will be updated accordingly.
Buttons cannot be manually added to a linked container.
Manual
The user creates quick display buttons individually.
Buttons can be created that play one or more media files from one or more of a display’s libraries.
The user gets complete control over what and how buttons are created.
Automatic method: linking a container to a library
A quick display container can only be linked to a display library when the container is empty. The best
time to do this is when creating a new quick display container.
1. Begin at the Quick Display Container Properties. To access the Quick Display Container
Properties, either:
a. Create a quick display container, or
b. Right-click from within a quick display container, and click Properties.
2. In the Quick Display Container Properties screen, click the Link To Library button to open the
Library Browser window.
3. In the Library Browser window, select the name of the library you wish to link to the container and
then click Open. The Link To Library button will now read Unlink From Library and the library name
will appear next to the button.
65 Daktronics Show Control System Quick Display
Page 73

4. Click Save. The Quick Display Container Properties screen will close and Display Studio will
automatically create buttons for all files in the library.
Manual method: creating quick display buttons individually
Note that quick display buttons cannot be created individually if the quick display container is linked to a
display library.
1. Right-click from within the quick display container and select New Button to open the Button
Creation Window.
66 Daktronics Show Control System Quick Display
Page 74

2. In the Button Creation Window, type the name of the quick display button in the text box.
3. Select File(s). Click Add to open the File Browser window. The file browser window will assist you in
selecting the file(s) that the button will activate.
4. Highlight the desired folder from the list of folders in the presentation pane. Click Open.
5. When using the File Browser, the navigation tools can assist with locating the correct file.
Return: Click to close the File Browser and return to the Workspace.
Up One Level: Click to move up one level in the selected sign’s (or signs’) libraries’ folder hierarchy.
Example: If the File Browser is in the Crowd Prompts\Touchdown folder (where Crowd Prompts is the
selected library), click Up One Level to return to the Crowd Prompts root folder.
67 Daktronics Show Control System Quick Display
Page 75

Tip: To manage the order of your playlist, files can be clicked and dragged to their
desired positions, or use the Insert button to insert a file above the selected file.
Back and Forward: Click the arrow buttons to move between folders to which you have navigated in
the order you have navigated to them.
6. Select the desired file(s) you wish to associate with the button. Multiple files may be selected by
holding down CTRL while clicking the files.
Note: Your sign’s digital media player determines the types of files which may be played on your sign.
Please consult your player’s documentation for a list of such file types.
7. After the desired file(s) have been selected, click Open to return to the Button Creation Window.
The selected file(s) will appear listed.
8. Proceed to the next step by clicking the below the button name. The buttons to the right
may also be used to move between steps.
9. Set Playlist Type. If you selected multiple files in the previous step, the next step is to designate what
type of playlist the button will activate. This will determine the manner in which the media files in a
68 Daktronics Show Control System Quick Display
Page 76

Normal Playlist: Clicking the button will add
all media files in the playlist to the Queue in
the order they appear on the playlist.
Common Use: For player introductions, load the
media files containing the players’ photos into
a Normal Playlist, and it will play each file in
order.
Next Playlist: Clicking the button will add one
media file from the playlist at a time to the
Queue. Clicking the button again will add the next
file from the playlist to the Queue.
Common Use: When there are multiple media files
for a single sponsor, place them all into a Next
Playlist. Each time the button is clicked, it will
cycle through the list one file at a time so that the
same ad does not play consecutively.
Shuffle Playlist: Clicking the button will add all
media files in the playlist to the Queue in a
shuffled order.
Common Use: When playing a set of ads for
multiple advertisers, place the ads in a Shuffle
Playlist so that the same advertiser does not
get played first, or last, every time.
Random Playlist: Clicking the button will add
one random media file from the playlist at a time
to the Queue. Note: Although random, this
playlist will ensure that all media files are played
an equal number of times and none will be played
twice in a row.
Common Use: When a contest is held at an event
in which the media file determines the winner(s)
of the contest (i.e. a video of mascots in a race),
place all of the different possible outcomes in a
Random Playlist. Each time the contest is played,
a random file is played – ensuring a random
outcome.
playlist will be added to the Display Queue. Choose the playlist type by clicking the radio button next
to the appropriate choice.
69 Daktronics Show Control System Quick Display
10. Select Thumbnail. Using the and buttons or by clicking and dragging the
selection bar, locate an appropriate image from the media file to serve as the thumbnail
preview for the button. Note: If multiple files were selected for the button, the first file
will provide the thumbnail preview.
Page 77

Continuous: Plays the file on the display until the operator
stops the file, advances the Queue, or starts another file.
Number Of Times: Plays the file on the display the specified
number of times. After the file plays the specified number of
times, the display blanks, plays the default file, or plays the
next file in the Queue.
Selected Frame: Plays the selected frame number in
the file.
Single Step: Plays the file frame-by-frame in
sequential order with the user controlling frame
advancement. For example, the user could play the words of
the National Anthem frame by frame as the audience sings.
11. Playmode Selection. Click the radio button next to the playmode you wish to select for the button.
The selected playmode will govern how the file(s) associated with the button will be played.
12. Select Color. Color-coding is an effective way to categorize buttons within a container. Color Options
allow you to assign color schemes to buttons, which can be used as another way to group similar
buttons and distinguish different buttons.
70 Daktronics Show Control System Quick Display
Page 78

Note: *Removal (in the scenario above) assumes that the quick button
was configured to play only one time.
If configured to play multiple times or continuously, the Quick
Display file will remain in the playlist until the designated
number of play times has been reached and then removed.
If configured to play continuously, the quick display button file
will continue playing as part of the playlist until the playlist
itself is removed.
13. To save a category, type the name of the category in the Edit Category text box, and click the
button to add it to the list. Categories which have already been created can be accessed from the
Category drop-down menu. Click the button to open the drop-down menu.
14. Immediate Play. If you want the file(s) associated with the button to play immediately (replacing
the currently playing file) when the button is pressed, enable Immediate Play by clicking the
next to the button name text box. When enabled, the button will change to .
a. Loop On – If the currently playing playlist has Loop On feature activated, clicking a Quick
Display button with Immediate Play activated will result:
i. The currently playing playlist file will be replaced by the Quick Display file, thus
adding the Quick Display file to the current playlist.
ii. The replaced playlist file will be added to the end of the playlist.
b. Loop Off – If the currently playing playlist has Loop Off feature activated, clicking a
Quick Display button with Immediate Play activated will result:
i. The currently playing playlist file will be (1) replaced by the Quick Display file and
(2) removed from the current playlist.
ii. When the Quick Display file completes play it will be removed. *
71 Daktronics Show Control System Quick Display
Page 79

15. Clear Queue on Play – Clear Queue Combined with Immediate Play. If, when the
button is executed, you want the display’s playlist queue to be cleared and the first file
associated with the quick display button to play immediately, enable Clear Queue on Play by
clicking the next to the button name text box. When enabled, the button will change to .
16. Normal – Without Immediate Play or Clear Queue on Play activated, clicking a quick display
button will add its top file into a playlist queue. The inserted quick display file will begin playing
right after the currently playing file finished. The inserted quick display file will remain in the
playlist queue until it has played its designated number of times and then be removed.
17. When finished, click Save to save the button to the quick display container, or click Cancel to
close the button creation window and discard any changes which were made.
Manage quick display buttons
A number of options are available for managing quick display buttons which have been created. To
manage a quick display button, right-click the button you wish to manage to open its context menu.
Immediate Play: Click to immediately play the file(s) associated with the button, even if Immediate Play
has not been enabled for the button. Selecting this option will add the file(s) to the top of the queue and
they will begin playing.
Copy: Click to create a copy of the selected button which may be pasted into another quick display
container.
72 Daktronics Show Control System Quick Display
Page 80

Note: Quick Display buttons can also be clicked and dragged to another quick display
container. To move a button to another container, simply click and drag it to the desired
new location. To copy a button to another container, while pressing [Ctrl], click and drag
the button to the desired location.
A button can be copied or moved to a new container in one step by clicking and dragging
the button to an empty area of your workspace page.
Next
Plays the next item in the queue
Pause
Pauses playback of the queue
Queue List: Contains the list of any content files which have been
queued to play on the display, in the order they are to appear.
Thumbnail Button: Click this button to toggle showing and
hiding thumbnail images in the Queue List.
Queue Button: Click this button to toggle showing and hiding the
Display Queue.
Cut: Click to remove the selected button from its container so that it may be pasted into a different quick
display container.
Delete: Click to delete the selected button.
Properties: Click to open the Button Creation Window to edit the button.
Note: Multiple buttons’ Button Creation Windows may be opened at one time to allow simultaneous
editing.
Show / Hide Thumbnails: Click to toggle showing and hiding the button’s thumbnail preview.
Using the Display Queue
The Display Queue, which appears on the right side of a Quick Display
Container, serves a role similar to that of the queue for a media player such
as the Windows Media Player® or Apple QuickTime® media players. The
main components of the Display Queue include the Queue List, Thumbnail
Button, and the Queue Controls.
Queue Controls
The Queue Controls provide quick access to the most commonly-used functions for managing the Display
Queue. Simply click the buttons to perform the below operations.
73 Daktronics Show Control System Quick Display
Page 81

Stop
Stops playback of the queue and plays the default file, if
configured. If not configured, display blanks. Queue is cleared.
Blank Sign
Stops playback of the queue and blanks the display. Queue is
cleared.
Clear Queue
Clears the queue (but allows the current item to keep playing)
Loop
If enabled, queue will play through items in queue continuously
until stopped or given another command
Note: For DMP-1500 displays, Loop is enabled by default.
74 Daktronics Show Control System Quick Display
Page 82

Scripting Containers and Buttons
If you’re looking for the tools and flexibility to exercise greater control over your displays, scripting
containers are for you. Scripting containers and buttons allow you to control multiple displays at the same
time, send configuration commands to displays, incorporate dynamic data into your content, and much
much more. And just like how all Display Studio Hubs work, each of these actions can be performed with
a click of the button.
Section Contents
Create a scripting container
Manage scripting container properties
Create scripting buttons
Manage scripting buttons
Custom scripting
Create a scripting container
1. Right-click from within the workspace page where you wish to create a container to open its context
menu.
2. Select New > Scripting Container. The Scripting Container Properties screen appears.
3. In the Scripting Container Properties screen, type the name of the scripting container in the text
box.
75 Daktronics Show Control System Scripting
Page 83

4. Click Save to save the container and close the Scripting Container Properties. The scripting
container will appear on the workspace page.
Manage scripting container properties
Various options are available to customize the way a scripting container stores scripting buttons and to
configure the default behavior of scripting buttons. Use the steps below to assist you in setting up your
scripting container how you would like.
1. From within the Scripting Container Properties screen, manage the container using the below
options.
Note: If you’re not already in the scripting container properties screen, right-click from within the
scripting container to open its context menu, and then click Properties.
Add/Delete Page: Click the appropriate button to add or delete a container page.
Show/Hide Page: Click to open the Show/Hide Page drop-down menu. Click to place a checkmark
or remove a checkmark in front of container page(s) you wish to show or hide.
76 Daktronics Show Control System Scripting
Page 84

Container Name: The name of the scripting container may be modified by editing the text in the text
box.
Visible Thumbnails: When enabled, buttons will be created, by default, with their thumbnail images
visible
Button Scale: Click the appropriate button to increase or decrease the size of the buttons within the
container.
Thumbnail Location: Click the appropriate button to select the default location for the thumbnail
images of new buttons
Switch Pages: Click to switch between different container pages. Different pages may also be
accessed by clicking the page’s Container Page Tab.
2. When finished, click Save to close the Scripting Container Properties, or click Cancel.
Create scripting buttons
Scripting buttons provide you with the ability to execute a scripting command, or a list of commands, with
a single click of the mouse. These scripting commands can complete many different types of tasks – from
running display content to performing display tests to managing display settings. Most significantly,
scripting commands allow the user to control multiple displays at the same time.
1. Right-click from within the scripting container and select New Button to open the Button Creation
Window.
2. In the Button Creation Window, type the name of the scripting button in the text box.
77 Daktronics Show Control System Scripting
Page 85

DMP-7000 Player Control: These types of
scripts can affect what is shown on a DMP-7000
display and how media items are shown on a
display.
DMP-7000 Display Control: These types of
scripts affect the settings and other
configuration options of a display.
Video Processor Control: These types of
scripts control the playback of media items
from input sources connected via a Video
Processor.
DMP-8000 Player Control: These types of
scripts can affect what is shown on a DMP-8000
display and how media items are shown on a
display.
DMP-8000 Audio Control: These types of
scripts affect audio playback from a DMP-8000.
System Control: These types of scripts control
the way Display Studio executes script
commands.
Note: Creating a Scripting Button requires the completion of up to six steps. The
steps which are required are determined by the type of button being created. For
illustrative purposes, the following steps will demonstrate how to create a Play Script
which would play a file on one or more DMP-7000 signs.
For information on how to create other commonly used Scripting Buttons, refer to
Common scripting buttons.
3. Click the Add Line button to add a command to the button.
4. Select Script Type. The first step of creating a command, identified by the below the button
name, is selecting the type of script command. The following script types are available.
5. Select the Player Control script type by clicking its corresponding radio button.
6. Proceed to the next step by clicking the below the button name. The buttons to the right
may also be used to move between steps.
7. Select Sign(s). Place a checkmark in the checkbox of the sign(s) you wish to control with this script.
To control multiple signs with the same script command, place a checkmark in the checkbox of each
desired sign. Proceed to the next step.
78 Daktronics Show Control System Scripting
Page 86

8. Select Player Script. Click the radio button next to the script you wish to create. Use the scroll bar on
the right to view all available choices. Continuing with this walkthrough, select the Play radio button.
9. Select File(s). In this step, you will choose the file that will play when the scripting button is clicked.
Click Add to open the File Browser window.
10. Choose the library which contains the desired file. Click Open.
79 Daktronics Show Control System Scripting
Page 87

11. When using the File Browser, the navigation tools can assist with locating the correct file.
Return: Click to close the File Browser and return to the Workspace.
Up One Level: Click to move up one level in the selected sign’s (or signs’) libraries’ folder hierarchy.
Example: If the File Browser is in the Crowd Prompts\Touchdown folder (where Crowd Prompts is the
selected library), click Up One Level to return to the Crowd Prompts folder.
Back and Forward: Click the arrow buttons to move between folders to which you have navigated in
the order you have navigated to them.
12. After you have located the desired file, click it to view details about the file and a preview of its
content. Click Open to choose the file and close the File Browser.
Note: Your sign’s digital media player determines the types of files which may be played on your sign.
Please consult your player’s documentation for a list of such file types.
The chosen file now appears in the Step 4 presentation pane.
80 Daktronics Show Control System Scripting
Page 88

Continuous: Plays the file on the display until the
operator stops it or starts another file.
Number Of Times: Plays the file on the display the
specified number of times. After the file plays the
specified number of times, the display blanks, plays
the default file, or plays the next file in the Queue.
Selected Frame: Plays and holds the selected frame
number in the file until a new command is executed.
Single Step: Plays the file frame-by-frame in
sequential order with the user controlling frame
advancement. For example, the user could play the
words of the National Anthem frame by frame as the
audience sings.
13. Playmode Selection. A script’s playmode allows you to designate the manner in which a file is
played, such as if it will play continuously, only play a certain number of times, or only a particular
portion of the file will play. The following playmodes are available.
14. Select the Number of Times radio button and ensure that the number 1 is entered in the textbox.
15. Select Thumbnail. To designate a thumbnail image for the button, click the button to show the
selected thumbnail preview. To choose a different thumbnail image, click the Browse button to open
the File Browser.
81 Daktronics Show Control System Scripting
Page 89

16. Use the File Browser to locate the desired thumbnail image. You may select any image file to be a
thumbnail.
17. After you have selected the desired thumbnail image, click Open to open that thumbnail and close
the File Browser.
18. Select Color. Color-coding is an effective way to categorize buttons within a container. Click the
button to open the Color Options. Color Options allow you to assign color schemes to buttons,
which can be used as another way to group similar buttons and distinguish different buttons.
82 Daktronics Show Control System Scripting
Page 90

Insert Line
Click to insert a line before the selected line.
Add Line
Click to add a line after all existing lines.
Remove Line
Click to delete the selected line.
Cut
Click to remove the selected line from its current location in order to Paste
it in a different location.
Copy
Click to make a copy of the selected line in order to Paste it in a different
location.
Paste
Click to paste a cut or copied line to a new location.
19. To save a category, type the name of the category in the Edit Category text box, and click the
button to add it to the list. Categories which have already been created can be accessed from the
Category drop-down menu. Click the button to open the drop-down menu.
20. After all steps have been completed, click Save to save your button and return to your workspace. If
you would like to continue making changes to the button, or add additional lines of script, click the
Select Script Line button to return to the list of scripts.
21. Multiple lines of script may be created for a single button. After clicking the Select Script Line button,
use the button creation window’s tools to edit lines and create additional scripts.
Note: In the following descriptions, selected line refers to the line of script that you click before
clicking the tool button.
83 Daktronics Show Control System Scripting
Page 91

Note: Scripting buttons can also be clicked and dragged to another scripting container. To
move a button to another container, simply click and drag it to the desired new location.
To copy a button to another container, while pressing [Ctrl], click and drag the button to
the desired location.
A button can be copied or moved to a new container in one step by clicking and dragging
the button to an empty area of your workspace page.
22. When editing scripts, use the buttons at the bottom of the button creation window at any
time to review the scripts which have been created.
23. After all button settings have been set, click Save to save the button, or click Cancel to close the
button creation window without saving. The newly saved button appears in the scripting container.
Manage scripting buttons
A number of options are available for managing scripting buttons which have been created. To manage a
scripting button, right-click the button you wish to manage to open its context menu.
Copy: Click to create a copy of the selected button (and its scripts) which may be pasted into a scripting
container.
Cut: Click to remove the selected button (and its scripts) from its container so that it may be pasted into a
different scripting container.
Delete: Click to delete the selected button.
Properties: Click to open the Button Creation Window to edit the button.
Note: Multiple buttons’ Button Creation Windows may be opened at one time to allow simultaneous
editing.
Show / Hide Thumbnails: Click to toggle showing and hiding the button’s thumbnail preview.
Custom scripting
Custom Scripting allows you to create and use scripting commands to control how the digital media
players(s) handle presentations and deliver content to a sign.
84 Daktronics Show Control System Scripting
Page 92

Caution: Advanced scripting is not enabled in Display Studio by default. As it involves
more than simply selecting from choices on a list, it is intended for advanced users only.
Entering incorrect data into a custom script can produce unexpected and undesirable
results.
To proceed to use advanced scripting, you must first enable it in Display Studio Settings.
To enable Advanced Scripting:
1. Click the Display Studio Hub to open the Main Menu, then select the Properties submenu. Click
Settings… to open the Display Studio Properties dialog box.
2. In the Advanced section of the dialog box, place a check in the checkbox located next to Enable
Advanced Features.
3. Click OK to save your changes.
To create a Custom Script Command:
For help with getting started creating a Scripting Button, refer to Create a scripting button.
1. In the Scripting Button Creation Window, click the Add Line button to add a command to the
button.
2. In the Select Script Type screen, select the System Control radio button. Proceed to the next step.
3. In the Select System Script screen, select the Advanced radio button. Proceed to the next step.
85 Daktronics Show Control System Scripting
Page 93

4. Select Custom ERTD Script. Click the radio button next to the custom script you wish to create. Use
the scroll bar on the right to view all available choices. Proceed to the next step.
5. Set Custom ERTD. Enter the applicable information for the custom ERTD script.
6. The following are common steps which are required to create a custom script:
a. Protocol: In most cases, UDP/IP should be selected. In instances where it is necessary to transmit
a script to a different subnet, however, TCP/IP and IP Multicast are available options.
b. Address: In most cases, the default value of 255.255.255.255 should be used. When sending a
script to a different subnet, however, a different IP address may be entered.
c. Port: Changes to this number are usually not necessary. By default, the Port number for scripting
is set to 27000. Follow the below steps if you wish to confirm the correct port number for your
sign(s).
86 Daktronics Show Control System Scripting
Page 94

Determining the port for DMP-7000 Sign(s)
i. Launch the Venus 7000 Shell.
ii. Click Configure.
iii. Select the RTD Inputs tab.
iv. Locate the configured RTD input for Commands, and its corresponding port number
(Source). By default, Commands are generally set up on Input #16.
Determining the port for DMP-8000 Sign(s)
i. Right-click on the V-Net icon in the Windows notification area and select Control Panel
to open the V-Net Control Panel.
ii. Select the Edit Configuration Settings tab.
iii. In the RTD Zones group, locate the configured port number in the Source box.
d. Enter the ERTD Sign Number which corresponds to the sign for which you are creating the script.
87 Daktronics Show Control System Scripting
Page 95

Determining the sign number for DMP-7000 Sign(s)
i. Launch the Venus 7000 Shell.
ii. Click Configure.
iii. Select the Signs tab.
iv. Locate the sign you wish to create a custom script for, and scroll right in the signs list to
locate its sign number (listed in the ERTD column).
Determining the sign number for DMP-8000 Sign(s)
i. Right-click on the V-Net icon in the Windows notification area and select Control Panel
to open the V-Net Control Panel.
ii. Select the Edit Configuration Settings tab.
iii. In the RTD Zones group, locate the configured Sign # for the display you are creating a
custom script for.
88 Daktronics Show Control System Scripting
Page 96

e. Enter the letter of the Drive (e.g. “C” or “D” (without quotes)) in which the file you wish to play is
stored.
f. Click the button on the File line to open the File Browser window. Locate the file you wish to
play and click Open. The Library and File boxes will be filled in automatically.
Note: The File filename cannot exceed 32 characters.
7. After setting the custom ERTD script, proceed to complete any remaining steps for creating the script
command.
89 Daktronics Show Control System Scripting
Page 97

Common scripting buttons
Because it is not always clear what script commands need to be created to complete a particular task, this
section will provide you with some assistance. Here you will be taken through the steps involved in
creating scripting buttons for many of the most common tasks needed to be performed on a display
network.
Each subdivision of this section is devoted to a particular task, and will identify the type(s) of script(s) (and
the steps which should be completed for each script) which should be created for the button to
accomplish the specified action. Each task is then, when applicable, further subdivided to describe the
respective steps to follow for DMP-7000 and DMP-8000 displays. For general assistance with creating a
scripting button, see Create scripting buttons.
In the following sections, “steps” refer to the steps involved in creating the script, identified by buttons
through in the script creation window.
Section Contents
Control multiple displays
Play a media file
Queue a Playlist
Blank one or more signs
Show video from an external source
Stats Request
Include scripting from another button
Set a display’s dimming level
Control multiple displays
An important benefit of using scripting buttons is the ability to control multiple displays with a single
button click. This allows you to avoid the hassle of clicking multiple buttons to perform tasks which should
be happening at the same time. The result is a more organized, timely, and coherent presentation.
Use multiple script commands
One way to control multiple displays with a scripting button is by including multiple script commands in
that button. When finished creating one script command, simply click the Select Script Line button
90 Daktronics Show Control System Scripting
Page 98

Notes:
If you want to play a media file on multiple displays, ensure that the media file is
located in the library of each display, and that each of the displays has the same folder
structure (i.e. the path to the file, including folders and subfolders, is the same for each
display).
This method, of course, can only be used when you want multiple displays to do the
same thing (i.e. execute the same type of script).
to return to the list of scripts, and then click to add a script command or to insert a script
command.
Controlling multiple DMP-7000 displays
In addition to using multiple script commands in a scripting button, when creating scripts for DMP-7000
signs, it is possible to create a single script command which controls multiple signs. As you create the
script, when you reach the step which requires you to choose the sign you wish to control, simply check
the box for each display you wish to control – you are not restricted to only selecting one display.
Play a media file
Create a scripting button with a Play script to play a specified media file on a specified sign in a specified
manner.
Create a Play script:
For DMP-7000 Displays:
Step 1: Choose DMP-7000 Player Control Script.
Step 2: Select the Sign on which you want the file to be played.
Place a check in front of the sign on which you want the file to be played.
Step 3: Choose Play.
Step 4: Select the Media File.
Click the Add button to open the File Browser. Locate the media file you wish for the button to
play.
Step 5: Select the desired Playmode.
The playmode designates the manner in which you want the media file to be played.
Continuous: The file will be played continuously until the operator stops it or another file
is started.
Number of Times: The file will be played the specified number of times, and then the display will
91 Daktronics Show Control System Scripting
either blank, play the default file, or play the next file in the display queue.
After selecting the radio button, specify the number of times you want the
file to play.
Page 99

Selected Frame: The specified frame of the file will be played and held until a new command
is executed. After selecting the radio button, specify the frame number you
want played.
Single Step: The file will be played one frame at a time in sequential order. To trigger the
next frame, create a scripting button which contains a Single Step script.
For DMP-8000 Displays:
Step 1: Choose DMP-8000 Player Control Script.
Step 2: Select the Sign on which you want the file to be played.
Place a check in front of the sign on which you want the file to be played.
Step 3: Choose Play File.
Step 4: Select the Media File.
Click the Add button to open the File Browser. Locate the media file you wish for the button to
play.
Step 5: Select the desired Playmode.
The playmode designates the manner in which you want the media file to be played.
Continuous: The file will be played continuously until the operator stops it or another file
is started.
Number of Times: The file will be played the specified number of times, and then the display will
either blank, play the default file, or play the next file in the display queue.
After selecting the radio button, specify the number of times you want the
file to play.
To play a media file on other signs at the same time:
1. After creating the Play script, click to return to the Select Script Line screen.
2. Click to add a new script command.
3. Repeat the above steps for creating a Play script for each additional sign, making sure to select
the appropriate sign in Step 2.
Queue a Playlist
Create a scripting button with a Create Playlist script to play a specified set of media files on one or more
DMP-7000 signs in a specified manner. When this button is executed, the sign’s (or signs’) display
queue(s) will be cleared, the playlist’s media files will be added to the queue(s), and the first file will start
to play.
Create a Create Playlist script:
Step 1: Choose DMP-7000 Player Control Script.
Step 2: Select the Sign(s) on which you want the files to be played.
Place a check in front of the sign(s) on which you want the files to be played.
92 Daktronics Show Control System Scripting
Page 100

Step 3: Choose Create Playlist.
Step 4: Select the Media Files.
Click the Add button to open the File Browser. Locate the media file you wish for the button to
play. The Insert button can also be used to insert files into the playlist.
Step 5: Select the desired Playmode.
The playmode designates the manner in which you want the media files to be played.
Continuous: The file will be played continuously until the operator stops it or another file
is started.
Number of Times: The file will be played the specified number of times, and then the display will
either blank, play the default file, or play the next file in the display queue.
After selecting the radio button, specify the number of times you want the
file to play.
Selected Frame: The specified frame of the file will be played and held until a new command
is executed. After selecting the radio button, specify the frame number you
want played.
Single Step: The file will be played one frame at a time in sequential order. To trigger the
next frame, create a scripting button which contains a Single Step script.
Blank one or more signs
A scripting button with a Blank Sign script will, when clicked, make the specified sign(s) go blank and
clear their respective display queues.
Create a Blank Sign script:
For DMP-7000 Displays:
Step 1: Choose DMP-7000 Player Control Script.
Step 2: Select the Sign(s) you would want to be blanked.
Place a check in front of the sign(s) you want this script to control.
Step 3: Choose Blank Sign.
For DMP-8000 Displays:
Step 1: Choose DMP-8000 Player Control Script.
Step 2: Select the Sign(s) you would want to be blanked.
Place a check in front of the sign(s) you want this script to control.
Step 3: Choose Blank Display.
Show video from an external source
To play video on a sign, create two scripting buttons – one to initialize the video processor and another to
key the video.
93 Daktronics Show Control System Scripting
 Loading...