

Page 1

School SID
NAIA Web-Sync Manual
DD1379209 Rev 7 – 24 July 2013
201 Daktronics Drive PO Box 5128 Brookings, SD 57006-5128
Tel: 1-800-DAKTRONICS (1-800-325-8766) Fax: 605-697-4746
www.daktronics.com/support
Page 2

DD1379209
Rev 7 – 24 July 2013
DAKTRONICS, INC.
Copyright 2009-2013
All rights reserved. While every precaution has been taken in the preparation of this manual, the publisher
assumes no responsibility for errors or omissions. No part of this book covered by the copyrights hereon may be
reproduced or copied in any form or by any means – graphic, electronic or mechanical, including photocopying,
taping or information storage and retrieval systems – without written permission of the publisher.
DakStats® and Web-Sync® are trademarks of Daktronics, Inc. All other trademarks used in this manual are property of their
respective owners.
Page 3

i
Table of Contents
Section 1: Introduction ................................................................................................................. 1
1.1 System Overview .................................................................................................................... 1
1.2 DakStats / NAIA History ...................................................................................................... 1
1.3 Web-Sync Integration ............................................................................................................. 1
1.4 Statistical Updates ................................................................................................................... 1
1.5 Missing Stats Reports ............................................................................................................. 2
1.6 Software Conventions ............................................................................................................ 2
1.7 DakStats and Web-Sync Support .......................................................................................... 3
Section 2: DakStats Installation .................................................................................................. 5
2.1 Installation................................................................................................................................ 5
2.2 Season Update ......................................................................................................................... 5
Section 3: DakStats Setup ........................................................................................................... 7
3.1 Creating Seasons ..................................................................................................................... 7
3.2 Creating a Web-Sync Profile .................................................................................................. 8
3.3 Entering Schedules .................................................................................................................. 8
Adding Teams .................................................................................................................. 8
Creating Games ................................................................................................................ 9
Importing Games ............................................................................................................. 9
3.4 Entering Rosters .................................................................................................................... 10
Creating a Roster ............................................................................................................ 10
Downloading Opponent Rosters ................................................................................. 10
Section 4: Web-Syncing ............................................................................................................. 11
4.1 Web-Syncing .......................................................................................................................... 11
Season .............................................................................................................................. 11
Game ................................................................................................................................ 11
4.2 Submitting & Retrieving Game Files .................................................................................. 12
Submit Game File ........................................................................................................... 12
Retrieve Game File ......................................................................................................... 12
4.3 Web-Sync Message Center ................................................................................................... 12
Viewing General Messages ........................................................................................... 13
Viewing Game Download Message ............................................................................ 13
Hiding Messages ............................................................................................................ 13
4.4 Advanced Features ............................................................................................................... 14
Downloading Opponent Rosters ................................................................................. 14
Merging Competitions .................................................................................................. 15
Reconcile Career Player IDs ......................................................................................... 16
Set Webcast Links .......................................................................................................... 16
4.5 Publisher-Ready Reports...................................................................................................... 17
Section 5: Webcast Feature ....................................................................................................... 19
5.1 Webcast on Web-Sync Computer ....................................................................................... 19
Configuring the Web-Sync Webcast ............................................................................ 19
Setting Webcast Links on Web-Sync Site .................................................................... 19
5.2 Webcast on Secondary Computer ....................................................................................... 19
5.3 Webcasting During the Game ............................................................................................. 20
Table of Contents
Page 4

5.4 WebTickers ............................................................................................................................. 20
Section 6: Web-Sync Team Admin Pages ................................................................................. 21
6.1 Login ....................................................................................................................................... 21
6.2 Editing Team and Sponsor Information ............................................................................. 22
Team Information .......................................................................................................... 22
Team Page Background Color and Text Color ........................................................... 22
Team Logo....................................................................................................................... 22
Division, Region, or Conference Alignment ............................................................... 23
Sponsor Advertisements ............................................................................................... 23
6.3 Managing Headshots ............................................................................................................ 23
Section 7: Web-Sync Tournaments ........................................................................................... 25
7.1 Web-Sync Tournament Setup .............................................................................................. 25
7.2 DakStats Version ................................................................................................................... 25
7.3 DakStats Setup ....................................................................................................................... 25
7.4 Web-Syncing Tournament Statistics ................................................................................... 26
Section 8: Troubleshooting Common Problems ...................................................................... 27
8.1 Duplicate Players within Rosters ........................................................................................ 27
8.2 Duplicate Teams within DakStats ....................................................................................... 27
8.3 Invalid Team Code When Web-Syncing ............................................................................ 28
8.4 Moving DakStats to a New Computer ............................................................................... 28
8.5 Deleting Games / Duplicate Games on Web-Sync Site ................................................... 28
8.6 Incorrect Career Statistics ..................................................................................................... 29
8.7 Deleting Players from the Web-Sync Site .......................................................................... 29
Appendix A: DakStats & Web-Sync Setup Checklist ....................................................................... 31
ii Table of Contents
Page 5

Section 1: Introduction
The purpose of this manual is to help familiarize a NAIA Sports Information Director (SID) with
setting up a DakStats® application for the Web-Sync process.
1.1 System Overview
A DakStats application with the Web-Sync process creates a centralized location for league
statistics while reducing the amount of time it takes to compile and distribute statistics to the
national office, other coaches, and the media. The Web-Sync service automates the collection
and distribution of player, team and league statistics by allowing the user to quickly report
statistics. Statistics can either be entered directly into the DakStats program or imported from
XML game files provided from third-party statistics software.
1.2 DakStats / NAIA History
DakStats programs have been the official statistical provider for the NAIA since 2001. Before
being named the official statistical software, DakStats programs were already involved in a
variety of NAIA national tournaments.
At the beginning of the DakStats/NAIA partnership, it was the responsibility of the
conference SID to report season-to-date files. This was a labor-intensive process, and in
January 2004, the Web-Sync service was launched, allowing schools to Web-Sync statistics on
their own and eliminating work for the middle man. Web-Syncing was initially used for
Basketball, and, in that first season, school participation was already at 80%. Football and
Baseball Web-Sync came online soon after, as well as Volleyball and Soccer most recently.
In August 2006, a revised Web-Sync site was launched, including a new layout. Additional
enhancements were released in subsequent years, providing users with new reports and
leader lists.
Page views for the Web-Sync site topped 20.6 million in the 2011-2012 season, illustrating the
success of the DakStats/NAIA partnership.
1.3 Web-Sync Integration
Daktronics has worked with other NAIA partners to automate many of the stats-related tasks
of SIDs. Information is distributed to partners to automate the following tasks:
Player of the Week Nominations
NAIA Scoreboard
All-American Voting
Schedule Entry
Regional Rankings
Year-End Statistics
1.4 Statistical Updates
Upon the completion of a successful Web-Sync, game statistics on the site update
immediately. Season cumulative statistics and rankings do not update until 3 a.m. CST
during a nightly process to tabulate and calculate the statistics.
Introduction 1
Page 6

Updated Immediately
Bold
Indicates an item that requires direct action, such as clicking, pressing,
selecting or formatting.
Italics
Indicates onscreen text or labels that are not clickable.
Bold Italics
Used to reference items within the manual, such as figures or sections, as
well as other documents and important notes.
[X]
Represents a keyboard key that needs to be pressed.
“Quotes”
Text or commands that may be typed. Quotes also indicate folder names.
Click
Press and release the left mouse button.
Double-click
Press and release the left mouse button twice.
Right-click
Press and release the right mouse button.
Select
Highlight or mark, such as by placing a check mark in a nearby box;
clicking will not necessarily perform an action.
>
Followed by (ex. File > Open).
The following portions of the Web-Sync site are updated right after a successful Web-Sync:
Box Scores
Game Score
Team Win / Loss Record
Updated at 3 a.m. CST
The following portions of the Web-Sync site are updated at 3 a.m. CST following a successful
Web-Sync:
Conference Leaders
National Leaders
Player Cumulatives
Team Cumulatives
Player Career Statistics
1.5 Missing Stats Reports
When statistics are missing for a game, Daktronics sends a nightly “Statistics Missing Report”
to the school, the conference SID, and the NAIA Sports Information department, depending
on how long the statistics have been missing.
The nightly PDF report goes out to the following individuals after the following number of
days has passed:
2 days – School Web-Sync User (this email goes to the email addressed entered into
the Web-Sync Profile for the sport/gender).
4 days – Conference SID
7 days – NAIA SID
A weekly report is also sent to Conference SIDs and the NAIA Sports Information
department on Tuesday of every week. This report includes any games that have been
missing stats for 72 hours or more in accordance with the NAIA statistics reporting policy.
1.6 Software Conventions
This manual contains the following software conventions and terminology:
2 Introduction
Page 7

1.7 DakStats and Web-Sync Support
DakStats.com includes a searchable Support Knowledgebase that can help answer many
questions about the DakStats program or the Web-Sync process. To search the articles, go to
www.dakstats.com and click Support.
If any question is not answered after reading the Support Knowledgebase, contact the
DakStats Helpdesk at dakstats@daktronics.com or call 888-325-7828.
Introduction 3
Page 8

Page 9

Section 2: DakStats Installation
2.1 Installation
1. Download the DakStats program.
a. Open an Internet browser.
b. Type www.dakstats.com/download.html in the address bar.
c. Click on Click Here next to the appropriate sport software to download.
d. In the window that appears, click Run. If an additional window opens, click
Run once more.
2. Follow the onscreen instructions.
3. Click Finish when done.
4. Double-click the desktop icon to open the program. Alternately, click on the
Windows Start button, navigate to All Programs > “DakStats(R)”, and select the
appropriate sport program.
2.2 Season Update
If previous seasons are saved to the computer, go to Configure > Season & System
Preferences. Select each existing season, and then click Update. This ensures older season
databases are compatible with the latest software version.
DakStats Installation 5
Page 10

Page 11
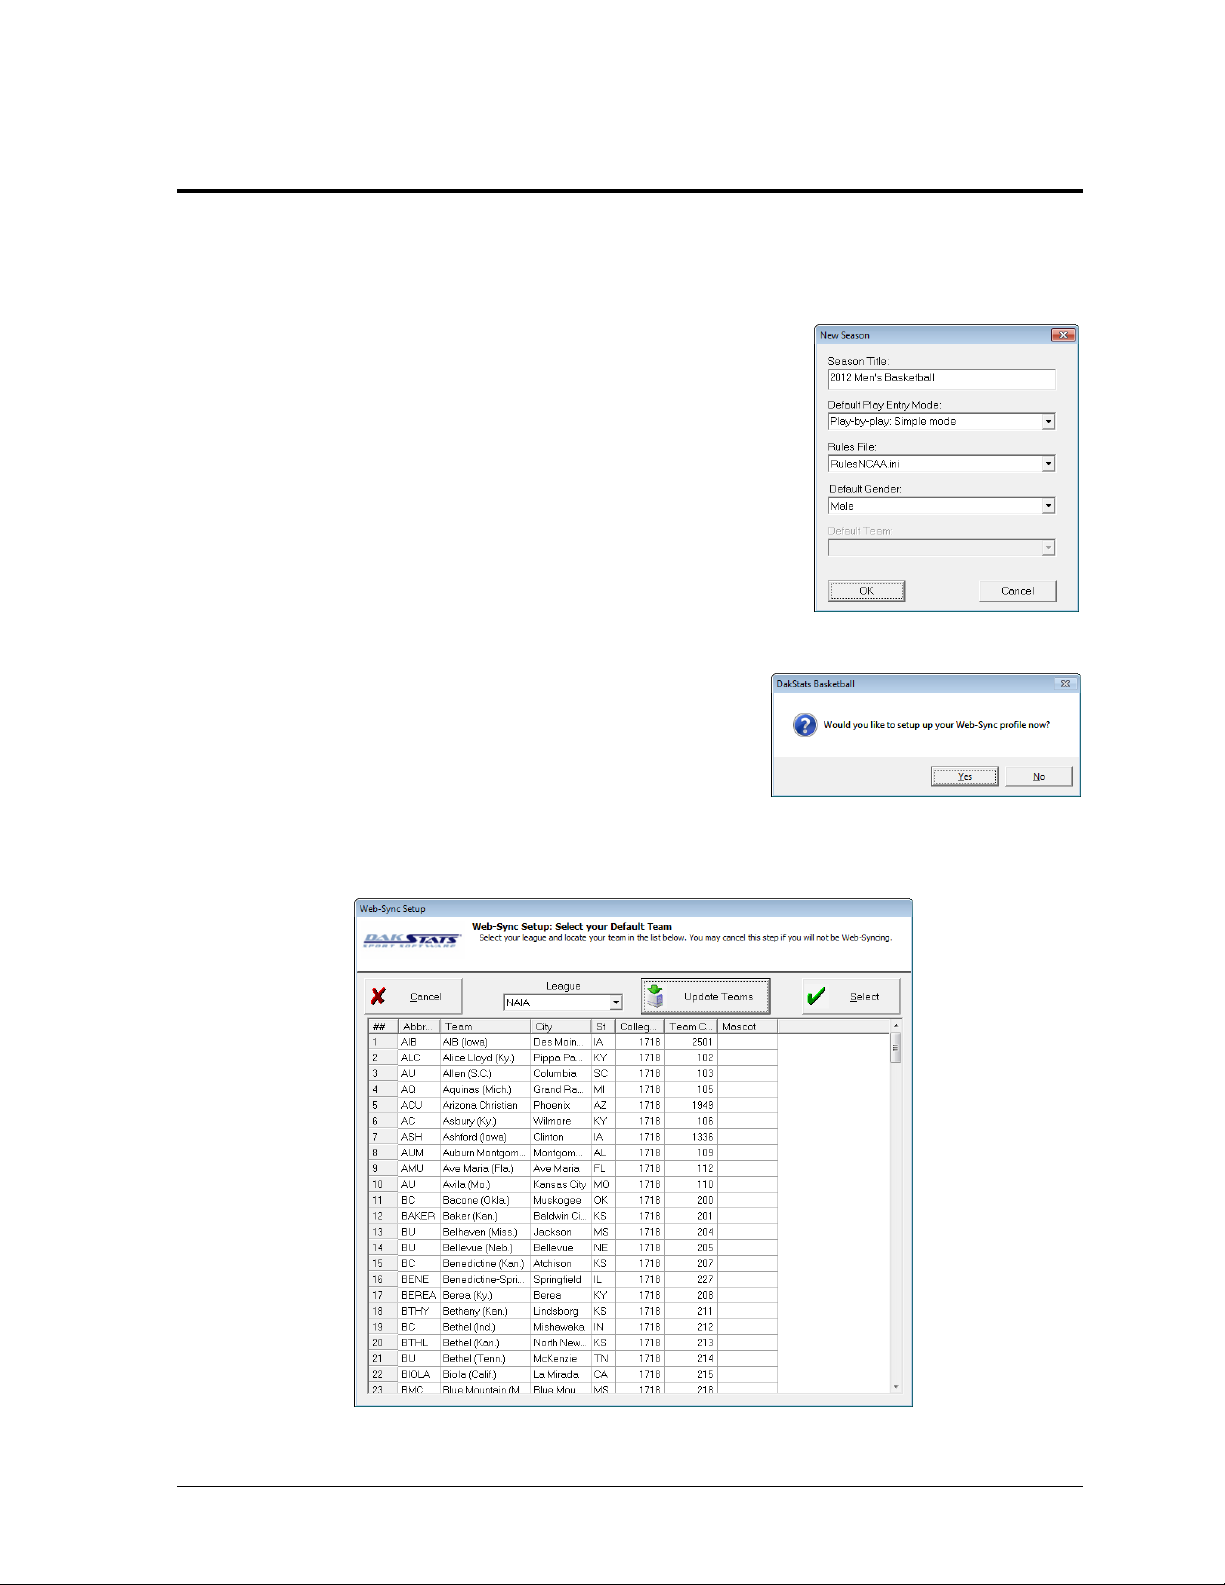
Figure 1: New Season
Figure 2: New Season Setup
Figure 3: Setting Default Team
Section 3: DakStats Setup
If already familiar with setting up a DakStats application, refer to Appendix A for a simple checklist of
steps. Otherwise, read the following sections to correctly set up the DakStats program:
3.1 Creating Seasons
1. In the DakStats program, go to Configure > Season
and System Preferences.
2. Click Add to open the New Season window (Figure 1).
3. Enter a descriptive Season Title.
4. Select the Default Play Entry Mode.
5. Select RulesNCAA.ini as the Rules File.
6. Select the Default Gender.
7. Click OK.
Note: As long as Web-Sync is unlocked, a prompt will
appear asking to set up a Web-Sync profile (Figure 2).
Click No to return to the System Preferences
window. Refer to Section 3.2 to continue.
Click Yes to open the Web-Sync Setup window
(Figure 3) and set the default team.
a. Select NAIA as the League.
b. Select the appropriate team from the list
that appears. If necessary, click Update
Teams to refresh the list.
c. Click Select when finished and refer to Section 3.2 , Step 5 to continue.
DakStats Setup 7
Page 12

3.2 Creating a Web-Sync Profile
Figure 4: Creating a Web-Sync Profile
1. Go to Web-Sync > Setup.
2. Click Add Profile (Figure 4).
3. Select NAIA as the League.
If NAIA does not appear, click
Update Leagues.
4. Select the home team from the
Teams list. If your team does not
appear, refer to the Adding
Teams section below.
5. Fill in the Email field (required).
6. Select a Profile Type:
Full Web-Sync: This profile
type gives the user full control
of a team’s Web-Sync page,
including the ability to add,
edit, and delete rosters,
games, and statistics.
Retrieve Only Web-Sync:
This profile type should only
be used to Webcast from a
secondary laptop instead of
the main Web-Sync laptop.
Single Game Web-Sync: This profile is not currently used by NAIA schools.
Tourney Host Web-Sync: This profile type is meant for tournament hosts, often
times third party schools. New games and statistics for those games may be
uploaded, but rosters cannot be edited.
7. Click Save to save the profile, and then click Done when finished.
3.3 Entering Schedules
Schedules are used to set up each game that the team will play in a season. It is also possible
to import XML files to create a schedule.
Note: It is highly recommended to enter the team’s entire schedule and perform a Web-
Sync before the season starts so that fans and media can view the full schedule online.
Adding Teams
1. Go to Configure > Teams.
2. Select a Season.
3. Under Add New Team, click Via List.
4. On the Look Up League ID window (similar to Figure 3), select NAIA as the League,
and then select the team(s).
Note: To select more than one team at once, hold the [Ctrl] key while clicking.
5. Click Select and the new teams will be added to the season.
6. For each team, type in any other information as desired. Note that when a new game
is created, the Stadium, City, and State will populate based on the selected home team.
8 DakStats Setup
Page 13

Figure 5: File Type
Figure 6: Problem Resolving Team
Creating Games
1. Go to File > New Game, and enter the following information:
Season
Visiting Team
Home Team
Game Type
Start Time
Entry Mode
Date of the game
Note: It is important to enter the proper game date. Incorrect dates will cause
duplicate games to appear on the Web-Sync site.
2. Other information on the screen is optional. Information entered can be edited later
by going to Configure > Games.
Importing Games
DakStats has the ability to import game files from other DakStats users as well as from thirdparty statistical software programs.
1. Go to File > Import Game.
2. Select the File Type (Figure 5).
To import a file from DakStats software, select
DakStats (*.txt) for box score information or
DakStats Pbp (*.pbx) for full play-by-play commentary
To import an XML file from Stat Crew
SC XML [*.xml].
3. Click Change Import Directory to select the folder from
which to import the file.
Note: Any game files in the directory will not be visible until OK is clicked.
4. Select the Season.
5. Highlight the game to import from the games listed on the left.
6. Click Import File.
If the Please select the appropriate TEAM window appears (Figure 6), match the
team listed at the top with the same team listed below, and then click Select.
If the team does not exist in the list, click Add New.
®
software, select
DakStats Setup 9
Page 14

If the Please select the appropriate PLAYER window appears (Figure 7), match the
Figure 7: Problem Resolving Player
player listed at the top with the same player listed below, and then click Select.
If the player does not exist in the list, click Add New.
7. When the import is complete, the game file will disappear from the left side of the
screen and the game will appear in the list of games on the right. Repeat the above
steps until all of the desired game files are imported into the season.
3.4 Entering Rosters
Enter the roster into DakStats for the current season. Rosters entered into DakStats can also be
imported into SID Help. When the season is Web-Synced for the first time, the system will
prompt the user to reconcile the career stats from previous seasons (see Section 4.4). Changes
to the roster can be made later if necessary.
Creating a Roster
1. Go to Configure > Rosters.
2. Select the Season.
3. Select the Team.
4. Click Add New.
5. Enter the Player Number, Player First Name, and Player Last Name. All other
information is optional.
6. Click Save.
7. Repeat Steps 1-6 for additional players on the team.
Downloading Opponent Rosters
If a team is NAIA, it may be possible to download their roster. See Section 4.4 to download
opponent rosters. If they are not NAIA, they must be entered as stated above.
10 DakStats Setup
Page 15

Figure 8: Completed Web-Sync Process
Section 4: Web-Syncing
After all of the statistics have been correctly entered for a game, they should be Web-Synced as soon
as possible. If unfamiliar with DakStats entry, please consult the DakStats manual or quick start guide
for the appropriate sport. The steps below will explain the Web-Sync process.
4.1 Web-Syncing
Season
Performing a season (full) sync uploads
every game in the season as well as the
complete roster information.
1. Go to Web-Sync > Setup.
2. Under Select Web-Sync Profile,
select the profile created in
Section 3.2.
3. Enter the Password.
Note: If the password is not
known or it is lost, please contact
dakstats@daktronics.com.
4. Click Synchronize.
5. When the Web-Sync process is
finished, a message will say
Successfully completed the sync.
Thank you!!! (Figure 8).
6. Click Done when finished.
Alternate method to Web-Sync season:
Go to Web-Sync > Web-Sync Season, and then select the previously configured season.
Follow steps 3-5 above to complete the sync.
Game
Performing a game (single) sync uploads information for the currently opened game.
Note: A single game sync may only be performed on the day of or day after the game,
typically by the home team.
1. After the game is finished, go to Web-Sync > Web-Sync Game.
1. Enter the Password.
2. Click Sync Single.
3. Click Done when finished syncing the competition.
On the Web-Sync page for the competition, scores and stats for both the home and guest
teams will be displayed. In addition, the game’s “.txt” file is uploaded to the Web-Sync
server, and a message will be sent to the opposing team’s Message Center (Figure 10), which
will allow them to download the competition to their computer.
Web-Syncing 11
Page 16

4.2 Submitting & Retrieving Game Files
Figure 9: Retrieve Game
Figure 10: Web-Sync Message Center
Web-Sync users can quickly share game files by submitting them to and retrieving them from
the DakStats server. This eliminates the extra effort of exporting and emailing game files
between teams. This can also be used as a way to backup games online in case of hard drive
crashes or other data loss.
Submit Game File
1. With the game open, go to Web-Sync > Submit game file.
2. Click OK after the file is successfully uploaded.
Retrieve Game File
1. Go to Web-Sync > Retrieve game file.
2. In the Retrieve Game window (Figure 9),
select a Web-Sync profile to view
available games saved on the server.
3. Select a game from the list, and then click
one of the following buttons:
Opponent Version: Contains the
stats uploaded by the opponent for a
competition
Home Version: Contains the stats
uploaded by the team in the selected
Web-Sync profile
Server Version: Contains only the
limited box score
Note: Users should download the Home
team’s file when one is available.
4. Click Done when finished.
An alternate way to retrieve games involves the Web-Sync Message Center (refer to Section 4.3
for more information on this feature).
4.3 Web-Sync Message Center
The Web-Sync Message Center (Figure 10) is a
central hub for viewing messages about software
updates, new games to retrieve, and other
important information from the DakStats team.
To activate the Web-Sync Message Center, close
any open games and go to Web-Sync >
Show/Hide Message Center. The DakStats
animation on the splash screen will then be
replaced with the message center.
To view new messages, users must first select a
Web-Sync profile below the message center. Each
message contains a Date, Title, and Hide column.
12 Web-Syncing
Page 17

Figure 11: General Message
Figure 12: Game Download Message
Viewing General Messages
1. Double-click a general message to view it in its own window (Figure 11).
2. Click OK to exit.
Right-clicking a general message presents users with the following options:
Browse to Url: Click to open a related website in the default web browser.
Hide: Click to hide the message.
Viewing Game Download Message
1. Double-click a game download message to view it in its own window (Figure 12).
2. Click OK to exit.
Right-clicking a game download message presents users with the following options:
Download Available Game: Click to open the Retrieve Game window (Figure 9).
Browse to Url: Click to open the game’s Web-Sync site in the default web browser.
Hide: Click to hide the message.
Hiding Messages
Click the box in the Hide column to instantly hide a message. Alternately, right-click a
message and select Hide. Click Show All Messages to make any hidden messages visible.
Web-Syncing 13
Page 18

4.4 Advanced Features
Figure 13: Web-Sync Advanced Features
To access the advanced Web-Sync features:
1. Go to Web-Sync > Setup.
2. Under Select Web-Sync Profile, select the
profile created in Section 3.2.
3. Enter the Password.
4. Click the Advanced Features button, and
the Web-Sync Advanced Features window
will open (Figure 13).
Downloading Opponent Rosters
If NAIA teams have already Web-Synced their
rosters, they may be downloaded instead of
manually entered.
Note: If it is early in the season, opponents may
not have Web-Synced current rosters. If this is
the case, the previous year’s roster will
download and will be available for edit later.
1. Select the desired team under Download Opponent’s Roster on the Web-Sync Advanced
Features window (Figure 13).
2. Click Download.
3. Follow steps 1-2 to download the roster for each team in the schedule.
Alternate methods to download rosters:
With a competition open, click on the Web-Sync menu and select either
Download Visitor Roster or Download Home Roster.
From the main DakStats screen, select a Season and a Team, and then click
Download Roster.
Note: Downloading an opponent’s roster only works for other teams who use the
Web-Sync service. Teams must first be added to the current season by going to
Configure > Teams.
14 Web-Syncing
Page 19

Figure 14: Merge Competitions
Merging Competitions
Games will occasionally be duplicated if not created properly. DakStats will ask the user
to merge these games during the sync.
Note: The merging process may be avoided by creating each game with the correct
date, home and visiting team, and start time. When both teams will be syncing, be
sure that each team has matching information.
1. Click Merge on the Web-Sync Advanced Features window (Figure 13). In the
DakStats Web-Sync Merge Competitions window (Figure 14), the list on the left
shows possible duplicate games. After highlighting a game on the left, similar
competitions will appear on the right.
Note: Double headers can appear as possible duplicates because of the same date.
2. If the game on the left is the same as the competition on the right, highlight the
game on the right and click Merge. Once all duplicated games have been
merged, click Done.
Web-Syncing 15
Page 20

Reconcile Career Player IDs
Figure 15: Verifying Career IDs
Figure 16: Setting Webcast Links
If a school has used the Web-Sync
service in previous years and there are
returning players, players’ years can be
linked to produce career statistics. It is
important to ensure that returning
players are properly linked.
1. Click Career IDs on the Web-
Sync Advanced Features
window (Figure 13).
2. The current roster is on the
left, and last year’s roster is on
the right (Figure 15). Match up
each player using the drop
down lists on the right. Select
New Player for new players to
the team.
3. Players that are matched up correctly will appear in white. Mismatched players or
new players will appear in yellow. Players may be mismatched because of
misspellings on one of the rosters, or a last name has been changed.
4. Once all players are reconciled, click Done.
Set Webcast Links
This window lets users select which
competitions should include a link to
a Webcast from the Web-Sync
schedule page. Refer to Section 5 for
more information about setting up
Webcasts.
1. Click Webcast Links on the
Web-Sync Advanced Features
window (Figure 13).
2. On the Schedule Webcasts
window (Figure 16), change
the Webcast value to Yes for
each competition that will
feature a Webcast by the
home or visiting team.
3. Click Done when finished.
16 Web-Syncing
Page 21

Level
Scope
Division
Individual Leaders
Team Leaders
Conference
Individual Leaders
Team Leaders
Team
Individual Stats
Team Stats
Player
Player
Figure 17: Publisher-Ready Reports
4.5 Publisher-Ready Reports
Publisher-Ready Reports allow users to quickly generate tab-delimited readouts of statistics
and leaders off a Web-Sync site from within DakStats. These reports may be copied and
pasted or saved and imported into desktop publishing programs.
1. Go to Web-Sync > Publisher-Ready Reports.
2. In the Publisher-Ready Reports window (Figure 17), select a previously created Profile.
Note: Make sure the Web-Sync Connected message appears in the lower-left corner.
If the Web-Sync Connection Error message appears, click Refresh to try again. If the
message persists, verify the DakStats computer is connected to the Internet.
3. Select a Season. Any previously Web-Synced season is available.
4. Under Level, select Division, Conference, Teams, or Player.
Note: At this point, users may check Opponent and select an opposing team, or
simply leave MY TEAM selected.
5. Leave the Type set to Stats.
6. Select a Scope. The settings will vary based on the selected Level:
Web-Syncing 17
Page 22

7. Select a Category. The available categories will vary based on the Scope and the sport,
Level
Season
Scope
Category
Type
and are also visible on the Web-Sync page:
8. Leave Overall selected to show all stats or click Conference to filter the stats.
9. After selecting the desired settings, click GO to generate the report.
10. After successfully generating a report, users have a couple options for getting the raw
data into a publishing program:
Click Copy To Clipboard to take a quick snapshot of the data that can be pasted
into the publishing program.
Click Save As to save the report as a text file that can be imported into the
publishing program.
Note: Once the data is in the publishing program, it may be necessary to use the
[Tab] key to manually adjust the spacing between the stat categories so that the
correct information lines up between each player or team.
18 Web-Syncing
Page 23

Figure 18: Enabling the Web-Sync Webcast
Section 5: Webcast Feature
Web-Sync users may use the Webcast feature to send live game information and statistics to the
Internet for fans and media to view. In order to use the Webcast feature, stats must be entered in
Play-by-play mode and Internet access at the venue is required.
Webcast may be used on the same computer used for Web-Sync, or on a different computer altogether.
Setup will vary slightly between the two options.
5.1 Webcast on Web-Sync Computer
Follow the steps below to set up the Webcast feature on the same computer that is used for
Web-Syncing.
Note: Games must be Web-Synced before they can be Webcasted.
Configuring the Web-Sync Webcast
1. Go to Webcast > Configure to open
the DakStats Webcast Properties
window (Figure 18).
2. Click on the Web-Sync tab.
3. Click Enable Web-Sync.
Note: Do not change the default URL.
4. Click Apply.
5. Click OK.
Setting Webcast Links on Web-Sync Site
The Web-Sync site will not automatically display the link to Webcasts for games until the
game is opened. However, the links can be set to show up for all future games. This step is
entirely optional. Refer to Section 4.4 for more information.
5.2 Webcast on Secondary Computer
Many schools take a laptop to games to record statistics and Webcast and then transfer the
statistics to a different computer in order to Web-Sync. To perform this process, the Webcast
will need to be set up a little differently, as explained in the following steps.
1. In the DakStats program, go to Web-Sync > Setup.
2. Click Add Profile.
3. Select the Association, Season, and Team from the appropriate menus.
4. Enter a valid Email address.
5. Change the Profile Type to Retrieve Only Web-Sync.
6. Click Save.
7. Click Done.
Get the rosters for opponent teams as explained in Section 4.4.
Configure the Webcast Component as explained in Section 5.1.
Set the Webcast Links on the Web-Sync site as explained in Section 4.4.
Webcast Feature 19
Page 24

5.3 Webcasting During the Game
Figure 19: Webcast Indicator
Figure 20: Viewing Webcast Links
Figure 21: DakStats WebTicker
1. Open the game that is about to begin.
2. Go to Webcast > Start.
3. An indicator in the Game in Progress bar will turn from red to green if the game is
successfully Webcasting (Figure 19).
Note: To view the current Webcast:
1. Go to www.dakstats.com/websync.
2. Navigate to the team’s webpage, and links will be available as shown in Figure 20.
Games with the ((W)) links have either been properly set up for a future Webcast or have
already occurred and have been Webcasted.
5.4 WebTickers
DakStats WebTickers (Figure 21) are a quick and easy
way to display live game scores and schedules for any
Web-Sync league on an outside website. Refer to the
DakStats WebTicker Quick Guide (DD1685707) for
more information.
20 Webcast Feature
Page 25

Figure 22: Web-Sync Home Page
Figure 23: Member Login Page
Section 6: Web-Sync Team Admin Pages
This section explains how to manage and edit team pages on the Web-Sync site. With the Team
Administration pages, users can edit team information displayed on the Web-Sync site, edit team
background and text colors, and upload team logos, sponsor advertisements, and headshots.
Note: Any images that are uploaded will not appear until approved by a DakStats representative.
Images may only be uploaded using Microsoft® Internet Explorer® (NOT Mozilla Firefox®).
6.1 Login
1. Open an Internet browser and go to www.dakstats.com/websync.
2. Click Member Login at the top of the page (Figure 22).
3. On the Member Login page (Figure 23), type in the Username and Password and then
click Login.
Note: The Username is the Team Code. The Password is the Web-Sync password.
If this information is not known or lost, please contact dakstats@daktronics.com.
Web-Sync Team Admin Pages 21
Page 26

6.2 Editing Team and Sponsor Information
Figure 24: Editing Team and Sponsor Information
Figure 25: Picking Colors
The Edit Team and Sponsor Information page is used to change team information as well as
upload and edit team logo and sponsor advertisements.
1. On the main School Administration
page, click Edit Team and
Sponsor Information below the
appropriate sport (Figure 24).
2. Click Save at the bottom of the
screen after making the desired
changes.
Team Information
All of the following information entered on the Edit Team and Sponsor Information page is
optional, but it is helpful to include for fans and media viewing the site:
Stadium name
Stadium address
Stadium city
State
Zip code
A personal email address or the coach’s email address. Email addresses are NOT
visible to fans viewing the site.
School athletic website address
Coach’s name
School enrollment
Team Page Background Color and Text Color
Use this feature to change the background and text color
of team pages.
1. On the Edit Team and Sponsor Information page,
click Select New below Team Page Background
Color to select a color for the pages.
2. Pick a background color (or enter specific values
in the boxes), and then click Select Color to save
the changes (Figure 25).
3. On the Edit Team and Sponsor Information page,
click Select New below Team Page Text Color to
select a color for the text.
4. Pick a text color and then click Select Color to
save the changes (Figure 25).
Team Logo
Use this feature to upload a team logo.
Note: The logo must be formatted at 72 DPI and at least 60 x 60 pixels.
1. On the Edit Team and Sponsor Information page, click Browse under Team Logo.
2. Locate the desired logo image file, and then click Open.
22 Web-Sync Team Admin Pages
Page 27

Figure 26: Managing Headshots
Division, Region, or Conference Alignment
If the school changes division, region or conference, the alignment may be changed on the
Edit Team and Sponsor Information page as needed:
Select the new division from the Divisions dropdown menu.
Select the new region from the Regions dropdown menu.
Select the new conference from Conferences dropdown menu.
Sponsor Advertisements
Sponsor advertisements may be uploaded to a team’s Web-Sync site as a means of earning
extra money for the team. There is a maximum of two advertisements per team.
Note: Recommended sponsor advertisement size is 200 pixels wide by 125 pixels high.
Maximum image file size is 200KB.
1. On the Edit Team and Sponsor Information page, click Browse under the Sponsor
Advertisement heading.
2. Locate the desired logo image file, and then click Open.
6.3 Managing Headshots
Player headshots may be uploaded to appear on individual stats pages. The same headshot
images can also be used for Webcasts.
Note: Recommended headshot size is 60 x 60 pixels. Maximum image file size is 200KB.
1. On the main School Administration
page, click Manage Headshots.
2. Click Browse below a player’s name
(Figure 26).
3. Locate the appropriate headshot
image file, and then click Open.
4. When done uploading headshots, click
Save at the top or bottom of the page.
Web-Sync Team Admin Pages 23
Page 28

Page 29

Section 7: Web-Sync Tournaments
The DakStats program includes a tournament feature to make it easy for Web-Sync users to compile
tournament results and statistical leaders. The site includes team and individual stat leaders,
tournament results, and Webcasts. It also allows the tournament host to report stats directly to the
Web-Sync site so the results will be included with season stats for each team.
Cumulative tournament statistics on the tournament pages update every time a user Web-Syncs,
instead of during the nightly process that regular Web-Syncing goes through. This ensures
tournament statistics are the most up-to-date.
7.1 Web-Sync Tournament Setup
The tournament must be registered. To do so, contact Daktronics with the following
tournament information:
Start date
End date
Number of teams
Host school
Contact information
After receiving the tournament information, Daktronics will set up the tournament and
supply a Tournament ID and Password. Email dakstats@daktronics.com or call 888-325-7828
to set up a tournament.
7.2 DakStats Version
Refer to Section 2.1 for instructions on downloading the latest version of DakStats. Be sure to
close any open DakStats program before reinstalling.
7.3 DakStats Setup
To initially set up DakStats for a tournament, the following steps must be completed.
1. Create a Season (Section 3.1).
2. Enter Teams (Section 3.3).
3. Create a Web-Sync Tournament Profile:
Note: Create the Web-Sync profile as described in Section 3.2. However, select
Tourney Host Web-Sync as the Profile Type. Enter the League ID in the Tournament Set
Up section and click Verify Tournament.
4. Retrieve Rosters (Section 4.4).
5. Create Games (Section 3.3).
6. Add games to the tournament:
a. Go to Web-Sync > Setup.
b. Select the tournament profile under Select Web-Sync Profile.
c. Enter the given Password from DakStats.
d. Select the first game in the list of competitions on the left side and click Sync
Tourney; do this for each game in the tournament.
Web-Sync Tournaments 25
Page 30

7. Enable Webcasts:
a. Go to Webcast > Configure.
b. Click the Web-Sync tab.
c. Check Enable Web-Sync.
d. Click OK.
Note: If each game is not Web-Synced individually, they will not appear on the Web-Sync
site. This should also be done after creating games for other rounds.
7.4 Web-Syncing Tournament Statistics
Follow the steps below to upload final statistics for the game.
1. Go to Web-Sync > Setup.
2. Select the tournament profile under Select Web-Sync Profile.
3. Enter the given Password from DakStats.
4. Select the completed game from the list of competitions and click Sync Tourney.
Note: Be sure to do this after each game is completed, or the game statistics will not appear
on the Web-Sync site.
26 Web-Sync Tournaments
Page 31

Section 8: Troubleshooting Common Problems
Below are some of the most common problems that users encounter when using their DakStats
software to Web-Sync. If a certain question is not covered below, please feel free to email
dakstats@daktronics.com or call 888-325-7828.
8.1 Duplicate Players within Rosters
1. On the Configure Rosters screen, attempt to delete one instance of the player. If the
first instance cannot be deleted, attempt to delete the second. If neither can be
deleted, proceed to the next step.
2. Merge the players:
a. On the Configure Rosters screen, click the first instance of the player, hold [Ctrl],
and then click the second instance of the player.
b. Click the Merge button that appears in the bottom right portion of the screen.
Note: If both instances of the player have statistics in Play-by-play games, the program will
not let them merge. A message will appear that says Both players have stats in Play-by-play
games. Manually edit the Play-by-play games so that only one of the players has stats.
a. Attempt to delete one of the players. It will show a list of Play-by-play games in
which the player has stats.
b. Open each game listed for the player, and then edit each play in which the player
is involved by giving the stats to the other instance of the player instead.
c. Go back to the Configure Rosters screen and attempt to Merge the players again.
Note: If both instances of the player have statistics in the same game, the program will not let
them merge. A message will appear that says Both players have stats in the following games.
Manually edit the game so that only one of the players has stats.
a. Open the game(s) listed in the error message.
b. Go to Game Control > Game Finished so that the stats may be edited.
c. Total the statistics for the two players into just one of the duplicate players.
Note: For DakStats Baseball, it will also be necessary to click In Game in the top
right corner of the screen. If the player is in the list, remove him or her.
d. Click Game Control > Game Finished to finish the game again.
e. On the Configure Rosters screen, attempt to merge the players again.
8.2 Duplicate Teams within DakStats
If there are duplicate teams within DakStats:
1. Attempt to delete one of the teams. If one does not delete, try the other. If neither of
the teams can be deleted, proceed to the next step.
2. In order to combine the teams, it will be necessary to export the games involved,
delete the games, delete the teams, and then re-import the games under the correct
team. The steps below explain this process:
a. On the Configure Teams screen, change the abbreviation of the duplicated team to
“AAA” in order to differentiate between teams in the upcoming steps.
b. Export the games involving the duplicate team (“AAA”).
1) Go to File > Export Game.
2) Select the Season.
3) Select each game individually and click Export.
Troubleshooting Common Problems 27
Page 32

c. Delete the games involving the duplicate team (“AAA”).
1) Go to Configure > Games.
2) Select the games involving the duplicate team and click Delete Game.
3) Delete the duplicate team (“AAA”) on the Configure Teams screen.
4) Import the games by going to File > Import Game.
5) Make sure to select the team when it says Problem Resolving Teams instead
of clicking Add New.
8.3 Invalid Team Code When Web-Syncing
When trying to Web-Sync, the following error appears: TEAM has invalid team code.
Make sure a Team Code for each team is entered on the Configure Teams screen. If the
team in question is not in the league, select it as a Non-Member School:
a. On the Configure Teams screen, select the team.
b. Click Look Up ID / Code.
c. Click Select As Non-Member School.
8.4 Moving DakStats to a New Computer
To move the DakStats program and statistics to a new computer:
1. On the new computer:
Download the latest DakStats program from www.dakstats.com/download.html.
2. On the old computer:
Open “My Computer”.
Go to “C:\Daktronics\”, and open the “DakStats” folder for the applicable sport.
Within the DakStats folder, there will be folders named the same as the seasons
that were created within DakStats. Burn these folders to a disc or copy them to a
USB flash memory drive.
3. Place the copied season folders in the same “C:\Daktronics\DakStats [Sport]”
directory on the new computer.
8.5 Deleting Games / Duplicate Games on Web-Sync Site
If a schedule on the Web-Sync site has games that should not be there or are duplicated:
1. The game must be in the DakStats schedule, not just on the Web-Sync schedule. If it is
not in the schedule, run the Web-Sync process to download the game into DakStats.
2. Go to Web-Sync > Setup.
3. Enter the Web-Sync Password.
4. Click Advanced Features.
5. Click Merge.
6. Suspicious competitions appear in the left-hand list. Select the duplicate competition
in the left-hand list.
7. Select the game to be merged in the right-hand list.
8. Click Merge.
Note: If the game on the Web-Sync site has opponent statistics, simply deleting it
from the DakStats schedule and Web-Syncing will not remedy the problem, and the
above procedure must be performed.
28 Troubleshooting Common Problems
Page 33

8.6 Incorrect Career Statistics
If there are players on the Web-Sync site with career statistics linked that are linked to
another player’s statistics or shouldn’t be linked at all:
1. Go to Web-Sync > Setup.
2. Select the profile under Select Web-Sync Profile.
3. Enter the Web-Sync Password.
4. Click Advanced Features.
5. Click Career IDs.
6. The current roster will appear on the left side of the screen.
If players are returning, select their names from the dropdown menu to the left
of their names.
If players have not played for the team before, leave the option set to Add New
Player.
7. Make sure all returning players match up with their own name in the right column.
Note: If a player has transferred from another NAIA school, contact
dakstats@daktronics.com to have their career statistics linked. Please provide the
player’s name, the current school, and the school from which they transferred.
8. When finished matching up the players, click Done.
8.7 Deleting Players from the Web-Sync Site
If there is a player that should no longer be on the team roster, and when the player is deleted
from DakStats and Web-Sync, he or she re-appears in the roster:
1. Determine in what game(s) the player in question is involved.
2. Remove all statistics for the player. It may be necessary to switch the game to Box
mode to change the statistics.
3. Web-Sync with the player’s statistics set to all zeros.
4. Go to Configure > Rosters.
5. Select the Season.
6. Select the Team.
7. Click on the player to be deleted.
8. Click Delete.
9. Run the Web-Sync process again to remove the player from the Web-Sync site.
Note: If players have statistics associated with them on the Web-Sync site, they cannot just be
deleted from a DakStats roster, as they will be downloaded back after a Web-Sync.
Troubleshooting Common Problems 29
Page 34

Page 35

Install latest version of DakStats
Create a new season
Enter teams using the Via List button
Enter the roster / Download opponent rosters from Advanced Features of Web-Sync
Enter games / schedule
Create new Web-Sync profile or edit last year’s profile
Web-Sync schedule and roster
Verify career statistics links
Appendix A: DakStats & Web-Sync Setup Checklist
Appendix A: DakStats & Web-Sync Setup Checklist 31
 Loading...