

Page 1

DakStats Volleyball Software
Installation & Operation Manual
ED-18152 Rev 7 – 18 November 2013
201 Daktronics Drive PO Box 5128 Brookings, SD 57006-5128
Tel: 1-800-DAKTRONICS (1-800-325-8766) Fax: 605-697-4746
www.daktronics.com/support
Page 2

ED-18152
Product 1149
Rev 7 – 18 November 2013
DAKTRONICS, INC.
Copyright 2009-2013
All rights reserved. While every precaution has been taken in the preparation of this manual, the publisher
assumes no responsibility for errors or omissions. No part of this book covered by the copyrights hereon may be
reproduced or copied in any form or by any means – graphic, electronic or mechanical, including photocopying,
taping or information storage and retrieval systems – without written permission of the publisher.
All Sport®, DakStats®, Venus®, and Web-Sync® are trademarks of Daktronics, Inc. All other trademarks used in this manual
are property of their respective owners.
Page 3

Table of Contents
Section 1: Introduction .................................................................................................................. 1
1.1 System Requirements .............................................................................................................. 1
1.2 Levels of Play ............................................................................................................................ 1
1.3 Software Conventions ............................................................................................................. 2
Section 2: Installation .................................................................................................................... 3
2.1 Installation................................................................................................................................. 3
Downloading from the Internet ...................................................................................... 3
Installing from the Installation CD ................................................................................. 3
2.2 Season Update .......................................................................................................................... 3
Section 3: Initial Setup .................................................................................................................. 4
3.1 Splash Screen ............................................................................................................................ 4
Season ................................................................................................................................. 4
Team ................................................................................................................................... 4
Roster .................................................................................................................................. 5
Schedule ............................................................................................................................. 5
Web-Sync ........................................................................................................................... 5
Common Tasks .................................................................................................................. 5
3.2 Creating a Season ..................................................................................................................... 5
3.3 Configure Teams ...................................................................................................................... 7
Adding a Team .................................................................................................................. 7
To Manually Add a New Team ............................................................................... 7
To Add a New Team Via List ................................................................................... 8
To Import a Team ...................................................................................................... 8
Editing a Team .................................................................................................................. 8
3.4 Adding or Editing Rosters ...................................................................................................... 9
Adding Players to a Roster .............................................................................................. 9
Deleting and Editing Players ........................................................................................... 9
3.5 Creating New Matches ........................................................................................................... 10
To Create a New Match .................................................................................................. 10
Section 4: Pregame Setup ............................................................................................................ 11
4.1 Before the Game ...................................................................................................................... 11
Be Familiar with the Program ........................................................................................ 11
Have a Good Spotter ....................................................................................................... 11
Start Simple ....................................................................................................................... 11
4.2 Beginning the Match ............................................................................................................... 12
Section 5: In Game Operations ................................................................................................... 13
5.1 Main Toolbar ........................................................................................................................... 13
5.2 Play-by-play Mode.................................................................................................................. 14
Entering Starters ............................................................................................................... 15
Serves ................................................................................................................................. 15
Receiving Serves ....................................................................................................... 15
Table of Contents i
Page 4

Assists and Attacks ................................................................................................... 16
Substitutions ..................................................................................................................... 16
Quick Substitution Buttons ...................................................................................... 17
Timeouts ............................................................................................................................ 17
Cards .................................................................................................................................. 17
Rally Scoring ..................................................................................................................... 17
5.3 Edit Menu ................................................................................................................................. 18
Manually Adding and Inserting Plays .......................................................................... 18
Deleting Plays ................................................................................................................... 18
Adding or Inserting Serves ............................................................................................. 18
Find Serve ......................................................................................................................... 18
Find Play ........................................................................................................................... 18
Add or Edit Play Commentary ...................................................................................... 18
Rebuild Stats ..................................................................................................................... 19
Check for Errors ............................................................................................................... 19
5.4 Game Control Menu ............................................................................................................... 20
Start Next Game ............................................................................................................... 20
Match Finished ................................................................................................................. 20
Update Team Win/Loss Records and Duration ................................................... 20
Rally Score ......................................................................................................................... 20
Tabs .................................................................................................................................... 20
Balance Stats ..................................................................................................................... 20
Swap Teams ...................................................................................................................... 20
Side Out ............................................................................................................................. 21
Point ................................................................................................................................... 21
Replay ................................................................................................................................ 21
Export Game as XML File ............................................................................................... 21
5.5 View Menu ............................................................................................................................... 21
Toolbars ............................................................................................................................. 21
Entry Modes ...................................................................................................................... 21
Rosters & Statistics ........................................................................................................... 21
5.6 Box Mode.................................................................................................................................. 21
Entering Scores & Statistics ............................................................................................. 22
Pass Ratings Tab ............................................................................................................... 22
Section 6: Creating Reports ......................................................................................................... 23
6.1 In-Game Reports ..................................................................................................................... 23
6.2 Season Reports ......................................................................................................................... 23
Printing Conference Season Reports ............................................................................. 25
Creating Collections ......................................................................................................... 25
6.3 Print Career Reports ............................................................................................................... 26
6.4 Roster Printouts ....................................................................................................................... 27
Section 7: Importing and Exporting ............................................................................................ 29
7.1 Importing Matches .................................................................................................................. 29
7.2 Exporting Matches .................................................................................................................. 30
7.3 Exporting Season Statistics .................................................................................................... 31
7.4 Importing Teams ..................................................................................................................... 32
7.5 Exporting Teams ..................................................................................................................... 32
7.6 Exporting Matches as XML Files ........................................................................................... 32
Section 8: Additional Features & Settings .................................................................................. 33
ii Table of Contents
Page 5

8.1 Season and System Preferences ............................................................................................. 33
Seasons .............................................................................................................................. 33
Tournaments ..................................................................................................................... 33
To Add a Tournament .............................................................................................. 33
To Delete a Tournament .......................................................................................... 33
Utilities .............................................................................................................................. 34
8.2 Rules.......................................................................................................................................... 35
8.3 Configuring DakStats Volleyball .......................................................................................... 35
Modifying Matches and Games ..................................................................................... 35
Configuring Conferences ................................................................................................ 36
To Create a New Conference................................................................................... 36
To Configure a Conference ...................................................................................... 36
To Delete a Conference ............................................................................................ 36
Configurations .................................................................................................................. 37
8.4 Play Entry Button Colors ....................................................................................................... 37
8.5 Team Button Colors ................................................................................................................ 38
8.6 Auto Start Options .................................................................................................................. 38
8.7 Messaging ................................................................................................................................ 38
8.8 Quick Display .......................................................................................................................... 39
8.9 Webcast .................................................................................................................................... 40
8.10 Web-Sync.................................................................................................................................. 40
8.11 Twitter ...................................................................................................................................... 40
Configuration ................................................................................................................... 41
Template .................................................................................................................... 41
Credentials ................................................................................................................. 42
Section 9: Using the Keyboard & Hotkeys ................................................................................. 45
Section 10: Contact Information ................................................................................................... 47
Index . ..................................................................................................................................... 49
Appendix A: Volleyball Stat & Pass Ratings Sheets ..................................................................... 51
Appendix B: Volleyball Play-by-Play Worksheet ........................................................................... 53
Appendix C: Supplementary Guides & Manuals ........................................................................... 55
Table of Contents iii
Page 6

Page 7

Section 1: Introduction
The purpose of this manual is to assist users with the installation and operation of the DakStats®
Volleyball application. The manual includes the following main sections:
Introduction covers the basic information about the program and this manual. Take time to
read the introduction as it defines terms and explains concepts used throughout the manual.
Installation describes the software installation procedures.
Initial Setup, Pregame Setup, In Game Operations, Creating Reports, Importing &
Exporting, Additional Features & Settings, and Using the Keyboard & Hotkeys explain
how to control and configure the application.
Contact Information offers details about who to contact for help.
Index presents an alphabetical listing of important terms and processes.
Appendix contains supplemental information about or for the application.
Daktronics identifies manuals by an ED or DD number located on the cover page of each manual.
Any manuals referenced in this document will be identified by its ED/DD number. For example, this
manual would be referred to as ED-18152.
1.1 System Requirements
The DakStats Volleyball application has the following recommended requirements:
Windows
CPU: 1.0 GHz or faster
Video: 1024 x 768 resolution
Internet Explorer
Memory: 512 MB or more of RAM
®
XP or higher
®
6.0 or higher
1.2 Levels of Play
The DakStats Volleyball application can be used at any level of competition including games,
tournaments and season statistics for club, high school, college, or professional teams.
The software application is available with three main entry modes:
Box supports the box statistics entry mode (post game stats entry).
Box Plus includes conferencing features and Web-Sync
Play-by-Play has all the features of the previous two entry modes, plus the ability to
enter stats live during competitions.
Introduction 1
®
with the standard Box version.
Page 8

1.3 Software Conventions
Bold
Indicates an item that requires direct action, such as clicking, pressing,
selecting or formatting.
Italics
Indicates onscreen text or labels that are not clickable.
Bold Italics
Used to reference items within the manual, such as figures or sections, as
well as other documents and important notes.
[X]
Represents a keyboard key that needs to be pressed.
“Quotes”
Text or commands that may be typed. Quotes also indicate folder names.
Click
Press and release the left mouse button.
Double-click
Press and release the left mouse button twice.
Right-click
Press and release the right mouse button.
Select
Highlight or mark, such as by placing a check mark in a nearby box;
clicking will not necessarily perform an action.
>
Followed by (ex. File > Open).
This manual contains the following software conventions and terminology:
2 Introduction
Page 9

Section 2: Installation
Figure 1: Desktop Icon
2.1 Installation
The DakStats Volleyball application can be downloaded from the Internet or installed from
an installation CD.
Downloading from the Internet
1. Download the DakStats Volleyball program.
a. Open an Internet browser.
b. Type www.dakstats.com/download.html in the address bar.
c. Find the Volleyball row on the web page.
d. Click on Click Here under the Download column.
e. In the window that appears, click Run. If an additional window opens, click
Run once more.
2. Follow the onscreen instructions.
3. Click Finish when done.
4. Double-click the desktop icon (Figure 1) to open the program.
Installing from the Installation CD
1. Insert the installation CD.
2. Choose the DakStats Volleyball program to install.
3. Follow the onscreen instructions.
4. Click Finish when done.
5. Double-click the desktop icon (Figure 1) to open the program.
2.2 Season Update
If previous seasons are saved to the computer, go to Configure > Season & System
Preferences. Select each existing season, and then click Update. This ensures older season
databases are compatible with the latest software version.
Installation 3
Page 10
Section 3: Initial Setup
Figure 2: Splash Screen
The season, teams, rosters, and other game information must first be set up before users can use the
DakStats Volleyball application to record scores and statistics. Users can set up the entire season and
all of the teams before the first game of the season even begins. It is recommended that games are set
up at least one hour before the game start time.
3.1 Splash Screen
When the DakStats Volleyball program is first opened, users are greeted by the splash screen
(Figure 2). Here users may select seasons, games, and rosters to configure as well as
open/import/export games, print detailed reports, and begin Web-Syncing.
4 Initial Setup
Note: This section gives only a brief explanation of the buttons on this screen.
Each function is also available in the File and/or Configure menus at the top of the
screen, and they are described in the sections or documents denoted in parentheses.
Season
Use the dropdown list to select a previously created season (Section 3.2). Click Configure to
edit the season settings (Section 8.1). Click Set as Default Season to keep the same season
selected each time the program is opened.
Team
After selecting a season, select a previously created team. Click Configure to edit the team
settings (Section 3.3). Click Set as Default Team to keep the same team selected each time the
program is opened.
Note: The default team may also be assigned in the season configuration (Section 8.1).
Page 11
Roster
Figure 3: System Preferences
After selecting the appropriate season and team, the roster will appear in this area if one has
already been created (Section 3.4).
Double-click a player in the roster, or click Configure to edit the roster settings.
Click Download Roster to get a team’s latest roster for those using DakStats Web-
Sync. Refer to the DakStats Web-Sync Guide (ED-14571) for instructions on setting
up the Web-Sync service.
Schedule
This area lists all scheduled games for a selected season.
Select a game on the list and click Open, or double-click the game to begin entering
scores and stats for that game.
Select a game and click Configure to edit the game settings.
Click Add New to create a new game for the season (Section 3.5).
Web-Sync
Select a user Profile, type in the Password, and click Sync to begin the Web-Sync Refer to the
DakStats Web-Sync Guide (ED-14571) for instructions on setting up the Web-Sync service.
Common Tasks
This area includes additional frequently used commands.
Print Season Reports: Click to generate a wide variety of printouts (Section 6.2).
Import Game: Click to import a game file (Section 7.1).
Export Game: Click to export a game file (Section 7.2).
3.2 Creating a Season
The first step to set up the DakStats Volleyball program is creating the season in which the
games will be played. By default a “Demo” season exists in the “Seasons” file, but users
should create their own seasons for all future games. Junior Varsity and Varsity teams, as
well as men’s and women’s sports should each have their own season.
To create a season:
1. Go to Configure > Season and System Preferences (Figure 3).
Initial Setup 5
Page 12

2. In the System Preferences window, click Add.
Figure 4: Creating a new season
3. In the New Season window (Figure 4), type in the Season Title.
4. Select the Default Play Entry Mode:
Box Score: Match Totals: Users enter total statistics for every game in the
match.
Box Score: Game by Game: Users enter statistics one game at a time rather
than all games together.
Play-by-play: Simple mode: Users enter statistics during the game for each
individual play.
5. Select the Rules File:
Rules HS: Volleyball rules set for high schools
Rules NCAA: Volleyball rules set for NCAA
Rules FIVB: Volleyball rules set for FIVB
Note: Refer to Section 8.2 for more information about rules configuration.
6. Select the Default Gender, either Female or Male.
Note: Default Team is only selectable when editing the season. Refer to Section 8.1.
7. Click OK.
6 Initial Setup
Page 13
3.3 Configure Teams
Figure 5: Configure Teams Window
League
Division
Coach
Conference
The next step to set up the DakStats Volleyball program is to configure the teams. For the
program to work correctly, both home and guest teams must be configured.
Adding a Team
Choose one of the following ways to add a team:
To Manually Add a New Team
Users are required to enter the team location, nickname, print name, and abbreviation for
teams to be added correctly. All other information is optional.
1. Go to Configure > Teams.
2. In the Configure Teams window (Figure 5), select the Season.
Initial Setup 7
3. Click Add New.
4. Type in the Team Location. (a high school’s or university’s name, for example)
5. Type in the Stadium, City, and State if desired. When a new game is created, these
fields will populate based on the selected home team (Section 3.5).
6. Type in the team’s Nickname. (The team’s mascot may also be entered here).
7. Type in the team’s official name in the Print Name text box. This name appears on
most reports and printouts.
8. Enter the team’s Abbreviation. The abbreviation is used to identify games.
9. Enter the following optional information as desired:
10. Click Save to keep the changes, or click Cancel to discard the changes.
11. Click Close when finished.
Note: Check Female as needed. Users should only check the Disable Team checkbox
when they do not want the selected team to show up in the teams list. Checking Show
Disabled Teams will allow the user to view all teams, whether they were disabled or not.
Page 14
To Add a New Team Via List
Figure 6: Look Up League ID Window
Teams that use the DakStats Web-Sync service are able to add other teams and information
using the Via List option rather than having to enter other teams’ information by hand.
1. Click Via List.
2. In the Look Up League ID window (Figure 6), select the team’s League.
3. Highlight a team, and then click Select.
Note: If no leagues appear in the League dropdown menu, click Update Leagues.
If no teams appear after selecting a league, click Update Teams.
To Import a Team
1. Click Import.
2. Select a team to import.
Note: The importing option is typically used to quickly get information from another
team that also uses DakStats Volleyball, rather than typing in all of the information
manually and risking errors. See Section 7 for more information about importing and
exporting teams.
Editing a Team
1. Go to Configure > Teams.
2. In the Configure Teams window (Figure 5), select the Season.
3. Select the team to edit.
4. Enter changes to the team’s information using the text and check boxes.
5. Click Save to keep the changes, or click Cancel to discard the changes.
6. Click Close when finished.
8 Initial Setup
Page 15
3.4 Adding or Editing Rosters
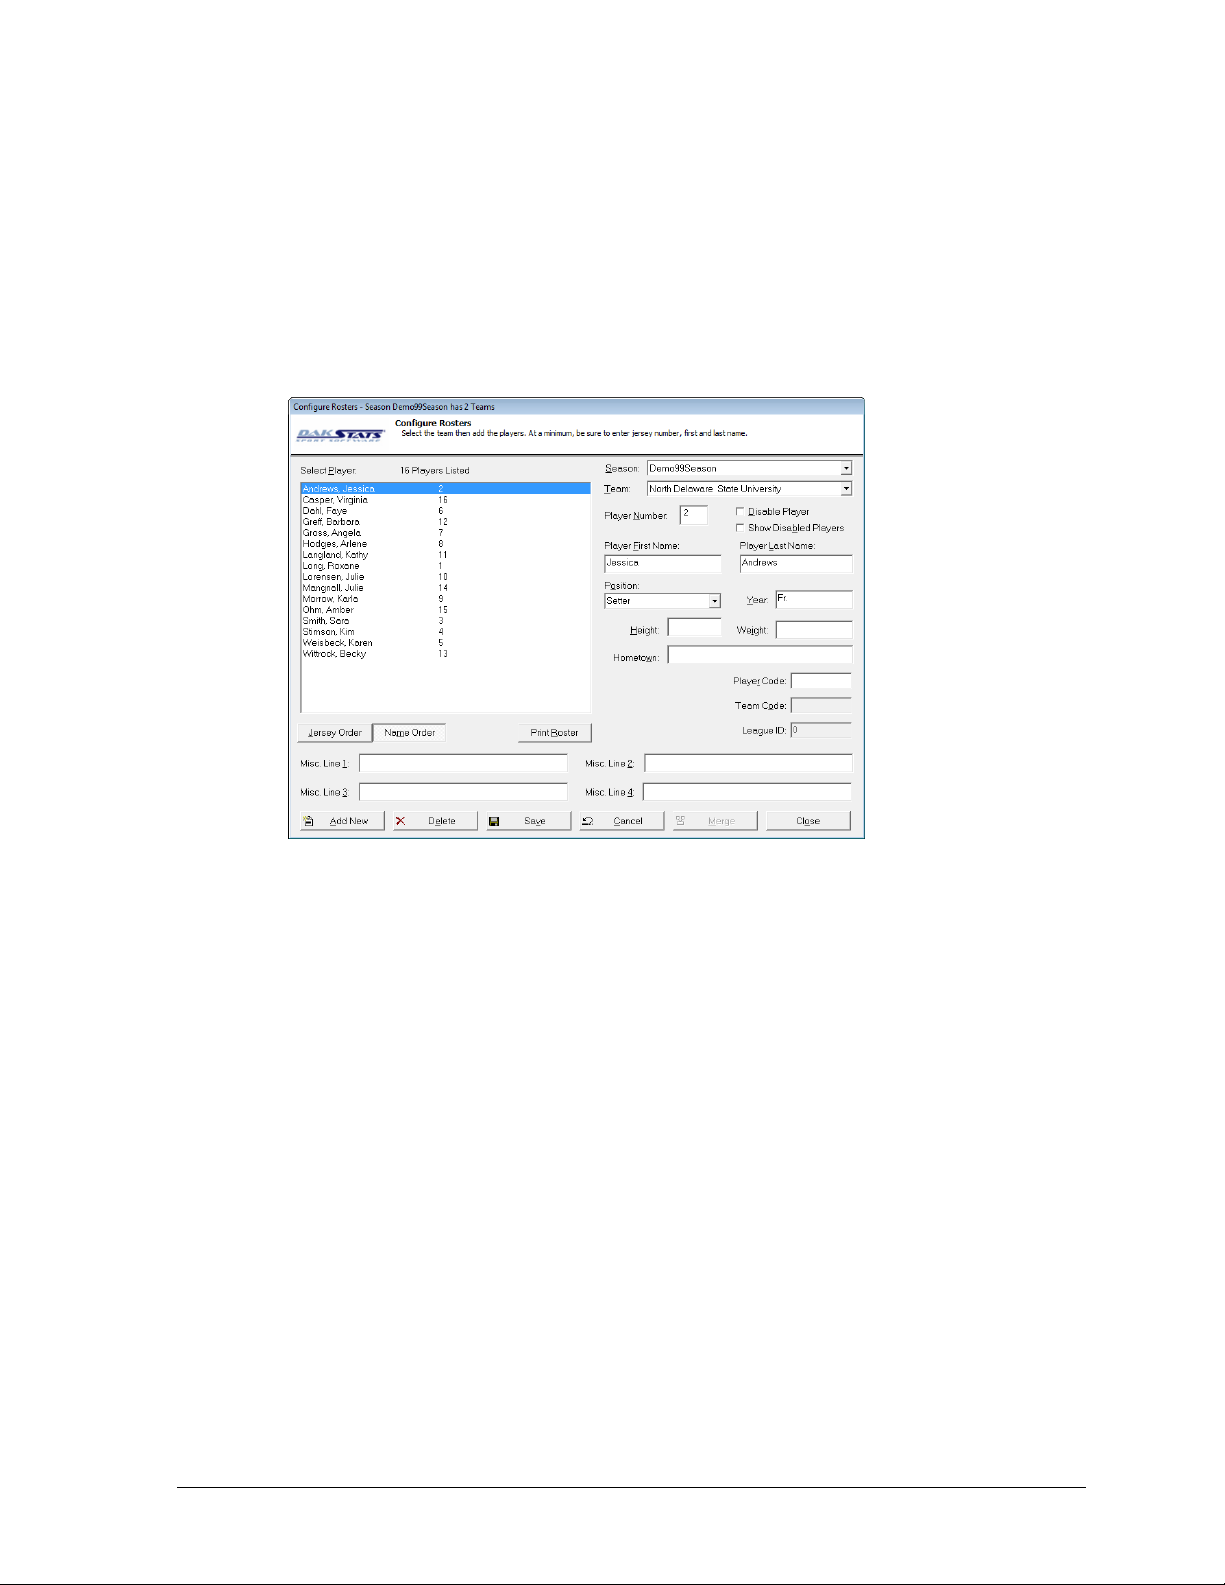
Figure 7: Configure Rosters Window
On the Configure Rosters window, users are able to add, retrieve, or edit rosters. Users must
enter a roster for their team. If using Play-by-Play mode, opponent rosters are also required.
When using Box Mode, opponent rosters are not necessary.
Adding Players to a Roster
If the team roster has no players or is missing a player, users may add players to the roster.
1. Go to Configure > Rosters.
2. In the Configure Rosters window (Figure 7), select the correct Season.
3. Select the correct Team.
4. Click Add New.
5. The new player will be displayed at the top of the roster as Add New Player.
6. Fill in the fields with the player’s information. At a minimum, users need to enter the
Player Number, Player First Name, and Player Last Name.
7. Click Save to keep the changes, or click Cancel to discard the changes.
8. Click Close when finished.
Note: Users should only check the Disable Player checkbox when they do not want
the selected player to show up in the roster. Checking Show Disabled Players will
allow the user to view all players, whether they were disabled or not.
Deleting and Editing Players
To edit a player: Select the player, and change the player information fields.
To delete a player: Select the player, and then click Delete.
Note: Players with statistics associated with them cannot be deleted. To delete the player
the statistics associated with the player need to be removed or set to zero.
Initial Setup 9
Page 16

3.5 Creating New Matches
Figure 8: Game Information Window
The Game Information window allows users to fill in several fields of detailed game information.
The following steps must be completed for a game to be created properly.
To Create a New Match
1. Go to File > New Match and the Game Information window will appear (Figure 8).
2. Select the correct Season.
3. Select the Visiting Team.
4. Select the Home Team.
5. Select the Game Type.
6. Enter the correct Start Time.
7. Select the desired Entry Mode.
8. Enter the correct Date.
9. Click Save Match to keep the changes, or click Cancel Match to discard the changes.
10. Click Done when finished. If the game has not been saved, the user will be prompted
to do so at this point.
Note: The remaining fields are optional and do not need to be filled in when creating a
new match. Return to the Game Information window at any time to adjust this information
(Section 8.3). Remember that the Stadium, City, and State fields will populate if they were
entered during creation of the selected home team (Section 3.3).
10 Initial Setup
Page 17

Section 4: Pregame Setup
4.1 Before the Game
Before using the DakStats Volleyball software for the first time, Daktronics suggests a few
simple steps to help make in-game use easy and efficient.
Be Familiar with the Program
There is a one or two game learning curve. It is highly recommended that users take the time
to read this manual and familiarize themselves with the program before game time. Some
other helpful hints include:
Practice taking stats while watching game film.
Identify the location of buttons associated with the most common plays.
Print out a Play-by-Play report from a Demo game, and then re-enter it to learn what
buttons/steps were used to follow the Play-by-play action.
Have a Good Spotter
The spotter is a person who watches the game and tells the operator the plays as they happen
so the software operator can concentrate on entering stats rather than looking back and forth
between the game and a computer screen. Having a spotter who pays close attention to the
game and has a good understanding of the game will help the user more quickly enter data
into the DakStats Volleyball program.
Note: It is also helpful to have pens and paper handy in case the operator gets behind
entering stats or there are any technical difficulties.
Start Simple
Keep things simple to start, and then add more stats to record as familiarity with the flow of
the game and the software is attained.
Assist Attempts – If it is decided to track every touch of the ball, press [Ctrl] + [D]
and set the Default Player to Assist Player. Otherwise, leave this set to Attack Player
until comfortable recording all assist attempts.
Substitutions – Subs are not required by the software. At any point, a player may be
selected from the roster and credited with a stat even if they are not listed as in-game.
Receptions – Receptions are optional on serves in DakStats, but they may be required
by certain leagues.
Pregame Setup 11
Page 18
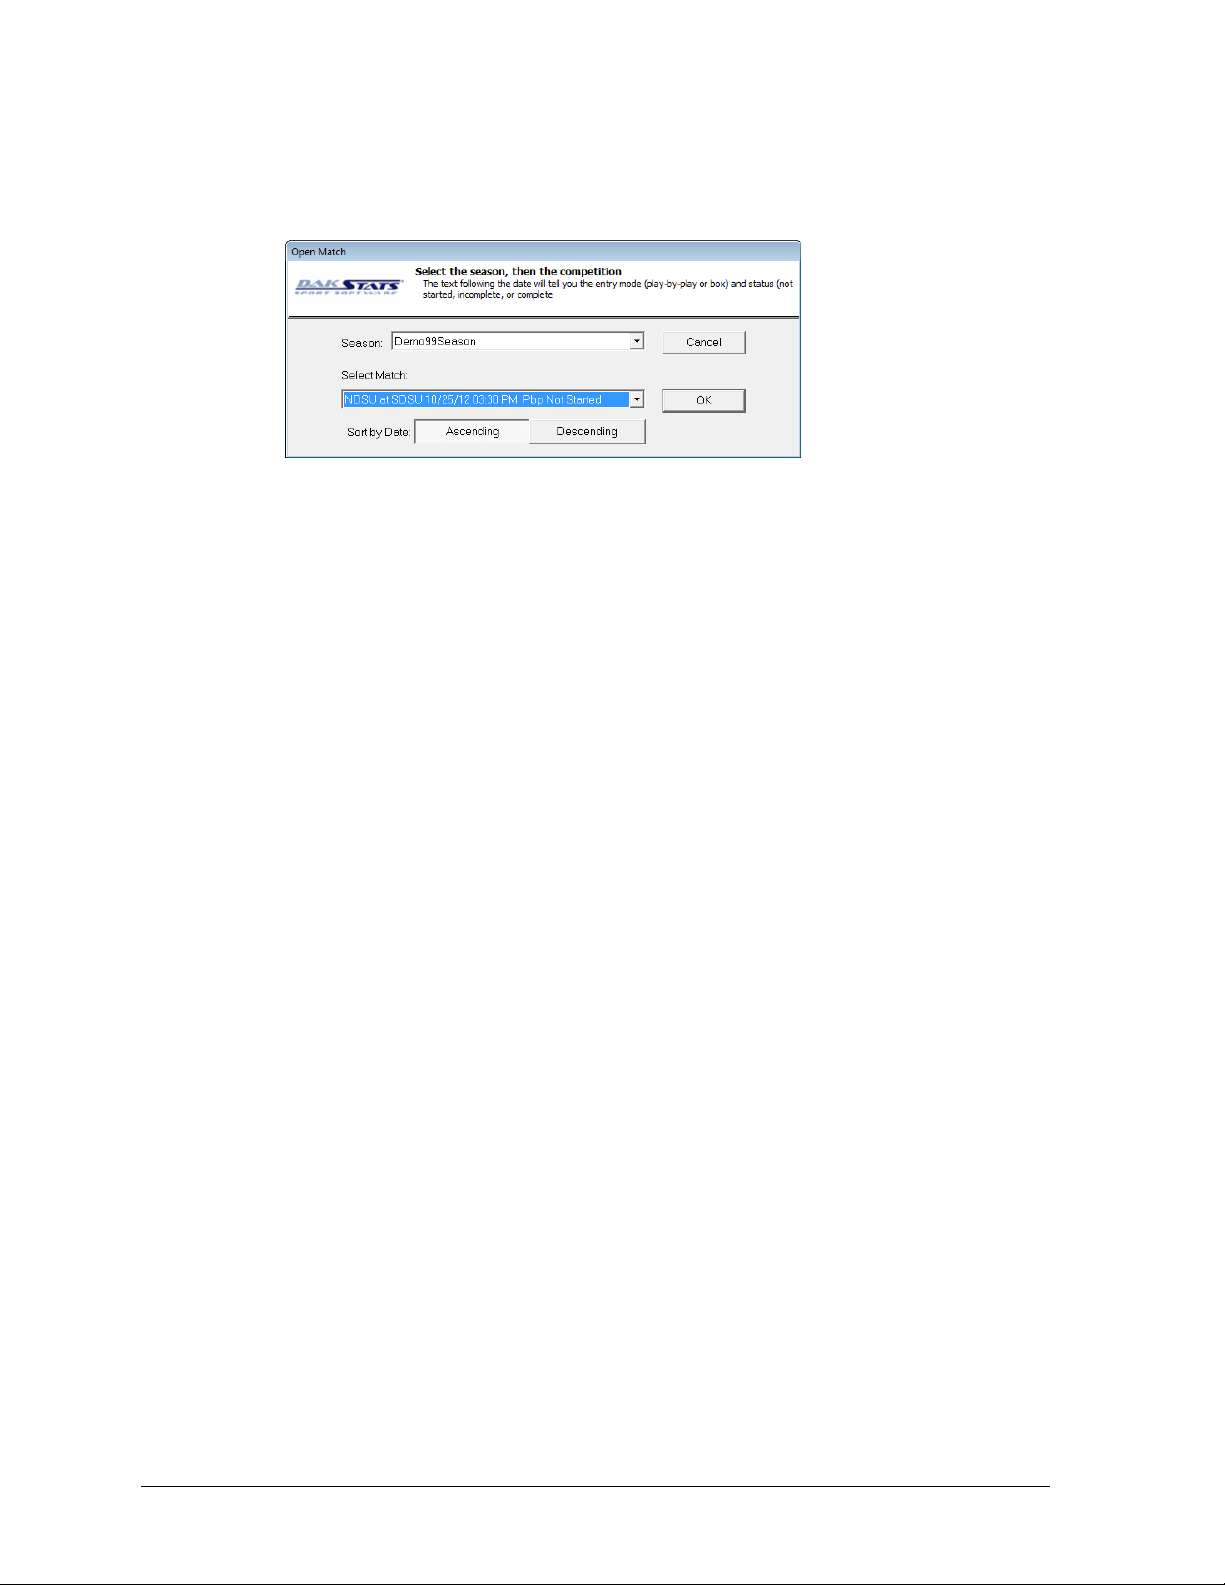
4.2 Beginning the Match
Figure 9: Open Match Window
1. Go to File > Open Match.
2. In the Open Match window (Figure 9), select the correct Season and Match. Use Sort by
Date to list the games from oldest (Ascending) to newest first (Descending).
3. Click OK.
Note: If a certain match does not appear in the list, return to the Game Information
window to make sure it was created in the correct season; create a new match in the
proper season if necessary.
12 Pregame Setup
Page 19
Section 5: In Game Operations
Figure 10: DakStats Volleyball Main Toolbar
Once a game is opened, users are able to begin entering statistics into the DakStats Volleyball
program. Depending on the Default Play Entry Mode (Section 3.2), the screen will appear with a
different layout and certain buttons available on the main toolbar.
5.1 Main Toolbar
1) 2) 3) 4) 5) 6) 7) 8) 9) 10) 11) 12) 13) 14) 15) 16) 17)
Users can click the buttons on the main toolbar (Figure 10) to quickly execute common tasks
during games instead of going through the menus. Use the toolbar buttons to:
1) Create a new match
2) Open a match
3) Print the current match
4) View only the home team’s statistics
5) View only the visiting team’s statistics
6) View both the home and visiting team statistics
7) Switch team court sides (Play-by-Play Mode only)
8) Make substitutions (Play-by-Play Mode only)
9) Mark penalties with yellow or red cards (Play-by-Play Mode only)
10) Balance the stats
11) Insert a time out (Play-by-Play Mode only)
12) Insert a side out (Play-by-Play Mode only)
13) Add a point (Play-by-Play Mode only)
14) Replay the volley (Play-by-Play Mode only)
15) Delete last play (Play-by-Play Mode only)
16) Edit last play (Play-by-Play Mode only)
17) Open Configurations window (Play-by-Play Mode only)
All of the buttons listed above have corresponding keyboard shortcuts.
Refer to Section 9 for more information.
Note: It is possible to click and drag the toolbar anywhere else on the screen, dock it to the
bottom or either side, or remove it completely (go to View > Toolbar to turn it off and on).
In Game Operations 13
Page 20
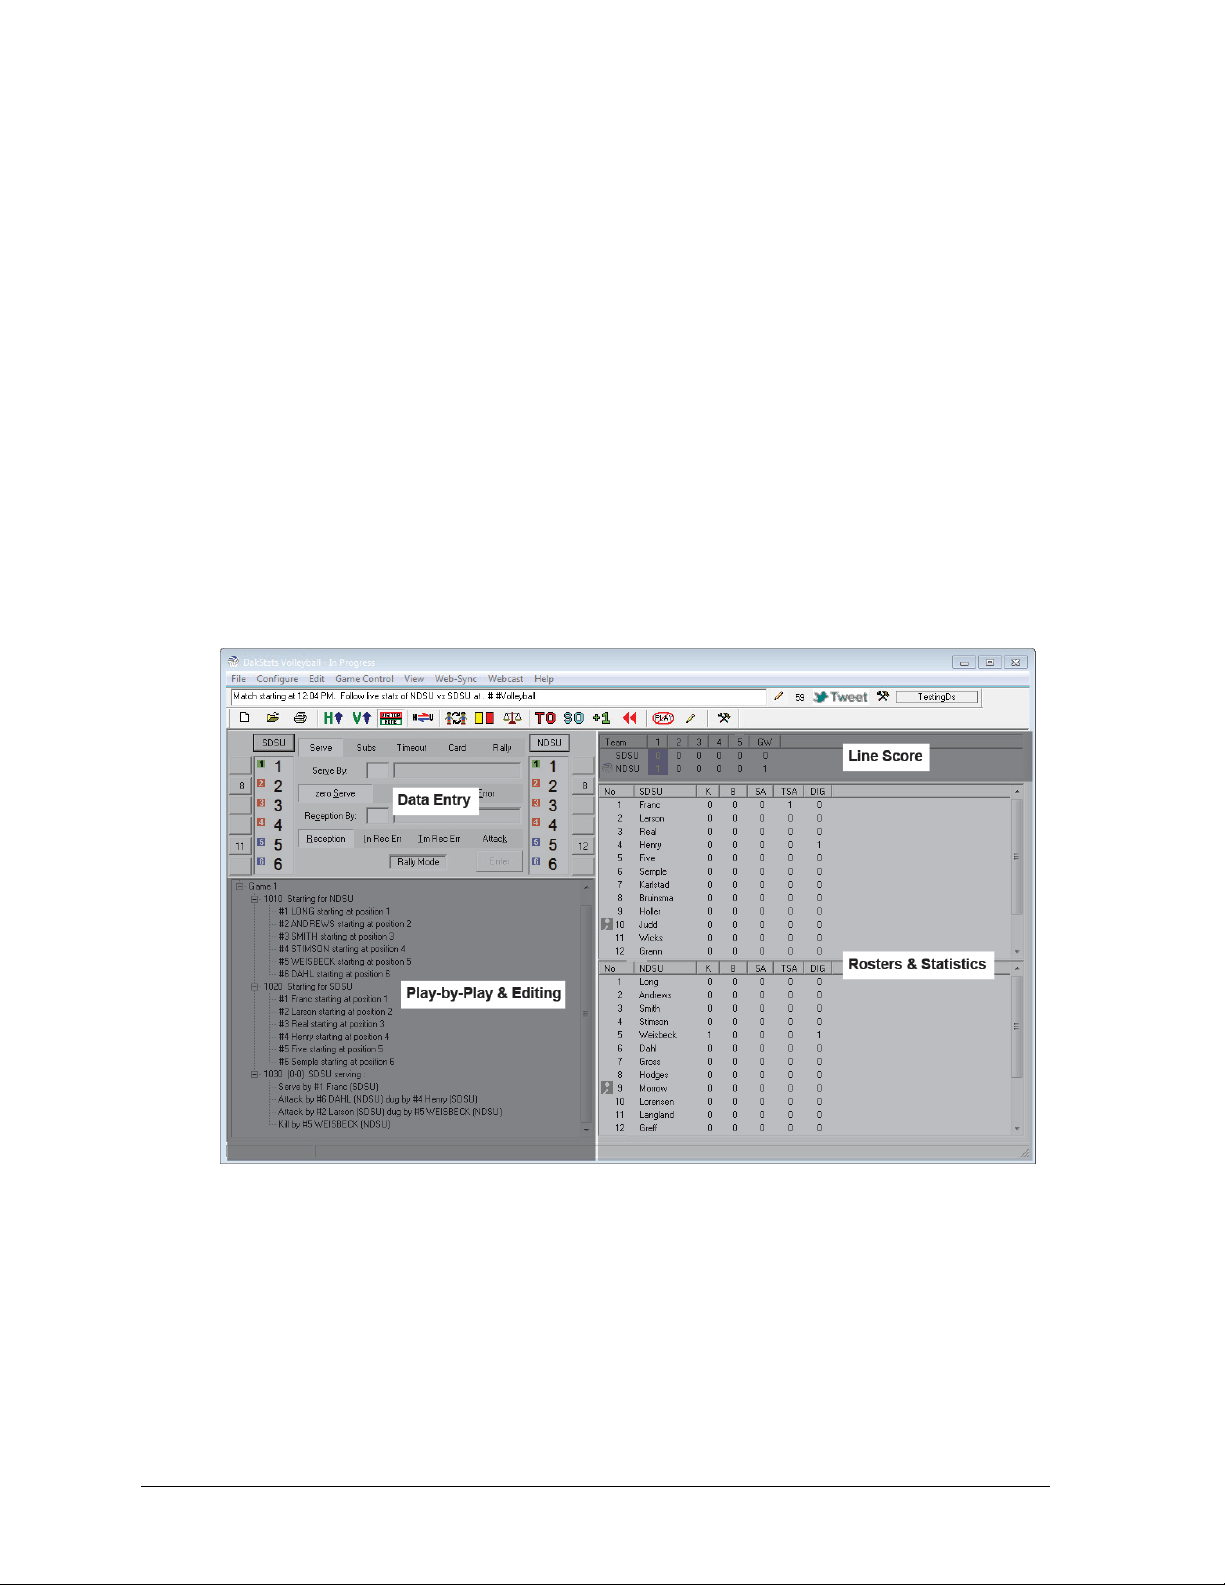
5.2 Play-by-play Mode
Figure 11: DakStats Volleyball Play-by-Play Screen
The DakStats Volleyball program allows users to enter plays as they happen. Operators are
able to input stats by selecting game commands and then entering specific information when
prompted; prompts will default to the most common choice. The Play-by-play screen is
available to users throughout the game, and remains available when the game is finished.
Figure 11 shows the main application screen in Play-by-play mode, with each section of the
screen labeled by function:
Line Score: Track the score for both teams in each period.
Data Entry: This is where the action of a play is recorded.
Rosters & Statistics: Shows each player of both teams and their statistics for the
game. It is not possible to edit the stats in this area.
Play-by-play & Editing: As stats are entered, a detailed commentary of each play
will appear here. It is possible to modify any previous play as needed, and the rest of
the game data will update accordingly.
Plays can be entered by clicking on the appropriate button or by using the hotkeys signified
by the underlined letter. Due to the fast pace of volleyball, it is recommended that users
become familiar using keyboard hotkeys rather than using a mouse.
Note: It is not possible to record a play until all of the required information has been
entered, and No plays save until pressing [Enter].
14 In Game Operations
Page 21
Entering Starters
Figure 12: Entering Starters
Figure 13: Entering Serves
Before beginning the game, the players/positions for each team should be assigned.
1. Press [F2] to begin entering
starters (Figure 12).
2. Enter the starting players for
each team, either by typing in
the players’ numbers or by
clicking on the names in the
roster list. This same screen is
used for making substitutions to
the starters later in the game.
Note: When entering starters, one of the teams will be automatically selected to enter
players. Click the other team button (or press [x]) to enter their rosters.
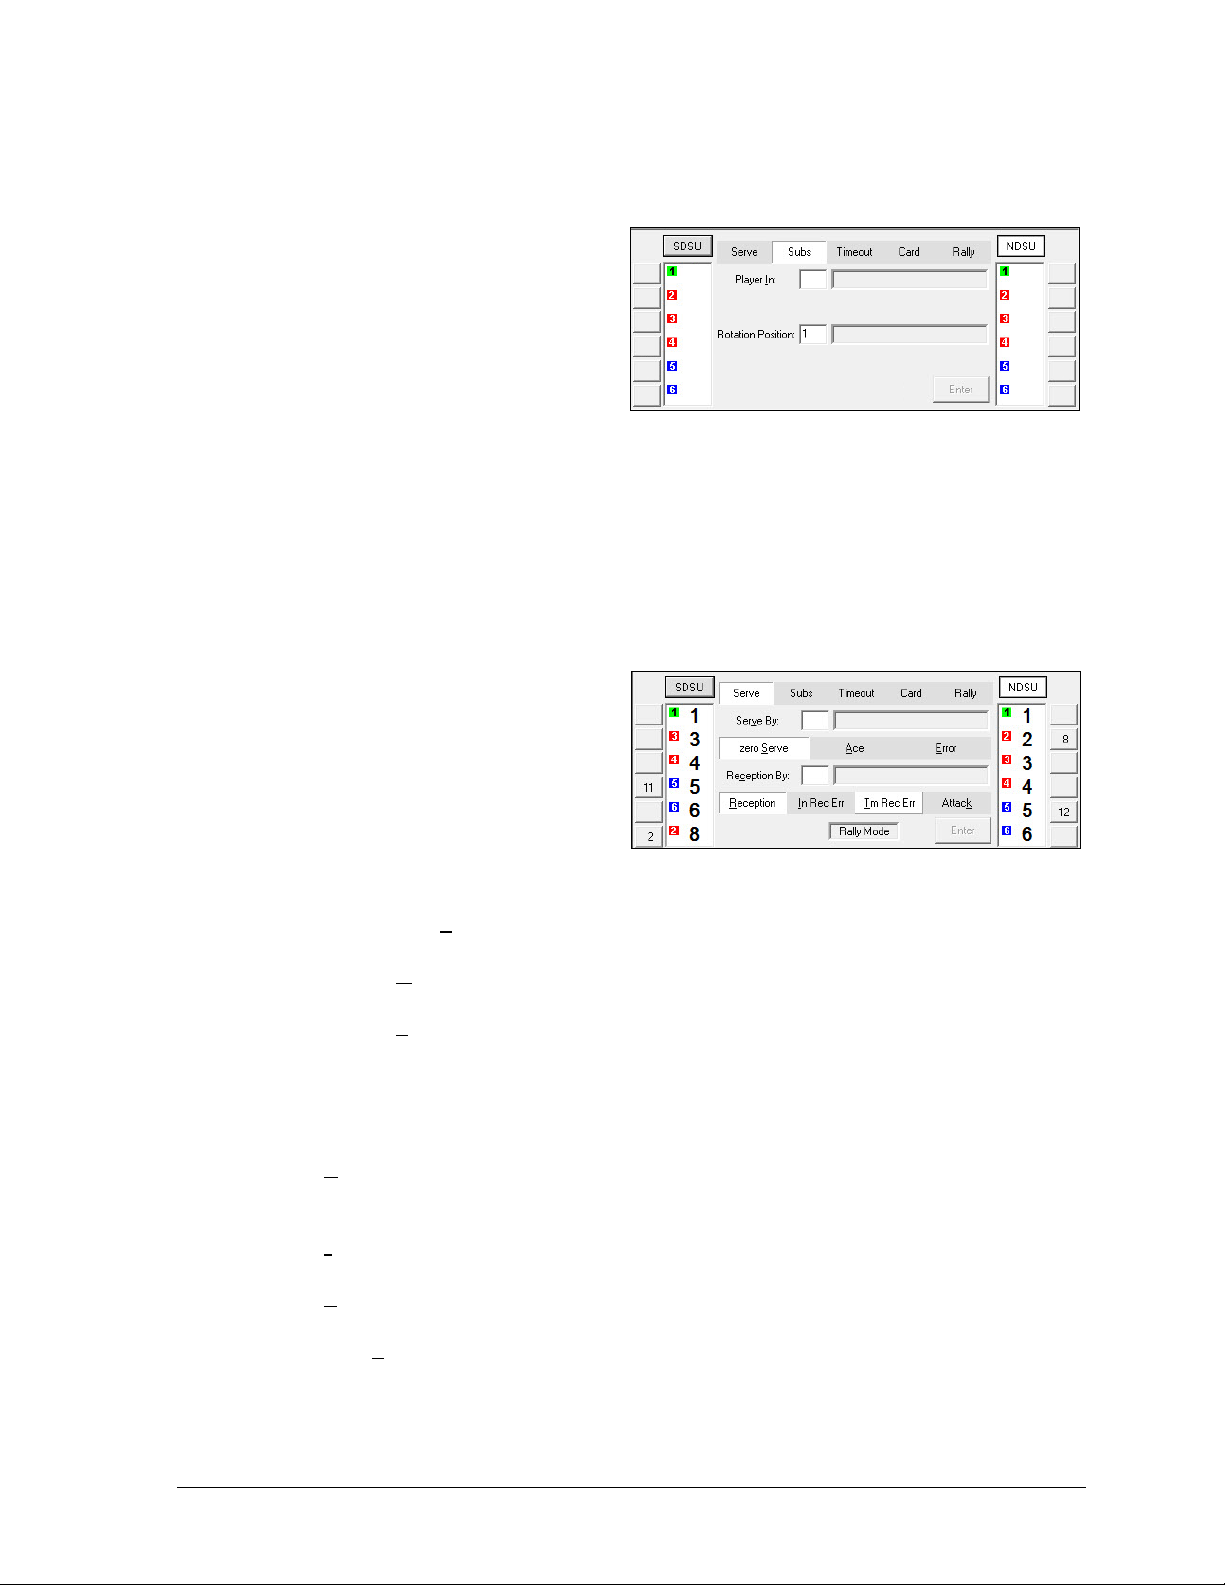
Serves
Because every volleyball game begins with a serve, the Serve tab is selected once the starters
are assigned (Figure 13).
1. Enter the number of the player
that served the volleyball.
Note: When entering single digit
numbers, enter a “0” first to
jump to the next text box.
Otherwise, press [Tab].
2. Select the type of serve:
zero Serve: The most common type of serve and the default selection. After
the serve, play continues as it is not an Ace or an Error.
Ace: Occurs when the receiving team does not gain control of the ball and
cannot return it, directly resulting in a point for the serving team.
Error: A serve error will most commonly occur if the serve is out of bounds,
or goes into the net.
In Game Operations 15
Receiving Serves
The following actions describe what happens after a serve is received:
Reception: The ball is passed and the offense sets up. When selected, enter the player
who received the serve in the Reception By field if desired. Press [Enter], and see
Assists and Attacks to continue the play sequence.
In Rec Err (Individual Reception Error): When chosen, enter the player who received
the error in the Reception By field. Press [Enter] to record the point.
Tm Rec Err (Team Reception Error): Select when the fault cannot be placed on an
individual player after an Ace serve, and then press [Enter] to record the point.
Attack: Select if an attack occurs after the serve, and then press [Enter], and see
Assists and Attacks to continue the play sequence.
Page 22

Assists and Attacks
Figure 14: Entering Assists and Attacks
Figure 15: Entering Substitutions
After a serve and reception or
attack, the attack sequence will
follow (Figure 14).
1. Enter the player who set
the ball if applicable
(Assist attempt).
2. Enter the player who
attacked the ball if
applicable (Attack By).
3. Select the type of attack:
0 Atk: Select if the attack did not end the play, but was dug by the defense.
Select Dig or zero Block (blocked back) along with the defensive player(s),
and then press [Enter].
Kill: Select if the attack was unreturned by the opposition or lead directly to a
block error. Select Block Err or B Hand Err (ball handling error) along with the
defensive player as needed, and then press [Enter].
Atk Error: Select after the ball was hit into the net, out of bounds, or blocked
down to the floor. Select Block along with the defensive player(s) as needed,
and then press [Enter].
BHE (Ball Handling Error): Select when a player receives an error attempting to
handle the ball. Select No Set Error or With Set Error as needed and then press
[Enter].
Set Error – Select when there was an error setting the ball. Press [Enter].
Over – Select when a team sends the ball over the net just to keep it in play.
Press [Enter] to give possession to the other team without crediting any statistics.
Replay: Select to stop the play and do not credit either team with a point.
Press [Enter] to begin a new play.
4. If a 0 Atk or Over occurred, continue recording the play until a point is scored.
Note: Refer to Section 9 for additional keyboard shortcuts for play entry.
Substitutions
When a player comes in from the bench to substitute for a player on the floor, press [F2] to
switch to the Subs tab. Enter the Player In (entering the game) followed by the Player Out
(leaving the game), and then press [Enter].
Alternately, from any tab it is possible to right-click on the player leaving the game and select
the player coming in from the list (Figure 15).
16 In Game Operations
Page 23

Quick Substitution Buttons
Figure 16: Quick Sub Buttons
Figure 17: Entering Timeouts
Figure 18: Entering Cards
Figure 19: Toggling Rally Scoring
Quick Subs buttons make substitutions easier and faster.
The software will remember previous subs, or the operator
can pre-set an established sub rotation. Click the button next
to a starter and select the player from the list to pre-set the
incoming sub. Quick Subs buttons will fill in as the match
progresses and more subs are entered. Once players are preset, click the button and the players will automatically switch
as in and out. A few notes about quick subs:
Unlike the starter subs list that only shows players
not in the game, the quick subs list includes all
members of the team.
Hold [Ctrl] and click on a sub button to clear a
player that may have been added incorrectly.
The software does not save quick sub entries upon
closing. If the match is closed and reopened, quick
subs will need to be re-entered.
Timeouts
When a team calls a time out, press [F6] to switch to
the Timeout tab (Figure 17). Press [t] to select which
team is taking the timeout, and then press [Enter].
Cards
In the event of a penalty:
1. Press [F3] to switch to the Card tab (Figure
18).
2. Press [x] to switch teams if needed.
3. Select a Red or Yellow card and the type of
penalty (Player, Coach, Bench, or Crowd).
4. If the penalty is on a player, enter the player
number.
5. Press [Enter].
Rally Scoring
In Rally mode, every serve can result in a point. With
Rally mode disabled, only the serving team can score
a point. To change rally scoring, select the Rally tab
(Figure 19):
Rally Mode is enabled by default. When the
user enters the Rally tab, Off will be selected
by default as well. Click Enter to disable
rally scoring.
With Rally Mode disabled, On will be selected by default. Click Enter to re-enable
rally scoring.
In Game Operations 17
Page 24

5.3 Edit Menu
The Edit menu allows users to manually edit stats, edit the play commentary, rebuild stats,
check for errors, and find a play or a serve.
Play by play can be edited simply by clicking on a play in the script and making the
appropriate changes. To quickly edit the last play, press [Ctrl] + [l].
Note: None of the Edit menu commands are available for Box scoring modes.
Manually Adding and Inserting Plays
In case a play was not inserted or added in the correct place, operators are able to insert
missing plays.
1. Locate the place where the play should have taken place in the Play-by-play script.
2. Go to Edit > Insert Play to put a new Dummy Play before the selected play, or click
Add Play to put a Dummy Play after the selected play.
3. Select the Dummy Play to enter in the play as it should have happened.
Deleting Plays
In the event that a play needs to be deleted from the play commentary or statistics, users are
able to delete any play.
1. Locate the play to be deleted in the Play-by-play script.
2. Go to Edit > Delete Play.
Note: Press [Ctrl] + [x] to delete the last play.
Adding or Inserting Serves
Users are also able to add and insert serves into the Play-by-play script.
1. Locate the place where the serve should have taken place in the Play-by-play script.
2. Go to Edit > Insert Serve to put a new serve before the selected play, or click Add
Serve to put a serve after the selected play.
Find Serve
To find a specific serve:
1. Go to Edit > Find Serve.
2. Enter the details of the serve into the appropriate boxes.
3. Click Find to locate the serve.
Find Play
To find a specific play:
1. Go to Edit > Find Play.
2. Enter the details of the play into the appropriate boxes.
3. Click Find to locate the play.
Add or Edit Play Commentary
1. Select the play to add to or edit.
2. Go to Edit >Add/Edit Play Commentary.
18 In Game Operations
Page 25

3. In the Add Commentary to Play window (Figure 20), type in the text desired to be used
Figure 20: Add Commentary to the Play
Figure 21: Rebuilding Database Statistics
Figure 22: Error Check Status Bar
in the play-by-play report.
Rebuild Stats
Users are able to rebuild stats by one play at a time or the entire game at once. Be sure to
rebuild the stats after editing previous plays.
Go to Edit > Rebuild Stats (Figure 21).
Click Step to rebuild one play at a time. The Step button will have to be clicked every
time to move on to the next play.
Click the Go button to begin rebuilding the entire game.
Press [Esc] to cancel.
Check for Errors
Check a game for statistical
errors by going to Edit > Check
for Errors. Any errors found
will be bolded in the play-byplay commentary and the total
number of issues will appear in
the lower-left corner of the window.
Hovering the mouse over a bolded play will also display the suspected issue (Figure 22).
Click the play to edit as needed, and then go to Edit > Check for Errors again; fixing one
issue may trigger changes that resolve several other issues down the line.
Enable Include Subs in Check for Errors only if entering every substitution.
In Game Operations 19
Page 26

5.4 Game Control Menu
Figure 23: Balancing Game Stats
The Game Control menu allows users to start the next game, end a match, toggle Rally Score,
enter substitutions, show penalty cards, balance statistics, swap team sides, enter a
timeout/side out, add a point, replay, and export XML files.
Note: Only the Match Finished, Balance, and Export as XML file menu choices are
available in Box scoring modes.
Start Next Game
At the end of a game, go to Game Control > Start Next Game.
Note: At the beginning of a new game, go to Game Control > Use Previous Starting
Players to quickly add starters used in the last game.
Match Finished
1. At the end of a match, go to Game Control > Match Finished.
2. Click Yes if the game is over, or click No if plays still need to be entered.
Update Team Win/Loss Records and Duration
After ending the game, the program will ask the user to update the Team Win/Loss Records
or Game Duration. Click No to skip the screen or click Yes to update the information. If Yes is
clicked, the Game Information window will appear. The user can then update any game
information shown.
Rally Score
Go to Game Control > Rally Score to quickly enable or disable Rally Mode.
Tabs
The following tabs can be accessed from the Game Control menu. They may also be accessed
by pressing the appropriate F key. Press the same F key again to return to the Serve tab.
Substitutions [F2]
Red/Yellow Card [F3]
Timeout [F6]
Balance Stats
Go to Game Control > Balance or click the
balance button to have the program
check to ensure all statistics are properly
balanced. A green check mark means stats
are correctly balanced, while a red X
indicates an issue to be resolved (Figure 23).
Swap Teams
Go to Game Control > Swap Teams to
change teams to the other side of the court.
20 In Game Operations
Page 27

Side Out
Go to Game Control > Side Out to insert a side out.
Point
Go to Game Control > Point to add a point to the active team’s score.
Replay
Go to Game Control > Replay to end the current play without adding points. Press [Enter] to
confirm.
Export Game as XML File
In some instances, teams may need to export games as XML files to send to various media
outlets. Refer to Section 7.6 for more information.
5.5 View Menu
Use the View menu to configure the in-game layout of the application screen.
Toolbars
Go to View > Toolbar to enable/disable the main toolbar (refer to Section 5.1).
Go to View > Quick Display Toolbar to enable/disable the Quick Display buttons
(refer to Section 8.8).
Go to View > Twitter to enable/disable the Twitter function (refer to Section 8.11).
Entry Modes
Users may switch from Play by Play mode to both Box Score by Game and Box Score by
Match, as well as switch between both Box Modes. Click View and then select which mode to
switch to: Box Score by Game or Box Score by Match.
Note: Once a game is switched to Box mode, any changes made to statistics will cause the
game to remain in Box mode. Games in Box mode cannot be changed back to Play by
Play. A warning message will appear to confirm the permanent change in scoring mode.
Rosters & Statistics
Click View and select which rosters and statistics to view on the right side of the screen:
Home Team Only ([F10]), Visiting Team Only ([F11]), or Both Teams ([F12]).
5.6 Box Mode
Users entering statistics in box mode have two options: they can enter stats in Box Score by
Game (Figure 24), or Box Score by Match. The difference between the two is that box mode
by game separates match totals into each game (4 kills in third game) whereas box mode by
match shows statistical totals as one sum (14 kills in the whole match).
Note: Most of the column headings in Box Mode contain abbreviations. To see what these
abbreviations stand for, place the cursor over each heading for a moment.
In Game Operations 21
Page 28

Entering Scores & Statistics
Figure 24: Box Mode by Game
1. Use the Select Game dropdown box to switch between games within the match if
working in Box Score by Game.
2. To increase the score or a statistic one point at a time, double-click it, or click the
green plus button in the upper right hand corner of the screen.
3. To decrease the score or a statistic one point at a time, double-right-click it, or click
the red minus button in the upper right hand corner of the screen.
4. To modify the score or a statistic by more than one point at a time, click the statistic,
type in the new value, and press [Enter].
Pass Ratings Tab
DakStats Volleyball lets users assign pass ratings for players in two ways on the Pass Rating
tab. Users can rate a player on a scale of P0-P3, where P0 is a Service Reception Error and P3
is a great pass. If the user has a different rating method, enter the number of attempts in the
TA column, and then enter the total number of points for the passes in the Pts column. In
either instance, the Avg column will calculate the average pass rating of the player.
22 In Game Operations
Page 29

Section 6: Creating Reports
Figure 25: Selecting Reports
Figure 26: Printing Season Reports
DakStats Volleyball allows users to view and print a wide variety of reports to help assess player and
team statistics. The reports are produced as HTML files for easy transfer and email.
6.1 In-Game Reports
Users are able to print game reports when a game
is finished or while it is still open.
Note: By “print” it is meant that the reports
are generated as HTML files that can be
opened in an Internet browser and then sent
to a printer.
To print in-game reports:
1. Go to File > Print In Game.
2. In the Select Report(s) window (Figure 25),
check one or more of the report types.
3. Under Include Sets, select which set(s) to include in the report(s).
4. Select whether or not to Show Report Name.
5. Selecting Output as combined file will show all reports on a single page. Combined
reports will also have links back to the top of the page under each section. Enable
Force Page Breaks to ensure each report appears on its own sheet of paper when
printed out.
6. Click Print to open the report(s) in the default Internet browser, or click Cancel to
avoid creating the report(s).
7. Typically, going to File > Print within the Internet browser will create a hardcopy
printout of the report.
6.2 Season Reports
Users are able to print reports containing statistics from entire seasons.
To print season reports:
1. Go to File > Print Season and
2. On the Competitions tab, select
3. Select the Season.
4. Select the Team.
5. Select the type of game:
Creating Reports 23
the Printouts window will
appear (Figure 26).
the Team Reports sub-tab.
All
Home
Away
Neutral
Conference
Non-Conference
Other - allows users to select specific games
Page 30

6. Click the Team Reports tab (Figure 27), and then select the desired reports to print.
Figure 27: Team Reports
Figure 28: List of Reports
Figure 29: Statistic Printout
7. Click the Other tab to view additional report options, such as the directory where
they are saved and their titles.
8. Click GO and a list of reports will appear in the default Internet browser (Figure 28).
Note: If any report is selected that asks for individual results (i.e. Individual Match by
Match) a screen with the team roster will appear, asking for an individual player to be
selected. Select a player and click Select to continue generating the report(s).
24 Creating Reports
9. Click a link, and a stat
printout will appear
(Figure 29).
10. Typically, going to File >
Print within the Internet
browser will create a
hardcopy printout of the
report.
11. Click the browser’s Back
button to return to other
report links, if necessary.
Page 31

Printing Conference Season Reports
Figure 30: Printing Conference Reports
Figure 31: Creating Collections
1. Go to File > Print Season
and the Printouts
window will appear
(Figure 26).
2. On the Competitions
tab, select the Conf
Reports sub-tab.
3. Select the Season.
4. Select the Conference.
5. Select the Games:
All
Home
Away
Neutral
Conference
Non-Conference
Other – allows
users to select specific games
6. Click the Conf Reports tab (Figure 30).
7. Select the Conference Reports.
8. Click the Other tab to view additional report options, such as the directory where
they are saved and their titles.
9. Click GO and a list of reports will appear in the default Internet browser.
10. Click a link, and a stat printout will appear.
11. Typically, going to File > Print within the Internet browser will create a hardcopy
printout of the report.
12. Click the browser’s Back button to return to other report links, if necessary.
Creating Collections
Collections are used to save lists of the most commonly used reports.
1. Click the button next to the word Collections on
the right side of the screen (Figure 31).
2. In the window that appears, type in a
descriptive name for the collection of reports.
3. Select the desired reports as described above.
4. Click the save button to assign the reports to the collection. The types of reports
within a collection can be changed at any time; just be sure to save the changes.
5. Click the red X to completely delete the collection.
6. Right-click a collection to Rename, Save, Save As, Delete, or Add New.
Creating Reports 25
Page 32

6.3 Print Career Reports
Figure 32: Career Reports
Figure 33: Example Team Career by Season Report
1. Go to File > Print Career Reports to view the Career Reports window (Figure 32).
2. Click Set Up Seasons to Include.
a. Assign each season a short Print Name.
b. Number the seasons in the order they should be displayed, using “0” for any
season to omit from the report.
c. Click Close.
3. Select a Season and a Team.
4. Click Automatic to automatically update the season totals, or click Manual to update
each statistic using a stat chart.
5. Click View Career Reports.
6. The DakStats Career Reports Internet browser window will appear.
To view a specific player’s career reports, select the player from the list and
click View Single Player by Season.
Select either Player Career by Season, Player Career Totals, or Team Career
by Season (Figure 33) to view each report.
26 Creating Reports
Page 33

6.4 Roster Printouts
Figure 34: Printing Rosters
1. Go to Configure > Rosters.
2. On the Configure Rosters window (Figure 34), select the Season and Team.
3. Click Print Roster and the roster will appear in the default Internet browser.
4. Typically, going to File > Print within the Internet browser will create a hardcopy
printout of the roster.
Creating Reports 27
Page 34

Page 35

Section 7: Importing and Exporting
Figure 35: Start Time & Score
Figure 36: Import Competition Window
Information can be exchanged electronically from any team or conference that uses DakStats
Volleyball by importing and exporting game files. This will eliminate the need to enter rosters or
statistics that have already been entered. It is also possible to import information to and from other
third-party software applications.
Note: When importing or exporting, right-click a game
to see the score and start time for that game (Figure 35).
This makes games easier to identify when importing
and for conference offices.
7.1 Importing Matches
1. Go to File > Import Match, and the Import Competition window will appear (Figure 36).
2. Select the Season in which to save the file.
3. Click Change Import Directory to select the folder from which to import the file.
4. Select the File Type to look for in the selected folder:
Importing & Exporting 29
DakStats (*.txt) – Text files generated from the DakStats program
SC XML (*.xml) – XML files generated from Stat Crew
DakStats Pbp (*.pbx) – Files generated from the DakStats program that
include the entire play-by-play commentary
SCVBF1 (*.vgm) – VGM files generated from Stat Crew
Note: After importing a PBX file, open the imported game and go to Edit >
Rebuild Stats.
®
programs
®
programs
Page 36

5. Select the game to be imported from the Select File to Import column, and then click
Figure 37: Import Into Window
Figure 38: Export Competition Window
Import File.
6. If a possible duplicate game is
detected, the Import Into window will
appear (Figure 37) with 2 choices:
Click Import New
Competition to import the
game as is.
Select the existing game from
the list, and then click
Import Into Existing to
replace the game with the
imported game.
Note: Import Into Existing commands cannot be undone.
7.2 Exporting Matches
1. Go to File > Export
Match, and the Export
Competition window will
appear (Figure 38).
2. Select the Season, Team,
and Competition to be
exported.
Note: The current save
directory is shown at the
bottom of the window.
To change this location,
click Directory and select
the desired destination
for the exported file.
3. Click the dropdown
arrow to select the type
of file to export:
DakStats (*.txt) –
Text files for use with DakStats programs
DakStats Pbp (*.pbx) – Files for use with DakStats programs that include the
entire play-by-play commentary
SC XML (*.xml) – XML files for use with Stat Crew
MaxPreps (*.txt) – Text files for users of MaxPreps.com
SCVBF1 (*.vgm) – VGM files for use with Stat Crew
4. Click Export.
5. With the game exported, it can now be emailed or burned to a disk for users of
DakStats Volleyball and other programs to import into their season.
®
programs
®
programs
30 Importing & Exporting
Page 37

7.3 Exporting Season Statistics
Figure 39 Export Season Statistics Window
DakStats Volleyball allows users to export files containing season-to-date statistics to send to
conference or league headquarters.
1. Go to File > Export Season to Date, and the Export Season Statistics window will
appear (Figure 39).
2. Select the Season statistics to export.
3. Select the File Output Format.
DakStats Text: The user should choose this format if sending the file to be
imported into DakStats.
NCAA XML: Only NCAA users will choose this format to send their stats.
4. Select the type of Season To Date:
Select School Season to Date if the user is a school exporting the season to
the conference.
Select Conference Season to Date if the user is a conference exporting
statistics for all teams in the conference.
Note: The current directory is shown at the bottom of the window. Click
Directory, and then select the desired destination for the exported file.
5. Click Export.
6. With the season statistics exported, they can now be emailed or burned to a disk and
given to the appropriate conferences.
Importing & Exporting 31
Page 38

7.4 Importing Teams
Figure 40: Importing & Exporting Teams
Importing a team is a simple way to get
another team’s roster and data rather
than having to manually type in all the
information.
1. Go to Configure > Teams.
2. Select the Season.
3. Click Import in the bottom-right corner of the Configure Teams window (Figure 40).
4. Browse to the location of the file.
5. Select the team’s file, and click OK.
7.5 Exporting Teams
Exporting teams only works for DakStats Volleyball users.
1. Go to Configure > Teams.
2. Select the Season.
3. Select the team to be exported.
4. Click Export in the bottom-right corner of the Configure Teams window (Figure 40).
5. Save the file with the team information to an easily accessible location, such as
“My Documents” or the “Desktop”.
6. With the team exported, it can now be emailed or burned to a disk for other DakStats
Volleyball users to import into their season.
7.6 Exporting Matches as XML Files
It is possible to export a match as an XML file so that the file can be sent to other users who
require game data in XML format.
Note: There must be a game open to export a game as an XML file.
1. Go to Game Control > Export Game as XML File.
2. Navigate to an easily accessible location, such as “My Documents” or the “Desktop”.
3. Enter a descriptive File name.
4. Click Save.
5. With the file exported, it can now be emailed or burned to a disk.
32 Importing & Exporting
Page 39

Section 8: Additional Features & Settings
Figure 41: System Preferences – Seasons
This section details the rest of the features and settings of the DakStats Volleyball application.
8.1 Season and System Preferences
The System Preferences window allows users to add, edit, delete, and update seasons, as well
as repair, make and restore backups, and perform several other system management tasks.
Go to Configure > Seasons and System Preferences, and the System Preferences window will
appear (Figure 41).
Seasons
Use the Seasons tab on the System Preferences
window to add and edit seasons. The
following actions are available:
To add a season, refer to Section 3.2.
To edit a season, select a season, and
then click Edit.
To delete a season, select the season,
and then click Delete.
To make sure the season is up-to-date,
select a season, and then click Update.
Note: The Update option is used to update
any changes made in DakStats Volleyball such
as database field updates and modifications.
If the database is not working properly, use
the Repair/Compact command (see Utilities).
Tournaments
The Tournaments tab on the System
Preferences window (Figure 42) allows users to
add, delete, or edit tournaments.
To Add a Tournament
1. Select a Season.
2. Click Add.
3. Type in a descriptive Tournament
Name.
4. Click OK.
Note: Click Edit to change the name
of a selected tournament.
To Delete a Tournament
1. Select a Season.
2. Select a tournament to delete.
3. Click Delete.
Additional Features & Settings 33
Page 40

Utilities
Figure 43: System Preferences – Utilities
The Utilities tab on the System Preferences
window (Figure 43) allows users to manage the
seasons with copies, repairs, and backup files.
1. Click the Utilities tab.
2. Select a Season.
3. The following actions are available:
To repair or compact the
season database, click
Repair/Compact.
To make a backup copy of an
entire season, click Backup.
To overwrite the current
database with a previously
backed up database, click
Restore Backup.
Note: Restore Backup commands
cannot be undone.
To delete the backup copy of the season, click Delete Backup.
Users may also enable Backup Externally? and select a different location to
save the season backup. Use this feature in case of hard drive crashes or
other unexpected computer problems.
If there are problems with a season, it is possible to submit the season to Daktronics so that a
DakStats representative may examine the problem.
Click Submit Season to upload a season to Daktronics.
Be sure to write an email to Daktronics explaining the problem as clearly as possible.
Click Retrieve Season to download a season that has been submitted to Daktronics.
34 Additional Features & Settings
Page 41

8.2 Rules
Figure 44: Volleyball Rules Configuration
Figure 45: Modifying or Updating a Game
Game rules can be changed by opening the Rules
Configuration window.
1. Go to Configure > Rules Configuration.
2. On the Volleyball Rules Configuration
3. Select or type in the applicable values for
4. Click Save to update the changes, or click
5. Click Close when finished.
window (Figure 46), select an available
Rules File.
Number of Games in a Match, Start Game in
Rally Mode, Points in a Non-Deciding Game,
and Points in a Deciding Game.
Note: If desired, users may enable Show
‘Games’ as ‘Sets’ in reports to change the
wording of reports and report menus.
Reset to restore the default rules.
8.3 Configuring DakStats Volleyball
Users are able to modify or update match/game and conference information at any time.
Modifying Matches and Games
Section 3.5 explains how to add a new match. To quickly modify an existing match:
1. Go to Configure > Matches
and Games.
2. In the Game Information
window (Figure 45), select
the Season and Game ID,
then add any information
that was left blank when a
game was first created, or
update the rest of the
information as needed.
3. Click Save Game to
preserve the changes.
Note: Use the Update
Game Notes function to
enter any additional match
information not covered in
the provided fields.
Additional Features & Settings 35
Page 42

Configuring Conferences
Figure 46: Configure Conferences Window
Configuring conferences allows users to group teams together for reporting purposes.
Conferences are unique to each season, but one team can belong to multiple conferences.
Go to Configure > Conferences, to access the Configure Conferences window (Figure 46).
To Create a New Conference
1. Select a Season for the conference.
2. Click Add New.
3. Type the conference name under Conference Identifier.
4. Type the conference short name under Conference Print Name. This name is for reports.
5. If desired, click Set As Default Import Conf for conference offices importing season-to-
date files.
6. Click Save.
To Configure a Conference
1. Select the Season of the conference.
2. Select the Conference.
3. Select which teams to include in the conference in the Conference Teams Selected box.
4. Click Save.
To Delete a Conference
1. Select the Season of the conference.
2. Select the Conference.
3. Click Delete.
36 Additional Features & Settings
Page 43

Configurations
Figure 47: Configurations Window
Figure 48: Quick Players
Figure 49: Set Play Entry Button Colors Window
The Configurations window allows users
to adjust settings that affect how
DakStats Volleyball operates.
Press [Ctrl] + [D] or go to Configure >
Configurations to access the
Configurations window (Figure 47).
Note: The Configurations menu is only
available in Play-by-play mode.
Default Player: Select either
Assist or Attack Player.
Default Statistics: Select whether
display Game or Match Totals
in the Rosters & Statistics list.
Quick Player Entry: Assign up to
three common players from
each team to the period (.),
comma (,), and semicolon (;)
keys. When entering plays,
simply press the assigned key
instead of typing in the player’s
jersey number. These settings
are not saved between matches.
Quick players can also be entered by rightclicking on the players in the roster list (Figure 48).
8.4 Play Entry Button Colors
The Set Play Entry Button Colors window (Figure 49) allows the user to change the text and
background colors for buttons, as well as to choose between a normal or flat button appearance.
1. Go to Configure > Play Entry
Button Colors.
2. Choose the color of the text or
background for Normal Play
Entry Buttons selected and not
selected, or choose the color of
the text or background for
Special Play Entry Buttons
selected and not selected.
3. Uncheck Flat Button Style to
give the buttons a 3D look.
4. Click Restore Defaults to
return the buttons to their
original settings, or click OK to
save the changes.
Additional Features & Settings 37
Page 44

8.5 Team Button Colors
Figure 50: Team Button Colors Window
Figure 51: Auto Start Options
Figure 52: DakStats/DSTI Messaging
Use the Team Button Colors
window (Figure 50) to further
customize the appearance of the
DakStats Basketball user interface.
1. Go to Configure > Team
Button Colors.
2. Choose Text and
Background colors for the
Selected(Depressed) and Not
Selected Guest Team Button
and Home Team Button.
3. Click Restore Defaults to
return the buttons to their
original settings, or click
OK to save the changes.
Note: Try changing the button
colors to match the team or
school colors for easier visual recognition.
8.6 Auto Start Options
The Auto Start Interface, and Auto Start Chart RTD,
options are found on the Configure menu (Figure 51).
Auto Start Interface: Should only be checked when using the Daktronics Scoring-
Timing Interface (DSTI) to interface with a display.
Output Season Xml: Check this option if instructed by a league office. This keeps an
up-to-date XML file that certain leagues need to update their websites (refer to
Appendix C).
8.7 Messaging
The messaging settings help determine
how DakStats Volleyball communicates
with other Daktronics software.
The default setting is that the DakStats
Volleyball program is on the same
computer as the DSTI program. If these
programs are on separate computers:
1. Go to Configure > Messaging.
2. In the DakStats/DSTI Messaging
window (Figure 52), select
Different Machine.
3. Click OK.
38 Additional Features & Settings
Page 45

8.8 Quick Display
Figure 53: Quick Display
Figure 54: Configure Quick Display Item
The Quick Display option allows
users who interface with Venus
7000 display controllers to run
sequences from DakStats Volleyball.
These settings do not need to be
modified if the DakStats Volleyball
program is not interfacing with a
display controller. For more
information about creating
sequences, refer to the Venus 7000
Operator’s Manual (ED-14551).
1. Make sure to have DakStats
Volleyball, DSTI, and Venus
7000 running.
2. In DakStats Volleyball, go to Configure > Quick Display, and the Quick Display
window will appear (Figure 53).
3. If the Empty Interface Configuration File! message appears at the bottom of the
window, click Request Config.
4. Right-click an empty cell, and then click Add Item; to modify an existing cell, right-
click the cell, and click Edit Item:
a. In the Configure Quick Display Item window (Figure 54), check the box next to
Show on toolbar, and click OK.
b. Type in a descriptive Item
Name.
c. Check Show on toolbar.
d. Fill in the Enhanced RTD
Parameters to specify the
desired sequence to play.
e. Fill in the Request Parameters
to specify what type of data
to output.
Note: Items with the
%Select Nickname are not
compatible with quick
display buttons.
f. Click OK to save the
changes to the quick display
button.
5. Repeat Step 4 to assign up to 20
other commands on the toolbar,
6. To delete an existing cell, right-click the cell, and click Delete Item.
7. Click Close when finished creating the quick display buttons.
8. Go to View > Quick Display Toolbar to make the Quick Display Toolbar appear
above the standard toolbar.
9. The QD Toolbar can be undocked and moved, and it will dock on either side or the
bottom of the screen.
®
Additional Features & Settings 39
Page 46

8.9 Webcast
1) 2) 3) 4) 5) 6)
Figure 55: Twitter Toolbar – Not Signed In
DakStats Webcast allows the user to easily broadcast a live play-by-play Webcast of games to
the Internet for fans and media to view.
For information on Webcasting to the Web-Sync server, refer to the DakStats Web-
Sync Setup Guide (ED-14571)
For information on Webcasting to a school server, refer to the DakStats Webcast
Setup Quick Start Guide (ED-17019).
8.10 Web-Sync
The Web-Sync service greatly reduces the effort needed to collect league statistics. Any group
of teams using DakStats, such as conferences or state associations, can easily compile league
leaders and game-by-game statistics. Refer to the DakStats Web-Sync Setup Guide
(ED-14571) or the DakStats Web-Sync Operation Manual (DD1670479) for instructions on
setting up the Web-Sync service.
8.11 Twitter
Internet access is required to use the Twitter function.
DakStats has the ability to send “tweets” through a validated Twitter account from within
the software, providing followers with instant game updates. DakStats can automatically
suggest tweets after specific actions occur – such as when a team scores, at the end of a
period/game, etc. – and users may manually edit and send these suggested tweets. Users are
also free to type in and send their own tweets at any time.
When a Play-by-Play game is first opened, the Twitter toolbar should be visible at the top of
the screen (Figure 55). If not, go to View > Twitter to enable it. The toolbar can be dragged
elsewhere on the screen as desired.
The following is a summary of each feature of the Twitter toolbar:
1) The user can type in tweets (or edit automatic tweets) in this textbox.
2) Click this button to toggle between automatic and custom tweet mode:
indicates that the text may be overwritten by an automatic tweet.
indicates that automatic tweets will not overwrite any custom text entered.
When in custom mode, the textbox is outlined in orange.
3) This shows a count of the remaining characters in the tweet. A single tweet has a
maximum of 140 characters, including spaces and punctuation.
4) This button shows Sign In when the user is not currently signed in to Twitter.
After signing in, it will show Tweet; click this button to send custom and auto tweets.
5) Click this button to modify tweet settings. Refer to the Configuration section below.
6) This box shows “Not signed in” when the user is not currently signed in to Twitter.
After signing in, this shows the current Twitter account that DakStats is connected to.
40 Additional Features & Settings
Page 47

Configuration
Game Open
Game Over
End of Period
End of Period Tied
Figure 56: Configure Twitter
Click the configure button to open the Configure Twitter window (Figure 56). After making
any changes to the configuration, click OK to save them, or Cancel to discard them.
Template
Templates tell the software how and when to generate tweets for certain game actions.
By default, 4 templates for automatic tweets are provided:
When one of these game actions occurs, the textbox in the Twitter toolbar will automatically
populate with the information defined in its template. Note that automatic tweets are only
generated when a Twitter user is signed in, and they are not sent until the user clicks the
Tweet button.
Select one of the available templates from the drop-down box to view the information it
contains. The On End of Period template is shown as an example:
End of <<CurGameText>> game, <<AbbrWinning>> leads <<ScoreWinning>> - <<ScoreLosing>>.
To edit the template, simply type in the textbox.
To return the template to its default text, click .
To turn off a particular type of automatic tweet, uncheck Enabled.
The information in <<double carets>> is known as a “markup”. Markups are
placeholders that will be swapped with real-time game data in the actual tweet.
For example, <<AbbrWinning>> is replaced by the leading team’s abbreviated name.
Click the [>>] button to view a complete list of available markups, and click on a
markup to insert it into the textbox at the location of the cursor.
Additional Features & Settings 41
Page 48

Credentials
Figure 57: Authorize DakStats
Figure 58: Authorization Page
Figure 59: Confirmation Window
1. Under Username, type in the Twitter account name
that the tweets will be posted to.
2. Click Validate Connection.
3. In the Authorize DakStats window (Figure 57), click
Authorize.
4. A Twitter webpage will open in the default Internet
browser (Figure 58). Enter the Username or email and
Password for the Twitter account (if not already
signed in), and then click Authorize app.
5. The next page will provide a unique PIN number.
Copy and Paste this number into the Pin text box,
then click OK.
6. Click OK again on the confirmation window
(Figure 59).
The text shown on the Configure Twitter window should
change as follows:
DakStats now has access to send tweets on behalf of this Twitter account.
Under Profile, users may select a Web-Sync profile associated with the season. The following
template markups require a Web-Sync profile in order to be used:
League
League Sport Gender
Team Schedule Link (this appears as a shortened bitly™ link to a Web-Sync page)
Note: The Web-Sync profile needs to have been successfully synced at least once. If the
profile was just created without being synced, or if no profile is selected, the software will
ignore these markups.
42 Additional Features & Settings
Page 49

After validating a Twitter account, the Twitter toolbar is updated. Figure 60 shows the
Figure 60: Twitter Toolbar – Signed In
Figure 61: Twitter Toolbar – Message Too Long
updated Twitter toolbar with an automatically generated tweet upon opening the game:
Users must manually click the Tweet button to send custom and automatic tweets.
For a few moments after sending a tweet, the textbox is outlined in green. Users may open
their Twitter page to verify the tweet has been sent successfully. Any undesired tweets may
be removed from this page as well.
If a template was created that contains too many or too lengthy markups (such as “Play by
Play Text”), the character count may show a red negative value (Figure 61). In this instance,
the Tweet button will be unavailable until the message is shortened.
Additional Features & Settings 43
Page 50

Page 51

Section 9: Using the Keyboard & Hotkeys
Hotkey
Command
Button
[F1]
Help (view manual)
[F2]
Subs tab (PbP Mode)
[F3]
Card tab (PbP Mode)
[F4]
opens Balance window
[F5]
Swap Teams to the other side of the court (PbP Mode)
[F6]
Timeout tab; press [t] to switch the team (PbP Mode)
[F7]
Side Out. Similar to [F8], but also switches serving team.
(PbP Mode)
[F8]
Point. Useful when unsure how to record a play (PbP Mode)
[F9]
Replay (press [Enter] to confirm) (PbP Mode)
[F10]
view Home roster/stats
[F11]
view Visitor roster/stats
[F12]
view both Visitor and Home roster/stats
[Ctrl] + [n]
opens Game Information window (new game)
[Ctrl] + [o]
opens Open Match window
[Ctrl] + [p]
opens Printouts window (season)
[Ctrl] + [i]
opens Select Report(s) window (in-game)
[Ctrl] + [x]
deletes last play; must select Yes to confirm ((PbP Mode))
[Ctrl] + [l]
edits the last play (PbP Mode)
[Ctrl] + [d]
opens Configuration window (PbP Mode)
[Ctrl] + [q]
opens Quick Display window
[u]
clears the Assist attempt on the Attack screen (PbP Mode)
[x]
toggles the active team (PbP Mode)
Comma,
Period,
Semicolon
These keys may be used as a shortcut for any player number
on both teams. Press [Ctrl] + [d] to access the setup menu, or
right-click player in the roster. (PbP Mode)
[?]
Team Player (TM). Use this anytime the player number was
missed and need to keep entering stats (or if a play should be
credited to the Team Player). (PbP Mode)
Many of the commands in the DakStats Volleyball software can be accessed with the keyboard as well
as the mouse. Most buttons in the main menu and Play-by-play entry mode have labels with an
underlined letter. Pressing the key on the keyboard that correlates with the underlined letter will
activate that particular button. To activate secondary buttons, which are usually colored differently,
press the underlined key while holding the [Shift] key.
Using the Keyboard & Hotkeys 45
Page 52

[t]
Attack on Two (on second contact). Used on the attack
screen, this moves the player in the Assist attempt field to the
Attack By field, and looks to see if it can grab the dig/pass
from previous play for the assist. It will not overwrite the
attacker if it’s already populated, nor will it change the
attacker if assist and attack will be the same player.
(PbP Mode)
[0] + [Enter]
Records an “over” play without crediting a statistic.
46 Using the Keyboard & Hotkeys
Page 53

Section 10: Contact Information
Mail: Daktronics, Inc., Customer Service
201 Daktronics Drive
PO Box 5128
Brookings, SD 57006
Phone: DakStats Help Desk: 1-888-325-7828
Fax: 1-605-697-4000 Attn: DakStats
Email: dakstats@daktronics.com
If there are any questions about installing or operating the DakStats Volleyball program that are not
covered in this manual, please contact DakStats Customer Service:
Contact Information 47
Page 54

Page 55

Index .
A
assists
in play-by-play mode ................................... 16
attacks
in play-by-play mode ................................... 16
B
balance stats ....................................................... 20
box mode ........................................................... 21
entering scores and statistics ....................... 21
C
cards ................................................................... 17
checking for errors ............................................ 19
conferences
creating ........................................................... 36
deleting........................................................... 36
Configure menu .................................... 5, 7, 8, 33
contact information .......................................... 47
D
DSTI
messaging options ........................................ 38
E
Edit menu .......................................................... 17
entry modes
descriptions of ................................................. 6
exporting
games in XML ............................................... 21
matches .......................................................... 30
matches in XML ............................................ 32
season stats .................................................... 31
teams .............................................................. 32
installing the software ....................................... 3
downloading from the internet .................... 3
using installation CD ..................................... 3
K
keyboard shortcuts ........................................... 45
M
matches
creating .......................................................... 10
ending ............................................................ 20
exporting ....................................................... 30
exporting in XML ......................................... 32
importing ....................................................... 29
opening .......................................................... 12
settings ........................................................... 35
starting new .................................................. 19
P
pass ratings........................................................ 22
penalties ............................................................. 17
play commentary
viewing .......................................................... 14
play-by-play mode ........................................... 14
appearance .................................................... 37
plays
adding and inserting .................................... 18
deleting .......................................................... 18
entry options ................................................. 37
finding ............................................................ 18
Q
quick display ..................................................... 39
F
File menu ......................................... 10, 12, 23, 29
G
Game Control menu ......................................... 19
game duration ................................................... 20
games
modifying ...................................................... 35
H
helpful hints ....................................................... 11
I
importing
duplicate games ............................................ 30
matches .......................................................... 29
Contact Information 49
rally scoring ................................................. 17, 20
rebuilding stats ................................................. 19
replay ................................................................. 20
reports ................................................................ 23
career .............................................................. 26
conference...................................................... 25
in-game .......................................................... 23
rosters ............................................................. 27
season ............................................................. 23
using collections ........................................... 25
rosters
adding players ................................................ 9
deleting players .............................................. 9
editing players ................................................ 9
on splash screen .............................................. 5
R
Page 56

viewing in play-by-play mode ....................14
RTD
auto start settings ..........................................38
rules
changing .........................................................35
setting to seasons ............................................6
S
seasons
backing up .....................................................34
creating .............................................................5
deleting ...........................................................33
exporting ........................................................31
updating .........................................................33
uploading to Daktronics ..............................34
viewing on splash screen ...............................4
serves
adding and inserting ....................................18
finding ............................................................18
in play-by-play mode ...................................15
sideouts ..............................................................20
splash screen ........................................................4
common tasks ..................................................5
schedule ...........................................................5
spotters ...............................................................11
starters
in play-by-play mode ...................................15
substitutions
in play-by-play mode ...................................16
system requirements .......................................... 1
T
teams
adding manually ............................................ 7
adding via list ................................................. 8
changing sides ............................................... 20
editing .......................................................... 7, 8
exporting ........................................................ 32
importing ....................................................... 32
on splash screen .............................................. 4
timeouts ............................................................. 17
toolbars
main ................................................................ 13
tournaments
creating .......................................................... 33
deleting .......................................................... 33
Twitter ................................................................ 40
Configuration ................................................ 41
Tweeting ........................................................ 43
V
Venus 7000 ........................................................ 39
View menu ............................................ 13, 21, 39
W
Webcast .............................................................. 40
Web-Sync ................................................. 8, 40, 43
50 Index
Page 57

Appendix A: Volleyball Stat & Pass Ratings Sheets
Appendix A: Volleyball Stat & Pass Ratings Sheets 51
Page 58

Page 59

Team (Record) 1 2 34
5
Date:
( )
( ) Start Time:
Conference _____ Non-Conference _____
End Time:
Volleyball Stats Sheet
Home _____ Away _____ Neutral _____
Player Name GP K E TA A SA SE RE DIG BS BA BE BHE GS AE ZA S0 REC ZBS ZBA
Site:_________________________
(Arena/City/State)
= Optional for non college teams
GP - Games Played, K - Kills, E - Errors, TA - Total Attacks, A - Assists, SA - Service Aces, SE - Service Errors, RE - Reception Errors, DIG - Digs, BS - Block Solos, BA - Block Assists,
BE, Block Errors, BHE - Ball Handling Error, GS - Gamer Started, Assist Errors, ZA - Zero Assists, S0 - Zero Serves, REC - Receptions, ZBS - Zero Block Solos, ZBA - Zero Block Assists
Page 60

Volleyball Pass Ratings
_
Date:
Game_______________
Player Name P0 P1 P2 P3 TA PTS P0 P1 P2 P3 TA PTS
Game__________________
Player Name
= DakStats calculated field
Page 61

Appendix B: Volleyball Play-by-Play Worksheet
Appendix B: Volleyball Play-by-Play Worksheet 53
Page 62

Page 63

DakStats Volleyball Play-By-Play Worksheet
Score
Team
Offense
Defense/Result
Srv Set
Atk
Srv Set
Atk
Srv Set
Atk
Srv Set
Atk
Srv Set
Atk
Srv Set
Atk
Srv Set
Atk
Srv Set
Atk
Srv Set
Atk
Srv Set
Atk
Srv Set
Atk
Srv Set
Atk
Srv Set
Atk
Srv Set
Atk
Srv Set
Atk
Srv Set
Atk
Srv Set
Atk
Srv Set
Atk
Srv Set
Atk
Srv Set
Atk
Srv Set
Atk
Srv Set
Atk
Srv Set
Atk
Srv Set
Atk
Srv Set
Atk
Srv Set
Atk
Starters
H G 1
2 3 4 5
6 L
Result Codes: Others:
BB
Sr
* be sure to write down the offensive team on the next play
Home_______________ Guest_______________ Date__________ Set_____ Page __ of __
-
-
-
-
-
-
-
-
-
-
-
-
-
-
-
-
-
-
-
-
-
-
-
-
-
-
K = Kill AErr = Attack Error ACE = Service Ace B = Blocked Over*
= Blocked Back* BErr = Block Error SErr = Set Error Replay
vErr = Serve Error BHE = Ball Handling Error Card
Page 64

Page 65

Appendix C: Supplementary Guides & Manuals
Document Title Document Number
DakStats Output Season XML Quick Start Guide ................................................................. DD2119764
Appendix C: Supplementary Guides & Manuals 55
Page 66

Page 67

DakStats Output Season XML Quick Start Guide 1 of 1
201 Daktronics Drive PO Box 5128, Brookings, SD 57006-5128
Tel: 1-800-DAKTRONICS (1-800-325-8766) Fax: 605-697-4700
Web: www.daktronics.com
DD2119764 Rev 0
23 September 2011
This guide will assist you with a feature of the DakStats software that allows you to output an XML file of the current season. This is useful when posting
up-to-date statistics to a website with your own style sheet applied. DakStats Baseball, Basketball, Football, Soccer, and Volleyball support this feature.
Enabling Season XML Output
1. Open the DakStats program.
2. Go to Configure > Output Season Xml. A checkmark appears
next to the menu item to indicate it is enabled.
Setting the Default Team
In order to create the season XML file, there must be a default team for the
current open season. The current season is shown on the top of the screen
when the program is opened.
To set a default team, simply select the team from the drop-down
list and click Set as Default Team. Alternately, a default team may
be selected when creating a new season. To set a different default
team, you must go to Configure > System and Season Preferences,
select the season, and click Edit.
With Output Season XML enabled and a default team set, a Season
XML file will be created in the following location:
“C:\Daktronics\DakStats [Sport]\season.xml”
Note: For Baseball and Basketball, a “gamebygame.xml” file is
also created in the same folder.
The XML files are created and updated ONLY after performing one
of the following actions:
Closing a game (File > Close)
Closing the Configure Teams window (Configure > Teams)
Closing the Configure Rosters window (Configure > Rosters)
The “season” file is the NCAA/Stat Crew specification. The
“gamebygame” file provides a record of each game of the season.
The names of the XML files are always the same. They can be
parsed by a CSS or XLST file to display the stats on a website
however you want, with your own style and branding.
 Loading...