

Page 1

DakStats 3000 Rodeo Software
Installation & Operation Manual
ED-14946 Rev 2 – 29 September 2014
201 Daktronics Drive PO Box 5128 Brookings, SD 57006-5128
Tel: 800-325-8766 605-697-4300 fax: 605-697-4700
www.daktronics.com/support
Page 2

ED-14946
Product 1092
Rev 2 – 29 September 2014
DAKTRONICS, INC.
Copyright 2009-2014
All rights reserved. While every precaution has been taken in the preparation of this manual, the publisher
assumes no responsibility for errors or omissions. No part of this book covered by the copyrights hereon may be
reproduced or copied in any form or by any means – graphic, electronic or mechanical, including photocopying,
taping or information storage and retrieval systems – without written permission of the publisher.
All trademarks used in this manual are property of their respective owners.
Page 3

Table of Contents
Table of Contents .................................................................................................................................. i
Section 1: Introduction ................................................................................................................. 1
1.1 System Requirements ............................................................................................................. 1
1.2 Software Conventions ............................................................................................................ 2
Section 2: Installation & Registration ......................................................................................... 3
2.1 Installation ............................................................................................................................... 3
Downloading from the Internet ..................................................................................... 3
Installing from the Installation CD ................................................................................ 3
2.2 Opening & Exiting the Application ...................................................................................... 3
2.3 Registration .............................................................................................................................. 3
Section 3: Rodeo Operation ........................................................................................................ 5
3.1 Creating New Seasons ............................................................................................................ 6
3.2 Creating New Rodeos............................................................................................................. 6
3.3 Opening a Rodeo ..................................................................................................................... 6
Closing a Rodeo ............................................................................................................... 7
Deleting a Rodeo .............................................................................................................. 7
3.4 Rodeo Setup ............................................................................................................................. 7
System Information ......................................................................................................... 7
Display Text ...................................................................................................................... 8
Event Information ............................................................................................................ 8
Adding Custom Events ............................................................................................ 8
Deleting Events ......................................................................................................... 8
Editing Events ........................................................................................................... 8
3.5 Contestant Entry ..................................................................................................................... 9
Adding Contestants ....................................................................................................... 10
Editing Contestants ....................................................................................................... 10
Finding Contestants ....................................................................................................... 10
Copying Contestants ..................................................................................................... 10
Deleting Contestants ..................................................................................................... 10
Contestant Messages ..................................................................................................... 11
Adding New Messages .......................................................................................... 11
Editing Messages .................................................................................................... 11
Deleting Messages .................................................................................................. 11
Displaying Messages .............................................................................................. 11
3.6 Stock Entry ............................................................................................................................. 11
3.7 Import File .............................................................................................................................. 12
Resolving Contestants ................................................................................................... 12
3.8 Performance Entry ................................................................................................................ 13
Rodeo Entry .................................................................................................................... 13
Event Entry ..................................................................................................................... 13
Individual Event ..................................................................................................... 13
Team Event .............................................................................................................. 14
Building Finals ........................................................................................................ 14
Go-Round Entry ............................................................................................................. 14
Individual Events.................................................................................................... 14
Table of Contents i
Page 4

Team Event .............................................................................................................. 14
Adding Performances ............................................................................................ 14
Removing Performances ........................................................................................ 14
Performance Entry ......................................................................................................... 15
Individual Events .................................................................................................... 15
Team Event .............................................................................................................. 15
3.9 Run Performance ................................................................................................................... 15
Activating Riders ........................................................................................................... 16
Results Entry ................................................................................................................... 16
Scored Events .......................................................................................................... 16
Timed Events ........................................................................................................... 17
Editing Results ........................................................................................................ 17
Display Buttons .............................................................................................................. 17
Leaderboard .................................................................................................................... 18
3.10 Box Entry ................................................................................................................................ 18
Entering/Editing Results .............................................................................................. 18
3.11 Reports .................................................................................................................................... 19
Printing Reports ............................................................................................................. 19
Copying Reports ............................................................................................................ 19
Section 4: Display Profile Configuration .................................................................................. 21
4.1 Display Buttons ..................................................................................................................... 21
4.2 Default Profiles ...................................................................................................................... 21
4.3 Editing Profiles ...................................................................................................................... 22
RTD Options ................................................................................................................... 23
Contestant Messages .............................................................................................. 23
Section 5: Input/Output Configuration ...................................................................................... 25
5.1 Adding New Ports ................................................................................................................ 25
INPUT: Timer ................................................................................................................. 25
OUTPUT: Rodeo In Progress (RIP) RTD .................................................................... 25
OUTPUT: Announcer Monitor .................................................................................... 26
5.2 Editing Ports .......................................................................................................................... 26
5.3 Deleting Ports ........................................................................................................................ 26
5.4 Monitoring Ports ................................................................................................................... 26
Refreshing Outputs ........................................................................................................ 26
Section 6: Season Configuration ............................................................................................... 27
6.1 Adding Seasons ..................................................................................................................... 27
6.2 Editing Seasons ...................................................................................................................... 27
6.3 Deleting Seasons .................................................................................................................... 27
6.4 Utilities.................................................................................................................................... 27
Section 7: Contact Information .................................................................................................. 29
ii Table of Contents
Page 5

Section 1: Introduction
DakStats® 3000 Rodeo software is a results program developed by Daktronics to be part of an
integrated stats, timing, and display package for rodeo. The program is used to input and organize
event information for display on Daktronics matrix displays. Such information might include: the
event leader, current contestant, overall event results, and go-round results. The operator is a critical
component in the success of a show and must have a thorough understanding of the system and how
each piece of hardware and software works together.
DakStats 3000 Rodeo software is compatible with:
Daktronics All Sport
Daktronics LED matrix display controllers
Daktronics Announcers Monitor terminals and Daktronics Press Row Monitor software
This manual includes the following main sections:
Introduction covers basic information about the program and this manual.
Installation & Registration describes the software installation procedures.
Rodeo Operations, Display Profile Configuration, Input/Output Configuration, and
Season Configuration explain how to control and configure the application.
Contact Information offers details about who to contact for help.
Appendix contains supplemental information about or for the application.
Daktronics identifies manuals by an ED or DD number located on the cover page. Any other
documents referenced in this manual will be identified by the ED/DD number. For example, this
manual would be referred to as ED-14946.
®
5100 and OmniSport® 2000 timing consoles
1.1 System Requirements
The DakStats 3000 Rodeo software operates on a Windows®-based computer. The following
list describes the computer requirements for the software:
Windows XP operating system or better (Windows 7/8 – both 32 & 64 bit operating
systems are supported)
CPU and RAM must at least be equal to minimum requirements of operating system
Internet Explorer
The following requirements/equipment are optional for software operation:
One serial port for connection to the OmniSport 2000 or All Sport 5100 console
(one USB port and USB-to-serial adapter may be used in place of a serial port)
Note: OmniSport 2000 console may instead connect via Ethernet jack
(requires network switch/router).
One serial port for connection to announcer monitor
Ethernet jack or serial port for connection to display controller interface
®
6.0 or newer
Introduction 1
Page 6

Bold
Indicates an item that requires direct action, such as clicking, pressing,
selecting or formatting.
Italics
Indicates onscreen text or labels that are not clickable.
Bold Italics
Used to reference items within the manual, such as figures or sections, as
well as other documents and important notes.
[X]
Represents a keyboard key that needs to be pressed.
“Quotes”
Text or commands that may be typed; also indicate file or folder names
Click
Press and release the left mouse button.
Double-click
Press and release the left mouse button twice.
Right-click
Press and release the right mouse button.
Select
Highlight or mark, such as by placing a check mark in a nearby box;
clicking will not necessarily perform an action.
>
Followed by, as in menu navigation (ex. File > Open).
1.2 Software Conventions
This manual contains the following software conventions and terminology:
2 Introduction
Page 7
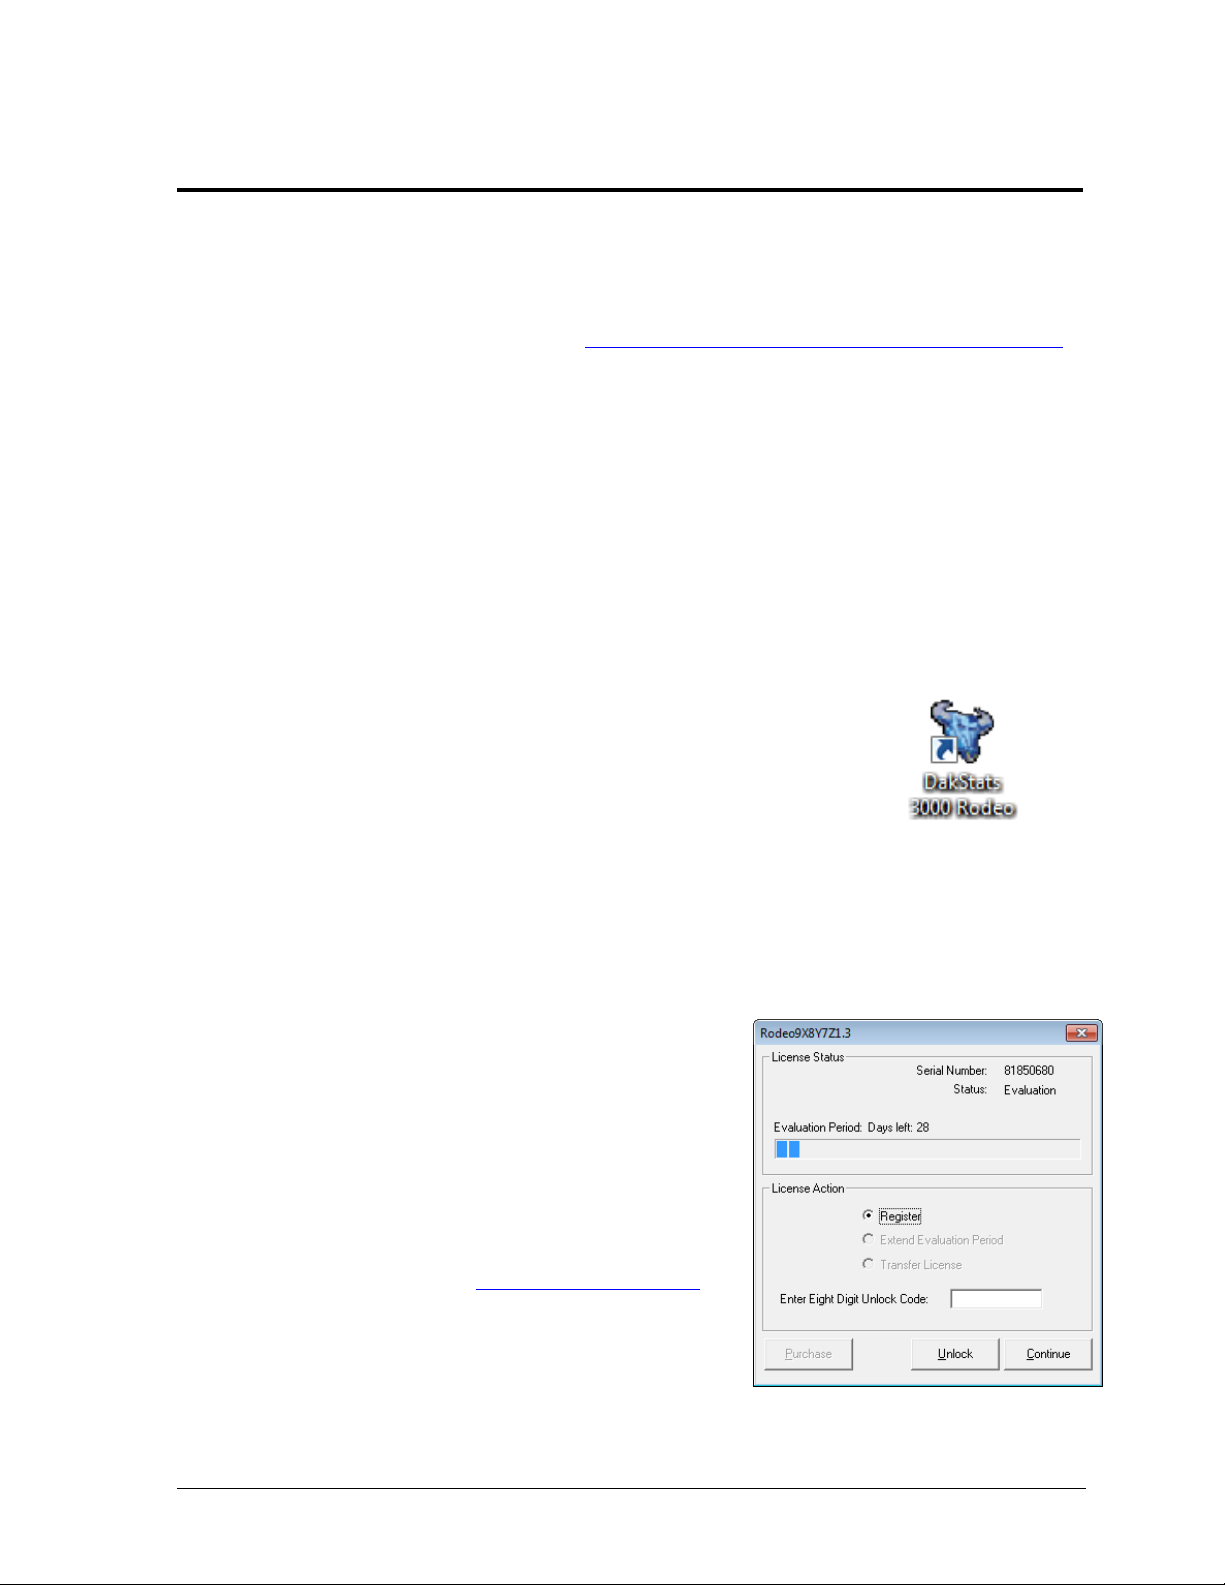
Section 2: Installation & Registration
Figure 1: DakStats
Rodeo Icon
Figure 2: Registration Screen
2.1 Installation
Downloading from the Internet
1. Open an Internet browser to: http://dakfiles.daktronics.com/downloads/DakStats
2. Click on the “DakStats 3000 Rodeo Installation.exe” file, and then click Run (twice if
necessary) to begin the installation procedure.
3. Follow the onscreen instructions to complete the installation.
Installing from the Installation CD
1. Insert the installation CD.
2. Navigate to the “Rodeo” folder.
3. Double-click on the “DakStats 3000 Rodeo Installation” file.
4. Follow the onscreen instructions.
5. Click Finish when done.
2.2 Opening & Exiting the Application
To open the application:
Double-click the “DakStats 3000 Rodeo” icon on the desktop
(Figure 1).
Click the Start menu and navigate to All Programs >
Daktronics > DakStats 3000 Rodeo.
To exit the application:
Click the exit button in the upper-right corner of the window.
Left- or right-click the icon in the upper-left corner of the window and click Close.
Go to File > Exit.
2.3 Registration
Installation & Registration 3
After installing the DakStats 3000 Rodeo software,
users are given a free 30 day trial period. Each time
the program is opened, the number of days remaining
for the free trial is shown. To use the software without
registering, click Continue. When the 30 day trial
period is over, users must register the software as
described below:
1. Send an email to dakstats@daktronics.com
containing the Serial Number shown on the top
right side of the registration screen (Figure 2).
2. Upon proof of purchase, Daktronics will
email an unlock code.
3. Type in or Paste the registration code in the
Enter Eight Digit Unlock Code text box on the registration screen.
4. Click Unlock followed by Continue to begin using the software.
Page 8

Page 9
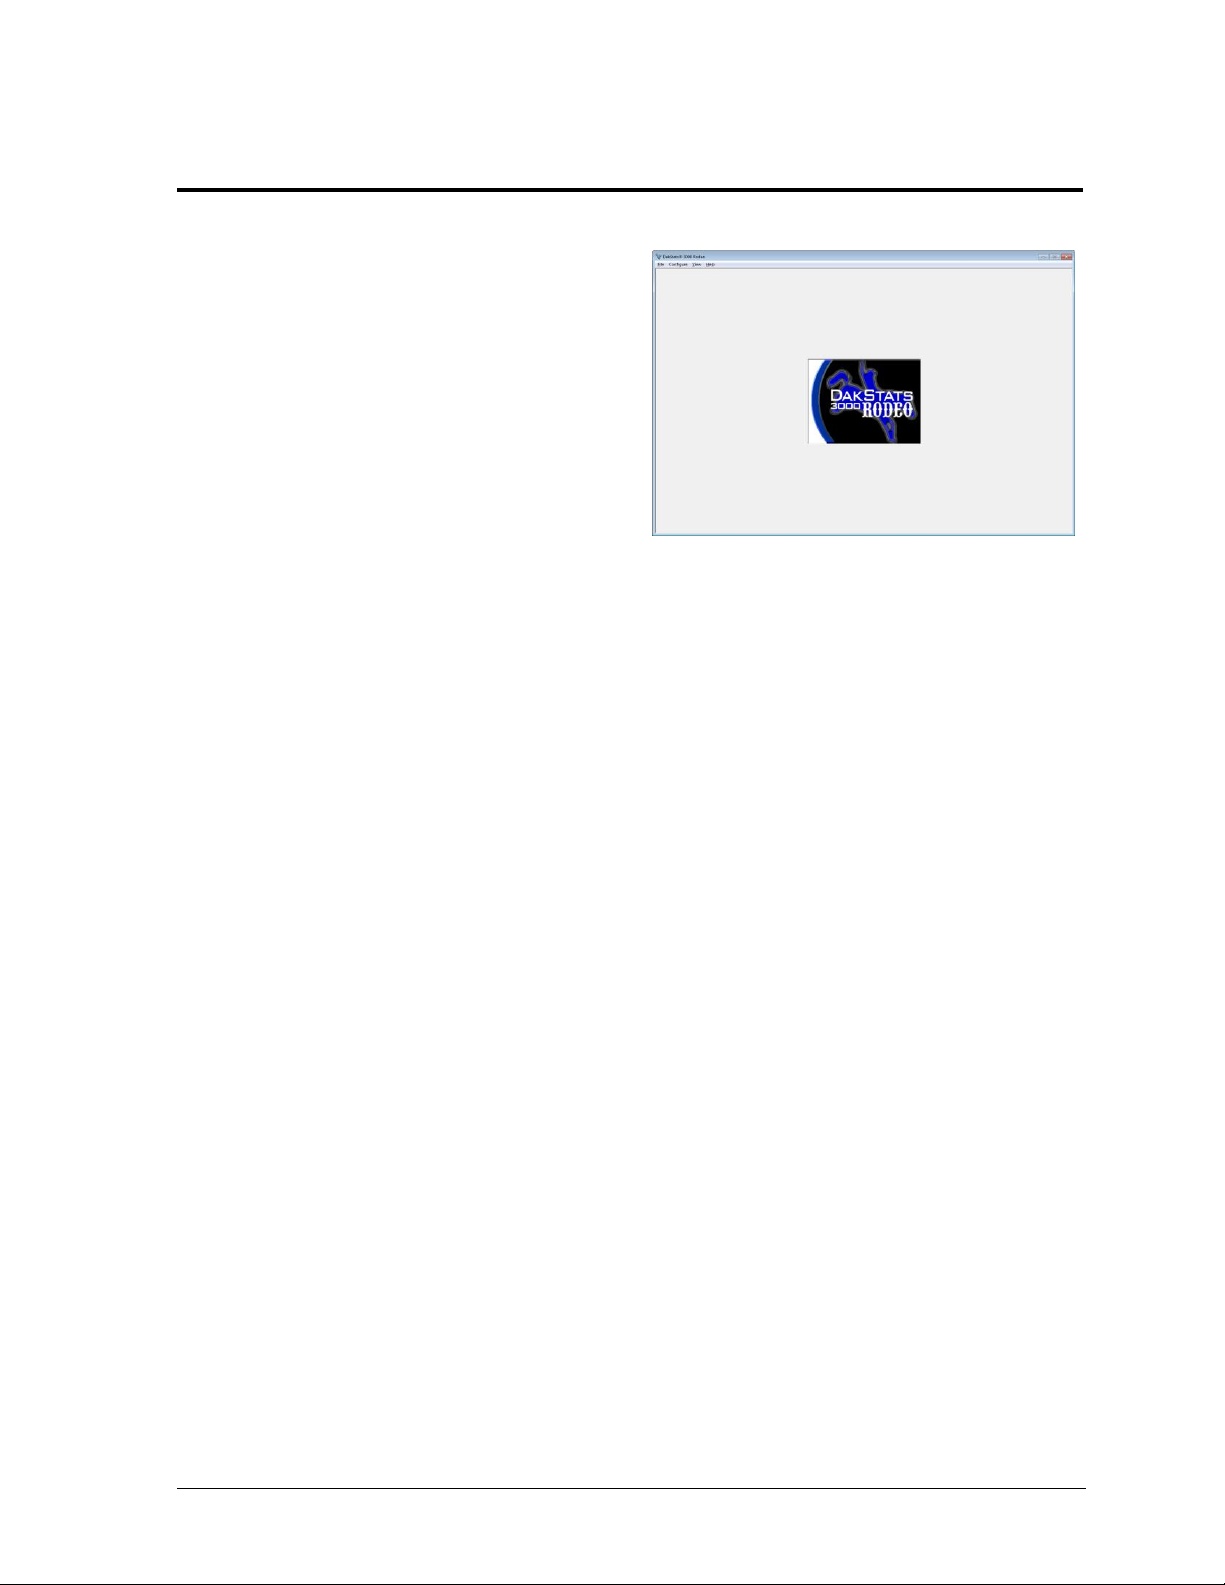
Section 3: Rodeo Operation
Figure 3: DakStats 3000 Rodeo Main Screen
When the software is opened for the first time, the
main screen will appear (Figure 3). If the software
has been opened before, the previous rodeo and
screen that was showing when the software was
last closed will appear.
The software organizes data by season, rodeo,
event, go-rounds, and performances. Each season
is its own database that contains all rodeos,
contestants, and stock. Contestants and stock are
saved at the season level; once entered into a
rodeo, they are always available for any other
rodeo in that season. See Section 3.1 for more
information about setting up new seasons.
Rodeos are made up of one or more events. Each event has configurations such as the type of event,
the number of go-rounds, the number of competitors that will go to finals (if there are finals), and the
format that the score or time will be stored. See Section 3.4 for how to set up a rodeo and the events
that make up that rodeo.
Contestants can be entered into a season manually (See Section 3.5), or simply imported from a file
from the PRCA (see Section 3.7). Stock entry is optional (see Section 3.6).
Note: Remember, contestants and stock can be copied from other seasons.
Once contestants and/or stock have been entered into a rodeo, go to the Performance Entry tab to
add performances to each of the go-rounds. Once the performances have been added, contestants
need to be assigned to the performance in which they will compete. It is recommended that they be
entered in the order that they compete, but for the rough stock events, that may be difficult. The most
important thing is to have them in the performance so that the operator can pick them in the Run
Performance screen as they get ready to ride. See Section 3.8 for Performance Entry.
The last step is running the performance. This is done on the Run Performance tab (see Section 3.9).
Quick Setup Summary
When setting up a rodeo event, the following steps should be followed:
Set up a new season (as needed).
Create the rodeo.
Configure the event parameters.
Enter the contestants into the rodeo.
Add the correct number of performances to each go-round.
Assign the contestants to the performance(s) in which they will compete.
Run the event.
Rodeo Operations 5
Page 10
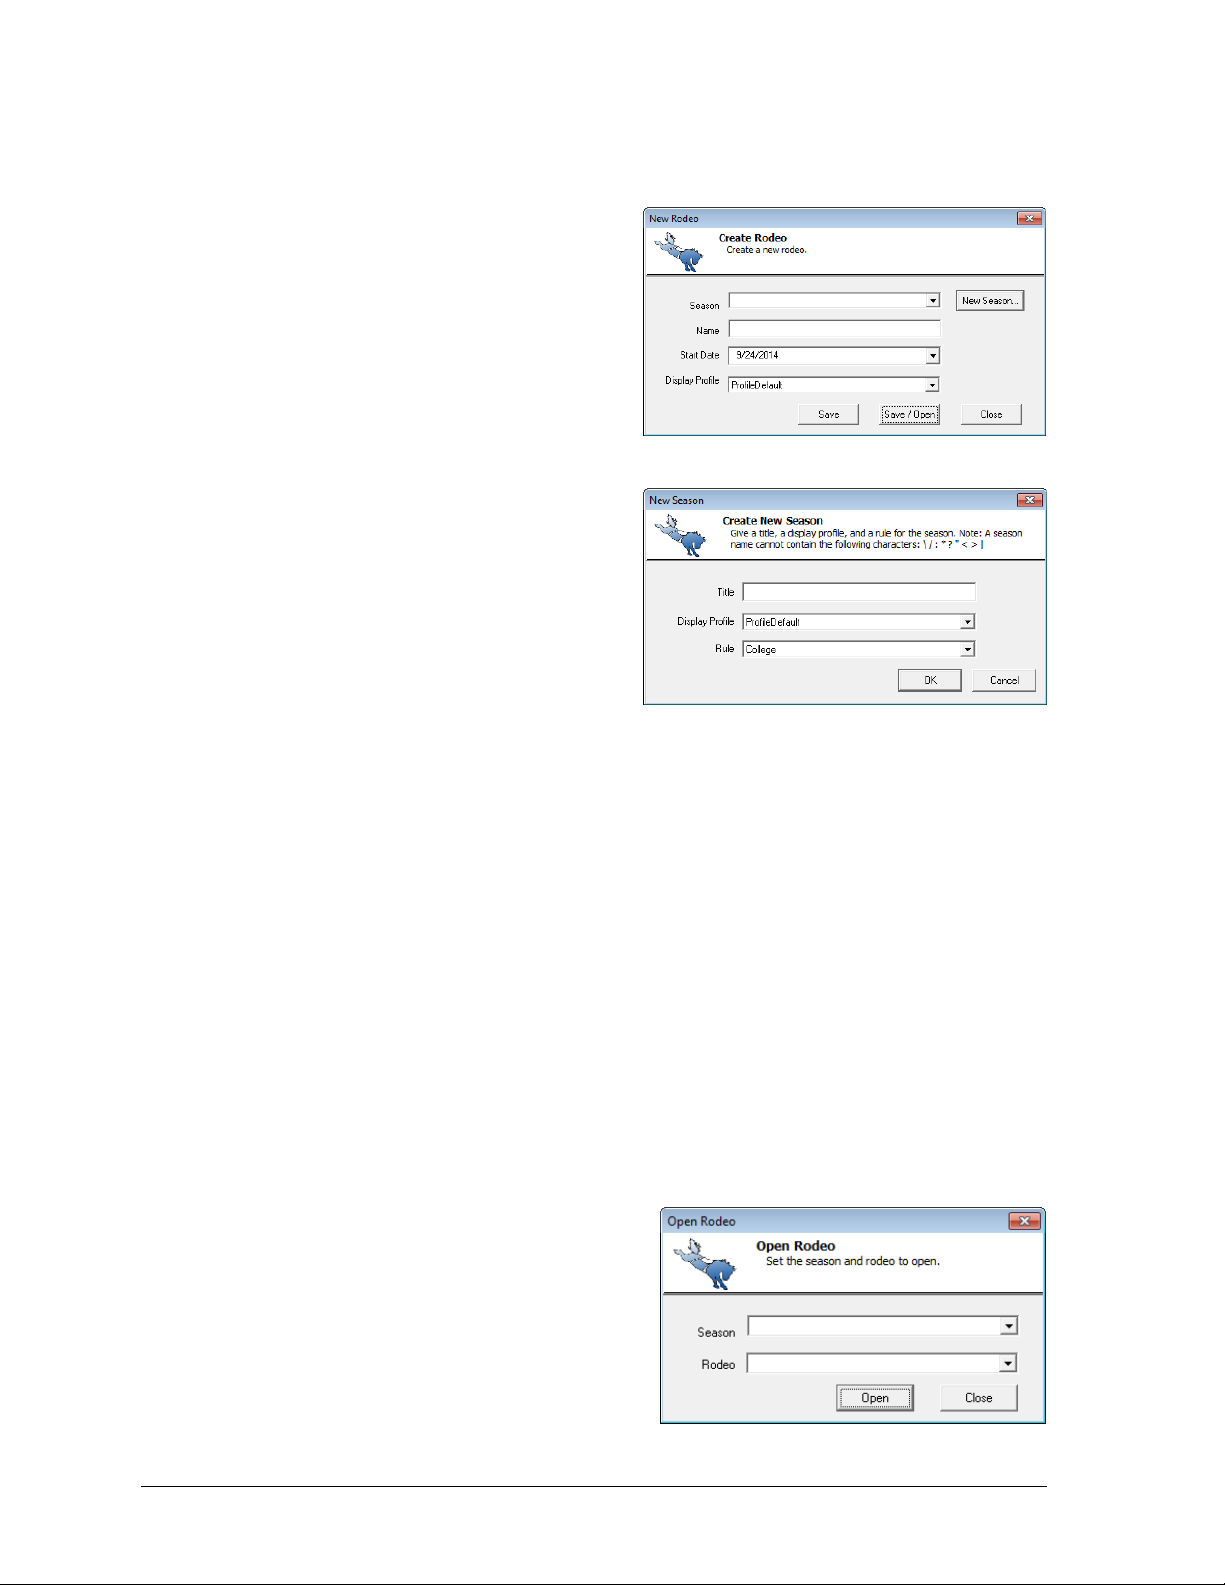
Figure 4: New Rodeo
Figure 5: New Season
Figure 6: Open Rodeo
3.1 Creating New Seasons
A season is where a group of rodeos and the
contestants that compete in those rodeos are
stored. An example of a season would be the
Badlands Circuit 2014. Many of the same
competitors will compete in each of the
rodeos in that circuit.
1. When first opening the software, go
to File > New Rodeo.
2. In the New Rodeo window (Figure 4),
click New Season.
3. In the New Season window (Figure 5),
enter the following information:
Title: descriptive season name
Display Profile: the default setup
for the display buttons (see
Section 4)
Rule: select from College or
PRCA rules (At this time, it does
not matter which rules are chosen
as they both operate the same)
4. Click OK when finished.
Refer to Section 6 for more about season configurations.
3.2 Creating New Rodeos
1. Go to File > New Rodeo.
2. In the New Rodeo window (Figure 4), select a previously created Season.
3. Enter a descriptive Name for the competition.
4. Set the Start Date if different from the current date.
5. Select a Display Profile if different from the season default.
6. Click one of the following buttons:
Save: Saves the rodeo and keeps the New Rodeo window open to create other
rodeos. Click Close to exit and open the rodeo(s) at a later time.
Save/Open: Saves the rodeo, closes out of the New Rodeo window, and
immediately opens the rodeo to begin scoring.
3.3 Opening a Rodeo
To open a rodeo:
1. Go to File > Open Rodeo.
2. In the Open Rodeo window (Figure 6),
select the Season and Rodeo to open.
3. Click Open.
6 Rodeo Operations
Page 11
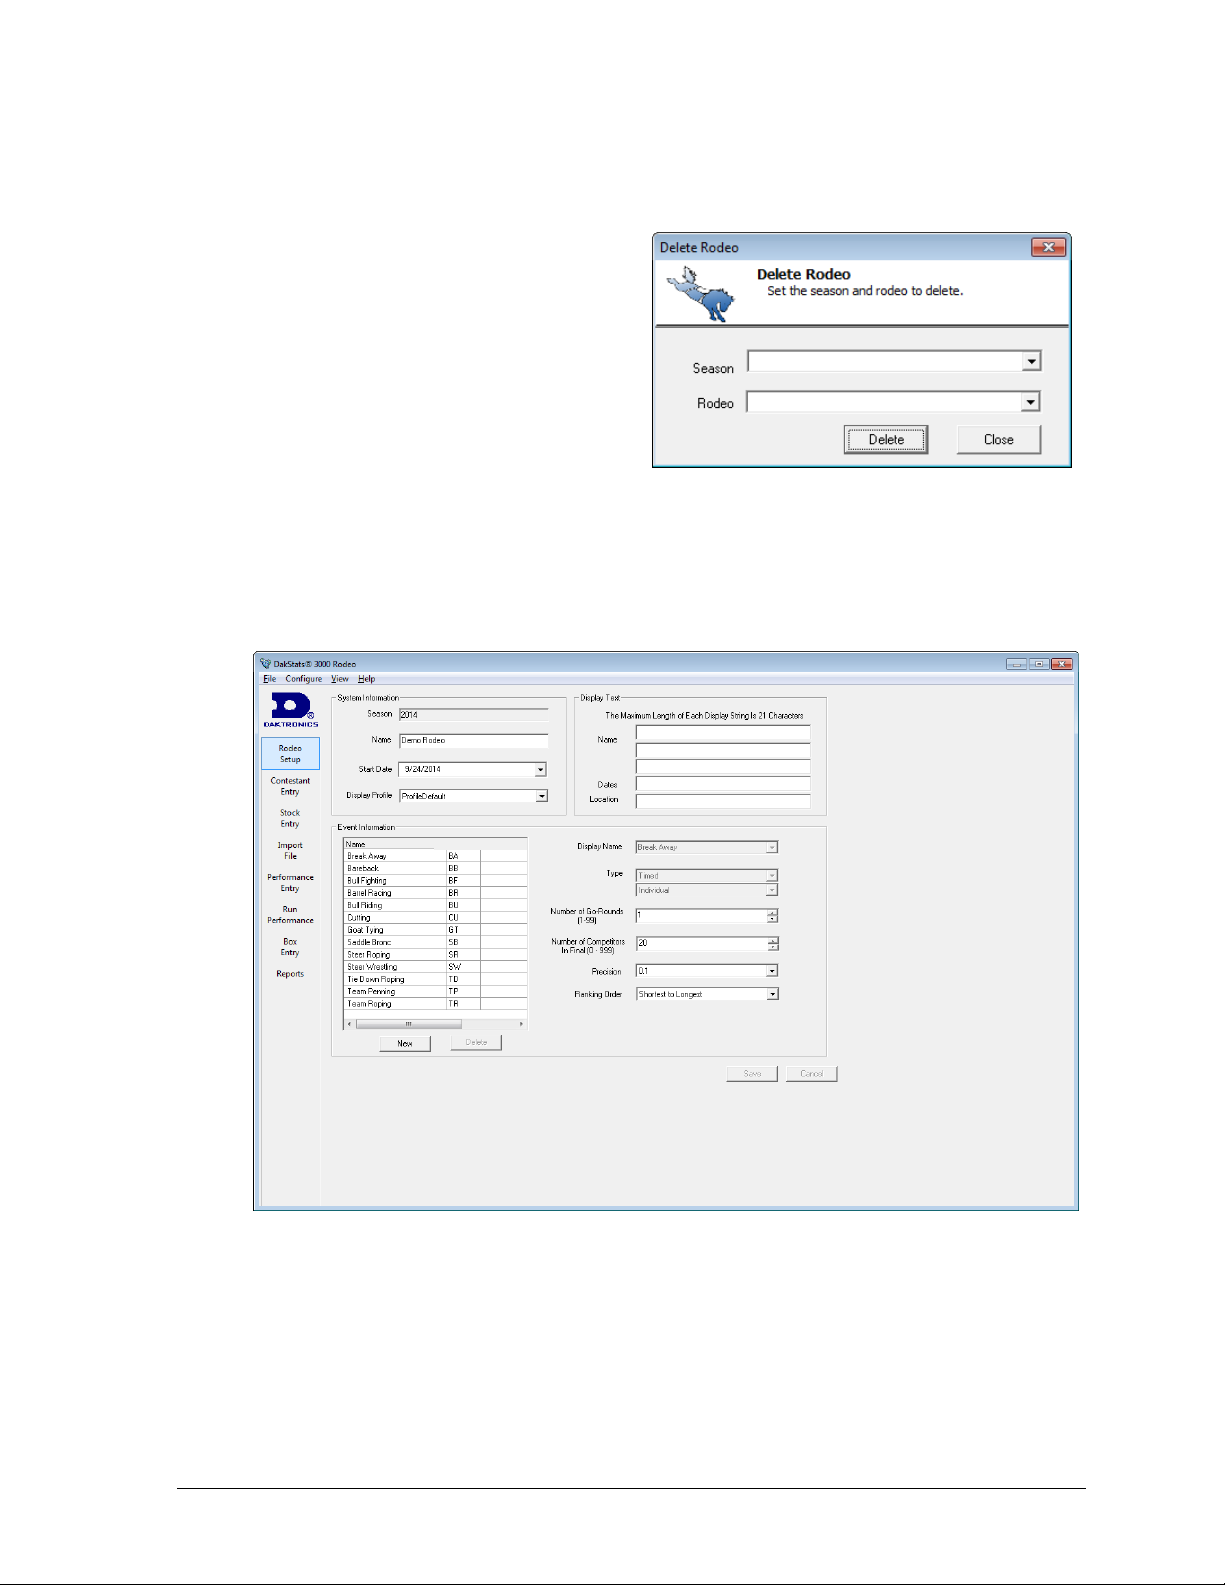
Closing a Rodeo
Figure 7: Delete Rodeo
Figure 8: Rodeo Setup
To close the current rodeo, go to File > Close Rodeo.
Deleting a Rodeo
To delete a rodeo:
1. Go to File > Delete Rodeo.
2. In the Delete Rodeo window
(Figure 7), select the Season and
Rodeo.
3. Click Delete.
Note: The rodeo must be closed before
it can be deleted.
3.4 Rodeo Setup
After opening a rodeo, the following information can be entered on the Rodeo Setup tab
(Figure 8):
Rodeo Operations 7
System Information
The System Information area contains the same information that was entered when the rodeo
was created. Users may edit the Name, Start Date, and Display Profile. The Season cannot be
changed after creating the rodeo.
Page 12

• Break Away
• Bareback
• Bull Fighting
• Barrel Racing
• Bull Riding
• Cutting
• Goat Tying
BA
BB
BF
BR
BU
CU
GT
• Saddle Bronc
• Steer Roping
• Steer Wrestling
• Tie Down Roping
• Team Penning
• Team Roping
SB
SR
SW
TD
TP
TR
Display Text
The Display Text area is where users enter information about the rodeo for display purposes.
The Name of the rodeo can be three lines of text.
The Dates are manually typed in and can feature a range of dates instead of a single
date (i.e. May 17-20, 2014).
The Location can be the name of the city or location of the rodeo (arena, event center,
fairgrounds, etc).
Note: Each line of the data is limited to 21 characters.
Event Information
The Event Information area is configurable data for each event in the rodeo. There are 13
default events with default data that cannot be removed from the rodeo. The events and their
two-letter abbreviations are as follows:
Note: The default event names and abbreviations may not be changed.
Adding Custom Events
Users can add a new event by clicking New. Custom events are abbreviated CX, where X
represents the number in which it was added.
Note: The names of custom events may be changed, but not the abbreviations.
Deleting Events
To delete a custom event, select it in the list and then click Delete.
Note: A custom event must be cleared of any stats before it can be deleted.
Editing Events
1. To edit an event, select it from the list and fill in the following information:
Display Name: The name of the event as it will appear on the display. This field
may only be changed for custom events.
Type: Select from Timed or Scored event type, then select Individual or Team
scoring. This field may only be changed for custom events.
Number of Go-Rounds: Enter a number from “1” through “99”.
Number of Competitors In Final: Enter a number from “0” through “999”.
Precision: This is the measurement of how precise the timing is for the event.
Select from 0.1, 0.01, or 0.001 seconds.
Ranking Order: (Timed events only) Select Shortest to Longest or Longest to
Shortest.
Number of Judges: (Scored events only) Select 1, 2, or 4 judges.
8 Rodeo Operations
Page 13

Score Entry: (Scored events only) Select how the judges are scoring. The following
Scoring Method
Explanation
Combined
The rider and stock are judged together.
Separate
The rider and stock are judged separately.
Subtotal
The total for the rider and stock and the individual score
for the stock.
Figure 9: Contestant Entry
table describes the different methods of scoring:
Also select Full or Fraction points.
2. Click Save to keep the event information changes, or click Cancel to discard them.
Note: If the user does not click Save after making changes, the program will ask to do
so before moving to another tab.
3.5 Contestant Entry
Use the Contestant Entry tab (Figure 9) to enter and view every contestant for every rodeo in
the selected season.
Rodeo Operations 9
Page 14

Figure 10: Copy Contestants
Adding Contestants
To add a new contestant, click in the first empty line (marked with *) at the bottom of the list
and start filling in their information (Bib number, First/Last Name, Home Town, Year, Last/This
Year Earnings, and Miscellaneous). Users may click these column headers to sort the rider info.
Editing Contestants
To edit contestants, simply click on the individual fields and type in the new information.
Finding Contestants
The Find fields at the top of the window allow a user to verify that a contestant has been
entered. The search can be on a Bib number, First Name, or Last Name. As the contestant’s
information is typed into one of these fields, the closest match will be highlighted (note that
the search is case sensitive). If the contestant doesn’t exist, click Add to enter them into the
list, and then manually enter the rest of their information.
Copying Contestants
If contestants do not exist in the current season but do exist in another season, they can be
added by using the Copy feature:
1. Click Copy From to open the Copy Contestants window (Figure 10).
2. Select the season that contains the contestant(s) to copy.
3. Scroll through the list or use the Find fields to locate the contestant(s).
4. Select the contestant(s) in the list to mark them with a check.
5. Click Copy, and then click OK on the message that appears. The contestant name(s)
will become grayed out to indicate that they are now in the new season.
6. Click Close when finished.
Deleting Contestants
To delete a contestant, select the contestant in the list and press the [Delete] button on the
keyboard. Alternately, right-click a contestant and then click Delete. The program will
prompt the user to verify removing the contestant.
10 Rodeo Operations
Note: In order to be deleted, the contestant must not have any stats.
Page 15

Contestant Messages
Figure 11: Messages Toolbar
Figure 12: Adding Messages
To enable contestant messages, users must first go to View > Toolbars > Message Box.
By default, the Messages area appears at the bottom of the window (Figure 11). However, the
toolbar can be clicked and dragged around the screen as desired. Click the small x in the
upper-right corner to close out of the toolbar.
Adding New Messages
1. Click on a contestant from
the list.
2. Click Add.
3. In the window that appears
(Figure 12), select a Message
Number from 1 to 99.
4. Begin typing the message on
Line 1, and move to the next
lines as needed.
Note: Each line supports up to 24 characters, for a total of 96 characters per message.
5. Click Update (or press [Enter]).
Editing Messages
1. Click on a contestant from the list.
2. Select a message.
3. Click Edit.
4. Change the message as needed.
5. Click Update (or press [Enter]).
Deleting Messages
1. Click on a contestant from the list.
2. Select a message.
3. Click Delete.
Displaying Messages
In order to display contestant messages, they must be assigned to a specific display button.
Refer to the last topic of Section 4 for more information.
3.6 Stock Entry
The Stock Entry tab has the same controls and behaviors as the Contestant Entry tab. The
main difference is that stock does not have any associated messages like the contestants.
Stock may have a Bib number, Name, Home Town, Stock Contractor, Age, and Weight. Refer to
Section 3.5 for more information on adding, editing, copying, and deleting entries.
Rodeo Operations 11
Page 16

Figure 13: Import File
Figure 14: Resolve Contestants
Figure 15: Name Resolver
3.7 Import File
Click the Import File tab to access the file import tools (Figure 13). This screen allows the user
to import rodeo data saved in a file from PRCA, College Rodeo or from DakStats software
export files.
1. Click the […] button to browse for the file (or manually type or Paste in the file path).
2. Locate the file to import and click OK.
3. By default, all of the events are checked to be imported. If any events are not
supposed to be imported, they need to be unchecked.
4. Click Import. If there are contestants set for an event, the user will be prompted to
overwrite the data.
Note: Stock lists cannot be imported.
Resolving Contestants
If a rider already exists in the database, the
Resolve contestants window lets the user decide
what information to keep (Figure 14).
Replace: Click to save the new
contestant over the old one
Merge: Click to merge the old and
new contestants together
Leave: Click to keep the old contestant
Add New: Click to keep the old
contestant and save the new one.
Check Apply to all the items to use the same action on all further disputes.
Note: If a name cannot be broken up into
First and Last names, the Name Resolver will
ask for the user to resolve it (Figure 15).
12 Rodeo Operations
Page 17

3.8 Performance Entry
Figure 16: Rodeo Entry
Figure 17: Event Entry
The Performance Entry tab includes four separate levels of competition information:
the rodeo itself, each event, each go-round, and individual performances. Each level must be
set up in order before moving on to the Run Performance tab (see Section 3.9).
Note: If the contestant does not exist in the season, they will be added at this time.
Be sure to fill in their other information on the Contestant Entry tab later on.
Rodeo Entry
To view the rosters for a rodeo, select the
rodeo name on the upper-left side of the
window. In the View area, select to view
all contestants in the Season, or just
those in the current Rodeo (Figure 16).
To add contestants to the rodeo:
1. Click in the Bib, First Name, or
Last Name columns.
2. Click on the drop-down arrow to
select a contestant. Alternately,
just type in the information.
The Find function (described in
Section 3.5) may also be used to
add contestants to the rodeo.
As contestants get added to the individual events (see below), a 1 will appear under the
appropriate event category to quickly show the events in which they are competing.
Rodeo Operations 13
Event Entry
Double-click the event name to view/hide the configured go-rounds. The number of gorounds is determined in the Rodeo Setup tab (see Section 3.4).
Individual Event
To view the rosters for an event, select the
event name on the left side of the
window. In the View area, select whether
to view all contestants in the Season,
Rodeo, or current Event (Figure 17).
To add contestants to the event:
1. Click in the Bib, First Name, or
Last Name columns.
2. Click on the drop-down arrow to
select a contestant. Alternately,
just type in the information.
The Find function (described in
Section 3.5) may also be used to
add contestants to the events.
Page 18

Figure 18: Go-Round Entry
Team Event
Adding or editing a team event is the same as for individual events, except users may select
up to three contestants per entry. Also, users may specify a name in the Team column,
otherwise it will be set to the next highest number that has not been taken. If the event is for a
two-contestant team, the third contestant columns will remain blank.
Note: The Find function is not available for team events.
Building Finals
Click Build Final to fill the finals go-round with leading contestants in descending order so
the leader will be last on the list.
Go-Round Entry
Double-click the Go Round number to view/hide any configured performances.
Individual Events
To view the rosters for a go-round, select
the Go Round number on the left side of the
window. In the View area, select whether
to view all contestants in the Season,
Rodeo, or current Event (Figure 18).
If Unassigned is selected, the list will only
show contestants that are registered for the
event but have not been placed into a
performance for the go-round.
To add contestants to the go-round:
1. Click in the Bib, First Name, or Last Name columns.
2. Click on the drop-down arrow that appears to choose from a list of contestants in the
season. Alternately, just type in the information. The Find function (see Section 3.5)
may also be used to add contestants to the go-round.
Team Event
Adding or editing a team go-round is the same as for individual go-rounds, except users may
select up to three contestants per entry. Also, users may specify a name in the Team column,
otherwise it will be set to the next highest number that has not been taken. If the event is for a
two-contestant team, the third contestant columns will remain blank.
Note: The Find function is not available for team events.
Adding Performances
Click Add Perf to insert a new a performance to the current go-round.
Removing Performances
Select an existing Performance number, and then click Remove Perf. Click Yes to confirm.
14 Rodeo Operations
Page 19

Performance Entry
Figure 19: Performance Entry
Figure 20: Run Performance Tab
Individual Events
To view the rosters for a performance,
select the Performance number on the
left side of the window. In the View
area, select whether to view all
contestants in the Season, Rodeo,
Event, or Performances (Figure 18).
If Unassigned is selected, the list will
only show contestants that are
registered for the event but have not
been placed into a performance for
the go-round.
To add contestants to the performance:
1. Click in the Bib, First Name, or Last Name columns.
2. Click on the drop-down arrow that appears to choose from a list of contestants in the
season. Alternately, just type in the information. The Find function (see Section 3.5)
may also be used to add contestants to the performance.
Team Event
Adding or editing a team performance is the same as for individual performances, except
users may select up to three contestants per entry. Also, users may specify a name in the
Team column, otherwise it will be set to the next highest number that has not been taken.
If the event is for a two-contestant team, the third contestant columns will remain blank.
Note: The Find function is not available for team events.
After all events, go-rounds, and performances are configured, go to the Run Performance tab
to begin scoring the event (see Section 3.9).
3.9 Run Performance
The Run Performance tab (Figure
20) is shown when a rodeo is in
progress. The Event, Go-Round, and
Performance should all be selected
at the top of the window before
entering scores/times. The running
time to the right of these selections
helps the user verify the connection
to the timer and ensure all settings
between the two are the same.
The contestant list in the upper-left
corner contains the bib number and
first/last name of each contestant
in the chosen performance along
with their overall position and total
time. It also shows stock name and bib number.
Rodeo Operations 15
Page 20

Figure 21: Results Entry (Scored Event)
The go-round list, located in the upper-right corner, shows result information for each
contestant split into each go-round for the event. Rows will be highlighted as follows:
Black: the rider is finished, yet to ride, or “active” (see below)
Yellow: the rider has the option to re-ride (scored event only)
Blue: the rider received a penalty (timed event only)
Red: the rider received a no time or no score
Green: the announcer's monitor is showing different information than the display
Activating Riders
When connected to a timing console, the riders must be made active in order for their results
to be filled in automatically as they are received. The active rider also determines whose
current information to send to the display. To make a rider active, first click anywhere in
their information, and then press a display button key ([F5] - [F8] by default).
Results Entry
The result entry controls are used to display
and edit the results.
Scored Events
For a scored event, each individual judge’s
score will be editable, along with a time if
applicable (Figure 21). The available fields
to edit depends on the Score Entry setting
(see Section 3.4):
Combined Scores: only the sub-total scores are editable and the totals are calculated.
Separate Scores: the rider and stock scores are editable and the sub-total and totals
are calculated by the software.
Subtotal Scores: the sub-total and stock scores are editable and the rider and totals
are calculated.
Note: When the judges are scoring with fraction score, the decimal will be placed in the
score boxes; otherwise, the scores will remain as whole numbers. If times/scores are
coming directly from the timing console, the results are automatically saved. If entering
scores manually, be sure to click Save (or press [Enter]).
Other Button Commands:
Click ReRide (or press [R]) to mark the contestant as having the option to re-ride.
This button stays enabled when pressed and sets the contestant’s current go-round
column to yellow. Click the ReRide button or press the [R] key again to deselect the
re-ride option.
Click No Score (or press [N]) to remove all scores from the rider. This button sets the
contestant’s current go-round column to red.
Click Clear (or press [C]) to return all of the scoring values to zeros.
Click Cancel (or press [Esc]) to discard any changes to the scores.
16 Rodeo Operations
Page 21

Timed Events
Figure 22: Results Entry (Timed Event)
Figure 23: Edit Results (Timed Event)
Figure 24: Display Buttons
For a timed event, the Ride Time and Penalty
Time are editable, while the Total Time will
be calculated by the software (Figure 22).
After confirming the correct times, click
Save (or press [Enter]).
Other Button Commands:
Click Penalty (or press [P] or [F1])
to add five seconds to the
Penalty Time. This button sets the
contestant’s current go-round column to blue.
Click No Time (or press [N]) to remove all times from the rider. This button sets the
contestant’s current go-round column to red.
Click Cancel (or press [Esc]) to discard any changes to the times.
Editing Results
Contestant times can be quickly edited by
selecting a contestant’s performance from the
go-round list. Scores/times in the current goround may be edited simply by typing in the
new values and clicking Save.
To edit scores/times in other go-rounds, click
on the value of a non-current go-round to
highlight it and then click on it again to open
the Edit Results window (Figure 23). Make the
appropriate changes, and then click OK.
Note: The buttons available will depend on
whether the event is scored or timed.
Display Buttons
The display controls feature a table of buttons mapped to the display shortcuts (Figure 24).
Operators can click these buttons instead of pressing the keyboard combination. The name of
the selected display profile is shown above this group of buttons. Refer to Section 4 for more
information on setting up display profiles.
Note: If the buttons are squished or hard to read, widen the application window.
Rodeo Operations 17
Page 22

Figure 25: Event Leader Board
Figure 26: Box Entry Tab
Leaderboard
To display the event leaderboard, go to View > Toolbars > Leader Board. This area is a split
view of both the current go-round leaders and the overall event leaders (Figure 25).
By default, the Leader Board area appears at the bottom of the window. However, the toolbar
can be clicked and dragged around the screen as desired. Click the small x in the upper-right
hand corner to close out of the toolbar.
3.10 Box Entry
The Box Entry tab (Figure 26) is used to enter results for an event when the live run
performance is not used or not available. This can be done for slack performances in an event
or for entry after a rodeo is complete for historical information.
Select the event at the top of the window to view all of the contestants assigned to the event.
Note: The Find function at the bottom of the window works the same as on previous tabs.
Entering/Editing Results
There are two methods to enter/edit the results:
Clicking once on the contestant’s go-round column will enable the result entry
Alternately, double-clicking on the go-round column will allow the user to directly
18 Rodeo Operations
controls (refer to Figure 21 and Figure 22). This will allow the editing of individual
judges scores and ride/penalty times.
type in the total time/score.
Page 23

3.11 Reports
Level
Available Reports
Rodeo name
Rodeo Registration List
Event name
Event Registration List
Average Standing
Go-Round #
Go-Round Standing
Performance #
Performance Registration List
Performance Standing
Figure 27: Rodeo Reports List
Click the Reports tab to view printouts of the rodeo results (Figure 27). Click the various
rodeo information levels along the left side of the window to view the report types on the
right side of the window:
Click on a report type to view it in the same area. Use the arrow and home buttons above the
report area to navigate.
Registration List report types show the contestant name and bib number,
hometown, and this/last year earnings.
Standing report types show the contestant name and position, each go-round score,
finals score, and total score.
Printing Reports
1. Select a level from the left side of
the screen.
2. Click on a report type link on the
right side of the screen.
3. Click the printer icon.
4. Select the desired printer options
and then click Print.
Copying Reports
1. Select a level from the left side of
the screen.
2. Click on a report type link on the
right side of the screen. This
ensures that the most recent
report is generated.
3. Navigate to “C:\Documents and Settings\All Users\Application
Data\Daktronics\DakStats 3000 Rodeo/HTML” (Windows XP) or
“C:\ProgramData\Daktronics\DakStats 3000 Rodeo\Html” (Windows Vista or later)
Note: The “Application Data” and “Program Data” folders are hidden by default.
To show hidden folders, go to Tools > Folder Options. Click the View tab and then
click Show hidden files and folders.
4. Copy the desired report and Paste it to the desired destination folder. Rename the
report file with a more descriptive name as needed.
5. Double-click the HTML report file to open it in the default web browser for viewing.
Rodeo Operations 19
Page 24

Page 25

Section 4: Display Profile Configuration
Button
Action
Save
Saves the profile information
Note: If the selection is changed without saving the information, the user
will be prompted to save any changes before closing the window.
Save As
Allows a user to save a current profile under a new name so that new (or
default) profiles only needing minor changes can be created more easily
Rename
Used to rename an existing profile
Close
Exits the configuration window.
Figure 28: Display Button Configuration
Go to Configure > Display Buttons to open the Display Button Configuration window (Figure 28).
4.1 Display Buttons
Display buttons use the [F2] through [F12] keys for displaying information during a rodeo.
There are 33 editable buttons using the F keys together with [Ctrl] and [Shift]. The following
chart explains the actions of each of the buttons across the bottom of the Display Button
Configuration window:
4.2 Default Profiles
DakStats Rodeo comes programmed with two default display profiles. Select one based on
the Daktronics display controller in use:
“ProfileDefault” – use this profile for DMP-7000 (Venus 7000) controllers.
“ProfilePlaySequenceDefault” – use this profile for DMP-8000 (V-Net) controllers.
Note that these controllers DO NOT support Selected Frame commands.
Daktronics Galaxy displays may use either profile, but “ProfileDefault”
(Selected Frame) is preferred.
Display Profile Configuration 21
Page 26

Column
Definition
Name
Name of the button; may be any text that makes sense to the operator
Display
Enable to have the button change the rider being shown on the display
Holding
Disable this setting to have the scores/times update immediately on the
display as they are received
Announcer
Enable to have the button change the current contestant on the
announcer's monitor
Page Dir
Select the direction of paging (Forward, Backward or Top)
Result
Specifies what to show on the display when the ride results are entered
Timer
Specifies what to show on the display before and during a ride; if the
Timer is not set, the Results will be used.
Figure 29: Sort By Function Key
4.3 Editing Profiles
To edit a profile, select it from the Display Profile box in the
upper-left corner of the Display Button Configuration window.
Note: Before modifying a Default Profile, click Save As
to create a new profile based off of it. This allows the
original default settings to be restored if needed.
The items listed under the display profile depend on the
following options:
By Event shows the events under the profile and the
function keys in the first column (Figure 28).
By Function Key shows the function keys under the
profile and the events in the first column (Figure 29).
The Contestant Display Name menu determines how contestant names will appear on the
display. The following options are available:
Last, First
Last, Initial.
First Last
Initial. Last
Last
The Team Display Name menu determines how contestant names will appear on the display
for team events. The following options are available:
Last/Last
Name (of the team)
The Number of Page menu specifies how many leaders from 1-12 are shown on a page when
the paging button is used.
Clicking in any of the columns allows the user to enable/disable preset options or type in
custom text. The following chart defines each of the columns:
22 Display Profile Configuration
Page 27

Note: The Result and Timer columns can
Figure 30: Right-click Menu
Figure 31: RTD Options Configuration
be edited by right-clicking and selecting
Configure (Figure 30), or by typing in the
commands directly using the same labels.
RTD Options
The RTD Options Configuration window
(Figure 31) configures display sequences or
certain frames within a sequence that will
show Real-Time Data (RTD).
Sign Number specifies the display
that will receive control commands.
Display Mode specifies how a
sequence plays, either Continuous
or Selected Frame.
Frame Number specifies what frame
to play in the sequence (if running in Selected Frame mode).
Note: Try to avoid mixing Continuous and Selected Frame modes – use all of the
same type of Display Mode in a given profile.
Drive Letter, Library, and Sequence tell the controller what sequence file to play on
the Daktronics display controller computers (if running in Continuous mode). If the
button doesn't need to play a sequence, leave at least one of these fields blank.
Refer to DD1660229 for more information on setting up rodeo display sequences.
Contestant Messages
If the sequence is for a contestant message, the user must specify the message number to
display in the Contestant Message Number field. The number must be between 1 and 99. The
selected message is only for the current contestant, and the current event. Refer to Section 3.5
for more information about contestant messages.
Display Profile Configuration 23
Page 28

Page 29

Section 5: Input/Output Configuration
Figure 32: Input/Output Configuration
Figure 33: DLStreams Wizard
Go to Configure > Input/Output Configuration to open the window shown in Figure 32.
Note: Refer to DD1660229 for more information on setting up the proper input and output ports
to interface with timing consoles and display controllers.
5.1 Adding New Ports
The Configure Ports area contains all of the input
and output ports that have been set up. To add a
new port:
1. Double-click the first empty line at the
bottom of this list.
2. In the DLStreams Configuration Wizard
(Figure 33), the General tab needs the
Type and Name specified.
3. After selecting a Type, click the Settings
tab and enter the appropriate connection
settings.
4. Click Finish when done.
Once the ports are configured, they are ready to
be used in the other areas:
INPUT: Timer
The INPUT: Timer area is used to assign the
timing console input.
Give the input a descriptive Name
Select a previously configured Port.
Note: There can only be one configured timer.
OUTPUT: Rodeo In Progress (RIP) RTD
The OUTPUT: Rodeo In Progress (RIP) RTD area is
used to assign outputs to the Daktronics display
controllers. This stream sends the current rodeo,
event, cowboy and ride information along with
go-round and average leaders.
Give the output device a descriptive Name.
Select a previously configured Port.
Select a port Type, either Serial or Network.
Note: Regardless of the connection type, it is typically recommended to select Serial.
The Offset is typically only needed for Daktronics Galaxy displays – set this to 5000
Input/Output Configurations 25
Page 30

Figure 34: Monitor Ports
OUTPUT: Announcer Monitor
The OUTPUT: Announcer Monitor area is used to send data to the announcer’s monitor.
Give the output device a descriptive Name.
Select a previously configured Port.
Set the Protocol to Terminal.
5.2 Editing Ports
To edit an existing port, double-click it in the Configure Ports area.
5.3 Deleting Ports
To delete a port, click on the port number to highlight the both the Name and Settings values,
and then press the [Delete] key on the keyboard.
5.4 Monitoring Ports
1. Exit the Input/Output Configuration
window (Figure 32).
2. Go to View > Monitor Ports.
3. In the Monitor Ports window (Figure 34),
select one or more configured ports, and
then click OK.
4. The chosen port(s) will appear in the
DLStream Monitoring window. Use these
windows to view incoming and outgoing
data. If there is no data coming into or
going out of the software, there may be a
connection problem between devices.
Refreshing Outputs
Go to File > Refresh Outputs to resend all chosen data from the configured outputs.
26 Input/Output Configurations
Page 31

Section 6: Season Configuration
Figure 35: Season Configuration
Go to Configure > Season to access the season configuration tools (Figure 35).
6.1 Adding Seasons
1. Click Add to open the New Season window (Figure 5).
2. Type in a descriptive Title.
3. Select a Display Profile.
4. Select the Rule.
5. Click OK when finished.
6.2 Editing Seasons
1. Select an existing season, and then click Edit.
2. Update the Title, Display Profile, and Rule settings as needed.
3. Click OK when finished.
Note: It is not possible to edit a season if one of its rodeos is currently open.
6.3 Deleting Seasons
1. Select an existing season, and then click Delete.
2. Click Yes to confirm the deletion.
Note: It is not possible to delete a season if one of its rodeos is currently open.
6.4 Utilities
The options on the Utilities tab are currently disabled.
Season Configuration 27
Page 32

Page 33

Section 7: Contact Information
Mail: Daktronics, Inc., Customer Service
201 Daktronics Drive
P.O. Box 5128
Brookings, SD 57006
Phone: DakStats Help Desk: 1-888-325-7828
DakStats Fax: 1-605-697-4700 Attn: DakStats
Email: dakstats@daktronics.com
If there are any questions about installing or operating the DakStats 3000 Rodeo program that are not
covered in this manual, please contact DakStats Customer Service:
Contact Information 29
Page 34

Page 35

Appendix A: DakStats Rodeo Display Profile Tables
Function
Key
Description
Update
Display
Update
Manually
Update
Announcer
Result
Updating
Timer
Updating
F2
Run Time
Yes
Yes
Yes
20
F3
Announcer
No
No
Yes
F4
Event Text
No
No
No
14 F5
Curr Profile
Yes
No
Yes
15
F6
Curr Score
Yes
Yes
Yes
17 F7
Curr GR
Yes
Yes
Yes
20
F8
Curr Avg
Yes
Yes
Yes
24 F9
GR Leaders
No
No
No
25
F10
Avg Leaders
No
No
No
26
F11
Page Back
No
No
No
F12
Page Fwd
No
No
No
CTRL +
F12
Event
Graphic
No
No
No
7 (BB)
8 (SB)
9 (BU)
11 (BF)
The DakStats 3000 Rodeo Results Default Display Profile
The DakStats 3000 Rodeo software uses function keys to send and select which data will be displayed
by Daktronics display controllers. The software allows the user to edit and create different display
profiles. All of the examples below are using the default display profiles.
In order for the display controller to match up data with the correct template, the RTD sequence
MUST be created with exactly 32 frames in a precise order. A good example of the integration of this
software with the display controller is a Barrel Racing event:
1. The operator would press [F7] to display the current Go Round Leader and current
competitor. Since the results software knows that a new contestant was selected, it sends the
correct data and a select frame command for frame 18. Frame 18 has the time field for the
current contestant configured for the Timer RTD input.
2. As soon as the ride is complete and the software sees the final time from the timer, it
automatically sends the new data and sends a select frame command for frame 19. Now the
display is showing the official time from the Results software RTD input.
Depending on the event in progress, pressing a function key will display different information.
The following tables summarize the default function key settings for scored, timed and team events.
Use these tables as a reference while creating RTD sequences.
Bareback, Bull Fighting, Bull Riding, Saddle Bronc, & Custom Score Event
DakStats Rodeo Display Profile Tables 31
Page 36

Function
Key
Description
Update
Display
Update
Manually
Update
Announcer
Result
Updating
Timer
Updating
F2
Logo
No
No
No 2
F3
Announcer
No
No
Yes
F4
Event Text
No
No
No
14
F5
Curr Profile
Yes
No
Yes
15
F6
Curr Time
Yes
No
Yes
19
18
F7
Curr GR
Yes
No
Yes
22
21
F8
Curr Avg
Yes
No
Yes
24
23
F9
GR Leaders
No
No
No
25
F10
Avg Leaders
No
No
No
26 F11
Page Back
No
No
No
F12
Page Fwd
No
No
No
CTRL +
F12
Event
Graphic
No
No
No
3 (TD)
4 (SW)
6 (BR)
10 (SR)
12 (BA)
13 (GT)
Function
Key
Description
Update
Display
Update
Manually
Update
Announcer
Result
Updating
Timer
Updating
F2
Logo
No
No
No 2
F3
Announcer
No
No
Yes
F4
Event Text
No
No
No
14
F5
Curr Profile
Yes
No
Yes
16 F6
Curr Time
Yes
No
Yes
19
18
F7
Curr GR
Yes
No
Yes
28
27
F8
Curr Avg
Yes
No
Yes
30
29
F9
GR Leaders
No
No
No
31
F10
Avg Leaders
No
No
No
32 F11
Page Back
No
No
No
F12
Page Fwd
No
No
No
CTRL +
F12
Event
Graphic
No
No
No
1 (TP)
5 (TR)
Barrel Racing, Break Away, Goat Tying, Steer Roping, Steer Wrestling, Tie Down Roping, & Custom Time Event
Team Penning & Team Roping
32 DakStats Rodeo Display Profile Tables
Page 37

The following list is a summary of the 32 RTD sequence frames and their function. All data is coming
Frame #
Description
1
Blank
2
Sponsor Logo
3
Tie Down Roping Logo
4
Steer Wrestling Logo
5
Team Roping Logo
6
Barrel Racing Logo
7
Bareback Riding Logo
8
Saddle Bronc Riding Logo
9
Bull Riding Logo
10
Steer Roping Logo
11
Bull Fighting Logo
12
Break Away Roping Logo
13
Goat Tying Logo
14
Rodeo Display Information (rodeo name, location, and date)
15
Current Contestant Information (name, hometown, earnings, and others)
16
Current Team Information (name, hometown of the header and the healer)
17
Current Contestant and their score (Individual scored event)
18
Current Contestant with running time (Individual timed event)
19
Current Contestant with time (Individual timed event)
20
Go Round Leader with score and Current Contestant with running time and score
(Individual scored event)
21
Go Round Leader with time and Current Contestant with running time
(Individual timed event)
22
Go Round Leader with time and Current Contestant with time
(Individual timed event)
23
Avg Leader with time and Current Contestant with need-for-lead and running time
(Individual timed event)
24
Avg Leader with time and Current Contestant with need-for-lead and time
(Individual timed event)
25
Go-round Leader Board for Individual Events
26
Average Leader Board for Individual Events
27
Go Round Leader with time and Current Team with running time (Team timed event)
28
Go Round Leader with time and Current Team with time (Team timed event)
29
Avg Leader with time and Current Team with need-for-lead and running time
(Team timed event)
30
Avg Leader with time and Current Team with need-for-lead and time
(Team timed event)
31
Go-round Leader Board for Team Events
32
Average Leader Board for Team Events
from the results RTD input except where running time noted, that comes from the timer RTD input.
DakStats Rodeo Display Profile Tables 33
 Loading...