

Page 1

All Sport 4000 Series
®
Control Console
Operation Manual
ED-9999
All Sport , Matside , ProSport and Venus are registered trademarks of Daktronics, Inc.
® ® ® ®
ED-9999
Product#1166
Rev. 16 - 03 November 2000
Copyright © 1996-2000 Daktronics, Inc.
All rights reserved. While every precaution has
been taken in the preparation of this manual,
the publisher assumes no responsibility for
errors or omissions. No part of this book
covered by the copyrights hereon may be
reproduced or copied in any form or by any
means - graphic, electronic, or mechanical,
including photocopying, taping, or information
storage and retrieval systems - without written
permission of the publisher.
DAKTRONICS, INC.
Communication Solutions
Through Technology
P.O. Box 5128 331 32nd Ave. Brookings, SD 57006
Phone (605) 697-4036 or (877) 605-1115 Fax 697-4444
www.daktronics.com e-mail helpdesk@daktronics.com
Page 2

Page 3

Table Of Contents
1. Introduction ............................................................ 1-1
1.1 How To Use This Manual ....................................................1-1
1.2 Console Overview ..........................................................1-1
1.3 Using the Console ..........................................................1-2
1.4 Revision History ...........................................................1-2
2. Console Connectors ..................................................... 2-1
3. Basic Operation ......................................................... 3-1
3.1 Console Overview ..........................................................3-1
3.2 Sport Inserts ...............................................................3-1
3.3 Sport Insert Operation Concepts ...............................................3-2
3.4 Menu Key ................................................................3-2
3.5 Startup ...................................................................3-4
3.6 Time Of Day Operation ......................................................3-4
3.7 Multi-Purpose Timer Operation ................................................3-4
4. Baseball Operation ...................................................... 4-1
4.1 Sport Insert LL-2266 ........................................................4-1
4.2 Sport Inserts LL-2264 & LL-2265 ..............................................4-2
4.3 Code 138 RTD Item Numbers .................................................4-4
5. Basketball Operation .................................................... 5-1
5.1 Sport Insert LL-2261 ........................................................5-1
5.2 Sport Insert LL-2330 ........................................................5-3
5.3 Sport Insert LL-2262 ........................................................5-3
5.4 Sport Insert LL-2263 ........................................................5-4
5.5 Remote Shot Clock Control ...................................................5-6
6. Football Operation ...................................................... 6-1
6.1 Sport Insert LL-2268 ........................................................6-1
6.2 Remote Delay-of-Game Control ...............................................6-2
7. Hockey Operation ....................................................... 7-1
7.1 Sport Insert LL-2274 ........................................................7-1
8. Soccer Operation ....................................................... 8-1
Table Of Contents
i
Page 4

8.1 Sport Insert LL-2269 ........................................................8-1
9. Track/Swimming Operation ................................................9-1
9.1 Sport Insert LL-2267 ........................................................9-1
9.2 Sport Insert LL-2372 ........................................................9-1
9.3 Sprint Timing Hardware .....................................................9-2
9.4 Sprint Timing Operation .....................................................9-3
10. Volleyball Operation .....................................................10-1
10.1 Sport Insert LL-2273 .......................................................10-1
11. Wrestling Operation .....................................................11-1
11.1 Sport Inserts LL-2275 & LL-2287 .............................................11-1
12. Timing/Scoring Operation ................................................12-1
12.1 Sport Insert LL-2271 .......................................................12-1
12.2 Sport Insert LL-2270 .......................................................12-1
13. Team Name Operation ...................................................13-1
13.1 Sport Insert LL-2276 .......................................................13-1
13.2 Entering Team Name Mode .................................................13-1
13.3 Selecting Sign Size ........................................................13-1
13.4 Selecting Character Width ...................................................13-2
13.5 Selecting Character Font ....................................................13-2
13.6 Selecting Bright or Dim Mode ...............................................13-2
13.7 Starting the Lamp Test .....................................................13-2
13.8 Team Name Operation Using Current Loop Boards ...............................13-2
13.9 Team Name Operation Using A Venus 100 Board ................................13-3
14. Message Center Operation ...............................................14-1
14.1 Sport Insert LL-2302 .......................................................14-1
14.2 Message and Sequence Data .................................................14-2
14.3 Creating and Editing Messages ...............................................14-3
14.4 Displaying A Message ......................................................14-4
14.5 Linking Message ..........................................................14-4
14.6 Creating and Editing Sequences ..............................................14-4
14.7 Displaying A Sequence .....................................................14-5
14.8 Linking Sequence .........................................................14-6
14.9 Effects ..................................................................14-6
14.10 Configure Sign Size ........................................................14-7
14.11 Display Test Sequence ......................................................14-7
Table Of Contents
ii
Page 5

15. Smart Console Operation ................................................ 15-1
15.1 Sport Insert LL-2333 .......................................................15-1
16. Pitch & Speed Operation ................................................ 16-1
16.1 Sport Insert LL-2332 .......................................................16-1
16.2 RTD Item Numbers ........................................................16-2
16.3 Frame Number And Pitch Types ..............................................16-2
16.4 Real Time Data (RTD) Hints For Venus Series Sequences ..........................16-2
17. Tae Kwon Do .......................................................... 17-1
17.1 Sport Insert LL-2344 .......................................................17-1
18. Judo ................................................................. 18-1
18.1 Sport Insert LL-2346 .......................................................18-1
19. Karate ................................................................ 19-1
19.1 Sport Insert LL-2345 .......................................................19-1
20. Boxing ............................................................... 20-1
20.1 Sport Insert LL-2347 .......................................................20-1
21. Photo Finish Interface ................................................... 21-1
21.1 Track Mode ..............................................................21-1
21.2 RTD Insert LL-2350 for Soccer ...............................................21-1
21.3 RTD Item Numbers for Soccer ................................................21-3
21.4 RTD Insert LL-2371 for Football ..............................................21-4
21.5 RTD Item Numbers for Football ..............................................21-5
22. GP99 Multi Sport ....................................................... 22-1
22.1 Sport Insert LL-2343 .......................................................22-1
22.2 Segment Timer Sports Insert LL-2349 ..........................................22-2
23. Event Counter ......................................................... 23-1
23.1 Sport Insert LL-2369 .......................................................23-1
Table Of Contents
iii
Page 6

23.2 Day and Time Event Countdown Codes 371 &372 ...............................23-1
23.2.1 RTD Item Numbers .................................................23-2
23.3 Timer Base Counter Codes 373 & 374 .........................................23-2
23.3.1 RTD Item Numbers .................................................23-3
23.4 External Input Counter Codes 375 & 376 .......................................23-3
23.4.1 RTD Item Numbers .................................................23-4
23.4.2 External Switch Inputs ...............................................23-4
23.5 System Setup/Operation ....................................................23-4
23.5.1 Venus 1500 Controlled Products .......................................23-4
23.5.2 Create an RTD Message .............................................23-4
23.5.3 Operations ........................................................23-6
23.5.4 Venus 4600 and 7000 Controlled Products ...............................23-7
23.5.5 Operations ........................................................23-7
24. Tennis Operation .......................................................24-1
24.1 Sport Insert 0G-103677 .....................................................24-1
24.2 Sport Insert 0G-124217 .....................................................24-2
25. Auto Racing Operation ..................................................25-1
26. Compulink Interface .....................................................26-1
26.1 Sport Insert 0G-139422 .................................................... 26-1
26.2 Test Mode of Console ..................................................... 26-1
26.3 Key and LCD Function .................................................... 26-3
Appendix A: Block Diagrams .............................................. A-1
Appendix B: Output Codes ............................................... B-1
B.1 Test Code ................................................................ B-1
B.2 Basketball Code ........................................................... B-1
B.3 Four-Digit Timing/Scoring .................................................. B-1
B.4 Football ................................................................. B-2
B.5 Baseball/Softball .......................................................... B-2
B.6 Track ................................................................... B-3
B.7 Wrestling ................................................................ B-3
B.8 Hockey ................................................................. B-3
B.9 Soccer .................................................................. B-4
B.10 Volleyball ............................................................... B-4
B.11 Team Score .............................................................. B-4
B.12 Two-Digit Timing ......................................................... B-4
B.13 Team Name .............................................................. B-4
B.14 Time Of Day ............................................................. B-5
B.15 Message Controller ........................................................ B-5
B.16 Smart Console ............................................................ B-5
B.17 Pitch and Speed ........................................................... B-5
B.18 Multi-Purpose Timer (2, 4, or 6 digit) .......................................... B-5
Table Of Contents
iv
Page 7

B.19 Shots On Goal ............................................................ B-5
B.20 GP99 Multi Sport .......................................................... B-6
B.21 Judo .................................................................... B-6
B.22 Karate ................................................................... B-6
B.23 Tae Kwon Do ............................................................. B-6
B.24 Boxing .................................................................. B-6
B.25 Photo Finish Interface ...................................................... B-6
B.26 Event Counter ............................................................ B-7
B.27 Tennis .................................................................. B-7
B.28 Auto Racing .............................................................. B-7
B.29 Compulink Interface ....................................................... B-7
Appendix C: Sport Inserts ....................................................C-1
Table Of Contents
v
Page 8

Page 9
Section 1: Introduction
1.1 How To Use This Manual
This manual explains the operation of the All Sport 4000 Series control console. For questions
regarding the safety, installation, operation or service of this system, please refer to the telephone
numbers listed on the cover page of this manual.
Important Safeguards:
1. Read and understand these instructions before installing.
2. Do not drop the control console or allow it to get wet.
3. Do not let any power cord touch hot surfaces or hang over the edge of a table which
would damage or cut the cord.
4. If an extension cord is necessary, use a three-pronged, polarized cord. Arrange the cord
with care so it is not tripped over or pulled out.
5. Always turn off and/or unplug the control equipment when not using it. Never yank the
power cord to pull the plug from the outlet. Grasp the plug and pull to disconnect.
6. To avoid electrical shock, do not disassemble the control equipment or the driver modules.
Incorrect reassembly can cause electric shock, faulty operation, or permanent damage to
the circuits.
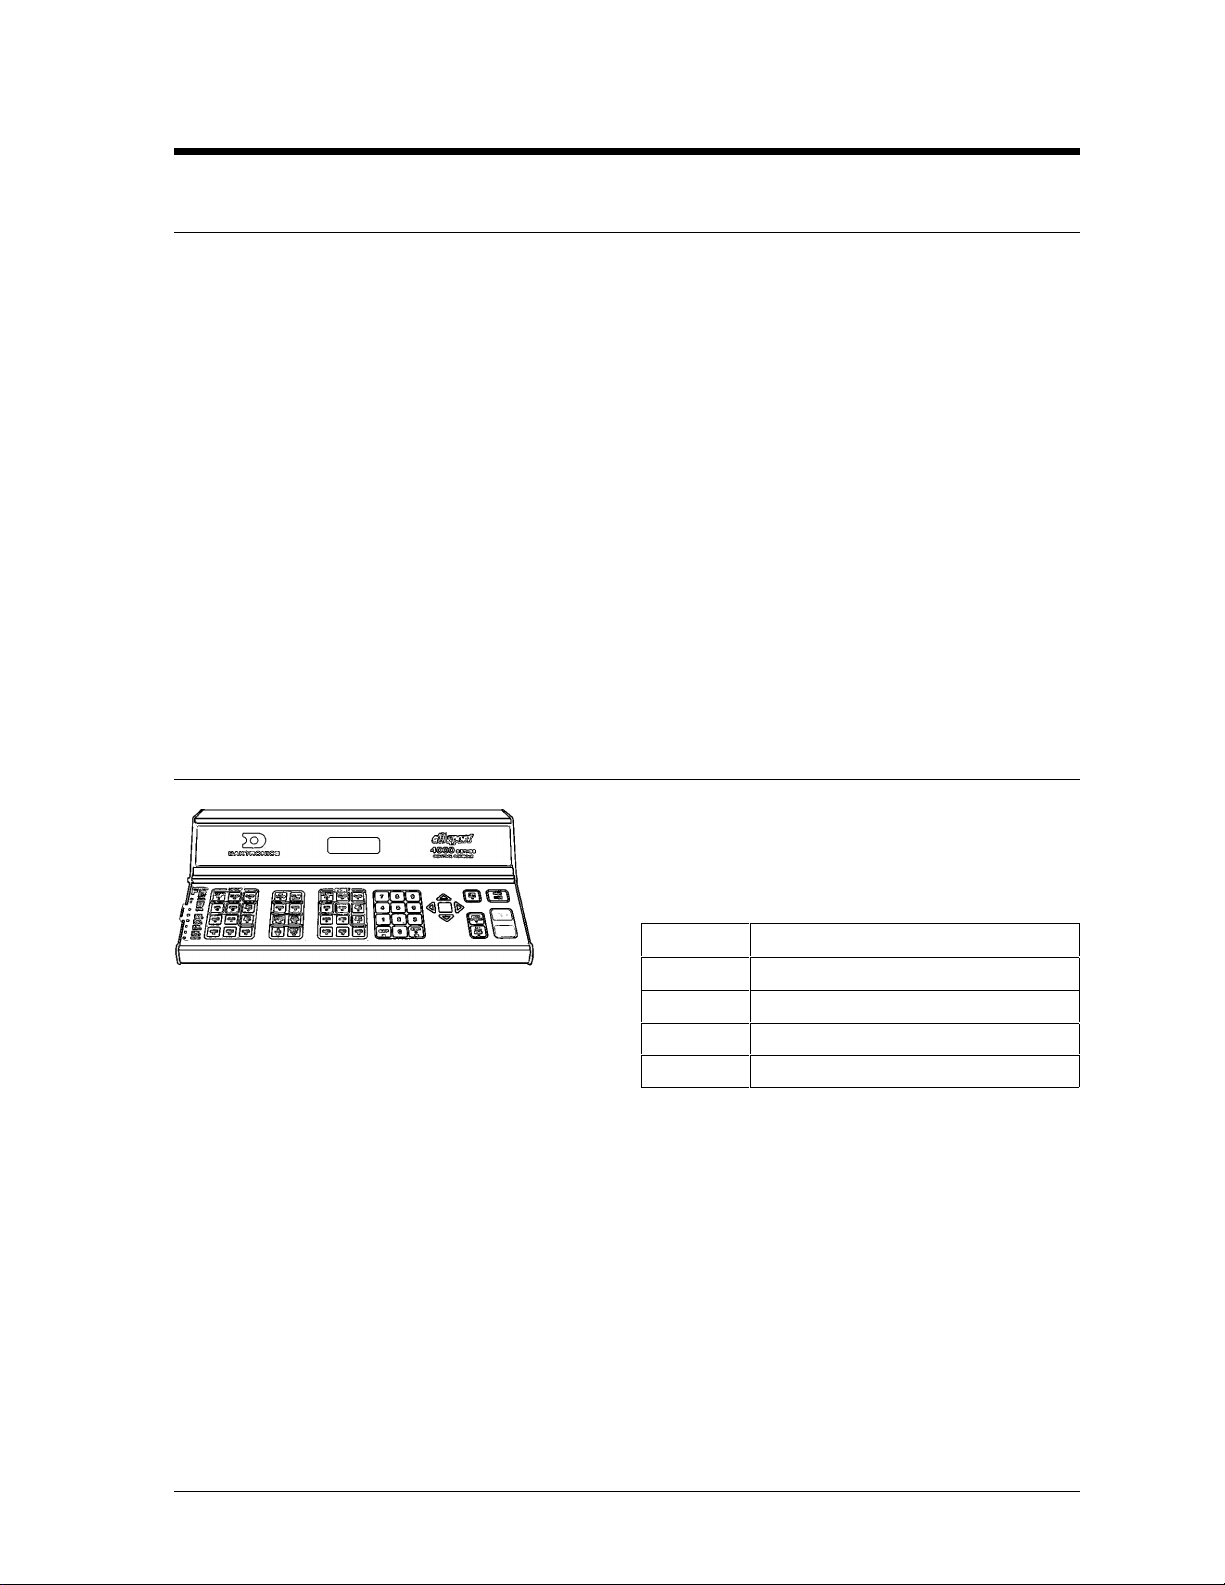
1.2 Console Overview
The All Sport 4000 Series console is a state-of-the-art scoring
and timing system. The console’s Liquid Crystal Display
(LCD) will guide you through the operation of the system.
®
Model # Description
4100 120 Volt, Standard Programming
T
h
e
r
e
a
re four console models in the All Sport 4000 Series that
differ by voltage and/or programming. This table lists
these consoles:
As a safety feature, this product has a 3-wire ground type plug equipped with a third (grounding)
pin. This plug only fits into a grounding-type power outlet.
Note: If you are unable to insert the plug into the outlet, contact a qualified electrician to replace the
obsolete outlet.
When opening the packages, inspect for shipping damage such as rattles and dents. See that all
equipment is included as shown on the packing slip. Immediately report any deficiencies to
Introduction
4120 230 Volt, Standard Programming
4900 120 Volt, Custom Programming
4920 230 Volt, Custom Programming
1-1
Page 10

Daktronics. Save all packing materials for shipping if warranty repair or exchange is needed.
1.3 Using the Console
An uppercase word in brackets (such as [OK]) represents a button on the screen. The names or
letters of keys on the keyboard will be given enclosed in arrows (such as <ENTER>) to differentiate
between the screen commands.
1.4 Revision History
Version 1.0 Release Date: 1 November 1996
Initial software release.
Version 1.1 Release Date: 11 March 1997
Added Baseball Code for the new standard Baseball Scoreboards. (Code 38)
Version 1.2 Release Date: 15 July 1997
1. New Soccer Code: Added saves for new soccer scoreboard models. (Code 69)
2. Speed Pitch: Program used to register and display speed and type of pitch to a
message display. Two codes were added where one displays the speed automatically
and the other requires user input for display. (Code 191: manual, and Code 192:
automatic)
3. One Console Basketball Score/Player Foul Operation: Eliminates the need for two
consoles to control player foul panels and scoring. (Code 7: BB18’s, Code 8: BB18A,
Code 17: BB17, Code 18: BB17A)
4. InfoSport Message Center Controller: Controls the new single line InfoSport
Message Center designed for indoor sporting applications. (Code 101)
5. Smart Clock: Provides remote game time control with DOG/Shot Clock control.
Used in conjunction with the ProSport 6000. This provides a RTD output with game
time and shot time/delay of game. (Code 111: indoor, Code 112: outdoor)
6. Test Codes: Added to help test the individual model of scoreboard, in both
manufacturing and field testing. Currently test codes are in place for a majority of
standard Basketball, Hockey, Baseball and Football boards. This is a menu option in
the standard code for the particular board being tested.
7. Time of Day: In earlier versions when running the time-of-day code, the time was
sent to more than one output. Time was displayed on other digits besides the normal
clock digits on multiple driver boards. This has now been corrected by sending the
time-of-day to output 1 only.
8. 1/10 Second Status: In previous versions, the 1/10 second prompt was not always
th th
displayed after resuming a game, depending on the position remote start/stop switch.
This has now been corrected. Count up/down status is also now saved. In earlier
versions this always defaulted to count down on power up.
9. Time-out Time on Clock Digits: This change now displays the time-out time on the
clock digits on the main scoreboard for basketball only.
10. LCD Usage: In previous versions, the second line of the LCD displayed command
entry information only. It has now been revised to show limited game-in-progress
information. On the majority of the sports, it will now show Home/Guest scores.
With baseball, where score was already displayed on the top line, the second line
displays Ball, Strike, and Out status.
1-2
Introduction
Page 11

11. Hour-Minute-Second Counter: Added to control simple 2,4, or 6-digit displays.
On the smaller displays, the hours, minutes, and seconds will shift as time expires or
increases. (Code 95: 2-digit, Code 96: 4-digit, Code 97: 6-digit)
12. Shot Clock Time: This update now blanks the shot time when it is greater than or
equal to the game time. The blanking of the shot time can be enabled/disabled from the
menu.
13. Football Delay-of-Game: Delay-of-game time can now be run independently from
game time. In earlier versions, the delay-of-game time would stop if the game time
was stopped and wouldn’t start unless game time was running.
Version 1.3 Release Date: 2 October 1997
1. New Judo Code: Code for new Standard Judo Scoreboards. (Code 281)
2. New Karate Code: Code for new Standard Karate Scoreboards. (Code 282)
3. New Tae Kwon Do: Code for new Standard Tae Kwon Do Scoreboards. (Code
283)
4. New Boxing Code: Code for boxing on Game/Shot Clock Displays. (Code 291)
5. New GP99 Code: Code for GP99 include Multi Sport and segment timer. (Code
271, Code 272, & Code 274)
6. New Finish Lynx Interface Code: Code for interfacing to the Finish Lynx Photo
Finish System. (Code 241)
7. New Soccer RTD Code: Code for Soccer with RTD output. (Code 242)
8. New Volleyball Code: Code for volleyball on standard BA-5 and BA-7. (Code 74)
9. New Smart Console Code: Code for Smart Clock Time of Day. (Code 113 &
Code 114)
Version 1.4 Release Date: 16 March 98
1. Reverse keyboard layout for Judo, Karate, Tae Kwon Do: Codes with the
keyboard reversed (white and red swapped) were added. (Code 284, Code 285, &
Code 286)
2. New Event Counter Codes: Codes for event countdown, time based counter and
external input counter with RTD output have been added. (Code 371 thru Code 376)
3. New Football RTD Codes: Code for football with RTD output. (Code 243)
4. New Swim Multi line Code: Code for Swim Score, Event, and Heat. (Code 244)
5. New Wrestling Code: Code for new Wrestling board with Blood and Injury Time.
(Code 57)
6. Time Out Time Selection: Menu option added in basketball for display of time out
time.
7. Relay Control Selection: Selection in Hockey menu for relay output being active on
clock stop or clock equals zero.
8. Time of Day added to RTD Data: Soccer code 242 has Time of Day data added to
RTD output.
9. Osaekomi Timer limits changed: The Judo Osaekomi timer has been changed due
to rule changes. It is now 20 or 25 seconds instead of 25 and 30.
10. Selection of Heat & Event number input: The track codes 41, 42, and 43 have an
added selection for displaying Heat and Event from the OmniSport input or from
keyboard input.
11. Analog Clock Control: Soccer code 242 has had analog clock control added.
Version 1.5 Release Date: 15 July 98
1. Dimming for Basketball: Added a menu option in standard basketball and hockey
codes to allow for dimming.
2. Lengths added to Multi-line Swim Output: Lengths were added to the output.
Introduction
1-3
Page 12

(Code 244)
3. Day/Event Counter Output added for TI-413: An additional output was added to
handle reverse configuration of Day/Time to Time/Day.
1-4
Introduction
Page 13

4. Speed Pitch Output added for TI-413: An additional output was added to shift digits
to accommodate the TI-413 layout.
5. Power Time Interface: Added an interface for power time information to be
displayed on Football and Track scoreboards.
6. New Tennis Code: Added a new tennis code to operate the new standard tennis
scoreboard TN-2001. (Code 220)
7. Modified 2 Digit Timer Code 95: Modified code to handle higher wattage lamp
displays such as the TI-2003.
8. Modified Baseball Codes 36, 38, & 40: Modified so inning runs scores now
increments 0 to 9 instead of 1 to 9.
9. Added TK-69 Output to Track Codes : Added output for TK-69 displays on output
3 to track codes 41, 42, 43, 45, 46, and 47.
Version 1.6 Release Date: 21 December 98
1. Speed Pitch: Added KPH and cycle KPH/MHP to speed pitch code.
2. Baseball RTD Output: Added Code 138 for baseball with RTD Output.
3. Time Event Counter: Revised Codes 373 & 374 for timed event counter to correct
occasional lock up problem.
4. Segment Timer: Segment timer now has up to 99 segments, added a copy of
segment times, and added saving of segment times if resume code is used.
5. Football Menu: Added a menu selection in football for reset/no reset on stop of
the delay of game.
6. Segment Timer: Added codes 275 & 276 for segment timer to work on basketball,
football, and wrestling WR-2024.
7. Basketball: Added code 161 for basketball on H-2023 with plyr/fls/points.
8. Auto Racing: Added codes 333 & 433 for new auto racing boards with AMB
timers.
9. Auto Racing: Added code 995 for new auto racing boards with manual posting and
timing.
Version 1.7 Release Date: 2 April 99
1. Wrestling Advantage Timer: Code 57 for wrestling will show advantage time on the
team score digits when the advantage time is on.
2. Baseball Timing: Codes 30, 31, 32 and 44 have the ability to time out to hours.
3. Auto Racing: Added codes 334, 335, 434 and 435 for positions 16-30 and 31-45 for
the AMB interface to the new AR model boards.
4. Pitch and Speed: Added codes 193 and 194 for the STALKER radar gun.
Version 1.8 Release Date: 18 November 99
1. Wrestling Advantage Timer: Added a blinking Bonus Light to show blood/injury
time in codes 51-54.
2. Delay of Game: Added a option of having the clock not reset on the stop position of
the switch--just on the reset button only. This is on code 82, 112.
3. Delay of Game and Shot Clock operations: Changed these functions so the last
entered set reset time is displayed at the start of each new game on all standard
Basketball and Football codes.
4. Judo: Modified the -1/+1 functions to show 0-9 and 0-3 on Waza Ari. These digits
will immediately go to 0. The Ippon will now stop the clock when pressed. The
Keikoku, Chui, Shido will do the proper increment and decrement of the digits.
5. Tennis: Added code 221 which is a 6 court tennis scoreboard.
6. Basketball: Changed the Stats codes 15, 16 to only update player-foul-points
information on the main scoreboard when the Foul button is pressed.
Introduction
1-5
Page 14

Version 2.0 Release Date: 15 October 00
1. AMB Interface: Enabled AMB Interface to handle up to 8 characters in get competitor
number.
2. +2 and +3 Points: Corrected the +2 and +3 point problem in basketball of only one point
being added. This problem only happened afer team fouls +1 was pressed followed
immediately by score +2 or +3.
3. Code 502: Added code 502 for compulink interface to 2 line scoreboards.
4. TI-418 Outputs: Added outputs for TI-418 for event counter codes 373, 374, 375, and 376.
5. Code 001: Added digit ID and walking dot test to test code 001.
1-6
Introduction
Page 15
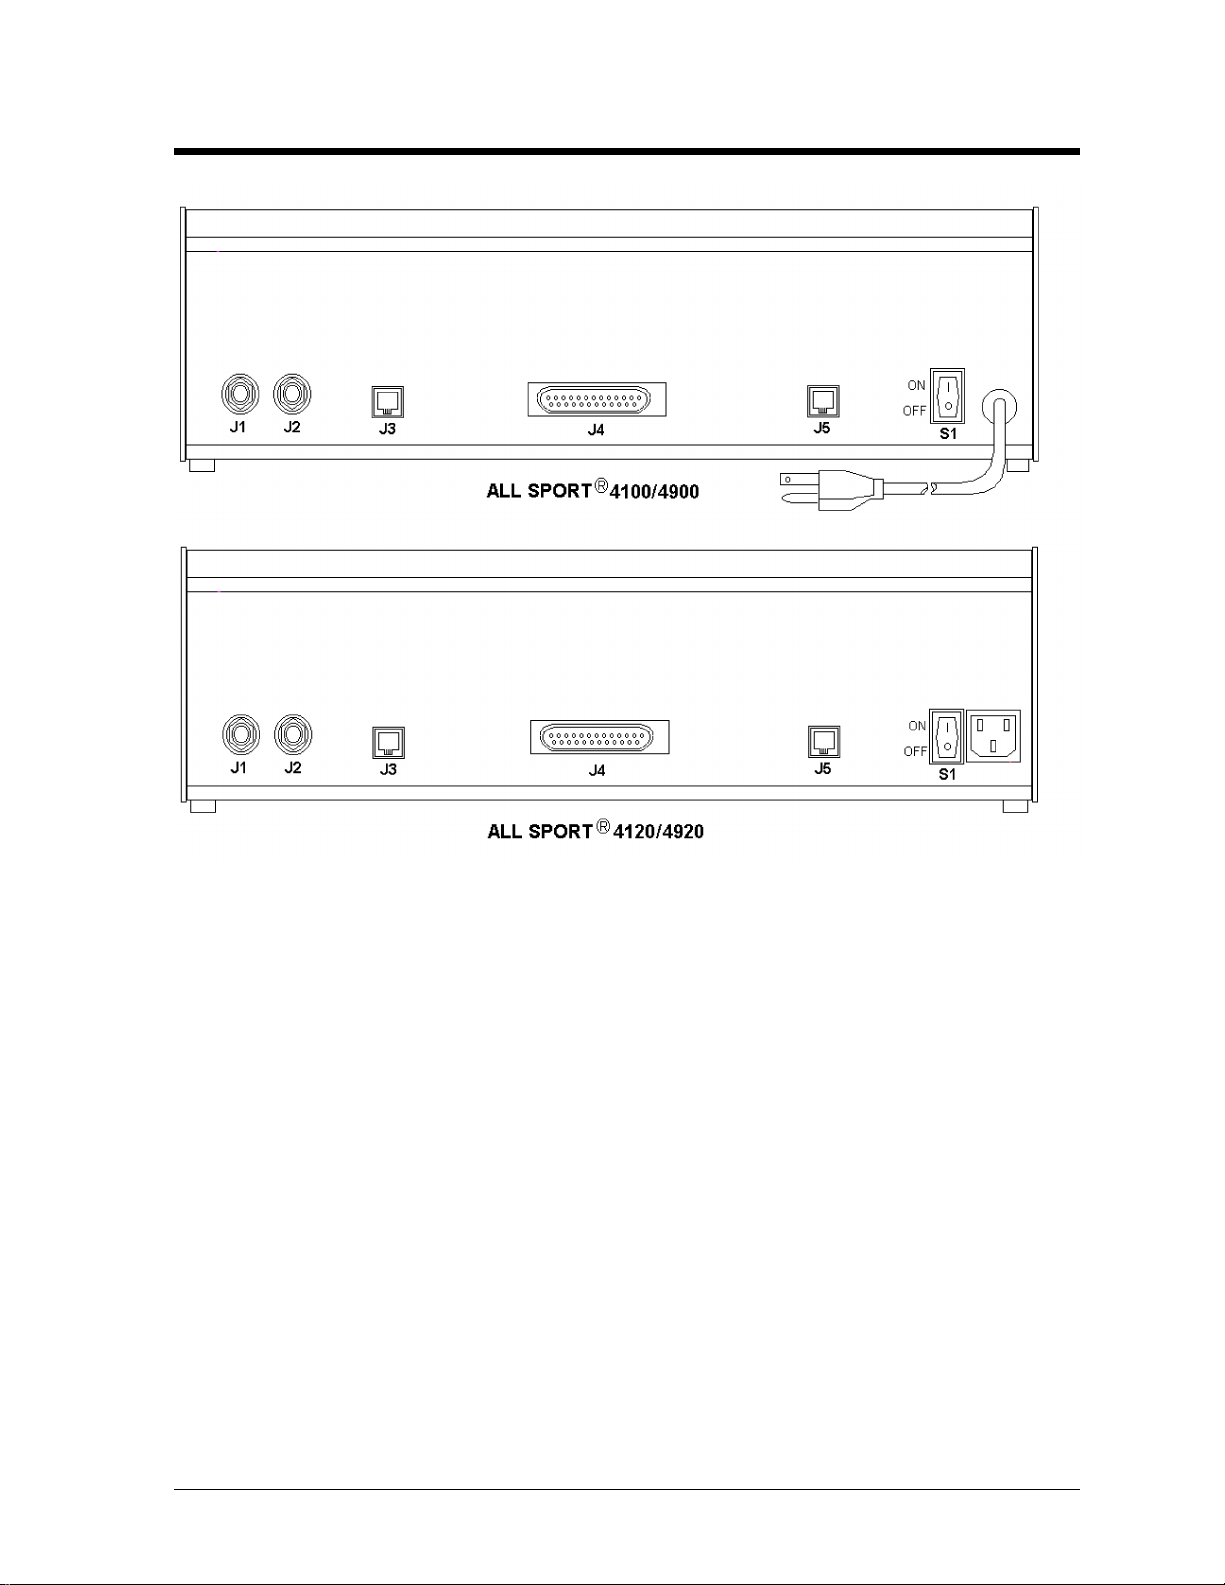
Section 2: Console Connectors
J1 & J2: Scoreboard outputs
J3: Remote start/stop and the horn
J4: Main output and input port
J5: Shot clock or delay-of-game control
S1: Power switch
There are two ways to connect signal, depending on the type of installation.
! One type of signal cable has a 25-pin connector on one end and a 16-pin circular plug on the
other. The 25-pin connector goes into J4 of the console, and the 16-pin plug goes into the
scoreboard junction box (j-box).
! The second type has a / " headphone plug at both ends. One end goes into J1 or J2 of the
console, and the other end into the scoreboard j-box.
For more information concerning various types of installations, refer to Appendix A.
1
4
Console Connectors
2-1
Page 16

Page 17

Section 3: Basic Operation
3.1 Console Overview
Reference Drawing: Keyboard Fixed Keys ...................... Drawing A-54698
The console face consists of a liquid crystal display (LCD), sport-specific insert, numeric keypad and
additional keys. In most cases, the top line of the LCD shows game time, the direction the clock is
counting, and whether the horn is set to automatic. The bottom line of the LCD generally shows
HOME and GUEST score. Some baseball modes display BALL, STRIKE, and OUT data on the bottom
line of the LCD.
Additional keys on the console include:
<CLEAR>: Clears the LCD of numerical information. Serves as [NO] for input prompts.
<ENTER>: Completes an action. The asterisk is a reminder that this key is to be pressed when
an asterisk appears on the LCD. Serves as [YES] for input prompts.
<MENU>: Invokes sport-specific menu options (refer to Section 3.4 for additional
information)
<AUTO HORN! >: Turns the automatic horn on or off. If the horn is on, an H appears on the
LCD
<HORN>: Sounds the horn as long as this key is pressed
<COUNT UP/DOWN!>: Sets the clock to count up or down. Press <ENTER> to toggle
between count modes. UP is displayed on the LCD if the clock is counting up and DN if the
clock is counting down.
<SET MAIN CLOCK!>: Sets the time on the main clock
<START>: Starts the main clock
<STOP>: Stops the main clock
Refer to Drawing A-54698 in Appendix A for additional information.
3.2 Sport Inserts
Various inserts are available depending on the sport and the type of scoreboard. For safekeeping,
store any unused inserts in the pocket available on the bottom of the console.
To remove a sport insert, pull on the tab that extends from the left side of the console. The insert
will easily slide out. To insert a sport insert, slide it under the protective covering until it stops.
Note: On each tab is a number (ex. LL-2261). This number is used as part of the section headings
in this manual. For example, the operation instructions for LL-2261 are under Section 5.1.
Each insert has a list of code numbers and scoreboard models. The code numbers configure the
console to control the scoreboard specified by the model number. For example, code 40 enables
the console to control a BA-3718 scoreboard. Code numbers also configure the console for a
specific sport mode as shown on the sport insert. This enables the console to control the
scoreboard as specified by keys on the insert. Codes are entered during startup. Refer to Section
3.5 for more information on starting up the console.
Basic Operation
3-1
Page 18

Note: Daktronics recommends that a permanent marker is used to rewrite the code number on the
insert. This is a precaution in case the model number is made illegible due to extensive use (that is,
rubbed away, scratched, etc.).
3.3 Sport Insert Operation Concepts
A sport insert identifies the action keys required in the normal course of the insert’s specific sport.
In most cases, pressing a key immediately changes the scoreboard. Sometimes additional keys
must be pressed. Keys that require additional information are marked by a !. This additional
information usually is a number followed by the <ENTER> key.
Keys with arrows (') activate an indicator (possession, bonus, etc.) on the scoreboard. The
direction of the arrow selects the appropriate team (HOME or GUEST).
Some keys have a +1, +2 or +3. By pressing one of these keys once, the value of the
corresponding field on the scoreboard (such as score or period) increments (increases) by the
corresponding number on the key. A key with a -1 decrements (decreases) by one.
On most inserts, certain keys have been grouped together under the heading HOME or GUEST.
These keys are team keys and work the same for both teams. They affect the statistics for that
one team. Keys not under one of these headings are game keys. They are general keys for the
progress of the game (such as period or quarter).
Other keys have been blocked together to emphasize that these keys work together.
Examples
Example 1: Change the HOME score from 3 to 4.
Key LCD
<SCORE +1> (Home) H. Score ••4
Example 2: Change the GUEST score from 21 to 12.
Key LCD
<SCORE !> (Guest) G. Score •21
1
2
<ENTER> G. Score •12
Note: The guest score can also changed by repeatedly pressing the <SCORE-1> key if it is
available.
3.4 Menu Key
G. Score ••1
G. Score •12
The <MENU> key allows the user to select from a list of options specific for each sport. The up
and down arrow keys allow the user to scroll through the menu list. All menu options require
either yes or no. Pressing <YES> or <NO> will select the action and exit from the menu. Pressing
any key other than <YES>, <NO> or the arrow keys will exit the menu function.
Basic Operation
3-2
Page 19

Note: Not all prompts must be answered. The following menu functions may be available:
1. RESTART GAME Y/N
Yes - Restarts the present sport with default settings
No - Exits menu
2. NEW CODE Y/N
Yes - Prompts Resume Game?, as if power to the console had interrupted (refer to
Section 3.5)
No - Exits menu
3. TEAM NAME Y/N
Yes - Prompts the user to enter team names (refer to Section 13)
No - Exits menu
4. SELECT 24HR Y/N (time of day only)
Yes - Selects 24 hour mode for time of day
No - Selects 12 hour mode for time of day
5. SYNC SHOT CL Y/N (Basketball)
Yes - Synchronizes the shot clock with the game clock
No - Allows the shot clock to run independently of the game clock
Note: When set to “Yes” (synchronous), the shot clock always stops when the game
clock stops. The shot clock starts when the game clock starts (if the shot clock start
switch is ON). When set to “No” (non-synchronous), the shot clock is not affected by the
game clock. It starts or stops only from its own switches.
6. BLNK SHOT CL Y/N (Basketball)
Yes - Shot clock time will blank when greater or equal to game time
No - Shot clock time will display at all times
7. SET MAX FOUL Y/N (Basketball)
Yes - Sets the maximum number of team fouls that will be displayed on the scoreboard.
Incrementing the team fouls will not go beyond this setting.
No - Exits Menu
8. SET PER END Y/N (Hockey, Soccer)
Yes - Sets the period end time when clock is in count up mode
No - Exits menu
9. SHOW TIMEOUT Y/N (Basketball)
Yes - Sets to show time out time on scoreboard.
No - Time out time will not show on scoreboard
10. RLY CLK STOP Y/N (Hockey)
Yes - Sets relay to activate on clock stop.
No - Selects relay to activate on main clock = 0:00
11. SHOW EVENT Y/N (Track)
Yes - Selects display of Event/Heat Data from OmniSport Input.
No - Selects display of Event/Heat Data from keyboard entry.
Basic Operation
3-3
Page 20

12. BRIGHT Y/N
Yes - Sets the display to bright
No - Sets the display to dim
13. STOP/RES DG Y/N (Football)
Yes - Sets for reset of delay of game on stop
No - Sets for no reset of delay of game on stop.
14. PRO & SPORT Y/N (Pitch & Speed)
Yes- Selects Stalker Pro Radar Gun
No- Selects Stalker Sport Radar Gun
15. SHOW ADV TIME Y/N (Wrestling)
Yes - Show advantage time on the scoreboard
No - Show team score on the scoreboard
16. TEST DISPLAY Y/N
Yes - Enters a test mode for testing display digits
No - Exits menu
Note: This is a production test option for some scoreboard models. When this option is
selected the console cycles through number patterns on each group of scoreboard digits
and cycles through the different digit groups on the scoreboard. Pressing the <START> key
turns all digits on, and <STOP> turns all digits off. The <SET MAIN CLOCK> key starts the
CYCLE ALL pattern and the <COUNT UP/DOWN> key starts the CYCLE GROUP
pattern. The <HORN> key puts it in single step mode and can be used to step it through
the test. The keys on the insert (starting in the upper left corner and from left to right) are
used to select the group of digits being tested. The remote start/stop console can be used
to control the test also. The <HORN> switch single steps through the test, the <START>
position selects STEP ALL and the <STOP> position selects STEP GROUP.
3.5 Startup
When the console is turned on, it cycles through a self test, after which the LCD prompts
Resume Game? Press <YES> to resume the last game stored in memory. This is useful when
power to the console is lost during a game. Pressing <NO> will then prompt Enter Code.
The last code used will be displayed. To accept the code shown, press <ENTER>. If this is not the
desired code, enter a new code and press <ENTER>.
3.6 Time Of Day Operation
Note: This operation is only available on scoreboards equipped with a game clock. No sport insert
is required for this operation. If this code is entered while another code is running, any
information entered during the first code will be lost.
To have the game clock on the scoreboard display the time of day, enter code 99 (refer to Section
3.4 or 3.5 to enter a code). Use the <SET MAIN CLOCK> key to enter the correct time of day. The
menu choice Select 24Hr can be used to select either a 12 or 24-hour time format.
Basic Operation
3-4
Page 21

3.7 Multi-Purpose Timer Operation
This operation is available for clocks with 2, 4, or 6-digit displays. The timer counts up or down in
hours, minutes, and seconds. The timer can display up to 99 hours, 59 minutes and 59 seconds.
On 4-digit clocks, the display shows hours and minutes if the hours value is not zero; otherwise, it
shows minutes and seconds. On 2-digit clocks, the display shows hours if not zero, shift to show
minutes when hours are zero, and shift to show seconds when minutes are zero. To select the
multi-purpose timer, enter one of the codes below.
Code 95 - 2 Digit Clock
Code 96 - 4 Digit Clock
Code 97 - 6 Digit Clock
Basic Operation
3-5
Page 22

Page 23

Section 4: Baseball Operation
Refer to the information in Section 3 to start up the console and use the sport insert. Read Section 3
carefully to fully understand the following operation instructions and for MENU KEY operations.
4.1 Sport Insert LL-2266
Reference Drawing: Sport Insert, Baseball Codes 36;38;40&138 .... Drawing A-86105
Team Keys
<ERRORS!>
Edits the team’s number of errors
<ERRORS +1>
Increments the team’s number of errors by one
<HITS!>
Edits the team’s number of hits
<HITS +1>
Increments the team’s number of hits by one
<GAME RUNS!>
Edits the number of total game runs
<INNING RUNS!>
Edits the number of inning runs in the inning specified by <INNING !>. This will not affect the
total game runs. Refer to Example 4.1a at the end of this section.
<RUNS -1>
Decrements the number of inning runs and total game runs by one
<RUNS +1>
Increments the number of inning runs and total game runs by one
Game Keys
<INNING!>
Edits the inning number
<INNING +1>
Increments the inning number by one
<PLAYER AT BAT!>
Displays the number of the player currently at bat
<AVERAGE!>
Displays the average of a player
<DIM>
Dims the scoreboard for night viewing. Pressing this key a second time returns the scoreboard
digits to full brightness.
<OUT +1>
Increments the number of outs by one
<CLEAR HIT AND ERROR>
Clears the H/E digit or indicator on the scoreboard
<HIT>
Indicates a hit. An “H” will appear on the H/E digit on the scoreboard or an indicator will light
up.
Baseball Operation
4-1
Page 24

<ERROR>
Indicates an error. An “E” will appear on the H/E digit on the scoreboard or an indicator will
light up
<CLEAR BALL AND STRIKE>
Sets the Ball and Strike (on the scoreboard) to zero
<BALL +1>
Increments the number of balls by one
<STRIKE +1>
Increments the number of strikes by one
Example 4.1a: The game is in the fifth inning, the home team has eight runs. Because of an
error in the fourth inning, we need to go back and change the inning runs from
five to six.
Key LCD
1
<INNING !> INNING •5
2
<4> INNING •4
3
<ENTER> INNING •4
4
<INNING RUNS !> (Home) H IN RUNS
•5
5
<6> H IN RUNS
•6
6
<ENTER> H IN RUNS
•6
7
<INNING !> INNING •4
8
<5> INNING •5
9
<ENTER> INNING •5
10
<GAME RUNS !> (Home) H GM RUNS
•8
11
<9> H GM RUNS
•9
12
<ENTER> H GM RUNS
•9
Steps 1-3 change the inning from five to three. Steps 4-6 change the number of runs in
the third inning. Steps 7-9 change the inning number back to five. Steps 10-12 change the
total game runs.
4.2 Sport Inserts LL-2264 & LL-2265
Reference Drawings:
Sport Insert, Baseball Codes 30-34, 39 ...........................Drawing A-86103
Sport Insert, Baseball Codes 35, 37, 44 .......Drawing A-86104
Note: Both inserts are identical, except the HOME and GUEST labels are on different sides.
The codes with timing (30, 31, 32 and 44) allow for times to be entered in hours, minutes and
seconds.
Team Keys
<AT BAT !>
Baseball Operation
4-2
Page 25

Indicates the team currently at bat
<ERRORS !>
Edits the team’s number of errors
<ERRORS +1>
Increments the team’s number of errors by one
<HITS !>
Edits the team’s number of hits
<HITS +1>
Increments the team’s number of hits by one
<RUNS !>
Edits the total number of runs
<RUNS +1>
Increments the total number of runs by one
Game Keys
<INNING !>
Edits the inning number
<INNING +1>
Increments the inning number by one
<PLAYER AT BAT !>
Displays the number of the player currently at bat
<AVERAGE !>
Displays the average of a player
<DIM>
Dims the scoreboard for night viewing. Pressing this key a second time will return the
scoreboard digits to full brightness.
<OUT +1>
Increments the number of outs by one
<CLEAR HIT AND ERROR>
Clears the H/E digit or indicator on the scoreboard
<HIT>
Indicates a hit. An “H” will appear on the H/E digit on the scoreboard or an indicator will light
up.
<ERROR>
Indicates an error. An “E” will appear on the H/E digit on the scoreboard or an indicator will
light up.
<CLEAR BAL LAND STRIKE>
Sets the Ball and Strike (on the scoreboard) to zero
<BALL +1>
Increments the number of balls by one
<STRIKE +1>
Increments the number of strikes by one
Baseball Operation
4-3
Page 26
4.3 Code 138 Standard RTD Item Numbers
Port configuration: 9,600 Baud Rate, 8 Data Bits, and Even Parity.
Standard RTD
Item# Data
1 Player at bat x 10
2 Player at bat x 1
3 Average x 100
4 Average x 10
5 Average x 1
6 Ball x 1
7 Strike x 1
8 Out x 1
9 (H)it or (E)rror
10 Err Position x 1
11 Inning x 10
12 Inning x 1
13 Guest Runs x 10
14 Guest Runs x 1
15 Guest Hits x 10
16 Guest Hits x 1
17 Guest Errors x 10
18 Guest Errors x 1
19 Guest Ing 1 Runs x 1
20 Guest Ing 2 Runs x 1
21 Guest Ing 3 Runs x 1
22 Guest Ing 4 Runs x 1
23 Guest Ing 5 Runs x 1
24 Guest Ing 6 Runs x 1
25 Guest Ing 7 Runs x 1
26 Guest Ing 8 Runs x 1
27 Guest Ing 9 Runs x 1
28 Guest Ing 10 Runs x 1
29 Guest Ing 11 Runs x 1
30 Guest Ing 12 Runs x 1
31 Home Runs x 10
32 Hone Runs x 1
33 Home Hits x 10
34 Home Hits x 1
35 Home Errors x 10
36 Home Errors x 1
37 Home Ing 1 Runs x 1
38 Home Ing 2 Runs x 1
39 Home Ing 3 Runs x 1
40 Home Ing 4 Runs x 1
41 Home Ing 5 Runs x 1
42 Home Ing 6 Runs x 1
43 Home Ing 7 Runs x 1
44 Home Ing 8 Runs x 1
4-4
Baseball Operation
Page 27
45 Home Ing 9 Runs x 1
46 Home Ing 10 Runs x 1
47 Home Ing 11 Runs x 1
48 Home Ing 12 Runs x 1
49 Guest Ing 1 Runs x 10
50 Guest Ing 2 Runs x 10
51 Guest Ing 3 Runs x 10
52 Guest Ing 4 Runs x 10
53 Guest Ing 5 Runs x 10
54 Guest Ing 6 Runs x 10
55 Guest Ing 7 Runs x 10
56 Guest Ing 8 Runs x 10
57 Guest Ing 9 Runs x 10
58 Guest Ing 10 Runs x 10
59 Guest Ing 11 Runs x 10
60 Guest Ing 12 Runs x 10
61 Home Ing 1 Runs x 10
62 Home Ing 2 Runs x 10
63 Home Ing 3 Runs x 10
64 Home Ing 4 Runs x 10
65 Home Ing 5 Runs x 10
66 Home Ing 6 Runs x 10
67 Home Ing 7 Runs x 10
68 Home Ing 8 Runs x 10
69 Home Ing 9 Runs x 10
70 Home Ing 10 Runs x 10
71 Home Ing 11 Runs x 10
72 Home Ing 12 Runs x 10
Baseball Operation
4-5
Page 28

Page 29

Section 5: Basketball Operation
Refer to the information in Section 3 to start up the console and use the sport insert. Read Section 3
carefully to fully understand the following operation instructions and for MENU KEY operations.
5.1 Sport Insert LL-2261
Reference Drawings: Insert, Codes 03, 04, 11, 12 & 161 ........... Drawing A-86100
Team Keys
<TIME OUTS LEFT!>
Edits the number of time outs left for the team
<TIME OUT>
Indicates which team called the time out
<POSS>
Indicates which team has the next possession of the ball
<BONUS>
Indicates that a team gets a bonus
<PLAYER!>
Used to enter the player’s number to select the player’s foul memory. The player’s numbers must
be entered before the game so that the <TEAM FOULS +1> key can be used. There are 20 playe r
positions in memory to save player’s foul data. Selecting a player’s number shows the number
of fouls and allows this number to be edited. Pressing the up/down arrow keys scrolls through
the players while in the editing mode (refer to Example 5.1a at the end of this section).
<TEAM FOULS!>
Edits the number of team fouls
<TEAM FOULS +1>
Increments the number of team fouls by one. The console prompts for the number of the
player who fouled. After the player’s number is entered, the player’s number and fouls are
shown on the scoreboard (refer to Example 5.1b at the end of this section).
<SCORE!>
Edits the team score
Note: When using code 161 for H-2023 boards. The console will prompt for the player
number of who made the points for score +1, +2, and +3 keys. After the player number is
entered, the players number, fouls, and points are shown on the scoreboard. If individual points
scoring is not desired, the players number does not have to be entered and then the <ENTER> key
can be pressed.
<SCORE +1>
Increments the team score by one
<SCORE +2>
Increments the team score by two
<SCORE +3>
Increments the team score by three
<SCORE -1>
Decrements the team score by one
Basketball Operation
5-1
Page 30

Game Keys
<SET TIME OUT!>
<TIME OUT ON/OFF>
<SET RESET TIME!>
<SET SHOT TIME!>
<DELETE PLAYER>
<BLANK PLAYER FOUL>
<PERIOD!>
<PERIOD +1>
Example 5.1a: Add players 21, 34 and 35 to the home roster.
Sets the length of the time out. The time out cannot be set while the clock is running.
Starts and stops the time-out clock
Sets the shot timer reset time
Sets the shot timer time
Deletes a player from memory. The player must first be selected using the <PLAYER !> key.
Refer to Example 5.1c at the end of this section.
Blanks the digits of the Player-Foul field on the scoreboard
Edits the period number
Increments the period number by one
Key LCD*
1
2
3
4
5
6
7
8
9
10
11
12
13
<PLAYER!> (Home)
<2>
<1>
<ENTER>
<PLAYER !> (Home)
<3>
<4>
<ENTER>
<PLAYER !> (Home)
<3> H.PLYR # •3
<5> H.PLYR # 35
<ENTER>
<ENTER>
H.PLYR # ••
H.PLYR # •2
H.PLYR # 21
01 12 F 0
H.PLYR # ••
H.PLYR # •3
H.PLYR # 34
02 34 F 0
H.PLYR # ••
03 35 F 0
03 35 F 0
5-2
Steps 1-4 add player 21, steps 5-8 add player 34 and steps 9-13 add player 35.
Example 5.1b: Give player 21 a foul and then change player 34's fouls from zero to three.
Key LCD*
1 <TEAM FOULS +1> (Home)
2
3
4
5
6
7
8
<2>
<1>
<ENTER>
<PLAYER!> (Home)
<3>
<4>
<ENTER>
H.PLYR # ••
H.PLYR # •2
H.PLYR # 21
01 21 F 1
H.PLYR # ••
H.PLYR # •3
H.PLYR # 34
02 34 F
0
9
<3>
02 34 F
3
Basketball Operation
Page 31

10
<ENTER>
02 34 F
3
Steps 1-4 assign player 21 a foul and steps 5-10 change player 34's fouls.
Example 5.1c: Delete player 35 from the home roster
Key LCD*
1
2
3
4
5
6
7
Steps 1-4 selects player 35 and steps 5-7 delete the player from memory.
Note: When “03 35 F 0” (or something similar) is displayed, the “03” is the player’s
position on the player list in the console, “35” is the player’s jersey number, “F” is Fouls,
and “0” is the number of fouls.
<PLAYER!> (Home)
<3>
<5>
<ENTER>
<DELETE PLAYER>
<ENTER>
<ENTER>
H.PLYR # ••
H.PLYR # •3
H.PLYR # 35
02 35 F 0
DELETE PLYR Y/N
03 •• F 0
03 •• F 0
5.2 Sport Insert LL-2330
Reference Drawing: Insert, BB w/SC Codes 07, 08, 17, & 18 ...... Drawing A-94024
Insert LL-2330 has two keys not found on LL-2261. Refer to Section 5.1 for the keys in
common with LL-2261.
Game Keys
<IN GAME (Y)>
Used to set a player as IN the game. The player must first be selected using <PLAYER!>.
<OUT OF GAME (N)>
Used to set a player OUT of the game. The player must first be selected using <PLAYER!>.
Note: Once the player is selected, either the <IN GAME (Y)> or <OUT OF GAME (N)> key can be
pressed to set the player status. The IN or OUT status is set in memory when the <ENTER> key
is pressed or either of the up/down menu arrow keys is pressed. The menu arrow keys scroll
through the player list to set the IN/OUT status of all players.
5.3 Sport Insert LL-2262
Reference Drawing: Sport Insert, BB Codes 05, 06, 13, 14 ......... Drawing A-86101
Note: Use this insert with sport insert LL-2263 on another console (refer to Section 5.4). Refer to
block diagram A-86936 in Appendix A to properly set up the consoles.
Team Keys
<TIME OUTS LEFT!>
Edits the number of time outs left
Basketball Operation
5-3
Page 32

<TIME OUT >
Indicates which team called the time out
<POSS>
Indicates which team has next possession of the ball
<SCORE !>
Edits the team score
<SCORE +1>
Increments the team score by one
<SCORE +2>
Increments the team score by two
<SCORE +3>
Increments the team score by three
<SCORE -1>
Decrements the team score by one
Game Keys
<SET TIME OUT !>
Sets the length of the time out. The time cannot be set while the clock is running
<TIME OUT ON/OFF>
Turns the time-out clock on and off
<SET RESET TIME !>
Sets the reset time of the shot timer
<SET SHOT TIME !>
Sets the shot time of the shot timer
<PERIOD !>
Edits the period number
<PERIOD +1>
Increments the period number by one
5.4 Sport Insert LL-2263
Reference Drawing: Sport Insert, Basketball Stats Codes 15&16 .....Drawing A-86102
Note: Use this insert with sport insert LL-2262 on another console (refer to Section 5.3). Refer to
block diagram Drawing A-86936 in Appendix A to properly set up the consoles.
Team Keys
<SETUP PLAYERS!>
Enters the player’s numbers into memory. The player numbers must be entered before the game
so that the <PLAYER!> key can be used to select a player (refer to Example 5.4a at the end of this
section).
<TEAM FOULS!>
Edits the number of team fouls
<BONUS>
Indicates which team has the bonus
<SUB!>
Substitutes one player for another player. First enter the number of the player to be brought in,
press <ENTER>, then enter the number of the player being brought out and press <ENTER> again.
<PLAYER!>
Selects a player number from the list created using <SETUP PLAYERS!>. The up/down arrow keys
5-4
Basketball Operation
Page 33

may be used to scroll through the player list after a player is selected (refer to Example 5.4b at the
end of this section).
Game Keys
<FOULS -1>
Decrements the number of fouls by one for the selected player and also the team fouls. The
<PLAYER!> key must be pressed first.
<FOULS +1>
Increments the number of fouls by one for the selected player and also the team fouls. The
<PLAYER!> key must be pressed first.
<DISPLAY PLAYER FOUL>
Displays the number of fouls of the player who just received a foul (on scoreboard)
<BLANK PLAYER FOUL>
Blanks the digits of the Player-Foul field on the scoreboard
<IN GAME (Y)>
Indicates a player is in the game (on scoreboard). The <PLAYER!> key must be pressed first.
<OUT OF GAME (N)>
Indicates a player is out of the game (on scoreboard). The <PLAYER!> key must be pressed
first.
<PLAYER POINTS -1>
Decrements the number of points credited to a player by one. The <PLAYER!> key must be
pressed first.
<PLAYER POINTS +1>
Increments the number of points credited to a player by one. The <PLAYER!> key must be
pressed first.
<PLAYER POINTS +2>
Increments the number of points credited to a player by two. The <PLAYER!> key must be
pressed first.
<PLAYER POINTS +3>
Increments the number of points credited to a player by three. The <PLAYER!> key must be
pressed first.
Example 5.4a: Enter home players 12, 24 and 30
1 01 H.PLYR ••
2 01 H.PLYR •1
3 01 H.PLYR 12
4 02 H.PLYR ••
5 02 H.PLYR •2
6 02 H.PLYR 24
7 03 H.PLYR ••
8 03 H.PLYR •3
9 03 H.PLYR 30
10 04 H.PLYR ••
11 04 H.PLYR ••
Steps 1-4 add player 12, steps 5-7 enter player 24, and steps 8-11 add player 30.
Basketball Operation
Key LCD*
<SETUP PLAYERS!>(Home)
<1>
<2>
<ENTER>
<2>
<4>
<ENTER>
<3>
<0>
<ENTER>
<CLEAR>
5-5
Page 34

Example 5.4b: Set home players 12, 24 and 30 to In Game. Note: Players must be set “In
Game” before they will display on the FP-25 stats panel.
Key LCD*
1 H.PLYR #••
2 H.PLYR #•1
3 H.PLYR #12
4 01 12 F 0 P••
<PLAYERS!>(Home)
<1>
<2>
<ENTER>
N
5 01 12 F 0 P••
<IN GAME (Y)>
Y
6 01 24 F 0 P••
<9>
N
7 01 24 F 0 P••
<IN GAME (Y)>
Y
8 01 30 F 0 P••
<9>
N
9 01 30 F 0 P••
<IN GAME (Y)>
Y
10 ENTER COMMAND
<ENTER>
Steps 1-4 selects player 12, steps 5 sets In Game, Step 6 selects next payer (24), step 7 sets In
Game, step 8 selects next player (30), step 9 sets In Game, and step 10 exits.
Example 5.4c: Give player 12 two points and take player 30 out of the game.
1 H.PLYR # ••
2 H.PLYR # •1
3 H.PLYR # 12
4 01 12 F 0 P•• Y
5 01 12 F 0 P•2 Y
6 01 12 F 0 P•2 Y
7 H.PLYR # ••
8 H.PLYR # •3
9 H.PLYR # 30
10 01 30 F 0 P•• Y
11 01 30 F 0 P•• N
12 01 30 F 0 P•• N
5.5 Remote Shot Clock Control
<PLAYER!> (Home)
<1>
<2>
<ENTER>
<PLAYER POINTS +2>
<ENTER>
<PLAYER!> (Home)
<3>
<0>
<ENTER>
<OUT OF GAME (N)>
<ENTER>
Key LCD*
5-6
The remote shot clock control box (0A-1166-0004) plugs into J5 on the back of the All Sport
console. The Shot Clock Console has a Start/Stop switch and a push-button Reset. When the
Reset button is pressed, the shot clock timer is changed to the reset value. The shot clock starts
when Reset switch is released. The Start/Stop switch starts and stops the shot timer when in a
synchronous mode. When in synchronous mode, the timer will not run unless the main clock is
on.
Basketball Operation
Page 35

Section 6: Football Operation
Refer to the information in Section 3 to start up the console and use the sport insert. Read Section 3
carefully to fully understand the following operation instructions and for MENU KEY operations.
6.1 Sport Insert LL-2268
Reference Drawing: Sport Insert, Football Codes 20-27 ........... Drawing A-86107
Team Keys
<TIME OUTS LEFT!>
Edits the number of time outs left for the team
<TIME OUT>
Indicates which team called time out
<POSS>
Indicates which team has possession of the ball
<SCORE!>
Edits the team score
<SCORE +1>
Increments the team score by one
<SCORE +2>
Increments the team score by two
<SCORE +3>
Increments the team score by three
<SCORE +6>
Increments the team score by six
Game Keys
<SET RESET TIME!>
Edits the reset value of the delay-of-game timer
<SET DELAY TIME!>
Edits the time displayed on the delay-of-game timer
<SET TIME OUT!>
Edits the length of the time out. This time cannot be set while the clock is running.
<TIME OUT ON/OFF>
Starts and stops the time-out clock
<DIM>
Dims the scoreboard for night viewing. Press this key a second time to return the digits to full
brightness
<FIRST AND 10>
Set the down display to 1 and yards-to-go to 10
<DOWN +1>
Increments the number of downs by one
<YARDS TO GO!>
Edits the number of yards-to-go
<BALL ON!>
Edits the yard line the ball is on
Football Operation
6-1
Page 36

<QTR!>
Edits the quarter number
<QTR +1>
Increments the quarter number by one
6.2 Remote Delay-of-Game Control
The remote delay-of-game control box (0A-1166-0004) plugs into J5 on the back of the All Sport
console. The Remote Delay-Of-Game Console has a Start/Stop switch and a push-button Reset.
The clock is started when the Start/Stop switch is set to the START position. Setting the
Start/Stop to the STOP position stops and resets the clock. The Reset switch resets the clock
when pressed.
6-2
Football Operation
Page 37

Section 7: Hockey Operation
Refer to the information in Section 3 to start up the console and use the sport insert. Read Section 3
carefully to fully understand the following operation instructions and for MENU KEY operations.
7.1 Sport Insert LL-2274
Reference Drawing: Sport Insert, Hockey Codes 62, 63 ........... Drawing A-86114
Team Keys
<PENALTY >
Indicates a team penalty
<PLAYER !PENALTY!>
Assigns a player penalty time. There are six memory slots for player penalty times. The first
available penalty slot is shown on the LCD. Use the up/down arrow keys to scroll through the
penalty memory. Pressing <ENTER> allows you to edit the selected player’s penalty time. Enter
the player number, press <ENTER>, then enter penalty time and press <ENTER> (refer to Examples
7.1a and 7.1b at the end of this section).
<SCORE!>
Edits the team score
<SCORE +1>
Increments the team score by one
<TIME OUTS LEFT Ž>
Edits the number of time outs left for each team
Game Keys
<ENABLE PENALTY CLOCKS>
Enables the penalty clocks to run when the game clock is running
<DISABLE PENALTY CLOCKS>
Prevents the penalty clocks from running when the game clock is running
<PERIOD!>
Edits the period number
<PERIOD +1>
Increments the period number by one
Note: The clock can be set to count up and stop when it reaches the period end time. The menu
key has a <SET PER END> function (refer to Section 3.4) that allows the period end time to be set.
Hockey Operation
7-1
Page 38

Example 7.1a: Enter a two-minute penalty for player 7, a five-minute penalty for player 12 and a
ten-minute penalty for player 31.
Key LCD
1 1 PL•• PN ••:••
2 1 PL•• PN ••:••
3 1 PL•7 PN ••:••
4 1 PL•7 PN •2:00
5 1 PL•7 PN •2:00
6 2 PL•• PN ••:••
7 2 PL•• PN ••:••
8 2 PL•1 PN ••:••
9 2 PL12 PN ••:••
10 2 PL12 PN •2:00
11 2 PL12 PN ••:•5
12 2 PL12 PN ••:50
13 2 PL12 PN •5:00
14 2 PL12 PN •5:00
15 3 PL•• PN ••:••
16 3 PL•• PN ••:••
17 3 PL•3 PN ••:••
18 3 PL31 PN ••:••
19 3 PL31 PN •2:00
20 3 PL31 PN ••:•1
21 3 PL31 PN ••:10
22 3 PL31 PN •1:00
23 3 PL31 PN 10:00
24 3 PL31 PN 10:00
<PLAYER PENALTY>
<ENTER>
<7>
<ENTER>
<ENTER>
<PLAYER PENALTY>
<ENTER>
<1>
<2>
<ENTER>
<5>
<0>
<0>
<ENTER>
<PLAYER PENALTY>
<ENTER>
<3>
<1>
<ENTER>
<1>
<0>
<0>
<0>
<ENTER>
Steps 1-5 enter a two-minute penalty for player 7, steps 6-14 a five-minute penalty for
player 12 and steps 15-24 a ten-minute penalty for player 31.
Example 7.1b: Change the penalty time for player 12 to five minutes, 30 seconds.
Key LCD
1 4 PL•• PN ••:••
2 3 PL31 PN 10:00
3 2 PL12 PN •5:00
4 2 PL12 PN •5:00
5 2 PL12 PN •2:00
6 2 PL12 PN ••:•5
7 2 PL12 PN ••:53
8 2 PL12 PN •5:30
9 2 PL12 PN•5:30
Steps 1-4 find player 12 in the penalty list and steps 5-9 change the penalty time.
<PLAYER ! PENALTY !>
<8> (up arrow)
<8> (up arrow)
<ENTER>
<ENTER>
<5>
<3>
<0>
<ENTER>
7-2
Hockey Operation
Page 39

Section 8: Soccer Operation
Refer to the information in Section 3 to start up the console and use the sport insert. Read Section 3
carefully to fully understand the following operation instructions and for MENU KEY operations.
8.1 Sport Insert LL-2269
Reference Drawing: Sport Insert, Soccer Codes 64-68 ............ Drawing A-86109
Team Keys
<C KICKS/SAVES!>
Edits the number of corner kicks/saves
<C KICKS/SAVES +1>
Increments the number of corner kicks/saves by one
<PENALTY>
Edits the number of penalties
<PENALTY +1>
Increments the number of penalties by one
<SHOTS ON GOAL!>
Edits the number of shots on goal
<SHOTS ON GOAL +1>
Increments the number of shots on goal by one
<SCORE!>
Edits the team score
<SCORE +1>
Increments the team score by one
Game Keys
<SET TIME OUT!>
Sets the length of the time-out. The time cannot be set while the clock is running.
<TIME OUT ON/OFF>
Starts and stops the time-out clock
<DIM>
Dims the scoreboard for night viewing. Press this key a second time to return the digits to full
brightness.
<HALF!>
Edits the half number
<HALF +1>
Increments the half number by one
Note: The clock can be set to count up and stop when it reaches the period end time. The menu
key has a <SET PER END> function (refer to Section 3.4) that allows the period end time to be set.
Soccer Operation
8-1
Page 40

Page 41

Section 9: Track/Swimming Operation
Refer to the information in Section 3 to start up the console and use the sport insert. Read Section 3
carefully to fully understand the following operation instructions and for MENU KEY operations.
9.1 Sport Insert LL-2267
Reference Drawing: Insert, Track Score Codes 41-43, 45-47,81 ..... Drawing A-86106
Team Keys
<HOME SCORE!>
Edits the home team score
<GUEST 1 SCORE!>
Edits the score for guest 1
<GUEST 2 SCORE (EVENT)!>
Edits the score for guest 2
<GUEST 3 SCORE (HEAT)!>
Edits the score for guest 3
<SCORE +1>
Increments the score by one
Game Keys
<DIM>
Dims the scoreboard for night viewing. Press this key a second time to return the digits to full
brightness.
<TRAINING MODE!>
Enters the training mode
<RESET!>
Resets the training mode
<PLACE!>
Edits the place
<LANE!>
Edits the lane number
Codes 41-43 are for interfacing to an OmniSport track timer or other timers with OmniSport
protocol. Codes 45-47 are for interfacing to Omega timers with extended OTR-7 protocol. Refer
to Drawings A-93764, A-95152, A-95153 and A-95154 in Appendix A for the different types of
interfacing.
9.2 Sport Insert LL-2372
Reference Drawing: Insert, Swim Multi line, Code 244 .......... Drawing A-100151
Team Keys
<SCORE 1!>
Edits the score 1
<SCORE 1 +1>
Increment the score of score 1 by 1
Track/Swimming Operation
9-1
Page 42

<SCORE 2!>
Edits the score 2
<SCORE 2 +1>
Increments the score of score 2 by 1
<SCORE 3!>
Edits the score 3
<SCORE 3 +1>
Increment the score of score 3 by 1
<SCORE 4>
Edits the score 4
<SCORE 4 +1>
Increments the score of score 4 by 1
<EVENT!>
Edits the event
<EVENT +1>
Increment the event by 1
<HEAT!>
Edits the heat
<HEAT +1>
Increments the heat by 1
<RECORD TIME!>
Edits the record time
<LENGTHS!>
Edits the number of lengths
<LENGTHS +1>
Increments the lengths by 1
<LENGTHS -1>
Decrements the lengths by 1
9.3 Sprint Timing Hardware
Reference Drawing: Setup Sprint Timer Photo Cell/Tape Switch ......Drawing A-72922
The All Sport Sprint Timing Kit includes the following hardware devices:
1. Photo cell with junction box
2. Reflector
3. Tape Switch
4. 100 yards of tape switch cord
5. 20 foot cord to connect the photo cell junction box to the All Sport console or the side line
remote start/stop junction box (refer to Drawing A-72922).
The photo cell has a range of 30 feet with the included reflector. The photo cell is lined up
with the reflector when the LED on the photo cell is off.
9-2
Track/Swimming Operation
Page 43

9.4 Sprint Timing Operation
Install the overlay (LL-2267) onto the All Sport console. Power up the All Sport console and
enter either code 41 or 43. Both codes will work on all Daktronics basketball and football
scoreboards.
After the console is powered up and the code is entered, press <TRAINING MODE><ENTER>. The
console is now in the training mode ready to time sprints. No further operation on the All Sport
console is required. The console is automatically reset when the tape switch is activated (held
down) for three seconds. The entire scoreboard will blank when the timer is reset and ready to
time the sprinter. As soon as the sprinter releases the tape switch, the scoreboard will begin to
display the time. The time will stop when the photo cell beam is broken. To time the next sprinter,
press and hold the tape switch until the scoreboard blanks.
Track/Swimming Operation
9-3
Page 44

Page 45

Section 10: Volleyball Operation
Refer to the information in Section 3 to start up the console and use the sport insert. Read Section 3
carefully to fully understand the following operation instructions and for MENU KEY operations.
10.1 Sport Insert LL-2273
Reference Drawing: Sports Insert, Volleyball Codes 71-73 ........ Drawing A-86113
Team Keys
<TIME OUTS LEFT!>
Edits the number of time outs left for the team
<TIME OUT>
Indicates which team called the time out
<SERVE>
Indicates the team serving
<GAMES WON!>
Edits the number of games the team has won
<GAMES WON +1>
Increments the number of games the team has won by one
<SCORE!>
Edits the team’s score
<SCORE +1>
Increments the team’s score by one
Game Keys
<SET TIME OUT!>
Sets the length of the time out. The time cannot be set while the clock is running
<TIME OUT ON/OFF>
Starts and stops the time-out clock
<GAME!>
Edits the game number
<GAME +1>
Increments the game number by one
Volleyball Operation
10-1
Page 46

Page 47

Section 11: Wrestling Operation
Refer to the information in Section 3 to start up the console and use the sport insert. Read Section 3
carefully to fully understand the following operation instructions and for MENU KEY operations.
11.1 Sport Inserts LL-2275 & LL-2287
Reference Drawings: Sports Insert, Wrestling Codes 51-54, 57 ..... Drawing A-86115
Sports Insert, Wrestling Codes 55, 56 ....... Drawing A-86973
Team Keys
<TEAM SCORE!>
Edits the team score for the team
<TEAM SCORE +1>
Increments the team score for the team by one
<MATCH SCORE!>
Edits the match score for the team
<MATCH SCORE +1>
Increments the match score for the team by one
<START INJURY TIME>
Starts injury time - can only be started if period clock is stopped
<STOP INJURY TIME>
Stops injury time - injury time must be stopped before period clock can be
started
<INJURY TIME!>
Edits injury time
<START BLOOD TIME>
Starts blood time - can only be started if period clock is stopped
<STOP BLOOD TIME>
Stops blood time - injury time must be stopped before period can be started
<BLOOD TIME!>
Edits blood time
Game Keys
<MATCH!>
Edits the match number
<RESET MATCH!>
Resets the match number to zero, period time to default period time, blood and injury times to
default times, and match scores to zero. When in code 57, this key will return the scoreboard
to show the team score instead of advantage time.
<PERIOD!>
Edits the period number
<PERIOD +1>
Increments the period number by one
<SET ADVANTAGE TIME!>
Sets the advantage time. When in code 57, this key will switch the scoreboard to show
advantage time inplace of the team score.
Wrestling Operation
11-1
Page 48

<HOME (GREEN) ADVANTAGE>
Indicates the HOME (green) advantage and starts the advantage timer. When in code 57, this
key will switch the scoreboard to show advantage time inplace of the team score.
<GUEST (RED) ADVANTAGE>
Indicates the GUEST (red) advantage and starts the advantage timer. When in code 57, this
key will switch the scoreboard to show advantage time inplace of the team score.
<STOP ADVANTAGE CLOCK>
Stops the advantage timer
<SET INJURY TIME DEFAULT!>
Sets the default injury
<SET BLOOD TIME DEFAULT!>
Sets the default blood time
<MENU KEY>
Pressing the menu key and scrolling down to the selection of “SHOW ADV TIME Y/N” will
allow you to select between team score (press no) or advantage time (press yes). This is only
available on code 57.
11-2
Wrestling Operation
Page 49

Section 12: Timing/Scoring Operation
Refer to the information in Section 3 to start up the console and use the sport insert. Read Section 3
carefully to fully understand the following operation instructions and for MENU KEY operations.
12.1 Sport Insert LL-2271
Reference Drawing: Sport Insert;4-Digit Timing/Scoring Code 10 .... Drawing A-86111
Team Keys
<SCORE!>
Edits the team score
<SCORE +1>
Increments the team score by one
Game Keys
<DISPLAY TIME>
Displays the time on the display
<DISPLAY SCORE>
Displays the score on the display
<PERIOD!>
Edits the period
<PERIOD +1>
Increments the period by one
12.2 Sport Insert LL-2270
Reference Drawing: Sport Insert, 2-Digit Timing Code 82 .......... Drawing A-86110
Game Keys
<DIM>
Dims the scoreboard for night viewing. Press this key a second time to return the digits to full
brightness
<SET RESET!>
Sets the reset time value
<SET OUT OF BOUNDS!>
Sets the out-of-bounds time value
<RESET>
Resets the timer to the reset time
<OUT OF BOUNDS>
Resets the timer to the out-of-bounds time
Timing/Scoring
Operation 12-1
Page 50

Page 51

Section 13: Team Name Operation
Refer to the information in Section 3 to start up the console and use the sport insert. Read Section 3
carefully to fully understand the following operation instructions and for MENU KEY operations.
13.1 Sport Insert LL-2276
Reference Drawing: Sport Insert, Team Name Code 98 ........... Drawing A-86116
The team name insert allows the console to be used as a keyboard to have team names appear on the
team name message centers of the scoreboard. It can also be used to store and display various
messages. Be sure the team names are not too long for the display.
Small 32-column displays are adequate for a few initials or a short name. Large 48-column displays
can hold longer names. The particular combination of letters affects how many characters fit. For
example, the letter “I” is only three columns wide while an “M” or “W” are five columns wide.
Note: When operating in the team name mode, commands and prompts appear on the message centers
of the scoreboard only, not the LCD.
13.2 Entering Team Name Mode
There are two ways of entering Team Name Mode. Code 98 can be entered when the console is
first powered up to enter the Team Name Mode. This mode can also be selected from the <MENU>
key while in a specific sport mode. If this method is used, exiting from the Team Name Mode will
return the operator to the sport mode with the current game retained in memory.
13.3 Selecting Sign Size
When powered up, the team name message center defaults to a sign size of 48 columns (3
lampbanks). If this is the correct size, the team names can automatically be entered.
If the sign size needs to be changed, enter one of the following combinations:
Sign Size Keys
16 columns (1 lampbank)
32 columns (2 lampbanks)
48 columns (3 lampbanks)
64 columns (4 lampbanks)
Note: Any information visible on the display will be deleted when the sign size is changed.
<ESC><1>
<ESC><2>
<ESC><3>
<ESC><4>
Team Name
Operation 13-1
Page 52

13.4 Selecting Character Width
The characters in the display may be single stroke or double stroke. Double stroke characters are
wider then single stroke characters, with vertical strokes two columns wide. Double stroke
characters should be used when entering team abbreviations, single stroke characters for full team
names. Press <DOUBLE> before entering each name to create double stroke characters. Press
<SINGLE> to return to single stroke. If neither key is pressed, the characters will be single stroke.
13.5 Selecting Character Font
There are four character fonts available for the team name message center.
1. 7 high single stroke font
2. 7 high double stroke font
3. 8 high single stroke font
4. 8 high double stroke font
To choose a 7 high font (letters 7 dots high), press <ESC><7>. To choose an 8 high font, press
<ESC>< 8>. The fonts default to single stroke. Refer to Section 13.4 to choose double stroke.
13.6 Selecting Bright or Dim Mode
The team name message centers can be operated in either bright (default) or dim mode. The bright
mode should be used for indoor applications or during the day for outdoor applications. The dim
mode should be used at night for outdoor applications.
To select the dim mode, press <ESC><D>; to select the bright mode, press <ESC><B>.
13.7 Starting the Lamp Test
The team name message centers include a lamp test to assist in finding faulty lamps. This test
alternately activates the top four rows and the bottom four rows of the display at six second
intervals.
To start the lamp test, press <ESC><T>. Press any key to end the test.
Note: The lamp test will go through one more complete rotation before exiting.
13.8 Team Name Operation Using Current Loop Boards
These operation instructions are for displays using team name message centers with current loop
boards. Section 13.9 covers team name message centers with a Venus 100 board.
®
Each team name is entered as a separate message. Either the name for the left side or right side of
the scoreboard may be entered first by pressing <LEFT> or <RIGHT> before entering the name.
Press <ENTER> after each name. To clear the display, press <ENTER> and then <LEFT> or
<RIGHT>.
Team Name
Operation13-2
Page 53

Example: Enter SDSU in double stroke on the left side of the display and USD in single stroke on
the right side.
1. Press <ESC>
2. Press <LEFT>
3. Type SDSU
4. Press <ENTER>
5. Press <SINGLE>
6. Press <RIGHT>
7. Type USD
8. Press <ENTER>
If the code number 98 was not used to enter the team name mode (and <MENU> was used instead
while in a sport code) press <EXIT> to return to the sport. If the code number was used, select
New Code from the menu to enter the specific sport code (refer to Section 3.4).
13.9 Team Name Operation Using A Venus 100 Board
These operation instructions are for displays with team name message centers using a Venus 100
board. The previous section (13.8) covers team name message centers with current loop boards.
Each team name is entered as a separate message. Type in the first team name and press <ENTER>.
The first team name is stored as message number one. Type the second team name and press
<ENTER>. The second team name is stored as message number two. The characters for each
name appear on the left display as they are entered.
To display the name, press <POST>, side (<LEFT> or <RIGHT>), the message number, then
<ENTER>. To get out of the post mode and return to the edit mode, press <ESC> (which will also
return the operator to message number one). Up to 99 messages can be saved. To display a saved
message, press <POST>, <LEFT> or <RIGHT>, the message number, and <ENTER>. To scroll
through the messages from the edit mode, press <ENTER> to view the next message or
<BACKSPACE> to review the previous message. To verify the message number of the message
being viewed on the LCD, press <MESSAGE #> and the message number will be displayed on the left
side of the scoreboard.
Caution: If there are 5 messages in the console and a new message is entered while viewing
message #4 on the LCD, the original message #4 will be overwritten. Remember, the message
number always goes back to one every time the edit mode is entered.
Example: Enter SDSU in double stroke on the left side of the display and USD in single stroke on
the right side.
1. Press <DOUBLE> and type in SDSU
2. Press <ENTER>
3. Press <SINGLE> and type in USD
4. Press <ENTER>
5. Press <POST>, <LEFT>, <1>, <ENTER>
6. Press <POST>, <RIGHT>, <2>, <ENTER>
Team Name
Operation 13-3
Page 54

Page 55

Section 14: Message Center Operation
Refer to the information in Section 3 to start up the console and use the sport insert. Read Section 3
carefully to fully understand the following operator instructions and for MENU KEY operations.
14.1 Sport Insert LL-2302
Reference Drawing: Insert, Message Controller Code 102 ........ Drawing A-91836
The message center insert resembles a keyboard. The insert is used to create
messages/sequences or to access predefined messages/sequences that are stored in the
console’s memory. The insert allows unique messages to be created and linked together
to create sequences.
Message Center Definitions
Message Center: Refers to the sign that displays messages; may also be called a display.
Console: The console controls what is displayed on the Message Center. Messages and
sequences are created on the console.
Message: A message is a word or group of words in a frame; for example, “GO TEAM!” A
list of predefined messages is located on the left side of the insert. Predefined messages are
stored on 51-70. User-defined messages can be stored on 1-50.
Sequence: Several frames of messages make up a sequence. User-defined sequences can
combine up to seven messages together to make one sequence. A list of predefined
sequences is located at the top of the insert. Predefined sequences are stored on 11-20.
User-defined sequences are stored on 1-10.
Keypad Definitions
<MESSAGE EDIT!>: Used to create or edit messages
<SEQUENCE EDIT!>: Used to create or edit a sequence
<SINGLE>: Selects a single-stroke font within a message
<DOUBLE>: Selects a double-stroke font within a message
<LINK MESSAGE!>: Allows several messages to be displayed in series. This key allows up to
ten messages to run at any one time.
<LINK SEQUENCE!>: Allows several sequences to be displayed in series. The <LINK
SEQUENCE !> key allows up to ten sequences to run at any one time.
<EFFECT SELECT>: Used to select a variety of creative messages and sequences. The <EFFECT
SELECT> key selects special effects, such as messages scrolling left, right, up, or down.
<DISPLAY MESSAGE!>: Allows a message to run on the Message Center
<DISPLAY SEQUENCE!>: Allows a sequence to run on the Message Center
<STOP>: Used to blank the display on the Message Center
Message Center
Operation 14-1
Page 56

14.2 Message and Sequence Data
The following information designates where user-defined messages and sequences
can be stored on the Message Center console. The predefined messages and sequences
stored on the console are also listed.
User-defined sequences: 1-10
Predefined sequences: 11-20 (sequences stored on console are listed below)
11 STOMP EM
12 VICTORY
13 GREAT PLAY
14 BALLOONS
15 TRUMPET
16 TIME OUT
17 TRAVELING
18 BUCKLE UP
19 DEFENSE
20 CONCESSIONS
User-defined messages: 1-50
Predefined messages: 51-70 (messages stored on console are listed below)
51 TWO POINTS 61 ONE SHOT
52 THREE POINTS 62 TWO SHOTS
53 DEFENSE 63 THREE SHOTS
54 TRAVELING 64 NICE PASS
55 CHARGING 65 FAST BREAK
56 3 SECONDS 66 NICE REBOUND
57 FOULED 67 NICE STEAL
58 NICE SHOT 68 TEAM WORK
59 TIME OUT 69 GOAL
60 SWISH 70 SLAPSHOT
Messages
A message is a single frame on the message center that displays one message (refer to
Example 14.2a). The length of message that can be displayed depends on display size and font
width as shown below.
Display Size Single Width Double Width
64 column 12 characters 10 characters
80 column 16 characters 13 characters
96 column 19 characters 16 characters
All predefined messages and sequences fit on all three display sizes. User-defined
messages should be entered and verified on the display before a game to ensure they fit
the display properly.
Sequences
Message Center
Operation14-2
Page 57

A sequence is a series of messages displayed together so that they are shown one after
another on the message center (refer to Example 14.2a). User-defined sequences can
combine up to 7 messages together into one sequence. Each message can have its own effect
and hold time.
The ten predefined sequences (11-20) listed on the insert are graphic animations.
Example 14.2a: Each frame represents one message. Multiple frames saved together
are a sequence.
WELCOME TO THE BIG ARENA! LETS HEAR IT
Frame 1 Frame 2 Frame 3
FANS!! SUPPORT THE BEARS!!!
Frame 4 Frame 5 Frame 6
14.3 Creating and Editing Messages
Messages can appear on the display in several different styles, called effects (refer to Section
14.9).
To create a message:
1. Press <MESSAGE EDIT>
2. Enter a number for the message (1-50). The console stores the new message under this
number. Press <ENTER>.
3. Type in the message. Press the shift key once to use a character in the upper left corner
of a key. The shift key has to be pressed once each time a character in the upper left
corner of a key is needed.
4. The left and right arrow keys can be used to move the cursor position in the message.
The up and down arrow keys can be used to scroll through the message.
5. If the message is to use single stroke or double stroke fonts, the <SINGLE> and
<DOUBLE> keys select that option. The font selected is shown on the LCD as SNG or
DBL.
6. When finished, press <ENTER>.
To edit a message:
1. Press <MESSAGE EDIT>
2. Enter the number of the message to be edited (1-50) and press <ENTER>.
3. Make any desired changes.
4. When finished, press <ENTER>.
To erase all messages:
1. Press the <MENU> key and use the menu down arrow key to select the option ERASE
MESG Y/N. Press the <YES> key to erase all user defined messages.
14.4 Displaying A Message
Message Center
Operation 14-3
Page 58

Once a message has been created, it can be displayed on the message center. In addition to the
50 user-defined messages (1-50), there are also 20 predefined messages (51-70) that can be
displayed.
There are two keys used to display messages, <DISPLAY MESSAGE> and <LINK MESSAGE>.
When switching between the <DISPLAY MESSAGE> and <LINK MESSAGE> keys the <STOP> key
should be pressed to clear the display.
The <DISPLAY MESSAGE> key should be used when only one message displayed at a time is
desired. This key clears the previous message and starts the next message selected. The <LINK
MESSAGE> key should be used when two or more messages are to be displayed together (one
after another). This key allows a quick display of several messages without editing a sequence.
The <DISPLAY MESSAGE> key displays one message at a time.
To display a message:
1. Press <DISPLAY MESSAGE>
2. Use the <EFFECT SELECT> key to choose the effect that complements the
message (refer to Section 14.9)
3. Enter the number of the message to be displayed and press <ENTER>.
4. Repeat steps 1-3 to display a new message.
5. To end the message on display, press <STOP>.
14.5 Linking Messages
The <LINK MESSAGE> key allows messages to be displayed one after another on the display. Up
to ten messages can be run at any one time. Refer to Section 14.4 for further explanation of the
<LINK MESSAGE> and <DISPLAY MESSAGE> keys.
To link messages:
1. Press <LINK MESSAGE>
2. Enter the number of the message to be linked and press <ENTER>.
3. Repeat steps 1 and 2 until the desired number of messages are linked together.
4. The <STOP> key will blank the display and allow you to link new messages.
14.6 Creating and Editing Sequences
A sequence is a series of messages displayed together so that they are shown one after another on
the message center. Before a sequence can be created, the messages to be displayed together
must be created (refer to Section 14.3). Hold time, effect, and frame number can be customized
for each message to appear in the sequence
Message Center
Operation14-4
Page 59

Example 14.6a The Sequence Edit screen.
To create a sequence:
1. Press <SEQUENCE EDIT>.
2. Enter a number for the sequence (1-10). The console stores the new sequence under
this number. Press <ENTER>.
3. Use the left and right arrow keys to select the message number and/or hold time.
Message Number (M#): Use the number keys to set the message number.
Hold Time (TM): Set the desired value using the number keys. The hold time is shown
in tenths of a second. If the hold time is set to 15, the length of time the message will be
displayed is 1.5 seconds.
Effect (EF): Use the <EFFECT SELECT> key to set the desired effect. Continue to press
<EFFECT SELECT> to scroll through the effect options (refer to Section 14.9).
Frame Number (F): Use the up/down arrow keys to change frames in the sequence.
Any frame that has the message number set to zero is the end of the sequence.
4. Repeat Step 3 until all the desired messages have been entered.
5. When the sequence is finished press <ENTER>.
To edit a sequence:
1. Press <SEQUENCE EDIT>
2. Enter the number of the sequence (1 through 10). Press <ENTER>.
3. Use the left/right arrow menu keys to select the message number and/or hold time.
Message Number (M#): Use the number keys to set the message number.
Hold Time (TM): Set the desired value using the number keys. The hold time is shown
in tenths of a second (15 = 1.5 seconds).
Effect (EF): Use the <EFFECT SELECT> key to set the desired effect. Continue to press
<EFFECT SELECT> to scroll through the effect options (refer to Section 14.9).
Frame Number (F): Use the up/down arrow keys to change frames in the sequence.
Any frame that has the message number set to zero is the end of the sequence.
4. Repeat Step 3 until all messages have been edited.
5. When all changes within the sequence have been made, press <ENTER>.
14.7 Displaying A Sequence
Once a sequence has been created (refer to Section 14.6), it can be displayed on the message
center. Ten predefined sequences (11-20) are available. Up to 10 user-defined sequences can be
stored on the console. Make sure the controller is set to the correct sign size before displaying a
sequence (refer to Section 14.10).
Message Center
Operation 14-5
Page 60

There are two keys used to display sequences, <DISPLAY SEQUENCE> and <LINK SEQUENCE>.
When switching between the <DISPLAY SEQUENCE> and <LINK SEQUENCE> keys, the <STOP>
key should be pressed to clear the display.
The <DISPLAY SEQUENCE> key should be used when only one sequence is to be displayed at a
time. This key clears the previous sequence and starts the next sequence selected. The <LINK
SEQUENCE> key should be used when two or more sequences are to be displayed together (one
after another).
The <DISPLAY SEQUENCE> key displays one sequence at a time.
To display a sequence:
1. Press <DISPLAY SEQUENCE>:
2. Enter the number of the sequence to be displayed and press <ENTER>.
3. Repeat steps 1 and 2 when a new sequence is needed.
4. To end the sequence on display, press <STOP>.
14.8 Linking Sequences
The <LINK SEQUENCE> key allows sequences to be displayed one after another on the display.
The <LINK SEQUENCE> key allows up to ten sequences to run at any one time. Refer to Section
14.7 for further explanation of the <LINK SEQUENCE> and <DISPLAY SEQUENCE>: keys.
To link sequences:
1. Press <LINK SEQUENCE>.
2. Enter the number of the sequence to be linked and press <ENTER>.
3. Repeat steps 1 and 2 until the desired number of sequences are linked together.
4. The <STOP> key will blank the display and allow you to link new sequences.
14.9 Effects
Effects are used to display messages more effectively on a message center. Refer to the
following table for a description of each of the effects.
Effect Description
CH Displays message instantly
SL Message scrolls in from right to left
SR Message scrolls in from left to right
RU Message rolls up from bottom
RD Message rolls down from top
RR Message rolls in from right on 5 column boundaries
RL Message rolls in from left on 5 column boundaries
TR Message scrolls on from right to left
To select effects:
1. While in either the Message Edit or Sequence Edit mode press <EFFECT SELECT>
2. Continue to press <EFFECT SELECT> to scroll through the effect options.
3. When the desired effect is shown on the screen it is selected.
Message Center
Operation14-6
Page 61

14.10 Configure Sign Size
Press the <MENU> key and use the menu down arrow key to select the option SELECT
SIZE Y/N. Press the <YES> key to configure the sign size. Select the appropriate sign size
by pressing any menu arrow key. When the correct size is shown on the LCD, press the
<ENTER> key to select it. The All Sport 4000 control console must have the correct sign size
selected for animations to be displayed.
The configure sign size function only needs to be set when the MDC control board is installed or
replaced. The configure sign size function should be used if messages do not appear centered on
the display.
14.11 Display Test Sequences
There are two sequences available to test the pixels on the display. Sequence 21 is a moving
row/column pattern, and sequence 22 is an all-on pattern. Refer to Section 14.7 to display either
of these sequences for checking display operation.
Message Center
Operation 14-7
Page 62

Page 63

Section 15: Smart Console Operation
Refer to the information in Section 3 to start up the console and use the sport insert. Read Section 3
carefully to fully understand the following operator instructions and for MENU KEY operations.
15.1 Sport Insert LL-2333
Reference Drawing: Smart Console Codes 111, 112, 113&114 .... Drawing A-93730
The smart console is used as the digit controller for the main clock, shot clock, or delay-of-game
clock. The Smart Console mode on the All Sport 4000 is used in conjunction with a ProSport
controller, in which the ProSport controls all other game functions. The smart console sends the
timing information to the ProSport controller as RTD information.
Timer Keys
<TIMER START>
Starts the timer clock
<TIMER STOP>
Stops the timer clock
<TIMER RESET 1>
Resets the timer clock to reset value 1. The timer will not resume counting until the key
is released
<TIMER RESET 2>
Resets the timer clock to reset value 2. The timer will not resume counting until the key
is released
<SET TIMER TIME!>
Sets the current value of the timer clock
<SET RESET TIME 1!>
Sets the value for Reset Time 1
<SET RESET TIME 2!>
Sets the value for Reset Time 2
<DIM>
Dims the scoreboard for night viewing. Pressing this key a second time returns the
digits to full brightness
®
Smart Console
Operation 15-1
Page 64

Page 65

Section 16: Pitch & Speed Operation
Refer to the information in Section 3 to start up the console and use the sport insert. Read Section 3
carefully to fully understand the following operator instructions and for MENU KEY operations.
16.1 Sport Insert LL-2332
Reference Drawing: Insert, Pitch and Speed Codes 191 & 192 .... Drawing A-90890
The Pitch and Speed Operation interfaces with a JUGS radar gun and displays the speed and
pitch type on a matrix display, or just the speed on a fixed digit display. It can be operated in
manual control (Code 191), where the pitch type is displayed when the pitch type key is pressed,
or it can operate automatically (Code 192) where the speed is displayed when the speed data is
received from the radar gun.
The STALKER radar gun can be interfaced to using code 193 for manual or code 194 for
automatic.
Key Functions
<PITCH KEYS>
FAST BALL, CURVE BALL, CHANGE UP etc. When the pitch type is pressed, the
pitch type and the speed are sent from the console as Real Time Data (RTD)
information.
<DISPLAY SPEED>
Sends the speed to the display as speed only (blank frame)
<BLANK DISPLAY>
This key blanks the speed and sends the blank frame for display
<BLANK TIME!>
Edits the time until speed and pitch are blanked from the display. If the blank time is set
to zero the console will not blank the speed and pitch type.
<SPEED!>
Edits the speed value that is to be displayed
<SHOW MPH>
Displays the speed in MPH and stop cycling speed. This is for fixed digit displays.
<SHOW KPH>
Displays the speed in KPH and stop cycling speed. This is for fixed digit displays.
<CYCLE MPH/KPH>
When speed is displayed cycle between MPH 1st and KPH 2nd at the cycle time rate.
This is for fixed digit displays.
<CYCLE KHP/MPH>
When speed is displayed cycle between KPH 1st and MPH 2nd at the cycle time rate.
This is for fixed digit displays.
<CYCLE TIME!>
Sets the time for the cycle rate in seconds.
Pitch & Speed Operation 16-1
Page 66

16.2 RTD Item Numbers
The RTD items and their numbers are shown below. The speed and pitch type are included in
the RTD information.
Item # Speed
1 MPH x 100
2 MPH x 10
3 MPH x 1
4-19 Pitch type text - 16 characters
20 KPH x 100
21 KPH x 10
22 KPH x 1
16.3 Frame Number And Pitch Types
The frame number sent with each RTD frame also represents the pitch type. The pitch types for
each frame number are shown below. Port configuration: 1,200 Baud Rate, 8 Data Bits, and No
Parity.
Frame # Pitch Type
1 CURVE BALL
2 SLIDER
3 SINKER
4 CHANGE UP
5 KNUCKLE BALL
6 FAST BALL
7 SPLIT FINGER
8 SCREW BALL
9 BREAKING BALL
10 (BLANK)
11 OTHER
12 USER 1
13 OFF SPEED
14 USER 2
15 USER 3
16 FORK BALL
17 USER 4
18 PALM BALL
16.4 RTD Hints For Venus Series Sequences
When creating sequences for select frame applications (especially with speed of a pitch type
display), you can utilize “include” frames within the sequence to show a brief animation followed
by the speed of the pitch for each type of pitch. For example, if a curve ball is selected on the All
Sport console, it selects the first frame for the sequence. If this is an “include” frame, the entire
include frame is run. This can be duplicated for other frames for other types of pitches. Review
the Venus series operator’s manual for further discussion on Include Frame Creation and RTD
frame setup.
Pitch & Speed
Operation16-2
Page 67

Section 17: Tae Kwon Do
Refer to the information in Section 3 to start up the console and use the sport insert. Read Section 3
carefully to fully understand the following operator instructions and for MENU KEY operations.
17.1 Sport Insert LL-2344
Reference Drawing: Insert, Tae Kwon Do Code 283 .............. Drawing A-96889
The code for Tae Kwon Do is 283.
Competitor Keys
<D+1>, <D-1>
The “D” keys are used to increment or decrement the point score. To increment the score
by one, press the <D+1> key for the appropriate competitor. Use the <D-1> key to
decrement the score by one.
<G+1>, <G-1>
The “G” keys (Gamjeom) are for full point deduction penalties. To increment the penalty
count by one, press the <G+1> key for the appropriate competitor. Use the <G-1> key to
decrement the penalty by one.
<K+1>, <K-1>
The “K” keys (Kyong-go) are for ½ point deduction warnings. To increment the warning
count by one, press the <K+1> key. Use the <K-1> key to decrement the warning count by
one.
<WIN>
Pressing the <WIN> key will light the win indicator for the appropriate competitor.
<T>
Pressing the <T> key will light the check indicator for the appropriate competitor.
Match Keys
<TOTAL ON/OFF>
<WEIGHT CLASS!>
<ROUND LENGTH !>
<REST LENGTH!>
<ROUND NO.!>
Tae Kwon Do
Pressing this key will first set the display of total points ON, so the score will show on the
display. Pressing the key again will set the display of total points OFF. The total points for
each competitor are calculated from scoring for all three rounds.
The total score formula is:
D (Points) - G (Penalties) - .5K (Warnings) = Total Score.
This key is used to show the weight class on the display.
This key is used to set the length of the round.
This key is used to set the length of the rest period.
This key can be used to change the round number. The round number will be
automatically incremented at the end of the rest period.
17-1
Page 68

Automatic Timing
The console can be set to do automatic timing or manual timing. When set to automatic
timing, the console will count down the round period time and sound the horn when the
clock reaches 0:00. The console will then reset and begin counting down the rest period
time. When it reaches 0:00, the horn will again sound. The console will reset the time for
the next round and automatically start counting down.
If it is set for manual timing, the clock will stop at the end of each rest interval and wait
for the <START> key to be pressed.
Automatic or manual timing is selected by pressing the <MENU> key and pressing the down
arrow key until AUTO TIMING Y/N is shown on the LCD. Press <Y> for automatic or
<N> for manual.
17-2
Tae Kwon Do
Page 69

Section 18: Judo
Refer to the information in Section 3 to start up the console and use the sport insert. Read Section 3
carefully to fully understand the following operator instructions and for MENU KEY operations.
The Osaekomi timer will continue to count up after the match time reaches zero. It will continue to count
until the maximum time is reached, or the <SONO-MAMA> key or <TOKETA> key is pressed. The
Osaekomi timer will resume by pressing the <YOSHI> key if the timer was stopped by the <SONO-
MAMA> key.
18.1 Sports Insert LL-2346
Reference Drawing: Insert, Judo Code 281 ..................... Drawing A-96891
The code for Judo is 281.
<RED OSAEKOMI>
Pressing this key will start the Osaekomi timer and display it on the Red side of the scoreboard.
As the Osaekomi timer counts up, it will check to see if the Red opponent has been awarded a
Wazaari and/or the White opponent has been assessed a Keikoku penalty. If one or both of
these conditions occur, the Osaekomi timer will stop at twenty (20) seconds and sound the
horn. If neither of these conditions occur, the Osaekomi timer will stop at twenty-five (25)
seconds and sound the horn. If this key is pressed while the Osaekomi timer is running and
displayed on the White side of the scoreboard, the Osaekomi timer value will be copied to the
Red opponent’s side of the scoreboard.
<SET RED OSAEKOMI!>
Pressing this key when the Osaekomi and Match timers are stopped allows you to enter a new
Osaekomi time for the Red competitor. Enter the new time in minutes and seconds on the
number pad and press the <ENTER> key.
<WHITE OSAEKOMI>
Pressing this key will start the Osaekomi timer and display it on the White side of the
scoreboard. As the Osaekomi timer counts up, it will check to see if the White opponent has
been awarded a Wazaari and/or the Red opponent has been assessed a Keikoku penalty. If one
or both of these conditions occur, the Osaekomi timer will stop at twenty (20) seconds and
sound the horn. If neither of these conditions occur, the Osaekomi timer will stop at twentyfive (25) seconds and sound the horn. If this key is pressed while the Osaekomi timer is
running and displayed on the Red side of the scoreboard, the Osaekomi timer value will be
copied to the White opponent’s side of the scoreboard.
<SET WHITE OSAEKOMI!>
Pressing this key when the Osaekomi and Match timers are stopped will allow you to enter a
new Osaekomi time for the White competitor. Enter the new time in minutes and seconds on
the number pad and press the <ENTER> key.
<YOSHI>
Pressing this key will restart the Osaekomi and Match timers if they were previously running
and then stopped by the <SONO-MAMA> key. They will resume counting from the previous
values displayed on the scoreboard when both timers stopped.
<SONO-MAMA>
Pressing this key will stop the Osaekomi and Match timers, but will not allow the <RED
OSAEKOMI> or <WHITE OSAEKOMI> keys to restart the Osaekomi timer from zero (0). The
Osaekomi and Match timers will hold their values until they are resumed by pressing the
Judo
18-1
Page 70

<YOSHI> key.
<TOKETA>
Pressing this key at any time during the Osaekomi timer count stops the Osaekomi time
displayed on the scoreboard. The Osaekomi timer will start at zero (0) the next time either the
<RED OSAEKOMI> or <WHITE OSAEKOMI> key is pressed.
<CLEAR>
Pressing this key clears the Osaekomi timer count from both sides of the scoreboard. The
Osaekomi timer must be stopped by pressing the <TOKETA> key before this key will work.
<START>
Pressing this key will start only the Match time count down.
<STOP>
Pressing this key will stop only the Match time from counting down.
<SET MATCH TIME!>
Pressing this key when the Match time is stopped will allow you to enter a new match time.
Enter the new time in minutes and seconds on the number pad and then press the <ENTER> key.
<MANUAL HORN>
Pressing this key will cause the horn to sound as long as the key is pressed.
<WIN>
Pressing the Red or White key will light the corresponding Winner indicator on the scoreboard
and clear the opposing Winner indicator on the scoreboard.
<IPPON>
Pressing the Red or White key will light the corresponding Ippon and Winner indicators on the
scoreboard and clear the opposing Ippon and Winner indicators on the scoreboard.
<MEDICAL EXAM>
This key controls the physician visit indicators on the scoreboard. Pressing the Red or White
key once will light the first indicator for the corresponding side. Pressing the same key again
will light the second indicator. Pressing the same key a third time will turn both indicators off.
<KEIKOKU>
Pressing the Red or White key will light the corresponding Keikoku penalty indicator on the
scoreboard, increment the opponent’s Wazaari by one, and display the new value on the
scoreboard. Pressing the same key a second time will clear the corresponding Keikoku penalty
indicator from the scoreboard, decrement the opponent’s Wazaari by one, and display the new
value on the scoreboard.
If the same color opponent has a lesser penalty activated when the Red or White Keikoku
penalty is assessed, the lesser penalty indicator will be cleared from the scoreboard and the
opponent’s corresponding score will decrement by one.
<WAZAARI +1>
Pressing the Red or White key will increment the corresponding Wazaari by one and display
the new value on the scoreboard.
<WAZAARI -1>
Pressing the Red or White key will decrement the corresponding Wazaari by one and display
the new value on the scoreboard.
<CHUI>
Pressing the Red or White key will light the corresponding Chui penalty indicator on the
scoreboard, increment the opponent’s Yuko by one, and display the new value on the
scoreboard. Pressing the same key a second time will clear the corresponding Chui penalty
indicator from the scoreboard, decrement the opponent’s Yuko by one, and display the new
value on the scoreboard. If the same color opponent has a lesser penalty already activated
when the Red or White Chui penalty is assessed, the lesser penalty indicator will be cleared on
the scoreboard, and the opponent’s corresponding score will decrement by one.
<YUKO+1>
Pressing the Red or White key will increment the corresponding Yuko by one and display the
new value on the scoreboard.
18-2
Judo
Page 71

<YUKO-1>
Pressing the Red or White key will decrement the corresponding Yuko by one and display the
new value on the scoreboard.
<SHIDO>
Pressing the Red or White key will light the corresponding Shido penalty indicator on the
scoreboard, increment the opponent’s Koka by one, and display the new value on the
scoreboard. Pressing the same key a second time will clear the corresponding Shido penalty
indicator from the scoreboard, decrement the opponent’s Koka by one, and display the new
value on the scoreboard.
<KOKA+1>
Pressing the Red or White key will increment the corresponding Koka by one and display the
new value on the scoreboard.
<KOKA-1>
Pressing the Red or White key will decrement the corresponding Koka by one and display the
new value on the scoreboard.
<RESET>
Pressing this key and the <ENTER> key will set all scores to zero and set the penalty, Ippon,
Winner, and Medical lights off.
Judo
18-3
Page 72

Page 73

Section 19: Karate
Refer to the information in Section 3 to start up the console and use the sport insert. Read Section 3
carefully to fully understand the following operator instructions and for MENU KEY operations.
19.1 Sports Insert LL-2345
Reference Drawing: Insert, Karate Code 282 .................... Drawing A-96890
The code for Karate is 282.
<W+1>, <W-1>
The “W” keys are used to increment or decrement the W (Wazaari) indicator. To increment the
indicator by one, press the <W+1> key for the appropriate competitor (Red or White). Use the <W-
1> key to decrement the indicator by one.
<H+1>, <H-1>
The “H” keys are used to increment or decrement the H (Hansoku) indicator. To increment the
indicator by one, press the <H+1> key for the appropriate competitor (Red or White). Use the
<H-1> key to decrement the indicator by one.
<M+1>, <M-1>
The “M” keys are used to increment or decrement the M (Mubobi) indicator. To increment the
indicator by one, press the <M+1> key for the appropriate competitor (Red or White). Use the
<M-1> key to decrement the indicator by one.
<J+1>, <J-1>
The “J” keys are used to increment or decrement the J (Jogai) indicator. To increment the
indicator by one, press the <J+1> key for the appropriate competitor (Red or White). Use the
<J-1> key to decrement the indicator by one.
<WIN>
Pressing the <WIN> key will light the win indicator for the appropriate competitor.
Karate
19-1
Page 74

Page 75

Section 20: Boxing
Refer to the information in Section 3 to start up the console and use the sport insert. Read Section 3
carefully to fully understand the following operator instructions and for MENU KEY operations.
20.1 Sports Insert LL-2347
Reference Drawing: Insert, Boxing Code 291 ................... Drawing A-96892
The code for boxing is 291.
<SET ROUND TIME!>
Edits the length of round time
<SET REST TIME!>
Edits the rest time
<ROUND NUMBER!>
Edits round number. The round number will be automatically incremented at the end of the rest
period.
<ROUND NUMBER +1>
Increments the round number by one
<MAXIMUM ROUND NUMBER!>
Edits the maximum number of rounds. The rounds will be automatically incremented up to this
number.
Automatic Timing
The console can be set to do automatic or manual timing. When set to automatic timing, the
console will count down the round time and sound the horn when the clock reaches 0:00. The
console will then reset and begin counting down the rest time. When it reaches 0:00, the horn will
sound again. The console will reset the time for the next round and automatically start counting
down.
If it is set for manual timing, the clock will stop at the end of each rest interval and wait for the
<START> key to be pressed.
Select automatic or manual timing by pressing the <MENU> key and pressing the down arrow key
until AUTO TIMING Y/N is shown on the LCD. Press <Y> for automatic or <N> for manual.
Boxing
20-1
Page 76

Page 77

Section 21: Photo Finish Interface
Refer to the information in Section 3 to start up the console and use the sport insert. Read Section 3
carefully to fully understand the following operator instructions and for MENU KEY operations.
21.1 Track Mode
There is no insert for the track mode. The code is 241.
The track mode is an interface to the photo finish timer. The All Sport console receives running
time information from the photo finish timer and displays it on a running time display. The All
Sport also re-sends the running time data out for use by a Venus controller.
The interface cable (0A-1065-0160) is used as shown below:
Connector Function
25 Pin D w/ 3 Cables Connects to All Sport
9 Pin D Connects to Photo Finish COM Port
25 Pin D RTD to Venus Controller
16 Pin D Output 1 (1,2) Time of Day
Output 2 (3,4) Running Time
Output 3 (5,6) TOD/Running Time
Output 4 (7,8) RTD
21.2 Insert LL-2350 for Soccer, Standard RTD
Configuration for soccer mode: Baud Rate 9,600, 8 Data Bits, and No Parity.
Reference Drawing: Insert, Soccer RTD, Code 242 ............. Drawing A-97142
Team Keys
<TEAM FOULS!>
Edits the number of team fouls
<OPTION NO. 1 !>
Edits the number for the first option
<OPTION NO. 2 !>
Edits the number for the second option
<TEAM FOULS +1>
Increments the number of team fouls by one
<OPTION NO. 1 +1 !>
Increments the first option by one
<OPTION NO. 2 +1>
Increments the second option by one
<SCORE!>
Edits the team score
<SCORE +1>
Increments the team score by one
Photo Finish Interface 21-1
Page 78

<SHOTS ON GOAL!>
Edits the shots on goal
<SHOTS ON GOAL +1>
Increments the shots on goal by one
<CORNER KICKS!>
Edits the corner kicks
<CORNER KICKS +1>
Increments the corner kicks by one
Game Keys
<SET TIME OF DAY!>
Sets the time of day. The time cannot be set while the clock is running.
<PERIOD!>
Edits the period number
<PERIOD +1>
Increments the period number by one
Photo Finish
Interface21-2
Page 79

21.3 Standard RTD Item Numbers for Soccer
Standard RTD
Item # Data
1 Min x 10
2 Min x 1
3 Colon
4 Sec x 10
5 Sec x 1
6 H. Score x 10
7 H. Score x 1
8 G. Score x 10
9 G. Score x 1
10 H. S.O.G. x 10
11 H. S.O.G. x 1
12 G. S.O.G. x 10
13 G. S.O.G. x 1
14 H. Corner Kicks x 10
15 H. Corner x 1
16 G. Corner Kicks x 10
17 G.Corner Kicks x 1
18 H. Team Fouls x 10
19 H. Team Fouls x 1
20 G. Team Fouls x 10
21 G. Team Fouls x 1
22 H. Option #1 x 10
23 H. Option #1 x 1
24 G. Option #1 x 10
25 G. Option #1 x 1
26 H. Option #2 x 10
27 H. Option #2 x 1
28 G. Option #2 x 10
29 G. Option #2 x 1
30 Period x 1
31 T.O.D. Hr. x 10
32 T.O.D. Hr. x 1
33 Colon
34 T.O.D. Min. x 10
35 T.O.D. Min. x 1
21.4 Insert LL-2371 for Football, Standard RTD
Photo Finish
Interface 21-3
Page 80

Reference Drawing:Insert, Football RTD, Code 243 ..............Drawing A-100150
Configuration for football: Baud Rate 9,600, 8 Data Bits, and No Parity.
Team Keys
<TIME OUTS LEFT!>
Edits the number of time outs left for the team
<POSS>
Indicates which team has possession of the ball
<SCORE!>
Edits the team score
<SCORE +1>
Increments the team score by one
<SCORE +2>
Increments the team score by two
<SCORE +3>
Increments the team score by three
<SCORE +6>
Increments the team score by six
Game Keys
<SET T.O.D.!>
Edits the time of day
<SET TIME OUT!>
Edits the length of the time out. This time cannot be set while the clock is running.
<TIME OUT ON/OFF>
Starts and stops the time-out clock
<DIM>
Dims the scoreboard for night viewing. Press this key a second time to return the digits to full
brightness
<DOWN !>
Edits the number of downs
<YARDS TO GO!>
Edits the number of yards-to-go
<BALL ON!>
Edits the yard line the ball is on
<QTR!>
Edits the number of the quarter
<QTR +1>
Increments the quarter number by one
21.5 Standard RTD Item Numbers for Football
Photo Finish
Interface21-4
Page 81

Standard RTD
Item # Data
1 Min x 10
2 Min x 1
3 Colon
4 Sec x 10
5 Sec x 1
6 H. Score x 10
7 H. Score x 1
8 G. Score x 10
9 G. Score x 1
10 H. T.O.L. x 1
11 G. T.O.L. x 1
12 QUARTER x 1
13 DOWN x 1
14 TO GO x 10
15 TO GO x 1
16 BALL ON x 10
17 BALL ON x 1
18 H. Poss. x 10
19 G. Poss x 1
20 T.O.D. Hr. x 10
21 T.O.D. Hr. x 1
22 T.O.D. Colon
23 T.O.D. Min. x 10
24 T.O.D. Min x 1
Photo Finish
Interface 21-5
Page 82

Page 83

Section 22: GP99 Multi Sport
Refer to the information in Section 3 to start up the console and use the sport insert. Read Section 3
carefully to fully understand the following operator instructions and for MENU KEY operations.
22.1 Sport Insert LL-2343
Reference Drawing: Insert, Multi Sport Code 274 ............... Drawing A-96888
The Multi Sport mode includes functions for sports with timing and scoring, baseball and
volleyball.
<SHOW CLOCK>
Displays the current clock information
<PERIOD INNING GAME!>
Edits the inning number
<PERIOD INNING GAME +1>
Increments the inning number by one
<SCORE!>
Edits the score
<SCORE +1>
Increments the score by one
Volleyball
<SHOW VOLLEYBALL>
The clock digits on the scoreboard will display the current values of GAMES WON for
two teams. The clock can continue to run in the console, even though the GAMES
WON data is showing in the digits on the scoreboard.
<GAMES WON!>
Edits game won (value 0-9)
<GAMES WON +1>
Increments the games won by one
Baseball
<SHOW BASEBALL>
Displays the current Ball, Strike and Out values. The clock can continue to run in the
console, even though the baseball data is showing in the digits on the scoreboard.
<BALL +1>
Increments the number of balls by one
<STRIKE +1>
Increments the number of strike by one
<CLEAR BALL/STRIKE>
Clears the number of balls and strikes to zero.
<OUT +1>
Increments the number of outs by one
GP99 Multi Sport
22-1
Page 84

22.2 Segment Timer Sports Insert LL-2349
Reference Drawing: Insert, Segment Timer, Code 271 & 272 ......Drawing A-97141
The segment timer utilizes all segments set to 10 minutes and the interval time set to 1 minute.
The timer has a total of 99 segments that can be timed. Segment time is displayed in the clock
digits, while segment number is displayed on the HOME score digits.
<FIRST SEGMENT!>
Edits the first segment number
<LAST SEGMENT!>
Edits the last segment number
<CURRENT SEGMENT!>
Edits the current segment number
A segment time can be copied to the next segments time by setting the current segment
number to the desired segment number. The LCD will show the current segment and time.
Make sure that the segment timer clock is stopped. Pressing the “up arrow” key by menu
will copy this segments time to the next segment and increment the current segment number
by one to the next segment. Each press of the “up arrow” will copy the time to the next
higher segment.
<RESET>
Resets timer to the first segment number (clock must be stopped)
<INTERVAL TIME!>
Edits the interval time
<SEG. NO. TIME!>
Edits segment number time. After pressing this key, the segment number to edit is entered
and then press <ENTER>. The current time for that segment is shown on the LCD and can be
edited. When the segment time is correct, press <ENTER> to accept.
22-2
GP99 Multi Sport
Page 85

Section 23 : Event Counter
Refer to the information in Section 3 to start up the console and use the sport insert. Read Section 3
carefully to fully understand the following operator instructions and for MENU KEY operations.
23.1 Sport Insert LL-2369
Reference Drawing: Insert, Event Counter Codes 371-376 ........ Drawing A-58047
The sport insert LL-2369 can be run with six operating codes. Three separate counting modes
are described in the operating code sections below. The sport insert for these codes is shown in
Appendix C.
23.2 Day and Time Event Countdown Codes 371 & 372
Code 371 - This code is used for the Venus 1500 Output. Venus 1500 configuration: Baud
Rate 19,200, 8 Data Bits, and No Parity.
Code 372 - This code is used for standard RTD Output (V4600/V7000). Venus 4600
configuration: Baud Rate 9,600 8 Data Bits and Even Parity.
<VALUE/DAYS!>
Edits the number of days (0 to 999)
<SET MAIN CLOCK!>
Edits the amount of time (00:00.00 to 99:59.59, but normally not over 23:59.59)
<COUNT UP/DOWN!>
Sets the clock to count up or down. Press <ENTER> to toggle between count modes. The
current direction is shown on the LCD by the displayed time as UP or DN. The direction can
only be changed when the clock is stopped.
<START>
Starts the clock. If set to count down, the console will count down the time to 0:00.00,
decrement the number of days by one, and the time will go to 23:59.59. The console will
continue to count down until it reaches 0 Days and 0:00.00 time, at which point the console
will begin counting up and start counting up the days and time that have elapsed since the
event.
<STOP>
Stops the clock. The clock must be stopped to set the time or change the clock direction.
<INCREMENT VALUE!>
Not used for these codes.
<DECREMENT VALUE!>
Not used for these codes.
<TIME INTERVAL!>
Not used for these codes.
Event Counter
23-1
Page 86

23-2
Event Counter Operation
Page 87

23.2.1 RTD Item Numbers
The console sends out data in a Venus 1500 RTD packet as shown below once every
second for code 371, or standard V4600/V7000 RTD for code 372.
Item # Function Offset
01 Days x 100 0
02 Days x 10 1
03 Days x 1 2
04 Hours x 10 3
05 Hours x 1 4
06 Colon 5
07 Min x 10 6
08 Min x 1 7
09 Dec.pt. 8
10 Sec x 10 9
11 Sec x 1 10
23.3 Time Base Counter Codes 373 & 374
Code 373 - This code is used for the Venus 1500 Output. Venus 1500 configuration:
Baud Rate 19,200, 8 Data Bits, and No Parity.
Code 374 - This code is used for standard RTD Output V4600/V7000. Venus 4600
configuration: Baud Rate 9,600, 8 Data Bits, and Even Parity.
<VALUE/DAYS!>
This key is used to enter the initial value that the console should start counting from.
The value can have up to 8 significant digits.
< INCREMENT VALUE!>
This key is used to set the increment value. The increment value can have up to 4
significant digits. This value is the amount that is added to the total value every time
interval.
<DECREMENT VALUE!>
This key is used to set the decrement value. The decrement value can have up to 4
significant digits. This value is the amount that is subtracted from the total value every
time interval if the increment value is set to zero.
<TIME INTERVAL!>
This key is used to set the time period for the time between each increment or decrement
of the value being counted. The time can be set from 00:00.01 to 99:59.59.
<START>
When the <START> key is pressed, the controller will count down the time interval to
0:00.00 and then adjust the value, changing it by the amount set in the <INCREMENT
VALUE>. If the increment value is set to zero, the controller will decrement the value by
the amount set in the <DECREMENT VALUE>. The controller will then reset to the last
entered time interval and count down the interval again.
If larger values than 99,999,999 are tracked, then the display would need to have fixed
0's in the lower significant digits. A display could be set up with 0's in the last 3 digits,
and the value could track up to 99,999,999,000. The smallest increment value of 1
would then represent 1000 being added to the total.
<STOP>
Pressing this key will stop the clock. The clock must be stopped to set the time interval.
Event Counter
23-3
Page 88

23.3.1 RTD Item Numbers
The console sends out data in a Venus 1500 RTD packet as shown below once every
second for code 373, or standard V4600/V7000 RTD for code 374.
Item # Function Offset
01 Value x 10,000,000 0
02 Value x 1,000,000 1
03 Value x 100,000 2
04 Value x 10,000 3
05 Value x 1,000 4
06 Value x 100 5
07 Value x 10 6
08 Value x 1 7
23.4 External Input Counter Codes 375 & 376
Code 375 - This code is used for the Venus 1500 Output. Venus 1500 configuration: Baud Rate
19,200, 8 Data Bits, and No Parity.
Code 376 - This code is used for standard RTD Output (V4600/V7000). Venus 4600
configuration: Baud Rate 9,600, 8 Data Bits, and Even Parity.
<INCREMENT VALUE!>
This key is used to set the increment value. The increment value can have up to 4
significant digits. This value is the amount that is added to the total value every time an
external switch input 1 is detected.
<DECREMENT VALUE!>
This key is used to set the decrement value. The decrement value can have up to 4
significant digits. This value is the amount that is subtracted from the total value each
time an external switch input 2 is detected.
<TIME INTERVAL!>
Not used for these codes.
<START>
Not used for these codes.
<STOP>
Not used for these codes.
<SET MAIN CLOCK!>
Not used for these codes.
<COUNT UP/DOWN!>
Not used for these codes.
23-4
Event Counter Operation
Page 89

23.4.1 RTD Item Numbers
The console sends out data in a Venus 1500 RTD packet as shown below as data is
changed or a minimum of once every second for code 375, or standard V4600/V7000
RTD for code 376.
Item # Function Offset
01 Value x 10,000,000 0
02 Value x 1,000,000 1
03 Value x 100,000 2
04 Value x 10,000 3
05 Value x 1,000 4
06 Value x 100 5
07 Value x 10 6
08 Value x 1 7
23.4.2 External Switch Inputs
A switch-closed input on pins 2 & 5 of switch input terminal block 1 will cause the
console to add the increment value to the total value. A switch-closed input on pins 1 &
6 of switch input terminal block will cause the console to subtract the decrement value
from the total value.
The external switch inputs come into the All Sport on J3. The signal cable used to
connect to these inputs has a 6-pin RJ-11 on one end and a 4-pin terminal block on the
other end. Refer to Appendix A for signal connection drawings.
23.5 System Setup/Operation
23.5.1 Venus 1500 Controlled Products
Install Venus 1500 software and create signs needed by following Venus 1500 manual
(ED-9067) and display manual.
If supplied with a RTD message, copy to the proper directory. The supplied message
is already in the display memory and can be run. To edit or create a new message go
to Section 23.5.2.
23.5.2 Creating an RTD Message
Install Venus 1500 software and create signs needed by following Venus 1500 manual
ED-9067 and the display manual.
Use the Venus 1500 to create a message. Use the following examples to aid in
creating the RTD field within the message.
Event Counter
23-5
Page 90

Example 1: Event Counter Mode: Countdown to Millennium
This examples applies to event counter mode.
If message is as follows:
DDD Days HH Hours
Where:
DDD = RTD field showing 3 digits of days.
Offset = 0 (Refer to table below):
Length =3
HH = RTD field showing 2 digits of hours.
Offset = 3 (Refer to table below).
Length = 2
Item # Function Offset
01 Days x 100 0
02 Days x 10 1
03 Days x 1 2
04 Hours x 10 3
05 Hours x 1 4
06 Colon : 5
07 Min x 10 6
08 Min x 1 7
09 Dec.pt. 8
10 Sec x 10 9
11 Sec x 1 10
Example 2: Time Based Counter Mode: National Deficit
This examples applies to the time based event counter mode.
If message is as follows:
$ XX, YYY, ZZZ
Where:
XX = RTD field for data in millions.
Offset = 0 (Refer to table below):
Length = 2
YYY = RTD field for data in thousands.
Offset = 2 (Refer to table below).
Length = 3
ZZZ = RTD field for data in ones to hundreds.
Offset = 5 (Refer to table below).
Length = 3
$,, = Text
23-6
Event Counter Operation
Page 91

Item # Function Offset
01 Value x 10,000,000 0
02 Value x 1,000,000 1
03 Value x 100,000 2
04 Value x 10,000 3
05 Value x 1,000 4
06 Value x 100 5
07 Value x 10 6
08 Value x 1 7
Note: If no comma’s entered: XX, YYY, ZZZ is RTD Field for Data from ones to ten
million. Offset = 0 and length = 8.
Example 3: External Switch Input Mode.
If message is as follows:
XX, YYY
Where:
XX = RTD field for data in thousands.
Offset = 3 (Refer to table below).
Length = 2.
YYY = RTD field for data in ones to hundreds.
Offset = 5 (Refer to table below)
Length = 3
1 = Text
23.5.3 Operations
! Send and run message to display using Venus 1500.
! Disconnect Venus 1500 and connect All Sport refer to Drawings A-95713 or A-
95696 located in Appendix A.
! Run the appropriate code 371, 373, or 375 on the All Sport.
Item # Function Offset
01 Value x 10,000,000 0
02 Value x 1,000,000 1
03 Value x 100,000 2
04 Value x 10,000 3
05 Value x 1,000 4
06 Value x 100 5
07 Value x 10 6
08 Value x 1 7
Event Counter
23-7
Page 92

23.5.4 Venus 4600 and 7000 Controlled Products
Refer to the Venus 4600 manual ED-4602 or the Venus 7000 manual ED-10155 for
instructions on creating the RTD sequence.
23.5.5 Operation
1. Set up an RTD communications port on the Venus controller.
2. Create a sequence with an RTD frame to display the items desired and save the
sequence.
3. Display the RTD sequence.
4. Connect the All Sport Controller to the Venus Controller RTD communications port.
Refer to Drawing A-100373 in Appendix A.
5. Run the appropriate code 372, 374 or 376 on the All Sport controller.
23-8
Event Counter Operation
Page 93

Section 24: Tennis Operation
Refer to the information in Section 3 to start up the console and use the sport insert. Read Section 3
carefully to fully understand the following operation instructions and for MENU KEY operations.
24.1 Sport Insert 0G-103677
Reference Drawing: Sport Insert, Tennis Code 220 .............. Drawing A-103677
Note: Top team keys score for the top of the display and the bottom team keys score for the
bottom of the display.
Team Keys
<POINT >
Increments the respective players game score for normal game scoring. If <TIE BREAK> is pressed
then the score will increment by 1.
<SCORE!>
Edits the team score
<ADV.>
Sets respective player game score to advantage
<DEUCE>
Sets the current game score to deuce
<=SERVICE >
Sets respective player to serve as the server
<GAMES! >
Edits the games won for the current set number
<GAMES+1 >
Increments the games won by 1 for the current set number
Game Keys
<SET!>
Edits the set number
<SET+1>
Increments the set number by 1
<RESET GAME>
Resets the game score. This will also reset the tie break mode of scoring.
<RESET MATCH>
Resets the match by clearing all set scores and setting game score to zero.
<TIE BREAK>
Allows score to increment by 1 for tie break scoring. The game must be reset before tie
break key will set the scoring mode to tie break.
Tennis Operation
24-1
Page 94

24.2 Sport Insert 0G-124217
Reference Drawing: Sport Insert, Tennis Code 221 ..............Drawing A-124217
Sport insert 0G-124217 is used to control the scoring for up to six courts. The Game Keys are
grouped under a court (Court 1, Court 2, etc.). The Match Keys are located along the left side. Use
code 221 to operate the All Sport controller using this insert.
Match Keys
<HOME MATCHES ! >
Edits the matches for the home team
<HOME MATCHES +1>
Advances the matches for the home team by 1
<GUEST MATCHES !>
Edits the matches for the guest team
<GUEST MATCHES +1>
Advances the matches for the guest team by 1
Game Keys (Courts 1 through 6)
<HOME GAMES ! >
Edits the games won for the home team.
<HOME GAMES+1>
Increments the games won by the home team by 1
<SET+1>
Increments the set number by 1
<GUEST GAMES ! >
Edits the games won for the guest team.
<GUEST GAMES+1>
Increments the games won by the guest team by 1
24-2
Tennis Operation
Page 95

Section 25: Auto Racing Operation
Refer to ED-11058 for information on auto racing operation of the All Sport 4000 series controller.
For Auto Racing using a Compulink System, refer to Section 26.
Auto Racing Operation
25-1
Page 96

Page 97

Section 26: Compulink Interface
Refer to the information in Section 3 to start up the console and use the sport insert. Read Section 3
carefully to fully understand the following operation instructions and for MENU KEY operations.
26.1 Sport Insert 0G-139422
Reference Drawing: Insert; A/S 4000 Loopback Test Data ........ Drawing A-139422
The All Sport code for the Compulink Interface is 502. The console receives signal input from
the Compulink Timer on Pin 2 (+RX) and Pin 7 (GND) of J3 on the All Sport.
Data Format: Baud Rate 9,600, 1 Start Bit, 8 Data Bits, 2 Stop Bits, and No Parity. This
application uses the language style ASCII standard. For additional infromation refer to ED-4659,
C-33/Compulink Protocol Specifications.
When the console is running code 502 and is connected to the Compulink Timer, the console will
display the race information on the drag race display.
26.2 Test Mode
The console has built in test functions for the data input and the scoreboard output. These tests
will help isolate system problems and verify proper operation.
To test the scoreboard output, the ALL ON test and the NUMBER TEST keys are pressed. When
pressed these keys will put the specified pattern on the scoreboard. Once data has been received
from the timer, these keys will not function until the console has been restarted with code 502
again. This is to prevent the test data keys from putting up data during the race.
To test the data input the loopback test keys will be used. Pins 2 and 3 of J3 on the All Sport will
need to have an electrical connection made between them. To make this connection, place a bent
paper clip or a similar wire from pin 2 to pin 3 of J3. When this is done pressing any of the
loopback keys will send that data out on pin 3 of J3 on the console. The data should show on the
LCD on the console and also on the scoreboard. If this test works then the data input on the
console is functional.
Compulink Interface
26-1
Page 98

26.3 Key and LCD Function
Score Test Keys
<ALL ON TEST>
This key will display an all on pattern on the scoreboard. The key will not function after data
has been received from the timer.
<NUMBER TEST>
This key will display a number pattern test on the scoreboard. The key will not function after
data has been received from the timer.
<DISPLAY NORMAL>
This key will return the display to normal display of the data received from the timer.
Loopback Test Keys
<TOP LEFT>
The two top left keys are used to send test data for testing of the data input on the console.
This data will display on the top line of the left lane display.
<TOP RIGHT>
The two top right keys are used to send test data for testing of the data input on the console.
This data will display on the top line of the right lane display.
<BOTTOM LEFT>
The two bottom left keys are used to send test data for testing of the data input on the
console. This data will display on the bottom line of the left lane display.
<BOTTOM RIGHT>
The two bottom right keys are used to send data for testing of the data input on the console.
This data will display on the bottom line of the right display.
The LCD will display the data that was received from the timer or the loopback test keys on the
bottom line of the LCD. The LCD data will have a > symbol displayed to the left of the data.
Compulink Interface Compulink Interface
26-2
Page 99

Appendix A: Block Diagrams
Reference Drawings:
Cable; 25 Pin to 16 Pin 16 Cond ..................................... Drawing A-31020
Keyboard Fixed Keys ............................................. Drawing A-54698
Rear View, Connector Assignments .................................. Drawing A-87150
Basketball Codes 03, 04, 11, 12 ..................................... Drawing A-86935
Basketball with Stats Panels ........................................ Drawing A-86936
Basketball Codes 07, 08, 17, 18 ..................................... Drawing A-95222
Baseball ....................................................... Drawing A-86970
Football ........................................................ Drawing A-86971
Hockey ........................................................ Drawing A-86972
Set up Sprint Timer Photo Cell & Tape Switch .......................... Drawing A-72922
Track .......................................................... Drawing A-93764
Track/Football Scoreboard W/Finish Lynx in Press Box ................... Drawing A-95152
Track/Football Scoreboard W/Finish Lynx in Field ....................... Drawing A-95153
Track/Football Scoreboard W/Finish Lynx in Press Box ................... Drawing A-95154
12V Hookups, Scoreboard to Console ................................ Drawing A-88082
System Riser Diagram InfoSport .................................... Drawing A-95122
System Riser Diagram RS/422 ...................................... Drawing A-95713
System Riser Diagram RS/432 ...................................... Drawing A-95696
System Riser Diagram V4600/V7000 ................................ Drawing A-100373
All Sport Smart Console with ProSport ............................... Drawing A-100460
Block Diagram; Basketball System W25 Pin .......................... Drawing A-104541
Appendix A
Compulink Interface
A-1
Page 100

 Loading...