


Humidifying air purifi er
Floor Standing Type
Ururu Air Purifi er
OPERATION MANUAL
EnglishDeutschFrançaisNederlandsEspañolItalianoEλληνικάPortuguesPyccкий
MODEL
MCK75JVM-K
FeaturesFeatures
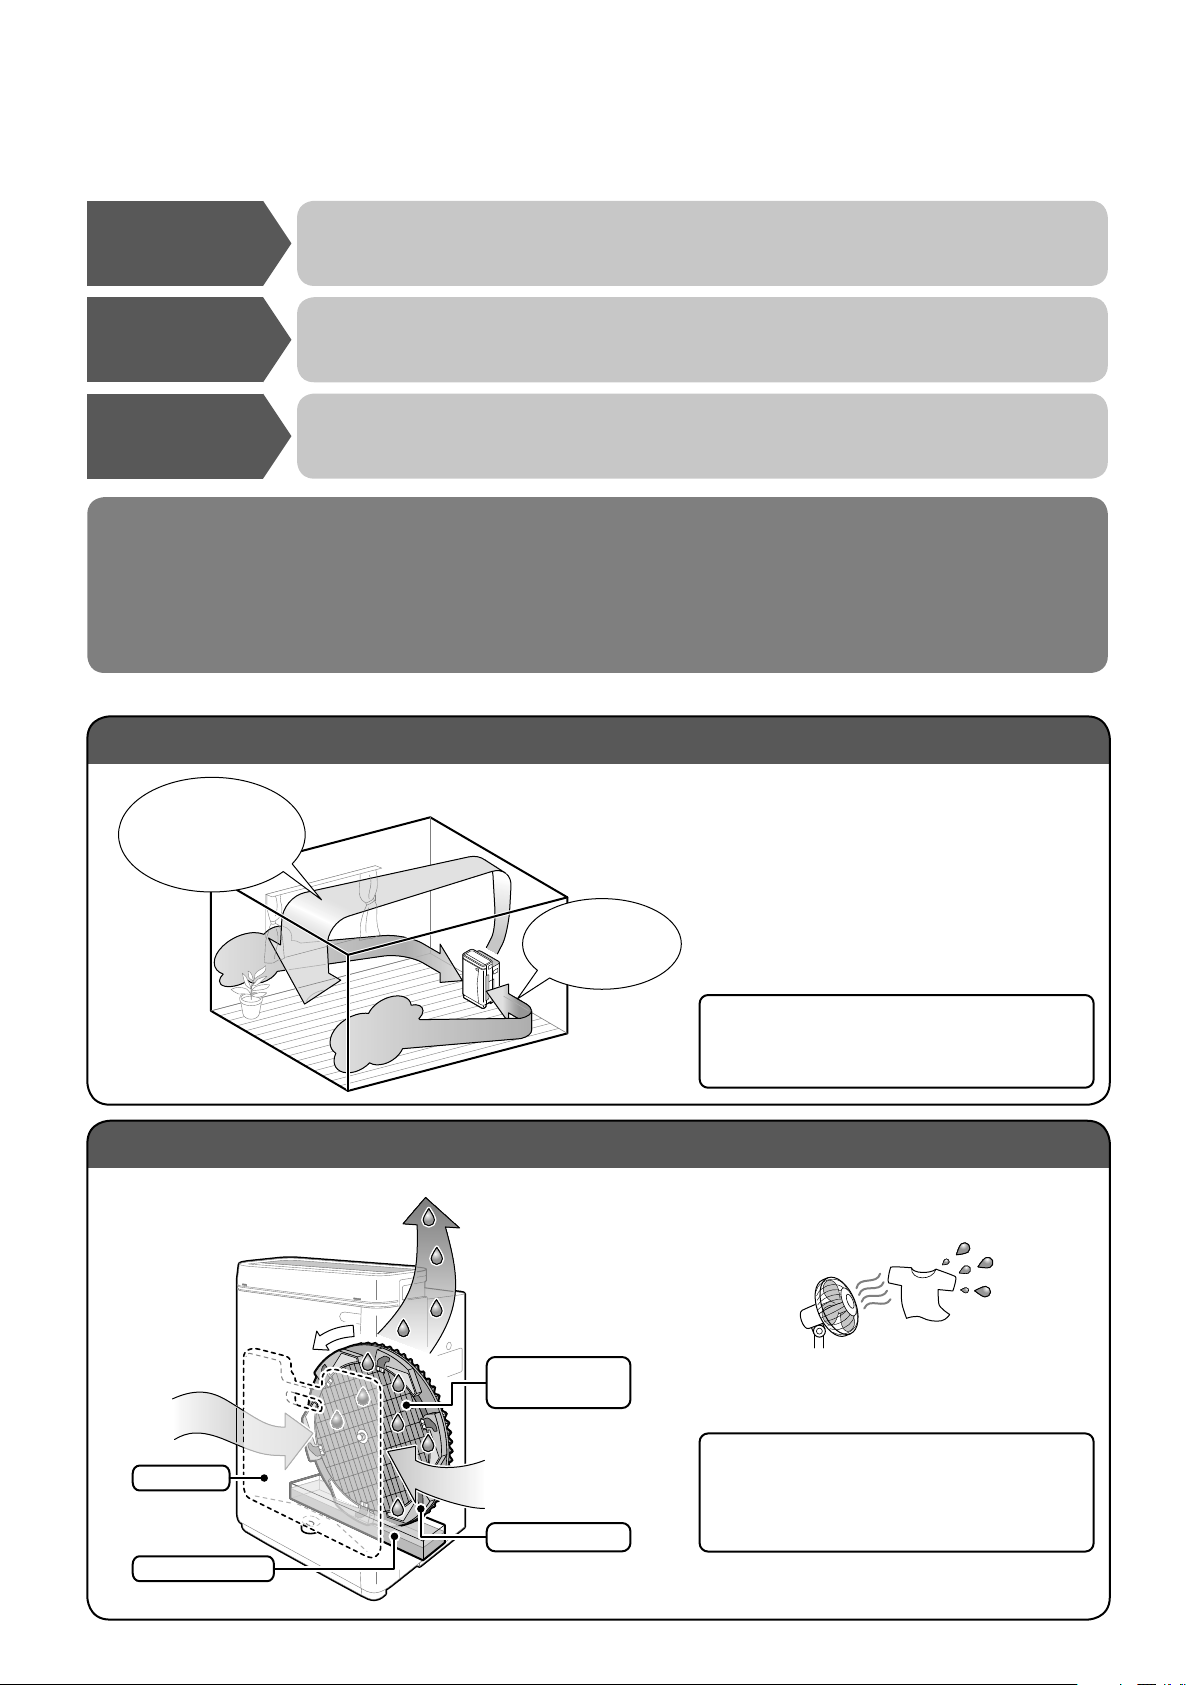
About air purifying
Pollen
Dust
Odor
The powerful suction of a high airflow
rate captures dust, pollen, etc.
Streamer discharge decomposes
formaldehyde and odors.
• Purifying capacity increases
alongside airflow rate.
Strong against pollen
Owing to a high airflow rate, even pollen that
readily settles because of its large particle size
is quickly caught.
Air is sucked
in on both sides.
Air is delivered to
all parts of room at
a high airflow rate.
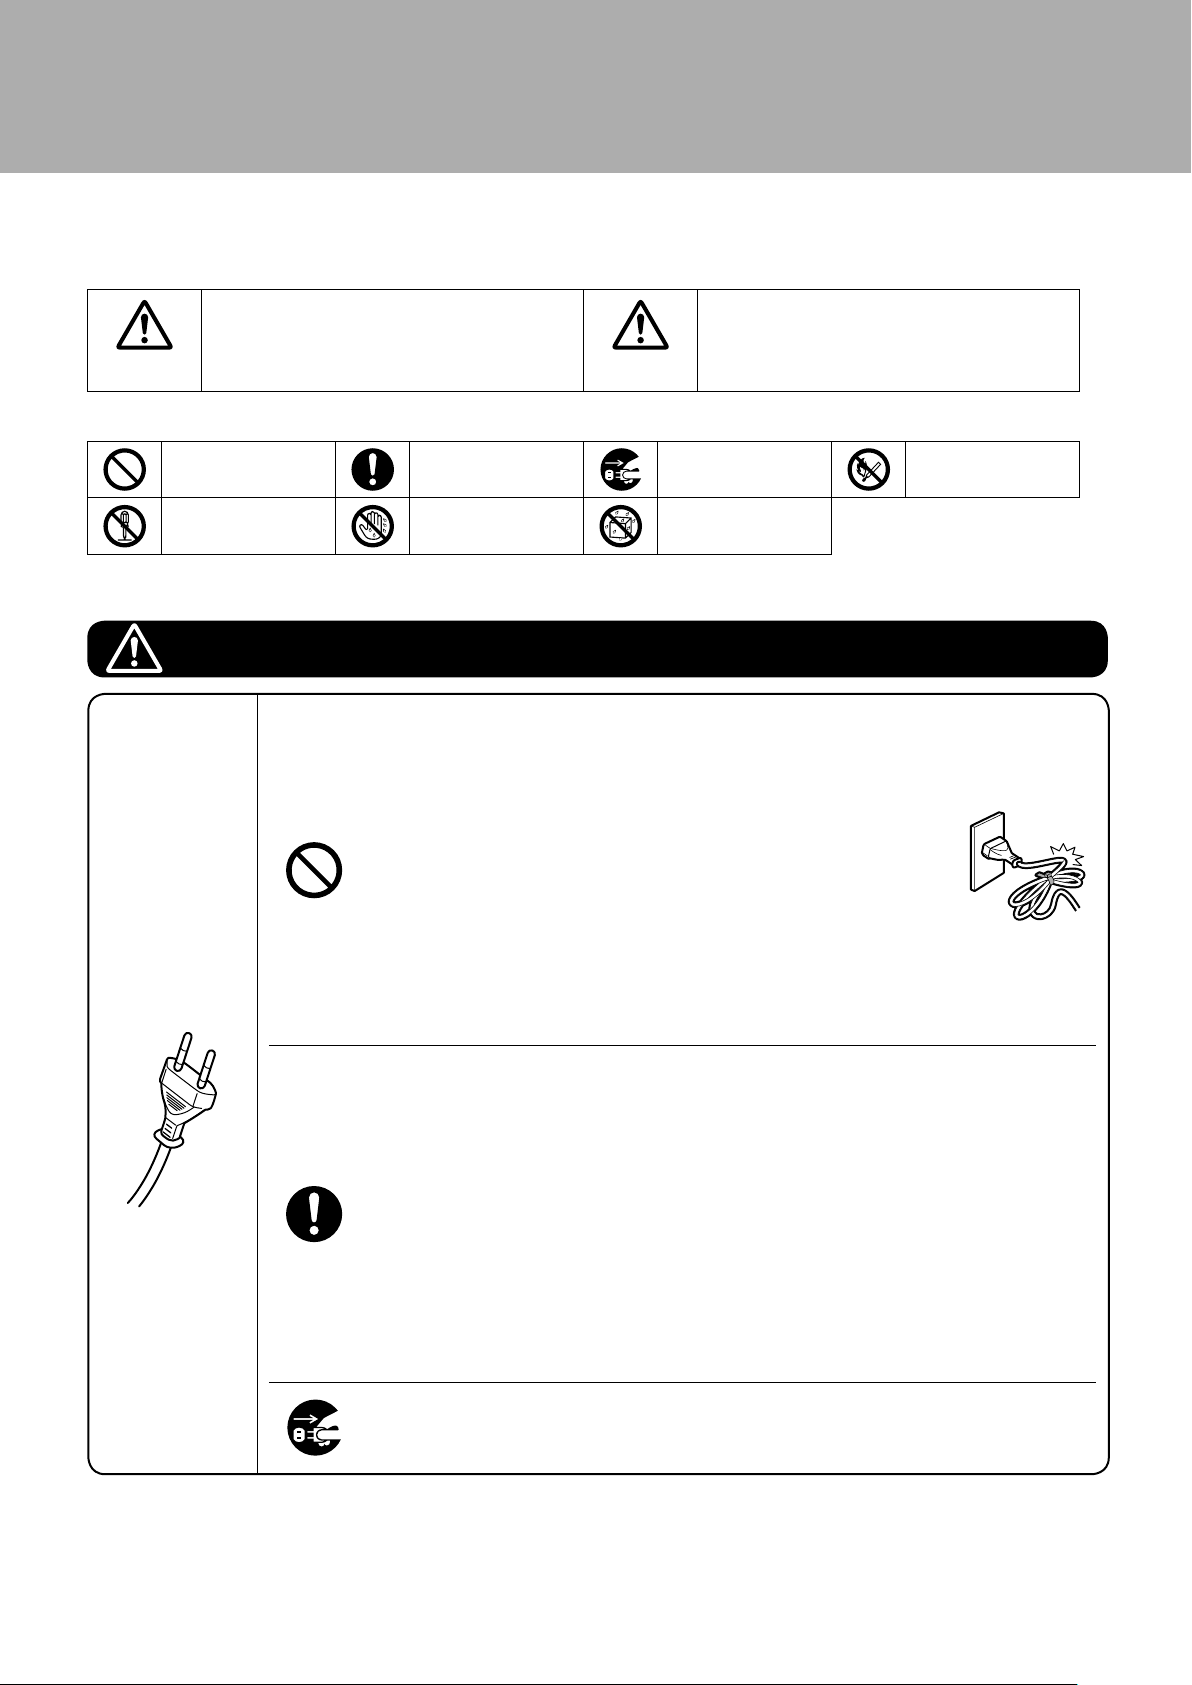
How air is humidifi ed
Deodorization
Dust collection
Humidifi cation
About
streamer discharge...
The strong decomposition capacity of streamer discharge assuredly removes unpleasant odor-causing
components in cigarette smoke, formaldehyde, etc.
A high airfl ow rate nimbly catches pollen, house dust, etc.
The room is quickly humidifi ed by the humidifying with “Vaporization system of high airfl ow rate”.
Streamer discharge nimbly decomposes odors and harmful gases by generating fast-moving electrons of high
oxidising strength inside the air purifi er. (Because the fast-moving electrons are generated and consumed inside the
unit, it is absolutely safe.)
During operation, the fi zzing sound of streamer discharge can be heard.
Also, depending on the conditions of use, the sound may be quieter or change in tone.
A very small amount of ozone is generated by the unit and may cause a slight odor at the air outlet. However, since
the amount of ozone is minute, it will not cause any health problem.
Water tank
Humidifying tray
1
Humid air
Rotating
(2)
Humidifying
filter
Moisture adheres to
the humidifying filter.
D
r
y
a
i
r
(1)
Waterwheel
Water is scooped from
the humidifying tray.
Adoption of vaporization system
This is the system to vaporize water by air-blow.
• Vapours and mist are unseen to the eye.
• Humidifying capacity increases alongside
airflow rate.
Water supply system by waterwheel
Waterwheel scoops up water only when needed
and humidifying filter is not soaked to water. This
specific system keeps the humidifying filter clean
and prevent molds.
• As water is supplied from the water tank to the
humidifying tray, the sound may be heard.

2
English
READ FIRST
Safety Precautions ■ .......................................... 3
Names and Operation of Each Parts ■ ............. 7
Sensitivity Settings of the Dust Sensor ■ ...... 13
PREPARATIONS BEFORE USE
Installation ■ ..................................................... 14
Preparation of Remote Controller ■ ................ 15
Attach the Filter ■ ............................................. 16
Water Tank Preparations ■ .............................. 17
HOW TO OPERATE
Air Purifying Operation ■ ................................. 19
Humidify and Air Purifying Operations ■ ....... 20
How to Operate with Remote Controller ■ ...... 21
How to Use the Recyclable Deodorizing ■
Cartridge ........................................................ 23
CARE and CLEANING
Quick Reference Table of Maintenance ■ ....... 25
Care & Cleaning ■ ............................................. 27
TROUBLESHOOTING
Frequently Asked Questions ■ ........................ 39
If These Lamps Light or Flash ■ ..................... 40
Troubleshooting ■ ............................................ 41
READ FIRST
Safety Precautions
Before use, read these Safety Precautions to ensure proper use.
The precautions used in this manual are classifi ed into the following two types. Both contain important
safety information, therefore observe them at all times.
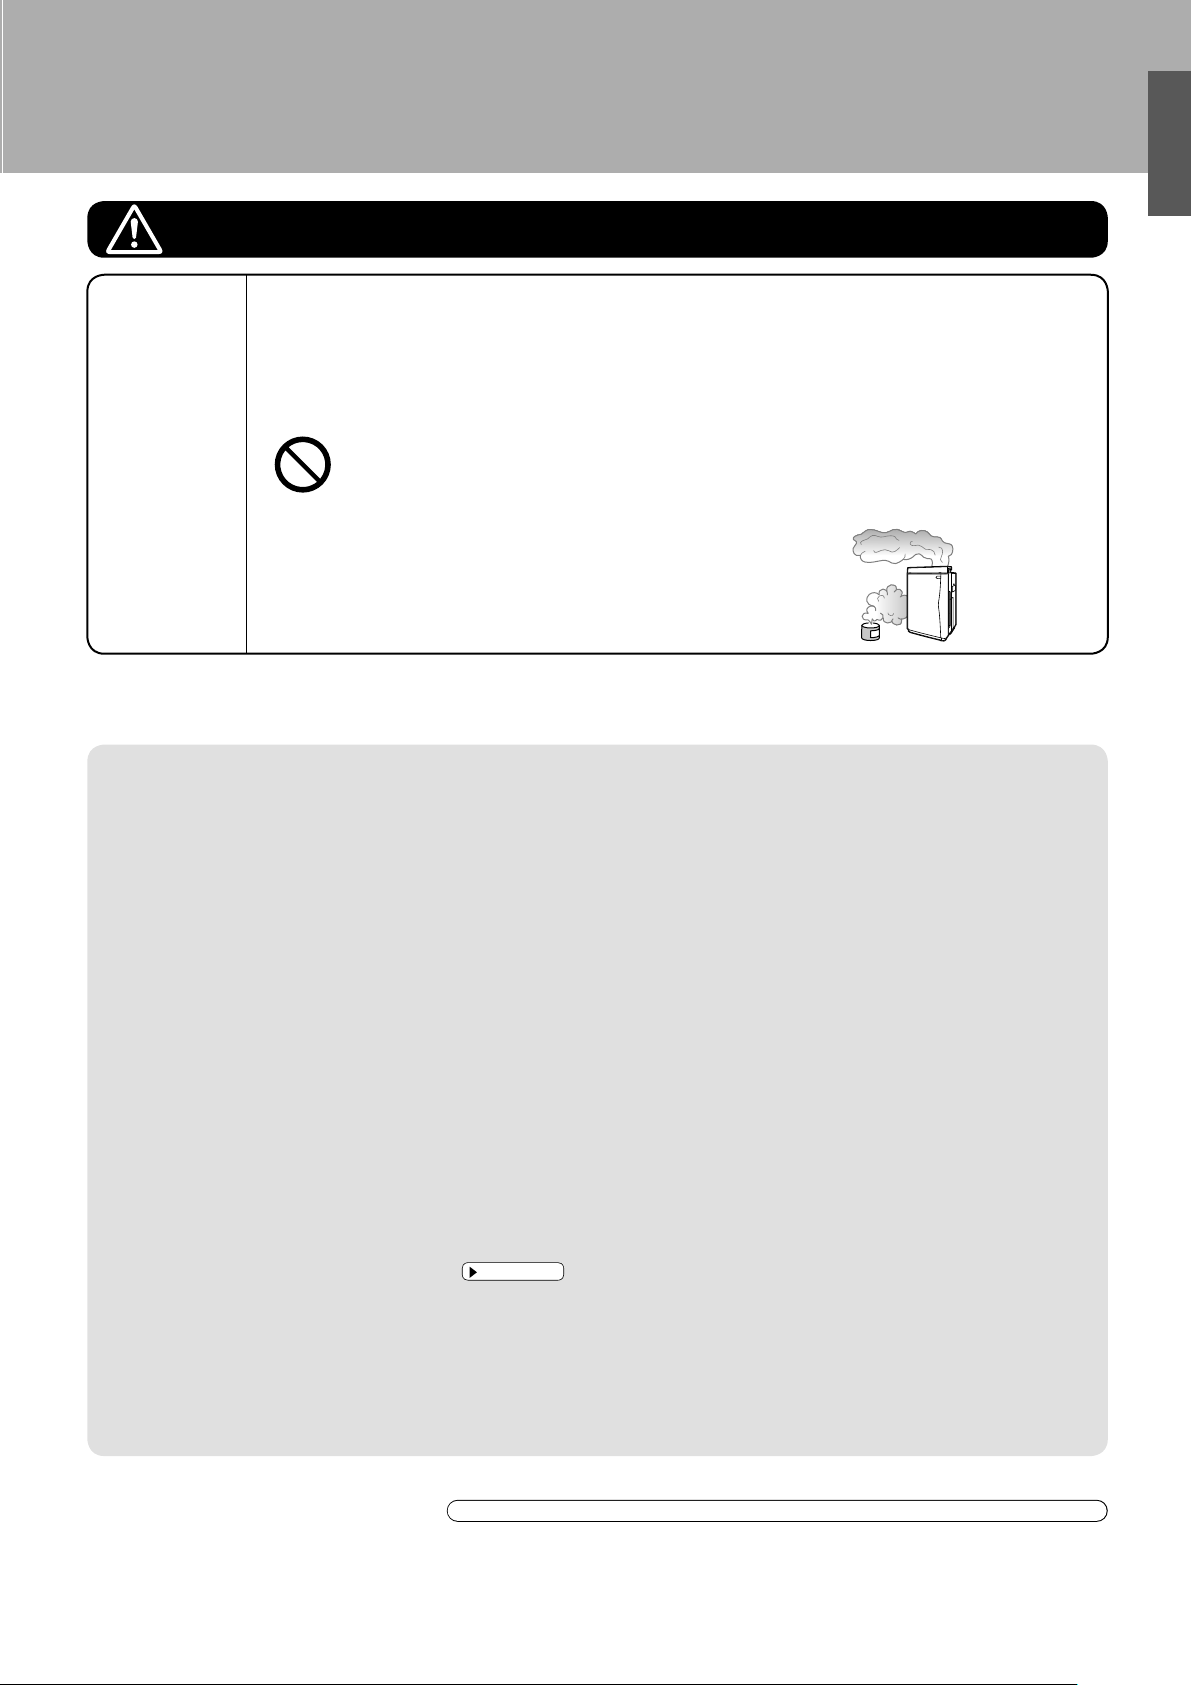
Improper handling may lead to serious injury or
even death.
WARNING
The icons used in this manual mean the following.
Never do.
Do not disassemble.
After reading this manual, keep it in a handy place for future reference by users.
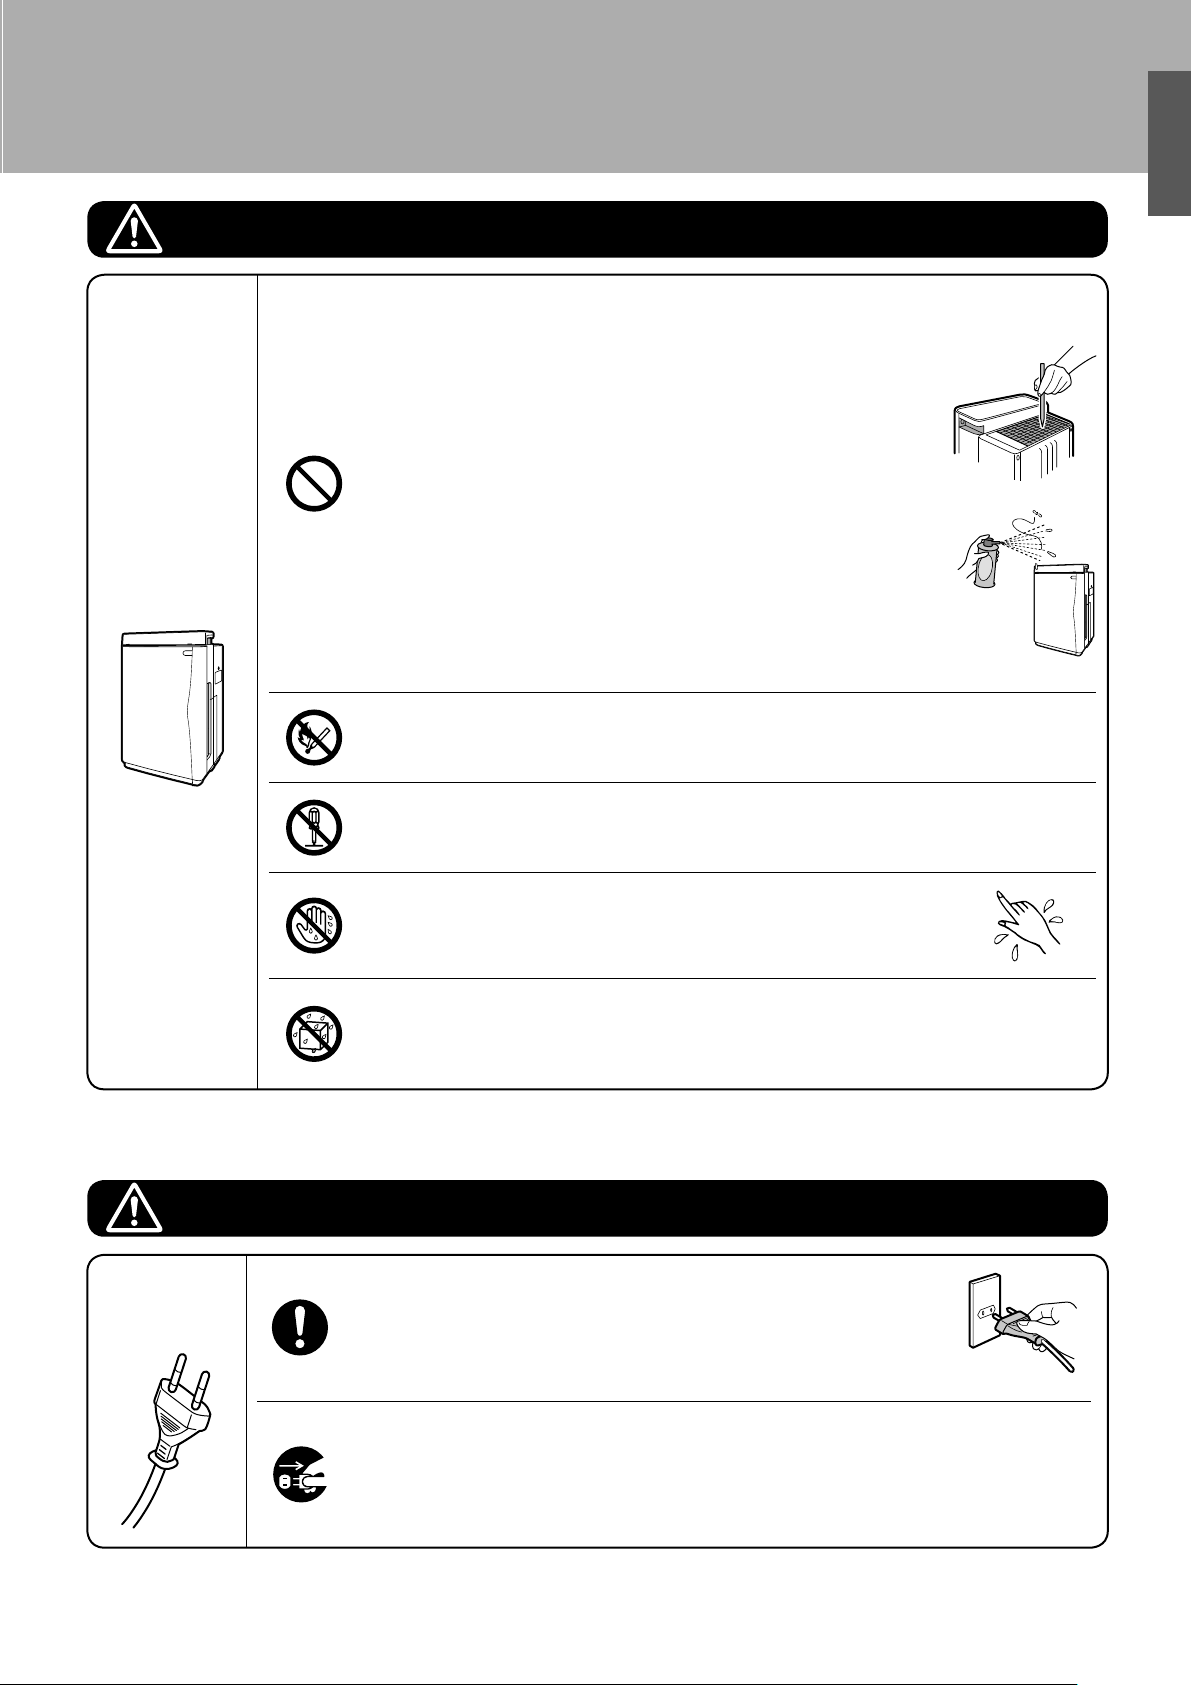
WARNING
Power supply
cord and plug
Improper handling may lead to injury or property
damage.
CAUTION
Be sure to follow the
instructions.
Do not handle with
wet hands.
Use only a 220 - 240V power supply. •
Other power supplies may lead to fi re or electric shock.
Do not damage, remodel, bend unreasonably, pull, twist or use the •
power supply cord bundled up.
Also, do not place heavy objects on or pinch the power supply cord.
Damage to the power supply cord may lead to fi re or electric shock.
Do not use the unit when the power supply cord or plug is damaged •
or plugged loosely into an electrical socket.
A damaged or loose cord or plug may lead to fi re because of a short circuit or electric shock.
Do not use the unit beyond the rating of the electrical socket or •
branching device.
Exceeding the rating of multiple socket outlets may lead to fi re because of overheating.
Do not insert or remove the power plug to turn the unit ON/OFF. •
Abusive handling may lead to electric shock or fi re because of overheating.
In some situations, the consequences may be grave.
Unplug the power cord. Keep away from fl ames.
Do not wet.
Insert the power plug into the socket all the way to the base. •
Incomplete connections may lead to electric shock or fi re because of overheating.
Periodically clean dust and other matter from the power plug with a •
dry cloth.
Insulation failure caused by humidity or otherwise may lead to fi re.
Stop operation and unplug the power supply cord if detecting •
anything strange such as burning odors.
Continued use the unit in anything strange may lead to electric shock or fi re because of
overheating.
Contact the service shop.
If the power supply cord is damaged, it must be replaced by the •
manufacturer, its service shop or similarly qualifi ed persons in
order to avoid a hazard.
A damaged cord may lead to electric shock or fi re because of overheating.
Before cleaning or relocating the unit, stop operation and unplug the •
power supply cord from the electrical socket.
Handling with the unit plugged in and running may lead to electric shock or injury.
3
4
English
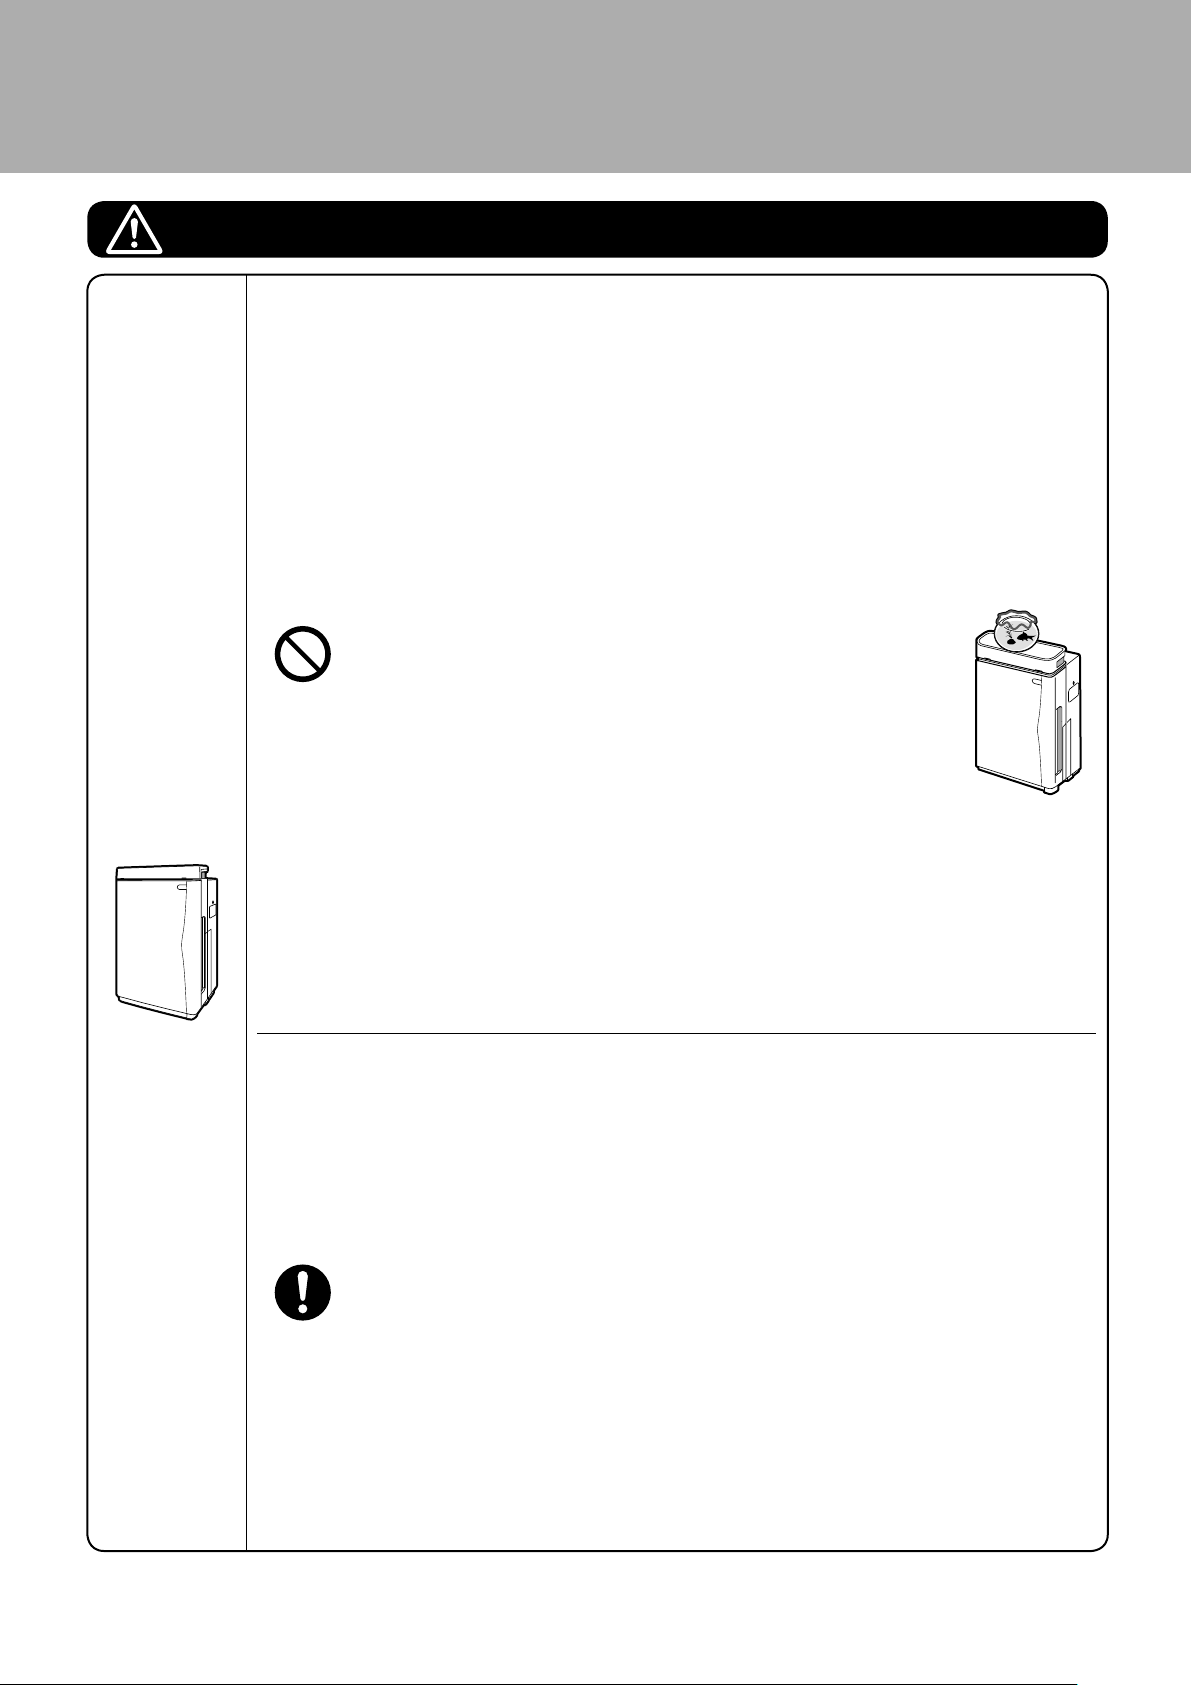
WARNING
Main unit
Do not use the unit anywhere there is airborne oil such as machine oil.•
Airborne oils may lead to cracking, electric shock or ignition.
Do not use the unit anywhere there are abundant oil vapours such •
as in kitchens, combustible or corrosive gases, or metallic dust.
These kinds of environments may lead to fi re or damage.
Keep fi ngers and objects out of the air inlets, air outlet and other •
openings.
Improper handling may lead to electric shock, injury or damage.
Do not wet the air outlet or unit frame. •
Contact with water may lead to fi re or electric shock.
Do not use combustible substances, i.e., hairspray, insecticides, etc., •
near the unit.
Do not wipe the unit with benzene or thinner.
These substances may lead to cracking, electric shock or ignition.
Use a neutral liquid detergent to clean the unit. •
Use of chlorine or acidic detergents to clean the unit may generate harmful gas and harm
health.
Keep cigarettes, incense and other naked fl ames away from the unit. •
Naked fl ames may lead to fi re.
Do not disassemble, remodel or service the unit yourself. •
Improper handling may lead to fi re, electric shock or injury.
Contact the service shop.
CAUTION
Power supply
cord and plug
Do not operate the unit with wet hands. •
Contact with water may lead to electric shock.
Do not use the unit anywhere that is very humid such as bathrooms •
or that experiences sudden temperature changes such as cold
storage boxes.
Improper environments may lead to electric shock or damage.
Hold the power plug – not the power supply cord – and pull to unplug the •
unit.
Pulling on the power supply cord may lead to fi re or electric shock because of short circuits.
Before long periods of disuse, unplug the power supply cord from •
the electrical socket.
Degraded insulation may lead to electric shock, current leaks or fi re.
Safety Precautions
CAUTION
Do not use the unit anywhere it is exposed to direct sunlight, rain or wind. •
Overheating or contact with water may lead to fi re or electric shock.
Do not use the unit anywhere that is hot such as near to heaters. •
High temperatures may discolour or deform the unit.
Do not block the air inlets or air outlet with laundry, cloth, curtains, etc. •
Adhering lint may obstruct air passage, possibly leading to overheating and fi re.
Do not use the unit anywhere the fl oor is unstable. •
If the unit topples over, water will spill from it, possibly wetting furniture or leading to fi re or
electric shock.
If the unit topples over, put it upright immediately.
Do not use the unit anywhere that chemicals are handled. •
Volatile medicines or solvents (found in hospitals, factories, test labs, beauty salons, photo
developing labs, etc.) may degrade mechanical parts, possibly causing water leaks that may
resultantly wet furniture, etc.
Do not use powders such as cosmetics near to the unit. •
Contact with powders may result in electric shock or damage.
Do not use the unit in cramped spaces such as closets. •
Poor ventilation may lead to overheating and fi re.
Do not expose plants or animals to direct air currents from the unit. •
Overexposure to air currents may have adverse effects.
Keep fi sh tanks, vases and other water containers away from the unit.•
Water infi ltration into the unit may lead to electric shock, fi re or damage.
Main unit
Do not climb, sit or lean on the unit. •
Falling or toppling over may lead to injury.
Do not remove the fi lter with the unit lying on its side. •
Handling of the sort facilitates dust infi ltration, possibly leading to fi re or electric shock.
Also, water may spill from the unit, possibly leading to damage.
Do not remove the fl oat or Styrofoam from the fl oat. •
This will disable humidifi cation.
Do not remove the silver ion cartridge. •
This will disable the antibacterial, anti-mildew and slime prevention effects.
Regularly ventilate the room when using the unit in conjunction with •
combustion appliances.
Inadequate ventilation may lead to CO poisoning.
This product does not remove CO.
Change the water in the tank for fl esh tap water every day when •
humidifying and periodically clean inside the unit (humidifying tray,
humidifying fi lter) to always keep it clean.
Failure to clean the unit may lead to mildew and bacteria proliferation because of grime and
scale, and resultantly foul odors. Depending on their physical condition, some persons may be
hypersensitive and their health jeopardised as a result.
• In such case, contact a doctor.
Before moving the unit, stop operation and discard the water from •
the water tank and humidifying tray.
Leaks or spills from the water tank or humidifying tray may wet furniture or lead to electric shock
or current leaks.
This appliance is not intended to be used by persons with reduced •
physical, sensory or mental capabilities, or with lack of operation
knowledge, unless they have been given supervision or instruction
concerning the appliance use by person responsible for their safety.
Keep out of children’s reach to ensure that they do not play with the
appliance.
Unplug the unit during fi lling and cleaning.•
Handling with the unit plugged in may lead to electric shock or damage.
5
6
English
CAUTION
Precautions in use
Keep TVs, radios, stereos, radio clocks and antenna wires at least 2m from the unit. •
Interference may affect images and audio. The same applies to cordless phones, wireless microphones and other devices that emit weak electric waves.
(However, audio interference may occur even beyond 2m depending on the strength of the electric waves. Reception is particularly hindered when using
indoor antennas, therefore distance antennas far enough away to prevent noise from being picked up.)
Do not use the unit in the place of kitchen fans or stove hoods. •
This kind of use will shorten the service-life of the pre-fi lter and pleated fi lter, possibly leading to damage.
Do not use the unit to preserve artwork, academic materials, etc., or for commercial or other special applications. •
This kind of use may degrade the quality of preserved objects.
Correctly attach parts after cleaning the unit. •
Using the unit with parts such as fi lters removed may lead to damage.
Use only tap water. •
In general, tap water is chlorinated, which prevents bacteria from proliferating.
Do not add the below liquids to the water tank. •
Hot water of 40˚C or more, aromatic oils, chemicals, dirty water, water containing fragrances or solvents, etc.
Liquids of the sort may deform or damage the unit.
Purifi ed water, alkaline ion water, mineral water, well water, etc.
These types of water may lead to bacterial proliferation.
Do not overhumidify the room. •
Overhumidifi cation may lead to condensation and mildew in the room.
Periodically clean the unit. •
Clean the unit as explained in “CARE and CLEANING”.
Page 27-38.
Excessive dirt may lead to mildew, foul odors or lost humidifi cation capacity.
Be careful of freezing. •
Discard water from the water tank and humidifying tray if freezing is suspected.
Using the unit when water is frozen may lead to damage.
Discard water from the unit when the unit is not being used. •
If not using the unit, discard the water from the water tank and humidifying tray.
Grime and scale may cause mildew and bacteria, possibly leading to foul odors.
Other
If used where pets are kept, be careful that pets do not urinate on the •
unit or bite the power supply cord.
This may lead to electric shock or fi re. In the event of abuse by pets, stop operation, unplug the
power supply cord and contact the service shop.
Do not use combustion appliances where directly exposed to air •
currents from the air outlet.
Incomplete combustion of the combustion appliance may lead to CO poisoning, etc.
Before using indoor fumigating insecticides, stop operation to •
prevent chemicals from being sucked into the unit.
Because chemicals accumulate inside the unit, some persons may, depending on their physical
condition, be hypersensitive and have their health jeopardised as a result.
This product does not remove the harmful substances (CO, etc.) in cigarette smoke.

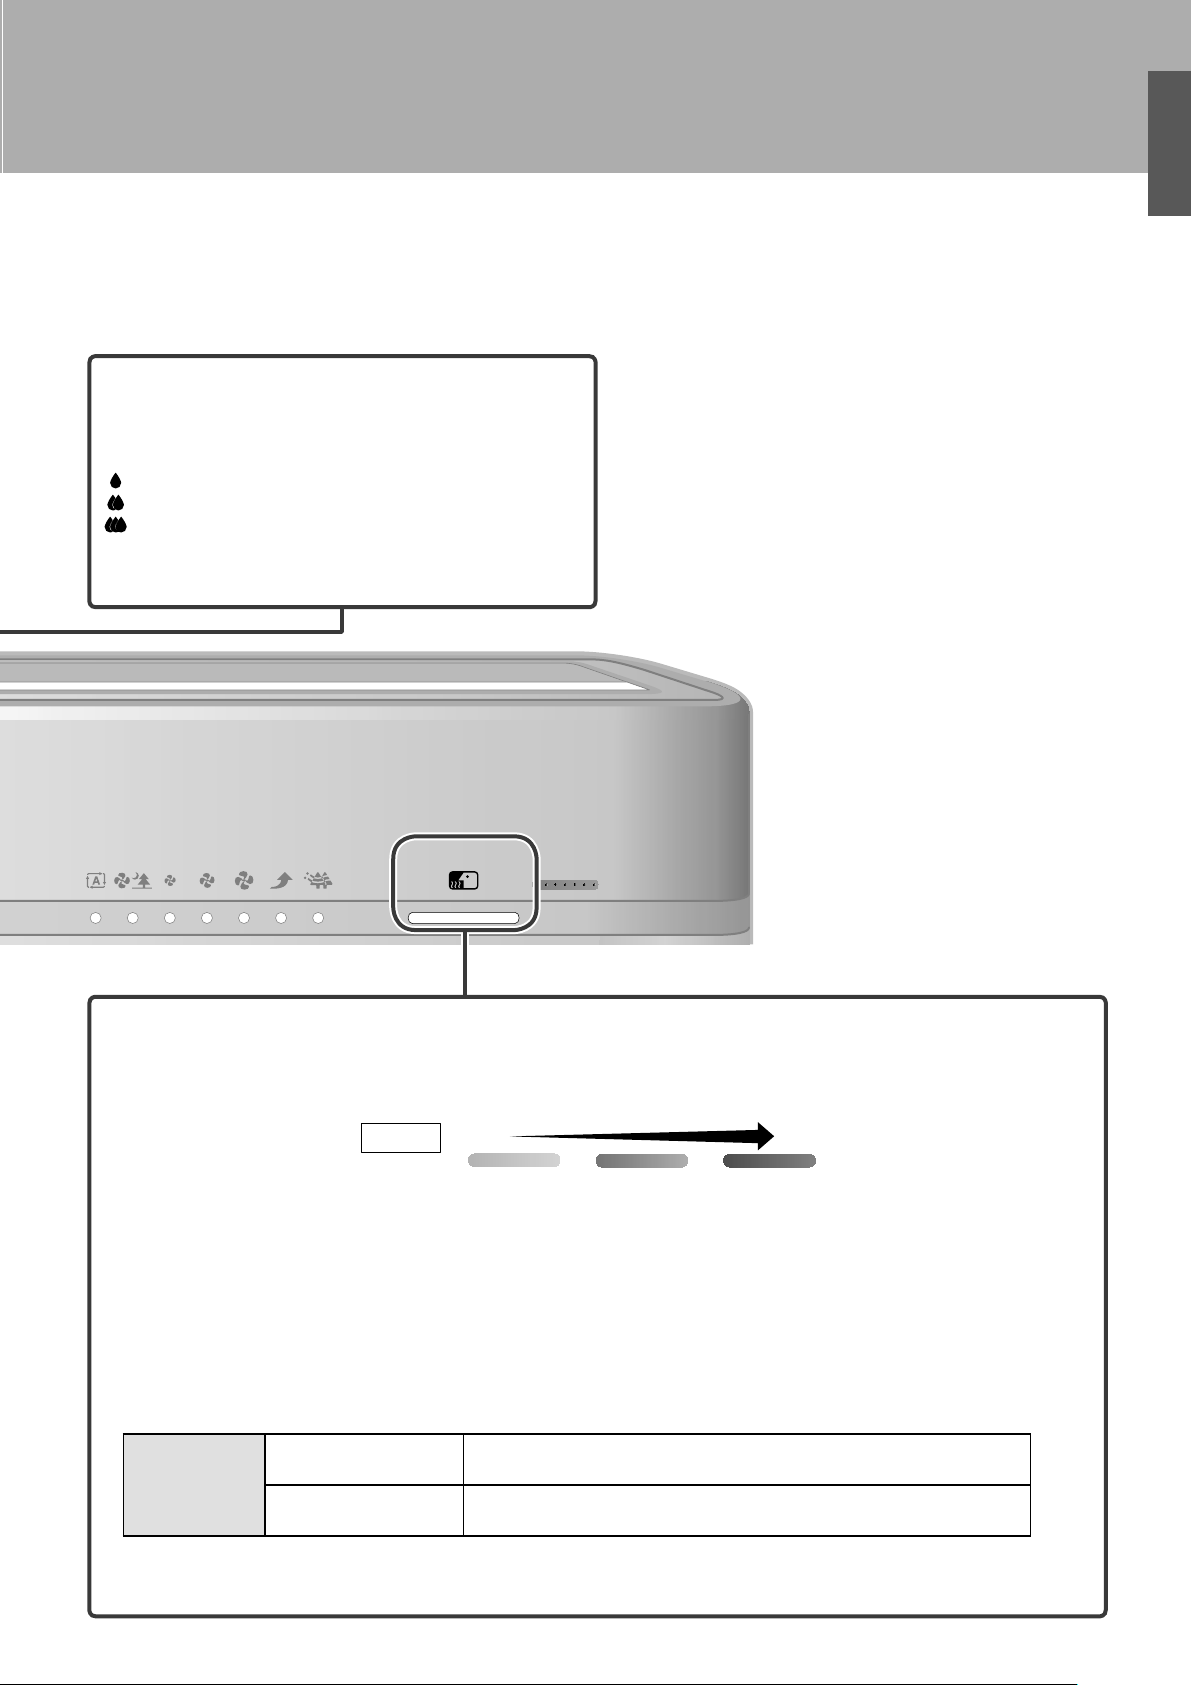
Names and Operation of Each Parts
Deodorizing catalyst unit
Absorbs airborne odors and
harmful gases using a deodorizing
catalyst (black), and decomposes
them by streamer action.
Pre-filter
(green)
Removes large dust particles.
Pleated filter
(front: white, back: blue)
Absorbs dust particles using the principle
of static electricity.
Small dust particles which are not captured by the pre-filter are positively charged
to that they can be more easily absorbed by the negatively-charged pleated filter.
Ionizing frame
Ionized wire (Rear)
Water tank
Front panel
Filter container
Holds 6 replacement pleated filters.
Safety guard
Odor sensor
Dust sensor
Humidity sensor · Temperature sensor
(First filter installed)
(Replacement filters) (Replacement filters)
Pleated filter 7pcs.
• 1pc. (Inside box)
• 6pcs. (Filter container)
Remote controller
Inside cushion
Filter container / Inside box
Operation manual
Recyclable deodorizing
cartridge
1pc.
Inside cushion
Inside box
Accessories check
Opposing pole plates
Main unit
(Plasma ionizer)
(Streamer unit)
UNIT2
UNIT1
Page 30, 31.
Page 23, 24.
Page 16.
7
8
English
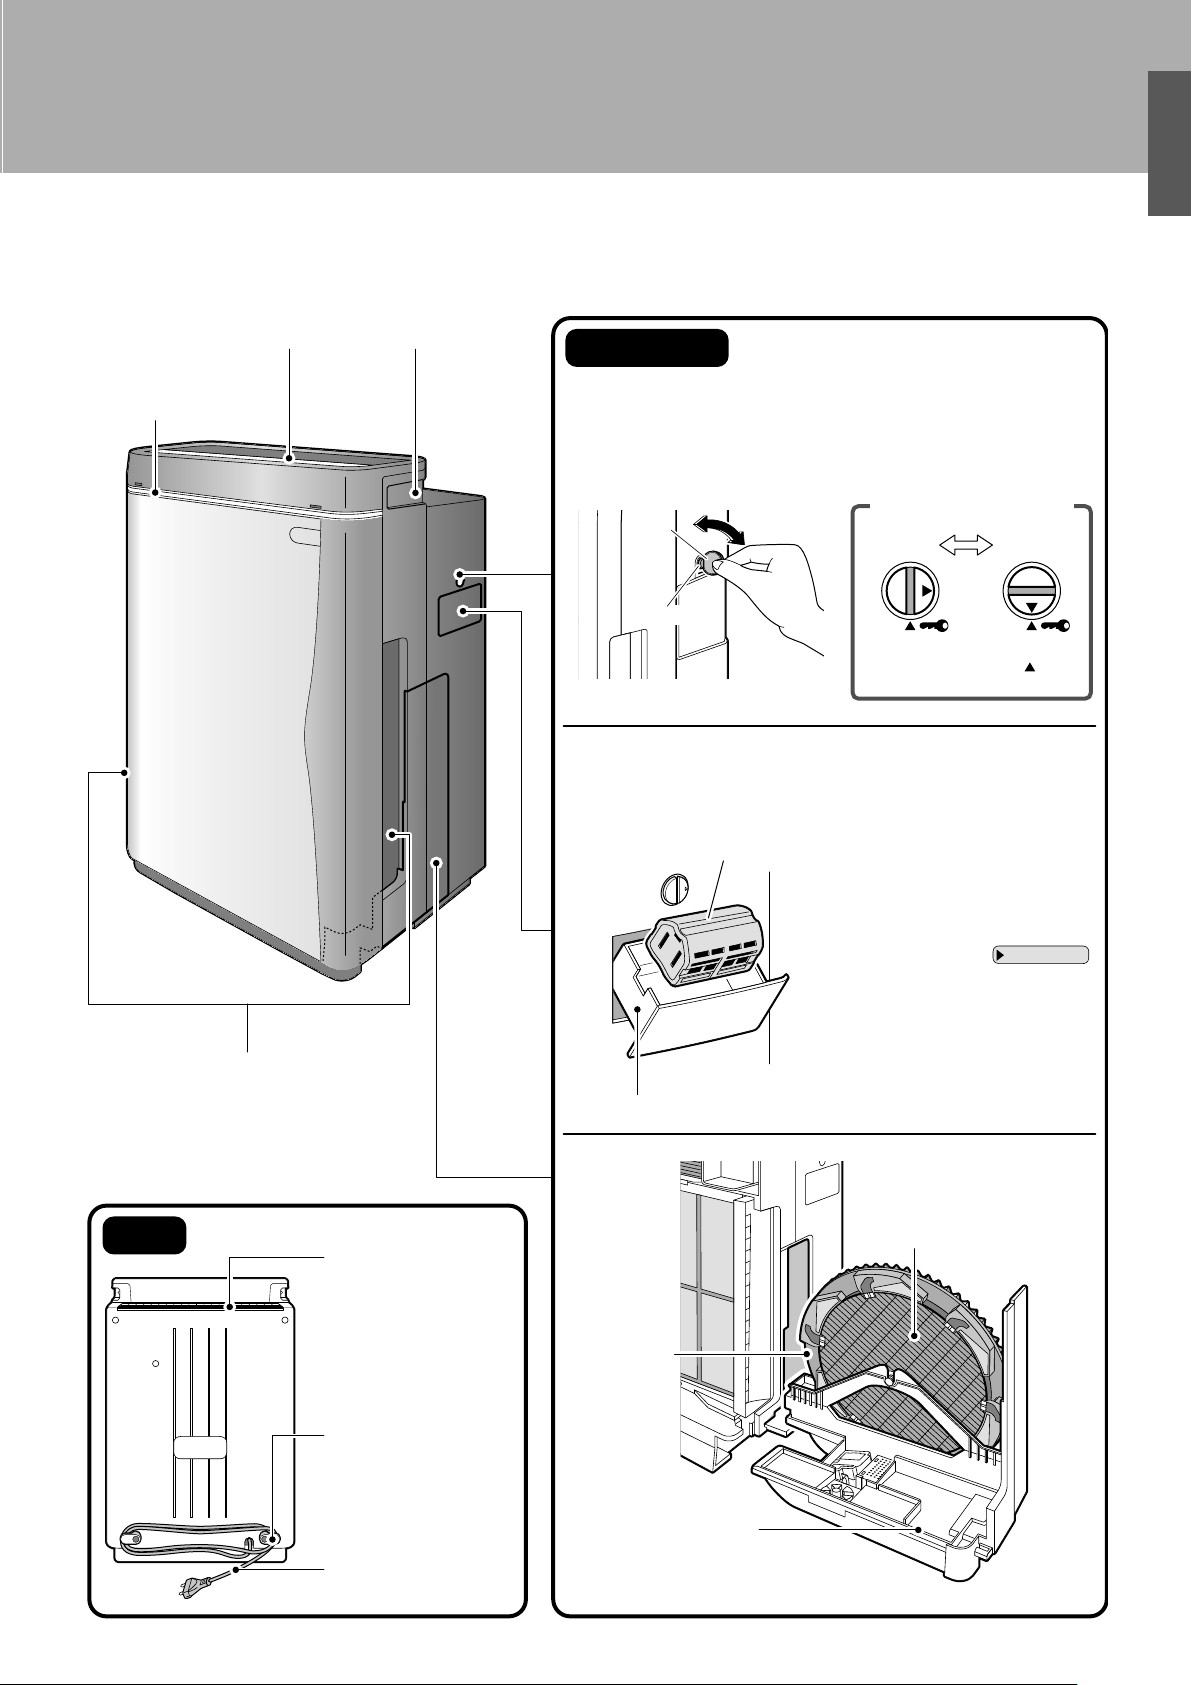
Rear
Side panel
Power supply
cord hook
Winds the cord for storing
unit.
Recyclable deodorizing cartridge
Use to regenerate the recyclable deodorizing cartridge.
Inserting into the streamer pocket decomposes absorbed odors and enables reuse.
Streamer pocket
Streamer pocket
Unlock Lock
How to use the pocket lock
Prevents streamer pocket from opening inadvertently.
Use a coin to open.
Pocket lock
Air outlet
Power supply cord
Humidifying filter
Operating panel
Front indicator
lamps
Handle
Air inlet
Humidifying tray
Waterwheel
Pocket lock
Coin
Unlock
Lock
Page 23, 24.
To lock, turn to where the meet.
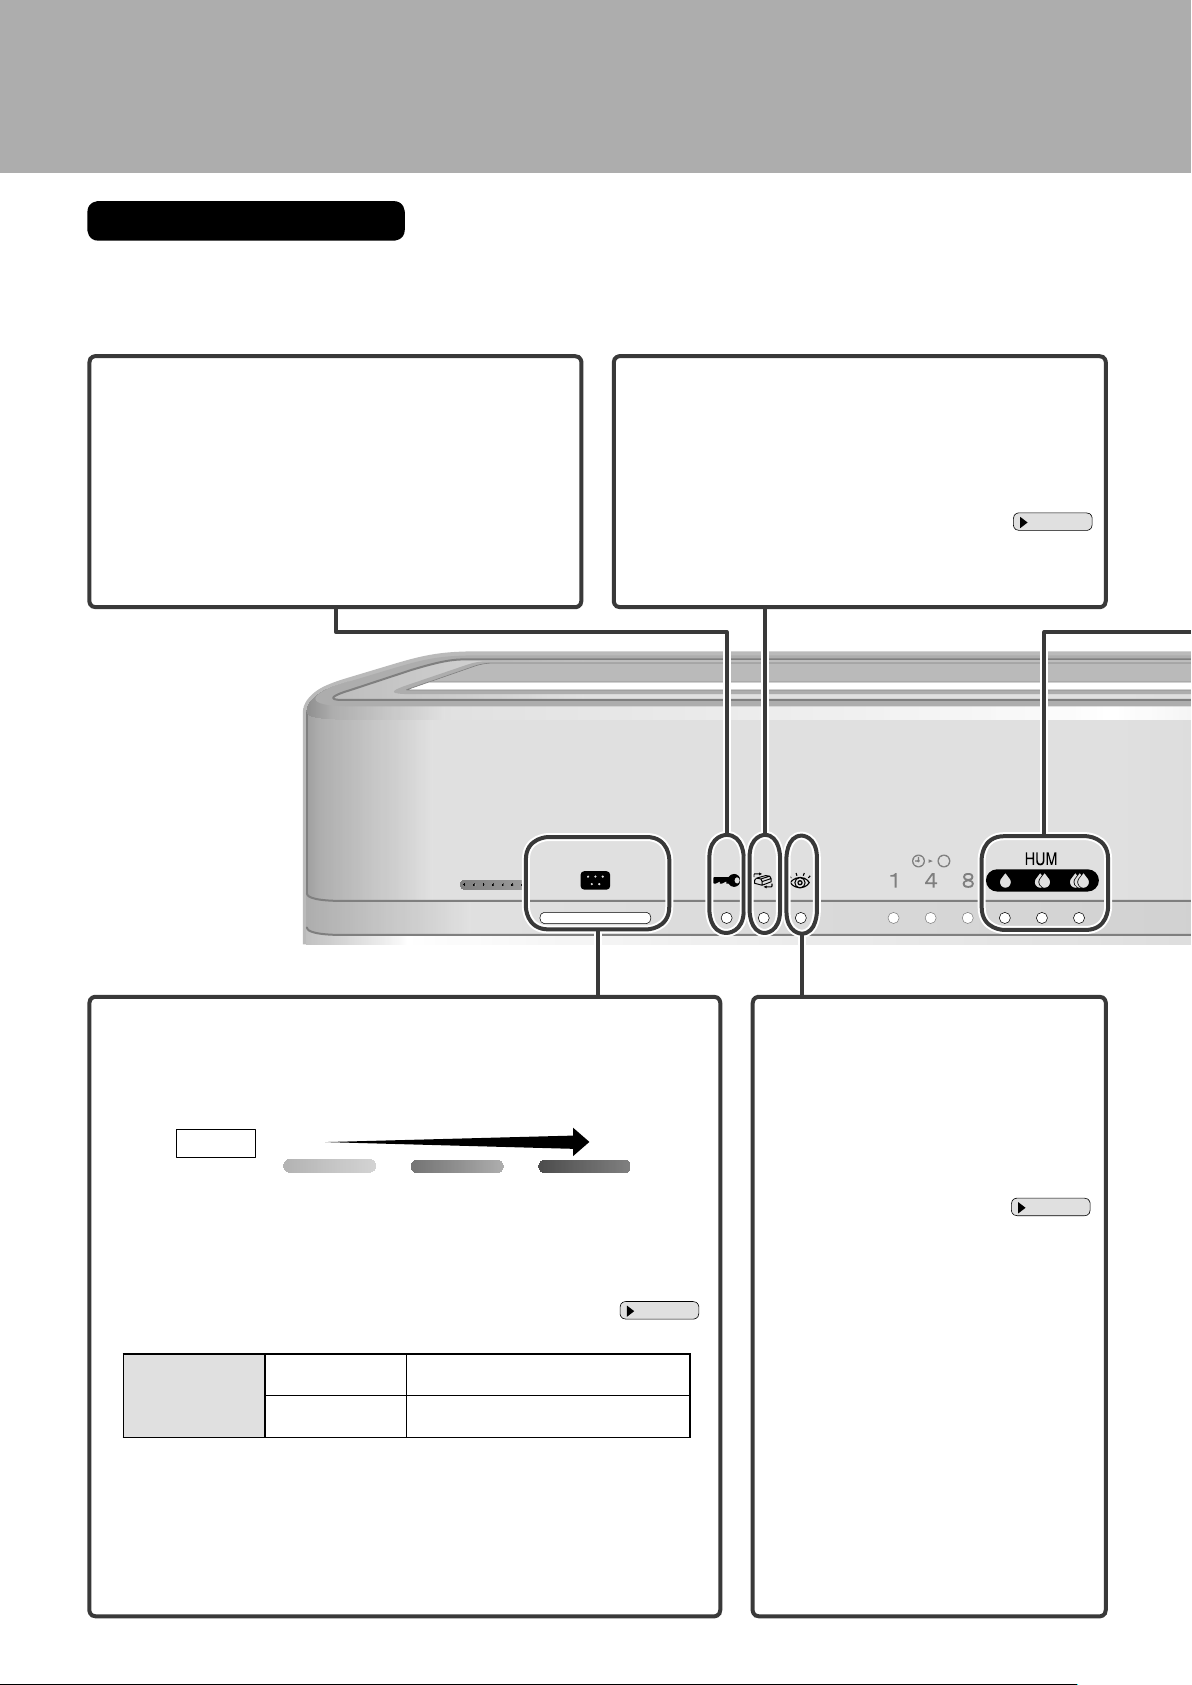
Names and Operation of Each Parts
Operating panel
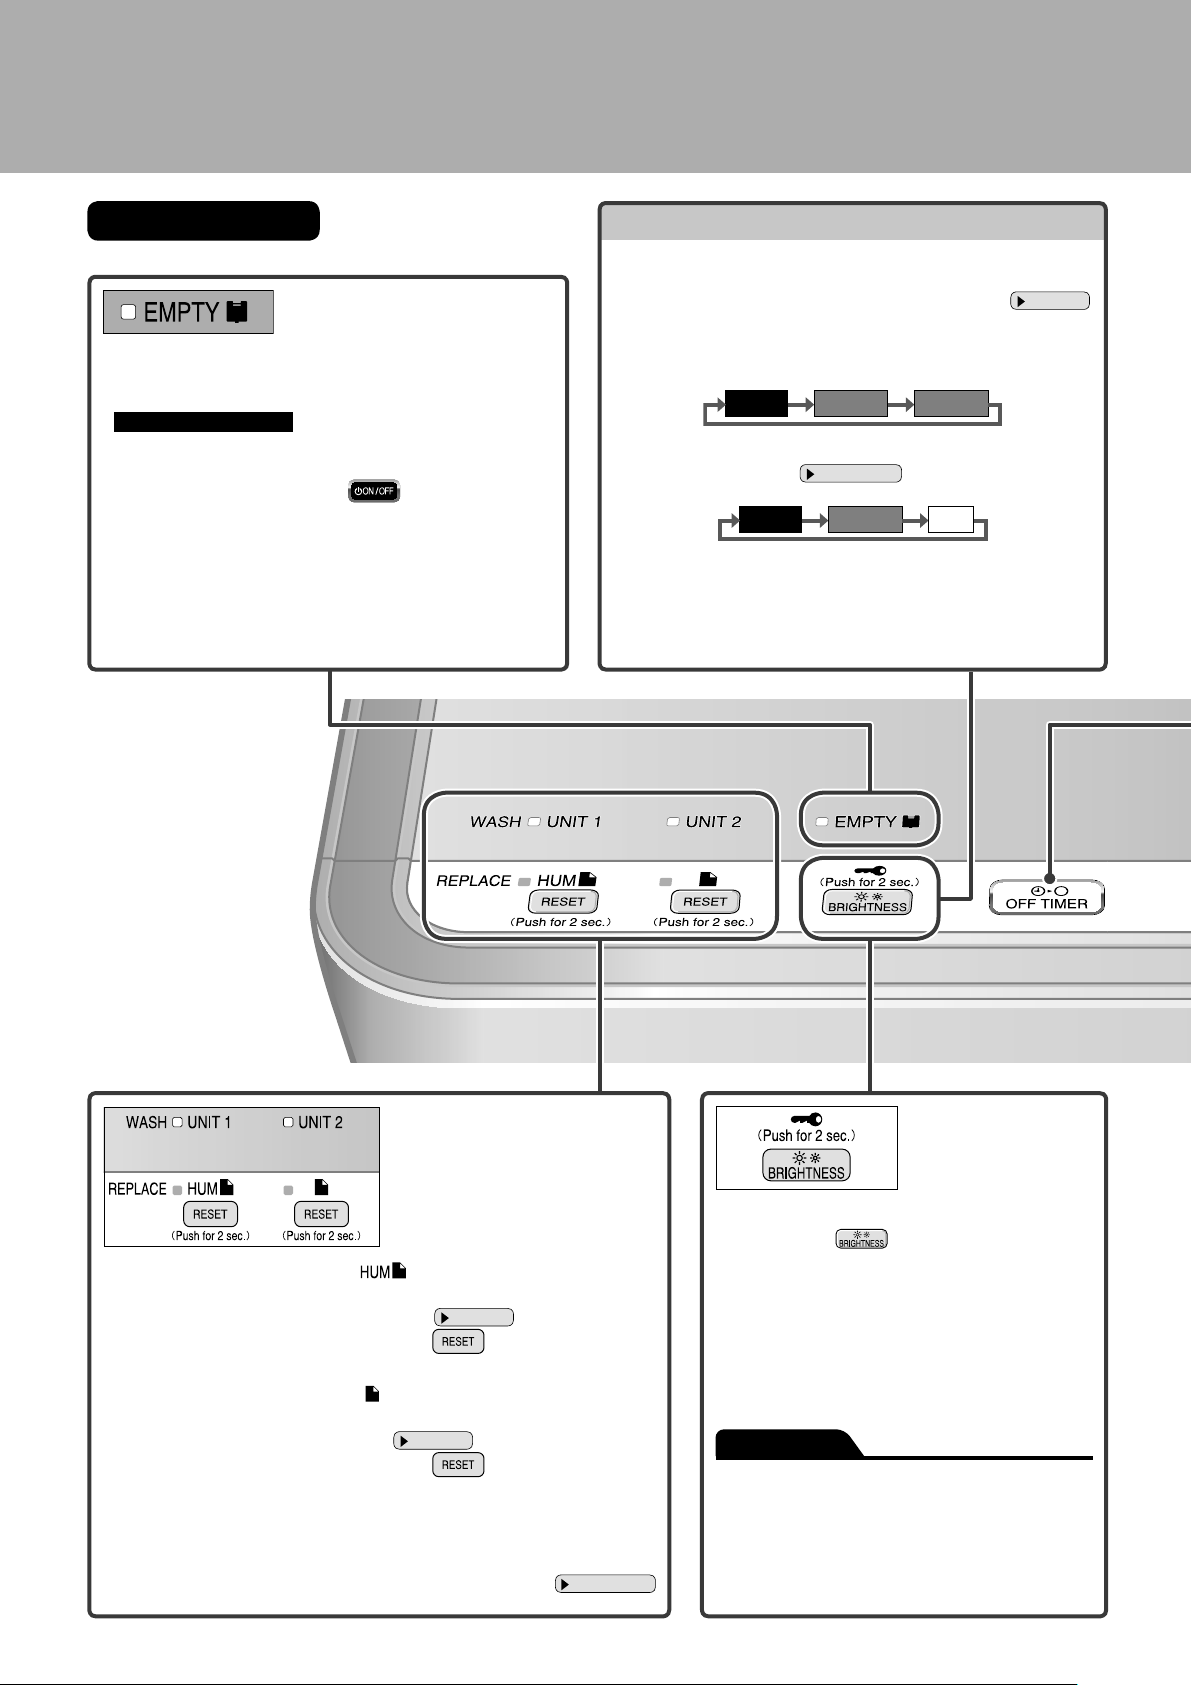
Water supply lamp
If the water tank becomes empty during humidifying operation,
•
a long beep sound repeat 3 times and this lamp lights.
Humidifying operation stops.
(Air purifying operation continues while the humidify lamp is lit.)
To resume humidifying operation, add water to the water tank, •
restore the water tank and press
.
Brightness adjustment
Use to set lamp brightness for sleeping or as you prefer.
Each time the button is pressed, the brightness of the operating
panel lamps and front indicator lamps change as follows.
<Operating panel lamps>
Bright Dimmed Dimmed
<Front indicator lamps>
Bright Dimmed
Only the front indicator lamps go completely off.•
Page 11, 12.
OFF
Page 13.
Child proof lock
Press and hold for about 2 seconds to
Humidifying fi lter lamp ( )
This lamp lights when it is time to replace the humidifying fi lter. It fl ashes if •
more time passes without changing the fi lter.
After replacing the fi lter, press and hold for about 2 seconds.
(A short beep sound is emitted and the lamps go out.)
Page 37.
engage the child proof lock.
(Do the same to cancel the setting.)
When engaged, the child proof lock restricts unit
operation so that it is not inadvertently operated by
children.
Air-purifying fi lter lamp ( )
This lamp lights when it is time to replace the pleated fi lter. It fl ashes if more •
time passes without changing the fi lter.
After replacing the fi lter, press and hold for about 2 seconds.
(A short beep sound is emitted and the lamps go out.)
UNIT lamp
UNIT1→This lamp lights when it is time to clean the plasma ionizer. •
UNIT2→This lamp lights when it is time to clean the streamer unit.•
Page 30.
Page 33, 34.
ATTENTION
The recyclable deodorizing cartridge can be ●
regenerated even while the child proof lock is
engaged.
If the front panel is removed while the child proof ●
lock is engaged, the unit stops for safety reasons
and the child proof lock is canceled.
9
10
English
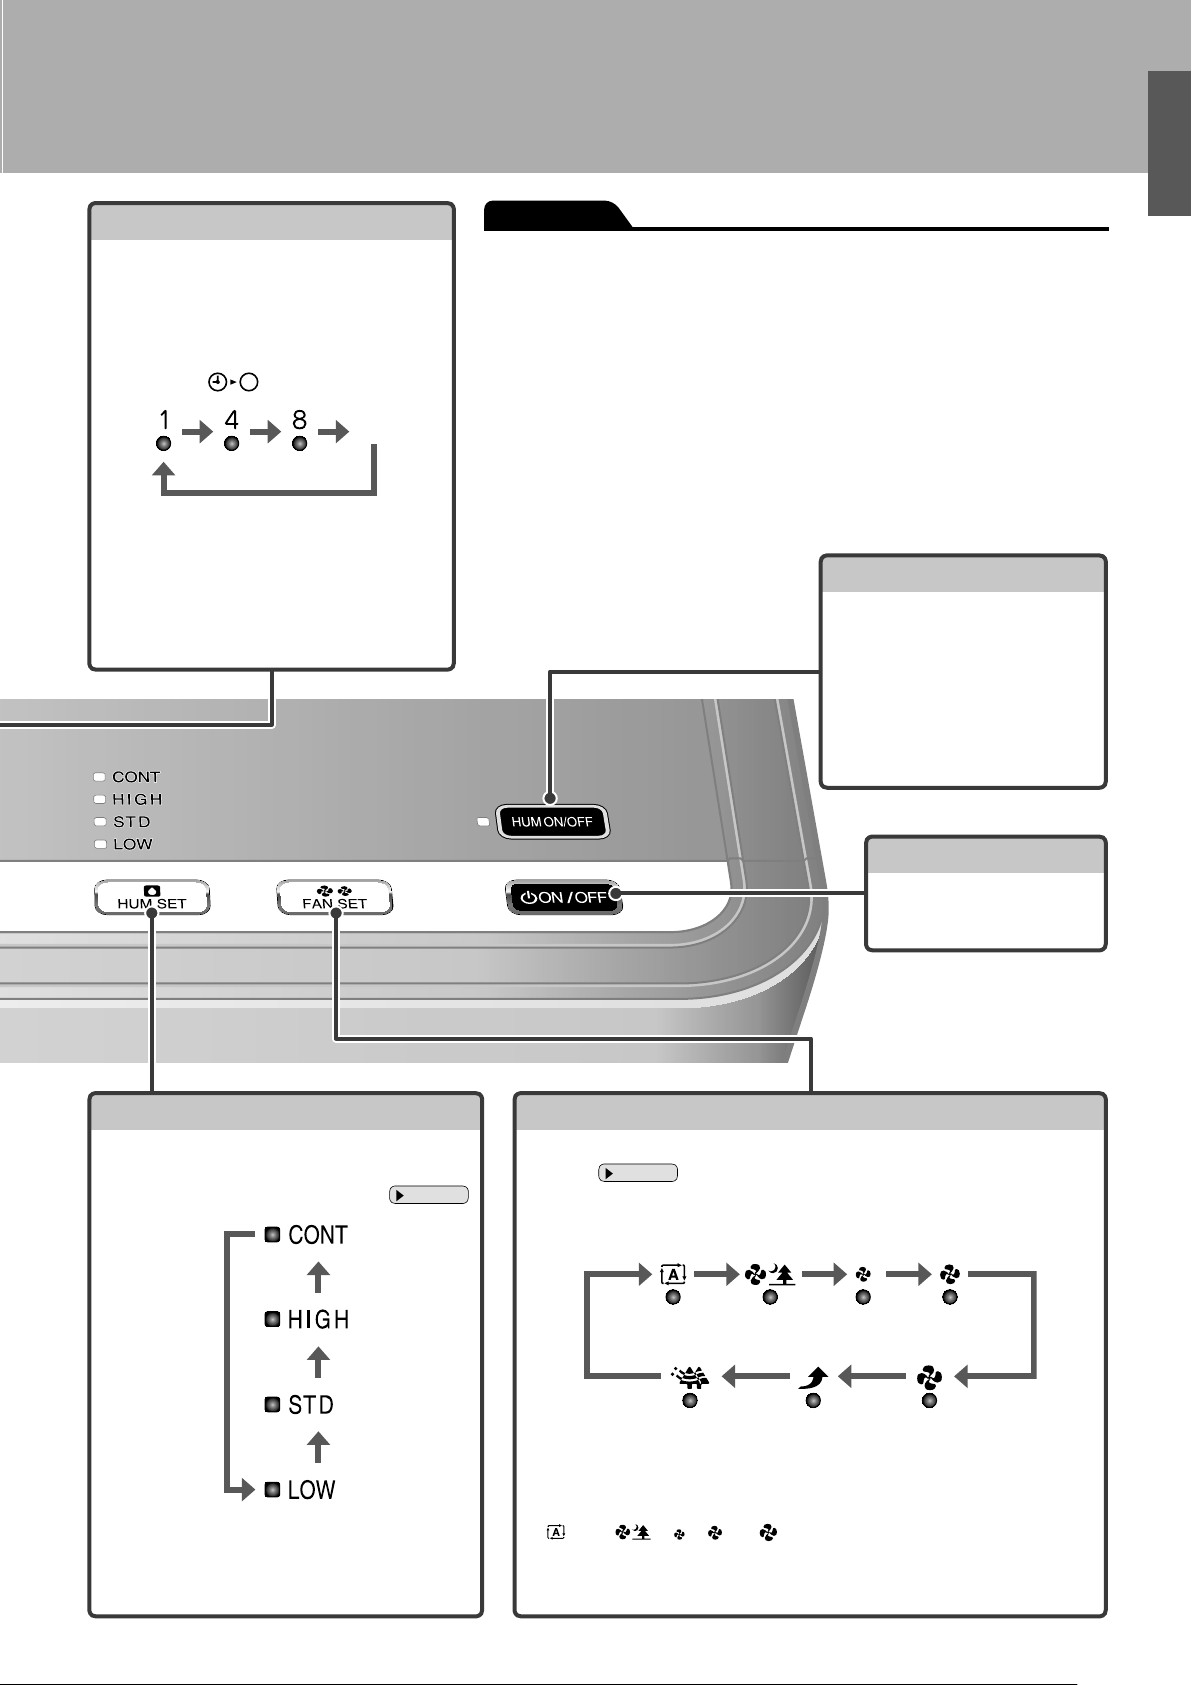
OFF TIMER button
Each time pressing this button, the OFF
time changes as follows.
<Front indicator lamps>
OFF
The timer setting indicator lights depending •
on the remaining time.
The set time can be changed while the timer •
is running.
ATTENTION
The operating panel is covered in a protective sheet to protect against scratching. ●
Peel the sheet off before use.
If the front panel is opened during operation, the unit stops for safety reasons. ●
If the unit malfunctions during operation
During operation, if the indicator lamps light erroneously or the unit cannot be
operated because of lightning or other reason, unplug the power supply cord, wait at
least 3 seconds, plug the power supply cord back in and start the unit.
Humidify ON/OFF button
Each time this button pressed, the •
humidifying operation is turned on
and off.
The lamp is lit while humidifying •
operation is ON.
Air purifying operation is active •
while humidifying operation.
(Humidifying operation cannot run
by itself.)
Humidify setting button
Each time pressing this button, the
humidify setting changes as follows.
Page 20.
ON/OFF button
When this button is pressed,
the unit starts. When pressed
again, it stops.
Fan setting button
Each time pressing this button, the airfl ow rate setting changes as
follows.
<Front indicator lamps>
Page 19.
(Automatic) (Quiet) (Low) (Standard)
(High)(Turbo)(Pollen)
The humidify setting cannot be changed when •
humidifying operation is OFF.
“ • ” and “ ”, “ ”, “ ” or “ ” will be lit simultaneously while in auto
mode.
The fan will be set to auto mode if the HIGH, STD, or LOW humidify setting is •
selected while in humidifying operation.
Names and Operation of Each Parts
Front indicator lamps
The readings of room hygrometers and the unit’s humidity indicator lamp may differ.
This is because air currents cause temperature and humidity drifts even in the same room. •
Consider the humidity indicator lamp as just a reference reading.
Child proof lock lamp
This lamp is lit while the child proof lock is engaged. •
If other buttons are pressed while the lamp is lit, a short beep
sound repeat 3 times and button operations are ignored.
Regeneration lamp
This lamp is lit while the recyclable deodorizing cartridge is •
being regenerated in the streamer pocket.
Regeneration takes 8 hours. •
Recyclable deodorizing cartridge regeneration is started and •
stopped by opening and closing the streamer pocket.
Page 24.
Dust sensor lamp
Dust sensor detects the dirty state of the air. The level of dirt is
indicated by dust sensor lamp on 3 colors: green, orange and red.
When the lamp is lit on green, the air is clean. •
Dust
In the following cases, the lamp is lit on green for the initial 2 seconds
regardless how clean the air is.
Operation directly after setting the front panel. (1)
Operation directly after setting the power plug. (2)
If the dust sensor reaction is dull, adjust the sensitivity setting.
Low
Green
Orange
High
Red
Page 13.
Sensor types and performance
Cigarette smoke, pollen, mites, house
dust, shed pet fur, diesel soot
Steam, oil vapors
Dust sensor
Detectable
Sometimes
detectable
Check lamp
This lamp lights to notify users that it is
time to replacement or care. Check the
operating panel for the area requiring
attention.
(Any of the humidifying fi lter lamp,
Air-purifying fi lter lamp, UNIT1/2 lamps,
or water supply lamp will light or fl ash
together with the check lamp.)
Page 25.
11
12
English
Humidity indicator lamp
(For reference only)
This lamp indicates the room humidity detected by humidity
sensor.
:Humidity: 40% or less
:Humidity: Approx. 50%
:Humidity: 60% or more
In case running the unit just to air purifying operation, the
lamp also indicates the humidity level.
Odor sensor lamp
Odor sensor detects the changes in airborne odors. The level of odors is indicated by odor sensor lamp on 3 colors:
green, orange and red.
When the lamp is lit on green, the air is clean. •
Odor
In the following cases, the lamp is lit on green for the initial 1 minute. This state is regarded as the sensitivity reference
Weak
Green
Orange
Strong
Red
value of the odor sensor.
Operation directly after setting the front panel. (1)
Operation directly after setting the power plug. (2)
In case the operation is started again. (3)
If the odor level remains constant without intensifying or weakening, the sensor may not detect even strong odors.
The odor sensor may not detect the type of odors other than ammonia, such as pet odors, garlic, etc.
Different people have different sensitivity to odors so you might notice an odor even though the lamp is green. If bothered
by odors, set manual airfl ow control and run the unit at a higher airfl ow rate.
Sensor types and performance
Detectable
Odor sensor
Sometimes detectable
Cigarette odors, cooking odors, pet and toilet odors, raw waste odors, mildew
odors , sprays, alcohol
Sudden changes in temperature and humidity, odorless gases such as CO,
steam, oil vapours, gas from combustion appliances

Sensitivity Settings of the Dust Sensor
The setting of dust sensor sensitivity can be changed.
Operating panel
1,21,3
Press for 10 seconds.
1
While holding down
, press .
After a short beep sound is emitted and the airfl ow (“• ” (Low), “ ” (Standard), “ ” (High)) lamps fl ash for about 5 seconds, the
lamp corresponding to the current sensitivity setting lights.
Change the sensitivity setting from .
2
3
Each time the button is pressed, the airfl ow lamps and the sensitivity change as below. •
The sensitivity setting is indicated by the airfl ow lamps. •
If the airfl ow lamps do not change, unplug the power supply cord, wait at least 3 seconds, plug the power supply cord back in and try
the operation again from the beginning.
To raise the sensitivity
Select the “HIGH” airfl ow lamp.
lower the sensitivity
To
Select the “LOW” airfl ow lamp.
After changing the setting, press .
A short beep sound is emitted and the lamp of the set sensitivity fl ashes. •
(High)
(Standard)
(Low)
Sensitivity
High
Normal
Low
The sensor more readily
reacts to dust.
Default setting
The sensor reacts less to dust.
13
Unplug the power supply cord, wait at least 3 seconds and plug the power supply cord back in.
4
This completes the setting.
ATTENTION
Dust sensor sensitivity can be set while the unit is running or stopped. ●
If step ●
is not performed, the unit does not go back to the normal operating mode.
4
14
English
PREPARATIONS BEFORE USE
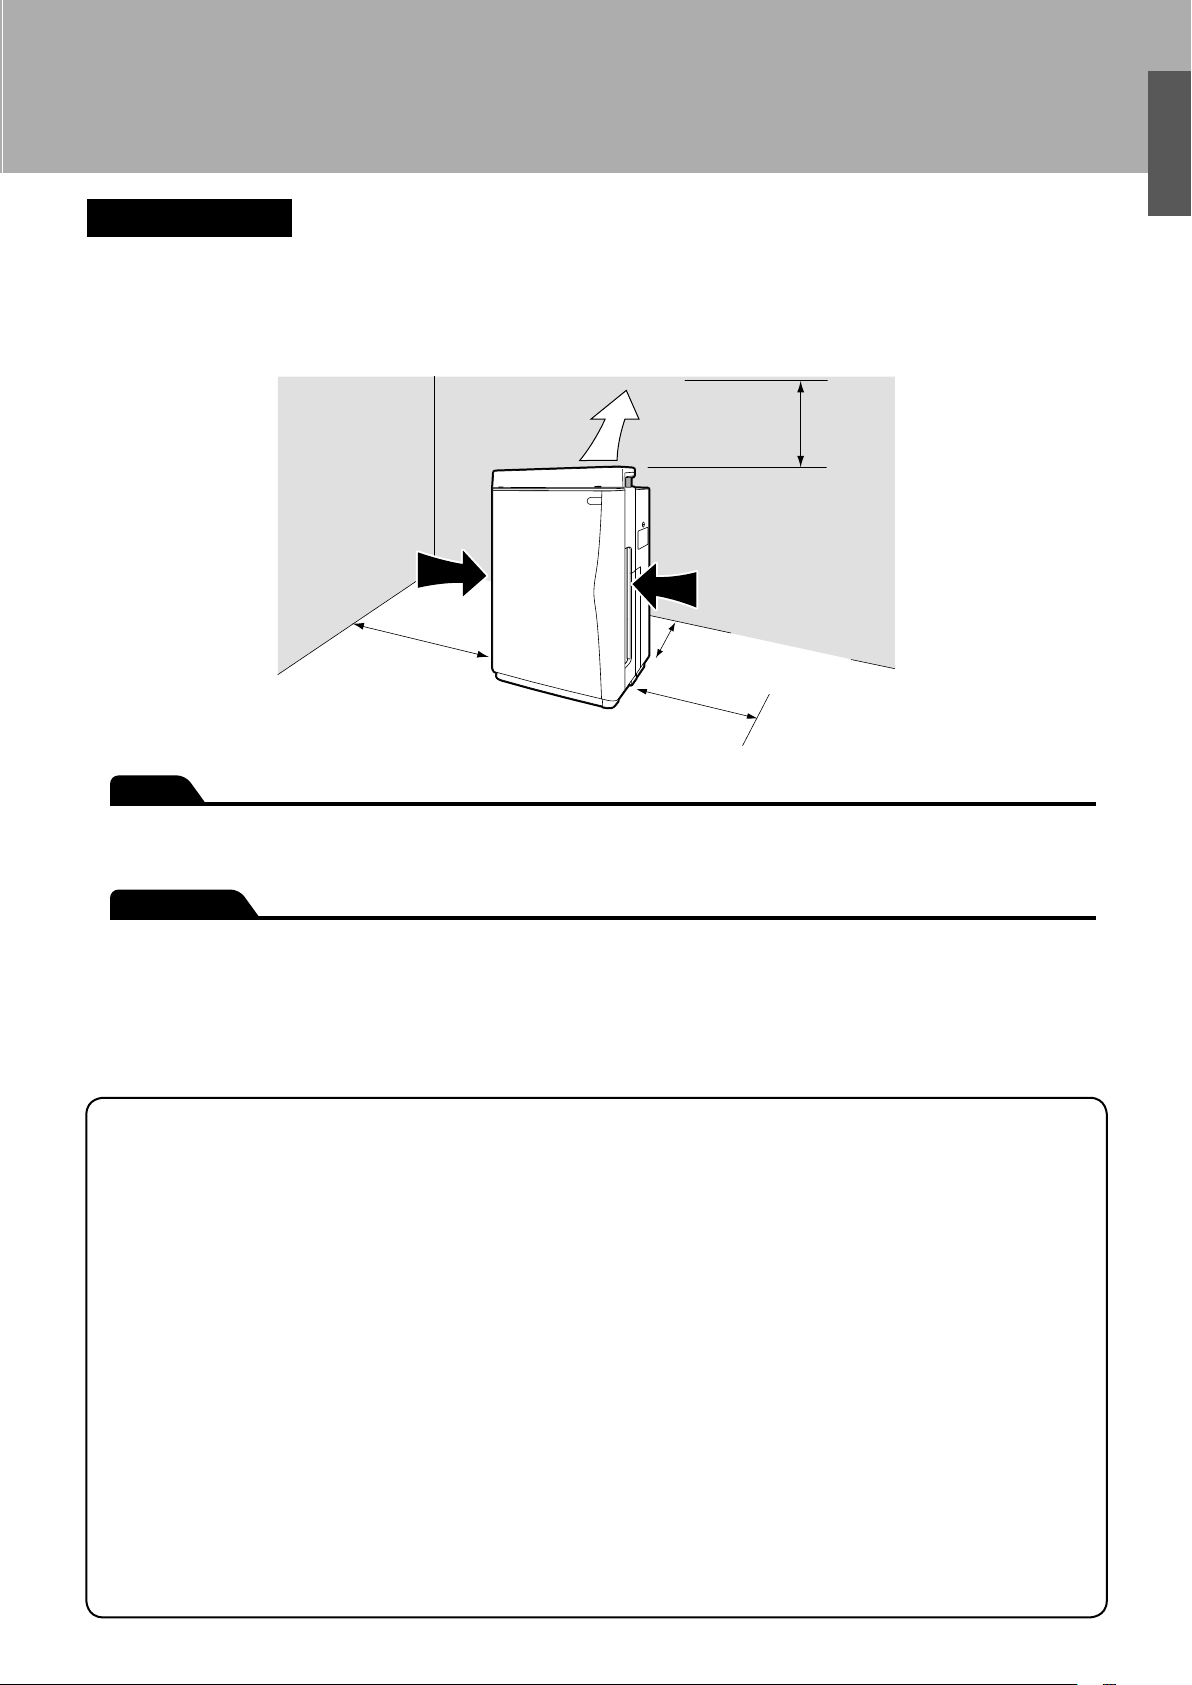
Installation
How to install
Set the unit in a preferred location.
Observe the following installation clearances to ensure unit performance.
Airflow
Min. 100cm
from ceilings
Min. 10cm from walls
Min. 50cm from walls
Min. 50cm from walls
NOTE
Depending on the type of wall, the wall may dirty even at the above installation clearance. ●
In such case, move the unit a safe distance away from the wall.
ATTENTION
Smart installation
Select a location that allows air to reach the entire room. ●
Air is blown slightly to the right, but nothing is wrong with the unit. ●
Set the unit on a stable fl oor. Unless the fl oor is stable, the unit may vibrate excessively. ●
Do not use the unit in the following places.
In contact with walls, furniture, curtains, etc.
Contacted objects may stain or deform.
On thick pile carpets or bedding
The unit may tilt, possibly spilling water or preventing the water level sensor from working correctly.
Exposed to direct sunlight or near to heaters
The unit may deform or discolor and the temperature and humidity sensors and safety devices may malfunction.
Exposed to outdoor air (i.e., by windows, etc.) or drafts from air conditioners, etc.
Room humidity may not be correctly indicated.
Near to curtains, bedding, etc.
The air inlets may be blocked, possibly leading to damage.
On inclined or unstable fl oors
The unit may fall or topple over in earthquakes or if contacted by someone.
If installed on an inclined surface, a safety device may trip and stop the unit.
Exposed to electromagnetic waves such as near to microwave ovens, speakers, etc.
The unit may not work correctly.

Preparation of Remote Controller
(2)
(4)
Battery
Adjust side of
battery to side of
the cover and set.
(3)
(1)
Tab
Remote controller setup
Remote controller preparations
1
Battery is already set in the remote controller.•
To use the remote controller, pulling out the clear sheet from the battery cover.
Using the remote controller
2
3
Point the transmitter of the remote controller towards the receiver of the main unit.•
If an obstruction to the signal, such as a curtain, exists, the remote controller will not
operate.
The distance from which the remote controller can transmit is approximately 6m.•
Battery replacement
1) Push the tab of the cover toward the arrow.
2) Pull out the cover.
3) Replace the battery with CR2025 (lithium) battery.
(Be sure to set the battery with the + side of the cover as shown in the fi gure.)
4) Close the cover to its original position.
NOTE
Store the batteries where babies and children cannot reach them. ●
If, by chance, a battery is swallowed, be sure to contact a doctor immediately.
When discarding batteries, cover the terminals of the batteries with tape. ●
If mixed with other metal or batteries, heat, explosion or combustion may occur.
Receiver
5m
30° 30°
5m
6m
ATTENTION
Battery
The included coin type battery is prepared for initial use. ●
They will be consumed within 1 year from the manufacturing date of the air purifi er.
A replacement target is approximately 1 year but if the reception becomes diffi cult, replace the batteries with new coin type battery CR2025 ●
(lithium).
Coin type battery close to the “recommended usage period” may need to be replaced soon. ●
In order to prevent malfunctions or injuries due to leaking or explosions, be sure to remove the coin type battery when the unit will not be ●
used for a long period of time.
Remote controller
Do not drop or place the remote controller in water. ●
(Damage may occur.)
Do not press the remote controller buttons with sharp objects. ●
(Damage may occur.)
The signals may not be received well of electronic lighting style fl uorescent lamps (such as inverter fl uorescent lamps) are in the same ●
room. For these cases, consult your dealer.
If other electrical device operate by the remote controller, either separate them from the remote controller or consult your dealer. ●
15

16
English
Attach the Filter
CAUTION
Deodorizing catalyst unit
Holes
(5 each on left and right)
Pleated filter
Projection
(5 each on left and right)
Face the white
side to the front
Do the following before plugging in the power supply cord. •
Attach the pleated fi lter
Be sure to attach the pleated fi lter
before starting the unit.
Remove the front panel.
1
Push the 2 projections (left and right) inwards, and pull the •
front panel upwards and remove.
Front panel
Push
Projection
(1 each on left and right)
Remove the deodorizing catalyst unit.
4
5
Holding the deodorizing catalyst unit by the handle, pull •
the deodorizing catalyst unit upwards and out of the unit.
Handle
(1)
Pull
Deodorizing catalyst unit
Attach the pleated fi lter.
Attach the pleated fi lter with the white side facing to
the front.
Fit the projections (5 locations) on the left and right faces •
of the deodorizing catalyst unit into the holes (5 locations)
on the left and right of the pleated fi lter.
(2)
Up
Remove the water tank.
2
3
Holding the water tank by the handle, pull the tank •
upwards and out of the unit.
(1)
Pull
Water tank
Remove the UNIT1.
Holding the UNIT1 by the handle, pull the UNIT1 upwards •
and out of the unit.
Handle
(2)
Up
Insert the pleated fi lter underneath the tabs (4•
the top and bottom of the deodorizing catalyst unit.
Top and bottom tabs (4 locations)
locations
) at
(1)
Pull
UNIT1
(2)
Up
NOTE
Always run the unit with both a pre-fi lter (green) and pleated
●
fi lter (front: white, back: blue).
Running the unit without both fi lters may lead to damage.
Unit performance drops if the pleated fi lter is attached ●
backwards.

Water Tank Preparations
Water tank preparations
Air purifying operation can be operated even
without water in the tank.
Open the cap on the water tank.
1
Add water to the tank and close the cap.
2
Use only tap water.
Add water somewhere that can be wet if spilled. •
Before adding the actual water to use in •
humidifi cation, add a small amount of water to the
tank, shake to rinse internally and discard the water.
Refer to water tank cleaning.
Cap
Page 28.
NOTE
Do not add the following to the water tank.
Hot water of 40˚C or more, aromatic oils, chemicals, dirty water, ●
water containing fragrances or solvents, etc.
Liquids of the sort may deform or damage the unit.
Purifi ed water, alkaline ion water, mineral water, well water, etc. ●
These types of water may lead to mildew or bacterial proliferation.
17
Close the water tank cap tightly.
Unless tight, water may leak.
Hold a full water tank by the handle to carry. •
Do not touch the valve at the center of the cap. •
Water may spill from the tank.
Do not touch the
valve at the center
of the cap.

18
English
After attaching the fi lter
Restore the deodorizing catalyst unit.
1
2
Holding the deodorizing catalyst unit by the handle, fi t the •
projections on the unit into the grooves (4
bottom of the main unit and press the deodorizing catalyst
unit into the main unit.
(1)
Fit here.
Deodorizing catalyst unit
Restore the UNIT1.
Holding UNIT1 by the handle, fi t the projections on the unit •
into the grooves (2
unit, and press UNIT1 into the main unit.
(2)Press inward until
hearing clicking sound.
locations
) at the bottom of the main
locations
) at the
Restore the front panel.
4
Fit the tabs (2•
grooves at the bottom of the main unit, and close the
panel.
[View from above]
(1)
Fit here.
Bottom grooves
(2 locations)
To correctly restore the front panel, press the
front panel until hearing the clicking sound from
the left and right sides.
Unless properly installed, a safety switch may trip
and prevent the unit from starting.
locations
Front panel
) at the bottom of the panel into the
(2)Press inward until
hearing clicking sound.
Page 27.
Pre-filter
Restore the water tank.
3
UNIT1
Holding the water tank by the handle, fi t the tank into the •
hole at the bottom of the main unit, and press the tank into
the main unit.
NOTE
Always run the unit with both a pre-fi lter (green) and pleated ●
fi lter (front: white, back: blue).
Running the unit without both fi lters may lead to damage.
(1)
Fit here.
(2)Press inward until
hearing clicking sound.
Water tank
(1)
Fit here.
(2)Press inward until
hearing clicking sound.

HOW TO OPERATE
Air Purifying Operation
Plug the power supply cord
into an electrical socket.
Socket
Power plug
Humidification lamp
2
NOTE
Do not insert or remove the power plug to turn the unit on/off. ●
Abusive handling may lead to electric shock or fi re because of overheating.
1
Press .
1
2
If humidifi cation was run the last time that the unit was used, humidifi cation starts automatically, therefore press • to turn
OFF the humidifi cation lamp.
Press to change the airfl ow rate.
Each time the button is pressed, the airfl ow rate changes as follows. •
(Automatic) (Quiet) (Low) (Standard) (High) (Turbo) (Pollen)
Airflow rate ((Quiet) (Low) (Standard) (High)) is
automatically adjusted according to the dirty state of
the air.
Quiet mode Anti-pollen mode
Air flows at a super slow rate.
This mode is recommended when sleeping.
Turbo modeAuto mode
This is the high airflow rate mode that quickly removes
airborne dust.
The airflow rate is changed every 5 minutes to create
gentle air currents so as to catch the pollen before
settling on the floor.
19
ATTENTION
The default settings are air purifying operation and “auto” airfl ow rate control. ●
If the power supply cord is unplugged or if the front panel was opened and the unit restarted, the next time that the unit is used, it runs at
the last used settings.

20
English
Humidify and Air Purifying Operations
Air purifying operation is active while
humidifying operation.
Do not move the unit while it is running. Displacements may cause ●
water leaks, damage or malfunctions.
(Humidifi cation cannot run by itself.)
Humidification lamp
Press .
1
Press to light the humidifi cation lamp.
2
If humidifi cation was run the last time that the unit was used, the humidifi cation lamp lights automatically.•
2
143
Press to change the humidify setting.
3
4
Each time the button is pressed, the humidify setting changes as follows. •
STD LOW HIGH CONT
Press to change the airfl ow rate.
Each time the button is pressed, the airfl ow rate changes as follows. •
The fan will be set to auto mode if the HIGH, STD, or LOW humidity setting is selected while in humidifying operation. The airfl ow rate •
setting cannot be select.
To set the airfl ow rate, set the humidify setting “CONT”. Humidifying capacity increases alongside airfl ow rate. •
When set to “auto”, airfl ow rate is automatically adjusted according to the dirty state of the air and humidity in the air. •
ATTENTION
As water is supplied from the water tank to the humidifying tray, the sound may be heard. ●
If the set humidity is reached or the water supply lamp lights during humidifi cation, humidifi cation stops, but air purifying operation ●
continues.
Humidifi cation rate varies according to the airfl ow rate setting. ●
NOTE
Be sure to install the humidifying ●
fi lter to run the unit.

(Low)(Quiet) (Standard)
(High)
“ ” “ ” “ ”
“ ”
How to Operate with Remote Controller
How to operate with remote controller
1. ON/OFF button
2. Auto fan button
10
2
4
6
8
To start operation
Press “
1
1
3
5
7
9
”.
3. Fan setting button
4. Turbo button
5. Anti-pollen button
6. Humidify ON/OFF button
7. Humidify setting button
8. OFF TIMER button
9. Brightness adjustment button
10. Child proof lock button
Pressing again will stop.•
To automatically switch the airfl ow rate
Press “
2
Automatically adjusts the airfl ow rate to “• ” (Quiet), “ ” (Low), “ ” (Standard), “ ” (High) in response to the quality of the air.
To manually switch the airfl ow rate
Press “
3
Each time it is pressed, the airfl ow rate switches as shown below allowing you to choose your desired fl ow.•
The setting “• ” (Quiet) is a very low airfl ow rate and is convenient when sleeping.
After setting “•
To clean the air quickly
Press “
4
”.
”.
” (Quiet), the power for cleaning the air decreases because of the operation at low airfl ow rate.
”.
A high airfl ow rate will quickly remove any dirtiness in the air.•
This is convenient to use when cleaning.•
To remove pollen
Press “
5
Switching the airfl ow speed every 5 minutes between “• ” (Standard) and “ ” (Low) will catch pollen before they fall on the fl oor.
21
”.

22
English
To switch the humidifying operation ON/OFF
“4”(4 hours)“1”(1 hour) “8”(8 hours) (Cancel)
Press “
6
Each time it is pressed, the humidifying operation ON/OFF will switch.•
When the humidifying operation ON/OFF is switched humidity indicator lamp indicate temporarily as shown below.•
In case the humidifying operation is turned ON: the humidity indicator lamp will be changed and indicate the setting.•
In case the humidifying operation is turned OFF: the humidity indicator lamp will turn OFF for 2 seconds.•
To change the humidify setting
Press “
7
Each time it is pressed, the humidity indicator lamp indicate temporarily as shown below.•
To decide a time to stop operation
Press “
8
”.
”.
“STD”(Standard)“LOW”(Low) “HIGH”(High) “CONT”(Continuous)
”.
Each time it is pressed, the timer setting switches as shown below. The remaining time will be lit in the OFF timer lamp.•
When the set time is reached, the operation will automatically stop.•
The set time can be changed if the button is pressed while the timer is operating.•
To change the brightness of the operation panel lamps and front indicator lamps
Press “
9
Each time it is pressed, the display will switch as shown below.•
<Operating panel lamps>
Bright Dimmed Dimmed Bright Dimmed OFF
To prevent incorrect operation
Press “
10
Stops the function of the button other than the “• ” on the main unit and buttons on the remote controller.
This makes it possible to prevent children from operating the unit incorrectly.•
To release the child proof lock settings, press “•
”.
” for 2 seconds.
<Front indicator lamps>
Only the front indicator lamps go completely off.•
” again for 2 seconds.
Page 11, 12.
To release the child proof lock settings when the remote controller is not in your hand, press “ •
NOTE
The unit will not operate for 3 seconds after the front panel is set or power plug is inserted even though “ ● ” button on the remote
controller is pressed.
Operation will stop for safety when the front panel is opened during operation. ●
When an incorrect operation is performed during operation. ●
If the main unit display is abnormally on or remote controller is disabled due to thunder or radio transmission during operation, pull the
power plug and then re-insert it after 3 seconds.
” of the unit for 2 seconds.

Inside shoe cabinets
Inside carsFoyers
Inside closets
Inside refrigerators
Toilets
• Do not use or store the recyclable deodorizing cartridge anywhere near to flames, exposed to direct sunlight or extremely hot or humid.
For refrigerator use only
(The recyclable deodorizing cartridge
cannot be used Inside freezers.)
How to Use the Recyclable Deodorizing Cartridge
The recyclable deodorizing cartridge can be removed from the air purifi er and used to
deodorize remote locations.
Deodorizing capacity can be regenerated with the streamer pocket so as to use the
cartridge time and time again.
Uses
The deodorizing cartridge can be used in the below places.
To use Inside refrigerators
Use 1 recyclable deodorizing cartridge per 450L of refrigerator. •
For sanitary reasons, use the cartridge solely for the refrigerator. •
Position the cartridge so as not to contact food. •
Do not use the cartridge Inside freezers. •
Condensation forms on the case if the cartridge is moved from •
cold places to warm places.
If condensation adheres to the cartridge, wipe up the water with a •
soft piece of cloth and dry the cartridge naturally.
How to use
Take the recyclable deodorizing cartridge (1)
out of the bag.
Though it can be used as is, a better deodorizing effect is •
obtained if the cartridge is fi rst regenerated before actual use.
.Bag content: Deodorizing catalyst fi lter (1pc.)
.Components: Photocatalyst (titanium apatite), activated charcoal
Set the starting month on the back of the (2)
recyclable deodorizing cartridge.
Example Deodorizing for 2 months from April to June
To use Inside cars
Position the recyclable deodorizing cartridge so as not to obstruct •
the driver’s vision.
Do not locate the cartridge under the driver’s seat because it may •
obstruct pedal operations.
Do not locate the cartridge in hot places such as on the •
dashboard, because it may deform.
Set in a smelly place. (3)
Example Inside shoe cabinets
Recyclable
deodorizing cartridge
The deodorizing effect continues for
about 2 months.
(The actual effect varies according to the environment.)
Odor
Odor
Odor
Slide to the left and right.
When the left slot is over the starting month, the month that the
deodorizing cartridge should be regenerated is shown in the right slot.
Expected duration of effect About 2 months
Recommended coverage area About 1.7m
The recyclable deodorizing cartridge removes odors by absorbing the odor element
therefore suffi cient effect may not be obtained if used in spacious places.
2
The recyclable deodorizing
cartridge may be laid down
or stood on end as demanded
by the place of use.
NOTE
The recyclable deodorizing cartridge is not edible. Accidental •
swallowing may result in serious illness, therefore be particularly
mindful to place the cartridge out of the reach of children.
If accidentally swallowed, consult a doctor.
Do not use the cartridge together with other air fresheners, •
deodorizers, insecticides, etc.
Keep away from pets. •
Clothes may be stained if contacted by the cartridge. •
23
Use the cartridge solely for its intended purpose. •
Do not disassemble the cartridge.•
The recyclable deodorizing cartridge is not intended for use in •
spacious places and places of strong smell, therefore use the
main unit in those cases.
The air purifi er may be used with the recyclable deodorizing •
cartridge inserted Inside the streamer pocket without any
problems.

24
English
How to regenerate the recyclable
deodorizing cartridge
After about 2 months (reference only), regenerate the recyclable deodorizing cartridge inside
the streamer pocket.
Suffi cient deodorizing effect may not be obtained if the cartridge is not regenerated
periodically.
Recyclable deodorizing cartridge regeneration is started and stopped by opening and closing
the streamer pocket.
Procedure Note
1
2
Open the streamer pocket and place the
recyclable deodorizing cartridge inside.
Push once on the cover to
open the streamer pocket.
Push
Streamer
pocket
Insert the cartridge in the
direction shown here.
Recyclable
deodorizing cartridge
Close the streamer pocket.
A short beep sound is
emitted when the regeneration is
properly started.
Close the
streamer pocket.
Regeneration start
Regeneration starts
automatically.
8 hours later
The regeneration
lamp lights.
Do not put anything other than the recyclable •
deodorizing cartridge into the streamer pocket. This
may lead to damage.
The recyclable deodorizing cartridge cannot be •
regenerated if wet with condensation, etc. Inserting a
wet cartridge into the streamer pocket may lead to
damage.
Do not use the air purifi er with the streamer pocket •
open. This may lead to damage.
The streamer pocket can be locked. •
When starting regeneration, make sure the •
regeneration lamp lights.
The recyclable deodorizing cartridge can be •
regenerated without running the air purifi er by simply
plugging into the power supply cord.
Regeneration stops automatically for safety reasons if •
the front panel is opened or the power supply cord is
unplugged during regeneration. In such case, the
regeneration time also resets. To start regeneration
again, open and close the streamer pocket.
Depending on the conditions of use and how old the •
recyclable deodorizing cartridge is, regeneration may
not completely restore the deodorizing effect.
The recyclable deodorizing cartridge can be •
regenerated about 200 times. (The actual amount
varies according to the environment.)
Main operating condition
Page 8.
Regeneration
Regeneration end
Regeneration ends
automatically.
After regeneration ends, remove the recyclable
deodorizing cartridge and return it to its place
of use.
The regeneration
lamp goes out.
Air purifi er running Possible
Possible
Air purifi er stopped
Child proof lock engaged Possible
Unit unplugged
Front panel open
(Fan turns and air is blown
from the air outlet.)
Impossible

CARE and CLEANING
If the check lamp lights, check the location that requires attention on the operating panel.
• Any of the humidifying filter lamp( ), Air-purifying filter lamp( ), UNIT1/2 lamps, or water supply lamp( ) will light or
flash together with the check lamp( ).
Air inlets for Dust/Odor
sensors and Temperature/
Humidity sensors
If clogged
Recyclable deodorizing
cartridge
If dust has accumulated
If bothered by dirt
Vacuum cleaner
Vacuum cleaner
Soak, drain and dry
Page 27.
(1)
Front panel If dirty
Wipe
(3)
Pre-filter Once every 2 weeks
(4)
If the “UNIT1” lamp lights
Soak, drain and dry
(5)
If the “UNIT2” lamp lights
If the sound of streamer
discharge changes in tone
or becomes quieter
Soak, drain and dry
Soak, drain and dry
(6)
Pleated filter
If the Air-purifying filter
lamp lights or flashes
Replace
Rinse with water
(7)
Deodorizing catalyst unit If dirty
Vacuum cleaner
Vacuum cleaner
Cannot be washed
with detergent
Replace
Page 33, 34.
Page 33, 34.
Page 30, 31.
Page 29.
Page 28.
*Humidifying tray
Once every 3 days
If the unit emits unpleasant
odors or is noticeably dirty
Page 36.
*Humidifying filter
(Waterwheel)
*Humidifying filter
Once every 1 week
If the unit emits unpleasant
odors or is noticeably dirty
If the humidifying filter
lamp lights or flashes
Page 35.
Page 37.
Page 27.
Page 28.
(Streamer unit)
UNIT2
(Plasma ionizer)
UNIT1
Rinse with water
(2)
Water tank Every time you add water
Page 28.
Rinse with water
*To clean the humidifying tray or humidifying filter, first remove the (1) front panel and remove the (2) water tank.
Remove parts for maintenance in numerical order.
Reattach them in the opposite order in which they were removed.
<Front indicator lamps> <Operating panel>
Cannot be
rinsed in water
Cannot be
rinsed in water
Sequence
Part When to perform maintenance How to perform maintenance Reference page
WARNING
Quick Reference Table of Maintenance
Before performing maintenance, stop the unit and •
unplug the power supply cord.
25

26
English
(3)
Pre-filter (green)
(2)
Water tank
(6)
Pleated filter
(front: white, back: blue)
(5)
(Streamer unit)
UNIT2
(4)
(Plasma ionizer)
UNIT1
(1)
Front panel
(7)
Deodorizing catalyst unit
• Air inlets for Dust/Odor
sensors and Temperature/
Humidity sensors
Humidifying tray
• Recyclable deodorizing cartridge
Humidifying filter
Page 33, 34.
Page 33, 34.
Page 30, 31.
Page 27.
Page 27.
Page 28.
Page 28.
Page 28.
Page 35.
Page 36.
Page 29.
To clean the humidifying tray or humidifying filter, first remove the (1) front panel and remove the (2) water tank.

Care & Cleaning
CAUTION
WARNING
Air inlets
Air inlets
Top hole
Be careful not to damage these projections.
Rear of front panel
Projection
WARNING
Front panel cleaning
Wipe off dirt with a piece of cloth or tissue moistened with water.•
For stubborn dirt, wipe with a cloth moistened with a neutral liquid detergent.•
Wipe
Do not use hard bristle brushes, etc. •
Tools of the sort may scratch the front panel.
Do not use petrol, benzene, thinner, scouring powder, kerosene, •
alcohol, etc.
Substances of the sort may lead to cracking, electric shock or ignition.
Do not wash the unit frame with water. •
Contact with water may lead to electric shock, fi re or damage.
Sensor air inlet cleaning
Vacuum cleaner
(Dust, odor, temperature and humidity sensors)
Using a vacuum cleaner nozzle attachment with a narrow opening, •
suck up dust adhering to the air inlets and sensor holes.
NOTE
Be careful not to scratch the front of the front panel or damage the projections on the back of it when it is removed. ●
The projections on the backside operate as a safety switch that shuts power OFF when the panel is opened.
If damaged, the unit cannot be started.
Unit frame cleaning
If dust has accumulated, suck it up with a vacuum •
cleaner.
Vacuum cleaner
27
In the rear of the hole at the top of the unit is a •
safety switch, therefore do not touch it.
Touching the switch may result in electric shock.
If the switches are accidentally damaged and the •
unit cannot be started as a result, contact the
service shop.

28
English
Deodorizing catalyst unit
Recyclable deodorizing
cartridge
CAUTION
Rinse with water
Do not rinse
with water.
Do not rub the
front surface.
Deodorizing catalyst unit
Deodorizing catalyst
(black)
CAUTION
Recyclable deodorizing
cartridge
Streamer pocket
Recyclable deodorizing cartridge cleaning
If dust has accumulated, suck it up with a vacuum cleaner. •
If the cartridge becomes dirty, soak the cartridge in warm or plain water for about 10 minutes, drain thoroughly and dry in a well-•
ventilated shade for about 1 day.
Water tank cleaning
Each time before you add water to the tank, add a small amount of water to the tank, close the cap and shake to rinse internally.•
Once a week, clean the inside of the tank by adding neutral liquid detergent to the water and shaking tank.•
For stubborn dirt, wash with a soft bristle brush or neutral liquid detergent.•
Rinse off the detergent thoroughly.
Vacuum cleaner Soak, drain and dry
Cannot be washed with detergent
Do not disassemble the recyclable deodorizing •
cartridge.
Do not use detergents, chemicals, etc. •
Substances of the sort diminish deodorizing
performance.
Deodorizing catalyst unit cleaning
Remove the deodorizing catalyst unit and suck up dust with a vacuum cleaner.•
Do not rub the front surface.•
For procedures on removing and restoring the deodorizing catalyst unit, see “Pleated fi lter replacement”. •
Vacuum cleaner
Cannot be rinsed in water
Do not rinse the deodorizing •
catalyst unit with water.
Contact with water prevents
further use.
Replacement unnecessary
Page 30, 31.

Care & Cleaning
Front panel
Projection
(1 each on left and right)
Push
(1)
Pull
Water tank
(2)
Up
Water tank
(1)
Fit here.
(2) Press inward until
hearing clicking sound.
Pre-fi lter cleaning
Remove the front panel.
1
2
Push the 2 projections (left and right) inwards, and pull the •
front panel upwards and remove.
Remove the water tank.
Holding the water tank by the handle, pull the tank •
upwards and out of the unit.
(About once every 2 weeks)
5
6
Vacuum cleaner
Restore the pre-fi lter.
Align the tabs (4 locations) on the left and right of the •
pre-fi lter with the holes (4 locations) on the left and right of
UNIT1, and insert into the holes.
Upper left tab (1 location)
(The upper left tab is shaped
differently from
the others.)
(4 on left and right)
Other tabs
(3 locations)
Restore the water tank.
Holding the water tank by the handle, fi t the tank into the •
hole at the bottom of the main unit, and press the tank into
the main unit.
Rinse with water
Holes
UNIT1
29
Clean the pre-fi lter.
3
4
Suck up dust with a vacuum cleaner. •
For stubborn dirt
Rinse the pre-fi lter with water.
Fit your fi ngers in the recess at the top of the pre-fi lter, pull the fi lter to
•
the front and disengage the tabs (4 locations) on the left and right of
the pre-fi lter from the holes (4 locations) on the left and right of UNIT1.
Pull to the front
to remove
(4 on left and right)
For stubborn dirt, wash with a soft bristle brush or neutral
•
liquid detergent, and dry thoroughly in a well-ventilated shade.
If water droplets remain on the pre-fi lter, the “UNIT1” lamp may
light, therefore dry the pre-fi lter adequately before using it again.
Tabs
Pre-filter
Restore the front panel.
Fit the tabs (2
• locations
7
grooves at the bottom of the main unit, and close the panel.
[View from above]
(1)
Fit here.
Bottom grooves
(2 locations)
To correctly restore the front panel, press the front panel
until hearing the clicking sound from the left and right sides.
Unless properly installed, a safety switch may trip and
prevent the unit from starting.
) at the bottom of the panel into the
(2) Press inward until
hearing clicking sound.
Front panel
Page 27.

30
English
UNIT1
Handle
(1)
Pull
(2)
Up
Deodorizing catalyst unit
Holes
(5 each on left and right)
Pleated filter
Projection
(5 each on left and right)
Face the white
side to the front
WARNING
Pleated fi lter replacement
Cannot be rinsed in water
If the Air-purifying filter lamp lights or flashes
Remove the front panel.
1
Remove the water tank.
2
Removed the UNIT1.
3
Holding the UNIT1 by the handle, pull the UNIT1 upwards •
and out of the unit.
The pleated fi lter does not need
replacing until the Air-purifying fi lter
lamp lights or fl ashes.
Replace
Page 29.
Page 29.
Before performing maintenance, stop the •
unit and unplug the power supply cord.
Replace the pleated fi lter with a new fi lter.
5
Remove the used pleated fi lter.(1)
Release the pleated fi lter from the projections
•
(5 locations each) on the left and right of the
deodorizing catalyst unit (front side).
Take a new pleated fi lter from the fi lter (2)
storage area, remove it from its bag and
attach it to the deodorizing catalyst unit.
Attach the pleated fi lter with the white side
facing to the front.
Fit the projections (5 locations) on the left and right •
faces of the deodorizing catalyst unit into the holes
(5 locations) on the left and right of the pleated fi lter.
Remove the deodorizing catalyst unit.
4
Holding the deodorizing catalyst unit by the handle, pull •
the deodorizing catalyst unit upwards and out of the unit.
Handle
(1)
Pull
Deodorizing catalyst unit
NOTE
If the deodorizing catalyst unit is dirty, suck up dust with a vacuum cleaner. If the plate is dirty, wipe off dirt with a piece of cloth or tissue ●
moistened with water.
For stubborn dirt, wipe with a cloth moistened with a neutral liquid detergent. (Do not rinse in water.)
Page 28.
(2)
Up
Insert the pleated fi lter underneath the tabs •
(4 locations) at the top and bottom of the deodorizing
catalyst unit.
Top and bottom
tabs (4 locations)

Care & Cleaning
(1)
Fit here.
UNIT1
(2) Press inward until
hearing clicking sound.
Restore the deodorizing catalyst unit.
6
7
Holding the deodorizing catalyst unit by the handle, fi t the •
projections on the unit into the grooves (4 locations) at the
bottom of the main unit and press the deodorizing catalyst
unit into the main unit.
(1)
Fit here.
Deodorizing catalyst unit
Restore the UNIT1.
Holding UNIT1 by the handle, fi t the projections on the unit •
into the grooves (2 locations) at the bottom of the main
unit, and press UNIT1 into the main unit.
(2) Press inward until
hearing clicking sound.
Restore the front panel.
9
Plug the power supply cord in.
10
Press and hold the air-purifying fi lter
reset button at the top of the unit for
11
2 seconds.
(A double acoustic tone is emitted and the Air-purifying fi lter
lamp goes out.)
Page 29.
31
After replacing the pleated fi lter, the Air-purifying fi lter lamp •
does not go out unless the fi lter reset button is pressed
and held for 2 seconds.
Restore the water tank.
8
Pleated fi lter replacement
For replacement pleated fi lters, contact the service shop. (See the ATTENTION on page 38.) ●
The pleated fi lter does not need replacing until the Air-purifying fi lter lamp lights or fl ashes. ●
Replace the pleated fi lter if the Air-purifying fi lter lamp lights or fl ashes, even if the fi lter is not dirty. Visible grime and fi lter performance are
not proportional to one another.
The replacement interval for the pleated fi lter varies according to how the unit is used and where it is located. ●
The Air-purifying fi lter lamp lights after about 1 year in a home where every day 10 cigarettes are smoked and the unit is used.
(The replacement interval shortens when the unit is used where the air is particularly dirty.)
Dispose of used pleated fi lters as noncombustible waste. (Material: polypropylene/polyester nonwoven textile) ●
If you replace the pleated fi lter before the Air-purifying fi lter lamp lights because dirt bothered you, press and hold the pleated fi lter reset ●
button for 2 seconds.
Page 29.

32
English
UNIT1
Handle
(1)
Pull
(2)
Up
Knob
(white)
Knob
(green)
Wear rubber
gloves.
There are
ionized wires inside,
therefore be careful
that they do not catch
on anything.
Opposing pole
plates
Ionizing frame
Pinching the sets of
knobs on the left and right at
the same time makes it easier
to remove the opposite
pole plates.
Ionized wire
Knob (white)
Arrow
Ionizing frame
Wear rubber
gloves.
UNIT1 (Plasma ionizer) removing and attaching
CAUTION
Wear • rubber gloves to remove and attach the opposite pole plates. Hands can be cut on the opposite pole plates and ionized wires.
Remove
Remove the front panel.
1
Remove the water tank.
2
Remove the UNIT1.
3
Holding the UNIT1 by the handle, pull the UNIT1 upwards •
and out of the unit.
Page 29.
Page 29.
Attach
Attach the opposing pole plates.
(1) Fit the opposite pole plates over the knobs (2 sets on left
1
and right) on the ionizing frame.
The opposite pole plates have no required right and left
direction and can be attached either side of ionizing
frame. Attach them so that the arrow is visible.
(2) Insert securely until it clicks.
4
Remove the opposite pole plates on the
backside of UNIT1.
Pinching together the white and green knobs (2 sets on •
left and right), lift the opposite pole plates up and out.
(3) Attach another side of the opposing pole plate.
Restore the UNIT1
water tank and front panel.
2
Page 31.
, pre-fi lter,
Page 29.

Care & Cleaning
CAUTION
Cleaning UNIT1 (plasma ionizer) and UNIT2 (streamer unit)
Before performing maintenance, stop the unit and unplug the power supply cord.
•
If UNIT lamps light
Soak, drain and dry
Wear • rubber gloves to when wiping or rubbing the units.
Hands can be cut on the opposite pole plates and ionized wires.
Procedure
Remove parts.
Suck up dust on the front surface with a
vacuum cleaner.
Vacuum cleaner
Soak in lukewarm or plain water.
(Approx. 1 hour)
Soak in warm/
plain water.
Remove dirt with a piece of cloth, soft
bristle brush, etc.
Wear rubber gloves
when cleaning.
Remove
dirt.
Rinse in running water and drain.
UNIT1
(1) Ionizing frame (2) Ionized wire (3) Opposing pole plates
Page 32. Page 32.
Wipe
Wear rubber
Wear rubber
gloves.
(For details, see
(1) and (2) in the
below figure.)
gloves.
Rub
Dry in a well-ventilated shade. (Approx.
1 day)
Reattach parts.
Ionizing frame (Remove dirt after soaking but before drying.)(1)
Remove dirt from plastic parts with a soft piece of cloth.•
Wipe away dirt in recesses and places where fi ngers do not fi t with a cotton swab, etc.•
Do not leave any lint from cleaning cloths behind. Lint may lead to malfunction.•
33
Page 31. Page 32.
Wear rubber
gloves.
Cotton swab
*Remove dirt from recesses with
a cotton swab, etc.

34
English
UNIT1
CAUTION
(Plasma ionizer)
(1) Ionizing frame
(2) Ionized wire (Rear)
(3)
Opposing pole
plates
UNIT2
(Streamer unit)
(4) Streamer unit
There are ionized wires to the rear of the opposite pole plates. Be
careful not to snap these wires when removing and attaching the
units.
If the unit is run with broken ionized wires, the “UNIT1” lamp •
lights. While the lamp is lit, dust collecting capacity is low.
If the ionized wires are accidentally snapped, they need •
replacing, therefore contact the service shop. (Do not replace
the wires yourself.)
UNIT2
(4) Streamer unit
Open the front panel and pull out the
streamer unit.
Wipe
Wear rubber
gloves.
(For details, see (4)
in the below figure.)
Notes
Do not remove the screws from the ionizing frame or streamer unit. •
This may lead to damage.
Clean UNIT1 and UNIT2 somewhere that can be wet such as in a shower room or kitchen sink.•
For stubborn dirt, soak UNIT1 and UNIT2 in lukewarm or plain water in which neutral liquid •
detergent (i.e., kitchen cleaner, etc.) has been dissolved.
Use the amount of neutral liquid detergent indicated in the cleaner’s instructions.•
Do not use powdered, alkaline or acidic cleaners, and do not rub with hard bristle brushes, etc. •
Abusive handling may lead to deformation and damage.
Deodorizing performance lowers if the needles inside • UNIT2 (streamer unit) become deformed.
If cleaner remains on UNITS 1 or 2, the “UNIT1” and “UNIT2” lamps do not go out after cleaning, •
therefore rinse off the cleaner well.
Do not leave any lint from cleaning cloths behind. Lint may lead to malfunction.•
Reattach the streamer unit as before.
Ionized wire (8 locations)(2)
Remove dirt from ionized wires and surrounding plastic parts •
with a soft piece of cloth.
Wear rubber
gloves.
Clean the ionized wires
without dislodging them
*Wipe ionized wires gently.
Pulling on them forcefully may
cause them to snap.
Plastic parts may deform or discolor if exposed to direct sunlight.•
If water remains on UNITS 1 or 2, even in small quantities, the “UNIT1” and “UNIT2” lamps do not •
go out after cleaning, therefore dry thoroughly in a shade.
Streamer unit(4)
If dust has accumulated on the needles, wipe gently with a cotton •
swab or soft piece of cloth.
Remove dirt from plastic parts (•
swab or soft piece of cloth.
Do not remove the screws.•
from the V-groove.
Wear rubber
gloves.
Cotton
swab
: Plastic parts
) in internal areas with a cotton
Dust
Wipe each needle
gently in the direction
from base to tip.
Cotton swab
Dust
*If the needles become deformed,
deodorizing performance will lower.

Care & Cleaning
WARNING
Humidifying fi lter cleaning
How quickly the humidifying fi lter becomes dirty depends on the environment of use. If odors are How quickly the humidifying fi lter becomes dirty depends on the environment of use. If odors are
emitted from the air outlet or if humidifi cation capacity is low (the decrease of water is slow), clean the emitted from the air outlet or if humidifi cation capacity is low (the decrease of water is slow), clean the
humidifying fi lter as follows even within 1 week. humidifying fi lter as follows even within 1 week.
Clean the humidifying fi lter in the same way if the unit has not been used for a long period of time.Clean the humidifying fi lter in the same way if the unit has not been used for a long period of time.
Remove the front panel and water tank.
1
Pull out the humidifying tray and remove
the waterwheel and humidifying fi lter.
2
The water tank must fi rst be removed to pull out the •
humidifying tray.
Hold the humidifying tray by the recess on its underside to •
pull out. (See the fi gure at right.)
The humidifying tray contains water, therefore pull it out •
slowly.
(About once every 1 week)
Page 29.
Before performing maintenance, stop the unit and unplug the
•
power supply cord.
Humidifying tray Recess
Soak, drain and dry
Waterwheel
Pull outward.
Humidifying filter
Do not remove the humidifying fi lter from the waterwheel.
The fi lter may lose its shape.
Dissolve neutral liquid detergent in warm
or plain water.
3
Quantity: Use the amount of neutral liquid detergent
indicated in the cleaner’s instructions.
Immerse the humidifying fi lter in the
water and soak for about 30 - 60 minutes.
4
Humidifying filter
Neutral
liquid
detergent
Waterwheel
For stubborn scale (white or brown)
(Running the unit with scale diminishes humidifying capacity.)
Dissolve citric acid in warm (approx. 40˚C or
3
less) or plain water.
Quantity: Approx. 20g citric acid (2 large spoonfuls)
per 3L water.
Immerse the humidifying fi lter in the water
4
and soak for about 2 hours.
Humidifying
filter
Citric acid
ATTENTION
•
Citric acid can be purchased
at pharmacies and drugstores.
Waterwheel
5
35
Rinse in running water.
Use clean water.•
Repeat 2 - 3 times with fresh water each time.•
Do not apply force to the humidifying fi lter when cleaning. •
The fi lter may lose its shape.
Inadequate rinsing may lead to odors or unit
deformation or discoloring.
Rinse thoroughly.

36
English
Effective against bacteria,
mildew and slime.
Float
Silver ion cartridge
Restore the humidifying tray.
Waterwheel
Humidifying
filter
Attach the humidifying
filter and waterwheel.
Install the humidifying filter and waterwheel in the direction shown in the figure.
Press inward until
hearing clicking
sound.
Check that the shaft is
connected securely.
Check the opposite side
of the shaft.
6
Reattach the humidifying fi lter and waterwheel to the humidifying tray, and push the humidifying tray back into the unit until hearing •
clicking sound.
Humidifi cation cannot be run unless the humidifying fi lter is properly installed.
Restore the water tank and front panel.
7
Humidifying tray cleaning
If the unit emits unpleasant odors or becomes noticeably dirty, clean the unit by following the
procedure described below, even if it was cleaned less than 3 days ago.
Remove the front panel and water tank.
1
Pull out the humidifying tray and remove the waterwheel
and humidifying fi lter.
2
Rinse the humidifying tray in water.
3
Restore the humidifying tray.
4
Restore the water tank and front panel.
5
ATTENTION
Do not remove the fl oat or silver ion cartridge. ●
Without the fl oat, humidifying operation cannot be run. Without the silver ●
ion cartridge, the antibacterial, anti-mildew and slime prevention
effects are disabled.
Depending on the water quality and environment of usage, the ●
accumulated water in the humidifying tray may be discolored by scale etc.
If that occurs, follow the instructions above and clean the tray.
Page 35.
(About once every 3 days)
See above.
Page 29.
Page 29.
Page 29.
Rinse with water
For stubborn scale
Dissolve citric acid in lukewarm or plain water and moisten •
a soft cloth or soft bristle brush with the water.
Remove scale with the soft cloth or the soft bristle brush.
Rinse off thoroughly with clean water.
* About the quantity of citric acid, refer to “For stubborn
scale (white or brown)”.
Page 35.

Care & Cleaning
Turn the shaft to
the left.
Pull the shaft out.
WARNING
Humidifying fi lter replacement
Using the unit without replacing the
humidifying fi lter causes mildew, foul
odors and humidifi cation loss.
If the humidifying filter lamp lights or flashes
Remove the front panel and water tank.
1
Pull out the humidifying tray and remove
the waterwheel and humidifying fi lter.
2
Remove the shaft that locks the
humidifying fi lter and waterwheel.
3
Replace
(About every 2 years [2 seasons])
Before performing maintenance, stop the •
unit and unplug the power supply cord.
Restore the shaft as before.
Page 29.
Page 35.
5
Restore the shaft.
Turn the shaft to
the right.
Restore the humidifying tray.
6
Page 36.
Remove the humidifying fi lter from the
waterwheel, and attach a new fi lter.
4
Waterwheel
T•
on the waterwheel so that it does not stick out from the
waterwheel.
Humidifying filter
Do not discard the waterwheel.
uck the humidifying fi lter underneath the tabs (6 locations)
Tuck the filter
under the tabs to
hold it in place.
Tab
Restore the water tank and front panel.
7
Plug the power supply cord in.
8
Press and hold the humidifying fi lter reset
button at the top of the unit for 2 seconds.
9
(A short beep sound is emitted and the humidifying fi lter
lamp goes out.)
Page 29.
For replacement humidifying fi lters, contact the service shop. (See the ATTENTION on page 38.) ●
Dispose of used humidifying fi lters as noncombustible waste. (Material: Polyester, rayon) ●
37
After replacing the humidifying fi lter, the humidifying fi lter •
lamp does not go out unless the fi lter reset button is
pressed and held for 2 seconds.
Humidifying fi lter replacement

38
English
Options
ATTENTION
For replacement pleated fi lters, humidifying fi lters or recyclable deodorizing ●
cartridges contact the service shop.
If the unit is used with dirty parts ●
Air is not cleaned.•
Odors are not removed.•
Unnecessary odors may be generated. •
Discard of the pleated fi lters, humidifying fi lters and recyclable deodorizing ●
cartridges as noncombustible waste.
Pleated fi lter (7) KAC998A4E
Humidifying fi lter (Without frame) (1)
Disposal requirements
Your product and the batteries supplied with the controller are marked with this symbol. This symbol means that electrical and
electronic products and batteries shall not be mixed with unsorted household waste.
For batteries, a chemical symbol can be printed beneath the symbol. This chemical symbol means that the battery contains a
heavy metal above a certain concentration. Possible chemical symbols are:
Pb: lead (>0.004%)
Hg: mercury (>0.0005%)
Disposal of this product must be done in accordance with relevant local and national legislation.
Units and waste batteries must be treated at a specialized treatment facility for re-use, recycling and recovery.
By ensuring correct disposal, you will help to prevent potential negative consequences for the environment and human health.
Please contact the installer or local authority for more information.
Part Model
KNME998A4E

TROUBLESHOOTING
Frequently Asked Questions
Questions & Answers
Question:
The dust sensor does not change from the
orange or red colour.
Answer:
This is due to dusts built up in the dust sensor.
Suck up dust accumulated in the dust sensor hole with a
vacuum cleaner.
Normal operation is restored shortly after sucking up dust
and running air purifi cation.
Page 27.
Page 19.
Question:
The sensitivity of the dust sensor seems to
be bad.
Answer:
This is because react time of the dust sensor differs
depending on the size of room.
Adjust the sensor with sensitivity settings.
Page 13.
Question:
Can I wash the deodorizing catalyst unit?
Is replacement necessary?
Answer:
The deodorizing catalyst unit cannot be washed.
(The unit will be ruined.)
Remove the deodorizing catalyst unit from the main unit and
suck up dust with a vacuum cleaner.
It is not necessary to replace the deodorizing catalyst unit.
Page 28.
Question:
Does the deodorizing effect of the recyclable
deodorizing cartridge disappear entirely in
2 months time?
Answer:
The effect should not completely disappear in 2 months time.
The effect may decrease by about half depending on the
conditions of use.
Page 23, 24.
Question:
Can the unit run without the humidifying
fi lter?
Answer:
The unit will engage the humidify setting, but it will not
humidify the room.
Always install a humidifying fi lter.
(Air can be cleaned.)
Question:
I threw the waterwheel (humidifying fi lter
frame) out.
Answer:
The humidifying fi lter does not rotate without the waterwheel,
therefore the room is not humidifi ed in the humidify setting.
To purchase another waterwheel, contact the service shop.
(Separately purchased humidifying fi lters do not come with a
waterwheel.)
Page 38.
Question:
What to do if the ionized wires are cut?
Answer:
Wires need to be replaced. Contact the service shop.
Do not replace the wires yourself.
Question:
Can I use the air purifi er while the “UNIT1” or
“UNIT2” lamp is lit?
Answer:
For safety reasons, power to the ionized wires and streamer
unit is shut OFF, therefore dust collecting performance and
deodorizing effect drop markedly. Clean inside UNIT1 and
2 until the “UNIT1” and “UNIT2” lamps go out. (There are no
safety issues while the lamps are lit.)
Question:
Do I need to replace the silver ion cartridge in
the humidifying tray?
Answer:
The silver ion cartridge do not need replacing for 10 years.
39

40
English
If These Lamps Light or Flash
Operating panel
Front indicator lamps
Contact the service shop.
If a long beep sound repeat 3 times is
emitted and the 4 lamps flash at the
same time
Trouble has occurred in the temperature or
humidity sensor.
If a long beep sound repeat 3 times is emitted and the
dust and odor lamps flash (red) at the same time
The lamps will blink if the unit is leaned in excess or toppled.
Set the unit on a flat floor and press the ON/OFF button.
If a long beep sound repeat 3 times is
emitted and the water supply lamp
flashes
The humidifying tray is out of place. Install it
correctly.
Page 35, 36.
Contact the service shop.
If all 3 lamps flash at the same time
Trouble has occurred in electrical parts.
If all 4 lamps flash at the same time
(The check lamp flashes, too.)
Something is obstructing the air outlet. Unplug
the power supply cord, remove the obstruction,
plug the power supply cord back in and start
the unit.
Check lamp

Troubleshooting
If this happens Check
The following situations have logical explanations.
Before requesting servicing, make the following checks.
The current humidity remains high.
The readings of the room hygrometer and
unit’s humidity indicator lamp differ.
A catching sound is heard during operation.
The sound of water is heard during operation.
A splashing sound is heard during operation.
Humidity in rooms facing north or rooms near plumbing fi xtures such as bathrooms is normally
high because moisture readily accumulates.
This is because air currents cause temperature and humidity drifts even in the same room.
Consider the humidity indicator lamp as just a reference reading.
A catching sound is made when humidifying operation starts and stops.
The sound of water may be heard as water is supplied from the water tank to the humidifying
tray.
This is the sound of water from the waterwheel splashing on the humidifying fi lter.
If this happens Check How to resolve
Does not operate.
The dust and odor sensor lamps are fl ashing?
Is the humidifying tray out of place?
(The water supply lamp is fl ashing.)
Set the unit on a fl at fl oor and press the ON/OFF
button.
Set the humidifying tray properly.
The airfl ow rate “high”,
“standard”, “low” and
“quiet” lamps all fl ash
at the same time.
The unit does not blow
air.
Both the dust and odor
sensor lamps are fl ashing
a red color.
Air is not cleaned.
The TV picture is
distorted.
Is the front panel or UNIT1 improperly set? Securely set it.
Are the projections on the backside of the front panel
damaged?
Is there any foreign matter in the air outlet?
Is the unit leaned in excess or toppled?
Is the unit located where air does not reach the entire
room or is something obstructing the air fl ow?
Has a lot of dust accumulated on the pre-fi lter and/or
pleated fi lter?
Is the room overly smelly or smoky?
Is a television or radio installed within 2m of this •
unit or is an indoor antenna being used close to
this unit?
Is the power supply cord or antenna of the television •
or radio close to this unit?
Check the projections.
Unplug the power supply cord, remove the
obstruction, plug the power supply cord back in and
start the unit. If the situation at left still persists or if
the obstruction cannot be moved, contact the service
shop.
Set the unit on a fl at fl oor and press the ON/OFF
button.
Select an unobstructed location from where air can
reach the entire room.
Clean the pre-fi lter and/or pleated fi lter.
Odors should clear as the unit continues running.
Move the unit as far away from TVs, radios and
antennas as possible.
Page 18.
Page 27.
Page 29-31.
Page 6.
41

42
English
If this happens Check How to resolve
Crackling, buzzing, and
fi zzes sounds are audible
during operation.
There is no sound of
streamer discharge.
Odor is coming from the
air outlet.
Is the UNIT1 set securely?
Has dust accumulated on the ionized wires of the
ionizing frame?
A hissing sound heard from UNIT2 during operation.
There is nothing wrong with the unit.
Are the needles inside UNIT2 clean?
Is a large amount of odor being generated
temporarily? (Many people smoking or grilling meat.)
Have you moved the main unit to another room?
Are the pre-fi lter, pleated fi lter, UNIT1 and/or
humidifying fi lter dirty?
Are odors constantly being generated in the room (i.e.,
paint, new furniture, wall paper, sprays, cosmetics,
chemicals, etc.)?
A very small amount of ozone is generated by the
unit and may cause a slight odor at the air outlet.
However, since the amount of ozone is minute, it will
not cause any health problem.
Securely set it.
Clean it.
Page 18.
Page 33, 34.
-
Clean the needles.
If operated, the odor will gradually go away.
Odor from the original room may smell.
Let the unit run for a while.
Clean it.
Ventilate the room or let the unit run with air fl ow
promoted in the room.
Page 29-36.
-
The “UNIT1” lamp does
Is the UNIT1 set securely?
Securely set it.
not go out or immediately
lights again, despite
having cleaned that UNIT1
Are not droplets left in the opposing pole plates or
other places?
Completely dry UNIT1 after cleaning it.
(plasma ionizer).
Are not bits of lint left in the UNIT1? Remove all lint.
Humidity does not rise.
Was UNIT1 inadequately rinsed after cleaning with a
cleaner?
Are not the ionized wires cut?
Is the room too big?
Is indoor temperature low with the walls and fl oor dry?
Is air fl ow set to a low rate?
Remove any remaining cleaner.
Check the ionized wires.
If broken, they need replacing, therefore contact the
service shop.
Use the unit in an appropriately sized room.
Humidity does not readily rise if the indoor temperature
is low, and the walls and fl oor are dry. Watch the
situation for 1 - 2 weeks to see if humidity rises.
Set “CONT” for the humidify setting and increase the
air fl ow rate setting.
If the problem cannot be corrected after taking the above action, contact the service shop.
Page 18.
Page 33, 34.
Page 34.

The following situations have logical explanations.
Troubleshooting
Before requesting servicing, make the following checks.
If this happens Check How to resolve
The unit does not humidify
despite having added
water to the water tank.
Water level in the water
tank does not lower.
The room does not
humidify despite setting
the “CONT” humidify
setting.
Is the humidifi er ON/OFF lamp is lit?
Does the unit have a humidifying fi lter? Install a humidifying fi lter.
Has scale accumulated on the humidifying fi lter?
Is the humidifying fi lter lamp lit or fl ashing? Replace the humidifying fi lter.
Is the water supply lamp fl ashing?
Is the front panel open?
Is the water supply lamp lit?
Does the unit have a humidifying fi lter? Install a humidifying fi lter.
Humidifi cation capacity is low when indoor
temperature is low and humidity is high.
Press if the lamp is out.
Soak the humidifying fi lter for about 30 - 60 minutes in
warm or plain water in which neutral liquid detergent
has been dissolved, then rinse in water.
If the lamp is fl ashing, the humidifying tray is not
properly installed.
Install the tray properly.
If none of the front indicator lamps or the lamps on the
operating panel light, the front panel may be open.
Check that the front panel is securely closed.
Add water.
Page 10, 17.
Page 35, 36.
-
Page 37.
Page 35, 36.
Page 37.
Page 18.
Page 37.
The unit does not stop even
though humidity is high.
The water supply lamp is lit
even though water was added.
Is the humidify setting set to “CONT”?
Air purifying operation is in active while humidifying
operation. Humidifying operation stops when the
set humidity level is reached, but air purifi cation
continues.
Is the unit exposed to direct sunlight or the hot air
draught of heaters?
Has the fl oat inside the humidifying tray come off? Reattach the fl oat as before.
Change the humidify setting.
Move the unit to a location where not exposed to
direct sunlight or the hot air draught of heaters.
If the problem cannot be corrected after taking the above action, contact the service shop.
Page 20.
-
Page 36.
43

44
English
MEMO

DAIKIN.TCF.018 E1/11-2008
KEMA Quality B.V.
82726-KRQ/EMC98-4545
Umeda Center Bldg., 2-4-12, Nakazaki-Nishi,
Kita-ku, Osaka, 530-8323 Japan
*
Low Voltage 2006/95/EC
Electromagnetic Compatibility 2004/108/EC
Noboru Murata
Manager Quality Control Department
1st. of Nov. 2008
DAIKIN INDUSTRIES, LTD.
MCK75JVM-K
EN60335-2-65, EN60335-2-98
3SB64467-1

Two-dimensional bar code is a code
for manufacturing.
3P234570-1D M08B113C
(1004)
HT
 Loading...