

Daikin KKRP01A Operation manuals
Air-conditioner network controller
Online Controller KKRP01A
I. autonomous II. server
Unit name: Alias name:
Local IP: MAC:
Mask:
Gateway: www.onlinecontroller.eu
DNS1:
DNS2: Wall controller address:
DNS3:
proxy is not supported
USER MANUAL

CONTENTS:
TThhaannkkss ffoorr ppuurrcchhaassiinngg
1. AUTONOMOUS OPERATION
1.1. Simple controller – without JAVA
1.2. LOGIN screen
1.3. Graphic controller - with JAVA
2. ONLINECONTROLLER.EU SERVER
2.1. Home and login page
2.2. Upper menu and Online controller icon
2.3. List of air-conditioners – My units
2.4. Control of A/C units
2.4.1. Graphic controller with weather forecast
2.4.2. Multi controller
2.4.3. Details
2.4.4. Time programmer
2.5. Sharing of units
2.6. Deletion of units
2.7. Activation of new unit
2.8. User management
2.9. Preferences
2.9.1. Basic settings
2.9.2. Password change
2.9.3. Info about client
2.9.4. Designated installer
2.9.5. Parental Superuser
2.9.6. Connectivity check
2.10. Benefits & Paid packages
2.11. Download
2.12. Support
2.13. Logout
2.14. Self-installation
3. iPhone APPLICATION
3.1. Apple Store
3.2. Login page
3.3. List of air-conditioners – Devices
3.4. Graphic controller with actual weather
3.5. Group
Online Controller KKRP01A - User manual - 20120531 1

4. ACCESSORIES
4.1. Easy Wall Controller KBRCS01A
4.2. Touch LCD Wall Controller KBRC01A
4.3. Temperature Sensor TS30
4.4. Weather station
5. COMPLIANCE
5.1. Declaration of Conformity
5.2. WEEE
TThhaannkkss ffoorr ppuurrcchhaassiinngg
Thank you for purchasing of Online Controller device. We wish you a useful usage and enjoy a comfortable
control & monitor of your air-conditioning system. Please, read this manual carefully; then store it in a safe
place for a future use.
Online Controller KKRP01A - User manual - 20120531 2
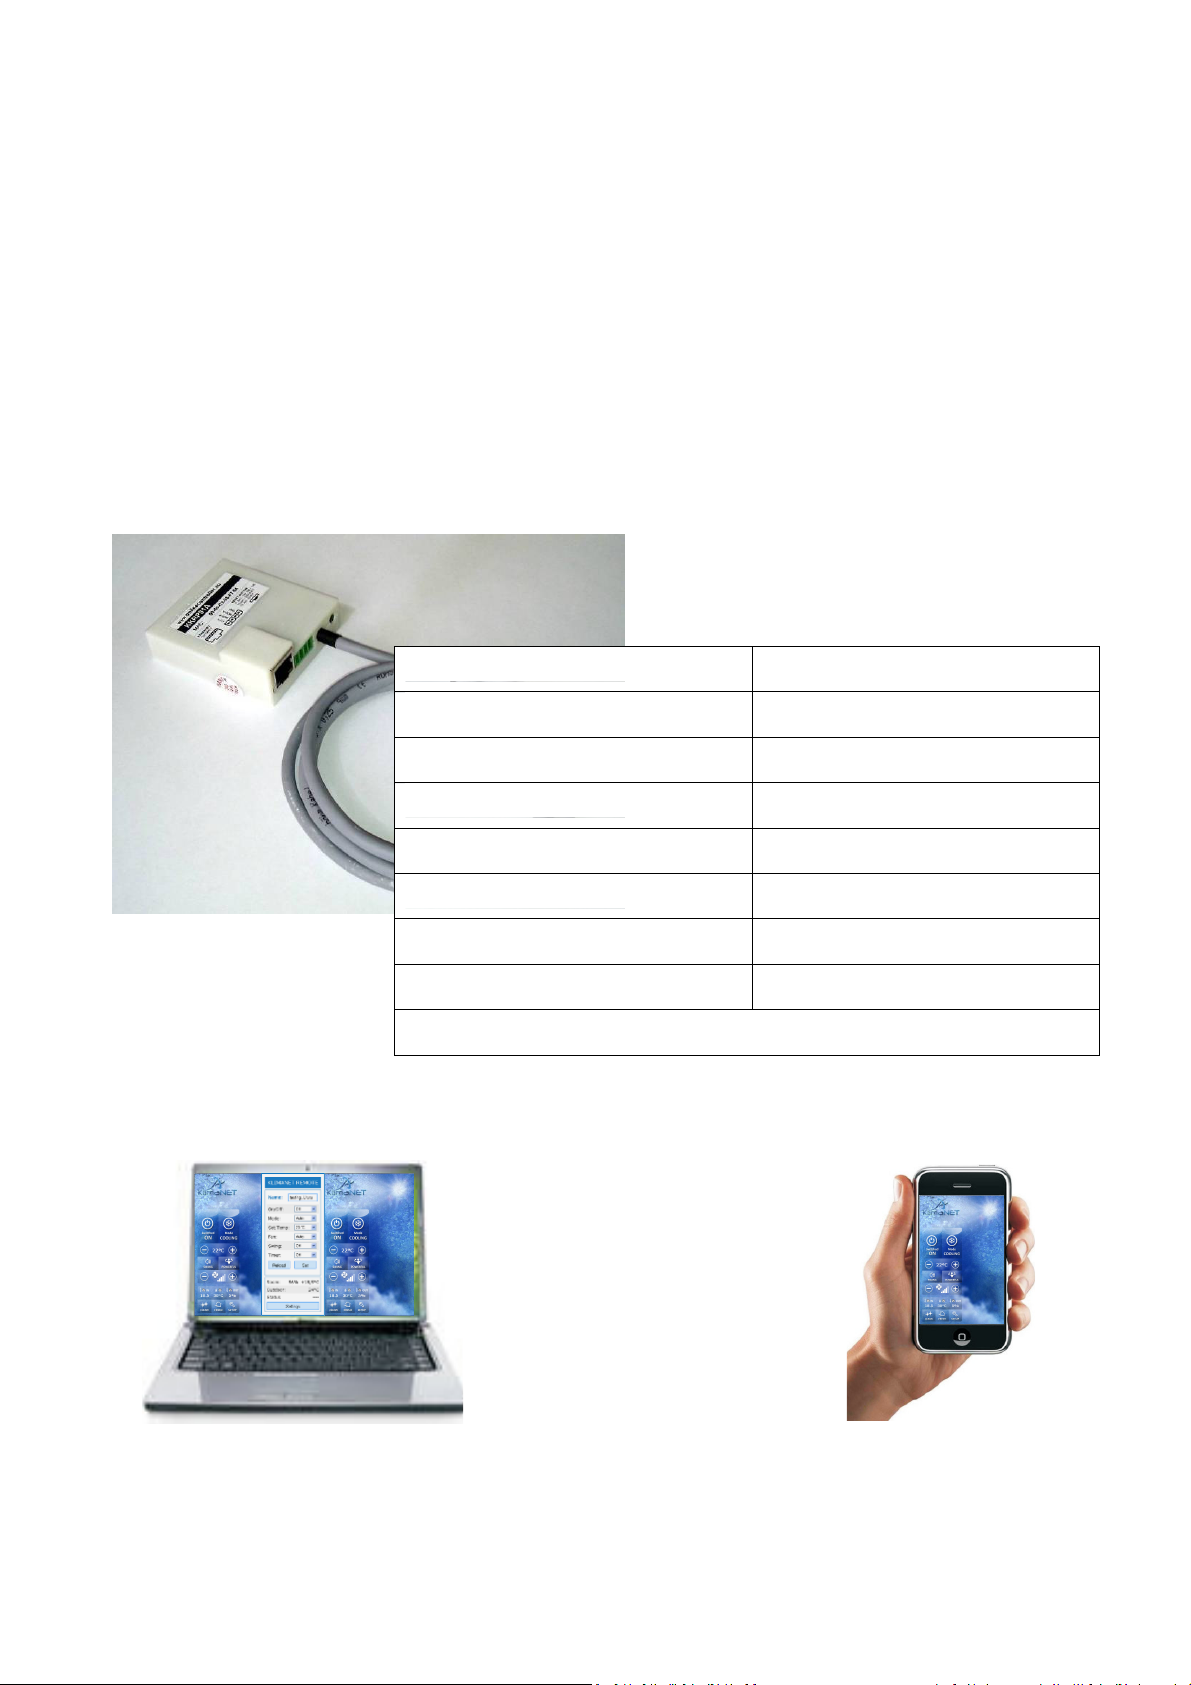
MONITOR and CONTROL function of air-conditioning system via computer
Room or air
-
conditioner name
FAN SPEED selectbox
SWING FUNCTION
s
electbox
MODE selectbox
SETPOINT selectbox
RESET TIMERS selectbo
x
SET CHANGES button
RELOAD button
Monitor a
rea
SETUP MENU
button
ON/OFF selectbox
Go
to LOGIN window
Name of logged user
Link to graphic controller
Link
to Online
c
ontroller
.eu
server
Picture N
o. 1
S
erver
connecti
on LED
Online Controller and connected air-conditioning system can be controlled in three different ways.
st
1
way is autonomous operation of Online Controller via its web-browser which is equipped directly in
Controller. This condition does not need a connection to the Internet. Direct connection to any computer is
sufficient. It may be plugged into switch or router too (to existing LAN).
nd
2
way is the monitoring and control remotely through the server www.onlinecontroller.eu .
Active connection to the Internet is essential.
rd
3
way is iPhone Application. Active connection to the Internet of KKRP01A adapter and your iPhone is
essential. You also need your own account on server www.onlinecontroller.eu .
1. AUTONOMOUS OPERATION
1.1. Simple controller – without JAVA
Start your favourite web-browser (f.e. Internet Explorer, Mozilla Firefox, Google Chrome…).
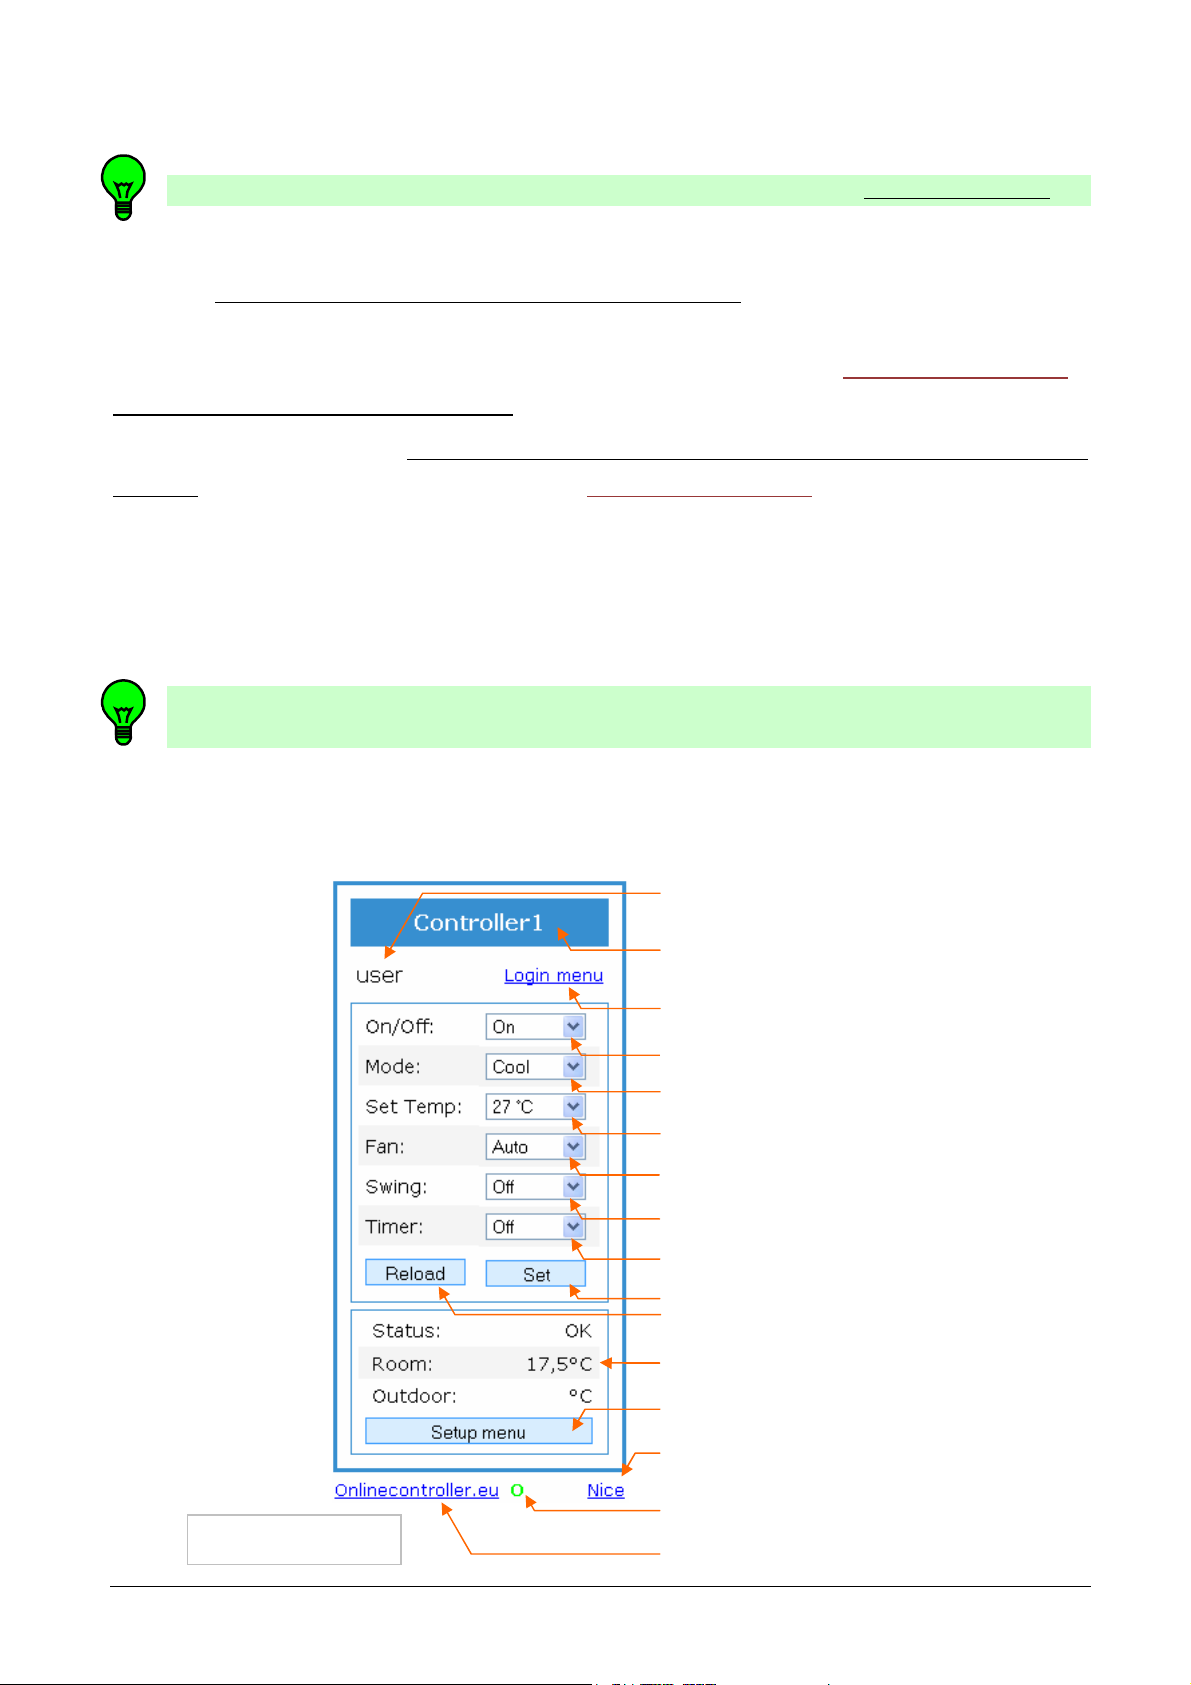
Type the IP address of Online Controller (default IP address is 192.168.1.100) into address bar of webbrowser. Simple control window will be opened (picture no. 1) with security level – user (default).
User security lever allows control of A/C system. Security levels will be discussed in chapter 4.2.3 Security of
Service manual. The easy controller has been developed for web-browser without JAVA and for the older
computers or simply for users who prefer easier control panel.
Online Controller KKRP01A - User manual - 20120531 3
Picture N
o. 2
In a first moment after loading the simple panel, it shows current A/C settings. The controlling of A/C system
is available by choosing of a new parameter’s value from an appropriate list by simply clicking on selectbox.
At first, set all parameters which have to be changed and then click on the Set button for confirming.
The new values will be set. Then press the Reload button to read actual A/C parameters again.
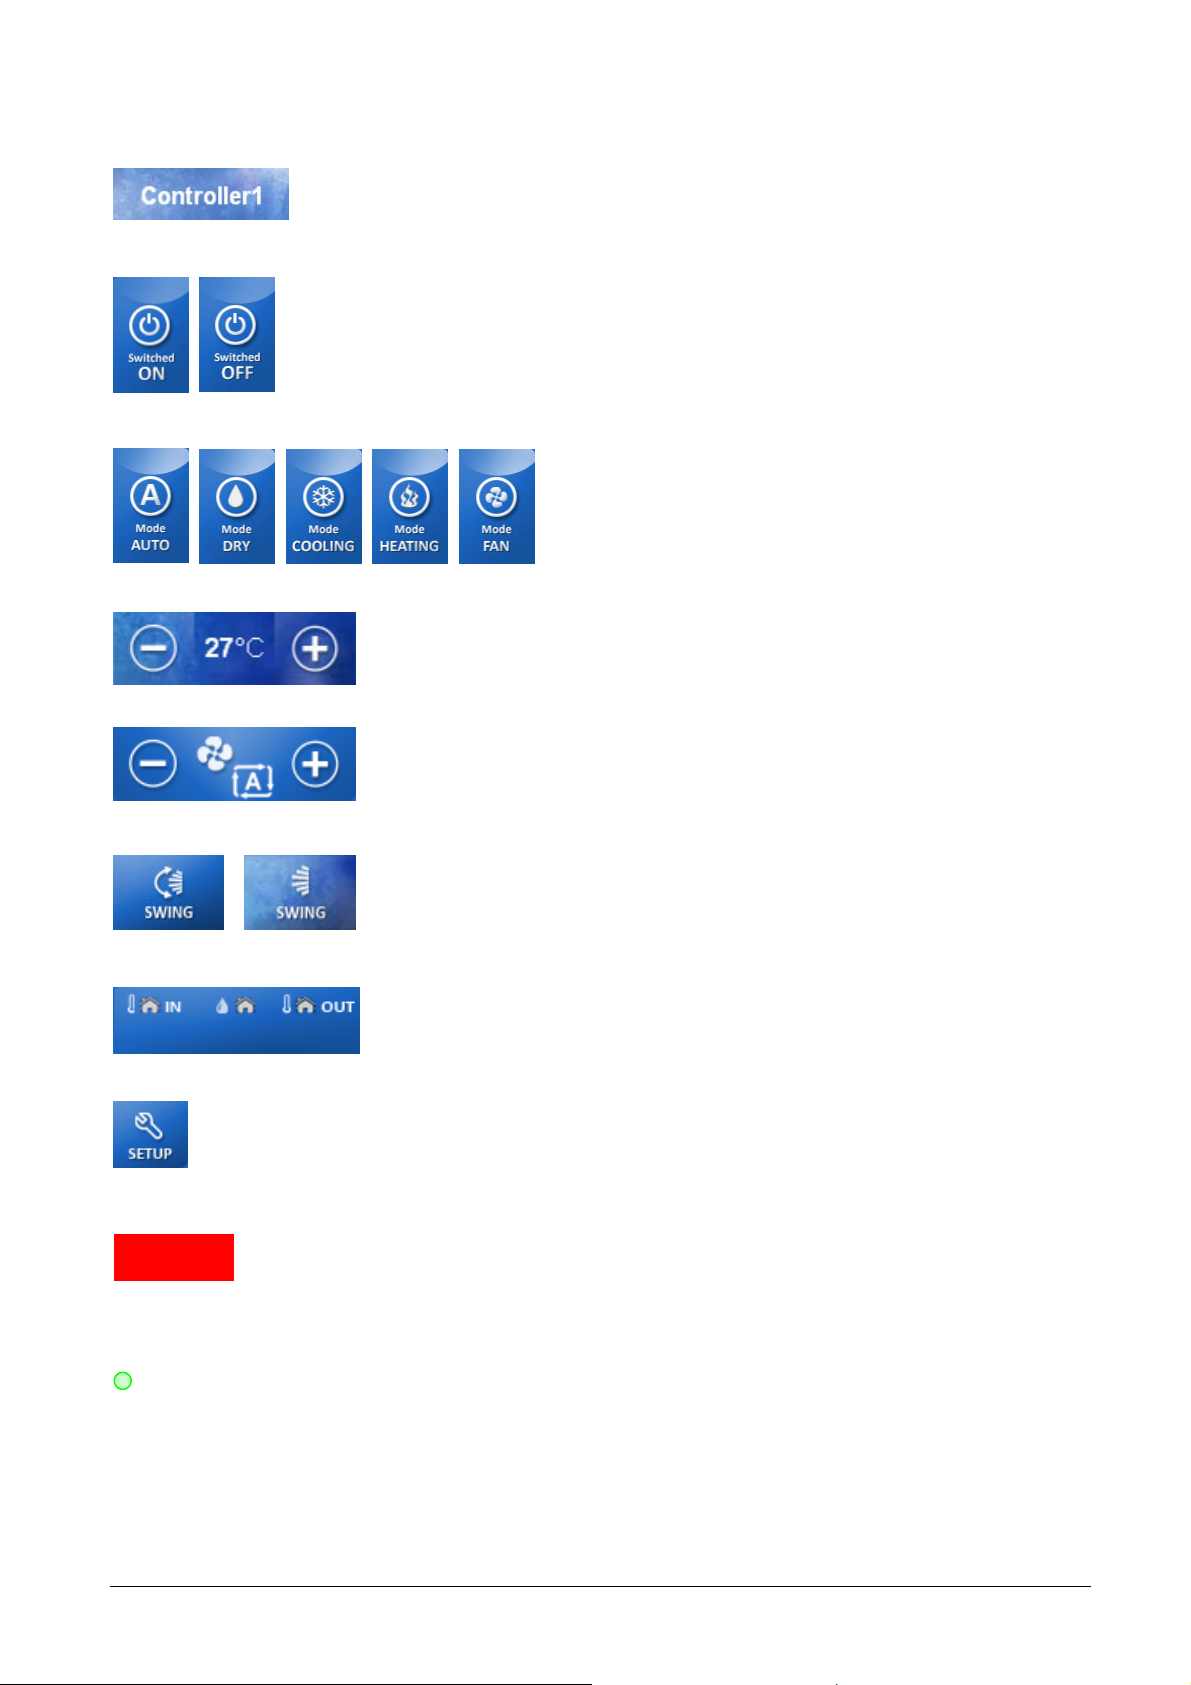
CONTROLS:
On/OFF – for switching the A/C ON or switching OFF
Mode – for choosing the A/C mode: AUTO, DRY, COOL, HEAT, FAN
Set Temp – for setting a required temperature: 10°C - 30°C (Heat), 18°C - 32°C (Cool), 18°C - 30°C (Auto)
Fan – for setting a required level of fan speed: *, **, ***, ****, *****, Auto
Swing – for setting a required swing function: OFF, ON, UP-DOWN
Timer – for resetting of Timer function, which were set via remote control
– possibility to switch OFF the ON-timer and OFF-timer
Set – button for confirmation all changes; after click on Set button use Reload button to read
current parameters
Reload – the button which is used for reading current parameters (use always when you want to
know actual parameters of A/C unit)
MONITOR AREA:
Room – temperature in the room detected by indoor A/C unit in °C
Outdoor – temperature of outdoor environment in °C (if the outdoor temperature sensor is connected)
Status – communication status and errors
X SERVER connection LED
• GREEN LED is displayed, when Online Controller communicates with server
• RED ACROSS is displayed, when Online Controller does not communicate with server correctly
• no symbol means, that Online Controller is not enabled for connecting with server
LINKS:
Login menu – for switching to login menu - login and logout of user
Setup menu – for entering the SETUP menu pages (only administrator level can enter to SETUP)
Onlinecontroller.eu – for entering to www.onlinecontroller.eu
Nice – for opening Graphic control panel with dynamic refreshing
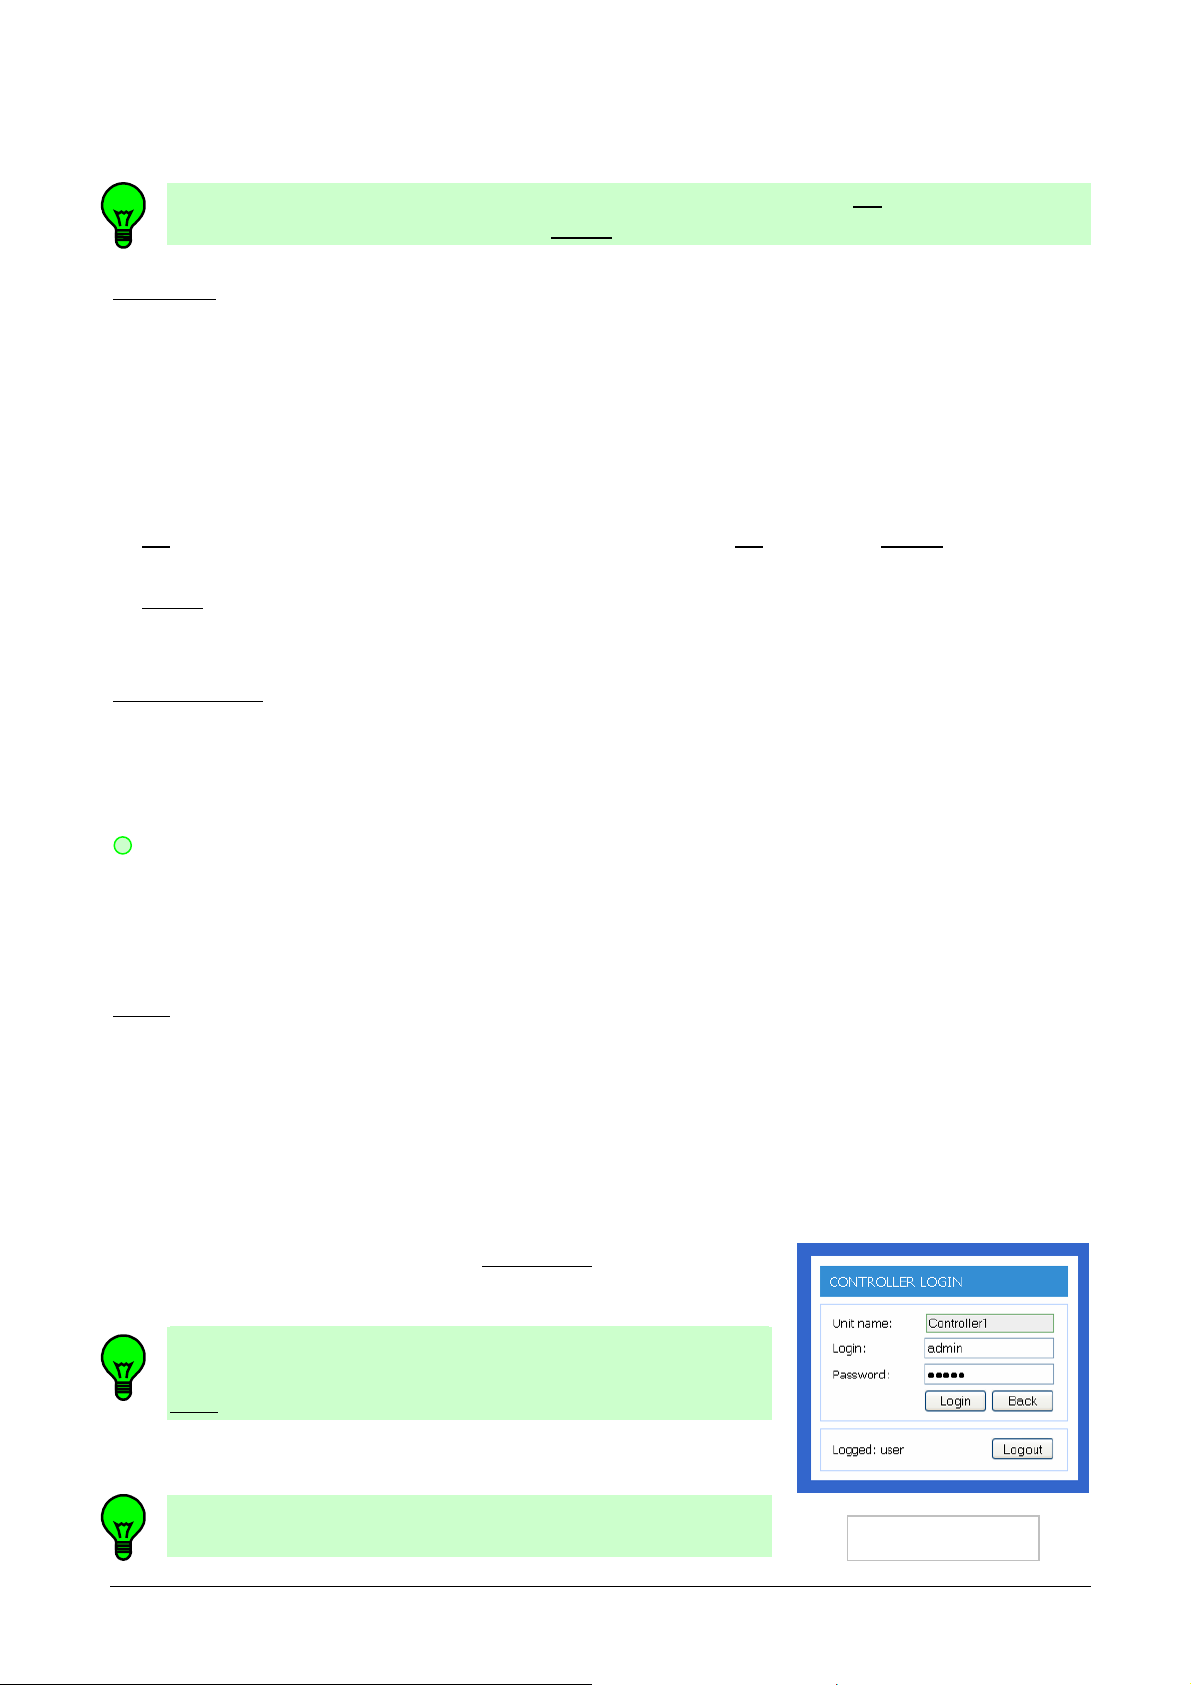
1.2. LOGIN screen
To open the LOGIN window, click on Login menu link. CONTROLLER
LOGIN screen will be loaded (picture no. 2).
For entering the SETUP, type the login name and password for
administrator level (default settings for both is admin) and click on
Login button.
If login name and password is correct, the SETUP will be open.
It is suggested to change the password to avoid the unauthorized
using and then not to forget it.
Online Controller KKRP01A - User manual - 20120531 4
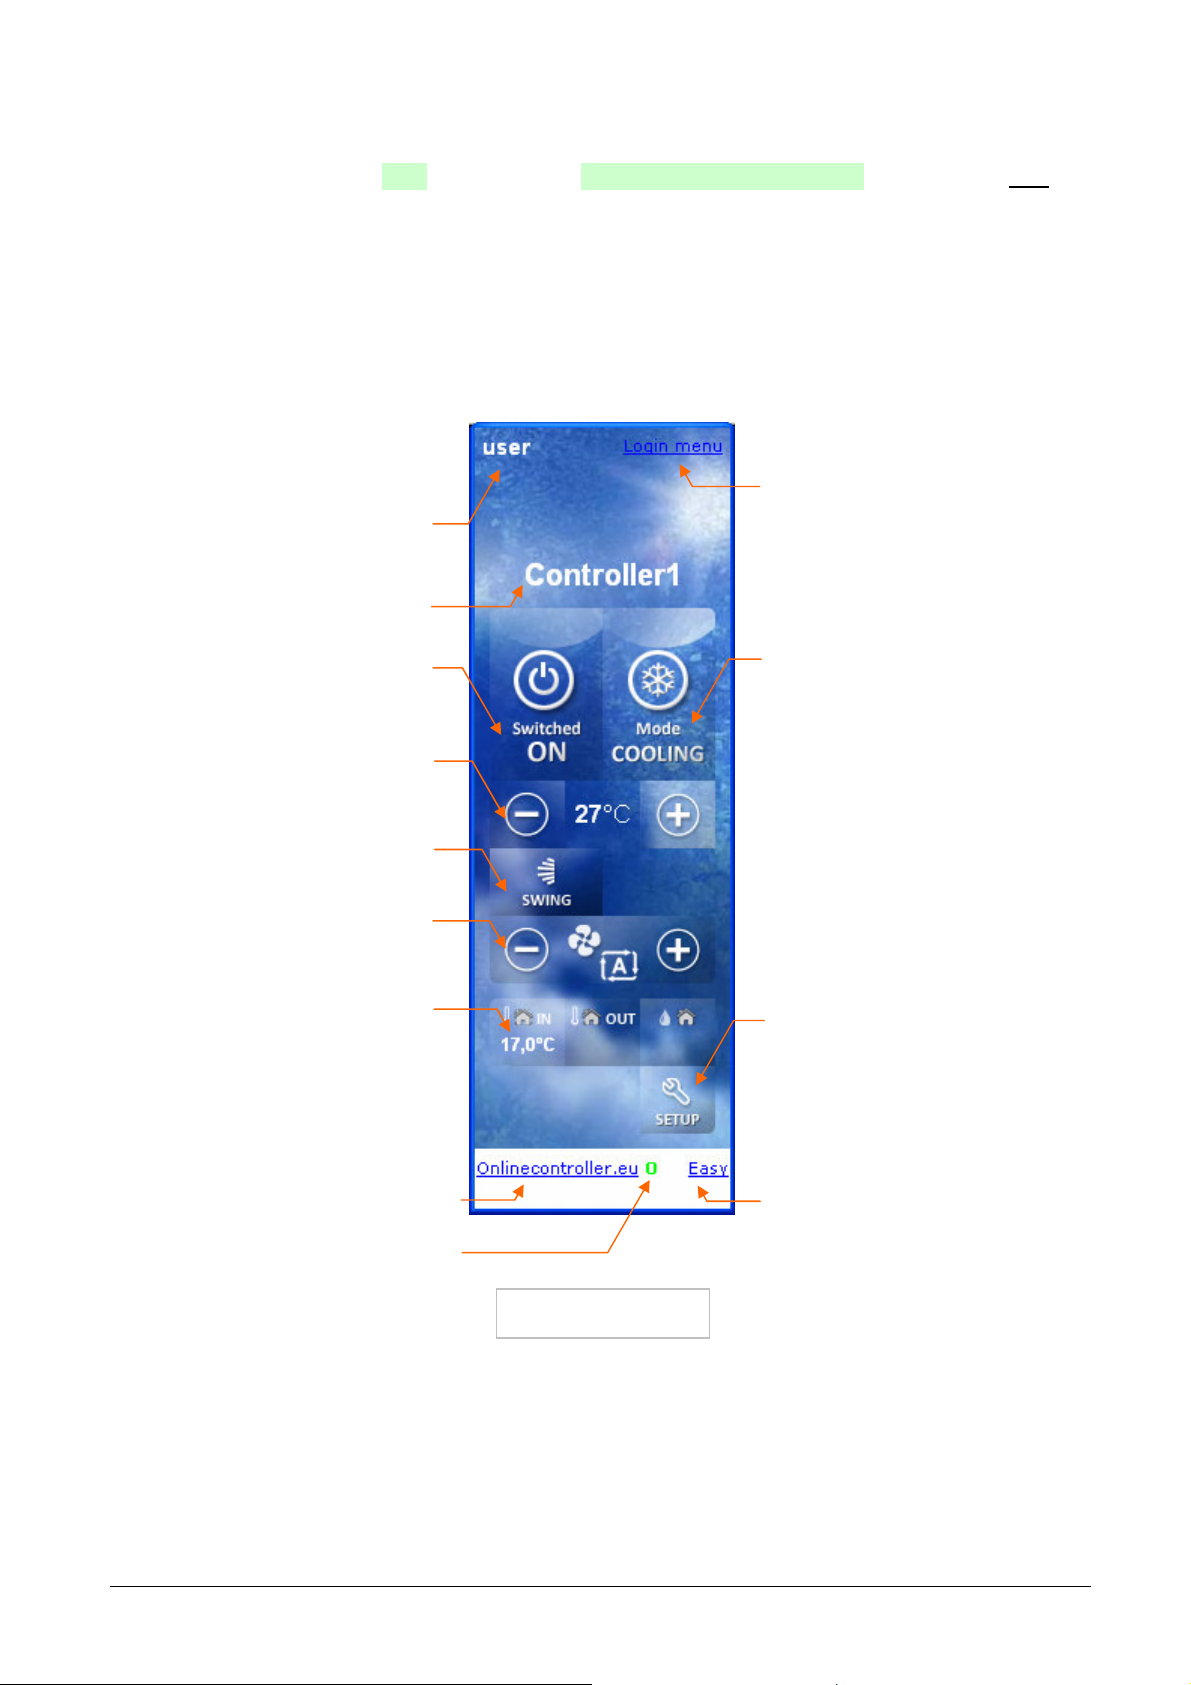
1.3. Graphic controller - with JAVA
Logged USER
CONDITIONER
NAME
ON/OFF button
TEMPERATURE ADJUST
buttons
ON
FAN SPEED buttons
TEMPERATURE and
HUMIDITY INDICATOR
Link to LOGIN screen
SETUP button
Link to simple controller
Link
to
Onlinecontroller.eu server
Picture N
o. 3
MODE button
Server connection LED
Open any web-browser (f.e. Internet Explorer, Mozilla Firefox, Google Chrome…) and type the IP address of
Online Controller with annex /nice at the end, f.e. http://192.168.1.100/nice.htm or click on the Nice link
in Simple panel. The graphic control panel will be loaded (picture no. 3).
Names and functions of icons and buttons are described beside the picture. Each icon is usually a button
simultaneously. When press those buttons their current status should be changed; after two seconds the
command sequence is sent into air-conditioner unit via Online Controller. After a several second (typically
2s) Online Controller waits for A/C response and then displays its current status.
AIR-
SWING FUNCTI
button
Online Controller KKRP01A - User manual - 20120531 5
ERROR
NAMES AND FUNCTION OF ICONS AND BUTTONS (Refer to picture no. 3 and no. 7)
Room, respectively air-condition name or ERROR indicator
• It can be changed in SETUP MENU.
ON/OFF button
• Press this button once to start operation.
Press once again to stop it.
OPERATION MODE button
• Press this button to change current mode of operation.
• The operation modes are changed in that order
cyclically.
TEMPERATURE ADJUST buttons
• Press these buttons to adjust current Setpoint.
FAN SPEED buttons
• Press these buttons to change air flow rate setting.
SWING FUNCTION button
• Press the button to activate moving of horizontal
and vertical louvers in this order.
DISPLAY OF CURRENT INDOOR, OUTDOOR TEMPERATURE
AND INDOOR HUMIDITY (optional, it depends on A/C possibilities)
SETUP button
• Press this button to enter SETUP MENU to set Online Controller nickname and other
parameters.
ERROR INDICATOR and BUTTON
• When some error or malfunction occurs the ERROR icon flashes.
• Click on it causes appearing of pop-up window with Error (Status) message.
X SERVER connection LED
• GREEN LED is displayed, when Online Controller communicates with server
• RED ACROSS is displayed, when Online Controller does not communicate with server correctly
• no symbol means, that Online Controller is not enabled for connecting with server
Online Controller KKRP01A - User manual - 20120531 6

2. ONLINECONTROLLER.EU SERVER
Picture N
o. 4a
UPPER MENU
Sign in
button
VIDEO demonstration
2.1. Home and login page
Open web browser (f.e. Internet Explorer version 7 or higher, Mozilla Firefox 3.11 or higher, Google Chrome
12.0 or higher…) and type www.onlinecontroller.eu into address bar.
LANGUAGES buttons
English, Spanish, French
German, Dutch, Italian,
Russian, Greek, Portuguese,
Turkish, Slovak
Online Controller KKRP01A - User manual - 20120531 7

Home page will be loaded (picture no. 4a). Choose your favourite language by clicking on appropriate
Picture N
o. 4b
Picture N
o. 5
icon
language button. Browse through the whole server as a guest, you can click on each link in upper menu.
View the interesting video demonstration. Then click on Sign in link for opening the login page (picture no.
4b). Write your username (generally e-mail), password and press Sign in button.
If your own account does not exist yet, ask your Installer or Superuser to create it. Or it is possible to
create your own account by yourself => use the self-installation method (chapter 2.14. Self-installation).
2.2. Upper menu and Online controller icon
TRIAL BANNER with
Learn more link
UPPER MENU – Superuser
Name of server
Online controller
Online Controller KKRP01A - User manual - 20120531 8
Home
My units
Benefits
User management
Download
Support
Name of user
User preferences
Sign out button
Clicking on the red icon causes opening the home page, where to find the basic information about Online
SELECTBOX for all dev
ices
SELECTBOX for one device
Picture N
o. 6a
UPPER MENU
POP-UP info line
REFRESH symbol
TRIAL banner
!
Controller, Extra Package and Supervisor Pack (look on the picture no. 4a).
My units – list of air-conditioners with KKRP01As assigned to this account. For BASIC-PACKAGE there is a
limit of number of units = 9. More units are available in EXTRA PACKAGE and SUPERVISOR PACKAGE.
Benefits – info page about possibilities of usage
User management – section for administration of user accounts – adding, editing and deleting
Download – section for downloading the manuals and other documents
Support page with frequently asked questions (FAQ) and contact form (E-mail us)
Preferences – tool for changing of personal data, environment language, Client’s data, e-mail of Installer and
parental Superuser and connectivity check option
Sign out button – pushing the button causes logging out of the user
TRIAL banner – it is displayed from creation of user’s new account till its expiration or buying of a paid
package. User’s account has full functionality and it is the same as Supervisor package. User can try all
server features within 60 days and can decide which package of services is the best for his solution.
For detailed description, how to buy a paid package, read the chapter 2.10. Benefits & Paid packages.
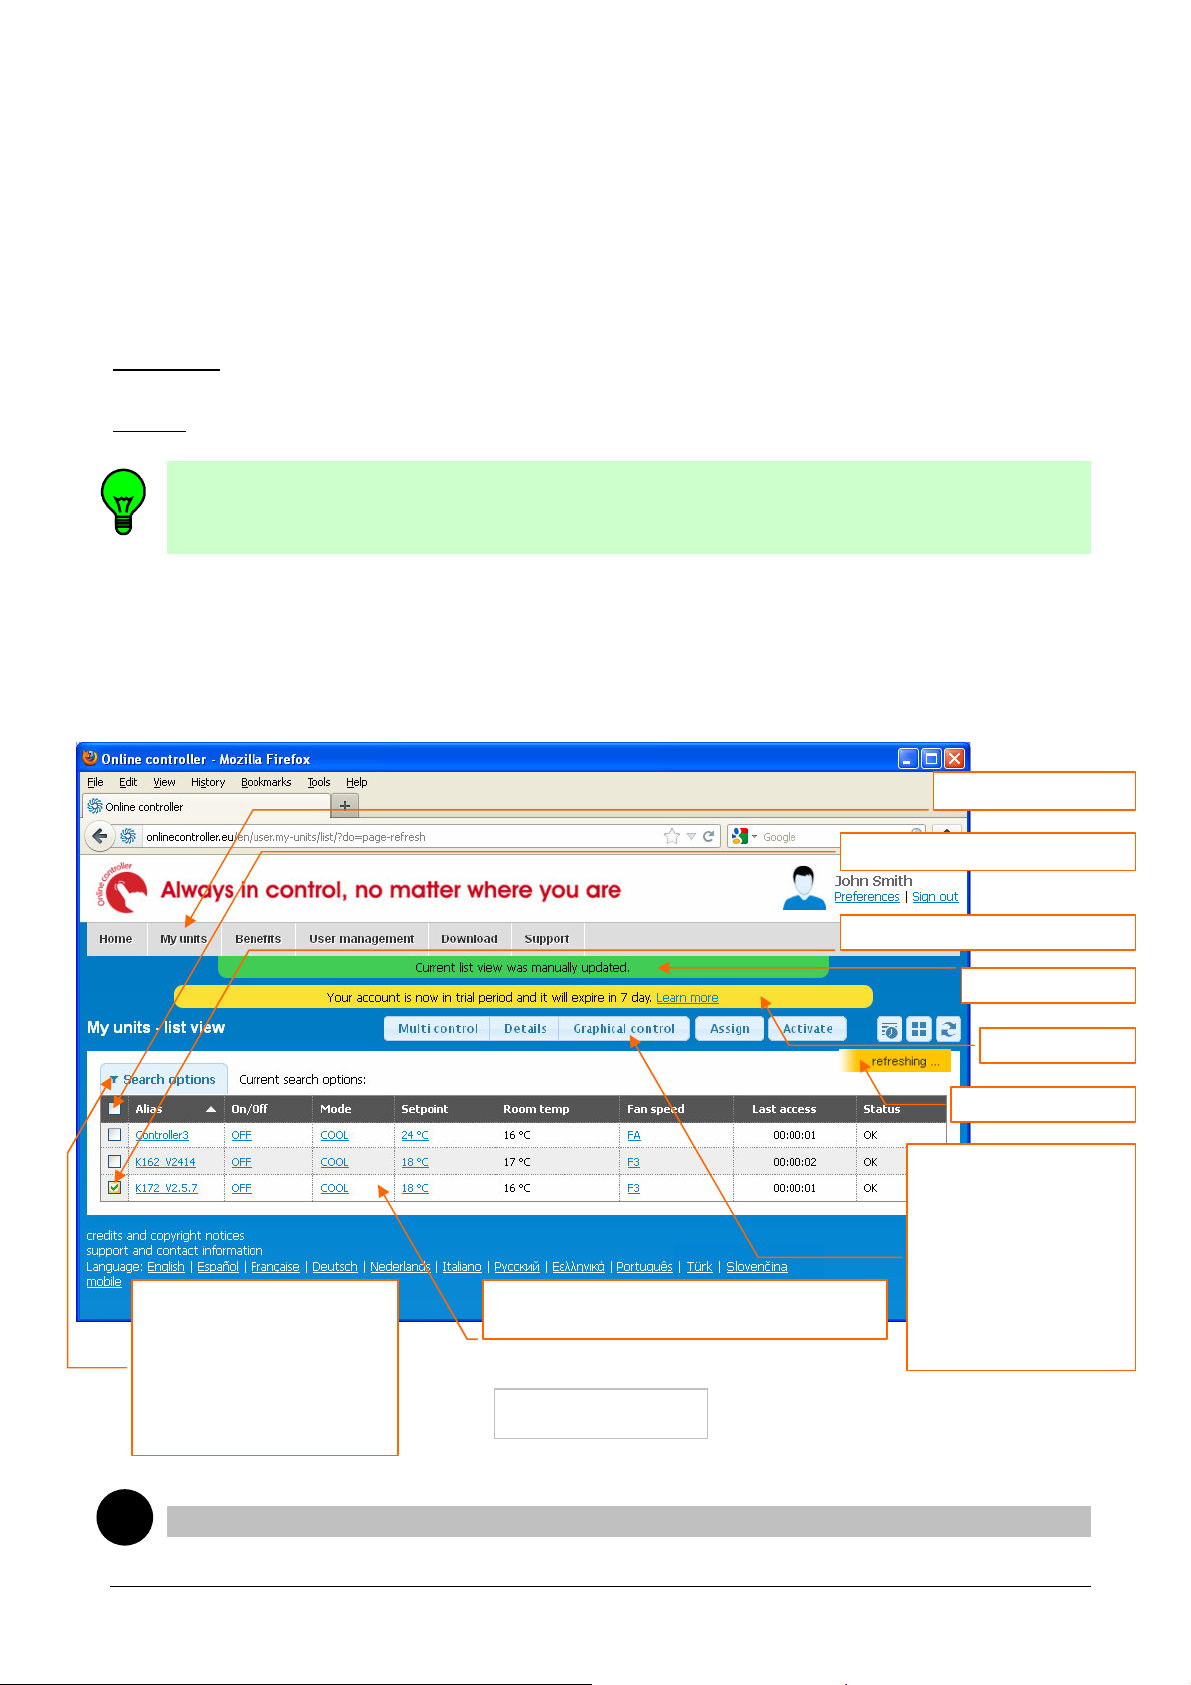
2.3. List of air-conditioners – My units
Search options - filter
All statuses
OK
KKRP01A COMM error
A/C COMM error
A/C error
ANY error
Data line – one controller KKRP01A;
operation mode column
One unit equals one indoor air-conditioner equipped with one adapter KKRP01A.
CONTROL BUTTONS
Multi control
Details
Graphical control
Assign button
Activate button
PLANNER switch
ICONS switch
REFRESH button
Online Controller KKRP01A - User manual - 20120531 9
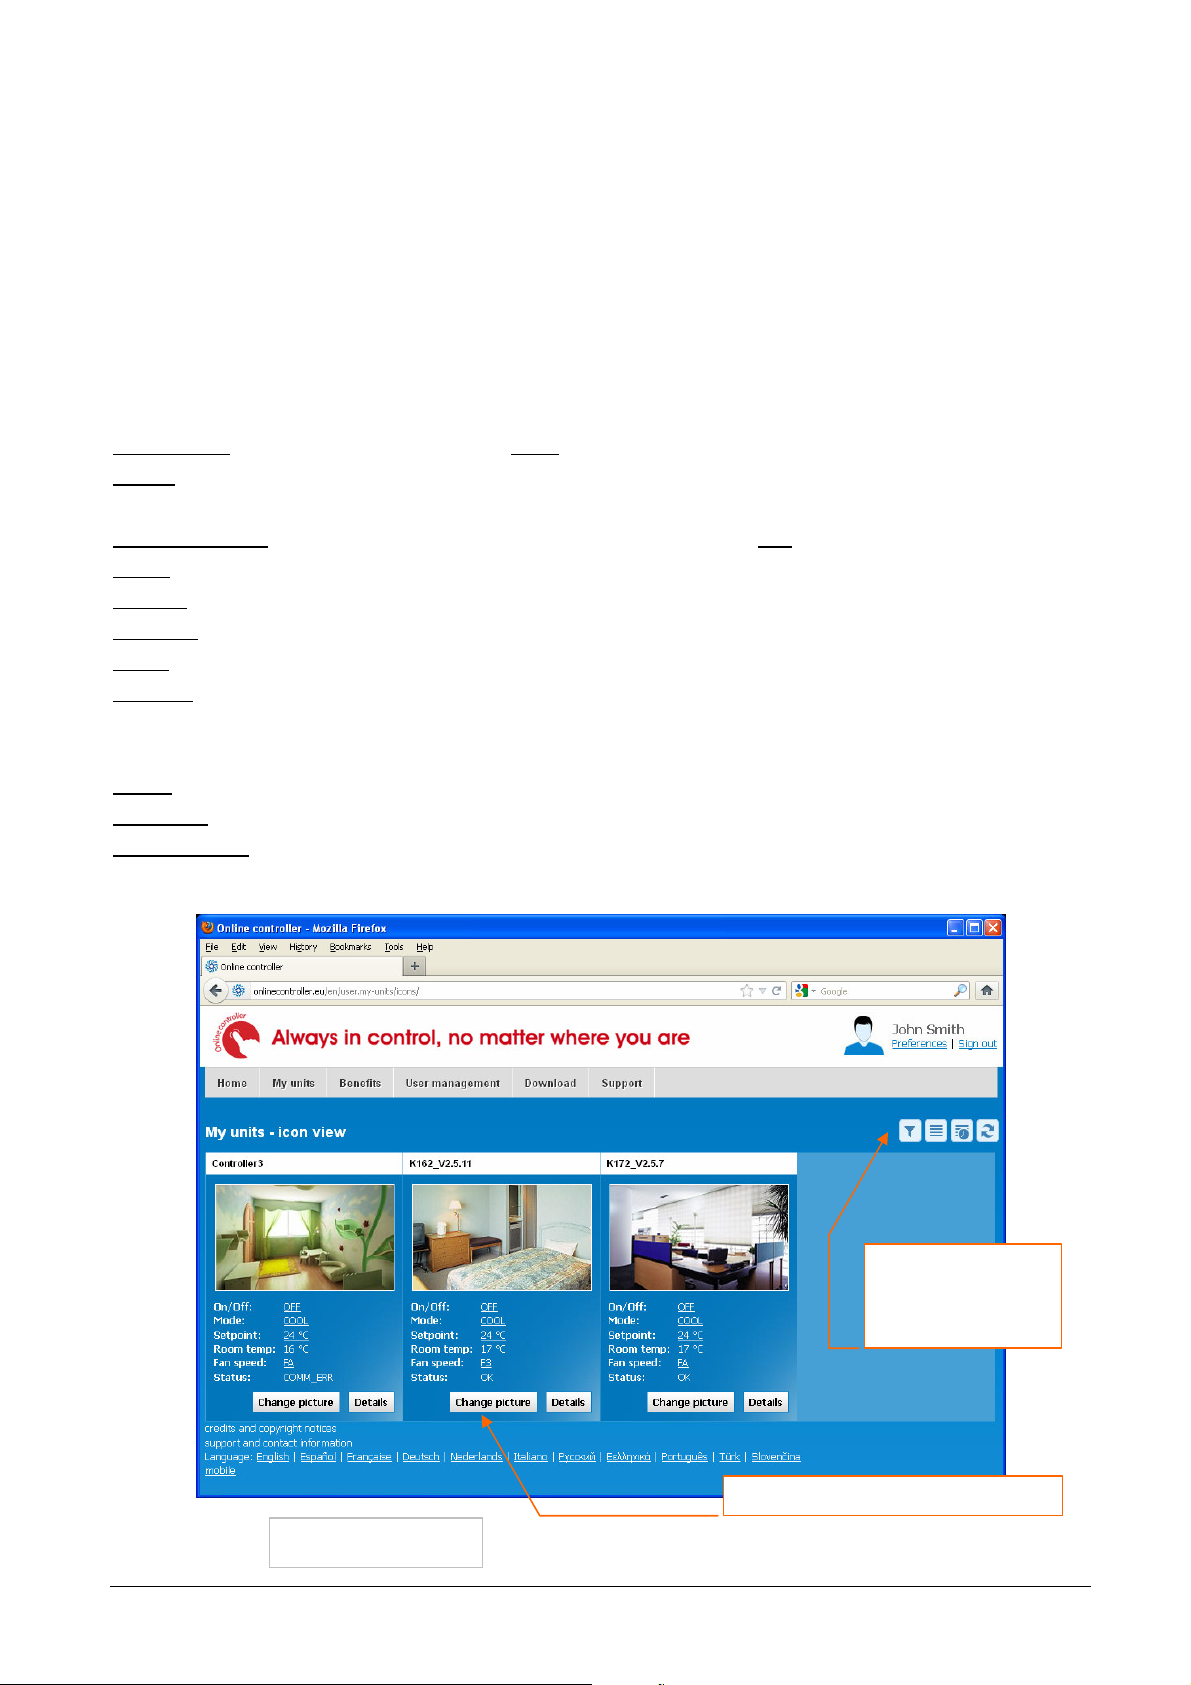
There are three ways, how unit can be assigned to the account:
Picture N
o. 6b
Data card
– one unit
KKRP01A
1. By Designated installer (for more information read the chapter 2.9.4. Designated installer)
2. By Superuser, who has used the self-installation method (read the chapter 2.14. Self-installation)
3. By another Superuser, who shares his unit (read the chapter 2.5. Sharing of units)
UPPER MENU – switching between Home page, My units, Benefits, User management, Download
and Support page
POP-UP info line - informs the user about current action which has been done, it drops out after few seconds
Refresh symbol – flashes once per 10 seconds and all data are up-to-date
Control buttons – are activated and deactivated automatically depending on choosing one or more KKRP01As
Before any action with A/C unit, sign its selectbox at the begin of data line
Multi control – simply module for control of more devices simultaneously
Details – page with detailed online data, weather forecast and information about unit, including simple
module for controlling one unit
Graphical control – graphic module with weather forecast for control of one device (picture no. 7)
Assign – share your unit with another user, remove unit from their account or own account
Activate – authorize and activate new controller KKRP01A
PLANNER – switch to the weekly programmer for air-conditioning
ICONS switch – selection of the icons visualization (picture no. 6b)
REFRESH button – for reloading the page with online data immediately
Search options – tool for filtering of devices by name and different states – ALL STATUSES, OK, KKRP01A
COMM ERR, A/C COMM ERR, A/C ERR and ANY ERR
FILTER button – in ICONS view (picture no. 6b) open the Search option menu (read above)
DATAGRID switch – in ICONS view, selection of the datagrid visualization (picture no. 6a)
Change picture – on data card (picture no. 6b), opening the window with selection of available pictures, also
uploadable from PC
FILTER button
DATAGRID switch
PLANNER switch
REFRESH button
Online Controller KKRP01A - User manual - 20120531 10
 Loading...