

Page 1

DAF XF
QUICK REFERENCE GUIDE
DRIVEN BY QUALITY
TRUCKS | PARTS | FINANCE
WWW.DAF.COM
Page 2

DAF XF Quick Reference Guide
DW63211901
Printed in the Netherlands
Page 3

Page 4

PREFACE
This Quick Reference Guide consists of sections which in short describe the systems,
controls and functions of the truck.
©1-4-2015 DAF Trucks N.V., Eindhoven, The Netherlands.
This text has been translated from the English source. Translation may lead to
interpretation differences regarding contents and meaning of the written text.
Therefore, in case of dispute, the English version of this document shall always be
considered the sole and authentic source for determining the contents and meaning of
the written text.
In the interest of continuing product development, DAF reserves the right to change
specifications or products at any time without prior notice.
No part of this publication may be reproduced and/or published by printing, by
photocopying, on microfilm or in any way whatsoever without the prior written consent
of DAF Trucks N.V.
INTRODUCTION
This truck is equipped with advanced features for optimal performance and driver
satisfaction.
These features have been designed to help you, and when correctly used, they result
in improved fuel efficiency.
To benefit optimally from all these new features it is good to learn about these features,
right from the beginning.
Before you start using this truck, read this quick reference guide to help you to realise
the maximum benefit in the shortest time possible.
NOTE: Learn more in the driver's manual or see the videos and animations
on the DAF Trucks NV YouTube channel.
1
Page 5
Quick Reference Guide
D002219
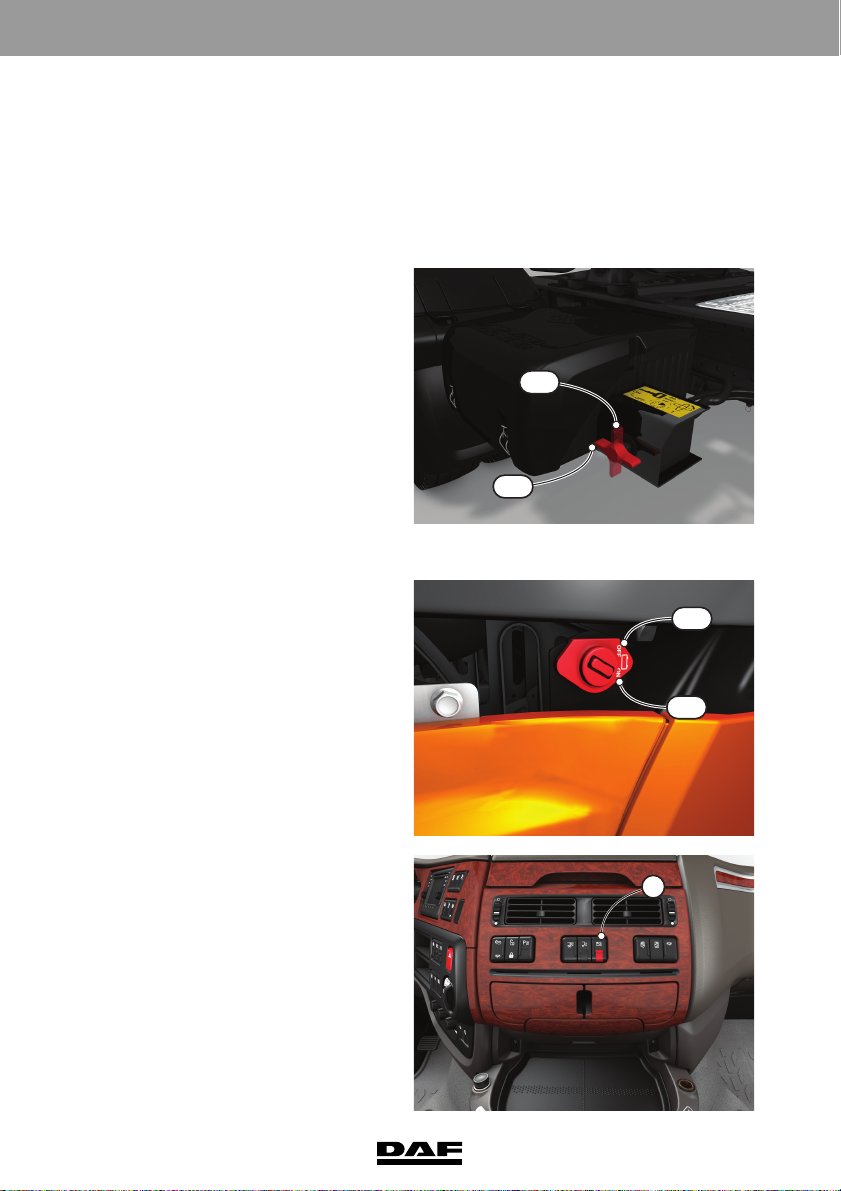
OFF
ON
BEFORE A DRIVE
Main switch
Switch on the main switch to provide power to the vehicle´s systems.
Mechanical main switch
ON
OFF
Electronic main switch
D002218
The electronic main switch also has a
switch (1) on the centre console in the
cabin.
2
1
D002258
Page 6

Quick Reference Guide
Checks
Always perform the following checks before driving off:
– Possible leaks of vehicle systems (air, engine oil, coolant).
– Wheel attachment and tyre pressures.
– Air filter indicator (on the air filter).
– Windscreen washer fluid level (behind the front panel).
NOTE: Use the lever in the driver site stepwell to unlock the front panel.
– Coolant level (behind the front panel).
– Fuel level.
– AdBlue level.
– Master display for system warnings.
– Engine oil level (on the master display).
NOTE: Topping up via the filler opening behind the front panel.
Exterior light check
Press the exterior light check switch (1)
on the ignition key or remote control for
2 seconds.
1
D002221
3
Page 7

Quick Reference Guide
Spoiler settings
To minimise fuel consumption, adjust
the roof spoiler as indicated.
Air suspension height settings
Adjust the front and/or rear axle of the
vehicle and/or the axles of the trailer to
the desired height and store the height.
(two 'pre-sets' possible, M1 and M2)
1
/
X
2
X
D002217
D002220
4
Page 8

Quick Reference Guide
Mirror settings
Set the chair and safety belt to the desired positions.
Adjust the mirrors at the driver side.
Adjust the mirrors at the co-driver side so the following areas are visible:
A Wide view mirror
B Main mirror
C Kerb mirror
D Front view mirror
D
C
Steering column settings
Unlock the steering column and adjust it
to the desired position.
B
A
D002222
D002223
5
Page 9

Quick Reference Guide
D002225
1
4
5
6
2
3
DRIVING CONTROLS
Master display
The master display informs you about
system warnings and/or vehicle
settings.
The colour indicates what the
information concerns:
– Red (danger).
– Yellow (warning).
– Blue (settings).
– Grey (information).
– Green (Driver Performance
Assistance).
Steering column controls
Left-hand steering column switch
1 Horn button.
2 Direction indicators, right.
3 Direction indicators, left.
4 Windscreen washers switch.
5 Windscreen wiper switch.
6 Main beam.
7 Headlight flash.
D002228
2
1
4
6
Steering wheel switches (SWS)
1 Volume control.
2 Scroll function.
3 Phone control.
4 Downhill speed control.
5 Variable speed limiter.
6 Driving: Cruise control.
Standstill: Engine Speed
Control.
6
5
7
3
D002224
Page 10

Right-hand steering column switch
D002227
1
A
1
B
With manual gearbox
A Version with MX Engine Brake
(MEB) or retarder.
B Version with exhaust brake.
1 Eco Mode 'OFF'. If selected, an
icon is displayed in the
tachometer display.
With AS Tronic gearbox
Quick Reference Guide
A
B
1
1
D002226
Manual gearbox
1 Changing half gears (splitting).
2 Pre-select the range (low and
high range).
1
2
D002229
7
Page 11

Quick Reference Guide
AS Tronic gearbox
R Reverse mode.
N Neutral.
D Drive mode.
The positions with the tortoise symbol
are for either the forward or reverse
manoeuvring mode.
With switch (1) the Hill Start Aid (HSA)
is switched on or off.
The HSA function can be used with an
AS Tronic gearbox to drive off at a hill
without using the park brake.
Regenerating DPF
The Emission Aftertreatment System (EAS) is equipped with a Diesel Particulate Filter
(DPF) which requires regular regeneration.
Normally regeneration is handled automatically by the vehicle without any driver
involvement.
Familiarise yourself with the DPF switch, the three levels of regeneration, their
warnings and what action to take. Make sure that you have enough AdBlue for your
journey.
There are three levels of regeneration:
Passive regeneration
Automatic regeneration of the DPF above a certain exhaust temperature. No
intervention required by the driver and no indication on the master display.
1
D002230
Active regeneration
Regeneration when driving, triggered by the engine management system (EMS). No
intervention by the driver required.
NOTE: When at low speed
or with the vehicle stationary
(during forced stationary
regeneration) the yellow
coloured high exhaust
system temperature (HEST)
is shown in the instrument
panel. Take care that no
people, vehicles, animals or
combustible materials are
within 2 metres of the
exhaust outlet.
8
D002232
Page 12

Quick Reference Guide
Forced stationary regeneration
When Passive and Active Regeneration is not sufficient the system will prompt that a
forced stationary regeneration is required.
A forced stationary regeneration is performed at stand-still and triggered by the driver.
To prevent the engine derating power, perform regeneration of the DPF as soon as
safely possible.
Four different levels of pop-up messages on the master display are possible to warn
you the DPF must be regenerated stationary.
1. Soot level high. Regeneration required (yellow).
An alternative to overcome this is to take a motorway route which will
clear the soot via passive regeneration.
When ignored, this warning will re-appear at the next key cycles.
2. Soot level too high. Start regeneration immediately (yellow).
Again, to overcome this is to take the motorway route.
3. Soot level full. Regeneration required now (yellow).
The engine derates power and a forced stationary regeneration is
required as soon as safely possible.
4. Soot level full. Service required (red).
The engine derates power and an authorised DAF Service dealer must
service the vehicle.
It is no longer possible to perform a forced stationary regeneration.
Safety checks
Before starting a forced stationary regeneration, make sure that following safety checks
have been performed:
– The vehicle is parked outside with a minimum of 2 metres clear space around the
exhaust outlet.
– The park brake is applied.
– The engine is running at idle speed.
– The vehicle is NOT left unattended.
– The coolant temperature is above 65 degrees.
9
Page 13

Quick Reference Guide
Performing forced stationary regeneration
When all safety checks have been met,
press (up) the DPF switch (1) once to
allow the engine management system
(EMS) to carry out a self check. Follow
the instructions on the master display.
Press the switch (up) again to start the
forced stationary regeneration process.
NOTE: Prevent any
regeneration action by
switching to 'OFF' (down)
when working inside or when
entering a hazardous area.
1
D002231
10
Page 14

CONTROLS
Mirror and window controls
1 Adjust mirror button.
2 Mirror selection and mirror
heater.
3 Window control left or right.
Dashboard
1 Light switch
– Spring-loaded position (left):
Switch off daytime running
lights.
– 0: Lights switched off.
– 1: Marker lights on.
– 2: Headlights and marker
lights on.
– Front fog lights: pull out one
step.
– Rear fog lights: pull out two
steps.
2 PTO switches.
Move the lock upward to release
the switch.
3 Interior light switch.
4 Dimmed instrument lighting.
5 Instrument lighting dimmer.
6 Static cornering light.
7 Tractor: Working light on the
cabin cross member.
Rigid: Light in the loading space.
Quick Reference Guide
1
2
3
D002233
1
6
7
8
3
4
5
2
D002234
11
Page 15

Quick Reference Guide
Master display
A Interactive and dialogue area.
B Indication bar.
C Driver Performance Assistant
(DPA) status bar.
1 Symbol of selected menu.
2 Menu title.
3 Warning indicators.
4 Scroll function available.
The on-board computer system can be
accessed using the master display.
C
1 2 3
B
A
The system is controlled using the
Menu Control Switch (MCS).
Turn the MCS to select and press to
enter a menu, function or setting.
Press the Enter key to go back one level
or press and hold to exit the menu fully.
VEHICLE INFO – Engine oil level.
– Air supply.
– Tyre Pressure Indication (TPI).
– DPF information.
DRIVING SUPPORT – Economic driving.
– Adaptive Cruise Control (ACC).
– Predictive Cruise Control (PCC).
– Power Take Off (PTO).
– Axle load.
– Speed information.
SERVICE INFO – Warning list.
–Next service.
– Vehicle Identification Number (VIN).
– Total fuel.
4
D002235
D002236
12
Page 16

Quick Reference Guide
TELEPHONE – Truck phone.
– Bluetooth telephone.
– Phone volume.
SETTINGS – Alarm & clock.
– Language.
–Units.
– Dim settings.
– Speed control.
– Tachograph card settings.
TRIP INFO – Drive time.
– Trip 1.
– Trip 2.
Control panel
1 Menu Control Switch.
2 Driving height switch.
3 Lane Departure Warning
System (LDWS) switch.
4 Diesel Particulate Filter (DPF)
switch.
5 Advanced Emergency Braking
System (AEBS) switch.
6 Predictive Cruise Control (PCC).
7 Adaptive Cruise Control (ACC).
8 Flasher hazard warning lights
switch.
9 Air conditioning switch.
10 Air recirculation switch.
11 Air temperature control, rotary
knob.
12 Air distribution, rotary knob.
13 Fan speed, rotary knob.
1
2
13
12
11
5
6
7
8
3
4
9
10
D002237
13
Page 17

Quick Reference Guide
D002239
1 2 3 4
Centre console
1 Lock or unlock co-drivers door.
2 Reverse buzzer deactivation
switch.
3 USB charge connection (5V,
maximum 1.8A).
4 24V / 15A accessory connection
(maximum 360W).
5 12V / 5A lighter or accessory
connection (maximum 60W).
6 USB / AUX plug connection DAF
radio.
Roof console
Sleeper Cab and Space Cab
1. Auxiliary driving light on roof
switch.
2. Rotating light switch.
3. Roof hatch switch.
4. Roof hatch insect screen switch.
1 2
6
5
3
4
D002238
Super Space Cab
14
1 2 3 4
D002240
Page 18

AFTER A DRIVE
Filling fuel tank
Fill the fuel tank or tanks with diesel of
the prescribed quality.
NOTE: When the vehicle is
equipped with a dual fuel
tank system, fill both fuel
tanks separately.
Filling AdBlue tank
When filling the AdBlue tank and there
is (a chance for) frost, fill it to maximum
75%.
Fill the AdBlue tank with AdBlue of the
prescribed quality.
Quick Reference Guide
D002241
D002242
Leaving the vehicle
Test the vehicle (combination) brakes using the test position of the park brake handle.
Close both doors and press button (1)
for more than 2 seconds to initiate
comfort locking.
2
1
D002243
15
 Loading...