

Page 1

-29-
Select the Channel to erase.
• The Channel to erase with the
“
CH ” button.
• You may select the Channel by
pressing the number button.
Ex) “13” channel
Press the “Add/Erase” button.
• If pressing the “Add/Erase”
button, the Channel number
changes from green color to red
color.
• Add – Erase character
alternatively appears whenever
pressing this button.
- This is function to erase unnecessary Channel memorized.
- This function is available even in the <Menu> - <Set Up> - <Ch Edit> - <Add/Erase>.
Erase of Memorized Channel
Notices:
Cautions in menu setup
• Menu disappears if not operating any button for 10 seconds from the menu.
Press the menu button to erase the menu.
• Only Channel signal with signal in setting up automatic Channel is memorized
and other channels becomes as erase status.
• The screen appears as “Cable” when watching “Air” cable TV during reception
of TV.
You may select Air – Cable by pressing the “
VOL ” button.
ADD/
ERASE
Page 2

-30-
- This is function to clearly adjust the screen to the minute part when any Channel screen appears as a dotted line
or when no color appears or when a stripe figure appears or when the screen is unstable.
Select the Set up with the “Menu” button and the “ VOL ” button.
• The “ ” mark appears as in the
right if pressing the “
VOL ”
button until it will arrive at the
Set up.
Select “Air/Cable”.
• This screen is used for selecting
“Air TV” and “Cable TV”
• The screen is changed to “Air
TV” and “Cable TV” whenever
pressing the “
VOL ” button.
When color looks separated
• You must adjust “Color Match”
when color of the screen (red, blue,
yellow) looks separated or looks
spread due to unmatched (See 56
page).
Minute Adjustment of Channel
Page 3
-31-
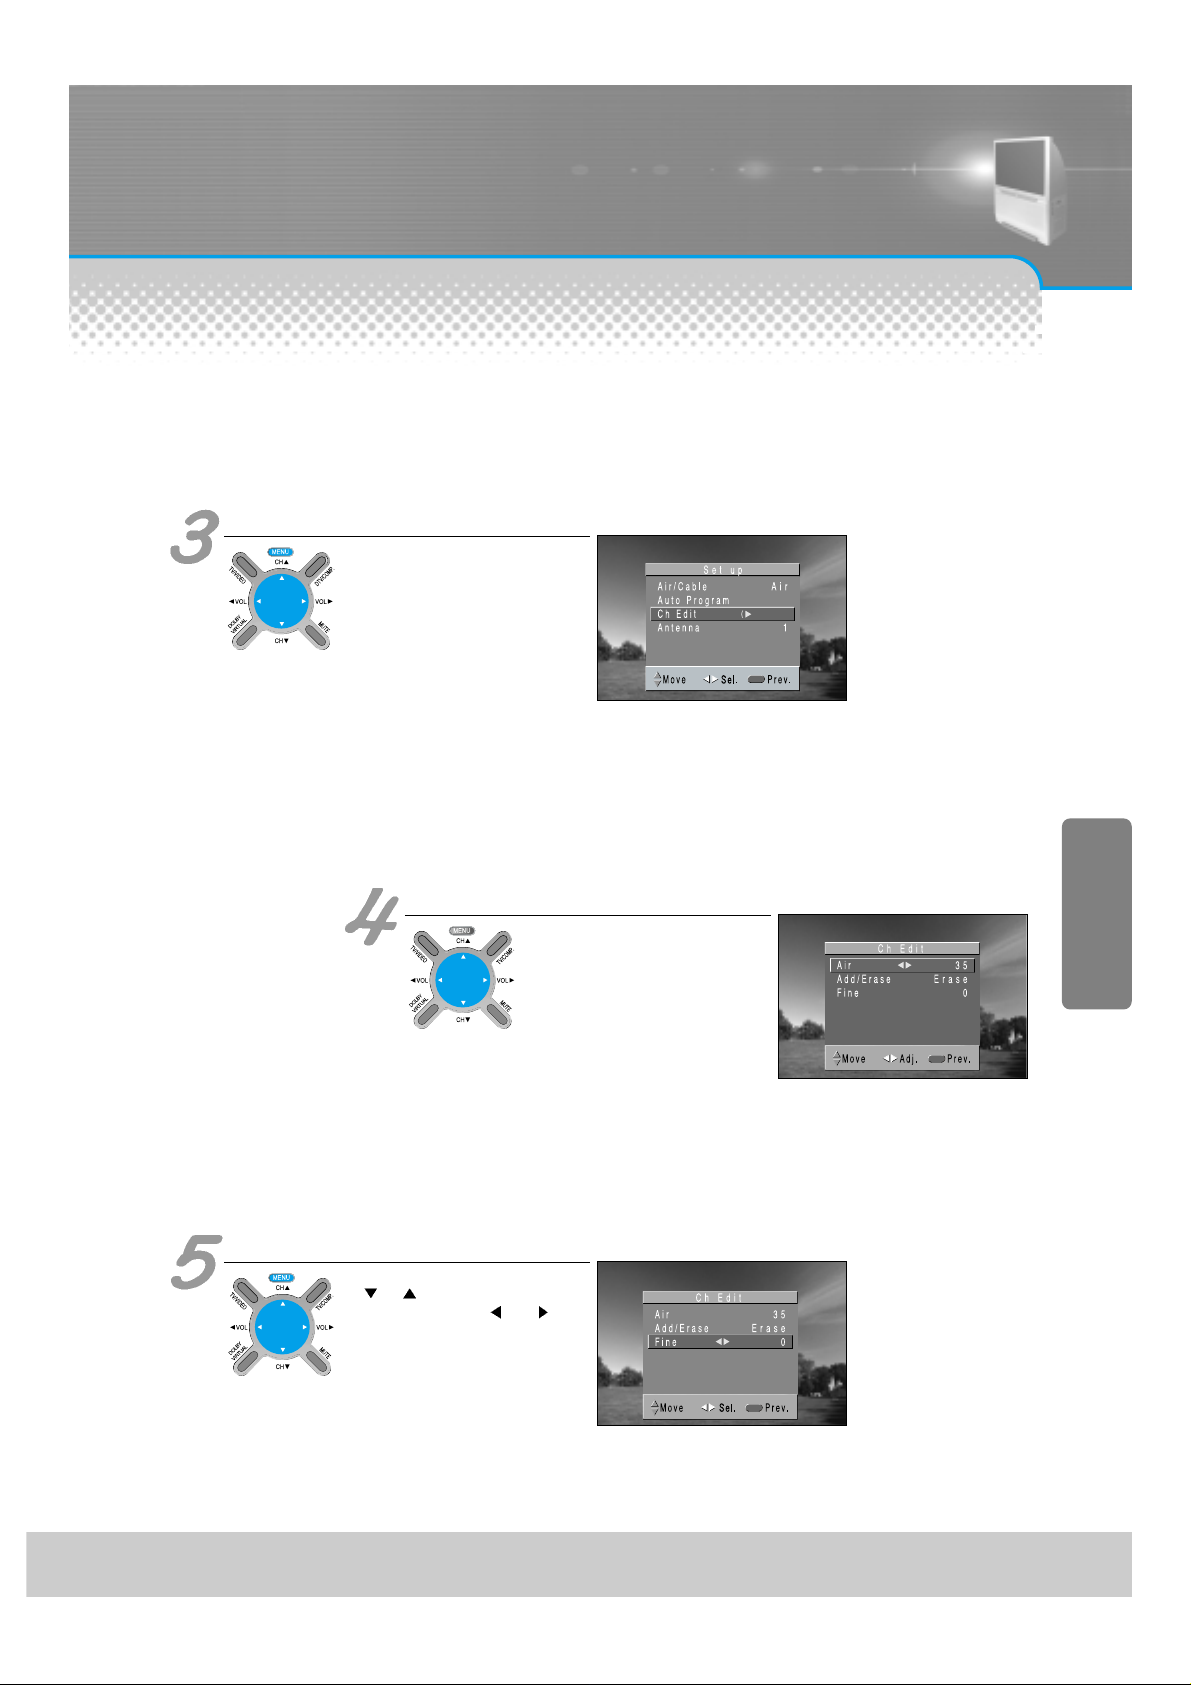
Select Ch Edit
• The screen appears as in the
right if pressing the “Ch Edit”.
Other items for Channel adjustment
• This item enables to erase,
memorize or minute adjust the
channel.
• Select the desired Channel
firstly.
• Performs Add or Erase.
• Minute adjust enables to adjust
minute and clear thing on the
screen.
Select Fine
• Select Minute Adjust by using the
“
CH ” button.
• Stop to press the “
VOL ”
button if the screen becomes
best conditions.
Page 4

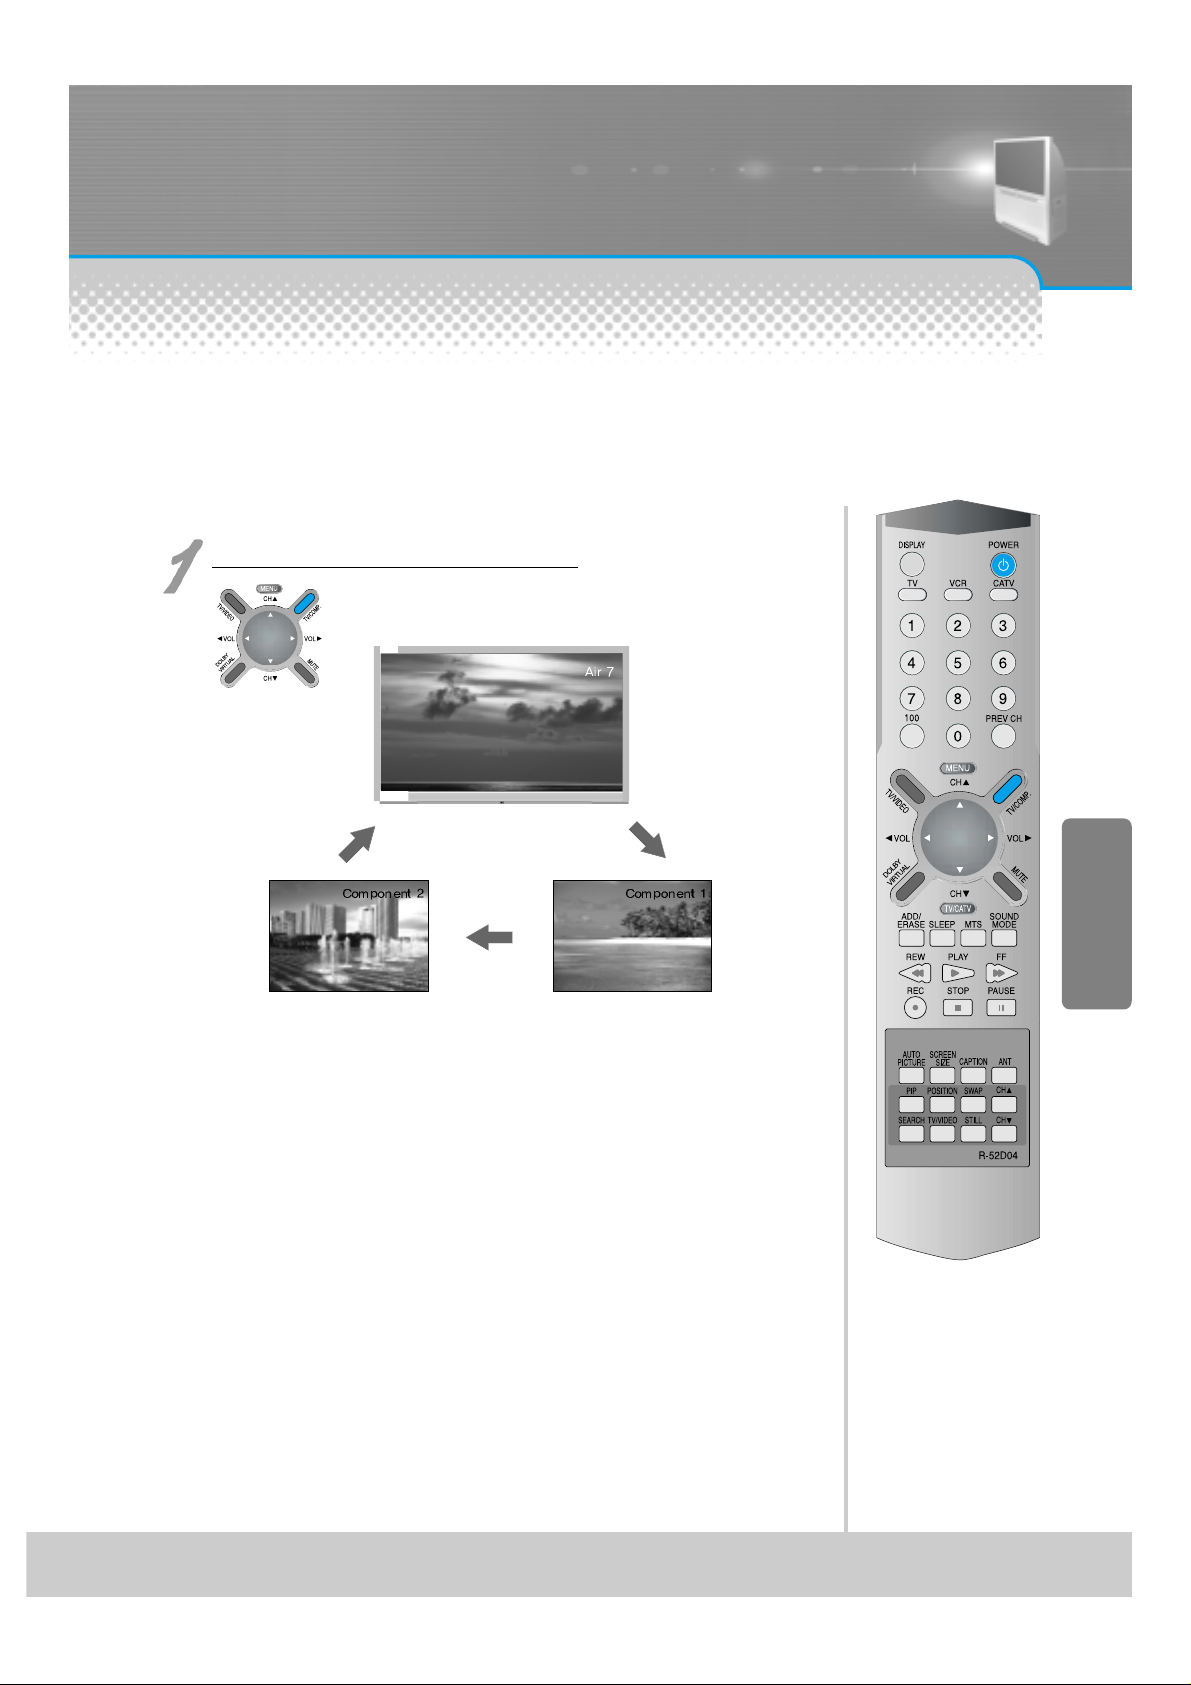
Selection of Input Signal
-32-
Press the “TV/VIDEO” button.
• Screen changes as follows whenever pressing the
“TV/Video Input” button.
- See 11p for connection method of TV and “Video”.
- You cannot designate channels when watching video.
When watching video, Camcorder, Cable TV
Notices:
Cautions in menu setup
• Menu disappears if not operating any button for 10 seconds from the menu.
• Don’t connect video signal and S-video signal to the video input terminal
(1,2,3) at the same time. If connecting both signals at the same time, the Svideo operates.
• You can watch only when this input terminal must be connected to the
composite video (generally video) signal.
• If sound signal is of mono method, connect it to the L-terminal of the sound
input terminal.
Page 5
-33-
- See 13p, 15p for connection method of DTV and DVD (component input).
- Input component video (called as color difference signal) as DVD signal.
Press the “TV/COMP.” button.
• The screen changes whenever
pressing the button once.
Component 2 Component 1
When watching DTV and DVD (component input)
Page 6
-34-
Press the Menu button.
Select “Component 1” or “2” from the “Special”.
• Component Off is repeated whenever pressing the “VOL ” button.
• Component 1 is repeated whenever pressing the “VOL
” button.
• Component 2 is repeated whenever pressing the “VOL
” button.
• Press the “
VOL ” button until the “ ” mark will come
on the “Special”.
• Press the “CH
” button in the “ ” mark will come ont the
“Special”
Method to watch by using Menu button
• “Conv Size” and “Conv Reset” is option.
Page 7
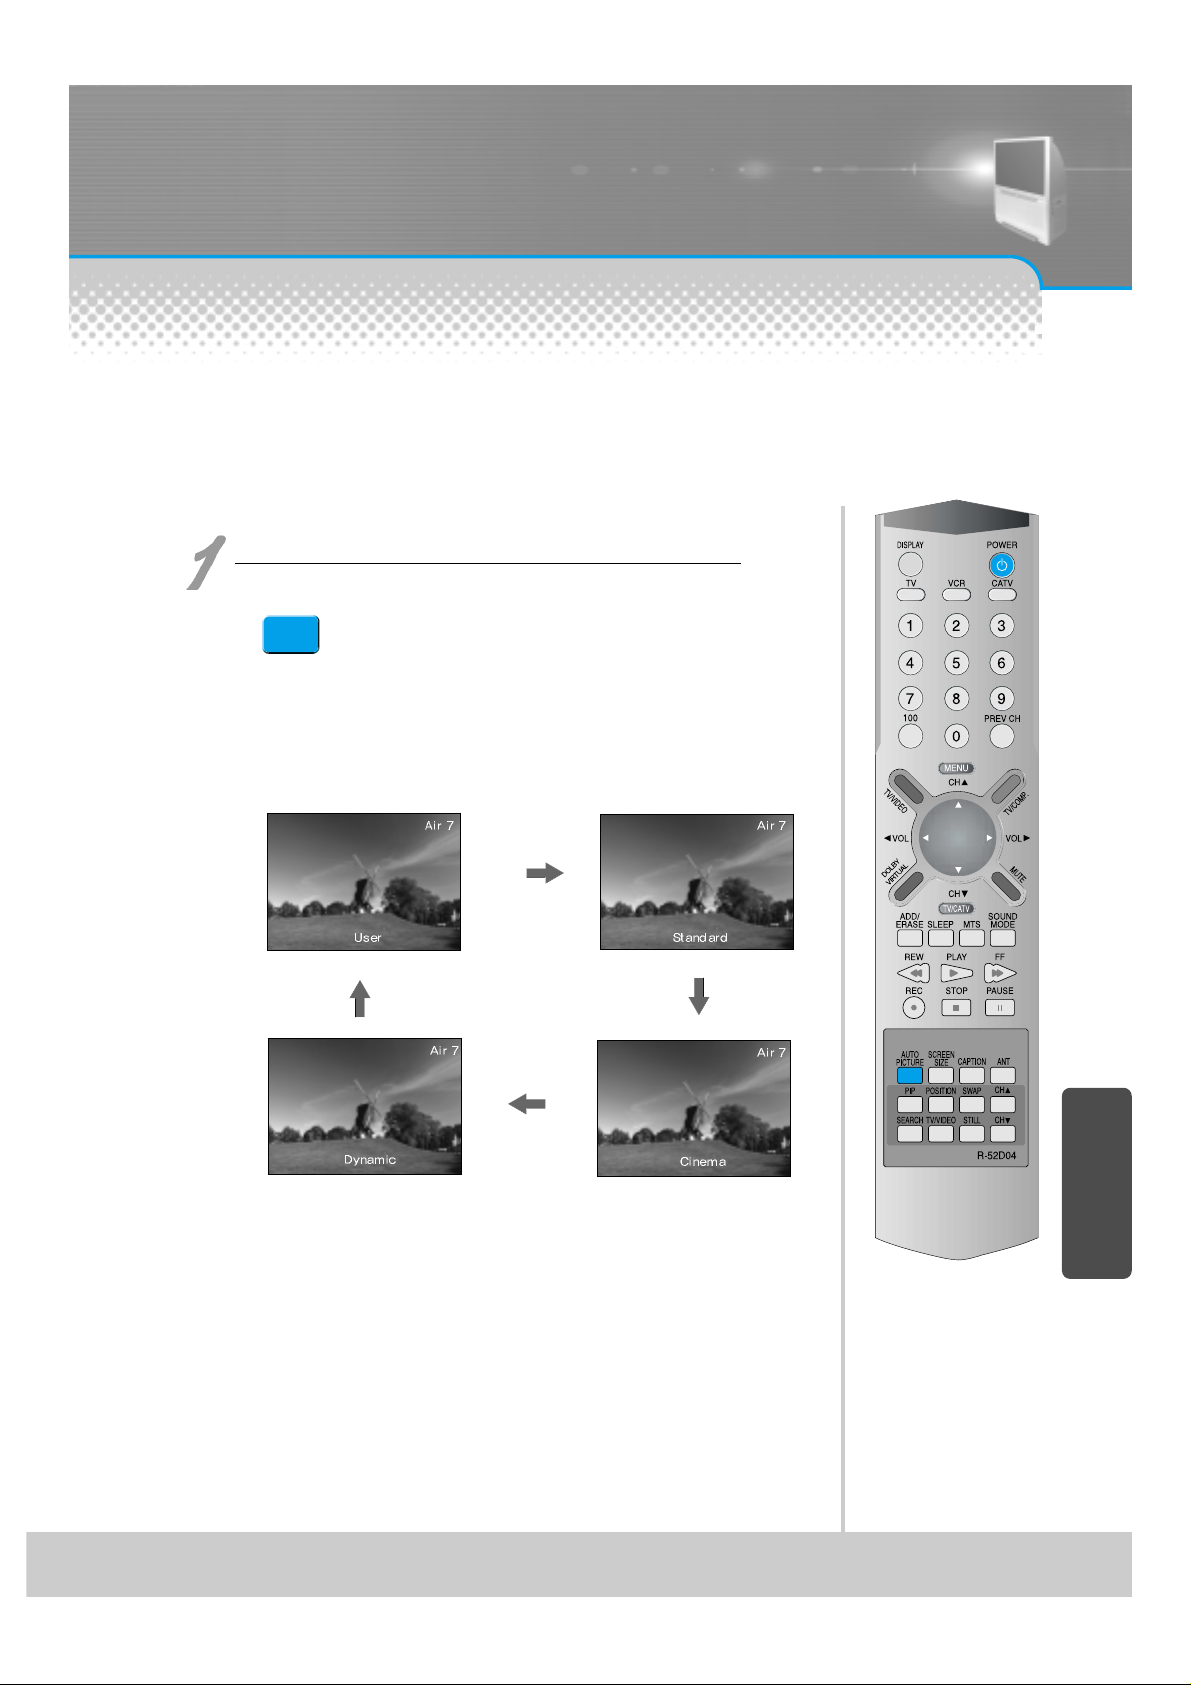
Screen Adjustment
-35-
- The user may select various screens designed in good appearance in respect of a professional without adjusting
the screen individually.
Press the “Auto Picture” button.
• The screen adjustment status changes as following
screens are displayed sequentially whenever
pressing the button of the Screen mode.
• Screen automatically changes to the User Screen if
adjusting Brightness, Contrast, Sharpness, Color, Tint
from individual screen mode.
• The screen returns to the mode prior to turn power off
if turning power off and then turning power in each
screen status.
When setting up various screen mode
AUTO
PICTURE
Page 8
-36-
Press the “Menu” button.
Press the “ VOL ” button.
• If pressing the “Volume ”
button, On and Off of the
Picture NR function are
repeated.
• Select On to select the Picture
NR function.
• Press the “
VOL ” button until
the “
” mark will come on the
“Picture”.
• Press the “CH
” button if the
“
” mark will come on the
“Picture”.
• Press the “
CH ” button and
select “Picture NR”.
- Screen noise refers to that screen looks bad as abnormal signal (noise) generates on the screen when
broadcasting signals are weak.
When removing screen noise
Page 9
-37-
- You can enjoy various screens by adjusting Brightness, Contrast, Sharpness, Color, Tint,
etc to the user’s taste.
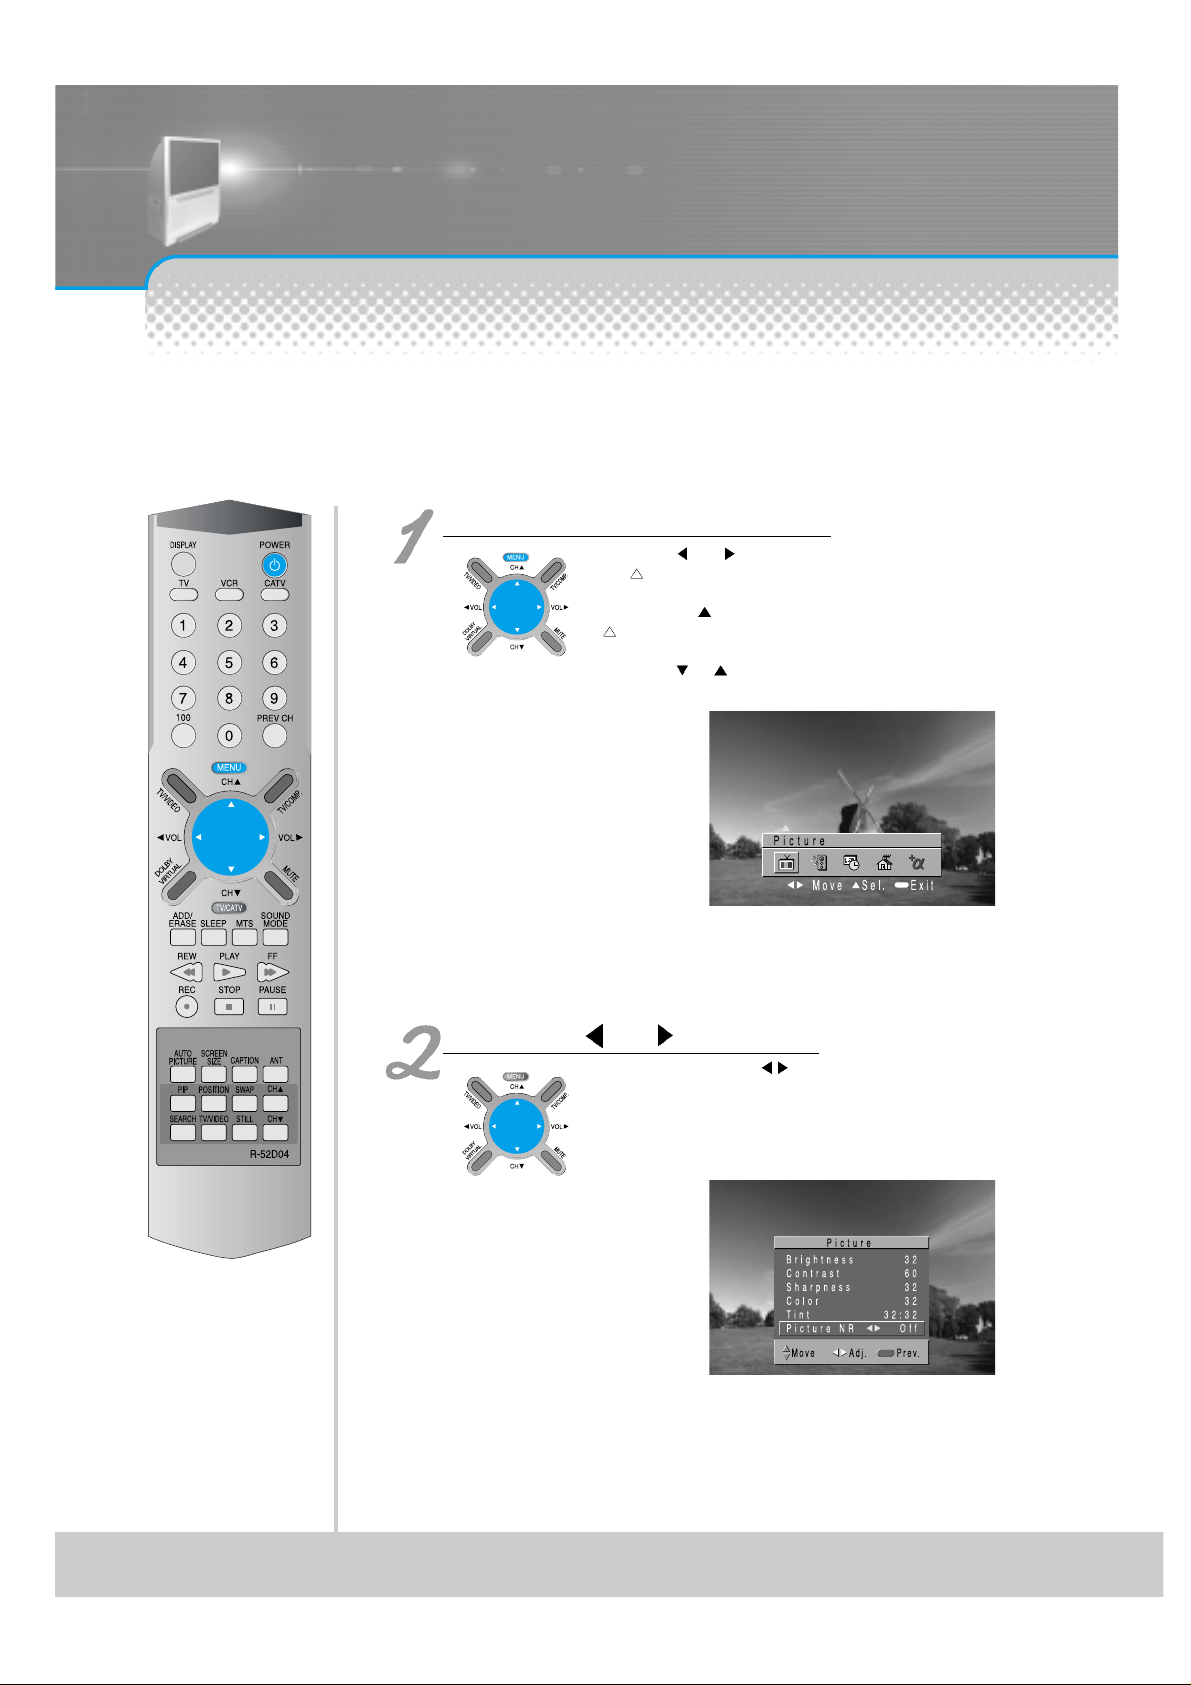
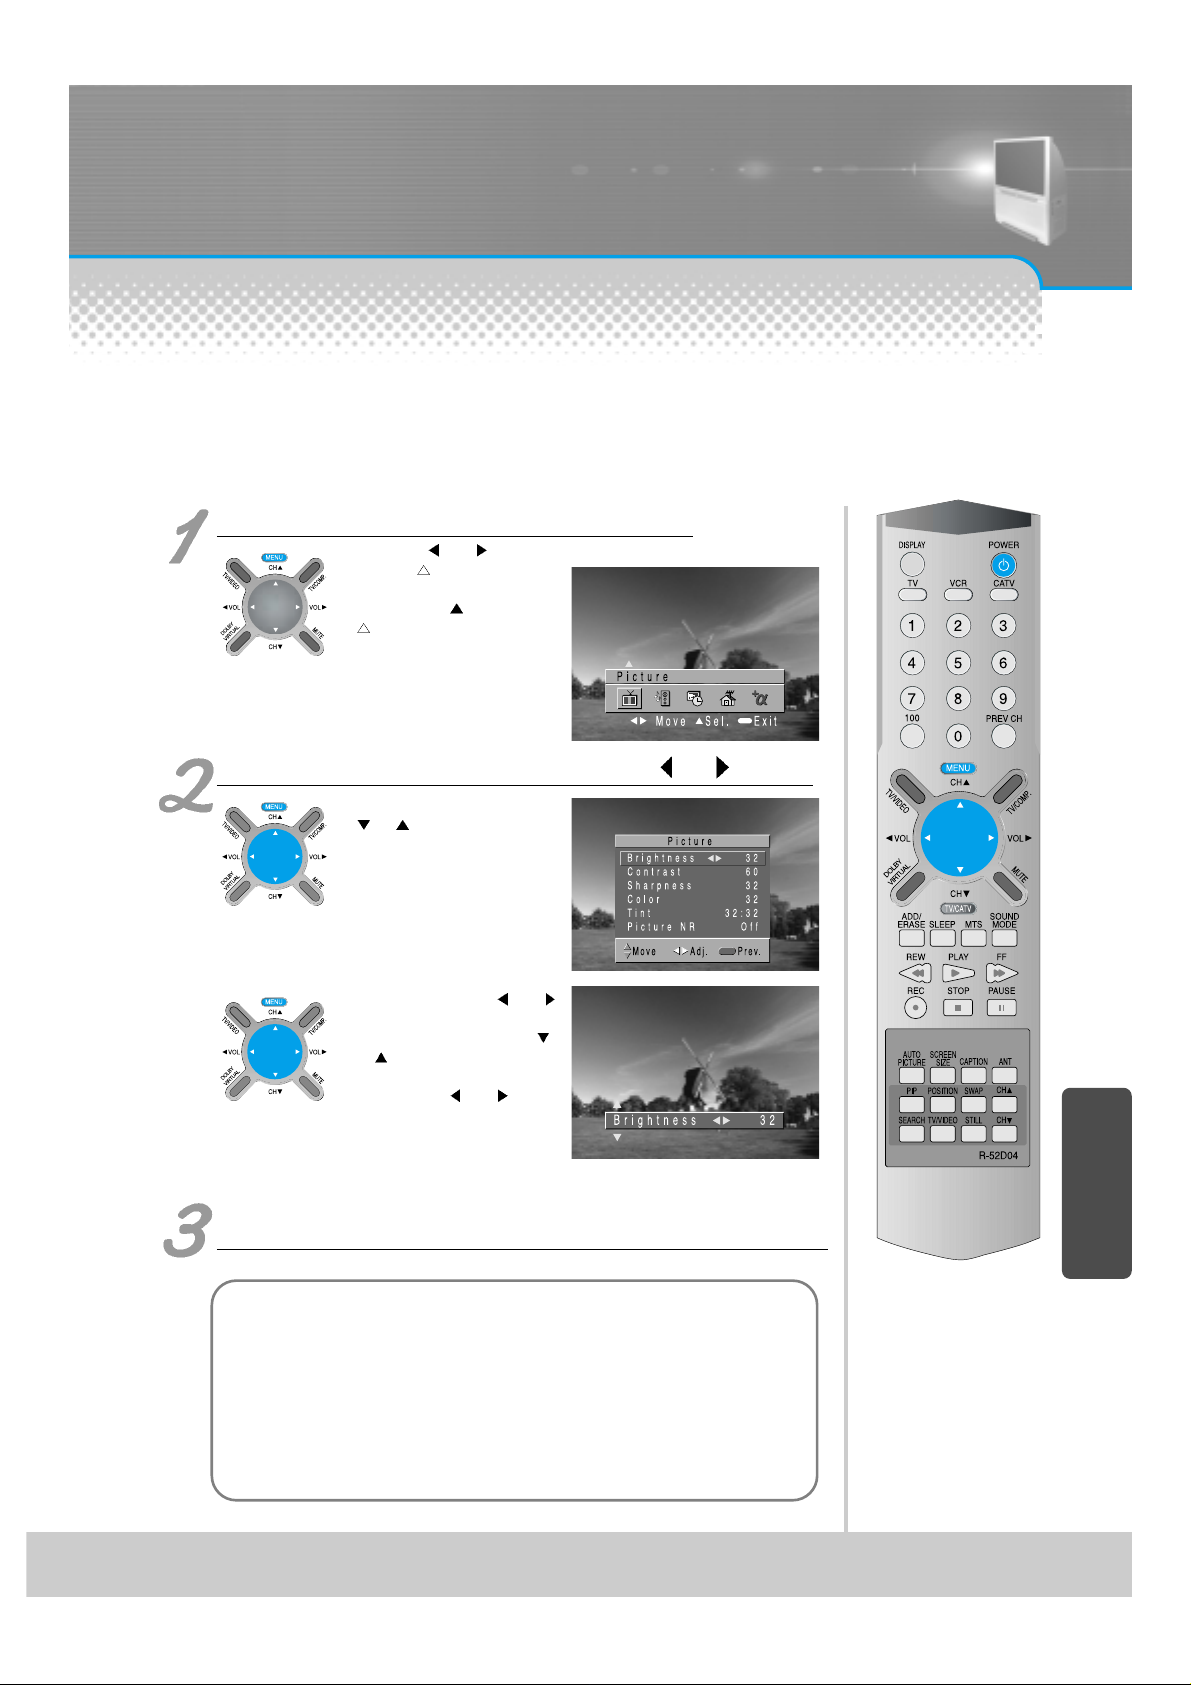
Press the “Menu” button and “Picture”.
• Press the “ VOL ” button
until the “
” mark will come on
the “Picture”.
• Press the “CH
” button if the
“
” mark will come on the
“Picture”.
Select the item desired to adjust and press the “ VOL ” button.
• Whenever pressing the
“
CH ” button, you can
select in the order of
Brightness, Contrast,
Sharpness, Color, Tint,
Picture NR function.
• The screen appears as in the
right if pressing the “
VOL ”
button after selecting items
desired to adjust with the “
CH ” button.
• You can adjust Brightness by
pressing the “
VOL ”
button.
Adjust Brightness, Contrast, Sharpness, Color, Tint,
in the same manner .
When adjusting the screen to taste
Notice
Brightness : Adjusts the whole of screen brighter or darker.
Contrast : Adjusts difference between brightness and darkness
between objects and background on the screen.
Sharpness : Adjusts outline of the screen smoothly or sharply.
Color : Adjusts color thinly or thickly.
Tint : Adjusts so that color of personal face becomes most naturally.
Picture NR : Automatically removes screen noise.
Page 10
-38-
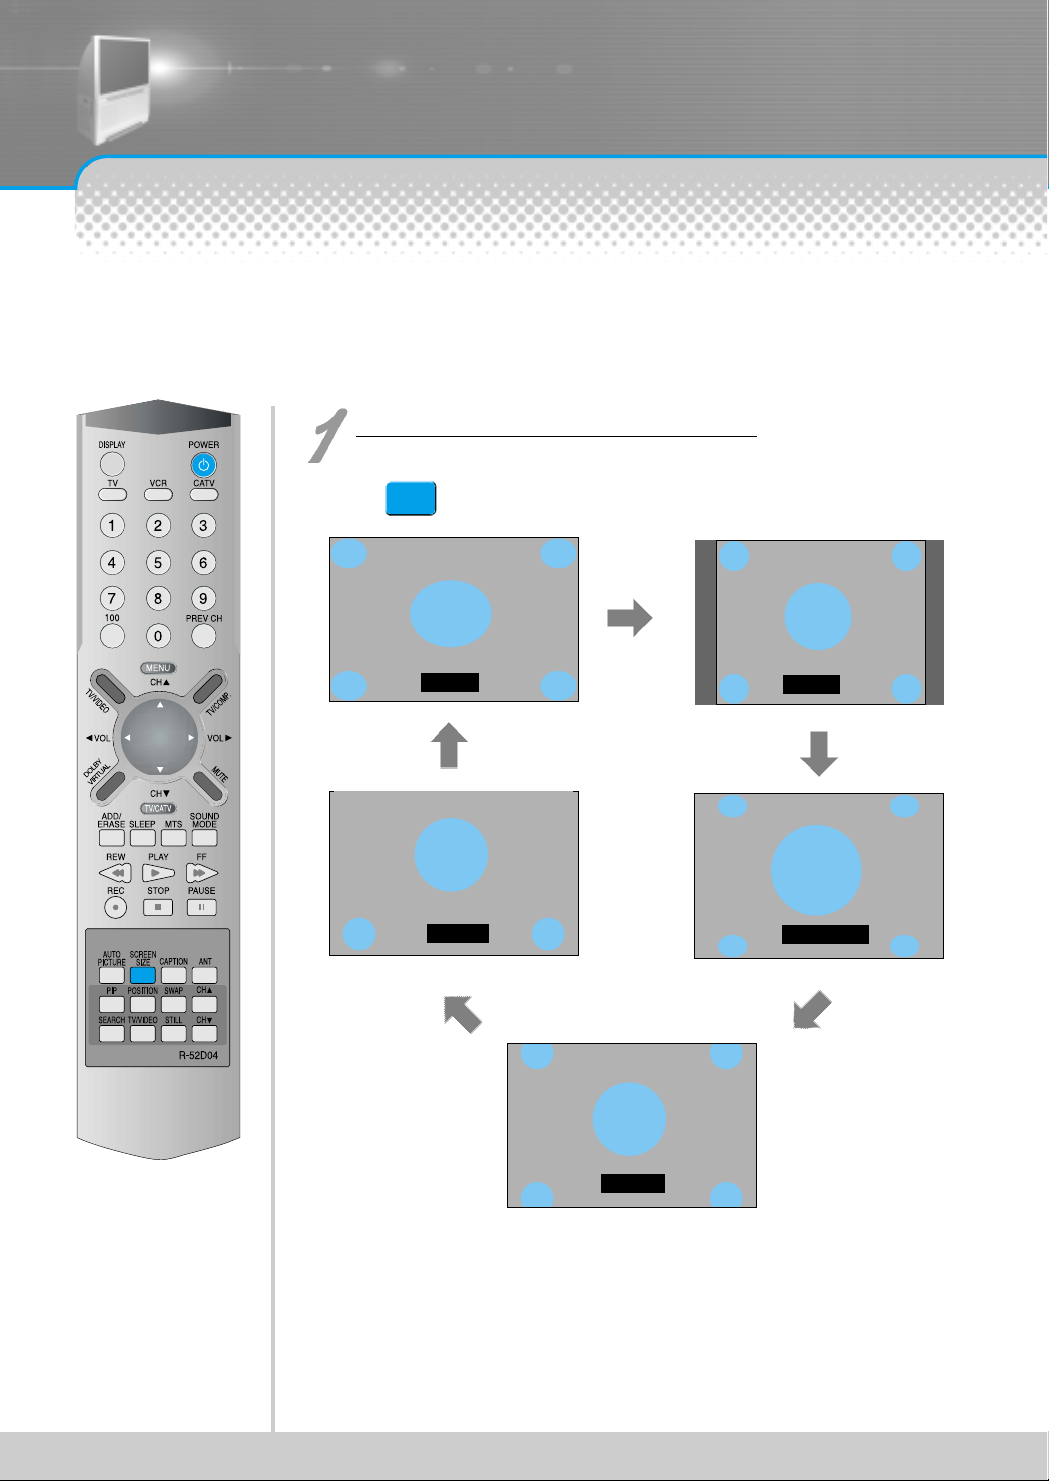
- Randomly change the size of the screen. Pleasure for enjoying the TV increases further.
- This mode does not operation in the component 1 and 2 terminal. (However, the mode operates when 480i is
entered into the component 1 and 2 terminal.)
- The 16:9 screen operates when power is turned on firstly.
Press the “Screen Size” button.
• The screen changes as below
whenever pressing the “Screen Size”
button.
• 16:9 : The 16:9 screen to prove atmosphere of the movie hall.
• 4:3 : General TV screen currently broadcasted.
• Panorama : Screen that extends the 4:3 image to 16:9 and spreads the left or right part,
and whose center provides natural and energetic feeling.
• Zoom 1 : Screen that enlarges image upward or downward.
• Zoom 2 : Screen that enlarges image upward or downward and inserts title for video
viewers into image.
16 : 9
4 : 3
Zoom 2
Zoom 1
Panorama
Adjustment of Screen Size
SCREEN
SIZE
Page 11

-39-
- You can watch in character (English) as well as hear sound in watching English caption program.
Press the “Caption” button.
• Setup performed once continues to keep
the status as it is.
CAPTION
Select “Caption” after selecting the “Menu” button
and “Function”.
• Off - CC1 - CC2 - CC3 - CC4 is repeated whenever
pressing the “Volume
” button.
Method to Setup the “Caption” with Menu button
Method to Setup the Caption Screen Mode
Page 12

-40-
- This is function to protect children or juveniles from the harmful broadcasting or videotapes.
Press the “Menu” button.
• Main menu appears as in the
right drawing.
Select “Function”.
• Select “Function” with the “ ”
mark by using the “ VOL ”
button.
• Sub-menu appears if pressing
the “CH ” button.
Select “Parental Lock” b y pressing the “ CH ” button.
• Press the “VOL ” button.
Setup of Parental Lock
Page 13

-41-
Press “Passw or d”.
• Press Password by using
number 0~9.
Caution) If using your password,
remember it. It is
needed for continuous
use of this function
hereafter.
On – Off of the Parental Control
is repeated whenever pressing
the “
VOL ” button.
• A guideline of TV is setup in all
the TV programs including
sports, news.
• The “
CH ” button selects
items and the “
VOL ” button
sets up or cancels each item.
Page 14

-42-
• Rating of movie is setup even
in movie, videotape and other
media objects including TV
program.
• The “
CH ” button selects
items and the “
VOL ” button
sets up or cancels each item.
• Interrupts program without rating.
• Interrupts program of the input
terminal for the outside video
(video 1, 2, 3).
• Interrupts program of the PIP.
• Sets up the Unblock or the Block
with the “
VOL ” button.
Page 15

-43-
“Change Passw ord”.
• In the initial purchase of TV set, password is set to blank.
In continuous use of Parental Control, you need to change your password.
• If pressing the “
VOL ” button after selecting password, the second screen of
below drawing appears. Here, newly enter your unique password by using number of
0 through 9. Enter your password in the same manner once again.
Exit from the “Parental Contr ol” menu.
• The main menu appears if pressing the menu button once.
• The OSD of the menu disappears if pressing the menu button until it disappears.
Page 16

Selection of PIP
-44-
Press the “Menu” button and select “Function”.
• Select “Function” with the “ ”
mark by using the “ VOL ”
button.
• Sub-menu appears if pressing
the “CH ” button.
Select “PIP” by pressing the “ CH ” button.
3. Press the “ VOL ” button from the “PIP”.
• The screen status may change to General
Screen
Main/Auxiliary Screen Two
Screen
Search Screen
General Screen
Main/Auxiliary Screen Search Screen
When selecting various PIP
- You can enjoy various screens to your taste by selecting various functions of PIP.
However, you cannot watch same Channel as main screen in the auxiliary screen.
- You cannot also watch the input terminal screen of the component 1 and 2 with a PIP (auxiliary screen).
Two Screen
Page 17

-45-
Press the “PIP” button and press the “ CH ”
button of the “PIP”.
• Select the Channel by pressing the “ CH ” button at the right of the “PIP”
button.
• The memorized Channel of the auxiliary screen can be selected.
Press the “PIP” button and press the
“Position” b utton.
Position of the auxiliary screen changes whenever pressing the position
button.
Selection of Auxiliary Screen Position
In case of
Main/Auxiliary screen
In case of both
screens
Selection of Auxiliary Screen Channel
PIP
PIP
Page 18

-46-
Press the “PIP” button and then press the “SW AP”
button.
• The main screen changes to auxiliary screen
and auxiliary screen changes to main screen.
In case of
Main/Auxiliary
screen
In case of both
screens
SWAP
When converting both main screen to auxiliary screen
PIP
Page 19

-47-
Press the “Search” button.
The “ ” mark sequentially moves on the search screen
whenever pressing the position button on the sear c h screen.
If pressing the Main/Auxiliary Con ver sion b utton on the
search screen, the sear ch screen with the “ ” mark and
the main screen converts each other.
4-screen Channel Search Function
- You can identify broadcasting contents while sequentially searching for only the memorized channel.
Page 20

Notice
Selection of input signal from the auxiliary
Press the “TV/VIDEO” button inside of the remote control on the PIP.
• You can watch video, cable broadcasting, etc on the auxiliary screen.
• This mode does not operation in the component 1 and 2 terminal.
Use the still function of external sets(DVD player.etc).
• The auxiliary screen changes in the order of TV
Video1
Video2 Video3 TV whenever pressing the button.
-48-
Still of Main Screen
• Press the “Still” button when
desiring to still the screen
currently watched.
• Pressing the button once again
returns to the screen being
watched as the still screen is
cancelled.
Still of Auxiliary Screen
• Press the “Still” button while pressing the “PIP” button.
• The auxiliary screen is temporarily stop if pressing the “Still” button in
the PIP.
• Pressing the button once again returns to the screen being watched
as the still screen is cancelled.
STILL
Still
- This is function to temporarily stop the main screen or the auxiliary screen currently watched.
- You can watch favorite scene, etc without missing important information since you can stop the screen.
PIP STILL
Page 21

Sound Adjust
-49-
Press the “Sound Mode” button.
• Sound status changes while the
following screens displays in turn
whenever pressing the Sound
Mode button.
When selecting various sound modes
SOUND
MODE
Page 22

-50-
Select “Sound” by pressing the “Menu” button.
• The menu screen
appears as follows:
Select items desired to adjust and press the “ VOL ” button.
• You can select item in
the order of Mode
Balance Equalizer
whenever pressing the
button.
What’s equalizer?
• High quality sound range
adjustment method used
for audio products.
Sound Balance
• Function to adjust
balance of sound volume
of the left and right
speaker.
When adjusting sound to taste
- The user can enjoy various sounds by adjusting Sound Mode, Balance, Equalizer
Page 23

-51-
In case of adjusting equalizer
• Select the Equalizer by pressing the “ CH
” button.
• If pressing the “
VOL ” button, the
Equalizer Adjust mode appears.
0.1 kHz, 0.3 kHz Low Sound Range
1.0 kHz, 3.0 kHz Middle Sound Range
10.0 kHz, 0.3 kHz High Sound Range
Select and use the relevant frequency b y pressing
the “
VOL ” b utton.
• You can adjust degree of the
relevant frequency by using the
“
CH ” button.
Adjust sound balance in the same manner, either.
Dolby Virtual
Manufactured under license from Dolby Laboratories.
“Dolby” and the double-D symbol are trademarks of Dolby Laboratories.
You can perspective, orientation and a cubic effect through the left/right speaker by developing the existing
surround system function.
Press the “Dolby Virtual” button.
• Dolby Virtual On Dolby Virtual
Off is repeated whenever
pressing the Dolby Virtual button.
• You can also operate this function
with the menu button.
Page 24

-52-
In Multi-sound and Stereo Broadcasting
Press the “MTS” button.
• The status changes while following screens sequentially
appears when pressing the button.
MTS
Multi-Sound and Stereo
- You can select to your taste since multi-sound broadcasting is broadcast in the order of Mono Stereo SAP.
- In stereo broadcasting, automatic conversion to the status selected in the multi-sound broadcasting is done.
- You may also select this function even in <Menu> <Sound> Mode by pressing the menu button.
Page 25

-53-
Press the “Menu” button and select “Function”.
• Select “Function” by
pressing the “
VOL ”
button and then press the
“CH
” button.
- You must previously adjust current time in order to reserve Automatic On/Off.
Press the “Timer” for selection.
• Select “Timer” by pressing
the “
CH ” button and
then press the “
VOL ”
button.
Setup the “Clock”.
• Hour is set up if pressing
the “
VOL” button and
minute is set sup if
pressing the “VOL
”
button.
• The menu disappears if
pressing the menu button
three times.
Press the “Menu” button if time setup is completed.
Adjustment of Current Time
Notice.
Current time is erased if setting up the Off status by pressing the
main power button.
• Leave the main power button in the On status in the case of not using
TV for a long time.
Function
Timer
PIP
Caption
Language
Parental Lock
Move Sel. Prev.
English
Off
Page 26

-54-
The red lamp turns on even setting up either of Off-time/ On-time.
This function is very convenient since TV is automatically turned off at the fixed time if reserving the Off-time for
sleeping time or at desired time.
If adjusted once, this function operate everyday unless canceling the Off-time setup or pulling the plugs out.
You can reserve current time if setting it up previously.
On/Off time setup is erased if pressing and turning the main power off.
Select “Function” after pressing the “Menu” button.
• Select “Function” by
pressing the “
VOL ”
button and then press the
“CH
” button.
Press “Timer” for selection.
• Select “Timer” by pressing
the “
CH ” button and
then press the “
VOL ”
button.
Select “Off Time” by pressing the “ CH ” button.
• Hour is set up if pressing
the “
VOL” button and
minute is set sup if
pressing the “VOL
”
button.
• Select “Off-time” by pressing
the “
CH ” button and
select ‘On” by pressing the
“
VOL ” button.
• Hour is set up if pressing the
“
VOL” button and minute is
set sup if pressing the “VOL
” button.
Press the “Menu” button if time setup is completed.
Setup of Off-time
Notice.
Setup of On-Time
• Setup in the same manner as in setup of Off Time.
• Reservation function allowing TV to turn on to the desired time.
• If adjusted once, the On-time continues to operate everyday unless canceling setup
or taking out the TV plugs.
• It is convenient if setting up so that it turns on the rising time in the morning.
• You can reserve by previously adjusting current time.
Function
Timer
PIP
Caption
Language
Parental Lock
Move Sel. Prev.
English
Off
Page 27

-55-
- This is function to reserve so that TV turns off after a fixed time (10 min. ~ 90 min.)
has passed from the current time.
- Adjust sleep time with sleep reservation button of a remote control.
Press the “SLEEP” button.
• Sleep Off Sleep 10 Sleep 20 Sleep 30
Sleep 60 Sleep 90 Sleep Off is repeated
whenever pressing the “Sleep” button.
• Stop to pressing at the desired time.
• Sleep Off means status that “Sleep” is not setup.
SLEEP
Reservation of Sleep Time
Page 28

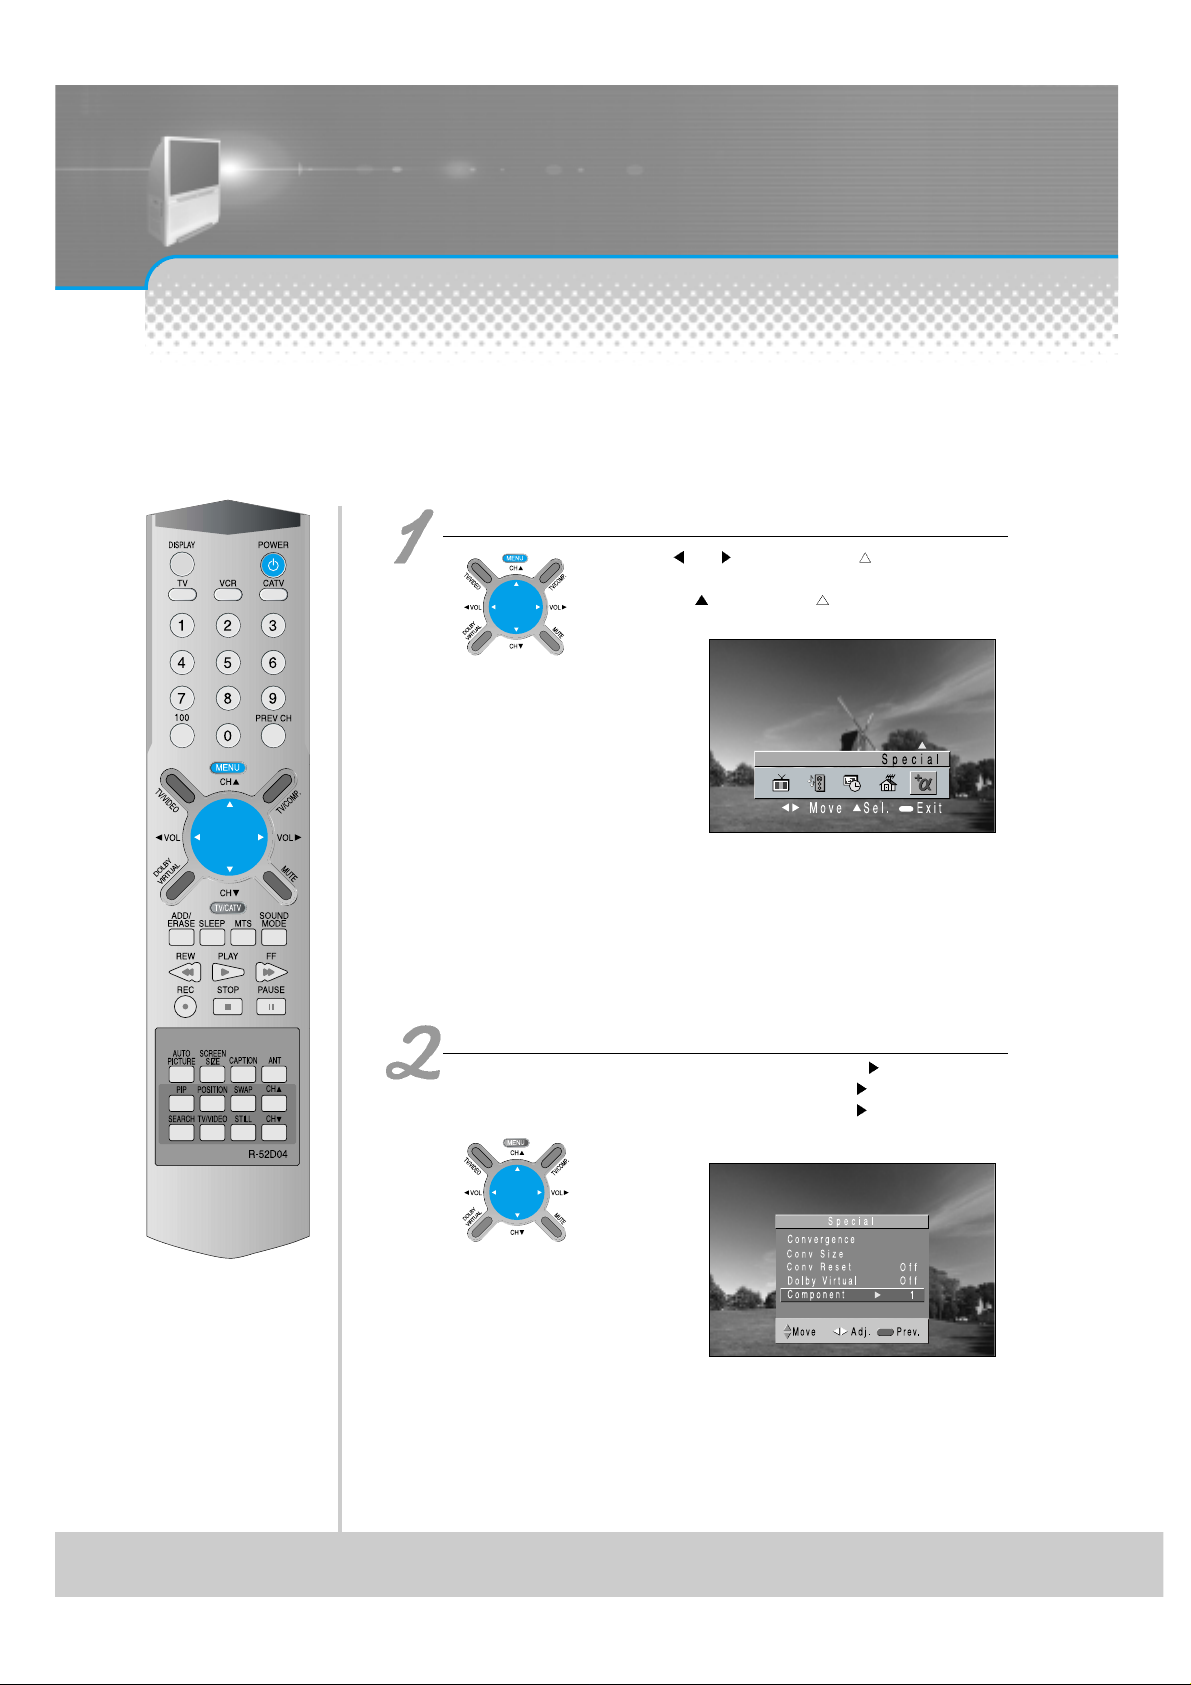
Adjustment of Color Match
-56-
Select “Conver gence”.
Adjust the Convergence.
• The “ CH ” button
selects items and the “
VOL ” button changes
data of the selected item.
• The “
VOL” button moves
color to the left (upper) and
the “VOL
” button moves
color to the right (lower).
• Adjust the screen so that
color of the middle cross becomes white.
• Adjust blue color in the same manner.
• Adjust the screen so that color of the middle cross becomes
white in the length and the width.
Press the “Menu” button.
• The Menu screen
appears as in the right.
Select “Special”.
• Select “Special” with the
“
VOL ” button.
• The extension appears
if pressing the “CH
”
button.
Adjustment of Color Match
- Perform this adjustment when color looks separated or when focus is not suitable or when the screen looks
spread, after movement to another place or watching projection TV for a long time.
- ”Conv Size” and “Conv Reset” is option.
Page 29

-57-
Select “Conv Size” and Adjust.
• This feature is to adjust the convergence, and it
is used when the color is not properly set up.
• The “
CH ” button selects items and the “
VOL ” button changes data of the selected item.
• Press “
VOL” button to adjust the convergence
to the center of the screen. Press “VOL
” button
to adjust the convergence to the edge of the
screen.
• Adjust the screen until the color of the middle
cross and the bars on the side turns in white.
• Adjust blue color in the same manner.
• Adjust the screen until the color of the middle
cross and both horizontal and vertical bars on the
side turns in white.
Press the “Menu” button.
• Press the menu button until the menu
screen disappears.
• Ensure that color is correct by turning the
channel.
• Perform setup again if color is unmatched.
• Before thinking it as failure
Select “Conv Reset” and Adjust.
• This function is to turn back the
convergence into the factory
initial settings.
• When “VOL
” button is selected,
the resetting menu will change in
Off -> On -> Off manner.
Page 30

Selection of Language
-58-
Press the menu button and select “Function”
Select language the “ CH button”
Press the “ VOL button from Language.
This function enables to select language of the OSD displayed on the TV screen.
Language of the OSD consists of English, French and Spanish.
Language of the OSD
changes in the order of
English
Français
Español whenever pressing
the volume button.
Selection of Language
Page 31

T r oubleshooting
-59-
Symptoms and Solutions
Please check the following list prior to calling Daewoo Electronics Service Center for assistance
Is the TV power cord plugged
into the outlet correctly?
Please check the power cord
and connect it properly to the
outlet.
Press the main power button at
the front controller panel.
Has the "mute" button at the
remote controller been pressed
accidentally?
Have you checked its volume?
Press the "mute" button on the
remote controller once more.
Adjust the volume pressing the
"right" button
Have you checked the Color?
Isn't the program itself
broadcasting in black and white?
Have you checked the antenna
connection?
Adjust the color pressing the
“Vol
/ ” buttons as explained in
page 37
Check other broadcasting
programs
Check the antenna
Is the antenna towards the right
direction?
Hasn't the Channel Fine Tuning
been adjusted wrongfully?
Turn the antenna towards
where the broadcasting station
is
Press the Fine Tuning button
and adjust the screen image
Have you checked the antenna?
Have you checked whether it
has been interfered by vehicles
or neon signs?
Connect the antenna or change
the antenna cable.
Have you checked whether it
has been interfered by any
other receiving waves-such as
radio?
Avoid any subject that may
interfere its proper operation
This may happen when there is
a bad reception due to
interference or depending on
the location of the broadcasting
station.
Press the "map" button and
select "Forced Mono"
Hasn't the remote controller receiving
window be blocked or interfered by
any object?
Aren't the batteries on the remote
controller low?
Hasn't the remote controller mode set
up in cable mode?
Please clear away any object that may
block the TV from receiving the
remote controller signals.
Press the "TV/Input" or "TV/CATV"
button to change its current mode.
Page 32

Standard of Product
-60-
Consult the service center after promptly cleaning this
product with clean water and drying it at a shade.
Never plug-in the power cords since electrical shock or
damage of part may occur.
DSJ-4710CRA/4720CRA Model DSJ-5510CRA/5520CRA
VHF 2~13, 14~69 Receipt Channel VHF 2~13, 14~69
CATV 1~125 CHANNEL CATV 1~125 CHANNEL
119cm Screen Size 139cm
NTSC Signal Method NTSC
15W / ch (Main L/R) Speaker Output 15W / ch (Main L/R)
AC 120V, 60Hz
Power
AC 120V, 60Hz
AC 220V, 50/60Hz(Chile, Peru) AC 220V, 50/60Hz(Chile, Peru)
Marking on the rear of set Power Consumption Marking on the rear of set
1110 x 1210 x 533mm(4710) 1278 x 1352 x 586mm(5510)
1110 x 1210 x 530mm(4720)
Dimension (W/H/D)
1278 x 1352 x 591mm(5520)
62kg Weight 78kg
Appearance and standard of this product may change
without prior notice for improvement.
 Loading...