

CycleOps PowerTap SLC+, PowerTap SL+, PowerTap Pro+, PowerTap Elite+, PowerTap 2.4+ Quick Start Manual
Page 1

PowerTap SLC+
PowerTap SL+
PowerTap Pro+
PowerTap Elite+
PowerTap 2.4+
QUICK START GUIDE
PowerTap SLC+ Featured
18561:Layout 1 10/30/2008 11:51 AM Page 1
Page 2
365
25
58.I0
WATTS
3
MI
D
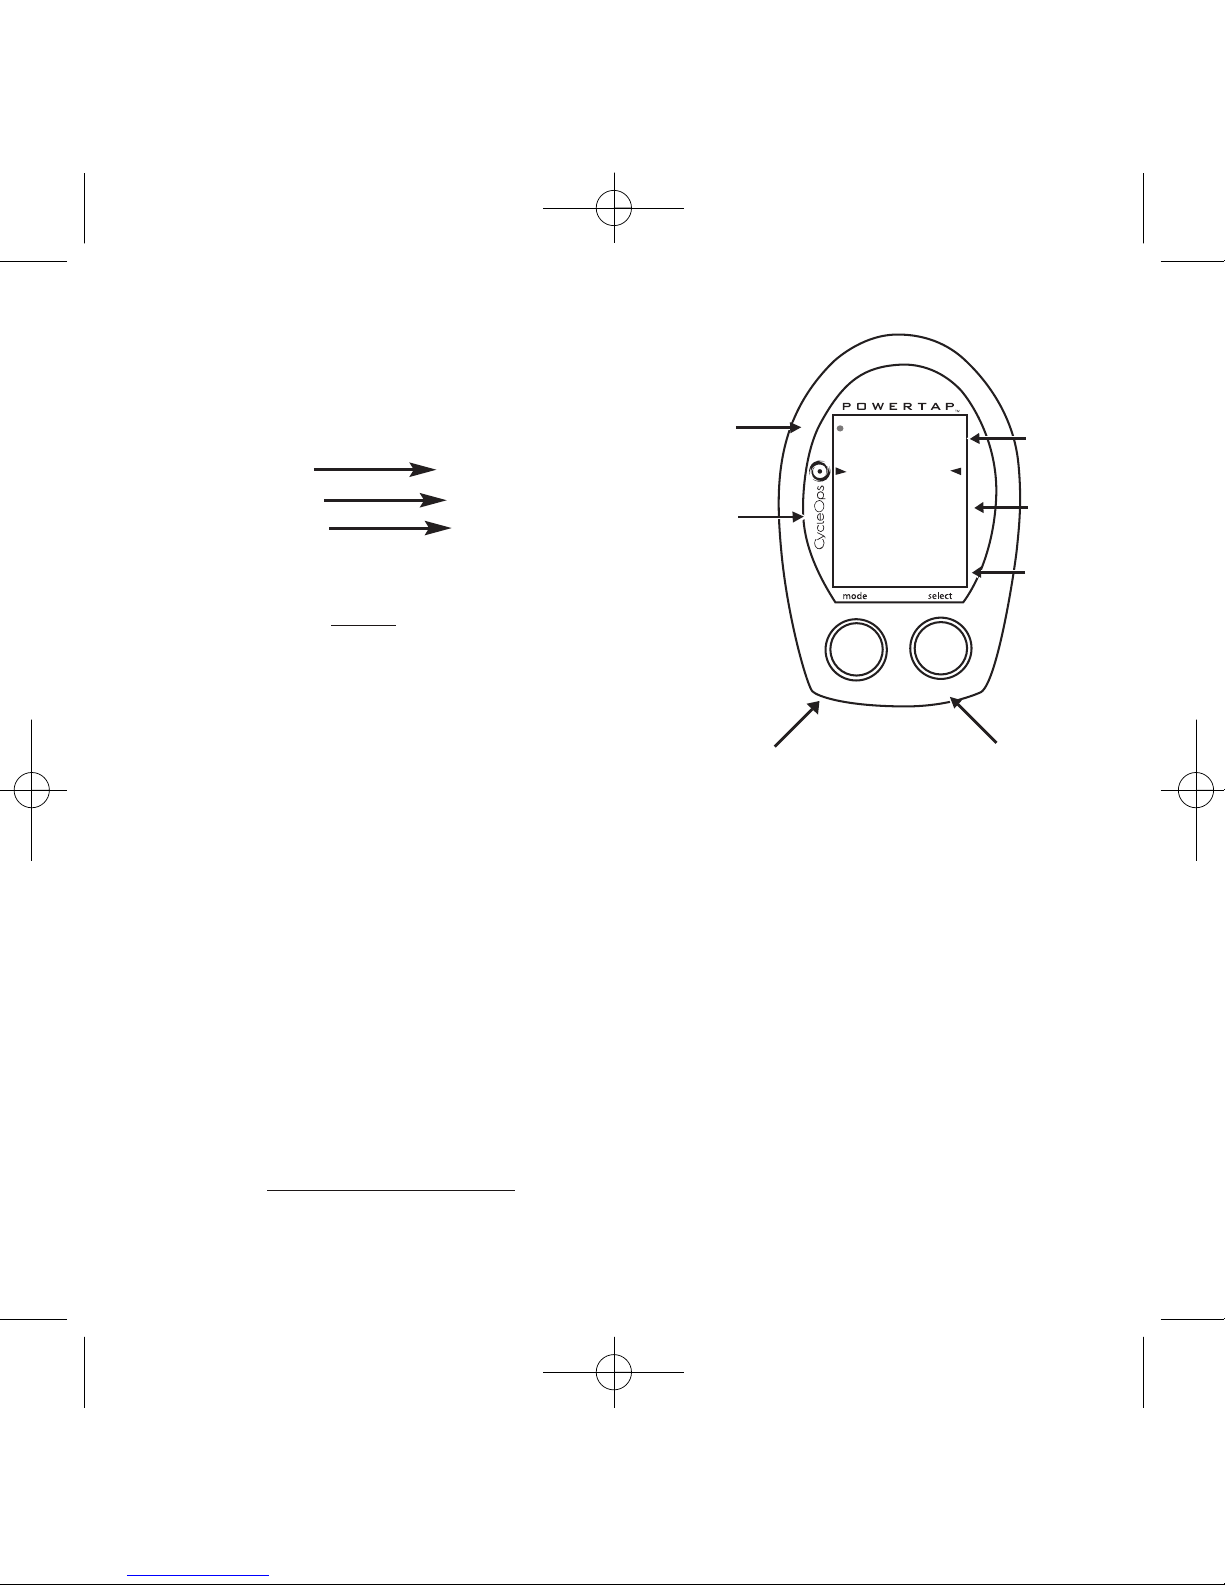
General Computer Operation
DISPLAY LEVELS
The computer has three (3) main display levels:
Top Power
Middle Speed
Bottom Multi-Function
NOTE: These locations only apply to trip and
interval modes and do not
apply to Cycle Computer
or Heart Rate Monitor Function
. See COMPUTER SETUP 4
to customize display options. (SLC+, SL+ and Pro+ only)
DISPLAY MODES
The computer has two (2) main modes of operation:
1) Trip
2) Interval
Hold [MODE] to toggle between display modes.
BUTTONS
There are two (2) buttons on the computer:
1) [Mode]
2) [Select]
NOTE: [BRACKETED] words indicate buttons.
There are four (4) types of button presses:
1) Press
[MODE] or [SELECT] - a single press and release of either [MODE] or [SELECT].
Used for entering different modes and navigating functionality.
TRANS.
ICON
INTERVAL
DISPLAY
MODE (LEFT)
POWER
DISPLAY
SPEED
DISPLAY
MULTI FUNCTION
DISPLAY
BOTH
SELECT (RIGHT)
Changes active
mode
Find hub
Clear data
Enter setup
Select function
2
18561:Layout 1 10/30/2008 11:51 AM Page 2
Page 3

2) Hold [MODE] or [SELECT] - a single button press and hold of either [MODE] or [SELECT] for 2 sec. Used for initiating a new mode or function.
3) Press [MODE] and [SELECT]
- simultaneously press and release of both [MODE] and
[SELECT]. Used for initiating a new interval.
4) Hold [MODE] and [SELECT]
- simultaneously press and hold both [MODE] and [SELECT] for 2 sec. NOTE: If mode and select are released when “ clr” is displayed, all data
will be erased. Used for initiating scrolling menu.
SCROLLING MENU:
Note: Only the SLC+, SL+, Pro+ and 2.4+ have setup menus 2, 3, and 4.
SCROLLING MENU:
Find: If [MODE] and [SELECT] are released
When “Find” is displayed the computer will find
the PowerTap sensors.
clr: If [MODE] and [SELECT] are released when
clr is displayed ALL DATA WILL BE ERASED.
SEt: If [MODE] and [SELECT] are released
When SEt is displayed on the top level of the
Screen, a flashing “E”, d and t on the middle
Level and 12345 on the bottom level.
E= exit, return to ride mode
d= restore default settings
T= test mode
1 2 3 4 5 = setup menus
3
18561:Layout 1 10/30/2008 11:51 AM Page 3
Page 4

FINDING SENSORS
The PowerTap hub, sensors and computer are "paired" or "learned" at the factory so that the system is ready to ride once installed on the bicycle. Learning involves viewing and storing each device ID into the PowerTap computer. Information on learning can be found in computer setup 5
section of this owner's manual.
In addition, there is a feature called "Find" that allows the user to search for stored devices in the
event a sensor has lost contact with the PowerTap computer for any reason. To initiate the Find,
hold [Mode] and [Select]. Release when "Find" appears on the bottom of the PowerTap screen
after about 2 seconds. The current watts display will switch to a spinning dial, indicating the
search is in process. When the search is successful, the transmission icon appears in the upper left
corner. If device ID's are stored for heart rate and cadence there will be spinning dials for these
metrics as well.
POWER CONSERVATION
The computer and hub have power saving features to prolong battery life. The computer powers
down the display after four (4) minutes of inactivity. Press either [MODE] or [SELECT] to activate
the display. Similarly, the hub powers down after five (5) minutes of inactivity. The transmission
icon will not be visible when the hub is asleep. To wake the hub spin the wheel and verify the
transmission icon is illuminated.
4
18561:Layout 1 10/30/2008 11:51 AM Page 4
Page 5

ANT+
The PowerTap + Series uses ANT+Sport wireless technology that allows you to use the PowerTap
with other ANT+Sport Power devices. The Garmin Edge 705 is one such device.
In order to pair your PowerTap + Series hub with a Garmin Edge 705, follow these instructions or
contact Garmin.
1. Check that your Garmin has the latest firmware version at www.Garmin.com
2. Update your bike profile by pressing Menu > Settings > Profile & Zones > Bike Profile > Check
the "Power Box"
3. To pair the PowerTap to the Garmin, press Menu > Settings > ANT+Sport > Accessories > Select
"Yes" for Power Meter Present? Spin the wheel to ensure the hub is transmitting.
4. Select "Restart Scan" which will take you back to the ANT+Sport screen under Accessories
where a "Power Meter Detected" message will be displayed when the Garmin detects the PowerTap.
5
18561:Layout 1 10/30/2008 11:51 AM Page 5
Page 6

Computer Setup
The setup feature has five(5) main modes. You do not have to
complete all five to change settings. Please reference each mode
to determine the correct location to begin. NOTE: The computer
illustrations for each mode displays the factory default settings.
COMPUTER SETUP MAIN MENU
1) Press either [MODE] or [SELECT] to activate the computer.
NOTE: The version of firmware is displayed upon startup. The
most updated firmware version is available at www.cycleops.com.
(FIGURE 28)
2) Extended hold of [MODE] and [SELECT] simultaneously enters
computer setup function. NOTE: Continue to hold through
“clr”
screen. Releasing hold early will clear all current data.
3) The setup mode displays three (3) letters and numbers 1-5.
Each letter represents a setup menu. A flashing alphanumeric
character indicates current selection. (FIGURE 29)
E = exit, return to ride mode
d = restore default settings
T = test mode
1 2 3 4 5= setup menus
Note: Only the SLC+, SL+, Pro+ and 2.4+ have setup menus 2, 3
and 4.
4) Press [SELECT] to scroll to setup 5.
5) Press [MODE] to begin setup.
Set
12345
FIGURE 29
Pro
5.33
FIGURE 28
E
T
d
Note: The new production version will
mark 6.0 version of
firmware.
6
18561:Layout 1 10/30/2008 11:51 AM Page 6
Page 7

COMPUTER SETUP 5
This setup allows the CPU to learn a new device or sensor such as the hub, heart rate strap and
optional cadence sensor. NOTE: This process only needs to be used if a new sensor or hub is being
used in conjunction with your CPU or vice versa. There are 2 Learn sequences, 1 and 2. Learn 1 is
used when you have switched sensors or the CPU and there are no other like bikes with PowerTap
within a 30’ radius. Learn 2 is used if there are other devices in the area but requires you to remove and reinsert the battery for that device before activating the Learn 2 sequence.
1) From the computer setup main menu press [SELECT] and scroll until the
number five (5) is flashing and press [MODE] to enter setup mode.
2) Press [SELECT] to toggle through the digit values to set the Hub ID.
Press [MODE] to advance to the next digit. After the last digit is set,
press [MODE] to save.
Note: Use either Learn 1 or Learn 2 to set the hub ID when the
numberical value is not known. (Most cases) Make sure the hub is awake
by spinning the wheel or axel.
3) Initiate Learn 1 by holding [SELECT] until “Learn” begins to flash.
Learn 1 will search for any active hub so be sure there are no other native
hubs in the area. When the search is complete press [MODE] to advance to
Learn 2.
Note: If Learn 1 was successful, learn 2 is not necessary.
4) Initiate Learn 2 by first removing the batteries from the hub for 5
seconds and replacing them. Then hold [Select] until "Learn" begins to
flash. When the CPU has learned the hub I.D. it will display the I.D.
Press [Mode] to save and proceed to the next device I.D. If it did not learn
the device it will take you back to the most recent Hub I.D.
hub
Id
45847
hub
Id
LEArn
1
hub
Id
LEArn
1
flashing
hub
Id
LEArn
2
hub
Id
LEArn
2
flashing
Set
E
1 2 345
t
d
7
18561:Layout 1 10/30/2008 11:51 AM Page 7
Page 8

5) Follow the above steps for any additional sensors you may be using,
such as the heart rate strap, speed and cadence sensors. The sensor name is
shown on the top line of the display.
SPd = speed sensor
Cd = cadence sensor
HS = heart rate sensor
Press [SELECT] to toggle through the digit values to get the I.D. Press
[MODE] to advance to the next digit. When the last digit is set, press
[MODE] to save and advance to the learn functions for that sensor.
Press [SELECT] to initiate the learn functions as needed.
Note: Changing the batteries in the speed sensor, cadence sensor or heart
rate sensor creates a new ID for that device. If other computers are paired
using the old ID, they will need to re-learn the sensor.
SPd
Cd
HS
8
18561:Layout 1 10/30/2008 11:51 AM Page 8
Page 9

TORQUE FUNCTION
Shows the torque placed on the hub in inch-pounds. To display torque while
in trip mode:
1) Press [MODE] to scroll the cursor to the top line of the main display.
2) Press [SELECT] until the current power function is displayed.
3) Hold [SELECT] until the word “WATTS” begins to flash. A blinking “WATTS” display indicates
the torque function is currently displayed.
4) Press [SELECT] to return to the current power function. (FIGURE 12).
3
MI
D
000
25
58.I0
FIGURE 12
IMPORTANT: ZERO TORQUE
Frequently
the torque must be zeroed to ensure the most accurate power
information is displayed. If the current power display is positive or
negative while coasting the the torque must
be zeroed. This operation
must be done while stopped with no tension on the chain, no tension
placed on the pedals, and the transmission icon must be illuminated. To
zero torque:
1) Press [MODE] to scroll the cursor to the top line of the main display.
2) Press [SELECT] until current power function is displayed.
3) Hold [SELECT] until the word “WATTS” begins to flash to enter the torque
function.
4) Hold [SELECT] again until “0” is shown.
5) Press [SELECT] to return to current power. The current power function
will now read zero while coasting.
9
18561:Layout 1 10/30/2008 11:51 AM Page 9
Page 10

Go for a ride.
Your PowerTap is now ready to ride.
Install PowerAgent Software
PowerAgent software allows you to download and analyze your PowerTap information. Simply insert the included CD and follow the on-screen instructions or visit www.cycleops.com for more information.
Instrucciones españolas www.cycleops.com/userguide
Instructions françaises www.cycleops.com/userguide
Deutsche Anweisungen www.cycleops.com/userguide
Istruzioni in italiano www.cycleops.com/userguide
Nederlandstalige instructies www.cycleops.com/userguide
Suomenkieliset käyttöohjeet: www.cycleops.com/userguide
Instruktioner på svenska www.cycleops.com/userguide
Instrukcje w jezyku polskim: www.cycleops.com/userguide
Ceský návod na www.cycleops.com/userguide
取扱説明書(日本語):www.cycleops.com/userguide
10
Saris Cycling Group, 5253 Verona Road Madison WI 53711 608.274.6550 www.cycleops.com
18561 10/08
18561:Layout 1 10/30/2008 11:51 AM Page 10
 Loading...