


CycleOps Pro Series Indoor Cycles
User Guide
400 Pro
300 Pro
200 Pro
100 Pro
Deutsche Anweisungen www.cycleops.com/userguide Istruzioni italiane www.cycleops.com/userguide Nederlandse instructies www.cycleops.com/userguide Norsk instruksjoner www.cycleops.com/userguide
TABLE OF CONTENTS |
|
Chapters: |
|
1. before beginning................................................................................ |
1 |
2. Unpacking the CycleOps pro series indoor Cycle............ |
2 |
3. Indoor cycle Assembly.................................................................... |
3 |
Attach Stabilizer Feet |
|
Attach Handlebar |
|
Attach Seat |
|
Level the Indoor Cycle |
|
Attach Pedals |
|
4. GENERAL USE............................................................................................ |
6 |
Adjust Seat |
|
Adjust Handlebar |
|
Adjust Resistance |
|
5. COMMON ADJUSTMENTS..................................................................... |
8 |
Replace Speed Sensor Battery |
|
Replace Cadence Sensor Battery |
|
Replace Hub Batteries |
|
Adjust Flywheel/Chain Tension |
|
Adjust Brake Pad |
|
6. Preventative Maintenance......................................................... |
10 |
7. eLECTRONICS......................................................................................... |
11 |
8. Radio Frequency (RF) INTERFERENCE........................................ |
12 |
9. Important precautions................................................................ |
12 |
10.WARRANTY............................................................................................ |
13 |
CHAPTER 1: before beginning
Congratulations on choosing the CycleOps Pro Series indoor cycle! The CycleOps Pro Series indoor cycle takes cycling to the next level as the only indoor cycle to fit, feel and ride like an outdoor bike.
CycleOps Pro Series Indoor Cycle User Guide for: -400 Pro
-300 Pro
-200 Pro
-100 Pro
Read this guide to learn how to: -Assemble the indoor cycle -Use the indoor cycle
-Make common adjustments
Visit www.cycleops.com to learn more about Saris Cycling Group and the CycleOps Pro Series indoor cycle: |
|
|
-Register product for warranty |
|
|
-View frequently asked questions |
|
|
-View instructional videos |
|
|
-View product and technical updates from CycleOps |
|
|
-Sign up for CycleOps Power newsletter |
1 |
|
-Learn more about training with power |
||
|
CHAPTER 2: Unpacking the CycleOps Pro series Indoor Cycle
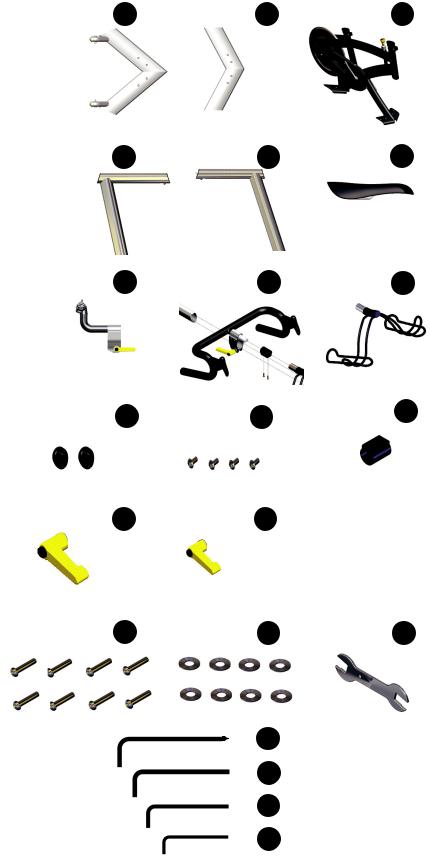
Place the box upright and cut the plastic binding straps. Lift the top of the box to expose the indoor cycle and packaging. Remove all parts from the box including foam inserts. Ensure all the following parts are included:
|
Name |
Quantity |
Rear stabilizer |
A |
Front stabilizer |
B |
Main frame assembly |
|||
A |
Rear stabilizer |
1 |
|
|
||||||
|
|
|
|
|
|
|
|
|||
B |
Front stabilizer |
1 |
|
|
|
|
|
|
|
|
C |
Main frame assembly |
1 |
|
|
|
|
|
|
|
|
D |
Handlebar post (shorter, reads to 18”) |
1 |
|
|
|
|
|
|
|
|
E |
Seat post (longer, reads to 23”) |
1 |
|
|
|
|
|
|
|
|
|
|
|
|
|
|
|
|
|
|
|
F |
Seat |
1 |
|
|
|
|
|
|
|
|
G |
Seat post clamp |
1 |
Handlebar |
D |
Seat post |
E |
|
Seat |
||
|
|
|
|
|||||||
|
|
|
||||||||
H |
Handlebar |
1 |
post |
|
|
|
|
|
|
|
|
|
|
|
|
|
|
|
|||
I |
Water bottle holder |
1 |
|
|
|
|
|
|
|
|
J |
End caps |
2 |
|
|
|
|
|
|
|
|
|
|
|
|
|
|
|
|
|
|
|
K |
End cap screws |
4 |
|
18” |
|
|
|
23” |
|
|
L |
Water bottle spacer |
1 |
|
|
|
|
|
|
|
|
M |
Large L handles |
2 |
Seat post |
G |
Handlebar |
H |
|
Water bottle |
||
|
|
|
|
|||||||
N |
Small L handles |
2 |
clamp |
|
holder |
|||||
|
|
|
|
|
|
|||||
|
|
|
|
|
|
|
|
|||
|
|
|
|
|
|
|
|
|||
O |
Stabilizer bolts |
8 |
|
|
|
|
|
|
|
|
P |
Stabilizer washers |
8 |
|
|
|
|
|
|
|
|
|
|
|
|
|
|
|
|
|||
|
|
|
|
|
|
|
|
|||
|
|
|
|
|
|
|
|
|
|
|
Q |
Multi-purpose wrench |
1 |
|
|
|
|
|
|
|
|
R |
6mm Allen wrench w/Phillips screw- |
1 |
|
|
|
|
|
|
|
|
|
driver end |
|
|
|
|
|
|
|
|
|
S |
5mm Allen wrench |
1 |
End caps |
J |
|
|
|
K |
|
Water bottle |
End cap screws |
|
spacer |
||||||||
T |
4mm Allen wrench |
1 |
|
|
|
|
|
|
|
|
|
|
|
|
|
|
|
|
|
|
|
U |
3mm Allen wrench |
1 |
|
|
|
|
|
|
|
|
C
F
I
L
Additional tools that may be helpful: -Vice Grips or small clamping tool -17mm Cone wrench
-15mm box wrench -10mm box wrench -Pliers
-Pedal wrench -2.5mm Allen wrench
Large L Handles
Stabilizer bolts
M
O
Small L Handles
Stabilizer washers
6mm Allen wrench w/ Phillips screwdriver end
5mm Allen wrench
4mm Allen wrench
3mm Allen wrench
N
P |
Multi-purpose |
Q |
wrench |
R
S
T
U
2

CHAPTER 3: indooR CyClE AssEmbly
Attach Stabilizer Feet
Rear stabilizer A |
Front stabilizer B |
A Rear stabilizer
B Front stabilizer
1. Note the difference between the front and rear stabilizers. The larger stabilizer with wheels goes in the rear of the indoor cycle (under the flywheel).
Attach handlebar
2. Attach the rear stabilizer to the rear of the main frame with four 5mm stabilizer bolts and stabilizer washers using the 5mm Allen wrench.Tighten the inner bolts first, and then proceed to the outer bolts to ensure the foot is secured properly and evenly.
|
|
Handlebar post D |
C |
|
M |
Main frame |
|
|
|
|
|
assembly |
|
Large L |
|
|
|
|
|
handle |
|
|
|
3. Attach the front stabilizer to the front of the main frame with four 5mm stabilizer bolts and stabilizer washers using the 5mm Allen wrench. Tighten the inner bolts first, and then proceed to the outer bolts to ensure the foot is secured properly and evenly.
Handlebar
Water bottle spacer
Water bottle holder
1. Remove 6mm bolt in main frame assembly using 6mm Allen wrench.The 6mm bolt can be kept in place of the large L handle for a more permanent placement of the handlebar height.
2. Insert the handlebar post into the head tube and secure it by inserting the large L handle into the main frame assembly on the right side of the indoor cycle (chain guard side).
3. Slide the water bottle holder and water bottle spacer onto the road style handlebar.
Handlebar |
Handlebar post |
Water bottle spacer
Water bottle holder
Handlebar
Small L
handle
End cap
4. Secure the water bottle holder and handlebar together using the previously removed, two 4mm spacer bolts and washers, on the underside of the handlebar.
5. Carefully slide the road style handlebar assembly onto the handlebar post. Secure the plastic end cap to the handlebar post using two end cap screws with the Phillips screwdriver side of the 6mm Allen wrench.
6. Once the road style handlebar is in place, secure it with the small L handle on
the right side of the indoor cycle (chain |
|
guard side). |
3 |
|

Large L |
M |
Small L |
N |
handles |
|
handles |
|
Push
Rotate
7 Push black button and rotate handle on small and large L handles to position the handle without tightening. Release the button and allow the handle to seat to tighten or loosen an adjustment.
Attach Seat
A seat has been included with the CycleOps Pro Series indoor cycle. If desired, the indoor cycle can accommodate an off-the-shelf seat to personalize the fit, feel and ride. In some instances, a shorter seat post clamp is required for individuals under five feet tall. If desired, contact Saris Cycling Group to purchase the short seat clamp.
Seat post E
Seat post E |
Seat post |
G |
|
||
|
clamp |
|
Main frame C
assembly Main frame C assembly
LargehandleL M
SmallhandleL N
1. Remove 6mm bolt in main frame assembly using 6mm Allen wrench.The 6mm bolt can be kept in place of the large L handle for a more permanent placement of the seat post height.
2. Insert seat post into the seat tube and secure it by inserting the large L handle into the main frame assembly on the right side of the indoor cycle (chain guard side).
3. Attach the seat post clamp to the seat post. Once the seat is level, properly tighten with the small L handle.
4
 Loading...