

Page 1

JetFluid
TM
Pro Trainer
User Guide
Page 2

INTRODUCTION
Common Sense Precautions
Before starting any exercise program, consult with
your physician or health professional. He or she can
help establish the exercise frequency, intensity and
time appropriate for your particular age and condition. If you have any pain or tightness in your chest,
an irregular heartbeat, shortness of breath, feel faint,
or have any discomfort while you exercise, STOP!
Consult your physician before continuing. Failure to
follow any of these safeguards may result in injury or
serious health problems.
Congratulations! You’ve purchased the best fl uid
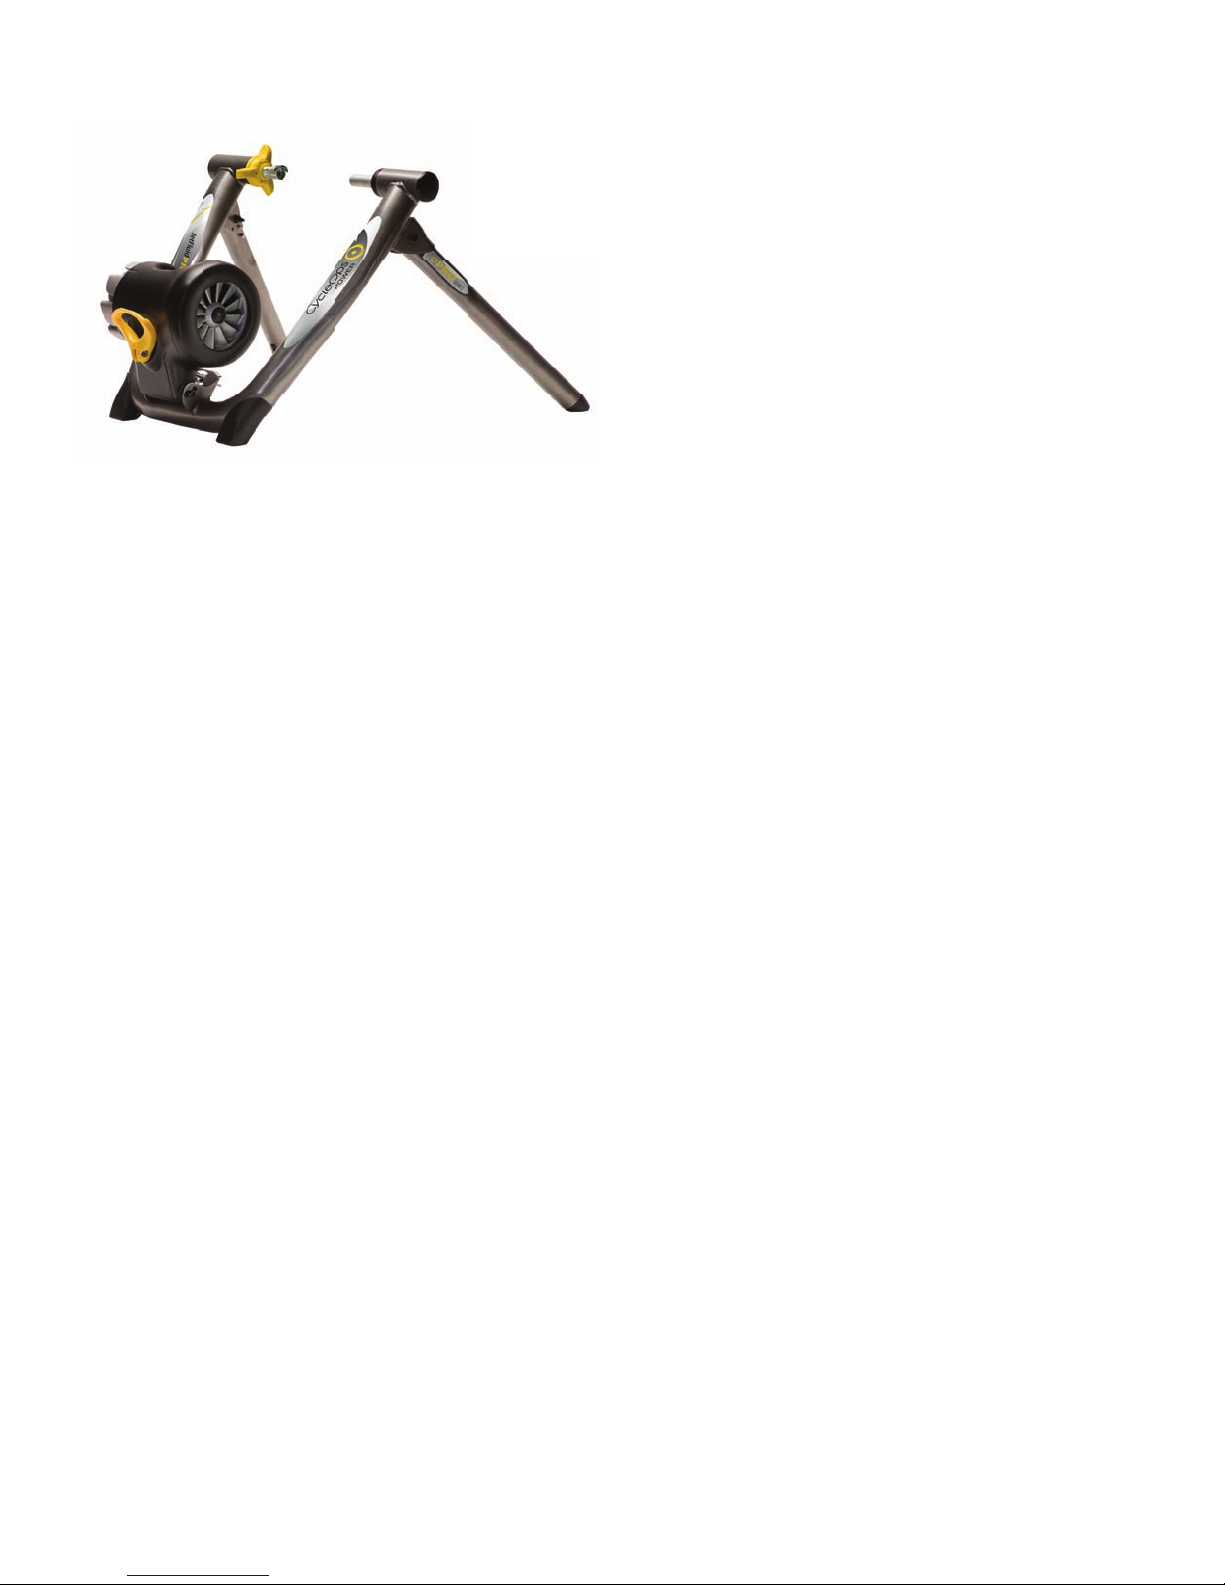
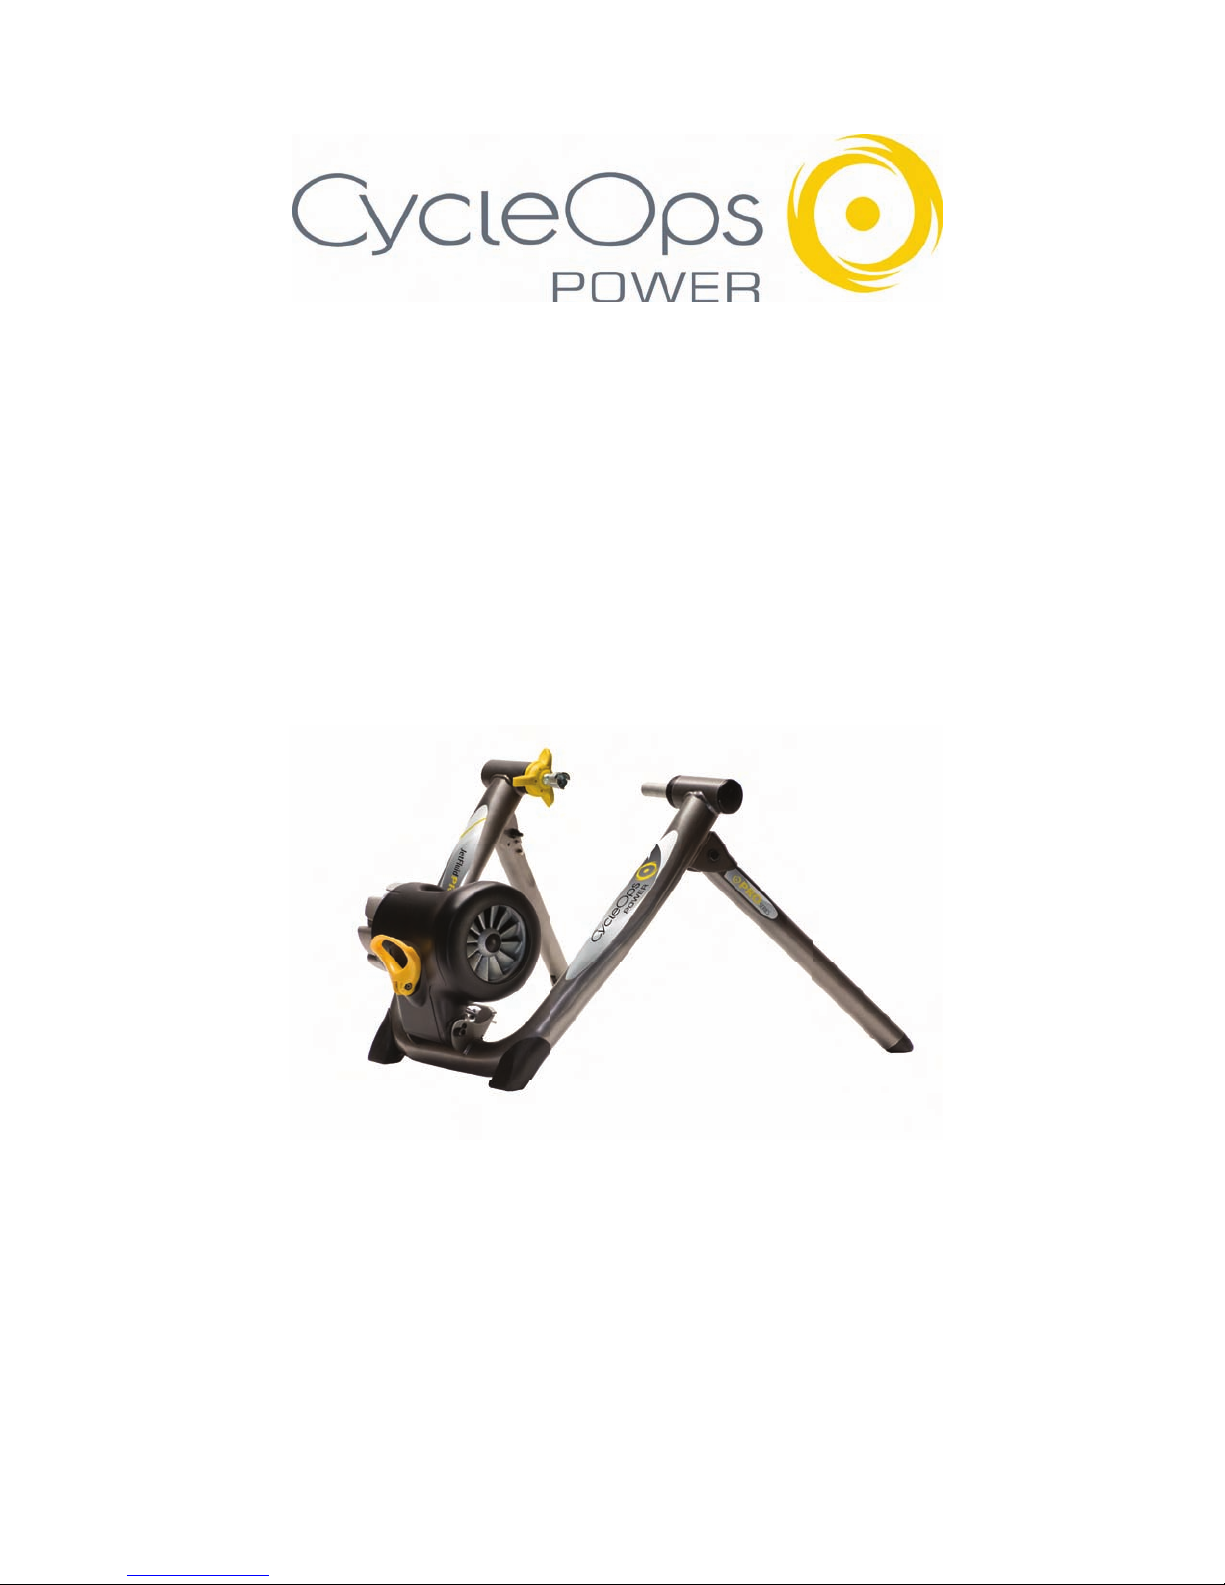
trainer available, pure and simple. The CycleOps JetFluidTM Pro offers the ultimate in real-world feel for
the widest range of riders possible.
The CycleOps JetFluidTM Pro takes the legendary CycleOps Fluid technology to the next level by offering
a progressive power curve, increasing resistance as
you increase speed, just like on the road. The power
curve is paired to the CycleOps JetFluidTM Pro fl ywheel using PowerTuned technology, ensuring the
proper balance between resistance and momentum
to best replicate the feeling of riding outdoors. The
patented Airfl ow channel maintains operating temperature for a smooth ride and durable operation,
backed up by our lifetime warranty.
This user guide will take you through setting up the
TM
CycleOps JetFluid
oughly explains how to use the CycleOps JetFluid
Pro trainer and frame, and thor-
TM
progressive Power curve to give you an edge over
the competition.
· Do not remove feet from pedals while cycling.
· Do not attempt to ride the bike at high RPM’s or in
a standing position until you have practiced at
lower RPM’s.
· Do not place fi ngers or any other objects into
moving parts of the trainer or bicycle.
· Keep children and pets away from your bike and
the trainer while in use. Do not allow children to
ride on your bike.
· Never turn pedal crank arms by hand. To avoid
entanglement and possible injury, do not expose
hands or arms to the drive mechanism.
· D o no t di sm ou nt f ro m yo ur b ike u nt il bo th t he
pedals and the rear wheel are at a complete STOP.
2
Page 3

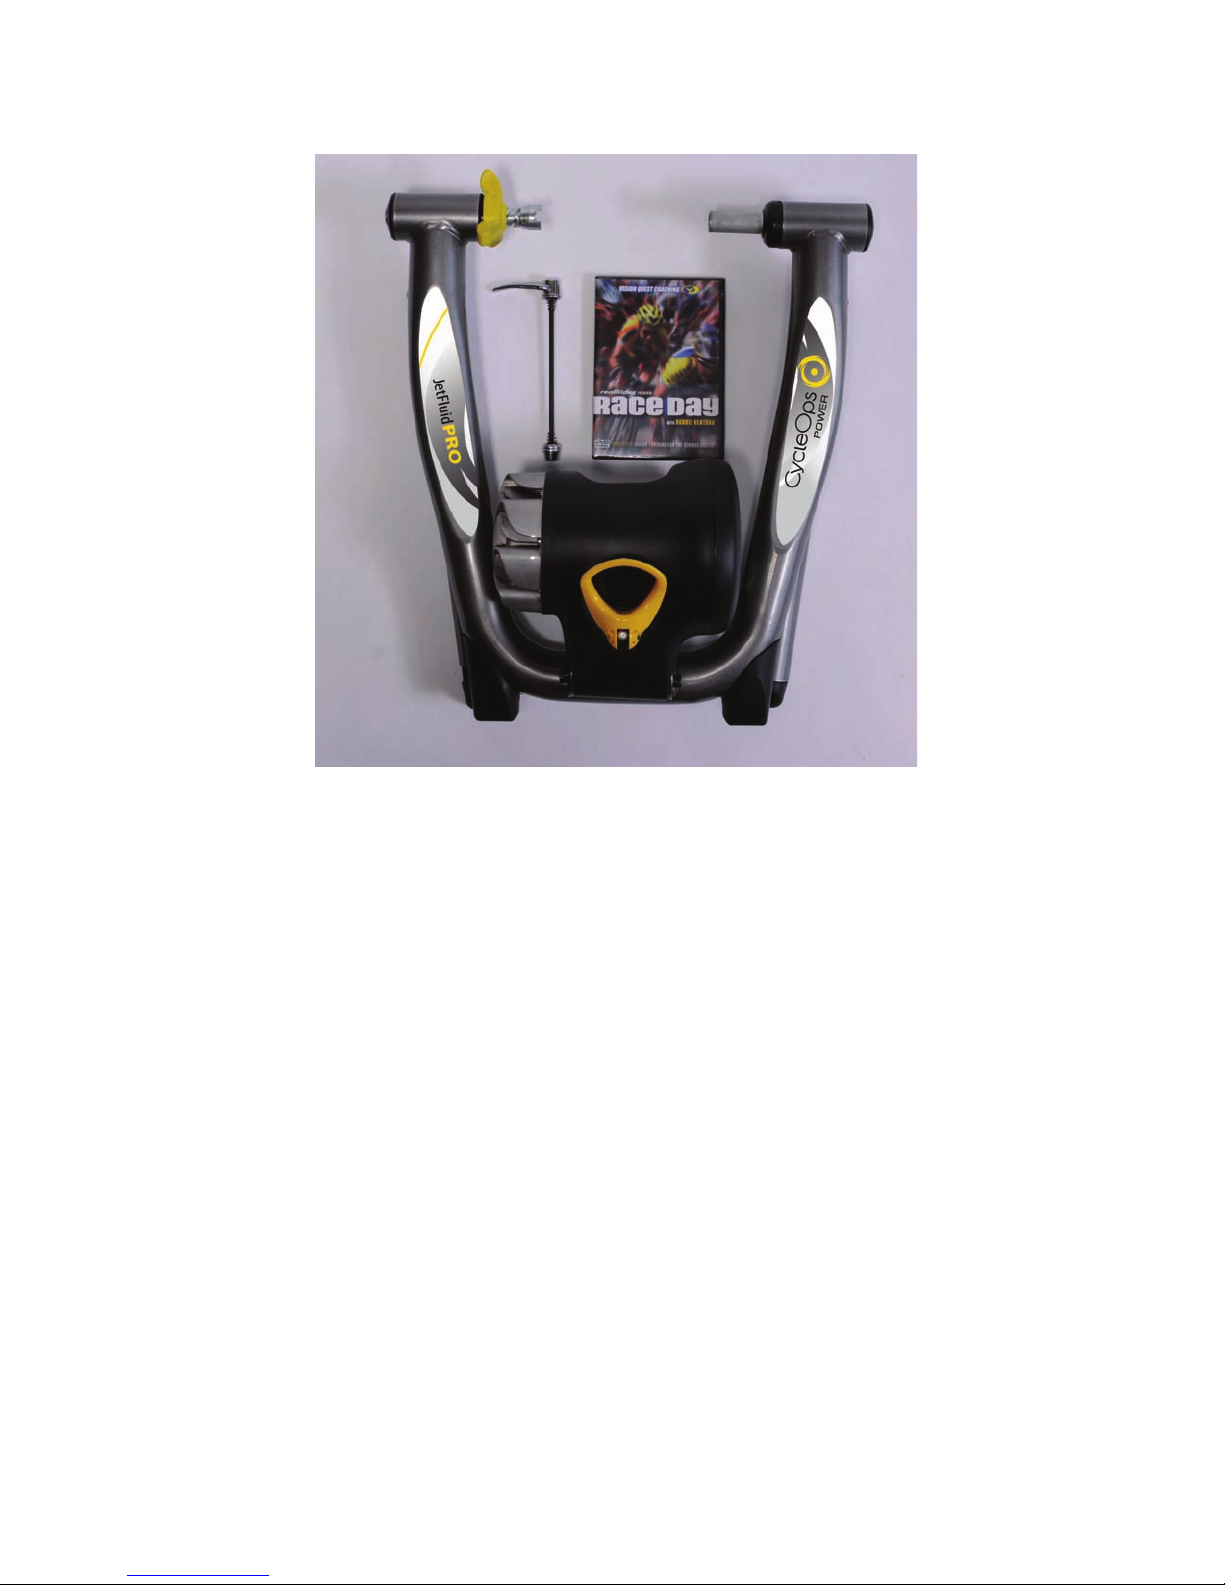
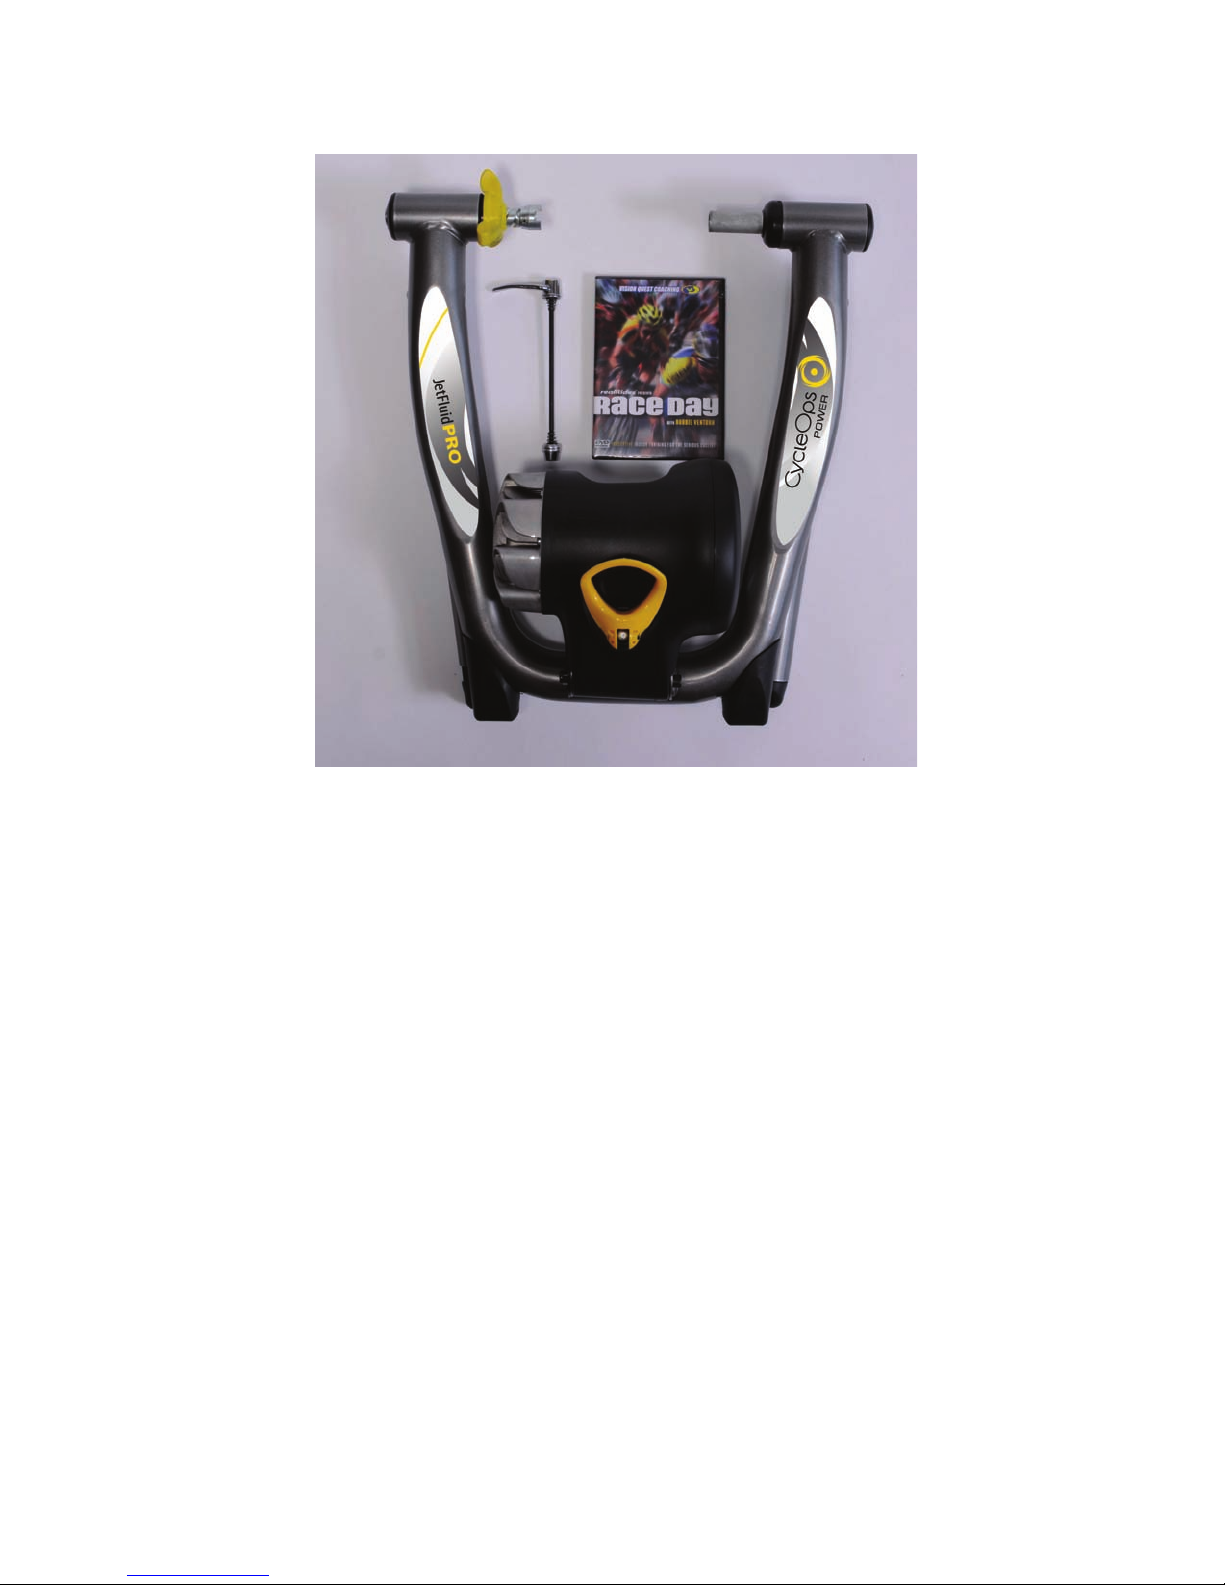
Part 1: Setting Up Your CycleOps JetFluid
(C)
(B)
TM
Pro
(A)
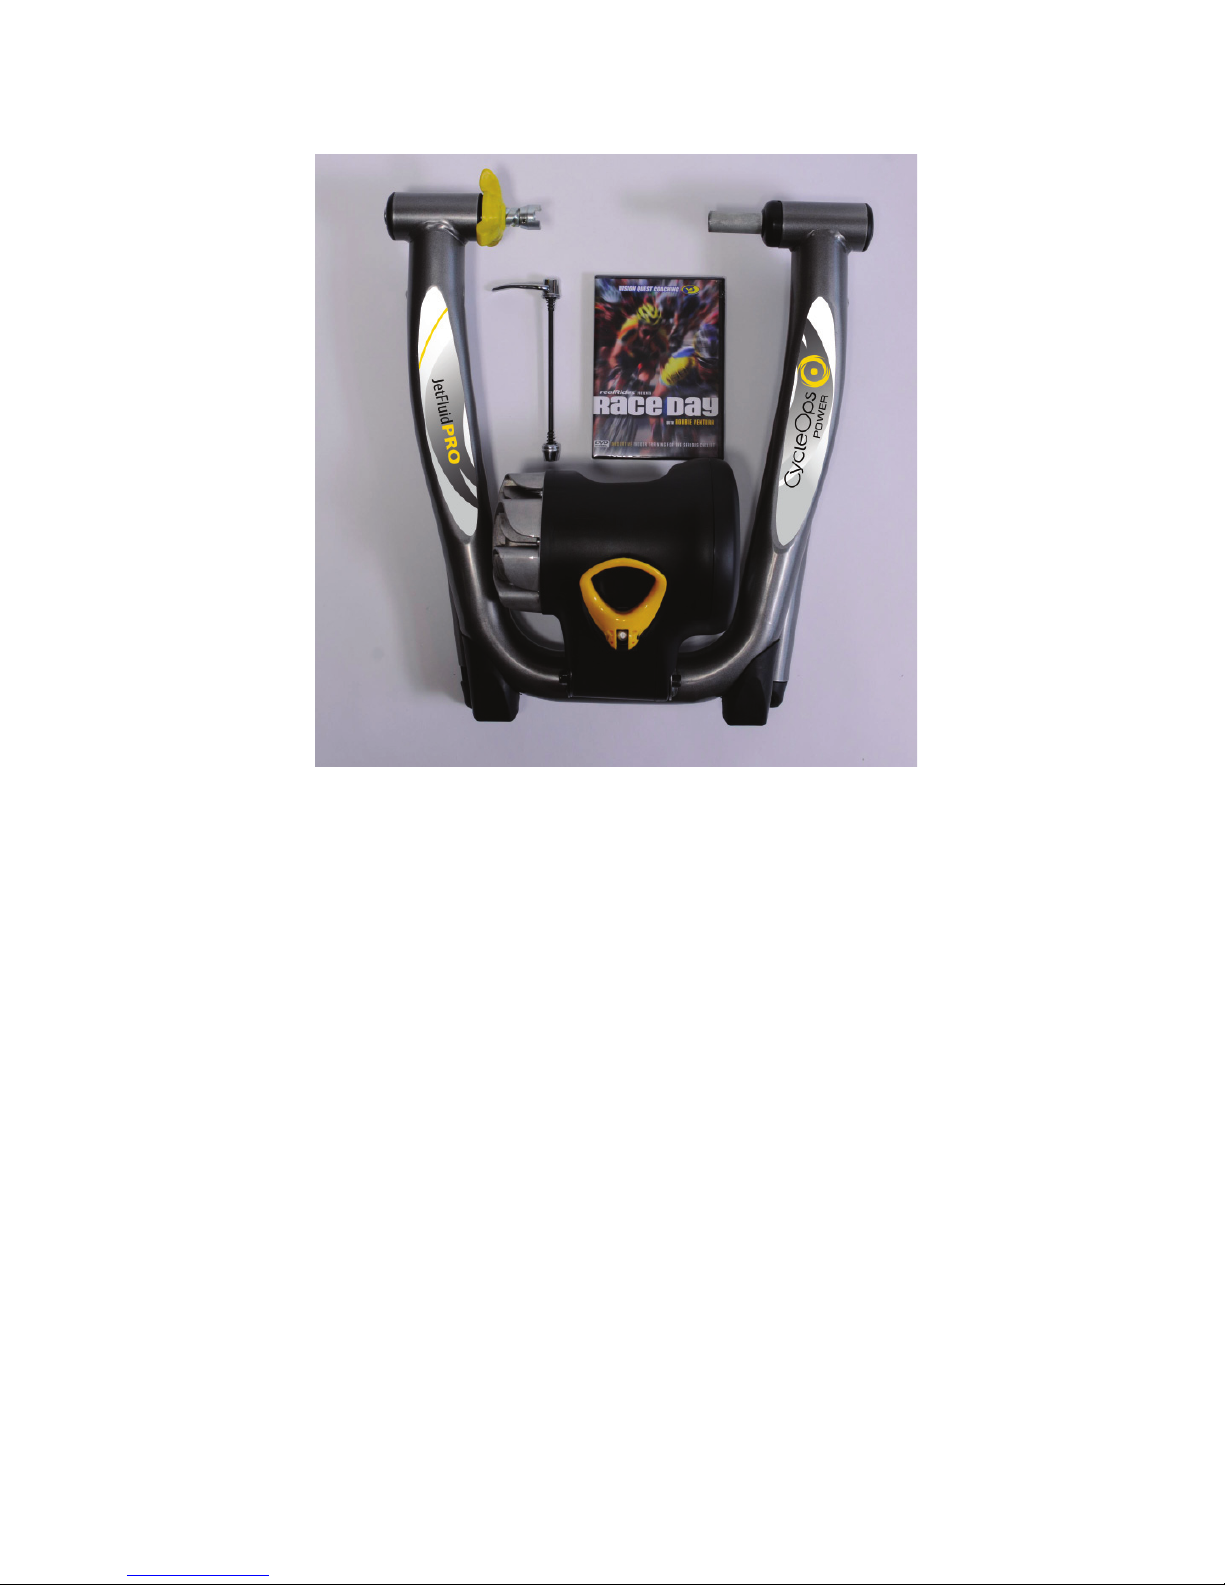
1.1: Parts Listing
Your CycleOps JetFluid
Assembled CycleOps JetFluid•
TM
Pro trainer should come with all of the following components:
TM
Pro Trainer resistance unit and frame (A)
CycleOpsSkewer (B)•
Race Day• training DVD (C)
Warranty registration card (Not Shown) (You may also register your CycleOps trainer at www.cycleops.•
com)
If you do not fi nd all of these items in the box, please contact Saris customer service at 800-783-7257 (option 3).
3
Page 4

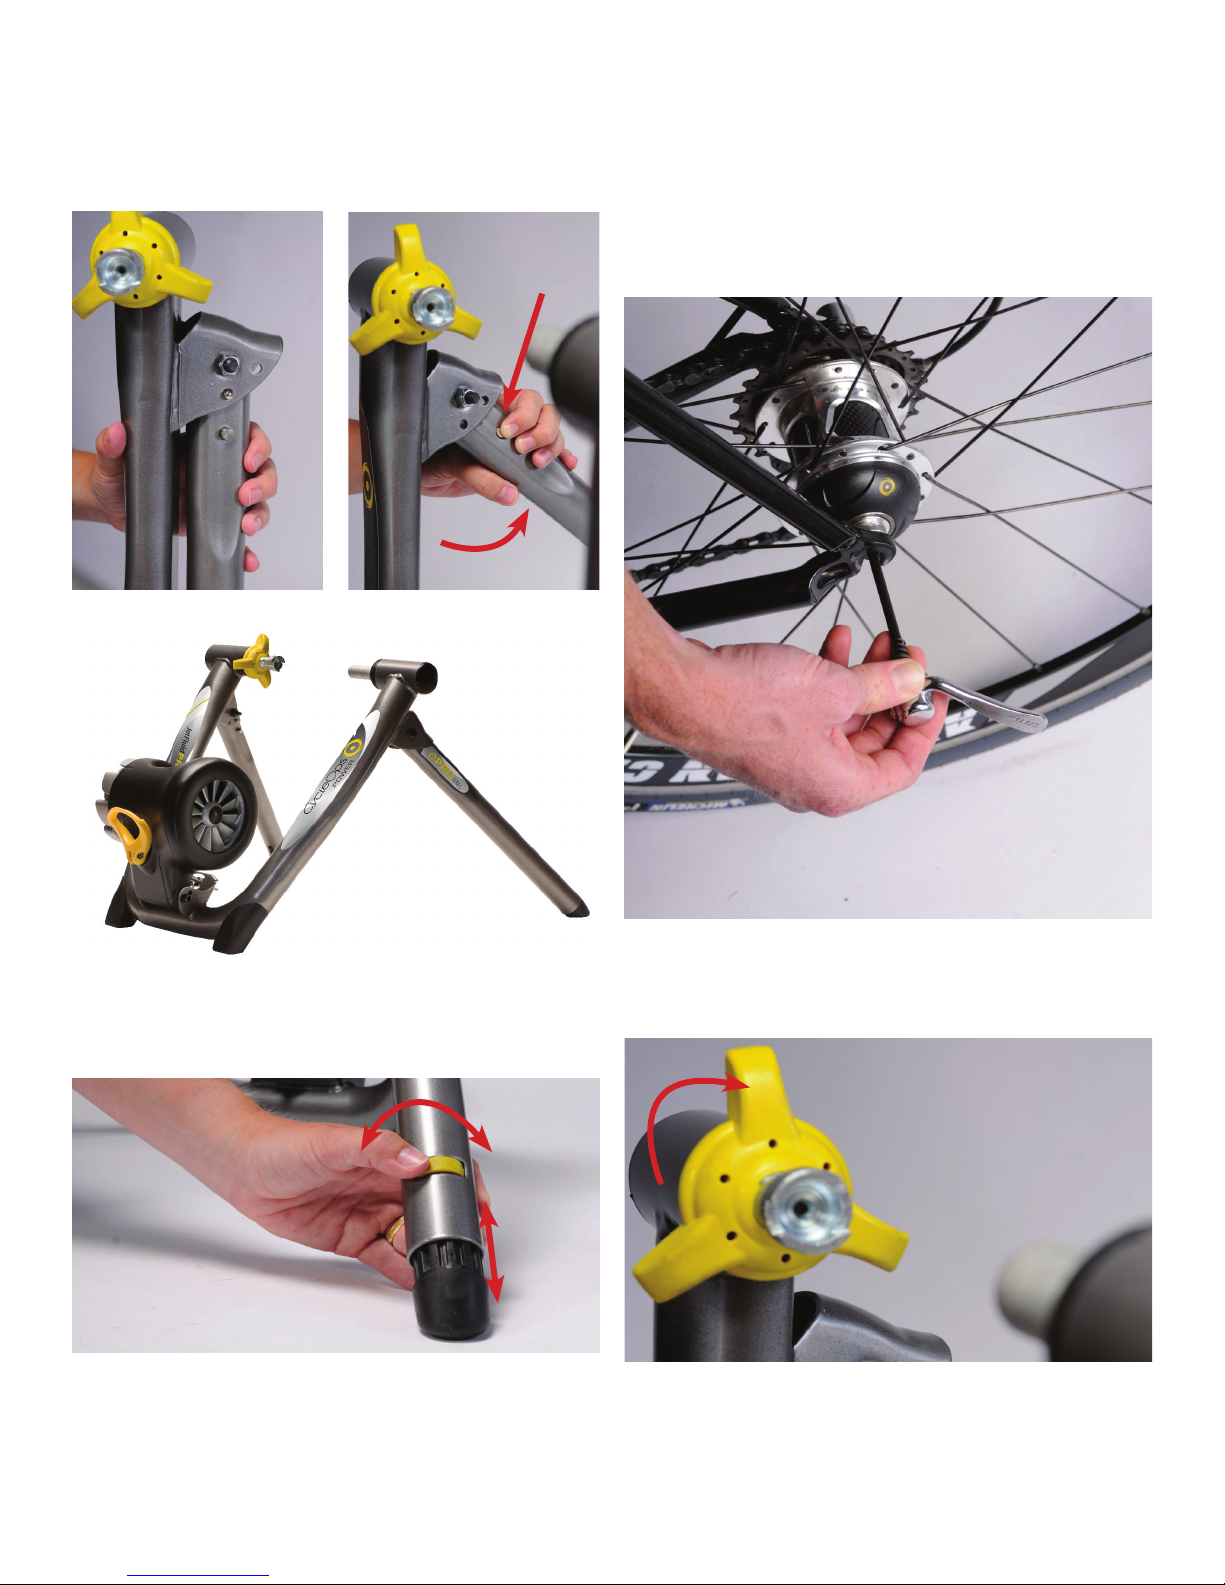
1.2: Trainer Setup
1.3: Attaching your Bike to the Trainer
To your trainer up, extend the legs as shown below,
then set the trainer on a fl at surface.
Press
Extend
The CycleOps JetFluid
TM
Pro trainer is designed to be
used with the provided skewer. Replace the skewer
on the rear wheel of your bike with the one provided.
Make sure the quick release handle is on the left side
of the bicycle and faces upward.
Turn the thumb wheel to adjust the leg and level the
frame as shown below.
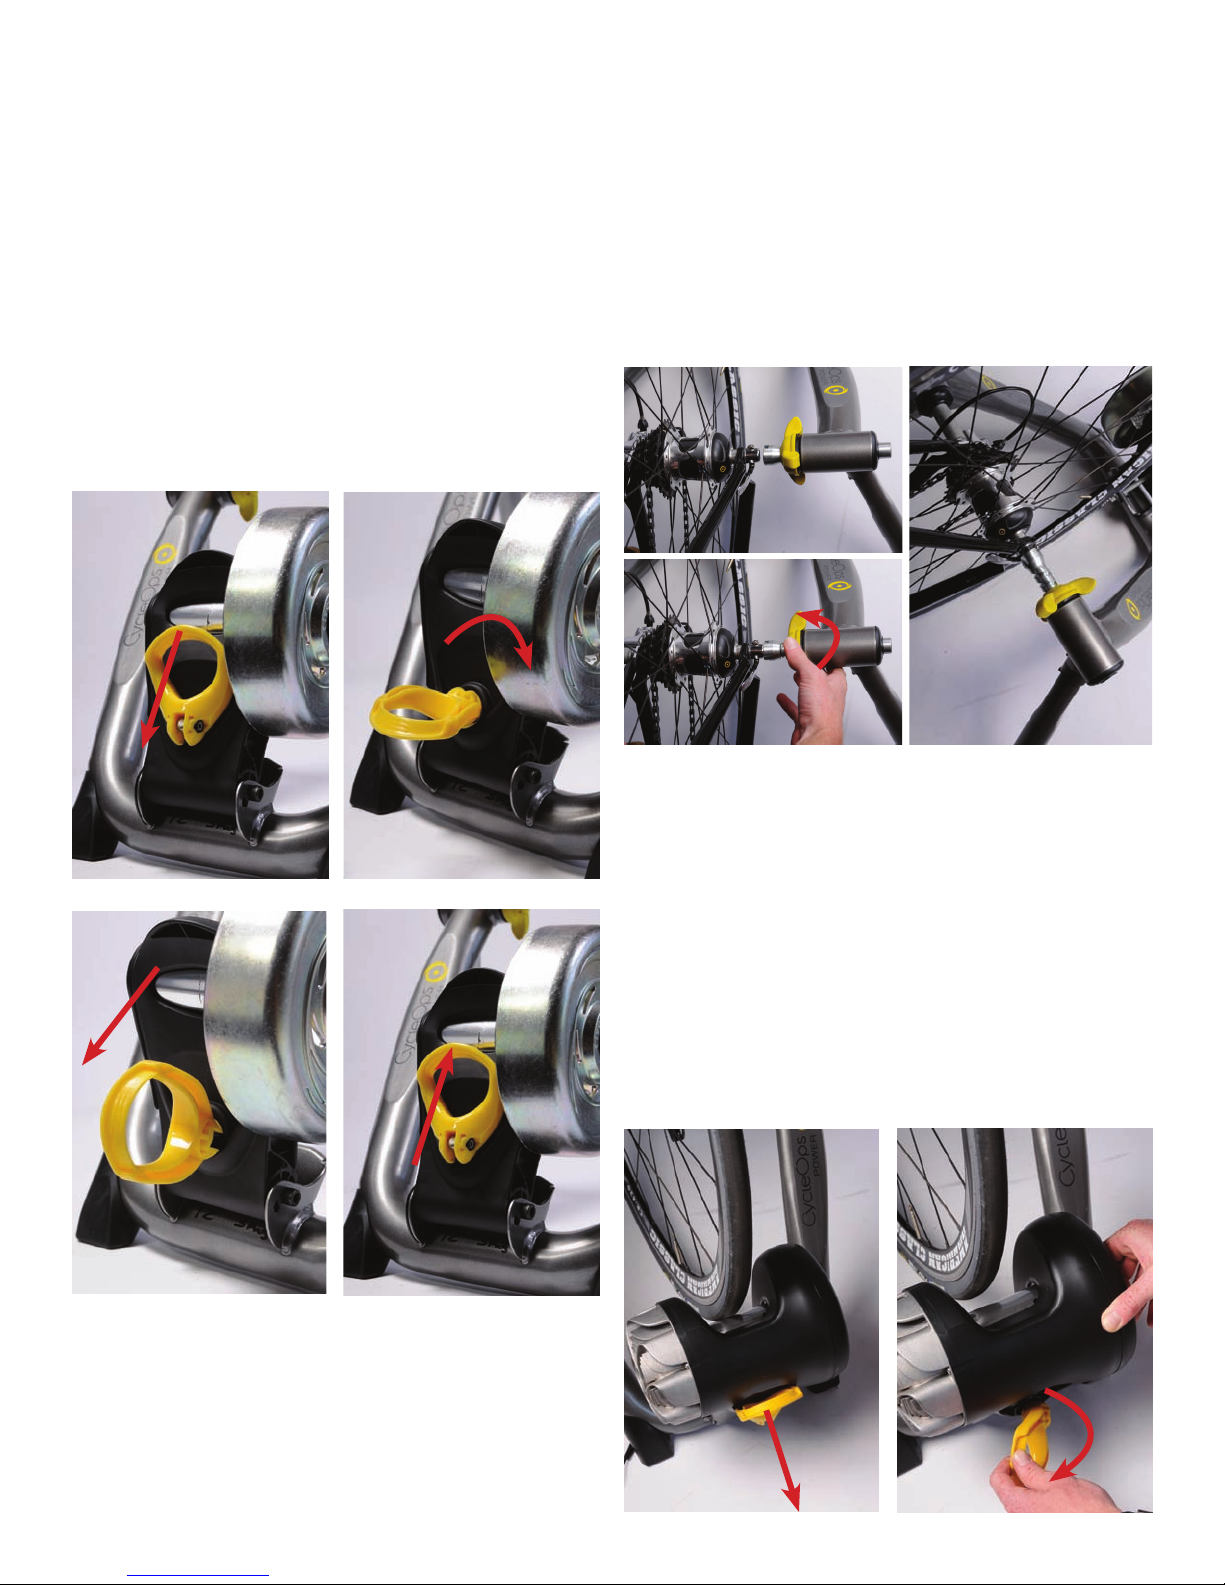
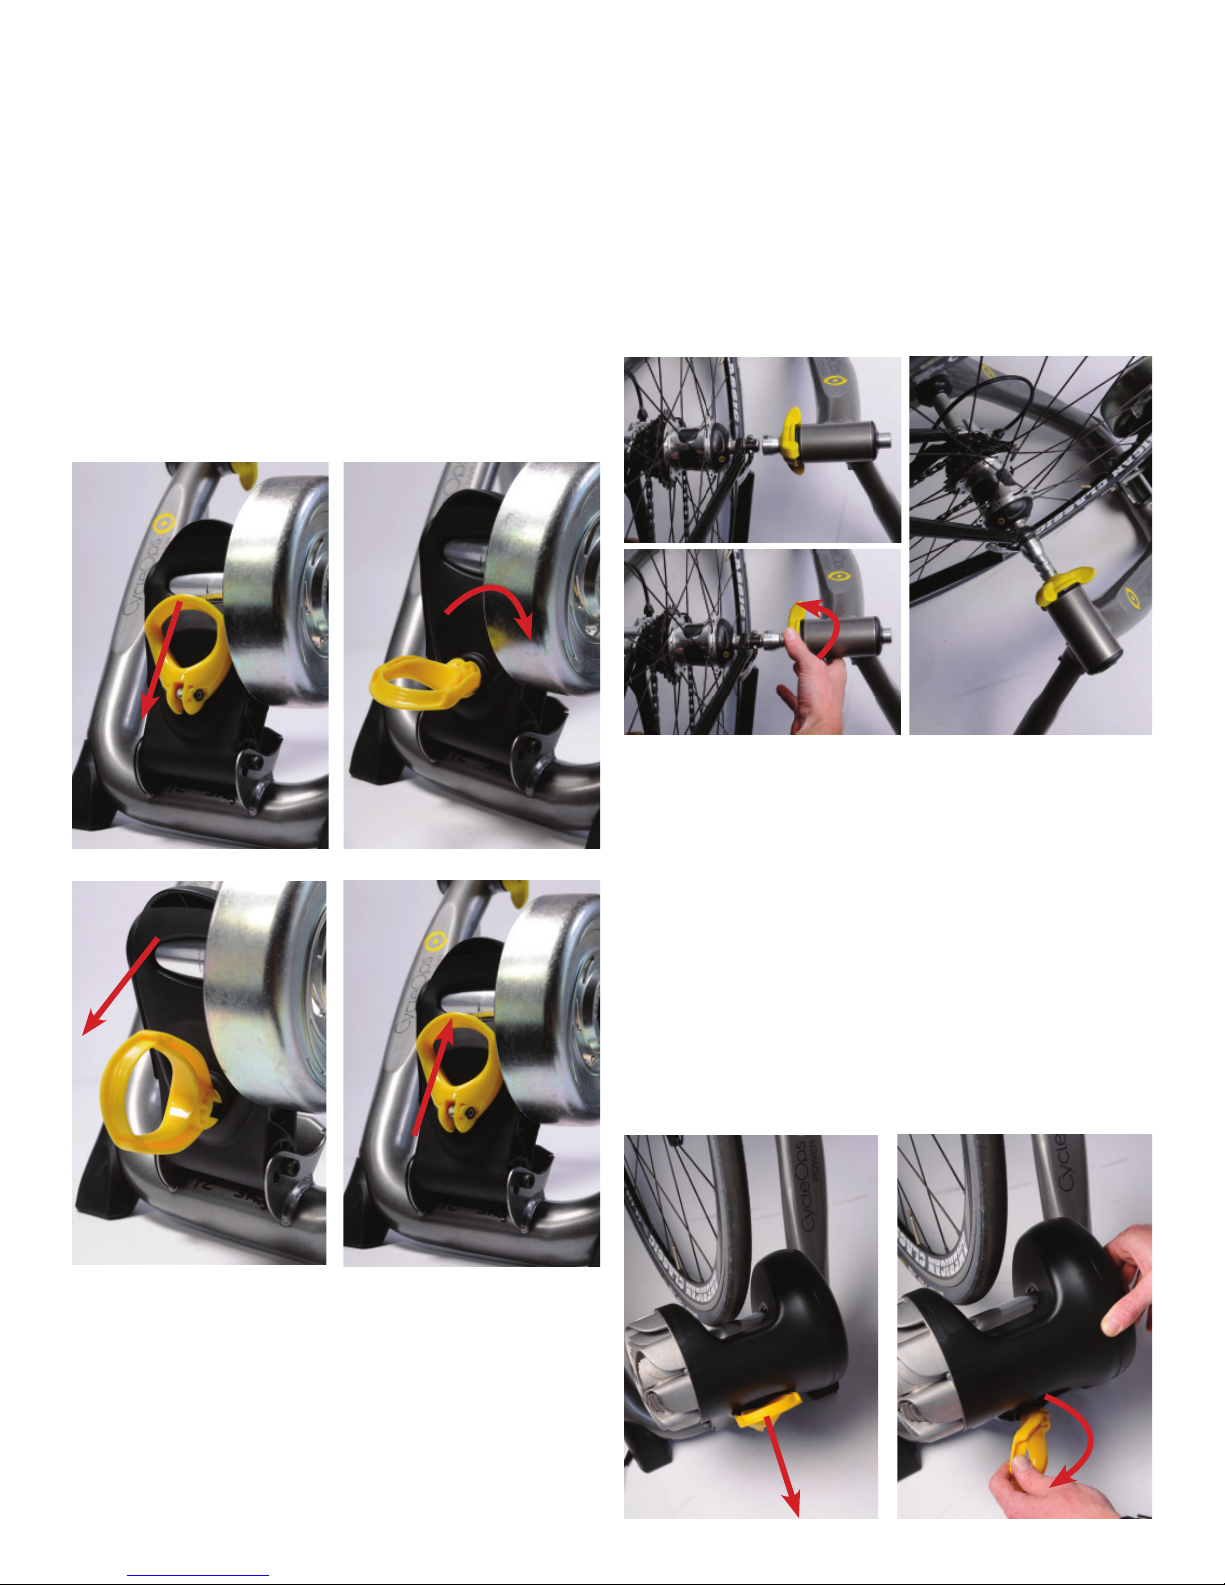
Rotate the yellow skewer clamp knob clockwise to
allow suffi cient clearance for your skewer.
4
Page 5

Pull the yellow cam lever down and rotate 90 degrees clockwise to unlatch the resistance unit. Pivot
the resistance unit down to allow clearance for your
rear wheel.
CAUTION: In this position the resistance unit can
move freely, keep fi ngers clear of moving parts.
Latch the resistance unit in a down position by rotating the cam lever 90 degrees counter clockwise and
push the cam lever against the resistance unit.
Lift your bike up by the seatpost and insert the right
side (drive side) of the skewer into the fi xed cone on
the corresponding side of the frame.
Align the left side of the skewer with the adjustable
cone, lining the notches in the cone up with the
quick release handle/lever. Rotate the yellow skewer
clamp knob as shown below to secure your rear
wheel into the trainer. Securely tighten the knob
until tightly in place.
Note: Your bike does not need to be centered on the
roller for it to function properly
Pull the yellow cam lever down and rotate 90 degrees clockwise to unlatch the resistance unit. Push
the resistance unit towards your rear wheel until the
roller contacts the tire. Latch the resistance unit by
rotating the cam lever 90 degrees counter clockwise,
while holding the resistance unit. Compress the
roller against the tire by pulling up on the cam lever
as shown below.
5
Page 6

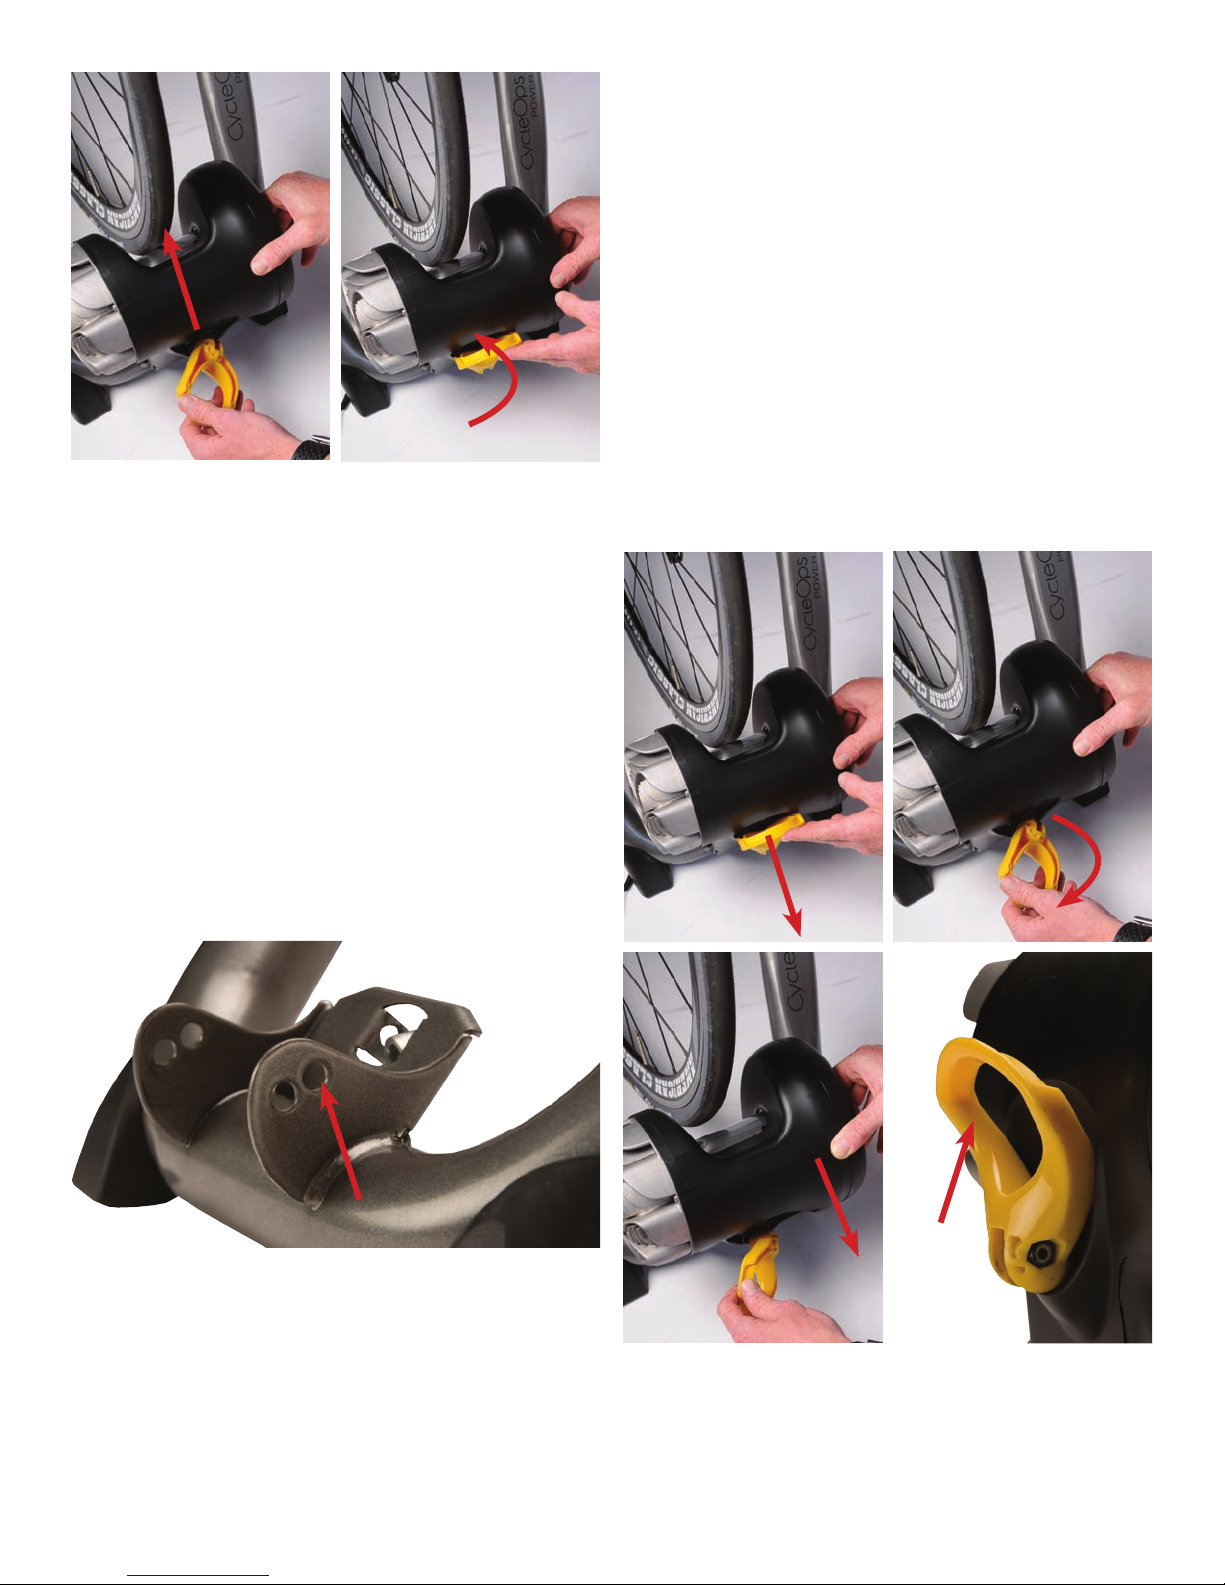
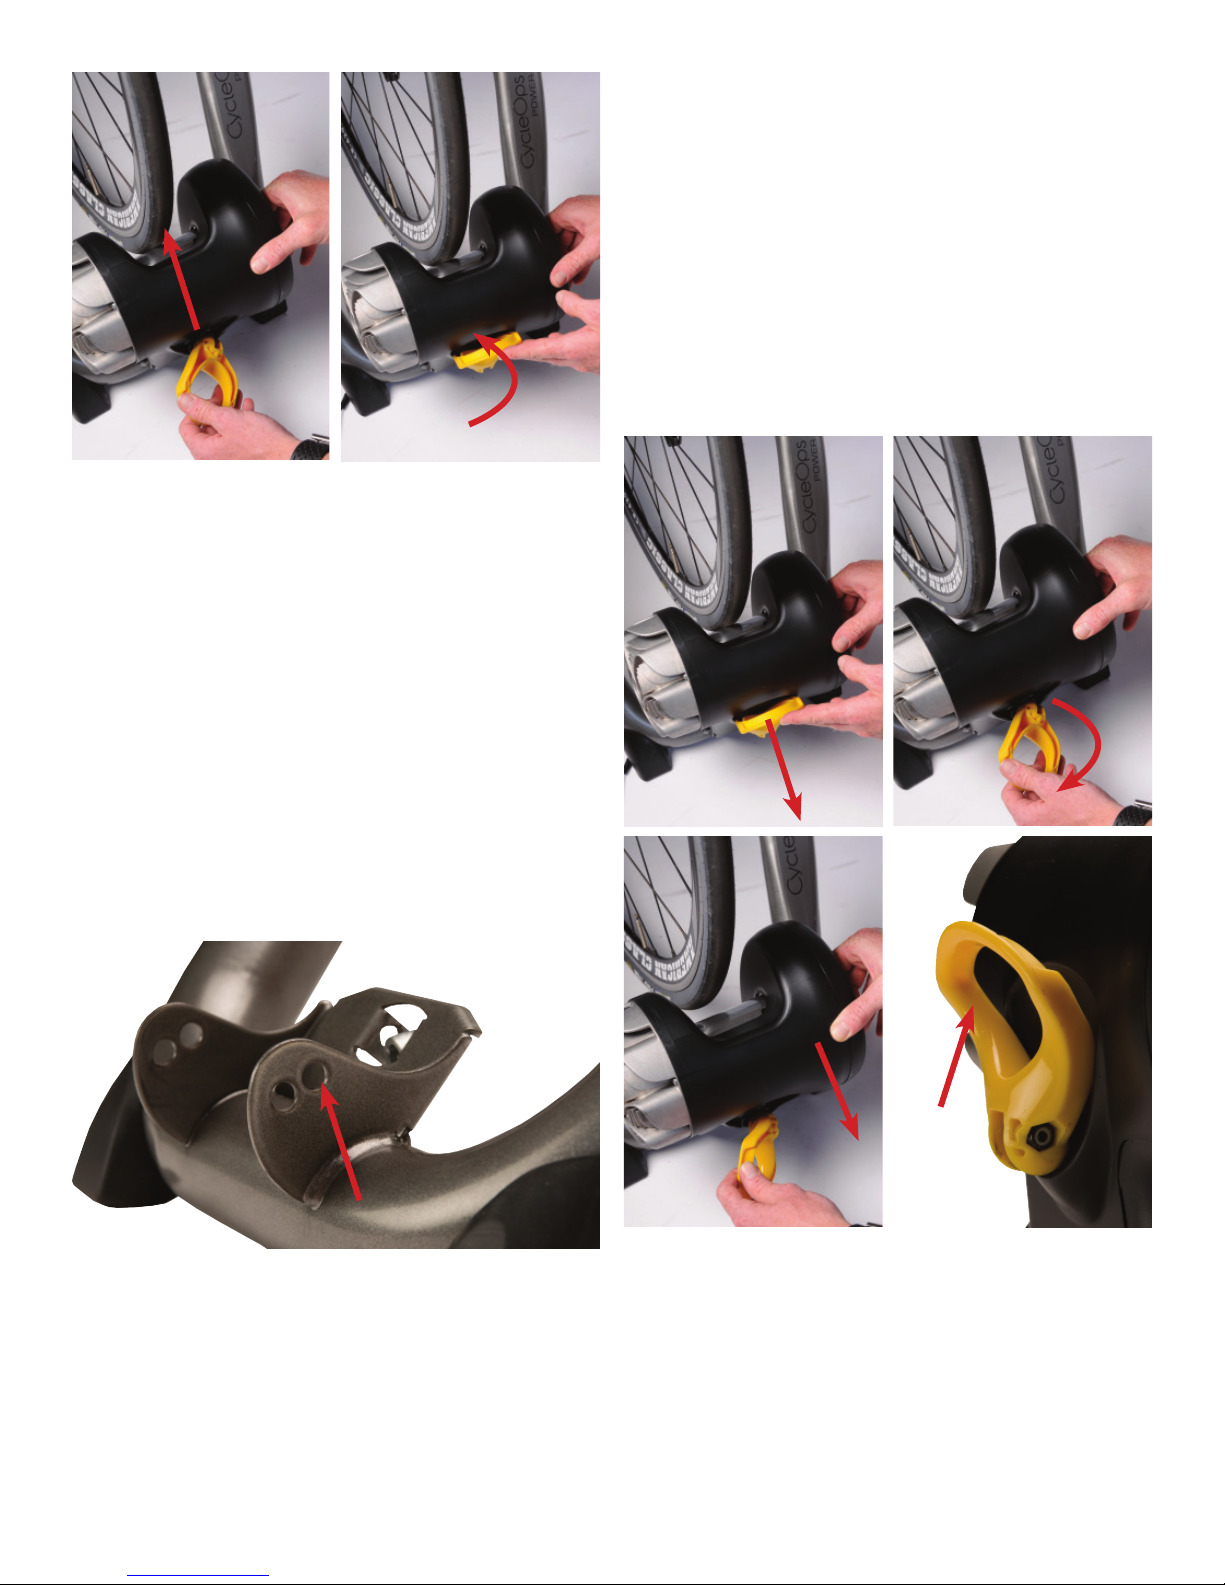
The resistance unit should be tight enough to prevent the tire from slipping during accelerations.
A small indentation will be seen in the tire when
tightened properly. If slipping occurs, increase tire
compression by re-latching the resistance unit. Pull
the yellow cam lever further down while performing
the initial unlatching step.
1.5 Detaching your Bike from the Trainer
Pull the yellow cam lever down and rotate 90 degrees clockwise to unlatch the resistance unit. Pivot
the resistance unit down to allow clearance for your
rear wheel. Latch the resistance unit by rotating the
cam lever 90 degrees counter clockwise and pushing
up.
Hold your bike by the seatpost. Rotate the yellow
skewer clamp knob counter clockwise to release
your bike.
Note: If the cam lever pops open while riding, move
the resistance unit and mount it to the front bolt
hole as shown below. Most tires will fi t using either
mounting hole. Larger tires including 29” MTB tires
require mounting to the rear hole.
Note: Be certain your tires are infl ated to their proper
pressure. Knobby tires will cause noise and vibration.
For best results, use a slick-tread tire. Note that any
stationary trainer will increase the wear on your tires.
Using harder rubber composed tires will improve
their life.
6
Page 7

Part 2: About the CycleOps JetFluidTM Pro Trainer
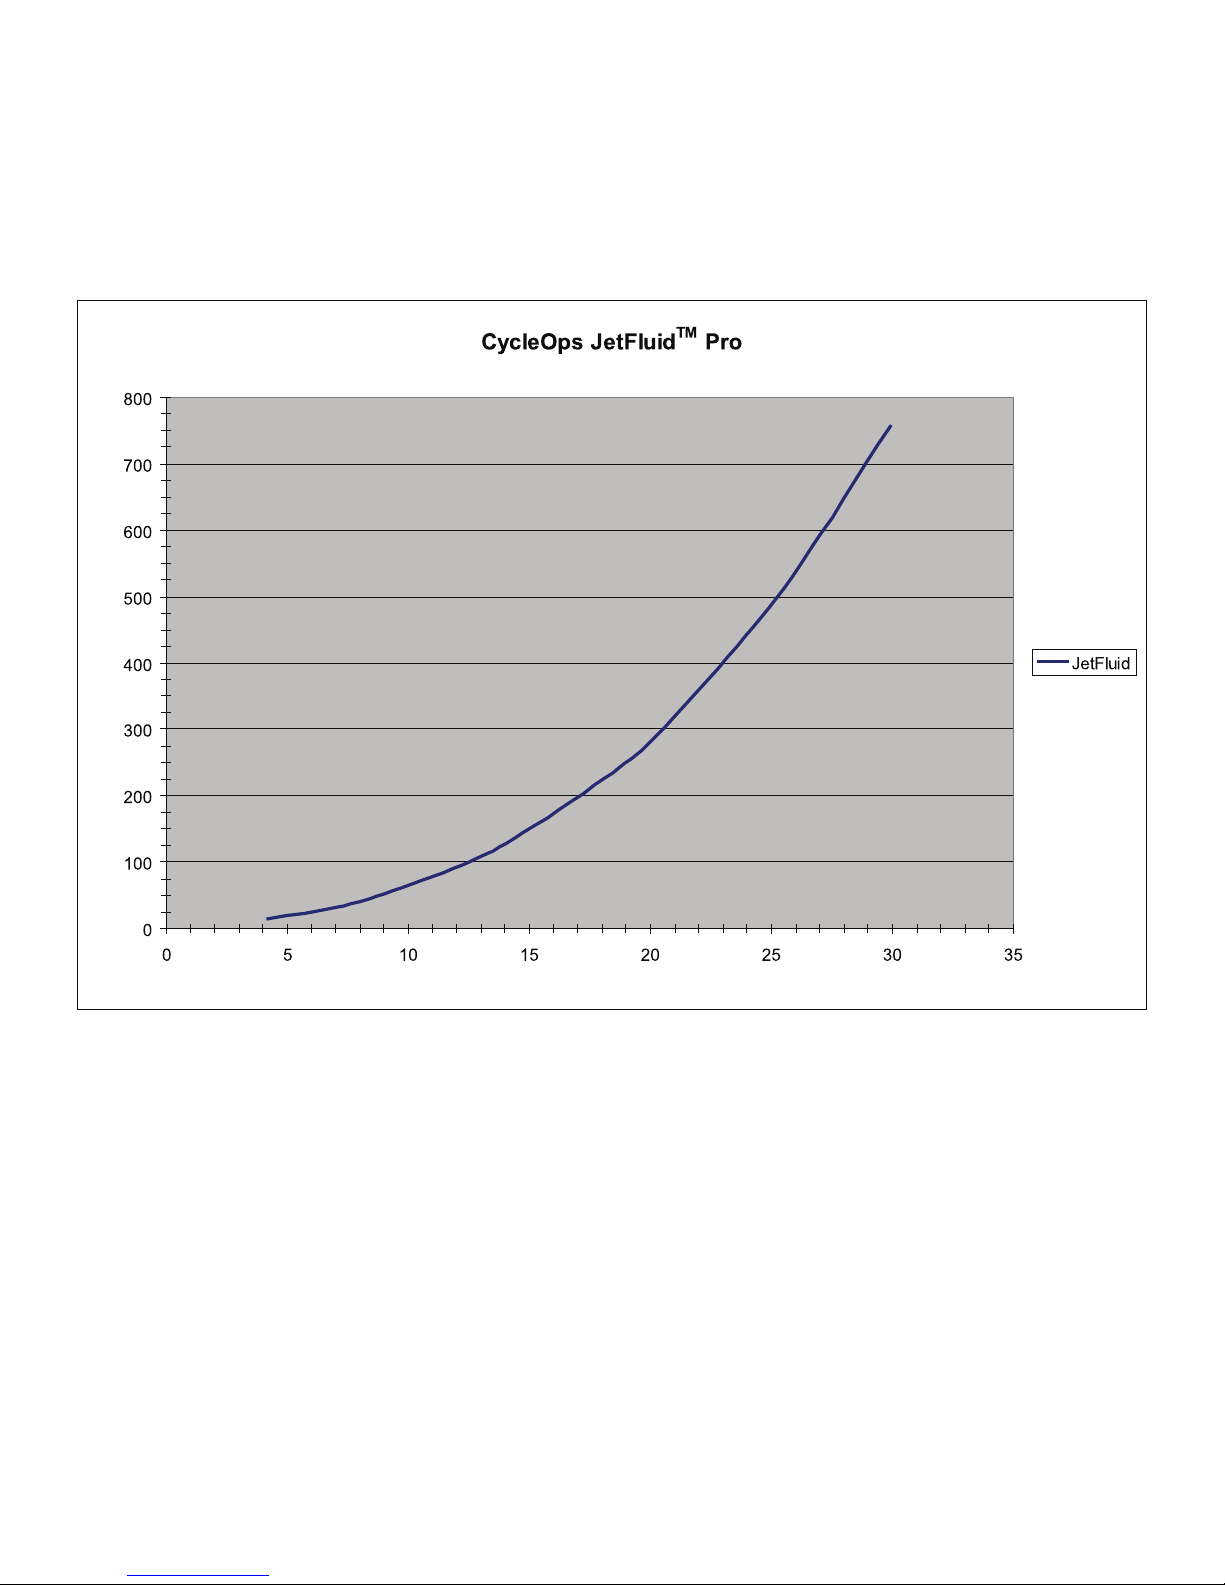
CycleOps JetFluidTM Pro
0
100
200
300
400
500
600
700
800
0 5 10 15 20 25 30 35
Speed (mph)
Power (watts)
JetFluid
The CycleOps JetFluidTM Pro Trainer has been carefully constructed using extensive testing and analysis,
including real world data collected by exercise physiologist Allen Lim, PhD. to provide the most road-like feel
possible in a stationary trainer. The resulting power curve illustrated here ensures the widest range of resistance for a fl uid trainer at any given speed. Use this chart to benchmark your power to speed relationship.
7
Page 8

Warranty
Procedures
The CycleOps JetFluid
TM
Pro is designed specifi cally
for the home use and as such carries the following
warranty:
All Saris Cycling Group CycleOps JetFluid
TM
Pro products are warranted to the retail purchaser to be free
from defects in materials and workmanship. Warranty coverage valid to the original purchaser only
and proof of purchase will be required.
Residential Environment:
Frame: Lifetime
Parts: 3 years
Labor: 1 year
This warranty excludes wear items that need to be
replaced due to normal wear and tear.
This warranty does not cover:
Warranty service will be performed by Saris Cycling
Group or an authorized Saris Cycling Group Dealer.
The original purchaser must provide proof of purchase. Service calls and/or transportation to and
from the Authorized Saris Cycling Group Dealer are
the responsibility of the purchaser.
Saris Cycling Group will have the option to repair 1.
or replace any product(s) which requires warranty service.
Saris Cycling Group will replace any unit that is 2.
structurally defective with a new unit or a unit of
equal value.
In the event a product cannot be repaired, Saris 3.
Cycling Group will apply a limited credit reimbursement toward another CycleOps JetFluidTM
Pro Trainer product of equal or greater value.
Normal wear and tear.1.
Any damage, failure or loss caused by accident, 2.
misuse, neglect, abuse, improper assembly, improper maintenance, or failure to follow instructions or warnings in Owner’s Manual.
Use of products in a manner or environment for 3.
which they were not designed.
Limitations
The foregoing warranties are in lieu of and exclude
all other warranties not expressly set forth herein,
whether expressed or implied by operation of law or
otherwise, including, but not limited to, warranties
of merchantability or fi tness for a particular purpose.
Saris Cycling Group shall in no event be liable for
incidental or consequential losses, damages or expenses in connection with its exercise products. Saris
Cycling Group’s liability hereunder is expressly limited to the replacement of goods not complying with
this warranty or, at Saris Cycling Group election, to
the repayment of an amount of the purchase price of
the exercise product in question. Some states do not
permit the exclusion or limitation of implied warranties or incidental or consequential damages, so the
preceding limitations and exclusions may not apply
to you.
Saris Cycling Group
5253 Verona Rd.
Madison, WI 53711
p. 800-783-7257
f. 608-274-1702
www.saris.com
www.cycleops.com
18456 07/08
8
Page 9

TM
JetFluid
Guía de usuario
Pro Trainer
Page 10

INTRODUCCIÓN
¡Enhorabuena! Ha adquirido el mejor sistema de
entrenamiento fl uido, puro y simple. CycleOps
TM
Jet- Fluid
para la mayor gama de ciclistas posible.
CycleOps JetFluidTM Pro aprovecha la legendaria
tecnología CycleOps Fluid y la sitúa en un nivel
superior, ofreciendo una curva de potencia
progresiva y un aumento de la resistencia al
aumentar la velocidad, igual que en carretera.
La curva de potencia se equipara al volante CycleOps
JetFluid
garantizando un equilibrio adecuado entre la
resistencia y el momento para simular mejor la
sensación de ciclismo al aire libre. El canal patentado
Airfl ow mantiene la temperatura de funcionamiento
para una sesión suave y un funcionamiento prolongado, respaldado por nuestra garantía de por vida.
Esta guía de usuario le indica cómo confi gurar el
aparato de entrenamiento CycleOps JetFluid
el bastidor y explica exhaustivamente cómo utilizar
la curva de potencia progresiva CycleOps JetFluid
para colocarse en posición de ventaja frente a los
competidores.
Pro le ofrece la sensación real defi nitiva
TM
Pro utilizando la tecnología PowerTuned,
TM
Pro y
TM
Precauciones recomendadas
Antes de iniciar un programa de ejercicios consulte
con su médico o con un profesional sanitario.
Dicho profesional podrá ayudarle a establecer
un programa de ejercicios con una frecuencia,
intensidad y horario acordes a su edad y condición
física. Si tiene algún dolor u opresión en el pecho,
observa un pulso irregular, le falta el aire, se siente
débil o incómodo mientras realiza el ejercicio,
¡DETÉNGASE! Consulte a su médico antes de
continuar. El incumplimiento de estos consejos
podría provocar heridas o problemas graves de
salud.
· No quite los pies de los pedales mientras utiliza la
bicicleta.
· No intente hacer girar la bicicleta a mucha
velocidad o de pie hasta que haya practicado a
una velocidad menor.
· No coloque los dedos ni ningún objeto en las
partes móviles del aparato de entrenamiento
o la bicicleta.
· Mantenga alejados a los niños y animales de su
bicicleta y del aparato de entrenamiento cuando
los esté utilizando. No permita que los niños
utilicen la bicicleta.
· No haga girar a mano la manivela del pedal. Para
evitar enredos y posibles daños, no acerque las
manos o los brazos al mecanismo de tracción.
· No se baje de la bicicleta hasta que los pedales
y la rueda trasera se hayan DETENIDO
completamente.
2
Page 11

Parte 1: Instalación de CycleOps JetFluidTM Pro
(C)
(B)
(A)
1.1: Listado de piezas
El aparato de entrenamiento CycleOps JetFluid
Unidad de resistencia CycleOps JetFluid•
TM
Pro debe incluir los componentes siguientes:
TM
Pro montada y bastidor (A)
Cierre rápido CycleOps (B)•
DVD de entrenamiento• Race Day (C)
Tarjeta de registro de garantía (no mostrada) (También puede registrar su equipo CycleOps en •
www.cycleops.com)
Si en la caja no encuentra todos estos elementos, póngase en contacto con el servicio de atención al cliente
de Saris en el 800-783-7257 (opción 3).
3
Page 12

1.2: Montaje del aparato de entrenamiento
Para montar el aparato de entrenamiento,
extienda las patas tal como se indica a continuación
y colóquelo sobre una superfi cie plana.
Presionar
Extender
1.3: Fijación de la bicicleta al aparato de
entrenamiento
TM
El aparato de entrenamiento CycleOps JetFluid
Pro
está diseñado para su uso con el cierre rápido
suministrado. Sustituya el cierre rápido de la rueda
trasera de la bicicleta por el suministrado. Asegúrese
que la manivela de desacople rápido esté en el lado
izquierdo de la bicicleta y que apunte hacia arriba.
Gire la ruedecilla para ajustar la pata y nivelar el
bastidor como se muestra a continuación.
Gire el pomo amarillo de la mordaza de la
abrazadera en el sentido de las agujas del reloj
para dejar espacio sufi ciente al cierre rápido.
4
Page 13

Tire de la palanca de leva amarilla hacia abajo y
gírela 90 grados en el sentido de las agujas del reloj
para desacoplar la unidad de resistencia. Gire la
unidad de resistencia hacia abajo para dejar espacio
para la rueda trasera.
PRECAUCIÓN: En esta posición la unidad de
resistencia puede moverse libremente, mantenga
los dedos alejados de las partes móviles.
Acople la unidad de resistencia en la posición
inferior girando la palanca de leva 90 grados en
sentido contrario a la aguja del reloj y presione la
palanca de leva contra la unidad de resistencia.
Levante la bicicleta por el sillín e inserte el lado
derecho (desde el punto de vista del ciclista) del
cierre rápido en el cono fijo del lado correspondiente
del bastidor.
Alinee el lado izquierdo del cierre rápido con el
cono ajustable, alineando las muescas del cono con
la manivela/palanca de desacople rápido. Gire el
pomo amarillo de la mordaza de la abrazadera tal
como se muestra a continuación para asegurar la
rueda trasera al aparato de entrenamiento. Apriete
el pomo hasta que se haya fijado con seguridad en
su posición.
Nota: No es necesario que la bicicleta esté centrada
en el rodillo para que funcione correctamente
Tire de la palanca de leva amarilla hacia abajo y
gírela 90 grados en el sentido de las agujas del reloj
para desacoplar la unidad de resistencia. Tire de la
unidad de resistencia hacia la rueda trasera hasta
que el rodillo haga contacto con la cubierta. Acople
la unidad de resistencia girando la palanca de leva
90 grados en sentido contrario a las agujas del reloj
mientras sujeta la unidad de resistencia. Presione el
rodillo contra la cubierta tirando hacia arriba de la
palanca de leva tal como se muestra a continuación.
5
Page 14

La unidad de resistencia debe tener la tensión
suficiente para evitar deslizamientos durante las
aceleraciones. Cuando se ha tensado correctamente
se verá una pequeña hendidura en la cubierta.
Si se producen deslizamientos, aumente la
compresión de la cubierta volviendo a acoplar
la unidad de resistencia. Tire más hacia abajo
de la palanca de leva amarilla al realizar el
desacoplamiento inicial.
1.5 Desmontaje de la bicicleta del aparato de
entrenamiento
Tire de la palanca de leva amarilla hacia abajo y
gírela 90 grados en el sentido de las agujas del reloj
para desacoplar la unidad de resistencia. Gire la
unidad de resistencia hacia abajo para dejar espacio
para la rueda trasera. Acople la unidad de resistencia
girando la palanca de leva 90 grados en sentido
contrario a las agujas del reloj y tire hacia arriba.
Mantenga sujeta la bicicleta por el sillín. Gire el
pomo amarillo de la mordaza de la abrazadera en
el sentido inverso a las agujas del reloj para soltar la
bicicleta.
Nota: Si la palanca de leva se suelta al utilizar la
bicicleta, mueva la unidad de resistencia y móntela
en el orificio del perno frontal tal como se muestra a
continuación. La mayor parte de las ruedas
encajarán en cualquier orificio de montaje. Las
ruedas mayores, incluidas las de 29” MTB requieren
el montaje en el orificio posterior.
Nota: Asegúrese de que las ruedas estén infladas a
la presión adecuada. Las ruedas flojas provocarán
ruidos y vibración. Para conseguir los mejores
resultados utilice una cubierta lisa. Tenga en
cuenta que cualquier aparato de entrenamiento
estacionario provocará un desgaste de las ruedas.
El uso de cubiertas fabricadas con una goma más
dura prolongará su vida útil.
6
Page 15

Parte 2: Acerca del aparato de entrenamiento CycleOps JetFluidTM Pro
El aparato de entrenamiento CycleOps JetFluidTM Pro se ha construido tras realizar amplios ensayos y
análisis, incluida la recopilación de datos reales por el fisiólogo Dr. Allen Lim, para ofrecer la sensación más
realista posible en un aparato de entrenamiento estático. La curva de potencia resultante que se muestra
aquí garantiza que el rango de resistencia sea el más amplio posible para un aparato de entrenamiento
fluido a cualquier velocidad dada. Utilice este diagrama para poner a prueba su relación entre potencia y
velocidad.
7
Page 16

Garantía
Procedimientos
TM
El aparato CycleOps JetFluid
Pro está diseñado
específicamente para uso doméstico y como tal
incluye la garantía siguiente:
Todos los productos CycleOps JetFluidTM Pro de
Saris Cycling Group cuentan con garantía del
minorista de estar libres de defectos tanto en los
materiales como en el montaje. La cobertura de
garantía sólo es válida para el comprador original y
será necesario un comprobante de compra.
Entorno residencial:
Bastidor: De por vida
Piezas: 3 años
Mano de obra: 1 año
Esta garantía excluye los elementos desgastados
que requieran sustitución por un desgaste normal
debido al uso.
Esta garantía no cubre:
El servicio de garantía será llevado a cabo por
Saris Cycling Group en un distribuidor autorizado
de Saris Cycling Group. El comprador original debe
proporcionar un comprobante de compra. Los
gastos de las llamadas de servicio y el transporte
hacia y desde el distribuidor autorizado de Saris
Cycling Group corren por cuenta del comprador.
Saris Cycling Group tendrá la opción de reparar o 1.
sustituir los productos que requieran el servicio
de garantía.
Saris Cycling Group sustituirá cualquier unidad 2.
defectuosa estructuralmente por una unidad
nueva o una unidad de igual valor.
En caso de que un producto no se pueda reparar, 3.
Saris Cycling Group aplicará un reembolso de
crédito limitado para otro producto CycleOps
TM
JetFluid
Pro de igual valor o superior.
Desgaste normal debido al uso.1.
Daños, averías o pérdidas provocados por 2.
accidente, uso incorrecto, negligencia, abuso,
montaje incorrecto, mantenimiento inadecuado
o incumplimiento de las instrucciones o
advertencias de este Manual de usuario.
Uso de los productos en un entorno o de una 3.
manera para la que no fueron diseñados.
Limitaciones
Las garantías precedentes sustituyen y excluyen a
cualesquiera otras garantías no establecidas
expresamente en el presente documento, tanto
expresas como implícitas previstas por la ley u otras,
pero no limitadas a garantías comerciales o
adecuación a un propósito particular. Bajo ninguna
circunstancia Saris Cycling Group será responsable
de daños, pérdidas o gastos imprevistos o derivados
en relación a sus productos. La responsabilidad de
Saris Cycling Group se limita expresamente a la
sustitución de los productos que no cumplan esta
garantía o bajo criterio de Saris Cycling Group al
pago de una cantidad del precio de compra del
producto en cuestión. Algunos estados no permiten
la exclusión o limitación de garantías implícitas o
daños derivados o imprevistos, por tanto es posible
que las limitaciones y exclusiones precedentes no le
afecten.
Saris Cycling Group
5253 Verona Rd.
Madison, WI 53711
p. 800-783-7257
f. 608-274-1702
www.saris.com
www.cycleops.com
18456 07/08
8
Page 17

Appareil d’entraînement
TM
JetFluid
Mode d’emploi
Pro
Page 18
INTRODUCTION
Félicitations ! Vous avez acheté le meilleur appareil
d’entraînement à fl uide qui existe aujourd’hui. Le
TM
CycleOps JetFluid
mieux en sensation réelle pour le plus large éventail
de coureurs cyclistes qui soit.
Le CycleOps JetFluid
technologie légendaire CycleOps Fluid en offrant
une courbe de puissance progressive qui accroît
la résistance parallèlement à la vitesse, comme sur
la route. Cette courbe de puissance va de pair avec
le volant CycleOps JetFluid
technologie PowerTuned pour un équilibre parfait
entre résistance et couple, afi n de reproduire au
mieux la sensation d’une course en extérieur.
Le canal de ventilation breveté maintient une
température de fonctionnement pour une course
agréable et une utilisation durable, et est couvert par
notre garantie à vie.
Ce mode d’emploi va vous guider à travers le
montage et le réglage de l’appareil d’entraînement
et du cadre CycleOps JetFluid
des explications détaillées sur l’utilisation de la
courbe de puissance progressive CycleOps JetFluid
pour obtenir des résultats qui vous donneront un
avantage décisif sur vos adversaires.
Pro offre en effet ce qui se fait de
TM
Pro fait encore progresser la
TM
Pro, qui fait appel à la
TM
Pro, et vous fournir
TM
Précautions élémentaires
Avant de débuter un programme d’exercice,
consultez votre médecin ou un professionnel de
la santé. Il vous permettra d’établir la fréquence,
l’intensité et la durée d’exercice qui conviennent à
votre condition de santé et à votre âge. Si vous
ressentez une douleur dans la poitrine, des
battements de coeur irréguliers, un souffl e court,
un évanouissement ou un inconfort quelconque
durant un exercice, ARRÊTEZ ! Consultez votre
médecin avant de continuer. Le non-respect de ces
mises en garde pourrait entraîner des blessures ou
de sérieux problèmes de santé.
· Ne retirez pas les pieds des pédales pendant
l’exercice.
· Ne tentez pas de monter le vélo à grande vitesse
ou debout avant de vous exercer à faible vitesse.
· N’introduisez pas la main, le doigt ou un
quelconque objet dans les pièces mobiles de
l’appareil d’entraînement ou du vélo.
· Tenez les enfants et les animaux de compagnie
à distance de l’appareil d’entraînement ou du vélo
pendant l’exercice. Ne permettez pas aux enfants
d’utiliser votre appareil ou votre vélo.
· Ne faites jamais tourner le pédalier à la main. Pour
éviter un accrochage et des blessures éventuelles,
ne posez pas les mains ou les bras sur le mécan
isme d’entraînement.
· Ne démontez pas le vélo avant que les pédales
et la roue arrière soient à l’ARRÊT complet.
2
Page 19

Partie 1 : Montage et réglage de votre CycleOps JetFluidTM Pro
(C)
(B)
(A)
1.1: Liste des pièces
Votre appareil d’entraînement CycleOps JetFluid
Unité de résistance et cadre CycleOps JetFluid•
TM
Pro doit être fourni avec les éléments suivants :
TM
Pro Trainer assemblés (A)
Broche CycleOps (B)•
DVD d’entraînement • Race Day (C)
Carte d’enregistrement de garantie (non illustrée) (vous pouvez également enregistrer votre appareil •
CycleOps sur www.cycleops.com)
Si un des éléments ci-dessus ne se trouve pas dans l’emballage, veuillez contacter le service clientèle Saris
au numéro 800-783-7257 (option 3).
3
Page 20

1.2: Montage et réglage de e l’appareil
d’entraînement
Pour monter votre appareil, étendez ses pieds
comme illustré ci-dessous, puis posez-le sur une
surface plane.
Pressez
Étendez
1.3 Fixation du vélo sur l’appareil d’entraînement
TM
L’appareil d’entraînement CycleOps JetFluid
Pro
est conçu pour être utilisé avec la broche fournie.
Remplacez la broche de la roue arrière de votre
vélo par celle fournie. Veillez à ce que la poignée de
desserrage rapide se trouve du côté gauche du vélo
et soit orientée vers le haut.
Tournez la molette pour régler le pied et mettre le
cadre de niveau, comme illustré ci-dessous.
Tournez le bouton de serrage de la broche (jaune)
dans le sens des aiguilles d’une montre afi n de
ménager un écartement suffi sant pour votre broche.
4
Page 21
Tirez le levier à came (jaune) vers le bas et tournez-le
de 90 degrés dans le sens des aiguilles d’une
montre pour libérer l’unité de résistance. Faites
pivoter l’unité de résistance vers le bas pour
ménager un espace suffisant pour la roue arrière.
ATTENTION : Dans cette position, l’unité de résistance
peut bouger librement. Évitez donc tout contact avec
les pièces mobiles.
Verrouillez l’unité de résistance en position basse en
tournant le levier à came de 90 degrés dans le sens
contraire des aiguilles d’une montre et poussez le
levier contre l’unité.
Levez le vélo par la tige de la selle et introduisez le
côté droit de la broche (côté entraînement) dans le
cône fixe sur le côté correspondant du cadre.
Alignez le côté gauche de la broche sur le cône
réglable en faisant correspondre les crans du cône
avec le levier/poignée de desserrage rapide. Tournez
le bouton de serrage de la broche (jaune) comme
illustré ci-dessous pour fixer la roue arrière sur
l’appareil d’entraînement. Serrez fermement le
bouton jusqu’à l’arrêt.
Note : Le vélo ne doit pas nécessairement être centré
sur le rouleau.
Tirez le levier à came (jaune) vers le bas et tournez-le
de 90 degrés dans le sens des aiguilles d’une
montre pour libérer l’unité de résistance. Poussez
l’unité de résistance vers la roue arrière jusqu’à ce
que le rouleau entre en contact avec le pneu.
Verrouillez l’unité de résistance en tournant le levier
à came de 90 degrés dans le sens contraire des
aiguilles d’une montre tout en maintenant l’unité
de résistance. Pressez le rouleau contre le pneu en
levant le levier à came comme illustré ci-dessous.
5
Page 22
L’unité de résistance doit être suffisamment
serrée pour empêcher le pneu de glisser pendant les
accélérations. Avec un serrage approprié, une petite
indentation doit apparaître dans le pneu. Si le pneu
glisse, augmentez la pression du pneu en libérant
à nouveau l’unité de résistance. Abaissez alors un
peu plus le levier à came (jaune) pendant l’étape
d’ouverture initiale.
1.5 Démontage du vélo de l’appareil
d’entraînement
Tirez le levier à came (jaune) vers le bas et tournez-le
de 90 degrés dans le sens des aiguilles d’une
montre pour libérer l’unité de résistance. Faites
pivoter l’unité de résistance vers le bas pour
ménager un espace suffisant pour la roue arrière.
Verrouillez l’unité de résistance en tournant le levier
à came de 90 degrés dans le sens contraire des
aiguilles d’une montre, puis en le poussant vers le
haut.
Tenez le vélo par la tige de la selle. Tournez le bouton
de serrage de la broche (jaune) dans le sens contraire
des aiguilles d’une montre pour libérer le vélo.
Note : Si le levier à came s’ouvre pendant que vous
roulez, déplacez l’unité de résistance et montez-la sur
le trou de passage de boulon avant, comme illustré
ci-dessous. La plupart des pneus peuvent être montés
en utilisant l’un ou l’autre de ces trous. Les pneus de
plus grande taille, dont les pneus MTB de 29”,
nécessitent un montage sur le trou arrière.
Note : Veillez à ce que les pneus soient gonflés à la
bonne pression. Des pneus noueux entraîneront du
bruit et des vibrations. Pour obtenir les meilleurs
résultats, utilisez des pneus lisses. Il est à noter que
tout appareil d’entraînement fixe augmente l’usure
de vos pneus. L’utilisation de pneus en caoutchouc
plus durs apporte une amélioration en terme de
durée de vie.
6
Page 23

Partie 2 : Informations relatives à l’appareil d’entraînement
CycleOps JetFluidTM Pro
L’appareil d’entraînement CycleOps JetFluidTM Pro a été fabriqué soigneusement sur la base de nombreux
essais et analyses détaillés, en se fondant notamment sur les données réelles collectées par le Dr Allen Lim,
physiologiste spécialisé dans les exercices, afin d’offrir la sensation la plus réelle possible de la route sur un
appareil fixe. La courbe de puissance qui en résulte, illustrée ici, assure la plus large plage de résistance pour
un appareil d’entraînement à fluide à toute vitesse donnée. Vous pouvez utiliser ce graphique pour
déterminer votre propre rapport puissance-vitesse.
7
Page 24

Garantie
Procédures
TM
Le CycleOps JetFluid
Pro est conçu spécifiquement
pour un usage à domicile. À ce titre, il est
couvert par la garantie suivante :
TM
Tous les produits CycleOps JetFluid
Pro de Saris
Cycling Group sont garantis contre tout défaut de
pièce et de main-d’œuvre pour l’acheteur au détail.
La garantie n’est valable que pour l’acheteur original,
une preuve d’achat sera demandée.
Environnement résidentiel
Cadre : à vie
Pièces : 3 ans
Main-d’œuvre : 1 an
Cette garantie exclut les pièces devant être
remplacées par suite d’une usure normale.
Cette garantie ne couvre pas :
l’usure normale ;1.
tout dommage, toute défectuosité et toute perte 2.
causée par accident, usage impropre, négligence,
usage abusif, montage incorrect, entretien
inadéquat ou non-respect des instructions ou
des avertissements du mode d’emploi ;
l’utilisation des produits d’une manière ou dans 3.
un environnement pour lequel ils n’ont pas été
conçus.
Le service de garantie est assuré par Saris Cycling
Group ou un revendeur Saris Cycling Group agréé.
L’acheteur original doit fournir la preuve d’achat.
Les appels pour entretien et/ou le transport vers et
en provenance d’un revendeur Saris Cycling Group
agréé sont à la charge de l’acheteur.
Saris Cycling Group peut choisir de réparer ou de 1.
remplacer un ou plusieurs produits concernés
par un entretien sous garantie.
Saris Cycling Group remplace toute unité 2.
présentant des défauts de structure par une
nouvelle unité ou une unité de même valeur.
Dans l’éventualité où un produit ne pourrait 3.
être réparé, Saris Cycling Group applique un
remboursement de crédit limité pour un autre
TM
appareil d’entraînement CycleOps JetFluid
Pro
de valeur égale ou supérieure.
Limitations
Les présentes garanties remplacent toutes les autres
garanties non expressément stipulées ici, qu’elles
soient explicites ou implicites par l’effet de la loi ou
autrement, y compris, sans limitation, la garantie
de commercialisation ou d’adaptabilité à un usage
particulier. Saris Cycling Group ne peut en aucune
manière être tenu pour responsable des pertes,
dommages ou dépenses accidentelles ou
consécutives liés à ces produits d’entraînement.
La responsabilité de Saris Cycling Group est
expressément limitée au remplacement de produits
non conformes à cette garantie ou, si Saris Cycling
Group le juge utile, au remboursement de tout ou
partie du prix d’achat du produit en question.
Certains États n’autorisent pas l’exclusion ou la
limitation des garanties implicites ou des dommages
accessoires ou consécutifs, et les restrictions et
exclusions qui précèdent peuvent ne pas s’appliquer
dans certains cas précis.
Saris Cycling Group
5253 Verona Rd.
Madison, WI 53711
p. 800-783-7257
f. 608-274-1702
www.saris.com
www.cycleops.com
18456 07/08
8
Page 25

JetFluid
Benutzerhandbuch
TM
Pro Trainer
Page 26

EINFÜHRUNG
Vorsichtsmaßnahmen
Wenden Sie sich an Ihren Arzt oder andere medizinische
Fachleute, bevor Sie mit einem Trainingsprogramm
beginnen. Sie können Ihnen helfen, Häufi gkeit, Intensität
und Zeit des Trainings festzulegen, die für Ihr Alter
und Ihre Kondition geeignet sind. Wenn während
des Trainings Schmerzen oder eine Beklemmung in
der Brustgegend, unregelmäßiger Herzschlag oder
Kurzatmigkeit auftreten oder wenn Sie sich schwach
oder unwohl fühlen, STOPPEN SIE! Wenden Sie sich
an Ihren Arzt, bevor Sie weitermachen. Nichtbefolgen
dieser Vorsichtsmaßnahmen kann zu Verletzungen oder
schweren Gesundheitsproblemen führen.
Herzlichen Glückwunsch! Sie haben, schlicht und
einfach, den besten „Fluid-Trainer“ erworben, den es
zu kaufen gibt. Der CycleOps JetFluidTM Pro bietet die
größtmögliche Realitätsnähe für die breitestmögliche
Palette an Fahrern.
Der CycleOps JetFluidTM Pro hat die legendäre CycleOps
Fluid-Technik zur nächsten Stufe weiterentwickelt
und bietet eine progressive Leistungskurve, die den
Widerstand erhöht, wenn Sie die Geschwindigkeit
erhöhen, eben genauso wie auf der Straße. Die
Leistungskurve ist unter Verwendung von PowerTunedTechnik mit dem CycleOps JetFluidTM Pro-Schwungrad
gekoppelt, um die richtige Balance zwischen Widerstand
und Schwungkraft sicherzustellen, damit das Gefühl,
draußen zu fahren, optimal reproduziert wird. Der
patentierte Airfl ow-Kanal hält die Betriebstemperatur
für eine reibungslose Fahrt und dauerhaften Betrieb
aufrecht, der außerdem durch unsere lebenslange
Garantie abgesichert ist.
Dieses Benutzerhandbuch führt Sie durch das Setup
TM
von CycleOps JetFluid
Pro-Trainer und -Rahmen und
erklärt ausführlich die Verwendung der progressiven
Leistungskurve von CycleOps JetFluid
TM
, um Ihnen einen
Vorsprung im Wettkampf zu verschaffen.
· Nehmen Sie während des Fahrens nicht die Füße von
den Pedalen.
· Versuchen Sie nicht, das Fahrrad bei hoher Drehzahl
oder im Stehen zu fahren, bevor Sie bei niedrigeren
Drehzahlen trainiert haben.
· Stecken Sie nicht Ihre Finger oder irgendwelche
Gegenstände in sich bewegende Teile des Trainers oder
Fahrrads.
· Halten Sie Kinder und Haustiere von Fahrrad und Trainer
während der Nutzung fern. Erlauben Sie es Kindern
nicht, auf Ihrem Fahrrad zu fahren. Erlauben Sie es
Kindern nicht, auf Ihrem Fahrrad zu fahren.
· Drehen Sie die Pedalkurbelarme nie von Hand. Um ein
Verheddern und mögliche Verletzungen zu vermeiden,
sollten Sie nicht mit den Händen oder Armen in den
Antriebsmechanismus greifen.
· Steigen Sie erst vom Rad ab, wenn sowohl die Pedale als
auch das Hinterrad STILLSTEHEN.
2
Page 27
Teil 1: Setup von CycleOps JetFluidTM
(C)
(B)
TM
Pro
(A)
1.1: Liste der Teile
Der Der CycleOps JetFluid
Montierte CycleOps JetFluidTM Pro Trainer-Widerstandseinheit und Rahmen (A)
•
CycleOps-Schnellspanner (B)
•
Trainings-DVD Race Day (C)
•
Garantiekarte für die Registrierung (nicht abgebildet) (Sie können Ihren CycleOps-Trainer auch auf
•
www.cycleops.com registrieren)
Wenn im Paket nicht alle Komponenten enthalten sind, wenden Sie sich bitte an den Saris-Kundenservice unter
800-783-7257 (Option 3).
TM
Pro -Trainer sollte mit folgenden Komponenten geliefert werden:
3
Page 28

1.2: Trainer Setup
1.3: Fahrrad auf dem Trainer montieren
Zuerst stellen Sie die Beine, wie unten dargestellt, aus.
Dann stellen Sie den Trainer auf eine ebene Fläche.
Drücken
Ausstellen
Der CycleOps JetFluid
TM
Pro Pro-Trainer muss mit dem
beiliegenden Schnellspanner verwendet werden.
Ersetzen Sie den Schnellspanner am Hinterrad Ihres
Fahrrads durch den beiliegenden Schnellspanner. Achten
Sie darauf, dass sich der Schnellspannerhebel auf der
linken Seite des Fahrrads befi ndet und nach oben zeigt.
Drehen Sie das Stellrad, wie unten dargestellt, um das
Bein anzupassen und den Rahmen auszurichten.
Drehen Sie den gelben Drehknopf im Uhrzeigersinn, um
ausreichend Platz für den Schnellspanner zu erhalten.
4
Page 29
Ziehen Sie den gelben Kipphebel nach unten und
drehen Sie ihn 90 Grad im Uhrzeigersinn, um die
Widerstandseinheit zu entriegeln. Kippen Sie die
Widerstandseinheit nach hinten, um Platz für das
Hinterrad zu erhalten.
VORSICHT: In dieser Position kann sich die
Widerstandseinheit ungebremst bewegen. Berühren Sie
keine sich bewegende Teile.
Verriegeln Sie die Widerstandseinheit in der unteren
Position, indem Sie den Kipphebel 90 Grad gegen
den Uhrzeigersinn drehen und ihn gegen die
Widerstandseinheit drücken.
Heben Sie das Fahrrad an der Sattelstütze an und stellen
Sie die rechte Seite (Antriebsseite) des Schnellspanners in
den feststehenden Konus auf der entsprechenden Seite
des Rahmens.
Halten Sie die linke Seite des Schnellspanners an den
verstellbaren Konus und richten Sie die Aussparungen im
Konus mit dem Schnellspannerhebel aus. Drehen Sie am
gelben Drehknopf, wie unten dargestellt, um das Hinterrad
im Trainer zu befestigen. Drehen Sie den Knopf fest zu.
Hinweis: Ihr Fahrrad muss nicht auf der Laufwalze
zentriert werden, um richtig zu funktionieren.
Ziehen Sie den gelben Kipphebel nach unten und
drehen Sie ihn 90 Grad im Uhrzeigersinn, um die
Widerstandseinheit zu entriegeln. Drücken Sie die
Widerstandseinheit gegen das Hinterrad, bis die
Laufwalze den Reifen berührt. Verriegeln Sie die
Widerstandseinheit durch Drehen des Kipphebels um
90 Grad gegen den Uhrzeigersinn, während Sie die
Widerstandseinheit dabei festhalten. Drücken Sie die
Laufwalze gegen den Reifen, indem Sie den Kipphebel,
wie unten dargestellt, heranziehen.
5
Page 30
Die Widerstandseinheit sollte fest genug sitzen, um
zu verhindern, dass der Reifen bei Beschleunigungen
rutscht. Man sieht eine kleine Einbuchtung im Reifen,
wenn er richtig sitzt. Wenn der Reifen rutscht, erhöhen
Sie den Andruck, indem Sie die Widerstandseinheit
erneut justieren. Ziehen Sie den gelben Kipphebel weiter
nach unten, während Sie die anfängliche Entriegelung
durchführen.
1.5: Fahrrad vom Trainer abmontieren
Ziehen Sie den gelben Kipphebel nach unten
und drehen Sie ihn 90 Grad im Uhrzeigersinn,
um die Widerstandseinheit zu entriegeln. Kippen
Sie die Widerstandseinheit nach hinten, um Platz
für das Hinterrad zu erhalten. Verriegeln Sie die
Widerstandseinheit durch Drehen des Kipphebels um 90
Grad gegen den Uhrzeigersinn und schieben Sie ihn hoch.
Halten Sie Ihr Fahrrad an der Sattelstütze. Drehen Sie den
gelben Drehknopf gegen den Uhrzeigersinn, um das
Fahrrad zu lösen.
Hinweis: Wenn der Kipphebel während der Fahrt
aufspringt, verschieben Sie die Widerstandseinheit und
montieren Sie sie am vorderen Bolzenloch, wie unten
dargestellt. Die Montage in eines der beiden Löcher ist für
die meisten Reifen geeignet. Größere Reifen, einschließlich
29”-MTB-Reifen, machen die Montage im hinteren Loch
erforderlich.
Hinweis: Achten Sie darauf, dass die Reifen den richtigen
Luftdruck haben. Andernfalls kann es zu starken
Abrollgeräuschen und Vibrationen kommen. Am besten
verwenden Sie Reifen mit glatter Lauffl äche. Beachten
Sie, dass feststehende Trainer die Abnutzung der Reifen
erhöhen. Die Verwendung von Reifen mit härterer
Gummimischung verlängert deren Lebensdauer.
6
Page 31
Teil 2: Über den CycleOps JetFluidTM Pro-Trainer
Der CycleOps JetFluidTM Pro-Trainer wurde sorgfältig konstruiert und ausgiebig getestet und analysiert, einschließlich
Echtdaten, die vom Sportphysiologen Allen Lim, PhD. gesammelt wurden, um das bestmögliche Straßengefühl zu
bieten, dass ein stationärer Trainer vermitteln kann. Die daraus resultierende Leistungskurve, die hier dargestellt
wurde, stellt die breiteste Palette an Widerstand für einen Fluid-Trainer bei jeder beliebigen Geschwindigkeit sicher.
Verwenden Sie dieses Diagramm, um Ihr Verhältnis von Leistung zur Geschwindigkeit zu bewerten.
Leistung (Watt)
Geschwindigkeit (Meilen pro Stunde)
7
Page 32

Garantie
Verfahren
Der CycleOps JetFluid
TM
Pro ist speziell für den Einsatz
zuhause gedacht und hat dafür folgende Garantie:
Für alle CycleOps JetFluid
TM
Pro -Produkte der Saris
Cycling Group gilt eine Garantie gegenüber dem
Einzelhandelskäufer in Bezug auf Material- und
Fertigungsfehler. Die Garantie gilt nur für den
ursprünglichen Käufer. Es ist ein Kaufnachweis
erforderlich.
Wohnumgebung:
Rahmen: lebenslang
Teile: 3 Jahre
Fertigung: 1 Jahr
Diese Garantie gilt nicht für Verschleißteile, die aufgrund
normaler Abnutzung ausgetauscht werden müssen.
Diese Garantie deckt Folgendes nicht ab:
Normaler Verschleiß
1.
Schäden, Ausfälle oder Verluste, die durch Unfälle,
2.
missbräuchliche Verwendung, Nachlässigkeit,
falschen Gebrauch, falsche Montage, falsche Wartung
oder Nichtbefolgen der Anleitung oder Warnhinweise
im Bedienungshandbuch verursacht werden
Verwendung des Produkts in einer Art und Weise
3.
oder Umgebung, für die es nicht gedacht ist
Der Garantieservice erfolgt durch die Saris Cycling Group
oder einen autorisierten Saris Cycling Group-Händler. Der
ursprüngliche Käufer muss einen Kaufnachweis liefern.
Für Serviceaufträge und/oder den Transport zu und vom
autorisierten Saris Cycling Group-Händler ist der Käufer
verantwortlich.
Die Saris Cycling Group hat die Option, Produkte, für
1.
die ein Garantieservice erforderlich ist, zu reparieren
oder zu ersetzen.
Die Saris Cycling Group ersetzt alle defekten Geräte
2.
durch ein neues Gerät oder durch ein Gerät gleichen
Werts.
Falls ein Produkt nicht repariert werden kann,
3.
übernimmt die Saris Cycling Group eine begrenzte
Gutschriftsrückzahlung für einen anderen CycleOps
JetFluidTM Pro-Trainer von gleichem oder höherem
Wert.
Einschränkungen
Die vorher aufgeführten Garantien gelten anstatt
aller anderen Garantien und schließen alle Garantien
aus, die nicht ausdrücklich hierin angegeben sind,
ob ausdrückliche oder stillschweigende oder
sonstige, einschließlich, aber nicht beschränkt auf, die
Gewährleistungen der Marktgängigkeit oder der Eignung
für einen bestimmten Zweck. Die Saris Cycling Group
übernimmt in keinem Fall eine Haftung für Nebenoder Folgeverluste, Schäden oder Aufwendungen in
Verbindung mit seinen Trainingsprodukten. Die Haftung
der Saris Cycling Group wird ausdrücklich auf den
Austausch von Waren beschränkt, die dieser Garantie
nicht entsprechen, oder, nach Wahl der Saris Cycling
Group, auf die Rückzahlung eines Teils des Kaufpreises
des betroffenen Trainingsproduktes. Einige Länder
erlauben den Ausschluss oder die Einschränkung
stillschweigender Garantien oder von Neben- oder
Folgeschäden nicht, deshalb gelten die vorher
erwähnten Einschränkungen oder Ausschlüsse für Sie
möglicherweise nicht.
Saris Cycling Group
5253 Verona Rd.
Madison, WI 53711
p. 800-783-7257
f. 608-274-1702
www.saris.com
www.cycleops.com
8
Page 33
TM
Rullo JetFluid
Manuale dell’utente
Pro
Page 34

INTRODUZIONE
Precauzioni generali
Prima di iniziare un programma di allenamento,
consultare il proprio medico o specialista. Egli potrà
essere d’aiuto nella determinazione della frequenza,
l’intensità e la durata degli allenamenti adatta ad
ogni età e condizione specifi ca. Nel caso in cui si
avvertano dolori o tensione al petto, battito cardiaco
irregolare, fi ato corto, senso di svenimento o altri
disturbi durante l’esercizio, FERMARSI! Consultare il
proprio medico prima di continuare. Il mancato
rispetto di queste precauzioni potrebbe causare
infortuni o gravi problemi di salute.
Complimenti! Ha acquistato semplicemente il
miglior rullo idraulico disponibile in commercio. Il
Jet- FluidTM Pro CycleOps offre il meglio in fatto di
prestazioni realistiche per tutti i tipi di ciclisti.
JetFluidTM Pro CycleOps porta la leggendaria
tecnologia Fluid CycleOps ad un nuovo livello
offrendo una curva di potenza progressiva che
aumenta la resistenza all’aumentare della velocità,
proprio come su strada. La curva di potenza si
combina con il volano JetFluidTM Pro CycleOps
grazie alla tecnologia PowerTuned, che assicura il
corretto equilibrio tra resistenza e momento per
simulare meglio la sensazione della corsa su strada.
Il sistema brevettato Airfl ow mantiene costante la
temperatura di funzionamento, assicurando una
corsa uniforme e un funzionamento prolungato,
confermato dalla nostra garanzia a vita.
Questo manuale dell’utente descrive tutte le
operazioni di impostazione del rullo e del telaio
JetFluidTM Pro CycleOps, e illustra dettagliatamente
come utilizzare la curva di potenza progressiva
JetFluidTM CycleOps per guadagnare una marcia in
più per la gara.
· Non togliere i piedi dai pedali durante la corsa.
· Non tentare di pedalare a regimi di giri elevati o in
posizione eretta prima di essersi esercitati ai regimi
di giri più bassi.
· Non introdurre le dita o altri oggetti nelle parti in
movimento del rullo o della bicicletta.
· Durante l’utilizzo, tenere i bambini e gli animali
lontani dalla bici e dal rullo. Non consentire
l’utilizzo della bici ai bambini.
· Non girare in nessun caso i bracci della pedivella
con le mani. Per evitare il rischio di rimanere
impigliati e possibili infortuni, non avvicinare le
mani e le braccia al meccanismo di trazione.
· Non smontare dalla bici fi nché entrambi i pedali e
la ruota posteriore non sono completamente
FERMI.
2
Page 35
Parte 1: Impostazione del JetFluidTM Pro CycleOps
(C)
(B)
(A)
1.1: Elenco parti
Il rullo JetFluidTM Pro CycleOps dovrebbe essere compreso di tutti i seguenti componenti:
TM
Unità di resistenza e telaio assemblati del rullo JetFluid•
Pro CycleOps (A)
Perno completo di meccanismo di chiusura CycleOps (B)•
DVD di allenamento • Race Day (C)
Scheda registrazione garanzia (non in figura) (è anche possibile registrare il rullo CycleOps sul sito •
www.cycleops.com)
In caso si riscontrassero dei pezzi mancanti nella scatola, contattare l’assistenza clienti Saris al numero
800-783-7257 (opzione 3).
3
Page 36

1.2: Impostazione rullo
1.3: Montaggio della bicicletta sul rullo
Per impostare il rullo, estendere le gambe come
mostrato qui sotto, quindi collocare il rullo su una
superfi cie piana.
Premere
Estendere
Il rullo JetFluidTM Pro CycleOps è progettato per
l’utilizzo con il perno completo di meccanismo di
chiusura fornito. Sostituire il perno della ruota
posteriore della bicicletta con quello in dotazione.
Assicurarsi che la leva di sgancio rapido si trovi sul
lato sinistro della bicicletta e sia rivolta verso l’alto.
Ruotare la rotella per regolare la gamba e stabilizzare
il telaio come mostrato qui sotto.
Ruotare la manopola gialla del perno completo di
meccanismo di chiusura in senso orario in modo da
fornire spazio suffi ciente al perno.
4
Page 37

Spingere verso il basso la leva a camme gialla e
ruotarla di 90 gradi in senso orario per sbloccare
l’unità di resistenza. Ruotare l’unità di resistenza
verso il basso in modo da lasciare spazio sufficiente
per la ruota posteriore.
ATTENZIONE: in questa posizione, l’unità di
resistenza può muoversi liberamente, tenere le dita
lontane dalle parti in movimento.
Bloccare l’unità di resistenza in posizione abbassata
ruotando la leva a camme di 90 gradi in senso
antiorario, quindi spingere la leva contro l’unità di
resistenza.
Allineare il lato sinistro del perno con il cono
regolabile, collocando le scanalature nel cono in
corrispondenza della maniglia/leva di sgancio
rapido. Ruotare la manopola gialla del perno
completo di meccanismo di chiusura come mostrato
qui sotto per fissare la ruota posteriore all’interno del
rullo. Stringere saldamente la manopola in posizione.
Nota: per un funzionamento corretto non è
necessario che la bici sia centrata rispetto al rullo.
Spingere verso il basso la leva a camme gialla e
ruotarla di 90 gradi in senso orario per sbloccare
l’unità di resistenza. Spingere l’unità di resistenza
verso la ruota posteriore fino a che il rullino non
entra in contatto con il copertone. Bloccare l’unità di
resistenza ruotando la leva a camme di 90 gradi in
senso antiorario e tenendo ferma l’unità.
Comprimere il rullino contro il copertone tirando la
leva a camme verso l’alto come mostrato in figura.
Sollevare la bicicletta dal canotto della sella e inserire
il lato destro (trazione) del perno completo di
chiusura all’interno del cono fisso sul lato
corrispondente del telaio.
5
Page 38

L’unità di resistenza dovrebbe essere sufficientemente stretta da impedire al copertone di slittare in
accelerazione. Quando è serrata correttamente,
dovrebbe essere visibile una leggera concavità sul
copertone. Se dovesse verificarsi uno slittamento,
aumentare la pressione del copertone fissando
nuovamente l’unità di resistenza. Tirare la leva a
camme gialla ulteriormente verso il basso durante il
passaggio iniziale della procedura di bloccaggio.
1.5 Smontaggio della bicicletta dal rullo
Spingere verso il basso la leva a camme gialla e
ruotarla di 90 gradi in senso orario per sbloccare
l’unità di resistenza. Ruotare l’unità di resistenza
verso il basso in modo da lasciare spazio sufficiente
per la ruota posteriore. Bloccare l’unità di resistenza
ruotando la leva a camme di 90 gradi in senso
antiorario e spingendo verso l’alto.
Tenere la bicicletta dal canotto della sella. Ruotare
la manopola del perno completo di meccanismo di
chiusura in senso antiorario per sganciare la
bicicletta.
Nota: in caso di apertura improvvisa della leva a
camme durante la corsa, spostare l’unità di
resistenza e montarla sul foro del bullone anteriore
come mostrato qui sotto. I due fori di montaggio
sono compatibili con la maggior parte dei copertoni.
Per il montaggio di copertoni più larghi, inclusi i
copertoni MTB da 29”, utilizzare il foro posteriore.
Nota: accertarsi che i copertoni siano gonfiati alla
pressione corretta. I copertoni tassellati causano
rumore e vibrazioni. Per dei risultati ottimali,
utilizzare copertoni con battistrada slick. Si noti
che qualsiasi rullo stazionario aumenta l’usura dei
copertoni. Per una durata superiore, utilizzare
copertoni con mescola in gomma più dura.
6
Page 39

Parte 2: Informazioni sul rullo JetFluidTM CycleOps
JetFluidTM Pro CycleOps
0
100
200
300
400
500
600
700
800
0 5 10 15 20 25 30 35
JetFlui d
Potenza (Watt)
Velocità (mph)
Il rullo JetFluidTM Pro CycleOps è stato realizzato accuratamente sulla base di test e analisi approfonditi, che
comprendono dati di allenamento su strada raccolti dal fisiologo sportivo Allen Lim PhD., al fine di offrire le
prestazioni più realistiche possibili per un rullo stazionario. La curva di potenza risultante descritta di seguito
assicura la gamma più ampia di resistenza per un rullo idraulico a ogni velocità. Questo grafico fornisce dei
punti di riferimento sul rapporto potenza/velocità.
7
Page 40

Garanzia
Procedure
Il rullo JetFluidTM Pro CycleOps è inteso
specificamente per l’uso domestico e per le sue
caratteristiche prevede la seguente garanzia:
Tutti i prodotti JetFluidTM Pro CycleOps di Saris
Cycling Group sono garantiti presso l’acquirente
come privi di difetti nei materiali e nella costruzione. La copertura della garanzia è valida solo per
l’acquirente originale in possesso di una prova
d’acquisto.
Ambiente residenziale:
Telaio: garanzia a vita
Parti: 3 anni
Manodopera: 1 anno
La presente garanzia non comprende gli elementi
consumabili la cui sostituzione è dovuta alla normale
usura.
La presente garanzia non include:
L’assistenza in garanzia sarà effettuata da Saris
Cycling Group o da un suo rivenditore autorizzato. L’acquirente originale dovrà fornire una prova
d’acquisto. La chiamata del servizio e/o il trasporto
da e verso il rivenditore autorizzato Saris Cycling
Group sono a carico dell’acquirente.
Saris Cycling Group avrà la facoltà di scegliere 1.
se riparare o sostituire eventuali prodotti che
richiedano un intervento di assistenza in
garanzia.
Saris Cycling Group sostituirà tutte le unità 2.
ritenute strutturalmente difettose con unità
nuove o unità dello stesso valore.
Nel caso in cui non sia possibile riparare un 3.
prodotto, Saris Cycling Group applicherà un
rimborso in forma di credito limitato all’acquisto
di un altro rullo JetFluidTM Pro CycleOps di
valore pari o superiore.
Normale usura.1.
Qualsiasi danno, guasto o perdita causato da 2.
incidenti, uso improprio, negligenza, cattivo uso,
montaggio o manutenzione scorretti o mancato
rispetto delle istruzioni o delle avvertenze
contenute nel Manuale dell’utente.
Utilizzo dei prodotti in un modo o luogo non 3.
adatto a quello per il quale sono stati progettati.
Limitazioni
Le seguenti garanzie sostituiscono ed escludono
tutte le altre garanzie non espressamente citate
nella presente, siano esse espresse o implicite
nell’applicazione della legge, incluse e senza
limitazioni per le garanzie di commerciabilità o
fitness per un particolare scopo. Saris Cycling Group
non sarà ritenuta in nessun caso responsabile per
perdite incidentali o consequenziali, danni o spese
connesse ai suoi prodotti per il fitness. La responsabilità di Saris Cycling Group, secondo quanto segue,
è espressamente limitata alla sostituzione di merci
non conformi alla presente garanzia o, a discrezione
di Saris Cycling Group, al rimborso di una parte del
prezzo di acquisto del prodotto per il fitness in
questione. Per i Paesi in cui l’esclusione o limitazione
delle garanzie implicite o dei danni incidentali o
consequenziali non è consentita dalla legge, le
suddette limitazioni ed esclusioni non sono valide.
Saris Cycling Group
5253 Verona Rd.
Madison, WI 53711
p. 800-783-7257
f. 608-274-1702
www.saris.com
www.cycleops.com
18456 07/08
8
Page 41

JetFluid
TM
Pro-trainingstoestel
Gebruikershandleiding
Page 42

INLEIDING
Verstandige voorzorgsmaatregelen
Raadpleeg uw arts of zorgverlener voor u aan een
trainingsprogramma begint. Hij of zij kan u helpen
om de geschikte trainingsfrequentie, -intensiteit
en -tijd te bepalen voor uw leeftijd en conditie.
Als u pijn of benauwdheid in uw borst gewaar
wordt, een onregelmatige hartslag hebt, kortademig
bent of u zwakjes of ongemakkelijk voelt tijdens
het trainen, STOP dan meteen! Raadpleeg uw arts
voor u opnieuw begint. De niet-naleving van deze
voorzorgsmaatregelen kan tot blessures of ernstige
gezondheidsproblemen leiden.
Gefeliciteerd! U hebt het beste trainingstoestel met
weerstandsvloeistof op de markt aangeschaft, heel
TM
natuurlijk en eenvoudig. De CycleOps JetFluid
Pro
biedt de ultieme echtheidservaring voor alle
wielrennertypes.
TM
De CycleOps JetFluid
Pro brengt de legendarische
CycleOps vloeistoftechnologie naar een nieuwe
dimensie door een progressieve krachtlijn aan te
bieden, waarbij de weerstand verhoogt naarmate u
versnelt, net zoals op de weg. De krachtlijn is d.m.v.
PowerTuned-technologie aan het CycleOps
TM
JetFluid
Pro-vliegwiel gekoppeld. Zo wordt er
voor een correct evenwicht gezorgd tussen
weerstand en impuls om het gevoel van buiten
fi etsen zo goed mogelijk te simuleren. Het
gepatenteerde “Airfl ow”-kanaal zorgt voor een
constante bedrijfstemperatuur, zodat u kunt
genieten van een vlotte rit en een duurzame
werking met een levenslange garantie.
Deze gebruikershandleiding zal u door de installatie
TM
van uw CycleOps JetFluid
Pro-trainingstoestel
en -frame gidsen en gedetailleerde informatie
verstrekken over hoe u de progressieve krachtlijn
TM
van uw CycleOps JetFluid
Pro moet gebruiken om
u een beduidende voorsprong op de concurrentie
te geven.
· Houd uw voeten tijdens het fi etsen op de pedalen.
· Oefen eerst bij een lage RPM voor u rechtstaand
of bij een hoge RPM probeert te fi etsen.
· Steek uw vingers of andere voorwerpen niet in
de bewegende delen van het trainingstoestel of
de fi ets.
· Houd kinderen en huisdieren uit de buurt van uw
fi ets of trainingstoestel wanneer deze in gebruik is.
Laat kinderen niet op uw fi ets rijden.
· Draai de pedaalkrukas nooit met uw hand.
Houd uw handen en armen uit de buurt van het
aandrijfmechanisme om contact en eventuele
blessures te vermijden.
· Blijf op uw fi ets zitten, totdat beide pedalen en
het achterwiel VOLLEDIG tot stilstand zijn
gekomen.
2
Page 43
Deel 1: Uw CycleOps JetFluidTM Pro installeren
(C)
(B)
(A)
1.1: Onderdelenlijst
Bij uw CycleOps JetFluid
Gemonteerde elektronische weerstandsunit en frame van het CycleOps JetFluid•
TM
Pro-trainingstoestel moeten de volgende onderdelen meegeleverd zijn:
TM
Pro-trainingstoestel
(A)
Ontgrendelingspen van CycleOps (B)•
Trainings-dvd • Race Day (C)
Garantieregistratiekaart (niet afgebeeld) (u kunt uw trainingstoestel van CycleOps ook op •
www.cycleops.com registreren)
Als u al deze onderdelen niet in de doos terugvindt, neem dan contact op met de klantendienst van Saris
op het nummer 800-783-7257 (optie 3).
3
Page 44

1.2: Montage van uw trainingstoestel
Om uw trainingstoestel te monteren, spreidt u eerst
de benen van het toestel, zoals hieronder afgebeeld.
Vervolgens plaatst u het trainingstoestel op een
effen oppervlak.
Druk
Spreid
1.3: Uw fi ets aan het trainingstoestel bevestigen
TM
Het CycleOps JetFluid
Pro-trainingstoestel
is ontworpen om met de meegeleverde
ontgrendelingspen gebruikt te worden. Vervang
de ontgrendelingspen op het achterwiel van uw
fi ets door de meegeleverde pen. Zorg ervoor dat
de hendel voor snelle ontgrendeling zich aan de
linkerkant van de fi ets bevindt en naar boven
gericht is.
Draai aan het duimwieltje om de benen aan te
passen en het frame gelijk te stellen, zoals hieronder
afgebeeld.
Draai de gele knop van de penklem in de richting
van de wijzers van de klok om voldoende ruimte
vrij te laten voor de ontgrendelingspen.
4
Page 45

Trek de gele afstelhendel naar beneden en draai
deze 90 graden in de richting van de wijzers van
de klok om de weerstandsunit te ontgrendelen.
Kantel de weerstandsunit naar beneden om ruimte
voor uw achterwiel vrij te maken.
OPGELET: In deze positie kan de weerstandsunit
vrij bewegen. Houd uw vingers uit de buurt van
bewegende onderdelen.
Vergrendel de weerstandsunit in neerwaartse
positie door de afstelhendel 90 graden te draaien
in de tegenovergestelde richting van de wijzers van
de klok en de afstelhendel tegen de weerstandsunit
te duwen.
Neem uw fiets bij de zadelpen vast en til hem op.
Steek de rechterkant (aandrijvingskant) van de
ontgrendelingspen in de vaste kegel aan de
overeenkomstige kant van het frame.
Stel de linkerkant van de ontgrendelingspen gelijk
met de afstelbare kegel, zodat de uitsparingen in
de kegel gelijk komen te liggen met de hendel voor
snelle ontgrendeling. Draai de gele knop van de
penklem om uw achterwiel in het trainingstoestel te
bevestigen, zoals hieronder afgebeeld. Draai de knop
stevig aan, totdat het wiel goed vastzit.
Opmerking: Uw fiets hoeft niet in het midden van de
rol te staan om correct te functioneren.
Trek de gele afstelhendel naar beneden en draai
deze 90 graden in de richting van de wijzers van
de klok om de weerstandsunit te ontgrendelen.
Duw de weerstandsunit naar uw achterwiel, totdat
de rol contact maakt met uw band. Vergrendel de
weerstandsunit door de afstelhendel 90 graden te
draaien in de tegenovergestelde richting van de
wijzers van de klok, terwijl u de weerstandsunit
vasthoudt. Druk de rol tegen de band door de
afstelhendel naar boven te trekken, zoals hieronder
afgebeeld.
5
Page 46

De weerstandsunit moet goed aangespannen zijn,
zodat de band bij versnelling niet slipt. Bij een
goede aanspanning ziet u een kleine indrukking
in de band. Als de band toch nog slipt, verhoog dan
de aanspanning door de weerstandsunit opnieuw te
vergrendelen. Trek de gele afstelhendel verder naar
beneden bij de eerste ontgrendelingsstap.
1.5 Uw fiets van het trainingstoestel loskoppelen
Trek de gele afstelhendel naar beneden en draai
deze 90 graden in de richting van de wijzers van
de klok om de weerstandsunit te ontgrendelen.
Kantel de weerstandsunit naar beneden om ruimte
voor uw achterwiel vrij te maken. Vergrendel de
weerstandsunit door de afstelhendel 90 graden te
draaien in de tegenovergestelde richting van de
wijzers van de klok en hem naar boven te duwen.
Houd uw fiets aan de zadelpen vast. Draai de gele
knop van de penklem in de tegenovergestelde
richting van de wijzers van de klok om uw fiets vrij
te maken.
Opmerking: Als de afstelhendel tijdens het fietsen
openspringt, verwijder dan de weerstandsunit
en monteer deze op het voorste boutgat, zoals
hieronder afgebeeld. De meeste banden kunnen
op beide monteergaten gemonteerd worden.
Bredere banden, waaronder 29” MTB-banden,
moeten op het achterste gat gemonteerd worden.
Opmerking: Zorg ervoor dat uw banden tot de
juiste druk zijn opgepompt. Knobbelige banden
veroorzaken lawaai en trillingen. Gebruik een
profielloze band voor de beste resultaten. Elk
trainingstoestel zal de slijtage van uw banden
verhogen. Gebruik banden uit hard rubber om
hun levensduur te verlengen.
6
Page 47

Deel 2: Over het CycleOps JetFluidTM Pro-trainingstoestel
Het CycleOps JetFluidTM Pro-trainingstoestel is zorgvuldig ontworpen op basis van uitgebreide
testprocedures en analyses. De fysioloog, dr. Allen Lim, heeft allerlei belevingsgegevens verzameld om
de best mogelijke wegervaring te simuleren op een statisch trainingstoestel. De resulterende krachtlijn,
die hier geïllustreerd wordt, zorgt bij elke snelheid voor het grootst mogelijke weerstandsbereik op
een trainingstoestel met weerstandsvloeistof. Gebruik deze grafiek als maatstaf voor uw kracht-tot-snelheidverhouding.
7
Page 48

Garantie
Procedures
De CycleOps JetFluid
TM
Pro is speciaal voor
thuisgebruik ontworpen en heeft in die
hoedanigheid de volgende garantie:
Alle CycleOps JetFluid
TM
Pro-producten
van Saris Cycling Group worden aan de
retailklant gegarandeerd zonder materiaal- en
fabricagedefecten. De garantiedekking is uitsluitend
geldig voor de oorspronkelijke koper op vertoon van
het aankoopbewijs.
Woonomgeving:
Frame: levenslang
Onderdelen: 3 jaar
Werkuren: 1 jaar
Deze garantie sluit slijtageonderdelen uit die
geregeld vervangen moeten worden omwille van
normale slijtage.
Deze garantie kan niet gebruikt worden voor:
Normale slijtage.1.
Schade, defecten of verlies door ongeval, 2.
verkeerd gebruik, verwaarlozing, misbruik,
incorrecte montage, slecht onderhoud
of niet-naleving van de instructies of
waarschuwingen in de gebruikershandleiding.
Gebruik van de producten op een manier of in 3.
een omgeving waarvoor zij niet bestemd zijn.
De garantieservice zal uitgevoerd worden door
Saris Cycling Group of door een erkende verdeler
van Saris Cycling Group. De oorspronkelijke koper
moet zijn aankoopbewijs kunnen voorleggen.
Serviceoproepen en/of transport naar en van de
erkende verdeler van Saris Cycling Group zijn ten
laste van de koper.
Saris Cycling Group heeft de keuze om een 1.
product onder garantie te repareren of te
vervangen.
Saris Cycling Group zal elk toestel dat structurele 2.
defecten vertoont door een nieuw toestel of
door een toestel van dezelfde waarde vervangen.
Als een product niet gerepareerd kan worden, 3.
dan zal Saris Cycling Group een beperkte
kredietvergoeding toepassen op een ander
CycleOps JetFluid
TM
Pro-product van dezelfde
of een grotere waarde.
Beperkingen
De bovenstaande garanties vervangen en sluiten
alle andere garanties uit die hier niet nadrukkelijk
vermeld zijn, ofwel expliciet of impliciet bepaald
door de wet, ofwel met inbegrip van maar niet
beperkt tot garanties van verkoopbaarheid of
geschiktheid voor een bepaald doel. Saris Cycling
Group kan niet aansprakelijk gesteld worden
voor incidentele schade, gevolgschade en
schade of kosten m.b.t. haar trainingsproducten.
De aansprakelijkheid van Saris Cycling Group onder
deze garantie is nadrukkelijk beperkt, naar keuze van
Saris Cycling Group, tot de vervanging van goederen
die niet overeenstemmen met deze garantie of
tot de terugbetaling van een bedrag van de
aankoopprijs van het trainingsproduct in kwestie.
Sommige staten staan de uitsluiting of
beperking van impliciete garanties, incidentele
schade of gevolgschade niet toe. De bovenstaande
beperkingen en uitsluitingen zijn in dat geval niet
op u van toepassing.
Saris Cycling Group
5253 Verona Rd.
Madison, WI 53711
p. 800-783-7257
f. 608-274-1702
www.saris.com
www.cycleops.com
18456 07/08
8
Page 49

JetFluid
ユーザーガイド
TM
Pro Trainer
Page 50

はじめに
安全上のご注意
エクササイズを始める前に、かかりつけの医者ま
たは健康管理の専門家にご相談ください。ユーザ
の年齢やコンディションに適したエクササイズの頻
度、強度、時間を設定するためのアドバイスを得る
ことが で きま す。エクササイズ中、胸に痛みや息苦
しさ、不整脈、息切れ、めまいなどの不快感を感じた
ときは、中止してください。エクササイズを再開する
前に、医者に相談してください。この予防処置を守
らない場合、怪我や深刻な健康問題に発展すること
があります。
お買い上げいただき、ありがとうございます。この製
品は、市場における最高のフルードトレーナです。
CycleOps JetFluidTM Pro は、幅広いライダーに対して
究極のライディング感覚を提供します。
CycleOps JetFluidTM Pro は伝説の CycleOps フルー
ドテクノロジーに、進行するパワー曲線、ロードと同
じようにスピードを上げながら増加する負荷を加
え、一段高いレベルを実現しました。パワー曲線は、
パワーチューンテクノロジーを採用した CycleOps
JetFluidTM Pro フライホイールと組み合わせ、屋外走
行の感触を再現する、負荷と運動量の最適なバラン
スを確保しています。特許のエアフローチャネルに
よって使用温度が維持され、滑らかなライドと耐久
性のある操作を実現します。そしてこれを当社の生
涯保証がバックアップしています。
本ユーザーガイドは、CycleOps JetFluidTM Pro トレ ー
ナーおよびフレームの設定方法や、競争相手に対し
て優位性を確保する CycleOps JetFluid
TM
の進行す
るパワー曲線の使用法を詳しくご説明します。
· サイクリング中は、ペダルから足を外さないでくだ
さい。
· 高い RPM でのライドや立ち上がった姿勢で自転
車をこぐ前に、低い RPM で十分練習してください。
· トレーナーや自転車の可動部分には、指や物で触
れないでください。
· 使用中は、子供やペットを近寄らせないようにし
てください。バイクには、子供を乗せないでくださ
い。
· ペダルクランクアームは絶対に手で回さないでく
ださい。巻き込まれや怪我を防ぐため、駆動メカ
ニズムには手や腕を近づけないでください。
· ペダルおよび後輪が両方とも完全に停止するま
で、自転車から降りないでください。
2
Page 51

第 1 部: CycleOps JetFluid
(C)
(B)
TM
Pro
(A)
1.1: 部品一覧
CycleOps JetFluid
•
組立て済みの CycleOps JetFluid
CycleOps スキュアー (B)
•
•
「レースの日」
•
保証登録カード (図示なし) (お客様の CycleOps トレーナーは www.cycleops. com でも登録できます)
TM
Pro の梱包内容は以下の通りです。
TM
Pro トレーナー負荷ユニットおよびフレーム (A)
トレ ー ニング DVD (C)
梱包内容にこれらすべてが含まれていない場合は、Saris 顧客サービス、800-783-7257 (オプション 3) にお
問い合わせください。
3
Page 52
1.2: トレーナーの設定方法
1.3: バイクのトレーナーへの取付け
トレーナーを組み立てるには、下図のように脚を拡
げて、平らな面に立てます。
押す
拡げる
CycleOps JetFluid
TM
Pro トレーナーは付属のスキュア
ーと使用するよう設計されています。バイク後輪の
スキュアーを付 属のスキュアーに 取り替えます。クイ
ックリリースハンドルが自転車の左側にあり、上向
きになっていることを確 認します。
下図のようにサムホイールを回して脚の高さを調
節し、フレー ムを 平らにします。
黄色のスキュアークランプノブを時計方向に回し、
スキュアーに十分な隙間を空けます。
4
Page 53

黄色のカムレバーを下に引き、時計方向に 90 度回
して負荷ユニットのラッチを外します。負荷ユニット
を下に旋回させ、後輪の隙間を作ります。
シートポストを持ってバイクを持ち上 げ、スキュアー
の右側 (駆動側) をフレームの対応側の固定コーン
に差し込みます。
注意: この位置では負荷ユニットが自由に動くので、
可動部品に指を挟まれないように注意してください。
カムレバーを反時計方向に 90 度回して負荷ユニッ
トに向けて押し、負荷ユニットを下位置でラッチし
ます。
スキュアーの左側を調整可能コーンに合わせ、コー
ン内のノッチをクイックリリースハンドル/レバー
に合わせます。黄色のスキュアークランプノブを下
図に示すように回し、後輪をトレーナーにセットしま
す。ノブをしっかりと締めます。
注意: バ イクはローラー の中 央になくても、機能に差
し障りありません。
黄色のカムレバーを下に引き、時計方向に 90 度回
して負荷ユニットのラッチを外します。負荷ユニット
のローラーがタイヤに接触するまで、後輪に向けて
押します。負荷ユニットを保持しながら、カムレバー
を反時計方向に 90 度回し、負荷ユニットをラッチし
ます。下図に示すように、カムレバーを引き上げて、
ローラーをタイヤに押し付けます。
5
Page 54

負荷ユニットは、タイヤが加速中にスリップしない
程度に固くしておかなければなりません。適切な固
さでは、タイヤに少し凹みが生じます。スリップが生
じたら、負荷ユニットをラッチし直して圧力を強め
ます。最初にラッチを外す場合、黄色のカムレバー
をさらに引き下げます。
1.5: バイクをトレーナーから取り外す
黄色のカムレバーを下に引き、時計方向に 90 度回
して負荷ユニットのラッチを外します。負荷ユニット
を下に旋回させ、後輪の隙間を作ります。カムレバ
ーを反時計方向に 90 度回しながら押し上げて、負
荷ユニットをラッチします。
シートポストでバイクを保持します。黄色のスキュア
ークランプノブを反時計方向に回し、バイクを外し
ます。
注意: ライド中にカムレバーが外れたら、負荷ユニッ
トを動 かし下 図のように前 のボルト穴 に取り付 けま
す。ほとんどのタイヤは、どちらの 取り付 け穴でも 適 合
します。29 インチ MTB タイヤを含む大きなタイヤで
は、後ろの 穴に 取り付けることが必 要 になります。
注意: タイヤの空気圧が適正なことを確認してくださ
い。ブロックタイヤは雑音や振動の原因になります。
最適な結果を得るには、スリックタイヤをご 使 用くだ
さい。固定トレーナーは、タイヤの磨耗を促進します。
より固いラバーのコンポジットタイヤを使 用 すると長
持ちさせることができます。
6
Page 55

第 2 部: CycleOps JetFluidTM Pro
CycleOps JetFluidTM Pro トレーナーは、静止トレーナーとして最も現実的なロードに近い感覚が得られるよ
う、運動生理学者のアレン・リム博士による実際のデータを含み、数多くの試験や分析に基づき入念に設
計されたものです。その結果得られた以下のパワー曲線によって、あらゆるスピードに対してフルードトレ
ーナーとしては最も幅広い負荷を確保することができました。パワーとスピードの関係について、この図を
ベンチマークとしてご活用ください。
パワー (ワット)
スピード (マイル / 時)
7
Page 56

保証
手続き
CycleOps JetFluid
TM
Pro は自宅用に設計されている
ため、以下が保証されています。
すべての Saris Cycling Group CycleOps JetFluid
TM
Pro
製品には、材質上および製造上の欠陥がないこと
を、小売購入者に保証します。保証は、最初の購入
者に限らせて頂きます。また、ご購入の証明が必要
になります。
住宅環境:
フレー ム:生涯保証
部 品: 3 年間
労 賃: 1 年間
本保証は、通常の使用における磨耗や損傷による
交換部品は対象外となります。
以下は本保証の対象外となります。
通常の磨耗や損傷
1.
事故、誤用、過失、乱用、不適切な組立て、不適
2.
切な保守、あるいはオーナーズ・マニュアルの指
示または警告に反する取り扱いが原因による損
傷、故障、損害。
設計の意図に反した方法または環境における
3.
使用。
保証サービスは、Saris Cycling Group または Saris
Cycling Group 認定代理店で行います。最初の購
入者は購買の証明を提供する必要があります。サ
ービスを受けるための電話代および/または Saris
Cycling Group 認定代理店へ/からの輸送費は、購入
者負担とします。
Saris Cycling Group は、保証サービスが必要な
1.
製品について、修理または交換を選ぶ権利を留
保します。
Saris Cycling Group は、構造的に欠陥のある装
2.
置は新しい装置と交換するか、同等価値の別の
装置に交換します。
製品が修理不能の場合、Saris Cycling Group
3.
は、同等価値またはそれ以上の別の CycleOps
JetFluidTM Pro トレーナー製品のみに使用できる
払い戻しクレジットを適用します。
制限事項
前項の保証は、本製品に対する他のすべての保証
に代わるもので、ここに明示的に述べられてるもの
以外の保証は、明示的であっても、法の執行により
暗示的に示されているものであっても、あるいは、
商品性または特定目的適合性を含む、ただしそれ
に限定されない保証すべてを除外するものです。
Saris Cycling Group は、いかなる場合においてもエ
クササイズ製品に関連する偶発的、結果的な損害、
損傷、あるいは費用の責任を負わないものとしま
す。Saris Cycling Group の賠償責任は、本保証に適
合しない商品の交換、あるいは Saris Cycling Group
の判断により対象となるエクササイズ製品の購入
価格の払い戻しに明示的に限定するものとします。
州によっては、暗示的保証または偶発的あるいは結
果的損害に対する除外規定を許可しないことがあ
り、上記の制限および除外規定はお客様に適用さ
れないことがあります。
Saris Cycling Group
5253 Verona Rd.
Madison, WI 53711
p. 800-783-7257
f. 608-274-1702
www.saris.com
www.cycleops.com
18456 07/08
8
 Loading...