

Page 1

Copyright and Disclaimer
All rights reserved. No part of this publication may be reproduced, stored
in a retrieval system, or transmitted in any form or by any means electronic,
mechanical, photocopying, recording, or otherwise without the prior
written permission of CyberLink Corporation.
To the extent allowed by law, POWERPRODUCER IS PROVIDED "AS IS",
WITHOUT WARRANTY OF ANY KIND, EITHER EXPRESS OR IMPLIED,
INCLUDING WITHOUT LIMITATION ANY WARRANTY FOR
INFORMATION, SERVICES, OR PRODUCTS PROVIDED THROUGH OR
IN CONNECTION WITH POWERPRODUCER AND ANY IMPLIED
WARRANTIES OF MERCHANTABILITY, FITNESS FOR A PARTICULAR
PURPOSE, EXPECTATION OF PRIVACY, OR NON-INFRINGEMENT.
BY USING THIS SOFTWARE, YOU AGREE THAT CYBERLINK WILL
NOT BE LIABLE FOR ANY DIRECT, INDIRECT, OR CONSEQUENTIAL
LOSS ARISING FROM THE USE OF THIS SOFTWARE OR MATERIALS
CONTAINED EITHER IN THIS PACKAGE.
The terms and conditions here under shall be governed and construed in
accordance with the laws of Taiwan.
PowerProducer is a registered trademark along with other company and
product names mentioned in this publication, used for identification
purposes and remain the exclusive property of their respective owners.
PowerDVD Auto-Player Agreement
The PowerDVD Auto-player is provided for your personal and individual
use only. Its commercial use, distribution or sublicense is strictly prohibited,
regardless of whether it is for profit or not. If you would like to use the
player for any of these prohibited purposes, you may be required to obtain
license(s) from third party(ies) for such use, and it shall be your sole
responsibility, and at your own expense, to obtain such license(s). For the
same reason, you shall indemnify and hold CyberLink harmless from any
claims, proceedings, damages, costs, and expenses resulting from your use
of the PowerDVD Auto-player for any of these prohibited purposes. You
will note that by incorporating the Auto-player, you shall be deemed to
have accepted all of the terms mentioned above, and such terms shall
constitute a part of the license agreement for PowerProducer between you
and CyberLink.
Page 2

International Headquarters
Mailing Address
CyberLink Corporation
15F, #100, Min Chuan Road, Hsin Tian City
Taipei County, Taiwan, R.O.C.
Web Site
www.gocyberlink.com
Phone Numbers
Telephone: 886-2-8667-1298
Fax: 886-2-8667-1300
Copyright © 1999-2003 CyberLink Corporation
Page 3

Contents
Introduction......................................................... 1
1
Welcome ................................................................................................... 2
Production Flow ...................................................................................... 3
Pre-Production .................................................................................... 3
Disc Production .................................................................................. 4
Ready to Burn ..................................................................................... 4
Your Production Environment .............................................................. 5
PowerProducer Projects ......................................................................... 6
The Right Technology ............................................................................. 7
CD vs. DVD ......................................................................................... 7
NTSC vs. PAL ................................................................................... 10
Video Quality .................................................................................... 10
System Requirements ........................................................................... 11
OS ....................................................................................................... 11
Memory .............................................................................................. 11
CPU .................................................................................................... 11
Hard Disk Drive ............................................................................... 12
Video Capture ................................................................................... 12
Burning .............................................................................................. 12
PowerProducer Versions ...................................................................... 13
Navigating in CyberLink PowerProducer ......................................... 14
Produce a Movie Disc ........................................ 15
2
Acquire Content .................................................................................... 16
Import Video Files ............................................................................ 17
Import DVD Content ....................................................................... 17
Capture from a DV Camcorder ...................................................... 18
Capture from a TV ........................................................................... 20
Capture from a VCR ........................................................................ 21
Capture from a PC Camera (Webcam) ......................................... 22
Capture from a Digital Camera ...................................................... 23
Organize Your Story ............................................................................. 24
Manipulate Clips in the Storyboard .............................................. 24
View a Clip ........................................................................................ 25
Edit Clips ................................................................................................ 26
i
Page 4

Trim .................................................................................................... 26
Merge ................................................................................................. 27
Split ..................................................................................................... 27
Add Audio ........................................................................................ 28
Produce a Photo Slideshow ................................................................. 29
Create an Album .............................................................................. 29
Select an Album ................................................................................ 30
Add Effects to an Album ................................................................. 30
Preview Disc Content ........................................................................... 32
Preview Using the Remote .............................................................. 32
View the Production Summary ...................................................... 33
Customize Your DVD ........................................................................... 34
Modify Your Disc’s Menus ............................................................. 34
Customize the Menu Page .............................................................. 35
Set Chapters ...................................................................................... 37
Add Special Effects .......................................................................... 38
Adjust Color ...................................................................................... 38
Burn to Disc ............................................................................................ 39
Set Your Burning Configuration .................................................... 39
Burn .................................................................................................... 40
QuickBurn ......................................................................................... 42
Burn DV Content to a DVD ................................................................. 43
Edit a Disc After Burning ..................................................................... 46
Disc Utilities ...................................................... 49
3
Erase a Disc ............................................................................................ 50
Copy a Disc ............................................................................................ 51
Defragment a Disc ................................................................................. 53
Burn a Disc Image ................................................................................. 54
Save a Disc Image .................................................................................. 55
Burn a Disc from a Folder .................................................................... 56
Appendix........................................................... 57
Technical Support ................................................................................. 58
Web Support .......................................................................................... 58
Fax Support ............................................................................................ 58
Telephone Support ................................................................................ 59
FAQ ......................................................................................................... 60
Glossary .................................................................................................. 64
Index ................................................................ 69
ii
Page 5

Chapter 1:
Introduction
This chapter introduces CyberLink PowerProducer and the digital
movie production process, including what you need to have on
hand before you begin working with CyberLink PowerProducer. If you
are looking for instructions on how to start producing a movie
immediately, see Produce a Movie Disc on p.15.
This chapter contains the following sections:
Welcome on p.2
•
Production Flow on p.3
•
Your Production Environment on p.5
•
PowerProducer Projects on p.6
•
The Right Technology on p.7
•
System Requirements on p.11
•
PowerProducer Versions on p.13
•
Navigating in CyberLink PowerProducer on p.14
•
1
Page 6

Chapter 1
Welcome
Welcome to the CyberLink family of digital video tools! CyberLink
PowerProducer allows you to finalize your digital video productions
and burn them to disc. You can use PowerProducer for light editing
tasks and to capture new media, and when it’s time to polish your
movie, CyberLink PowerProducer is the best production tool to use.
What is a production tool?
A production tool turns the movie on your hard drive into a DVD or
CD that you can play on a disc player and share with friends. But
that’s not even half the story. PowerProducer’s production functions
include the following:
•
burn
s C
Ds, DVDs, VCDs, SVCDs, MiniDVDs, and editable
DVDs
•
erases discs that contain unwanted content
•
copies discs
•
defragments discs for burning video content
•
burns DV content straight to DVD
•
offers HQ, SP, and LP video qualities
•
supports CD-R, CD-RW, DVD-R, DVD-RW, DVD+R,
DVD+RW, VCD, SVCD, and miniDVD formats
•
sets chapters within video content
•
adds background music to videos and menus
•
offers custom menu layouts that include buttons, frames, and
backgrounds
•
captures from DVD, firewire devices, analog capture cards,
USB devices, and files
PowerProducer also boasts simple but powerful video editing
functions, including the following:
•
trims, merges, and splits video clips
•
creates photo slideshows
•
adds special effects to photos and video clips
•
matches slideshow length to background music duration
•
adds transitions in slideshows and movies
2
Page 7
Production Flow
The digital movie production process involves
a combination of artistry and technology,
beginning with raw video footage and ending
with a movie production burned to disc.
CyberLink PowerProducer provides the easiest
way to produce your finished movie and burn
it to the medium of your choice.
Pre-Production
Before you produce your movie using
CyberLink PowerProducer, you must first
gather (or create) its component parts: video
clips, photos, and background music.
You may collect raw footage yourself with a
camcorder or other recording device, or you
may simply use non-copyright protected
media files that you have on hand.
Introduction
You may even have already created your
own movie in a video editing software
program, such as CyberLink PowerDirector.
Whatever the case, you should have all of the
bits and pieces of your movie on hand so that
the production process goes as smoothly as
possible.
3
Page 8

Chapter 1
Disc Production
When your movie is ready for production, that’s the time to use
PowerProducer. Because PowerProducer offers basic video editing
tools, your movie does not have to be perfectly polished at this stage.
If you have your media clips on hand, but have not previously edited
and polished your movie, you might expect to use CyberLink
PowerProducer to perform the following tasks:
1. Specify the disc type and video quality you want to use.
2. Acquire video content.
3. Trim video content to a desired length.
4. Split your video into chapters for disc navigation.
5. Add a special effect to a video clip.
6. Adjust the sharpness, contrast, and color of a video clip.
7. Add background music to a video file.
8. Specify the buttons, background image, background music, and
layout of your menu page.
9. Preview your production.
10. Burn your production to CD/DVD.
Ready to Burn
When you are ready to burn your movie to disc,
you should have several discs on hand that are
compatible with your burning drive. Make sure
not only that the media type is correct (i.e.: that
you have DVDs for a DVD drive and CDs for a CD
drive), but that your discs are all in the correct
format (CD-R, DVD+RW, and so on).
Keep several discs on hand in case your first
production doesn’t turn out the way you expected,
or to make duplicate copies when you are satisfied
with the results.
4
Page 9

Your Production Environment
CyberLink PowerProducer offers a range of choices to set your video
production environment to better suit the way you work. These
preferences, described below, can be accessed by clicking the
button, available on most PowerProducer screens.
•
Movie playback mode: Set your video to return to the disc
menu or continue on to the next movie after each movie on
the disc finishes playing.
•
Working directory: This is the directory that PowerProducer
uses for output. This directory is set during installation. If
you change this directory, be sure that the hard disc it is on
has enough free space to accommodate your production.
•
Temporary directory: This is the directory that
PowerProducer uses for temporary files that are
automatically deleted when you exit PowerProducer. This
directory is set during installation.
•
Default name for captured video: Enter a name to give to
each video file you capture. PowerProducer adds a unique
timestamp to distinguish each captured file.
•
Split captured video files according to disc size limit: Split
video as you capture to ensure that each captured video file
can fit on the type of disc you are using.
•
Create new chapter every: Create a new chapter
automatically whenever the set time period is reached.
•
Prompt me if my recording drive is not detected at startup:
Instruct PowerProducer to notify you if your computer loses
communication with your disc burner at startup.
•
Back up photos on disc: Make backup copies of your original
photos whose resolution is higher than that of your final
movie production.
•
Default menu style: Specify your favorite style (.fl file) as the
style for each new PowerProducer project.
Introduction
5
Page 10

Chapter 1
PowerProducer Projects
CyberLink PowerProducer saves projects as a .PPP file. This project
file is the collection of all of your movie content, your special effects,
and your settings, but is not the final production. This file must be
rendered (compiled, or created) from its component parts in order to
create the final production, much like a batter must be baked to make
a cake out of eggs, flour, and milk.
Whatever changes you make to your video clips, audio files, or
photos in CyberLink PowerProducer does not affect your original
media. Since your settings are all saved in the project file, you can
trim, edit, or delete clips in PowerProducer, but still keep your
original files on your hard drive, untouched. So let yourself get
creative! If you end up changing things too drastically, you can
always start over.
You can use the standard Windows buttons to create a new
PowerProducer project file, as well as open or save existing files. The
buttons for these tasks are located at the top of the page under most
PowerProducer function
New
Save
s
.
Preferences
Open
Note: These tools are not always available in all functions.
6
Save As
Page 11

The Right Technology
With a seemingly unending array of technologies in the digital video
industry, selecting exactly which is suitable for your movie
production may seem overwhelming: Should you burn your movie
to CD or DVD? Should you use HQ, SP, or LP video quality? What
are NTSC and PAL?
This chapter takes the guesswork out of digital technology, so you
can use CyberLink PowerProducer to turn a daunting task into
creative freedom.
CD vs. DVD
CDs and DVDs look the same and do pretty much the same thing:
store data. Both can be used to record your movie. However, CDs
and DVDs are incompatible, bringing different advantages and
disadvantages. Therefore, the decision of which to use is left up to
you. This confusion can be cleared up by asking yourself two simple
questions:
Introduction
•
What disc type is supported by my disc burner?
•
What disc type is supported by my disc player?
Knowing the answers to these questions goes a long way towards
deciding on a disc type: after all, you want to be able to play your disc
after burning it, and of course, your burner must support the disc
type you want to create.
In broad terms, discs are divided into CD (which, being the earlier
technology, is more widely supported) and DVD (which holds seven
times the amount of content). Below is a brief description of the
different disc types supported by CyberLink PowerProducer.
7
Page 12

Chapter 1
CD Types
CD denotes a disc size that contains up to 74/80 minutes of high
quality video or 650/700 MB of data. DVDs, VCDs, SVCDs, and
miniDVDs (despite the name) are all CD size.
CD-R
CD-RW
SVCD
VCD
CD-R is a once-writable format. CD-RW writers and some new
DVD writers can write in CD-R, and most DVD players can also
read this format. The CD-R format is commonly used for
distribution of computer data and digital audio.
CD-RW is a rewritable CD format. CD-RW writers and some
new DVD writers can write in CD-RW, and most DVD players
can also read this format. The CD-RW format is best suited for
storage of computer data and digital audio.
SVCD (super video compact disc) is a CD-size disc that offers
much higher video quality than VCD, but lower than that of
DVD. It can hold 35 minutes of video, and can contain menus
and chapters like a DVD, as well as slideshows with background
audio. SVCD can be played on a PC with DVD playback
software, and on some standalone DVD players.
VCD (video compact disc) is a CD format that contains audio and
video of a quality about the same as that of VHS, and menus and
chapters like a DVD. VCD uses the MPEG compression standard,
and can be played on a PC with VCD/MPEG playback software
and on most stand-alone DVD players.
8
Page 13

DVD Types
DVD is a high capacity CD-size disc that holds anywhere from 1 - 12
gigabytes of data, or from 1 - 6+ hours of video (depending on the
type of DVD). Using the High Quality setting, you can expect to be
able to record 1-2 hours of video.)
DVDs can be played on DVD players and computers equipped with
DVD drives. For more detailed information on DVD-R/RW formats,
see www.dvdrhelp.com/dvd or other web sources. For more
detailed information on DVD+R/RW formats, see www.dvdrw.com
or other web sources.
Introduction
DVD-R
DVD-RW
DVD+R
DVD+RW
MiniDVD
DVD-R is a once-writable DVD format. It is a competitor
product to DVD+R, and is therefore not compatible with
that format. Some new DVD writers can write in both DVDR and DVD+R, and most DVD players can read both
formats.
DVD-RW is a DVD format that can be written to about
1,000 times. It is a competitor product to DVD+RW, and is
therefore not compatible with that format. Some new DVD
writers can write in both DVD-RW and DVD+RW, and
most DVD players can read both formats.
DVD+R is a once-writable DVD format. It is a competitor
product to DVD-R, and is therefore not compatible with
that format. Some new DVD writers can write in both DVDR and DVD+R, and most DVD players can read both
formats.
DVD+RW is a rewritable DVD format that can be written to
about 1,000 times. It is a competitor product to DVD-RW,
and is therefore not compatible with that format. Some new
DVD writers can write in both DVD-RW and DVD+RW,
and most DVD players can read both formats.
MiniDVD is a variation of DVD, in which a true DVD
(including menus and high-resolution video) is placed on a
disc in CD-R/W format. While technically a DVD in terms
of data structure, miniDVD is not supported by many DVD
players because the format is mistaken for standard CD
media. MiniDVD is playable on a PC with DVD playback
software, but on very few stand-alone DVD players.
9
Page 14

Chapter 1
NTSC vs. PAL
NTSC and PAL are formats adopted by television broadcasters in
different countries. The main difference between the two formats is
the number of frames per second they offer: 30 in NTSC, and 25 in
PAL. This difference means that a movie recorded in NTSC format is
unplayable by a PAL player and vice versa.
Fortunately, the question of whether to use PAL or NTSC television
format for your disc can be reduced to the following simple question:
•
In which country do you plan to play this disc?
Since all countries use either the NTSC or PAL format, knowing the
country in which the disc will be played pretty much resolves this
issue for you. By selecting the desired country in PowerProducer, the
television format (PAL or NTSC) is automatically set.
Note: Generally speaking, the United States, Japan, Canada,
and Mexico use NTSC, while Germany, Great Britain, South
America, Australia, and most of Western European and
Asian countries use PAL.
Video Quality
The different video quality settings (HQ, SP, and LP) available in
CyberLink PowerProducer result in a final picture of higher or lower
quality and a movie file of larger or smaller size. Better quality video
also demands more from your computer and limits the video
duration you can burn to disc. Below is a comparison of the length of
video you can expect to be able to burn to a DVD using the different
qualities:
•
HQ (High Quality): 60 mins
•
SP (Standard Play): 120 mins
•
LP (Long Play): 180 mins
For the best possible image in your final production, select the
highest video quality that will allow your production to fit onto the
disc type you are using. Your ultimate choice of video quality,
however, should be based both on the image quality you want in
your final production and on the processing power of your computer.
10
Page 15

System Requirements
The system requirements listed below are recommended as
minimums for general digital video production work. You may find
that your system, while meeting these recommended minimums,
requires expanded capacity during specific DV editing tasks.
OS
Windows XP/2000/ME/98SE
Memory
128 MB RAM (256 or above recommended)
DDR RAM recommended for the Right-to-Disc function
CPU
Introduction
Production
VCD (MPEG-1): Pentium II 450 Mhz or AMD Athlon 500 Mhz
DVD (MPEG-2): Pentium III 700 Mhz or AMD Athlon 700 Mhz
DV Tape Capture
MPEG-1 real-time: Pentium III 800MHz, AMD Athlon 800 MHz
MPEG-2 real-time: P4 1.6GHz, AMD Athlon 1.4GHz
MPEG-1/MPEG-2 non real-time: Pentium II 450, AMD Athlon 500
Mhz
Right-to-Disc
P4 1.8GHz (P4 2.0GHz recommended) or AMD Athlon 1.6 Ghz
11
Page 16

Chapter 1
Hard Disk Drive
MPEG-1 (VCD) files: 1GB or higher
MPEG-2 (DVD) files: 10GB or higher
Video Capture
Analog
WDM-compliant USB or PCI capture device
DV
OHCI-compliant IEEE1394 I/O device
Burning
A CD or DVD writer is required for burning VCD, SVCD, DVD, or
miniDVD movies.
12
Page 17

PowerProducer Versions
Listed below is a table outlining the differences between
PowerProducer DE, ME, and VE OEM versions.
Features DE ME VE
DVD authoring -- --
VCD authoring
SVCD authoring --
cDVD authoring --
Editable DVD authoring -- --
Copy Disc CD only CD only
Defragment Disc -- -- --
Introduction
Right-to-Disc -- --
Edit Disc -- --
Import DVD content -- --
Editing functions
(includes trimming, audio, and color
adjustment)
13
Page 18

Chapter 1
Navigating in CyberLink PowerProducer
When you have finished using a function in PowerProducer, click
to proceed to the next function. (You can also skip functions
that are not required for your production by clicking this button.)
To return to a function you have skipped over or already modified,
click .
To return to the PowerProducer main page, click .
To skip directly to the burning function, click . See Burn to Disc
on p.39.
14
Page 19

Chapter 2:
Produce a Movie Disc
This chapter leads you through the process of producing a movie,
from capturing content to burning your finished production to disc. It
includes instructions for creating a full-feature video production or
photo slideshow, customizing your DVD, burning DV directly onto
DVD, and editing a disc after burning. The focus of this chapter is on
the fun, creative side of production.
This chapter contains the following sections:
Acquire Content on p.16
•
Organize Your Story on p.24
•
Edit Clips on p.26
•
Produce a Photo Slideshow on p.29
•
Preview Disc Content on p.32
•
Customize Your DVD on p.34
•
Burn to Disc on p.39
•
Burn DV Content to a DVD on p.43
•
Edit a Disc After Burning on p.46
•
15
Page 20

Chapter 2
Acquire Content
The first step in any production is acquiring content. You may
already have digital files you simply want to import into
PowerProducer, or you may have raw footage from either an analog
or a digital source that you need to capture.
Your production can contain a mixture of video and photos. If you
would like to mix still photos with video clips, you must separately
acquire your video media and create a photo slideshow (see Produce
a Photo Slideshow on p.29).
Note: If you would like to add a single still image to a video
production, you must still create a slideshow of an album
containing one photo.
The import and capture functions are located on the Import/Capture
Content page within the Produce Movie Disc function.
To get to the Import/Capture Content page, do this:
1. Start CyberLink PowerProducer.
2. Click Produce Movie Disc.
3. Click to bypass the Select Your Disc page.
Note: You can either adjust the settings on this page now or
return to this page to modify them later.
4. Select an import or capture source from the list of available
devices on the left-hand side.
The procedures for acquiring content depend on the kind of device
used. The sections that follow describe the specific steps to take for
importing or capturing content using the devices available to
PowerProducer.
16
Page 21
Produce a Movie Disc
Import Video Files
You can import video files (including the audio portion) for use in
PowerProducer by clicking the Video Files option.
You import video files using a normal Open dialog box, but with one
exception: PowerProducer allows you to preview video files
(including the audio portion) before you open them. Use the controls
under the preview window to start and stop the preview.
After import, the video appears in the storyboard as a clip. To learn
about the actions you can perform on clips, see Edit Clips on p.26.
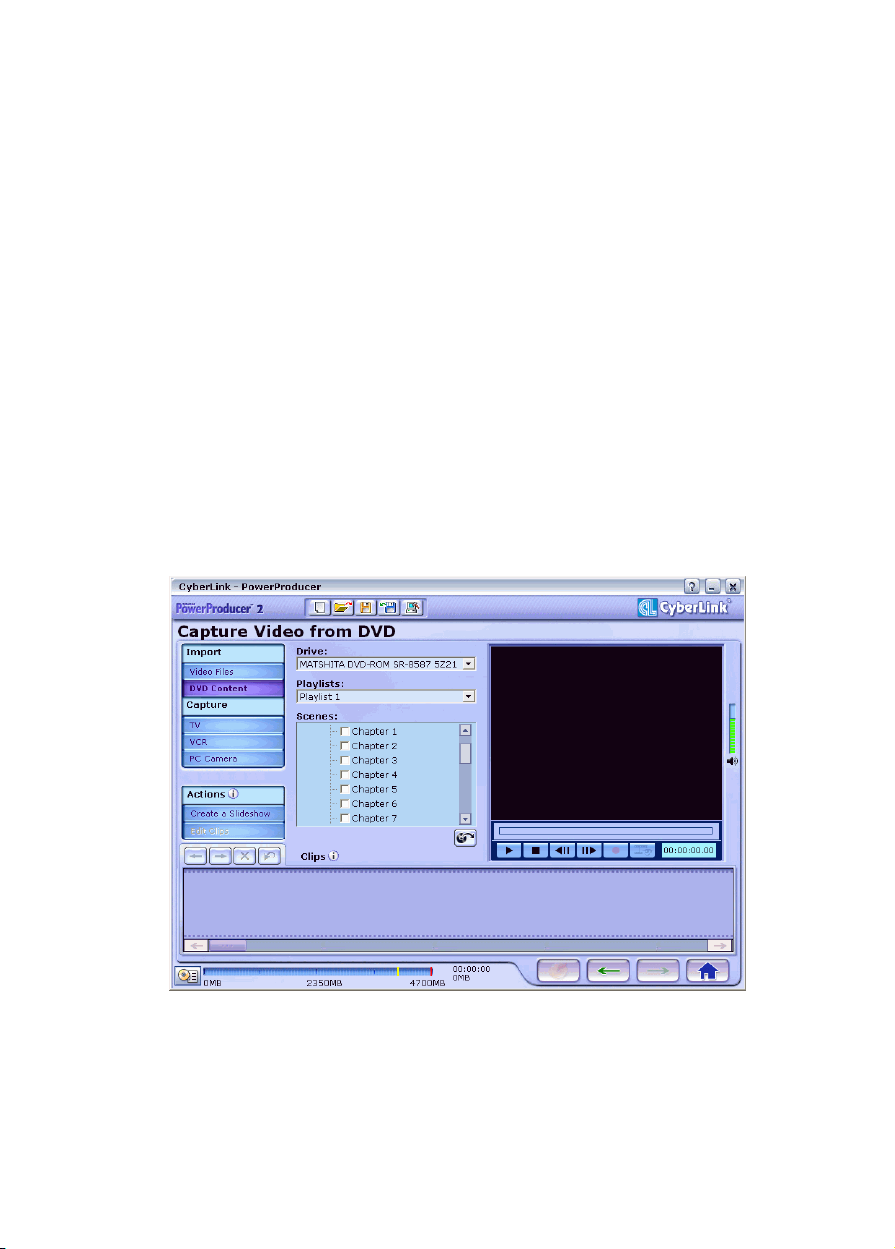
Import DVD Content
You can import video (including the audio portion) for use in
PowerProducer by clicking the DVD Content option.
17
Page 22
Chapter 2
To import DVD content, do this:
Note: Some DVDs are protected by technology that does not
allow you to import the content they contain.
1. Select your DVD drive.
2. Locate the content you want to import. You may use the
Playlists and Scenes options to better define your search.
•
You can preview the video using the playback controls in the
preview window to ensure that the video content you are
importing is the content you want.
3. Click .
After import, the video appears in the storyboard as a clip. To learn
about the actions you can perform on clips, see Edit Clips on p.26.
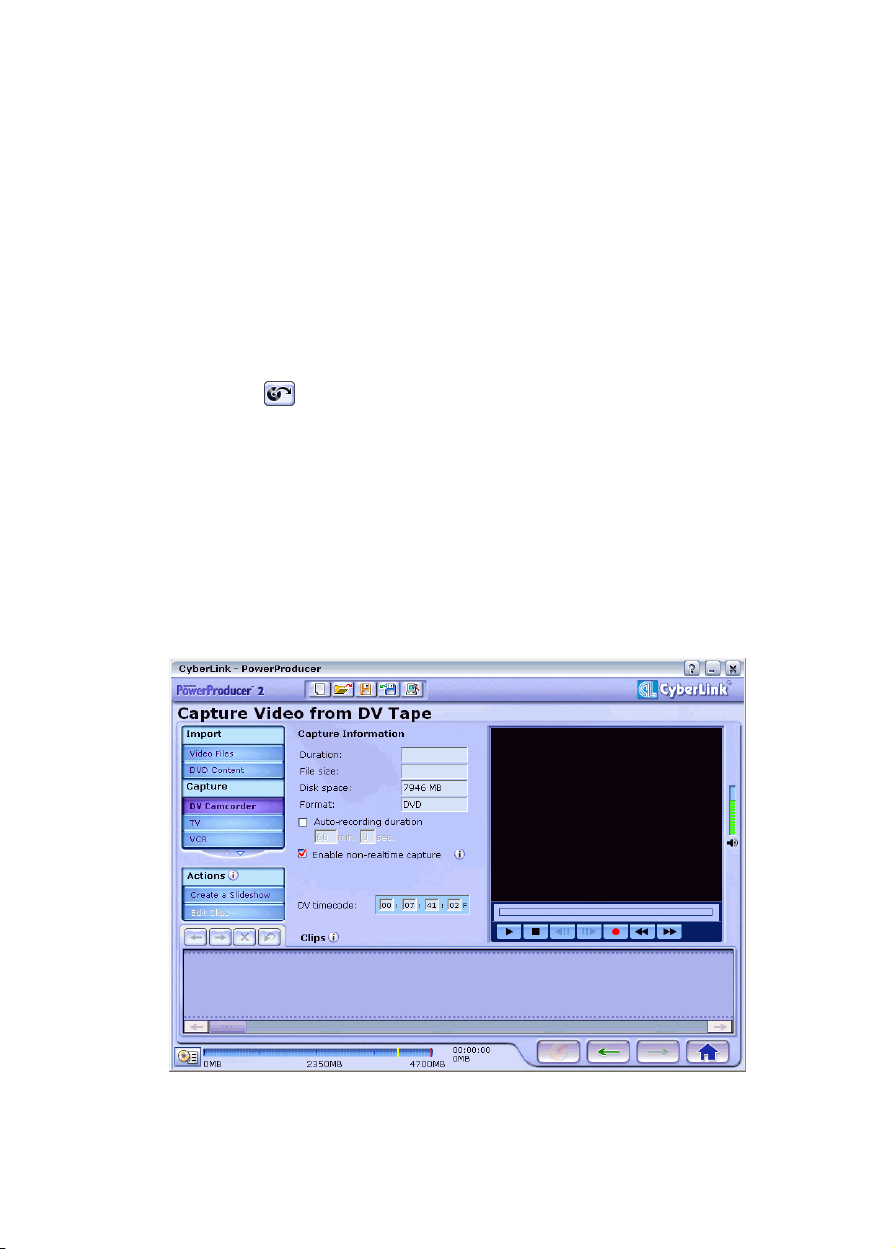
Capture from a DV Camcorder
You can capture video (including the audio portion) from a DV
camcorder for use in PowerProducer by clicking the DV Camcorder
option.
18
Page 23

Produce a Movie Disc
To capture from a DV camcorder, do this:
Note: Be sure that your DV camcorder is set to VCR mode.
1. Locate the content you want to capture.
•
You may use the playback controls under the preview
window.
•
You may enter the timecode of the first frame of the video
you want to capture.
•
You may enter a duration (in minutes and seconds) in the
Auto-recording duration field to instruct PowerProducer to
capture this amount of video from the current position when
you begin recording.
•
Non-realtime capture continues capturing and processing
after the video has finished playing in order to ensure that no
frames are dropped during capture.
2. Click to begin capture.
3. Click to end capture when you have captured the video you
want.
After capture, the video appears in the storyboard as a clip. To learn
about the actions you can perform on clips, see Edit Clips on p.26.
19
Page 24

Chapter 2
Capture from a TV
You can capture video (including the audio portion) from a TV for
use in PowerProducer by clicking the TV option.
To capture from a TV, do this:
1. Select the source (antenna or cable) of your TV signal.
2. Select the channel you wish to record.
•
You may enter a duration (in minutes and seconds) in the
Auto-recording duration field to instruct PowerProducer to
capture this amount of video from the time you begin
recording.
3. Select an audio source from the drop-down box. This source
reflects the input source of your audio card.
4. Click to begin capture.
5. Click to end capture when you have captured the video you
want.
After capture, the video appears in the storyboard as a clip. To learn
about the actions you can perform on clips, see Edit Clips on p.26.
20
Page 25

Produce a Movie Disc
Capture from a VCR
You can capture video (including the audio portion) from a VCR for
use in PowerProducer by clicking the VCR option.
To capture from a VCR, do this:
1. Select a video source. The options Composite and S-Video refer
to different types of analog video. Select the option that matches
your VCR.
Note: If you are unsure which kind of VCR you have, check the
type of connector you attached it with: this connector
should be labeled as composite or s-video.
2. Select an audio source from the drop-down box. This source
reflects the input source of your audio card.
3. Click to begin capture.
•
You may enter a duration (in minutes and seconds) in the
Auto-recording duration field to instruct PowerProducer to
capture this amount of video from the time you begin
recording.
21
Page 26

Chapter 2
4. Click to end capture when you have captured the video you
want.
After capture, the video appears in the storyboard as a clip. To learn
about the actions you can perform on clips, see Edit Clips on p.26.
Capture from a PC Camera (Webcam)
You can capture video from a PC camera (webcam) for use in
PowerProducer by clicking the PC Camera option.
To capture from a PC camera (webcam), do this:
1. Select an audio source from the drop-down box. This source
reflects the input source of your audio card.
2. Click to begin capture.
•
You may enter a duration (in minutes and seconds) in the
Auto-recording duration field to instruct PowerProducer to
capture this amount of video from the time you begin
recording.
22
Page 27

Produce a Movie Disc
3. Click to end capture when you have captured the video you
want.
After capture, the video appears in the storyboard as a clip. To learn
about the actions you can perform on clips, see Edit Clips on p.26.
Capture from a Digital Camera
You can capture still photos from a digital camera for use in
PowerProducer by clicking the Digital Camera option.
To capture from a digital camera, do this:
1. Select your camera from the drop-down box.
2. Check the photo(s) you want to capture.
Note: Since all photos are selected by default, uncheck the
photos you do
•
Click to select all of the photos.
want to capture.
not
3. Click to locate the directory where you want to save the
photos.
4. Click .
After capture, the photos appear in the storyboard as slides. To learn
about creating a photo slideshow, see Produce a Photo Slideshow on
p.29. To learn about changing the appearance of slides, see Add
Special Effects on p.38 and Adjust Color on p.38.
23
Page 28
Chapter 2
Organize Your Story
Once your video content has been acquired and your slideshow has
been created, it appears in the storyboard as a clip. You can reorder,
remove, and preview each of these clips in order to organize your
production into proper order.
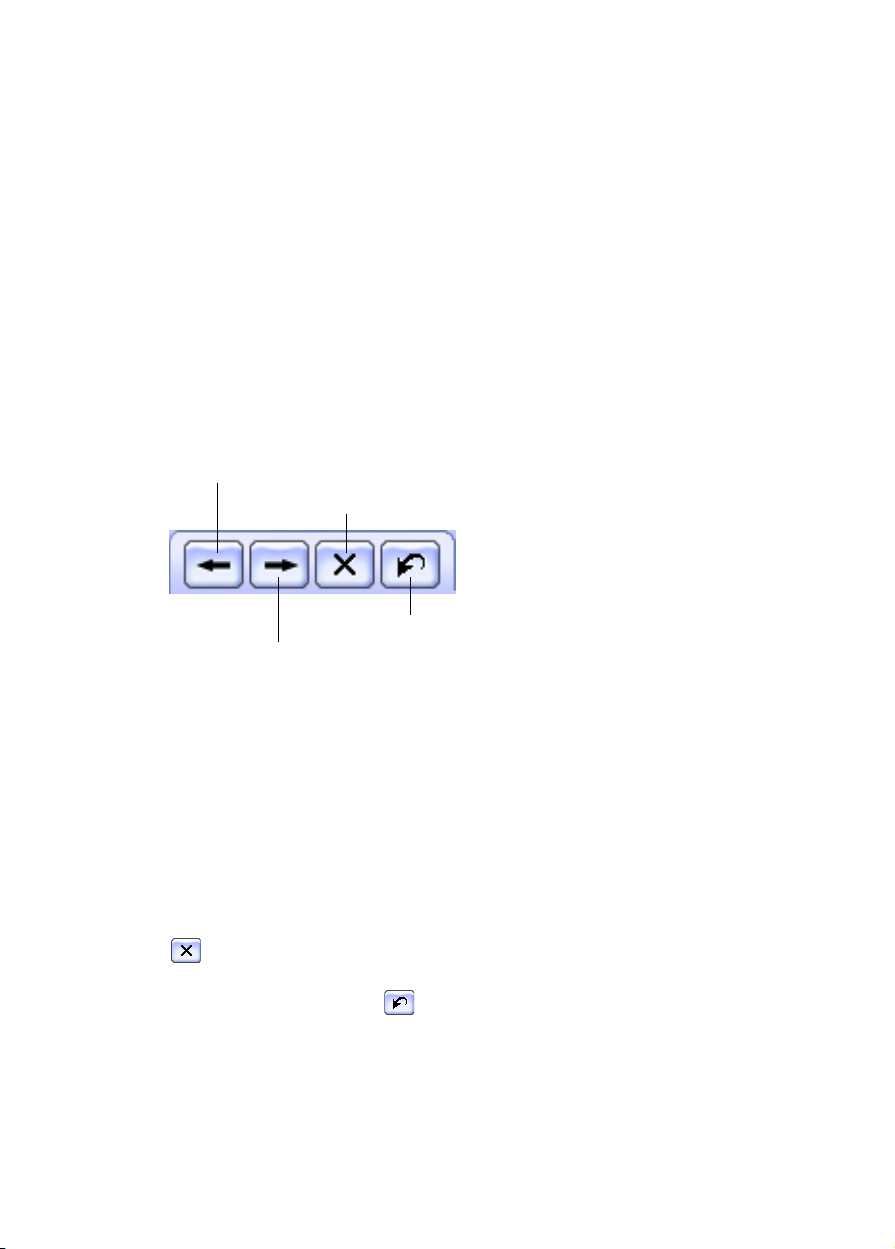
Manipulate Clips in the Storyboard
PowerProducer offers tools to allow you to move, delete, and
undelete clips in the storyboard.
Move towards start
Delete
Undelete
Move towards end
Move a Clip
To move a clip, right-click on it and select Move towards start
(towards the beginning of your story) or Move towards end (towards
the end of your story). The clip moves one position in the direction
you have specified each time you click the button.
Delete a Clip
To remove an unwanted clip from the storyboard, select it and click
. The clip is removed from the storyboard.
To undelete a clip, click .
Note: You can undelete all of the clips you delete in reverse
order of deletion.
24
Page 29

Produce a Movie Disc
View a Clip
When you click on a video or slideshow clip in the storyboard, the
first frame appears in the preview window.
Preview Video Media
To preview a video clip in the preview window, use the playback
controls at the bottom of the window.
Preview a Slideshow
To preview a slideshow in the preview window, use the playback
controls at the bottom of the window.
To view the collection of slides in a slideshow, click under the
preview window. A window appears, displaying all of the slides in
the slideshow. If the total number of slides in a slideshow cannot be
displayed in the window, click or to reveal more slides.
To view an individual slide, double-click it in the Slideshow Photos
window. Another window appears, displaying an enlarged view of
the slide.
View Clip Properties
You can view clip-related properties, which include the clip’s file
name, resolution, and playback time (along with other information).
To view clip properties, right-click on the clip and select Properties.
25
Page 30

Chapter 2
Edit Clips
Clip editing options are located on the Edit Clips page within the
Produce Movie Disc function. The editing options available in
PowerProducer may be applied to both video clips and to albums
contained in slideshows.
To get to the Edit Clips page, do this:
1. Click Edit Clips on the Import/Capture Content page.
2. Select an editing option from the list on the left-hand side.
Trim
Trim a clip to remove unwanted portions.
To trim a clip, do this:
1. Select the Trim option.
2. Click on the clip you want to trim.
3. Set the mark in time/slide (the first frame or slide of the portion
that you want to keep). There are several ways to set the mark in
time/slide:
•
Enter the time/slide number of the beginning of the portion
you want to keep in the entry boxes, then click to set the
starting position.
•
Drag the slider under the preview window to the beginning
of the portion you want to keep, then click to set the
starting position.
4. Set the mark out time/slide (the last frame or slide of the portion
that you want to keep). There are several ways to set the mark
out time/slide:
•
Enter the time/slide number of the beginning of the portion
you want to keep in the entry boxes, then click to set the
ending position.
•
Drag the slider under the preview window to the beginning
of the portion you want to keep, then click to set the
ending position.
5. Click .
The trimmed clip appears in the storyboard.
26
Page 31

Produce a Movie Disc
Merge
Merge multiple clips into a single file that you may find easier to
work with in certain editing functions, or to ensure that effects that
you apply later are applied evenly over the length of the clips.
Note: Video clips and slideshow albums may not be merged.
To merge multiple clips, do this:
1. Select the Merge option.
2. Select a clip, then click to add the clip to the merge list.
Continue to add all the clips you want to merge.
•
Use the button to remove clips from the merge list.
•
Use the and buttons to reorder the clips, if necessary.
3. Click to merge the clips.
The merged clips appear in the storyboard as one clip.
Split
Split a long video clip into two clips if you want to apply different
special effects or audio files to each of the different portions or for
further editing.
To split a clip, do this:
1. Select the Split option.
2. Set the split time/slide (the frame or slide at the position at
which you want to split the clip). There are several ways to set
the split time/slide:
•
Enter a time in the entry boxes and click to seek to that
time.
•
Drag the slider under the preview window to the desired
position, then click to set that position as the split
position.
3. Click to split the clip.
The split clip appears in the storyboard as two clips.
27
Page 32

Chapter 2
Add Audio
You may add an audio file to a video clip whether or not it already
contains an audio portion. PowerProducer provides options for
mixing the two audio portions for a greater degree of artistic control.
You may also add an audio file to a slideshow.
To add audio to a clip, do this:
1. Select the Add Audio option.
2. Click . The Background Music dialog box opens. You can
adjust the fade in/out options and the volume of the original
audio track here. You can also mute the original audio if you
prefer to use a different audio track for the video clip.
3. Click to open an audio track. You may edit the audio file
here or click to add it to the video file you have selected.
The following options are available, if desired:
•
Select a fade in/out option.
•
Select to repeat the audio track until the video clip ends.
•
Trim the audio file using the sliders on the trim bar.
•
Adjust the volume.
4. Click .
The additional audio track appears beneath the original audio track.
•
If you want to remove the additional audio track, click .
28
Page 33

Produce a Movie Disc
Produce a Photo Slideshow
A slideshow is a presentation that can include both photos (called
slides) and effects, such as transitions and background music. The
photos and effects in a slideshow are contained in units called
albums, which can contain any number of photos, as well as
transitions and music.
Using multiple albums allows you to use additional background
music or effects. If you want to use a single audio file and special
effect for your entire slideshow, you can use a single album.
The functions for creating a slideshow are located on the Create a
Slideshow page within the Produce Movie Disc function.
To get to the Create a Slideshow page, click Create a Slideshow on
the Import/Capture Content page.
Create an Album
When you create a slideshow, PowerProducer automatically creates a
new album within that slideshow, in which you can add your photos.
To create a slideshow, do this:
1. Click New Album.
2. Open the photos you want to add. The photos appear in the
storyboard as slides, and the first slide appears in the album
window as a preview.
•
To add slides to the album, click Add Slides, then open the
photos you want to add.
•
To view album properties, right-click the preview slide in the
album window and select Properties.
•
Check the Back up photos on disc option to burn copies of
your photos onto your disc. This is especially useful for
photos with a resolution higher than DVD (720x480).
29
Page 34

Chapter 2
Select an Album
When you create a new album, a preview appears in the album
preview window. You may, however, have other albums that are not
visible.
To select a different album, click or . Its preview slide
appears within the album preview window and the slides it contains
appear in the storyboard.
Add Effects to an Album
Adding effects to an album turns your slideshow into a full
multimedia production.
Add Background Music
The procedure for adding an audio file to an album is the same as the
procedure for adding an audio file to a video clip. See Add Audio on
p.28 for the steps to follow.
Set Durations
You can set the duration of all of the slides or albums in a slideshow
or by matching the duration of the audio file that accompanies it.
To set slide durations, click Slides and enter a duration.
To set album durations, click Album and enter a duration.
To match the duration of the audio file, click Match music duration
and enter a duration.
30
Page 35

Produce a Movie Disc
Add Transition Effects
To set a transition effect between all of the slides in an album, do this:
Note: Transitions can only be applied within a slideshow.
1. Select a transition effect from the drop-down box.
2. Enter the duration (in seconds) of the transition effect.
•
Click to apply the same transition effect to all of the
albums in the slideshow. Click to remove the transition
effect from the current album.
31
Page 36

Chapter 2
Preview Disc Content
When you have organized your clips and finalized the content, it is a
good idea to preview your entire production. You can also customize
your disc from the Preview page, so if you make further
modifications, it’s a good idea to preview your production again
before you burn it to disc.
Preview Using the Remote
To preview your production, press .
To preview a specific chapter or slideshow album, click on it in the
preview window.
While your production is playing, use the playback controls on the
remote to control playback. These controls are explained below:
32
Play chapter that corresponds to number
Return to main menu
Menu page navigation (up, down, left, right)
Enter
Playback controls (play, pause, stop)
Volume controls (decrease, mute, increase)
Previous/next chapter
Page 37

Produce a Movie Disc
View the Production Summary
You can view up-to-the-minute system and production information
by clicking on the PowerProducer interface. This button is
available on most PowerProducer pages.
PowerProducer gives you an overview of the file size and duration of
your production next to this button.
Current size Maximum size
Warning level Current size/duration
33
Page 38

Chapter 2
Customize Your DVD
Customization options are located on the Preview page within the
Produce Movie Disc function. When you have finished making
modifications, it is a good idea to go back and preview your
production before proceeding to burn it to disc.
Modify Your Disc’s Menus
Menus allow you to navigate around on your final disc. The Preview
page offers several options for modifying the appearance of the menu
pages that appear on your disc.
Note: If you wish to include menus on your disc, be sure to check
the Include menus option. Checking this option enables
the menu customization functions.
Background Style
To specify a background style, do this:
1. Click .
2. Select a file type (favorites or images) from the drop-down box,
then click OK.
•
Favorite (.fl) files include all of the customizable menu styles.
•
Image files include .bmp, .jpg, and .jpeg formats.
Menu Heading
To set the heading text of the menu page, enter the text in the entry
box. Click to apply this same heading to all menu pages.
Menu Audio
The procedure for adding an audio file to a menu is the same as the
procedure for adding an audio file to a video clip. See Add Audio on
p.28 for the steps to follow.
34
Page 39

Produce a Movie Disc
Customize the Menu Page
The Customize Menu page gives you complete creative control over
the look of your menu page. You can modify the appearance of the
menu’s buttons, text, and overall layout.
Menu Options
To customize your disc’s menu, do this:
1. Click Customize Menu.
2. Select the menu you want to customize in the directory tree.
3. Select the items you want to modify. You can modify the
following items:
•
Background
•
Buttons Per Page
•
Frame
•
Button Layout
•
Button Style
•
Highlight
4. Select a template, then one of the items it contains. The item you
select appears in the preview window.
5. Click to close the customization window.
Add an Image to the Template
To add your own image to the User-defined template, do this:
1. Click Background.
2. Click and open an image. The image you select is added to
the User-defined template.
•
Select an image and click to remove it from the Userdefined template.
•
Select an image and click to apply this image to all of
your menus.
3. Click to close the customization window.
35
Page 40

Chapter 2
Te xt
You can modify the menu page heading text as well as the names of
each of the buttons on the menu page.
To modify any of the text on the menu page, do this:
1. Double-click the text to select it.
•
Enter new text if desired.
•
Click to change the font properties.
2. Click to close the customization window.
Favorites
After you modify the settings on the Customize Menu page, you can
save your new settings as a Favorite (.fl) file by clicking . To open
a Favorites file you have created, click .
Background Music
The procedure for adding an audio file to a DVD menu page is the
same as the procedure for adding an audio file to a video clip. See
Add Audio on p.28 for the steps to follow.
First Play
A clip designated as first play is the initial sequence that plays as
soon as the DVD is inserted and before you reach the menu page. No
navigation buttons are available during the first play, and viewers
cannot fast forward past this segment. In a professional production,
first play typically consists of a copyright notice or warning.
However, you may prefer to use a personal introduction or other
video clip instead.
To set a clip as first play, click and open the file that you want.
Click to remove the file set as first play.
36
Page 41

Produce a Movie Disc
Set Chapters
Chapters allow for ease of navigation on a DVD. If you set chapters,
viewers can jump from the menu page to the start of these chapters in
order to skip previous content. However, your content may not
require chapters, or you may choose not to include them.
Note: If you do not set chapters, your movie automatically starts
to play when your final disc is inserted into a player.
To set chapters, do this:
1. Click Set Chapters.
2. Set the chapters in your DVD.
•
If you want to specify the number of chapters in your DVD,
select the Set chapters evenly option, then enter the number
in the entry box.
•
If you do not know the number of chapters you want, but
want to set chapters at specific points in your production, use
the playback controls to locate the points, then click to
set chapters at these points.
•
If you want PowerProducer to set chapters for you, select the
Set chapters by scene detection option. You can control the
relative number of chapters by increasing or decreasing the
sensitivity of scene detection. (Increased sensitivity sets more
chapters.) Click to start scene detection and automatic
chapter setting.
•
To remove chapters from the clip in the storyboard, select
them and click .
3. Click .
37
Page 42

Chapter 2
Add Special Effects
To add special effects to a clip, do this:
1. Click Add Special Effects.
2. Select the clips you want to add the special effect to.
3. Select the effect you want.
•
Use the playback controls under the preview window to
preview the effect.
•
Click to reset the clip to its original appearance.
4. Click to apply the effect.
5. Click .
Adjust Color
To adjust the color of a clip, do this:
1. Click Adjust Color.
2. Select the clips you want to adjust.
3. Click along the slider to adjust the level of the color component
you want to change.
•
Use the playback controls under the preview window to
preview the adjustment.
•
Click to reset the clip to its original appearance.
4. Click to apply the color adjustment.
5. Click .
38
Page 43

Produce a Movie Disc
Burn to Disc
When you have acquired your media, assembled your story, edited
your clips, added audio and other effects, and customized the layout
and look of your DVD, then it’s time to burn your production to disc.
CyberLink PowerProducer offers several methods to burn a disc,
which are useful under different circumstances. You can burn a disc
as the last step in your movie production process, use the QuickBurn
function to skip unnecessary editing steps, or burn DV content
directly to DVD.
Note: If you are not familiar with the many disc types available in
PowerProducer, see The Right Technology on p.7.
Set Your Burning Configuration
Before you burn to disc for the first time, set your burning
configuration on the Final Output page. After you set this
configuration, PowerProducer uses the same configuration each time
you burn until you change the settings.
To set your burning configuration, do this:
1. Click .
2. Select your recording drive.
3. Select a recording speed.
Note: It is recommended that you burn at 1x speed to avoid
errors during burning.
The Include buffer under-run protection option ensures that
•
your drive write without errors when your hard drive is busy
or system resources are low.
4. Click to set your configuration and return to the Final
Output page.
Note: You can erase a disc before burning to it by clicking
. See Erase a Disc on p.50 for the steps to follow.
39
Page 44

Chapter 2
Burn
The Burn to Disc option is located on the Final Output page. This is
the final stage of the movie production process.
To burn a disc, do this:
1. Select Burn to Disc and enter the number of copies you want to
make.
•
You may save your production as a disc image.
•
You may create a DVD folder.
•
To give the disc a volume label, enter the desired label.
•
Check the Include PowerDVD Auto-player option to
include CyberLink’s PowerDVD software player. This option
ensures that you can play your production on any computer
that supports the disc type.
40
Page 45
Produce a Movie Disc
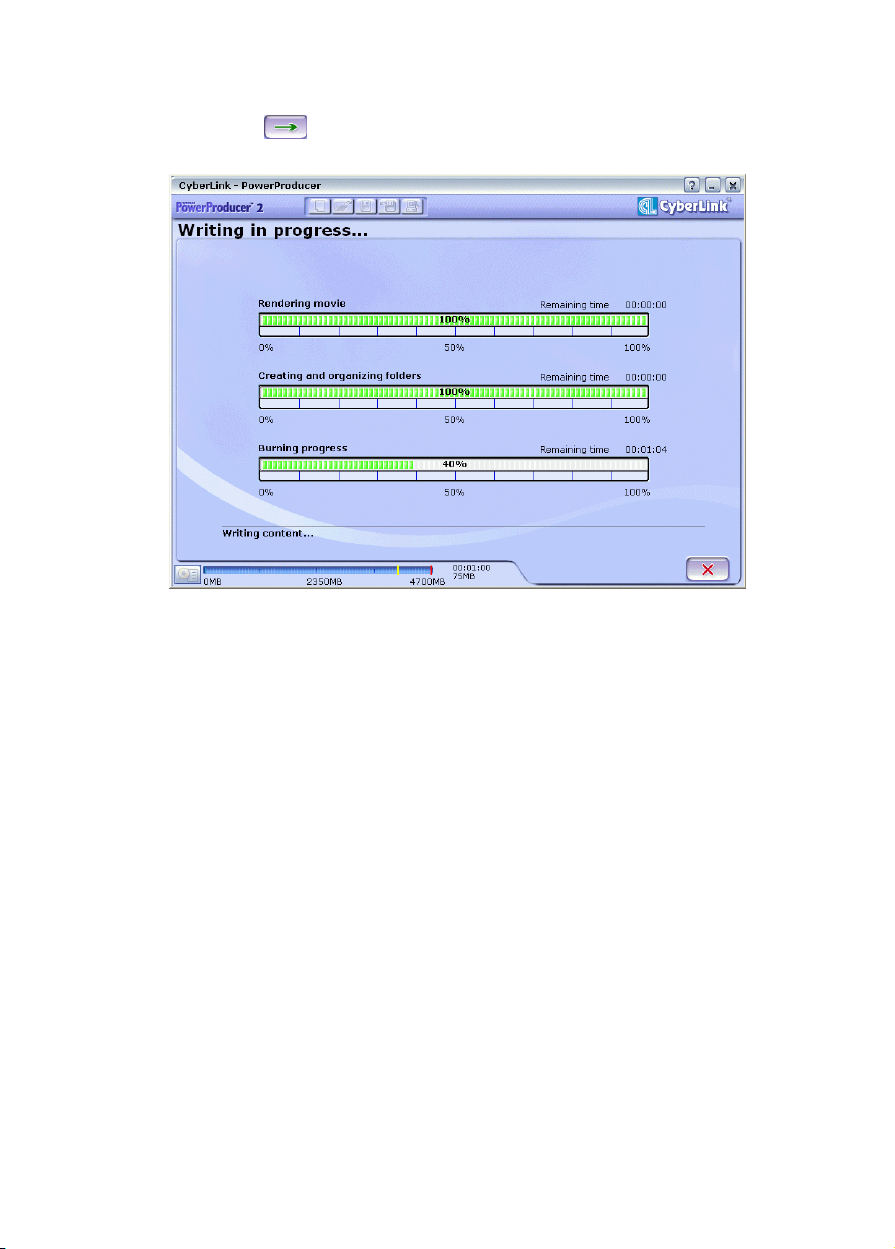
2. Click . Burning begins immediately. PowerProducer
displays the real-time progress of the task.
•
When the task is completed, a screen message appears,
informing you of the status.
41
Page 46

Chapter 2
Note: The burning process may take at least a few minutes,
depending on the length and quality of your video and
your computer’s processing power. Be prepared for a short
wait while PowerProducer renders your production!
QuickBurn
The QuickBurn option is available at any time during the movie
production process. You may wish to use the QuickBurn option
immediately after acquiring your video, for example, if you do not
plan to edit your video, add any special effects, or customize your
disc. The QuickBurn option allows you to skip these functions and go
directly to the burning function.
To burn a disc using the QuickBurn option, click . The
procedure for burning a disc using the QuickBurn option is the same
as the procedure for burning a disc. See Burn to Disc on p.39 for the
steps to follow.
42
Page 47

Produce a Movie Disc
Burn DV Content to a DVD
You can burn DV content stored on a camcorder
directly onto a DVD without the intermediary step
of first burning to your hard drive. This can save
you a lot of time when you want to add DV content
to your production.
In the simplest scenario, you could burn your DV content straight
onto DVD, then immediately play your movie on a DVD player. You
can also choose to edit your video content and customize your DVD
after burning.
To burn DV content directly to DVD, do this:
Note: Be sure that your DV camcorder is set to VCR mode.
1. Start CyberLink PowerProducer.
2. Click Right-to-Disc.
43
Page 48

Chapter 2
3. Insert your target disc and ensure that the correct drive is
selected.
4. Select a recording speed, then click .
Note: It is recommended that you select 1x speed to avoid errors
during burning.
5. Select the duration of your DV tape under the DV tape length
drop-down box.
6. Set the TV format (NTSC or PAL) by selecting the location where
you want to play your disc, and select a video quality. You may
also set a number of other options at this time:
•
To give your movie a name, enter the name in the Movie title
entry box, then click to change the font properties.
•
To set a menu style, click to open a Favorites file, or click
to customize the menu before burning.
•
To give the disc a volume label, enter the desired label.
•
To defragment the disc before burning, check the
Defragment disc option. See Defragment a Disc on p.53.
44
Page 49

Produce a Movie Disc
•
To record a specific length of video, enter the mark in and out
times. The steps are similar to trimming a clip. See Trim on
p.26.
7. Click to start burning. PowerProducer displays the real-
time progress of the task.
When the task is completed, a screen message appears, informing
you of the status.
Note: The burning process may take at least a few minutes,
depending on the length of your video and your
computer’s processing power.
45
Page 50

Chapter 2
Edit a Disc After Burning
What happens if you shoot additional video
that would complete your production
perfectly? Do you have to erase your entire
disc or burn a new one? Not necessarily...
After you burn your production onto a
rewritable disc (i.e.: in -RW or +RW format),
you can go back and edit the content at a later
time.
To edit a disc after burning, do this:
1. Start CyberLink PowerProducer.
2. Click Edit Disc.
3. Insert your target disc.
4. Select a recording speed, then click .
Note: It is recommended that you burn at 1x speed to avoid
errors during burning.
46
Page 51

Produce a Movie Disc
You can now preview your movie or select an editing option from the
list on the left-hand side.
To add video to your production, click Append New Video. See
Acquire Content on p.16.
To customize the menu, click Customize Menu. See Modify Your
Disc’s Menus on p.34.
To set chapters, click Set Chapters. See Set Chapters on p.37.
47
Page 52

Chapter 2
When you are ready to burn your new modifications to your
production, click . See Burn to Disc on p.39.
48
Page 53

Chapter 3:
Disc Utilities
In addition to its production, editing, and disc burning functions,
CyberLink PowerProducer offers a number of other utilities for
managing your discs.
This chapter contains the following sections:
Erase a Disc on p.50
•
Copy a Disc on p.51
•
Defragment a Disc on p.53
•
Burn a Disc Image on p.54
•
Save a Disc Image on p.55
•
Burn a Disc from a Folder on p.56
•
49
Page 54

Chapter 3
Erase a Disc
If you are using a rewritable disc (i.e.: a disc in RW or + RW format), you can erase content that
has been previously recorded onto it. This allows
you to reuse the same discs over and over without
the need to continually buy new discs. Most
manufacturers suggest that current rewritable
discs can be written to about 1,000 times.
To erase a disc, do this:
1. Start CyberLink PowerProducer.
2. Click Disc Utilities.
3. Click Erase Disc.
4. Insert your disc and select your drive.
5. Select an erasing method.
•
The Quick option erases the disc index contained on the disc.
•
The Full option erases all of the content the disc contains.
6. Click to start. PowerProducer displays the real-time
progress of the task.
When the task is completed, a screen message appears, informing
you of the status.
50
Page 55

Copy a Disc
CyberLink PowerProducer allows you to make an
exact copy of a disc of any format. However, you
must copy the disc onto another disc of the same
format. (You cannot, for example, copy a CD onto
a DVD.)
Note: You may not copy a blank disc.
To copy a disc, do this:
1. Start CyberLink PowerProducer.
2. Click Disc Utilities.
3. Click Copy Disc.
4. Insert your source disc into your drive.
Note: If you use the same drive to copy discs, you must first set a
disc image directory so PowerProducer can copy the disc
contents to your hard drive during the copy function.
5. Insert your target disc into your burning drive.
Disc Utilities
51
Page 56

Chapter 3
6. Enter the number of copies you want to make and select the
burning options you want.
•
Keep the Enable buffer underrun protection option checked
in order to avoid errors during copy.
•
The On the fly option burns directly to disc without the
intermediary step of first burning to your hard drive.
•
Check the Create disc image option when using one disc
drive for the copy function.
7. Click to start. PowerProducer displays the real-time
progress of the task.
When the task is completed, a screen message appears, informing
you of the status.
52
Page 57

Defragment a Disc
Defragmenting a disc moves all of the content on a
disc to one location so that the total free space on a
disc is available for burning video. If unused space
is scattered on the disc, video burning software is
unable to access it, resulting in a loss of recording
capacity of the disc. The Defragment Disc utility
allows you to recover this lost space.
Note: The Defragment Disc utility is only available for DVDs. You
may not defragment a blank disc.
To defragment a disc, do this:
1. Start CyberLink PowerProducer.
2. Click Disc Utilities.
3. Click Defragment Disc.
4. Insert your disc and select your drive.
Disc Utilities
5. Click to start. PowerProducer displays the real-time
progress of the task.
When the task is completed, a screen message appears, informing
you of the status.
53
Page 58

Chapter 3
Burn a Disc Image
A disc image is the collection of all of your movie
content, your special effects, and your settings that
is compressed and saved to disc for storage so you
can work on it at a later time. (In essence, a disc
image is a PowerProducer project file saved to
disc. Unlike a project file, however, a disc image is
saved in the .RDF file format.) This function is
particularly useful if you change hard drives or
want to work on your production on a different
computer.
To burn a disc image, do this:
1. Start CyberLink PowerProducer.
2. Click Disc Utilities.
3. Click Burn Disc From Image.
4. Insert your disc and select your drive.
5. Click to start. PowerProducer displays the real-time
progress of the task.
When the task is completed, a screen message appears, informing
you of the status.
54
Page 59
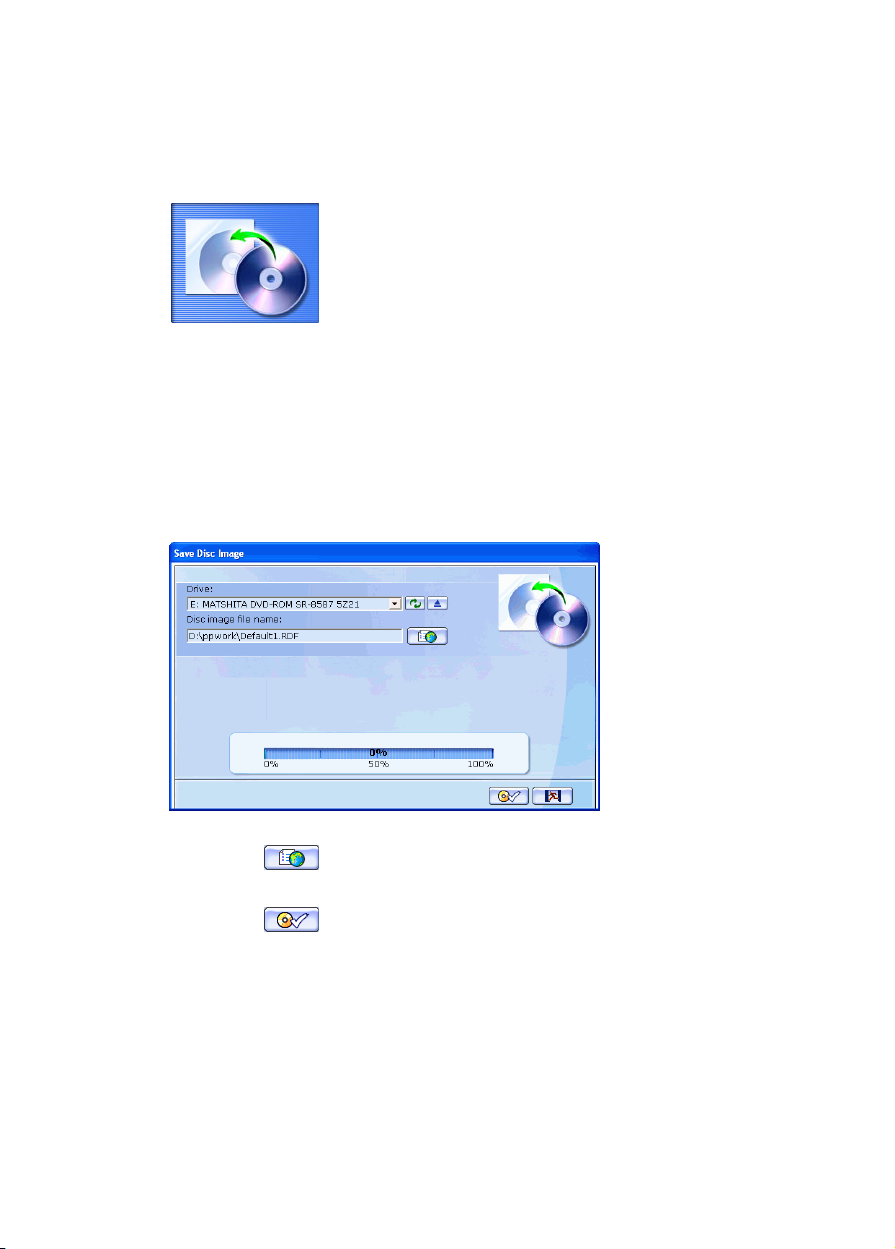
Save a Disc Image
If you have previously burned a disc image to a
disc, you can save that image onto your hard drive
so you can resume working on your movie
production. This function is particularly useful if
you change hard drives or want to work on your
production on a different computer.
To save a disc image, do this:
1. Start CyberLink PowerProducer.
2. Click Disc Utilities.
3. Click Save Disc Image.
4. Insert your disc and select your drive.
Disc Utilities
5. Click to set the file name and to select a directory to save
the file to.
6. Click to start. PowerProducer displays the real-time
progress of the task.
When the task is completed, a screen message appears, informing
you of the status.
55
Page 60
Chapter 3
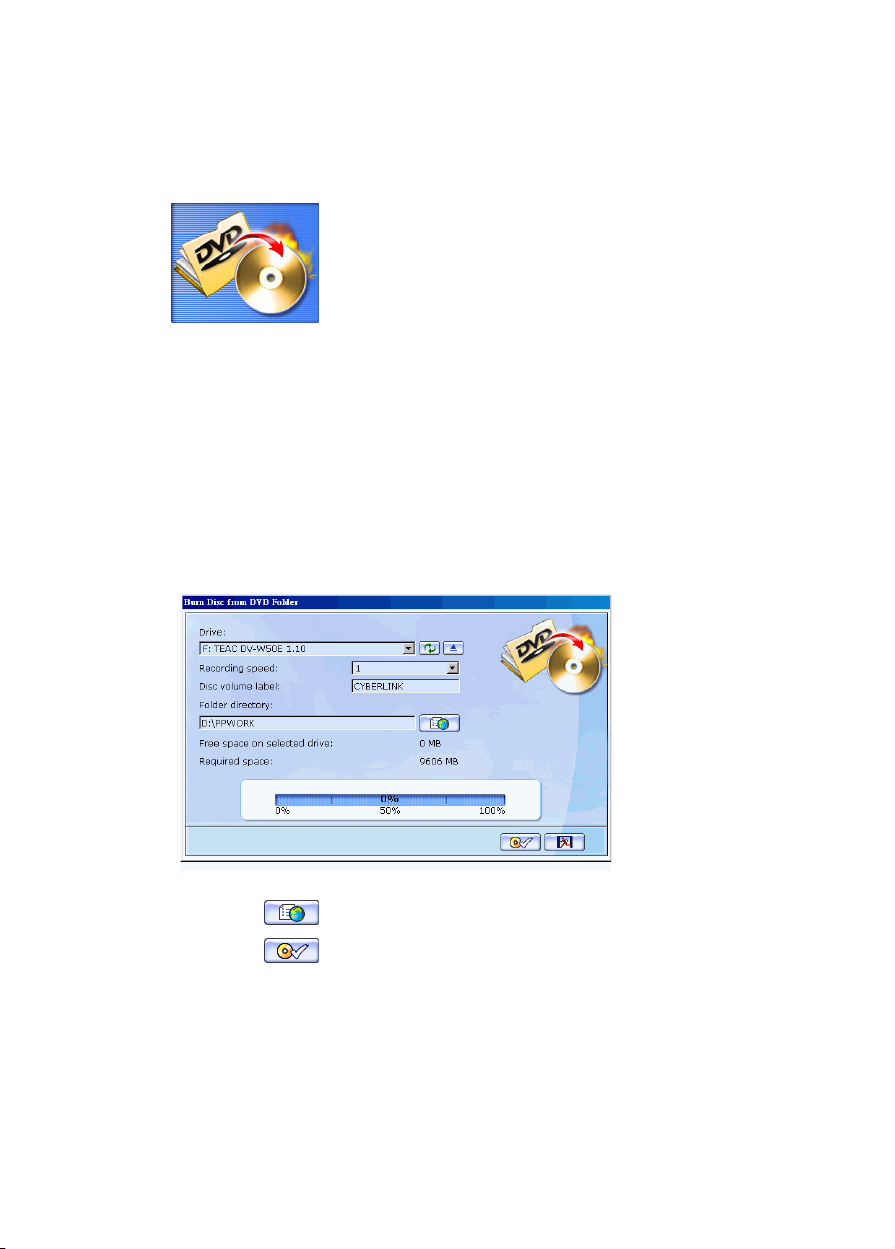
Burn a Disc from a Folder
If you have created a folder that contains all of the
media files for your production, you can burn this
folder to a disc for storage. (Burning a DVD folder
to disc is similar to burning a disc image, but does
not employ compression, and therefore has no
compatibility issues.) This function is particularly
useful if you want to work on your production on
a different computer.
To burn a disc from a DVD folder, do this:
1. Start CyberLink PowerProducer.
2. Click Disc Utilities.
3. Click Burn Disc From DVD folder.
4. Insert your disc and select your drive.
5. Click to set the folder directory you want to burn from.
6. Click to start. PowerProducer displays the real-time
progress of the task.
When the task is completed, a screen message appears, informing
you of the status.
56
Page 61

Appendix
This chapter contains reference information to help answer questions
you may have about the digital movie production process or about
using CyberLink PowerProducer.
This chapter contains the following sections:
Before asking CyberLink Corp. for technical support, please
•
refer to this user's guide or online help for more information.
You may also contact your local distributor/dealer. If your
problem is still not resolved, the following sections provide
ways to obtain technical support. on p.58
FAQ on p.60
•
Glossary on p.64
•
57
Page 62

Appendix
Technical Support
Before asking CyberLink Corp. for technical support, please refer to this user's guide
or online help for more information. You may also contact your local distributor/
dealer. If your problem is still not resolved, the following sections provide ways to
obtain technical support.
Web Support
Solutions to your problem are available 24 hours a day at our Web sites:
www.gocyberlink.com
www.cli.co.jp
You may also find solutions or additional support at support.gocyberlink.com. In
addition to frequently asked questions, we also provide troubleshooting techniques,
the latest in product news, and other relevant information.
Fax Support
In order to answer your technical questions as quickly as possible, fax us at:
(886) 2-8667-1300
Note: Technical support is only offered to registered users, so please make sure to jot down
your CD-key located on your CD case when visiting our Web sites or faxing.
58
Page 63

Appendix
Telephone Support
You are welcome to call the CyberLink's Technical Support Hotline at (886) 2-8667-
1298. Phone support hours are Monday to Friday, 9:00 AM-5:00 PM (GMT +8:00)
Taiwan local time excluding holidays. When calling for support, please have your
computer ready and provide us with the following information:
your registered CD-key
the product version
Windows' OS version
hardware types (capture card, sound card, VGA card) and their specifications
warning messages displayed
detailed problem description and when it occurred
Note: Technical support is only offered to registered users, so please make sure your CD-key
is ready when calling.
59
Page 64

Appendix
FAQ
Answers to the most frequently asked questions concerning
CyberLink PowerProducer are listed below. If you require further
information, see Before asking CyberLink Corp. for technical
support, please refer to this user's guide or online help for more
information. You may also contact your local distributor/dealer. If
your problem is still not resolved, the following sections provide
ways to obtain technical support. on p.58.
1. What is PowerProducer?
PowerProducer is a software program for producing movie titles
and photo slideshows in formats such as DVD, VCD, SVCD and
MiniDVD. With video editing and menu customization
capabilities, PowerProducer allows you to add the finishing
touches to your home movies.
2. What's new in PowerProducer 2.0?
•
Right-to-Disc: recording your DV video straight to DVD.
•
Editing DVDs: appending new video, changing menu
backgrounds, and modifying chapters.
•
Direct support of digital still camera
•
DVD video import
•
Additional audio track to your original video clips
•
Slideshow transitions
•
More disc utilities (Copy Disc, Defragment Disc)
3. How do I know if my DVD player will play the DVDs I create
with PowerProducer?
Movie titles/discs created by PowerProducer has been
thoroughly tested in the Class A verification lab approved by the
DVD Forum. This means we are being verified and tested in
world class labs that guarantee our compatibility. A DVD player
that carries a DVD-video compatible logo should playback any
movie discs without any problems.
60
Page 65

Appendix
4. How do I know if my hardware is supported by CyberLink
PowerProducer?
Check out the hardware approval sheet in the readme file. An
updated version can also be found on CyberLink’s website. Just
click Products > CyberLink PowerProducer, then click a device
type under Supported Devices. There is information on the
following types of devices:
•
Capture Cards
•
DV Camcorders
•
CD Burners
•
DVD Burners
5. What file formats can be imported into PowerProducer?
•
Video: .avi, .dat, .mpg, .mpeg, DivX (requires codec, which
can be downloaded at www.divx.com/divx/)
•
Audio: .mp3, .wav
•
Photo: .bmp, .jpg, .jpeg
6. What movie disc types can be produced by PowerProducer?
•
DVD
•
DVD folders and disc images
•
MiniDVD (DVD-Video on CD)
•
SVCD
•
VCD
7. What is editable DVD?
Editable DVD is a DVD in either DVD-RW or DVD+RW format
that can be written to, then edited after the burning process.
Once a disc has been burned, you can further append video,
modify backgrounds, and set chapters without rewriting the
entire disc. The disc can be played on a standard DVD player
after editing.
61
Page 66

Appendix
8. What is the difference between CyberLink PowerProducer and
CyberLink PowerDirector Pro?
CyberLink PowerProducer is mainly for users who want to turn
their home videos saved in their computers or in DV camcorders
and digital cameras into movie titles on DVDs or CDs and share
with friends and family. Without spending too much time on
learning how to operate a movie authoring software. Also you
can produce a movie title with 3 simple steps.
CyberLink PowerDirector Pro, on the other hand, is mainly for
users who have creative ideas on making fancy videos and
would like to add stunning special effects by spending time in
the cutting room. It also exports videos on popular video
formats to hard drive and burns onto optical discs.
9. Which languages does PowerProducer support?
PowerProducer supports the languages listed below:
•
Chinese, Simplified
•
Chinese, Traditional
•
English
•
French
•
German
•
Italian
•
Japanese
•
Korean
•
Spanish
10. Commercial DVDs often contain up to 3 hours of video. How
can I use PowerProducer to make a DVD that long?
Change the video quality setting in the Select Your Disc page.
When you select a video quality, the detailed attributes of that
quality setting are displayed at the bottom of the PowerProducer
interface. For more information, see Video Quality on p.10.
62
Page 67

Appendix
11. Isn't MPEG encoding slow? How does PowerProducer increase
production speed?
PowerProducer incorporates a technology developed by
CyberLink called SVRT - Smart Video Rendering Technology.
Using SVRT, PowerProducer only renders the modified part of a
video sequence, without rendering the untouched parts. This
speeds up production time considerably. SVRT is the smartest
way to render MPEG and still retain the original video quality.
12. What is the scene detection feature? How do I use it?
PowerProducer uses scene detection to create chapters based on
the scenes in the original video file. To set relatively more scenes,
increase the sensitivity setting. To set relatively fewer scenes,
decrease the sensitivity setting. For more information, see Set
Chapters on p.37.
63
Page 68

Appendix
Glossary
The glossary provides definitions of terms used in this user’s guide
that you may find unfamiliar. In addition to this glossary, CyberLink
offers i-Help definitions on the PowerProducer program interface.
(To use i-Help, click the icon.)
album
CD-R
CD-RW
chapter
clip
codec
The building blocks of slideshows. An album may contain
any number of slides (even just one), and a slideshow
may contain any number of albums. An album can also
contain special effects and background music.
A once-writable CD format that can hold up to 74 or 80
minutes (650 or 700 MB) of data. CD-RW writers and
some new DVD writers can write in CD-R, and most DVD
players can also read this format. The CD-R format is
commonly used for distribution of computer data and
digital audio.
A rewritable CD format that can hold up to 74 or 80
minutes (650 or 700 MB) of data. While CD-RW discs can
be reused, they are not supported by all CD drives. CDRW writers and some new DVD writers can write in CDRW, and most DVD players can also read this format. The
CD-RW format is best suited for storage of computer data
and digital audio. CD-RWs can be written to about 1,000
times.
A marker set in a video clip in order allow viewers to
jump to that specific point for navigation purposes.
A piece of video or a slideshow album that appears in
PowerProducer’s storyboard.
Software used in compressiong/decompressing video.
64
contrast
The relative difference between the highlights and
shadows in a picture.
Page 69

Appendix
defragment
disc
de-interlacing
disc image
DivX
DV
DVD
DVD folder
Defragmenting a disc moves all of the content on a disc to
one location so that the total free space on a disc is
available for burning video. If unused space is scattered
on the disc, video burning software is unable to access it,
resulting in a loss of recording capacity of the disc. The
Defragment Disc utility allows you to recover this lost
space.
Methods used to reduce or eliminate the decrease in video
quality caused by interlacing.
The collection of all of your movie content, your special
effects, and your settings that is compressed and saved to
disc for storage so you can work on it at a later time.
A video file format based on MPEG-4 technology. The
DivX codec can be downloaded for free from the DivX
website at www.divx.com/divx/
(Digital Video) Refers to the capturing, manipulation and
storage of video in digital formats. The DV format is an
international standard for consumer use created in 1995
by a consortium of companies.
(Digital Versatile Disc) A high capacity CD-size disc for
video, multimedia, games and audio applications.
A folder containing all of the media files for your
production that can be burned to a disc for storage.
DVD-R
DVD+R
DVD-ROM
A DVD format that allows you to write once. It is a
competitor product to DVD+R, and is therefore not
compatible with that format. Some new DVD writers can
write in both DVD-R and DVD+R, and most DVD players
can read both formats. For more detailed information, see
www.dvdrhelp.com/dvd or other web sources.
A DVD format that allows you to write once. It is a
competitor product to DVD-R, and is therefore not
compatible with that format. Some new DVD writers can
write in both DVD+R and DVD-R, and most DVD players
can read both formats. For more detailed information, see
www.dvdrw.com or other web sources.
A read-only DVD format commonly used for distribution
of movies (which are more specifically referred to as
DVD-Video) and computer games.
65
Page 70

Appendix
DVD-RW
DVD+RW
A DVD format that can be written to about 1,000 times. It
is a competitor product to DVD+RW, and is therefore not
compatible with that format. Some new DVD writers can
write in both DVD-RW and DVD+RW, and most DVD
players can read both formats. For more detailed
information, see www.dvdrhelp.com/dvd or other web
sources.
A rewritable DVD format that can be written to about
1,000 times. It is a competitor product to DVD-RW, and is
therefore not compatible with that format. Some new
DVD writers can write in both DVD+RW and DVD-RW,
and most DVD players can read both formats. For more
detailed information, see www.dvdrw.com or other web
sources.
editable DVDA DVD in either DVD-RW or DVD+RW format that
can be written to, then edited after the burning
process.
Favorite file
HQ
A file (in .fl format) used by PowerProducer to remember
your favorite styles for disc menus. Disc menu styles
include button styles, button highlights, button frames,
and page layouts.
(High Quality) The highest video quality you may select
in PowerProducer.
66
hue
interlacing
LP
menu
The attribute of a color that distinguishes it from other
colors.
Flickering or artefacts caused by the way video signals are
broadcast. (Each frame of video is made up of a number
of lines. When video frames are broadcast, the odd lines
of the screen display are illuminated first, then the even
lines. This causes the interlacing problem, which is most
evident when the video contains motion.)
(Long Play) The lowest video quality you may select in
PowerProducer.
A page on a DVD that contains links to the chapters the
DVD contains.
Page 71

Appendix
MiniDVD
MPEG
NTSC
PAL
production
render
A variation of DVD, in which a true DVD (including
menus and high-resolution video) is placed on a disc in
CD-R/W format. while technically a DVD in terms of data
structure, miniDVD is not supported by most DVD
players because the format is mistakenly recognized as
standard CD media. MiniDVD is playable on a PC with
DVD playback software, but on very few stand-alone
DVD players.
(Moving Picture Experts Group) A family of international
standards used for coding audio/video information into
digital format. Currently, MPEG-2 is the standard for
digital video formats and MP3 for digital audio formats.
(National Television Systems Committee) A standard
format adopted by the FCC for television broadcasts in
the United States, Japan, Canada, and Mexico. NTSC
offers 525 lines of resolution per frame at 30 fps.
(Phase Alteration Line) The standard format for television
broadcasts in Germany, Great Britain, South America,
Australia, and most of Western European and Asian
countries. PAL offers 25 frames per second.
A movie or photo slideshow that can contain background
music, special effects, and other settings.
To compile a video production from its component video,
audio, photo, and settings parts.
saturation
slide
slideshow
SP
The richness of a color.
An individual photo within a slideshow. Slides are
contained within albums.
A presentation that can include both photos (called slides)
and effects, such as transitions and background music.
The photos and effects in a slideshow are contained in
units called albums, which can contain any number of
photos, as well as transitions and music.
(Standard Play) The median video quality in
PowerProducer, inferior to HQ but superior to LP.
67
Page 72

Appendix
SVCD
TV format
VCD
video quality
volume label
(Super Video Compact Disc) A CD-size disc format that
offers much higher video quality than VCD, but lower
than that of DVD. It can hold 35 minutes of video, and can
contain menus and chapters like a DVD, as well as
slideshows with background audio. SVCD can be played
on a PC with DVD playback software, and on some
standalone DVD players.
One of the formats (NTSC or PAL) that television
broadcasts use around the world. PowerProducer helps
you choose the right TV format by allowing you to select
the country where you plan to play the disc you create.
(Video Compact Disc) A CD that contains audio and
video of a quality about the same as that of VHS. VCD can
hold up to 74/80 minutes of video on a 650/700Mb disc,
and can contain menus and chapters like a DVD, as well
as slideshows with background audio. VCD uses the
MPEG compression standard, and can be played on a PC
with VCD/MPEG playback software and on most standalone DVD players.
The quality of the final video that you produce. Select
between HQ (high quality), SP (standard play), and LP
(long play).
A title that can be seen in Windows’ Explorer and some
disc players used to label a disc.
68
Page 73

Index
A
acquiring content 16
from digital camera 23
from DV camcorder 18
from DVD 17
from file 17
from PC camera (webcam) 22
from TV 20
from VCR 21
adding
audio to clips 28
audio to menu pages 36
background music to albums 30
slides to albums 29
special effects to clips 38
text to menu pages 36
albums
adding background music to 30
adding slides to 29
applying transition effects 31
creating 29
in slideshows 29
selecting 30
audio
adding to clips 28
adding to menu pages 36
B
background
image in a menu 35
style 34
background music
adding to albums 30
adding to clips 28
adding to menu pages 36
adding to menus 34
backing up photos on disc 5
buffer underrun protection 52
burning
at end of production process 40
configuration 39
disc from a DVD folder 56
disc images 54
DV content to DVD 43
editing after 46
QuickBurn 42
buttons
frames 35
highlights 35
layout on menu pages 35
number per page 35
style 35
text 36
C
camcorder, capturing from 18
capturing
from digital camera 23
from DV camcorder 18
from PC camera (webcam) 22
from TV 20
from VCR 21
CD
types 8
vs. DVD 7
CD-R 8
CD-RW 8
chapters, setting 37
clips
adding audio 28
adding special effects to 38
deleting from storyboard 24
editing 26
merging 27
moving in storyboard 24
organizing in storyboard 24
previewing in storyboard 25
69
Page 74

splitting 27
trimming 26
viewing properties 25
color, adjusting 38
composite video 21
content
acquiring 16
mixing video and photos 16
previewing 32
copying discs 51
countries that use NTCS or PAL 10
creating
albums 29
disc image file 52
PowerProducer projects 6
slideshows 29
customizing menu pages 35
D
default
menu style 5
name for captured video 5
defragmenting discs 53
deleting clips from storyboard 24
detecting scenes 37
digital camera, capturing from 23
disc burning 39, 40
QuickBurn 42
disc image
burning 54
creating 52
saving 55
disc types supported 61
disc utilities 49
burn a disc from a DVD folder 56
copying 51
defragmenting discs 53
disc images 54
erasing 50
saving a disc image 55
durations in slideshows, setting 30
DV camcorder, capturing from 18
DV, burning to DVD 43
DVD
importing content from 17
types 9
vs. CD 7
DVD folder
burning a disc from 56
DVD+R 9
DVD+RW 9, 66
DVD-R 9
DVD-ROM 65
DVD-RW 9, 66
E
editable DVD 61
editing
after burning 46
clips 26
functions in PowerProducer 2
erasing discs 50
F
FAQ 60
Favorites files
opening 36
saving 36
file formats supported 61
final output 49
first play 36
frames on menu page buttons 35
full erase 50
G
glossary 64
H
HQ (High Quality) 10
70
Page 75

I
importing
DVD content 17
video files 17
introduction 1
O
OEM versions 13
on the fly copying 52
opening Favorites files 36
organizing clips in storyboard 24
L
languages supported 62
LP (Long Play) 10
M
mark in 26
mark out 26
menus
adding audio 34
adding background music 36
background image 35
background style 34
button frames 35
button highlight 35
button layout 35
button style 35
buttons per page 35
customizing 35
first play 36
frames 35
headings 34
modifying 34
text on 36
merging clips 27
MiniDVD 9
mixing video and photos 16
movie playback mode 5
moving clips in storyboard 24
P
PAL vs NTSC 10
PC camera, capturing from 22
photos
adding to slideshows 29
backing up on disc 5
playback modes 5
PowerProducer versions 13
preferences 5
pre-production
disc production 4
ready to burn 4
previewing
clips in storyboard 25
color adjustment 38
disc content 32
slideshows in storyboard 25
while importing DVD content 18
while importing video files 17
producing movie discs 15
production
environment 5
flow 3
functions in PowerProducer 2
pre-production 3
summary, viewing 33
project files 6
properties of clips, viewing 25
N
navigating in PowerProducer 14
NTSC vs PAL? 10
Q
quick erase 50
QuickBurn 42
71
Page 76

R
remote
buttons 32
using to preview movie 32
right technology for you 7
Right-to-disc 43
S
saving
disc images 55
Favorites files 36
scene detection 37, 63
setting chapters 37
slides, adding to albums 29
slideshow
albums in 29
creating 29
previewing in storyboard 25
producing 29
SP (Standard Play) 10
special effects, adding to clips 38
splitting clips 27
storyboard, organizing clips in 24
SVCD 8
S-Video 21
SVRT 63
system requirements 11
V
VCD 8
VCR, capturing from 21
versions of PowerProducer 13
video editing functions 2
video files, importing 17
video quality
hint on selecting 10
HQ 10
LP 10
SP 10
viewing
album properties 29
albums in preview window 30
clip properties 25
production size 33
production summary 33
W
webcam, capturing from 22
welcome 2
what’s new in PowerProducer 2.0? 60
working directory 5
T
technical support ??–59
temp directory 5
text on menu pages 36
transition effects, applying 31
trimming clips 26
TV, capturing from 20
U
utilities 49
72
 Loading...